- The subtleties of operating an unconventional furnace
- We collect the stove with our own hands
- metal stove
- brick oven
- Do-it-yourself rocket furnace construction
- Rocket stove from a gas cylinder
- Stationary brick oven with stove bench
- Other rocket stove designs
- Manufacturing Recommendations
- Balloon Rocket Furnace
- Brick rocket-type heater masonry
- Reactive oven - what is it
- Geography of application of rocket heating units
- Advantages and disadvantages of a rocket oven
- Working principle and design advantages
- Varieties of rocket furnaces
- Simple metal ovens
- Simple brick ovens
- Complex rocket ovens
- How to do it yourself?
- Location selection
- Solution preparation
- Masonry rocket stove with stove bench
The subtleties of operating an unconventional furnace
The rocket furnace is heated by analogy with the upper combustion heat generator. It turns out that the kindling of equipment called a rocket must be carried out according to certain rules:
- the main raw material for the furnace of the unit must be laid only after the structure has warmed up well, for which, first, sawdust or paper is placed and set on fire in the blowing sector;
- they necessarily react to the muffling of the hum coming from the furnace - they put a large batch of fuel into the combustion chamber, which will ignite on its own from the red-hot residues of sawdust;
- the process is closely monitored, that is, after laying firewood, the damper is fully opened, and after a while, when the equipment makes a hum, it is covered to produce a sound similar to rustling;
- as necessary, the damper is covered more and more, otherwise the furnace will become filled with an excess volume of air, which will disrupt the pyrolysis inside the flame tube and lead to the creation of a strong hum.
Since the reaction furnace was originally designed for use in the field, its design is extremely simple. This allows you to cope with the manufacture of the unit by an ordinary home master. But, despite the apparent lightness, the rocket stove is supposed to be assembled, taking into account the correct ratio of parameters. Otherwise, the equipment will be unproductive.
We collect the stove with our own hands
Consider two schemes for building jet furnaces with your own hands:
- From metal;
- From bricks.
Each of the presented designs is quite simple, so you do not need any special skills to build your own hands.
metal stove
- To build a do-it-yourself jet furnace made of metal, you will need buckets, stainless steel pipe and gravel.
- In the bottom of the bucket for indoor installation, make a hole for the pipe. A hole is made 2-4 cm from the bottom in order to fill the bottom with small gravel.
- Place the pipe inside the first bucket. The pipe should have 2 elbows - for chimney and loading. The first is longer and the second is shorter.
- In the second bucket, a hole is also made in the bottom, put on the first bucket.Insert the pipe head so that the cut is 3-4 cm from the bottom.
- Pour gravel into the bottom of the lower bucket so that it reaches the middle of the height of the container. The rubble will store heat and insulate the duct of your jet stove.
- Make a dish rack for your jet stove. To do this, you can weld several metal rods or use improvised gratings, steel meshes.
brick oven
It is very easy to assemble a jet stove from bricks with your own hands. The order at the jet stove is elementary here.
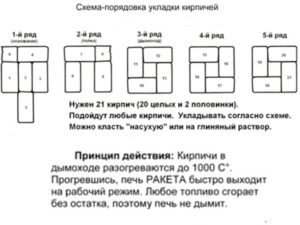
- Lay the first row solid so that it covers the bottom. It is better to do this in the form of a square, which will take you 4 whole bricks and one half. Another brick is placed on the side and will serve for more convenient loading of fuel into the furnace;
- Next comes a row for the stove of 3 solid bricks and 1 halves. The center should be empty. This will be the bottom of your firebox;
- Lay out 3 more rows of bricks for the jet stove with whole pieces in each. You should end up with a square hole in the center;
- Such a scheme provides the creation of a jet stove with a vertical loading channel from 20-25 bricks.
The jet furnace is distinguished by its elementary design in the simplest models. If you need to quickly build a stove from scrap materials, a rocket is one of the best options.
Yes, jet stoves are not without drawbacks. But tell me, which oven does not have them ?!
Do-it-yourself rocket furnace construction
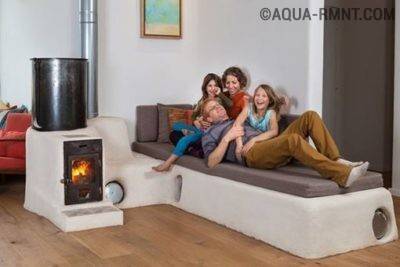
A jet stove is easy to build on your own. First you need to choose the design option that suits you and make a drawing. If necessary, you can use ready-made schemes made by professionals.Many are captivated by the simplicity of manufacturing a rocket furnace and the ability to do without the use of expensive materials. If necessary, a rocket stove can be made even in 20-30 minutes, for example, from an iron can. However, if you make every effort, then it is possible to get a comfortable stationary structure for the rest room in the bathhouse with a heated bench that can replace an ordinary sofa. At the same time, the “rocket” will not require complex arrangements, as with bell-type or Russian stoves, which are massive structures.
Rocket stove from a gas cylinder
For the manufacture of this rocket furnace, you will need such a kit.
- Used gas cylinder with a volume of 50 liters under the cap.
- Pipe with a diameter of 150 mm for the fuel and loading chambers.
- Pipes with a diameter of 70 mm and 150 mm for the riser (primary vertical chimney).
- Nonflammable heater.
- Pipe 100 mm for the outlet chimney.
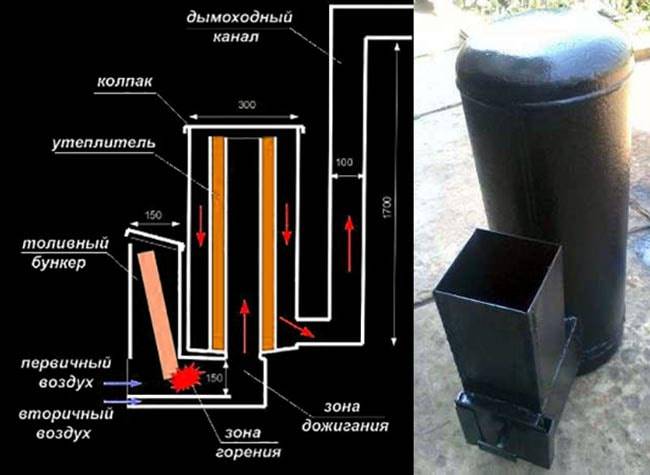
Cut off the top of the balloon. Openings for the firebox and chimney are cut out from the sides. The pipe under the firebox is connected to the riser at an angle of 90 degrees. The primary vertical chimney consists of two pipes of different diameters inserted into each other, the space between which must be insulated. Calcined sand can be used as a heater. All parts of the rocket stove are carefully welded to each other.
Do not forget to weld the cut off top of the gas cylinder after mounting the internal elements of the rocket furnace. If necessary, you can make a more powerful jet unit, using a standard two-hundred-liter barrel as a cap. At the same time, the dimensions of all elements of the stove increase.
Stationary brick oven with stove bench
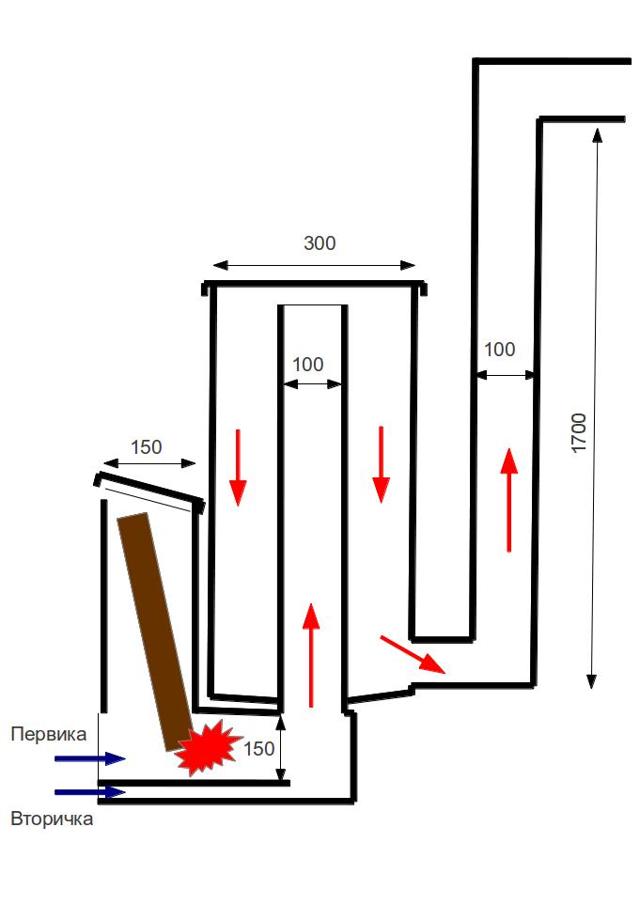
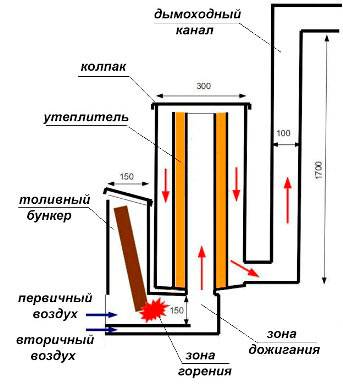
To build a rocket furnace with a place to rest, you must follow a certain rule: the dimensions of this model depend on the diameter and cross-sectional area of \u200b\u200bthe cap that the riser covers. Based on this:
- the height of the cap is equal to 1.5–2 parts of its diameter;
- the height of its coating with clay is equal to 2/3 of the height of the cap;
- clay coating thickness - 1/3 of the cap diameter;
- the riser area is 5–6% of the cap area;
- the gap between the inverted bottom of the cap and the upper edge of the riser must be at least 7 cm;
- the length of the horizontal section of the furnace is equal to the height of the vertical primary chimney;
- the blower area is 50% of the riser area;
- the external chimney has a size equal to 1.5–2 of the cross-sectional area of the cap;
- the thickness of the adobe cushion under the horizontal chimney is 50–70 mm;
- the thickness of the adobe solution of the couch is 0.2–0.5 of the cap diameter;
- the height of the chimney must be raised above the furnace by 4 m, which will ensure sufficient draft in the furnace.
When the cap is made from a two-hundred-liter barrel, then the bench is made up to 6 m long. And if from a gas cylinder, then the horizontal chimney should not be longer than 4 m. And do not forget to take care of the quality of the riser lining. For this, light fireclay bricks are used. Suitable and river sand, which must be clean.

Stove with stove bench
Other rocket stove designs
A small-sized "rocket" made of bricks is another of the easiest options for building a furnace of such do-it-yourself type. For its assembly does not require cement mortar. It is enough to lay the bricks on top of each other.There are also models of a rocket stove with a water jacket, which allow not only to heat the room, but also to provide the owner with hot water.


The components of refractory concrete are not cheap and a concrete mixer is needed for mixing. But its thermal conductivity is much lower than that of other units. The new rocket furnace began to work more stable and it became possible to release some of the heat outside in the form of infrared radiation through heat-resistant glass. It turned out a rocket stove-fireplace.
Manufacturing Recommendations
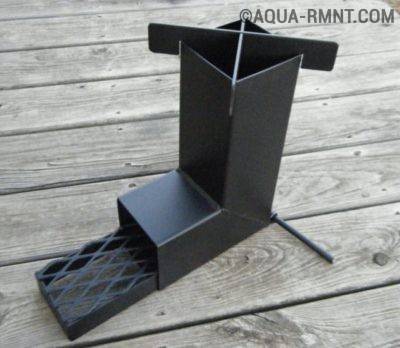
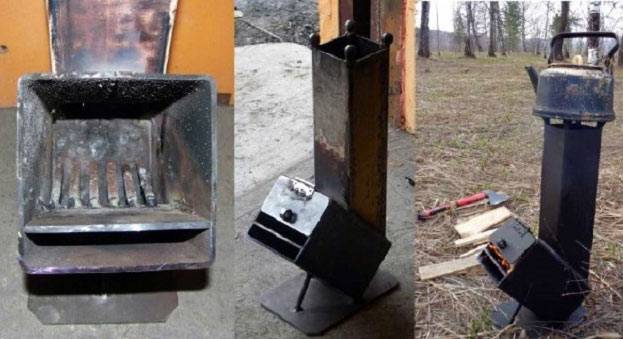
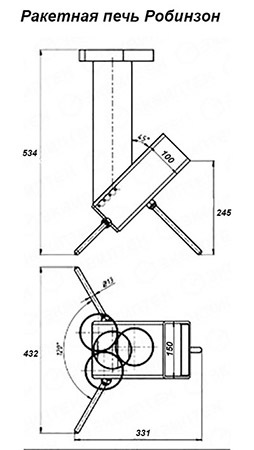
The easiest way is to make a small portable oven with your own hands - the Robinson rocket, whose drawing is presented below. You will need trimming of profile pipes, metal for legs and stands, as well as welding skills. Moreover, compliance with the exact dimensions indicated in the drawing is not necessary. You can take pipes of a different section, you just need to reduce or increase them proportionally so that the parts fit together.
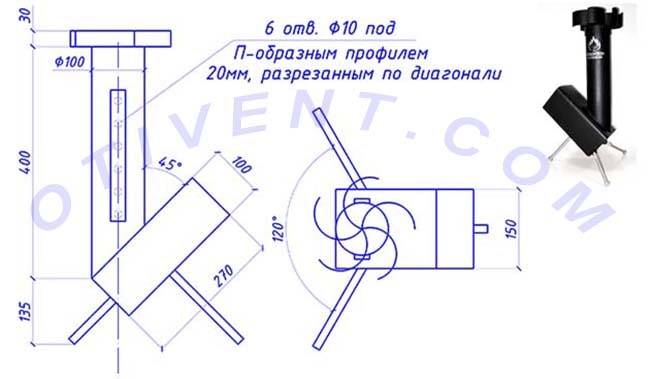
Drawing of an improved field stove "Robinson" with nozzles from a profile pipe, cut lengthwise into 2 parts
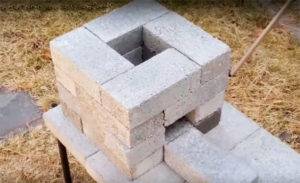
The most common variants of large rocket ovens are made from gas bottle or metal two hundred liter barrel. It must be understood that these finished elements are used as an outer cap, and the internal parts of the stove must be made from pipes of a smaller diameter or laid out from fireclay bricks. Moreover, from the cylinder you can make both a stationary heater with a small bench, and a unit that can be moved.
Please note that it is quite difficult to calculate the thermal power of a rocket-type furnace; there is no single calculation methodology. It is easier to rely on ready-made drawings of already working samples and assemble according to them.It is only necessary to compare the dimensions of the future stove with the dimensions of the heated room. For example, the size of a cylinder is enough to heat a small room, in other cases it is better to take a large barrel. The selection of internal parts for them is shown in the diagram:
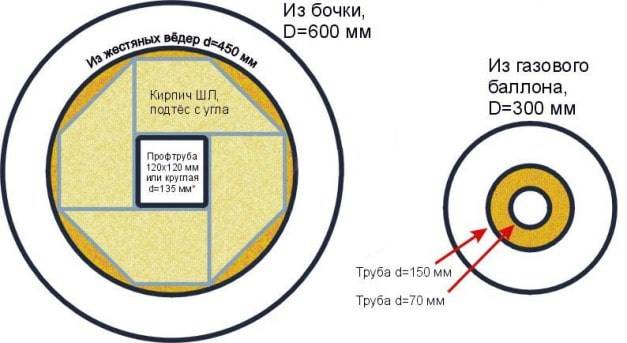
2 options for potbelly stoves - from a gas cylinder and a standard iron barrel
Balloon Rocket Furnace
In addition to the gas cylinder itself, to assemble the stove you will need:
- profile pipe 150 x 150 mm for the firebox and the hopper;
- steel pipes with a diameter of 70 and 150 mm will go to the internal vertical channel;
- the same with a diameter of 100 mm for the chimney;
- insulation (basalt fiber with a density of at least 100 kg / m³);
- sheet metal 3 mm thick.
For a master who owns welding, this work will not present any particular difficulty. At the cylinder, cut off the upper part along the seam, having previously turned out the valve and filled it to the top with water. On the sides, openings are cut out on both sides for the installation of a firebox and a chimney tie-in. The profile pipe is inserted and connected to a vertical channel, which is led through the bottom of the cylinder. Further work on the manufacture of the rocket furnace is carried out in accordance with the drawing:
At the end, the upper part must be welded into place, then carefully check all the seams for permeability so that air does not enter uncontrollably into the furnace. After that, you can attach a chimney with a water jacket (if any) and start testing.
Brick rocket-type heater masonry
This version of the stove will require the cost of buying fireclay bricks; an ordinary ceramic one for a rocket stove will not work. Masonry is carried out on a solution of fireclay clay, it is also sold as a ready-made building mixture.How to make a stationary rocket oven:
- First you need to dig a hole, tamp the bottom and fill the foundation with dimensions of 1200 x 400 mm and a height of 100 mm, as shown in the photo.
- After hardening, the foundation is covered with a sheet of basalt cardboard and the combustion chamber, the firewood hopper and the vertical channel are being laid. From the end of the combustion chamber, a door is installed for cleaning the ash pan.
- After the clay dries, the pit is filled up, and a pre-selected pipe or a small barrel with a diameter of 450 mm is put on the vertical channel. The gap between the brickwork and the walls of the pipe is filled with refractory insulation, for example, basalt wool, expanded clay, vermiculite.
- At the last stage, a cap made of a large metal barrel with a diameter of 600 mm is put on the structure. Previously, a cutout is made in its upper part and a pipe is placed for connecting the chimney. When the barrel turns over, he will just be at the bottom.
Further - a matter of technology, you can take the chimney immediately outside or build another stove bench with smoke turns. For this purpose, an ordinary ceramic brick and a clay-sand mortar will already fit. The ordering of the brickwork of a rocket furnace with a small bench is shown in detail in the video:
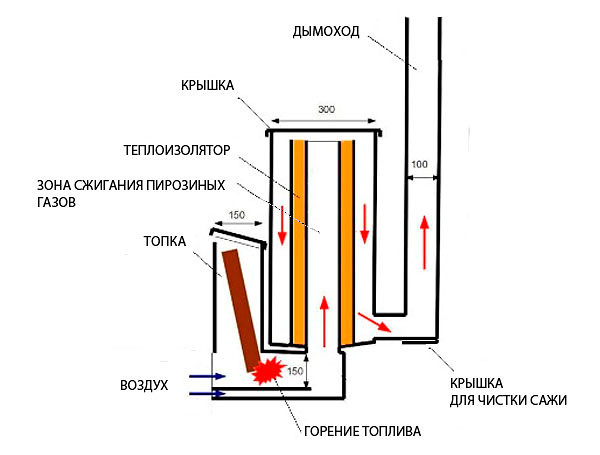
Reactive oven - what is it
Home heat that comes from a jet stove will not be given by any modern heater
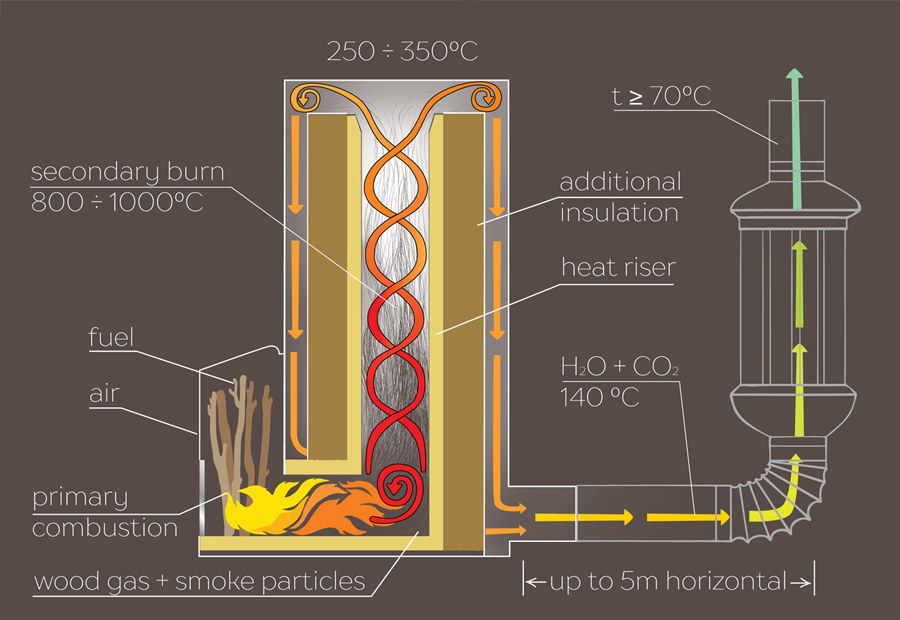
A jet, or, as it is also called, a rocket furnace, in fact, has nothing to do with modern technology. The only thing that makes this heating unit look like a space vehicle is the intense flow of flame and the buzz associated with the wrong mode of operation.Nevertheless, it cannot be said that the rocket oven is a completely technically backward device. Despite the simple design, it uses the most advanced solid fuel combustion methods:


- pyrolytic combustion of gases released during the dry distillation of solid fuels;
- the movement of gaseous products through the channels of the furnace, which does not require forced ejection due to draft.
This is what a simple jet-powered stove looks like
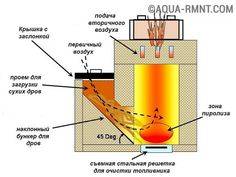
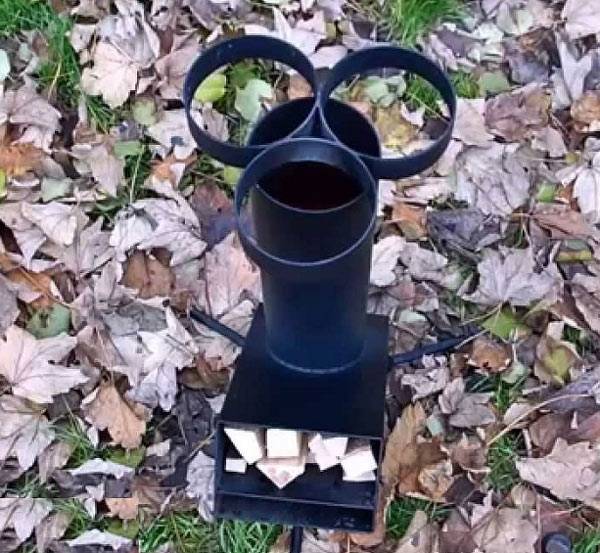
The simplest "rocket" is a curved piece of large diameter pipe. Firewood or other fuel is laid in a short horizontal section and set on fire. At first, the heater works like the most ordinary potbelly stove, but this is only until the temperature of the longer vertical part rises, which acts as a chimney. The red-hot metal contributes to the re-ignition of combustible substances and the appearance of a vacuum at the top of the chimney. By increasing the draft, the flow of air to the firewood increases, which significantly increases the intensity of combustion. In order to achieve even greater efficiency from this original device, the furnace opening is equipped with a door. When the cross section of the air channel decreases, the oxygen supply to the firewood stops and their pyrolytic decomposition into gaseous hydrocarbons begins. But they will not burn completely in such a simple installation - for this it will be necessary to equip a separate zone for afterburning the exhaust gases. By the way, this, as well as the thermal insulation of the chimney, allows more complex “rockets” to successfully compete with other solid fuel units.As for the simplest design we are considering, it is often used for cooking or heating food. All that is required for this is to equip a convenient platform for a pot or kettle on the vertical section of the furnace.
Geography of application of rocket heating units
Being a simple and convenient heating and cooking unit, the rocket stove is widely used both in mobile and stationary versions. Most often it is used:
- for heating residential premises;
- as fruit drying equipment;
- for heating greenhouses;
- to ensure normal working conditions in workshops or garages;
- to maintain a positive temperature in warehouses, utility blocks, etc.
Due to its simplicity, unpretentiousness and reliability, the jet heater enjoys well-deserved respect among fishermen and hunters, rally enthusiasts and survivalists. There is even a special version, the purpose of which is indicated by the name - "Robinson".
Advantages and disadvantages of a rocket oven
Despite the simple design, the rocket oven has a lot of advantages:
- efficiency at the level of the best samples of modern solid fuel heating equipment;
- efficiency - to achieve the required temperature, the jet unit will consume four times less firewood than a traditional oven;
- heating temperature above 1000 °C;
- the possibility of using any type of solid fuel, including dry vegetable waste, cones, needles and shavings;
- completeness of combustion and environmental friendliness - during operation, the temperature of the flame rises so much that soot ignites. The smoke of a rocket stove consists mainly of water vapor and carbon dioxide;
- the possibility of reloading fuel for continuous operation of the heater;
- simplicity and reliability;
- the presence of portable structures designed for mobile use.
The heating unit is not without drawbacks. The operation of the appliance is associated with the risk of carbon monoxide penetration into the dwelling. The stove cannot be used to heat a large house, and attempts to install a water heat exchanger in the combustion zone lead to a decrease in heat output and disruption of normal operation. The disadvantages include the low aesthetic value of the design, which, however, is a very ambiguous statement, since for lovers of ethnic style, the design of the stove is a real find.
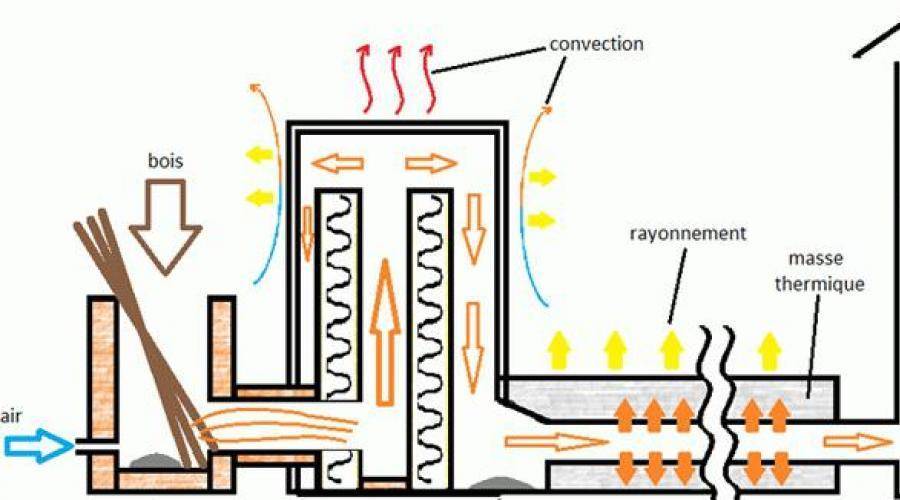
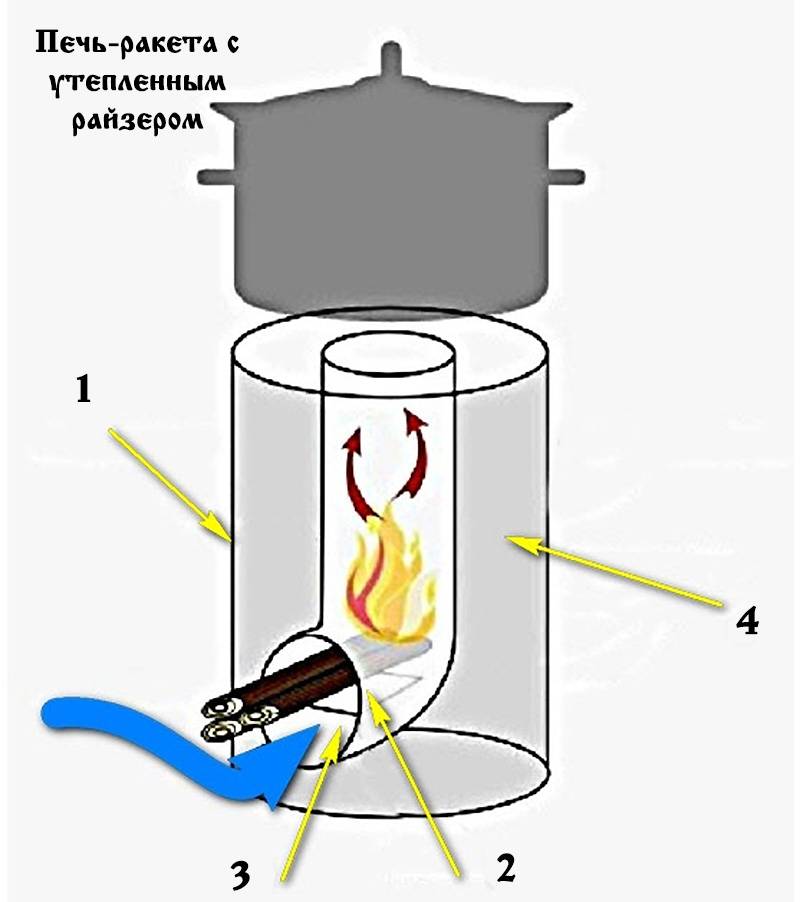
Working principle and design advantages
The name of the device speaks for itself. Indeed, the principle of operation of such a furnace is reminiscent of the functioning of a rocket engine running on solid fuel. Briefly, it can be described as follows:
- Firewood and coal are placed in a vertical bunker, after which the hot gases rise up.
- Gases enter the so-called afterburning zone - here they undergo secondary combustion due to the highly heated space.
- Afterburning is facilitated not by primary, but by secondary air entering through an additional supply channel.
- Further, gases follow a complex system of chimneys, which are mounted in capital structures in order to completely warm up all rooms.
This design provides quite a few tangible advantages compared to a conventional oven:
- Gases are burned completely - almost no intermediate combustion products are formed. This allows, on the one hand, to extract energy from the fuel to the maximum. On the other hand, carbon dioxide and water do not clog the internal surfaces of pipes and chimneys, making them much easier to clean.
- Thanks to a branched, rather extended system of chimneys, one stove is able to heat a whole house of standard sizes (100-150 m2). In addition, the heat from heating lasts 6-7 hours.
- The design is safe, since the risk of penetration of combustion products is excluded - all intermediate products are completely oxidized by air. Thus, carbon monoxide is not formed in the furnace, it turns into carbon dioxide.
- You can assemble the structure quite quickly and essentially for free - for example, a rocket stove is constructed from an ordinary pipe or an old empty gas cylinder in a few hours. The simplest options are shown in the photo.
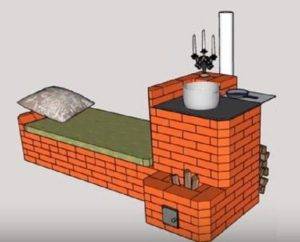
The stove is multifunctional: despite the simplicity of the design, it is able not only to heat the room, but also allows you to cook food, and if you wish, you can provide a warm sleeping place. The figure shows a camping option, which provides for the possibility of cooking in the field.
Of course, this design also has certain disadvantages, but there are few of them:
- First of all, a flaming rocket should not be left unattended - but strictly speaking, this rule applies to all furnaces. If the gases are pressurized too high, heating can increase dramatically, potentially causing a fire.
- Even barely damp wood should not be placed in a jet-powered stove.Due to water vapor, the intermediate products of combustion will not be able to burn out to the end, as a result, reverse thrust will occur, and the flame will weaken.
- Finally, in the case of a bath, a rocket will not work. This means that the design is not suitable for a steam room, which is heated by infrared radiation. A rocket gives such radiation is clearly not enough.
A visual description of the rocket furnace device can be seen here.


Varieties of rocket furnaces
In this section, we will consider the most common types of rocket stoves used in field and stationary conditions.
Simple metal ovens
The simplest wood-fired jet stove is made from an L-shaped piece of large-diameter metal pipe. The horizontal part is short, it is a firebox. The combustion chamber is located in the vertical part of the pipe, firewood is actively burning here. A small metal plate is often welded into the horizontal section, forming a blower. After warming up, the rocket furnace enters the operating mode, a flame bursts out of its vertical section (flame tube).
Such rocket stoves are used for cooking in camping or outdoor conditions - due to their small area, they are characterized by low heat release, and the vast majority of heat energy escapes through the flame tube. Teapots, frying pans and pots are placed on this pipe so that the raging flame ensures their heating. To maintain traction, stands are located in the upper part of the pipe, on which dishes are placed - combustion products can freely go outside.
In order to make a metal rocket furnace from an L-shaped pipe section more efficient, it is equipped with a metal casing from an old barrel.At the bottom of the barrel you can see a blower, and a flame tube peeps out of the top. If necessary, the internal volume is filled with insulation, for example, ash - it does not burn and retains heat well.
The most convenient are metal rocket furnaces with vertical fireboxes located at an angle to the flame tube. Often, the furnace openings are closed with lids; in this case, air is taken through the blower. Sometimes the firebox is made larger in diameter than the flame tube in order to ensure long-term burning.
Simple brick ovens
A small-sized brick rocket stove is another of the easiest options for building a do-it-yourself rocket stove. For its assembly, cement mortar is not required, it is enough to lay the bricks on top of each other to get at your disposal a convenient brick outdoor cooking unit. In chapter for self-assembly rocket furnaces, we will suggest that you familiarize yourself with the simplest order for self-assembly.
A do-it-yourself brick rocket stove can be used to heat households. In this case, simple ordering is not enough - you will have to build a stationary version using a special cement mortar. There are many orders for this, you just have to choose the appropriate option. By the way, some variants of such furnaces provide for the presence of a water circuit.
Advantage of brick rocket kilns:
- Simple construction;
- Long-term heat retention;
- The ability to create a comfortable warm couch.
Some models are made combined, they use both steel and bricks.
Complex rocket ovens
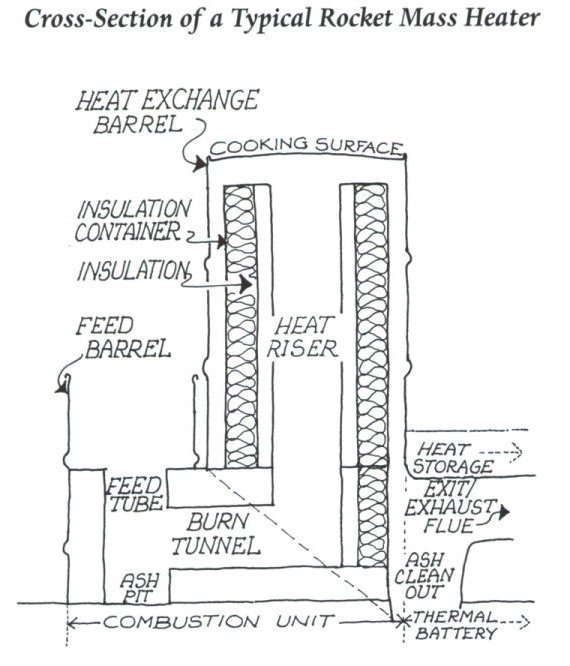
A jet stove for heating households or for a bath is characterized by increased complexity. The main link here is still the riser (flame tube), enclosed in a metal case. Its upper part can be used for cooking, forming a kind of cooking surface. The firebox is made large to accommodate an increased amount of solid fuel. The raw materials are metal, bricks and clay.
On the basis of clay coating, streamlined rocket furnaces of irregular shape are made, which is well perceived by human vision.
There are projects of wood-burning rocket stoves that provide for the presence of additional modules. Their construction schemes include small boilers for preparing hot water, hobs, water jackets and even small ovens. Such stoves will help to heat households and create comfortable conditions for a person to live.
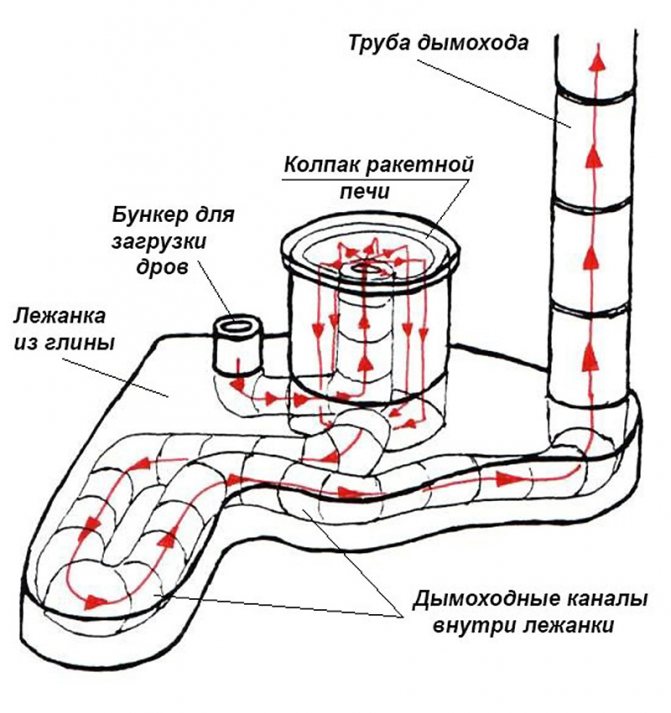
A water-jacketed rocket boiler, based on a wood-burning stove, will help warm up a multi-room building. It is equipped with a water circuit for heating the coolant. Additional convenience is created by samples with stove benches - these stove benches are created on the basis of thermal channels between the flame and chimney pipes.
How to do it yourself?
Before you make a rocket furnace, you need to decide on the place of its installation, with the dimensions of the future design, and develop a diagram. The technology of masonry itself is quite simple, any novice builder can master it.


The simplest design of a rocket stove can be built from 20 bricks in a summer cottage and used to heat food brought from home.
Location selection
Before starting construction, the first step is to choose a place.Rocket-type brick ovens are recommended to be placed closer to the front door. In this case, the ash after cleaning will not need to be carried across the entire room, which will positively affect the overall dustiness of the room.
It is also desirable that at the exit of the pipe there are no rafters located closer than 40 cm to the chimney. And yet, the stove should not be adjacent to the outer wall of the house so that expensive heat does not go to heat the street.
Solution preparation
Cement mortar under the influence of high temperatures quickly cracks, therefore, only a mortar consisting of clay and sand is used for laying brick heating devices.
Their proportions are determined experimentally, depending on the quality of the clay. Most often in a ratio of 1:2 or 1:3, and the higher the fat content of the clay, the less it is added to the solution.
First, the clay must be soaked, filtered, and then sand is introduced. The resulting solution should have the consistency of thick sour cream. You can check the level of its viscosity in the following way:
- place a wooden stick or trowel handle into the mixture;
- remove the tool and shake well;
- check the thickness of the adhering layer: if less than 2 mm add clay, more than 3 mm - sand.
The preparation of the mortar must be approached with all responsibility, since only a plastic mixture of the required density can fill all the irregularities of the bricks and ensure their strong adhesion.
Ordering a rocket furnace for 20 bricks
An example of a brick rocket stove
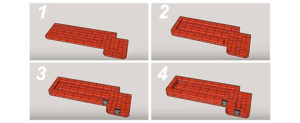
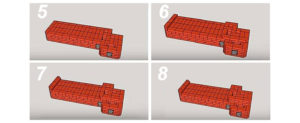
Masonry rocket stove with stove bench
A brick rocket stove, even equipped with a bench, is small. The order shown in the figures (below) allows you to assemble the structure without the use of metal products. Only the doors will be iron.Subsequently, the body can be coated with clay to give it more rounded shapes.
| row number | Number of bricks, pcs. | Description of masonry | Picture |
| 1 | 62 | Formation of the furnace base |
(click to enlarge) |
| 2 | 44 | The formation of the base of the channels for heating the couch along the entire structure. Fastening mortgages for mounting a cast-iron door | |
| 3 | 44 | Repeating the contour of the second row | |
| 4 | 59 | Complete channel coverage. The beginning of the formation of a vertical smoke channel and a furnace | |
| 5 | 60 | The construction of the couch |
(click to enlarge) |
| 6 | 17 | Continuation of laying the smoke channel | |
| 7 | 18 | ||
| 8 | 14 | ||
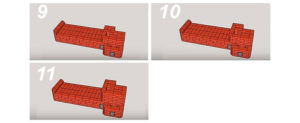
| 9; 10 | 14 | Smoke channel formation |
(click to enlarge) |
| 11 | 13 | ||
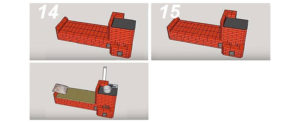
| 12 | 11 | The beginning of laying the chimney pipe. From here begins the channel through which the air from the hob will go down to move to the stove bench | |
| 13 | 10 | The end of the formation of the surface under the hob. Laying asbestos gasket, which is covered with sheet steel. |
(click to enlarge) |
| 14; 15 | 5 | Closing the chimney channel and forming a low wall between the bench and the hob. |
After completing the masonry work, the home-made rocket stove must be dried, carefully, by heating at low intensity. First, no more than 20% of the norm of firewood is laid in the firebox, and the device is heated twice a day for 30-40 minutes
According to this scheme, the stove is heated until its outer surface is cleared of damp spots. Drying, depending on the dimensions of the device, may take from three to eight days. During this time, the room should be well ventilated, especially in summer.


Accelerating drying can lead to cracking of the masonry, that is, the device will become unsuitable for further heating.
Ready view