- Sewer pipeline installation
- Five essential requirements
- Sewer wiring in the room
- Calculation of the volume of filtering facilities for sewerage at home
- Connecting a septic tank to pipes
- Charting
- Cast iron
- Plastic
- Branch line installation
- Types and arrangement of water supply systems in a private house
- Series or tee connection
- Manifold or parallel connection
- Water supply principle
- Do-it-yourself sewerage arrangement in the bath: a step-by-step guide
- A step-by-step guide to building a sewer in a bath with your own hands
- Sewerage construction in a private house: ventilation scheme in the bath
- Plumbing in private homes
- Choosing the location of the bathroom in a village house
- Choosing the best type of bathroom
- Determining the size of the bathroom
- Features of arranging a hygienic room in a wooden building
- Installation of plumbing equipment and other components of the system
- Shower and bath installation
- Installation of a sink, washbasin, washstand
- Recommendations for installing a toilet
- Sewer installation
- Installation of a washing machine, dishwasher and other similar equipment
Sewer pipeline installation
Five essential requirements
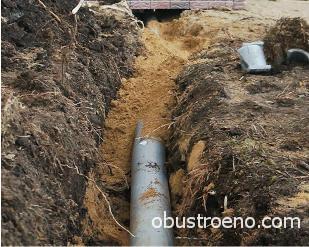
Pipes are laid on a sand cushion and sprinkled with sand
First, I want to list you five basic requirements, without which not a single sewer pipe layout in a private house can do
But I will do it briefly to focus your attention on further installation instructions.
In any case, wherever you lay the sewer pipeline - in a house, in an apartment, in a basement, by air or underground, you will have to observe a certain slope, and different for each diameter.
Of particular importance are the main pipes leading to the storage or flow tank - the quality of the drain depends on the correct slope. If you make it more than necessary, then the water will wash the feces without washing them away, and if it is less, then again prerequisites for blockage will be created due to the low intensity of fluid movement.
If this is a sewerage wiring in an apartment, then short sections of the pipeline are obtained there, but in a private house they increase significantly, which requires revisions
In addition, in cases where the length of the route on the site exceeds 10 m, revision wells should be equipped there.
When laying a sewer system in a private house (meaning underground installation), certain distances to objects and structures should be observed, which are considered in SNiP 2.04.03-85 and SNiP 2.04.01-85.
In order to avoid freezing of the system in winter, the laying of the pipeline should be carried out at or below the zero freezing point of the soil. But since in some regions of Russia this limit is deeper than two meters, in such cases they often resort to installing thermal insulation.
Pipe laying should be done only on a sand cushion and covered with it, as shown in the photo in the subheading.This protects the PVC from deformation and damage from sharp stones and metal objects.
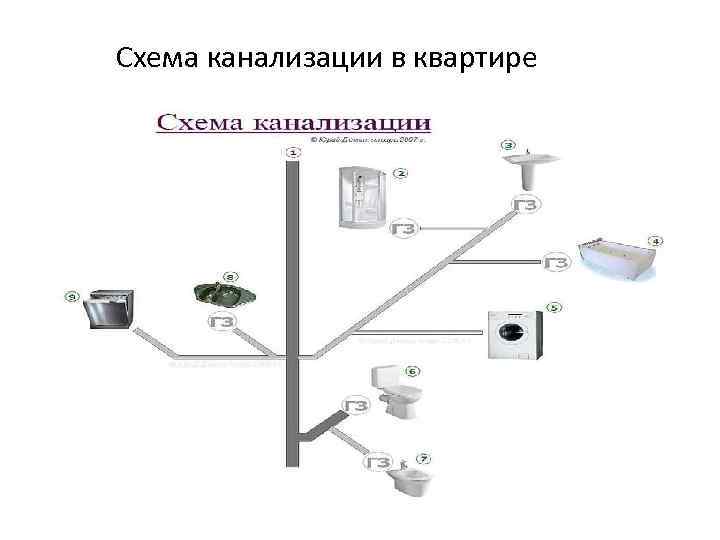
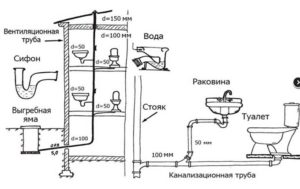
Sewer wiring in the room
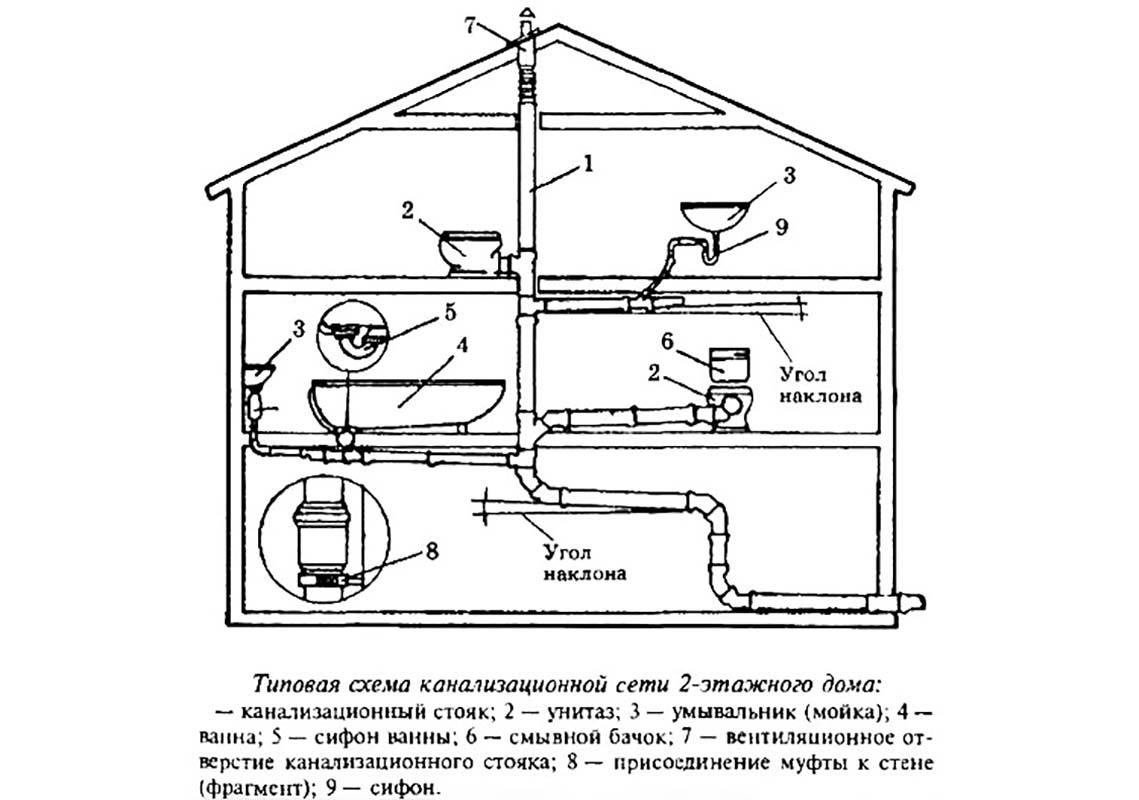
The principle of wiring plumbing
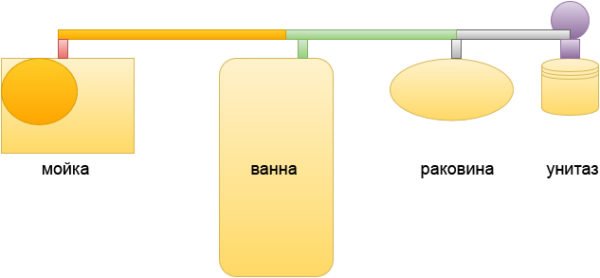
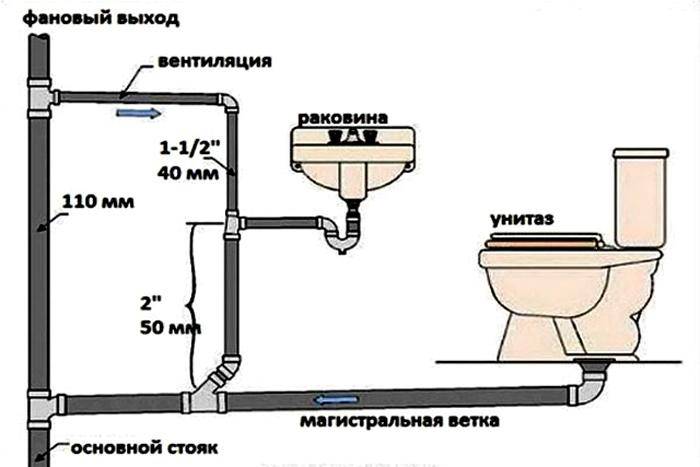
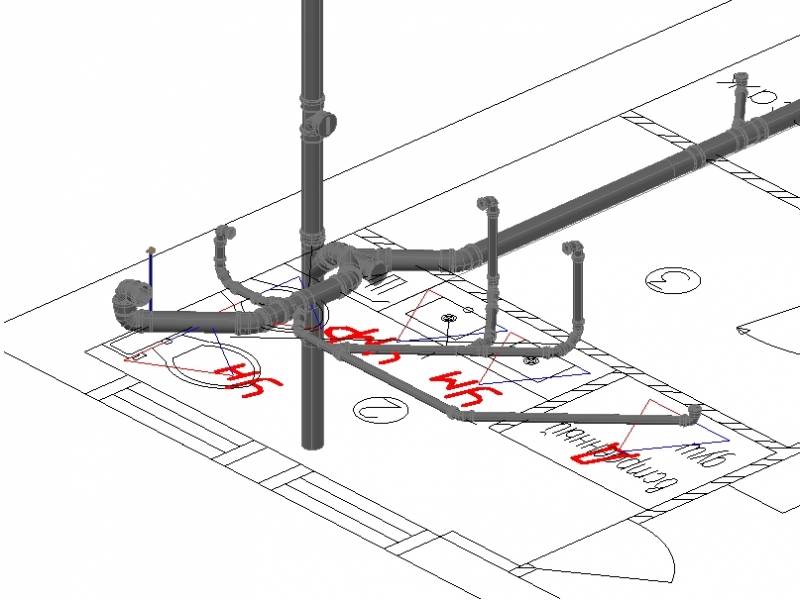
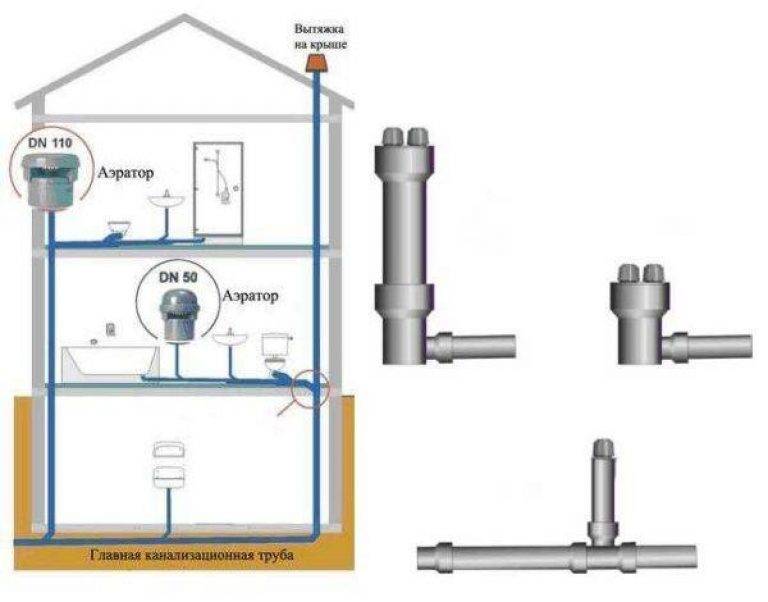
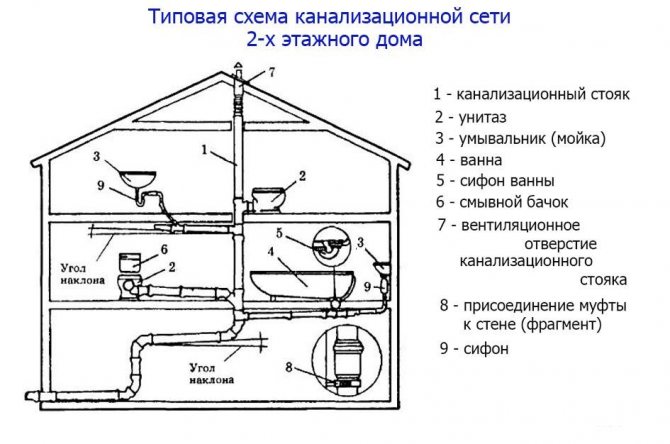
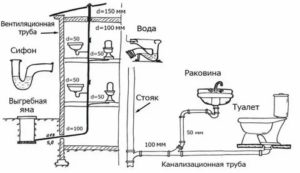
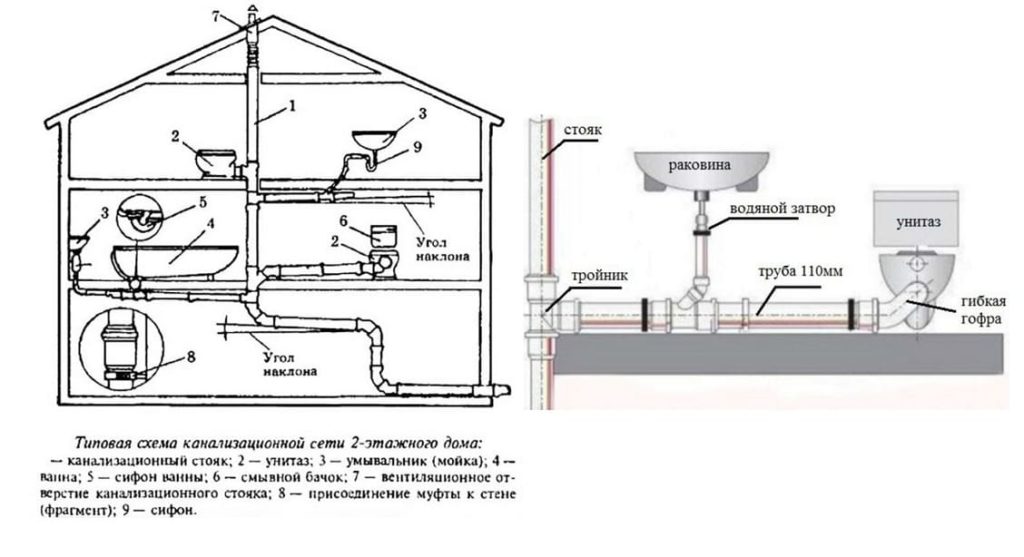
First of all, it should be firmly understood that the sewerage layout in a private house or apartment, that is, indoors, remains the same in principle. In 99%, the toilet drain will always be the most extreme point - this is a 110-mm pipe, where all the other bathrooms are already inserted - an example of such a device is shown in the upper diagram.
In any case, a 110 pipe is used at the exit from the room, whether it be a riser or a deck chair, although on the street or in the basement the diameter may increase if other sewage systems are connected there.
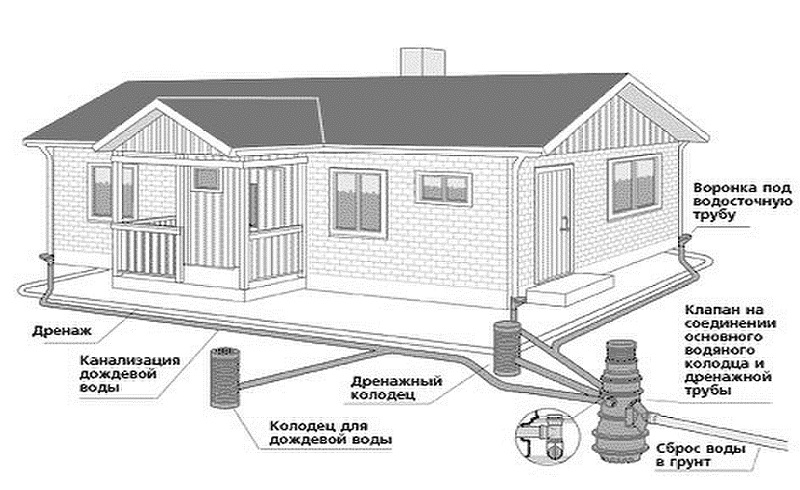
Calculation of the volume of filtering facilities for sewerage at home
It should be understood the responsibility of the residents of the house for the ecological state of the place of residence. And in many respects it depends on the purity of groundwater. Therefore, a number of documents regulating water consumption and water treatment have been developed:
- Building codes and regulations 2.04.03.85 regulating the external sewerage of private houses, as well as the arrangement of sanitary protection zones for small protective structures;
- SNiP 2.04.01.85 for internal networks and water supply in terms of determining the volume of effluents;
- manual on the procedure for designing engineering support systems MDS 40.2.200, which provides calculations for calculating the volume of effluents in private housing construction.
Watch the video
 The main value in the development of a septic tank project for a country house is its working volume, which can be calculated using the following algorithm:
- as the displacement of daily volumes of incoming wastewater multiplied by the time of their anaerobic processing in days;
- as the total amount of liquid in all compartments of the septic tank;
- the distance from the bottom of the tank to the lower cut of the spout pipe is taken into account;
- from the volume, you need to subtract the height of the sediment layer, which can be up to 20% of the depth of the tank, if cleaning is carried out in accordance with the rules - 2 times a year, this indicator can be ignored.
When making a calculation with your own hands, your own treatment device with final cleaning by filtration through the soil, it should be noted that this is realistic with a fluid flow rate of 3-5 cubic meters per day.
If it is higher, SBR reactors should be used or a combination design should be used with both anaerobic and aerobic bacteria treatment, not excluding the use of aeration.
The use of biochemical materials for wastewater treatment increases the degree of wastewater treatment and accelerates their processing tenfold.
The use of biochemical treatment of wastewater makes it possible to purify them to a degree of 98%, so such water can be used for watering a garden and at the same time receive an increase in yield. To fertilize the soil
use sludge.
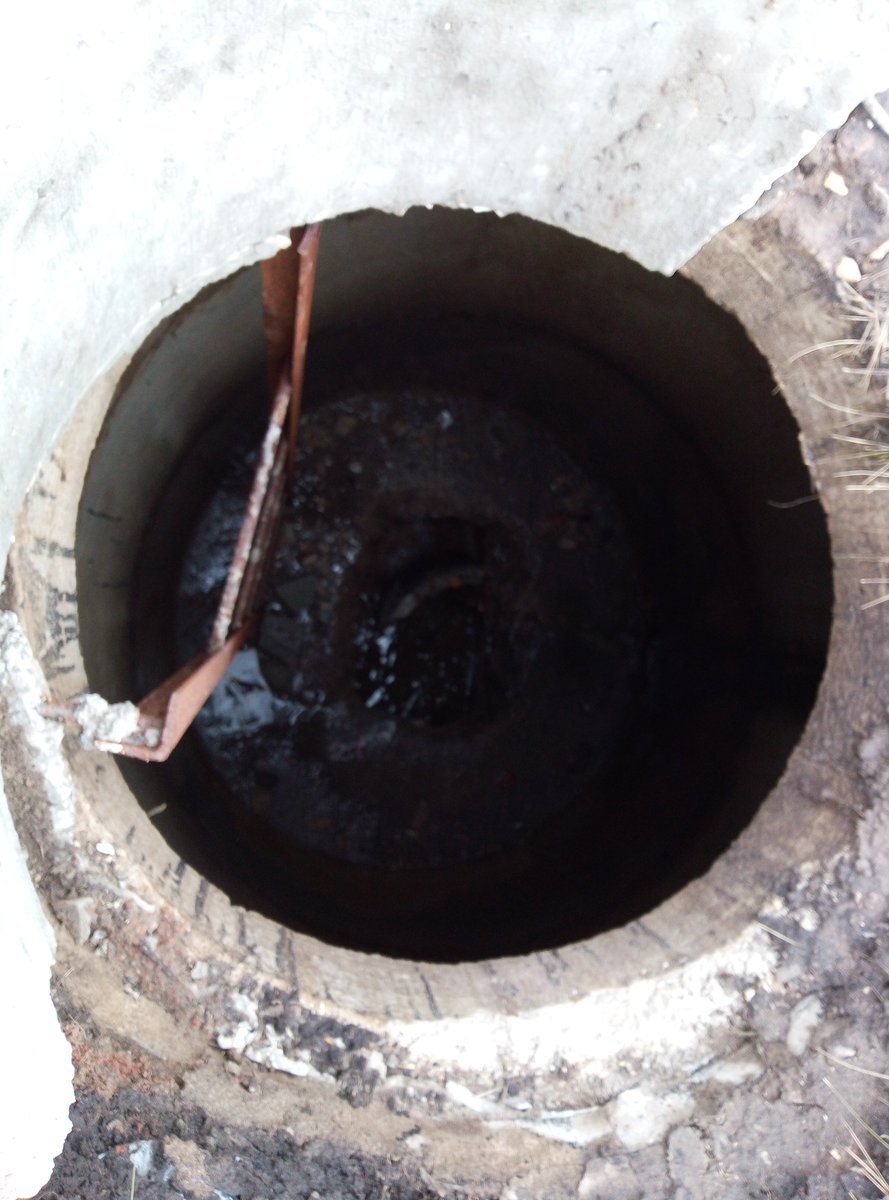
Connecting a septic tank to pipes
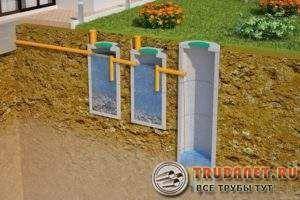
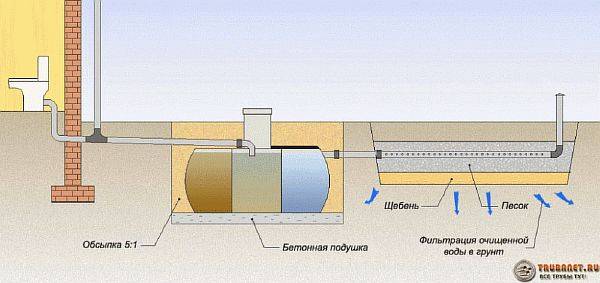
When sewerage is being installed in a country house, a fully assembled treatment plant is combined into a single structure and connected to a pipeline running from the house. To this end, holes are made in concrete rings to create an overflow in the form of a short piece of pipe and another hole for the entrance of the sewer line.


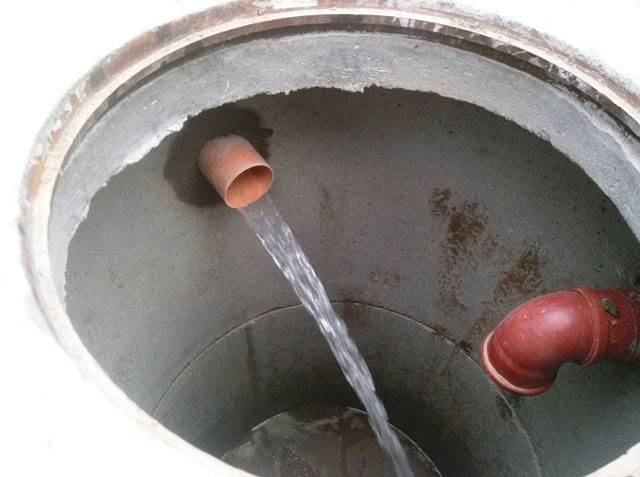
These elements are interconnected as tightly as possible and covered with waterproofing. Bring out the ventilation riser. Further, in order to check the operability and tightness of the septic tank, the first tank is filled with water.When the first wastewater enters the accumulator, a bioactivator is used to ensure a more efficient waste processing process.
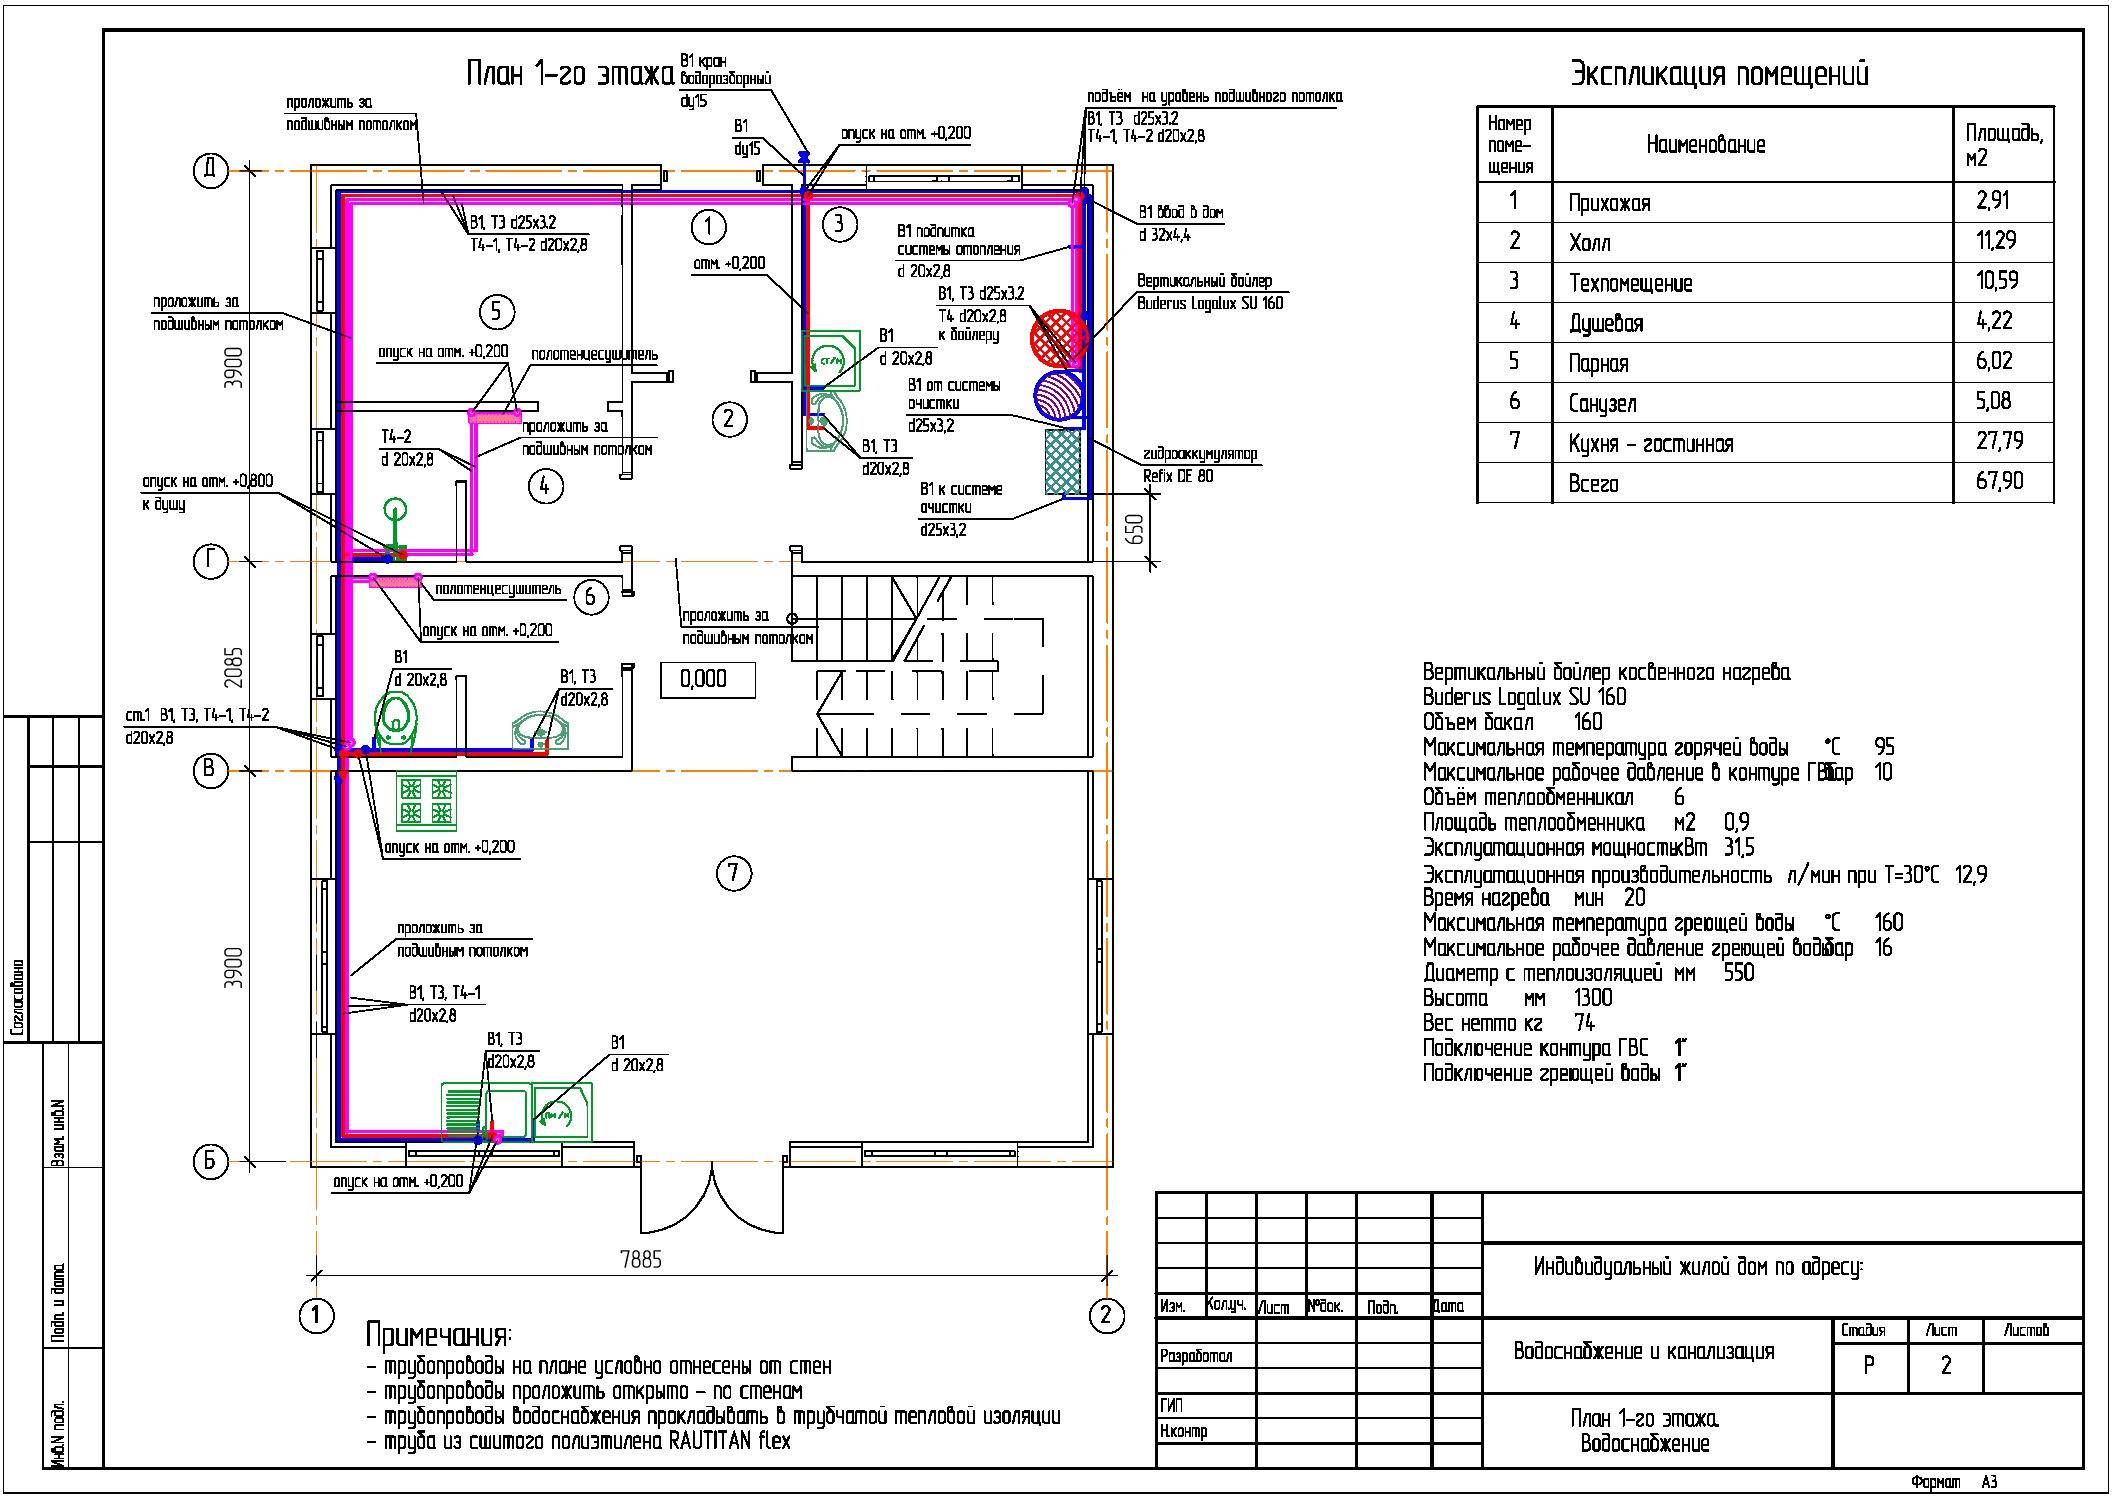
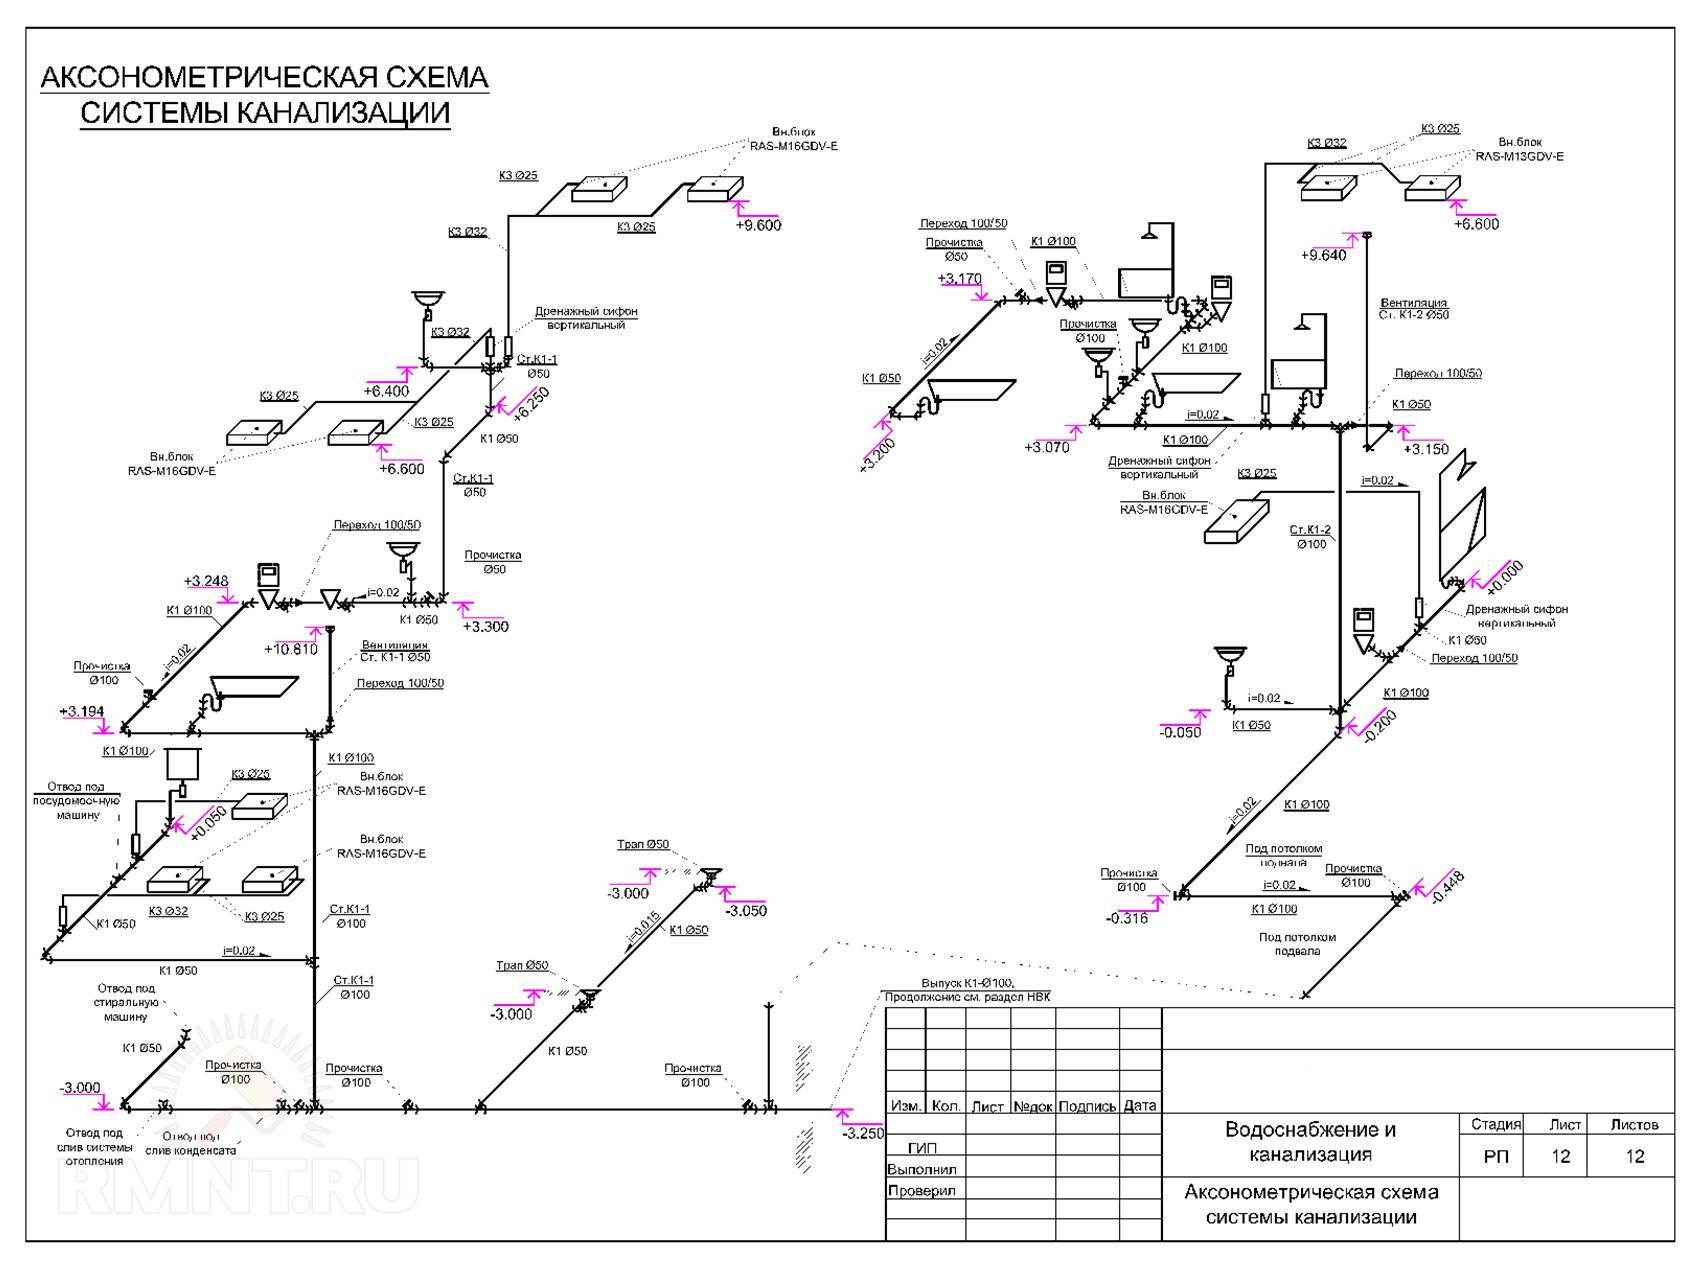
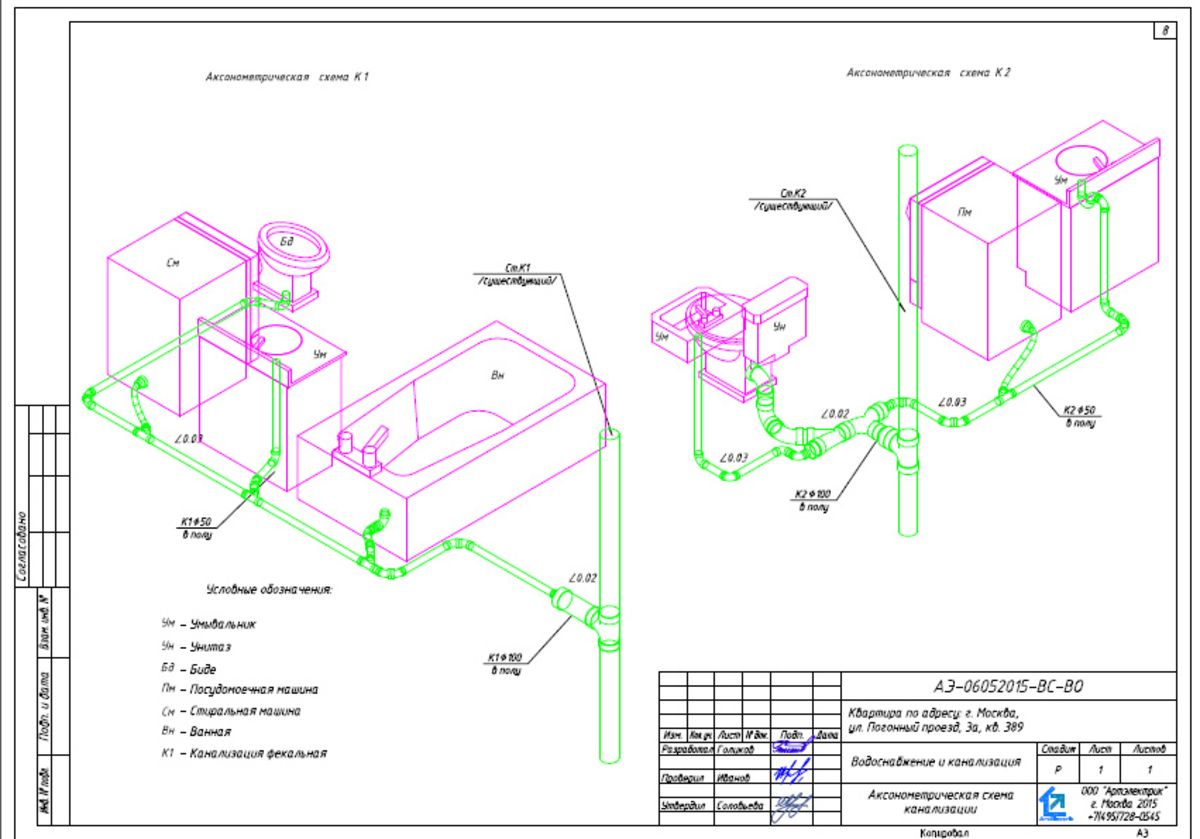
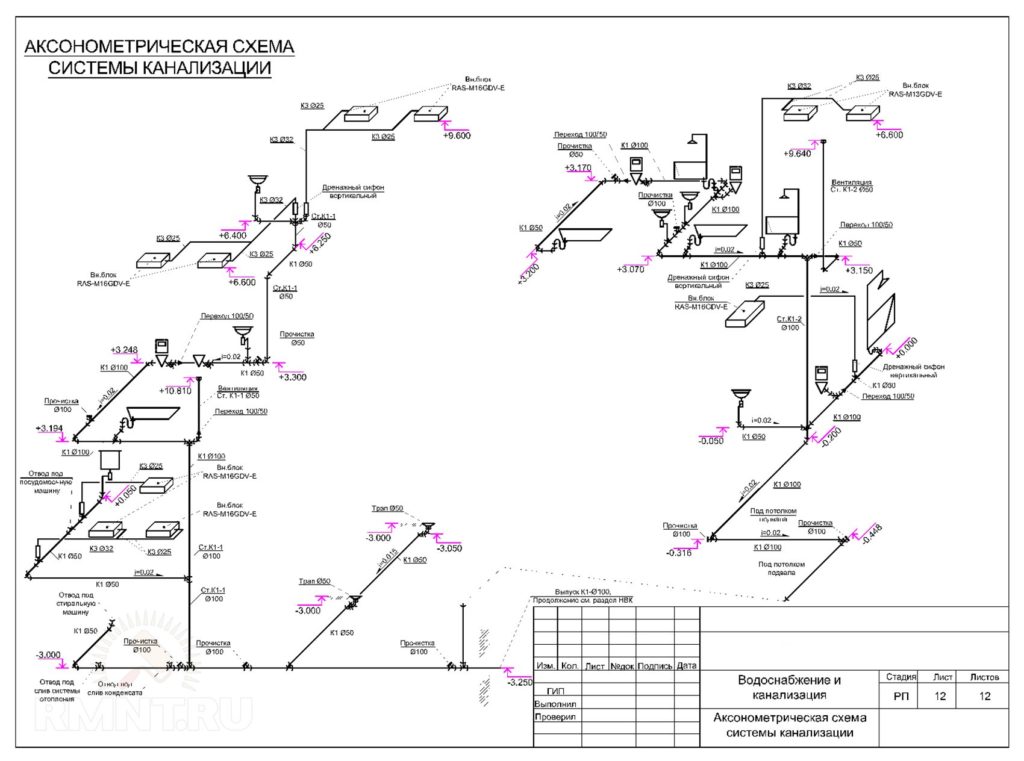
Charting
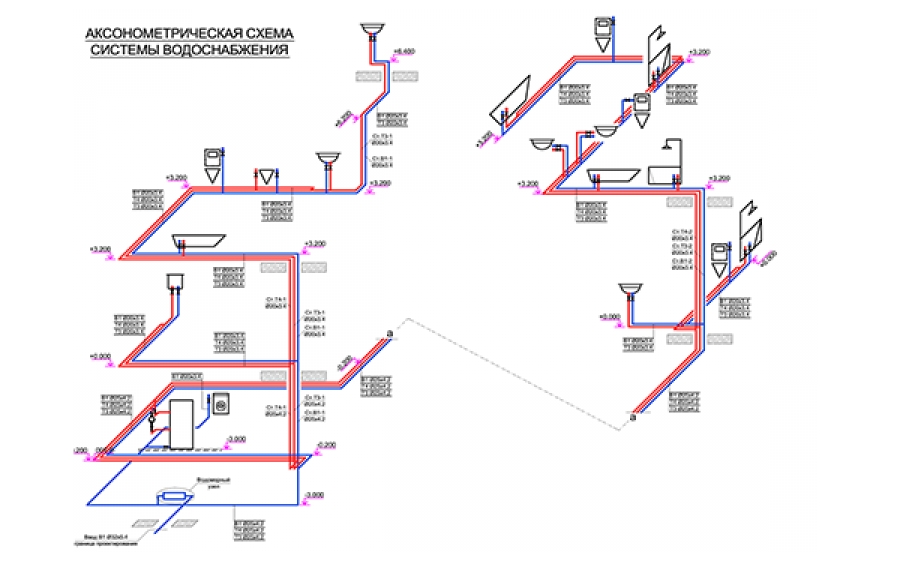
A preliminary scheme is drawn up at the design stage. In the future, this will save you from carrying out time-consuming operations for punching technological holes in ceilings and walls for laying sewer pipes.
The project defines the equipment and devices, the places of their connection to the sewerage.
A detailed diagram reduces the number of trips to a specialty store for missing parts.
Figure 2. Wiring diagram for determining the number of pipes and fittings.
If the work is entrusted to be performed by a third-party organization, then the project will simplify the control over the reliability of the estimates in the sections “materials” and “work performed”.
Material selection
The product range allows you to create communications of any complexity and configuration - manufacturers produce: pipes of various lengths and diameters, adapters, connections, angles and turns, fittings for connection. All of them are called shaped parts (styling).
For sewerage in an individual residential building, they choose between cast-iron or plastic products available for purchase. Stainless and steel communications in individual construction have not received distribution due to the high cost and features of installation, which cannot be carried out without special welding equipment.
Cast iron
Cast iron sewers are also rarely used in sewerage layouts in private homes:
- components are much more expensive than plastic ones;
- the mass of pipes makes transportation difficult;
- installation is impossible without a team of assistants;
- for sealing joints, packing and cement putties are used, which is not technologically advanced;
- connection, not provided for by the original plumbing project, is difficult without partial destruction of the entire structure.
Cast iron products are suitable for installation in cold rooms, as they can be heated with a blowtorch when frozen.
Figure 3. Cast iron fittings.
In individual construction, cast-iron pipes with the ChK marking (cast-iron sewer) and modern models for socketless installationcalled SML. The latter have a much lower mass, and clamps are used for connection. It is allowed to use cast iron products marked VSHCHG and CHNR, but these are specialized products for pressure water supply and underground sewage, their cost is high, and at home they are used only if they were able to purchase "for a song".
Plastic
Plastic pipes and accessories:
- durable;
- do not require sealing joints;
- easy to install by one person
- unaffected by aggressive liquids.
When buying, take into account that "plastic" is of three types:
- Polyethylene products are cheaper than other types, but it is undesirable to use them to install sewers in the premises of the house. Pipes are subject to deformation during temperature changes, while the tightness in the joints is broken. However, the material is UV resistant, so it is suitable for storm sewers.
- The cost of components made of polyisopropylene is high, but they are not subject to deformation when exposed to temperature, they can be cleaned with metal brushes, chemicals do not harm.
- Sewerage made of polyvinyl chloride (PVC) is the best choice in terms of price and consumer properties. The disadvantages include the inability to use metal brushes when cleaning. Boiling water entering the sewer leads to deformations. But, it is difficult to imagine such a case - no one takes a bath at a water temperature above 80 ° C. It is impossible to heat pipes with an open flame in case of freezing, therefore polyvinyl chloride is not used in unheated rooms.
The joints of PVC pipes and standard fittings without threads are reliably sealed with special rubber (silicone) rings. To facilitate assembly, they purchase silicone sealant for plumbing. The composition of the "seal" includes additives that prevent the development of fungi and mold at the joints.
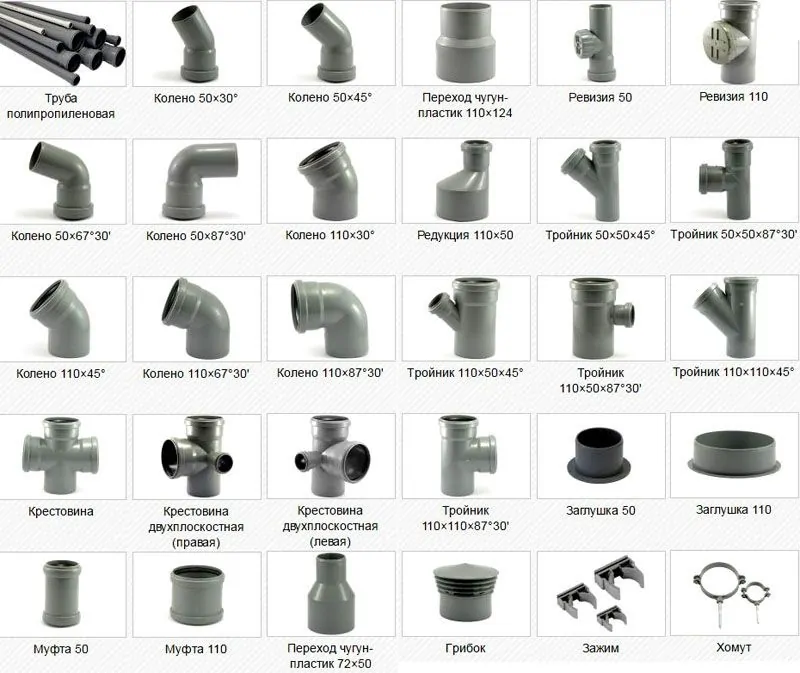 Figure 4. PVC product range.


There is, but not widely used, socketless systems, when the connection is made by gluing. The disadvantage is that it will not work to change the assembled structure without mechanical destruction.
The diameter of sewer pipes and fittings depends on the connected equipment. The recommended sizes are collected in the table.
| Santekhpribor | Minimum inner diameter, mm |
| Washing | 50 |
| Wash basin | 50 |
| Washing machine | 32 |
| Dishwasher | 40 |
| Toilet | 100 |
| Drain for heating appliances | 32 |
| Riser in a one-story house | 100 |
| Riser in a two-story building | 150 |
Branch line installation
At the same time, the diameter of the holes that are on the drain at the plumbing products must have the same size entry points to the main sewer.
And in order to connect pipes of various diameters, special fittings are used.
For the correct implementation of such work, the following conditions must be taken into account:
- According to current standards, the length of each branch line should not exceed 10 m in length.
- To work with pipes, it is recommended to use a hacksaw for metal carving. It should be borne in mind that the cut must be made exclusively perpendicular to the longitudinal axis.
- Branch pipes are laid taking into account a certain slope directed towards the drain. So, options with a diameter of 50 mm are recommended to be made at a slope of 3 cm per meter, but larger pipes of 2 cm.
Types and arrangement of water supply systems in a private house
 There are two methods of bringing water to the points of use. The selection of the wiring diagram depends on the parameters of the network, as well as on how intensive the water consumption will be.
Series or tee connection
A water supply scheme of this type in a private house implies that a tap, shower and other points are connected one after another.
Advantages of this solution:
- ease of installation - no special knowledge is required when connecting additional elements;
- low cost - two times less pipe segments are used;
- compactness - tees are mounted directly near the water points.
However, there are also disadvantages. If all consumers are turned on at the same time, there is a significant drop in pressure in the water supply network. Connecting a new user is problematic. Another tee will be required.
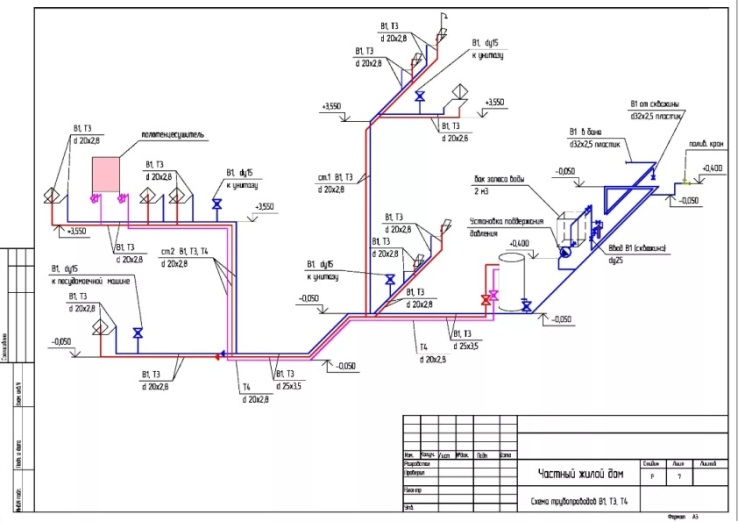
Manifold or parallel connection
Collector plumbing
It is an installation of a splitter or two - for hot and cold water supply, to which the branches going to each consumer are connected.To make an eyeliner of such a plan, a larger footage of pipes is needed, but at the same time its principle of operation helps to maintain a constant pressure.
- convenience - all key points are in one place;
- reliability - one pipe is supplied to each consumer, which significantly reduces the possibility of leaks;
- pressure stability - the collector evenly distributes the pressure between all users, so even if you open all the taps at once, the pressure in the system will not drop.
The disadvantages include high cost due to an increase in the consumption of materials and the need to allocate space for installing and connecting collectors.
Water supply principle
The installation of the water supply system is carried out by a dead-end, circulation or combined method. "Deaf" branches, ending with a plug, are more economical, but there are inconveniences with hot water supply. When opening the tap, you need to wait a while until the water reaches a dead end.
Closed circulation branches are more practical and convenient, but such a project will require not only more pipe sections, but also a special pump.
Do-it-yourself sewerage arrangement in the bath: a step-by-step guide
As in the case of a residential building, the sewerage of a bath includes an internal and external system. Even if the building has a dry steam room, it will be necessary to drain the liquid from the shower. The water collection system depends on how the floors are installed. The sewerage scheme is entered into the bath project at the development stage and is laid at the initial stage of construction even before the floors are equipped.
If it is planned to install wooden floors from boards, then the elements can be laid closely or with small gaps. If the coating is installed tightly, the floors are formed with a slope from one wall to another. Next, you should find the lowest point near the wall and leave a gap in this place, where the gutter will be subsequently installed (also with a slope). At the lowest point of its placement, a connection is made to the sewer outlet pipe.
If the wooden flooring will be made with slots, small gaps (5 mm) should be left between the boards. A concrete base is made under the floor with a slope towards the central part of the room. A gutter and a sewer pipe will be installed in this area. Instead of a concrete base, metal pallets can be laid on top of the insulated floor under a wooden deck. If the floors are self-leveling or tiled, a water intake ladder is installed at the lower point of the slope, which drains the drains into the pipe.
Using septic tanks for drains from the bath
A step-by-step guide to building a sewer in a bath with your own hands
For the installation of sewer pipes, it is necessary to form ditches with a slope of 2 cm per 1 m. Their depth is 50-60 cm. A pillow should be made at the bottom of these trenches. To do this, a layer of sand 15 cm thick is poured and carefully compacted. In this case, do not forget about the slope.


Next, the installation of the sewer line is carried out. Polypropylene pipes with a diameter of 100 mm are laid in trenches. If necessary, a sewer riser is equipped. It must be fixed to the wall with clamps. Be sure to organize ventilation. When the system is ready, the flooring is installed using one of the previously discussed methods.
Upon completion of all work, the ladders and gratings provided for by the project are connected to the system at the designated locations. In the area where the water intake is connected to the outlet pipe, it is desirable to install a siphon. It will prevent the penetration of odors from the sewer back into the room. Most often, ladders are equipped with built-in water seals.
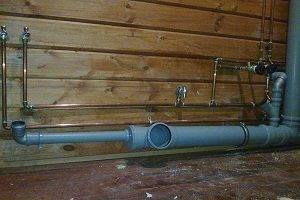
Sewer pipes in the bath
On sale you can find gutters made of asbestos cement, plastic or cast iron. It is not recommended to use products made of wood and steel, because. they quickly break down under the influence of moisture. The minimum allowable diameter of the gutter is 5 cm. If the project provides for the presence of a toilet bowl or other sanitary equipment, it is installed and connected. This completes the work on the organization of internal sewage. The external system is carried out in the manner described earlier, and may be a septic tank or a drainage well.
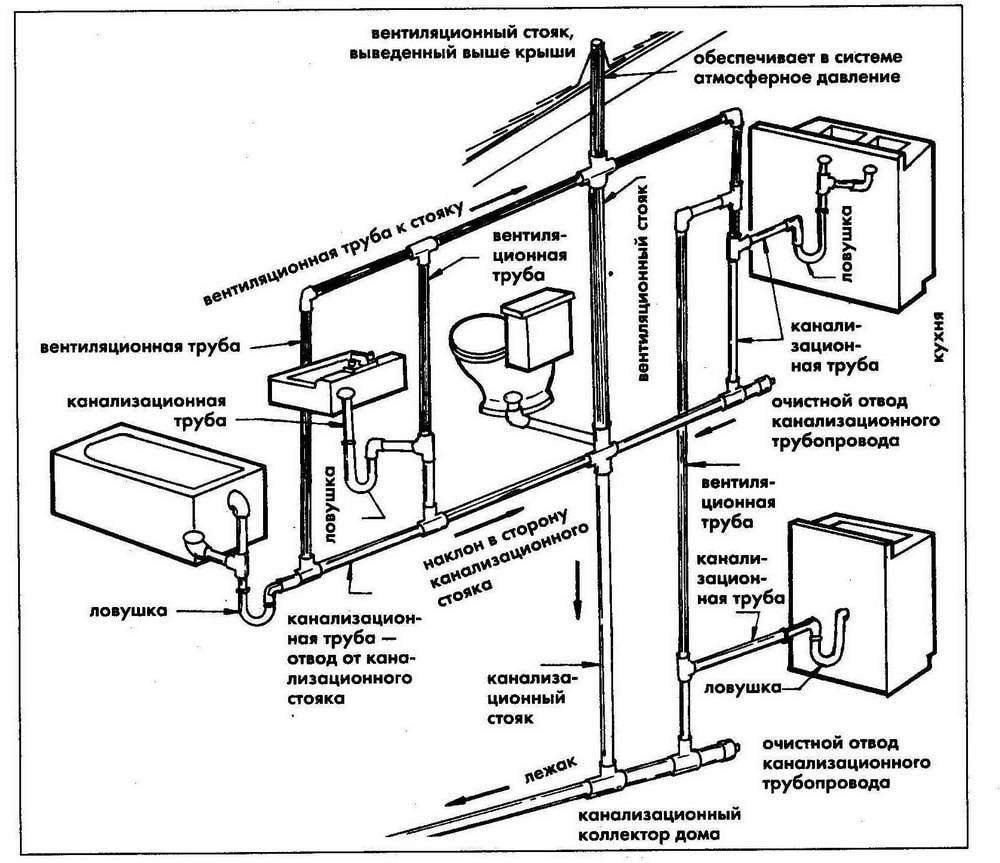
Sewerage construction in a private house: ventilation scheme in the bath
Air exchange in the bath can be organized in various ways. Each of them has its own characteristics and advantages. Having studied the specifics of each method, you can choose the best option for a bath.
The first method involves creating an opening designed to supply fresh air. It should be placed behind the stove-heater at a height of 0.5 m from the floor level. The exhaust air will be discharged through the opening on the opposite side. It must be placed at a height of 0.3 m from the floor. To increase the movement of air flow at the outlet, you need to install an exhaust fan. All openings are closed with gratings.
Sewerage scheme for a toilet in a bath with a septic tank and ventilation
The second method involves placing both holes in the same plane. In this case, the work will affect the wall opposite to the one where the furnace is located. The inlet duct is placed at a height of 0.3 m from the floor level, at a similar distance from the ceiling, an exhaust hole must be made and a fan installed in it. Channels are closed with gratings.
The third method is suitable for flooring where the boards are laid with gaps to drain liquid. The inlet is made at a height of 0.3 m from the floor on the wall behind the stove. In this case, installation of an outlet duct is not required, since the exhaust air will exit through the gaps between the boards.
Plumbing in private homes
- Prepared pipes are laid in the house, starting from water consumers.
- The pipes are connected to the consuming point with an adapter so that a tap can be installed to shut off the water.
- Pipes are laid to the collector. It is advisable not to pass pipes through walls, as well as partitions, and if this has to be done, enclose them in glasses.
For easier repairs, place pipes 20-25 mm from wall surfaces. When installing drain taps, create a slight slope in their direction. Pipes are attached to the walls with special clips, installing them on straight sections every 1.5-2 meters, as well as in all corner joints. Fittings, as well as tees, are used to combine pipes at angles.
When connecting pipes to the collector, shut-off valves are always installed (it is needed for repairs and the possibility of turning off water consumption).
Choosing the location of the bathroom in a village house
In order for a bathroom in a wooden house to be beautiful and functional, it is important to choose its location correctly.Since the supply and discharge of water is necessary for the normal functioning of the bathroom and toilet, the bathroom in a wooden house should be located close to the water source, and also have access to the sewer system.
Important: according to SNIP, the minimum distance from the house and cellar to the outdoor restroom should be at least 12 m, from the well to the sewer, or composting device - at least 8 m.
Approximate layout of a mansion on a suburban area
Choosing the best type of bathroom
The method of arranging the sewerage and toilet is determined by how much time per year it is planned to live in the cottage (permanently or seasonally). There are several types of toilets for country houses, or cottages:
dry closet - a compact portable device consisting of a toilet seat and a reservoir under it. The tank contains a special liquid that exposes human waste products to chemical or organic attack, turning them into water, powder, or compost.


Tip: the main disadvantage of dry closets is quick filling and the need to dispose of the contents of the tank.
Compact dry closet - a bathroom in the country, photo
backlash closet - a waste disposal system, which is an insulated restroom at the house, when the toilet is connected to a cesspool using a pipe system;
Note: an important design feature of the backlash closet is a ventilation system that prevents the accumulation of unpleasant odors in the room.
The design of the backlash closet - a bathroom in the country, photo
powder closet - a dry method of waste disposal, in which the toilet in the house is directly connected to a box-type cesspool. A periodic layer of waste is covered with peat to neutralize them. In this case, the tank box should be cleaned regularly.
The device powder-closet in a country house
Tip: with permanent residence in a country house, the backlash closet will be the most convenient and practical way to equip the toilet. The rest of the options are more suitable for occasional or seasonal use.
Determining the size of the bathroom
A bathroom in a private house can be organized in several ways:
- as a full-fledged bathroom (with a shower, a tank-bath and a toilet);
- like a toilet (only a toilet and a sink).
Recommendation: for the convenience of all the inhabitants of the house, there should be one bathroom per floor.
The dimensions of the bathroom in a private house directly depend on what kind of plumbing and household appliances it is planned to install there. If the hygienic room will include only a toilet bowl and a washbasin, then its area may be 2-3 square meters.
The layout of a small toilet in a private house
If it is planned to install a shower cabin in the bathroom, its optimal area should be 3-4 square meters. Corner plumbing will save space, but all appliances must be placed at a certain distance from each other so that they are convenient to use.
Planning options for a combined bathroom in a wooden house
If a bath, a washing machine, cabinets for storing various bath accessories are installed in the room, then the dimensions of the bathroom should be from 5 sq. m.
Options for how to rationally plan a bathroom in a private house, photo
Features of arranging a hygienic room in a wooden building
The device of a bathroom in a wooden house has some features. The linear dimensions of a wooden structure during shrinkage are constantly changing, this should be taken into account when building a bathroom and toilet. How to make a bathroom in a house from a bar?
For this, a sliding frame is used. The technology of erecting the base of a bathroom in a log house consists in installing metal or wooden profiles in vertical grooves of the logs, which will make it possible to rigidly fix the base of the bathroom structure. Overlappings are strengthened with the help of wide logs located at a minimum distance from each other. Then flexible water and sewer pipes are laid, electrical cables are routed, and at the end all communications are sewn up with plasterboard sheets, or clapboard.


Note: the use of a sliding frame in the construction of a bathroom allows the room to resist the shrinkage of the house without damaging the plumbing.
Arrangement of a bathroom on a sliding frame - a bathroom in a log house
This is interesting: Smart home will follow the garden
Installation of plumbing equipment and other components of the system
Before installing pipes, prepare their locations as much as possible. For the installation process, you will need scissors for trimming them, a tape measure and a welding soldering iron. It is recommended to free up space from unnecessary elements. It is mandatory to install rubber gaskets in the docking points. Their absence will lead to leaks. When installing, it should be noted that the slope of the pipes in relation to the main riser from the equipment should be within 3 cm per 1 m of the pipe.In cases where a tee system is used, each new branch requires installation of stainless steel taps.
Shower and bath installation
For the correct functioning of the shower cabin or bathtub, the following points should be considered during installation:
- Supply of electricity (with additional insulation from moisture), hot and cold water, sewerage;
- The outlet of the cabin sewerage according to the standard should not exceed 70 mm from the floor surface to the sewer pipe (if this parameter is exceeded, an additional installation of the podium should be carried out);
- Mandatory application of sealant to the joints.
- Drain installation involves the following processes:
- Connecting the drain hose of the cabin or bath to the sewer drain;
- Sealant treatment of joints;
- Installation of a sealing gasket in the drain hole;
- Silicone surface treatment.
- If there is a branch, a stainless steel faucet should be installed.
Installation of a sink, washbasin, washstand
What are the main points to consider when installing such equipment?
- The correct comparison of the size of the supply pipes and the location of the washbasin, sink or sink.
- Installation of stainless taps (if this element is included in the overall scheme of the system).
- Sealing works must be carried out exclusively on dry fittings (it is possible to use a household hair dryer).
- Avoid contact of hands with mating surfaces.
- Install paronite gaskets between the plastic parts and the metal conductive pipe.
- Trimming of standard fittings (a slight deviation during cutting will lead to leakage at the junction).
- Mandatory application of lubricant (silicone sealant) to gaskets.
- According to the recommendations of SNiP, the installation height of plumbing is 80-85 cm.
Recommendations for installing a toilet
Modern models of toilet bowls provide special holes for fixing the device to the floor surface. Equipment installation is carried out according to the following principle:
- Connecting the device to the sewerage using a corrugated outlet;
- Installing the corrugation seal on the outlet steamer of the toilet bowl;
- Sealing the joint between the toilet and the floor.
Connecting the water supply and sewerage requires the following steps:
- Connecting a flexible hose using a FUM tape;
- Installation of a stainless steel cut-off valve on the pipe;
- Fixing the outlet pipe into the socket of the sewer pipe.
Sewer installation
Sewer pipes are connected to the fitting with a hermetic rubber band. The percentage of the slope is from two to fifteen units - the difference between the end at the beginning and end of the pipe should be from 2 to 15 cm. When changing the direction of the sewer, the degree of turn should be made greater than the direct one. Pipes providing connection to the riser must be connected at an angle of less than 45°.
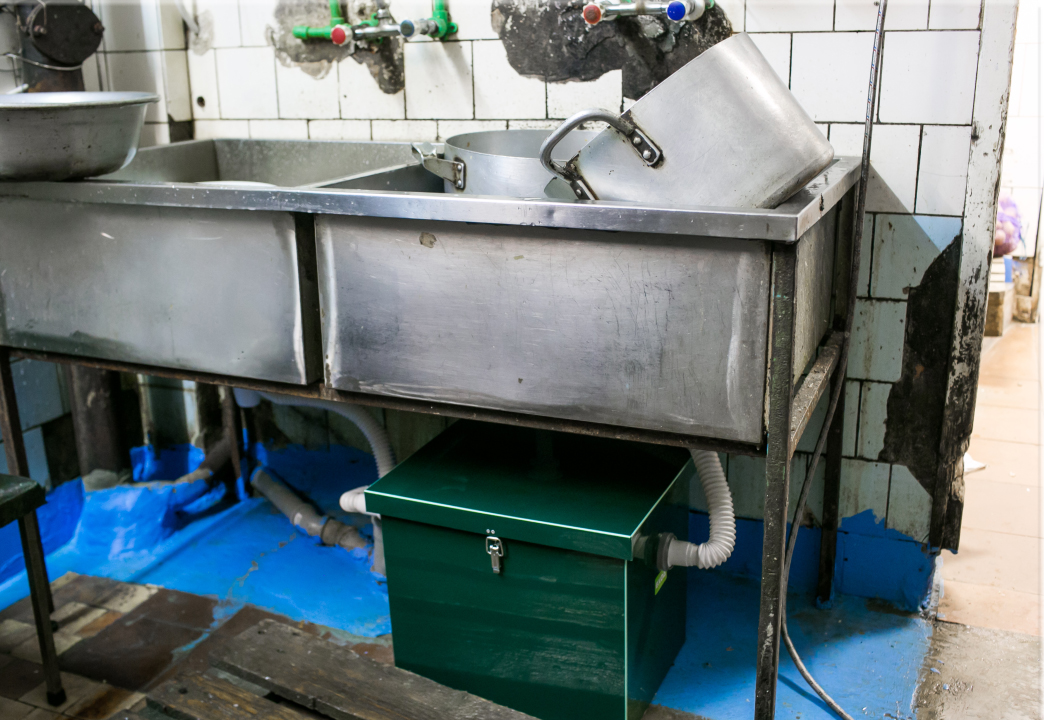
Installation of a washing machine, dishwasher and other similar equipment
Installation of plumbing fixtures such as washing machines, dishwashers, etc. requires compliance with the following requirements:
- In the absence of a check valve, they are not installed without taking into account the level limit (outlet hose location) - the manufacturer specifies this parameter on an individual basis.
- Mandatory installation of a siphon to prevent leaks.
- Provision of stationary water drainage.
- The equipment is connected to the plumbing system using 3/4 inch hoses.Additionally, rubber gaskets should be installed.