- Ways of laying wires and cables
- As it was before
- The procedure for performing work with electrical wiring
- Stage # 1 - connecting apartment outlets
- Stage # 2 - installation of apartment lighting switches
- Stage #3 - work at the meter installation site
- How many phases to bring into the house
- DIY wiring photo
- Drawing a diagram - lighting part
- Wire Connection Rules
- Electrical Wiring Rules
- Wire Selection Guidelines
- Assembly of the switchboard and "ringing" electrical wiring
- Drawing up an electrical project of sockets
- Practical division of electrical wiring into groups
- Installation of hidden electrical wiring
- Conclusion on the topic
Ways of laying wires and cables
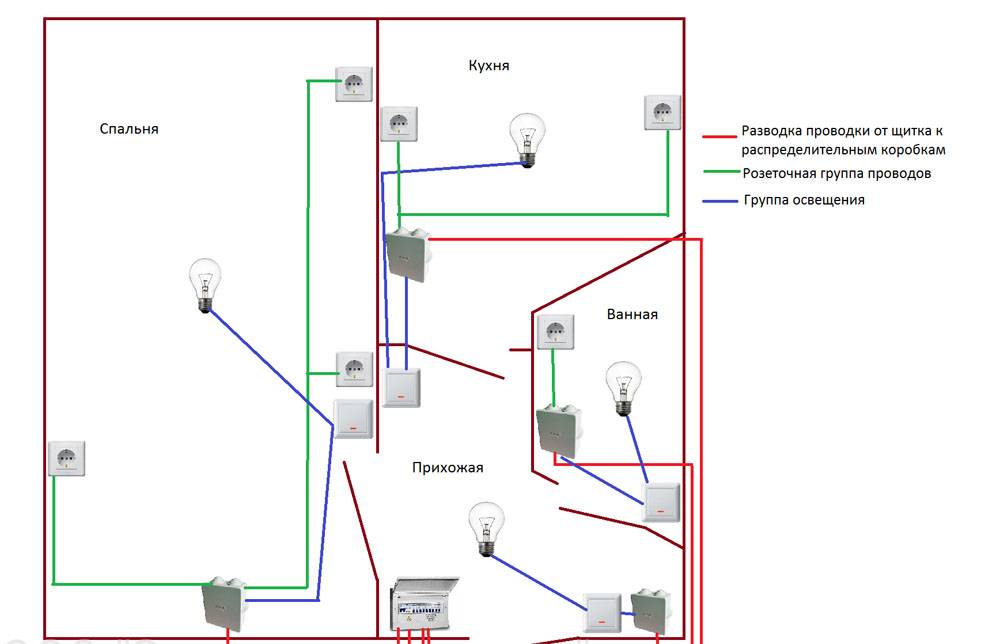
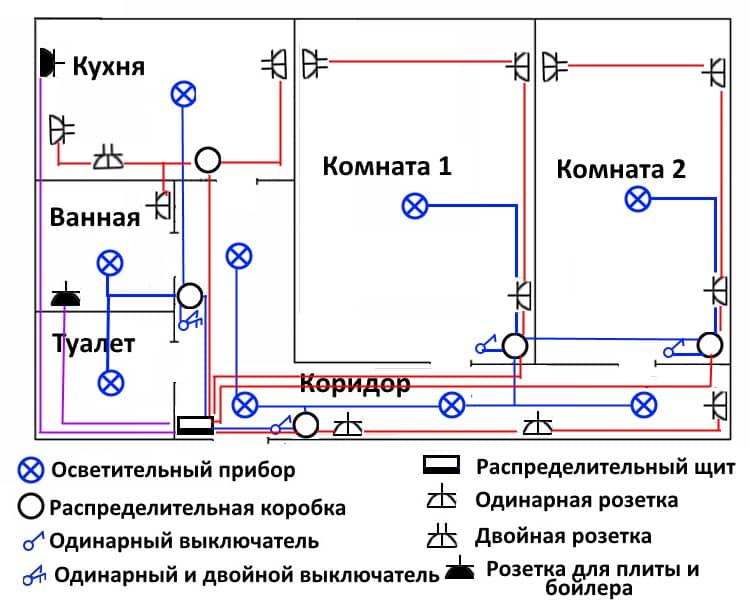
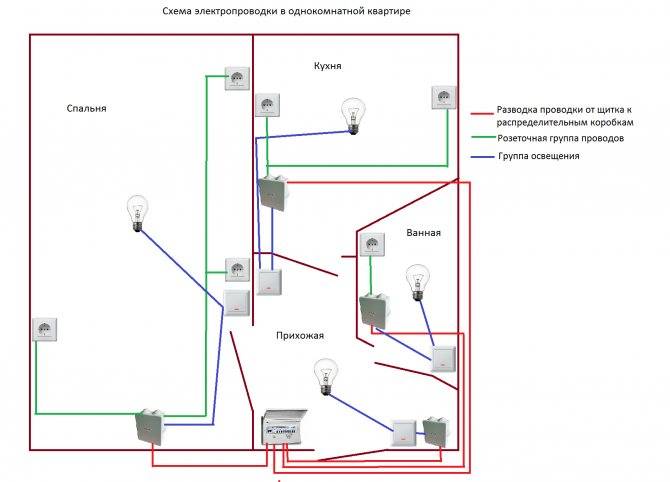
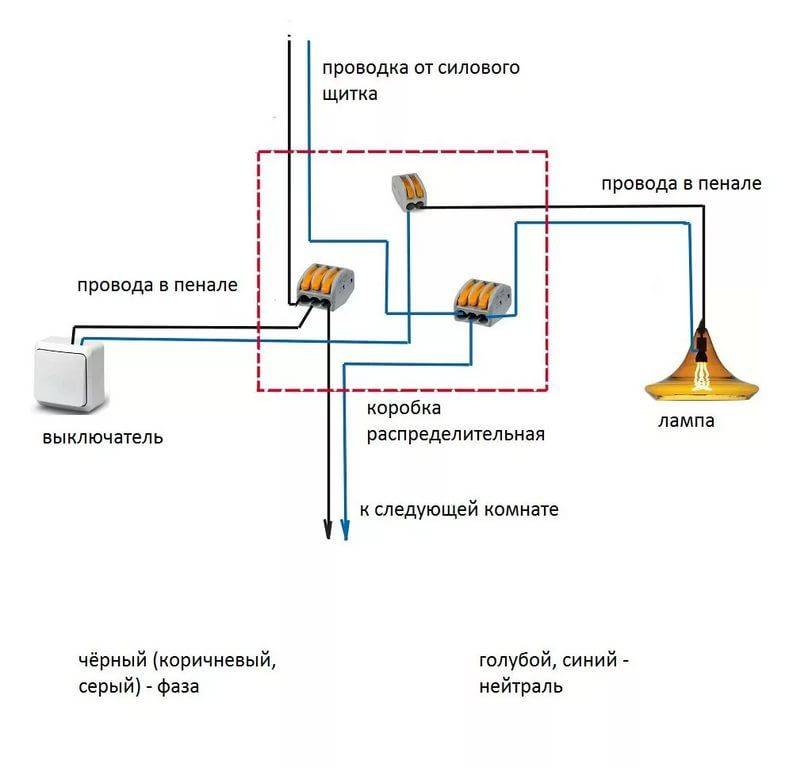
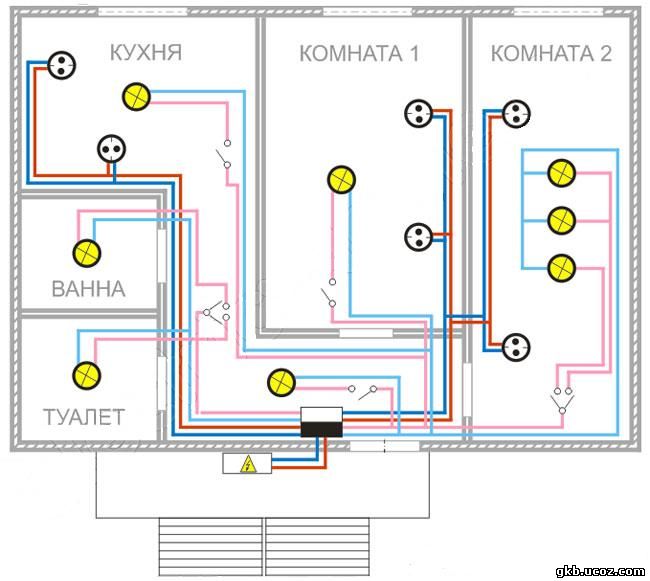
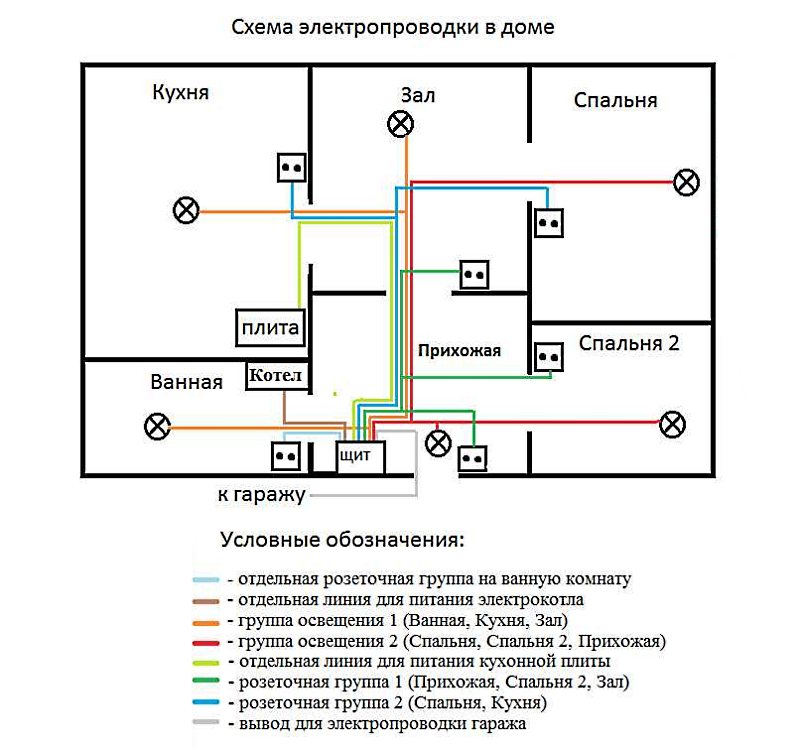
Here, our wiring diagram takes on a certain shape. The diagram already has markings for lighting devices, sockets and switches, now it is only necessary to separate and connect all these elements with an electric cable or wiring.

This stage is the most important in the process of cabling indoors, it is on this that the performance of the electrical network in the room largely depends.

It should be noted that it is recommended to wire the network along the shortest paths, this must be done to save wires.
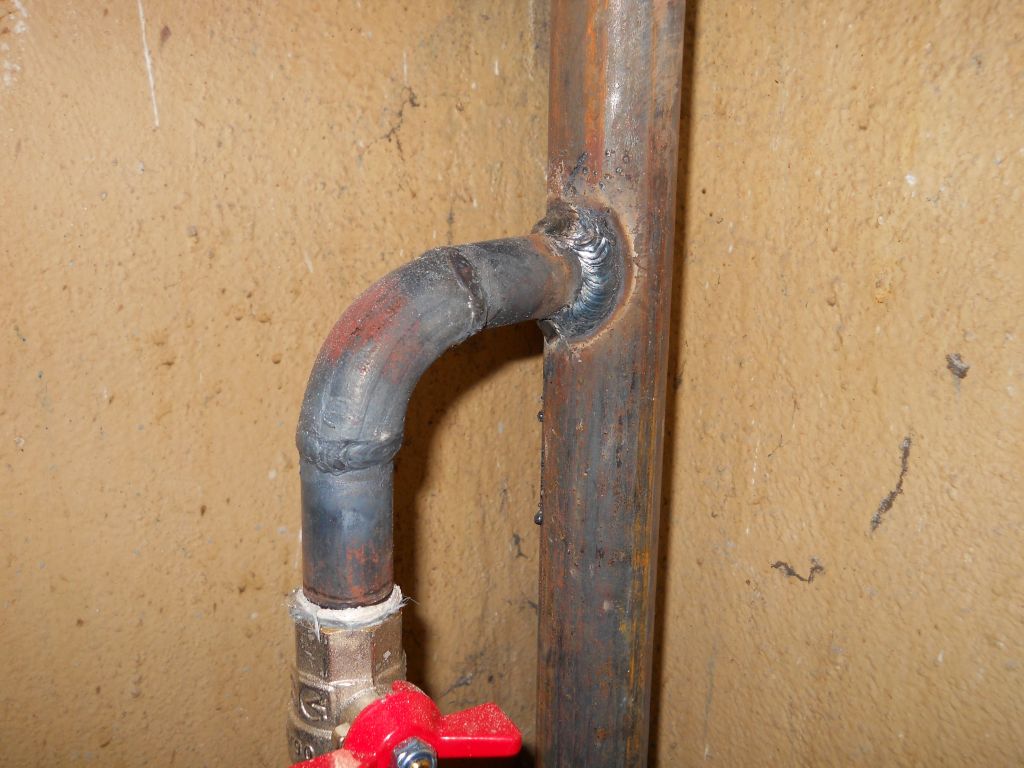
The wiring of the wires themselves can have two options.The first is when all the wires are laid along the wall strobes inside the walls, and the second option is when the cable is laid in a special box that is mounted outside the wall.

It is also necessary to install junction boxes that distribute the wires around the room. If, in the room there is a need to conduct grounding, then in this case it is necessary to use wires for three cores.


The power supply in the room is very important and of great importance, which is mainly performed by two types of wires. The first is a power cable capable of withstanding high voltages in the mains, and the second is a standard cable that can be used for lighting. So, this article describes the specific steps for drawing up a wiring diagram for a do-it-yourself connection.
It is not so difficult to draw up such a circuit, as it seems at first glance, almost everyone who understands at least a little in electrics will cope with such work.
So, this article describes the specific steps for drawing up a wiring diagram for connecting with your own hands. It is not so difficult to draw up such a circuit, as it seems at first glance, almost everyone who understands at least a little in electrics will cope with such work.
Also in the article there are various photo wiring diagrams that will help anyone who wants to understand at each stage of work.
Therefore, there should be no certain difficulties in drawing up a wiring diagram. With a clear and correct observance of all the recommendations, you will succeed!

As it was before
During the times of socialist management, electrical wiring in apartments was uncomplicated.Firstly, they did not hear about copper cables at that time, the wiring was made of aluminum wire with one layer of insulation. The input wire was connected to the input bag, and from it the wire was routed through the rooms.


And if an electric hob was used in the apartment, then the wire cross section was 4 mm², if the stove was gas, then the cable cross section was 2.5 mm². And this is for the whole apartment, which today, of course, is unacceptable.
By the way, with regard to the groups of the electrical circuit, they could be different and most often combined. For example, a kitchen, a corridor, a bathroom, a toilet and even a hallway were closed on one loop. At the same time, the division into lighting and sockets was not carried out. Of course, in those distant times, when the number of household appliances was reduced only to a TV, a refrigerator and an iron, this was enough. That is, the electrical wiring diagram withstood the loads from these devices without problems.
By the way, this type of wiring is not uncommon today, where an aluminum wire with a cross section of 2.5 mm² is used, connected in a switchboard with 16 A automatic machines. True, modern operating rules do not approve of such a combination. And the point here is not that aluminum wires with a single layer of insulation have low safety, and not even that their cross section is too small for modern loads. The thing is that the rules prohibit the division of trains into rooms, they must be divided into groups of consumers. That is, the lighting is separate, the sockets are separate, if there are stationary receivers in the apartment (an electric hob, for example) separately.
The procedure for performing work with electrical wiring
It is recommended to start work on the installation of electrical installation products and connection of terminal nodes from the point farthest from the central junction box.
As a rule, such a point is the electrical outlet (s) of the farthest room.
Work on connecting apartment electrical outlets traditionally starts from the outlets of the most remote room. Modern installation requirements of such electrical installation products require a three-wire configuration
Stage # 1 - connecting apartment outlets
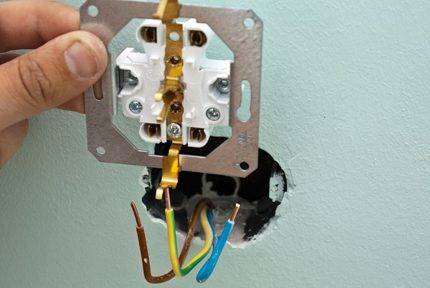
The outlet terminals are connected to the conductors of the electric line (phase - zero), plus, according to the rules, each of the outlets must be connected to the ground terminal to the ground conductor.
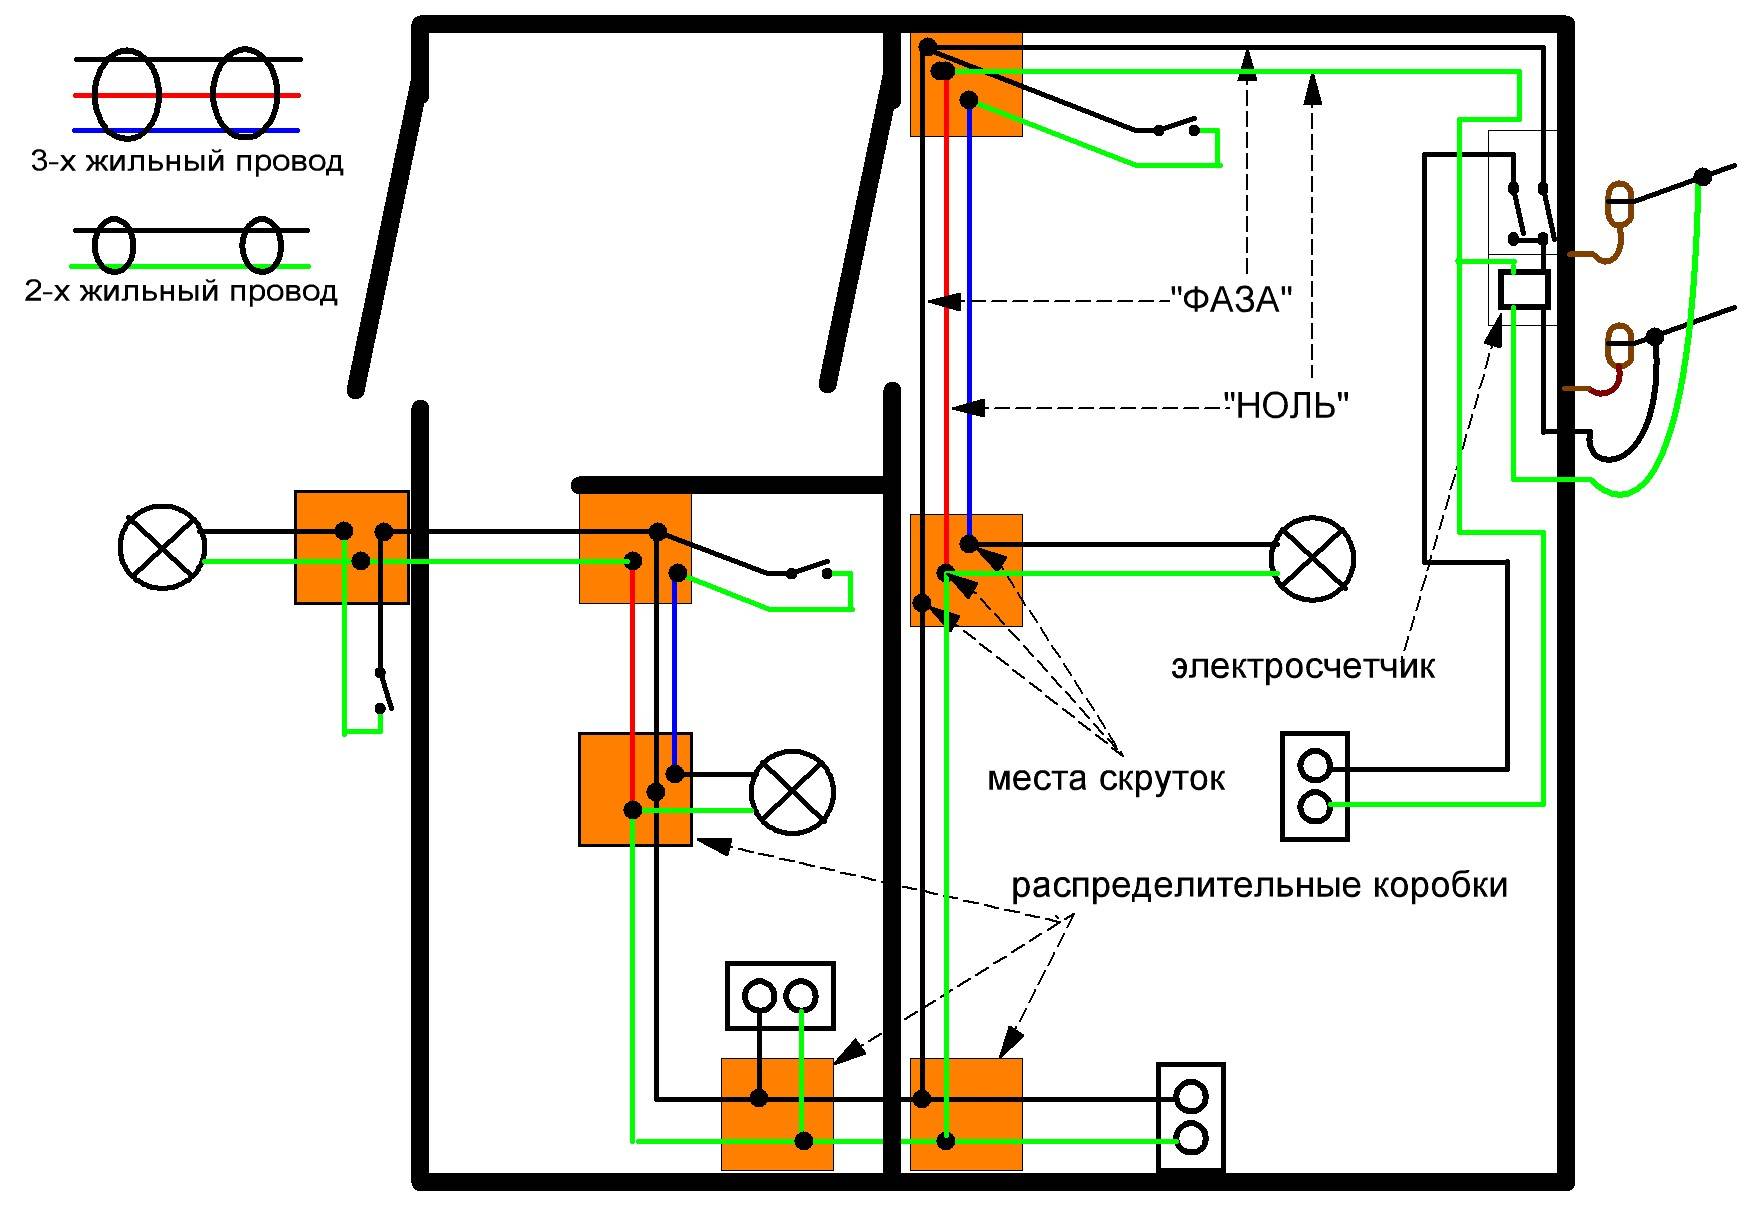
Conductors - phase, zero, ground, as a rule, differ in color:
- phase - brown;
- zero - blue;
- earth is yellow-green.
In addition, the ground conductor, again according to the rules, always has an increased diameter in relation to the other two conductors.
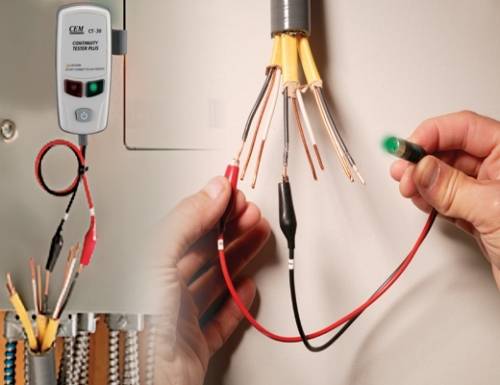
After completing the installation and connection, you should check the integrity of the lines of the current section of the apartment wiring using an electrician's tester.
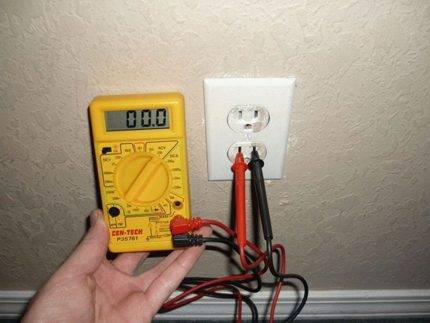
Testing of the connected terminal points by means of a test instrument. The check is simple - through the resistance measurement function for a "short circuit" of the circuit
To run a test:
- At the other end of the channel in the junction box, connect the phase and neutral wires together.
- Connect the probes of the measuring device, which is connected to the measurement of resistance, to the socket.
- Verify that the tester indicates "short circuit".
A similar check is also made for the ground line by connecting it to any of the line wires. At the same time, one of the probes of the device is moved to the ground bus.
Thus, moving closer to the main input point, all socket terminals included in the apartment circuit are switched off in sequence.
In this case, after testing each of the two sections, wire connections are made inside the junction boxes. Having completed work with sockets, they move on to switches - communication devices.
Stage # 2 - installation of apartment lighting switches
This type of installation as a whole is not much different from work with apartment sockets. However, its technical points when installing a light switch.
So, if the sockets provide for direct parallel connection to the circuit, the switch circuit forms a circuit break through one wire (phase) - that is, switching in series.
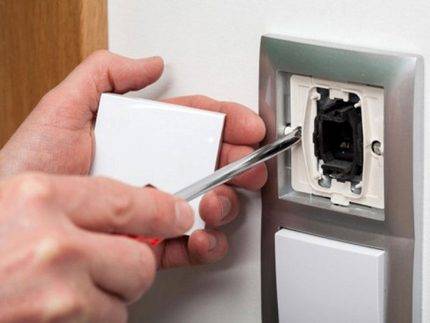
An example of a switching unit device, consisting of two switches of the same type (single) design. Typically, this arrangement of devices is typical for the bathroom of an apartment.
Switches are also mounted in wall panel niches, but it is taken into account that each communication device works with a specific lighting device. From here, the execution of the switch is selected - a single key, two keys.


The operation of residential wiring switches is also recommended to be tested. This is done simply. The conductors intended for the lighting device are connected to the tester in the resistance measurement mode, after which the key is manipulated.
In the closed state, the tester will show a "short circuit", in the open state - no contact.
Part of the circuit with switches and lamps also involves the presence of junction boxes, where, after testing individual sections, connections are made to the rest of the wiring.
Stage #3 - work at the meter installation site
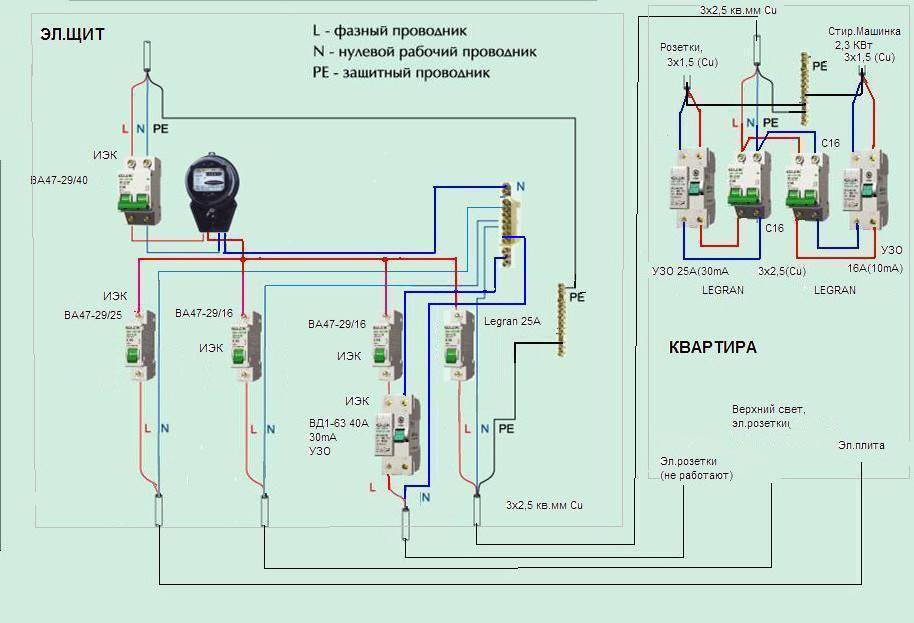
Most of the installation options provide for the installation of an electricity meter inside the apartment. Usually this control device is mounted in close proximity to the point of entry of conductors emanating from the shield.
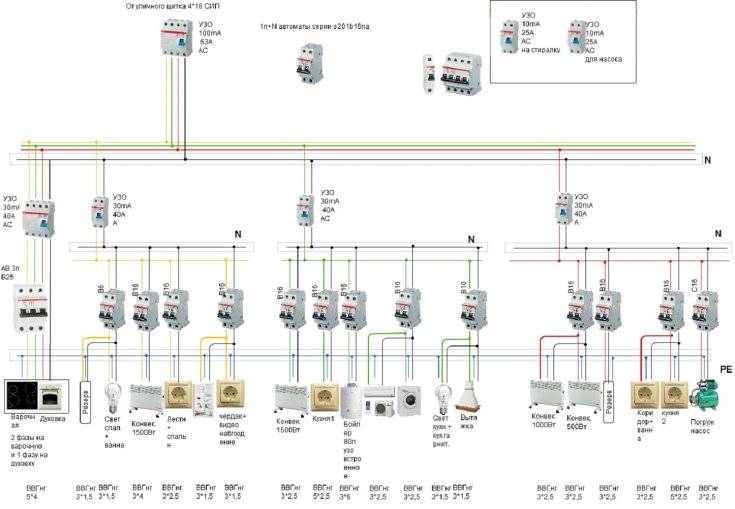
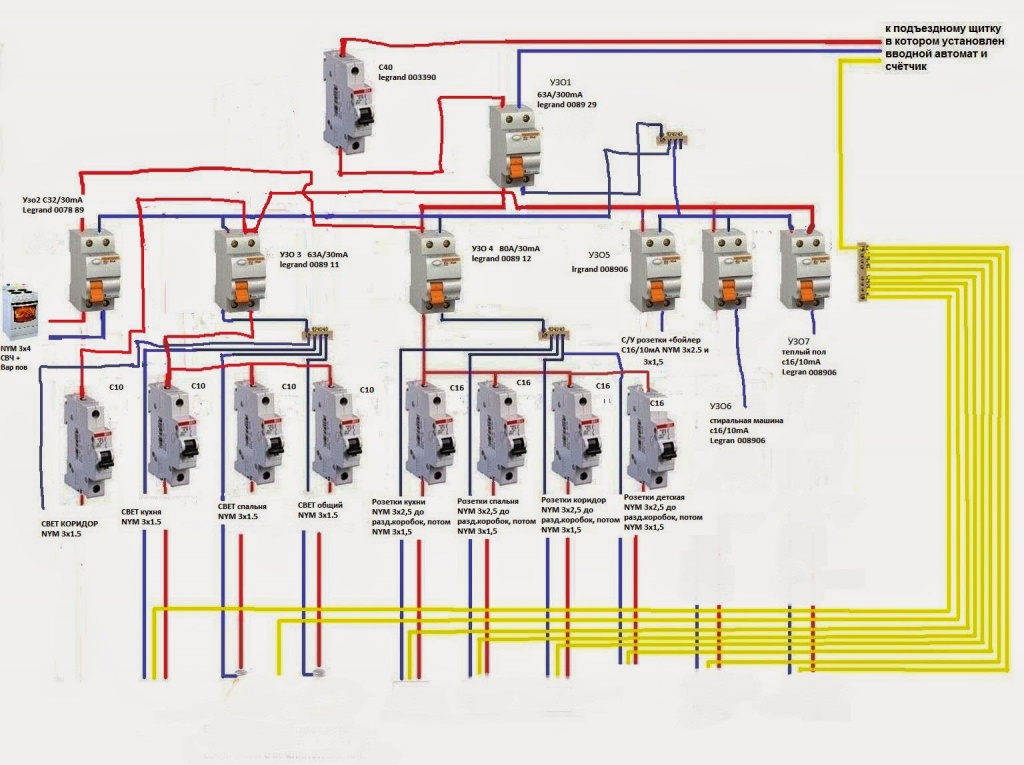
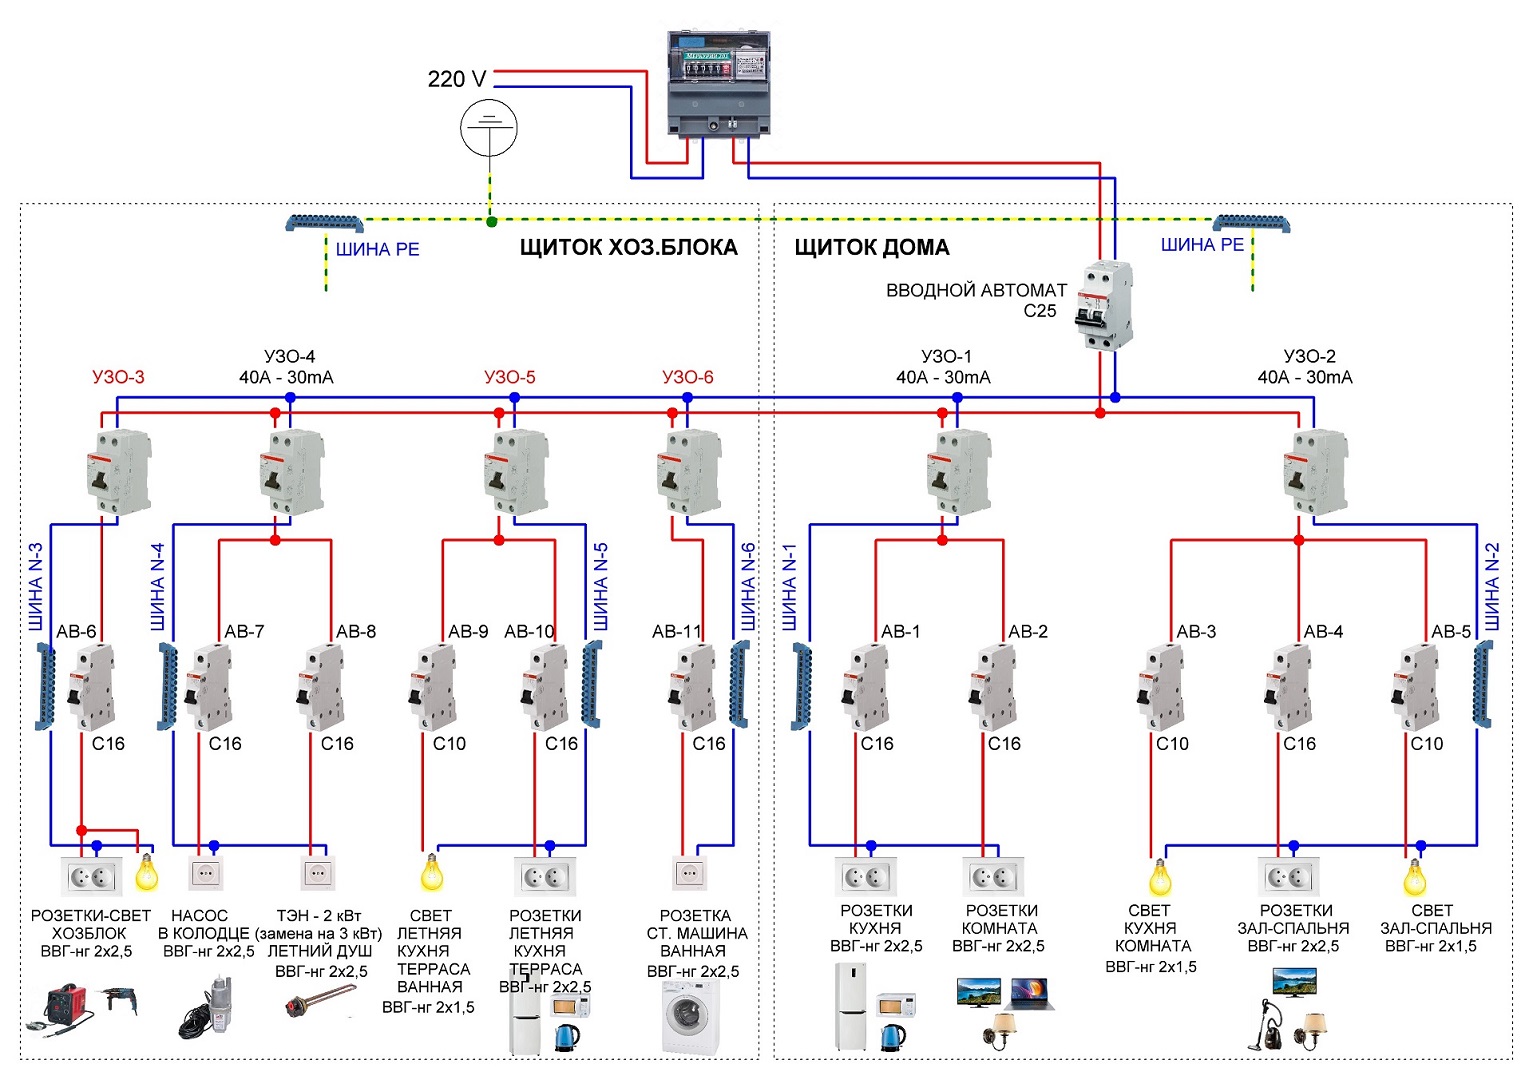
This requires the installation of not only the meter itself, but also the installation of circuit breakers calculated according to the load - theoretically, switching each functional section of the apartment wiring, as in the example below:
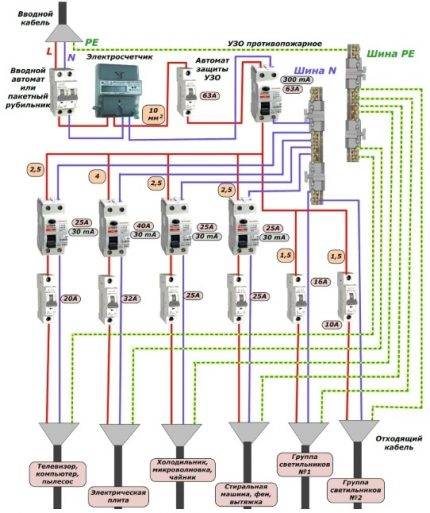 Scheme of effectively protected apartment wiring by installing circuit breakers on each individual segment (+)
Such a scheme ensures the reliable functioning of the electrical wiring in the apartment, allows you to eliminate possible malfunctions without removing the voltage on the entire home network.
In addition, it becomes convenient to test the apartment wiring when it is first turned on, sequentially including each individual segment.
How many phases to bring into the house
It is permissible to start one phase (220V) or three phases (380V) into a private house, while the consumption rates for single-phase consumers are from 10 to 15 kW, and for three-phase consumers - 15 kW.
 Three-phase input is needed only when you need to connect powerful equipment powered by 380 V
For ignorant people it may seem that there is not much difference, but in fact the difference is quite significant.A three-phase network will be needed only if it is planned to install powerful electrical consumers, such as 3-phase stoves or heating boilers (electric). Otherwise, there is no need for a 3-phase network in the house, since almost all household consumers are designed to work on a 220V network. In addition, 380V is much more dangerous than 220V, so using 380V in a private house cannot be called a reasonable decision, and it is unlikely that you will be able to get permission if there are no good reasons.
DIY wiring photo


We also recommend viewing:
- Do-it-yourself siding installation
- Warm floor do it yourself
- Bath with your own hands
- Do-it-yourself self-leveling floor
- DIY decorative putty
- Do-it-yourself toilet installation
- Do-it-yourself fence posts
- Do-it-yourself stretch ceiling
- Do-it-yourself ceiling lighting
- Do-it-yourself warming of the loggia
- DIY partition
- DIY wooden floor
- Do-it-yourself slopes
- How to make DIY paint
- DIY bricklaying
- DIY decorative plaster
- Do-it-yourself fence from corrugated board
- DIY fireplace
- Do-it-yourself home insulation and the main methods of thermal insulation
- mesh fence
- Do-it-yourself installation of plastic windows
- Do-it-yourself interior decoration
- DIY fence
- How to make a balcony with your own hands
- Do-it-yourself oven
- Do-it-yourself door
- DIY gazebo
- Pour concrete with your own hands
- Do-it-yourself formwork
- DIY liquid wallpaper
- Do-it-yourself floor screed
- Do-it-yourself foundation
- DIY frame house
- Hallway with your own hands
- Do-it-yourself ventilation
- Do-it-yourself wallpapering
- DIY concrete ring
- Do-it-yourself roof
- Do-it-yourself laminate flooring
- Staircase to the second floor with your own hands
- Do-it-yourself blind area
- DIY bathroom renovation
- Do-it-yourself polycarbonate
- Do-it-yourself door installation
- Do-it-yourself drywall
- Do-it-yourself arch
- Sheathe clapboard with your own hands
- DIY house project
- DIY gate
- DIY shower cabin
- Do-it-yourself tile laying
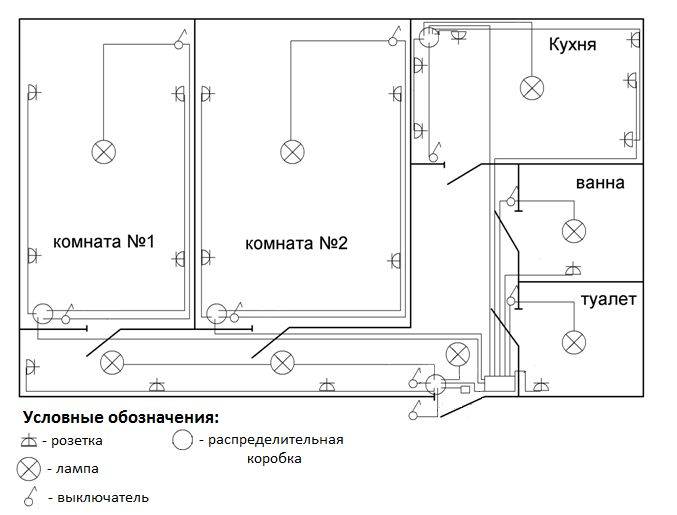
Drawing a diagram - lighting part
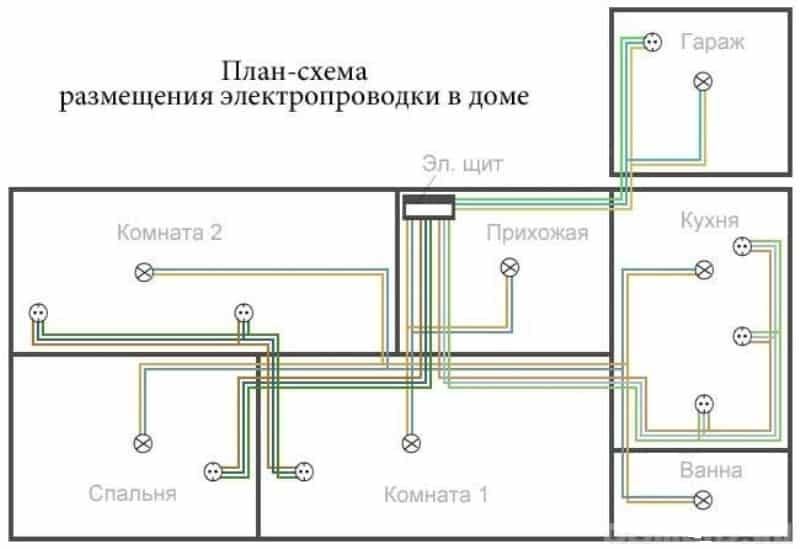
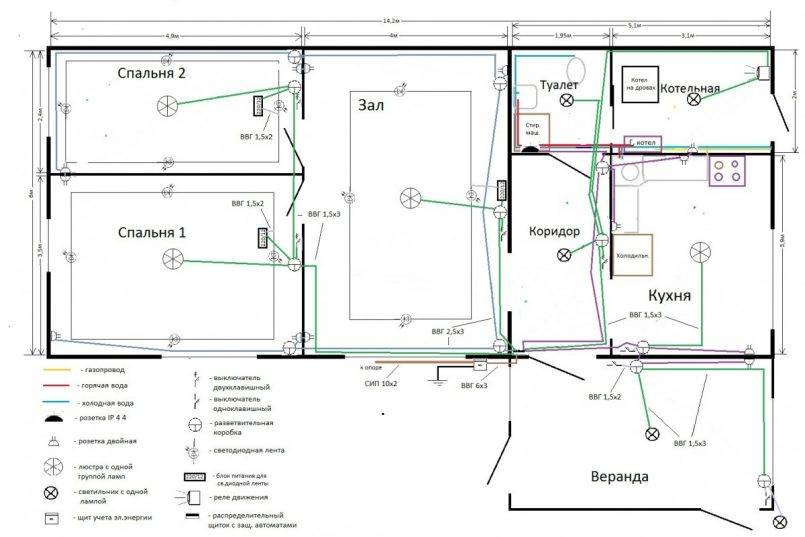
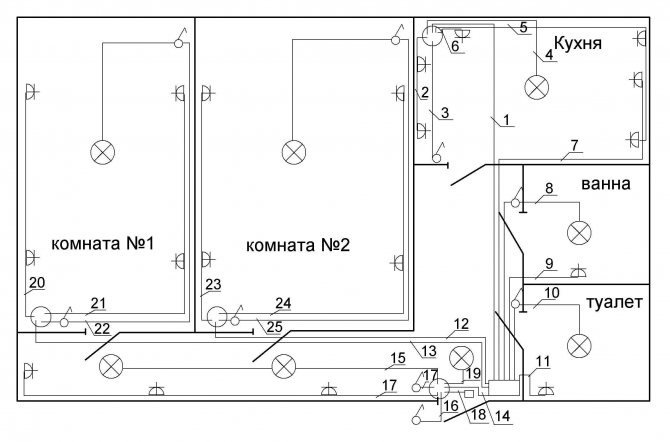
In our example, all chandeliers and lamps will be located in the center of the room. Let's start drawing, from the room, number 1 is the hall. The coordinates of the location of the fixtures, the length and width, if available, the exact dimensions of the room, you can specify immediately. For our example, there are no specific dimensions, so we will perform all the necessary measurements during the first stage of installation - marking. For example, I'll show you how to find the center of the room. First, we measure the width of the room, divide the resulting value in half. For example, if the width turned out to be 4 meters, we divide it in half, 4: 2 \u003d 2, it turns out 2 meters. 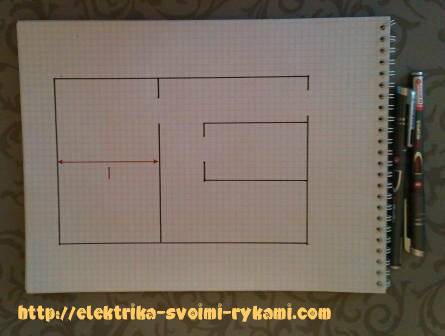 Now, we measure the length of the room and also divide it in half. For example, 6 meters long, divide in half, 6: 2 \u003d 3, it turned out 3 meters. We know the coordinates of the middle. According to the given values, mark the center of the room. I marked it with a cross.
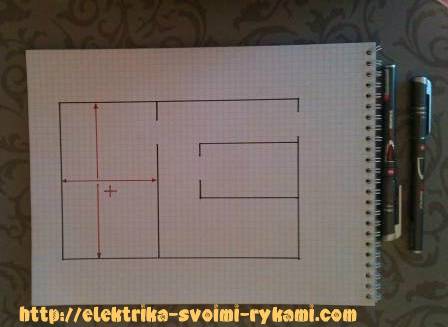 Similarly, we mark all other rooms.
 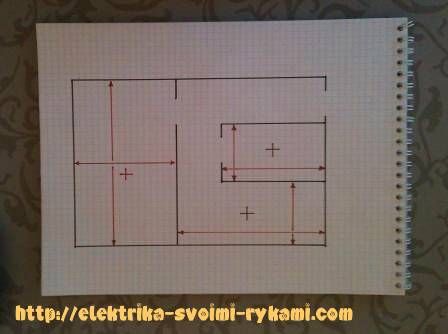 Г - shaped room, at number 4 (entrance hall), we divide into two parts and also mark it.
  Now, we replace the crosses with the symbols of the fixtures and get just such a picture.
 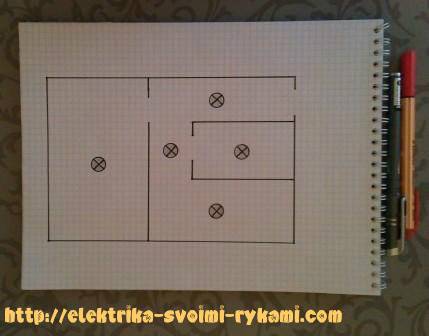 To complete our circuit, we need to draw the switches. To do this, we again need to think and decide, this time, with interior doors. Namely, on which side they will open, to the left or to the right, and where, inward or outward.This is done so that some kind of switch does not turn out accidentally outside the door when the repair is completely ready. Usually, opening doors is done in the smallest angle. Here, the usefulness of the place on the left and right is taken into account, but we also do not forget about the furniture, the door should not rest against it. So, we decided on the doors.
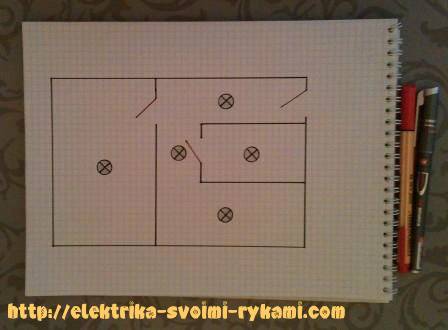 Now, we can draw the switches. As a rule, switches are located inside the rooms. So that when you open the door and enter the room, you can immediately turn on the light, and turn it off when you leave. The control of the light of a particular room will be completely in the hands of the one who is in it. They went to bed, turned off the light, and there was no need to leave the room. Comfortable. The exception is damp and damp rooms, such as bathrooms and toilets. Here, the switches are taken out, as the constant ingress of moisture into the switch will lead to its rapid failure.
We draw switches on the diagram using symbols. Before starting the installation of electrical wiring, it will be necessary to indicate on the diagram the specific dimensions of the switches, the height and indent from the edge of the door.
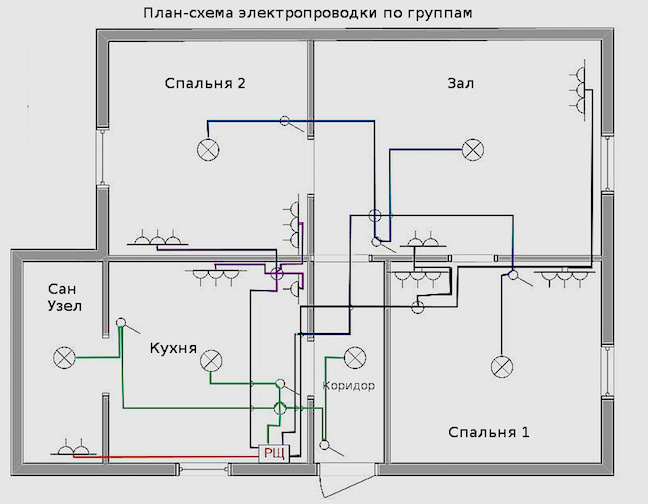
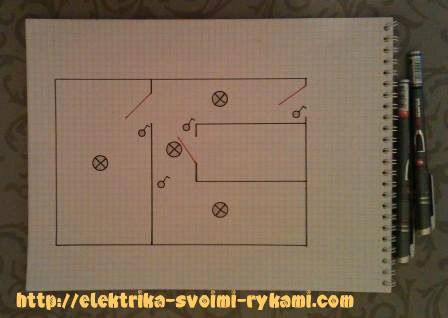 So, in the end we got two pictures:
- socket layout
- diagram of lamps and switches
The first stage has been completed. As a result, we have the first and main part of the electrical circuit.
Wire Connection Rules
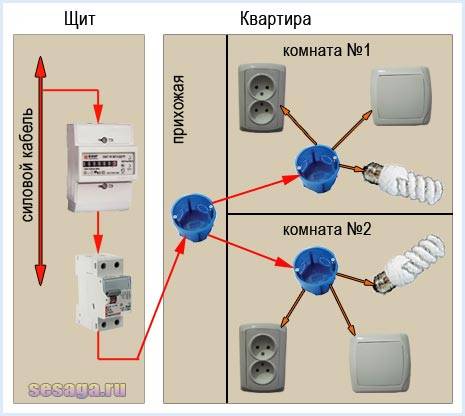
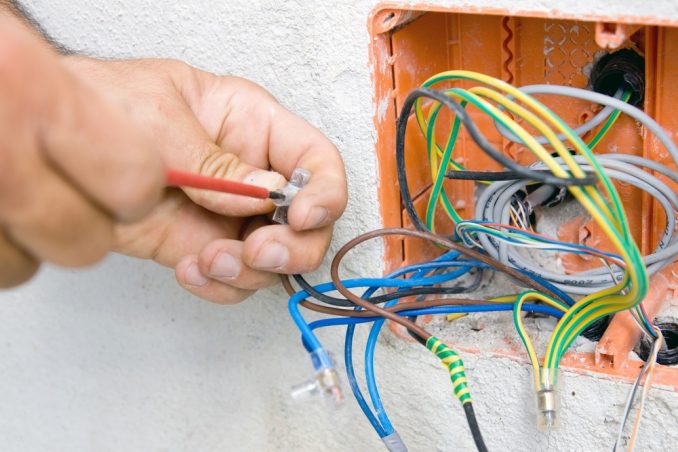
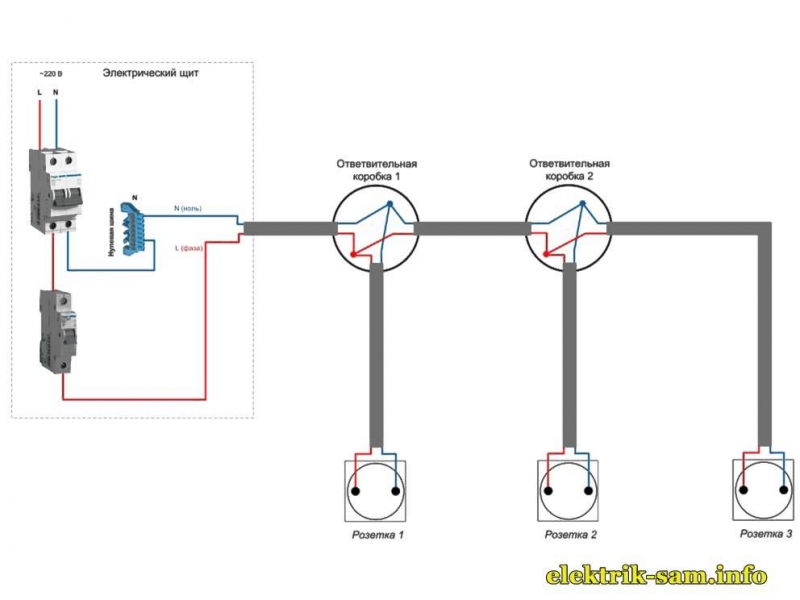
The practical point is the connection of wires. It is carried out either through junction / mounting boxes or directly, using terminals or twisting.
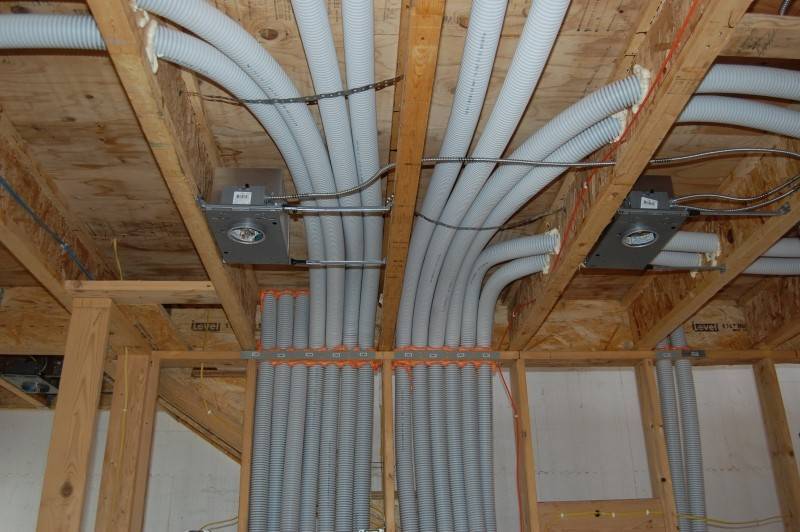
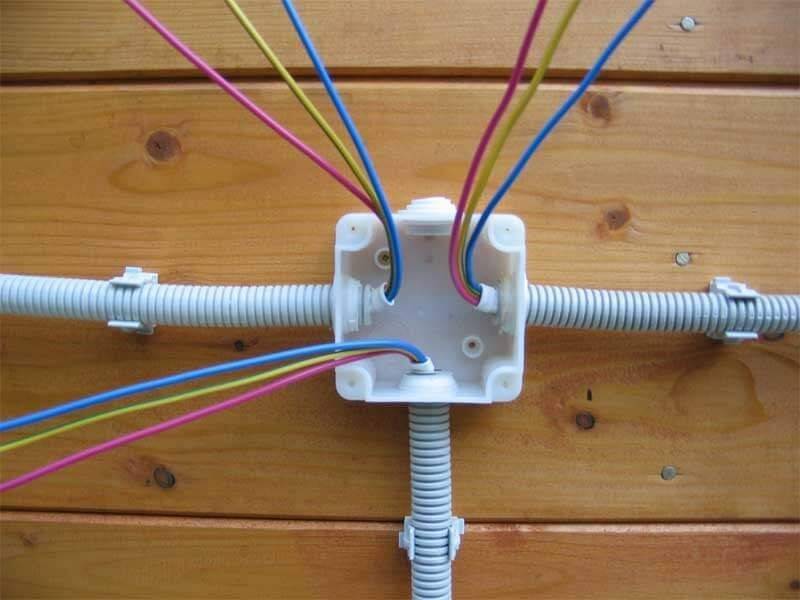
 The layout of junction boxes at the intersections of horizontally and vertically laid wires.The purpose of the RC is to combine consumers into groups or separate lines. This allows more economical use of the cable and simplifies the installation process.
Hiding junction boxes under plaster or wallpaper is risky - you will have to remove the cladding for repairs. In this regard, some electricians implement a different way of connecting wires - with mounting boxes for sockets and switches.
The advantage of this method is the free access to the connections, the minus is the increased consumption of cables.
To connect the wires in the socket line, heat shrink is used, for the installation of the lighting network - Wago terminals with a spring mechanism.
In addition, many use terminal blocks, crimping, and traditional soldering.
Consider the procedure for crimping with sleeves:
This is one of the simplest and most effective ways to do your own wiring, for which you need press tongs, sleeves to size, a torch and heat shrink material.
We examined a detailed analysis of the methods of connecting wires here.
Electrical Wiring Rules
So, correctly carried out electrical installation work depends on the fulfillment of the requirement of one document - these are the "Electrical Installation Rules" or, in short, the PUE. In fact, this is a step-by-step instruction for use. In this document, everything is laid out on the shelves. Which of these rules will help to properly install the wiring in a private house with your own hands?
- All wiring elements must be accessible, regardless of their installation location. These elements include sockets, switches, junction boxes, meters.
- Sockets are installed at a height of 50-80 cm from the floor surface. The distance from the hobs and heating radiators is half a meter.The number of sockets is determined by the area of the room. One outlet per 6 m². In the kitchen, the quantity is determined by the need for these devices. They are not mounted in the toilet, moisture-proof samples are installed in the bathroom.
- Switches must be mounted at a height of 60-150 cm, while taking into account the width of the door leaf. It should not cover the switch. Usually if the door opens to the left. The switch is installed on the right side of the entrance.
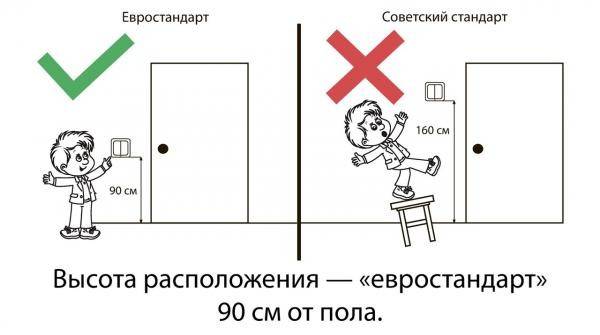
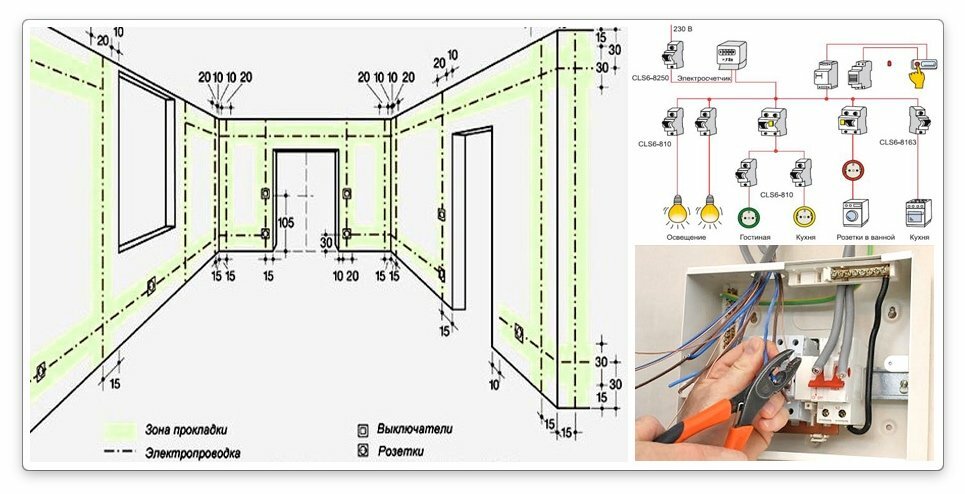
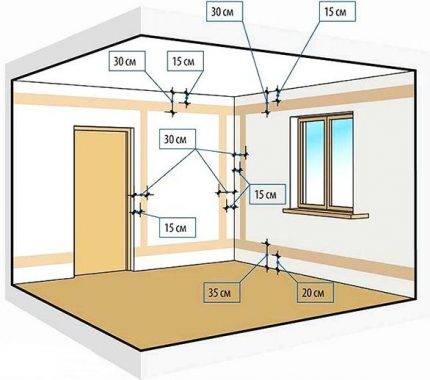
Mounting height of switches
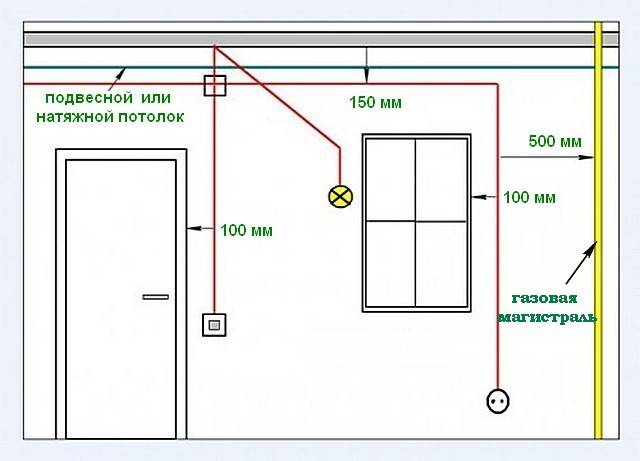
- Wires can only be laid horizontally or vertically. In this case, there are certain distances from adjacent surfaces, pipes or supporting structures. For horizontal contours - 5-10 cm from the floor beams, or 15 cm from the base surface of the ceiling. From the floor in the range from 15 to 20 cm. Vertical contours: from window and door openings not less than 10 cm, from gas pipes - 40 cm.
- Regardless of what kind of wiring will be laid (hidden or open), it is necessary to ensure that the cable does not press against the metal parts of the structure.
- If several wires are laid along one circuit at once, then it is contraindicated to press them against each other. The minimum distance is 3 mm between them. It is better to lay each cable in a corrugation or box.
- It is forbidden to connect aluminum and copper wire to each other.
- Grounding and grounding loops are connected only with bolted fasteners.
As you can see, the rules are not very complicated, so doing the wiring correctly with your own hands will not be difficult.
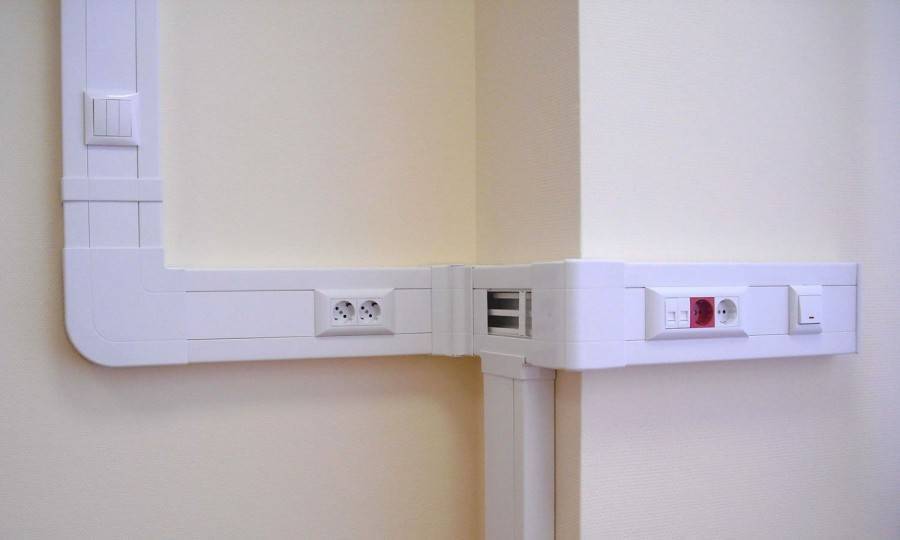
open wiring
Wire Selection Guidelines
In houses made of bricks, aerated concrete blocks, cinder blocks, interior wall decoration is necessary, which means that a hidden method is used to lay wires.
To provide additional protection, and in case of repair to quickly replace the cable, it is placed in a corrugated sleeve of a non-combustible polymer.
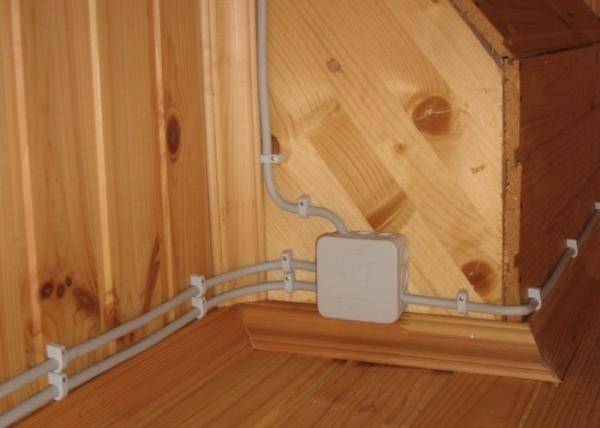
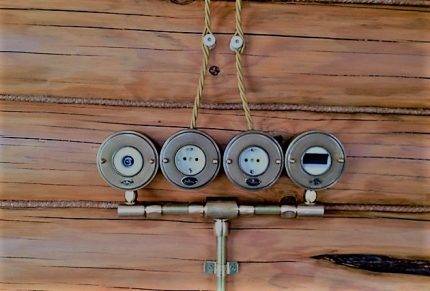 In houses made of timber or logs, to preserve the retro style, they use the open method of laying wires, purchasing decorative products - twisted wiring, rollers, stylized switches and sockets
To choose the right wire cross-section, experts make calculations related to determining the load.
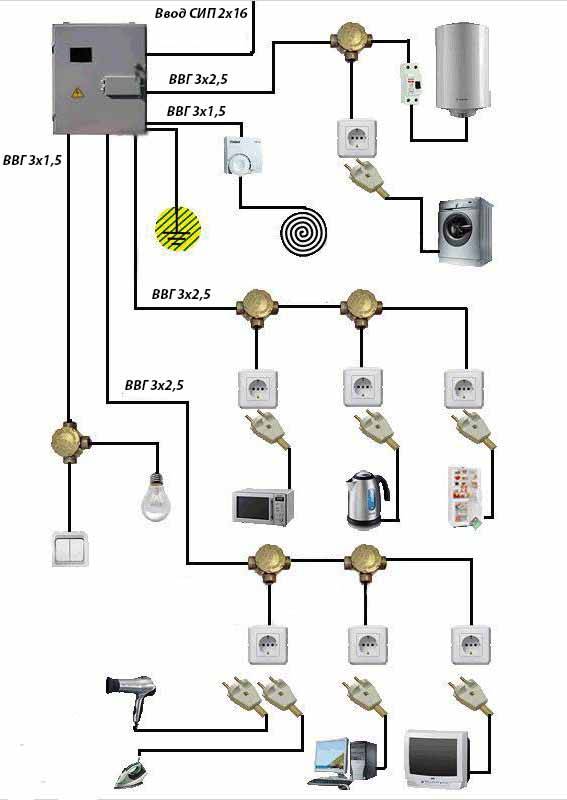
However, based on typical diagrams and many years of experience, qualified electricians adhere to the following parameters:
- lighting circuits - 3 * 1.5 mm² or 3 * 2 mm²;
- socket groups - 3 * 2.5 mm²;
- electric stove / oven - 3 * 4 mm²;
- air conditioning - 3 * 2.5 mm², for appliances devices more powerful than 5 kW - 3 * 4 mm²;
- heating boilers - 3 * 4 mm² or more (according to the manufacturer's recommendations).
The optimal type of cable is a copper three-core: VVGng, ShVVPng. Do not use wires with a cross section smaller than the specified one, as they will not correspond to the load and will begin to melt, creating a dangerous situation.


Assembly of the switchboard and "ringing" electrical wiring
First of all, the shield itself is purchased:
- outdoor version - easy to install, but requires space;
- internal type - more aesthetic and compact, but installed in a niche.
Then the shield is installed in the apartment, most often in the hallway, after which all circuit breakers of the wiring lines in the apartment are assembled and mounted in it. It is not recommended to place more than one line on one machine.
All wiring lines are “ringed” from node to node, after which they are brought to the shield and connected to the machines.
At the end of the connection with the machines of all lines, one common cable with a cross section of at least 6 mm2 is diverted from the switchboard to the access shield.
Drawing up an electrical project of sockets
On a clean plan of the apartment, apply all the planned sockets. For now, we do not connect them with lines, but simply apply (schematically) the planned sockets.
Next, the sockets need to be divided into group circuits (groups). You can calculate the wiring and break it into groups theoretically. But you can use the practical rules for dividing wiring into groups.
Practical division of electrical wiring into groups
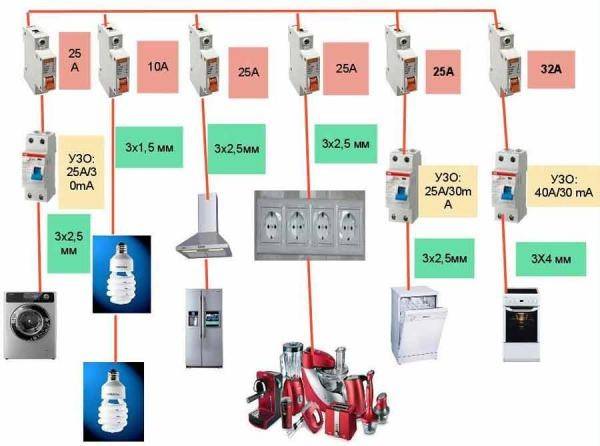
- The total power of one group of sockets should not exceed 4300 W. Such a total power will allow you to power the group with a 3 × 2.5 mm² cable (copper). The wiring of each such group should be protected by a 25 Amp circuit breaker or a 20 Amp fuse.
- For the electric stove, plan a separate power line, 3×6mm² (with a stove power up to 7300W), you need to protect the line for the stove with a 40 Amp circuit breaker or a 32 Amp fuse. If the stove has a lower power, then a cable of 3x4 mm² is sufficient.
- Considering all the above rules, the sockets marked on the plan are connected into groups. Records are written on the plan about circuit breakers, for example, group 1 - 25 Amperes - cable 3 × 2.5 mm², brand VVGng.
If the number of outlets in the apartment is small, and the outlets of different rooms fall into the same group, then it is necessary to plan the installation of a junction box between the rooms. This only changes the type of wiring, but does not change the principle of drawing up an electrical project.
Installation of hidden electrical wiring
Hidden wiring is quite simple. A significant difference from the open one is only in the way the wires are hidden from the eyes. The rest of the steps are almost the same. First install lighting panel and RCDs, after which we start and connect the input cable from the side of the switchboard. We also leave it unconnected. This will be done by an electrician.
Next, we install distribution boxes and socket boxes inside the niches made.
Now let's move on to the wiring. We are the first to lay the main line from the VVG-3 * 2.5 wire. If it was planned, then we lay the wires to the sockets in the floor. To do this, we put the VVG-3 * 2.5 wire into a pipe for electrical wiring or a special corrugation and lay it to the point where the wire is output to the sockets. There we place the wire inside the strobe and put it into the socket. The next step will be laying the VVG-3 * 1.5 wire from switches and lighting points to junction boxes, where they are connected to
main wire. We isolate all connections with PPE or electrical tape.
At the end, we “ring” the entire network with the help of a tester for possible errors and connect it to the lighting panel. The connection method is similar to that described for open wiring. Upon completion, we close up the strobes with plaster
putty and invite an electrician to connect it to the switchboard.
Laying electricians in a house or apartment for an experienced craftsman is quite an easy task. But for those who are not well versed in electrics, you should take the help of experienced professionals from start to finish. It will of course be
cost money, but this way you can protect yourself from mistakes that can lead to a fire.
—
—
Conclusion on the topic
So, we tried to answer the question regarding the wiring diagram of the electrical network inside the apartment. Of course, it is necessary to correctly determine the groups of consumers, calculate their total capacity. And as experts say, there is nothing complicated about this, you can do all this on your own if you have certain knowledge (the school curriculum is sufficient). So for those who ask how to do your own wiring, we answer that consider mainly the power of each device that is in the room. It is from this indicator that the cable cross-section and the rated current of the machine will depend.