- Electric shock protection
- 2 Consumer groups - how to distribute according to the rules
- Installation of a shield for a country building
- Schema creation rules
- Currently, I have opted for electrical panels and devices from ABB.
- How to calculate the number of places in the electrical panel?
- Connecting the power cable
- Do I need to use RCD
- A simple diagram for connecting the electrical panel of a private house 15 kW
- Simple metering board, TT grounding system
- Shield Assembly
- Next article:
- Calculations and drawing up a diagram
- Material calculation
- Schemes for several consumers
- 6 Cable connection - entry and termination inside the shield
- Final assembly
- Where to start?
- Some useful tips for assembling a shield
- Lighting board installation
- Single-phase lighting boards
- Three-phase SCHO
- Ready-to-install lighting boards
- Installation and assembly of the electrical panel
- Electrical panel - what is it and why is it needed?
- Charting
- Conclusion
Electric shock protection
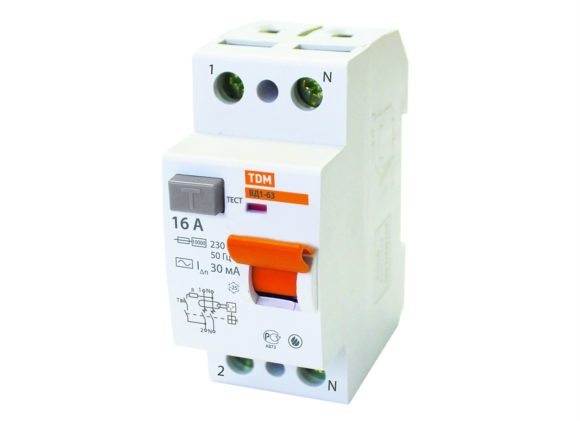
To protect a person from the action of current in case of unexpected contact with a bare conductor and the body of an electrical appliance, a residual current device (RCD) is installed in the shield. When touching the phase wire and the grounded conductive housing at the same time, the power supply is turned off.For an apartment, the operation current is selected 30 mA. It is not dangerous to humans, although it causes unpleasant pain. It doesn't work on a short circuit. Therefore, in the electrical circuit, an automatic machine must be connected with it. If you use a differential machine, it performs the function of both devices, responding not only to a short circuit, but also to current leakage.
Wet rooms and powerful consumers are supplied with separate RCDs or difavtomatov. In a humid environment in wooden structures, even a current of 30 mA can cause a fire. In such areas, wiring requires special attention and protection.
2 Consumer groups - how to distribute according to the rules
The electricity supplied to the house is correctly distributed among consumers. There are rules, subject to which you can assemble an electrical panel with your own hands:
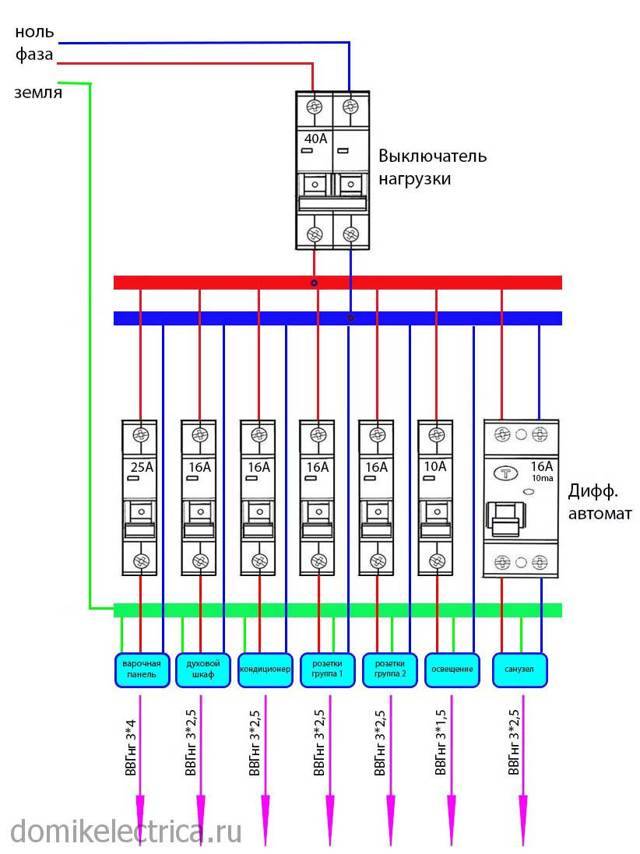
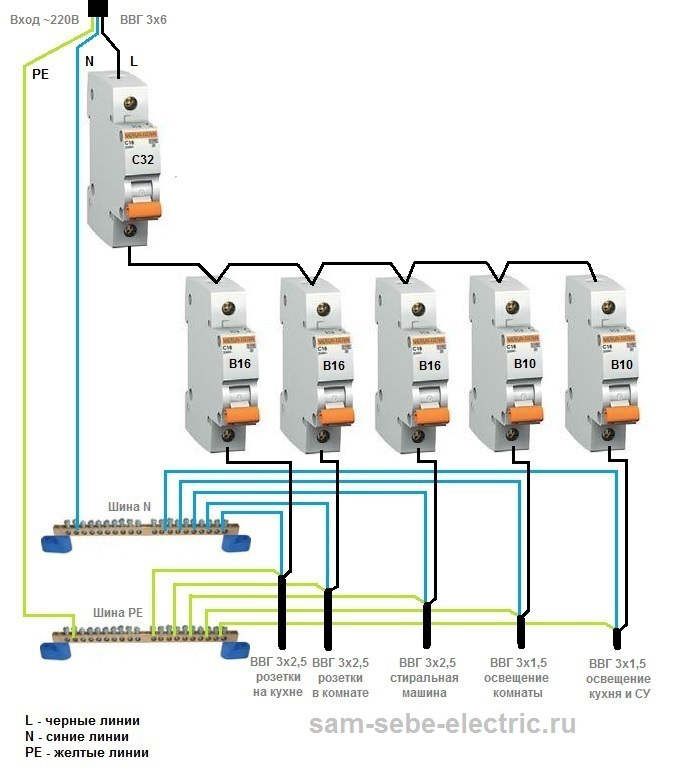
- 1. All consumers with a power of 2 kW and above are divided into separate groups. For each we put an automatic machine designed for a certain load.
- 2. For a washing machine, dishwasher, air conditioner, and other devices with low power, 16 A circuit breakers are needed. We connect with a cable with a cross section of 2.5 mm2.
- 3. We connect more powerful devices through a 20 A or 32 A automatic machine. We take a larger cable: 4 mm2 or 6 mm2.
- 4. We make lines to sockets separately for each room, using a three-core cable 2.5 mm2. In the junction box we make branches to the sockets.
- 5. For lighting lines we use a cable of 1.5 mm2, we protect each with a 10 A automatic machine. We run a separate cable.
At first glance, the approach to installation with connection of separate cables may seem redundant.In fact, it is the only true one, provides high security, ease of management. In any emergency situation, a group of consumers is automatically turned off, and not the entire network. Finding and fixing a problem with this wiring diagram is much easier.
Electrical panel installation
Installation of a shield for a country building
- We install with the help of self-tapping screws Din rails, on which all equipment will be attached. They must be 35 mm.
- We proceed to the installation of equipment according to a pre-made scheme and calculations. we mount automatic machines, RCDs and two separate tires, to which grounding and zero are connected, we install a metering device.
- We connect the phase wires, using a special bus we connect the machines. According to the general rules for connecting such devices, the input should be on top and the output on the bottom.
- We mount protective covers, sign all machines for convenience.
- Then we connect them with a special comb or make jumpers from the wire. If you are going to use a comb, then remember that the cross section of its core must be at least 10 mm / sq.
- We start wires from consumers to machines.
Learn from this video how to properly assemble an electrical panel in a private house for 220 V:
From the following video you will learn how to make a three-phase 380 V switchboard in a private house:
After you have assembled the shield, without closing it, turn it on for several hours, and then check the temperature of all elements.
Do not allow the insulation to melt, otherwise a short circuit will occur in the future.
With a careful consistent approach and compliance with the rules of electrical safety, everyone can independently assemble the ASU on their own. though it will take some getting used to.After completing the installation, it remains only to wait for the representatives of the power grid company, who will check your circuit and organize the connection.
Schema creation rules
The easiest way is if the garage is being built on a site to which a power line has already been connected, a separate switchboard is installed. It remains only to run the cable from the shield to the garage. If the latter is a building located far from the main house, then you will have to choose two connection options: from the house or a separate line from a pole located outside the territory of the summer cottage. The second option is more difficult because the air can be carried out by electricians who have access to this type of work. In addition, a separate switchboard will have to be installed in the garage.
Now, as for the wiring diagram in the garage (wires and cables). First of all, the entry point of the external power cable is determined, as well as the installation location of the shield. Then the locations of lamps and sockets are applied to the diagram. All this is connected by wiring lines. What are the requirements for all these elements:
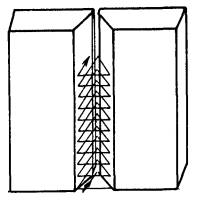
- Wiring lines inside the garage should only be laid in vertical or horizontal directions. No dodges.
- The transition from a horizontal section to a vertical one (and vice versa) is carried out only at a right angle.
Electrical wiring is horizontal and vertical sections
- The distance of horizontal sections from the ceiling or floor, vertical sections from the corners of the building, window and door openings - 15 cm.
- The same distance to heating appliances (radiators, stoves, etc.).
- The number of sockets at the rate of one per 6 m2 or every 4 m.
- The installation height of sockets is 60 cm from the floor surface.
- The installation height of the switches is 1.5 m. They are mounted at a distance of at least 15 cm from the door jambs.
- If the garage has a basement and a viewing hole, then sockets are not installed in them. This also applies to light switches. These elements are mounted in the garage itself in a convenient place.
The optimal solution is a three-phase wiring diagram. In this case, one phase is connected only to lighting fixtures, the other two are scattered over sockets. If a three-phase connection is a problem, then use a single-phase (220 volts). For this option, you will have to accurately calculate the load on the cables and select their cross section correctly. This mainly applies to wires for sockets.
In this case, again, it is better to divide the circuit into two sections: for light bulbs and sockets. And for each loop, you will have to select a circuit breaker for power consumption and current strength.
Wiring diagram with two sections: lighting and socket
Currently, I have opted for electrical panels and devices from ABB.
But knowledge of modular and panel products Schneider Electric (Schneider Electric), Legrand (Legrand), Hager (Hager) allow me to assemble electrical panels from components of any manufacturer. Therefore, when choosing a company, I always go to meet the customer of the electrical panel.
But it should be noted that the prices of these manufacturers are almost the same. The only difference is different series of devices, but they, if we take similar parameters, are also approximately the same. Recently, however, ABB is cheaper than its competitors.
Below I will give a comparative calculation of the cost of an electrical panel of different ABB and Schneider Electric series for one of the orders (calculation from 2015, but relevant).
Comparison of prices for machines, RCDs, ABB and Schneider Electric switches.
At the request of the customer, electrical panels can be equipped with various additional “Wishlist” and protections: light indicators, digital voltmeters, contactors with switching on / off of all or part of the load, timers (time relays) for switching on the load according to the schedule, voltage control relays, etc.


How to calculate the number of places in the electrical panel?
For electrical equipment that is used to mount the switchboard, unified standard dimensions are provided. Even different manufacturers of switches and other components will have similar dimensions.
The main elements are fastened on a DIN rail, the width of this profile is 3.5 cm. For one circuit breaker, a “seat” is provided, 1.75 cm wide. Each box offered by manufacturers has a certain number of cells for modules.
In order to calculate how many spaces are needed for a distribution board of a certain configuration, it is necessary to know the exact number of elements needed, their type and size, and also provide approximately 20% for a margin in case of changes in the assembly process or future purchases of electrical equipment. From the table below, the dimensions of the devices are selected.
| Name | Width/number of seats |
| Single-pole automatic knife switch | 1.75cm/1 seat |
| Automatic knife switch two-pole single-phase | 3.5 cm / 2 places |
| Three-pole automatic switch | 5.25 cm / 3 places |
| RCD single-phase | 3.5 cm / 2 places |
| RCD three-phase | 7 cm / 4 places |
| Automatic differential single-phase | 7 cm / 2 modules for 4 places |
| DIN rail terminal block | 1.75cm/1 seat |
| Modular electricity meter | 10.5-14 cm / 6-8 seats |
| Modular DIN rail socket | 5.25 cm / 3 places |
| Voltage relay | 5.25 cm / 3 places |
The simplest switchboard will require the smallest number of elements - 20 pcs. For premises with wiring consumption above 400 m, this figure increases significantly. Due to the fact that in most equipment cases there are 24, 36 or a multiple of 12 number of “seats”, then in a simple version of the case, 24 seats should be enough. It is better to purchase the 36 option, as there is more room for changes in the future.
Connecting the power cable
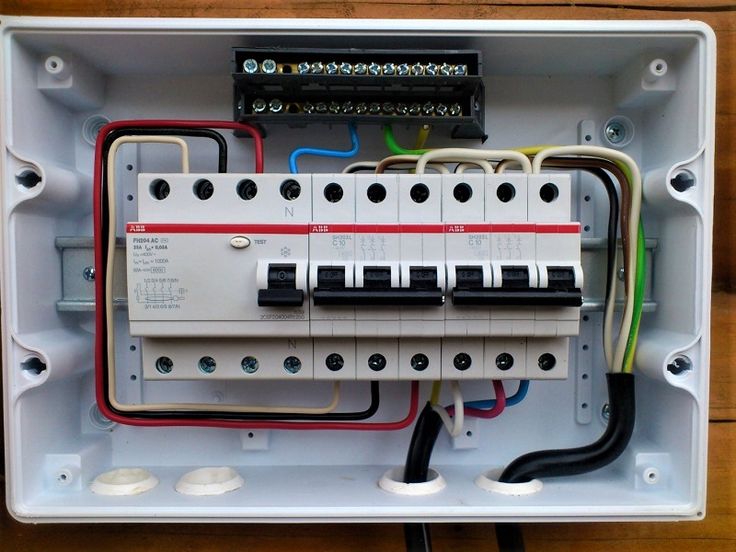
The power cable has three wires of different colors. The phase is connected to the input of the circuit breaker. It can be white, red or brown. The blue zero is connected to the corresponding bus, and the yellow with a green stripe goes to the ground terminal block. A similar operation is done with wires in the premises. Only the phase wire is connected to the bottom of the circuit breaker corresponding to this group.
Do-it-yourself installation of the electrical panel is much easier if all the machines on the upper side of the phase are connected to each other by busbars
They are called combs, and when choosing, you should pay attention to the cross section, which should not be less than 10 mm 2. Some manufacturers sell them cheaply by reducing the thickness of the core
They are more reliable than the pieces of wire that were previously used.
Do I need to use RCD
The residual current device is designed to protect its group load line.During the assembly of the electrical panel for a private house, they must be installed if, at a rated voltage of 220 V, the machine does not work within 0.4 s.
To protect electrical wiring in a private house, apartment, the RCD for the switchboard is selected according to the following principles:
- for socket, power consumer groups, a device is selected that operates at a current value of 30 mA;
- for washing machines, hot tubs, underfloor heating, sockets installed in rooms with high air humidity, RCDs are suitable that operate at a current value of 10 mA;
- if several groups of consumers are tied to one RCD, then the value of the operating current is determined as the sum of the ratings of all automata.
Comment!
When assembling electrical panels, differential automata are not profitable to use. It is customary to install them separately to protect important lines, such as, for example, underfloor heating in a bathroom.
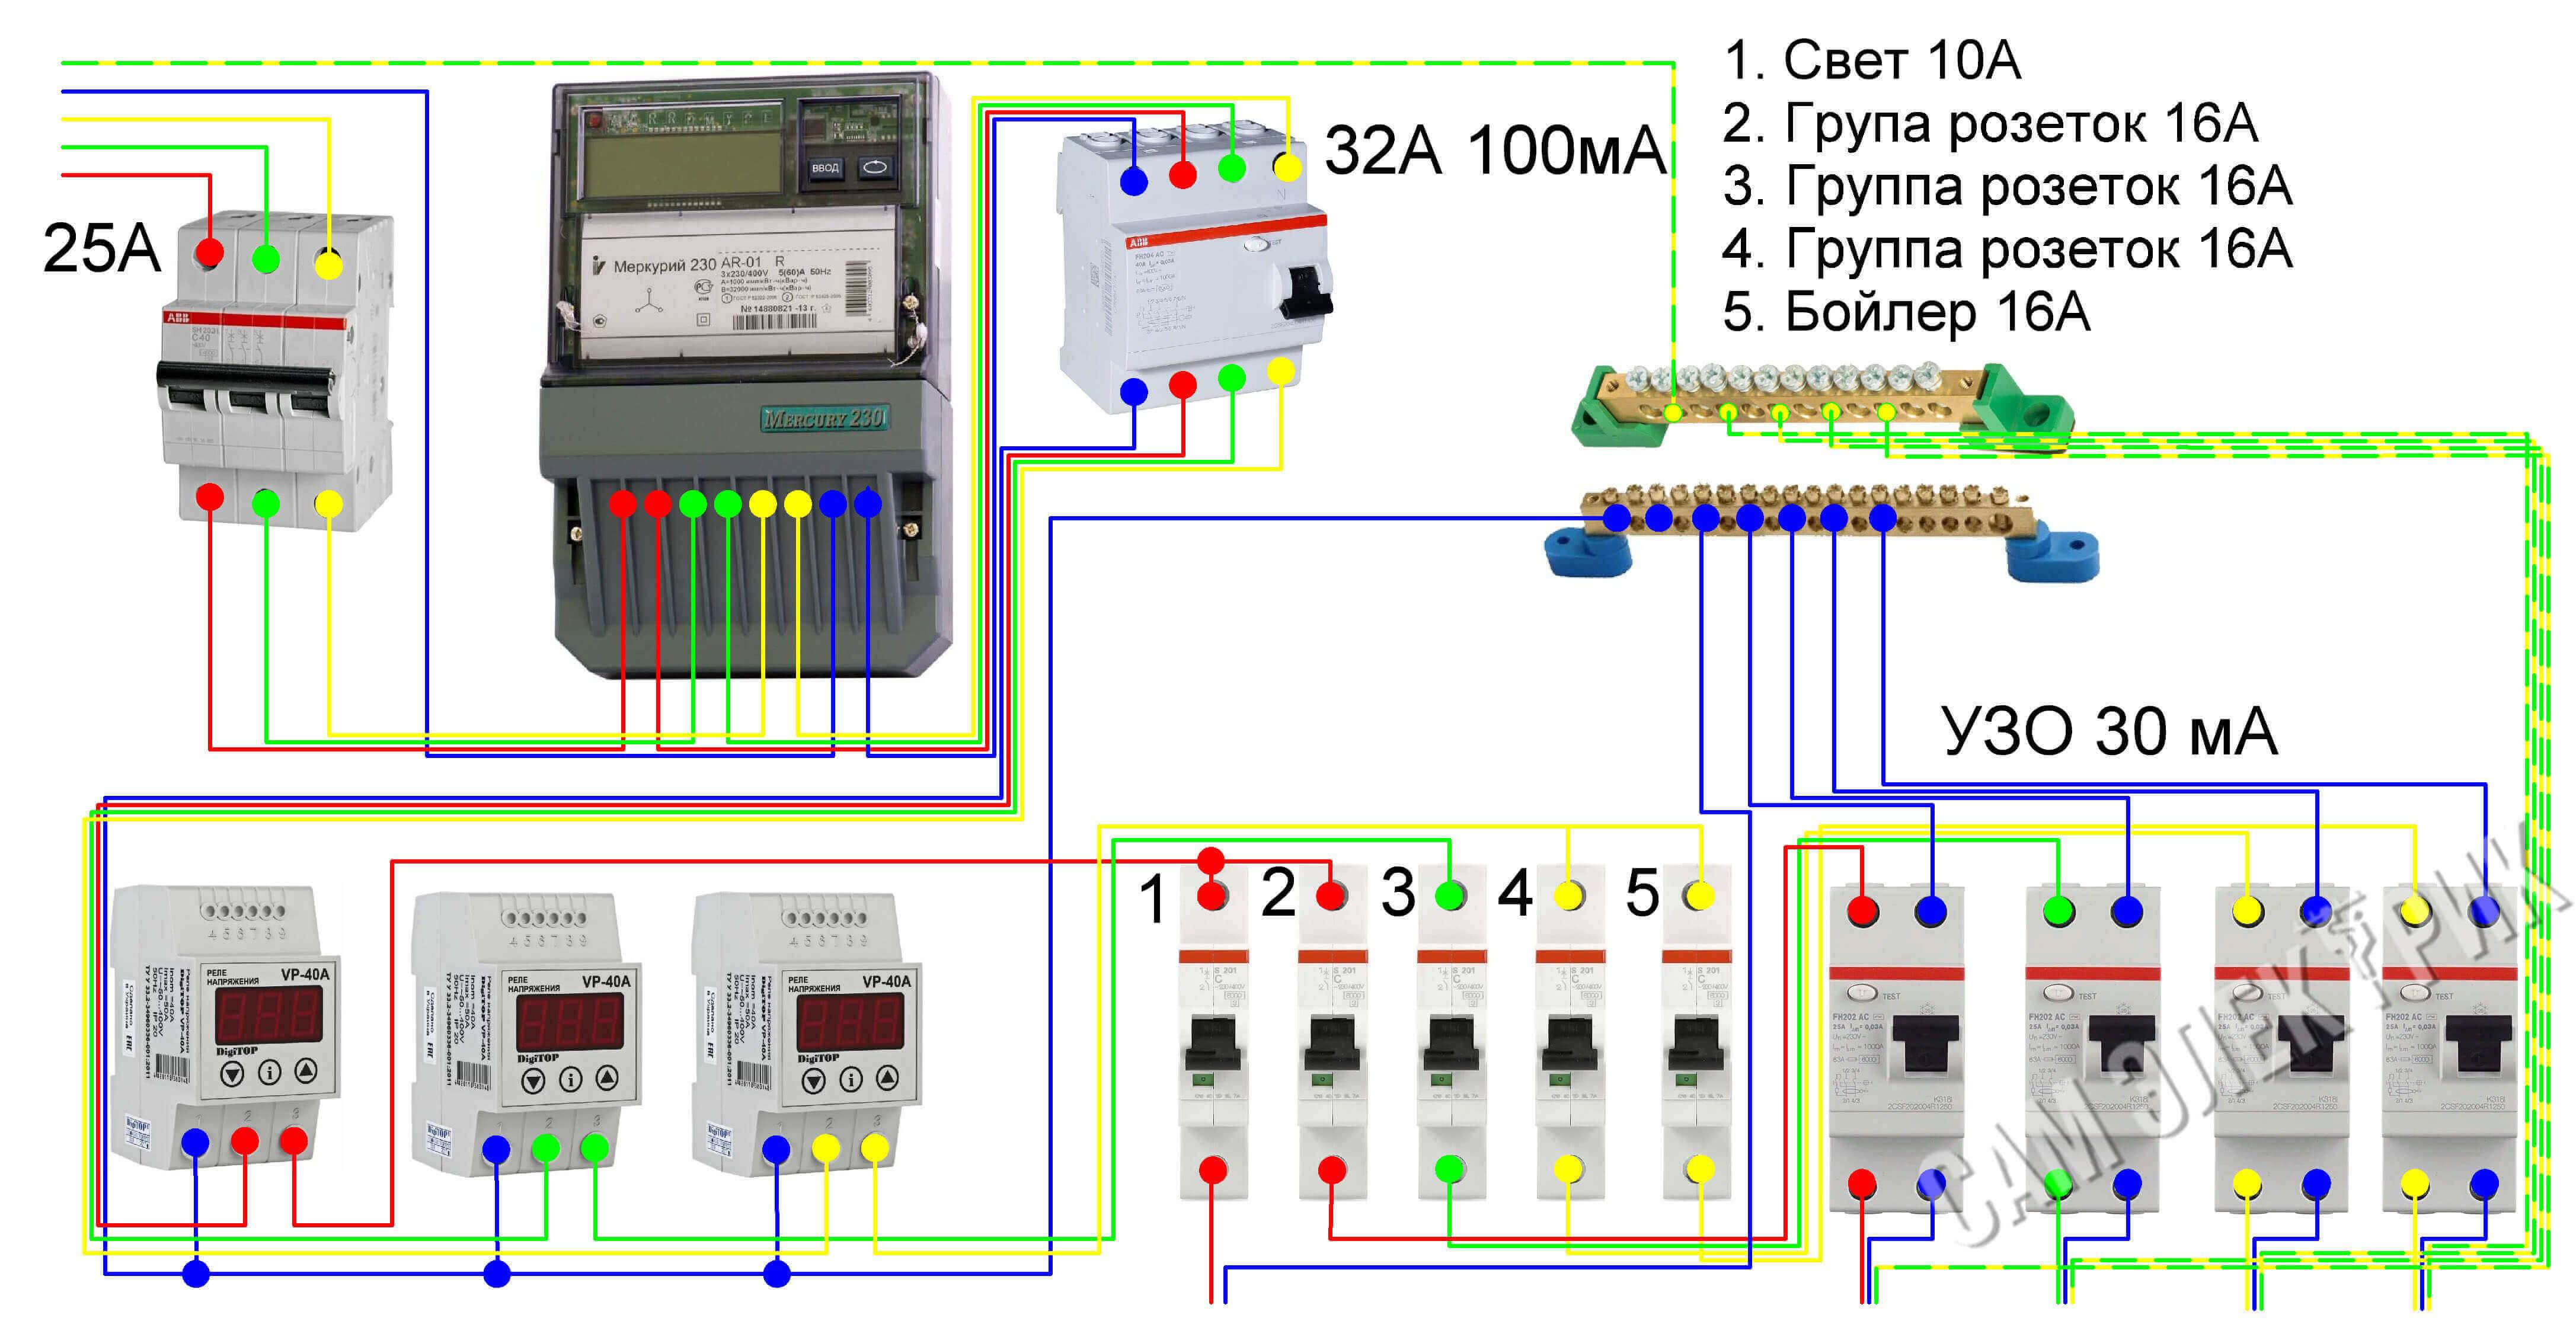
A simple diagram for connecting the electrical panel of a private house 15 kW
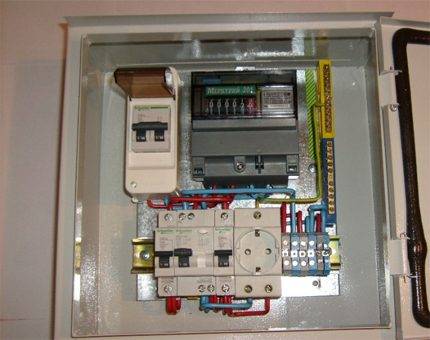
The simplest budget option for assembling a metering board is presented below. Only the most necessary elements are used here:
2. Plastic box 3 modules, with lugs for seals
3. Three-pole Safety circuit breaker, characteristic C25 (for a dedicated power of 15kW, this rating is needed)
4. Electric energy meter (meter) 3-phase 380V
5. Distribution switching block, the ability to connect wires with a cross section of up to 16mm.kv.
Simple metering board, TT grounding system

This option is more often used as a temporary one, for example, to connect a change house during construction, as it has few means of protection.
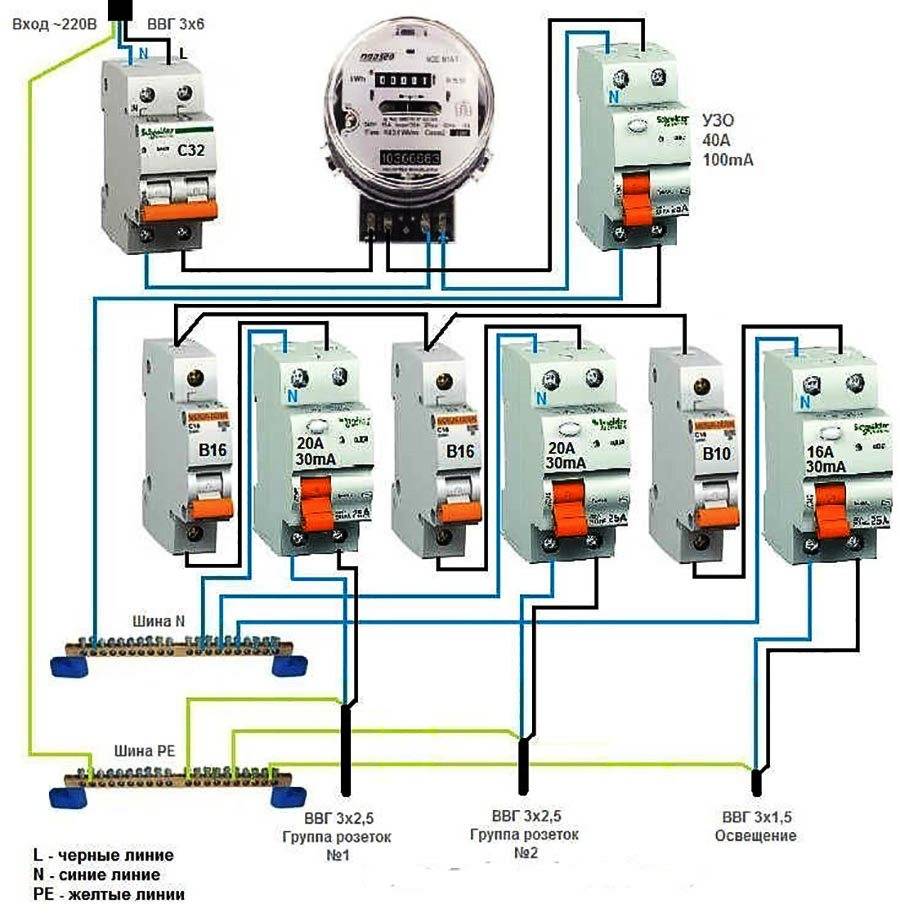
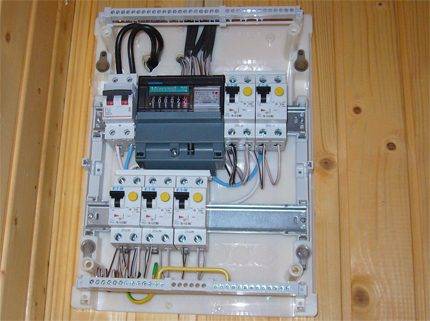
For your home, in which you plan to live permanently, even for a country house, I advise you to use the following assembly:
Shield Assembly
For each group of wires, the necessary machines are selected. You should always have a wiring diagram of the electrical panel at hand. It must be constantly checked and, if necessary, amended. The central main switch, which connects all circuits at the same time, should be slightly less powerful than the external one. It is located as close as possible to the incoming power cable. In addition, 2-3 spare bags should be added so that they can be used to turn on powerful consumers, such as an electric boiler or electric oven. Devices with a power of more than 5 kW have their own fuses.


How to install an apartment electrical panel and properly connect the ground, you should consult a specialist. Mounting brackets are placed in the shield housing for mounting equipment. First, zero and ground tires are installed on them. In the photo below, they are shown from above and can be supplied with a shield.
It should be checked that they match the power of the main switch. After that, the body and doors of the shield are connected to the N bus. In a private house, the ground wire is inserted from a special circuit, mounted outside in accordance with all the rules.
Next article:
What is the connection of circuit breakers with wires, you can see in the photo. We have already talked about how to assemble a switchboard with our own hands!
Modern shields are modular. The modern electrical panel has a strong case and is locked with a padlock so that children will not fit in there unless you leave the key in a conspicuous place.
The electrical circuit is created in several stages.
The rating is selected depending on the power of the consumer.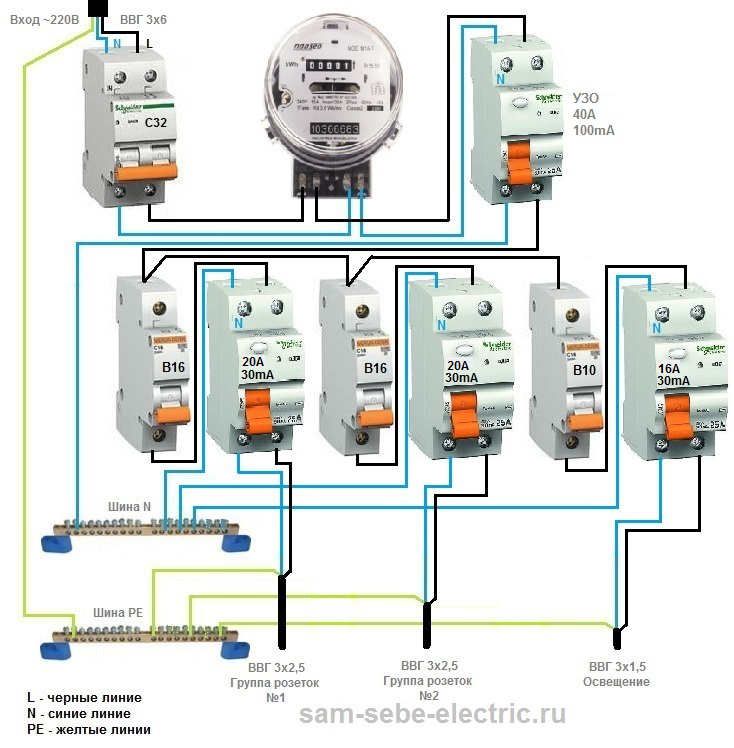
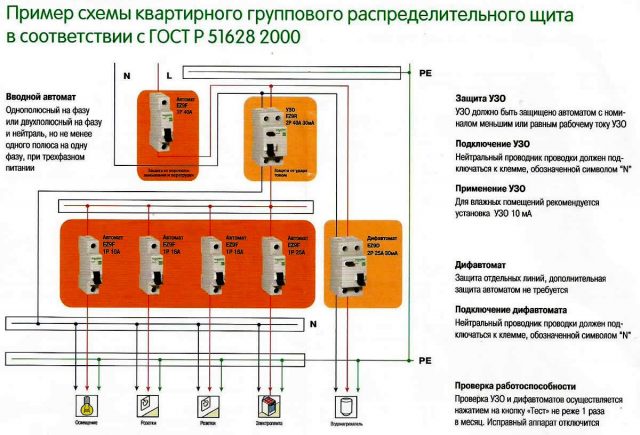
Assembly and connection diagram To create an electrical panel diagram, you need to determine the type of power supply system in the house, divide the electricity consumers into several groups, and, based on these data, create a diagram using GOST
Thus, you can protect yourself from additional expenses in case of installing additional machines.
If you turn everything on at the same time, then, of course, the introductory circuit breaker will work and turn off the entire apartment.
T 12.2 Schemes for assembling a group apartment shield

Calculations and drawing up a diagram
To figure out how to assemble a household electrical panel, you must first draw up a diagram of such a design. In turn, the drawing up of the circuit is preceded by calculations, with the help of which electrical equipment is selected.
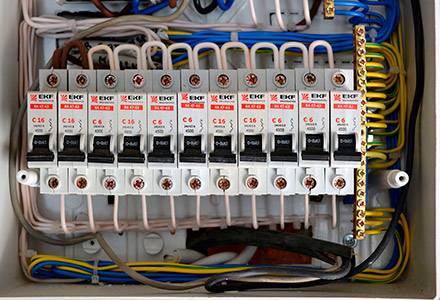
A good example of the distribution of constituent components inside a household electrical panel. Nothing superfluous, rationally arranged equipment, enough free space
The electrical parts that make up the internal contents of the electrical panel are usually represented by the following set:
- automatic switches;
- safety pads;
- contact tires;
- packet switches;
- accessories such as staples, clamps, bushings, etc.
Despite the relatively low requirements for household wiring, compared to the industrial version, the principle of energy distribution remains unshakable. That is, each consumption group is built as a separate segment of the overall network.
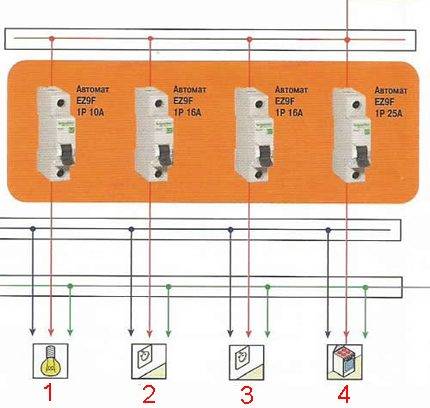
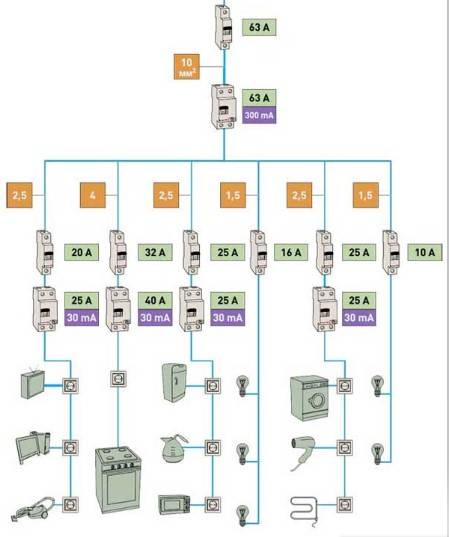
An example of calculation and selection of automata for each individual segment of the circuit: 1 - lighting segment (automatic 10A); 2 - electric sockets in one room (machine 16A); 3 - electrical sockets of the second room (machine 16A); 4 - household electric stove (automatic 25A)
A house or apartment in modern equipment traditionally contains equipment of sufficiently high power. For example, electric stove, microwave oven, washing machine.
Equipment of this class is connected by a separate group when installed inside the switchboard. Accordingly, this group requires an individual switching and blocking unit.
For such a group, a total calculation of the power consumption is made, taking into account the safety factor. In other words, the power data for electric machines taken from the passport are summarized.
A margin of safety is added to the amount received - approximately 30% of the amount received. As a result, there is a power value by which electrical equipment is selected for the installation of a group node - a bag, a switching machine, a safety block.
A natural view of an assembly example inside a household electrical panel, where the distribution of energy by sectors is organized depending on the power consumption and the purpose of the sector
In a similar way, any other group of a separate network segment is created, for example, separately for sockets, for lighting, for a floor heating system, etc.
For standard apartments, the creation of a large number of groups is not relevant. Here they are usually limited to two, maximum three groups.But for suburban real estate, multi-group schemes are a quite common phenomenon.
Material calculation
In addition to the fact that you need to calculate the exact number of sockets, switches, installation boxes, you also need to take care of the length of the wire for installing all the electrical wiring in the house.
Be sure to purchase a length with a margin, otherwise in the process of work, trouble may arise when literally 10-15 cm is not enough for you to reach the end point.
We advise you to calculate the length, taking into account the following rules:
- For installation boxes, add 10-15 cm + box depth to the length.
- For the installation of lamps, add 10-20 cm, depending on which lamp will be installed. Choose the length so that the end protruding from the ceiling can be hidden in the lamp, but also so that it is convenient to make the connection.
- We add 10-15 cm to the length of each segment to connect the wires to each other.
We talked about how to calculate the amount of cable for electrical wiring in a separate article. An option for the lazy is to multiply the area of \u200b\u200bthe house by 2, this will be the length of the cable for home wiring.
Schemes for several consumers
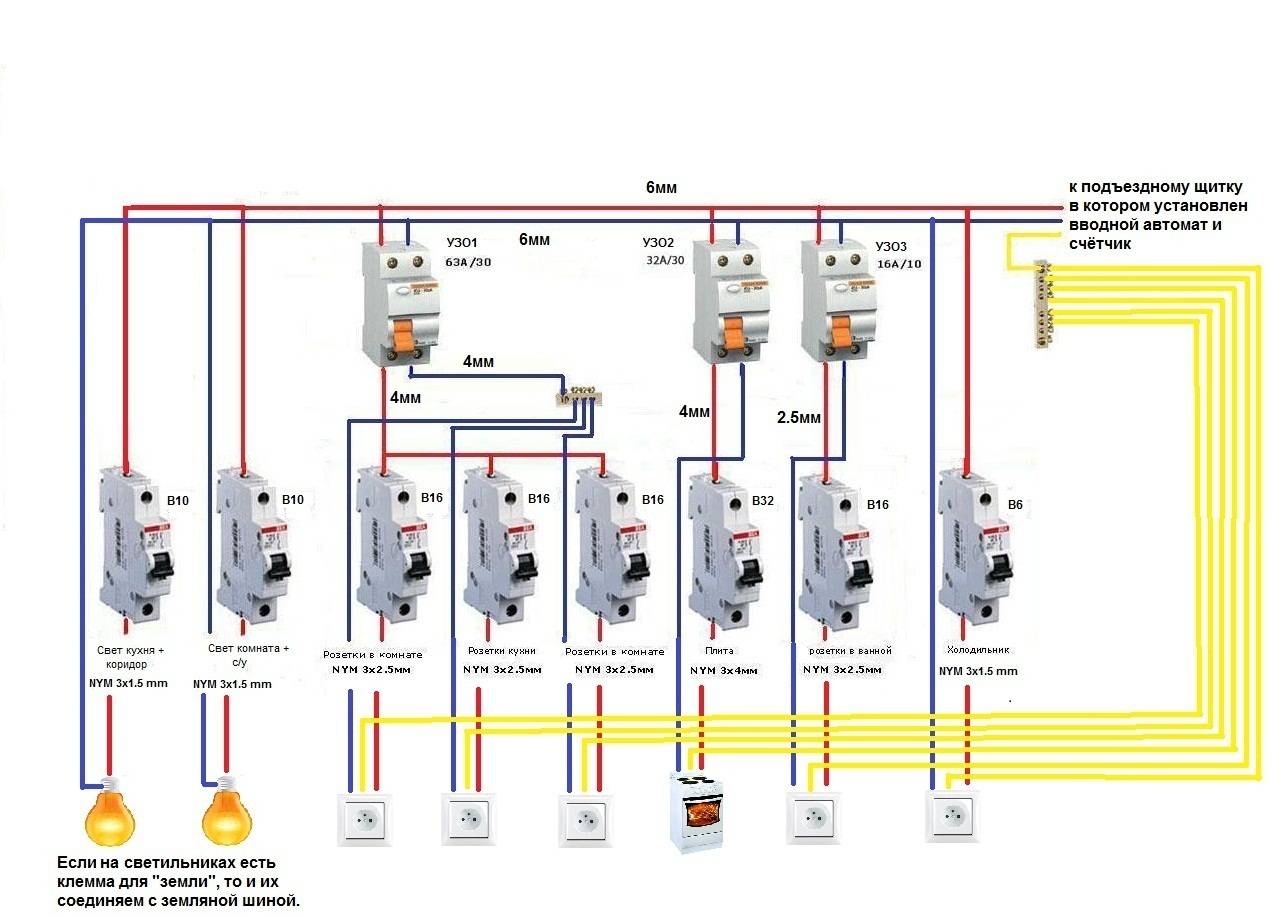
Power supply schemes depend on the categories of electrical consumers and on their significance. Groups of electrical consumers are distributed by floors, according to the purpose of the building, according to the number of rooms, etc. Usually they separate living rooms and outbuildings, basements and garages, as well as street lighting. If there are many consumers, then not on each individual line, in addition to the main RCD, separate RCDs of lower power should be installed. The kitchen and bathroom must be protected by protective devices according to a separate scheme.

If it is planned to install consumers with a power of up to 2.5 kW, then it is desirable to install a separate protection. Household appliances such as a microwave oven, an electric kettle and a hair dryer have similar power.
At the stage of developing a power supply circuit for electrical consumers, first of all, one should think not about savings, but about safety. All electrical appliances are purchased only from well-known companies, and they cost a lot of money.
6 Cable connection - entry and termination inside the shield
Proper cable entry greatly simplifies installation and enables optimal organization of the interior space. You should buy shields that have technological holes for input, otherwise you will have to cut or drill. In good shields there are plugs that we remove and start the cable. We connect to the introductory machine, fix it with a plastic clamp. We mark all cables immediately.


Surface insulation at the input is not needed, therefore, carefully, so as not to damage the insulation of the conductors, remove it. It is more convenient to work with individual wires than with a rigid cable. We distribute all the wiring in the shield in bundles: separately phase (L), zero workers (N) and protective zero (PE). We want them to overlap as little as possible. We pre-mark the ends, tighten with clamps.

Connecting cables to the shield
Leading the cable inside the shield, leave it a length that is twice the height. This is done as follows: they stretched the cable to the connection point, stretched it again to the inlet and cut it off. This is not superfluous at all: the wiring follows its own path, and not the shortest path. When you have to stretch them to reach your destination or build up, this is bad. So saving a dozen centimeters is not worth it.
Final assembly
When all modular devices are adjusted and tested, it remains to transfer them to the electrical panel housing. For safety, turn off the power. A niche in the wall is being prepared. The assembled devices on a DIN frame are mounted inside the case.

The main and protective zero tires are mounted. When distributing wires into bundles, it is not recommended to allow their intersections. Protective zero wires are attached to the PE bus. The connection sequence is observed as in the electrical panel diagram. Protective zero before switching with the bus terminal - marked.

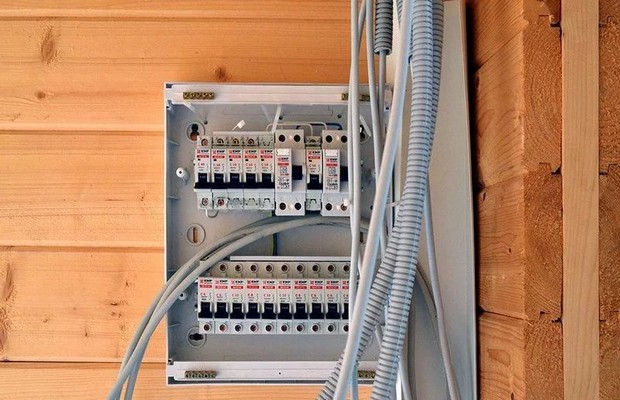
When all devices are connected, a check for compliance with the connection diagram begins. On the Internet you can see a photo of the electrical panel in the assembled state.

When the adjustment is over, do not rush to close the electrical panel. He should work for a couple of hours, and then it will become clear whether the assembly was carried out with high quality. Installing and connecting the shield is a laborious process that requires certain knowledge and experience. It should be started after studying the theoretical part, and follow the step-by-step assembly instructions.

Where to start?
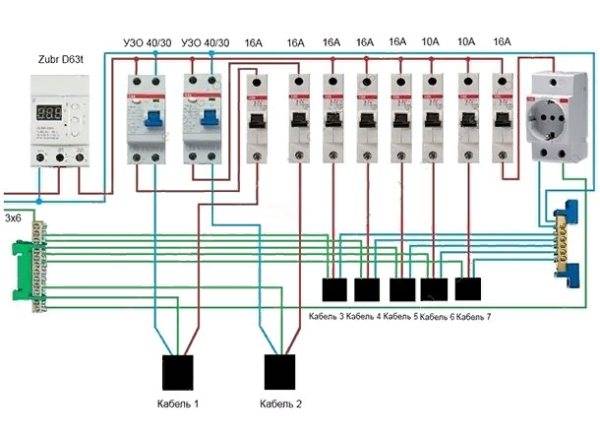
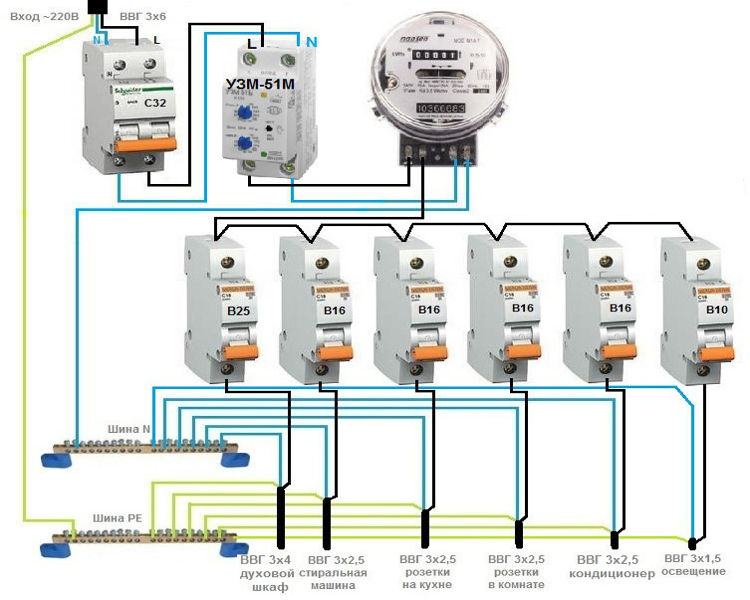
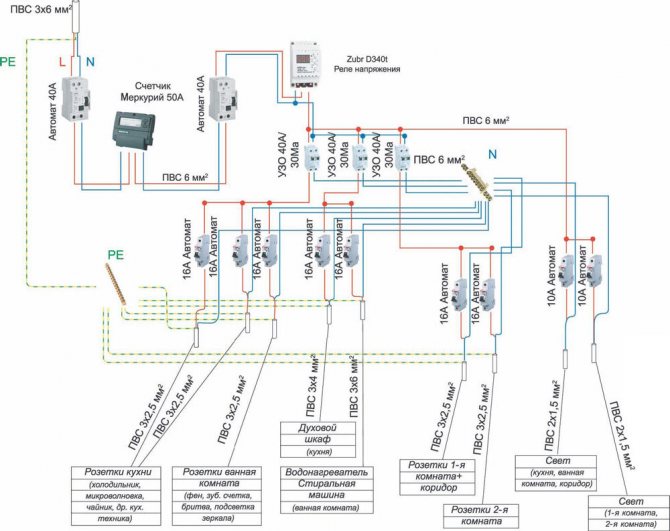
Every experienced electrician will confirm that it is much easier to start work on the installation of the electrical panel and wiring, having in front of your eyes a floor plan indicating the proposed placement of household appliances, lighting fixtures, as well as sockets and junction boxes. Having decided on the number and power of consumers, it is necessary to draw up a diagram of the electrical panel itself. A one-line diagram might look like this:

In this diagram, all consumers are divided into 20 groups, for each of which are indicated:
- brand of wire and cross-section of the core, mm²;
- power;
- consumed current;
- type of circuit breaker with indication of rated current.
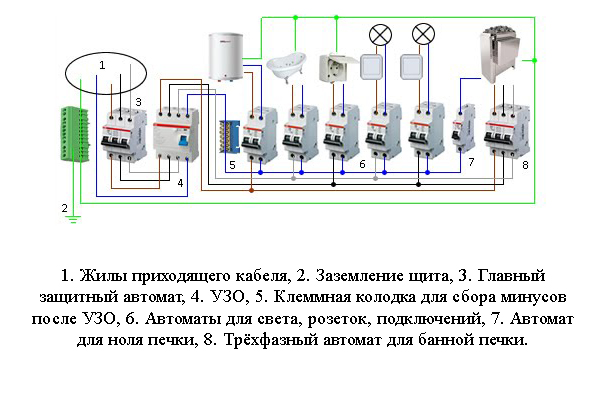
For the uninitiated, such a diagram looks quite complicated, so you can use a simplified schematic representation of the location of the electrical panel components.
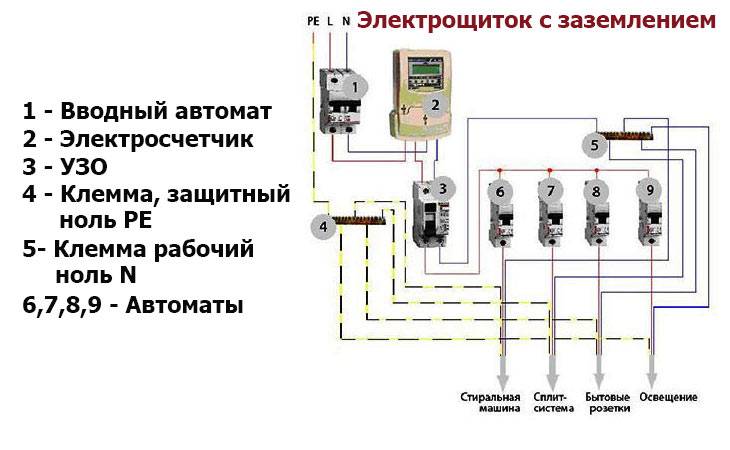
For greater clarity, the electrical panel diagram can be depicted as follows:

Or even like this:
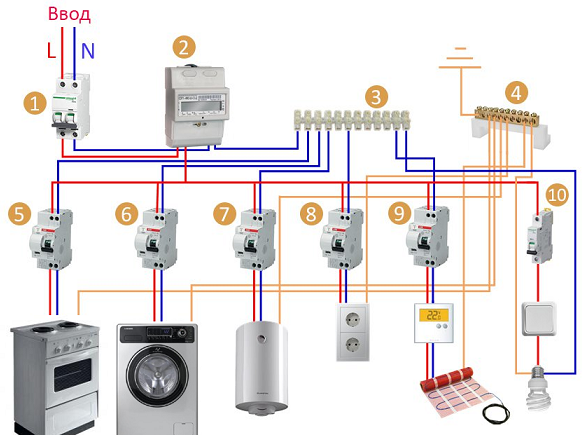
where
- 1 - introductory AB;
- 2 - counter;
- 3 - zero bus;
- 4 - ground bus;
- 5–10 - AB consumers.
Having such a scheme in hand, it is much easier to figure out how to properly assemble the electrical panel.
Some useful tips for assembling a shield
When assembling the electrical panel, it is necessary to use only high-quality and reliable electrical products
Do not pay attention to cheaper Chinese counterparts, personal safety is much more important
To connect wires to machines, it is best to use special lugs for crimping. Of course, then you will have to purchase pliers, with which crimping is performed, but their cost is not too high.


The use of insulating tape is no longer relevant, many electricians use heat shrink tubing exclusively. Such consumables are convenient and reliable and it is not necessary to purchase a building hair dryer, you can use an ordinary lighter.
For ease of use, all elements of the electrical cabinet must be marked. Only then it will be possible to quickly and easily turn off the voltage in a certain room. You can make notes on the body of the device or make small plates and fix them on the product with adhesive tape.
Lighting board installation
When the preparatory work is fully completed, you can proceed directly to the installation. The installation process will depend on the number of phases.
Single-phase lighting boards
Today, lighting panels with single-phase consumers are the most popular.
Connecting a single-phase lighting board
The process of installing such shields is as follows:
- Before starting installation, you need to study and prepare a single-line diagram. Some attach the circuit later on the door of the electrical panel.
- The installation process begins with the fastening of DIN rails. On them you can fix all modern switching devices. Some designs already have din rails, but in most cases they will need to be redone.
- It is immediately desirable to install tires for attaching wires. These tires can later be mounted on rails or to the box. It all depends on their design.
- Now you can start installing the equipment on the rails. Fastening is carried out due to the spring mechanism.
- According to the rules of the PUE, power will always be on the left. Therefore, if you open the electrical panel for the first time, you can be sure that an introductory machine is located in the upper left corner. If there is a backup power supply, then it is usually located on the right.
- If the design has an introductory machine, then the phase wire is installed immediately below it. Terminal blocks for neutral wires can be located a little lower. In some cases, they are also placed on the side walls of the cabinet.
- In the future, group machines are powered from the phase terminal block. Therefore, they are located below the tires.
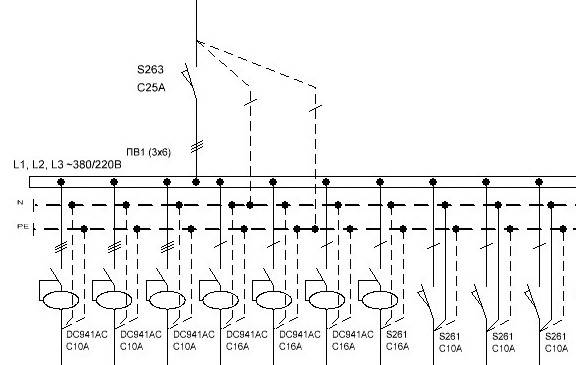
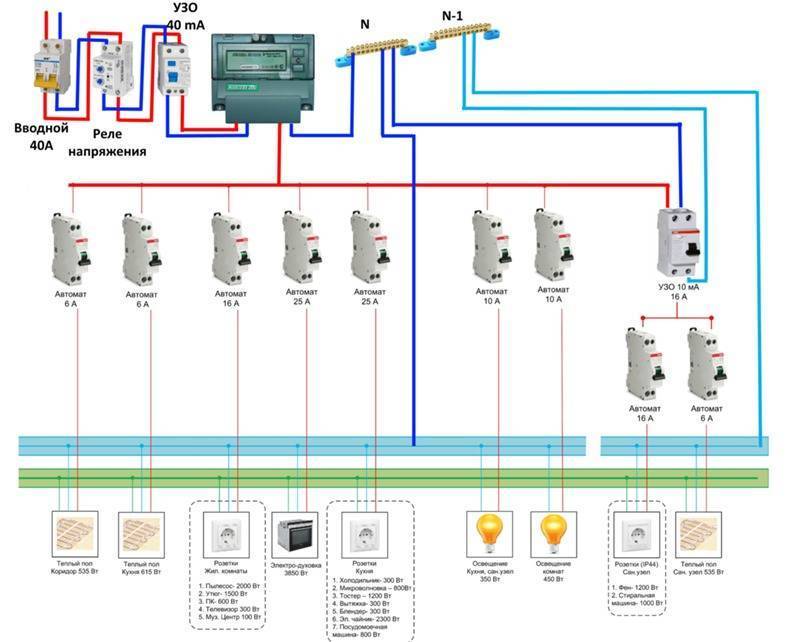
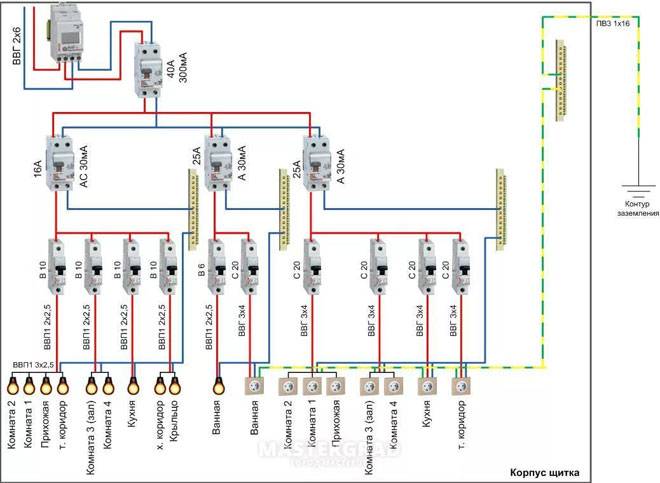
The photo shows a three-line diagram of the switchboard
- If you decide to install an RCD, then they must be placed below the group machines.You can also place additional equipment in this row.
- When the power equipment is installed, it will be possible to start connecting it. To do this, you will need a circuit diagram of the lighting shield. It allows you to trace each wire.
- When the switchboard is switched off inside, it can be mounted on a permanent installation site.
Three-phase SCHO
Installation, as well as manufacturing, which is made in a three-phase version, is practically the same, but there are certain nuances.
The photo shows a diagram of a three-phase switch-off of the lighting panel
Now let's look at the nuances that you may encounter during installation:
- The main difference is the ability to connect three-phase and single-phase loads. Depending on the types of load, there is also an option when a single-phase load will be powered by 2 or 3 different phases.
- The first possible option is power supply from the introductory machine of three-phase and single-phase loads. In this case, below the introductory machine, you will need to place three busbars of phase wires. They can supply single-phase and three-phase loads. In another, the principle of constructing such a shield will be similar to a single-phase one.
- If only single-phase loads are fed from a three-phase input machine, then in this case, three tires for phase conductors must be installed below the input machine at the same level. Separate groups can be powered from each of these buses.
Ready-to-install lighting boards
Ready-to-mount lighting switchboards are now on the market as well. Their design already contains all the necessary equipment, which is quite simple to connect.There are many types of such shields, so it makes no sense to consider each one.
- The designation of the configuration and type of device will be applied at the top. The first character indicates the presence of an introductory automaton. If the number is "1", then this means that there is a switch without built-in protections. The symbol "1A" indicates that there is a switch with built-in protections. The symbol "1D" indicates that the design has an automatic machine with built-in protective shutdown protection. Accordingly, the number "0" means that the device does not have an introductory machine.
- The following figures indicate the rated current for which the lighting shield is calculated.
- Through a fraction, the number of circuit breakers and RCDs is indicated.
In addition, in the designation you can meet the following letters:
- "U" - indicates the need to embed the shield in a niche;
- "Sch" - the presence of a counter in the design of the shield;
- "F" - the presence of additional control devices, as well as alarms.
Installation and assembly of the electrical panel
The structure of the electrical panel includes complex modular equipment. If necessary, you can carry out the installation yourself, but first you need to learn how to properly assemble the shield.

To separate work from electrical components and installation of the case, you should purchase a panel on which the frame is removed and there are DIN rails.

There are several types of electrical installations:
- wall mount;
- wall installation.
Consider the second option, since the first is installed simply on the holders. Before you gouge an opening in the wall, you need to make sure that it is not "bearing" in the house. According to the rules, it is impossible to do installation work in it.


The power supply must be visible.Doors should not interfere with his access. For safety reasons, the shield must not be placed near gas pipes and other combustible substances. To place it on the wall, it is necessary to take into account the height from the floor to its lower edge of at least 1.4 m, and the distance of the upper edge from the floor is not more than 1.8 m.


The building level will help to mark the future area. To comply with all dimensions, you can attach the case to the wall and circle it with chalk. A cut is made along the marked lines with a grinder.

A chisel and a puncher will help to hollow out the inside. It is necessary to check the depth of the resulting niche by inserting the body of the electrical panel into it.

First, the mount included in the kit is mounted there. Then the electrical panel. Holes are made for fasteners and dowels are inserted. The remaining cavities are sealed with mounting foam.

DIN rails are unscrewed from the electrical panel in order to install modular equipment on them. If there are no special fasteners in the kit, then you need to drill holes in the back wall of the shield for future fasteners. This is done carefully, from excessive force the case may burst.

Electrical panel - what is it and why is it needed?
The electrical panel can be called differently switchboard, electrical panel, group panel. The tasks of the electrical panel:
- receive energy from an external source;
- distribute electricity among different groups of consumers;
- protection of electrical wiring from high current loads and short circuits;
- energy quality control, if necessary - connection of other devices;
- ensure safety, excluding electric shock.
Small in size, the device performs important functions. The attitude to the electrical panel should be thoughtful and serious.In this case, one cannot avoid clarifying calculations and the fundamentals of physics. However, complex postulates can be conveyed in simple words even to people far from science.
Charting
Modern power supply systems involve the use of a three-core cable, where one wire is a phase, and the rest are ground and zero. Given the growing power of devices, it is also necessary to divide into groups, which allows you to increase the life of the wiring. Guided by these principles, they proceed to drawing up a shield diagram.
It is mandatory to install a protection device on the input cable that will protect the internal network from overvoltage. Then a voltage relay is installed to control surges in the network, after which they proceed to the installation of groups and individual lines. It is worth noting that for powerful devices, in addition to switches, additional RCDs or diffusers are used. Such an organization of a home electrical network is not only safe, but also convenient. If necessary, you can turn off the machine and turn off the washing machine. You can also disable the RCD and de-energize all consumers included in the global group.
Conclusion
Installation and assembly of the switchboard is a time-consuming and responsible process. The reliability and service life of the device depends on deliberate actions and the adoption of all safety measures. It is necessary to take into account all the rules, norms and requirements of the technique for performing work with electrical appliances.
In the event of any sources of smoke, sparks or excessive heating of the elements during commissioning, it is necessary to immediately disconnect the equipment from the mains and conduct a full test with a multitester.High-quality components, thoughtful approach, accurate calculation - a guarantee of successful installation and operation of the switchboard.