- An example of an approximate calculation
- Types of warm floors
- The main advantages of underfloor heating:
- Warm floors are divided into 2 types:
- Calculation rules
- We prepare the base
- ViSoft Premium
- How to choose and calculate pipes
- Types of pipes
- Pipe sizing
- Materials for a warm water floor
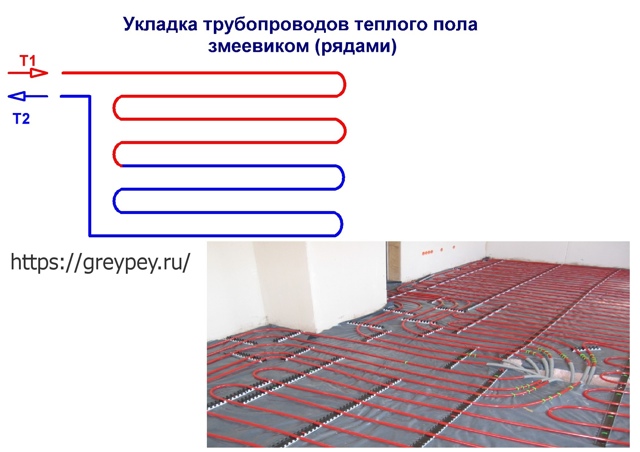
- Underfloor heating pipes and laying schemes
- Screed
- We select the type of pipe rolling and produce their laying
- Mounting, proportions and hinge pitch
- Pouring cement-sand screed
- Video instructions
- Warm floor power calculation
- System load
- Calculation of heat transfer power: calculator
- Calculations
- Calculation example
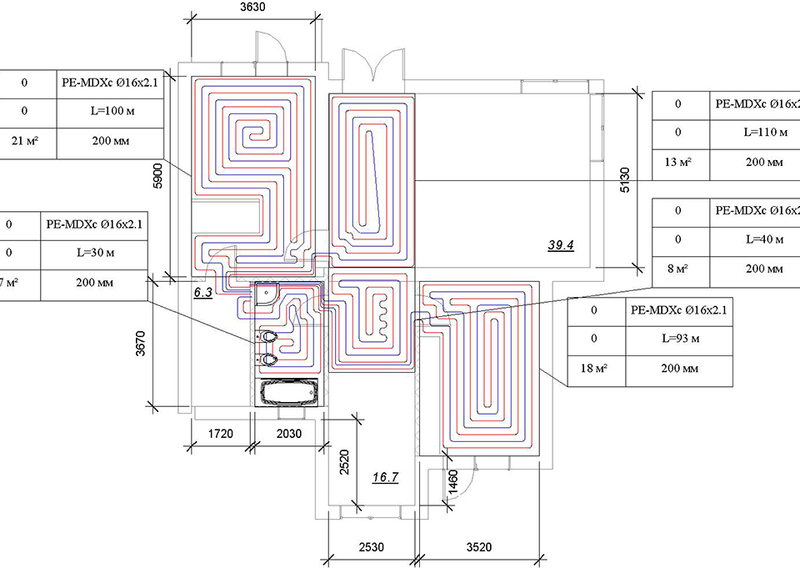
An example of an approximate calculation
Suppose you need to make a warm floor in a room measuring 5x6 m, with a total area of 30 m2. Part of the floor is lined with furniture and appliances. It is believed that the heated area for the efficient operation of the system cannot be less than 70%, so we will take this value as the active area. It will be 21 m2.
The house has small heat losses, the average value of which is 80 W / m2, therefore, the specific heat losses of the room will be 21x80 = 1680 W / m2. The desired temperature in the room is 20 C°. It is planned to use pipes with a diameter of 20 mm, on which a 7 cm screed and tiles will be laid. If the screed is thicker, then you need to know that each centimeter of it reduces the heat flux density by 5-8%.
The graph shows the relationship between the temperature of the coolant, the heat flux density, the pitch and the diameter of the pipes.
The graph shows the relationship between the temperature of the coolant, the heat flux density, the pitch and the diameter of the pipes
As follows from the graph data, a 20 mm pipe, in order to compensate for heat loss of 80 W / m2, requires a water temperature of 31.5 C ° at a step of 10 cm, with a step of 15 cm it becomes already 33.5 C °, and a step of 20 cm needs water 36.5 C°. Screed and coating will cause the temperature on the floor surface will be 6-7 degrees lower than the water in the pipes, and these values are within the norm for a dwelling.
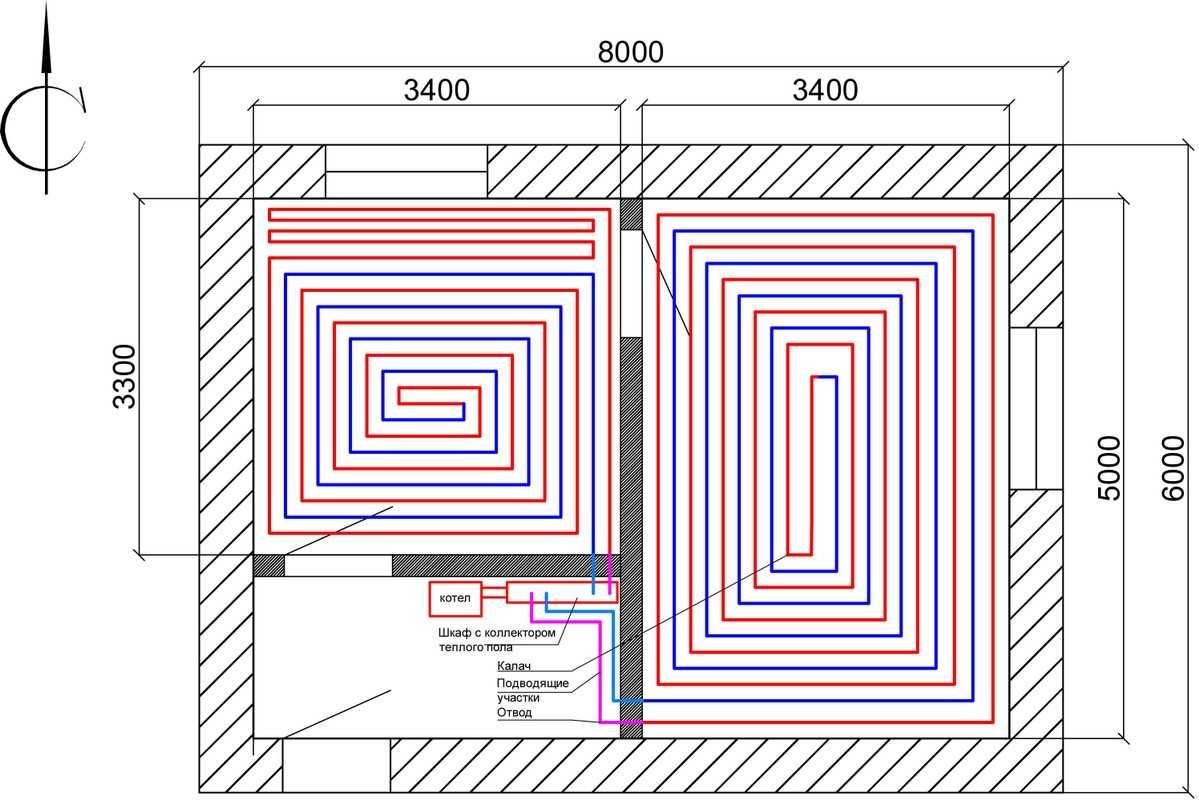
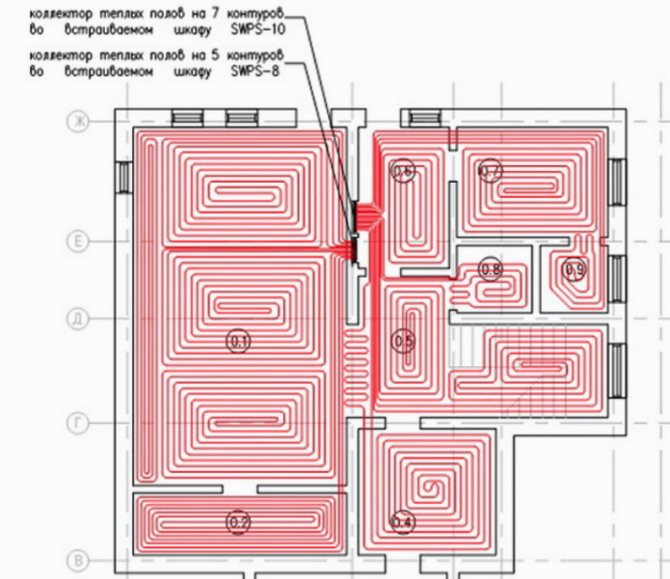
Suppose it was decided to lay pipes with a step of 15 cm. At the same time, 6.7 m.p. is required per 1 m2. pipes, therefore, an area of \u200b\u200b21 m2 needs 140.7 meters of pipes. Since for a pipe with a diameter of 20 mm the maximum length of the circuit is limited and is 120 m, you will have to make two circuits with a length of 71 m, so that there is also a margin for connecting to the collector and errors.
In addition to pipes and a collector for this room, you will need to calculate:
- the price of waterproofing under the screed. There should be enough of it so that it covers the entire room with an overlap at the joints and a margin on the walls;
- heater cost. It can be foam, polystyrene or special mats for a water floor. Fortunately, their number is easy to calculate: the packaging usually indicates how much area can be covered with its contents.
- the cost of a damper tape, the length of which will be equal to the perimeter of the room;
- the price of reinforcing mesh for the entire floor area;
- cost of screed materials. It can be either a ready-made mixture, or sand and cement separately. Sometimes a plasticizer is added to them;
- the cost of fittings and fasteners for pipes.
As a rule, when installing a water-heated floor, they are not limited to one room, so you will have to perform such calculations for all rooms, and based on these data, select a gas boiler and pump.
Any independent calculations are approximate, unless, of course, the repair organizer has a deep knowledge of physics. Even so, it is better to perform these calculations. Firstly, it will give at least a superficial idea of \u200b\u200bthe upcoming costs. They will be quite tangible, so it is advisable to decide in advance whether such repairs are affordable at the moment. Secondly, the calculations will make it possible to better understand the essence of the upcoming work, which will help save money on something and control negligent workers.
Types of warm floors
Before you make a warm floor with your own hands, you need to figure out what types of heating systems are and which ones are more suitable for a particular home.
The main advantages of underfloor heating:
- uniform heating of the room;
- comfort;
- complete autonomy.
The heat generated by these floors is effectively used for space heating. How to choose underfloor heating for your home? There are different types of underfloor heating, so you can only determine which one is better by knowing all their pros and cons. Some of them are heated with hot water (water), while others are heated with electricity (electric). The latter are divided into 3 types:
- rod;
- cable type;
- film.
All floors have their own advantages and disadvantages. So the advantages of water heated floors include:
- lack of air conversion, creating a more comfortable atmosphere in the house;
- relatively low heater temperature;
- lack of damp corners, which prevents the formation of fungus;
- normal humidity in the room;
- ease of cleaning;
- self-regulation of heat transfer when the temperature changes;
- efficiency, allowing to reduce heating costs by 20-30%;
- lack of heating radiators;
- long service life (up to 50 years).
The disadvantages of water floors can only be attributed to the fact that they cannot be used in an apartment building from a central heating system and permission from the housing and communal services services is required for their installation in such buildings.
The advantages of an electric underfloor heating include the same properties as a water floor, but besides this, they still have the possibility of repairing local faults and installation without special equipment and permits.
Warm floor do it yourself
Many people think about whether laminate flooring is suitable for underfloor heating? What materials are used for floor coverings? The disadvantages of such heating systems include:
- Restriction in choosing the type of flooring. This means that its heat transfer coefficient should not exceed 0.15 W/m2K. For a decorative coating of such a floor, tiles, self-leveling floors, granite, marble, linoleum, laminate, carpet, which have a permissive marking, are suitable. Thus, a warm floor under a carpet or under a carpet can be mounted only in compliance with the above requirements.
- The need to raise the floor by 6–10 cm.
- The inertia of heating for 3-5 hours.
- The use of furniture made of natural wood, since products made of MDF, chipboard, plastic, with constant heating, can release substances harmful to humans.
- Quite high financial costs for electricity when installing electric floors.
Taking into account all the above advantages and disadvantages of underfloor heating, it is preferable to install them in small rooms: in the bathroom, corridor, toilet, kitchen, bedroom, on an insulated balcony. Most often, masters lay a warm floor under the tile. This is due to the good heat-conducting characteristics of ceramics. Water floors are more suitable for round-the-clock space heating.
Warm floors are divided into 2 types:
- Comfortable, slightly warming screed, guaranteeing a pleasant feeling when walking. Along with them, other heating systems are also used.
- Heating, when, in addition to creating comfortable conditions, they are full-fledged heating.
For apartments in multi-storey buildings, it is better to use electric underfloor heating, and in private houses - water. A warm water floor rarely gives a specific power of more than 100 W / m2, so this heating should be used in well-insulated buildings.
Calculation of the water underfloor heating or It is better to entrust the electrical system to specialists, since not everyone will be able to calculate all the necessary indicators in accordance with sanitary standards. Calculate how much a warm floor costs, everyone can independently, using an online calculator.
Calculation rules
To implement a heating system on an area of 10 square meters, the best option would be:
- use of 16 mm pipes with a length of 65 meters;
- the flow rates of the pump used in the system cannot be less than two liters per minute;
- the contours must have an equivalent length with a difference of no more than 20%;
- the optimal indicator of the distance between the pipes is 15 centimeters.
It should be taken into account that the difference between the temperature of the surface and the heating medium can be about 15 °C.
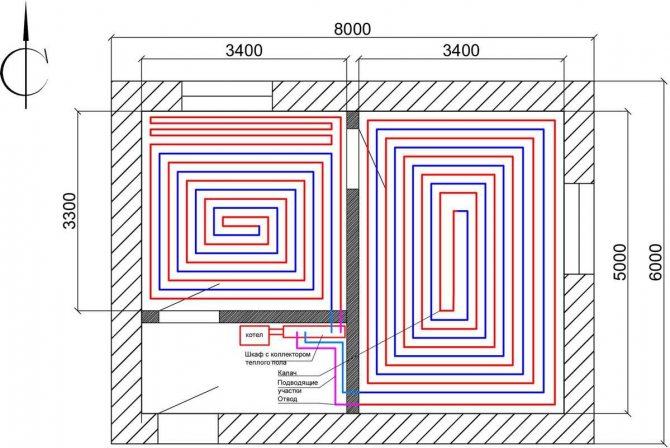
The best way when laying the pipe system is represented by a "snail". It is this installation option that contributes to the most even distribution of heat over the entire surface and minimizes hydraulic losses, which is due to smooth turns. When laying pipes in the area of external walls, the optimal step is ten centimeters. To perform high-quality and competent fastening, it is advisable to carry out preliminary marking.

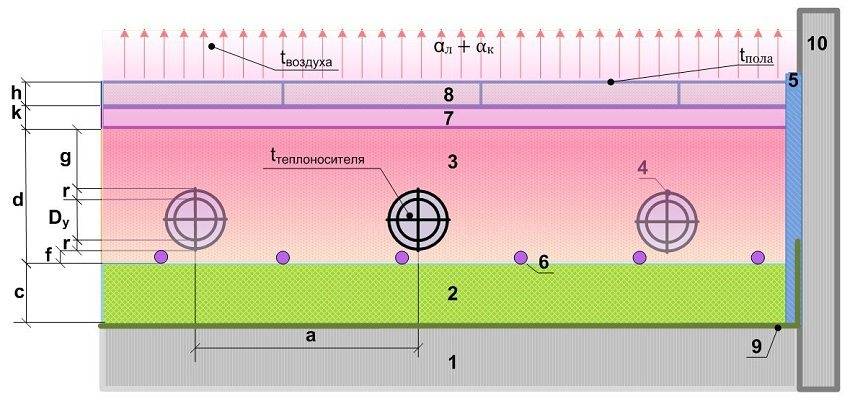


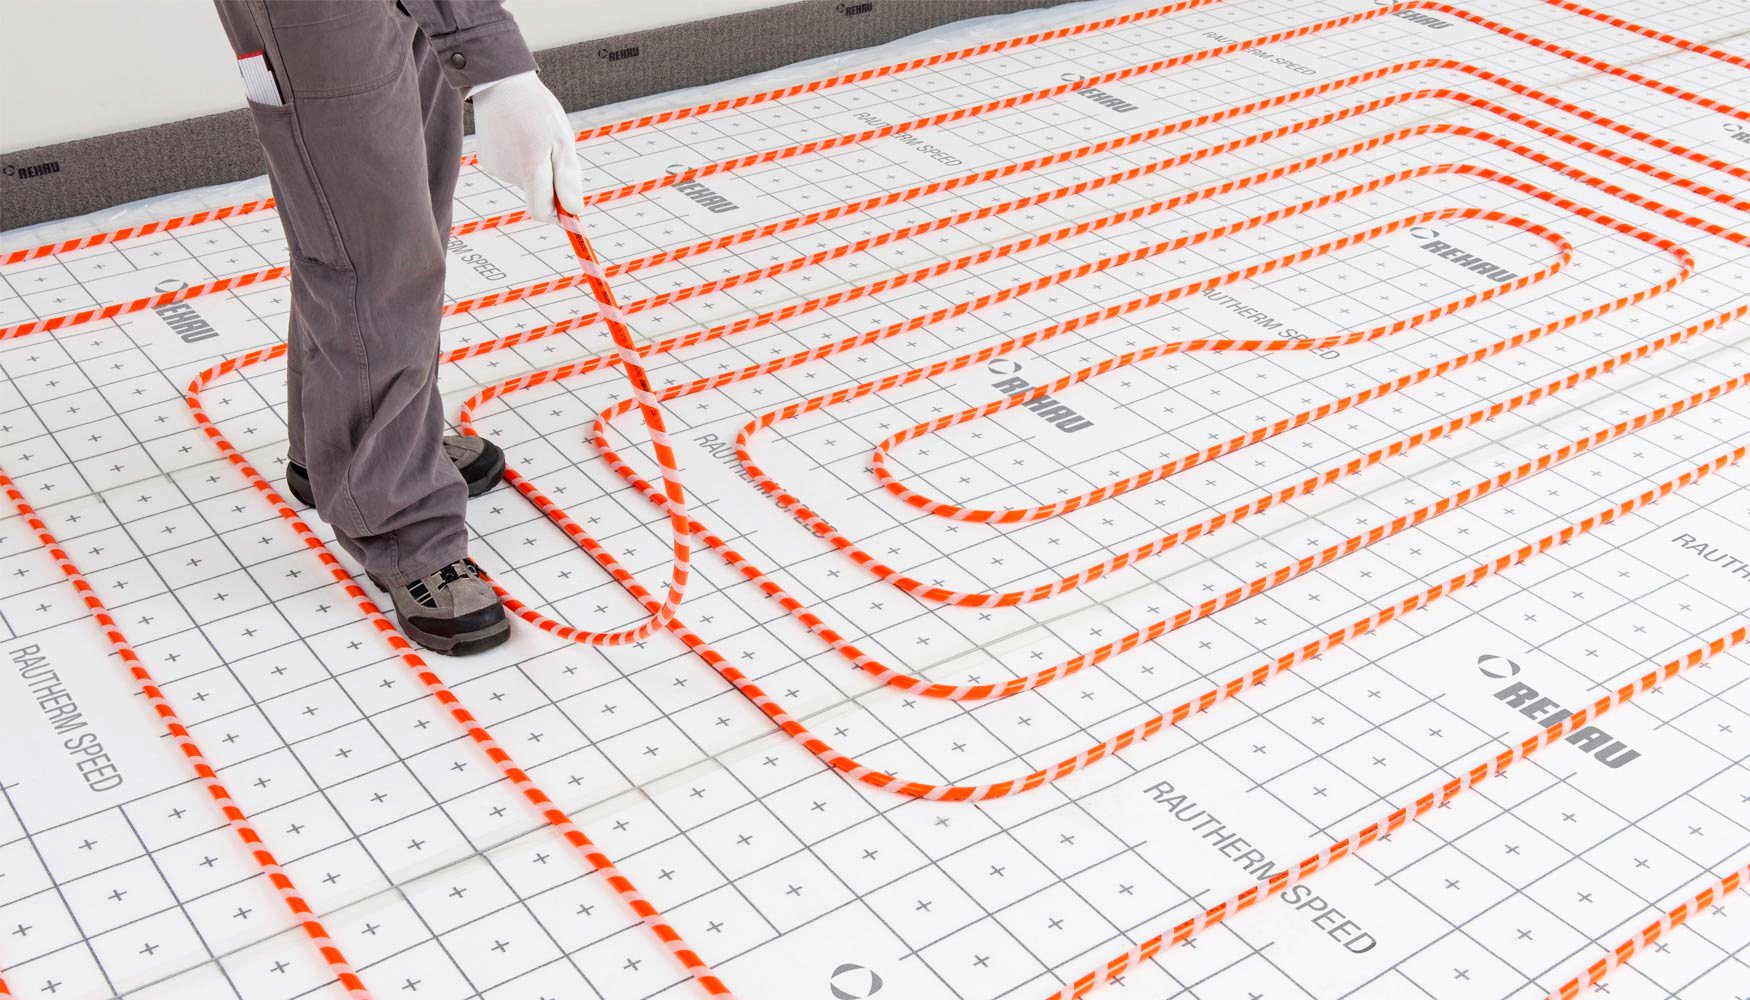
Table of heat consumption of various parts of the building
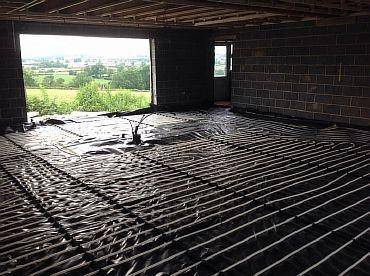
We prepare the base
The purpose of the preliminary work is to level the surface of the base, lay the pillow and make a rough screed. The preparation of the soil base is carried out as follows:
- Level the ground over the entire floor plane and measure the height from the bottom of the pit to the top of the threshold. In the recess should fit a layer of sand 10 cm, footing 4-5 cm, thermal insulation 80 ... 200 mm (depending on climate) and a full screed 8 ... 10 cm, at least 60 mm. So, the smallest depth of the pit will be 10 + 4 + 8 + 6 = 28 cm, the optimal one is 32 cm.
- Dig a pit to the required depth and tamp the earth. Mark the heights on the walls and pour 100 mm of sand, mixed with gravel. Seal the pillow.
- Prepare M100 concrete by mixing 4.5 parts of sand with one part of M400 cement and adding 7 parts of crushed stone.
- After installing the beacons, fill in the draft base 4-5 cm and let the concrete harden for 4-7 days, depending on the ambient temperature.
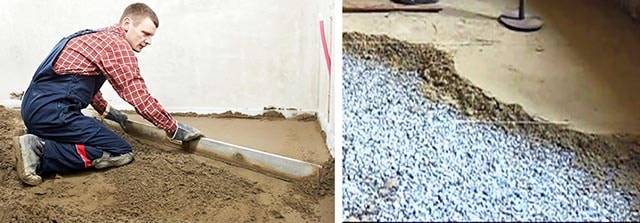
The preparation of the concrete floor consists in cleaning the dust and sealing the gaps between the slabs.If there is a clear difference in height along the plane, prepare a gartsovka - a leveling dry mixture of Portland cement with sand in a ratio of 1: 8. How to properly put the insulation on the garzovka, look at the video:
ViSoft Premium
This is a specialized bathroom design software for professionals. One of the functions is tile layout. The database contains a large number of samples - almost 39 thousand types of tiles from different manufacturers (at the time of this writing, there are 362 of them). The layout project is developed on the basis of samples that are in the database; new ones cannot be made.
There is also a Russian version
Here is a summary of the features of the program:
- The selected tile samples are automatically placed on the specified area.
- It is possible to view other layout options.
- To create a bathroom interior, you can choose plumbing from a huge base. In this case, the sets are generated automatically. If necessary, they can be corrected.
- During the creation process, the project can be deployed in any direction, evaluating the result from different points.
- Take snapshots of the result.
There are two modes of operation: drawing and sketch. Drawing mode creates a black-and-white image, which can later be “filled” with different colors. Sketch mode - immediately with color.
How to choose and calculate pipes
Before starting independent work on the construction of a hydrofloor, you should correctly select the type of pipes and calculate the optimal diameter size.
Video
Types of pipes
Today, a large number of types of pipes are produced for laying in water-heated floors; they are made of various materials.
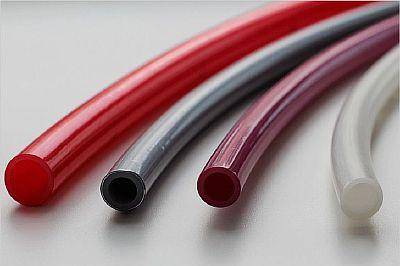
Professionals advise for self-assembly, to give preference to polyethylene pipes of the cross-linked type PEX or PERT. The ideal option is PE-Xa, which has the highest crosslink density (85%).
This makes it possible to use axial fittings with a sliding end, they can be safely mounted in a concrete structure. In addition, in cases where such pipes break, it is not difficult to return them to their original shape with the help of a building hair dryer by heating the fracture area.
Read the article: there are situations when it is necessary to connect pipes to each other in a screed, a pipeline has been pierced or it needs to be lengthened - find out how to do it.
There is no memory property in PERT circuits, therefore it can only be used with push-in fittings, which are not recommended to be hidden in a screed. But if the system is mounted from solid pipes, then the connecting nodes will only be on the collector, and such the type of pipes is quite suitable.
Experts recommend using the PE-Xa or PERT model with a layer of polyethylene, which can be outside or inside, when installing water systems. It is better to install pipes with an EVOH inner layer.
In addition, metal-plastic pipes are often installed - the price is not expensive and they are not difficult to install. There are copper pipe products that are more expensive and require protection from alkaline exposure when pouring concrete.
Another type of pipe recommended for underfloor heating is composite. Consist of two layers of cross-linked polyethylene with foil in between. The presence of an inhomogeneous material that has a different coefficient of expansion when heated can cause delamination of the circuit.


When choosing a model, you must consider:
- brand (Rehau, Tece, KAN, Uponor) is a guarantee of quality;
- marking;
- certificate of conformity for products;
- take into account the coefficient of thermal expansion of pipes;
- the cost of components required for installation.
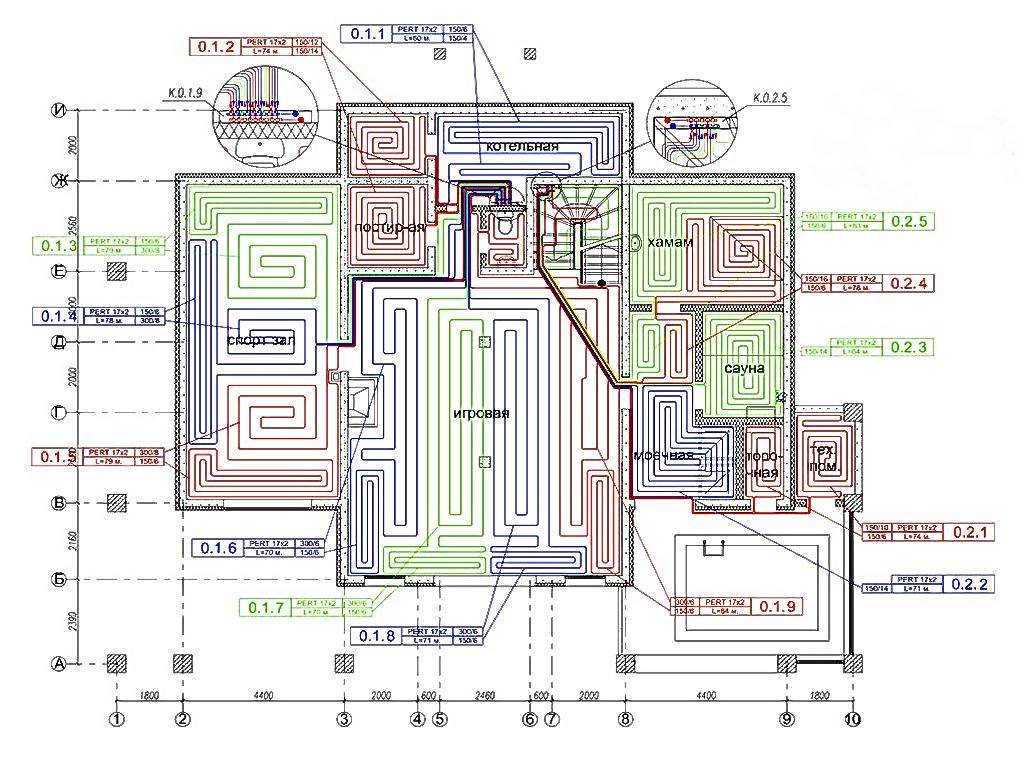
Pipe sizing
For water floors, three main pipe sizes are available: 16 * 2, 17 * 2 and 20 * 2 mm. The most popular mounting dimensions are 16*2 and 20*2.
Before purchasing a heating circuit, a size calculation should be carried out. If you are not sure you can do it yourself rightbetter entrust it to professionals. For this, you need to decide:
- with the layout of the water-heated floor;
- with floor areas where furniture will be placed and plumbing will be installed (pipes under the furniture are not installed).
A product with a diameter of 16 mm should have a contour no more than 100 meters long, with 20 mm - 120 m. That is, each should occupy a maximum of 15 square meters. m, otherwise the pressure in the system will be insufficient.
If the room is large, it is divided into several circuits. They must have the same size, the difference is allowed within 15 meters. In the presence of good thermal insulation, the standard laying step is 15 cm, it is permissible to reduce it to 10 cm.
In laying step:
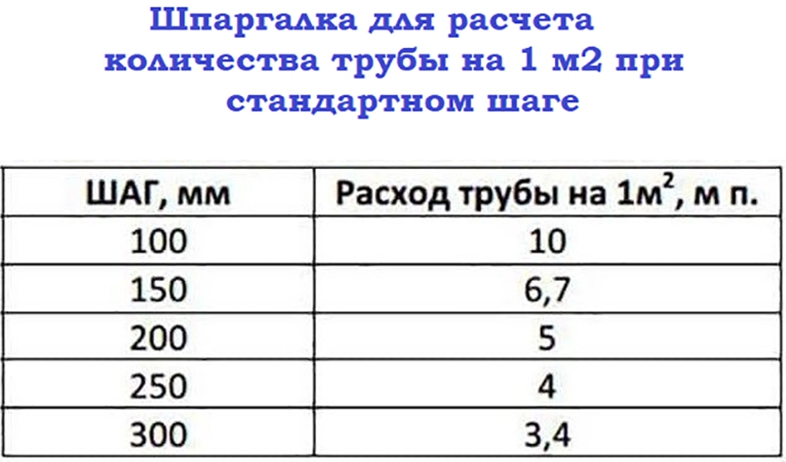
- 15 cm - you will need 6.7 meters of the heating element per 1 sq. m;
- 10 cm - 10 m.
In addition, when calculating the size of the water floor, heat losses, system power, material of pipes, ceilings and flooring are taken into account.
The standard formula for determining the size of the circuit is the heated area in square meters. must be divided by the laying step in meters. To this indicator add the size of the curls and the distance to the collector.
Materials for a warm water floor
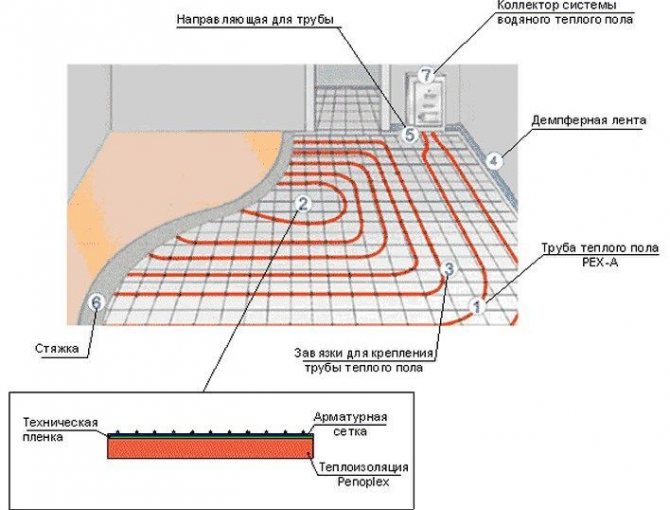
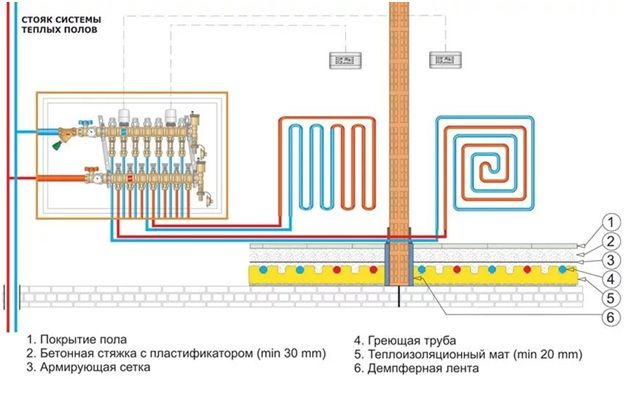
Most often they make a water-heated floor in a screed. Its structure and necessary materials will be discussed.The scheme of a warm water floor is presented in the photo below.
Scheme of a warm water floor with a screed
All work begins with leveling the base: without insulation, heating costs will be too high, and insulation can only be laid on a flat surface. Therefore, the first step is to prepare the base - make a rough screed. Next, we describe step by step the procedure for work and the materials used in the process:
- A damper tape is also rolled around the perimeter of the room. This is a strip of heat-insulating material, no more than 1 cm thick. It prevents heat loss for wall heating. Its second task is to compensate for the thermal expansion that occurs when materials are heated. The tape can be special, and you can also lay thin foam cut into strips (no more than 1 cm thick) or other insulation of the same thickness.
- A layer of heat-insulating materials is laid on the rough screed. For underfloor heating, the best choice is polystyrene foam. The best is extruded. Its density must be at least 35kg/m2. It is dense enough to support the weight of the screed and operating loads, has excellent performance and a long service life. Its disadvantage is that it is expensive. Other, cheaper materials (polystyrene, mineral wool, expanded clay) have a lot of disadvantages. If possible, use polystyrene foam. The thickness of the thermal insulation depends on many parameters - on the region, the characteristics of the foundation material and insulation, the method of organizing the subfloor. Therefore, it must be calculated for each case.
- Next, a reinforcing mesh is often laid in increments of 5 cm.Pipes are also tied to it - with wire or plastic clamps. If expanded polystyrene was used, reinforcement can be dispensed with - you can fasten it with special plastic brackets that are driven into the material. For other heaters, a reinforcing mesh is required.
- Beacons are installed on top, after which the screed is poured. Its thickness is less than 3 cm above the level of the pipes.
- Next, a clean floor covering is laid. Any suitable for use in an underfloor heating system.
These are all the main layers that need to be laid when you make a do-it-yourself water-heated floor.
Underfloor heating pipes and laying schemes
The main element of the system is pipes. Most often, polymeric ones are used - made of cross-linked polyethylene or metal-plastic. They bend well long service life. Their only obvious drawback is not too high thermal conductivity. This minus is not present in the recently appeared corrugated stainless steel pipes. They bend better, cost no more, but due to their low popularity, they are not often used yet.
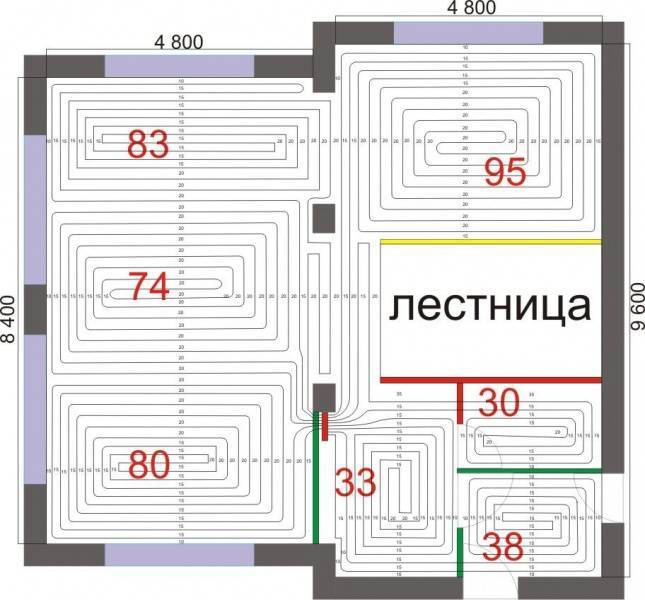
Diameter pipes for underfloor heating depends on the material, but usually it is 16-20 mm. They fit in several schemes. The most common are spiral and snake, there are several modifications that take into account some features of the premises.
Schemes for laying pipes of a warm water floor
Laying with a snake is the simplest, but passing through the pipes the coolant gradually cools down and by the end of the circuit it is already much colder than it was at the beginning. Therefore, the zone where the coolant enters will be the warmest. This feature is used - laying starts from the coldest zone - along the outer walls or under the window.
This drawback is almost devoid of a double snake and a spiral, but they are more difficult to lay - you need to draw a diagram on paper so as not to get confused when laying.
Screed
You can use a conventional cement-sand mortar based on Portland cement to fill a water-heated floor. The brand of Portland cement should be high - M-400, and preferably M-500. Concrete grade - not lower than M-350.


Semi-dry screed for underfloor heating
But ordinary “wet” screeds gain their design strength for a very long time: at least 28 days. All this time it is impossible to turn on the warm floor: cracks will appear that can even break the pipes. Therefore, so-called semi-dry screeds are increasingly being used - with additives that increase the plasticity of the solution, significantly reducing the amount of water and the time for "aging". You can add them yourself or look for dry mixes with the appropriate properties. They cost more, but there is less trouble with them: according to the instructions, add the required amount of water and mix.
It is realistic to make a water heated floor with your own hands, but it will take a decent amount of time and a lot of money.
We select the type of pipe rolling and produce their laying
Before designing a warm floor, you should decide on the material of pipe products. Products made of metal-plastic, polyethylene, galvanized or copper are allowed. The most popular models are metal-plastic and polymer.
The quality of the structure depends on the strength of the material and the integrity of the contour. It is not allowed to lay pipes on a surface that has slopes and irregularities greater than 5 mm.
Mounting, proportions and hinge pitch
Installation of a warm floor on the ground must be carried out according to a previously prepared laying plan.If the room is not rectangular, then it is necessary to draw up a diagram of separate rectangles, with its own loop loop.
In each section, taking into account the purpose of the zone and the desired level of heating, the circuit can be arranged like a snake or a snail.
When carrying out work, you must follow some rules:
- To prevent overheating of the structure, it is necessary to correctly place the pipes on the surface of the area. They are located denser around the perimeter, and a rarer contour is made in the center. You need to retreat from the walls about 15 cm.
- The step between the heating elements, regardless of the laying method, should be 0.3 meters.
- At the junction of plates and ceilings, pipe products should be separated with a metal sleeve.
- The size of the circuit should not exceed 100 meters, as the level of heat transfer will decrease.
The contour can be laid in one of two options:
- bifilar (spiral) - characterized by uniform heating, the process is not complicated, since the bending angle is 90 degrees;
- meander (in the form of a zigzag) - the coolant cools down during the passage along the highway, thereby heating the floor becomes uneven.
The system is fastened to the concrete base through the bottom layer of insulation with dowels. Each branch of the pipeline, regardless of the selected circuit layout option, must go to the switch cabinet.
The ends of the pipeline are connected to the corrector unit by crimping or soldering. Each outlet must be equipped with shut-off valves, and ball valves must be installed on the supply sections. In addition, it is worth making the thermal insulation of the pipes leading to the room located nearby.
Before pouring the final screed, it is necessary to carry out pressure testing.There must be no air in the pipes that will be connected to the corrector. To do this, the air is removed from them through drain valves
It is important that the air outlets are closed at this point.
Testing of metal products is carried out using cold water, and testing of plastic products with a double increase in pressure in the pipeline.
Pouring cement-sand screed
Mixture for pouring screed prepared from 1 part cement, 3 parts sand. Liquids need 200 grams per 1 kg of the mixture. To increase the strength of the structure, 1 gram of polymer fiber is added.
Pouring a warm floor is similar to installing a base. A reinforced screed 8 cm thick is recommended. An important point is that heated floors can only be operated after a month, this time is necessary for the screed to harden. In addition, only after that you need to proceed with the installation of the finish coating.
If groundwater is located close to the layer of the warm floor cake, you need to take care of their diversion - equip drainage below the floor level by 30 cm.
The bottom is filled with river sand or gravel. It is poured in layers of 10 cm, and wetted with water. Usually 3 layers are enough, on which you need to put geological textiles.


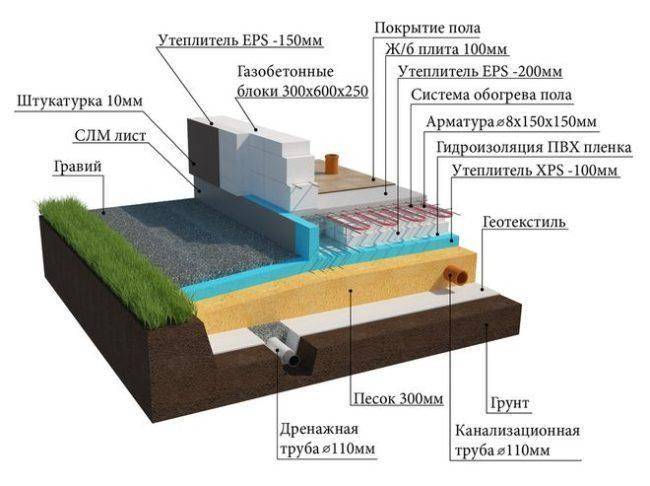
Next, you need to equip the foundation with bituminous mastic or other waterproofing material, and lay polystyrene boards as thermal insulation. In the future, the scheme for installing a water-heated floor does not differ from the standard installation.
According to experts' analysis, the main mistake in the performance of work for installing a warm floor on the ground with your own hand is a violation of technology - the absence of compensation gaps in the slab, poor compaction of the powder, improperly laid waterproofing.
A warm water floor in a private house on the ground is a complex structure, and its installation must be approached very seriously. However, by opting for this option, you will initially lay the conditions for a comfortable atmosphere in the house.
Video instructions
Warm floor power calculation
The determination of the required power of a warm floor in a room is influenced by the heat loss indicator, for an accurate determination of which it will be necessary to make a complex heat engineering calculation using a special method.
- This takes into account the following factors:
- the area of the heated surface, the total area of the room;
- area, type of glazing;
- presence, area, type, thickness, material and thermal resistance of walls and other enclosing structures;
- the level of penetration of sunlight into the room;
- the presence of other sources of heat, including the heat emitted by equipment, various devices and people.
The technique for performing such accurate calculations requires deep theoretical knowledge and experience, and therefore it is better to entrust heat engineering calculations to specialists.
After all, only they know how to calculate the power of a warm water floor with the smallest error and optimal parameters.
This is especially important when designing heated built-in heating in rooms with a large area and high height.
Laying and efficient operation of a heated water floor is possible only in rooms with a heat loss level of less than 100 W / m². If the heat loss is higher, it is necessary to take measures to insulate the room in order to reduce heat loss.
However, if the design engineering calculation costs a lot of money, in the case of small rooms, approximate calculations can be carried out independently, taking 100 W / m² as an average value and the starting point in further calculations.
- At the same time, for a private house, it is customary to adjust the average heat loss rate based on the total area of \u200b\u200bthe building:
- 120 W / m² - with a house area of up to 150 m²;
- 100 W / m² - with an area of 150-300 m²;
- 90 W/m² - with an area of 300-500 m².
System load
- The power of a water heated floor per square meter is influenced by such parameters that create a load on the system, determine the hydraulic resistance and the level of heat transfer, such as:
- the material from which the pipes are made;
- circuit laying scheme;
- the length of each contour;
- diameter;
- distance between pipes.
Characteristic:
Pipes can be copper (they have the best thermal and operational characteristics, but they are not cheap and require special skills, as well as tools).
There are two main contour laying patterns: a snake and a snail. The first option is the simplest, but less effective, as it gives uneven floor heating. The second one is more difficult to implement, but the heating efficiency is an order of magnitude higher.
The area heated by one circuit must not exceed 20 m². If the heated area is larger, then it is advisable to divide the pipeline into 2 or more circuits, connecting them to a distribution manifold with the ability to control the heating of floor sections.
The total length of the pipes of one circuit should be no more than 90 m. In this case, the larger the diameter chosen, the greater the distance between the pipes. As a rule, pipes with a diameter of more than 16 mm are not used.
Each parameter has its own coefficients for further calculations, which can be viewed in reference books.
Calculation of heat transfer power: calculator
To determine the power of the water floor, it is necessary to find the product of the total area of \u200b\u200bthe room (m²), the temperature difference between the supply and return fluid, and coefficients depending on the material of the pipes, flooring (wood, linoleum, tiles, etc.), other elements of the system .


The power of a water heated floor per 1 m², or heat transfer, should not exceed the level of heat loss, but not more than 25%. If the value is too small or too large, it is necessary to recalculate by choosing a different pipe diameter and distance between the contour threads.
The power indicator is the higher, the larger the diameter of the selected pipes, and the lower, the larger the pitch is set between the threads. To save time, you can use electronic calculators for calculating the water floor or download a special program.
Calculations
So, let's move on to the main question of our article: how to calculate a warm floor?
- First of all, it is necessary to calculate the length of the pipe that will be used in the heating system. There is a special simple formula for this, where the heated area of \u200b\u200bthe room is divided by a step, which is multiplied by a constant - 1.1. What is this indicator 1.1? In fact, these are the costs of the pipe for contour turns.
- The second - we determine the power of the warm floor. Since all calculations are carried out relative to the usable heating area, before proceeding with these calculations, it is necessary to designate this usable area. In fact, this is a floor on which furniture and other decorative elements will not stand.With electric underfloor heating, this area is defined as 70% proportion to the total area of the room.
And now we return to our first definition, what kind of heat source will the warm floor be used by you (as the main or auxiliary)? If it will be the main heating system, then a specific power equal to 150-180 W / m² is used for the calculation. If as an auxiliary system, then 110-140 W / m².
Contour laying type
But that's not all. Of great importance is the type of room where the floor heating is installed. Below is a table where we show the rooms and the warm floors recommended in them in relation to the power used.
| room | Underfloor heating power, W/m² |
| living rooms | 110-150 |
| Bathroom | 140-150 |
| Balcony or loggia (attached) | 140-180 |
The dependence turns out to be direct: the lower the thermal insulation qualities of the room, the more power it should have underfloor heating. It is necessary to add here the presence of an additional source of heat. For example, in the kitchen, you can install underfloor heating at the rate of 110-120 W / m². True, it should be noted that all power indicators given in the tables are given with a certain margin of up to 25%. And do not forget about the number of storeys of the location of apartments, when it comes to electric underfloor heating in city apartments. If this is the first floor, then it is worth adding fifteen percent to all digital indicators. Especially if the apartment building does not have a heated basement.
Contour layout
Calculation example
Let's look at a small example of how to correctly calculate the power of a water-heated floor installed in a 15 m² kitchen.We will assume that the kitchen is located in a private house, so as not to contradict the statement of experts - water heated floors in city apartments where centralized heating networks are used are not installed.
So, first of all, the usable area is determined. The dimensions of the refrigerator, hob, sink and various furniture are deducted from the total area. Let it be approximately 5 m².
The total heat loss in any case will be calculated taking into account the total floor area, that is, 15 sq.m. If we take the standard heat transfer of any heating system, which is 100 W per 1 m², then we can get that the heat loss of our kitchen is 1500 W. This is the power that a warm floor should produce. We add here the safety factor, which varies between 1.2-1.3. Let's take the minimum, so the heat loss is 1800 watts.
Heated floor in the kitchen
Now we calculate the length of the contour. This formula is known to us, it was written about above. It requires a usable area - 10 m², a laying step - choose, for example, 20 cm, and an additional coefficient of 1.1. In the end, we get - 45 m.
Now, in order to determine the maximum power of the warmest floor, it is necessary to divide the total heat loss of the room by the usable area: 1800:10=180 W/m². If you reduce the laying step, then you can reduce the specific power of the circuit. With an increase in the usable area, the power also increases. By varying various dimensional indicators, it is possible to change the purely technical characteristics of the heating system. And the cost of the structure itself will depend on this.


