- Instructions for an online drywall calculator
- Helpful Hints
- Video description
- Briefly about the main
- Structural sheathing
- Choice of sheet thickness
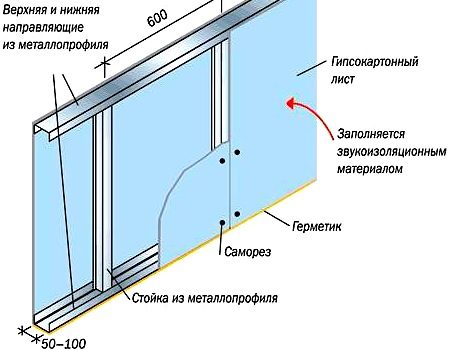
- The total thickness of the septum
- Alternative options for increasing stiffness
- How to choose profile sizes
- What to buy, how to calculate?
- simple drywall partition
- How is the frame of drywall partitions arranged?
- How to sheathe walls with drywall
- Installation of drywall on the frame
- Installing drywall with glue
- Making a doorway, installing crossbars
- Brick wall laying
- Making a doorway in a partition
- The subtleties of calculating dry plaster
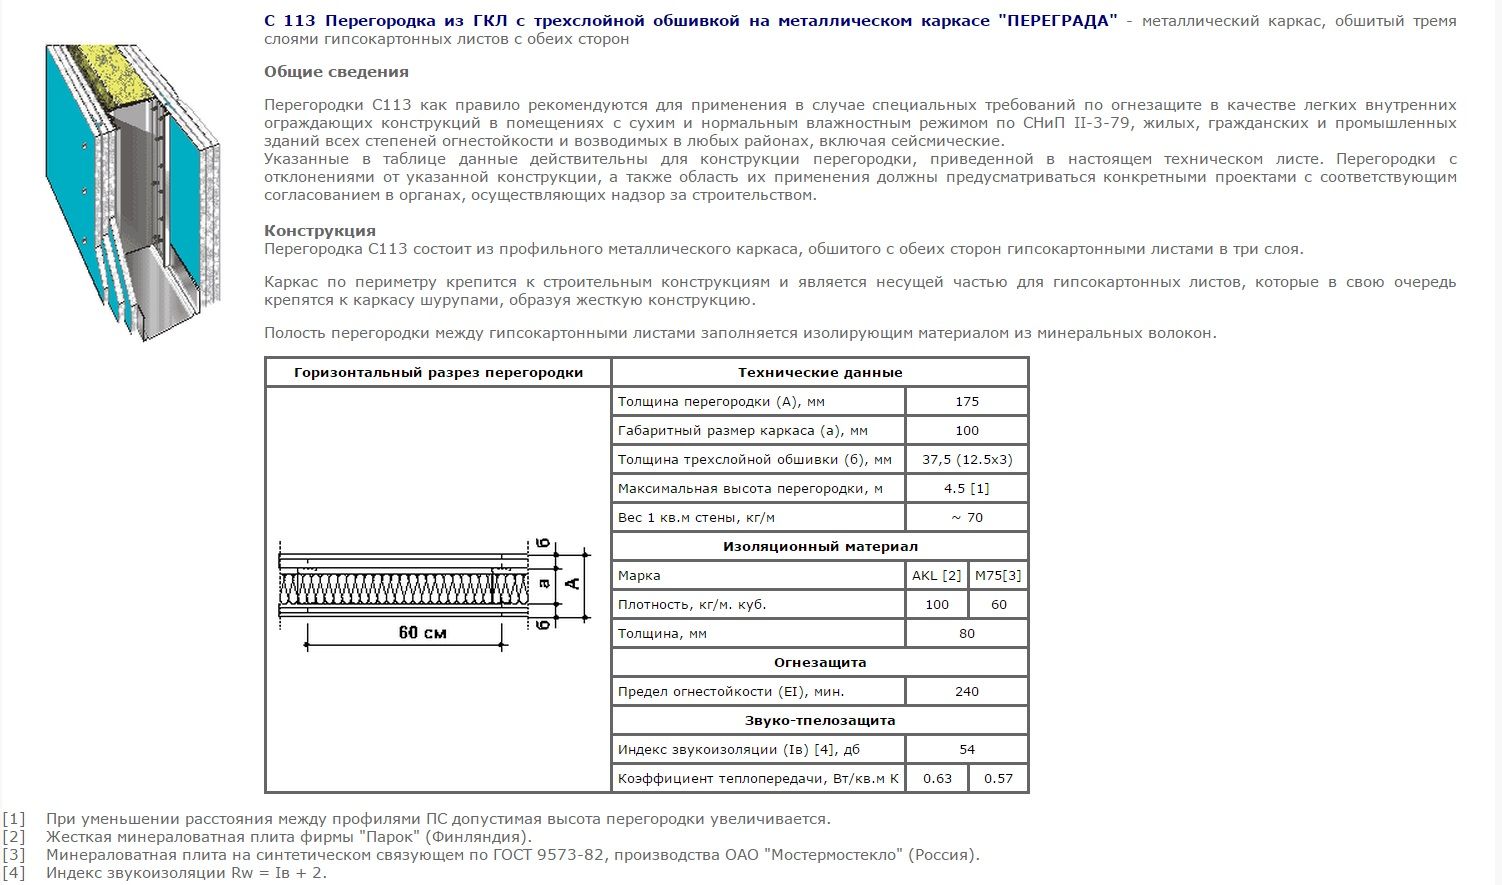
- Types and features of drywall partitions
- From a metal profile
- From a wooden beam
- Profile for plasterboard partitions
- Gypsum board partition profile for Knauf partition
- Gypsum board partition profile for Gyprock partition
- Profile size table for drywall Knauf
- Size table of PS Giprok profiles
- Profile size table PN Giprok
Instructions for an online drywall calculator
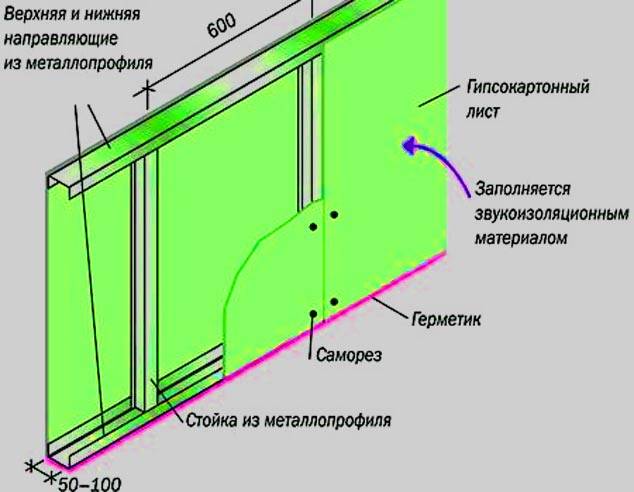
To calculate drywall for a wall, partition or ceiling, first fill in the dimensions in millimeters:
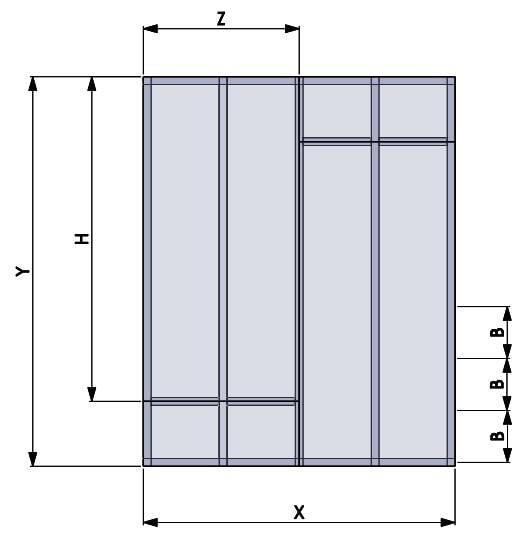
Y - The height of the partition or wall (length of the ceiling) to be sheathed.
X - The width of the wall, partition or ceiling.
The Y and X values depend on the size of your room and the design decision, they are easy to measure with a construction tape measure.
H - Sheet length. Standard length of gypsum board according to GOST 6266-97 “Gypsum board sheets. Specifications” is 2500 mm. Also, this material can be produced in lengths from 1500 to 4000 mm.
Z - Sheet width. According to the standard, the value Z = 1200 mm, however, depending on the manufacturer, the width of drywall can be from 600 to 1500 mm. Be sure to check the dimensions of drywall sheets with the supplier before purchasing.
Consumption of materials:
S - The number of rack profiles per drywall sheet is selected based on the width of the facing material. It is optimal to place rack profiles every 600 mm (it is possible to reduce the pitch to 300-400 mm if an increased load-bearing capacity of the structure is required). The S value should be chosen between 2 and 4.
V - The number of layers of drywall. For a wall, one layer of plasterboard is usually sufficient. If additional strengthening, leveling and soundproofing is necessary, which is important for arranging partitions, more layers may be needed (optimally no more than two). Increasing the number of skin layers significantly reduces the size of the room, and increases material consumption.
The calculator features allow you to select a V value from one to four.
B - The distance between the self-tapping screws for fastening the gypsum board to the profile is taken from 100 to 250 mm.
N1 - Primer consumption rate for processing 1 m2 of surface. The consumption of the primer is mandatory indicated by the manufacturer of the goods on the packaging, and you can easily find it there. However, these are average costs.The actual consumption will depend on the type of surface to be primed, season and weather conditions and the method of applying the primer. Therefore, a margin of up to 10% should be made in excess of the consumption declared by the manufacturer.
N2 - Consumption of putty per square meter (for starting treatment, i.e. the first layer over drywall) depends on the characteristics of the material used and the curvature of the treated surface. For a starting putty based on gypsum and lime, the approximate consumption is 0.8-1.0 kg per m2 (provided that the layer thickness is up to 10 mm). It should be remembered that the consumption declared by the manufacturer on the packaging is often given at a thickness of 1 mm. If a thicker layer is required, then the consumption will increase. It is also recommended to stock up on starting putty 10-15% more than the indicated consumption.
N3 - Consumption of finishing putty is from 0.5 to 1 kg / m2 (with an optimal application thickness of 0.5-1 mm).
It may seem that drywall is a fairly smooth material that does not require additional leveling before painting, however, putty is needed not only to make the surface even, but also to increase strength, increase adhesive properties and reduce the absorbency of the cardboard base. The paint on the puttied surface holds better, and its consumption is reduced.
N4 - The amount of paint to cover 1 m2 of surface depends on the type of paintwork material, the method of application and the quality of the surface itself. The average paint consumption per square meter is about 0.2 kg. Check with the manufacturer or supplier for the exact consumption of a particular paint material.
Please note that if a roller is used for painting, then it cannot be changed until you cover the entire area of \u200b\u200bthe wall or ceiling, since differences in texture will appear when changing (i.e., the entire area should be painted with one roller)
By checking the “Black and white drawing” item, you will receive a drawing that is close to the requirements of GOST and you will not need color ink or toner to print it.
Click Calculate.
The calculator will help you calculate the required amount of materials for cladding walls, ceilings or partitions with drywall. Find out how many sheets of drywall, guide and rack profile (in meters or pieces of standard length), self-tapping screws for fixing drywall sheathing and assembling the frame (and their total number) are needed. The program will also calculate how much sealing and reinforcing tape, insulation, primer, starting and finishing putty and paint will be required. This will minimize the risks of acquiring excess material for wall cladding with plasterboard, as well as their further finishing and, accordingly, reduce your repair costs.
Please note that the calculation does not take into account openings for doors and windows.
Helpful Hints
Disputes among builders about the optimal time for the construction of plasterboard walls do not subside. Some believe that these works must be performed after pouring the screed. The second half believes that walls are erected first and after they are protected with a polyethylene film, pouring is carried out.
Drywall manufacturers recommend that work be done before clean floors are installed. In this case, all "wet" work should be completed.Therefore, the screed is first poured, then a partition is constructed from the gypsum plasterboard, and at the end, clean floors are mounted.


If a plasterboard partition is installed in a country house in which heating is carried out with certain interruptions, cracking of its seams is inevitable. To minimize these defects, it is necessary to use only high-quality putties and reinforcing tape.

Seal seams with special tape
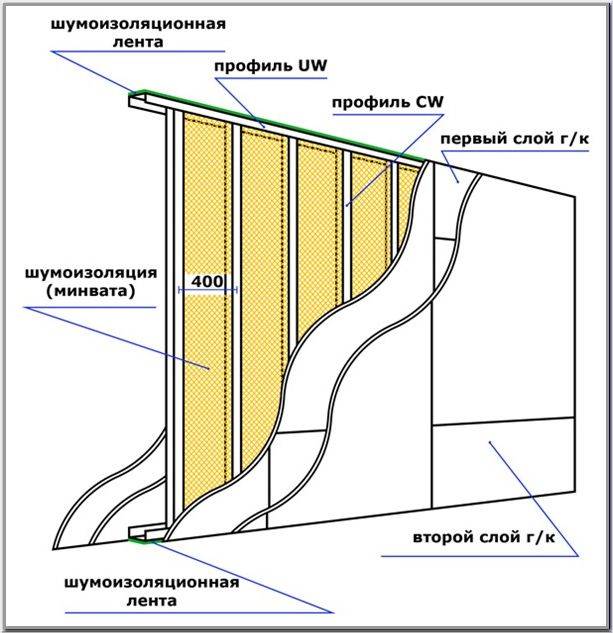
In order to increase the sound insulation of the partition, you can use a double covering with sheets. Or apply a special cork material 4 mm thick, which will add, as in the case of a double skin, about 3 decibels to the sound insulation. In 6 decibels, the double frame of the spaced type increases the sound insulation.
Video description
Finishing a plasterboard partition for decorative plastering in the video:
Briefly about the main
Drywall is one of the first materials that will be remembered when deciding how to quickly build interior walls - what is the best way to do this work.
Along with other building materials, the use of gypsum plasterboard looks like a more preferable option. Finished walls practically do not require additional finishing and, after a little puttying, they are ready for painting or wallpapering.
Depending on the required characteristics of the partition being erected, the number of GKL sheets required for operation must first be calculated. This is quite simple to do, since the dimensions of the sheets in each type of material are standard.
Installing drywall, although it requires some skill, is generally a fairly simple operation.
Source
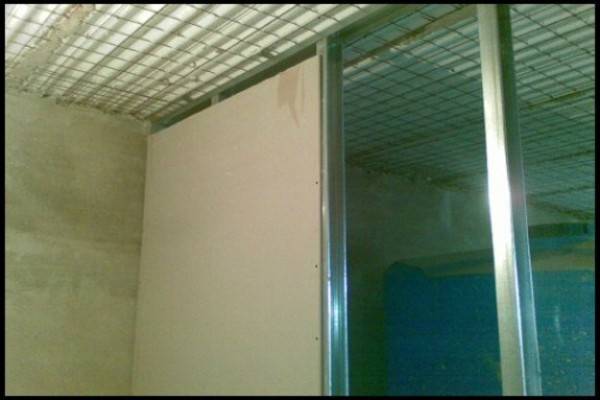
Structural sheathing
When the metal structure has been assembled, we proceed to sheathing it with plasterboard sheets. To sheathe the structure with your own hands, you must also adhere to certain recommendations. The lining of the partition is as follows:
- We put solid sheets in the middle, and we sheathe the edges with pieces. So trimming will be less noticeable;
- to obtain pieces of the desired size, we make markings on the sheets and cut them with a knife;
- next we sheathe the doorway;
- the edges of the pieces must be processed with a planer;
- the fastening of drywall sheets is carried out so that the edges fall into the middle of the profiles;
- the screwing pitch of the self-tapping screws is 15-20 cm. And the screwing depth into the material is 1 mm.
 Partition sheathing
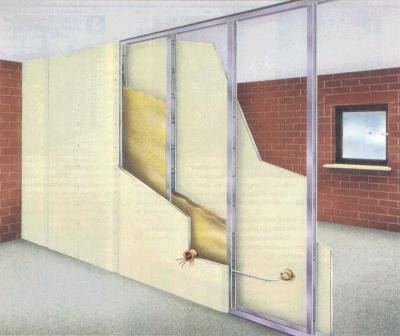
Partition sheathing is first carried out on one side. Then we put soundproofing material inside. Most often, mineral wool or isover is used as such a material. The sheathing of the structure on one side allows you to make the insertion of sound insulation more convenient. After installing the soundproofing layer, sheathing with drywall plates is carried out on the other side.
Choice of sheet thickness
Of course, the profile determines the main size of the false wall in terms of thickness, but drywall also makes its contribution, which is available in three sizes.
Thickness can be:
- 12.5 mm - the most suitable type (and thickness) for creating partitions;
- 9.5 mm - used for suspended ceilings;
- 6.5 mm - the thinnest type (arched). It turns out to be indispensable when mounted on a curved metal profile frame, it bends much easier.
Plasterboard constructions allow you to perfectly divide the space of the room, but in no case should you forget about planning a passage or a doorway
The total thickness of the septum
Thus, the total thickness of drywall partitions is determined by the thickness of the profile used and the thickness of the sheet.
We can list the following most widely used options for partitions in thickness (without taking into account a slight error in fasteners and finishes, which can give an increase of 2-4 mm):
125 mm - PS profile 100 mm + 2 sheets on both sides. Such a thickness fully meets the long-term standards for the execution of internal walls, made in a capital way during panel construction.
73 mm - 65 mm arched PP profile + 2 sheets of the thinnest drywall on both sides. The thinnest partition that can be obtained in a drywall-profile-drywall combination. Such a false wall with a minimum thickness is only decorative in nature; you should not place any hopes on it in terms of load. (see also the article Profile for drywall partitions: the basis of the false wall frame)
Alternative options for increasing stiffness
The given two sizes are boundary in terms of rigidity - maximum and minimum. But design goals sometimes force you to create a variety of combinations. On the widest PS profile, you can apply a layer of the thinnest drywall by combining several layers at once. At the same time, however, you will have to stock up on a fair amount of additional self-tapping screws.
As the installation progresses, the room is literally changing before our eyes, but a preliminary calculation of the ratio of the width of the drywall sheets and the location of the profiles is necessary
On a standard sheet measuring 2.5x1.2 m, about 60 self-tapping screws are required. If you decide to lay 2 layers one on one, the first layer will require no more than 6-8 self-tapping screws 2.5 cm long. They must be placed in increments of 1 m. But the second layer will already require 4 times more fasteners 3 long, 5 cm, while the installation step should be 25 cm.
Useful advice! When mounting on a metal frame of sheets on both sides, follow the old building rule of staggered placement. Move the sheets on the reverse side exactly half the width. Such a simple technique can significantly increase the rigidity of the entire structure.
If the thickness of the partition significantly exceeds the thickness of the structure (the profile is two plasterboard sheets), special care will have to be taken about the end of the false wall
Good design requires maximum use of all available space. By creating a wider false wall, you can provide yourself with additional space at the end. In this situation, you will have to take care of increasing the reliability of the frame by introducing additional horizontal crossbars into the structure. (See also the article How to make a drywall niche: tips and tricks)


Not a single instruction will teach you how to do this, fantasy and design ideas prevail here, and the source material is still the same - 4 types of metal aluminum profiles, fasteners and photos of possible embodiments.
Let's not forget about such an opportunity as a wooden frame - in some cases it may seem more convenient than a frame made of metal profiles
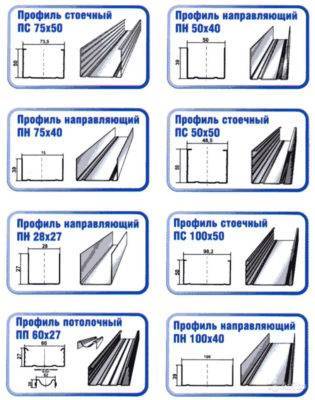
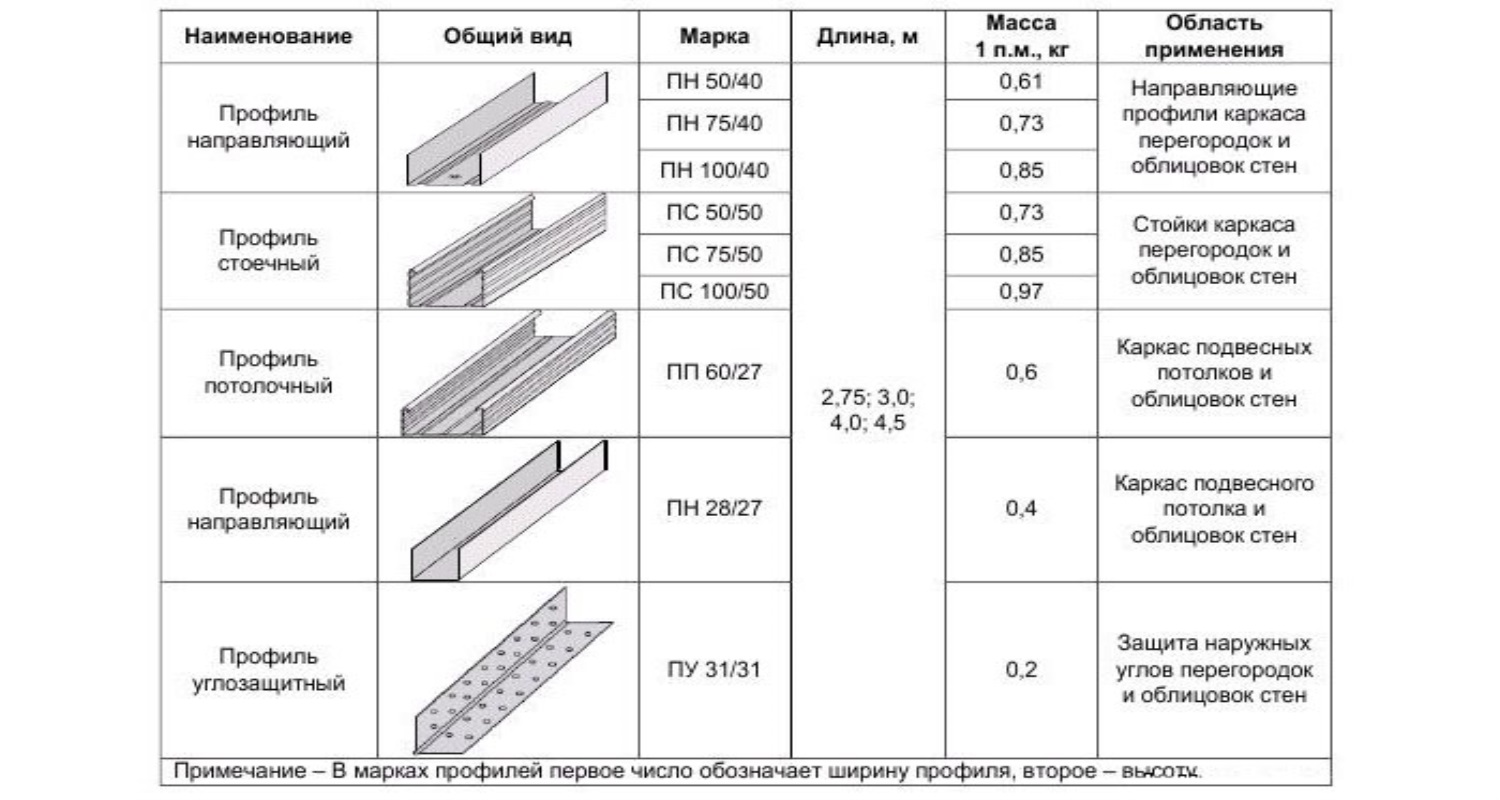
How to choose profile sizes
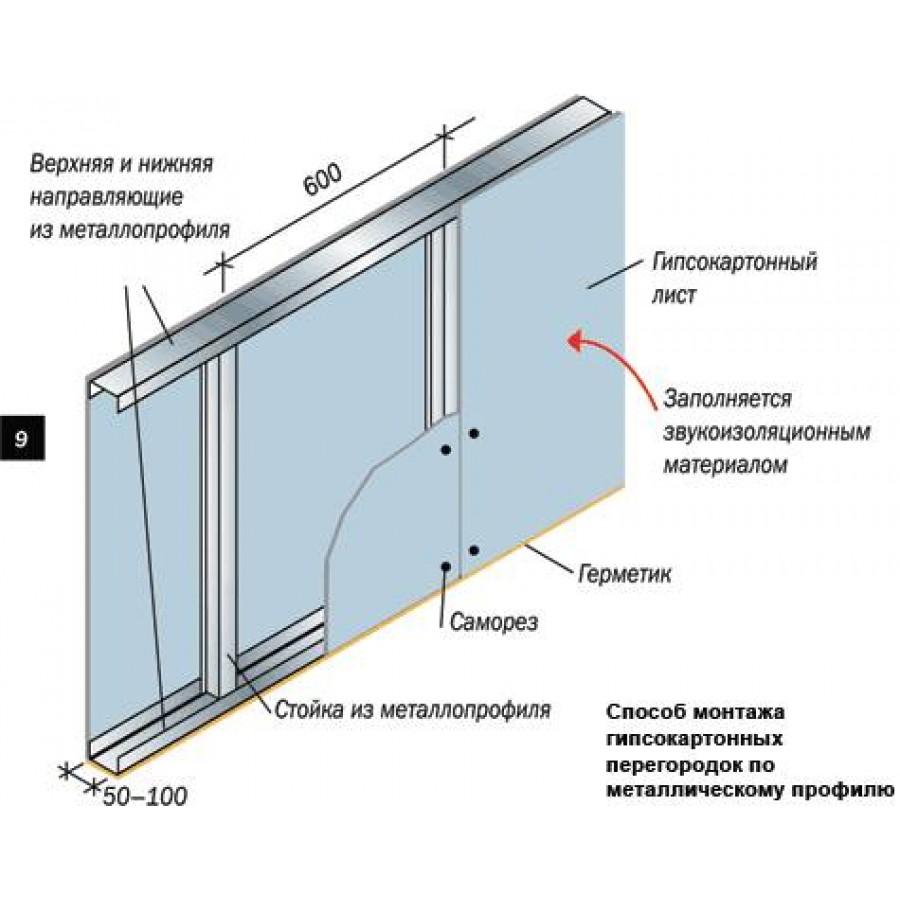
They construct partitions from drywall profiles - horizontal (guides) and vertical (rack-mount).They are U-shaped, made of galvanized steel. Their parameters (mm):
- Cross-section of guides - 50x40, 75x40, 100x40, rack-mount - 50x50, 75x50, 100x50.
- Length - 3000, 3500, 4000.
- Thickness - from 0.5 to 2.
The size of the product is selected based on the height of the ceilings, planned loads, sound insulation requirements, etc.
Please note: the rack must fit snugly into the guide. For example, for a horizontal element with a section of 50x40, vertical sections of 50x50 are suitable
Often, to save the area of the apartment, the wall is made only 7-8 cm on a frame of galvanized steel profiles 50 × 50. Such a system is highly susceptible to vibrations, and 0.5 cm thick mineral wool is not enough to comply with building codes for sound insulation (41 dB).
The system should be assembled from 50x70 or 50x100 elements. You can also take dry knotless wooden blocks - some experts believe that this option is even better in terms of airborne sound insulation.
In addition, the thickness of the profile is also important. For the inner wall, designs of at least 0.6 mm are chosen. If you use thinner parts, then when fixing the plates, the screws can scroll, which reduces the strength of the structure. There are already products on the market, but they have insufficient rigidity and therefore should not be used. Otherwise, there is a risk of sagging.
What to buy, how to calculate?
First, you need to decide on the size of the required partition. Having determined the number of sheets on one side, do not forget that the same volume of sheets will be required to sew the second side of the partition. Among the materials you will also need:
- Guide profiles, size 50x40. You need enough profile to sheathe the entire perimeter of the partition with it.
- Rack profiles 50x50.They differ from guides by shelves at the top and bottom. The calculation is carried out individually, based on what type of installation will be used by the master.
- Dowels and self-tapping screws, 45 mm long - for fixing the guide profiles to the floor, walls and ceiling
- Self-tapping screws for metal 35mm - for fixing drywall to the frame;
- Self-tapping screws with a 10 mm press washer for attaching profiles to each other;
- Perforated paper and plaster putty.
In addition to the material, you need to ensure the availability of construction tools. If there is no such thing at home, in order not to spend money on buying it, you can rent equipment. In the installation, a puncher, drill, plumb line, level, screwdriver are useful.
simple drywall partition
Repairs should begin with the construction of plasterboard partitions from the choice of the thickness of the product being erected. Standard interior partitions with a door opening have an optimum thickness of 125 mm if a 75 mm thick profile is used, which is sheathed on all sides with a double layer of drywall from 6.5 mm (arched) to 9.5 mm (ceiling) thick.
If the ceiling height is more than 4 m, then it is advisable to use profiles of 100 mm, and the thickness of the plasterboard partition will be 150 mm (two layers of plasterboard).
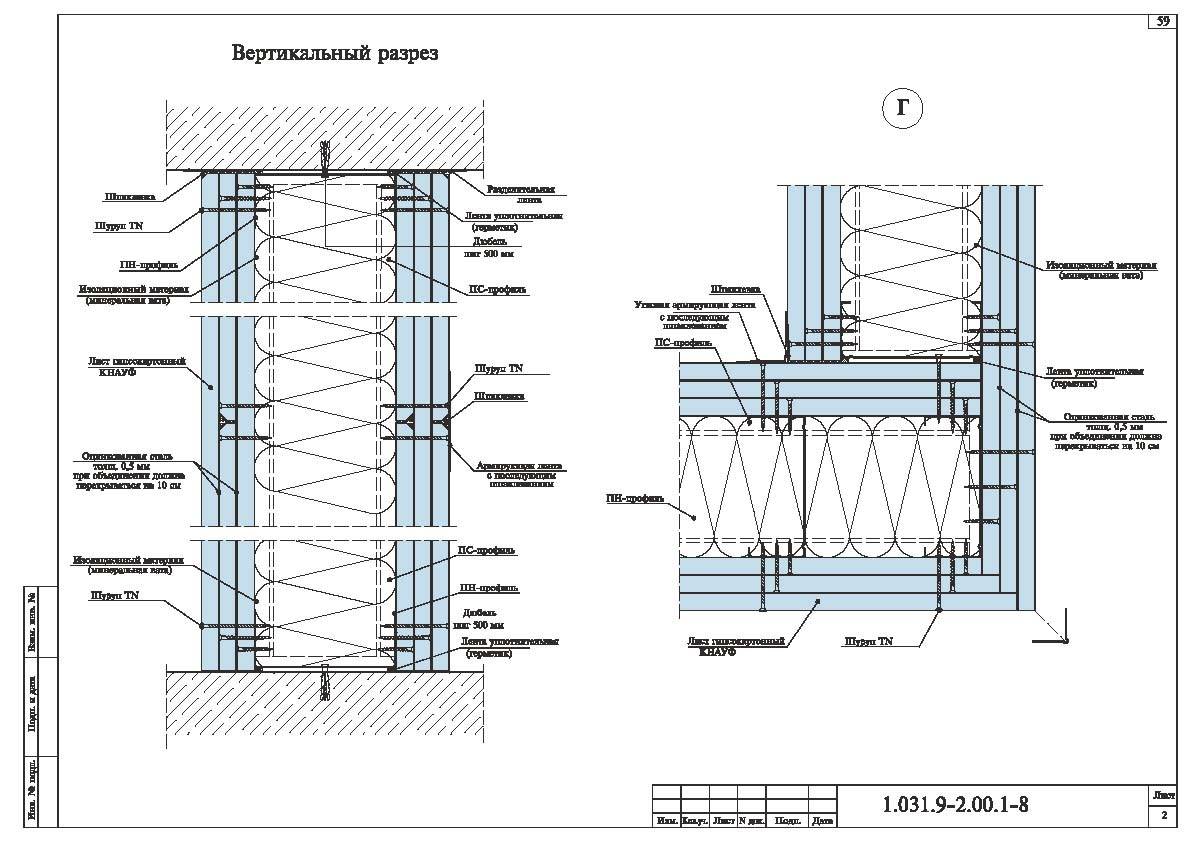
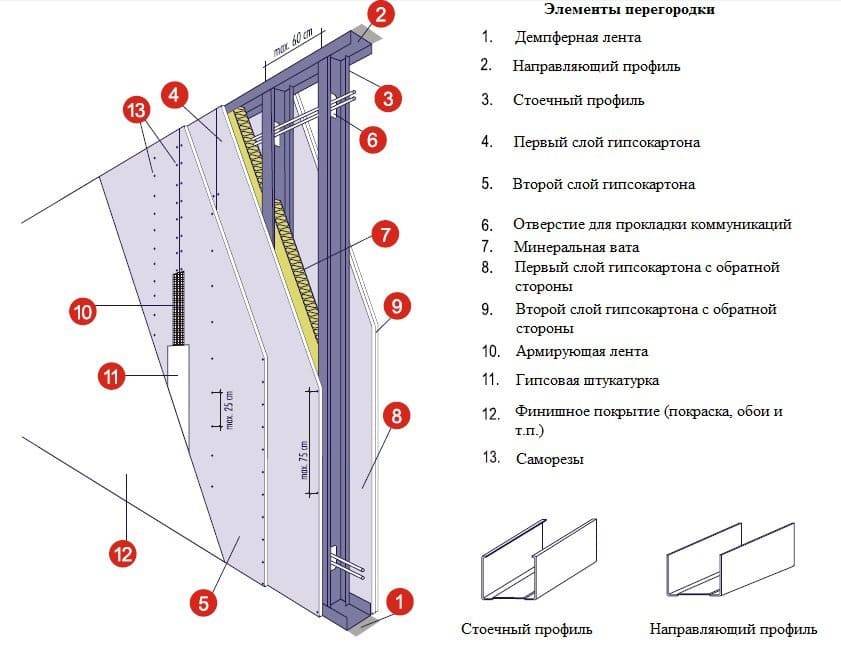
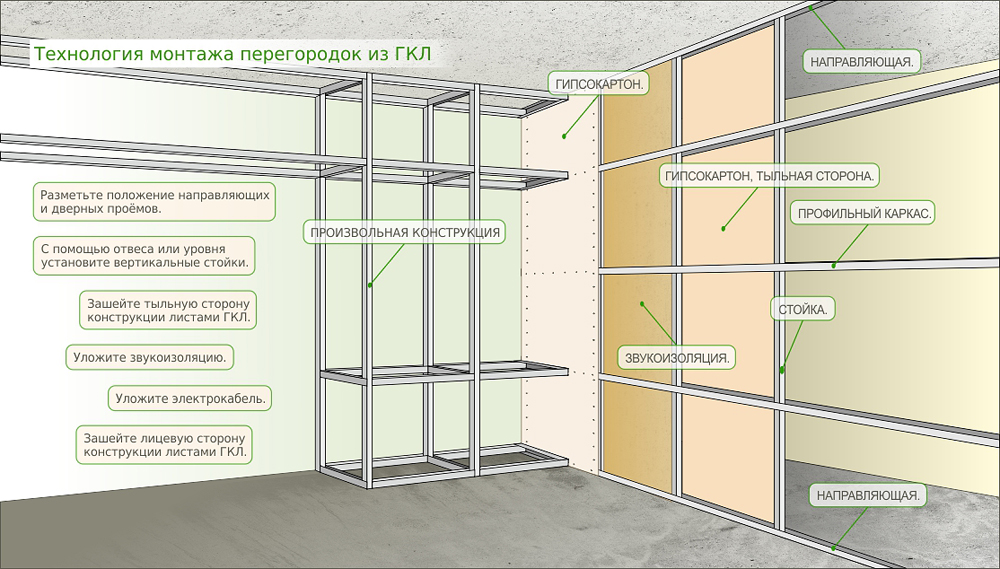
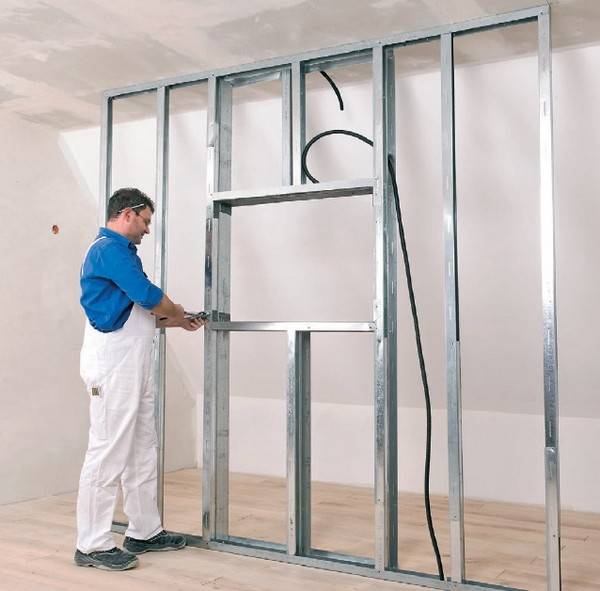
How is the frame of drywall partitions arranged?
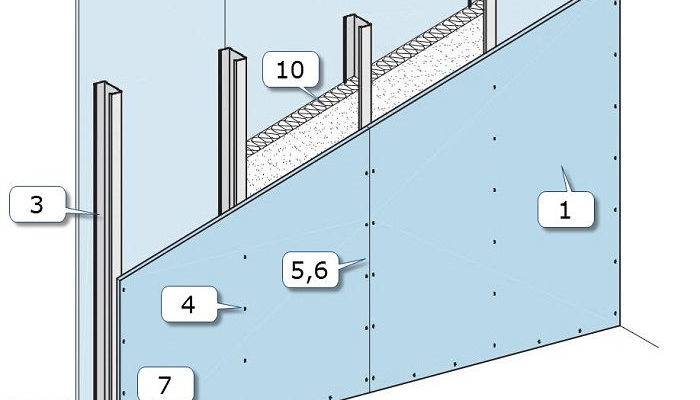
The device of a metal frame for a partition: a) with a flat ceiling; b) with ribbed floor 1 - reinforced concrete floor; 2 - porous rubber; 3 - guides PNZ-PN7; 4 - racks PS1-PSZ; 5 - self-drilling screws; 6 - racks PSZ-PS7; 7 - leveling screed; 8 - inserts for attaching boxes; 9 - dowel-nail; 10 - clean floor level; 11 - fastening the rack to the guide notch; 14 - ribbed plate.
Fastening of the guide parts is made by dowels to the ceiling and floor. To improve sound insulation, an edge tape is glued to the outer side of the wall (the plane of contact between the floor and the profiles). Sections of the rack, pre-cut in height from each other at a distance of 6 cm, are installed in the guide. Planks are fastened with a cutter or self-tapping screw.
Between the rack strips, you need to install jumpers at half the height of the sheet and at the border of the drywall sheets (after 2.5 m). It must be taken into account that the drywall is fixed in a checkerboard pattern, which means that the jumpers are fixed at a distance of 2.5 m from the floor and ceiling. There are several ways to make and install jumpers. Choose the one that is closer to you.
Method 1. Make cuts at an angle of 45 degrees along the edges of the guide bar and make semicircular edges. Using self-tapping screws or a notcher, fix the jumper on the racks. This method is good because this type of jumper is suitable for any side of the profiles. The downside is their low strength.
Method 2. V-shaped cutouts are made on the planks, then they are bent to the inside, and the edges of the profiles are fixed to each other. The advantage of this method is the greater strength of the structure. The negative side is the possibility of using this technology only for materials that are collected in boxes.
Method 3. The first two technologies are combined. An incision on one edge is made according to the first method, and on the second - according to the second. The advantage is the possibility of using for slats, regardless of their location in relation to each other.This design is more rigid than in the first case. But the downside is the lower rigidity than the design of the second type.
Method 4. Separately, a structure is assembled from pieces of the rack and guide bars. A piece of a guide profile 10 cm long is cut off, into which a jumper is inserted from the rack bar. A plus can be considered the maximum use of the remnants of guide sheets. And due to the use of a rack bar as a jumper, the structure is as rigid as possible. The weak side is financial: the use of rack-mount strips has a higher cost.
Then drywall is attached to one side of the wall. If you plan to fix drywall to the side in such a way that a double layer is formed, then you can only “bait” the first layer, a distance of up to 750 mm is possible between the screws. And already the second layer must be fastened with self-tapping screws with a pitch not exceeding 250 mm. Keep in mind that drywall must be fixed in a checkerboard pattern.
Then it is necessary to fill in layers of rock wool as a sound-absorbing material and attach drywall to the other side of the wall.
How to sheathe walls with drywall
To start work, you need to prepare inventory. You can start plasterboard sheathing only if you have the following tools:
- Hammer, tape measure, Phillips screwdriver, pencil.
- Screwdriver, perforator, drill with a diameter of 6 mm.
- Plumb or laser level.
- Chopping thread.

There are two ways to install the GKL:
- On the frame
- For glue.
Let's consider both options.
Installation of drywall on the frame
Before starting to fix drywall, a frame base is created. If necessary, wires or other communications can be hidden under the sheets.For erection, we need guides 27 * 28 and a mounting profile 60 * 27.


- Using a level and tape measure, on the floor, wall and ceiling, we make markings for the guides.
- With the help of a perforator and fast mounting dowels, we drill and fix the guides 27 * 28.
- With a step of 60 cm, we install vertically, rack profile 60 * 27. We fasten it to the lower and upper rails, with small self-tapping screws, with a press washer.
- We make markings for suspensions in order to fix the rack profile to the wall. To do this, we start it by the profile and with a pencil, put two marks on the wall, through the mounting holes. With a puncher and a 6mm drill, we drill holes and hammer a collar into them, on both sides. We put the plate and fasten it with screws. And so, every 60 cm, vertically.
- We bend the plates onto the profile, check the level vertically, and fix them with short self-tapping screws (bugs).
- Depending on the height of the room, it may be necessary to cut drywall sheets. Accordingly, the next row will begin with a trimmed piece. At the junction of two sheets, it is necessary to install a horizontal jumper from the rack profile.
- We make installation of sheets GKL.
Installing drywall with glue
Before starting installation, make sure that the surface is even. For this, a long rule and a level are used. Having measured the vertical, horizon and diagonal, we note all the bumps and drops. For wall cladding, it is necessary to use GCR with a thickness of 12.5 mm.
- After marking and cleaning, the wall surface, for better adhesion with glue, must be primed.
- We knead the glue solution, and apply it with a spatula, around the entire perimeter and one strip, in the center of the sheet.
- We put the sheet vertically and, using the rule, press it.
- We perform steps 2, 3 for gluing all sheets, controlling the evenness of the surface with a level.
In more detail, you can see all the subtleties of installation in this video:
Read more:
Calculation of drywall on a partition - consumption rates, calculator
Calculator for calculating drywall on the ceiling
How to calculate the area of a room: formulas, tips and tricks
How to calculate the consumption of paint for walls and ceilings?
Grout consumption for tiles per 1 m<sup>2</sup> - calculator, calculation formula
Basal Metabolism Calculator, most accurate BMR formulas
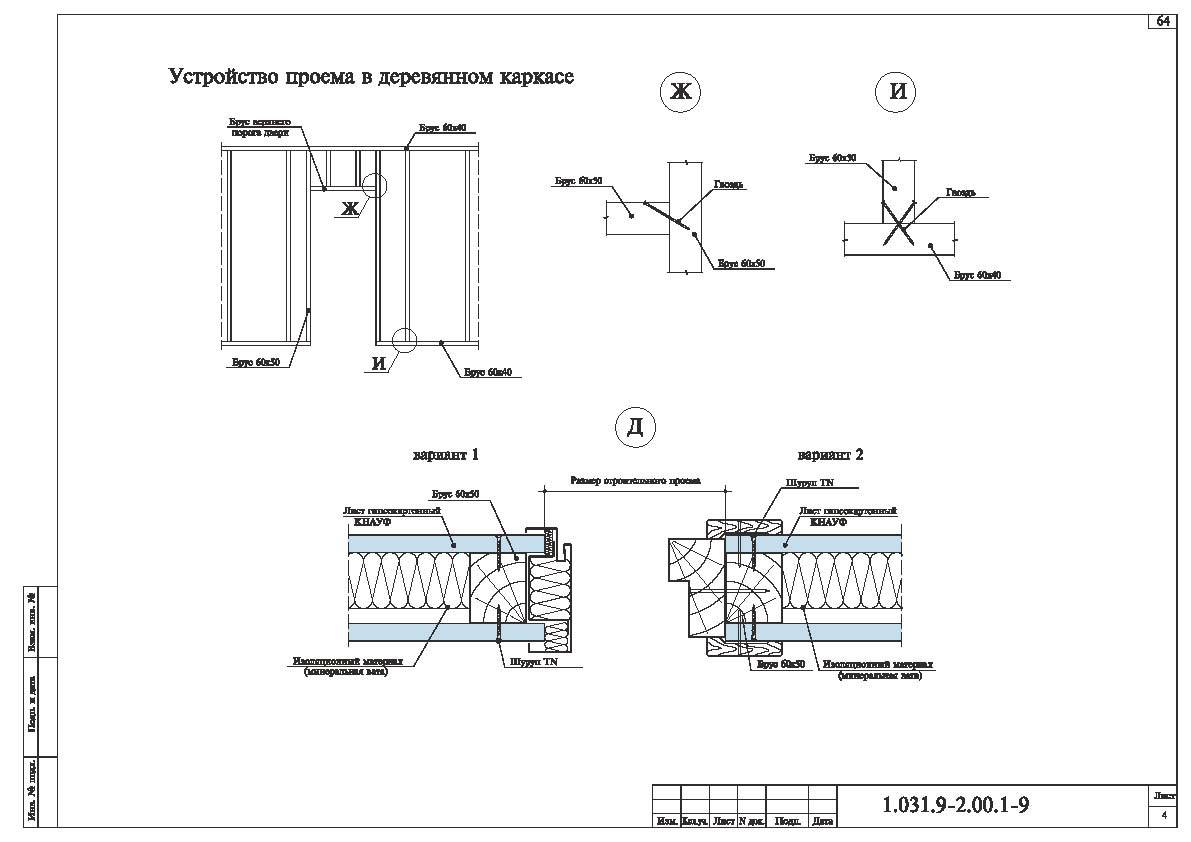
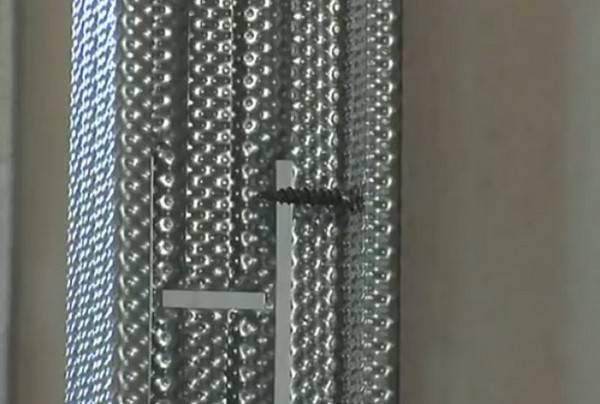
Making a doorway, installing crossbars
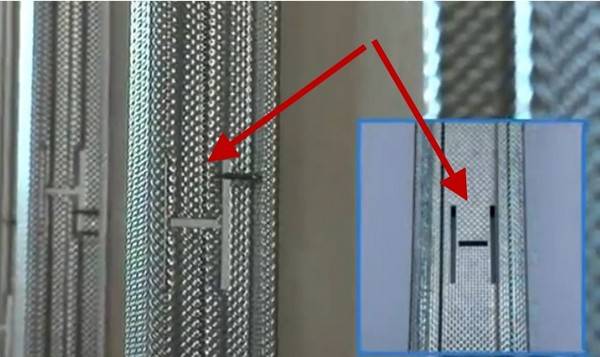
The upper part of the doorway is formed using a guide profile (PN). It is cut so that its design length is 30 cm more than the width of the opening. On the outer side of the resulting workpiece, two marks are made at a distance of 150 mm from the edge of the crossbar.
Both risks should be visible on the sidewalls of the profile: it is along them that it is cut in the direction from the edges of the sidewalls to the mark on the bend of the profile. After that, both edges of the profile are bent at a right angle. It turns out a U-shaped crossbar, which easily moves along the racks and is also easily screwed to them with the help of self-tapping screws - “bugs”. See photo below:
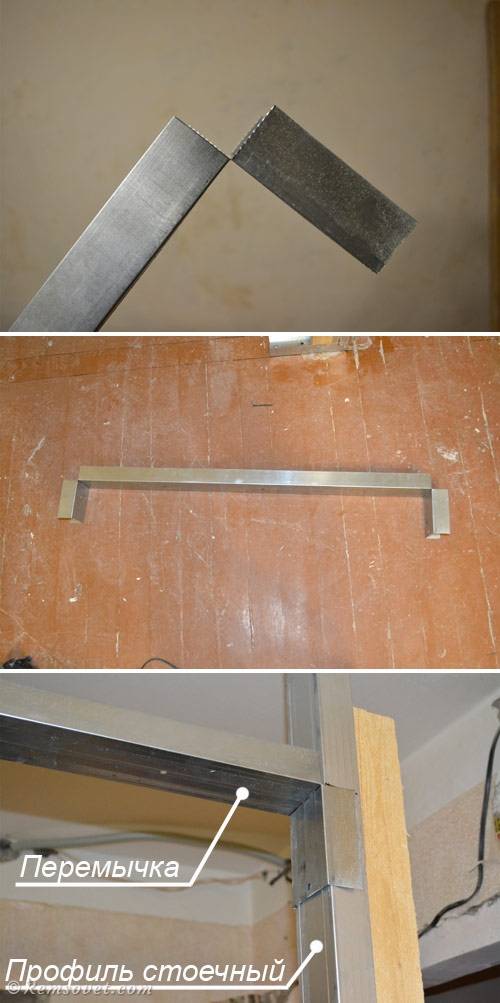
Below are the schemes for installing the profile and sheathing with drywall sheets in the area of the doorway:
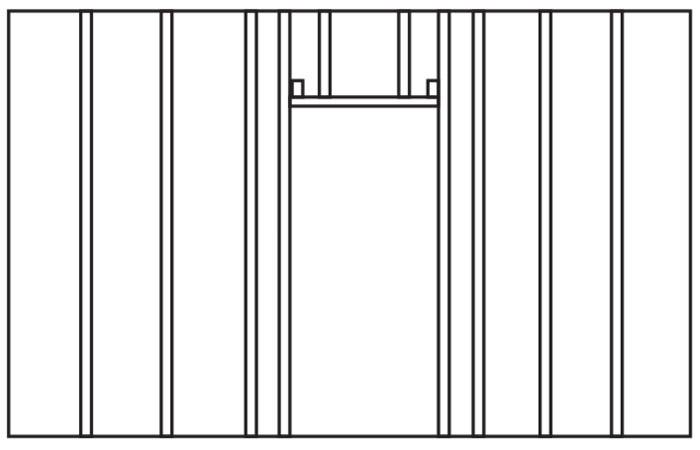
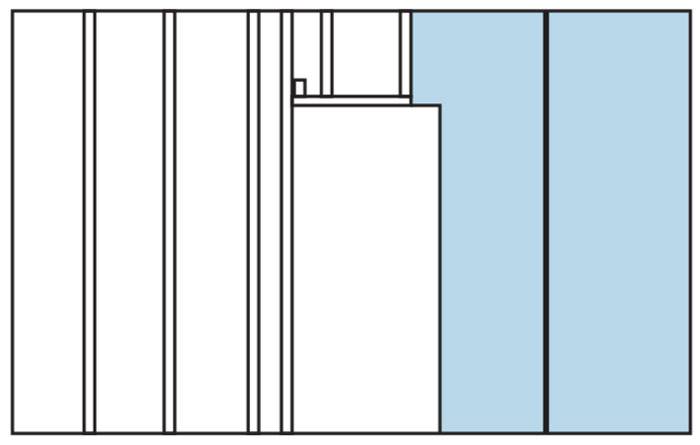 The joint of drywall sheets should not fall on the rack to which the door frame is attached
Similarly, horizontal crossbars are made. They are used both to strengthen the frame and to join drywall sheets with a significant height of the partition. Therefore, for high walls, it is recommended to make 2-3 rows of horizontal crossbars.
Please note that according to all the rules for fixing the jumpers, the shanks of adjacent bars are bent in different directions (up / down), and the crossbars themselves are staggered (with a seam spacing of at least 40 mm). This is done so that the horizontal joints of adjacent sheets do not have coincidences and cruciform seams.
Brick wall laying
Such structures in the vast majority of cases are erected simultaneously with the construction of the building itself. The foundation under them is poured along with the base under the walls.
Regardless of how thick the owners of the house decided to make an interior partition made of bricks, the masonry mortar for such a structure is mixed from cement and sand in a ratio of 1/3. In order to give the mixture plasticity, masons usually add a little slaked lime to it as well. Before laying, the bricks are put dry and the row is leveled. Further, the assembly of the wall is carried out using a mooring cord.


Sometimes it is necessary to erect brick partitions in an already built building. In this case, the structure can be laid out without first pouring the foundation. But it is allowed to do this only in those rooms where concrete was used to fill the floor. Work begins in this case in this way:
- perform marking on the floor;
- make notches in concrete and moisten it with plenty of water;
- a strip of mortar 20 mm thick is applied to the floor;
- lay out the first row of bricks with tapping with a hammer to obtain a lower seam 10-12 mm thick;
- laying according to standard technology.
Making a doorway in a partition
If the design of the partition provides for the presence of a swing door, you should take care of the space in the frame for mounting the door block. The walls of the structure must have sufficient rigidity to withstand the expected load.
Strengthening the profile with dry, straight wooden blocks will help to give rigidity to the profile.
To install a doorway in a partition, we perform the following steps:
- We trim the rack profile to the required height, strengthen it with a wooden block inserted inside.
- We install the finished structure inside the upper (ceiling) and lower (floor) guide profile so that the width is the same in the upper and lower parts of the opening. We check the verticality of the racks with a level, and fix them with self-tapping screws.
- To make a cross beam, we cut out a piece of a rack profile corresponding to the width of the future doorway. We also strengthen it with a wooden block.
- We set the transverse profile strictly horizontally to the required height.
The crossbar can be installed in two ways:
- Fasten the cuttings of the rails, corresponding to the width of the rack profile, on both reinforced racks, insert the prepared crossbar into them and fix.
- At the rack profile, which will serve as a crossbar, cut out the middle part, leaving the "antennae" for which it will be attached to the racks.
Important! In both cases, when connecting the profile, it is recommended to use a cutter. This will help ensure a snug fit of the gypsum board and avoid "humps" from the screws on the surface of the partition.
Using nails, we fasten wooden structures inserted into the profile.
The subtleties of calculating dry plaster
The above was a simple way to calculate drywall, however, it will be difficult to avoid a large amount of waste in this way. So let's go the classic way. So, we do not need the total area of the surfaces to be finished, that is, only the walls or complete with the ceiling, but minus the window and door openings. We get a formula of the form Spom = a .h . 2 + b .h . 2 + a .b, where a and b are the length of two adjacent walls, h is the height of the room.
If any of the walls or ceiling is not sheathed, remove one of the deuces or the last part of the formula. In addition, you should immediately add the slopes of the same openings, as well as all the niches and plasterboard walls that you want to make indoors. The material opens up quite wide possibilities, up to the introduction of a built-in shelving with a large number of shelves into the wall cladding. Of particular note are the nuances that take place during the construction of curly piers or niches.
The fact is that all the filigree patterned cuts will mean that you practically never use the fragment separated from the material plate. Therefore, we immediately believe that at least one slab is required for each wall, you just have to close your eyes to the waste. The same applies to curly niches in the shape of hearts, circles and triangles - such trimmings are good for nothing. An exception may be the use of the resulting figures as decoration for a children's room. It is no less difficult to calculate the area of curly suspended ceilings, in particular, with a wavy contour.

It is best to avoid waste by sawing each sheet lengthwise, exactly in half, and using both halves.It is somewhat easier to calculate multi-level false ceilings with simple geometry, since there are special formulas for determining the area of \u200b\u200bcircles and squares. The round shape is calculated as follows: S = πR2, where R is the radius, and we have already considered the rectangle above: S = ab. If you are inclined towards a non-standard design, and you have planned a triangular structure of the second hinged level on the ceiling, then the formula will be as follows: S = bh / 2, where b is the base and h is the height.
Types and features of drywall partitions
The structure for dividing the space in the room is built on the basis of a frame system made of wooden beams or a metal profile. The outer skin is made of gypsum boards in one or more layers, the inner space serves to accommodate thermal insulation and hide communications.
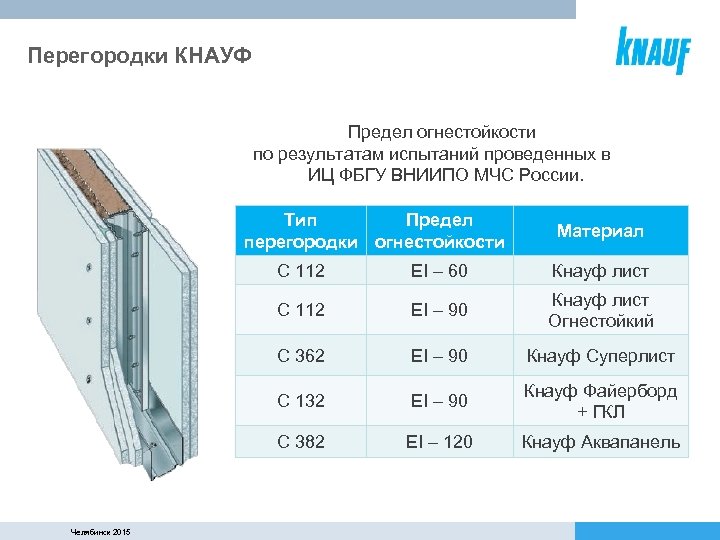
To select the appropriate solution, it is recommended to rely on the classification proposed by the well-known manufacturer of building and finishing products - KNAUF. The division by structure includes several options with special markings.
 Partitions are classified by thickness, height, the presence or absence of sound insulation and the number of layers of plasterboard, but the general scheme of construction of the structure remains standard.
From a metal profile
Varieties:
For the arrangement of interior partitions in an apartment, modification C-111 or C-112 is sufficient, more complex and reinforced types of structures are designed for installation in office and industrial premises
Galvanized profile allows you to work even in rooms with high humidity.
From a wooden beam
Existing variations:
- C-121. It is made of wood material with a maximum moisture content of 12%.The frame is made in the form of a frame with a middle of rack-mount parts. Sheathing is mounted in one layer, the thickness is individual. The height should not exceed 3.1 m. The weight is about 32 kg per 1 m3.
- C-122. Reinforced version of the previous version. The cladding includes an additional layer of drywall, the interior space is filled with mineral material. The structure has good sound and heat insulation. Maximum height - 3.1 m, weight per 1 m3 - about 57 kg.
Regardless of the type of construction, the most suitable types of GCR boards can be used for work. Combination of products is allowed, taking into account compliance with environmental and fire safety standards.
 Wooden frames for a GKL partition were developed for wooden houses; for arranging the structure, a forest with a moisture content of not more than 12 - 14% is used
Profile for plasterboard partitions
At the heart of a plasterboard partition, a frame is made of special profiles. The installation of the frame begins with the installation of horizontal profiles around the perimeter of the future partition. Vertical profiles are inserted into horizontal ones and fixed there. After the finished frame, it is sheathed with sheets of drywall.


Gypsum board partition profile for Knauf partition
The horizontal profile for the partition is called the guide profile (PN). It has a U-shaped section. PN is used as a guide profile for vertical racks, as well as for jumpers between racks along the partition area. The guide profile base (PN) has stiffening grooves, the profile walls (PN) are smooth.
PN Knauf profile size table, at the bottom of the article.
The vertical profile is called the rack profile (PS). It has an eS-shaped profile section.The ends of the profile walls are bent to increase rigidity. Longitudinal grooves are made on the walls of the rack profile to increase rigidity and ease of installation (hooks for self-tapping screws). Technological holes are made on the shelf of the rack profile (PS) for laying communications inside the partition. PS profiles, of course, are not reinforced concrete columns, but they are strong enough to create a solid structure when assembled.
PS Knauf profile size table, at the bottom of the article. PN and PS profiles are produced with matching dimensions. The size of the profiles is such that the PS profile is inserted into the PN profile. Moreover, the dimensions are made in such a way that the profiles are inserted rigidly, but without deformation. This initially makes the partition structure rigid.
Gypsum board partition profile for Gyprock partition
Gypsum profiles for plasterboard partitions are also divided into guide profiles (PN) and rack profiles (PS).
The profile dimensions are shown in the table below. A feature of the Giprok-ultra profiles are the factory markings on the guide profiles for installing PS profiles. Also, in the guide profile (PN), special recesses are made in the shelf, into which the edges of the PN profile fit tightly. In the Giprok rack profile, technological openings for laying communications inside the partition have a rectangular shape with folding "leaves".
In conclusion, I want to note that the profile for drywall partitions of both manufacturers (Knauf and Giprok) are absolutely equivalent in quality and ease of installation. The choice of profiles when buying depends only on their availability from the seller and cost. When buying material for a drywall partition, follow one rule.
It is better to buy all materials for the partition from one manufacturer.Knauf so everything is from Knauf. Giprok so everything from Giprok.
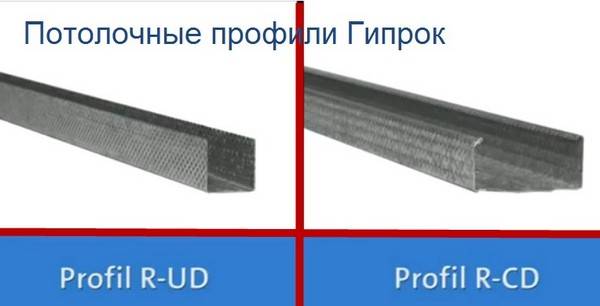
Profile size table for drywall Knauf
Size table of PS Giprok profiles
| Profile Giprok-ultra | PS-42/40 | PS-50/40 | PS-66/40 | PS-75/40,PS-100/40 |
| Dimensions | 42×40×0,5 | 50×40×0,5 | 66x40x0.5 | 75x40x0.5,100x40x0.5 |
Profile size table PN Giprok
| giprok profile | PN42/37 | PN-50/37 | PN-66/37 | PN-75/37 | PN-100/37 |
| Dimensions, mm | 42x37x0.5 | 50x37x0.5 | 66x37x0.5 | 75x37x0.5 | 100x37x0.5 |
- High plasterboard partitions
- How to make a doorway in a drywall partition
- Plasterboard interior partition with door
- Installation of plasterboard partitions
- General information about drywall partitions
- DIY plasterboard partition
- Partition of two layers of drywall: sheathing technology of 2 layers of drywall
- Rules for the installation of plasterboard partitions
- Profile for plasterboard partitions
- Calculation of plasterboard partitions


