- Instrument preparation
- Frame assembly
- Built-in sinks: pros and cons
- How to cut a hole
- Prices for popular models of jigsaws
- Preparatory work
- Benefits of installing a mortise sink over a consignment note
- Overhead mounting basics
- Creating a hole in the countertop
- How to install a sink in the kitchen: an overview of methods
- Hanging sink installation
- Overhead sink installation
- Inset sink installation
- Connection to water supply and sewerage
- Features of mounting a built-in sink
- Tips that will not be redundant
- Benefits of installing a mortise sink over a consignment note
- Why mortise: reasons for choosing
- Sink selection
- Installation features: hole marking
- Tools and materials
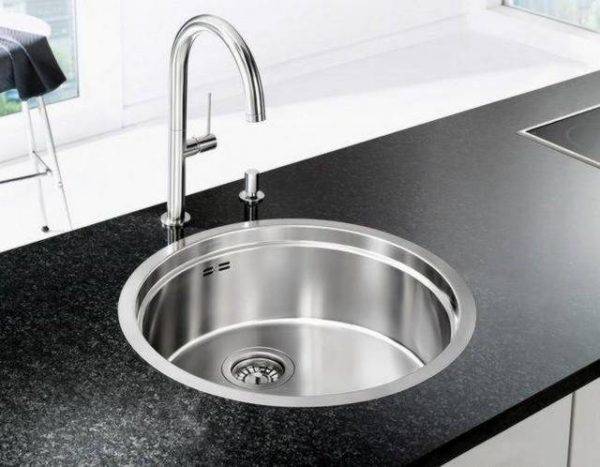
- Purpose of a modern kitchen sink
- Conclusions and useful video on the topic
- Conclusions and useful video on the topic
Instrument preparation
In order to attach the sink to the cabinet, you need the appropriate tools. Before installing the sink, it is necessary to check the presence of fasteners for it in the kit. Often these are double-sided clips. They need to be fixed on the ends of the already cut countertops and on the inside of the sink. Additionally, the kit should include a tubular sealant for the tightness of the joints.
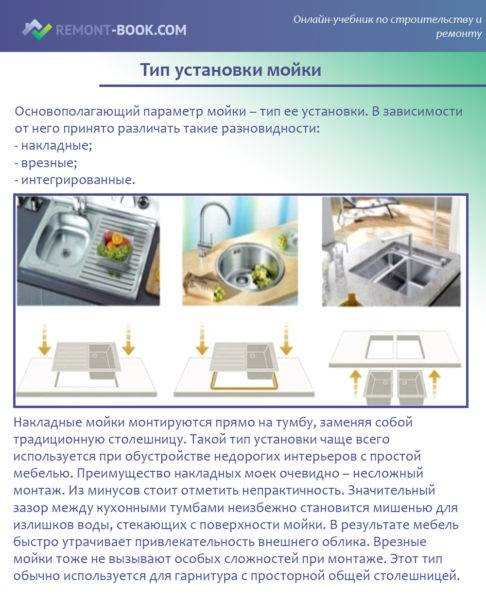
You also need to take care of the following tools:
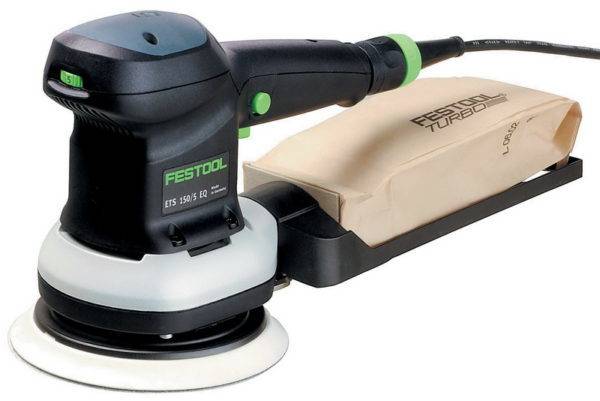
- Jigsaw and a set of paintings to it. It can be replaced with an ordinary saw.
- Drill with drills of different diameters and screws.
- A set of tools for measuring: a clerical knife, a water level, a square, a ruler, a screwdriver for screws, a pencil and a tape measure.
- Silicone sealant.
Frame assembly
It is carried out in the following sequence:
- In order not to confuse the blanks, it is better to number them. In each make holes of 6 mm.
- Each profile is applied along the marking lines and marks through the holes where the dowels will be located.
- Drill holes for hardware in the wall. If the surface is tiled, the enamel is scratched at the intended point.
- Using a perforator, which is inserted into the holes in the frame blanks, holes are drilled again for the length of the dowel in the walls. and on the floor.
- They take the profiles and put them in their places, insert the hardware and fix the guides. The evenness of their location is checked using a level.
- The protruding rack is formed from two guide profiles, inserted one into the other and fixed with self-tapping screws along the joint line.
- On the upper markup, horizontal jumpers are fixed, which are also made double. Fastening is carried out with a bracket of profile scraps on self-tapping screws.
- Reinforce the frame with spacers. Two are placed on the sides, and two more - under the base of the countertop.
Check the evenness of all guides and the quality of the connection, as well as the absence of gaps and backlash.
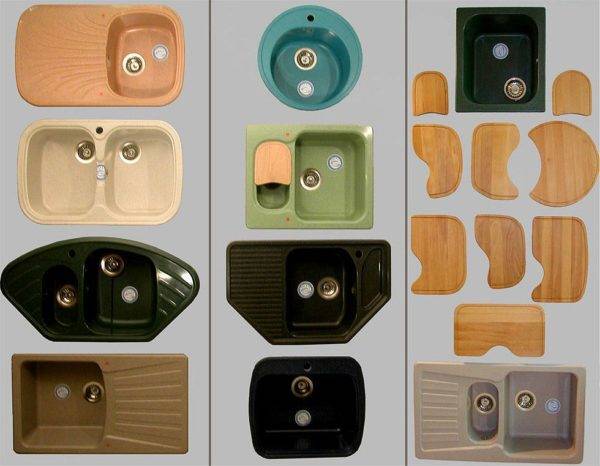
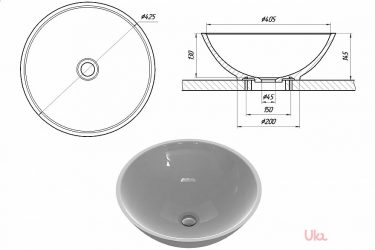
Built-in sinks: pros and cons
Properly matched to the style of the room and neatly installed in the countertop, the sink will look very attractive in the bathroom. Sinks are made from various materials.They are ceramic (porcelain and faience), metal, acrylic. They are also made of natural or artificial stone, glass, specially processed wood.
The advantages of built-in options, compared with other types, include:
- practicality - such sinks are installed on any surface, you can place the necessary accessories for washing nearby, and use the space under the sink to store any things;
- reliability - this type of bathroom sinks are rigidly fixed on the surface of the countertop, stand securely and firmly;
- ease of installation - you do not need to mount the sink to the wall, even a person who does not have much experience in such work can handle embedding the sink into the countertop;
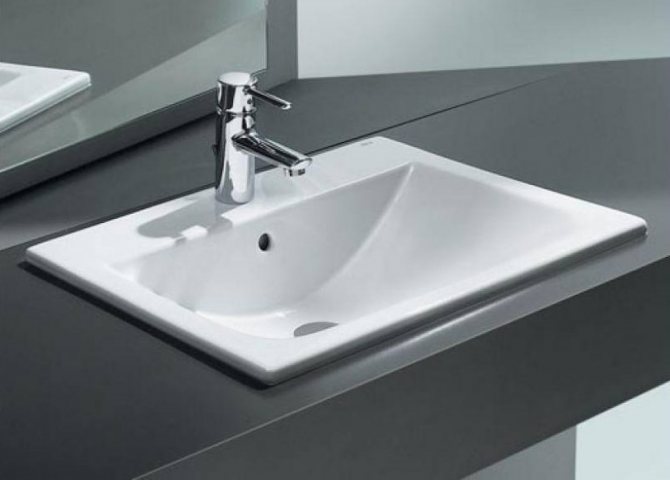
 Built-in sink
- aesthetic appeal - even inexpensive sink models, neatly built into the countertop, can look unusual and stylish. In addition, with the built-in version, all communications are hidden from view by the closed cabinet door;
- a large selection of models - a variety of configurations and sizes of sinks allows you to choose the best option for the bathroom.
Some of the disadvantages of such sinks include the fact that in small bathrooms it is difficult to find enough space to place suitable sanitary furniture for installing a sink.
How to cut a hole
After the markup has been completed, the hole must be cut. It should be accurate, but slightly larger in diameter than the sink bowl, so that the sink can easily enter it. To do this, you need to step back a couple of millimeters from the inner contour to the outside and make a cutout along this line.Thus, it will be possible to achieve the necessary backlash.
 Fitting a sink in the kitchen
To cut a hole, you can use a jigsaw or drill. It will take longer to fiddle with a drill, and this work is much easier to do with a jigsaw.
Prices for popular models of jigsaws
Electric jigsaw
In order to make a hole with a jigsaw, first you need to make a hole with a drill anywhere along the inner contour so that you can insert the jigsaw blade. Next, you just need to take a jigsaw and cut the countertop along the drawn line. To prevent the cut-out piece of tabletop from falling on your feet, it is best to hold it or substitute something under it. It can be quite heavy and injure the master if it just falls.
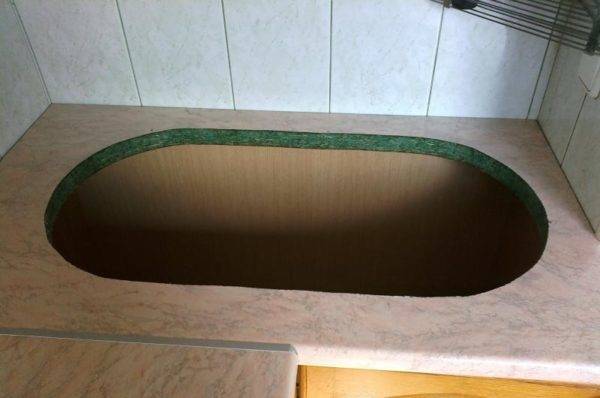 Hole for sink
Once the hole has been made, you need to try on a sink for it. If it comes in freely enough, then everything is done correctly. If the sink is inserted with resistance, then you will have to grind the edges of the hole a little so that it enters calmly. By the way, it is better to grind the saw cut edges in any case using a file, grinder or ordinary sandpaper. This measure will achieve evenness and accuracy of the cut.
 grinder
Preparatory work
Before you embed the sink into the kitchen countertop, you need to make sure that the current water supply to the site where the product is planned to be installed is reliable, as well as how well the sewer system is established. One of the tools that is required when carrying out these works is an electric jigsaw. In case of absence, you will need to borrow it from your friends or rent it.  If a jigsaw is needed only for the described task, then it is pointless to acquire it, but you should not start work without it either. In addition, during installation, the presence of a sealant is required. It is best to give preference to transparent silicone-based formulations.
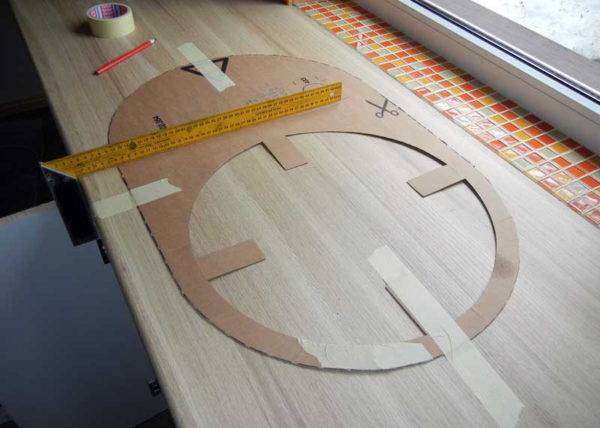
Together with the sink, a ready-made template for cutting it out can also be supplied, which is its packaging. Otherwise, in the future, it will be necessary to draw it on the countertop, applying the product itself to its surface. If the kitchen set was just purchased, then most likely it does not have holes for pipes either, which, along with the siphon and all the hoses necessary for connecting them, will also have to be bought. Together with the sink, they are generally not supplied in the kit.


Note! If the kitchen furniture has yet to be assembled, then there is no need to rush to fix the countertop, since it is much more comfortable to cut a hole for the sink before it is fixed in it.
Benefits of installing a mortise sink over a consignment note
Installation of the sink in the kitchen can be carried out overhead and mortise. Giving preference to the first option, in addition to the bowl for washing dishes, it is possible to additionally purchase a pedestal or cabinet on which it is installed. Installation of a mortise sink is carried out directly in the countertop of the kitchen set. The second method is preferred much more often, even though it is an order of magnitude more difficult to implement, but against the background of many advantages, this drawback becomes less significant.
First of all, overhead sinks are the reason for the constant presence of moisture in the room, which is formed between the cabinets, which are located near the unit with it. One of the main positive aspects of mortise products lies in a wider variety of assortment, from which it is much easier to choose a sink, taking into account all personal preferences and needs. They are made from a wide variety of materials and some of them have shapes that countertop sinks are not made in. Mortise kitchen sinks are made of ceramic, stone, copper, plastic, porcelain stoneware, bronze and stainless steel. Outwardly, they can have a round, rectangular, angular, and one of the many asymmetric shapes.
The sink can be installed in 3 ways: exactly at the level of the countertop, slightly below or above it. It depends not only on personal preferences, but also on the configuration of the purchased kit, therefore, at the time of purchase, you should find out how the bowl should be placed and what fasteners must be used during installation.
The choice of fasteners also requires special attention, since the level of strength of these components directly affects the period of their operation.
Overhead mounting basics
How to embed a sink in a countertop in the kitchen? For this, special fasteners are used. They usually come with a sink. Enough 4-5 fasteners for one product.
Installing the sink in the countertop yourself looks like this:
- First make the necessary marks. To do this, attach fasteners to the inside of the table and make notes
- Next, take self-tapping screws and screw them into the marked places.
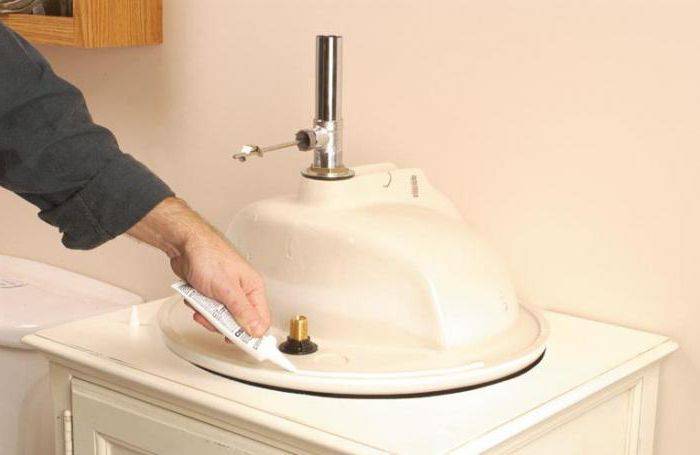
- So that the table does not deteriorate from water, its ends are covered with sealant
- Next, you need to place the sink on the countertop and fix the fasteners
- Remove excess sealant if necessary.
- The last stage is the connection to the sewerage and water supply
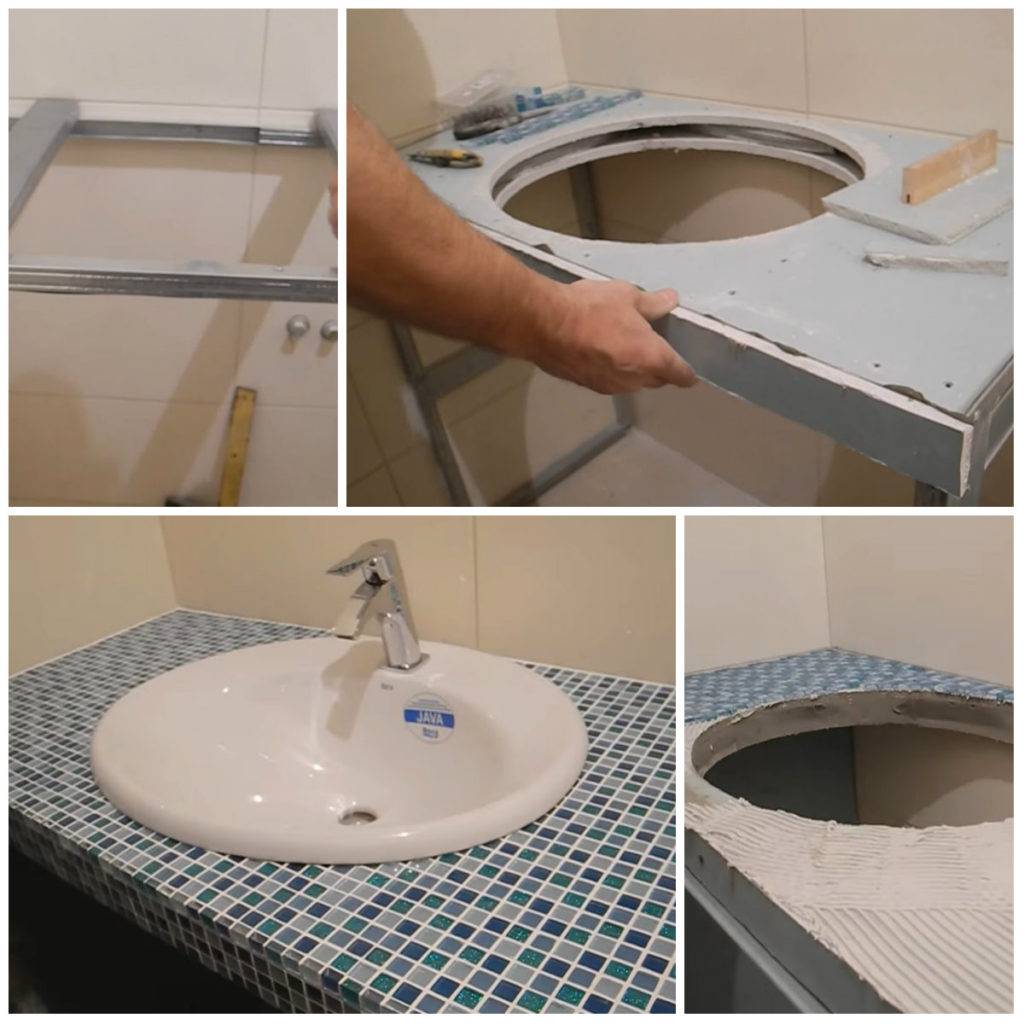
Creating a hole in the countertop
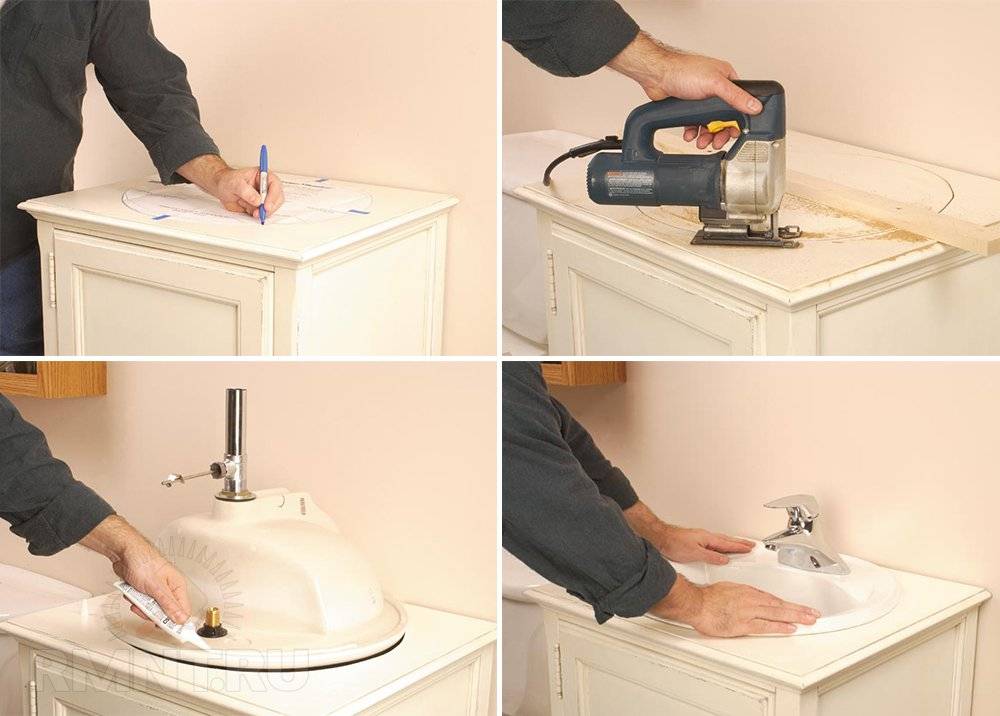
The work related to how to properly cut the countertop under the sink is performed with an electric jigsaw, adhering to certain rules:
- Before the saw of this tool enters the material to its full depth, it is required to create technological holes in the corners of the internal marking using a drill or screwdriver. They will make the job easier. In this case, the corner holes are placed in the inner plane of the cut material, and their edges can only come into contact with the cut line.
- In order to prevent the appearance of chips on the laminate flooring, all work on how to properly cut the sink in the countertop should be done on its front surface.
- After holes are created at the corners of the plane to be cut, a place for washing is cut out with a jigsaw along the inner border of the cut. To prevent the cut off part of the tabletop from falling, self-tapping screws are screwed along the line of movement of the jigsaw to ensure its fixation.
- After the hole is prepared, the fasteners are removed and the cut is cleaned of dust. The sink is pre-placed in place to make sure it fits the size of the product. The sink in the finished hole must be mounted freely. If you have difficulties with how to insert a sink into the countertop, cut the edges using a jigsaw.

How to install a sink in the kitchen: an overview of methods
The method of installing a kitchen sink depends on its type and the type of work surface of the cabinet. At home, it is easiest to mount a hanging and overhead sink. A little more effort will have to be applied when connecting the mortise structure.
Hanging sink installation
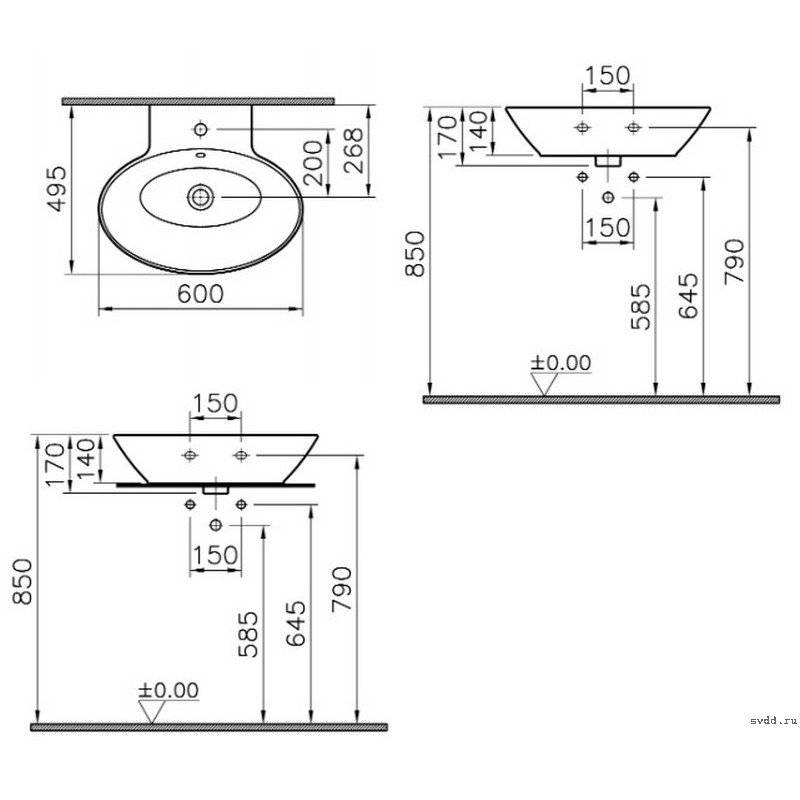
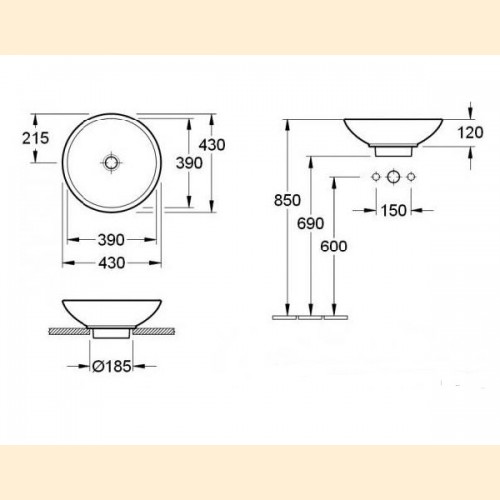
The fixing studs on which the sink will be installed are usually included in the delivery along with dowels and plastic inserts. From additional materials you will need Teflon tape. Holes for dowels are drilled in the wall at a height of 80-85 cm from the floor, fixing studs are screwed in. The sink (with a mixer pre-installed on it) is put on the studs, then the plastic inserts are installed and the nuts are tightened.
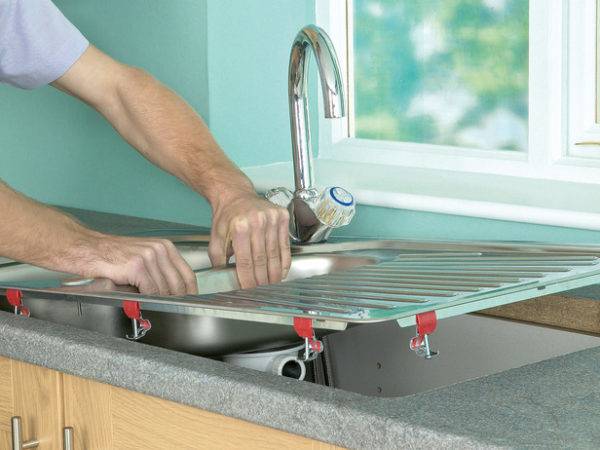
Overhead sink installation
Overhead sinks are simple and retractable. The former usually have a wooden frame and are installed using guide pins, holes for which are drilled in the upper ends of the cabinet walls. If the wall thickness is insufficient or the cabinet is metal, fastenings are made using metal furniture corners and self-tapping screws. Sliding sinks have guides in the form of a sled, they are easily and securely fastened, sliding onto the bedside table along the longitudinal grooves.
Inset sink installation
It is worth noting right away that it will not work to mount the sink into a surface made of marble, porcelain stoneware or similar hard material on your own, you will have to invite a specialist. If the hole is to be cut in fiberboard or MDF, you will need the most common tools of a home craftsman: an electric jigsaw, drill, pliers, screwdrivers.
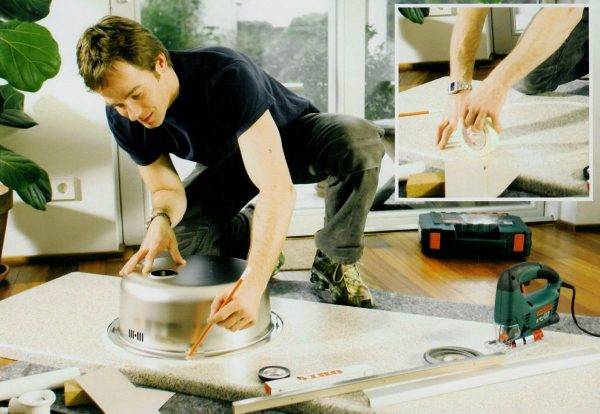
You will also need sandpaper, masking tape, waterproof glue, silicone sealant.The installation of the sink begins with the marking of the countertop, the template, along with fasteners and brackets, is included in the kit. Using a pencil and a template fixed with adhesive tape, outline the contour of the slot. Then adhesive tape is glued along the contour (to protect the surface from chips). After cutting the holes, the edges are cleaned and treated with a sealant. Waterproof glue will help to fix the sink tightly in the opening. After that, the mounting brackets are tightened and an additional layer of silicone sealant is applied.


Connection to water supply and sewerage
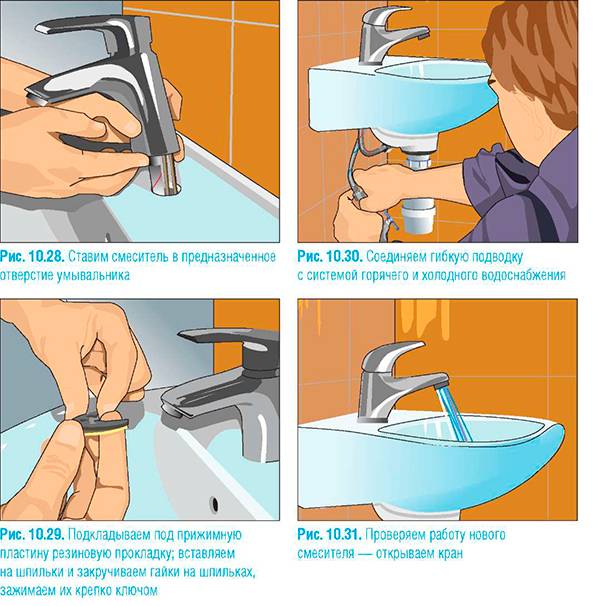
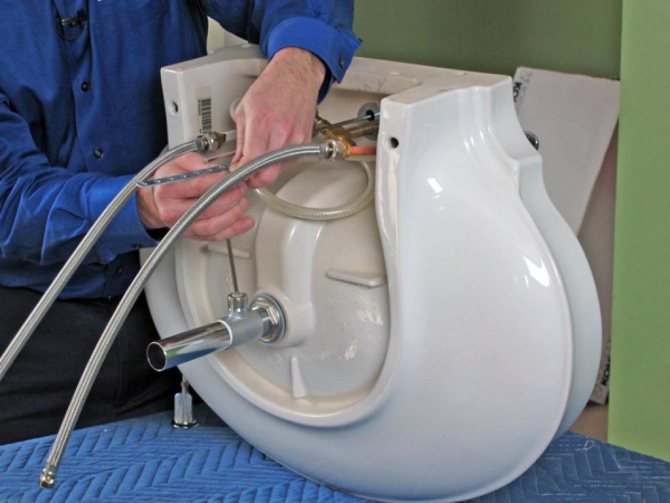
The connection of all models to the water supply system and the sewer pipe is the same. Differences can only be in the sequence of actions. After installing the bowl, proceed to assemble the mixer:
- Screw in the mounting pins.
- Connect the hot and cold water hoses with a wrench.
- Put on the mounting studs rubber insert and pressure washer.
- Tighten the nuts carefully.
Next, connect the hoses coming from the mixer to the corresponding pipes for hot and cold water. To seal the connection, rubber liners are used, as well as Teflon tape. After the mixer, a siphon is connected. It is advisable to choose an S-shaped siphon, it clogs less, unlike bottle ones. Through the drain, the outlet of the siphon is brought into the sinks, fixed, then the drain pipe is screwed - rigid or elastic corrugated.
Features of mounting a built-in sink
Installation is carried out in two ways:
- Over the table top. The bowl protrudes several centimeters above the surface.
- Bottom of the tabletop.This method is convenient in that when using a sink, splashes will be removed in one motion.
Type of built-in sink.
A template prepared in advance facilitates this step. The stencil is included with most built-in plumbing fixtures. When choosing an installation site, consider the following points:
- The sink must not be installed close to the wall or the edge of the countertop, because. this leads to water ingress on the floor and the accumulation of dirt.
- Access to the plumbing fixture must be free.
With proper marking, the bowl is securely fixed.
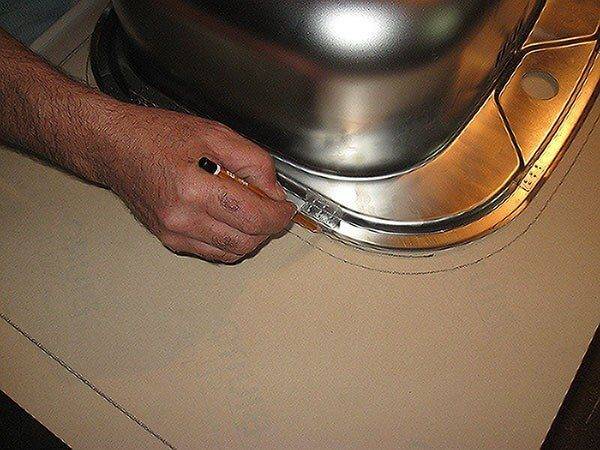
If there is no template, the washbasin is turned over and applied to the countertop. Outline with a pencil. At a distance of 1.5-2 cm towards the center, another contour line is drawn. They are guided by it when cutting a hole. After that, measure the distance from the sides of the sink to the fasteners. Fixation points are marked on the contour.
Marking the installation site.
When preparing the mounting hole, perform the following actions:
- Install a jigsaw, lead it along the drawn line. When using a hacksaw, additional processing of the cut will be required. In this case, a hole is drilled in the marking area, allowing the saw blade to be inserted.
- Cut out the desired section of the countertop. To avoid damage to the decorative coating, the actions are performed smoothly, without unnecessary effort.
- The cuts are cleaned with an emery bar.
- The edges are covered with sealant. The mixture is applied in several layers. When choosing a protective agent, take into account the type of material from which the countertop is made. For products made of porous materials, alcohol compositions are used.
We suggest that you familiarize yourself with a basket of newspaper tubes for beginners step by step
At this stage, the following actions are performed:
- The bowl is inserted into the prepared hole. The shell is rocked, providing a tight fixation. Tighten the previously installed fasteners. Excess sealant is removed with a rag. During the day, do not perform any work, allowing the glue to dry.
- Mount the mixer. The device is inserted into a special hole before the sink is installed. The hoses are attached to the body, nuts are screwed onto the studs. After that, the tube bowls are connected to the water supply.
- Connect the siphon. The socket is combined with the drain hole of the sink and the decorative grille, the screw is screwed in. The outlet of the device is inserted into the branch pipe of the sewer line.
Connecting equipment to the sink.
Tips that will not be redundant
It is possible that the installation process will seem too simple for you. But it is not so.
Mistakes or carelessness in the performance of this work can lead to a deterioration in the appearance of the sink or to damage to the countertop if water constantly penetrates between it and the sink.
If you are not sure that you are able to cope with the task, invite a specialist. But then you won't be able to save money. Think about what is more important to you.
To finally dispel your doubts, we suggest you watch a video in which the installation process is performed by a professional.
Benefits of installing a mortise sink over a consignment note
Installation of the sink in the kitchen can be carried out overhead and mortise. Giving preference to the first option, in addition to the bowl for washing dishes, it is possible to additionally purchase a pedestal or cabinet on which it is installed. Installation of a mortise sink is carried out directly in the countertop of the kitchen set.The second method is preferred much more often, even though it is an order of magnitude more difficult to implement, but against the background of many advantages, this drawback becomes less significant.
First of all, overhead sinks are the reason for the constant presence of moisture in the room, which is formed between the cabinets, which are located near the unit with it. One of the main positive aspects of mortise products lies in a wider variety of assortment, from which it is much easier to choose a sink, taking into account all personal preferences and needs. They are made from a wide variety of materials and some of them have shapes that countertop sinks are not made in. Mortise kitchen sinks are made of ceramic, stone, copper, plastic, porcelain stoneware, bronze and stainless steel. Outwardly, they can have a round, rectangular, angular, and one of the many asymmetric shapes.


The sink can be installed in 3 ways: exactly at the level of the countertop, slightly below or above it. It depends not only on personal preferences, but also on the configuration of the purchased kit, therefore, at the time of purchase, you should find out how the bowl should be placed and what fasteners must be used during installation.
The choice of fasteners also requires special attention, since the level of strength of these components directly affects the period of their operation.
Why mortise: reasons for choosing
The aesthetic component of the kitchen sink is far from the only mortise design selection criterion. Why do modern consumers love this type of sink so much?
 The mortise sink can have both a standard siphon and an enlarged hole, which was originally provided for the installation of a dispenser
Design advantages:
- Possibility of installation in any place. By purchasing a mortise-type product, you do not depend on the cabinet installed under it. The bowl can be embedded in any place, the main thing is to bring communications.
- No moisture. When using an overhead construction, it is impossible to hermetically seal the joints between the modules, the washing unit and the walls. Almost always, water flows into the cracks that form, which is fraught with the rapid destruction of furniture and dampness on the walls.
- The choice of mortise sinks is much wider than in the case of overhead sinks. They can have a different form of functionality, the number of bowls, the material of manufacture and sets of additional accessories.
- Modern appearance combined with affordability. The mortise accessory looks almost like an integrated one, but it costs much less.
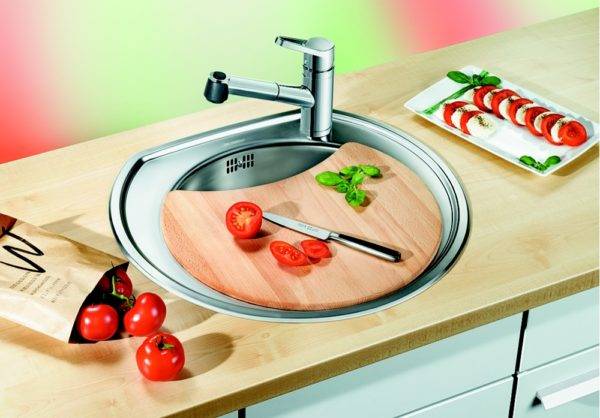 An inset sink may include removable cutting boards, food washing nets and other accessories.
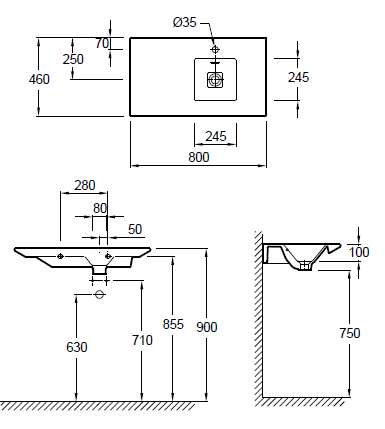
Sink selection
It is also important to choose a sink and depth, volume. It is the sink that is considered optimal that will have a sufficiently large depth, but at the same time a mixer of moderate height
Otherwise, the dispersion of water splashes when washing dishes will be strong, and the headset will somehow suffer from constant wetting.
 How to choose a kitchen sink
You should decide in advance on the material from which the sink is made. It is best to take a stainless steel sink - it is both easier to install and easier to connect. Enameled version is also suitable. The most difficult thing will be working with ceramics - it is quite easy to damage it.Yes, and the weight of the ceramic sink is large, if it falls, it can not only damage the headset, but also injure a person (there is no guarantee that a beginner will be able to fix such a sink well right away). And as a rule, such sinks do not differ in great depth.
Which sink is suitable for your kitchen
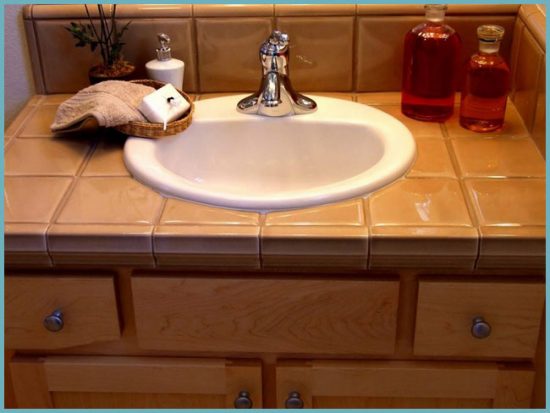
 Countertop and sink
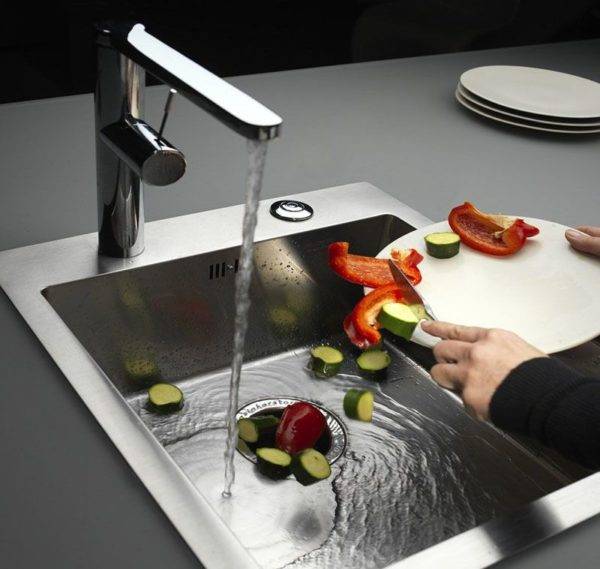
As for the mortise-type sinks, which are discussed in this article, it is worth noting their advantages:
- hygiene and ease of cleaning;
- the ability to have a sufficiently large working area;
- good appearance due to the low side (about 5 mm);
- a large selection of sinks themselves and mixers for their installation.
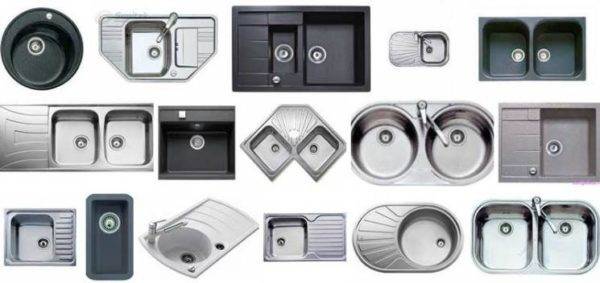
 Types of kitchen sinks
Of course, installing such a sink is not entirely easy, but proper installation will ensure a good joint between the sink and countertop, and will prevent dampness from appearing in the area between the walls and cabinets.
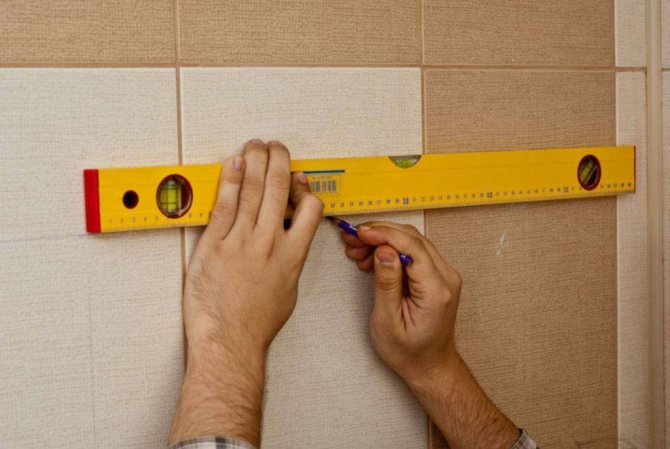
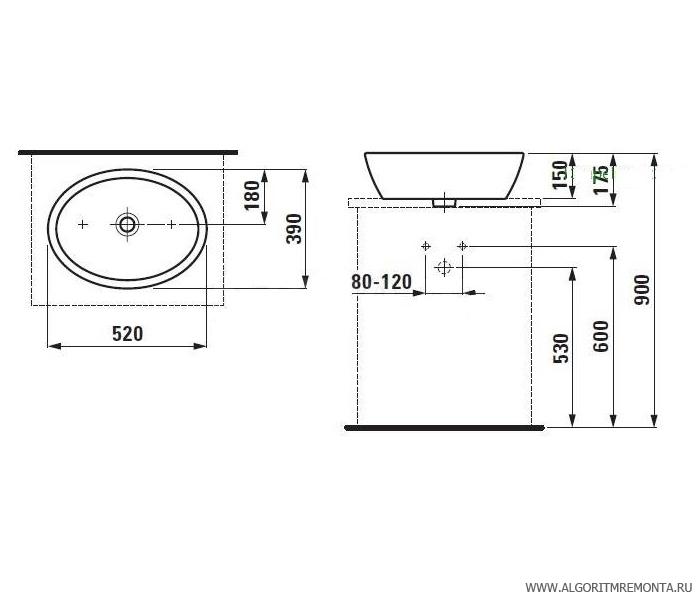
Installation features: hole marking
One of the main tasks of the entire process of installing a mortise sink is the correct marking and precise cutting of the mortise hole. This is a complex process that requires attention and precision of actions - the quality of the entire installation will depend on it. Having made a gross mistake here, you will have to buy a new countertop - not always flaws can be corrected.
 Sink hole marking
The sink should be located on the countertop so that it is at least 5 cm from the front edge of the table cloth, and about 2.5 cm from the back, near the wall.Of course, the parameters are quite approximate, a lot will depend directly on the size of the kitchen set and the wishes of the owner, but in general, the optimal acceptable parameters are indicated above.


In order not to make a mistake when marking the mortise hole, you first need to draw two lines perpendicular to each other on the tabletop, that is, at an angle of 90 degrees. The place of their intersection should coincide with the center of the sink bowl itself. Next, you need to turn the sink over and lay it on the markup, aligning the centers, and then circle it with a pencil along the outer edge.
 Inset sink installation
Now you need to definitely and accurately measure the width of the overlay side, not forgetting to take into account the presence of protrusions for fasteners. The width will depend on the configuration of the sink. Now, from the contour already drawn on the tabletop, you need to set aside the resulting distance inward and draw another contour, smaller in size, inside the previously drawn one. This will be the cut line to create the mortise hole.
It should be understood that cheap sinks may have flaws in geometric parameters.
So this is also important to consider when applying markup. Where there will be fasteners, it is better to make a small margin
And it is important to leave a little space so that the sink can be easily inserted into the hole.
 To install a sink in a countertop, you need to spend a lot of time and work.
 Type of sink installation
Tools and materials
Many people do not know what tools and materials are needed in order to properly install a sink. They may differ depending on the sink material. Consider, without which tools it is impossible to install the sink:
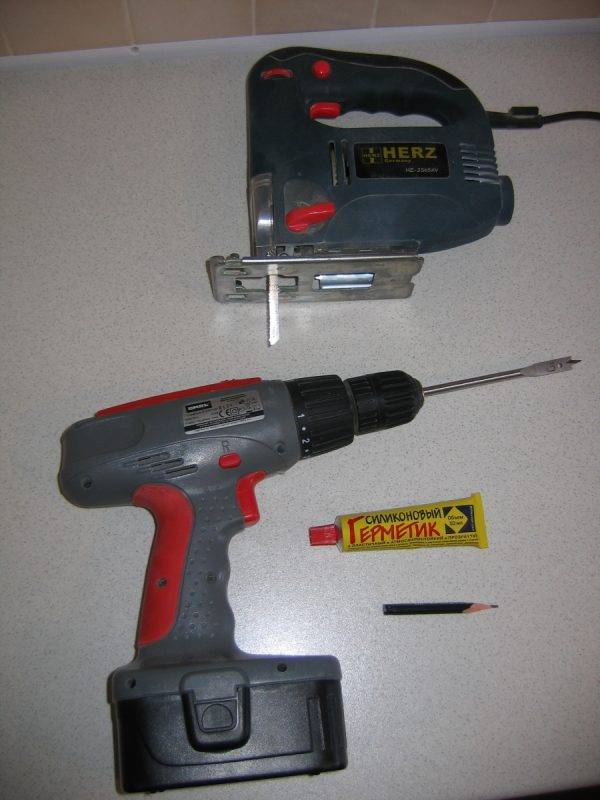
- electric jigsaw;
- electric drill with a set of drills;
- pliers;
- screwdriver;
- rubber seals;
- silicone;
- sandpaper;
- square;
- regular pencil;
- ruler;
- scotch.
If you have all the above tools and materials, you can proceed to the preparatory stage that precedes the installation - marking. Proper editing allows you to hold photo and video materials on this topic.
Purpose of a modern kitchen sink
In order to optimize the cooking process as much as possible, it is necessary to correctly place furnishings and various appliances in the kitchen. According to the existing principles of ergonomics, the placement of furniture and equipment in this room is carried out taking into account the sequence of work.
For this reason, furnishings are placed in the direction from left to right, and in a specific sequence: refrigerator - then dishwasher (if any) - kitchen sink - gas or electric stove. Between them should be placed modules with working surfaces.
It is also necessary to observe the minimum gaps between the above objects:
- the distance from the sink to the stove, as well as between it and the refrigerator, should be about 40 centimeters;
- the refrigerator and stove are installed so that there is 40 centimeters between them.

Before you embed the sink into the countertop in the kitchen, you need to choose the right one, taking into account the following characteristics:
- Functionality. It depends on the intended type of kitchen work, the number of bowls in the sink and the wings intended for drying. These objects will be used when the user is used to performing several manipulations at the same time.
- capacity. When determining this parameter, you need to take into account the number of dishes that have to be washed daily.
- Durability and stability. They mainly depend on the material of manufacture of the structure.
- Design. The design of the sink should ideally match the surrounding interior so that it is a full-fledged object of the created concept.
- Convenient use. Its configuration should ensure comfortable performance of kitchen work.
Conclusions and useful video on the topic
This video visualizes the process of installing the sink and will help you see some of the subtleties of the wizard.
Mounting the mortise model:


The installation of a sink is a responsible task, on which the functionality of the workspace and reliability depend. Incorrect installation can lead to the rapid destruction of the countertop, if water will seep under the sink.
The main thing in installation is high-quality sealing of the joint between the sink and the ends of kitchen furniture.
If you have experience installing a sink, please share the information with our readers. Leave comments on the article and ask questions. The feedback form is located below.
Conclusions and useful video on the topic
Video #1 How to install a countertop sink on a cabinet:
p>Video #2. Overhead bath: 75 ideas for your home in the photo:
Summing up, I would like to say that the overhead sink in the bathroom is very beautiful, not hackneyed and just functional.
Moving away from the traditional perception of the bathroom only as a place for hygiene procedures, you understand that it can become a full-fledged relaxation room. Therefore, I want to make the room stylish, cozy and harmonious, and the overhead sink will take not the last place here.
Do you want to talk about how you assembled the structure from the countertop sink with your own hands? Do you want to share technological subtleties known only to you? Please write comments in the block below the text of the article, ask questions, post photos on the topic.