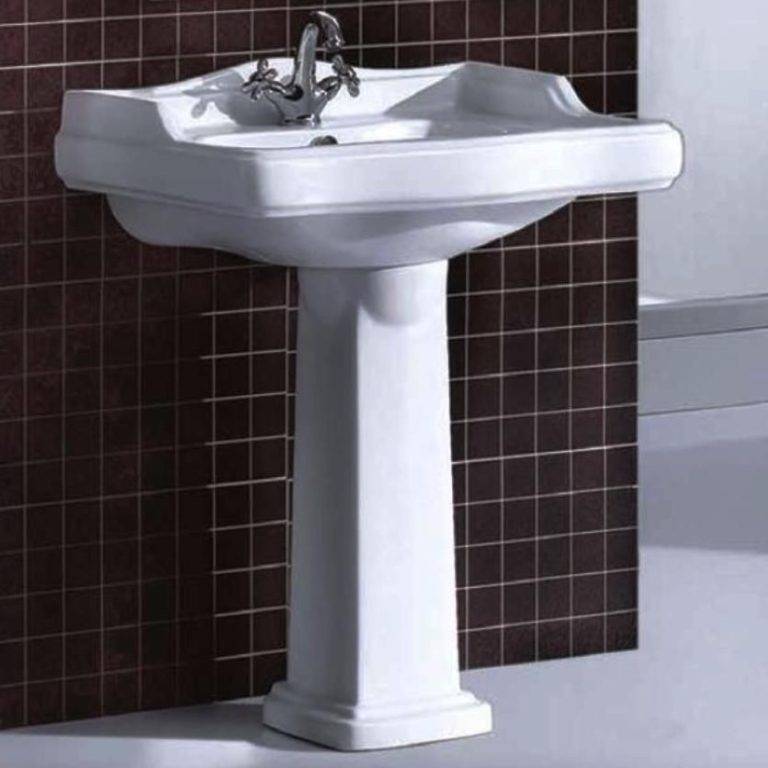
- Features of sinks with a pedestal
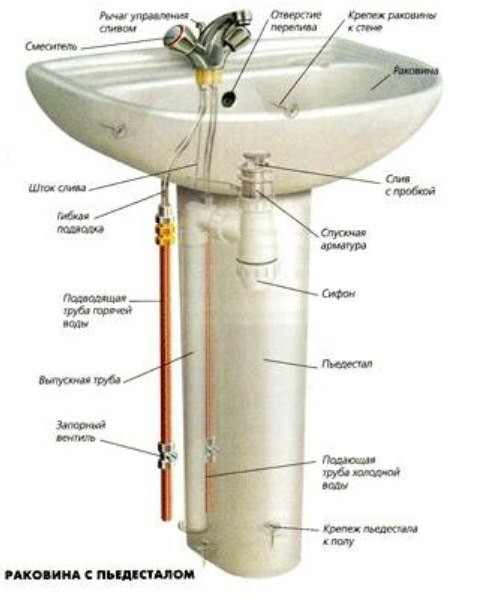
- Installation schemes for household sinks
- How to choose a hanging cabinet?
- Technology for installing a bathroom sink with a pedestal
- Common Mistakes
- Choosing a tandem washing machine
- System health check
- Pros and cons of a tulip sink
- Installing a mortise sink
- Necessary tools and materials
- Marking and cutting a niche
- The process of installing and connecting the sink
- Types of siphons and material for their manufacture
- Installing the wall product
- Required Tools
- Preparatory stage
- Faucet and washbasin assembly technology
- Fixing the sink to the wall
- Connection to water and sewer systems
- Sink on a pedestal. Selection guide
- Related Tools/Parts
- How to dismantle old equipment?
- Conclusions and useful video on the topic
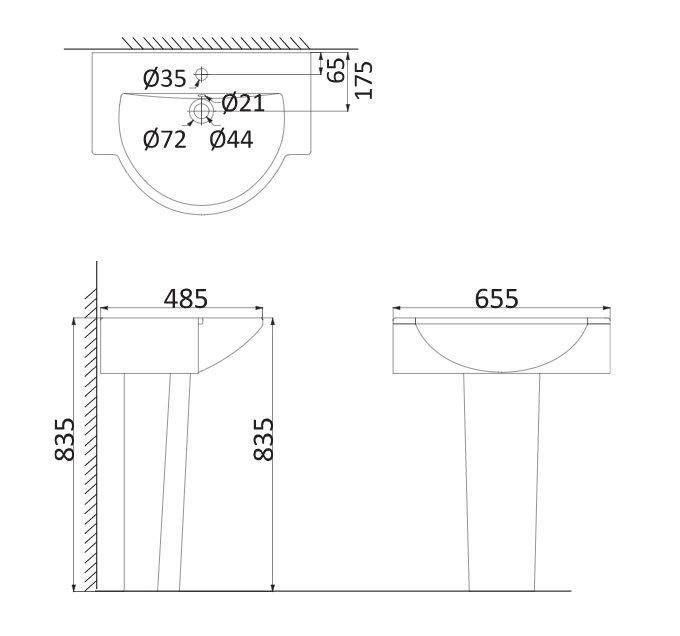
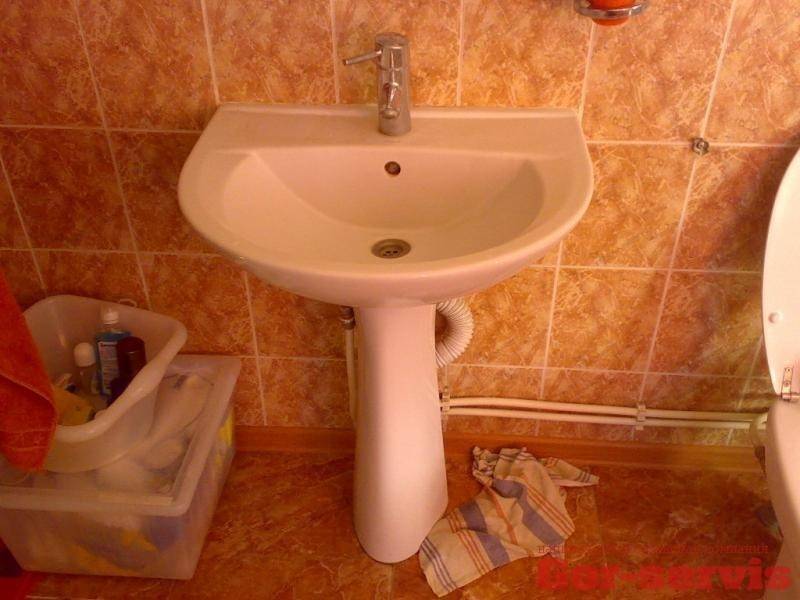
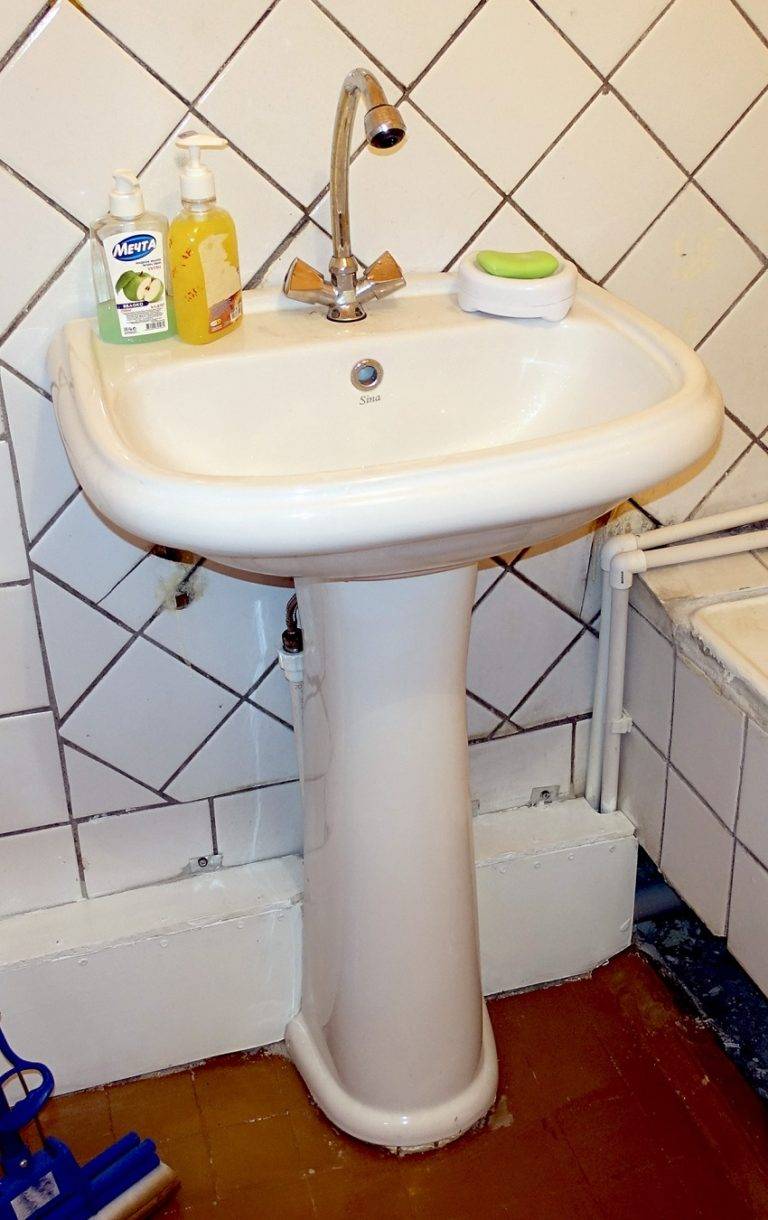
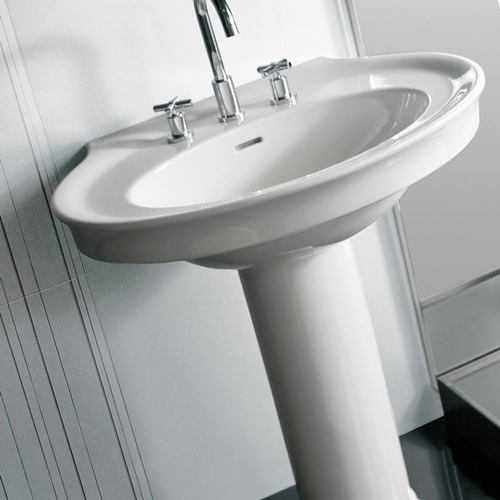
Features of sinks with a pedestal
Sink with pedestal
By installing a washbasin on a pedestal, several tasks are solved at once:
- a reliable reference point appears;
- drain communications are hidden;
- design is improved.
The floor stand under the sink comes in the form of:
- cylinder;
- painted vases.
Height - 70-80 cm. You can find a little more, but it will be possible to significantly increase the level of the sink only due to the pedestal under the pedestal.
According to the method of fastening the model are:
- based on a pedestal;
- with wall mount.
For the manufacture of such shells use:
- faience;
- acrylic;
- glass
- porcelain;
- ceramics;
- a natural stone.
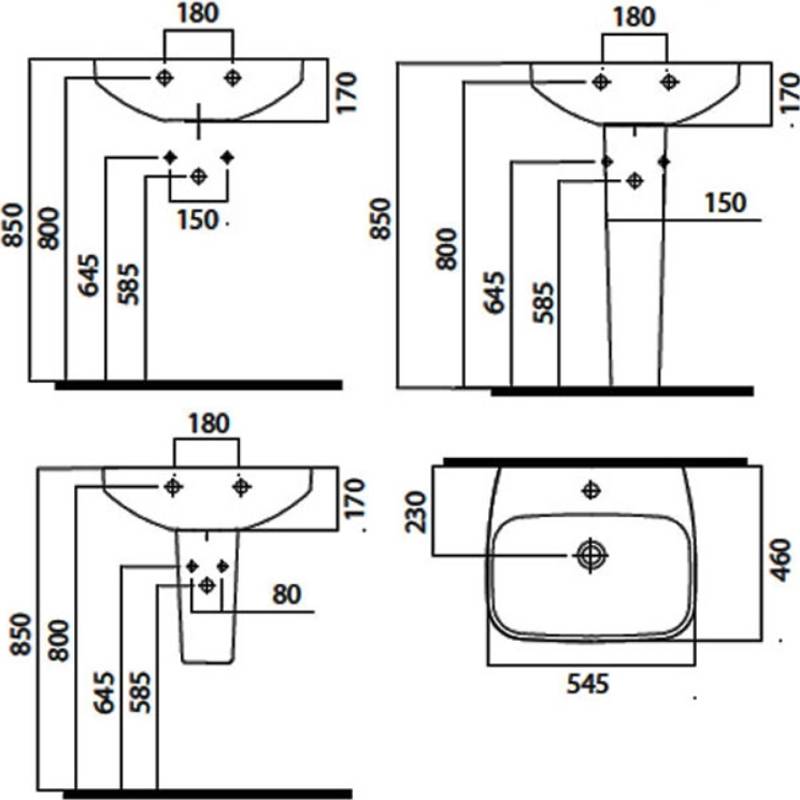
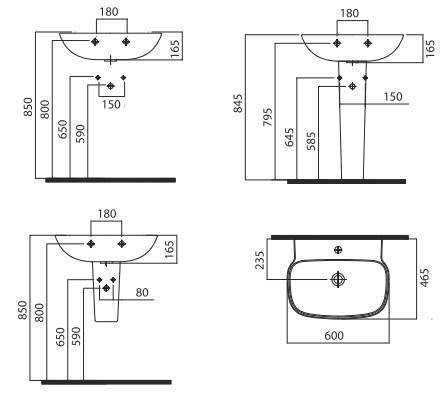
Installation schemes for household sinks
Modern industrial enterprises produce plumbing fixtures of various configurations. To deal with this huge range, the manufacturer of the product attaches a washbasin installation diagram to a specific model. If this is a simple sink, then for its installation you will need two brackets on the wall. Then the device is placed on them, the supply / withdrawal lines are connected and the process is completed.
Faience sanitary wares are distinguished by their large weight and large dimensions. These nuances must be taken into account during installation. For this reason, the installation of sinks in bathrooms is usually drawn up taking into account all expected loads.
Mounting brackets for washbasins are fixed with screws that are designed for at least twice the weight of the equipment. For fasteners, reliable seats should be equipped.
How to choose a hanging cabinet?
Let's look at the basic rules that have been verified by people conducting this kind of installation in their bathroom. They know exactly the advantages and disadvantages of all models:
- All cabinets will be divided according to the method of their installation. Most often, a sink on a pedestal, which is called a "tulip", will be used. There are also overhead sinks where a pipe is used. But there are also mounted sinks, which we will now get acquainted with.
- Whichever of the listed options was chosen by you, you can always give preference to a particular form.Sinks can be in the form of a square, oval, rectangle, triangle. Remember that any model will have rounded edges, as this is a more practical option, giving the necessary ergonomics while working. Keep in mind that a sink with rounded corners is much easier to clean than a model with sharp corners.
- Speaking about the maximum popularity, it is necessary to mention the sink in the form of an oval and a rectangle. There are some advantages to such models. Firstly, they will take up a minimum amount of space, and secondly, absolutely the entire capacity with which you are working is easily accessible. The beauty is that during washing, water will not splash around.
- Many people say that a sink of this kind is installed most often in houses and apartments with VIP repairs. Naturally, the price of implementation and creation of such a model will not be small. The sink also has certain dimensions, and most often they differ from the standard ones.
- Most often, the width of the sink for this kind of sink will not be determined by the desire of the family, but by the possibilities that are in the bathroom. Naturally, you can use a fairly wide cabinet in the bathroom in combination with other elements, but from this it will lose its beauty and unusualness.
- You can independently choose a model that is created from any material. There are models made of ceramics, glass, acrylic, granite, steel and cast iron. A popular option is a bathroom, which is made of faience. Initially, it can fit absolutely any kind of interior, and its color characteristic is easily selected by the client himself.The long-term use of the model is guaranteed by the fact that the surface of the material is covered with a special glaze. This will help to use this kind of model several times longer.
Technology for installing a bathroom sink with a pedestal
The aesthetics of the sink is an important factor in a positive start to the day. The bathroom often has various unpleasant smells from the toilet, shower or cat pot, so at least a bathroom sink with a pedestal should please residents with an appearance and not create negative images.
Both a standard pedestal and a sanitary cabinet with cabinets can act as a pedestal. The installation process does not change depending on the type of stand.
- Advantages of a sink with a pedestal
- Types of sinks and pedestals for the bathroom
- Classification by fastening method
- Varieties of shell material
- Dismantling of old plumbing
- Mounting a sink with a pedestal
- Features of mounting a semi-pedestal
- Conclusions and useful video on the topic
Common Mistakes
Sometimes, due to lack of experience or simply because of haste, gross mistakes can be made that lead to problems in the process of further operation of the washbasin.
 Level alignment
Mistake #1: Tilt the sink to one side.
The occurrence of this problem is due to improper installation of fasteners. For this reason, their installation and preliminary marking should be carried out according to the level. Even a slight distortion can spoil the overall appearance. Fixing this will not be easy: you will need to completely dismantle the washbasin and re-drill the holes.


Mistake number 2: the gap between the wall and the sink.
If you make such a mistake during installation, then water will always flow behind the washbasin.If you use a cabinet, dampness will sooner or later destroy the wood. For this reason, after installing the washbasin, such places should be properly sealed, for example, with silicone.
Mistake number 3: a leak in the water supply or sewerage.
Sometimes, due to haste, threaded connections can be poorly tightened.
If you do not pay attention to this, it is very easy to flood the neighbors. Therefore, after installation, each connection should be checked under water pressure.
 Mounting markings
Mistake number 4: the sink “moves”.
This is especially true when a tulip or pedestal sink is installed. There can be two reasons for this phenomenon. The first is an uneven floor, which causes the washbasin to “dance”. The second reason is loose bolts.
So, considering all the above recommendations and tips, you should be able to install a washbasin in the bathroom. If you have some difficulties in the process of its installation, then ask us your questions or leave to this article.
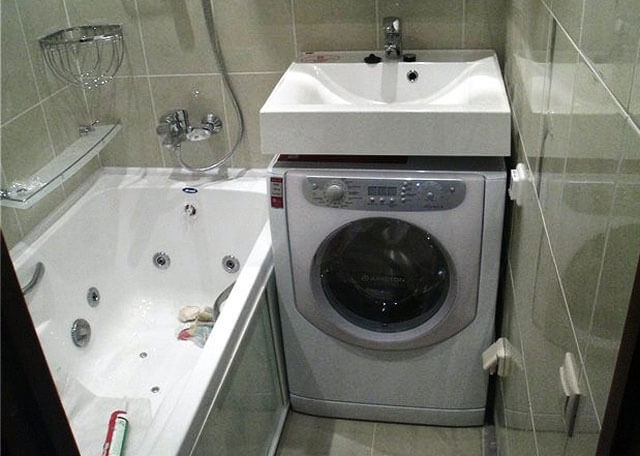
Choosing a tandem washing machine
The device, designed specifically for installation under the bowl of the sink, is the optimal solution to the task. The washing machine under the sink in this type of bathroom has a size that differs from the standard values. The height of the equipment does not exceed 60 cm, the depth of the machine is 34-43 cm. Such parameters explain the small capacity of the device, while the maximum load cannot exceed 3.5 kg. This condition is not at all suitable for a large family, so here the choice is most often made in favor of standard equipment.
There are several opinions that dispute the indicated values \u200b\u200bof the depth and height of the washing machine.
In response to this, the following can be said:
Indeed, the washing machine under the sink in the bathroom can be of any height, but it should be taken into account that the height of the sink, about 20 cm, and the distance between the elements of the pair will be added to it. As a result, the installation height of the sink is about 1 meter, which makes it difficult to wash a child or a small person. As an addition to this design, you can build a small stand, but this will also cause some inconvenience.
The depth of the washing machine combined with the sink can also be any, but it should be understood that the machine must be completely located under the sink bowl. The best option is a sink that slightly overlaps the washing machine. Acting as a visor over the appliance panel, the bowl will prevent splashing on the machine
It is also important to remember that the appliance for washing clothes cannot be installed tightly against the wall, the gap must be at least 8 cm. Communications will be located in this place
To select a washing machine according to such criteria with a normal load, it will take a lot of time and effort.
System health check
Before you start using the washbasin, you need to check the quality of the connections and how firmly the bowl is installed. To do this, once again check the quality of all fasteners. After that, open a tap with hot and cold water and check the tightness of the water hoses. If there are water leaks, then the connections must be tightened, and when this does not help, unscrew the hose and wind up the FUM tape.
To check the tightness of the siphon, it is recommended to draw water into the sink by closing the drain hole. Then drain all the water - if there are no leaks in the siphon and hoses, then you can start using the sink.
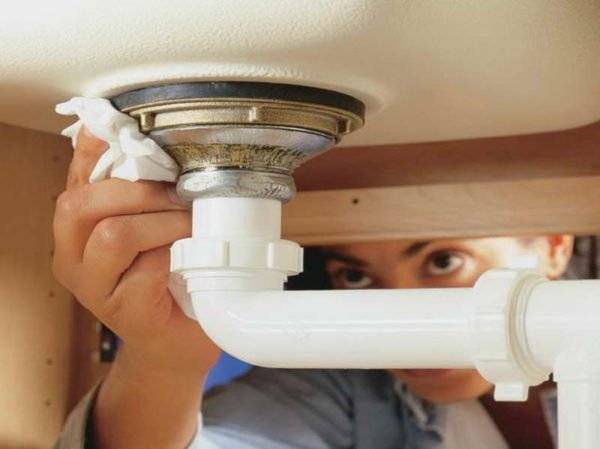
While draining the water, check the tightness of the connections
The connections should not be overtightened, as you may damage the gaskets or strip the threads.
Pros and cons of a tulip sink
Wash basins with a pedestal have a large number of important advantages:
- Large range of models. On sale there are various modifications that differ not only in design features, but also in design, color, size. Thanks to this, you can always choose the option suitable for the interior of a different stylistic orientation.
- Affordable cost. The cost of a "tulip" mainly depends on the material from which it is made. However, ceteris paribus, the price of this type of washbasin is somewhat lower than for other models (for example, “moidodyr”).
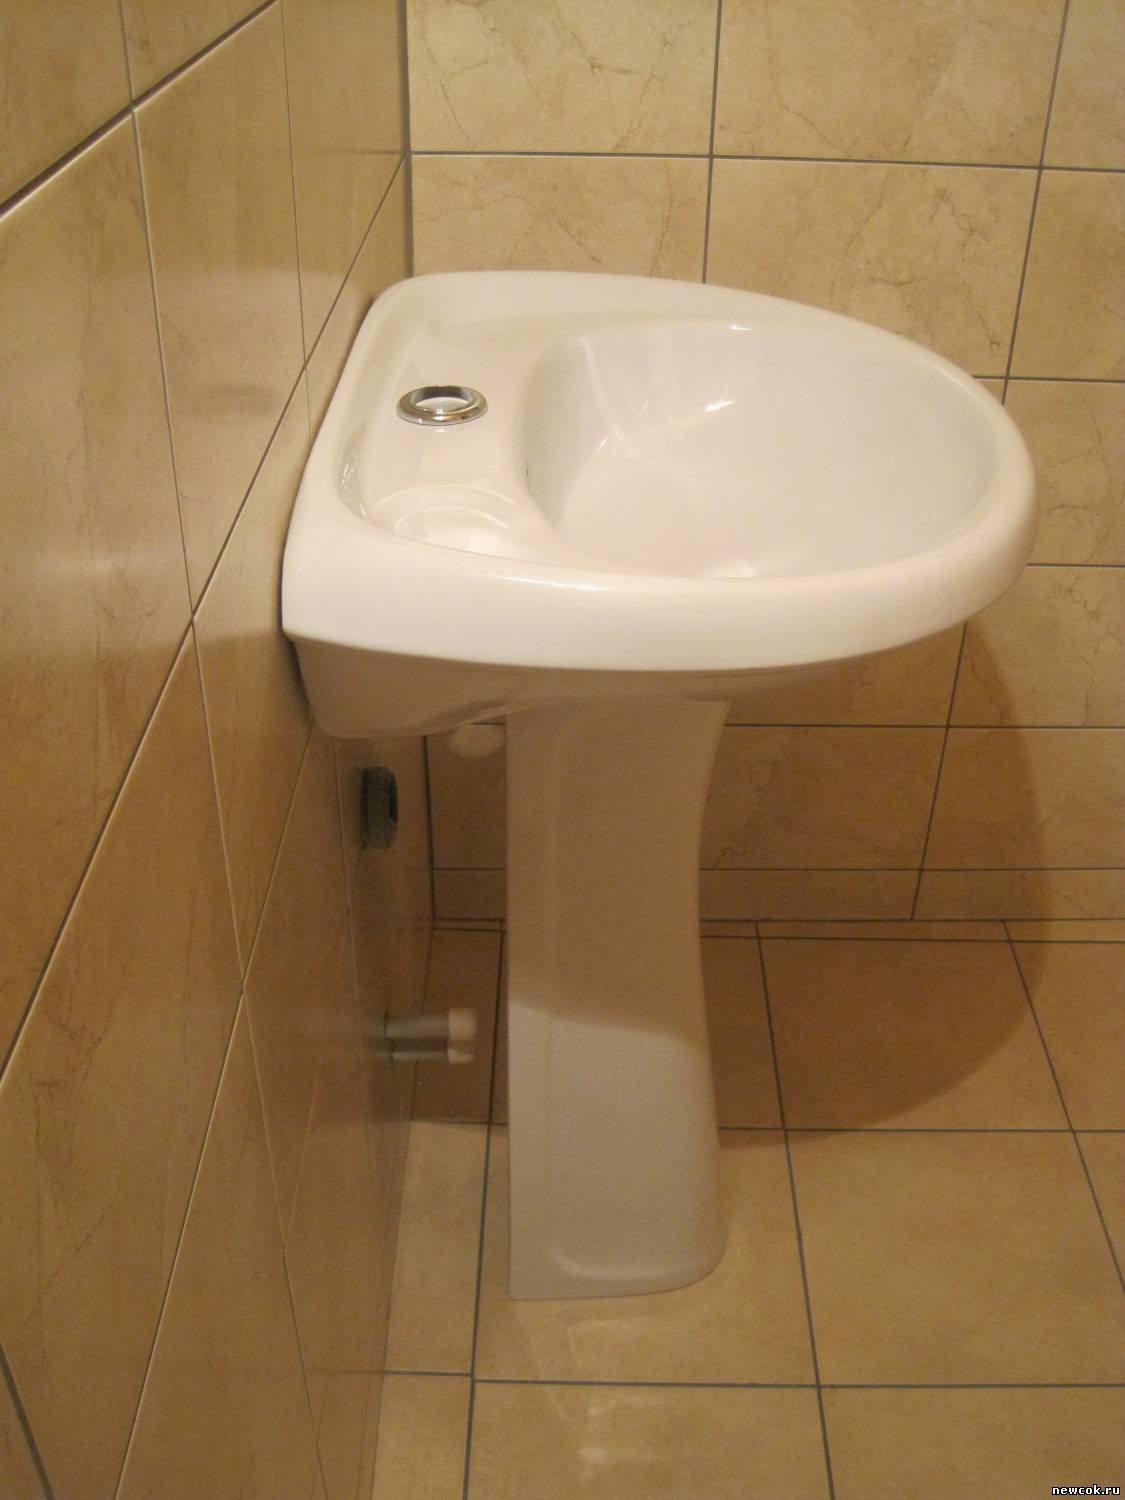
- Compact design. Even conventional modifications have relatively small dimensions, which allows them to be installed in fairly compact rooms. In addition, there are miniature models - corner tulip shells and options with a semi-pedestal. At the same time, even small-sized structures can effectively remove service communications (water and sewer systems) from the eyes.
The tulip shell is practically devoid of flaws. Some inconvenience can be considered the impossibility of using the space under the washbasin (for example, under the bedside tables).


However, there are models that provide additional cabinets and shelves that are attached to the column.
Compared to other types of sanitary ware, the installation of a washbasin with a pedestal is quite easy.
It is only important to attach the bowl to the wall, as well as correctly assemble the mixer and siphon. All this can be done with your own hands without the involvement of specialists.
You should also take into account the features of models made from different types of materials (porcelain structures are fragile, stone structures are heavy, and so on).
Installing a mortise sink
Kitchen furniture consists of different products, each of which performs a specific function. The countertop is one of the main elements of the kitchen. It is a work surface, and can also become a frame for the sink. The material from which it is made is important, the ability to withstand loads depends on it. Thin composite panels will hold only stainless models. Stone sinks require a massive surface, it must be made of a similar material, have a special design that includes holders.
It is quite possible to install a sink into a wooden countertop with your own hands, as for a granite one, it is better to entrust the work to professionals. Of course, you can try to make a tie-in yourself, following the recommendations for working with a specific material, but this will require a special milling cutter or waterjet, the price of which will be several times higher than the cost of the hole. Let us consider in more detail the method of installing mortise sinks.
Necessary tools and materials
Before starting work, an audit of the existing tools should be carried out, if necessary, purchased. Standard set includes:
- measuring instruments, pencil, marker, cardboard, adhesive tape;
- construction knife, glue, sealant, screws;
- adjustable, open-end wrenches, screwdriver, pliers;
- electric drill, drill, jigsaw;
- sink, faucet, siphon, hoses for water supply.
Marking and cutting a niche
Having determined the location of the product, it remains to perform a number of simple steps with which the installation of the sink in the kitchen will be successful. The step by step process is as follows:
- Mortise sinks are sold complete with ready-made cardboard templates and fasteners. If there are none, you will have to cut the patterns yourself. In this case, the sink itself will become a template. A sheet of cardboard is applied to it, a silhouette is outlined along the contours, a blank is cut out.
- To determine the inner contour according to which the cut is made, the width of the rim is measured. After that, these data are transferred to the workpiece to indicate the final type of pattern.
- The drain point is indicated on the countertop. A template is applied to it, fixed with adhesive tape, a contour is outlined. In this case, the indentation from the front end of the working surface to the side of the sink should be more than 5 cm, from the rear - 2.5 cm.
- Holes are drilled along the contour of the finished marking using an electric drill. To pass the jigsaw blade, a drill diameter of 10-12 mm is sufficient. The number of holes depends on the shape of the bowl to be installed. For round - the step between them will be 7 cm, for square, rectangular - four passes of the drill in the corners are enough. Drilling and cutting work is performed from the front side of the surface. Next, using an electric jigsaw, a hole for the sink is cut. After that, the cut is cleaned of dust, polished with sandpaper.
- The edges of the saw cut are treated with a silicone-based sealant. It protects uncoated wood from swelling. Insufficient sealing can lead to rotting of the countertop at the saw cut, so it is better to apply a double layer.
The process of installing and connecting the sink
- Using a brush or spatula, a layer of transparent silicone is applied to the work surface in the area of the sink rim.
- The rim of the sink inside is treated with a sealant. It provides reliable fastening of the objects in question, does not allow liquid to pass through at the junction of the elements.
- The next step is to install the sink in the cut hole. It is superimposed from the side of the crane attachment. Gradually pressed until the moment of complete contact of objects. Remove excess sealant with a rag.
- With the help of fasteners, the sink is fixed to the countertop. They can be plastic or metal. More reliable iron clamps.
- After the installation is completed, the necessary communications are connected. Usually the sink is attached with the faucet fixed to it, and the only thing left to do is to screw the water supply hoses (hot, cold) to the water pipes.
- At the final stage, a drain is installed. The siphon outlet is inserted into the sink, and the corrugated pipe is inserted into the sewer.
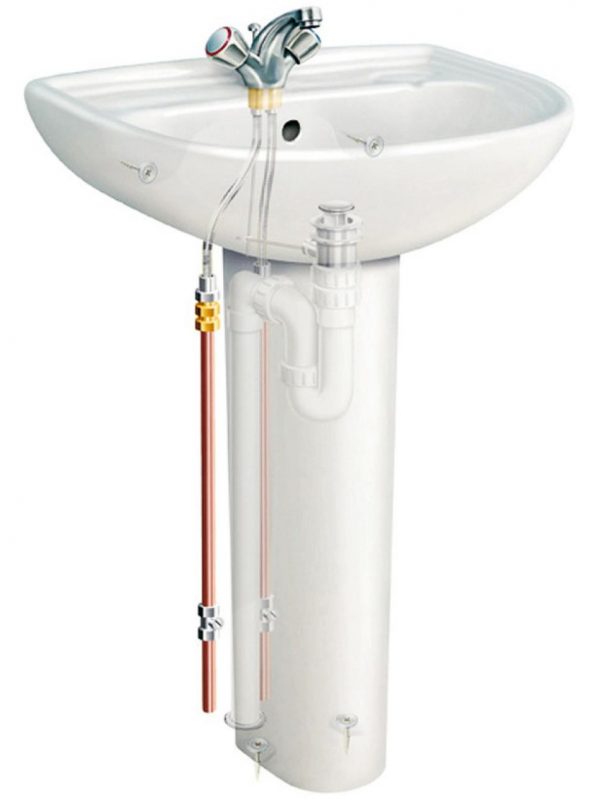
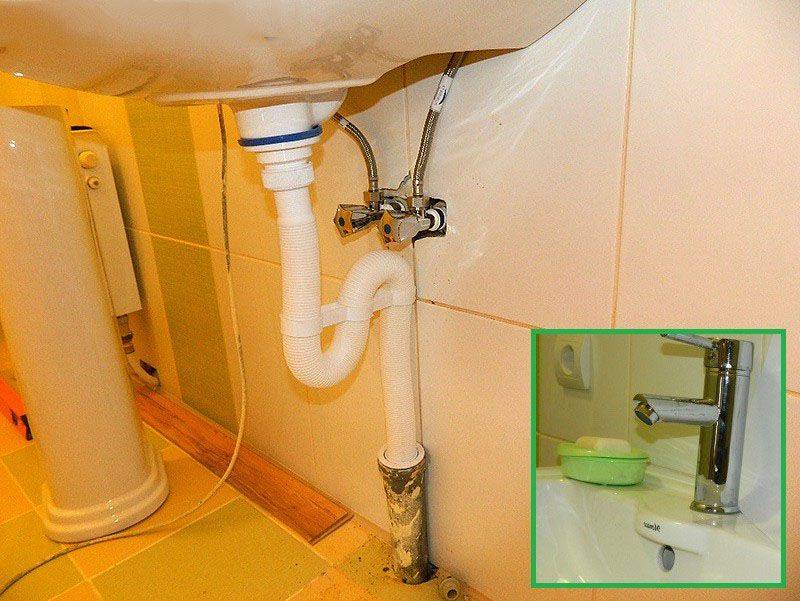
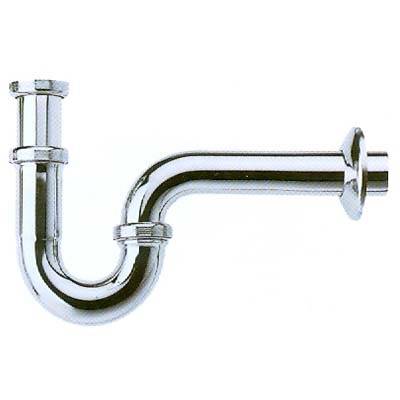
Types of siphons and material for their manufacture
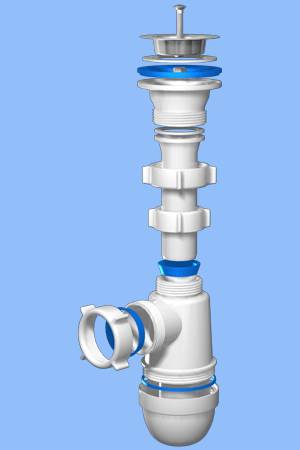
A siphon is a design resembling the English letter S, the location of which is located immediately under the sink. Its purpose is to connect to the sewerage system for the withdrawal of water. Siphons are of different types:
- bottle siphons.The advantages are the presence of a water seal, the ability to connect the drain of water from the washing machine, independent regular cleaning. This type is often used with overflow;
- siphons are tubular, which resemble a curved pipe. In the bend of this pipe, a shutter is formed that prevents the appearance of specific odors;
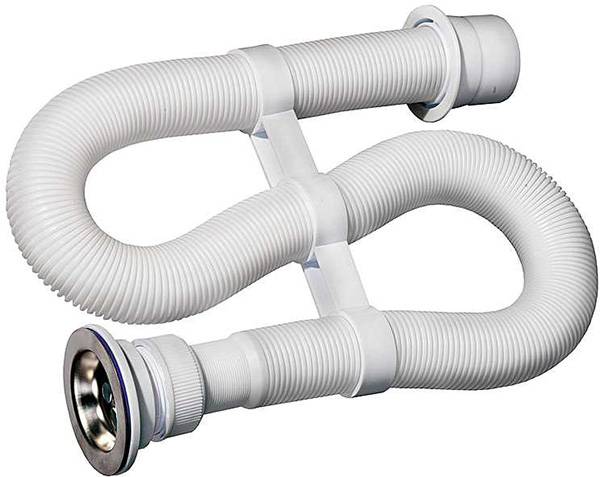
- corrugated siphons, reminiscent of tubular ones, with the only difference being that, due to its plasticity, it can take any shape, becoming more compact;
- siphons with overflow, these are all of the above varieties with an additional pipe branch, brought from the siphon to the top of the sink, to prevent water from overflowing from it.
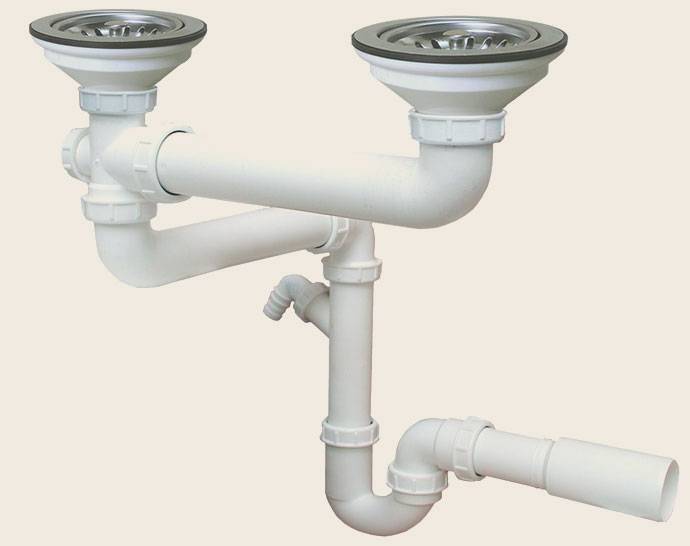
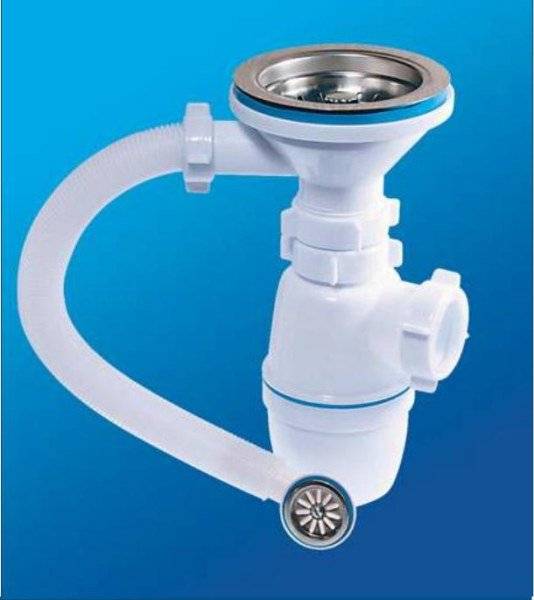
Siphons are made from different materials:
- cast iron siphon, its advantages are corrosion resistant, strength. The cast-iron siphon also has disadvantages, this is poor cleaning, a difficult dismantling process. Cast iron siphon is used only in bathrooms;
- brass siphons, its advantages are durability, strength, non-corrosive, easy dismantling;
- plastic siphons, the most common type, due to the affordable price, ease of installation and dismantling, are quite durable.
Installing the wall product
Required Tools
Attach the sink to the wall:
- powerful screwdriver;
- gas key;
- electric drill with drills of 6, 8, 10 mm;
- a drill designed for concrete work, equipped with a pobedit tip;
- several wrenches;
- the level that determines the horizontal;
- marker with a thin rod;
- a hammer.
To make the threaded connections tight, you should purchase FUM tape in advance at the store, but you can get by with ordinary tow.Stock up on enough fasteners.


Preparatory stage
Before attaching the washbasin to the wall, it is necessary to bring communications to the installation site, namely pipes with hot and cold water. They can be made of metal-plastic, metal and PVC material, be sure to check the condition of the pipes for leaks. Place a valve at the outlet of each pipe, which, if necessary, will help stop the flow of water. The best choice is a valve made of chrome.
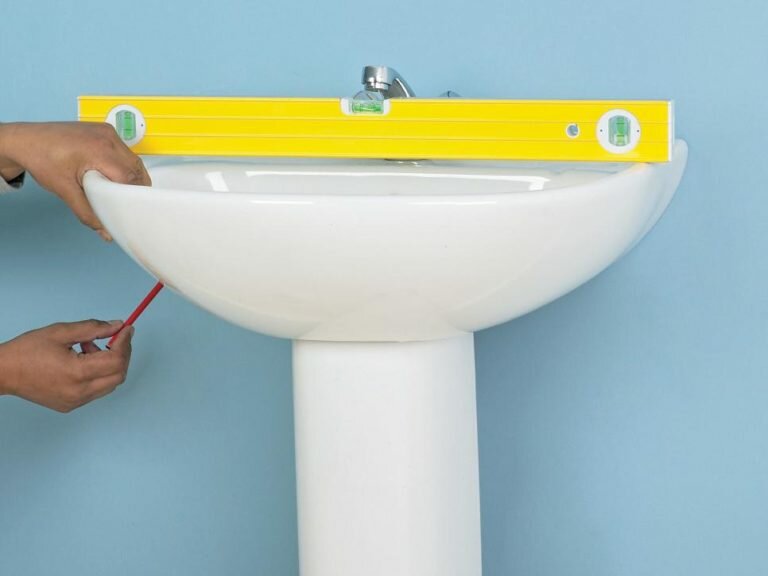
The sink must be fixed at a level of 80 cm, counting from the top of the washbasin to the floor.
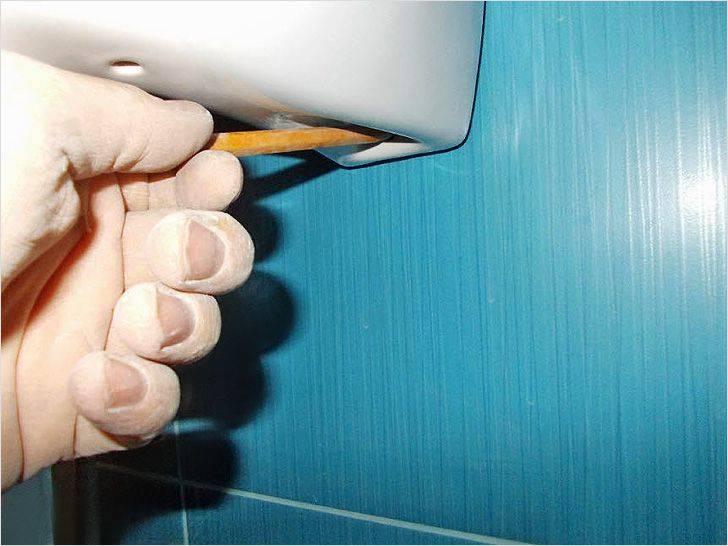
Before hanging the sink on the wall, make a mark on the wall with a marker where exactly the appliance will be placed. Through 2 points, draw a line horizontally located relative to the floor surface. This is the main reference point for mounting the unit.
Each sink has holes through which the washbasin is fixed. Attach a ruler and measure the distance between the holes, measure the resulting value on the wall. Thus, you should have 4 marks: a horizontal line, a central fixation point for the product and a pair of marks calculated for the bolts.
You need to start the process with in tiled panels. Next, change the drill to a larger one and make holes for the fasteners in the wall. Insert the dowels into the holes, note that they must enter with great effort.
Faucet and washbasin assembly technology
In most cases, wall-mounted specimens go on sale from the manufacturer already with a hole in the shelf for mounting the faucet to the washbasin.
Fix the faucet to the sink hole, turn the latter over and tighten the faucet tightly with the nut
Pay attention to how symmetrically placed the spout of the mixer to the washbasin
Fixing the sink to the wall
It will not be possible to hang the sink on the wall without the appropriate fixing kit, including studs and gaskets.
Install the studs on the dowels. First, "put" a couple of nuts on the stud, then use the wrench and screw each stud.
Now is the time to apply silicone sealant to the end of the washbasin, namely to the area where it comes into contact with the wall structure. Put the washbasin on the studs, install the gaskets and tighten the fasteners well. Slightly "shake" the device from side to side, if there are no vibrations and movements - the work of fixing the washbasin to the wall can be considered completed.
Connection to water and sewer systems
Wind the linen around the thread of the valve, lubricating it with a special paste, for example "Unipak". Connect the mixer hoses to the pipes and tighten them with an adjustable wrench. Do not overdo it - this can provoke a rush of cushioning material. The sink is now connected to the plumbing. It remains to work with the sewer.
Put the siphon on the washbasin. Before assembling the siphon, read in detail. Check that all gaskets are well aligned with the sink. Position the hose from the siphon to the sewer drain. Turn on a small amount of water and see if the wall gets wet. If everything is in order - you can be congratulated, the wall-mounted sink is installed!
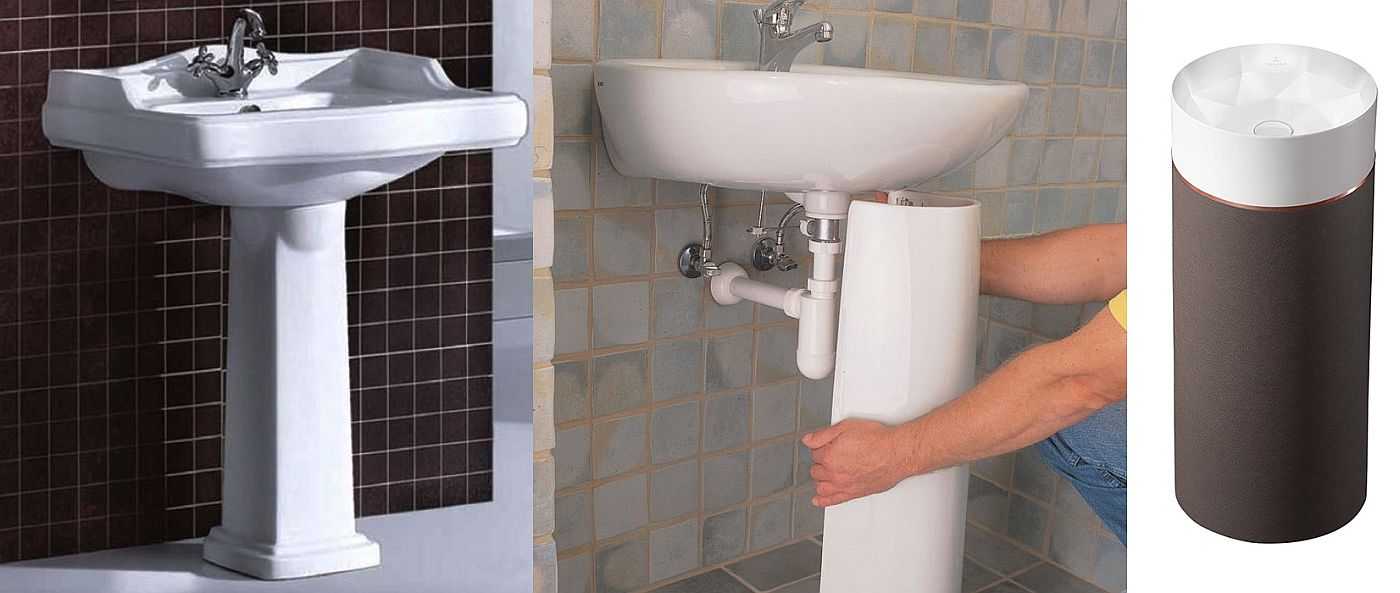
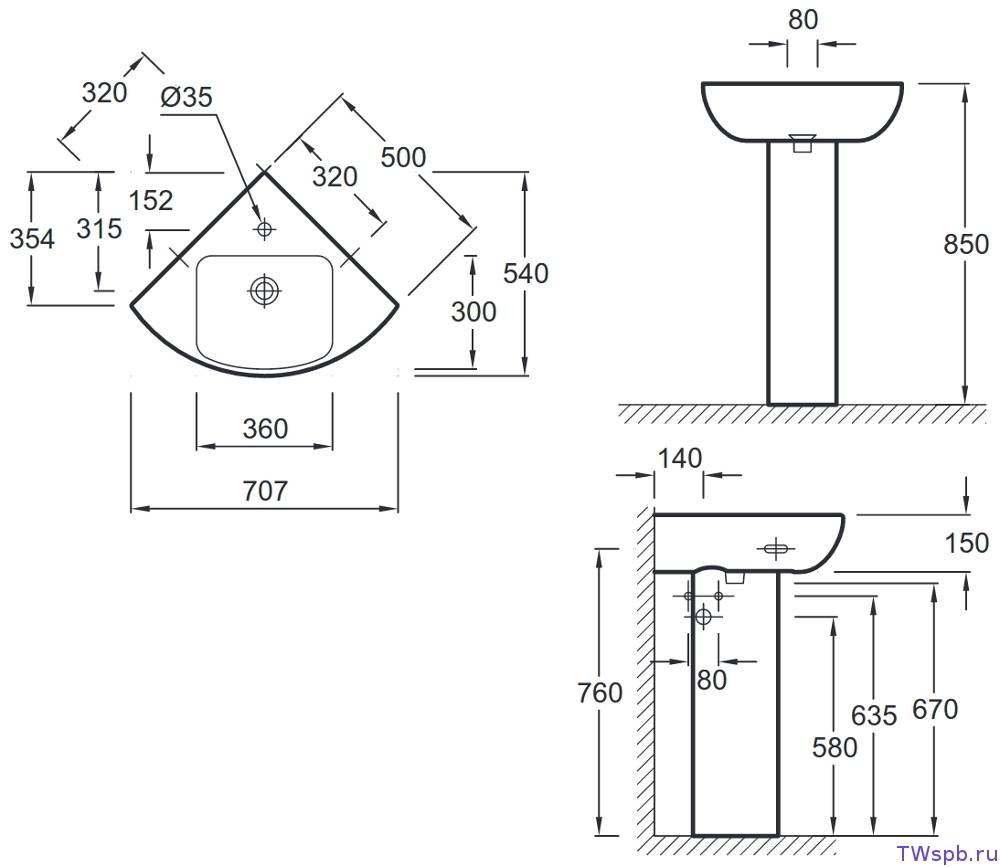
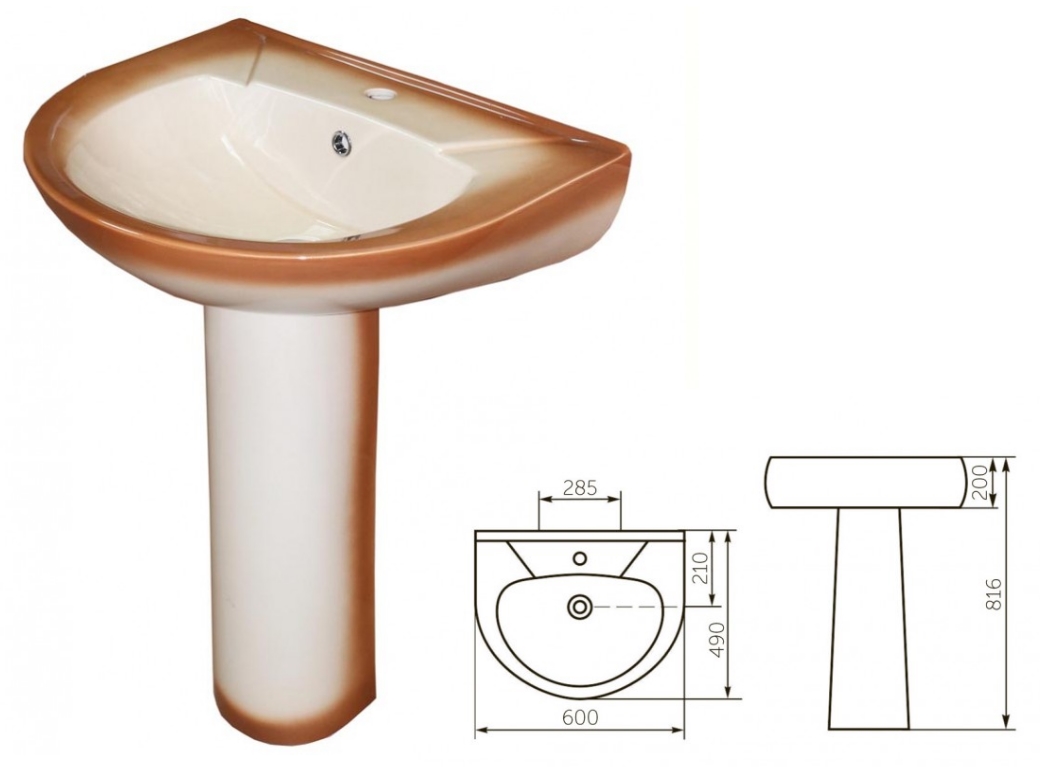
Sink on a pedestal. Selection guide
Manufacture sinks on pedestals in a variety of colors and shapes
The first thing you should pay attention to is the color scheme and design. All plumbing in the bathroom must certainly be in harmony, forming a single stylistic ensemble.
This also applies to the material of manufacture.
The classic solution is faience and porcelain sinks. An alternative solution for lovers of unusual shapes and materials is sinks on pedestals made of stone, tempered glass, less often acrylic, with steel and plastic elements (shelves for soap, towel holders, cup holders) and decorative patterns. Each individual non-classical model of a washbasin with a pedestal is installed strictly according to the instructions from the manufacturer.
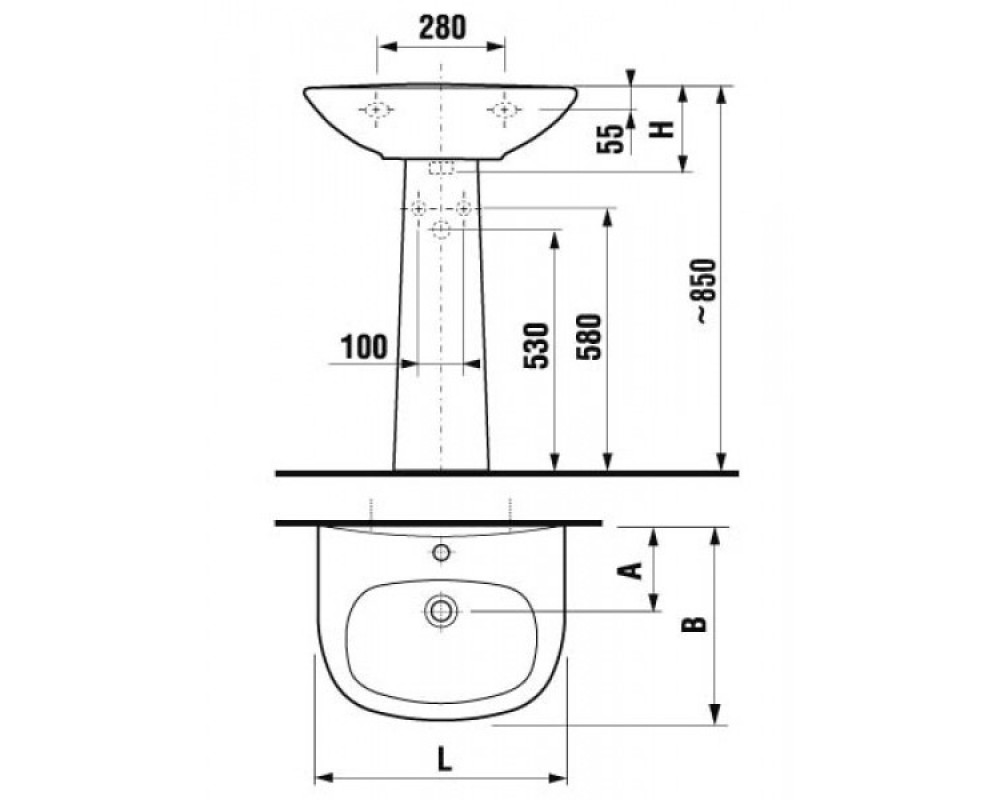
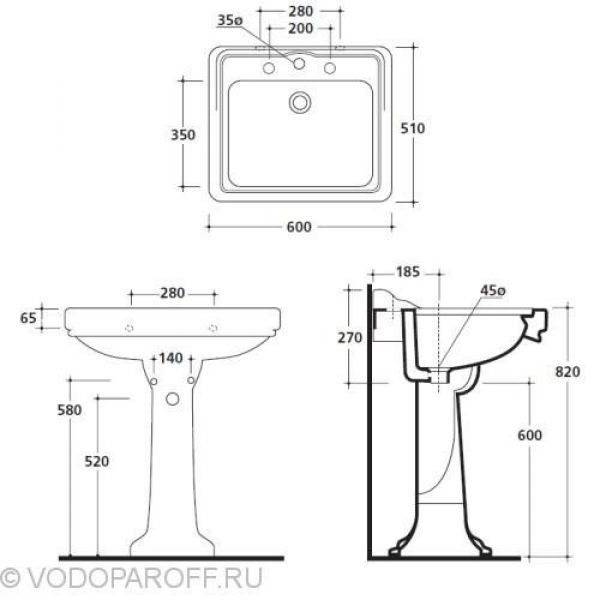
Washbasin on a pedestal, drawing
The shells themselves can be of any shape - square, round, oval, etc. It is worth choosing the one that fits into the interior of the bathroom, does not take up much space (the optimal length is about 60 cm) and allows you to wash your face and brush your teeth with convenience. It is recommended to choose a model with an overflow hole.


Sink with pedestal, material - tempered glass, steel
Sink on a pedestal with shelves
The pedestal (if it is not included) should be selected in a similar shape to the sink. That is, a cubic “leg” is suitable for a square bowl, and for a round bowl, respectively, with rounded edges.
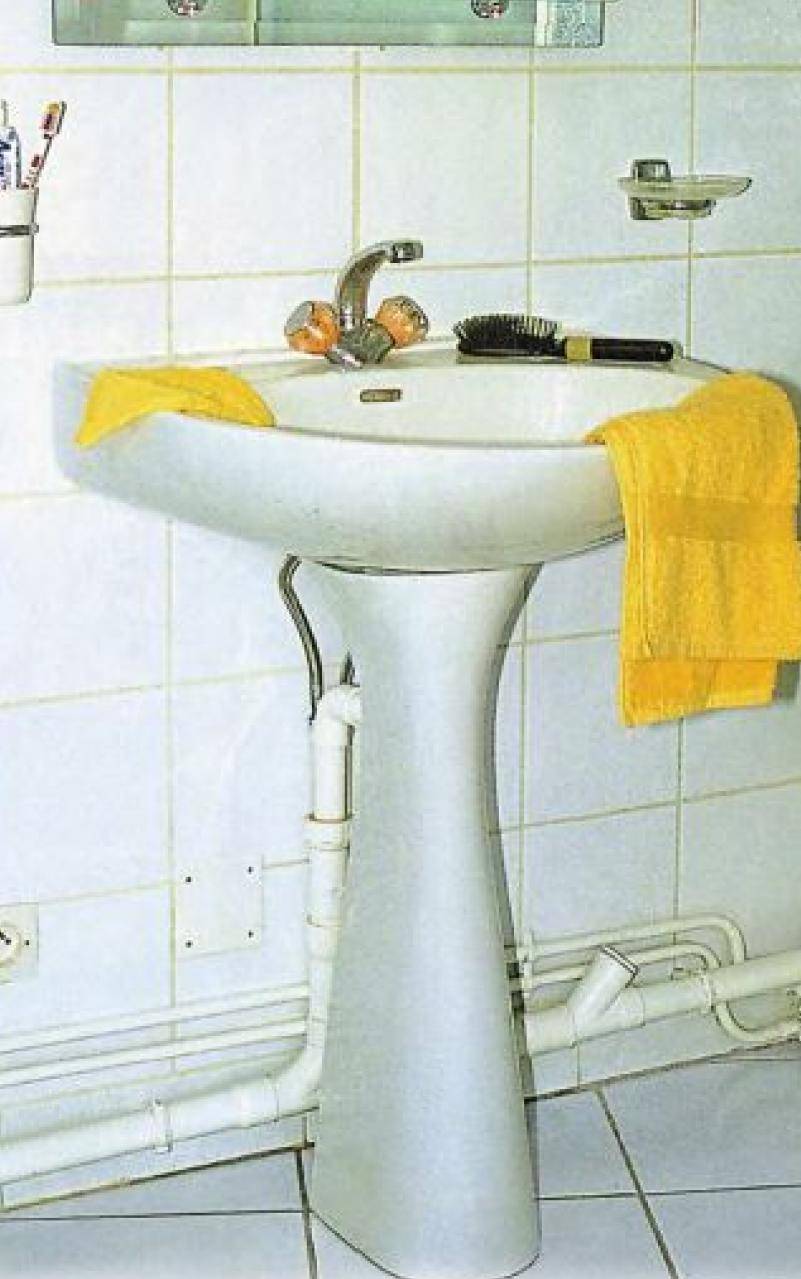
Sink with pedestal
Faucets are usually installed directly on the edge of the washbasin, but there are models without technological holes suitable for installation under wall-mounted (common for bath and washbasin) or next to floor-standing faucets. In the case of wall-mounted and built-in mixers, all communications (supply water pipes or flexible hoses, siphon) are hidden behind or inside the pedestal.
Sinks on a pedestal (material - natural stone)
But there are the most important points to pay attention to when choosing a sink:
The “leg” is a weak point of plumbing due to its design, so when choosing, you should pay attention to the quality of the material of manufacture and the absence of cracks / chips / scratches;
a pedestal, devoid of various jumpers and partitions on the back side, is much more convenient and easier to install with your own hands;
The distance between the pedestal and the wall is very different for different models, this fact should be taken into account when choosing a washbasin with a pedestal for the option of laying water and sewer pipes in your apartment.
Related Tools/Parts
Together with the washbasin and pedestal, you need to purchase suitable fasteners (guided by the type of your walls and wall finishes), a siphon, if necessary, a faucet and flexible hoses, as well as shut-off ball valves.
For installation work, you will need a list of the following tools and materials:
- building water level;
- screwdriver, tape measure; perforator and drill;
- simple pencil;
- silicone-based sealant;
- wrench;
- tape fum or tow with oil paint.
How to dismantle old equipment?
How to install the sink correctly? You should start by dismantling the device that has served its purpose. To do this, first unscrew the nut that secures the mixer. After that, the device is disconnected from the eyeliner, carefully removed and removed. Then the drain elements are dismantled. The nuts are unscrewed from the bottom of the sink. A siphon is disconnected from the drain outlet, the water from which is immediately removed. If it is necessary to replace the siphon, it is separated from the drain pipe.At the end of the work, it is recommended to tightly close the opening of the sewer pipe with a rag, cork or other suitable object in order to prevent the appearance of an unpleasant odor. The sink is removed from the support.
Conclusions and useful video on the topic


If you still decide install sink with pedestal without professional help, read all the recommendations twice, especially if you are doing this for the first time. Of course, unforeseen situations may arise, no one is immune from this.
Being theoretically savvy, you will see the full picture of the process. If you follow the instructions exactly, everything should go like clockwork.