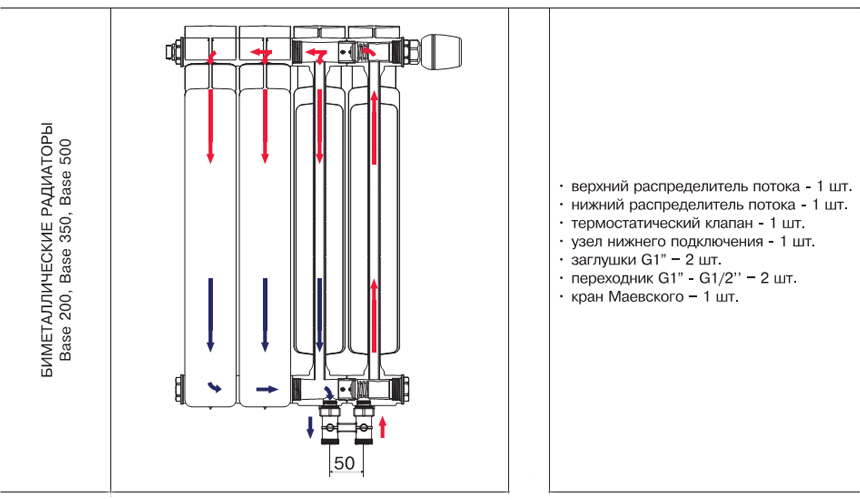
- How to connect a bimetallic radiator?
- What pipes to choose for mounting radiators?
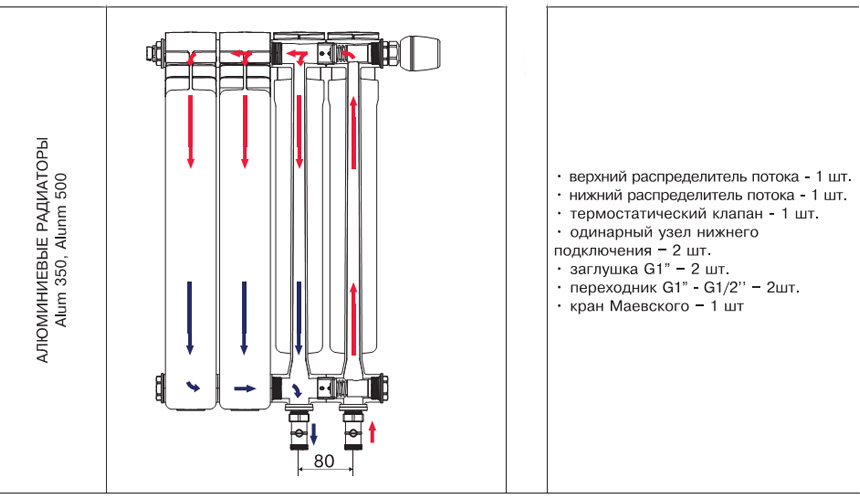
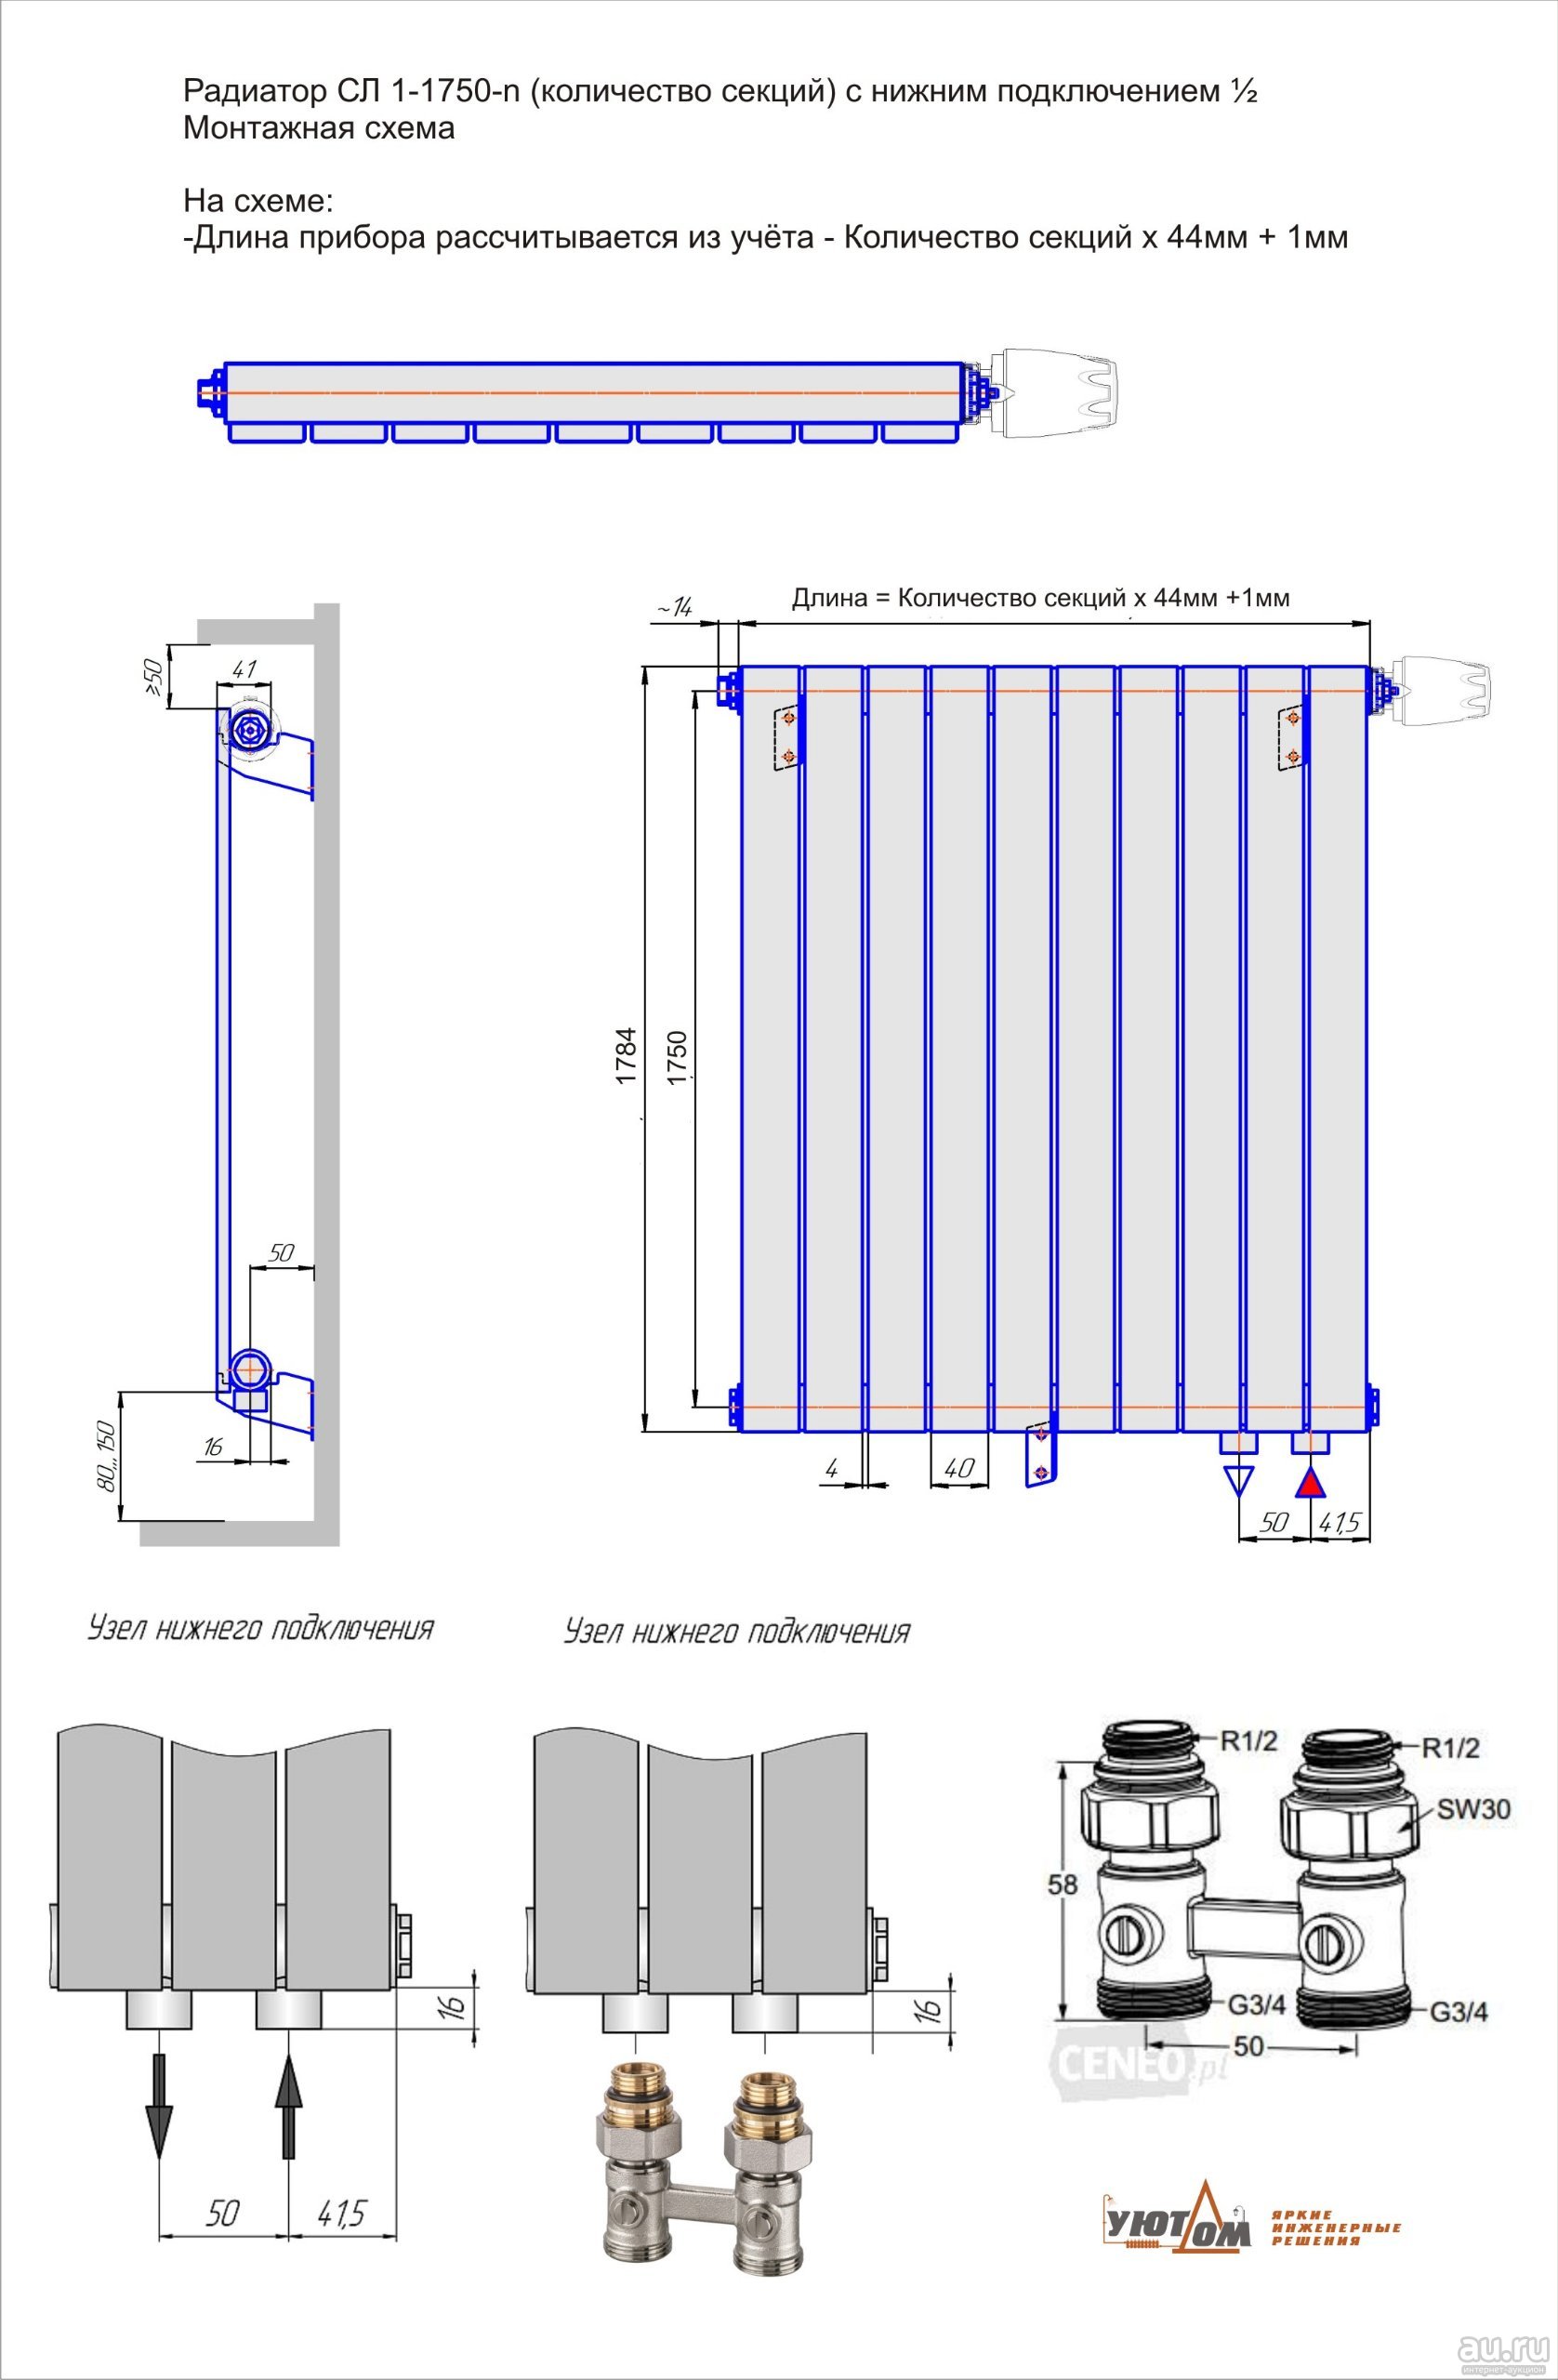
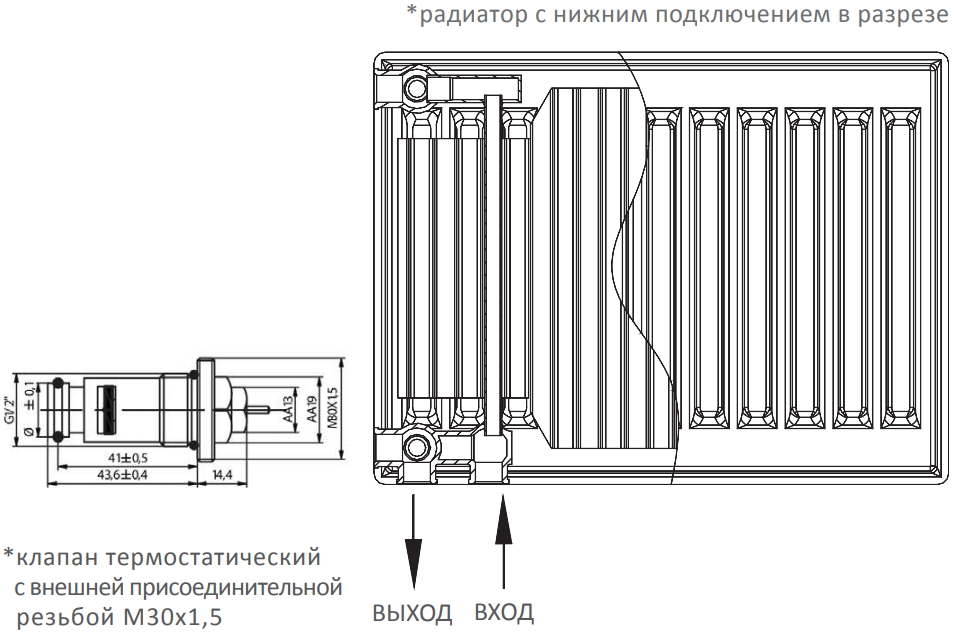
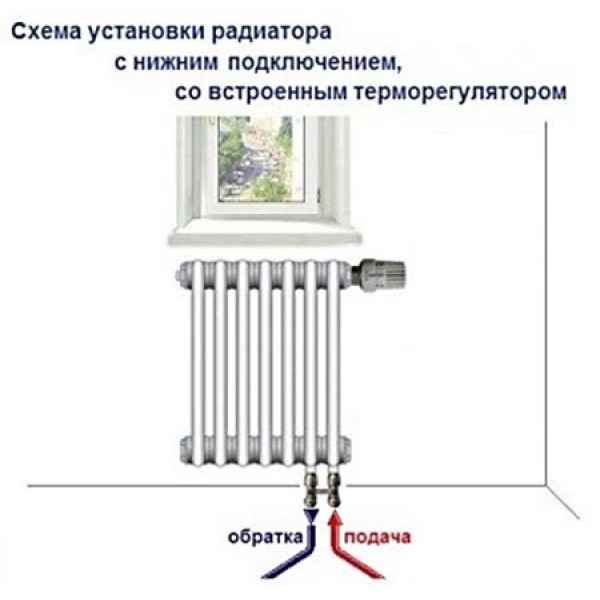
- About special radiators designed for the lower connection scheme
- Two-pipe heating systems
- In which heating systems is the bottom supply practiced?
- Diagonal connection
- What is required for efficient battery operation?
- What is needed for installation
- Mayevsky crane or automatic air vent
- Stub
- Shut-off valves
- Related materials and tools
- Bottom eyeliner - what can it be?
- Scheme of arrangement of the heating system
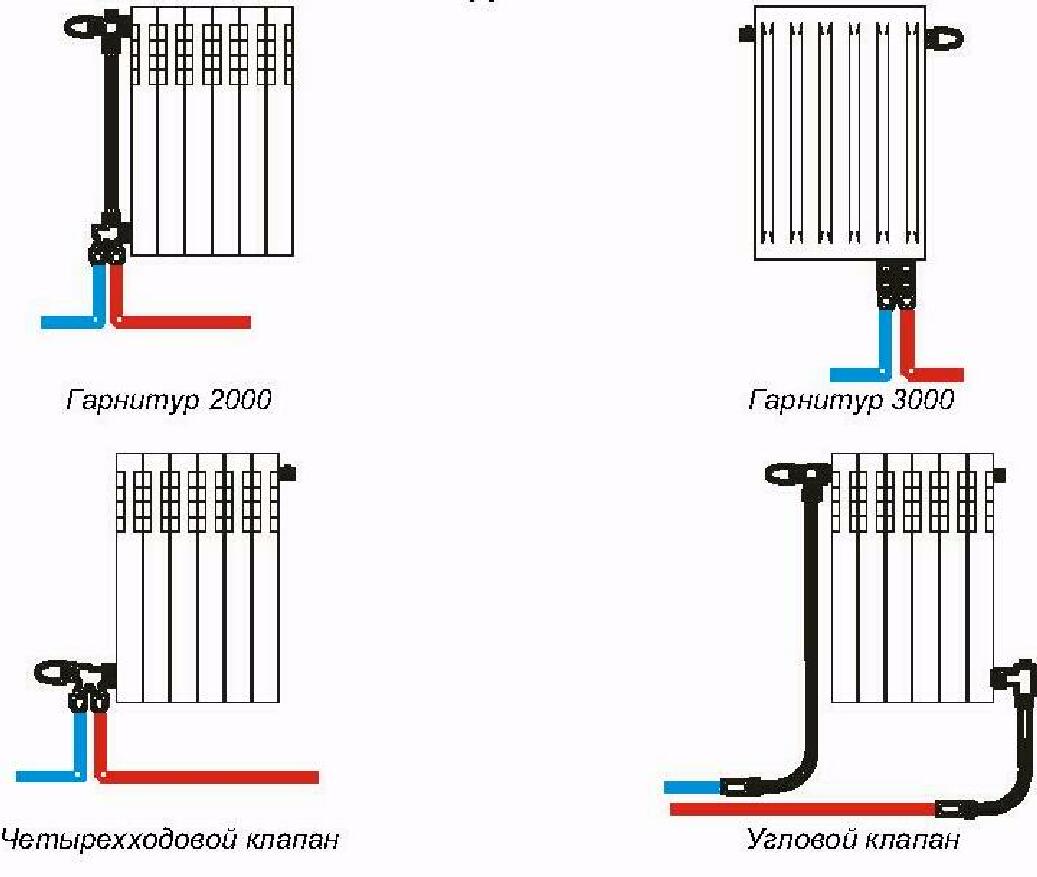
- Radiator connection options
- Choosing a place and method of installing a radiator
- Coolant circulation methods
How to connect a bimetallic radiator?
Very often, and in the fall almost daily, on the most popular forum in Runet on the topic of installation, topics or messages appear with the question of problems connecting bimetallic radiators in apartments, and I am very sorry that in our time, when there is access to any information on the network, there are many people are faced with this problem by turning to “specialists” to replace radiators, who have no idea how this installation is performed.And the question is not only that the radiators do not warm up completely or completely, which casts doubt on the feasibility of such a replacement, but also that installation is also often carried out with serious violations of the design conditions of the heating system, which seriously affect its reliability, thereby the life and health of residents are in serious danger. In this topic, through the posted photos of my work, I will try to give simple tips on how to connect radiators so that all building codes are observed and new heaters are fully warmed up.
What pipes to choose for mounting radiators?
Firstly, I would like to immediately decide on the type of pipeline material that the new radiator is connected to: if in the house, according to the project, the heating system risers are made of a steel black pipe, then the leads to the radiator must be made of steel. Options made of plastic pipes (polypropylene, metal-plastic) are significantly inferior in reliability to a steel pipe and are categorically unacceptable in systems designed from steel, especially with open laying, which is unacceptable according to the requirements of SNiP, connecting a radiator with copper pipes and stainless steel pipes, I personally consider it inappropriate for economic and aesthetic reasons, as well as due to a decrease in the reliability of the pipe due to the significantly smaller wall thickness.
Secondly, it is necessary to determine the type of connection for the pipeline, it is difficult to argue that gas welding is optimal, both for reasons of reliability (with threaded connections there is always a weak spot-squeeze) and from the aesthetic side due to the absence of threaded fittings
It is also important that the risers mounted by the builders of the house rarely differ in the correct geometry relative to the walls and floor, while gas welding, the installers can easily correct all the irregularities left by the builders
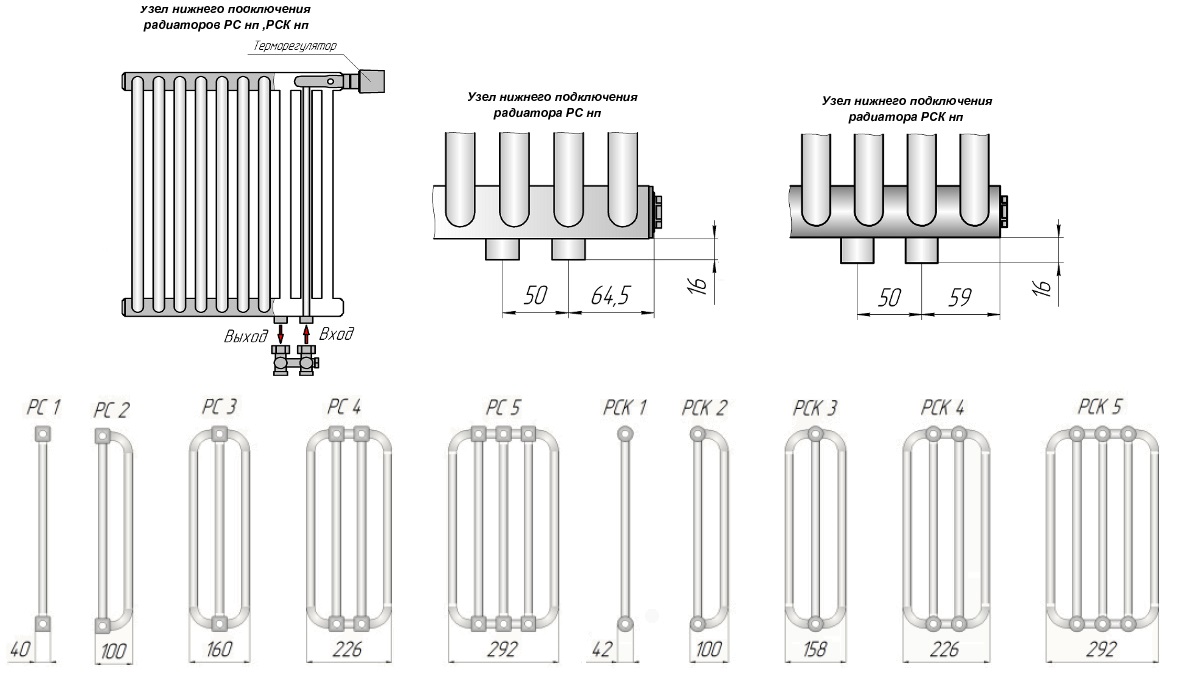
About special radiators designed for the lower connection scheme
As noted earlier, special batteries with a lower connection are sold today. Their design is such that optimal heat transfer is ensured. Radiators consist of a pair of steel plates connected to each other by welding, which forms technological channels for the movement of the working fluid. The plates are varnished in two layers for high-quality protection against corrosion.
Bimetal radiators Titanium (Marek) 500/96 with bottom connection
To connect the radiator with your own hands, you need to prepare:
- L- or T-shaped tubes;
- building level;
- multiflex nodes;
- FUM tape;
- thermal insulation;
- pipe cutter;
- nuts as required.
It is desirable that the lower connection of the batteries be made even in the early stages of repairing an apartment / house, because in this case the pipes are laid inside the floor (or wall). Keep this in mind when planning your concrete floor screed.
It is better to connect the radiator in the early stages of repair
If pipes for one reason or another cannot be laid into the floor, then in the future they can be closed with a plinth or plasterboard box.
Plinth for radiator pipes
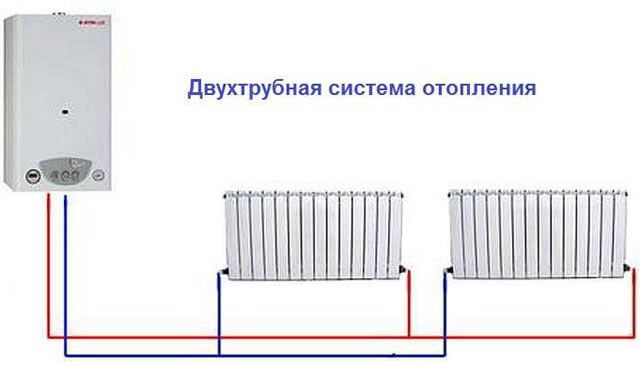
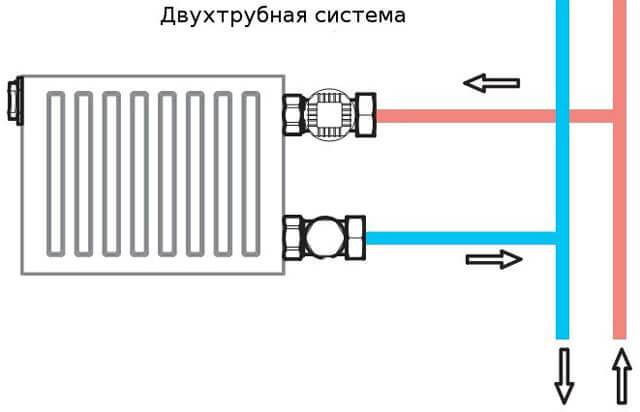
Two-pipe heating systems
Inside the two-pipe circuit, the coolant moves through two separate pipelines.One of them is used for the supply flow with hot coolant, and the other for the return flow with cooled water, which moves towards the heating tank. Thus, when installing heating radiators with a bottom connection or any other type of tie-in, all batteries warm up evenly, since water of approximately the same temperature enters them.
It is worth noting that a two-pipe circuit when connecting batteries with a lower connection, as well as when using other schemes, is the most acceptable. The fact is that this type of connection provides a minimum amount of heat loss. The water circulation scheme can be both associated and dead-end.
Some owners of private houses believe that projects with two-pipe types of radiator connections are much more expensive, since more pipes are required to implement them. However, if you look in more detail, it turns out that their cost is not much higher than in the arrangement of single-pipe systems.
The fact is that a single-pipe system implies the presence of pipes with a large cross section and a large radiator. At the same time, the price of the thinner pipes required for a two-pipe system is much lower. In addition, in the end, unnecessary costs will pay off due to better circulation of the coolant and minimal heat loss.
With a two-pipe system, several options are used for connecting aluminum heating radiators. The connection can be diagonal, side or bottom. In this case, the use of vertical and horizontal joints is allowed. In terms of efficiency, the diagonal connection is considered the best option.At the same time, heat is evenly distributed over all heating devices with minimal losses.
The lateral, or one-sided, connection method is used with equal success in both single-pipe and two-pipe wiring. Its main difference is that the supply and return circuits cut into one side of the radiator.


Lateral connection is often used in apartment buildings with a vertical supply riser
Please note that before connecting a heating radiator with side connection, it is necessary to install a bypass and a tap on it. This will allow you to freely remove the battery for washing, painting or replacing without shutting down the entire system.
It is noteworthy that the efficiency of one-sided tie-in is maximum only for batteries with 5-6 sections. If the length of the radiator is much longer, with such a connection there will be significant heat losses.
In which heating systems is the bottom supply practiced?
Obviously, the supply of the coolant from the bottom up is unnatural, because it is directed against the action of gravity. For this reason, the bottom supply of radiators cannot be carried out in open heating systems with natural circulation. But this is far from the only limitation.
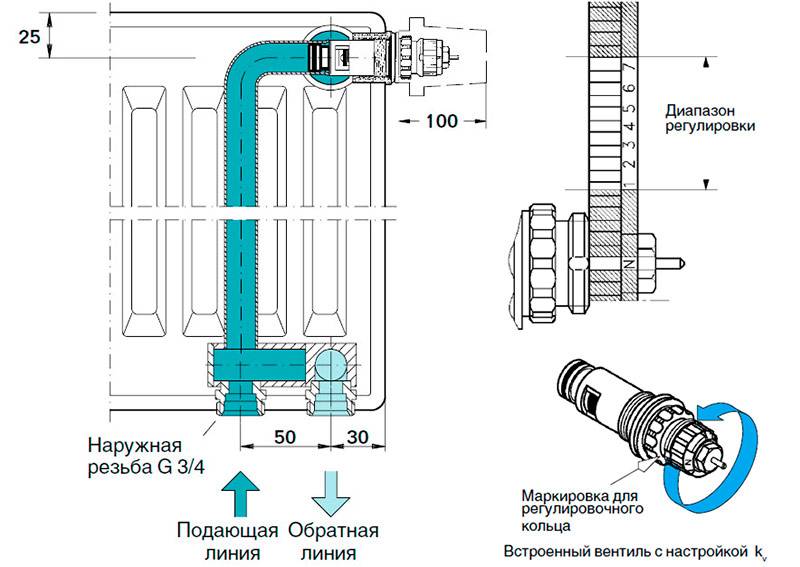
Even with a double-sided bottom connection, where the return pipe is connected according to the standard scheme, a special valve is installed on the supply. Its capacity is lower than that of a conventional fitting with a screwed-in fitting, so the coefficient of local resistance of the radiator in this case will be at least twice as high as the nominal value.This forces the use of circulation pumps with a more intense pressure and a radical revision of the hydraulic calculation procedure.

With a one-way bottom connection, even more difficulties arise. Firstly, the local hydrodynamic resistance of the radiator increases even more, because now two opposite channels with a rather small conditional passage pass through one outlet. In addition, there are difficulties with the installation of shut-off and control valves. High-quality lower radiator connection units with a built-in thermostatic head are a rarity in the domestic market. Most of the range is represented by Chinese-made products that do not provide sufficient flexibility and adjustment accuracy. Another nuance lies in the method of regulating the coolant flow: instead of a rod that limits the throughput, most injector units have a built-in bypass, which radically changes the balancing method. At the same time, the installation of an injection unit with a separate throttle and a thermostatic head is often unacceptable due to the lack of free space, and if such a configuration is still possible, it will be extremely cumbersome and inconvenient to manage.

Two-pipe heating system with passing movement of the coolant
It can be said that two-pipe systems with a passing movement of the coolant or radial interchanges are best suited for the lower connection of radiators. Due to the significant reduction in the capacity of the radiators, there is no obvious reason to refuse thin PEX pipes with tension fittings, which look much sleeker than other power systems.Not the best idea would be to use a bottom connection for single-pipe circuits, in this case it is quite difficult to balance the system and ensure its stable operation.
Diagonal connection
As we have already noted, the diagonal method of connecting radiators is characterized by the smallest heat loss. With this scheme, the hot coolant enters from one side of the radiator, passes through all sections, and then exits through the pipe from the opposite side. This type of connection is suitable for both one- and two-pipe heating systems.
Diagonal connection of radiators can be performed in 2 versions:
- The hot coolant flow enters the upper opening of the radiator, and then, having passed through all sections, exits the lower side opening on the opposite side.
- The coolant enters the radiator through the bottom hole on one side and flows out from the opposite side from above.
Connecting in a diagonal way is advisable in cases where the batteries consist of a large number of sections - from 12 or more.
What is required for efficient battery operation?
An efficient heating system can save you money on fuel bills. Therefore, when designing it, decisions should be made carefully. Indeed, sometimes the advice of a neighbor in the country or a friend who recommends such a system as his is not at all suitable.
Sometimes there is no time to deal with these issues. In this case, it is better to turn to professionals who have been working in this field for more than 5 years and have grateful reviews.
Image gallery Photo from Step 1: Regardless of the type of heating appliance, installing it involves a number of similar steps.First, the wall is marked and the brackets are installed under the radiator. Step 2: Before fixing the radiator, it is necessary to check the correct installation of the radiator with a building level. If necessary, it is better to move the bracket before connection Step 3: If there are no complaints about the location of the heating device, its branch pipe is connected to the supply pipe Step 4: Then it is connected to the pipe that drains the cooled coolant from the radiator to the heating boiler Marking the wall and installing brackets Checking the location before mounting Connection radiator to the supply pipeConnecting the radiator to the return pipe
Having decided to independently install new batteries or replace heating radiators, you need to take into account that the following indicators have a direct impact on their efficiency:
size and thermal power of heating devices;
their location in the room;
connection method.
The choice of heating appliances strikes the imagination of an inexperienced consumer. Among the offers are wall radiators made of various materials, floor and baseboard convectors. All of them have a different shape, size, level of heat transfer, type of connection. These characteristics must be taken into account when installing heating devices in the system.


For each room, the number of radiators and their size will be different. It all depends on the area of the room, the level of insulation of the external walls of the building, the connection scheme, the heat output indicated by the manufacturer in the product passport.
Battery locations - under the window, between windows located at a fairly long distance from each other, along a blank wall or in the corner of a room, in the hallway, pantry, bathroom, in the entrances of apartment buildings.
It is recommended to install a heat-reflecting screen between the wall and the heater. It can be made with your own hands, using for this one of the materials that reflect heat - penofol, isospan or another foil analogue.
You should also follow these basic rules for installing a battery under a window:
all radiators in one room are located on the same level;
convector ribs in a vertical position;
the center of the heating equipment coincides with the center of the window or is 2 cm to the right (to the left);
the length of the battery is at least 75% of the length of the window itself;
the distance to the window sill is at least 5 cm, to the floor - not less than 6 cm. The optimal distance is 10-12 cm.
The level of heat transfer from appliances and heat loss depends on the correct connection of radiators to the heating system in the house.
It happens that the owner of the dwelling is guided by the advice of a friend, but the result is not at all what was expected. Everything is done like his, but the batteries do not want to heat up.
This means that the selected connection scheme was not suitable specifically for this house, the area of \u200b\u200bthe premises, the thermal power of the heating devices were not taken into account, or annoying errors were made during installation.
What is needed for installation
Installation of heating radiators of any type requires devices and consumables. The set of necessary materials is almost the same, but for cast-iron batteries, for example, the plugs are large, and the Mayevsky tap is not installed, but, somewhere at the highest point of the system, an automatic air vent is installed. But the installation of aluminum and bimetallic heating radiators is absolutely the same.
Steel panel ones also have some differences, but only in terms of hanging - brackets are included with them, and on the back panel there are special metal-cast shackles with which the heater clings to the hooks of the brackets.
Here for these bows they wind up hooks
Mayevsky crane or automatic air vent
This is a small device for venting air that can accumulate in the radiator. It is placed on a free upper outlet (collector). Must be on every heater when installing aluminum and bimetallic radiators. The size of this device is much smaller than the diameter of the manifold, so another adapter is required, but Mayevsky taps usually come with adapters, you just need to know the diameter of the manifold (connecting dimensions).
Mayevsky crane and method of its installation
In addition to the Mayevsky tap, there are also automatic air vents. They can also be placed on radiators, but they are slightly larger and for some reason are only available in a brass or nickel-plated case. Not in white enamel. In general, the picture is unattractive and, although they deflate automatically, they are rarely installed.
This is what a compact automatic air vent looks like (there are bulkier models)
Stub
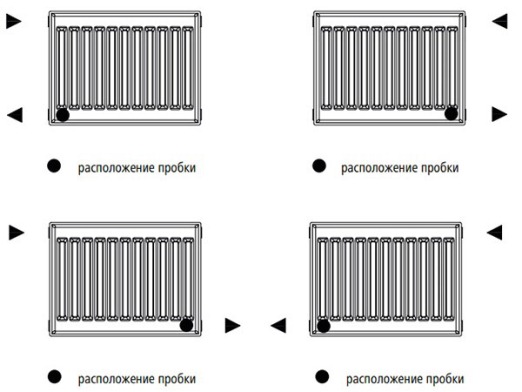
There are four outlets for the radiator with lateral connection. Two of them are occupied by the supply and return pipelines, on the third they put a Mayevsky crane. The fourth entrance is closed with a plug. It, like most modern batteries, is most often painted with white enamel and does not spoil the appearance at all.


Where to put the plug and the Mayevsky tap with different connection methods
Shut-off valves
You will need two more ball valves or shut-off valves with the ability to adjust. They are placed on each battery at the input and output. If these are ordinary ball valves, they are needed so that, if necessary, you can turn off the radiator and remove it (emergency repair, replacement during the heating season). In this case, even if something happened to the radiator, you will cut it off, and the rest of the system will work. The advantage of this solution is the low price of ball valves, the minus is the impossibility of adjusting heat transfer.
Taps for heating radiator
Almost the same tasks, but with the ability to change the intensity of the coolant flow, are performed by shut-off control valves. They are more expensive, but they also allow you to adjust the heat transfer (make it smaller), and they look better outwardly, they are available in straight and angular versions, so the strapping itself is more accurate.
If desired, you can put a thermostat on the coolant supply after the ball valve. This is a relatively small device that allows you to change the heat output of the heater. If the radiator does not heat well, they cannot be installed - it will be even worse, since they can only reduce the flow. There are different temperature controllers for batteries - automatic electronic, but more often they use the simplest one - mechanical.
Related materials and tools
You will also need hooks or brackets to hang on the walls. Their number depends on the size of the batteries:
- if the sections are not more than 8 or the length of the radiator is not more than 1.2 m, two attachment points from above and one from below are sufficient;
- for every next 50 cm or 5-6 sections, add one fastener from above and below.
Takde need a fum tape or linen winding, plumbing paste to seal the joints. You will also need a drill with drills, a level (a level is better, but a regular bubble one is also suitable), a certain number of dowels. You will also need equipment for connecting pipes and fittings, but it depends on the type of pipes. That's all.
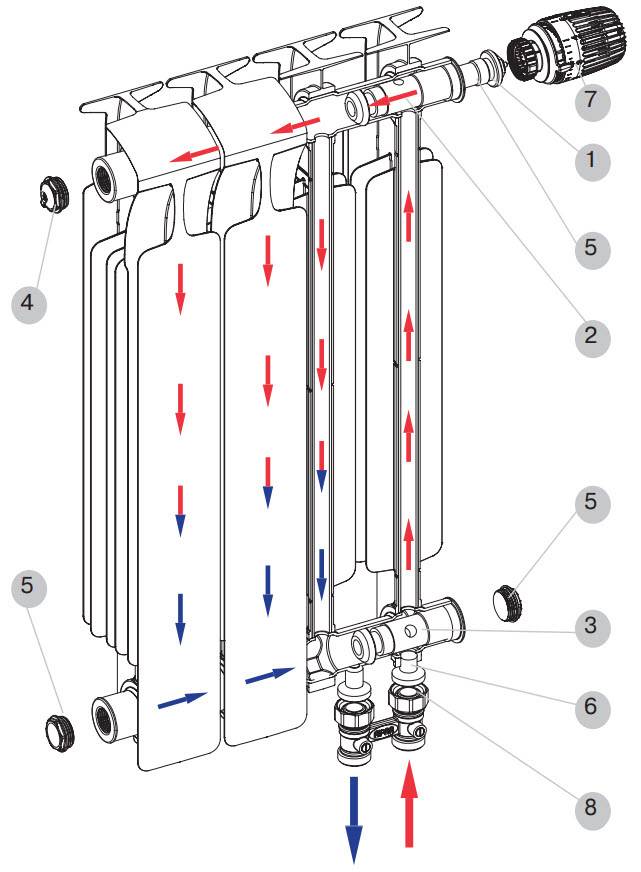
Bottom eyeliner - what can it be?
And there may be only two types.
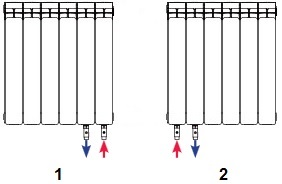
- In the case of a one-way connection, both pipes are connected on one side of the heater. One of them - the upper one - supplies the heated coolant, and the second - the lower one - outputs the already cooled one.
In a versatile version, hot liquid is supplied to the battery from one side, and cold liquid is removed from the other. It should be noted that this method is more suitable for heating an individual type. The advantage is that the coolant can circulate in almost any direction, as well as in a small supply / return length. Although the decisive role, of course, is played by the required heat transfer.
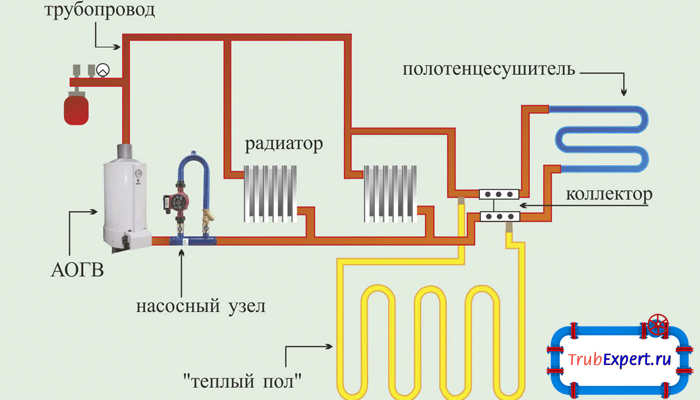
Scheme of arrangement of the heating system
The main element in every heating system is a heating boiler. In many ways, the wiring diagrams for heating radiators depend on it. If a floor-standing heater is selected, it should not be mounted on top of the heating structure, as such an arrangement reduces the efficiency of the system or can even lead to a malfunction in its operation.
Typically, such boilers do not have devices for venting air, and this often leads to air locks.It must be taken into account that in the absence of an air vent, the pipes of the supply section of the line should be mounted strictly vertically.
It is not difficult to find out if the boiler has an air vent - you need to look at whether or not there are nozzles in its lower part that are intended to connect the heater to the heating system. In this case, the supply line is connected to the return pipes using a special manifold. Usually, pipes are available for wall-mounted gas and electric heating boilers.
Some models of heating units do not have a circulation pump, expansion tank and pressure control device. All these components can be purchased and installed, if necessary, taking into account their location. So it is most reasonable to place a circular pump on the return pipes.


As for the safety group, it is allowed to mount it both on the supply section of the circuit and on the reverse (read: “Safety group for heating - we make the system reliable“).
When tying radiators with polypropylene is done, you need to consider the type of system on which additional components are to be installed. If the design provides for the natural circulation of the coolant, then they are unlikely to be required. In the case when the radiator is piping with polypropylene in a forced circulation design, it will be necessary to additionally use both a circulation pump and other elements. After that, to check the quality of the system, the heating radiators are pressure tested.
In apartments with central heating, it is now customary to install bimetallic radiators, and in private housing construction, piping of an aluminum radiator or a steel heating battery is more common.
Radiator connection options
To know how to properly connect a heating battery, you need to consider that in addition to the types of piping, there are several schemes for connecting batteries to the heating system. These include the following options for connecting heating radiators in a private house:
In this case, the connection of the outlet and supply pipes is made on one side of the radiator. This method of connection allows you to achieve uniform heating of each section at minimal cost for equipment and a small amount of coolant. Most often used in multi-storey buildings, with a large number of radiators.
Useful information: If the battery, connected to the heating system in a one-way scheme, has a large number of sections, the efficiency of its heat transfer will be significantly reduced due to the weak heating of its remote sections. It is better to ensure that the number of sections does not exceed 12 pieces. or use another connection method.
It is used when connecting to a heating system with a large number of sections. In this case, the supply pipe, as in the previous connection option, is located at the top, and the return pipe is at the bottom, but they are located on opposite sides of the radiator. Thus, heating of the maximum battery area is achieved, which increases heat transfer and improves the efficiency of space heating.
This connection scheme, otherwise called "Leningrad", is used in systems with a hidden pipeline laid under the floor. In this case, the connection of the inlet and outlet pipes is made to the lower branch pipes of the sections located at opposite ends of the battery.
The disadvantage of this scheme is heat loss, reaching 12-14%, which can be compensated by the installation of air valves designed to remove air from the system and increase battery power.
Heat loss depends on the choice of the method of connecting the radiator
For quick dismantling and repair of the radiator, its outlet and inlet pipes are equipped with special taps. To adjust the power, it is equipped with a temperature control device, which is installed on the supply pipe.
What are the technical characteristics of aluminum heating radiators. you can learn from a separate article. It also contains a list of popular manufacturers.
And about what constitutes an expansion tank for closed-type heating. read in another article. Volume calculation, installation.
Tips for choosing an instantaneous water heater for a faucet are here. Device, popular models.
As a rule, the installation of the heating system and the installation of heating radiators is carried out by invited specialists. However, using the listed methods for connecting heating radiators in a private house, this can be done independently, strictly observing the technological sequence of this process.
If you perform these works accurately and competently, ensuring the tightness of all connections in the system, there will be no problems with it during operation, and installation costs will be minimal.
The photo shows an example of a diagonal way to install a radiator in a country house
The procedure for this will be as follows:
- We dismantle the old radiator (if necessary), having previously blocked the heating line.
- We mark the place of installation. The radiators are fixed on brackets that need to be attached to the walls, taking into account the regulatory requirements described earlier. This must be taken into account when marking.
- Attach brackets.
- We collect the battery. To do this, we install adapters on the mounting holes in it (they come with the device).
Attention: Usually two adapters are left-handed and two are right-handed!
- To plug unused collectors, we use Mayevsky taps and locking caps. To seal the joints, we use sanitary flax, winding it on the left thread counterclockwise, on the right - clockwise.
- We fasten ball-type valves to the junctions with the pipeline.
- We hang the radiator in place and connect it to the pipeline with mandatory sealing of the joints.
- We make pressure testing and trial start-up of water.
Thus, before connecting a heating battery in a private house, it is necessary to determine the type of wiring in the system and its connection scheme. At the same time, installation work can be performed independently, taking into account the established standards and process technology.


How the installation of heating batteries in a private house is carried out, the video will show you clearly.
Choosing a place and method of installing a radiator
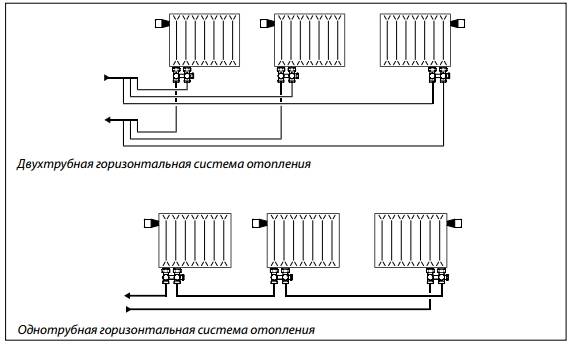
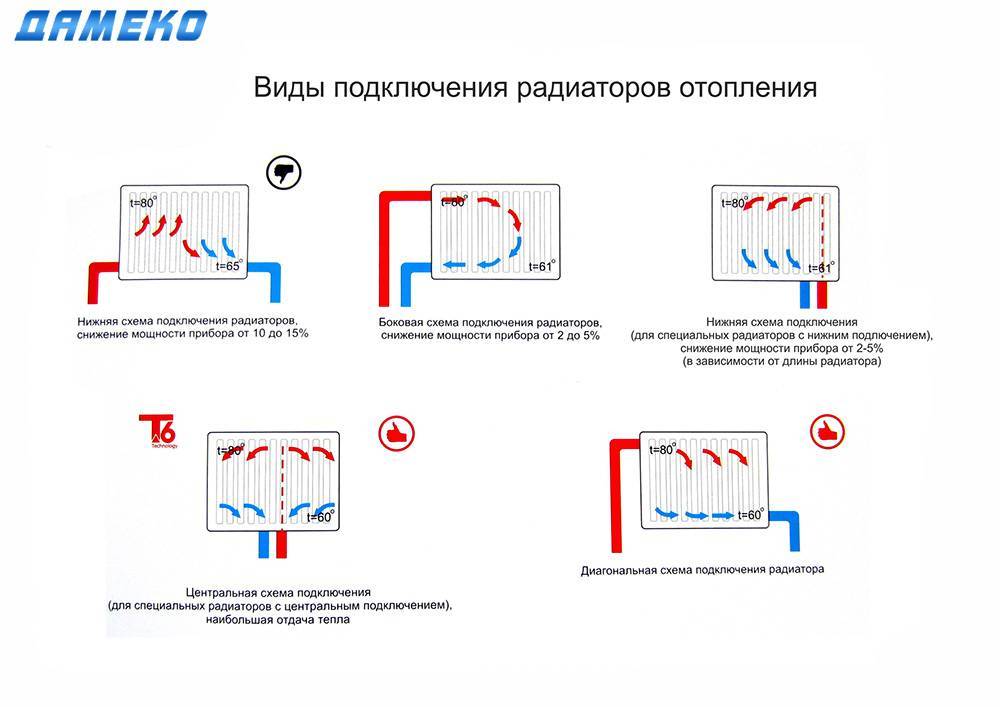
The options for connecting heating radiators depend on the general heating scheme in the house, the design features of the heaters and the method of laying pipes.The following methods of connecting heating radiators are common:
- Lateral (unilateral). The inlet and outlet pipes are connected on the same side, while the supply is located at the top. The standard method for multi-storey buildings, when the supply is from the riser pipe. In terms of efficiency, this method is not inferior to the diagonal one.
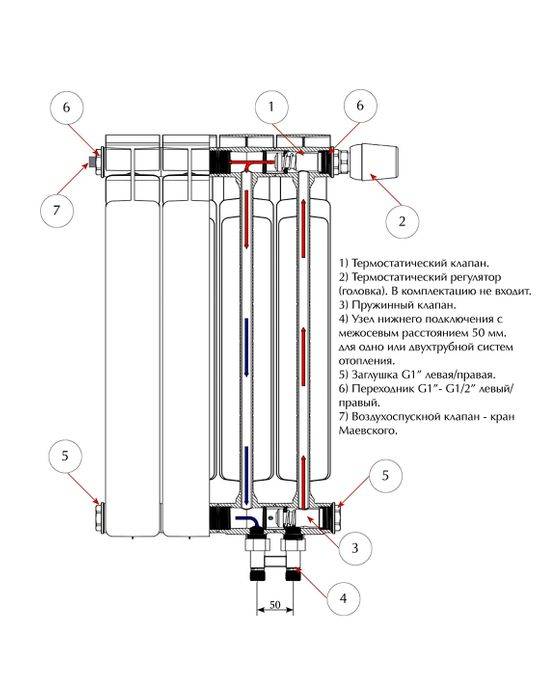
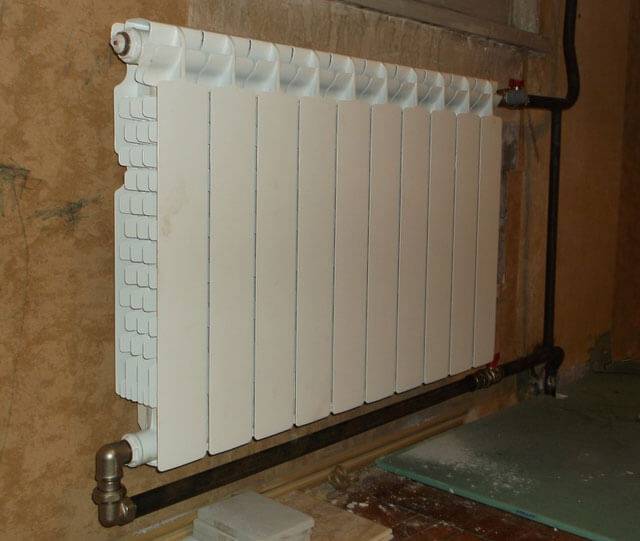
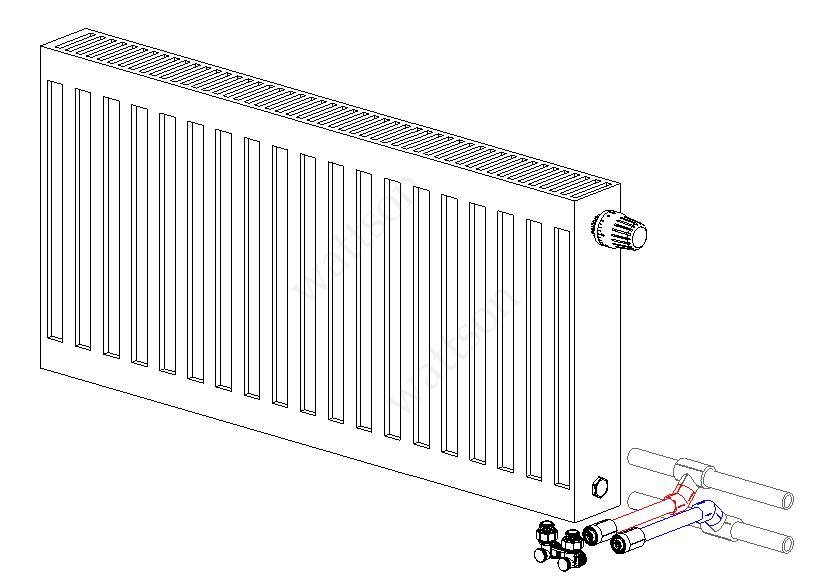
- Lower. In this way, bimetallic radiators with a bottom connection or a steel radiator with a bottom connection are connected. The supply and return pipes are connected from below on the left or right side of the device and connected through the lower radiator connection unit with union nuts and shut-off valves. The union nut is screwed onto the lower radiator pipe. The advantage of this method is the location of the main pipes hidden in the floor, and heating radiators with a bottom connection harmoniously fit into the interior and can be installed in narrow niches.
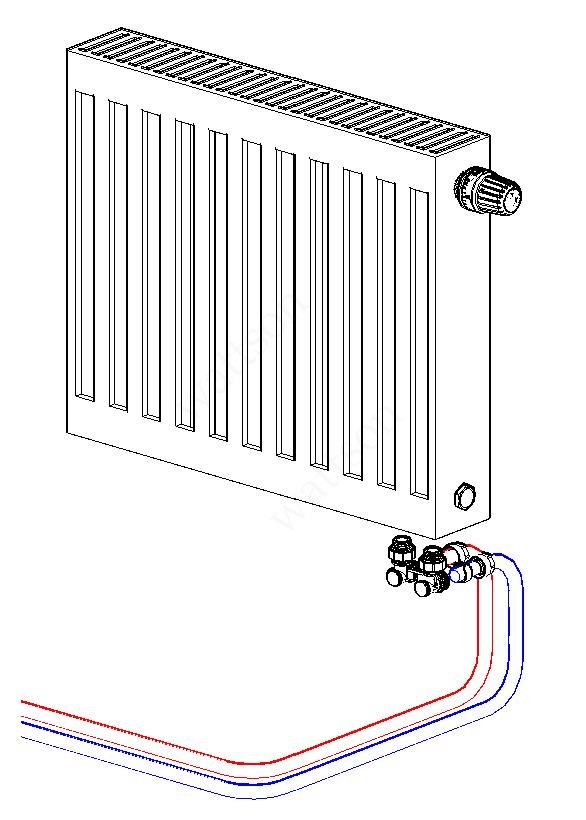
The advantage of most bottom-connected steel radiators is that the thermostatic valve is already built-in for mounting a thermostatic head, so it's not surprising that they cost a little more than similar-sized side-connected radiators.
- Diagonal. The coolant enters through the upper inlet, and the return is connected from the opposite side to the lower outlet. The optimal type of connection, providing uniform heating of the entire area of the battery. In this way, correctly connect the heating battery, the length of which exceeds 1 meter. Heat loss does not exceed 2%.
- Saddle. The supply and return are connected to the bottom holes located on opposite sides. It is mainly used in single-pipe systems when no other method is possible.Heat losses as a result of poor circulation of the coolant in the upper part of the device reach 15%.
When choosing a place for installation, several factors are taken into account that ensure the correct operation of heating devices. Installation is carried out in the places least protected from the penetration of cold air, under window openings. It is recommended to install a battery under each window. The minimum distance from the wall is 3-5 cm, from the floor and window sill - 10-15 cm. With smaller gaps, convection worsens and battery power drops.
Typical mistakes when choosing an installation location:
- Space for installation of control valves is not taken into account.
- A small distance to the floor and window sill prevents proper air circulation, as a result of which heat transfer decreases and the room does not warm up to the set temperature.
- Instead of several batteries located under each window and creating a thermal curtain, one long radiator is chosen.
- Installation of decorative grilles, panels that prevent the normal spread of heat.
Coolant circulation methods
The circulation of the coolant through pipelines occurs in a natural or forced way. The natural (gravitational) method does not involve the use of additional equipment. The coolant moves due to a change in the characteristics of the liquid as a result of heating. The hot coolant entering the battery, cooling down, acquires a greater density and mass, after which it falls down, and a hotter coolant enters in its place. Cold water from the return flows by gravity into the boiler and displaces the already heated liquid.For normal operation, the pipeline is installed at a slope of at least 0.5 cm per linear meter.
Scheme of coolant circulation in the system using pumping equipment
For forced supply of coolant, the installation of one or more circulation pumps is mandatory. The pump is installed on the return pipe in front of the boiler. The operation of heating in this case depends on the electrical supply, however, it has significant advantages:
- The use of pipes of small diameter is allowed.
- The main is installed in any position, vertically or horizontally.
- Less coolant required.