- Typical wiring diagrams
- Marking on the wall
- Do-it-yourself propylene plumbing: installation technology
- Sequencing
- Marking the pipe and fitting
- Mounting methods
- open laying
- Hidden styling
- Minuses
- Plumbing installation
- Connecting a plastic water pipe to a metal
- Welding of polypropylene pipes
- Connection of metal-plastic pipes with fittings
- Business is a pipe: choose the right one
- Checking the quality of joints
- Equipment for installation work
- Anatomy of polypropylene pipes
- PP material classification
- What does the marking look like?
- Appearance and internal structure
- Material Advantages
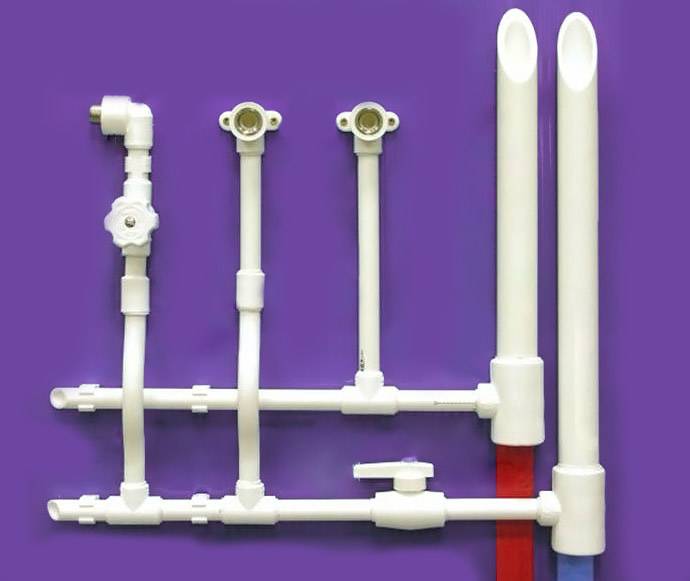
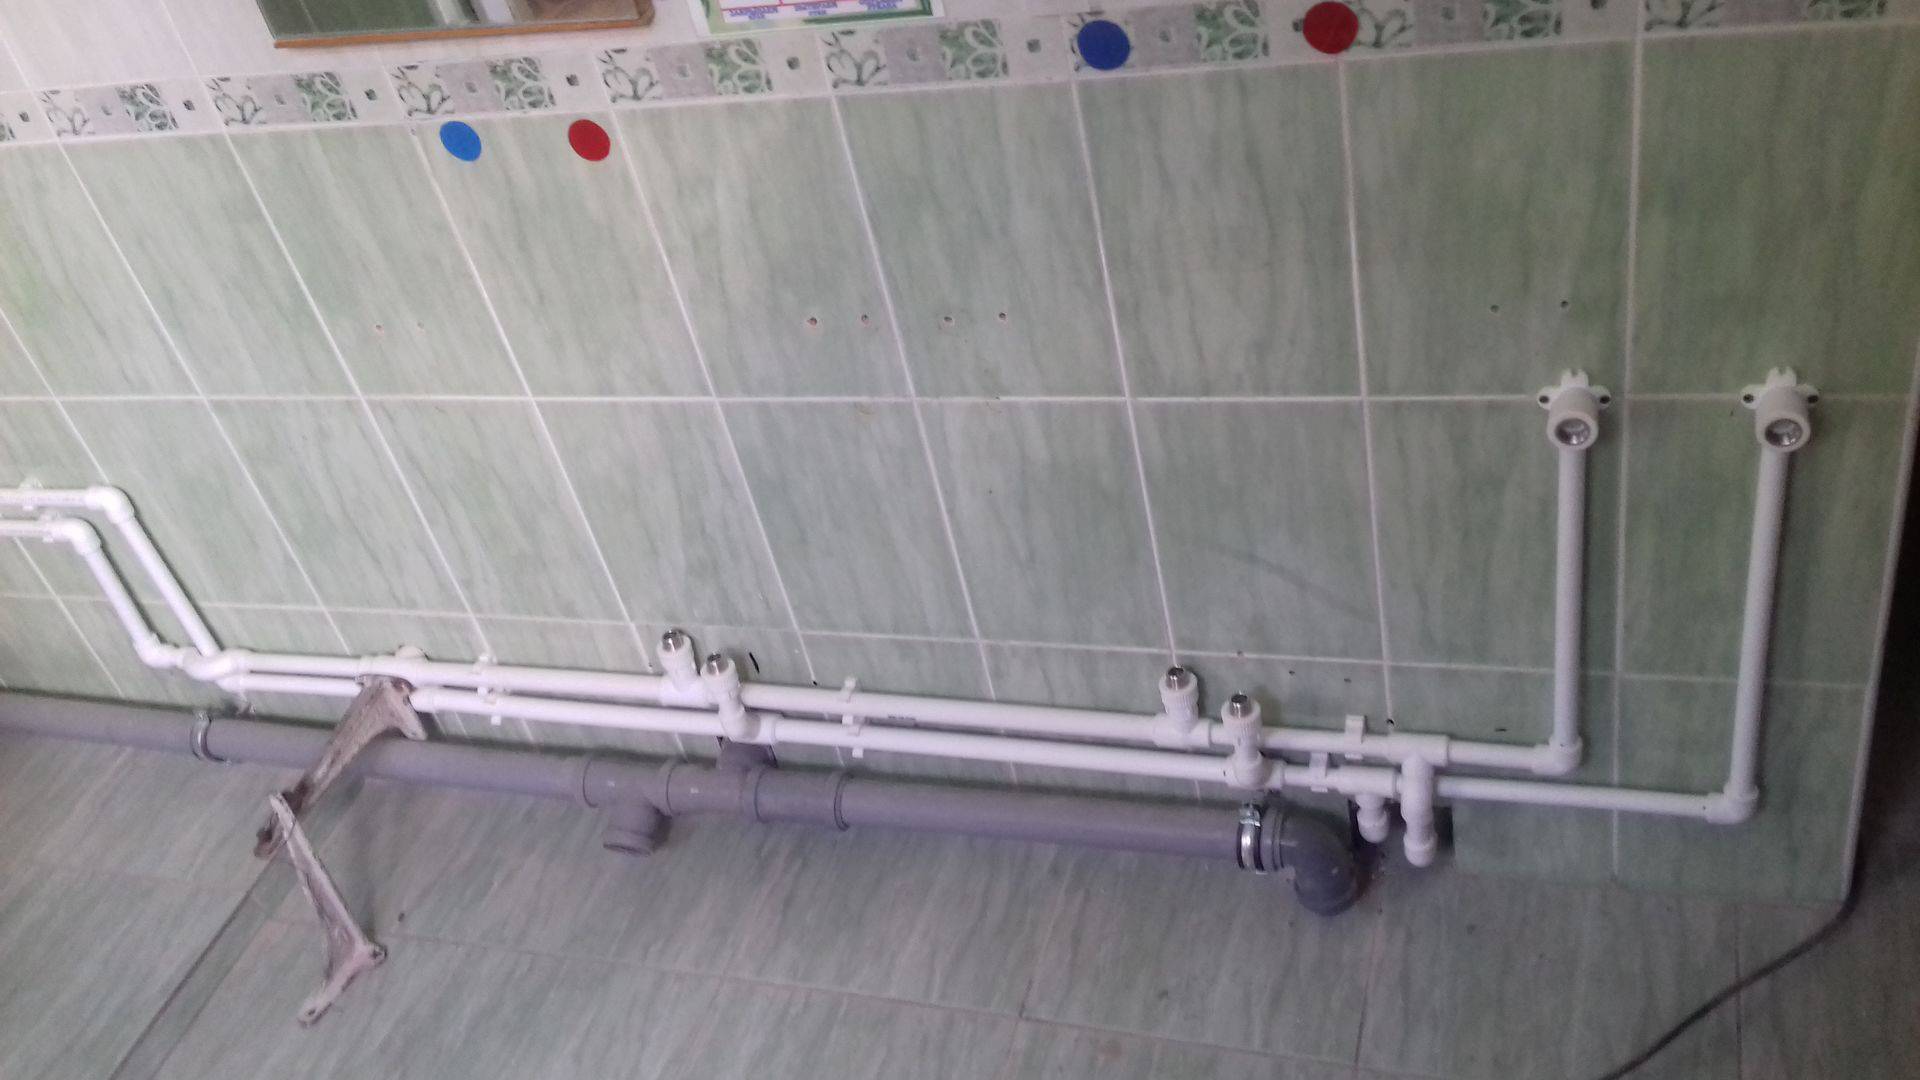
Typical wiring diagrams
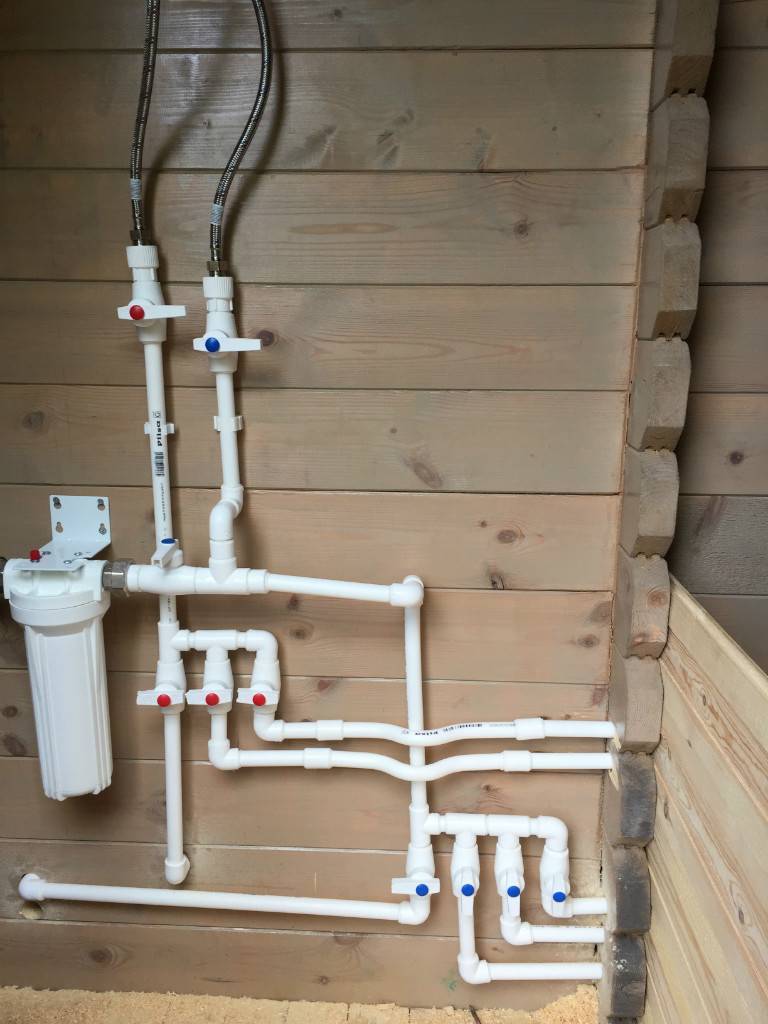
There are many circuit solutions regarding the wiring of propylene water supply lines. Each of the individual schemes is usually considered taking into account the financial costs of the construction and with an eye to the technical requirements for the premises of the facility.
Most often, the classic wiring diagram is used, which is the same type in relation to the cold water and hot water lines.
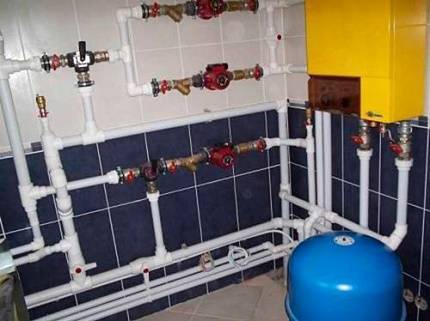
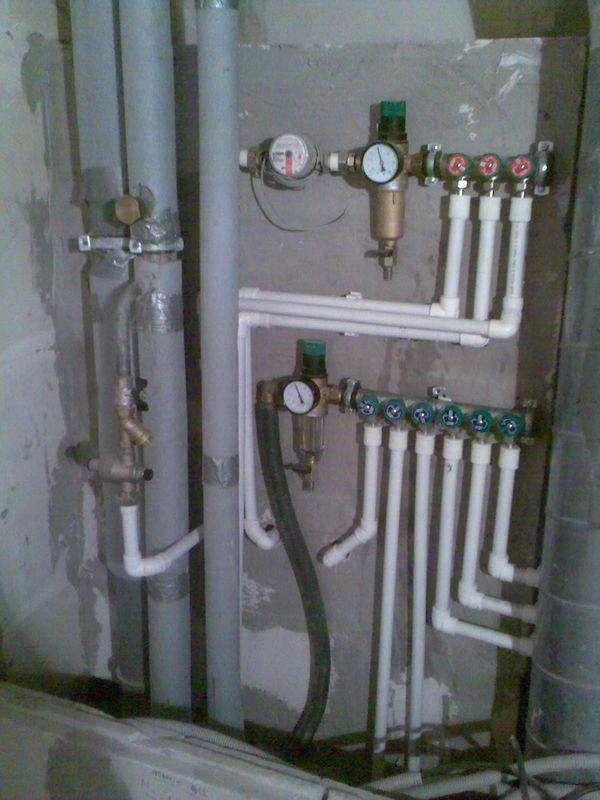
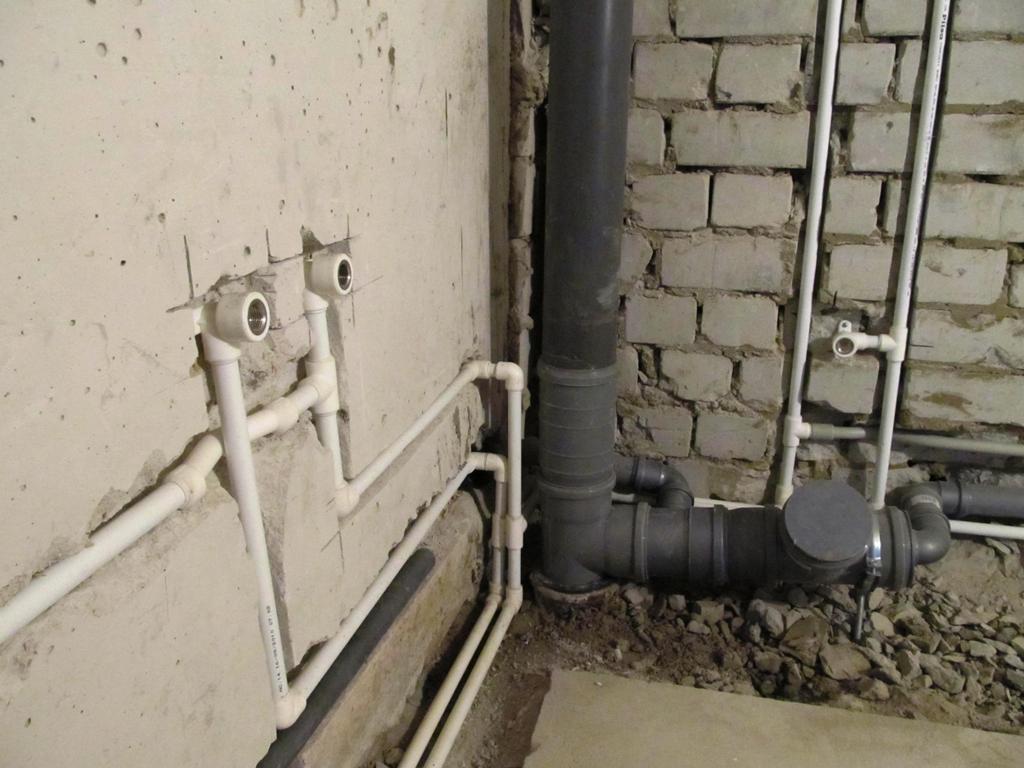
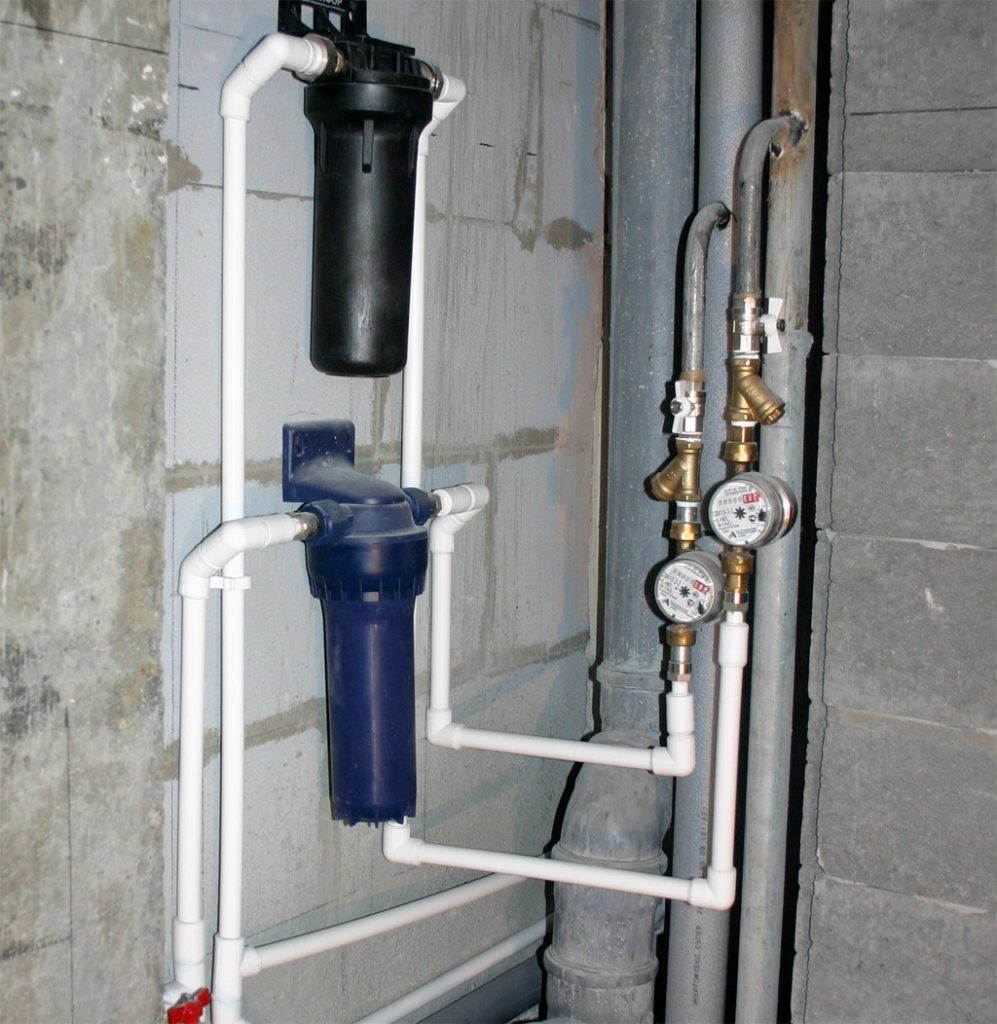
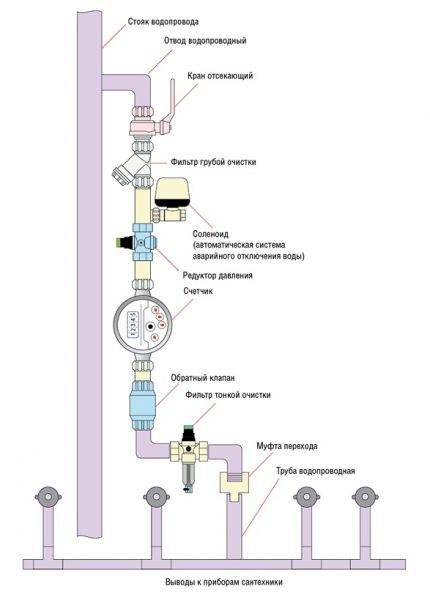 Standard scheme for distributing cold / hot water in municipal buildings. Such solutions are more common than others. However, in private houses, the scheme may differ slightly due to a different layout of residential premises (+)
The water supply is carried out from the riser of the centralized line by a pipe outlet with a shut-off valve installed on it. Next, the system elements are mounted in series: a filter, a reducer, a meter, a check valve, and a connection is made to the distribution manifold.
From the collector, cold or hot water is distributed to plumbing fixtures. This solution is traditionally used when distributing water supply in an apartment.
Many private households use an autonomous water supply system. Therefore, a departure from traditional circuit solutions in such cases is not excluded. But usually the principle of collector distribution for water supply systems (not heating) is preserved in any case.
Boiler systems of private households often provide only a supply of cold water. Moreover, instead of a centralized main, for example, a well can act as a source of cold water. Then the wiring diagram could be something like this:
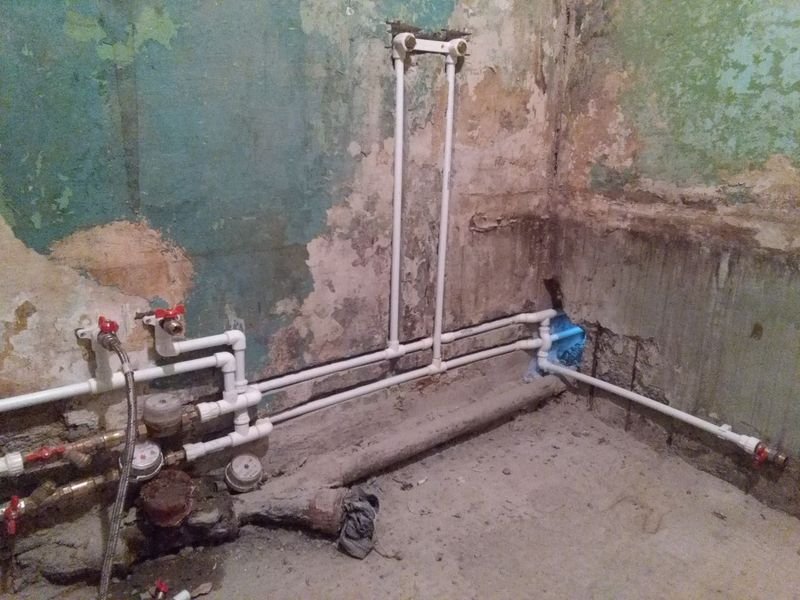
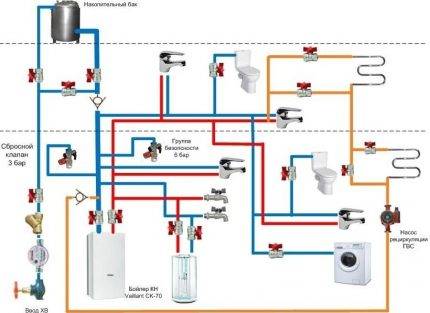 A common circuit solution for distributing water supply in a private house. Only one main input is used here - cold water. Hot water is obtained through a boiler system (+)
Wiring diagram in any version should provide for the presence of shut-off (cut-off) valves for each individual plumbing fixture. Autonomous type schemes (with boilers or boilers) are characterized by the obligatory presence of bypass lines on devices that carry out a functional process.
Such solutions allow you to quickly switch the system from an autonomous mode to a centralized supply mode if necessary.
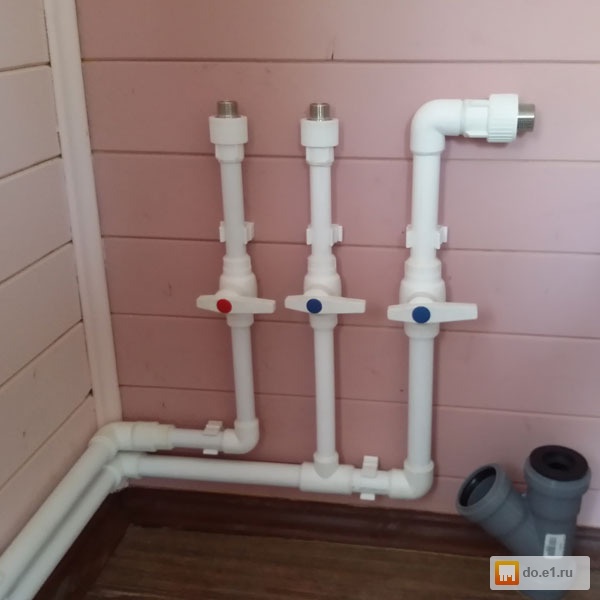
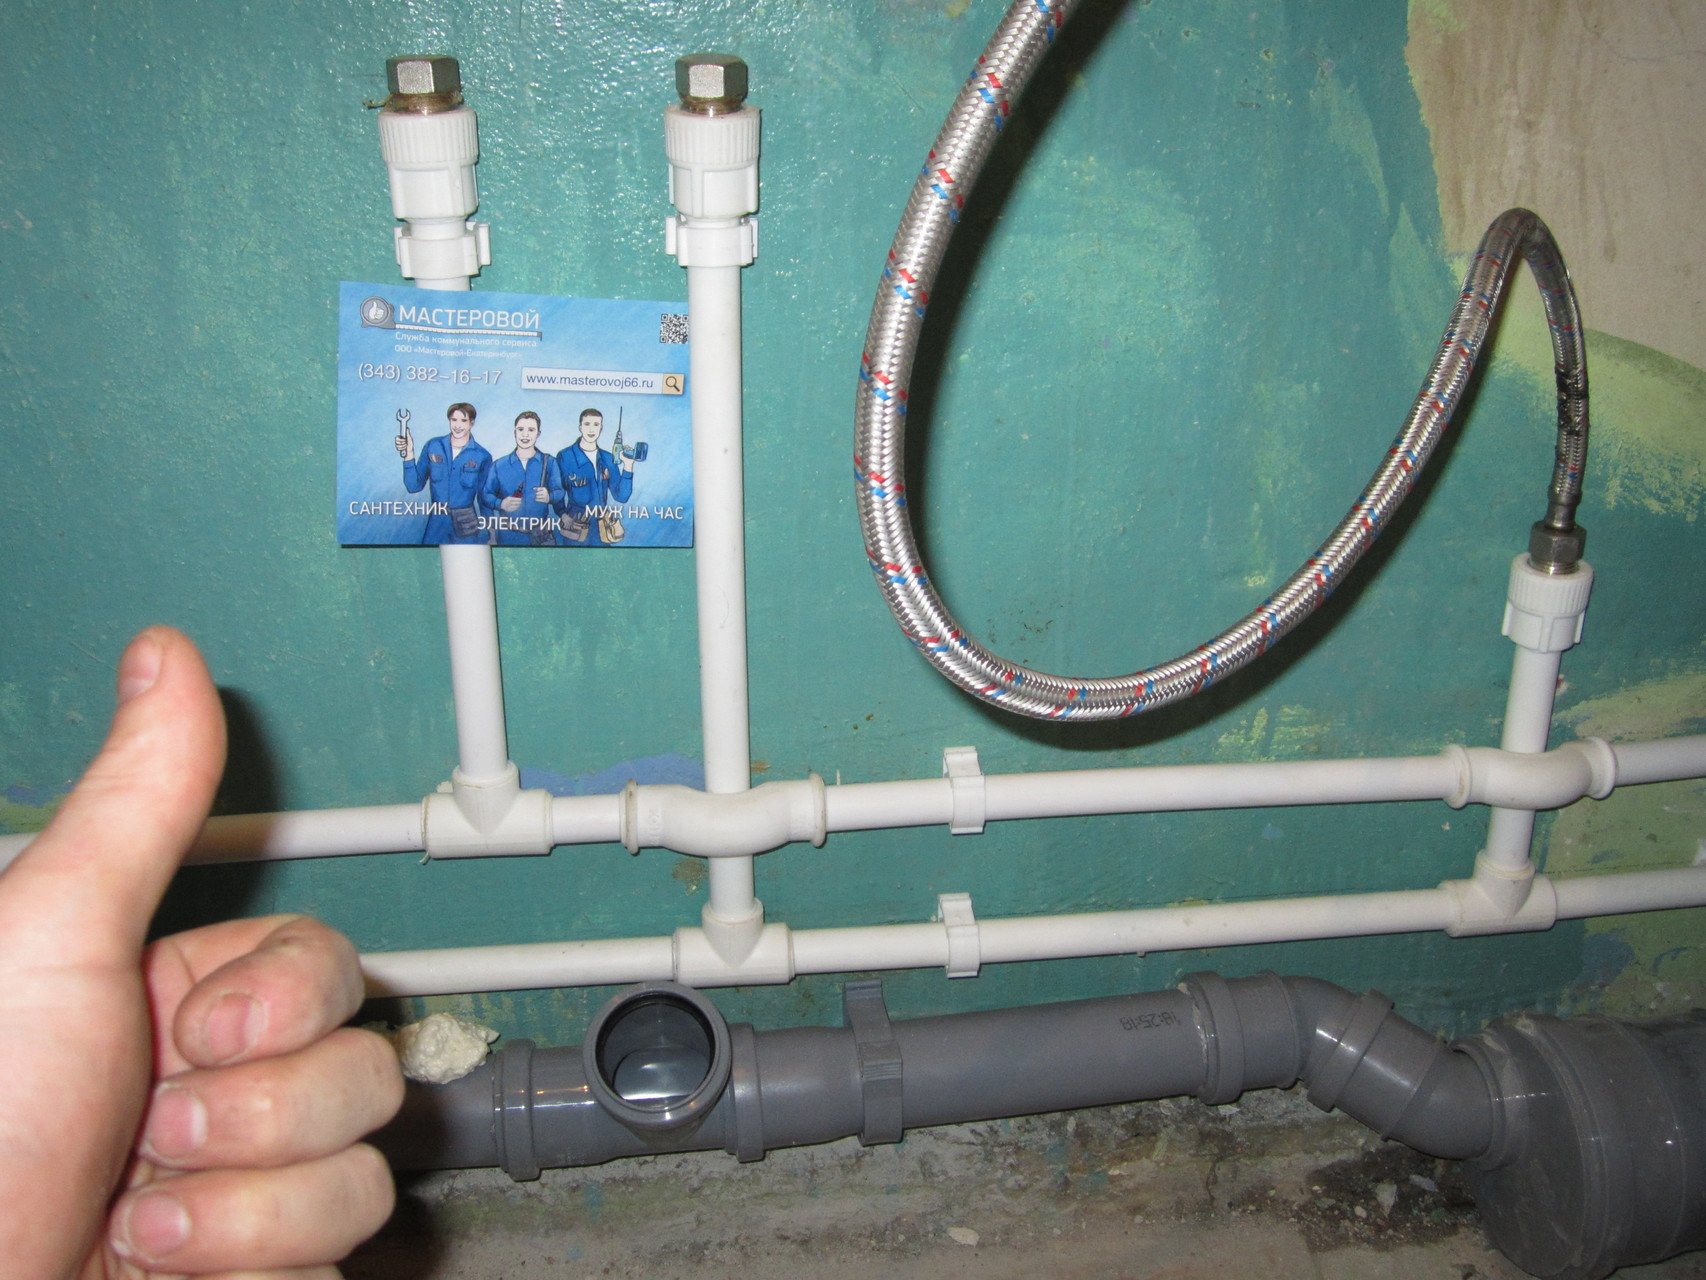
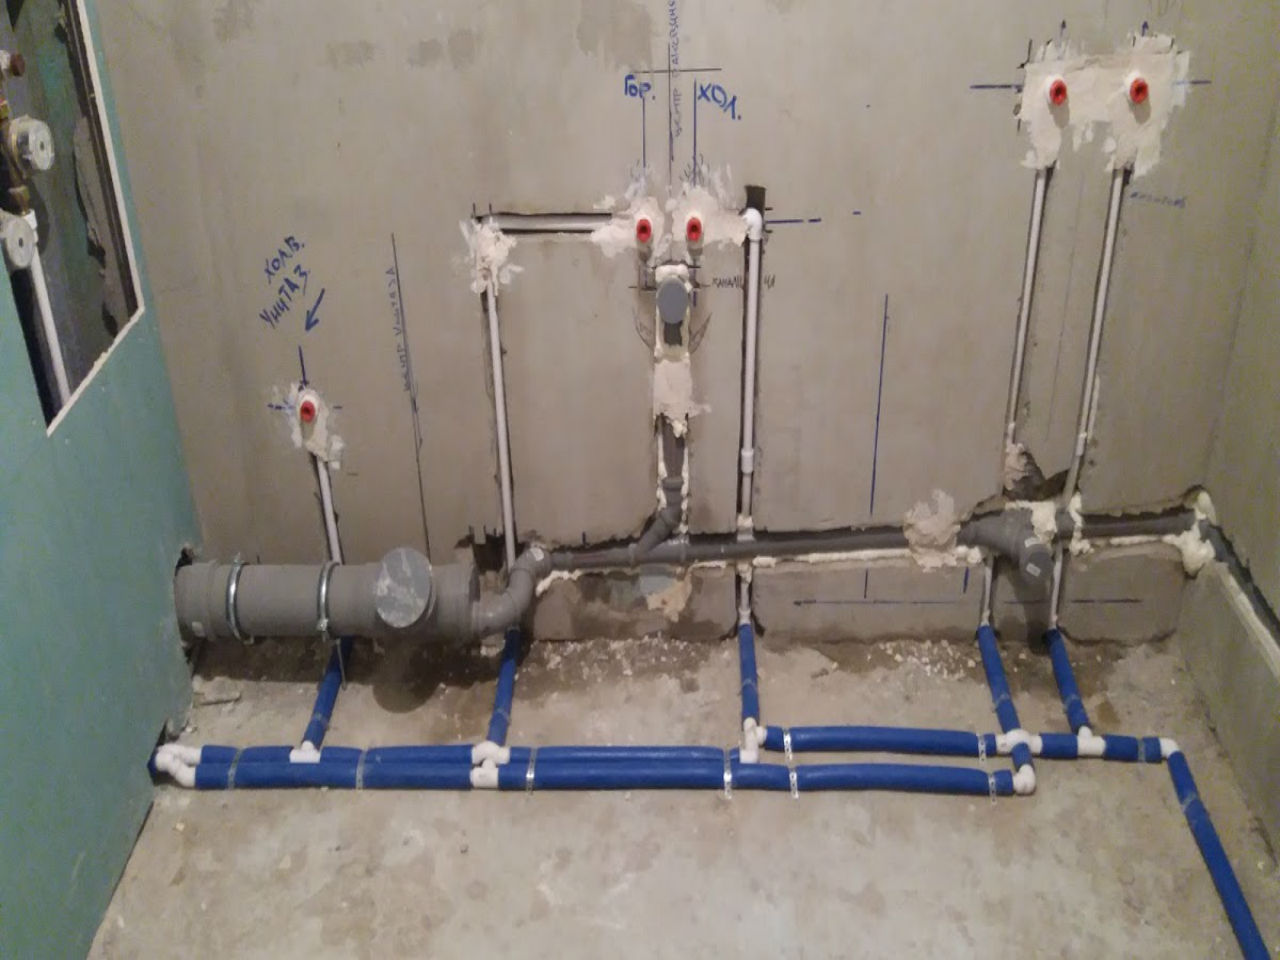
Marking on the wall
Having thought over the scheme according to which you will place the pipelines, mark up.Measure the required distances and cut the pipes with an overlap of 1-1.5 cm, depending on the depth of the soldering tips (“cups”).
Fasten the clamps (fastening latches) along the wall along the line of the future pipeline - this will facilitate the measurement task. Mounts can be placed in increments of 60-80 cm.
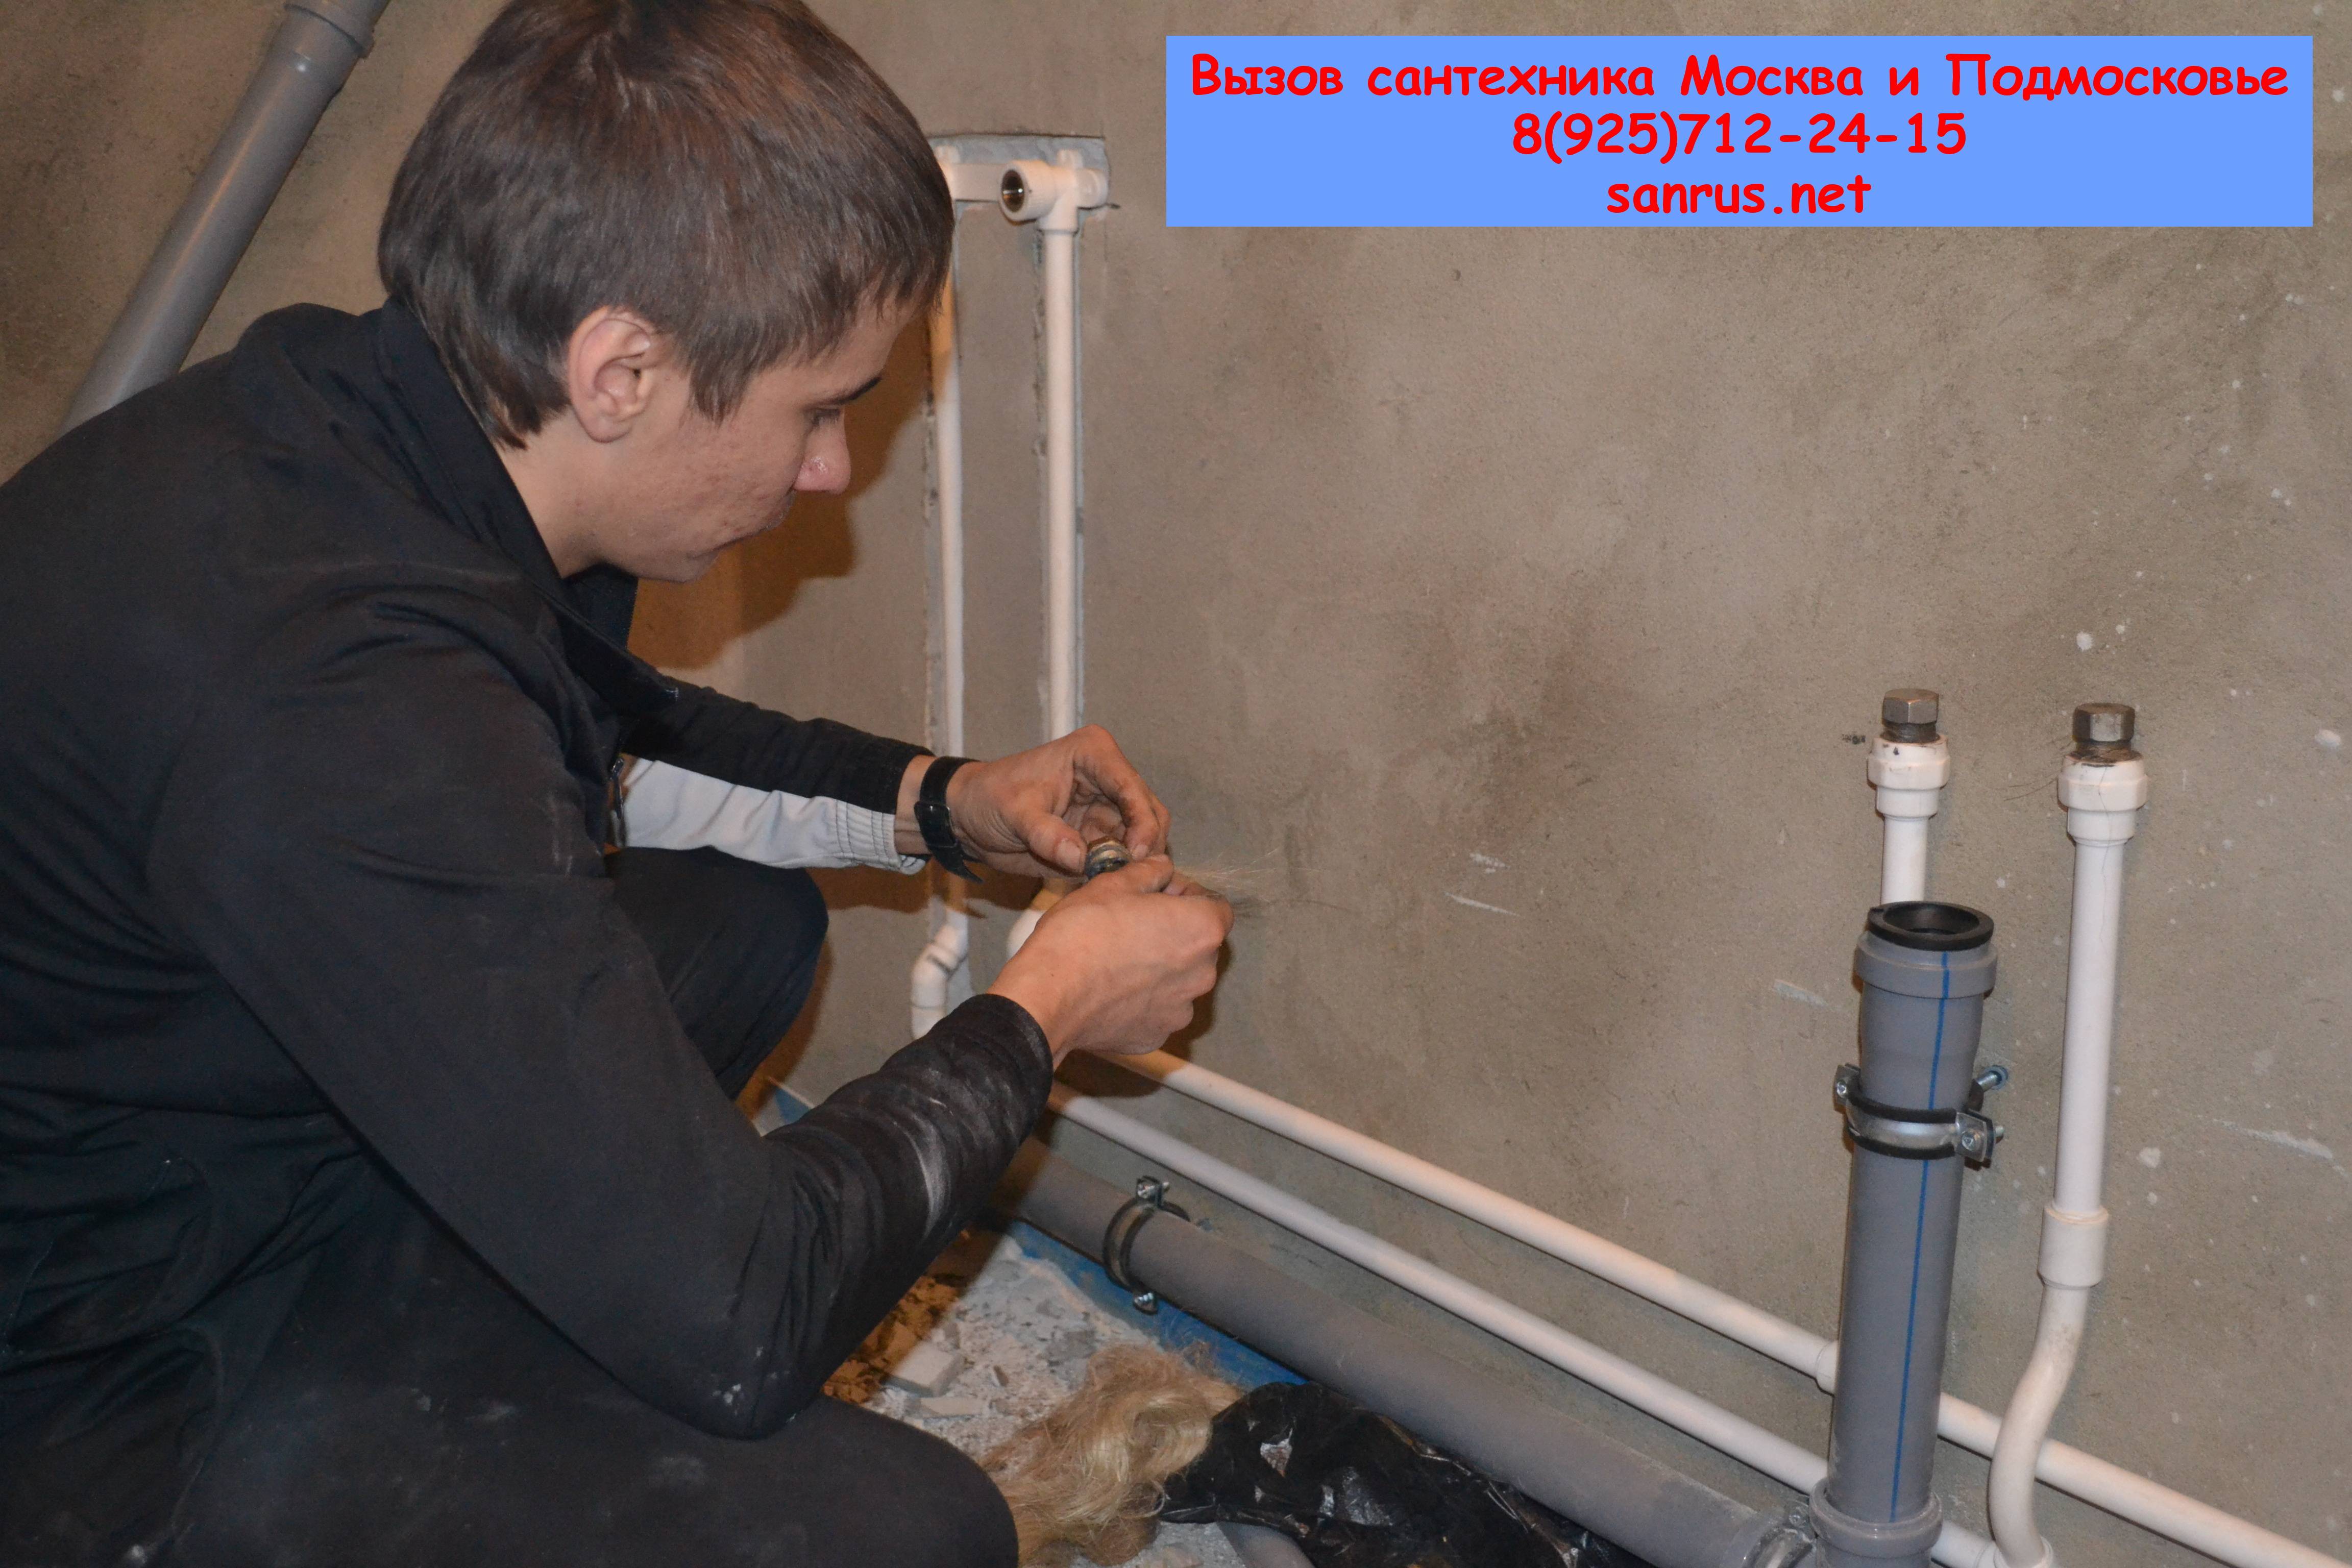
 Marking walls and pipes
If you have a strong water pressure (the room is located near the entrance to the building), then it is necessary to place fasteners every 40 cm. This will eliminate pipe vibrations during pressure drops during connection or a decrease in neighbors' water analysis.
When neighbors reduce water intake, the load on your part of the water supply increases: when opening taps, using a toilet drain, there can be hydraulic shocks, which cause vibrations (relevant for the first floors of high-rise buildings).
It is also necessary to clearly mark the pipes themselves: when cutting with scissors, the cut often goes oblique, adding another 2-5 mm to your pipe (depending on the diameter and quality of the scissors). Even high-quality scissors slightly “take away” the cut when cutting.
Try to cut as accurately as possible so that you do not end up soldering the sections. When installing with your own hands, especially for the first time, these subtleties should be taken into account.
Do-it-yourself propylene plumbing: installation technology
Do-it-yourself propylene plumbing
The choice of certain fittings during the installation of a water supply system depends entirely on the operating conditions. For example, to install a water meter, it is better to use a detachable threaded fitting, and to connect a flexible hose, it is more advisable to use a permanent connection.

Fitting
When soldering products of different diameters, as well as on straight sections of the highway, couplings are used.Squares, in turn, are needed when turning the water supply. With the help of tees, branches are created.


Sequencing
- Calculation of all necessary parameters.
- Dismantling of the old plumbing.
- Installation of adapter fittings (if it is planned to connect PP elements with steel ones).
- Welding of pipes and fasteners (welding technology will be discussed below).
- Installation of stopcocks.
- Shtrobirovanie walls (making channels for laying pipelines).
- Final installation of polypropylene pipes.
Marking the pipe and fitting
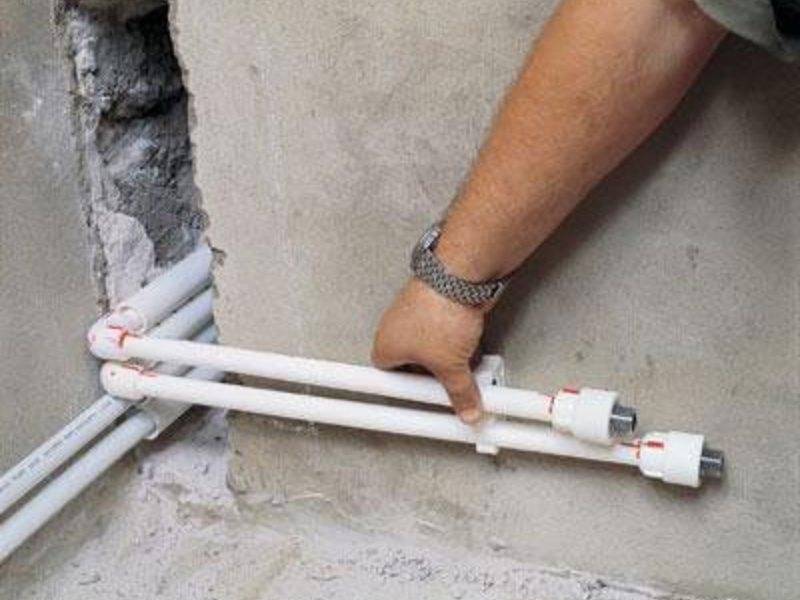
 Installation of PVC pipes by marks
On high-quality expensive plastic, there are always marks along the pipe and fittings to maintain the alignment of the elements. It is convenient to solder such plastic “in place”. If there are no such elements, apply them with a marker - it draws best on a polypropylene pipe.
Installation of inexpensive products (the manufacturer saves on everything - on labels too) is associated with a high risk of inaccuracies. And each error then leads to the fact that in the end it is necessary to re-solder the pipeline with your hard-working hands: cut and install a coupling-connector for lengthening.
To avoid this, beat off one axial line under the ruler. This is done simply: two pipes are laid side by side (one for soldering, the other for support) along an even profile (for example, for plasterboard).
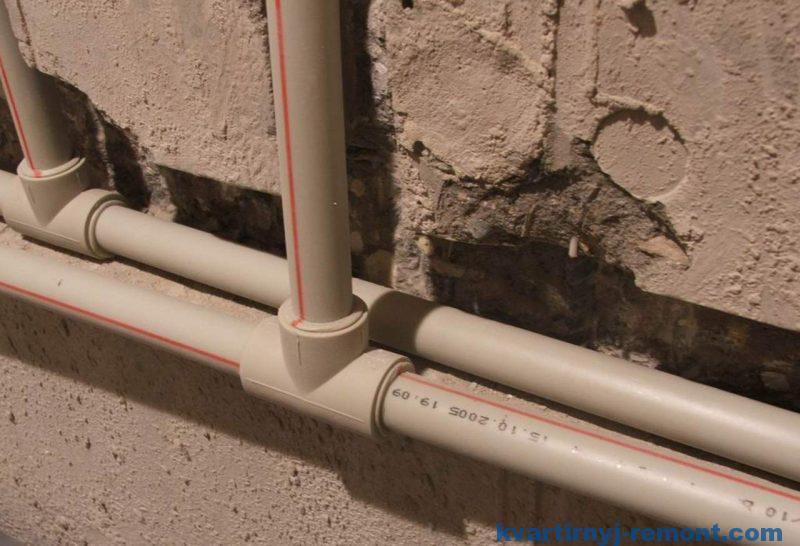
 Cutting a polypropylene pipe
The ruler is attached close to the profile and lowered onto the pipes. Along the edge of the ruler, marks are made along the area prepared for installation. Two marks around the edges are enough. If the section is long and there are no marks, then it is better to solder “in place”: install the segment in the prepared fasteners and then solder the remaining sections.
Soldering difficult areas with many turns should also be done according to the markup. Make sure there is a flat, level surface on which to check (evaluate) the alignment and squareness of the brazed pipes. For example, such a surface cannot be an old wooden or tiled floor - there are a lot of warps on them. A half-sheet of drywall, plywood is fine.
Mounting methods
The new version of the plumbing unit is a separate room where an individual design has been created. Openly laid pipes, even from polypropylene, will not become an interior decoration. Therefore, pipelines are often mounted in walls and floors.
However, not all places require a unique interior. In this case, the pipes are laid in an open way. Both methods have their own characteristics.
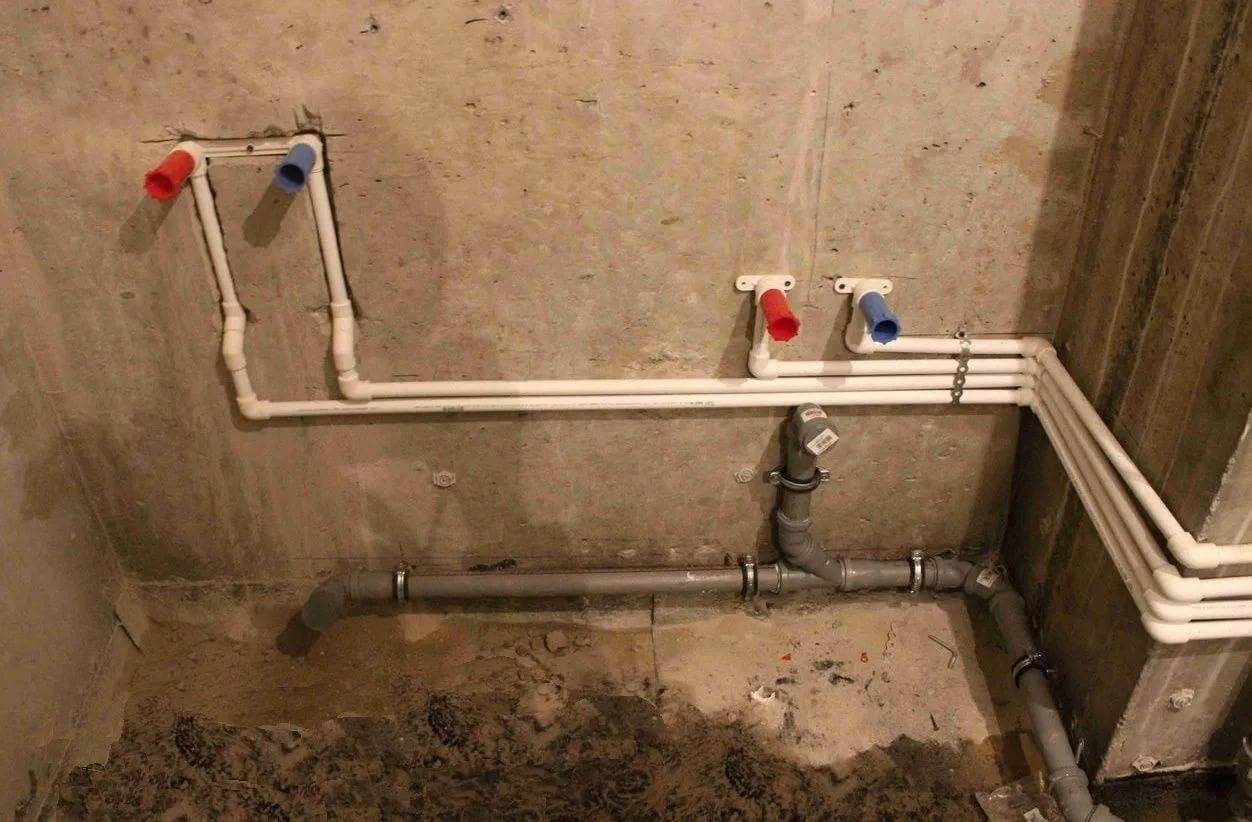
open laying
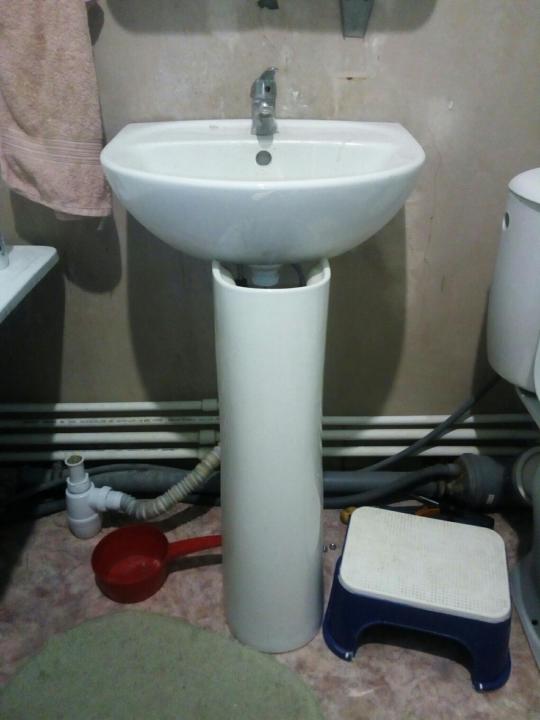
When pipes are mounted in an open way, access to any element of the water supply system appears. Non-walled piping in the toilet and bath is an easy system maintenance. If necessary, it is always possible to carry out repairs without violating the integrity of the interior decoration.
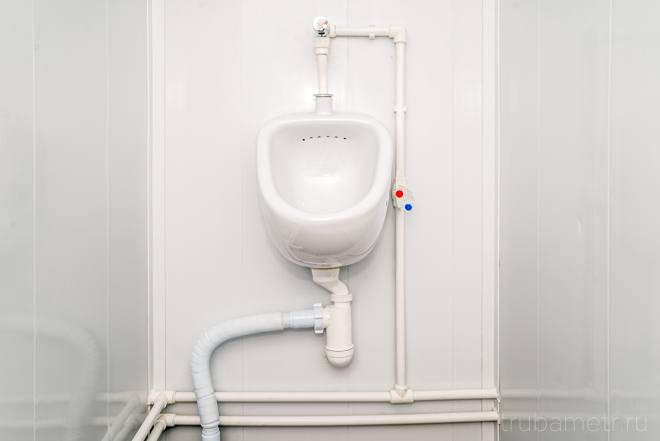 Polypropylene pipes in the toilet
Open laying of polypropylene pipes is easily done by hand. After all, such an installation process requires a little effort and the use of a small amount of tools.
The disadvantage of open laying is the possibility of damage to the polypropylene pipeline during other installation work or even during cleaning. However, plastic pipes need to be impacted with great force to break their integrity.
Open gasket also spoils the interior of the toilet and bathroom. In addition, people may be disturbed by the noise generated by the moving water.
To reduce the negative effects of openly laid pipes, you can install a box, for example, from drywall. Then the structure is finished with the same material that was used on the walls and / or floor.
When installing the box, it is necessary to provide a technical hatch. It will allow you to access water meters, filters, pressure gauges, ball valves and other fittings.
It is best if such elements of the system are located as compactly as possible in one place. This will allow not to create several technical hatches.
In some cases, a collapsible box is installed. This design allows access to almost the entire system. Thanks to the collapsible box, it will be possible to conveniently carry out revisions and preventive measures so that the network works trouble-free and efficiently for as long as possible.
Hidden styling
This method of mounting polypropylene pipes involves the creation of strobes in the walls. They are niches that are cut by a grinder with a special stone cutting element. In the case of gypsum partitions and walls, pipelines are laid inside the structures.
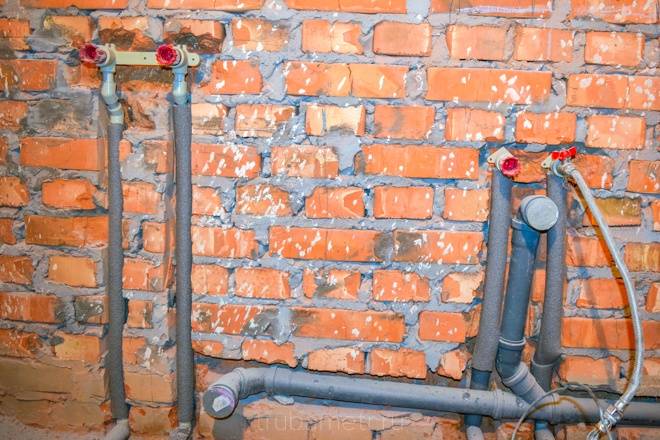 Plumbing in the bathroom from polypropylene pipes
When carrying out hidden pipe laying, it is necessary to remember the following nuances:
- It is impossible to cut special niches for pipelines in ceilings. Otherwise, the reinforcement in the hollow core slabs will be damaged. Therefore, structures will lose strength. If it is necessary to lay pipes in the floor, a screed must be performed.
- A mixture of cement and sand creates an additional load on the floors.This also reduces their strength. With a large weight, the screeds of the plate may crack.
- It is not recommended to create strobes in load-bearing walls. The implementation of special niches in the frame of the building can violate its integrity. As a result, the walls will collapse.
- It is not forbidden to make strobes in walls made of blocks and bricks. Structures made of hollow core panels must always remain intact.
If a person is not sure about the correct installation work regarding the laying of water pipes and the creation of gates, you can turn to professionals for help. Specialized companies will also help, if necessary, to prepare a redevelopment project.
Specialists will even take care of obtaining official permission to combine a bathroom with a toilet or change the configuration of the premises.
Closed laying allows you to hide the pipes in the building structures of the building. This is a significant advantage of this method. As a result, it will be possible to create a pleasant and harmonious look in the bathroom and toilet.


Minuses
The disadvantage of the hidden laying of pipelines is the inability to monitor the state of the system and carry out repairs. In the latter case, it will be necessary to violate the integrity of the finish, and in the event of a leak, even compensate for the losses of the neighbors on the lower floor.
Polypropylene pipes are connected by soldering. This method allows you to create reliable joints. Therefore, plastic pipelines are allowed to be laid in the walls. The main thing is that the welding is done with high quality.
It is recommended to perform work in accordance with GOST. The regulatory documents say that the joints of pipes cannot be walled up in walls and floors. After all, it is in such areas that leaks most often occur.
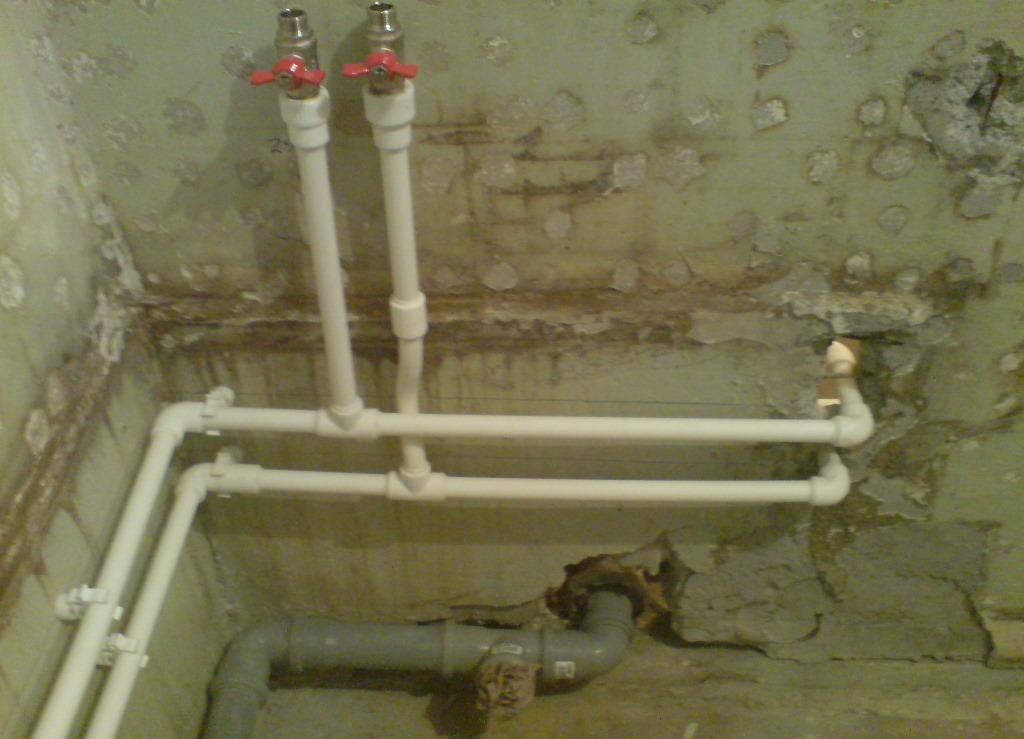
Plumbing installation
Installation of the water supply system must begin from the riser - the water pipe of the main water supply system. Therefore, an important point of installation is the connection plastic pipe with metal pipe, which refers to the main riser of the house.
Connecting a plastic water pipe to a metal
To connect metal and plastic parts, a special adapter is required, one side of which is smooth - for plastic, and the second - with threaded - for metal.
 Special adapter with thread for metal and smooth sleeve for plastic
Such fittings have standard sizes and are selected easily.
If plastic pipes for water supply are connected to the thread of a shut-off ball valve or on a pipe where there is already a suitable thread, then it is enough to ensure the impermeability of the future connection - sealing.
Tip: If the thread on a metal water pipe seems unreliable, then a new thread is needed.
Tow is better for sealing (for greater effect, it can be impregnated with paint or drying oil). The fum tape is often criticized, so not all experts advise it.
The last is to weld the smooth part of a special fitting to polypropylene or connect it with a fitting to metal-plastic.
Assembling a water pipe made of plastic is similar to children's design, but only with a greater degree of responsibility, therefore it is constantly necessary to check both with the scheme prepared in advance and with the dimensions of each section of the pipe.
The first step is the same for both working with polypropylene and welding, and for connecting metal-plastic parts using metal fittings.
First you need to cut off 1-2 parts of the pipe, try them on relative to each other and relative to the scheme on the wall as a whole.
Tip: Before using scissors to cut plastic pipes, you need to check the length and dimensions of each part of the pipe, be sure to take into account those millimeters and centimeters that will be inserted into the fitting and other connecting parts of taps and meters.
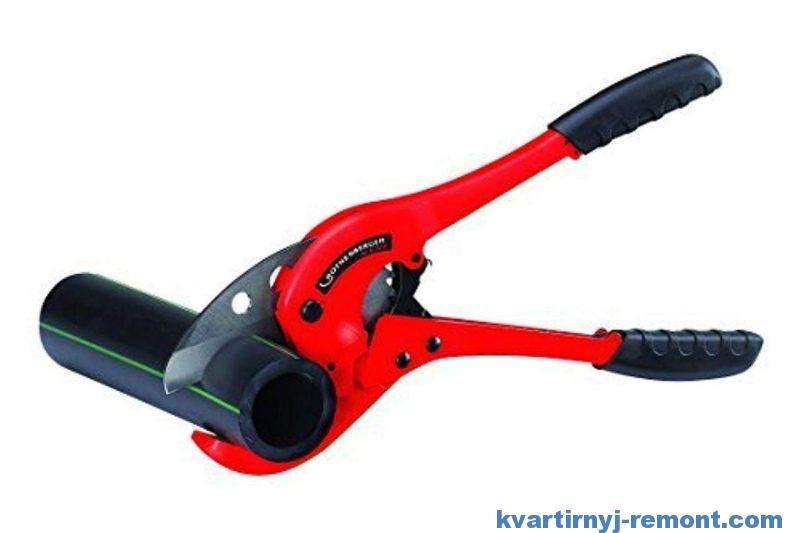
You can also use a hacksaw for cutting, but plastic pipe shears will simplify the work, as they allow you to cut exactly at an angle of 90 degrees and without breaking the coating, and this is important for a quality connection both when welding and when connecting with fittings
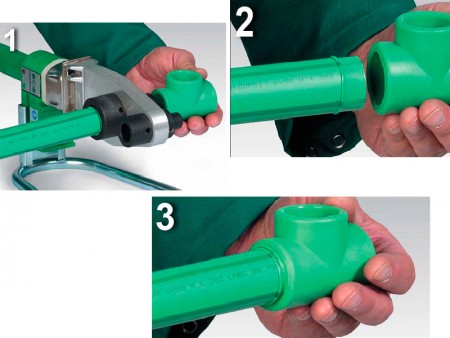
Welding of polypropylene pipes
1. Prepare the device, select the desired nozzle, put on heat-protective gloves.
If you have never worked with a welding machine, you should practice connecting different parts, including corner parts, in segments, small areas “on black”.
2. Welding of polypropylene pipes begins with cleaning and leveling the cut, this is usually not required if cutters are used to cut plastic pipes.
 Welding of polypropylene pipes
3. When the welding machine is heated, it is necessary to insert the fitting and the pipe almost to the stop (2-3 mm is desirable to leave) into the heated nozzle. The time required to heat up the polypropylene parts depends on the apparatus and the diameter of the pipe.


4. Carefully remove the parts from the nozzle, smoothly and evenly connect them to each other, holding for 5-10 seconds.
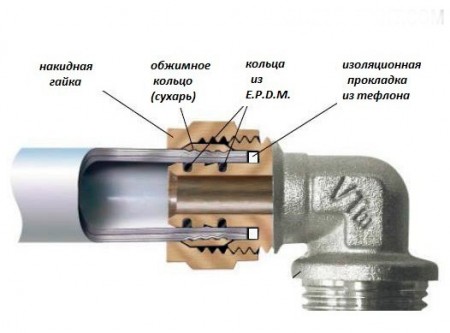
Connection of metal-plastic pipes with fittings
one.To connect pipes made of metal-plastic, a nut and a fitting clamp are first used: they are put on the pipe,
2. It is necessary to flare the pipe - expand it, clean its edges (with a special calibrator).
3. Put the pipe on the branch pipe (nipple) of the fitting and align the parts.
4. Already put on the nut and clamping collar, begin to twist onto the fitting fitting until characteristic crackling sounds. In this case, sudden movements and pressure should not be allowed to avoid deformation of the pipe.
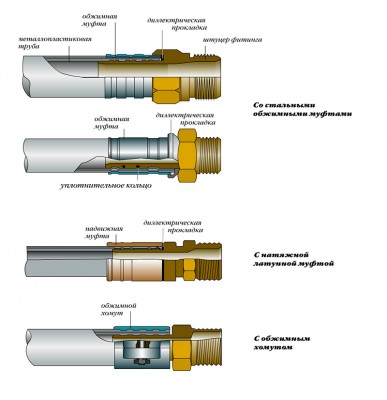 Connection of metal-plastic through a system of fittings
A straight line and clear corners are an indicator of high-quality welding and a reliable connection in both cases.
When working with water pipes made of plastic pipes, it is not possible to check the tightness of the connection, so an important task at the level of design and installation is to avoid unnecessary connections and bends. However, it is desirable to make at least one additional outlet for possible plumbing fixtures, and plastic plugs used for profile pipes will come in handy in this place.
The last step in the installation of the plumbing system is to fix the pipes to the wall surface with special clips. Recall: the clips for the hot water pipe should be a little looser - taking into account the possible expansion from high temperatures.
In general, a water supply system made of plastic pipes, made with the correct observance of technology, is in no way inferior in quality and reliability to a water supply system made of steel or even copper.
Business is a pipe: choose the right one
Before connecting plastic pipes, it is important to prepare all the necessary materials and tools for installation. These include:
- tubes directly;
- connections - fittings;
- cranes;
- soldering iron;
- cutter.
When choosing pipes for installation, an important role is played by the purpose for which they are purchased. If you need to lay a plumbing system where hot and cold water will circulate under high pressure, then it is better to buy metal-plastic spare parts. If it is necessary to deliver, for example, cold water from a well under low pressure to a country house, then PVC pipes can be used.

PVC pipes are considered very weak, they can be used if the pressure is low
All plastic fittings for installation are divided into the following types according to the pressure they carry:
- LDPE are designed for high pressure (suitable for hot and cold water, used anywhere);
- PESD - for medium (suitable for cottages and private houses, the pressure should not be strong);
- HDPE - for low (intended for suburban areas, the water inside passes under very low pressure).
Also, plastic tubes differ in the materials added to the plastic during the manufacturing process. Depending on the additive, the nozzles are:
- Polyethylene. Very fragile and low strength. Can be used for irrigation system in the garden or in the garden. The main thing is to properly insulate them. It is better not to bury such details in the ground. They are unlikely to withstand such a load.
-
Polypropylene. Not the most durable, but absolutely resistant to the formation of mold, fungus and rust inside. Therefore, they are often used to supply clean cold drinking water.
- Reinforced polypropylene. Inside there is a layer of metal or fiberglass. Its presence allows, after connection, to let hot water through the system. Do not bend parts, they may be damaged.
- PVC. It is supposed to be used in the country.Such plastic pipes are able to withstand hot and cold water, but are not able to work with high pressure, which is usually available in private houses and apartments.
- Metal-plastic - best suited for creating a full-fledged plumbing system in a private residential building or within the walls of an apartment. The base is metal, on which a plastic casing is “put on” from the outside and from the inside. Absolutely not subject to corrosion, serves from 50 years and more.
What size PVC pipe to choose for connection? The following dimensions are suitable for self-manufacturing of a water main:
- 110 mm;
- 160 mm;
- 200 mm.

The more consumers in the water system, the thicker the pipes themselves should be and vice versa
The average price tag for a plastic "knitting needle" is 300 rubles per meter. Among the manufacturers have proven themselves:
- Heisskraft;
- Wavin;
- Banninger;
- Aquatech;
- Wefatherm.
Connection fittings for installation must be made of metal-plastic. Only in this case they will be efficient and reliable. The diameter of the connection must be 1-2 millimeters larger than the diameter of the tube itself so that the latter can fully enter the fitting. Good connections are made by the same companies that produce the main parts of the system.


Prices range from 150 to 500 rubles. Tee connections are more expensive, to which several consumers can be connected at once.
It is important to connect plastic water pipes with a special soldering iron for installation. Plumbers often refer to it as a connection iron. This device fastens PVC pipes and fittings together within a few seconds. It is a ring that is put on the part of the water main that needs to be connected.Due to the critically high temperature, the plastic on the parts melts and holds together, then cools in the "fresh" air.
The simplest unit costs about 1500 rubles. Products from Diold, Splav, Kandan are considered reliable.

No need to buy an overpriced pipe welding iron, it's a waste of money. They all work the same
Special scissors for cutting can not be purchased. For this purpose, a construction knife available from any home craftsman is suitable.
Important: to cut PVC pipes for connection, they do not need to be heated with an iron or in any other way. You will learn about the choice of nozzles and other spare parts in the following video. You will learn about the choice of nozzles and other spare parts from the following video
You will learn about the choice of nozzles and other spare parts in the following video.
Checking the quality of joints
Before operation, the water supply system is checked for leaks by subjecting it to a pressure 1.5 times higher than the nominal one, but not lower than 0.15 MPa. At the same time, the system is filled with water and the pressure is increased to the required level using a car pump. The indicators are controlled by a pressure gauge with a division of 0.01 MPa. During the test, joints and connections are checked for leakage. If necessary, the problematic joint is cut out and new elements are installed, after which the control process is repeated from the beginning. If the size of the new elements is not enough, then the pipeline is extended using a pipe segment of the required size and a pair of couplings.
Equipment for installation work
Self-installation of the heating system is carried out using a soldering iron for polypropylene pipes, otherwise it is also called "iron". It is great for this type of work, but when choosing such a tool, it is worth considering some nuances:
- Inexpensive models of soldering irons for polypropylene pipes are equipped with Teflon-coated metal nozzles. More expensive soldering irons are equipped with copper nozzles.
- Large temperature range and high power make the device more convenient to operate. By observing the temperature and time parameters of soldering, it is possible to assemble the heating system with high quality.
- Cheap soldering irons are not designed to last.
- Of great importance is the form of "ironing". Tube-shaped devices cost several positions more than hammer-shaped soldering irons. However, the first option makes it easier to braze counter-joints and weld pipes with elbow fittings in difficult places.
Professional equipment is rich in equipment, but you should not buy it for this reason. Nozzles for a hand soldering iron can always be purchased at specialized stores.
Installation of heating from PP pipes must be carried out according to certain rules, which state that the diameter of the nozzle must correspond to the diameter of the element to be welded. However, it should be borne in mind that other types of nozzles can be used on tubular soldering irons, and hammer-shaped “irons” work only with their component parts.
At a professional level, mechanical type welding units are used. When working with pipes of large diameter, the alignment of the joints is carried out by a special hydraulic drive.Such a device provides comfortable conditions for welding tubular elements with a diameter exceeding 4 cm. The device is characterized by a minimum temperature error and high reliability. To install a heating system with such a device, you must have special skills and experience.
Do not operate any equipment used for welding polypropylene pipes, without a reliable stand, which is most often one of the components. In addition, soldering of damp, wet or dirty inside PP pipes is not allowed. All these factors adversely affect the tightness of the seams.
Anatomy of polypropylene pipes
Most polypropylene (PP) pipes are the same only at first glance. A more detailed examination of them will make it possible to notice differences in material density, internal structure and wall thickness. The scope of pipes and the features of their installation depend on these factors.
PP material classification
The quality of the welded polypropylene seam and the performance of the pipes are largely determined by the manufacturing technology of the PP.
There are such types of parts, based on the material of their manufacture:
- PRN. Single-layer products made of homopolypropylene. Are applied in industrial pipelines and systems of cold water supply.
- RRV. Single-layer products made of PP block copolymer. Are applied at installation of floor heating networks and cold pipelines.
- PPR. Single-layer products made of PP random copolymer. Are applied in systems of water supply and home heating with water temperature up to +70 °C.
- P.P.S. Flame-retardant type of pipes with operating temperature up to +95 °С.
There are also multilayer reinforced parts made of PP.
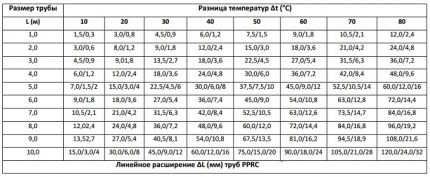 When heated to 80 degrees, reinforced PP pipes lengthen by 2-2.5 mm / m, and ordinary single-layer pipes - by 12 mm / m
They have an additional inner aluminum shell, which dramatically reduces thermal elongation, facilitating wiring installation and operational safety.
The disadvantage of these products is the need to remove the upper polymer layer and aluminum before soldering to the depth of penetration of the pipe into the fitting.
We examined in more detail the types of PP pipes according to the material of manufacture and fittings in our other article.
What does the marking look like?
You can choose the required pipes and fittings for plastic wiring in the construction market yourself. You just need to know the labeling conventions.


 The indicators may be in a different sequence and in a foreign language, but store managers should know any decoding
To determine the scope of polypropylene products, the main indicator is PN. This is an indicator of the nominal pressure in kgf / cm2 (1 kgf / cm2 \u003d 0.967 atmospheres), at which the service life does not change. The base temperature of the coolant in the calculation is assumed to be 20 °C.
In the domestic sector, 4 main types of PP pipes with different PN indicators are used:
- PN10 - for cold water supply;
- PN16 - for cold and for warm water supply;
- PN20 - for hot water and heating systems;
- PN25 - for heating systems, especially central type.
Products with PN25 often have a large linear length, so they are almost always reinforced with aluminum foil or strong fiberglass for less expansion when heated. We recommend that you take a closer look at the marking of PP pipes for heating.
Appearance and internal structure
High-quality PP pipes have a perfectly round shape on the cut. The thickness of the walls and the reinforcing material must be the same around the entire circumference, there should be no breaks in aluminum or fiberglass.
To trim the top layer of plastic and foil on reinforced pipes, you need to purchase a special tool - a shaver. It is inexpensive and easy to operate
The reinforced pipe traditionally consists of three layers: inner and outer polypropylene and medium aluminum or fiberglass. Pipe surfaces must be smooth, without sags and recesses.
The color of the material can be green, white or gray, but the quality and characteristics of the pipes do not depend on this at all.
Material Advantages
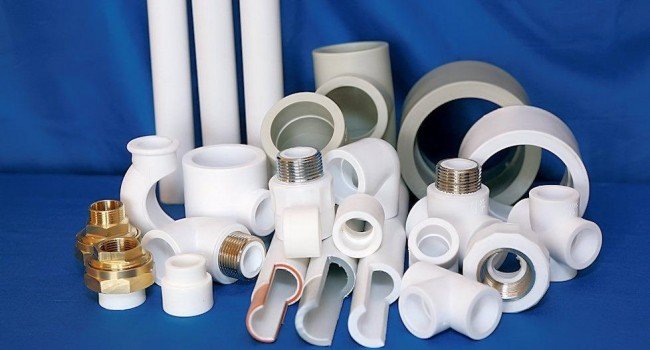 Polypropylene pipes and fittings
Increasingly, products made of various types of plastics are replacing metal pipes in the installation of life support systems for residential buildings. When arranging plumbing and heating systems, pipes made of polypropylene have proven themselves best. Here are just some of the advantages of this material and the benefits of using it:
- High durability (up to 50 years of operation in cold water supply systems);
- Ease of installation (during operation no special training and expensive equipment is required);
- High resistance to chemical compounds;
- No deposits over time;
- High sound absorbing ability;
- Low coefficient of thermal conductivity (no condensate on the outer surface);
- Light weight (easy to transport and install);
- High environmental friendliness.
Note that when choosing products made of polypropylene, it is better to give preference to products from leading European or domestic companies.Although it is more expensive than materials from China, it is provided with a manufacturer's guarantee for the main technological and environmental factors.