- General wiring rules
- Who can benefit from this guide?
- Where to start execution
- DIY wiring
- Wire connection methods
- DIY wiring photo
- Preparation of materials
- Pros and cons of wiring in a cable channel
- What needs to be done to replace
- Schema Design
- Coordination
- Wiring
- Tips for the correct combination of electrical outlets
- Replacing wiring in an old apartment
- Wiring Replacement Instructions
- De-energizing
- Dismantling
- Channels for wires
- Distribution boxes
- Wire laying
- Inserting wires into the electrical panel
- System testing
- Conclusions and useful video on the topic
General wiring rules
The document defining the requirements for the installation of electrical wiring and any other electrical equipment is the PUE - "Rules for the Arrangement of Electrical Installations".
The basic rules for arranging an internal electrical network in an apartment:
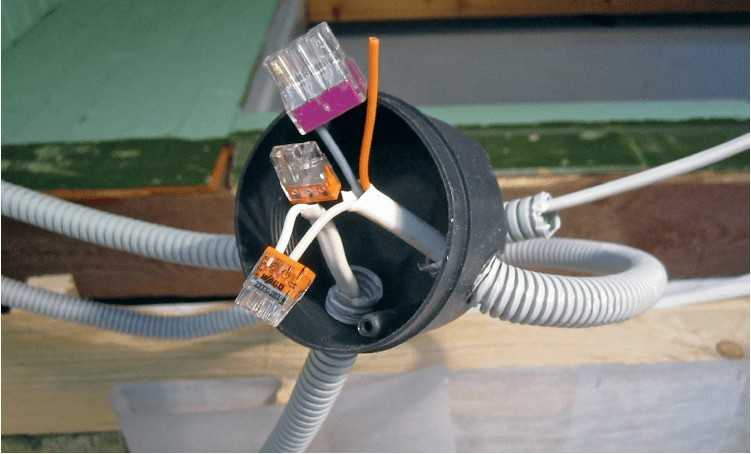
- The wiring and connection of cables are made inside junction boxes with careful isolation of the connection points.
- Meters, junction boxes, sockets and switches must be easily accessible.
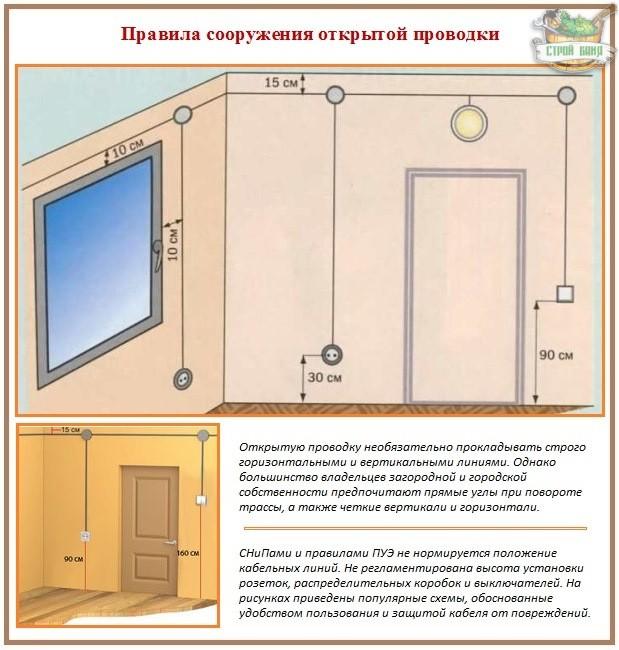
- The switches are mounted on a section of the wall that is not closed by the door leaf in the open position (from the side of the door handle).
- There are 2 standards for the height of the switch from the floor - "Soviet" (160 cm) and "European" (90 cm), both are acceptable for use.
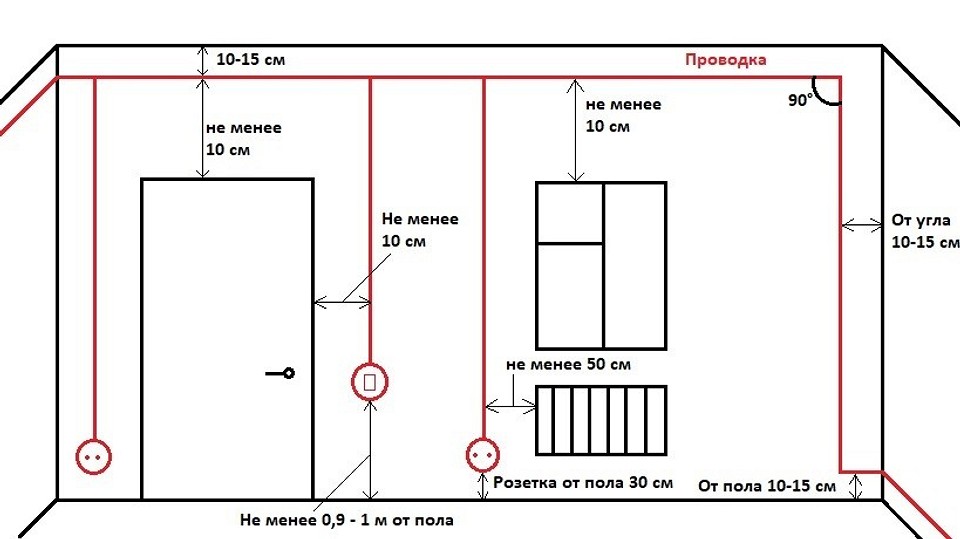
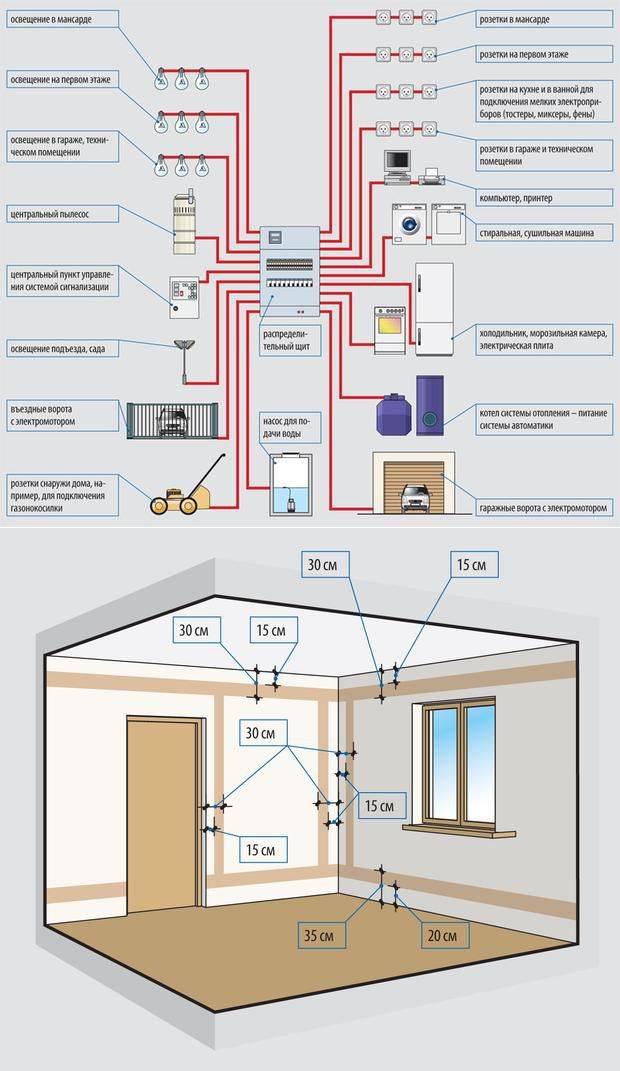
- When connecting the wire from below, sockets are installed at a height of no more than 1 m, focusing on ease of use, when connected to the network from above - from 1 to 1.5 m. In children's rooms of apartments, for safety reasons, it is allowed to place sockets higher - at a height of 1.8 m, based on the standard for the premises of institutions with the stay of children.
- Sockets and switches are placed no closer than 50 cm from the gas pipeline.
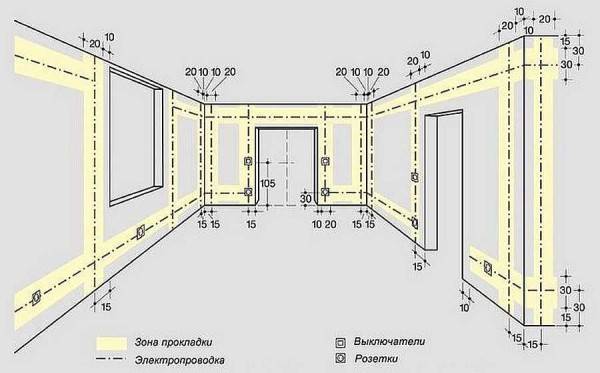
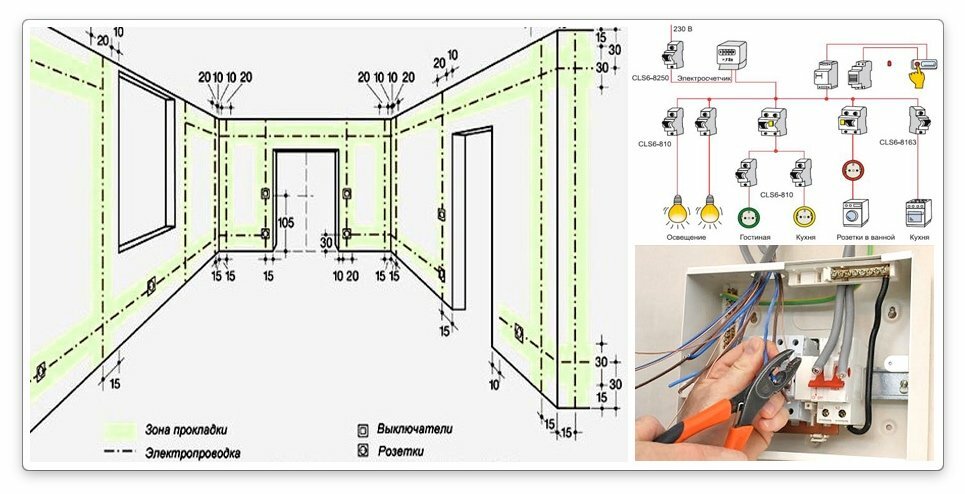
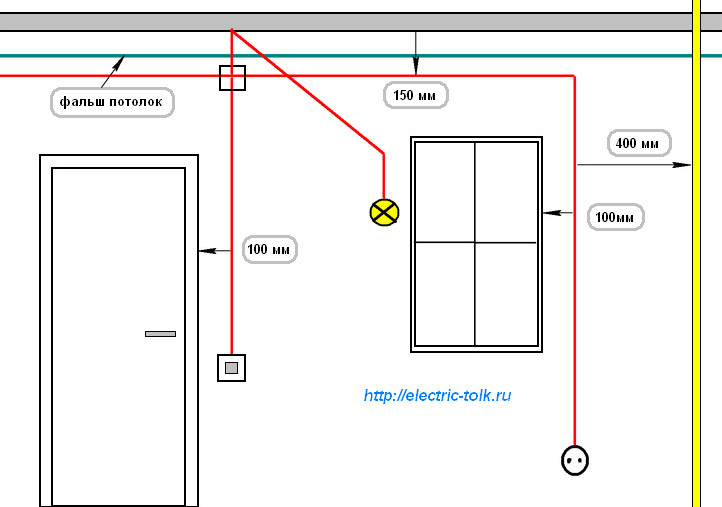
- The location of the wiring sections on the walls should be orthogonal (vertical or horizontal) - this will facilitate the tracking of cables when performing minor repairs (drilling holes, chasing).
- Electrical wiring should not come into contact with metal elements of building structures (fittings, embedded parts).
- When installing several cables with single-layer insulation in one strobe, each of the wires must be placed in a corrugated cover.
- Vertical sections of wiring should be located at a distance of at least 10 cm from door and window openings.
- Horizontal sections of wiring are located no closer than 15 cm from the floor slabs.
- The distance from the cable to the gas pipeline pipes must be at least 0.4 m.
Who can benefit from this guide?
First of all, those who buy an apartment in the secondary housing market or want to do everything their own way in a new building.
Firstly, all dilapidated wiring is completely changed, since the life of the cable is about 20 years. After this period, the strands of the wires become more fragile, as a result of which the likelihood of a short circuit and fire increases.
Therefore, in old houses it is recommended to pay special attention to the condition of the wiring.
Secondly, new residents may not be satisfied with the wiring option from the developer, and they are redevelopment of electrical wiring and all premises. Previously, this was called European-quality repair and it was fashionable to lower switches down, transfer sockets, etc.
Where to start execution
As a rule, at the first stages of repair, people usually still have little idea of the final result. And for competent electrical wiring, it would be very desirable to present it. Since the functionality and logic of the location of sockets, switches, lighting, and indeed, the entire wiring as a whole, will depend on this. The wiring diagram in a private house or apartment should always begin the same way, with drawing up an electrical plan. And that's why. Let's say you made repairs, while not really thinking about the end result, as the electrician advised, they did it. All is ready. We put the furniture in place, placed the consumer electronics, and what did we get? Catastrophe! All sockets turned out to be in a cold reserve, one was blocked by a closet, another by a sofa, a third chest of drawers and a fourth bedside table, even near the TV and your favorite stereo system, as by the law of meanness, there were no sockets within a radius of 3-4 meters. And here, a very fun and exciting game begins, called, scatter extension cords and pilots throughout the apartment. The question is, why did you make new electrical wiring, so that later you could walk and trip over extension cords? Of course no. And in the apartment, this is still half the trouble, but an incorrectly executed wiring diagram in a private house promises more global consequences.Indeed, if in apartments, the wiring changes on average, once every 20-25 years, then in private residential buildings, much less often or never at all. Yes, and how many extension cords will be required for a two or three-story house, but you still need to buy them, how much money will be spent? And how many nerves will be spent every time you once again stumble over the pilot's wire lying on the floor.
What to do? Sit down and calmly think, decide on the arrangement of furniture and consumer electronics. Be sure to note what new electrical appliances you plan to purchase in the coming years. For example: air conditioning, dishwasher, freezer, electric water heater, electric oven or hob, and so on, and where, after these acquisitions, existing cabinets, sofas and bedside tables can move. Consult with your family, wife and children, in practice, their advice turns out to be very useful.
DIY wiring
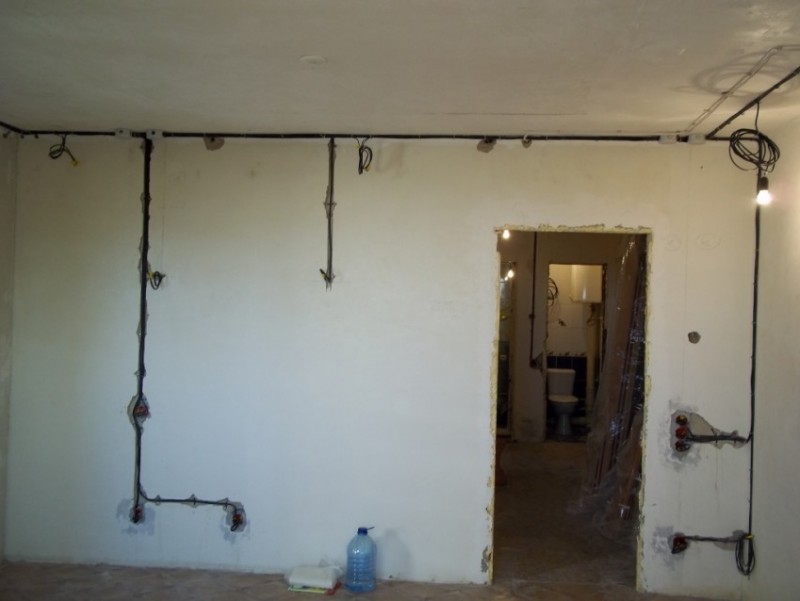
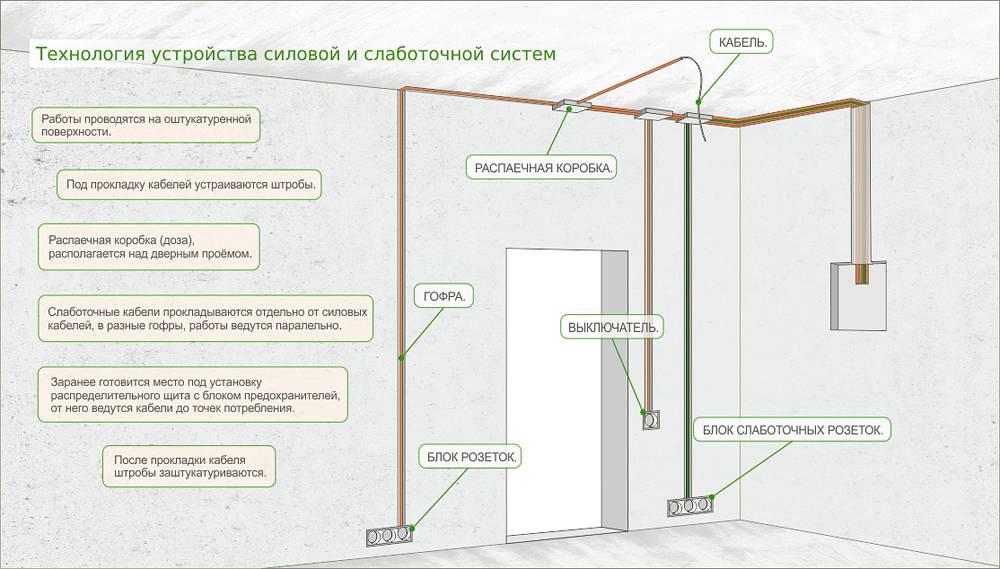
Modern construction trends include hidden wiring. It can be laid in grooves specially made in the walls - strobes. After laying and fixing the cables, they are covered with putty, comparing with the surface of the rest of the wall. If the erected walls will then be lined with sheet materials - drywall, GVL, etc., then strobes are not needed. Cables are laid in the gap between the wall and the finish, but in this case - only in corrugated sleeves. The sheath with laid cables is fastened with clamps to the structural elements.
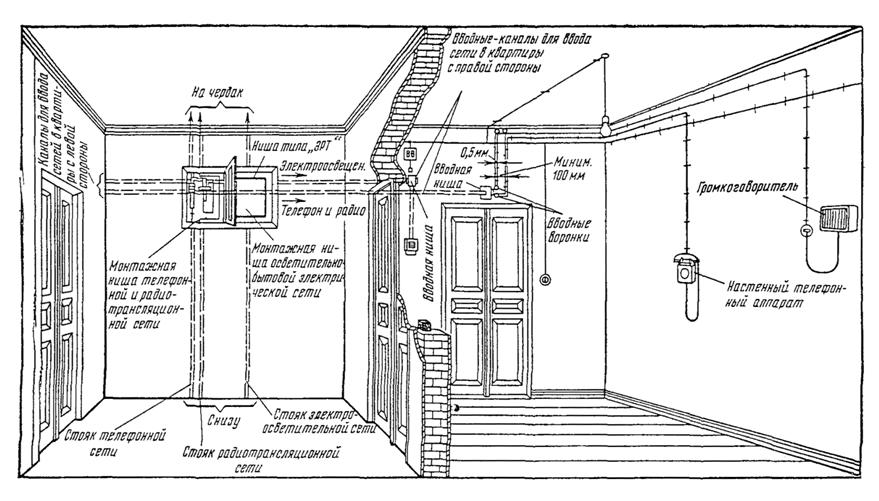
How should internal wiring be laid? In a private house, when arranging with your own hands, you must follow all the rules
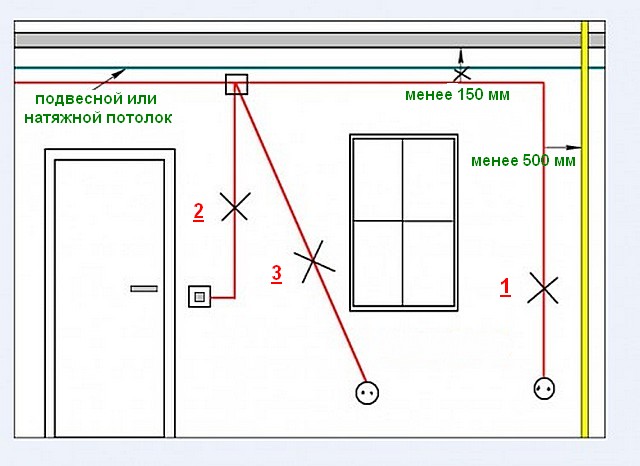
When laying, you need to remember that the internal wiring of a private house is done in accordance with all the rules and recommendations. This is the only way to guarantee safety. The basic rules are:
- wiring only vertically and horizontally, no rounded corners or beveled routes;
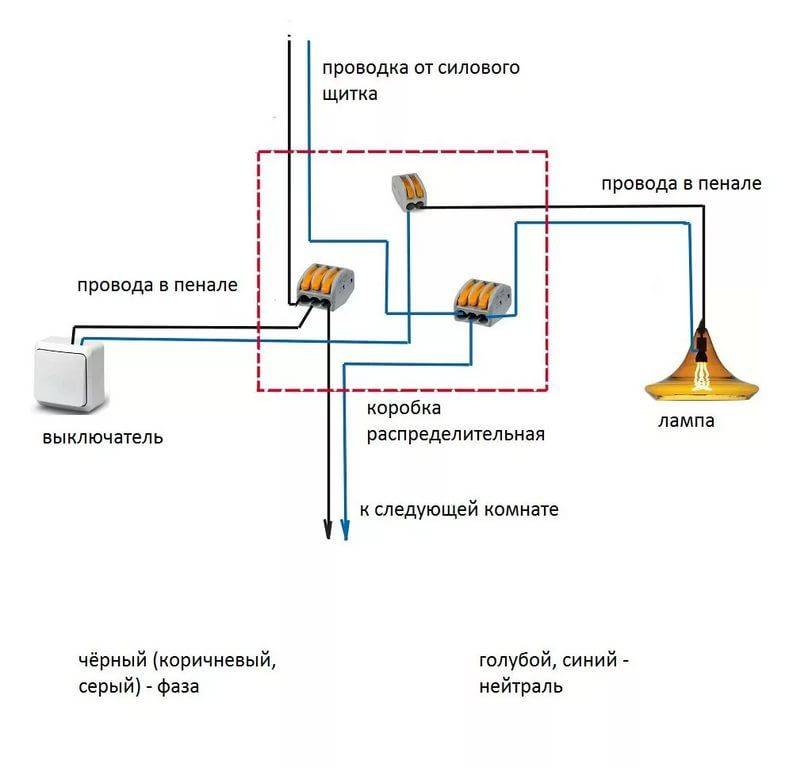
- all connections must be made in mounting junction boxes;
- horizontal transitions must be at a height of at least 2.5 meters, from them the cable goes down to the outlet or to the switch.
A detailed route plan, similar to the one in the photo above, must be saved. It will come in handy during the repair or modernization of wiring. You will need to check with him if somewhere nearby you need to ditch or make a hole, hammer in a nail. The main task is not to get into the cable.
Wire connection methods
A large percentage of wiring problems stem from poor wire connections. They can be done in several ways:
-
Twisting. Only homogeneous metals, or those that do not enter into a chemical reaction, can combine in this way. It is impossible to twist copper and aluminum categorically. In other cases, the length of the bare conductors must be at least 40 mm. Two wires are connected to each other as tightly as possible, the turns are stacked one next to the other. From above, the connection is wrapped with electrical tape and / or packed with a heat shrink tube. If you want the contact to be 100%, and the losses to be minimal, do not be too lazy to solder the twist. In general, according to modern standards, this type of wire connection is considered unreliable.
-
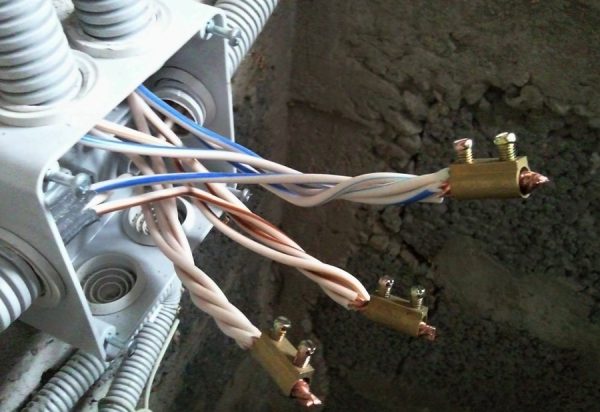
Connection via terminal box with screw terminals.Metal terminals are soldered in the case made of heat-resistant plastic, which are tightened with screws. The conductor, stripped of insulation, is inserted into the socket, fixed with a screw, using a screwdriver. This type of connection is the most reliable.
- Connecting blocks with springs. In these devices, contact is provided by a spring. A bare conductor is inserted into the socket, which is clamped by a spring.
And still, the most reliable connection methods are welding and soldering. If it is possible to make the connection like this, we can assume that you will not have problems. At least with connections.
Do-it-yourself installation of electrical wiring in a house requires careful fulfillment of all requirements. This is a guarantee of your privacy and the safety of your private property.
After the wires from the machine to the point of connection of the socket or switch are laid, they are checked for integrity with a tester - the wires ring among themselves, checking the integrity of the conductors, and each individually to the ground - checking that the insulation is not damaged somewhere. If the cable is not damaged, proceed with the installation of the socket or switch. Having connected, they check it again with a tester. Then they can be started on the appropriate machine. Moreover, it is advisable to immediately sign the machine: it will be easier to navigate.


Having finished the electrical wiring throughout the house, having checked everything on their own, they call the specialists of the electrical laboratory. They check the condition of conductors and insulation, measure grounding and zero, based on the results they give you a test report (protocol). Without it, you will not be given a commissioning permit.
DIY wiring photo


We also recommend viewing:
- Do-it-yourself siding installation
- Warm floor do it yourself
- Bath with your own hands
- Do-it-yourself self-leveling floor
- DIY decorative putty
- Do-it-yourself toilet installation
- Do-it-yourself fence posts
- Do-it-yourself stretch ceiling
- Do-it-yourself ceiling lighting
- Do-it-yourself warming of the loggia
- DIY partition
- DIY wooden floor
- Do-it-yourself slopes
- How to make DIY paint
- DIY bricklaying
- DIY decorative plaster
- Do-it-yourself fence from corrugated board
- DIY fireplace
- Do-it-yourself home insulation and the main methods of thermal insulation
- mesh fence
- Do-it-yourself installation of plastic windows
- Do-it-yourself interior decoration
- DIY fence
- How to make a balcony with your own hands
- Do-it-yourself oven
- Do-it-yourself door
- DIY gazebo
- Pour concrete with your own hands
- Do-it-yourself formwork
- DIY liquid wallpaper
- Do-it-yourself floor screed
- Do-it-yourself foundation
- DIY frame house
- Hallway with your own hands
- Do-it-yourself ventilation
- Do-it-yourself wallpapering
- DIY concrete ring
- Do-it-yourself roof
- Do-it-yourself laminate flooring
- Staircase to the second floor with your own hands
- Do-it-yourself blind area
- DIY bathroom renovation
- Do-it-yourself polycarbonate
- Do-it-yourself door installation
- Do-it-yourself drywall
- Do-it-yourself arch
- Sheathe clapboard with your own hands
- DIY house project
- DIY gate
- DIY shower cabin
- Do-it-yourself tile laying
Preparation of materials
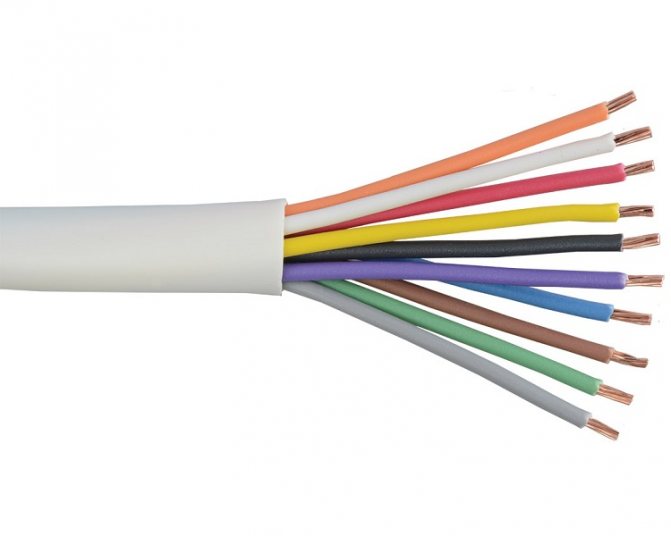
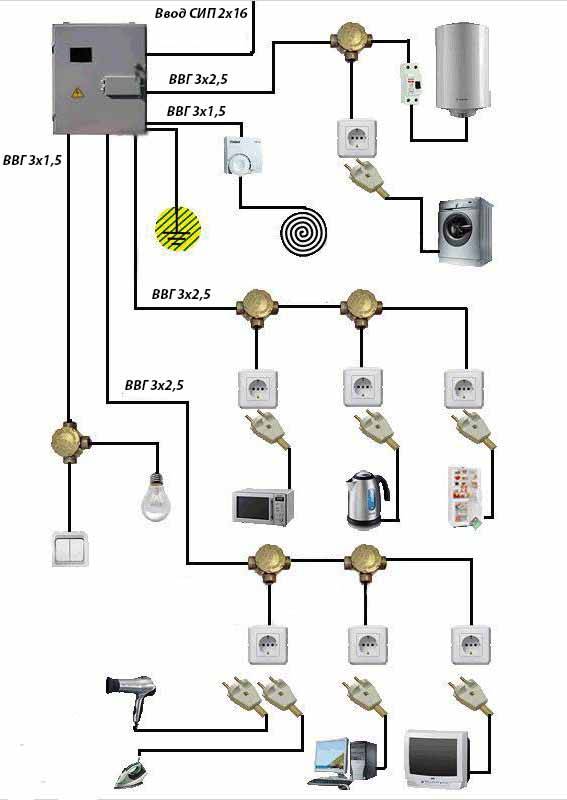
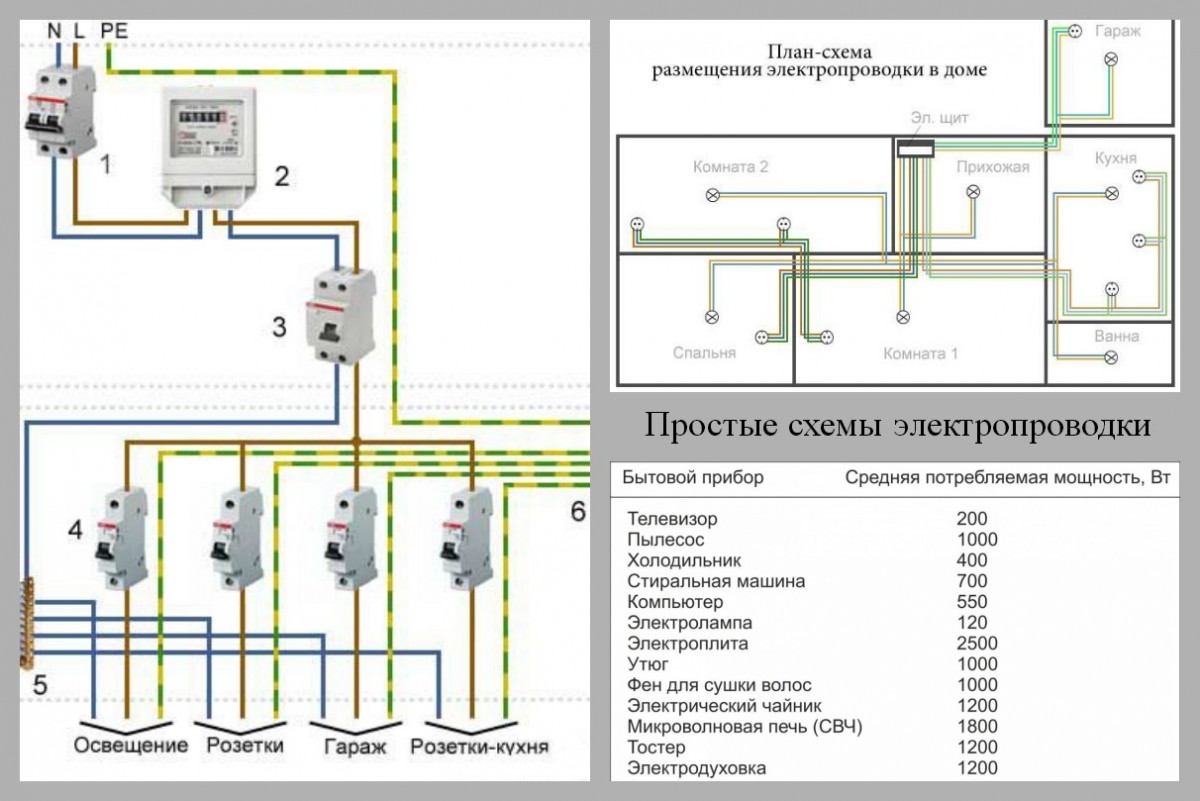
When choosing for intra-apartment wiring copper wires by cross section, it is recommended to focus on the following standards:
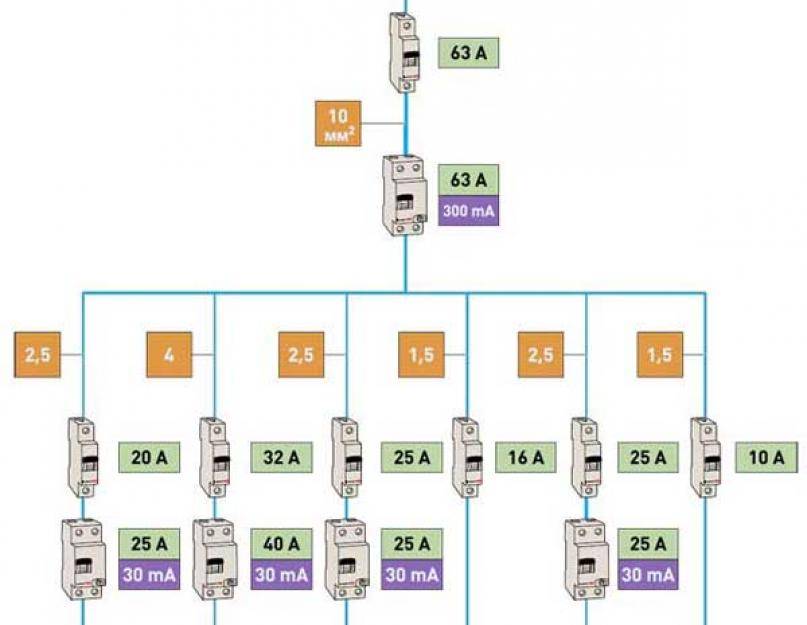
- For an electric stove and other similar powerful consumers, wires of 6 mm2 are needed (an automatic machine on the line is 32–40 A).
- For sockets and for domestic air conditioning, 2.5 mm2 is required (automatic 16–20 A).
- For lighting groups, 1.5 mm2 is enough (automatic 10–16 A).
Sockets are recommended to be installed at the rate of one per 6 squares of living space in the room. If another RCD is placed after the circuit breaker, then it should exceed the machine in amperes by 10–20%. It is best to take the cable VVG, PVS or NYM.
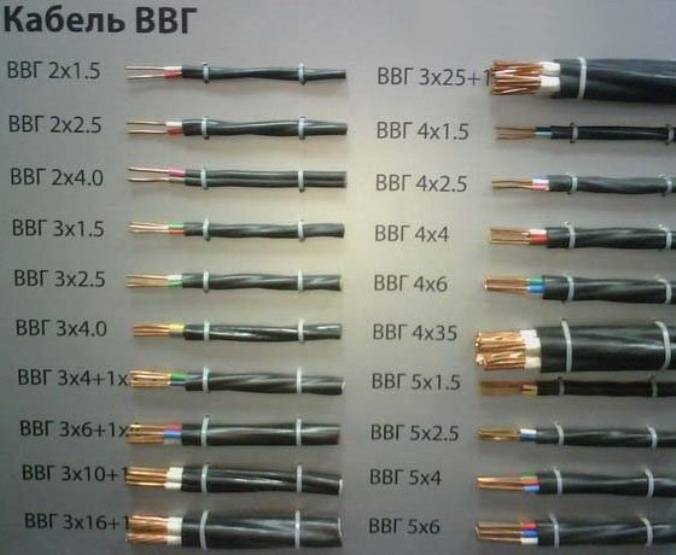
Types of cable for electrical wiring
If you run a separate wire from the shield to each outlet, then their total footage in the created electrical network will be huge. Usually, junction boxes for electrical wiring are installed in the apartment and the wiring is done in groups. This option is cheaper and the cable channels require a smaller size.
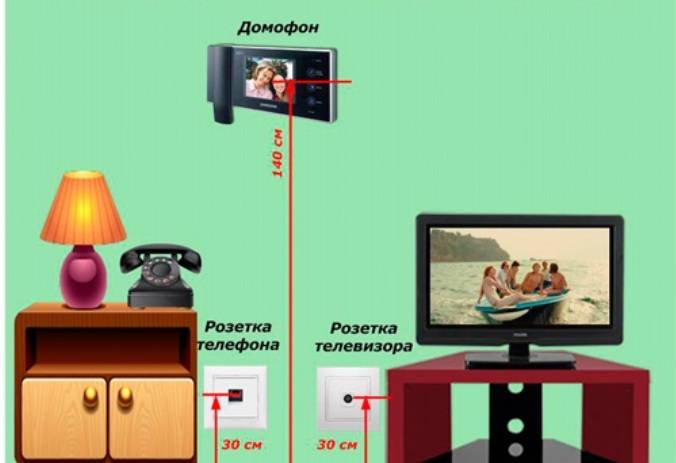
The layout of electrical appliances in the hall
Pros and cons of wiring in a cable channel
The use of electrical trays is accompanied by the following positive aspects:
- Installation is carried out using a minimum number of tools.
- It can be used indoors with different design due to the variety of colors.
- There are options for using complex trays for simultaneous laying of power and low-current lines.
- You can easily add connection points.
The only non-obvious disadvantage of ducts for outdoor laying of cable lines is the visibility of the structure. For some people, this factor is unacceptable in the interior.
For convenient installation, electrical boxes are assembled with special accessories:
- plugs;
- internal and external corners;
- adapters;
- T and L-shaped branches.
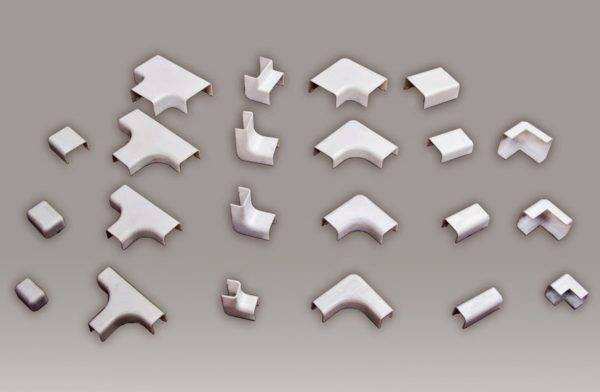
Accessories for cable channels The use of a cable channel is relevant for many cases, for example:
- when installing electrical wiring in wooden houses with high humidity;
- to eliminate problems with hidden electrical wiring.
Fastening wires in special electrical channels, called cable channels (hereinafter referred to as KK), is a type of open wiring and successfully competes with hidden wiring, which requires:
- chasing brick or reinforced concrete walls of the house for laying cable lines;
- subsequent embedding with plaster;
- "ennoblement" of plastered strobes.
Installation of the cable channel is carried out for:
- hiding laid wires and cables;
- protection of current-carrying lines from mechanical damage;
- giving an aesthetic appearance to the mounted electrical wiring route.
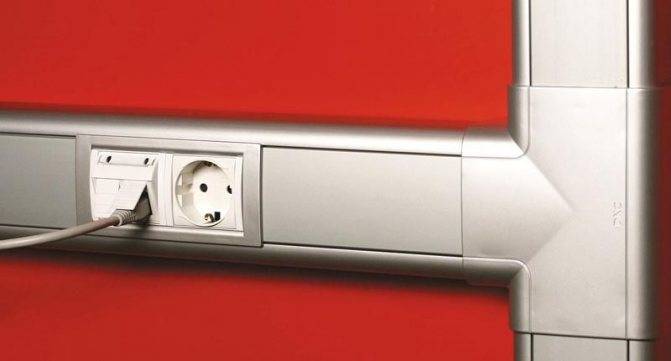
Cable channel with sockets
When using special accessories, the places where plastic spacers pass through the outer and inner corners of the walls or floor are closed, respectively, by the outer and inner corners, aesthetically fitting into the interior of the room. The joints of the KK boxes can be cut with slight deviations from right angles and straightness of the cut, if connectors are used that hide the joints of the sections.
If there are no factory-made elements, corner transitions can be made as follows:
- To pass the inner corner, you must:
- at the bend of the KK route, make cuts on the sides of the box with a cutting depth to the level of the plastic base;
- bend the box at the desired internal angle;
- install the box at the transition point and attach it to the wall using one of the previously described methods (depending on the wall material);
- close the boxes with lids.
- For mounting the KK on the outer corner, the box is cut and fixed by analogy with the work for the inner corner. However, notches are made on the lid at an angle of 450 with the center of the angle on the bend line.
The use of cable channels in the arrangement of home and workshop electrical wiring greatly simplifies the design and installation of cable networks, speeds up installation work and allows the full reuse of wires and cables after dismantling the wiring.
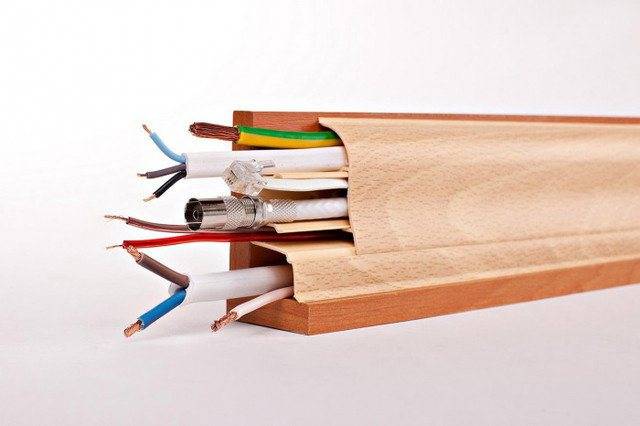
QC with cabling
What needs to be done to replace
To replace the electrical wiring in the apartment, you must:
- Develop a project and wiring diagram.
- Dismantle the old network.
- Lay new electrical wires (open or closed).
- Install and connect electrical installation products and lighting devices with switches.
- Mount the switchboard with protection.
- Check the created electrical network as a whole and each individual line for short circuits.
There is nothing fundamentally complicated here. With minimal skills in electrical installation, everything can be done by hand. However, such a replacement must be done in stages, step by step, and with strict observance of the rules of the EIC.


Schema Design
Drawing up a wiring diagram for the apartment allows you to clearly determine the required amount of consumables and the amount of work. It indicates all consumers of electricity and the location of sockets, switches, etc.
The main point here is the total power consumption.
When a plan is being prepared for a new electrical wiring in a private house outside the city, then it is necessary to obtain technical conditions from the power engineers in advance for the kilowatts supplied to the site.Usually it is about 5–15 kW.
The residential electrical network already exists and is already connected to the general house network. And most often the value of the permitted power for it ranges from 1.3–5 kW. Only in modern high-rise buildings without gas stoves, this parameter can reach up to 10 kW.
When replacing electrical wiring, it is impossible to go beyond the established maximum. This will lead to an accident and the operation of protection on the common network, and then ZhEK electricians will instantly figure out the problematic apartment and make claims. The existing permitted capacity must first be found out in the housing office, and only then start from these figures and divide the in-house consumers into groups.
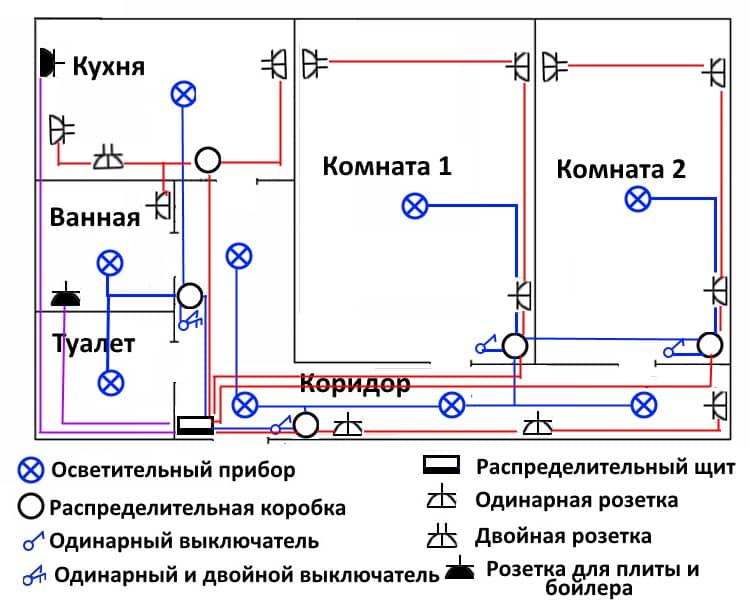
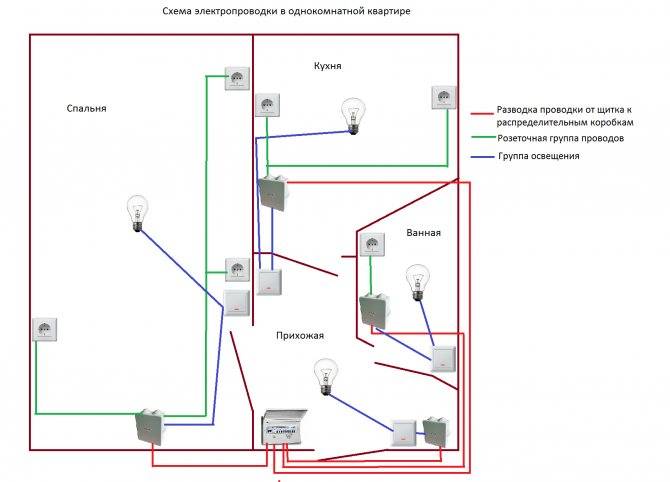
Wiring diagram in the apartment
Coordination
Formally, everything in the apartment is the property of the landlord. Therefore, in principle, internal wiring can be changed as you like. However, if this is done with errors and after an accident occurs with the victims, then all responsibility will fall on such a homemade owner.
Strict requirements for approval in ZhilInspektsiy apply only to redevelopment. The usual replacement of wiring does not apply to this category of work. But with global changes in the intra-apartment network and its complete alteration with the connection of an electric boiler or electric stove with high power, you still have to order a plan and coordinate it with the Housing Office (or with power engineers, depending on the region). But simply shifting the wires with the change of old aluminum to new copper ones is possible without going through the authorities.
Wiring
Self-installation of electrical wiring in the apartment will be cheaper than the alternative of calling professional electricians.However, if there are no skills for such work, and “kilowatts”, “RCD”, “grounding” and “amperes” are some completely incomprehensible terms, then it is better to turn to professionals. Otherwise, you can take on the replacement of the wiring in the apartment yourself.

Layout of sockets for kitchen appliances
Tips for the correct combination of electrical outlets
To create an effective wiring in an apartment, it is necessary to distribute various directions and combine groups of electrical outlets in these directions.
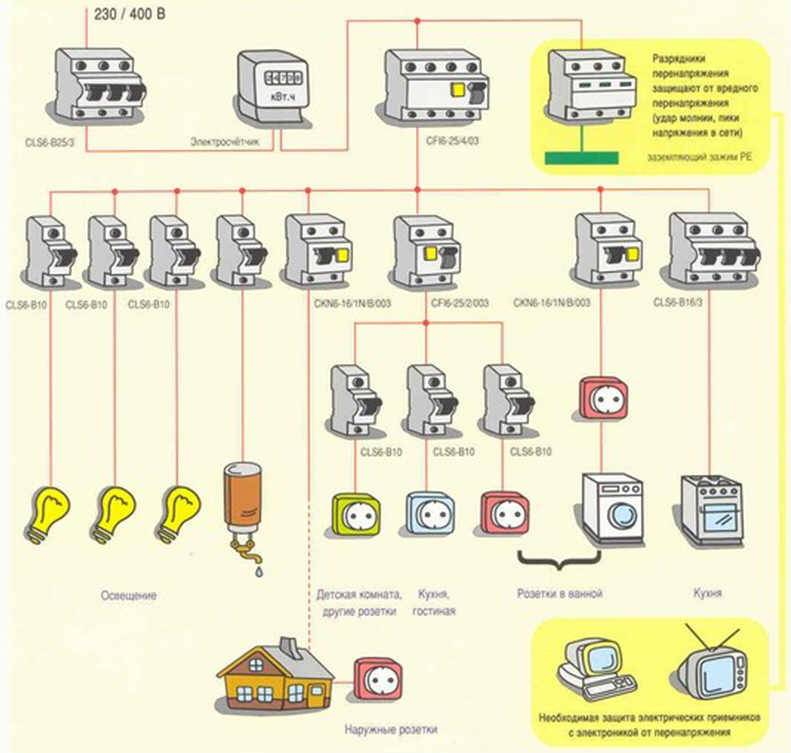
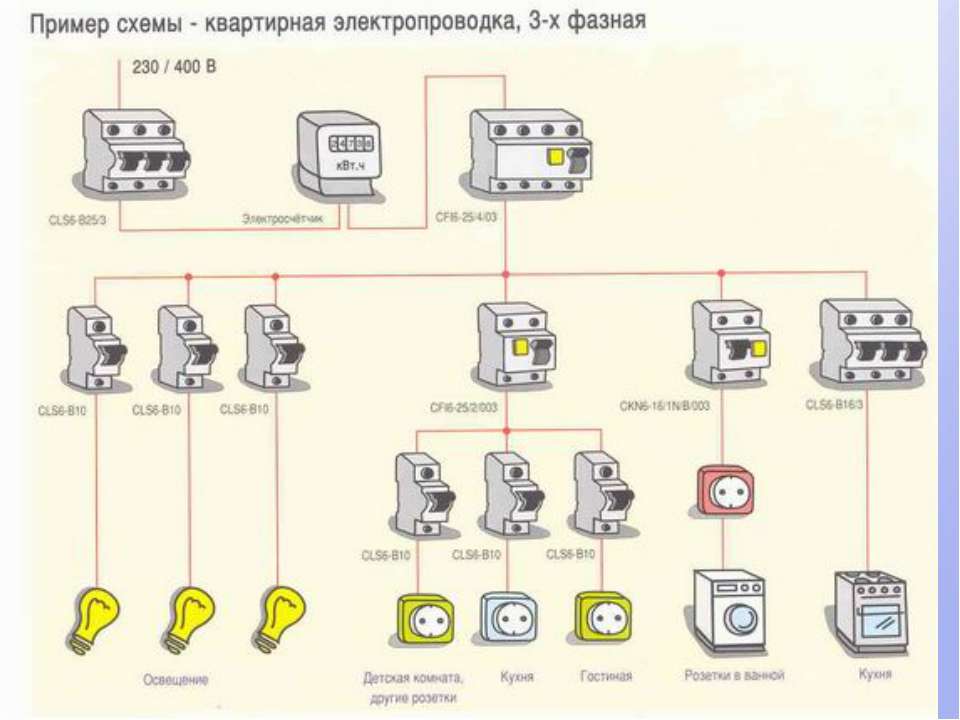
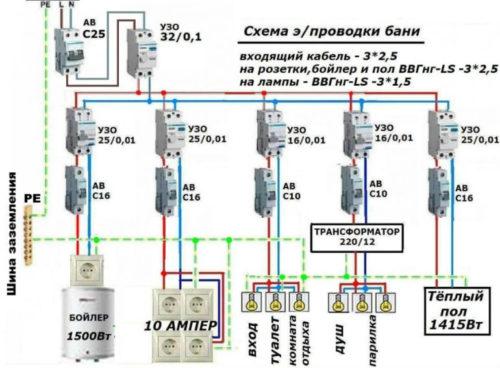
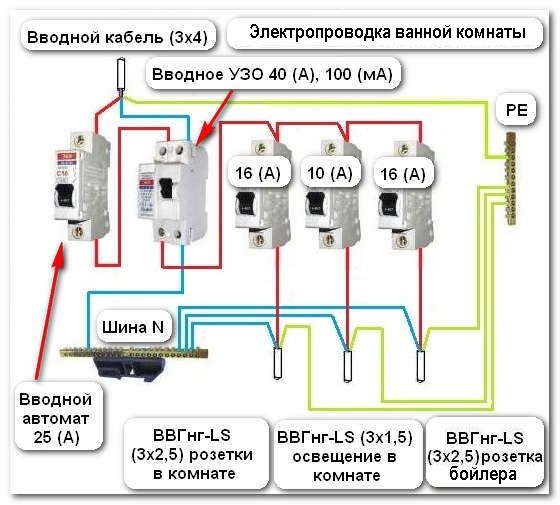
So, for laying electrical wiring from an electrical panel, it is worth highlighting the following lines:
- lighting for living rooms, kitchen and corridor;
- power supply for living rooms;
- separate power supply to the kitchen;
- lighting and power supply for the bathroom and toilet;
- a separate power line for electric stoves and appliances that consume high power.
It will be necessary to install a special residual current device for each group, which will turn off a specific line in a timely manner, which will protect the wiring and the equipment powered by it from damage.
 When combining electrical outlets, you should definitely use junction boxes, since they are, first of all, one of the ways to isolate connections
It is worth noting that the connection of the electrical panel to the power lines in the apartment must be entrusted to the electricians of the management companies, since these works must be carried out exclusively by specialists in accordance with the requirements of legislative documents.
Replacing wiring in an old apartment
Almost the same picture emerges if it is necessary to carry out a major overhaul in an old apartment. In addition to all the finishing work, replace your old wiring with a new one with a connection to modern sockets and switches.

But, if doing the finishing on your own does not seem to be a particularly difficult task, then how to change the old wiring with your own hands without having the appropriate knowledge? It's difficult to imagine.
Works related to electricity have an increased degree of accuracy and if you make a mistake, this can lead not only to a stop of vital activities in the apartment (turning on the lights, the operation of electrical appliances and various equipment), but also create risks for human life. So you need to either be a specialist yourself, or invite qualified master electricians.


You should not rely on your own strength and consider yourself a knowledgeable person in this area, just watching a couple of training videos on the Internet. This is not the case. Everything is much more serious here.


Wiring Replacement Instructions
There are several stages of work.
De-energizing
Before replacing the wiring, you need to dismantle the old wires. To do this, completely turn off the current in the room. After turning off, we check the presence of current with a multimeter. We also remove furniture from the room (or move it away from the walls). Remove sockets and switches.
We prepare a temporary outlet for connecting a hammer drill and any other power tools to it. We connect the socket immediately after the electric meter. We place this hardware on the board. We also equip the board with an automatic 16-amp switch. After the socket is prepared, we de-energize the room.
Dismantling
We remove the electrical wiring from the junction boxes. The boxes are distinguished by the presence of round removable plastic lids.
We disconnect the wires and carefully remove the old wires from the wall. If necessary, we use a metal detector to search for cables.

In prefabricated buildings, dismantling often consists of the simple removal of wires from a junction box. However, there are exceptions when the wire is located in such a way that its pulling entails the destruction of the building structure. In this case, you can isolate this area from the system. To do this, the old wires are cut as much as possible and carefully insulated.
Channels for wires
After removing the electrical wiring, we prepare the walls for laying a new network. To do this, we make special channels in the wall. To get an even strobe, we draw two lines on the wall in advance, a couple of centimeters apart from each other. It’s good if there are old channels, since in this case chasing is not needed. We also mark the areas where sockets and switches will be installed.
We make strobes with a perforator or grinder to a depth of about 4 centimeters. We use a hammer and chisel to remove small fragments of material.
Distribution boxes
The next step is the installation of distribution boxes. They must be immediately fixed in place of installation. The fixing agent is cement mortar. The cable is laid from the shield to the distribution boxes.
Wire laying
To determine the correct laying of wires, we use the level. The length of the cable must be in accordance with the length of the strobe. Wires should not be too much or too little.
We connect the wires to each other with terminals.We make twists in such a way as not to confuse the ends of the wires in the phase. All twists are in junction boxes.
The correct connection is made as follows:
- we clean the end of the wire (3-5 centimeters);
- we twist the cleaned ends with each other and shorten by a centimeter;
- isolate the wires with electrical tape or terminals.
Further, it is possible to divert the cable from the junction boxes to consumers through pre-prepared recesses.
Inserting wires into the electrical panel
When running cables into the electrical panel, they should be divided into separate lines. It is recommended to draw up a distribution scheme in advance. Each line will need its own switch. Such a scheme is especially good if there are powerful household appliances in the house, since separate lines will better cope with the transfer of the desired current. Also, the presence of separate lines makes it easier to repair work with electrical wiring.


Wiring can be placed in corrugated or conventional pipes laid in strobes. This will provide a higher level of security in comparison with wiring placed under a layer of putty. It will also be easier to replace wiring in the future when disassembly is simply a matter of pulling the cables out of the pipe through the junction box.
System testing
We carry out the laying of the solution in the strobes only after we make sure that the power supply is working. To do this, we need a multimeter, with which we will ring the system. This device allows you to find a short circuit in case of an incorrectly established connection.
If no defects are found in the system, we cover the strobes with putty, install sockets, switches and lighting devices.The temporary socket is turned off and a new electrical wiring is connected in its place.
So, there is nothing complicated in replacing wiring in a panel house with your own hands. However, as mentioned earlier, it is recommended to coordinate the circuit with an electrician, and when performing installation work, you should clearly follow the instructions.
Conclusions and useful video on the topic
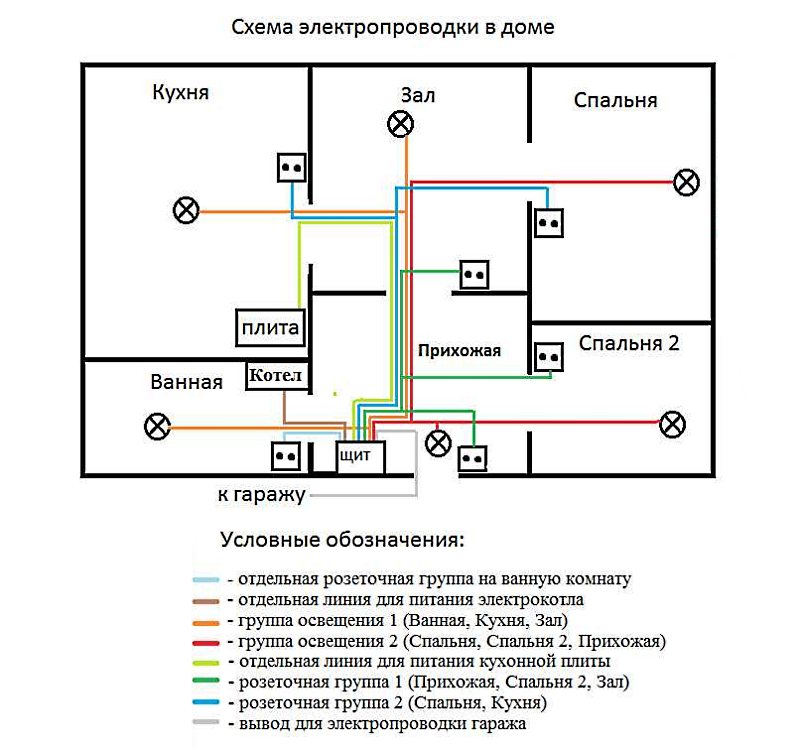
Analysis of the floor diagram:
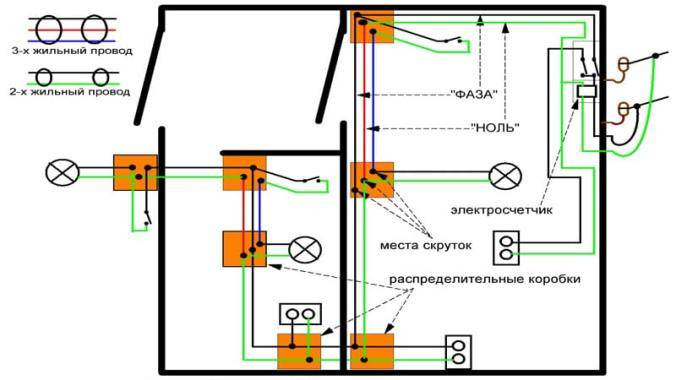
Rules for drawing up wiring diagrams:
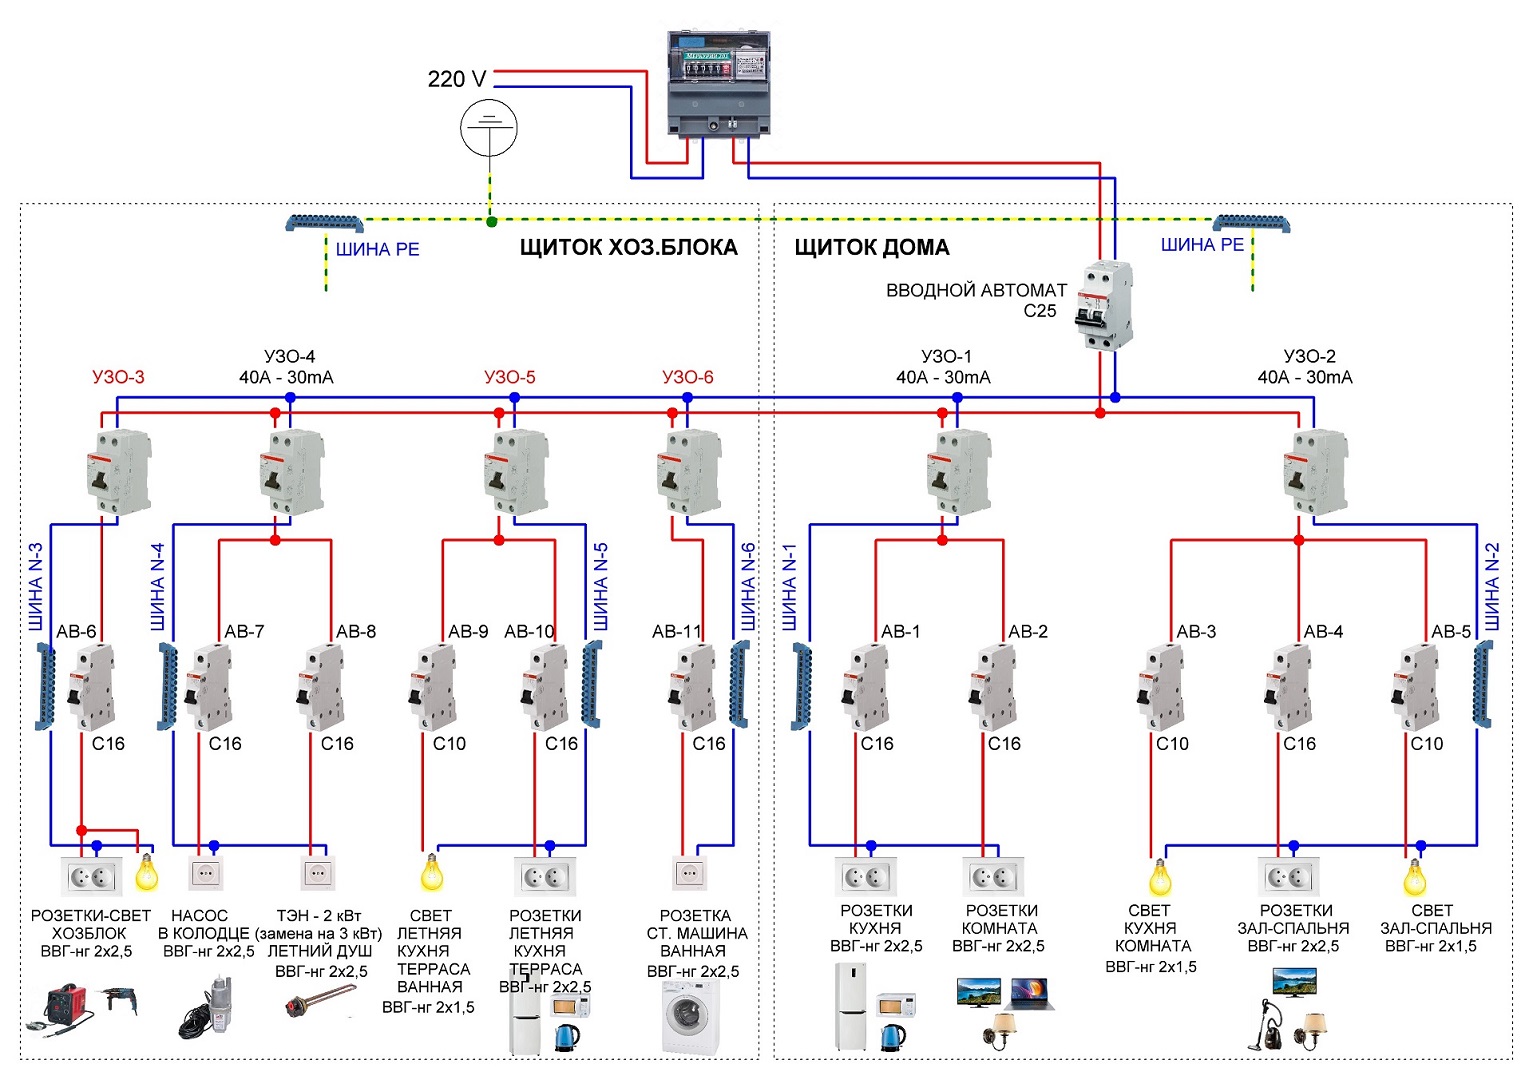
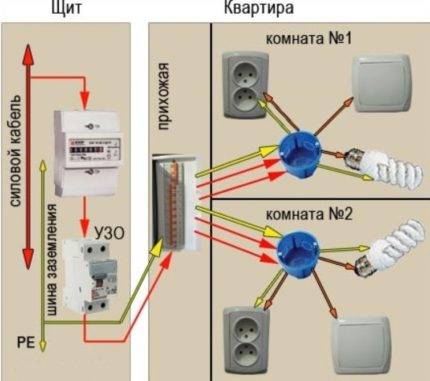
Description of the device diagram on the switchboard:
Responsibility and risks for "amateur activity" in the preparation of the project fall on the shoulders of the owner of the house. If you do not have the appropriate education and experience, we recommend ordering documents from an organization that is engaged in the professional development of power supply projects.
Do you have personal experience in designing and wiring electricians in a private house? Do you want to share your accumulated knowledge or ask questions on a topic? Please leave comments and participate in discussions - the feedback form is located below.


![Choosing the Best Water Towel Warmers [Our Top 8] | engineer will tell you how to do it](https://fix.housecope.com/wp-content/uploads/2/e/c/2ec9bd33db262982410ba1db2395e9fa.jpeg)