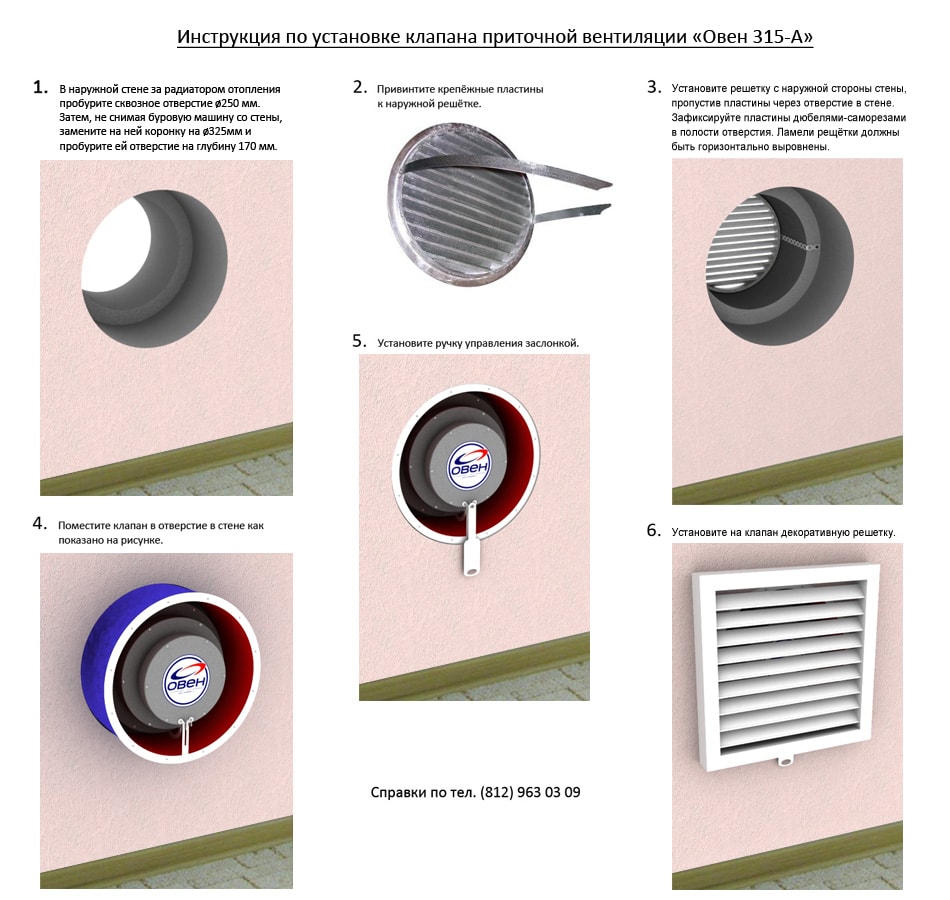
- Installation nuances
- Installation steps
- Care and maintenance
- Why is it needed and how does a supply valve into the wall work?
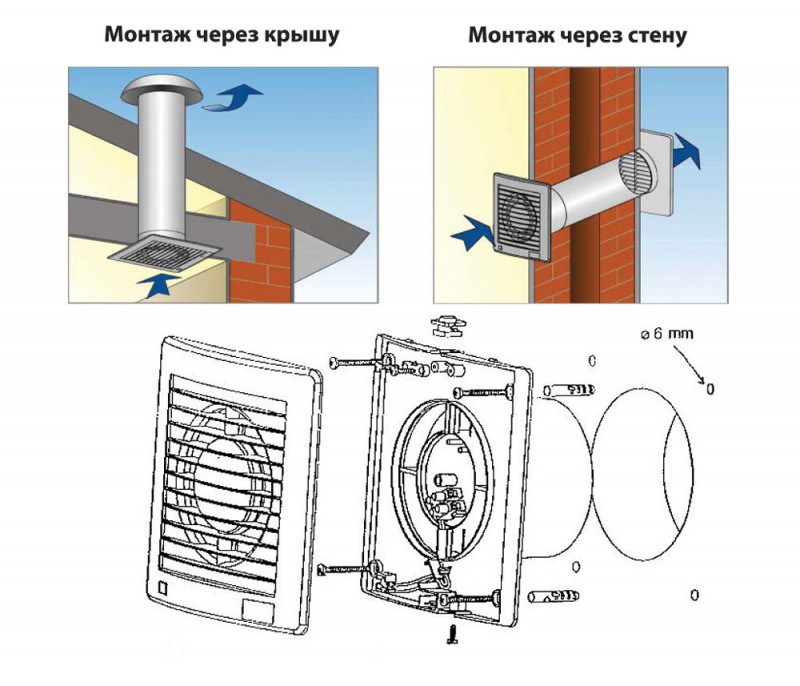
- Supply and wall damper installation technology
- Determination of the optimal installation location
- Necessary tools and materials
- Work sequence
- How to install a supply valve on plastic windows with your own hands
- Installation instructions for Air-Box equipment
- Installation instructions for Aereco equipment
- Installation nuances
- Installation steps
- Care and maintenance
- Scope of the wall inlet damper
- Inner head
- Do-it-yourself installation of a supply valve in the wall
- Ventilators, breathers - supply valves with forced impulse
- Advantages and disadvantages of the ventilator, breather
- What is it needed for?
Installation nuances
In addition to the above-mentioned model SVK V-75 M, other supply ventilation wall dampers can be mounted in any place on the outer wall. However, the following areas are the most successful:
-
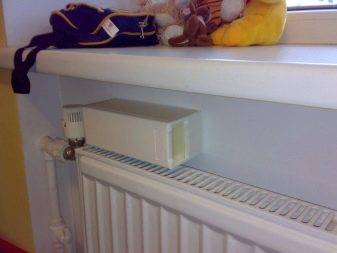
Under the windowsill, next to the battery.
-
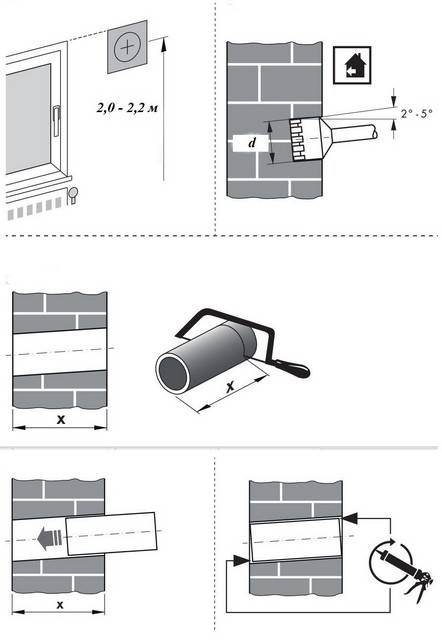
At the level of 2/3 of the height of the window opening (for an ordinary apartment - at a height of about 1.8-2 meters from the floor).
In the first case, the air entering inside is immediately heated from the battery. In the second, it enters the upper part of the room, where it mixes with warm air.Both options are good because this arrangement allows you to hide the wall valve behind the curtains.
The only requirement that should be taken into account in the second case is that there must be at least 30 centimeters from the location of the supply valve in the wall to the window slope. Otherwise, this area may freeze in winter.
Installation steps
To install the inlet valve into the wall (we will consider the installation process for valves with a round air duct, you can read about the installation of the SVK V-75 M separately) you will need:
-
Marking tool.
-
Installation of diamond drilling.
-
Hacksaw (for cutting the duct if necessary).
-
Glue (if the outer grille is glued to the duct) or a screwdriver (if it is bolted).
-
Unnecessary rags or plastic sheeting - to cover the floor in the work area.
-
Protective equipment for eyes and respiratory organs (against flying dust during drilling).
Stages of installing a ventilation valve in a wall
Installation is carried out in the following sequence:
-
The place of installation of the ventilator is selected, taking into account the rules mentioned above.
-
A hole is drilled in the wall. It should have a slight slope (3-4 degrees) towards the street - so that moisture does not accumulate when it enters the duct.
-
Holes are drilled for self-tapping screws (for fixing the inner case).
-
The air duct is “trying on”: the pipe is inserted into the hole, and the desired length is marked.
-
Excess pipe - cut off at the mark.
-
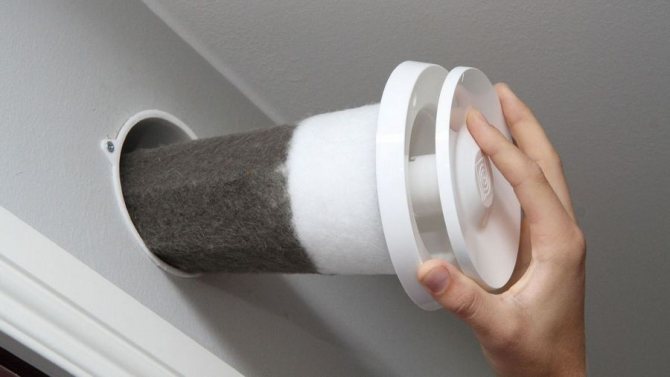
A noise insulator is installed inside the duct (if it is included in the kit; if not, it is recommended to buy a pipe insulation “shell” of the required diameter on your own and use it as sound insulation).
-
The pipe is inserted into the hole.
-
Outside, a ventilation grill is attached to the pipe (with glue or bolts). Its blinds should be directed down towards the street, and located horizontally.
-
The inner case is attached to the wall with self-tapping screws.
-
Assemble the inner case.
Care and maintenance
It is recommended to periodically clean the supply ventilation valve in the wall - dust and small debris can accumulate inside the duct. Dust can also clog both the filter and the noise insulator.


For cleaning, it is necessary to dismantle the inner housing and remove the filter and noise insulator. It is recommended to do this in the warm season so that the cold wind does not blow into the room (or the hole will have to be sealed).
Wall valve maintenance
If the filter and insulator are made of synthetics (and this is the case for most models), they can be washed in soapy water. After that, without fail, they must dry.
You also need to pay attention to the cleanliness of the air duct inside: you can look inside while the filter and insulation dry. If there is a large layer of dust or small debris inside, you can remove it with a vacuum cleaner
Alternatively, you can remove the outer grate and blow the pipe with a vacuum cleaner.
If the temperature in the room begins to decrease significantly in winter (usually this happens when the temperature outside the window is below -10º and / or when there is strong wind), it is recommended to reduce the air flow through the valve (if there is a possibility of adjustment).
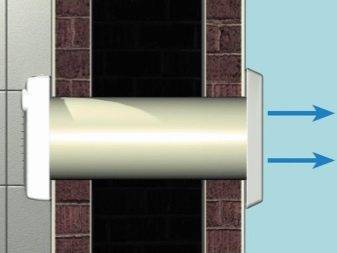
Why is it needed and how does a supply valve into the wall work?
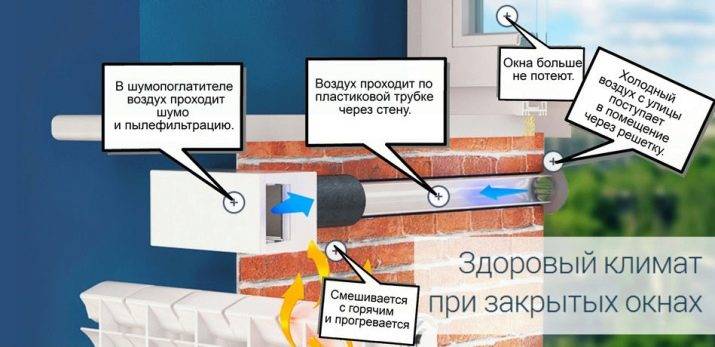
The main purpose of the supply unit is to provide fresh air access to the room.Under the condition of normal operation, the air supply unit passes an average of up to thirty cubic meters of air per hour into the room, which corresponds to the physiological needs of one person.
The device does not take up much space and is hardly noticeable
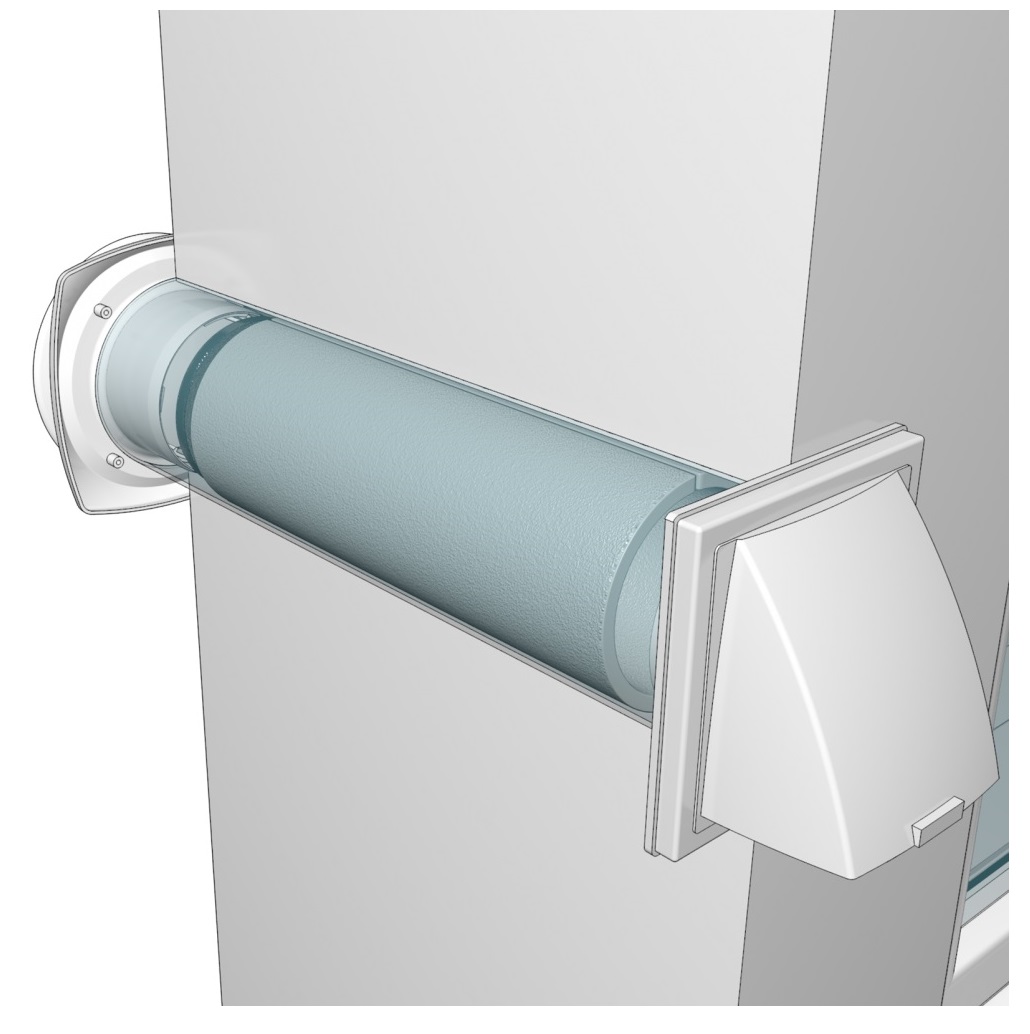
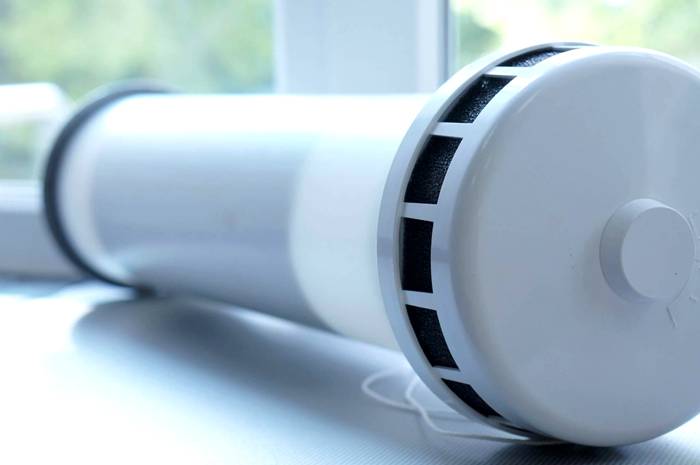
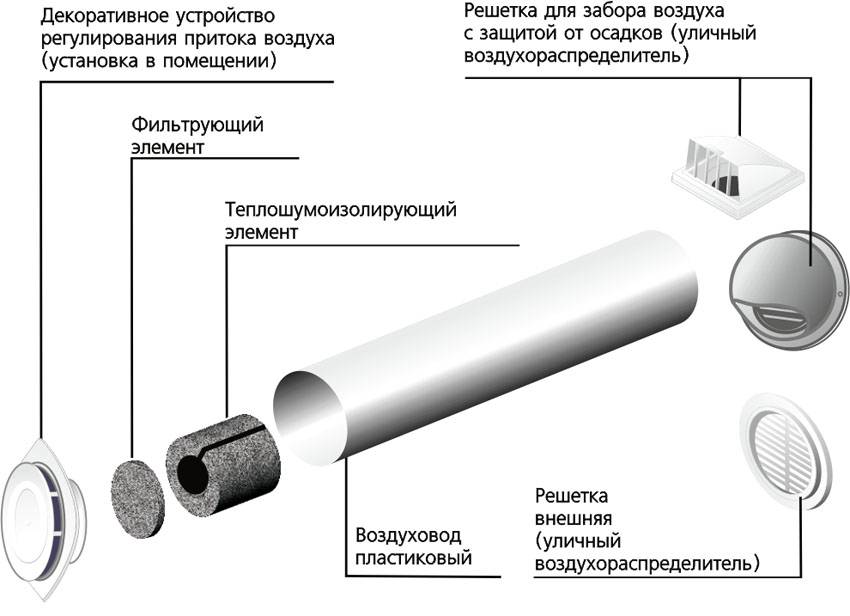
The device consists of several elements:
- Air tube. Usually this part of the device is made of plastic.
- Grille (metal or plastic) to protect the outside of the duct.
- Inner insert with cap and air filter.
Some devices are equipped with an additional noise insulator and insulation. These additional elements do not allow the supply ventilation valve in the wall to freeze in severe frosts and block street noise.
Another additional feature that is not present in all models is humidity control.
The hygroregulation system automatically opens the valve if the humidity in the room exceeds the normative readings.
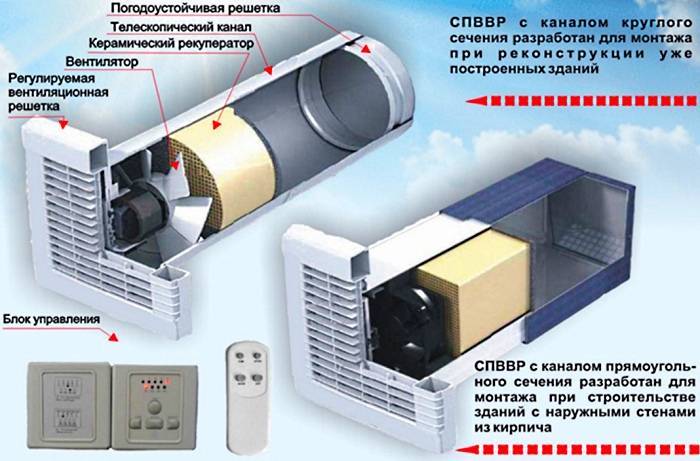
The supply and exhaust valve can also be additionally equipped with:
- fan;
- temperature sensors;
- air recovery system;
- remote control.
The principle of operation of the device
Supply and wall damper installation technology
The installation process of the device is quite simple, but specialized equipment is required for operation.
It is important to choose the right place for installation and follow the algorithm of actions
Determination of the optimal installation location
When choosing a room for installing a wall "supply", you should be guided by the following rules:
- Installation is preferably carried out in a load-bearing wall.
- In an apartment building, it is better to install the valve with the exit of the outer part to the balcony or loggia.
- It is undesirable to equip forced ventilation on the wall of the building facing the highway and the industrial zone.
It is not recommended to use the wall valve in rooms with a high degree of humidity - in winter there is a high risk of freezing of the device. As an option, you can use "supplies" with a heating function.
Having decided on the wall, it is necessary to choose the optimal place for inserting the valve.
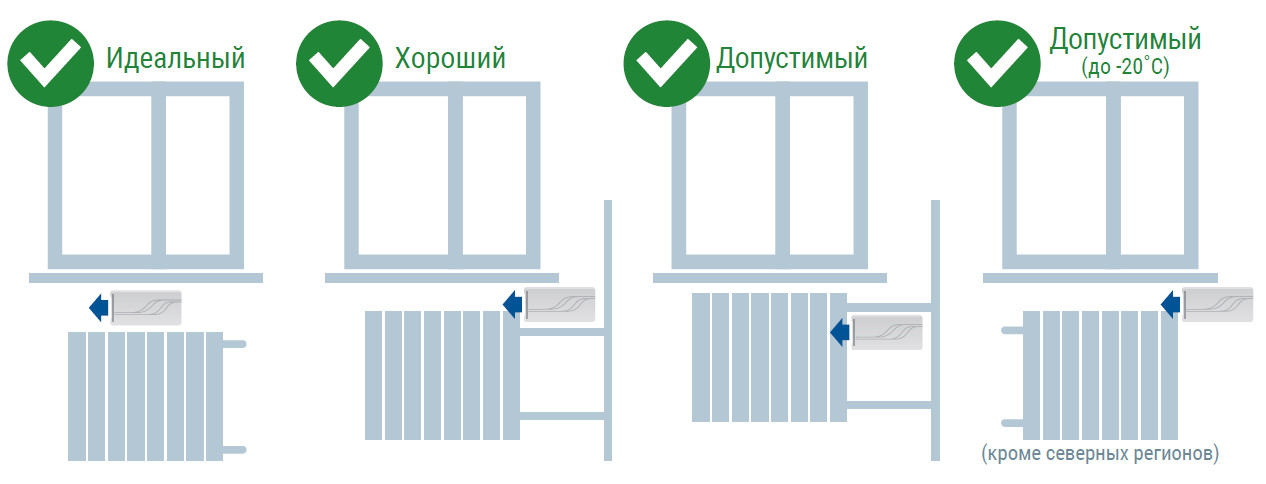
The most successful areas are:
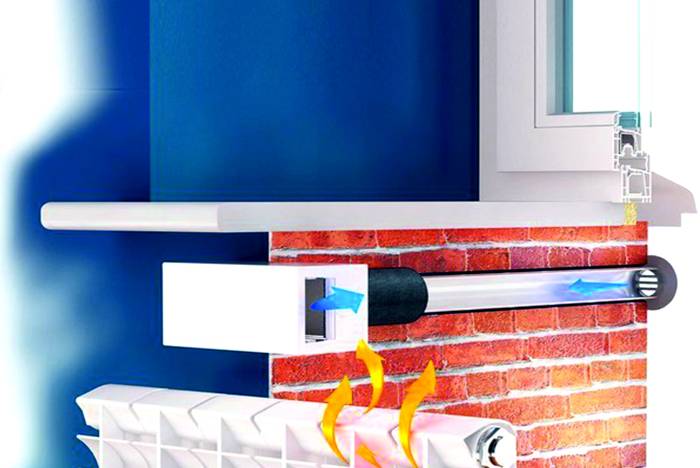
- between the window sill and the batteries - the supply air is heated from the heating device and distributed throughout the house;
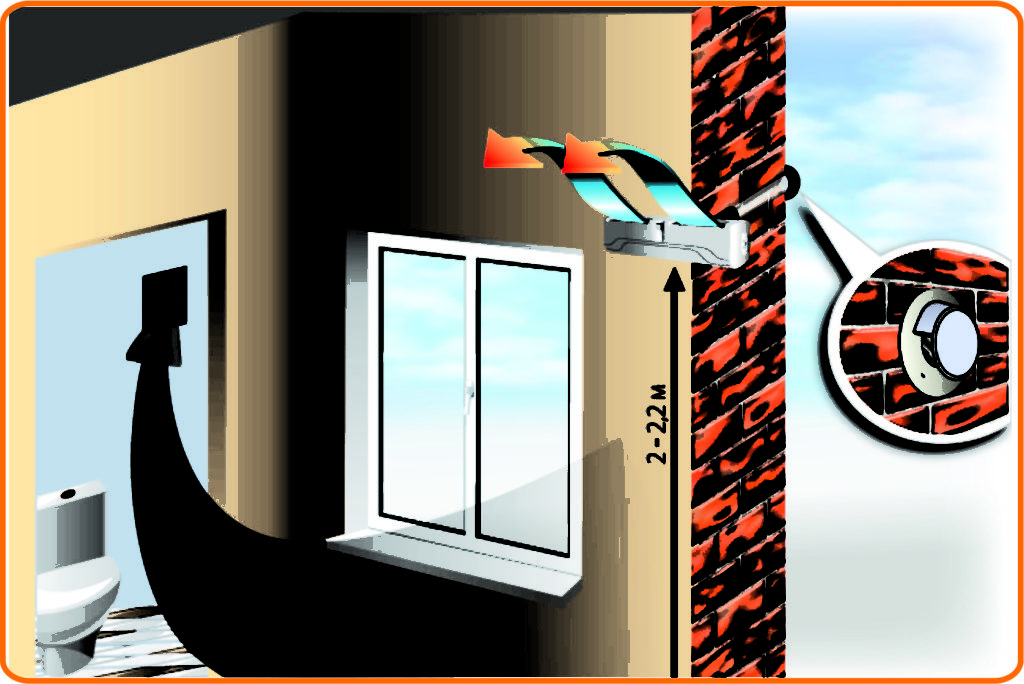
- at the top of the window opening (2-2.2 m) - air masses enter a warm environment, warm up to a comfortable temperature and fall down.
In both cases, the wall valve can be hidden behind a curtain.
When installing the ventilator at the top of the window, it is necessary to maintain a distance between the slope and the device of at least 30 cm - this will reduce the likelihood of freezing of the ventilation duct
Necessary tools and materials
To tie the supply valve into the wall you will need:
- a stationary drill or a powerful perforator with a diamond crown, the diameter of which should be slightly larger than the size of the duct;
- industrial or household vacuum cleaner - especially important if the installation is carried out in a "clean" area where the repair has already been completed;
- mounting foam;
- plaster mixture;
- construction knife;
- curly screwdriver;
- marking tools: measuring tape, building level, pencil.
Mounting the ventilator is a dusty and noisy job. Therefore, it is necessary to use personal protective equipment: gloves, goggles, construction earmuffs and a respirator with a dust filter.


To install a ventilation valve with a breather, a device with cleaning and heating of the air mass, a diamond drilling installation is required, because a conventional drill will not be able to drill a hole of sufficient diameter:
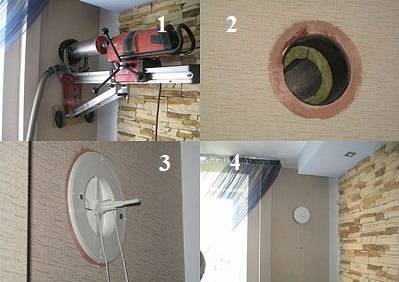
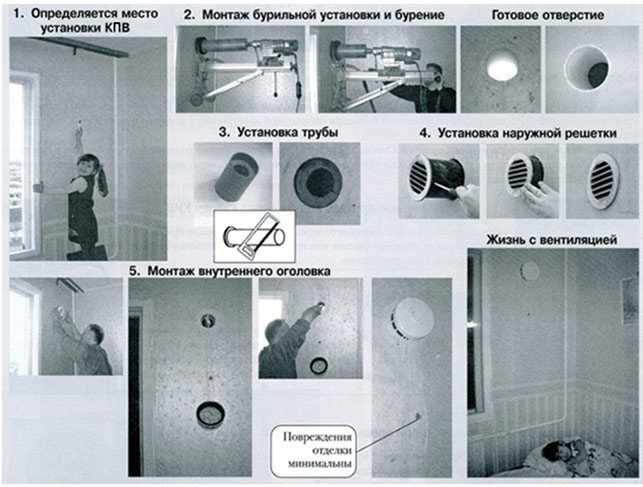
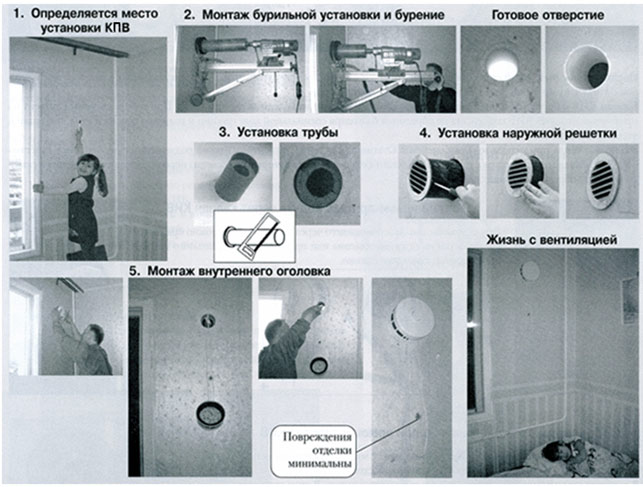
Work sequence
The entire technological process can be divided into several main stages.
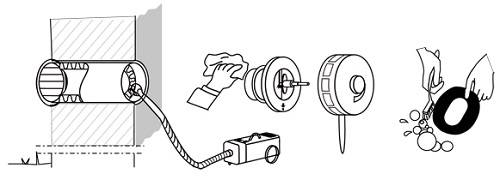
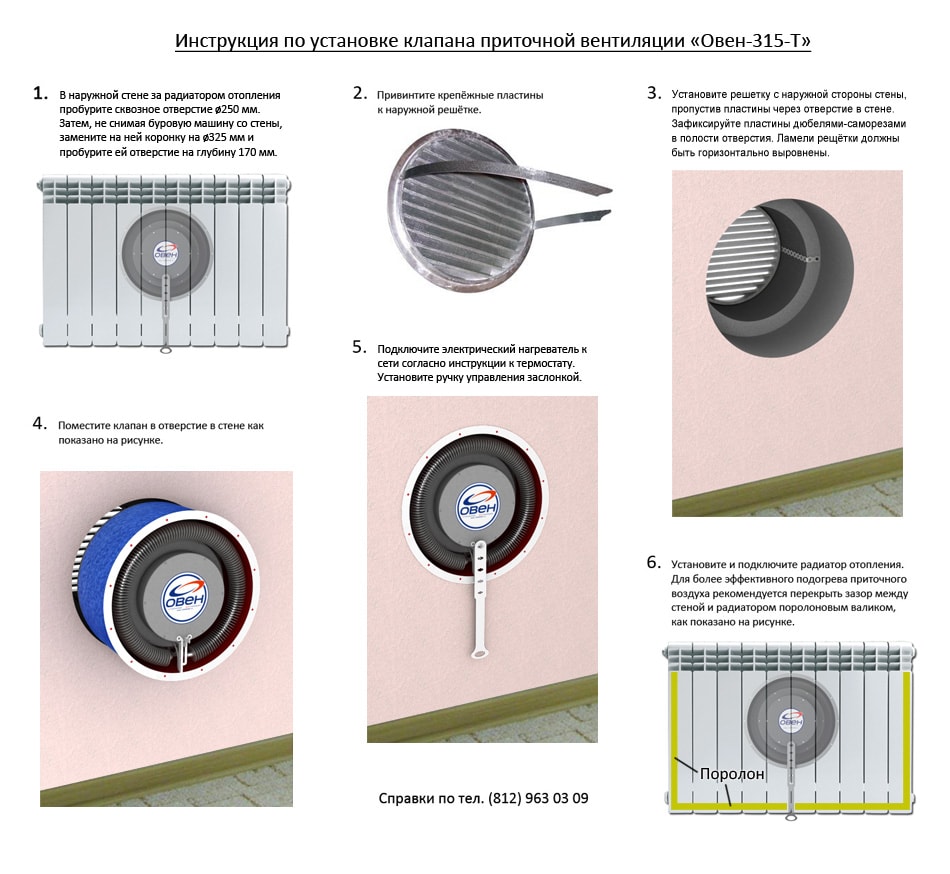
Stage 1. Wall preparation. If the building is lined with hinged panels, then they must be temporarily dismantled. On the inner side of the wall, mark for drilling - attach the base of the valve and mark the contour with a pencil. It is advisable to organize the removal of dust.
Secure the plastic bag and plastic container with masking tape. Connect the hose of a vacuum cleaner to the “trap” from above - the dust generated during drilling will enter the garbage collector
Stage 2. Drilling a hole. Using a diamond core bit or a drill, perform initial drilling to a depth of 7-10 cm. Remove broken fragments of concrete, knock out a notch in the center with a chisel for a more stable positioning of the drill. The entire channel must be made at a slight slope outward to prevent moisture from entering the room.
During drilling, the work area must be periodically moistened - this measure will reduce dust formation and protect the tool from overheating
Stage 3. Canal cleaning. Insert the vacuum cleaner hose into the cut groove and remove all dust from the hole.
Stage 4. Installation of thermal insulation. To accommodate an additional layer of heat and sound insulation, it may be necessary to expand the hole. The exact dimensions of the channel depend on the type of insulation.
The optimal heat insulator for a wall valve is a foamed polymer material. It does not lose its qualities in conditions of high humidity
Stage 5. Installing the sleeve.Place the air duct tube into the channel with a heat-insulating casing, moving it outwards with screwing movements.
Stage 6. Mounting the body and cover. Fasten the protective grille on the outer side of the wall. From the inside, apply markings for installing the case, drill holes, hammer in plastic dowels and fix the panel on the wall.
We also have a material that describes in more detail the process of installing an inlet wall valve.
After the housing is fixed, a damper is mounted that regulates the air flow and an anti-dust filter. The final stage - installing the cover
How to install a supply valve on plastic windows with your own hands
There are several types of household products on the market. AT rating of popular models includes products of French and Russian production:
- Airbox.
- Aeroco.
We will tell you more about the installation of their systems.
Installation instructions for Air-Box equipment
The device is installed on the top of the sash. We perform the work in the following sequence:
- Mark the center of the frame with a pencil.
- We open the sash, apply an internal mounting plate to it and put marks along the edges.
- According to the marks, cut out a section of the sealing gum.
- Instead of standard rubber, we insert the seal that comes with the kit.
- We install the device itself into the resulting gap in the seal, having previously removed the protective film from it.
- We fasten the brackets with self-tapping screws.
- We close the window and mark the dimensions of the device on the frame.
- According to the markup, we cut out a fragment of the frame seal.
- We insert a new thin elastic band.
Optionally, the product can be supplied with an external air intake. A filter element is installed in it, which traps atmospheric dust.step by step installation guide let's put it in the video.
Installation instructions for Aereco equipment
Devices are intended for automatic regulation of a microclimate. They are integrated into the frame, thanks to which they provide greater air exchange. During installation, the integrity of the profiles is violated, so you need to be careful. If you doubt your abilities, it is better to use the services of competent professionals. We carry out work in the following sequence:
- We mark the middle of the window sash.
- We fasten a metal template or a plastic mounting plate.
- With a drill with a diameter of 4-5 mm, we make centering holes along the edges.
- According to the template, we mark the contour of future slots and remove it.
- We drill holes with a 10 mm drill.
- With a jigsaw, renovator or router, we cut the grooves between the holes.
- With the window closed, we transfer the dimensions of the holes to the frame.
- We install the template on the frame profile and repeat all the operations for milling grooves. For convenience, we temporarily pull out the sealing gum.
- We fasten the mounting plate from the inside.
- We install on it an element with a valve that regulates air exchange.
- From the outside, we fasten the protective visor.
You can clearly see the installation process in the video.
If you need to ventilate a small room or get rid of glass fogging, simple Air-Box designs will do. For autonomous climate control, products like Aereco are the best solution. And the above tips and tricks will help you install the valve for ventilation with your own hands.
Material prepared:
Igor Stepankov
Reading
6 min.
Plastic windows have gained wide popularity all over the world, as they have a lot of advantages compared to outdated wooden frames. They do an excellent job of saving heat, so after installing them, a significant improvement in the temperature in the room is found.
The complete tightness of the windows limits the flow of fresh air into the room, therefore, the structures have two ventilation modes: macro- and micro-ventilation. But, standard designs of ventilation modes have disadvantages: with micro-ventilation, there is an insufficient supply of air volume, and with macro-ventilation, drafts are formed. To solve the problem, there is a special device - a supply ventilation valve for plastic windows, which this material will tell about.
Installation nuances
In addition to the above-mentioned model SVK V-75 M, other supply ventilation wall dampers can be mounted in any place on the outer wall. However, the following areas are the most successful:
- Under the windowsill, next to the battery.
- At the level of 2/3 of the height of the window opening (for an ordinary apartment - at a height of about 1.8-2 meters from the floor).
In the first case, the air entering inside is immediately heated from the battery. In the second, it enters the upper part of the room, where it mixes with warm air. Both options are good because this arrangement allows you to hide the wall valve behind the curtains.


The only requirement that should be taken into account in the second case is that there must be at least 30 centimeters from the location of the supply valve in the wall to the window slope.Otherwise, this area may freeze in winter.
Installation steps
To install the inlet valve into the wall (we will consider the installation process for valves with a round air duct, you can read about the installation of the SVK V-75 M separately) you will need:
- Marking tool.
- Installation of diamond drilling.
- Hacksaw (for cutting the duct if necessary).
- Glue (if the outer grille is glued to the duct) or a screwdriver (if it is bolted).
- Unnecessary rags or plastic sheeting - to cover the floor in the work area.
- Protective equipment for eyes and respiratory organs (against flying dust during drilling).
Stages of installing a ventilation valve in a wall
Installation is carried out in the following sequence:
- The place of installation of the ventilator is selected, taking into account the rules mentioned above.
- A hole is drilled in the wall. It should have a slight slope (3-4 degrees) towards the street - so that moisture does not accumulate when it enters the duct.
- Holes are drilled for self-tapping screws (for fixing the inner case).
- The air duct is “trying on”: the pipe is inserted into the hole, and the desired length is marked.
- Excess pipe - cut off at the mark.
- A noise insulator is installed inside the duct (if it is included in the kit; if not, it is recommended to buy a pipe insulation “shell” of the required diameter on your own and use it as sound insulation).
- The pipe is inserted into the hole.
- Outside, a ventilation grill is attached to the pipe (with glue or bolts). Its blinds should be directed down towards the street, and located horizontally.
- The inner case is attached to the wall with self-tapping screws.
- Assemble the inner case.
Care and maintenance
It is recommended to periodically clean the supply ventilation valve in the wall - dust and small debris can accumulate inside the duct. Dust can also clog both the filter and the noise insulator.
For cleaning, it is necessary to dismantle the inner housing and remove the filter and noise insulator. It is recommended to do this in the warm season so that the cold wind does not blow into the room (or the hole will have to be sealed).
Wall valve maintenance
If the filter and insulator are made of synthetics (and this is the case for most models), they can be washed in soapy water. After that, without fail, they must dry.
You also need to pay attention to the cleanliness of the air duct inside: you can look inside while the filter and insulation dry. If there is a large layer of dust or small debris inside, you can remove it with a vacuum cleaner
Alternatively, you can remove the outer grate and blow the pipe with a vacuum cleaner.
If the temperature in the room begins to decrease significantly in winter (usually this happens when the temperature outside the window is below -10º and / or when there is strong wind), it is recommended to reduce the air flow through the valve (if there is a possibility of adjustment).
Scope of the wall inlet damper
The scope of supply valves is quite wide. They are used both in private cottages and apartments of multi-storey buildings, and in industrial and public buildings, preschool institutions and hospitals.
In kindergartens, where it is very important to ensure good ventilation without creating drafts, the use of an inlet valve is especially important.
Silent bathroom fan with non-return valve - device, choice, installation features.Types of exhaust fans, device, bathroom fan selection, installation features.
Another equally important application of supply valves is their use to create the necessary microclimate in livestock and poultry farms. Installing air inlets in the poultry wall plays a huge role in the climate control of such facilities. Valve models are selected according to the requirements of the premises and placed remotely from each other.
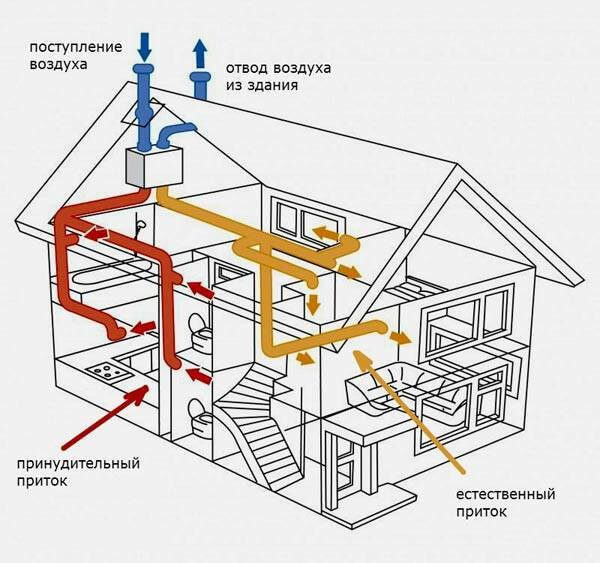
Natural supply and exhaust ventilation with installed ventilation valves in the walls of the house
Considering that hermetic plastic windows are increasingly being installed in houses. the functions of natural ventilation, especially in "Khrushchev", are noticeably reduced. Ventilation with open windows leads to a significant decrease in temperature and the penetration of noise and dust from the street into the apartment.
The lack of proper ventilation can be compensated by installing forced ventilation. In this sense, installing a supply ventilation damper into a wall is an effective and affordable procedure. The design of such a device allows you to regulate the flow of air and heat it through a centralized heating system. In order to ensure the necessary air exchange, it is recommended to install a valve in each room.
Unlike the supply valve, the exhaust valve in the wall provides for the presence of ventilation channels in the room. Typically, such ventilation shafts pass through the walls of technical rooms (kitchen, bathroom, bathroom). If you install an exhaust valve in these rooms, it will be enough to circulate the air of the entire apartment or house. It is only necessary to connect the valve device to the ventilation duct and fix the grate.
Exhaust vent with fan ensures a healthy microclimate in the bathroom
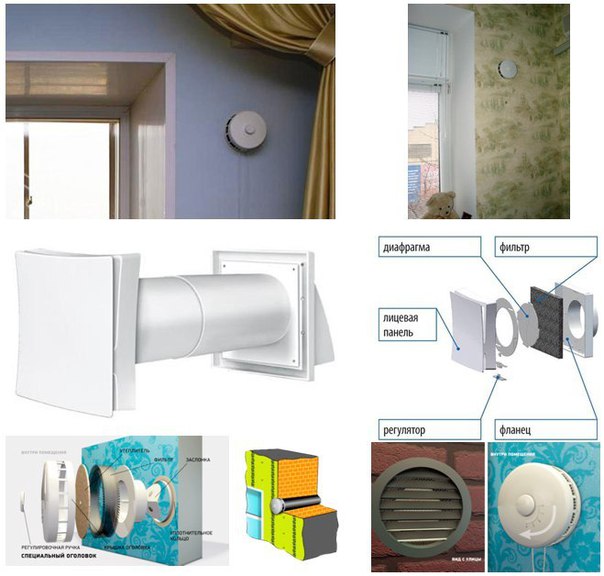
Inner head
The inner head of the KIV valve is designed for distribution and regulation of air flow. It is made of impact-resistant ABS plastic resistant to temperature extremes and ultraviolet radiation.


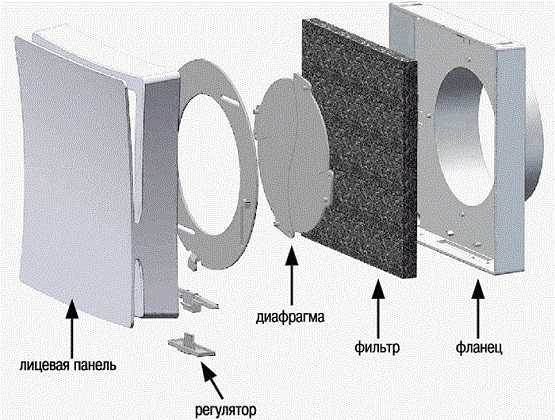


The inner head consists of:
- inner part with damper and sealing ring;
- adjustment node;
- filter;
- head covers;
- control knob.
The inner part of the head is tightly inserted into the plastic channel and is screwed to the wall through the sealing gasket.
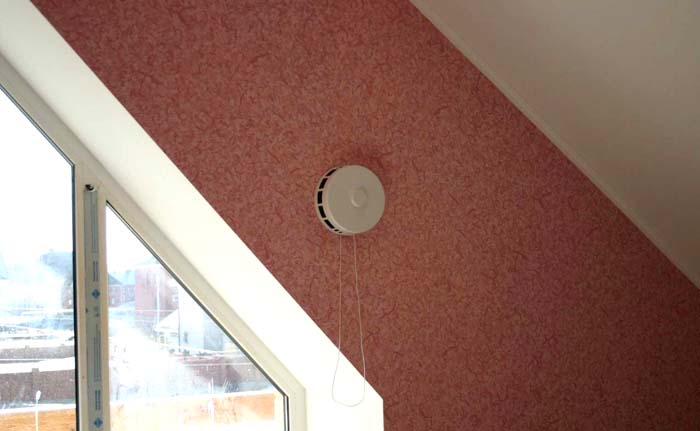
The adjustment unit allows you to open and close the gate with a handle or cord.
The EU3 (G3) class filter is a porous, washable synthetic material that effectively removes dust from the incoming air.
The head cover is removable and has a scale showing the degree of damper opening.
By means of the adjusting handle it is possible to open and close the KIV damper easily.
Do-it-yourself installation of a supply valve in the wall
To install the inlet valve in the wall with your own hands, you will need the following tools:
- powerful perforator, drill rod with a crown - for drilling a through hole in a load-bearing wall. The diameter of the crown is selected according to the hole;
- yardstick;
- construction level;
- curly screwdriver, construction knife.
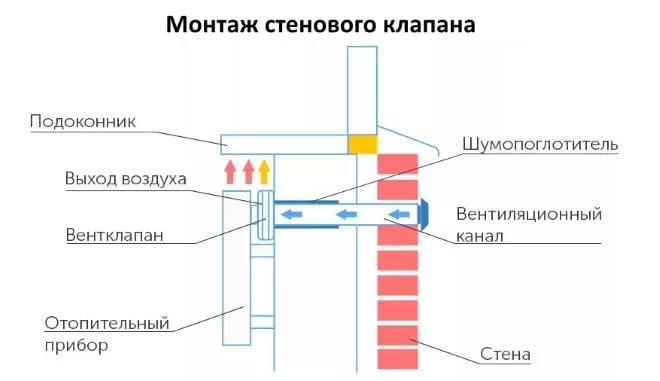
Drilling a hole for installing a ventilation valve in the wall
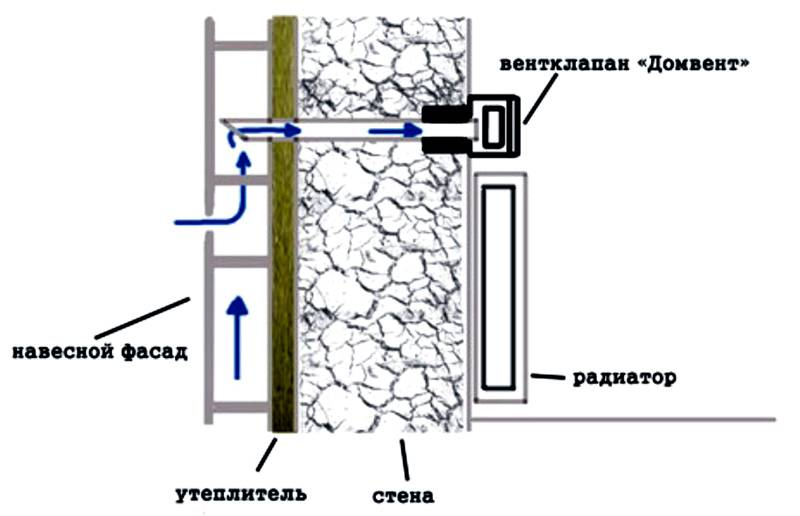
Before you start drilling a hole, you need to make a markup. The hole is drilled with a slight slope to the outside. When the hole is ready, the valve pipe is inserted into it.A prerequisite is the wrapping of the pipe with insulation. The pipe is installed from the outside flush with the wall, and from the side of the room - with a small protrusion (about 1 cm). All remaining gaps between the pipe and the wall are filled with foam.
Useful advice! If the external wall where the ventilation damper is to be installed faces the roadway or industrial area, installation on it is not recommended.
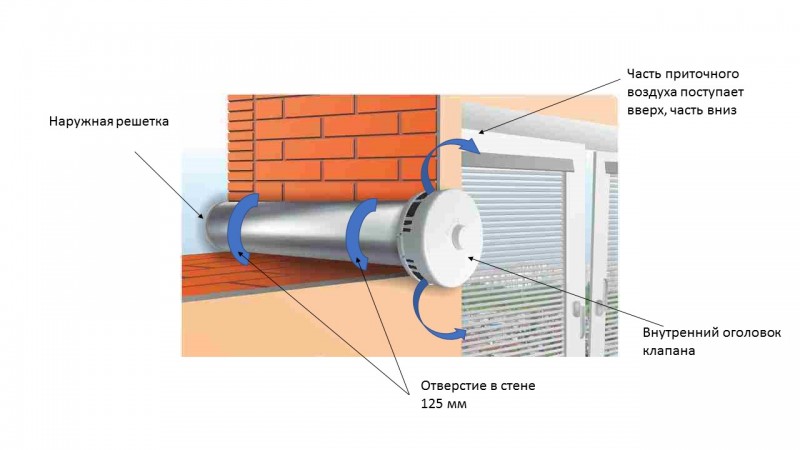
The principle of installing a ventilation valve in a house with a ventilated facade
After installing the pipe from the outside, it is closed with a protective grill with shutters so as to prevent precipitation from entering it. Further, the rings of the filters included in the valve kit are inserted, the body is superimposed, and with the help of dowels and self-tapping screws, the cover of the device is fixed on the wall.
When the valve is properly installed, the air flow is adjusted by opening or turning the damper. During operation, it is necessary to change or clean the filters at least twice a year.
For effective air exchange, it is necessary to monitor the cleanliness of the ventilation grill and periodically check the draft in the ventilation duct
If desired, it is possible to install a home-made supply valve in the wall, which is similarly mounted and can be equipped with an additional fan for more efficient air exchange. Examples of assembling homemade structures valves can be found on the Internet.
So, with the help of an inexpensive and efficient device, high-quality air exchange is provided, excluding street noise and dust.
Ventilators, breathers - supply valves with forced impulse
The natural ventilation inlet valves described above should have a small aerodynamic resistance. Their throughput very much depends on climatic factors - outdoor temperature and wind pressure.
These features limit the throughput of the valves and do not allow equipping the valves with effective devices for supply air preparation.
The same through channel in the wall, with a grill on the outside and heat and sound insulation inside. But indoors, an electrical appliance is mounted on the inside of the wall. The design and dimensions of ventilators from different manufacturers differ, but the principle of operation is the same. The air is taken from the street by a fan. Productivity depends on fan speed — 10-160 m3/h.
The ventilators for air purification are equipped with class G or F filters (coarse and fine filters). Some models are equipped with an electric air heating device.


Breathers are ventilators with extended functions. In the breather, unlike the ventilators, there is a highly efficient HEPA class H11 filter. In front of it is a fine filter of class F7, and after it a carbon adsorption-catalytic filter to purify the air from harmful gases.
Breezers, as a rule, have a microprocessor control system with climate control, LCD screen and remote control from the remote control.
Air filters in ventilators, breathers differ in cleaning class. The classes differ in the percentage of air purification and the type of pollutants for which the filter is designed. Dust, wool, plant pollen, bacteria, viruses - the sizes of these particles range from tens and hundreds of microns to fractions of a micron.
Coarse filters remove the largest particles from the air, fine filters - smaller particles, high-efficiency HEPA filters - the smallest particles of 0.01-0.1 microns, and carbon filters - molecules of harmful gases.
A ventilator with a fan increases the level of background noise in the apartment. But the uniform buzz of the device, as a rule, is perceived more easily than the "ragged" noise from the street.
Advantages and disadvantages of the ventilator, breather
Compared to the supply valve, ventilators, breathers provide:
- the influx of a sufficiently large amount of air into the house under any climatic conditions;
- the possibility of automatic and manual adjustment of performance in a wide range;
- deep purification of air from mechanical particles and some harmful gases;
- heating the air supplied to the house.
Among the disadvantages of installing a ventilator or breather in the house, it should be noted:
- rather high cost of installation and operation of devices;
- the need for regular maintenance - filter replacement;
- electricity consumption - especially large in the air heating mode;
- constant noise from the fan - the higher the speed of its rotation, the greater the noise level.
It is beneficial to use ventilators or breathers for ventilation if there is a need for good cleaning of the air supplied to the house. For example, in houses located near roads with heavy traffic. Or, if household members are allergic to particles contained in the street air.
What is it needed for?
The role of ventilation valves can hardly be overestimated.Energy-saving trends in modern construction often lead to absolute sealing of premises, which results in a violation of air exchange between the street and the space of buildings. This often entails stagnation of air masses, excessive moisture formation and, as a result, the appearance of mold and fungus.
In addition, it is difficult to stay in clogged rooms: as a result of a decrease in the level of oxygen, while an increase in the amount of carbon dioxide, working capacity decreases and the general condition of a person worsens. A practical solution to this problem is to install a ventilation valve. This allows you to ensure a constant supply of fresh air and dispense with the purchase of expensive air handling units or air conditioning.
In addition, the air passing through the valve is cleaned from sand, insects, dust and small mechanical debris.
An important feature of the models is a powerful soundproofing function. Valves prevent the penetration of street noise into the room and provide maximum comfort
This is precisely the main advantage of using supply type valves over airing the room with the help of vents and transoms. In addition, opening the window in winter can cause a noticeable decrease in the air temperature inside the room. Using a supply valve, this problem is easily solved. It is enough just to place the device above the heating radiator, and the incoming air will be mixed with warm streams rising from the bottom up.