- Do-it-yourself ring drainage
- Adjoining water disposal
- Types
- Device
- Calculation of a special drainage structure
- The principle of operation of the drainage system
- Foundation contour drainage
- Elements of wall and ring drainage of the foundation:
- Drainage trenches
- Pipes for drainage
- Crushed stone for drainage
- Geotextile
- Plinth waterproofing
- Manholes
- storage well
- Foundation drainage device:
- Construction of a drainage system
- Required Tools
- Work algorithm
- Rules for the location of manholes
- Optional equipment
- Varieties for slab base
- Plastovoy
- Wall system
- Kinds
- Open drainage system
- ditches
- French drainage
- Closed drainage system
- Trench or ring system
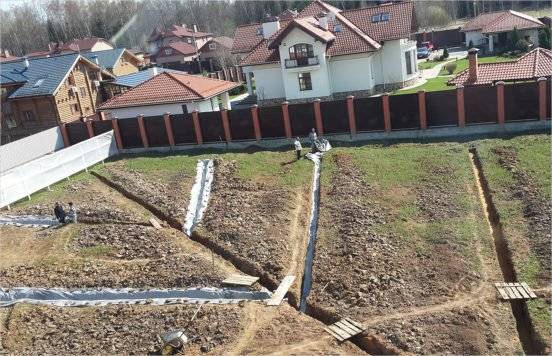
Do-it-yourself ring drainage
Such a system can be equipped after the completion of the construction of the building. The recommendations for spacing between structures and drainage remain the same.
A couple of additional important remarks should be made first.
Firstly, regarding the depth of the drainage pipes. The dependence is simple: the pipes are laid half a meter below the foundation of the building.
Scheme of laying pipes of the annular drainage
Secondly, regarding the storage well.In the case of a collector system, it is more expedient to use its variety with a blank bottom. The installation procedure differs from the instructions for the filtration well only in the absence of bottom gravel backfill.
Revision wells are installed according to the same principle as storage wells. Only the overall characteristics of the products change (selected depending on the conditions of a particular situation) and the place where the drainage pipes enter.
revision well
Well installation scheme
Thirdly, regarding the size of the trench. To determine the optimal indicator, add 200-300 mm to the outer diameter of the pipe. The remaining free space will be filled with gravel. The cross section of the trench can be rectangular and trapezoidal - as you prefer. From the bottom of the pits, stones, bricks and other elements that can violate the integrity of the pipes being laid must be removed.
The order of work is presented in the table.
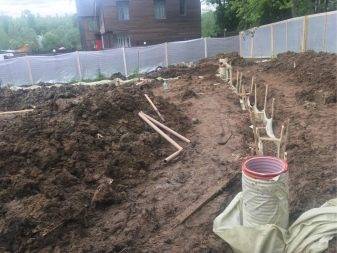
For your own convenience, you can make a markup first. To do this, step back from the walls of the house 3 m (ideally. In the absence of sufficient space, many developers reduce this figure to 1 m, be guided by the situation), drive a metal or wooden peg into the ground, stepping further from it to the width of the trench, drive in the second peg, then set similar landmarks opposite, at the opposite corner of the building. Stretch the rope between the pegs.
Table. Do-it-yourself ring drainage
| Stage of work | Description |
|---|---|
| Excavation | Dig trenches around the perimeter of the foundation. Do not forget about the slope of the bottom - keep it within 1-3 cm per meter. As a result, the highest point of the drainage system should be located below the lowest point of the supporting structure. |
| The device of the filter layers | Fill the bottom of the trench with a 10 cm layer of river sand. Tamp carefully with observance of the given slope. Lay a layer of geotextile on top of the sand (if the soil is clean sandy) of such a width that in the future it will be possible to cover the pipes, taking into account the thickness of the crushed stone backfill. On top of the geotextile, pour a 10-centimeter layer of gravel, not forgetting to withstand the specified slope. Lay pipes on rubble. The image shows ordinary orange sewer pipes - here the developer made the holes himself. It is more convenient to use the flexible initially perforated pipes recommended by us, but in the absence of such, you can go the way of the developer from the photo. Maintain a 5-6 cm step between the holes. Recommendations for connecting pipes were given earlier. |
| Continuation of the isolation device | Pour a 15-20 cm layer of gravel over the pipe. Overlap the geotextile. As a result, the pipes will be surrounded on all sides by gravel, separated from the soil and sand by geotextiles. |
In conclusion, it remains to install revision and storage wells, connect pipes to them and backfill the soil.
Well connection
Adjoining water disposal
Types
The device of the drainage system around the house has several types.
- Reservoir drainage is used as an auxiliary structure. Such drainage is most often used as an additional to the main system. It is best to choose it for areas where groundwater occurs at a shallow depth. It is ideal for surface water drainage. Often reservoir drainage is used in clayey areas. It must be located at a small distance from the foundation of the building.
- Ring drainage prevents flooding of basements and basements. It is best to use such drainage in areas where the sand content is increased. This is due to the fact that the annular drainage almost does not retain moisture, easily passing it through.
- Wall drainage is used most often. It allows you to protect not only the building, but also the basement levels from moisture. It is recommended to use it in areas with a lot of clay.
Device
To better understand what type of drainage is suitable for a particular area, it is necessary to consider in detail the device of each of them.
Plast. At the heart of reservoir drainage is an air gap. Such a drainage option can be made in various ways. The most common of these is drainage in the form of a layer of gravel. For its arrangement, it is necessary to place a layer of gravel about 50 centimeters high under the exploited coating. This layer will become the air gap. A filter cloth, such as a geotextile, must be placed over this gap. Then pour a layer of sand and finish, for example, with tiles.


- Annular. The scheme of this drainage is a vicious circle. Circle breaks are acceptable if water flows exclusively from one side of the building. The ring system is installed lower than the level of the base and at a distance of two to three meters from the walls. This helps to prevent flooding of the basements, and also prevents the soil on the site from collapsing.
- Wall mounted. This system is mounted at a distance of about 50 centimeters from the walls of the building. Moreover, it must be installed lower than the level at which the basement is located.Due to this, wall drainage optimally protects the foundation from moisture ingress. Most often, this type of drainage is used in areas where the composition of the soil is heterogeneous.
Calculation of a special drainage structure
When stocked up with all the necessary materials, proceed to the calculations special drainage design
our site. We will need to calculate the depth of laying pipes and wells and the ideal slopes of pipelines.
In most cases foundation drainage
is arranged at 0.3-0.5 m, below the support structure. Pipes should be installed at such a slope that the water from them quickly reaches the collector - in most cases it is 20 mm., For any running meter.
You should find the highest and lowest points of the site. In the upper (basically, the highest corner of the building) we will place a place of concentration of water, and in the other we will put a well for reception. Likewise, we will create a natural slope that frees us from the need to purchase additional pumps.
What do we need from the tools?
2 shovels - a scoop and a bayonet, a pickaxe, a perforator and a wheelbarrow for the removal of earth and the importation of gravel.
The principle of operation of the drainage system
The action of the drainage is fully consistent with its main purpose - the removal of excess moisture to a safe distance. It would be a mistake to assume that one pipe laid around the perimeter of the house can cope with this problem.
In fact, this is a whole engineering and construction complex that fights against an excess of moisture, protecting foundations and basements, but without overdrying the surrounding area.
The wall type of drainage is appropriate in conditions of clay soil and loam, when melt, rain and groundwater cannot independently leave the area located around the building. A complex design of pipes, wells and outlets removes excess water quite effectively, despite the budgetary cost.
One of the simplest designs of wall drainage: installation of drains along the perimeter of the building, revision wells in the corners (sometimes two are enough), drainage outside the garden plot (+)
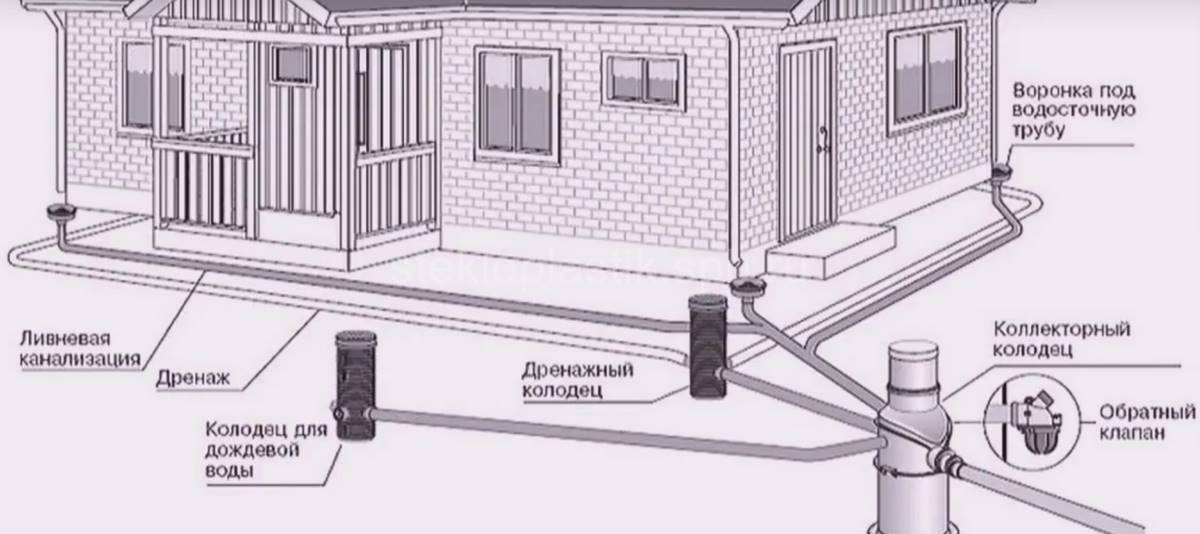
One of the popular schemes involves the connection of two systems - drainage and storm water - in the area of \u200b\u200bthe storage well, which is usually located at the lowest point of the territory adjacent to the house.
In practice, the option is often used when the drainage pipeline is cut into the manholes of the storm sewer. However, this is possible only under one condition - if the total volume of effluents does not exceed the norms calculated for the installed equipment.
If the drain zone is located above the water level in the reservoir, pumping equipment has to be installed. A popular option is a submersible drainage pump, matched by power.
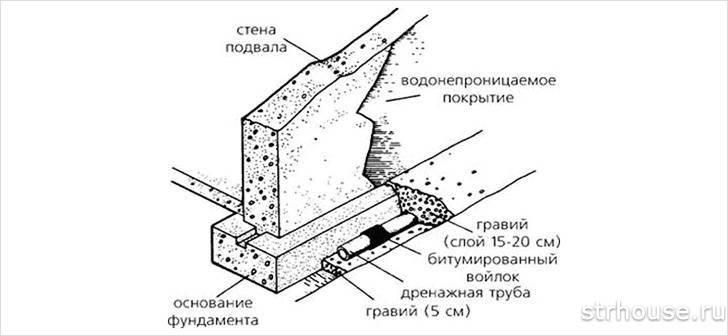
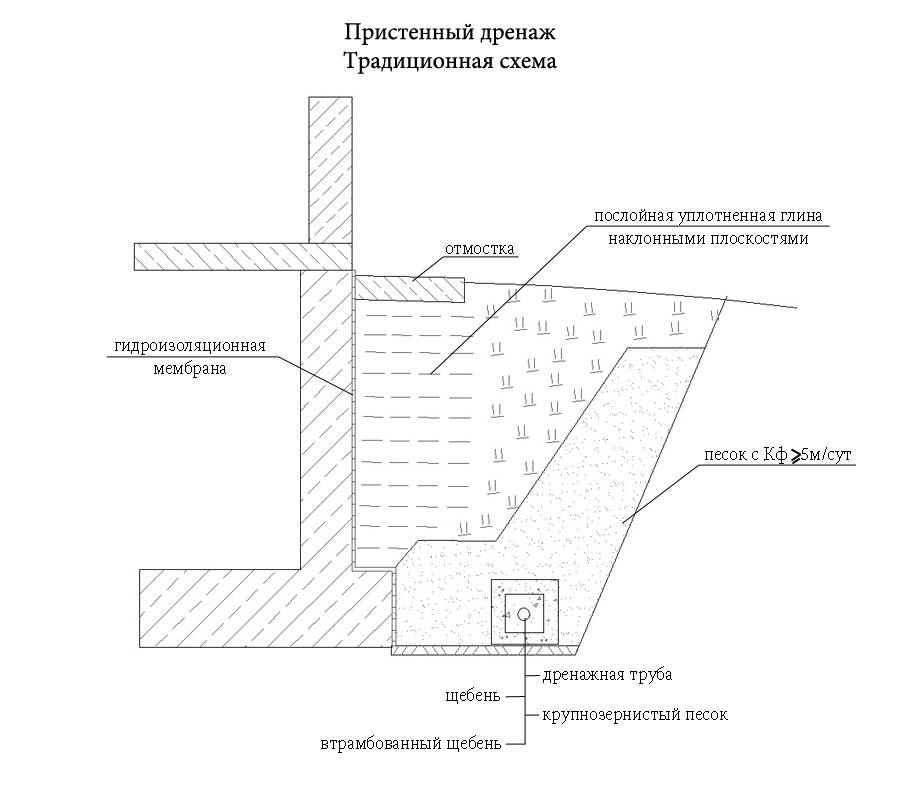
There are two options for arranging drainage around the foundation: traditional and more reliable. Traditional - this is the installation of pipes with gravel backfill, a filter and a clay lock. Its performance has been proven for decades.
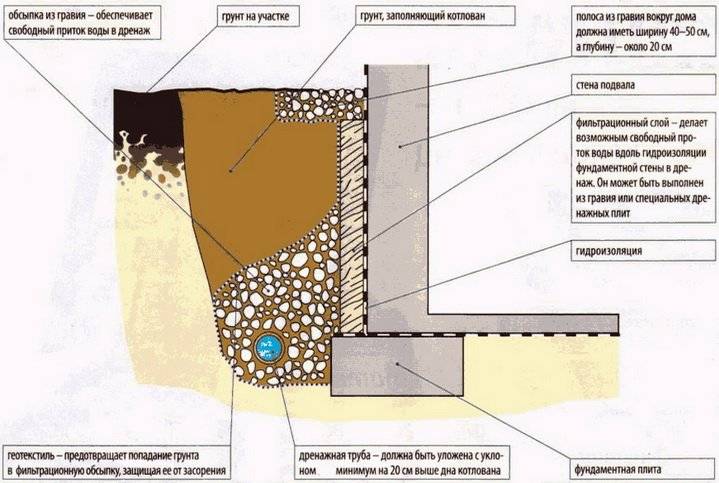


The clay lock, which is one of the important elements of the system, is compacted in layers to increase water resistance. It cuts off groundwater from the foundation, thus creating an impenetrable water barrier (+)
More reliable modern drainage is distinguished by the design of the foundation.A geomembrane is fixed along its entire width, the characteristics of which are not inferior to a clay castle.
Installation of a geomembrane is more economical in terms of device: no need to dig a deep ditch, look for the right grade of clay, transport a heavy load to a construction site, remove excess soil (+)
The installation process is much simpler, if only because you do not need to do calculations and calculate the angle of inclination of the clay "plug". Now almost all wall drainage schemes include the use of a geomembrane, because it is reliable, practical, fast and efficient.
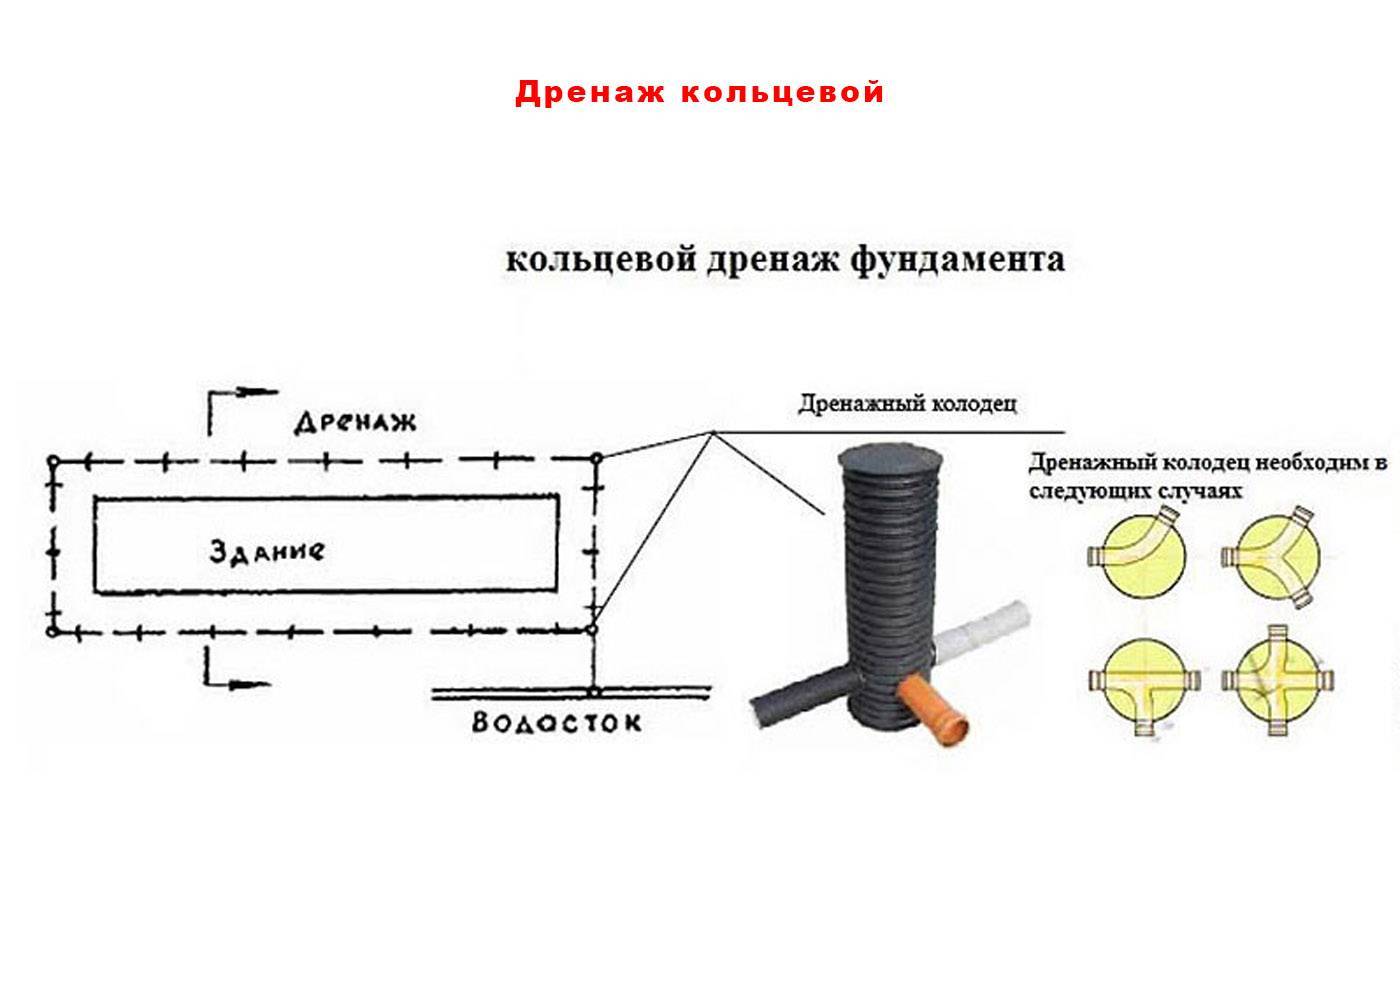
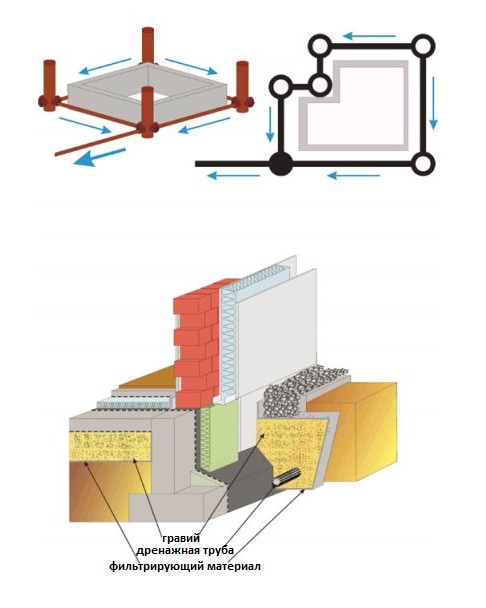
Foundation contour drainage
To divert water from an already built foundation, wall and ring drainage are used. Their working principle is the same. The difference is that the wall system is made close to the foundation, and the ring system is made at a distance, usually 1.5-2 meters.
Wall drainage is arranged in non-filtering soil (clay, loam). Collects surface meltwater that seeps mainly along the wall, and not through the impervious soil.
The ring system is suitable for sandy filter soils. Lowers the groundwater level.
Types of foundation drainage according to the depth of pipe laying:
- Perfect . Drainage pipes are laid on a water-resistant layer of soil. Use if this layer is shallow.
- Imperfect . Pipes are laid above the water-resistant layer, if it lies deep.
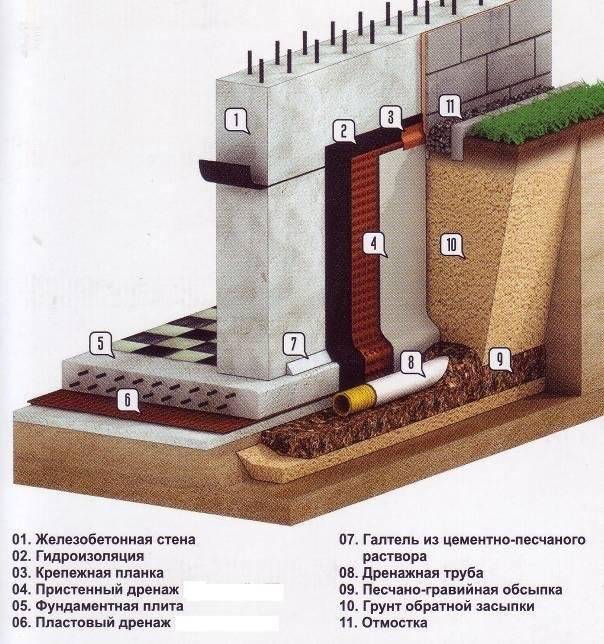
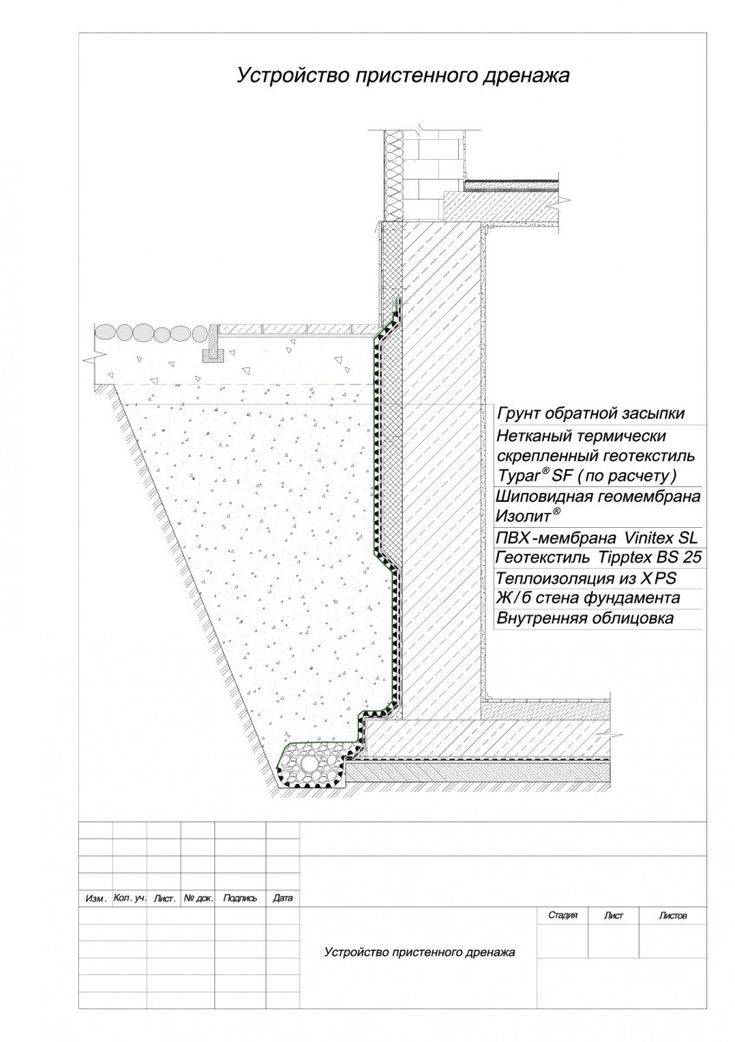
Elements of wall and ring drainage of the foundation:
- Drainage trenches.
- Outlet pipes.
- Filter cake, crushed stone or gravel.
- Filter fabric (geotextile).
- Basement waterproofing.
- Viewing wells.
We will tell you how these elements are arranged and what they are for.
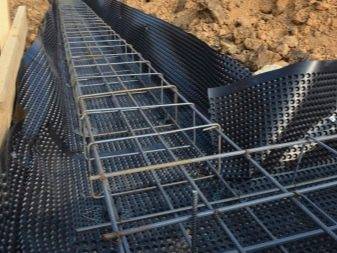
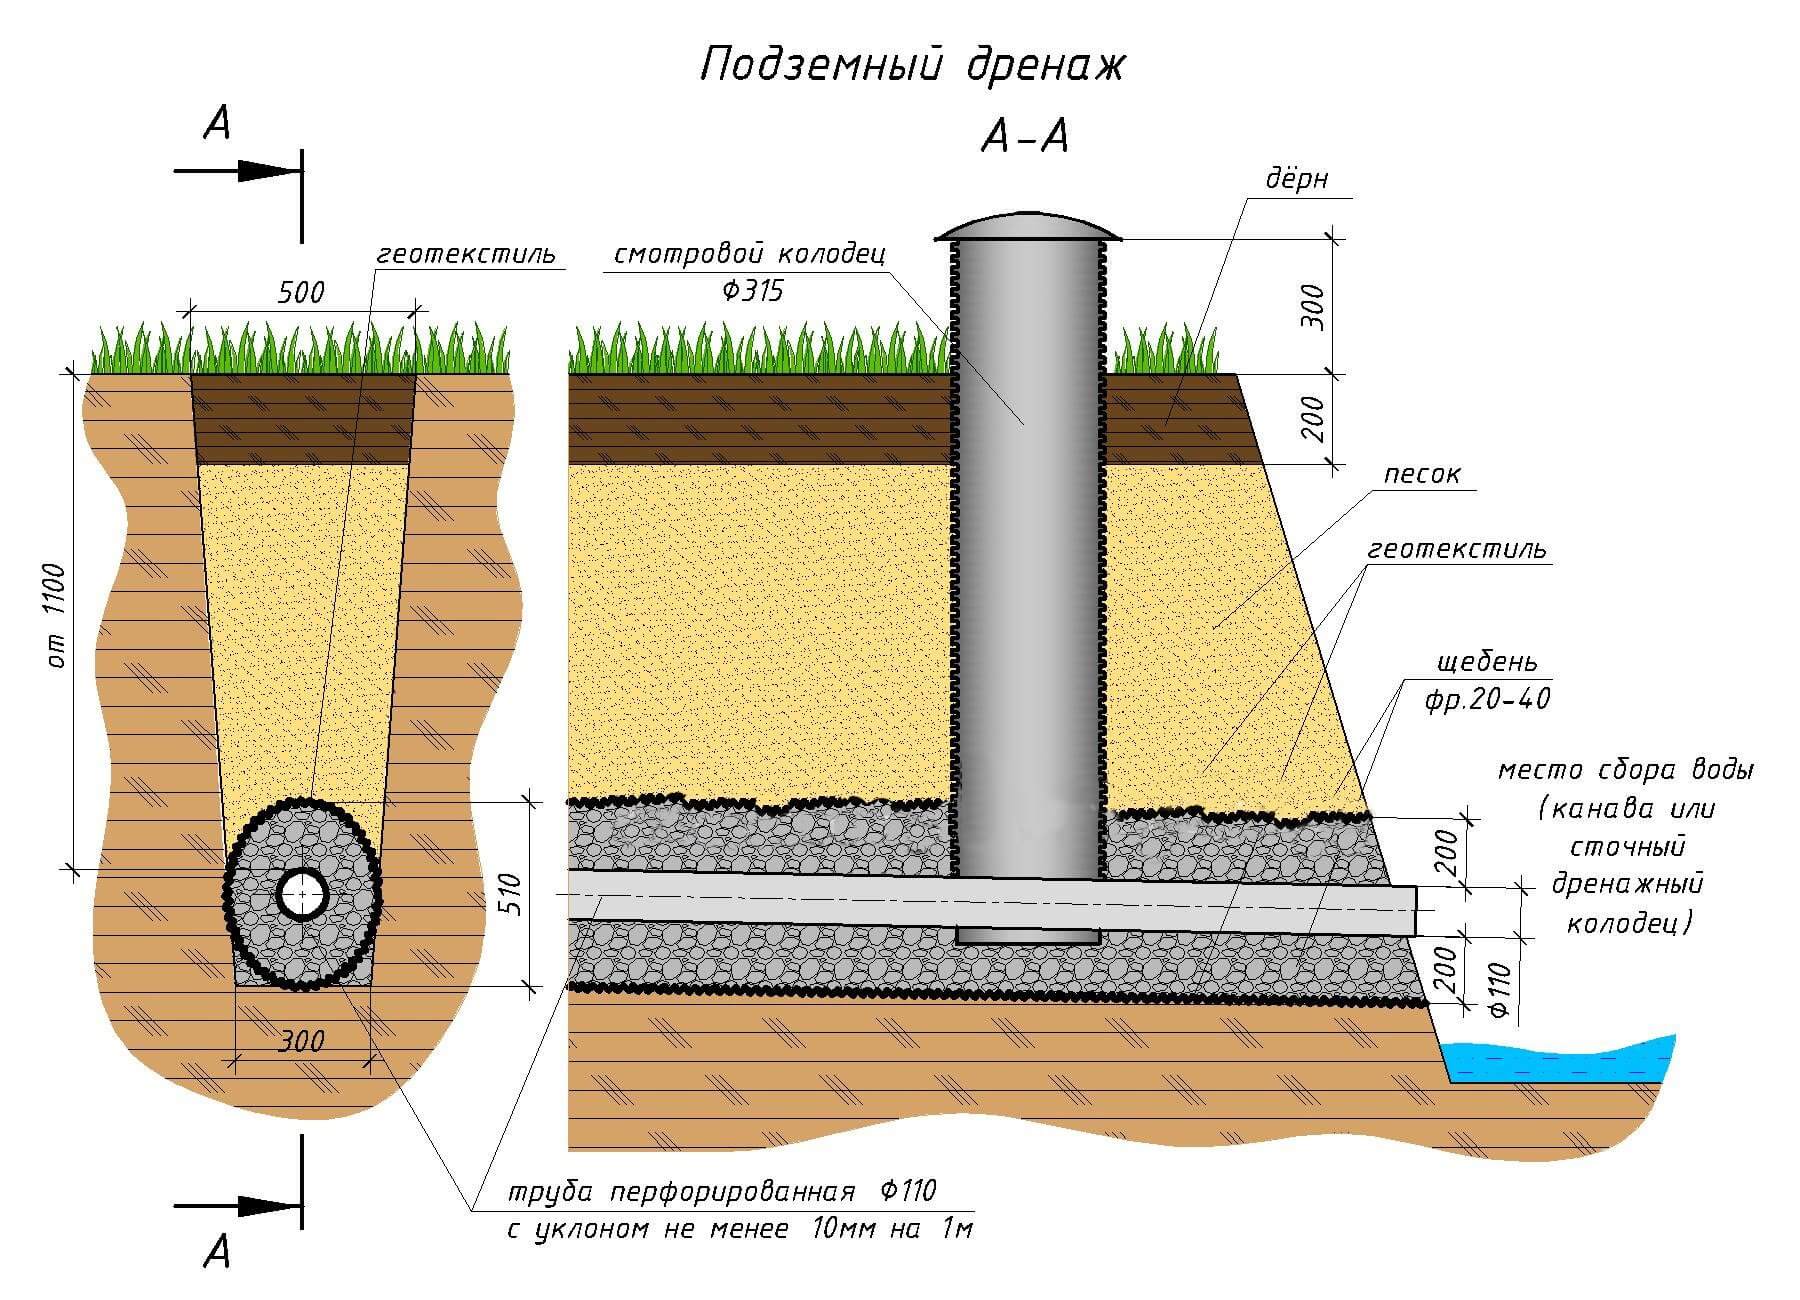
Drainage trenches
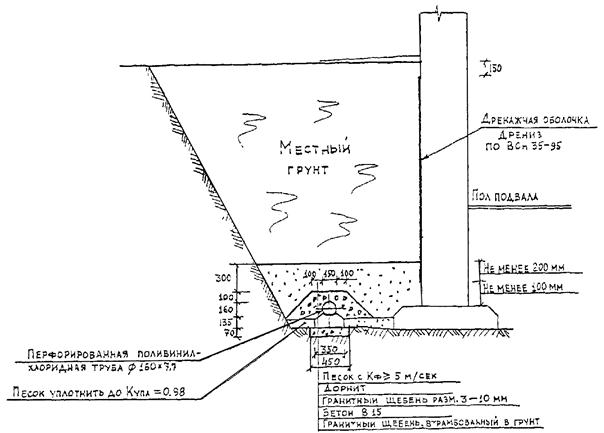
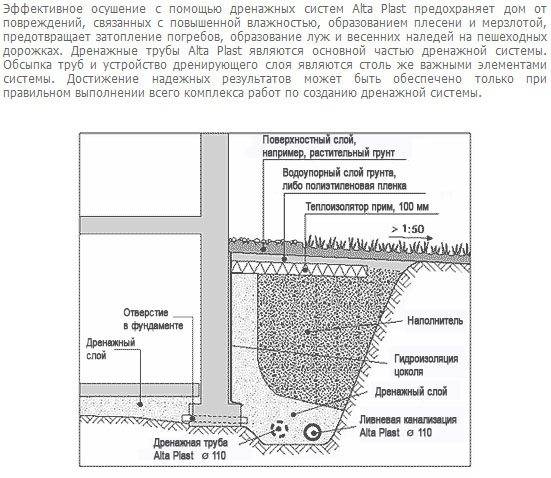
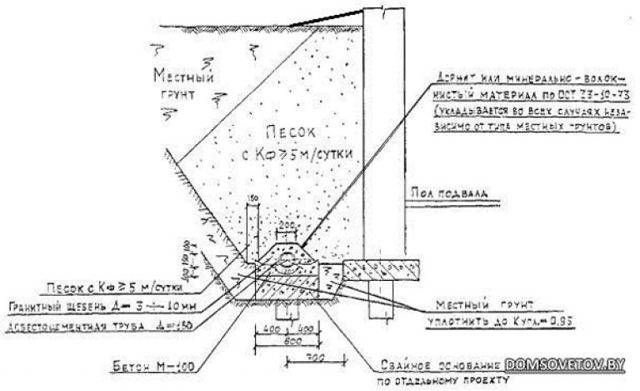
The RMD states that "in weak soils with insufficient bearing capacity, the drainage pipe must be laid on an artificial base." Such a base is a sand cushion. For this, we use river sand with a particle size of 1.5-2 mm. The thickness of the sand bed is 50 cm.
Pipes for drainage
Corrugated pipes made of low pressure polyethylene (HDPE) are commonly used. The standard pipe diameter is 110 mm. Holes are made in the pipes through which water enters. "The dimensions of water intake holes should be selected taking into account the granulometric composition of the drained soil" (RMD, 10.9)
Standard PE pipe
Pipes in the geotextile filter are also used. They are designed for sandy and loamy soils. These soils are easily eroded by water, can be washed into pipes and clog them. The filter traps dirt.
Pipes in geotextile
Crushed stone for drainage
Crushed stone is needed to filter groundwater so that the pipe holes do not become clogged. The filtering ability of crushed stone depends on its fraction - the size of one grain. A fraction of 20-40 mm is considered optimal. We use just such gravel.
Geotextile
Geotextile protects gravel from erosion, and also keeps the soil from subsidence. As stated in the RMD, “a geotextile filter must pass water and screen out the soil, not unnecessarily deform and not restrict the access of moisture to the drainage structure, and have bio- and chemical resistance” (RMD, 10.2).
The main characteristics of geotextiles:
- Manufacturing technology . From one endless thread (monofilament) or from a staple (individual threads 5-10 cm).
- Material . Geotextiles can be needle-punched, thermally bonded or hydro-bonded.
- Density . For drainage systems, geotextiles with a density of 200 g / m³ are used
- Filtration coefficient . Measured in meters per day.
RMD recommends the use of needle-punched monofilament geotextiles. This geofabric is also used by our company.


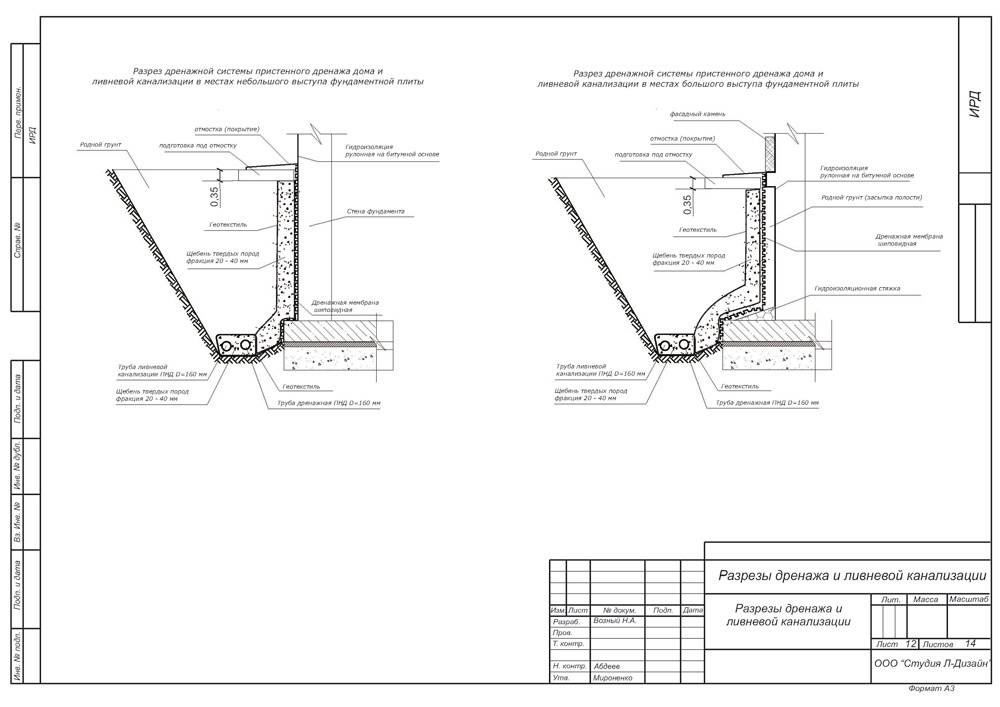
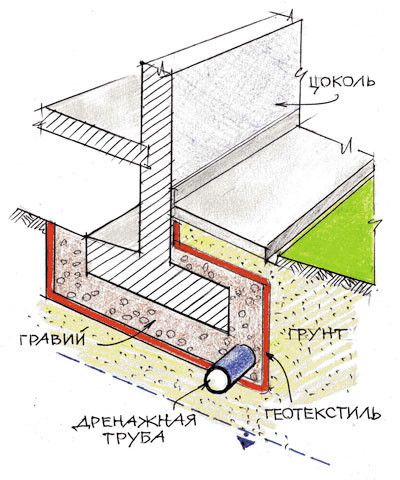
Plinth waterproofing
To protect the plinth from moisture, waterproofing membranes are used. They are laid with an overlap of 10 cm and connected with a self-adhesive bitumen-polymer tape. Fastening is carried out using plastic dowel-nails in increments of 20-25 cm.
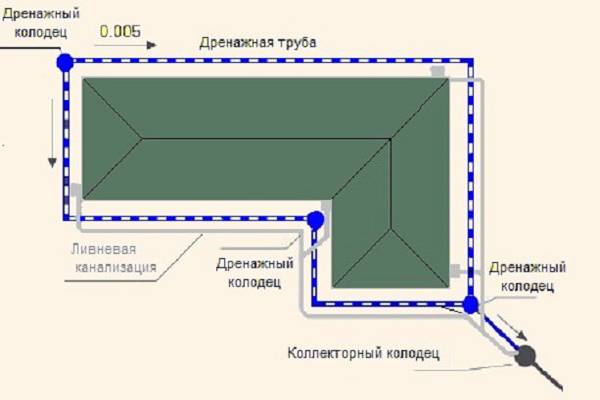
Manholes
Needed to control the operation of the system and for cleaning. The well consists of a bottom part, a vertical part and a cover. The spigots are either made at the factory or cut in during installation. Wells are installed along the drainage route every 40-50 m. It is imperative to install wells at the turns of the route, as well as at level differences.
storage well
Serves to collect water and drain it into a ditch. Installed at the lowest point of the system. A float pump is placed in the well, which throws water into the ditch.
Foundation drainage device:
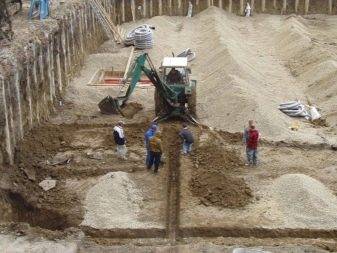
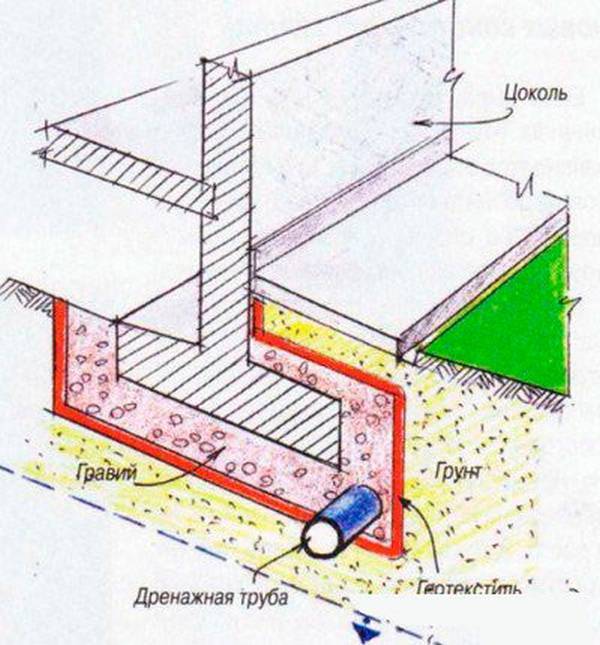
- Dig drainage trenches around the perimeter of the house.
- The trenches are filled with sand. Sand is leveled.
- Geotextiles are laid at the bottom of drainage ditches.
- Granite crushed stone is poured into the geotextile with a layer of 10 cm.
- Pipes are laid on gravel. The minimum pipe slope is 2 mm per meter in clay soil, 3 mm per meter in sandy soil.
- Manholes are placed at the corners of the route, and a drainage well is placed at the lowest point of the site. Pipes are connected to wells.
- The pipes are covered with rubble from above.
- Wrap the edges of the geotextile so that they overlap and completely cover the pipes and gravel
- Fill the trenches with sand.
It is impossible to combine the drainage system with storm sewers. This will lead to the fact that storm and melt water will wash away sand and gravel. It is recommended to do drainage and storm water in parallel, in one trench.
Construction of a drainage system
Consider how to make the drainage of the foundation in stages.
Required Tools
To do the job, you will need a small set of tools, namely:
- Shovels - shovel and bayonet.
- Pick.
- Hammer drill with pneumatic or electric drive.
- A wheelbarrow for the removal of soil and the transport of rubble.
Work algorithm
- Trenches for laying drainage pipes are dug, stepping back from the foundation to the side of 1 meter.
- The width of the trench should be 20 cm larger than the diameter of the pipes. So, if you plan to use a pipe having a diameter of 100 mm, then the width of the trench should be 30 cm. The trenches should be made with a slope of 1 cm per meter.
- The depth of the trench depends on the depth of the foundation. Pipes should be located half a meter lower than its lowest point. Only in this case, the drainage of the basement will be effective.
- The bottom of the trench is compacted and a sand cushion 10 cm high is poured. The sand layer should be well compacted. Now you need to check the slope again, it should remain unchanged.
- Wide strips of geotextile fabric are laid on a layer of sand so that the side sections of the material protrude beyond the sides of the trench.
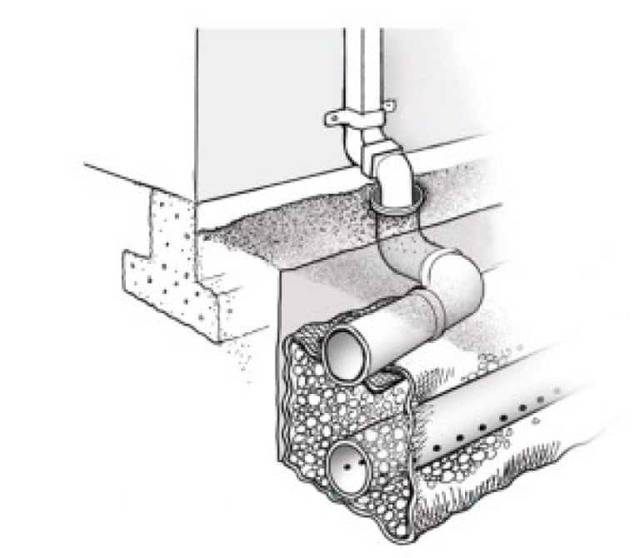
- We continue to build drainage around the foundation by backfilling a layer of rubble, since this material is an excellent conductor of water. It is better to use crushed stone of a fairly large fraction.
- Now we proceed to the construction of the pipeline, making sure that the pipes lie with a slope to the lowest point of the system.
- Pipes are connected using fittings using a press fit method. To reduce backlash in the joints, winding with insulating tape is performed.
- From above, the pipes are covered with a layer of crushed stone so that there is a layer 10 cm high above the pipe.
- The ends of the geotextile are wrapped and fastened with threads (sewn).
- Since the drainage of the foundation slab is built to divert water, a place should be provided where this water will be collected. To do this, at a distance of at least five meters from the house, a water intake is arranged. It should be located about a meter below the pipe, but at the same time be higher than the groundwater level.
- The bottom of the pit under the water intake is covered with a geotextile fabric, then a plastic container is installed there.
- Several holes are drilled in the bottom of the tank and it is fixed in case of soil shift. Backfilling is carried out first with gravel, then with soil.
- The trenches are backfilled with soil in such a way that a noticeable mound forms above them. The fact is that the soil will still sag and, if backfilling is flush with the soil level, then soon you will have to backfill.
Rules for the location of manholes
Fulfilling foundation circular drainage buildings, the installation of manholes should be provided. They are placed according to the following rules:
- The installation of wells is planned in the corners of the building.
- As a rule, the standard scheme for constructing the basement drainage provides for the installation of four viewing and two receiving wells. Moreover, one of them will be used for storm sewers, and the second - for the drainage system.
Optional equipment
Not in all cases it is possible to collect drainage under the foundation using a standard scheme.In some cases, it is necessary to provide for the installation of additional equipment.
So, if the water intake point is higher than the location of the pipes, then a drainage pump should be included in the circuit. This setting will be used to force the collected waters to move.
If the pipe depth is insufficient (above the freezing depth), it is rational to install pipe heating using a heating cable. The use of this element will allow you to 100% protect the drainage system during the off-season from freezing.
So, if you have the desire and free time, do-it-yourself drainage of the foundation can be done. Beginners in the construction business can be advised to carefully study the theory and watch a training video that shows all the work processes.
Varieties for slab base
The drainage system under the slab foundation can be arranged in several ways:
- Reservoir drainage - is most often used under a slab foundation, if there are several layers of aquifers, pressure groundwater on the site, there is a risk of capillary absorption of moisture into the structure of the reinforced concrete monolith. The technique is suitable for any type of soil and for various structures (residential buildings, summer cottages, baths, garages, etc.).
- Ring drainage - used to drain areas, eliminate flooding, as well as reduce the level of underground sources. It is also mandatory when building houses on slopes and in areas along the runoff of water.
- Wall drainage - effective in the construction of structures on clay soils and loams. Combine with other types of drainage.
Plastovoy
The key elements of formation drainage are perforated pipes laid under the entire base area with a slope from the center towards the main pipe to drain excess water.
Pipes are laid in pre-prepared trenches across the perimeter of the building. The bottom of the trenches is covered with compacted rubble.
From the outside, the elements are also protected with a layer of crushed stone and geosynthetic fabric to eliminate the risk of siltation of the entire drainage system. From above they arrange a layer of compacted sand cushion and proceed directly to the construction of the slab foundation.
Wall system
After the construction of the slab foundation, its surface is waterproofed. A profiled membrane is glued on top of the slab in such a way that its lower edge overlaps the surface of the earth.


Drainage pipes are laid on the horizontal part of the membrane and the free space around them is filled with sand. Pipes are laid at a slope so that water flows into a collection well or central sewer.
Wall drainage scheme:
Kinds
Consider the different types of drainage. First of all, the drainage is open and closed.
Open drainage system
This system includes ditches and French drainage.
ditches
The simplest variety - ditches - is not suitable for all soils, but for clay and loam slowly permeable to water. Such a system eliminates surface water. If the site is on a slope, and the house is in the middle, then it is advisable to draw a ditch perpendicular to the slope above the house - this way you will reduce the amount of moisture near the foundation. Open drainage is easier to build in sloping areas - or you need to carefully calibrate the change in the depth of the ditches, and this is problematic.
Ditches with a depth of 50–70 centimeters and a width of about 50 centimeters can be located throughout the area with a “Christmas tree” (in cases of uniform flooding of the entire area), along the perimeter or locally in especially flooded places. In the case of a tree-like structure, the central ditch is deeper than the lateral ones and deepens towards the drain. Ditches should have shallow edges (about 30) to prevent them from crumbling, and the shape can be either trapezoidal (flat bottom) or V-shaped.
Ditches can be designed in different ways.
-
Cover them with geofabric and pour small drainage material there - crushed stone, pebbles, expanded clay - not to the top; but geotextiles on the edges of the ditch need to be masked with turf or earth.
-
Cover them with geofabric or do without it by filling the ditch with rubble to the top.
-
Cover with geofabric and cover with large draining material - for example, pebbles.
-
You can do without geotextile.
-
In extreme cases, do without everything at all.
The ditches of a linear open drainage ("Christmas tree") are connected by a deeper "trunk" and close on the ditch at the lowest point of the site, suitable for the drain.
The location of the ditches with a "Christmas tree", which closes on the main ditch leading to the drain
The main disadvantage of an open system is the need to distribute the excavated barren land somewhere. Ditches take up space for planting, do not decorate the territory at all, and require constant care and cleaning.
French drainage
This is a simple and beautiful structure in the landscape sense - a "stone pond", or "stone stream", filled with gravel and acting as a water collector. It is made according to the type of open drainage, sometimes with one rubble inside, sometimes with soft drainage, but it looks more aesthetically pleasing.It must be connected to a normal drainage system, since it can accumulate moisture, and it needs help to drain it.
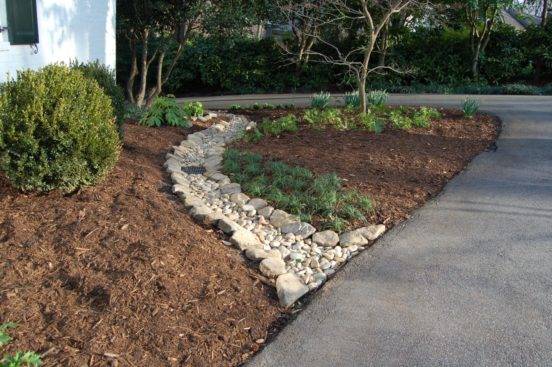
"Stone Stream" - a kind of French drainage, and also an element of landscape design
Storm surface drainage can be conditionally classified as open, although it is protected by gratings, and there are also closed deep sections in the system.
Closed drainage system
A closed system, in contrast, is used primarily to remove groundwater. Because there is not so much precipitation that seeps into the depths, and if the soil is clayey, then it does not seep at all. Unlike an open system, this system makes it possible to plant plants above it, to set up garden structures. Closed drainage is usually deep. In addition to geotextiles and drainage materials, it uses: perforated drain pipes (in the case of “soft” drainage, drains are not used), and fittings for them. In addition, there are:


-
collector wells or free-standing wells;
-
absorption/latrine pits or wells;
-
artificial or natural reservoirs.
Trench or ring system
This type of drainage is used to protect a house that is located on a site with sandy soils and does not have a basement. The trench system is located at a distance of 3 to 12 meters from the house foundation, it is best to remove it at least 5 m from the building in order to avoid soil shrinkage, which will lead to the destruction of the foundation of the structure. When constructing such a drainage system from the foundation of buildings, all those elements are used that are in the classical system described above.
For additional protection of the base of the house, a clay castle is also used.In addition, the general rule is to install drains at a depth of 50 cm from the lowest point of the floor. The remaining parameters are determined on a case-by-case basis.


