- Types of pipes for drainage
- Foundation drainage scheme
- Purpose and need for drainage
- Installation
- Main works
- Foundation contour drainage
- Elements of wall and ring drainage of the foundation:
- Drainage trenches
- Pipes for drainage
- Crushed stone for drainage
- Geotextile
- Plinth waterproofing
- Manholes
- storage well
- Foundation drainage device:
- drainage system
- We arrange drainage in the slab foundation
Types of pipes for drainage
To create drainage systems, pipes of several diameters are used:
- 10-15 cm - drainage pipes, light, located horizontally in the trench
- 50-70 cm - pipes for manholes, located at nodal points, or every 10-15 m of a linear section
- 100-150 cm - rings made of concrete, asbestos cement. Used for the device of prefabricated wells, installed strictly vertically
From the point of view of the material, pipes are used for drainage:
- Ceramic - expensive, rarely used, similar in composition to expanded clay, absorb water through the entire surface through microscopic pores. To increase the contact area, the pipe shell is made ribbed.
- Asbestos-cement - large diameter, thick-walled. They are used exclusively for prefabricated wells. The holes are made with an impact drill, replaced by a series of transverse cuts (abrasive wheel, angle grinder).
- Plastic - the most common, practical, affordable. Can be corrugated, smooth-walled. Sometimes they do not have holes, you need to drill yourself.
 Ring drainage plan
Foundation drainage scheme
The main reason for the accumulation of water in near-surface layers is the high occurrence of a waterproof layer (for example, clay). Water does not go deeper, accumulates near the surface. The purpose of the drainage is to take it to the sewer well, the collector. The system consists of conduits and storage wells. There are several device options:
- wall drainage of the foundation is relatively inexpensive and easy to install, while an effective system for areas with clay soil. This is the optimal drainage of the strip foundation. Drainage pipes are laid along the perimeter of the house 30-50 cm deeper than the pillow, and manholes are arranged at the corners of the house (where the pipes are connected). At the lowest point of the site, a pumping well is dug, from which water flows into a ditch, reservoir or storm drain - by gravity or using a pump. The walls of the wells can be made of concrete or purchased ready-made plastic;
- a modification of the wall drainage is an annular one. The principles of the device are the same, but the system is separated from the foundation at a distance of up to 3 meters. This technology is used when there is already a foundation and a blind area, and for some reason drainage has not been completed. But if the waterproofing of the basement was not completed at the same time, it is more reasonable to dismantle the blind area, carry out work in accordance with all the rules and perform wall drainage. The depth of the ring in any case should be greater than the deepening of the base of the foundation;
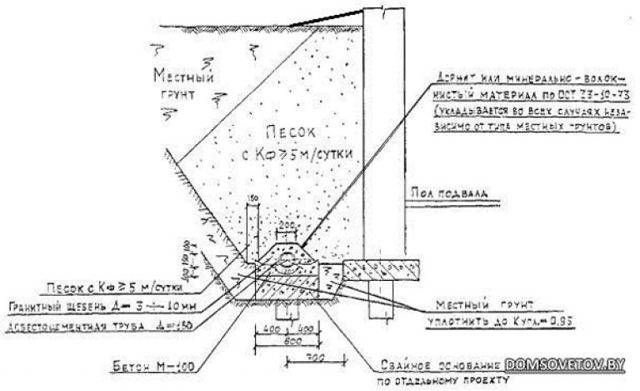
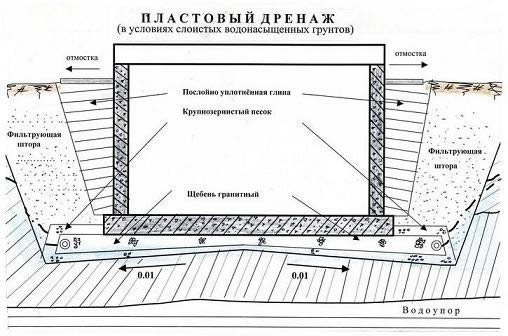
- reservoir drainage under the foundation slab.It is used on waterlogged clay soils for slab foundations in cases where other technologies are ineffective. This is the optimal protection for basements and basements. The conditions for choosing this type of drainage (SNiP): layered soil from various aquifers, pressure groundwater, a large basement deepening (below the water-resistant layer). Here, too, there is a system of discharge pipes along the perimeter, and, in addition to it, the formation drainage itself.
Purpose and need for drainage
In modern construction, drainage effectively performs the functions of protecting the basement and basement from flooding. First you need to find out the reasons for the appearance of water near the foundation of the building. These can be nearby groundwater aquifers or atmospheric precipitation coming from the surface of the earth. In any case, they provide for double protection - drainage with waterproofing of the entire foundation base. This is interesting: do-it-yourself waterproofing technologies for the basement of a house. Drainage is needed in a place of high water. If the blind area of the building is disturbed or there are constant water leaks in the drainage system, the soil is saturated with water and negatively affects the foundation and basement. In this case, drainage is also performed. Another reason for installing the system may be nearby underground structures, such as cellars and a pool.
Installation
Installing wall drainage is quite simple if you have a work plan and a plan on hand. Let's consider an easier option - a linear system, since it is recommended to equip the reservoir system only by specialists.
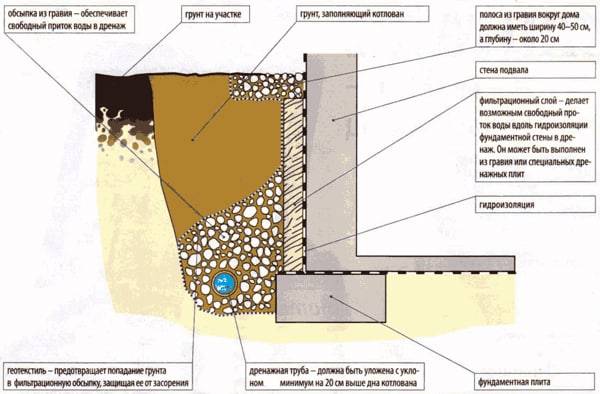 Photo - arrangement
How to do wall trench drainage with your own hands:
-
At the calculated level, a trench is dug from the house according to a certain size.Please note that it should exceed the size of the pipe by several centimeters (if tubular drainage is being arranged);
- From the foundation slab or pillars you need to retreat 10–20 centimeters;
- When arranging a drainage system on sand, additional organization of a sand cushion is not required. But if you are working on rocky, clay and other soils, then the bottom of the pit will need to be covered by 20 centimeters with fine river sand;
-
The system is then waterproofed. To prevent water from flowing beyond the designated route, moisture-resistant fiber is covered throughout the system. At the same stage, drainage insulation is provided. A variety of materials can be used for this: Maxdrain 8GT geotextile, fiberglass, improvised means;
- Crushed stone or fine gravel is poured over the heat and water insulation film. The lower to the bottom, the smaller the fraction. Backfilling is necessarily carried out at a certain level along the entire length of the drainage;
- For laying, special drainage pipes are used, which have small perforations along their length. Holes should not be larger than rubble, otherwise the system will clog. They are installed according to the level that the drawing indicates;
-
The nodes are connected to each other with clamps. Most often, non-pressure drainage systems do not require “dead” fastening using thermal tools;
- After the entire structure of the pipes is additionally rewound with insulation to prevent them from freezing in the winter;
-
It remains only to backfill the surface layer and connect the drains to the septic tank.
It is possible to fix a septic tank only in places with the lowest level, otherwise their installation will be impractical.The total estimate can be significantly less if you use driftwood, boards, bricks or plastic bottles instead of pipes. In terms of time, the entire organization takes from several days to a week of intensive work.
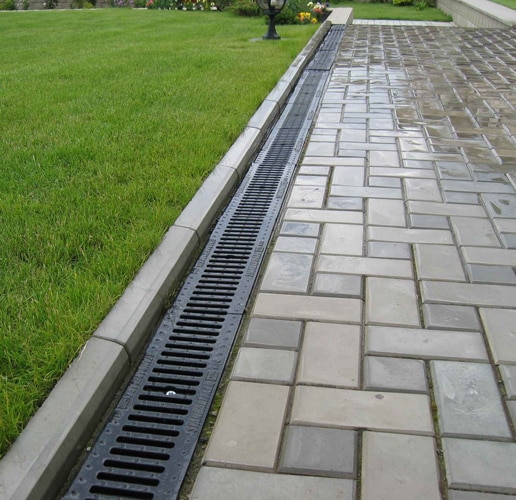 Photo - design
Main works
If you have assessed the situation on your site and realized that you can’t get anywhere without intervention, then before you start draining the foundation with your own hands, you should specify some more rules.
- Firstly, all work must take place in the summer - for obvious reasons.
- Secondly, it should be understood that the process will be time-consuming and long from 2 to 3 months.
- Thirdly, care must be taken to protect the drainage system from moisture ingress if the weather deteriorates. For example, arrange a canopy made of polyethylene or boards.
- Fourth, if you have weak soil, you need to take care of strengthening it with retaining structures in advance.
- Fifth, it would be a good idea to dig out the foundation and inspect its depth and shape.
- Sixth, the land cadastre will need to know the location of underground sources and groundwater.
- Seventh, watch where your foundation accumulates more moisture.
And finally, prepare in advance a diagram of pipes, wells, etc., stock up on everything you need for drainage.


Before you go directly to the wall drainage, you should perform some preparatory work on waterproofing.
- First, as mentioned earlier, you need to dig out the foundation. In this case, it is necessary to clean the foundation slabs from the earth and old waterproofing.
- Give the foundation time to dry.
So, let's get started. To begin with, we will dig trenches for laying our system, while retreating 1 meter away from the foundation.Let's estimate the width of the trench - it should be 20 cm larger than the diameter of the pipe.
When laying pipes, do not forget that the drainage must pass half a meter below the supporting structure.
We put wide strips of geotextile fabric on the sand so that its ends protrude beyond the boundaries of the trench. Next, we fall asleep around the foundation of large gravel - it conducts water perfectly.
Only after all this, we lay the pipes, while making sure that they fall with a slope to the lowest point of the system. With the help of fittings, we connect the pipes, just in case, we wrap them with electrical tape and fall asleep 10 cm with gravel. Then we sew the ends of the geotextile with threads.
We install the collector at a distance of at least 5 m from the house. It should be located between the levels of the pipe and groundwater. From the pipes below about a meter. We also cover the pit for the collector with geotextile fabric, and only after that we install the well itself. To eliminate the bevel of the well in the bottom of the tank, you need to drill several holes and secure it firmly. After that, we fall asleep with gravel and then with earth.
By the way, trenches should be filled in such a way that a small mound is formed, because if this is not done, the soil will sag and will have to be poured again.
For example, let's imagine that your water intake tank is above the level of the pipes, then you will have to install a drainage pump among other things. It will forcibly distill the water masses.
We suggest you familiarize yourself with: Stove for a bath do-it-yourself brick

If the pipe depth is higher soil freezing depth, it is necessary to install a heating system with a heating cable. This will keep your drainage system from freezing in the winter.
Thus, if you want to do the drainage of the foundation with your own hands, it is not the easiest, but quite doable task.
According to the functional purpose and method of installation, there are several main types drainage around the foundation of the house:
- surface drainage - acts as a storm sewer around the house, is closely connected with the roof drainage system;
- wall drainage of the foundation;
- circular foundation drainage;
- reservoir drainage.
Photo from area for drainage.
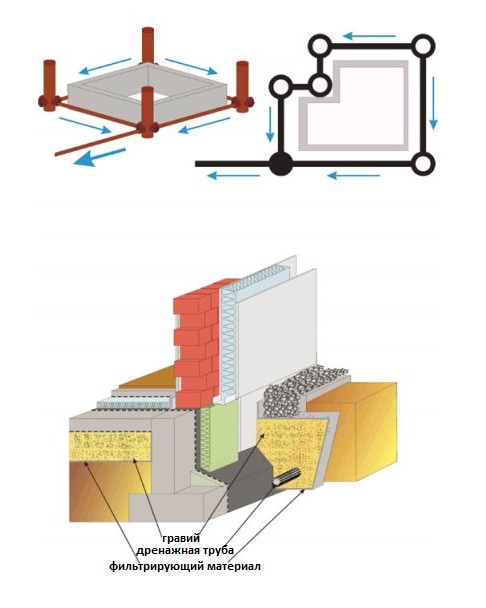
Ring drainage is often used in the construction of private houses in areas with a high level of groundwater. It consists of drainage perforated pipes laid along the foundation of the house around the perimeter, and manholes.


Such a drainage system can be around any foundation - slab, tape, columnar. This the system ends with a common drainage wellinto which all waste water is discharged. Water is drained from it by a sewer pipe towards the street or ravine.
The difference between wall and ring drainage is the distance of its device from the foundation surface. For ring drainage, this is an average of three meters, and wall drainage is arranged at a distance of about one meter.
Reservoir drainage is carried out under the entire building area and can be used with slab and strip foundations. It is often used in the construction of baths.
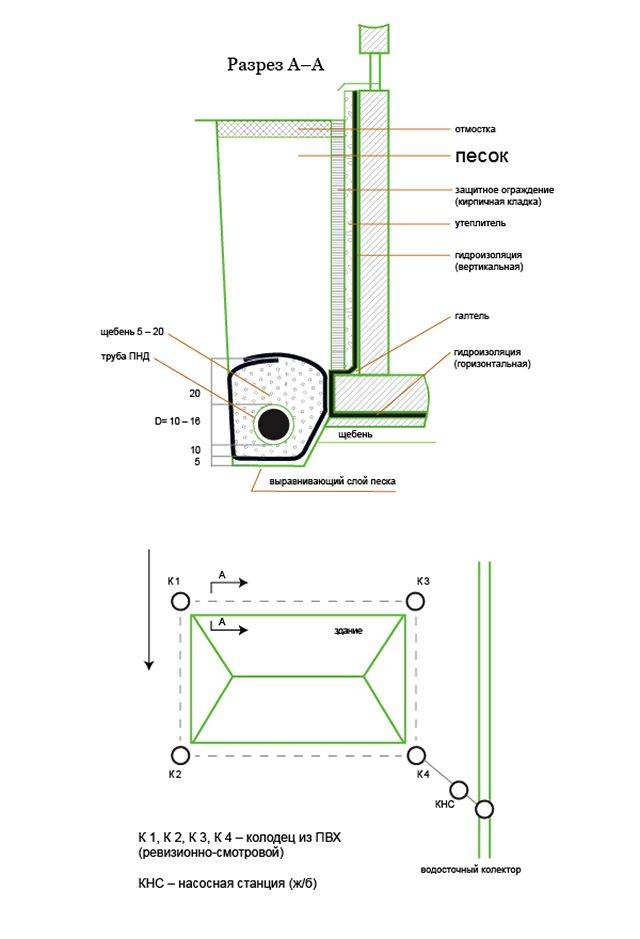
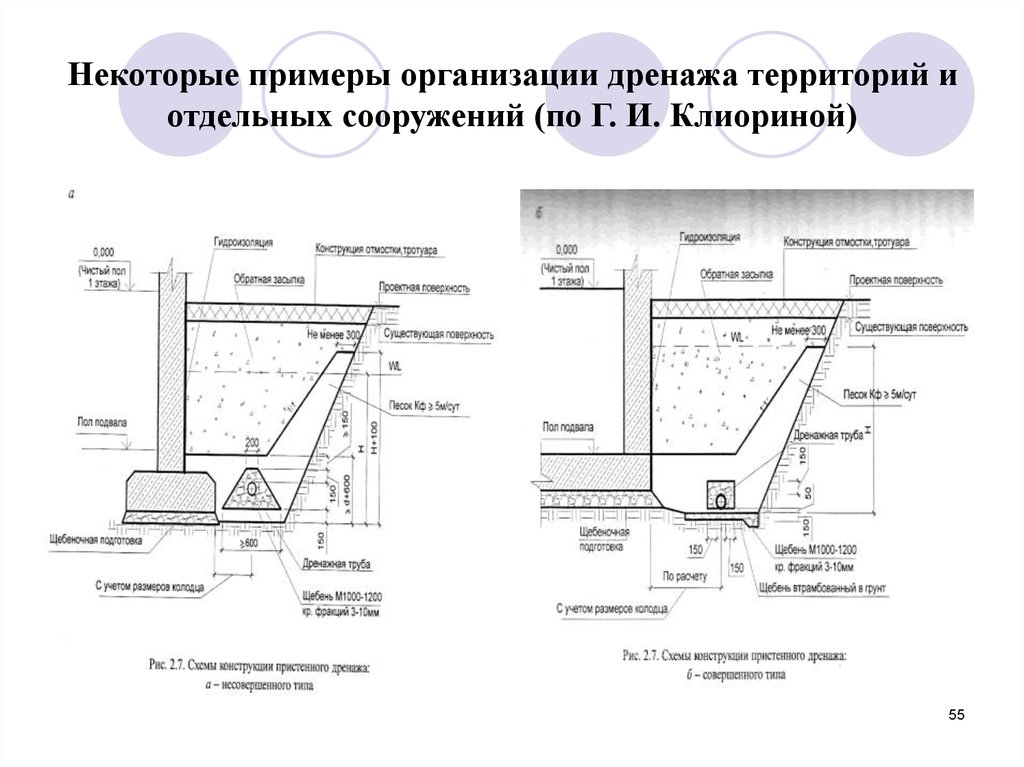
Foundation contour drainage
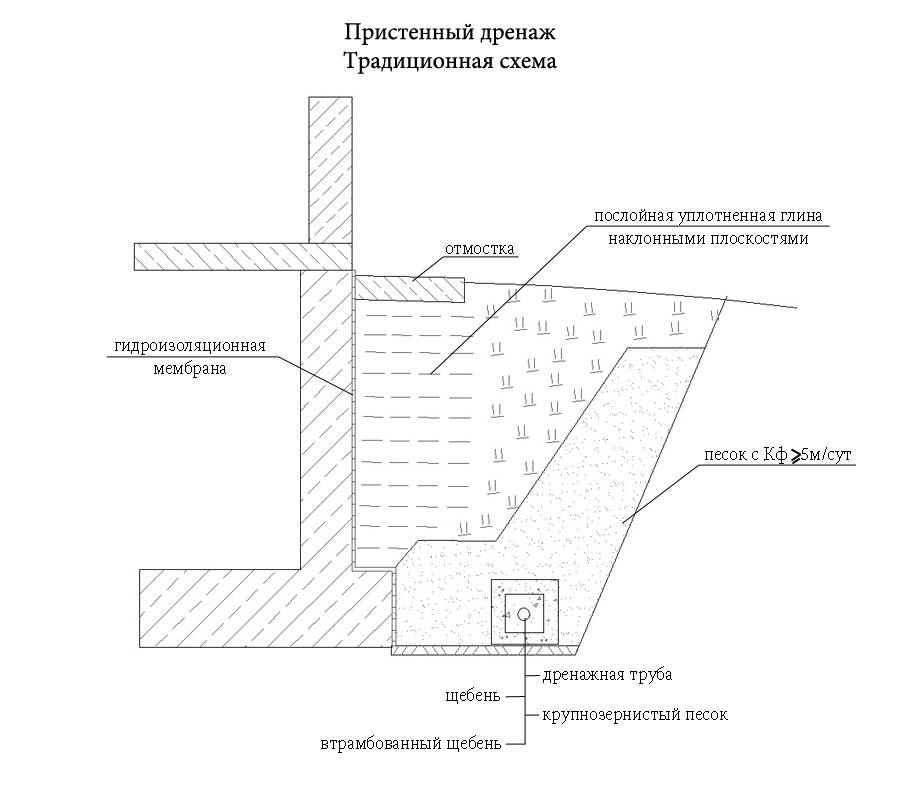
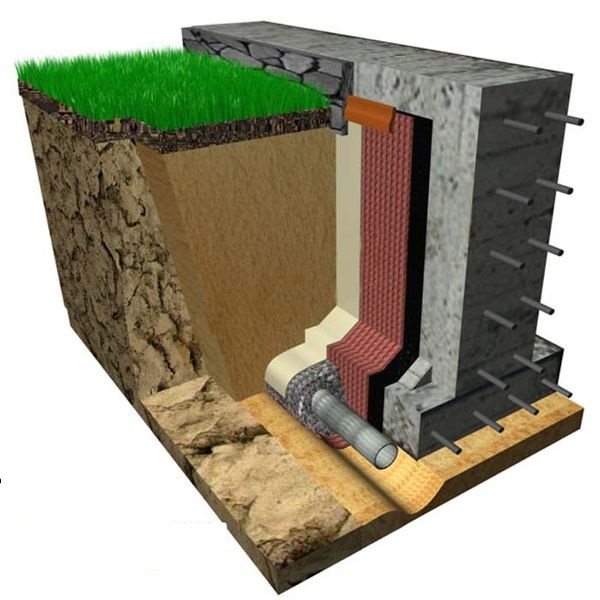
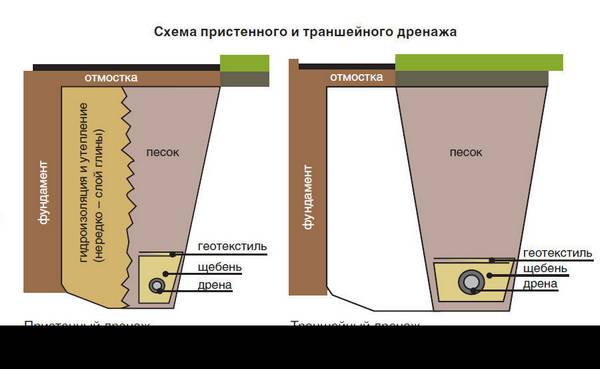
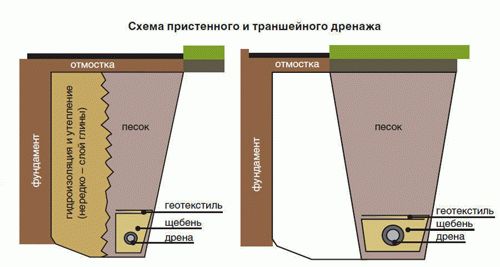
For water drainage from already constructed foundation, wall and ring drainage are used. Their working principle is the same.The difference is that the wall system is made close to the foundation, and the ring system is made at a distance, usually 1.5-2 meters.
Wall drainage is arranged in non-filtering soil (clay, loam). Collects surface meltwater that seeps mainly along the wall, and not through the impervious soil.
The ring system is suitable for sandy filter soils. Lowers the groundwater level.
Types of foundation drainage according to the depth of pipe laying:
- Perfect . Drainage pipes are laid on a water-resistant layer of soil. Use if this layer is shallow.
- Imperfect . Pipes are laid above the water-resistant layer, if it lies deep.
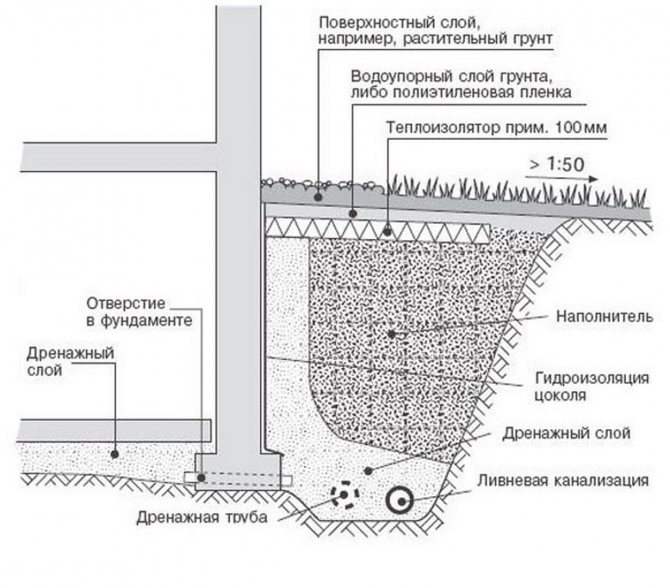
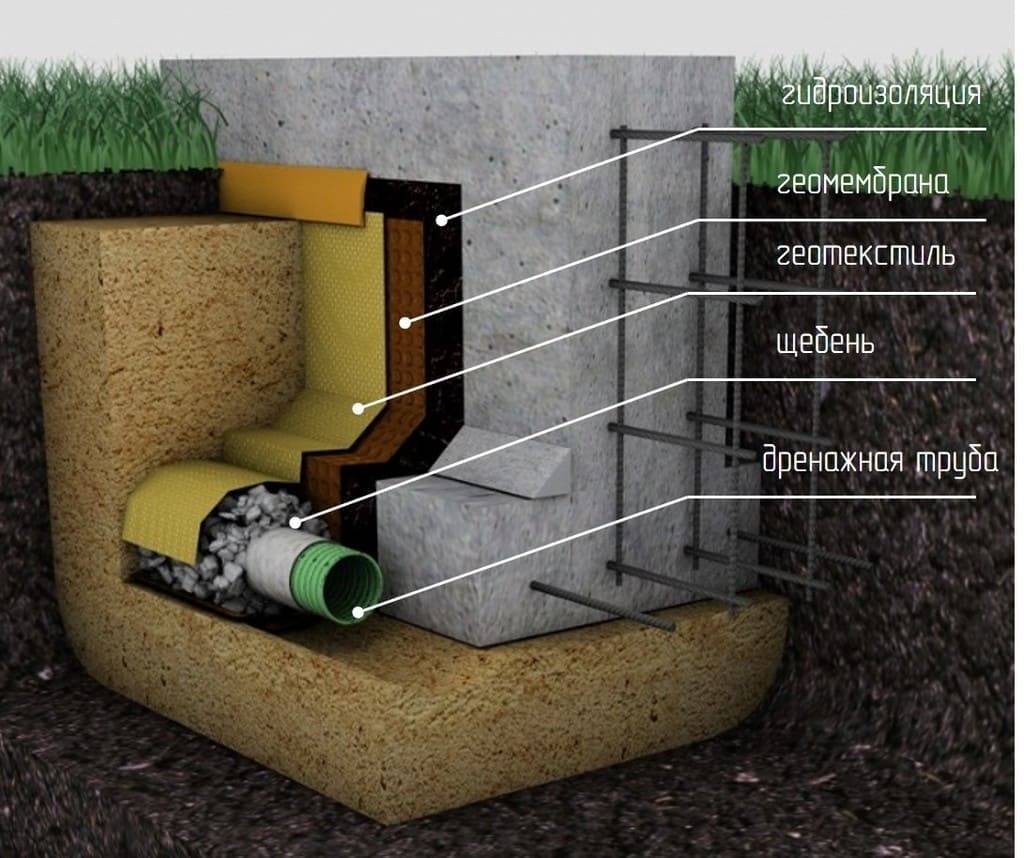
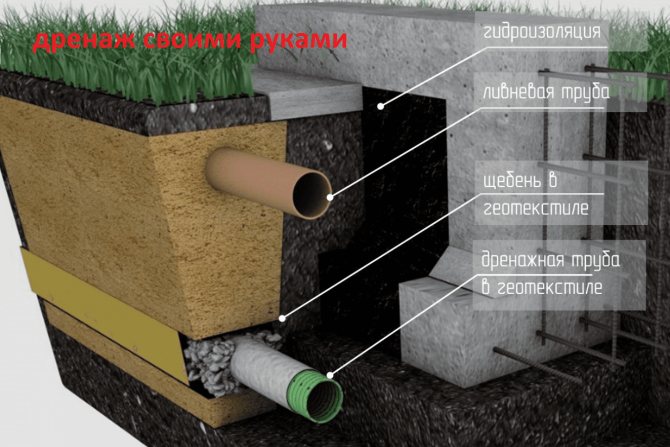
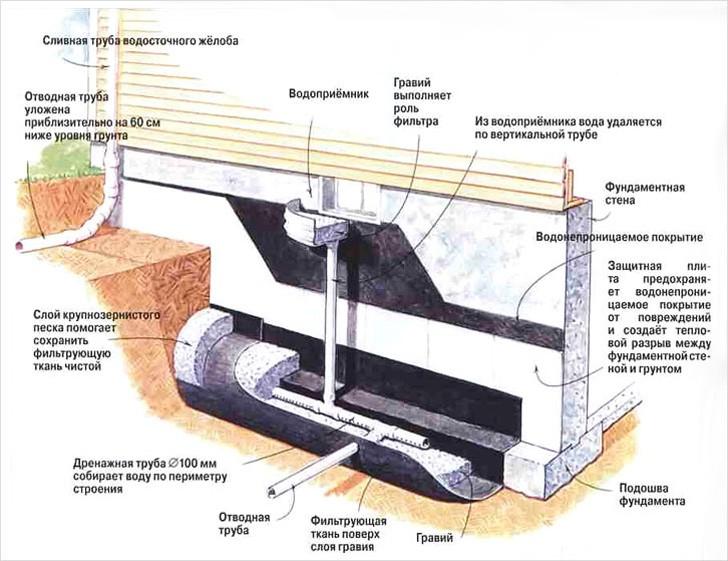
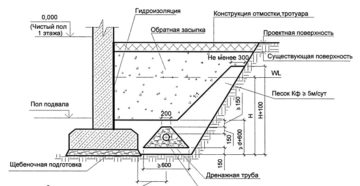
Elements of wall and ring drainage of the foundation:
- Drainage trenches.
- Outlet pipes.
- Filter cake, crushed stone or gravel.
- Filter fabric (geotextile).
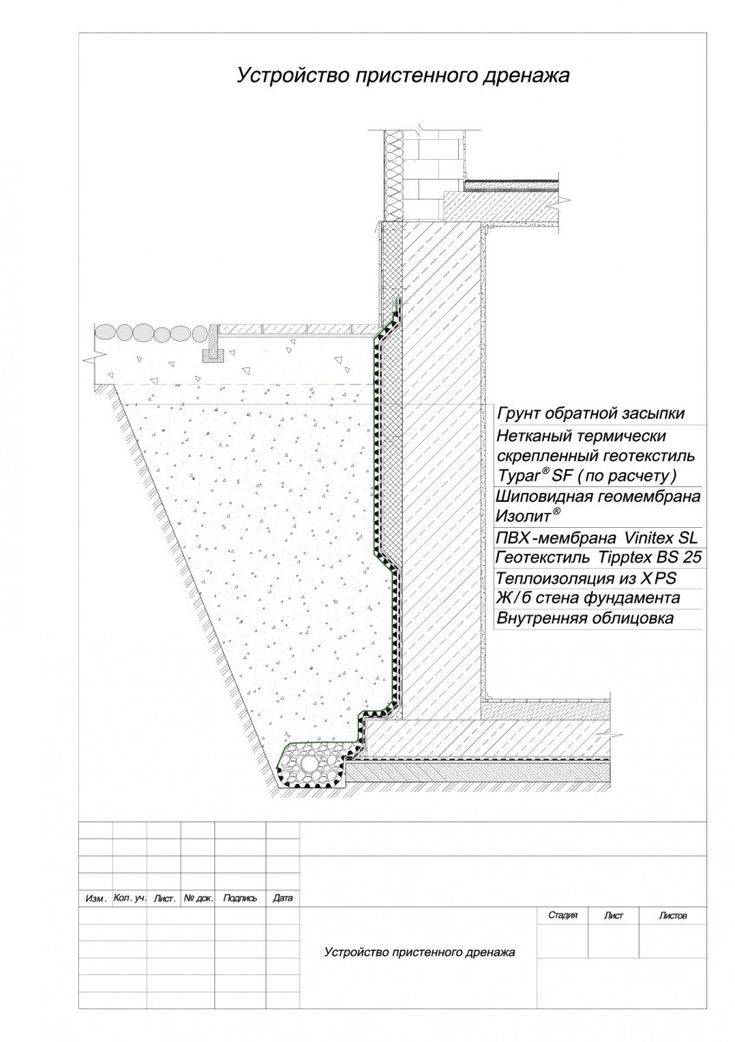
- Basement waterproofing.
- Viewing wells.
We will tell you how these elements are arranged and what they are for.
Drainage trenches
The RMD states that "in weak soils with insufficient bearing capacity, the drainage pipe must be laid on an artificial base." Such a base is a sand cushion. For this, we use river sand with a particle size of 1.5-2 mm. The thickness of the sand bed is 50 cm.
Pipes for drainage
Commonly used corrugated pipes from low pressure polyethylene (HDPE). The standard pipe diameter is 110 mm. Holes are made in the pipes which water enters. "The dimensions of water intake holes should be selected taking into account the granulometric composition of the drained soil" (RMD, 10.9)
Standard PE pipe
Pipes in the geotextile filter are also used. They are designed for sandy and loamy soils.These soils are easily eroded by water, can be washed into pipes and clog them. The filter traps dirt.


Pipes in geotextile
Crushed stone for drainage
Crushed stone is needed to filter groundwater so that the pipe holes do not become clogged. The filtering ability of crushed stone depends on its fraction - the size of one grain. A fraction of 20-40 mm is considered optimal. We use just such gravel.
Geotextile
Geotextile protects gravel from erosion, and also keeps the soil from subsidence. As stated in the RMD, “a geotextile filter must pass water and screen out the soil, not unnecessarily deform and not restrict the access of moisture to the drainage structure, and have bio- and chemical resistance” (RMD, 10.2).
The main characteristics of geotextiles:
- Manufacturing technology . From one endless thread (monofilament) or from a staple (individual threads 5-10 cm).
- Material . Geotextiles can be needle-punched, thermally bonded or hydro-bonded.
- Density . For drainage systems, geotextiles with a density of 200 g / m³ are used
- Filtration coefficient . Measured in meters per day.
RMD recommends the use of needle-punched monofilament geotextiles. This geofabric is also used by our company.
Plinth waterproofing
To protect the plinth from moisture, waterproofing membranes are used. They are laid with an overlap of 10 cm and connected with a self-adhesive bitumen-polymer tape. Fastening is carried out using plastic dowel-nails in increments of 20-25 cm.
Manholes
Needed to control the operation of the system and for cleaning. The well consists of a bottom part, a vertical part and a cover. The spigots are either made at the factory or cut in during installation. Wells are installed along the drainage route every 40-50 m.It is obligatory to put wells on the turns of the route, as well as at level differences.
storage well
Serves to collect water and drain it into a ditch. Installed at the lowest point of the system. A float pump is placed in the well, which throws water into the ditch.
Foundation drainage device:
- Dig drainage trenches around the perimeter of the house.
- The trenches are filled with sand. Sand is leveled.
- Geotextiles are laid at the bottom of drainage ditches.
- Granite crushed stone is poured into the geotextile with a layer of 10 cm.
- Pipes are laid on gravel. The minimum pipe slope is 2 mm per meter in clay soil, 3 mm per meter in sandy soil.
- Manholes are placed at the corners of the route, and a drainage well is placed at the lowest point of the site. Pipes are connected to wells.
- The pipes are covered with rubble from above.
- Wrap the edges of the geotextile so that they overlap and completely cover the pipes and gravel
- Fill the trenches with sand.
It is impossible to combine the drainage system with storm sewers. This will lead to the fact that storm and melt water will wash away sand and gravel. It is recommended to do drainage and storm water in parallel, in one trench.
drainage system
Each type needs to be sprinkled differently. So, a perfect view is sprinkled on top and sides, and an imperfect one along the entire contour
It is important to note that when compiling drainage system is necessary take into account a number of its features. In particular, linear drainage, consisting of PVC sections, has gutters and protective gratings, so it must be installed around the perimeter of the blind area
Moreover, water must enter the water intake through special pipes.
Reservoir drainage should be directly under the foundation. However, do not bury it deep. It must be placed at the level of the sand cushion. Excess water will flow out through perforated drains, which are pre-sprinkled with sand and gravel. In this case, sand and gravel are additional filters that prevent moisture from entering the basement or basement.


Wall drainage must be used when:
- The basement floor is located below the groundwater level, and also if there is less than half a meter between the field level and the groundwater level.
- The floor is located in an area with high capillary moisture. In this case, the installation of drainage should be taken care of in advance, before the humidity level exceeds the threshold.
- The depth of the foundation does not exceed 130 cm.
- Clay or loamy soil at the construction site.
We arrange drainage in the slab foundation
But how to make drainage foundation slabs? Such a base is often chosen for a bath due to the fact that thanks to it you can make a small technical underground and mount all communications there. The voids between them are covered with sand, insulation is put in and everything is covered with a finishing screed already on the floor. But there is an important point here: water must be diverted from the foundation, especially if the soil itself is saturated with moisture - and it is on this that a monolithic slab is most often built. Yes, and constant dampness in a Russian bath is completely useless ... But there is a way out: this is a good drainage system around the foundation.
Let's break down the whole process step by step:
Step 1. So, first you need to determine exactly where the water will be discharged. Usually this is a drainage well 20 meters from the house.It is necessary to assess the depth of passage of the water intake pipe in the catchment area, and already on this basis to determine the maximum allowable depth of laying pipes around the bath - namely, the laying depth in the corner of the foundation as the closest to the water discharge point. And the general slope of the entire drainage system will be from about 70 cm to 1 meter.
Step 2. Next, the drainage work itself begins - a pit is dug to a depth of 40 cm. The whole pie will be like this: 10 cm of a sand cushion, 20 cm of gravel and 10 cm of EPPS insulation. The stock should be taken 1-1.5 cm from the edges of the plate.
Step 3. Along the entire perimeter of the bath, it is necessary to dig trenches with a slope - 10 cm deeper than it is supposed to lay the drainage pipe. For the convenience of controlling the position of the pipes, you can pull a rope over the trench itself - with the slope that will be needed.
Step 4. Now the trenches are covered with geotextiles 2 meters wide, and a gravel pillow is poured and rammed on top of them.

Step 5. A pipe is laid in the trench, and gently falls asleep a little. As soon as it is fixed, the final backfill is made.
Step 6. Now the entire pit is filled with a ten-meter layer of sand with watering and tamping.
Step 7. Next, the pit is covered with geotextile - so that the gravel following it is not pressed into the sand, and the layers do not mix. Such a gravel layer will filter water well and lower it into drainage wells, and will also prevent the effect of the so-called capillary suction of moisture.
Step 8. Once the gravel is compacted with a vibrating plate, those parts of the geotextile that protrude at the edges also need to be wrapped again on the gravel. As a result, after tamping, the entire layer will turn out to be even and uniform, the uniformity of the surface will fluctuate + -2 cm.


Step 9The next step is to lay EPPS - 50 mm each, in two layers. The first layer will extend beyond the boundaries of the plate by 30 cm, and the second - by a maximum of 5 cm.
Step 10. As soon as the XPS is embedded, the formwork is mounted and the bottom is covered with a film 6 meters wide. Reinforcement is knitted and mortar is poured.
The drainage pipe itself for these purposes can be purchased in geotextile or in coconut winding, which, of course, is more expensive, but more efficient.


