- Idea 4. Topiary for kitchen or home decor
- How to properly fold storage bags
- Triangle
- tubules
- Envelope
- How to fold packages compactly - 3 interesting ways
- Save space
- Method 1. Triangle
- Method 2. Tube
- Method 3. Envelope
- Storage in dispensers
- conclusions
- Optimize the arrangement of devices on the desktop
- Get rid of cryptic and redundant tools
- How to fold packages correctly?
- Jewelry stand photo
- How to make a cardboard jewelry stand?
- Ideas for quickly putting things in order in the closet
- clothing
- Sweatshirts
- Skirts and trousers
- Suits, blouses and shirts
- Shoes
- Underwear and socks
- Accessories
- Getting rid of unnecessary things
- Idea 8. Universal knife holder
- Bag dolls
- Check spices and herbs for freshness
- How to organize the package storage system?
- Idea 1. Cutting board tablet holder
- Ready-made shopping baskets from the store
- Storage in containers or boxes
Idea 4. Topiary for kitchen or home decor
Topiary is a small decorative tree that decorates a dining or coffee table, chest of drawers or mantelpiece. And the topiary is a great addition to the gift, especially if you decorate its crown with, say, sweets or flowers.Making such crafts with your own hands does not take much time, does not require the use of expensive materials, and even beginners can do it. Having mastered the basic principle, you will be able to create topiaries for any occasion, any shape and design. Take a look at our selection of DIY home decor photo ideas, you will surely like something!
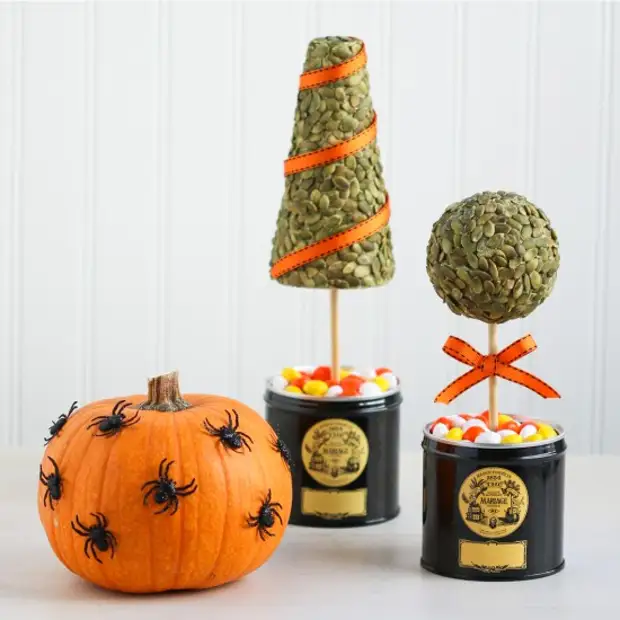
Halloween Kitchen Decor Idea
To make crafts you will need:
- Styrofoam, plastic or floral foam base in the form of a ball or other desired shape;
- Trunk (a smooth branch of a tree, a pencil or any other small stick);
- Decorative elements for creating a crown: coffee beans, artificial flowers, cones, colored beans, etc.;
- Decor to mask the pot filler, such as moss, pebbles or sisal fiber;
- Flower pot;
- Filler for the pot, which will fix the trunk. For example, cement mortar is suitable, all the same polystyrene or alabaster (the best option);
- Hot glue gun;
- If necessary, you will need paint to decorate the trunk, base or pot. Also, the trunk can be decorated with ribbon or twine.
Basic instruction:
- To begin with, it is desirable to paint the base in the color of the crown elements so that possible bald spots are not noticeable. You can also paint the trunk and pot and leave them to dry.
- Cut a hole at the base of the crown for the trunk a couple of centimeters deep, fill it with glue and fix the trunk.
- Take the base of the crown and start gluing decorative details one by one. The principle of operation at this stage is simple: first, large parts are glued, then medium ones, and finally, small elements fill in the bald spots. You need to glue the decor quickly, until the glue is absorbed into the base.
- Dilute the stem fixing mixture in the pot according to the manufacturer's instructions and fill the pot with it, not reaching a couple of centimeters from the edge. Next, insert the barrel, hold it for a while and then leave it to dry for a day.
- Mask the filling of the pot with a decorative "cover" (you can fix it a little with glue).
For detailed master classes, see the materials:
- How to make a do-it-yourself topiary - 4 instructions for beginners and not only
- Topiary from cones, acorns and chestnuts - photo ideas and 2 master classes
- How to make coffee topiary
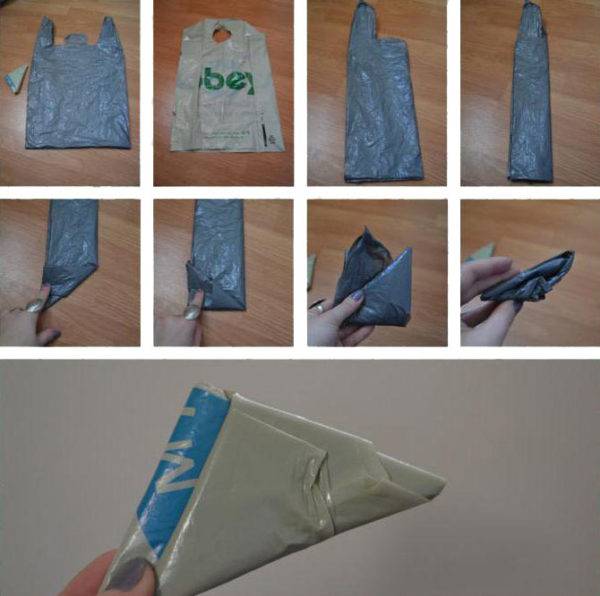
How to properly fold storage bags
Saving a package for later use is easy with helpful tips. There are several methods for accomplishing this task. Each of them is aimed at preserving the possibility of subsequent use of packages and their compact placement. Let's get acquainted with each of the methods.
 The methods described below are suitable for products made of cellophane.
Triangle
The package needs to be straightened and folded in half. This is best done on a firm, level surface. We fold several times. The corner at the bottom of the package folds up to the handles that hide in the triangle itself. The method is effective when it comes to standard T-shirts, soft polypropylene bags. Subsequently, rollups can be stored anywhere, as they take up little space.
 If the plastic bag has handles, then the latter must first be tucked in and folded in the manner indicated above.
tubules
Tube-shaped roll-up is convenient for storage in a cut-off bottle. After all, by pulling the triangular bottom edge, it is quite possible to pull out the package, straighten it and it will be ready for use. Having folded the package into a narrow strip, it is wound around two fingers.So that he does not get untied, he is tied from above.
 This method allows you to conveniently place cellophane products in drawers in the kitchen.
The resulting convolutions can be:
- put in bags;
- place in special shelves, lockers;
- store in boxes and containers.
 The resulting bag takes up little space. This option is suitable for folding thick bags.
Envelope
The method is simple, and its name largely explains not only the procedure, but also the end result. Packages that need to be folded like this are large in volume. It needs to be straightened and smoothed so that there is a minimum amount of irregularities. Then you need to fold alternating horizontally and vertically. A simulated envelope is created.
 The result is a small rectangle that needs to be placed in a storage container.
Advantages of the method:
- dense packaging can reduce the space occupied;
- convenient to stack packages in large quantities;
- easy enough to deploy.
 This option is also suitable for storing gift bags.
How to fold packages compactly - 3 interesting ways
Plastic bags can take up a lot of extra space.
Thinking about how to compactly fold the bags? Yes, they can take up too much space. I realized this when they peeked out from everywhere: from the pantry, from kitchen drawers, etc. I found some interesting ideas on how to neatly fold bags with my own hands. I want to share my findings with you.


Save space
Folding packages correctly is quite simple, but here you need to consider their sizes and shapes:
| Image | Options |
| Type 1. Packaging Transparent packaging designed to protect products and other products from external contamination. They are considered disposable. | |
| View 2. Bag handles in the form of a loop In such bags, heavy objects can be carried. Holders can be both reinforced and cut-through. | |
| View 3. "T-shirt" The special shape allows the "t-shirt" to be thin and very durable at the same time. The most popular type of bags. | |
| View 4. With a round handle Such products do not differ in particular strength. They are mainly used for carrying documents and giving voluminous gifts. | |
| Type 5. Gift There are paper and polyethylene. They serve as packaging for various kinds of presents. |
Method 1. Triangle
So, the instruction on how to fold the package into a triangle in 6 steps (for example, "T-shirts"):
| Image | Description |
| Step 1. Level the canvas, smooth out all the corners, as in the photo. | |
| Step 2. Fold the bag lengthwise 4 times. You should get a narrow strip. | |
| Step 3. From the side where the bottom is, start folding the strip with the corners up. | |
| Step 4. Using the method of laying one corner on the other, reach the top edge. Fold your arms in half. | |
| Step 5 Bend the handles into a triangle. | |
| Step 6. Insert the triangle obtained from the handles into the pocket of the main bag. |
Method 2. Tube
How to fold bags with a tube? The algorithm is pretty simple:
Flatten the canvas completely, straighten the corners and handles.
Fold the bag in half 4 times (for very large bags - 6-8 times).
Wind the resulting strip around 2 fingers.
Tie the tube in a circle with free handles.
It is convenient to store such tubes in old shoe boxes.
Method 3. Envelope
How to fold bags with an envelope:
| Image | Description |
| Approach 1. For plastic bags, flatten the canvas carefully. Fold first horizontally in half, then vertically. Should get a small rectangle. Compactly pack the received envelopes into any convenient box. | |
| Approach 2: For paper bags, bend the sides of the package inward. Flatten it so that it becomes flat. If the appearance of folds is not critical, fold the package in half several times. Place flat bags in a box or other empty container. |
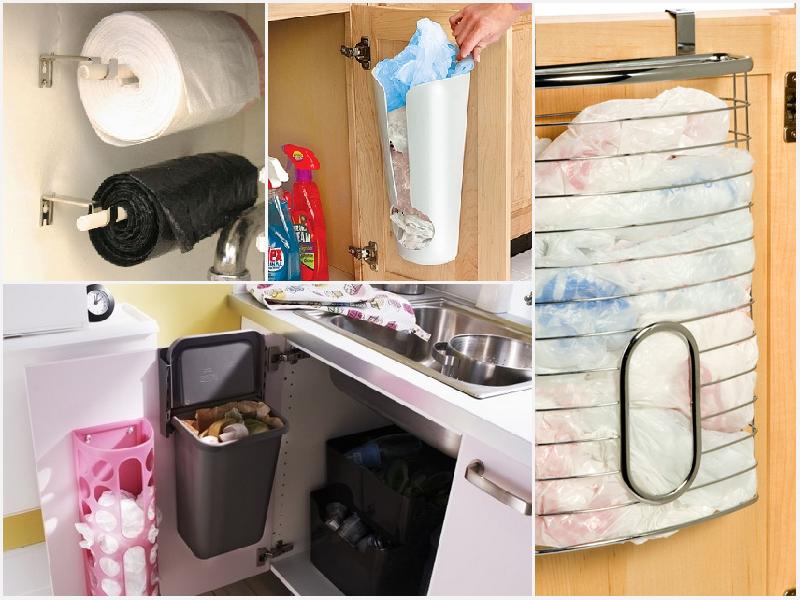
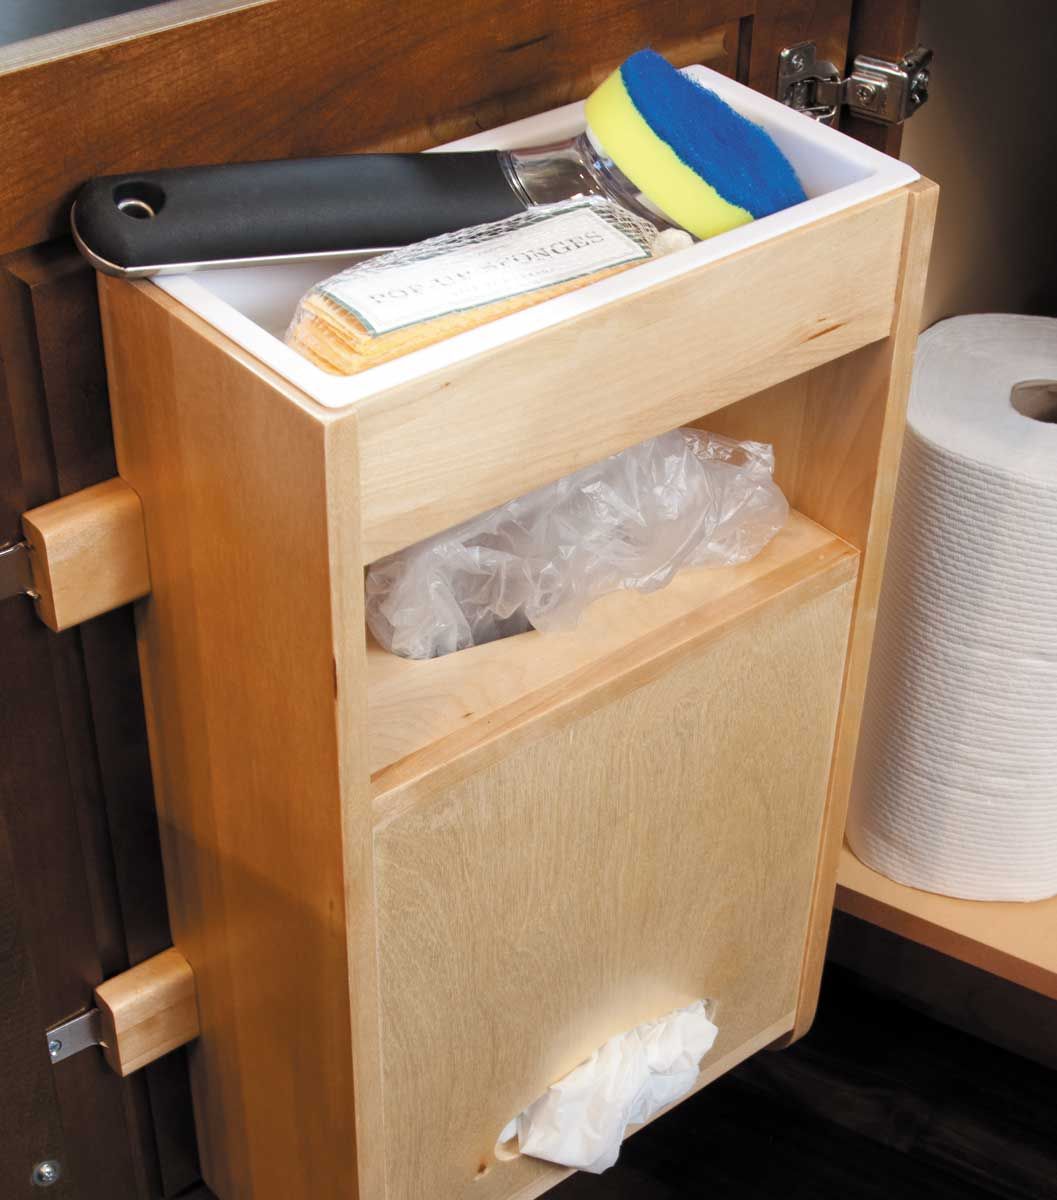
Storage in dispensers
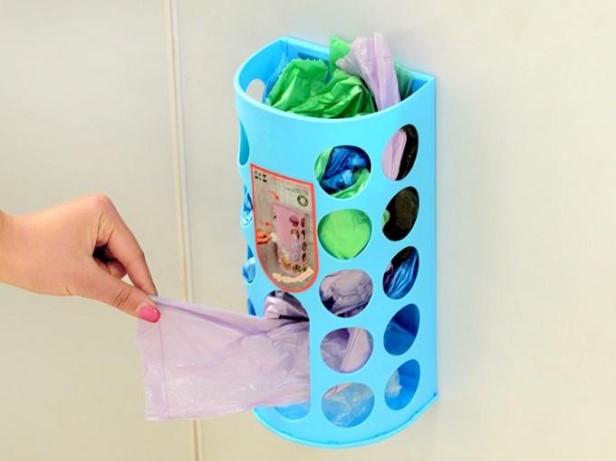
In household chemical stores, you can buy a special bag holder - a small device that allows you to compactly store a large number of bags. The dispenser can be made with your own hands from improvised means (old boxes, bottles, cans).
In the table I will present possible options for convenient storage of bags in dispensers:
| Image | Description |
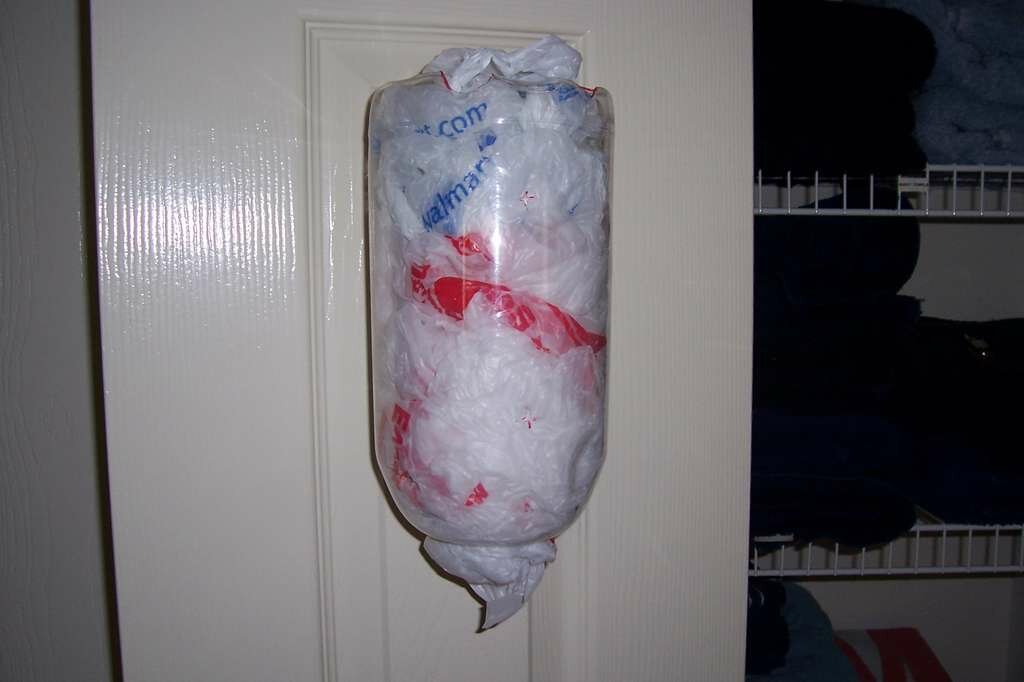
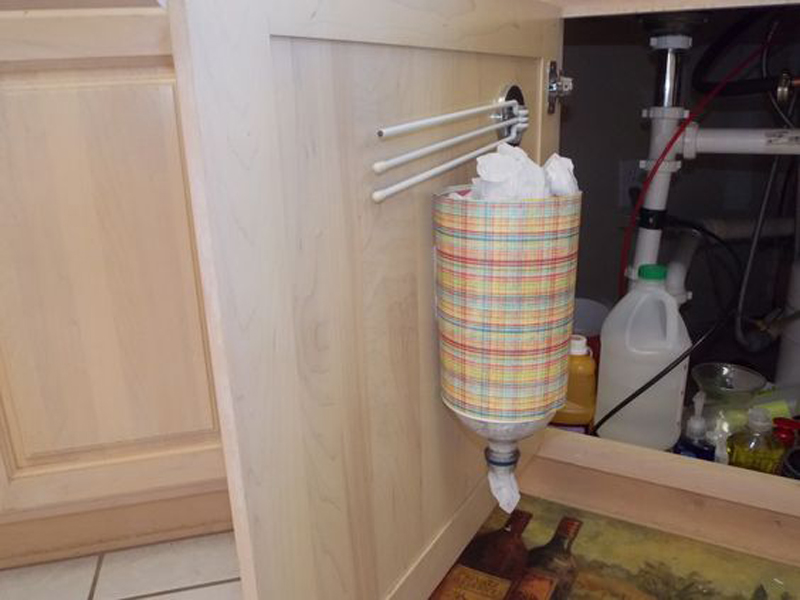
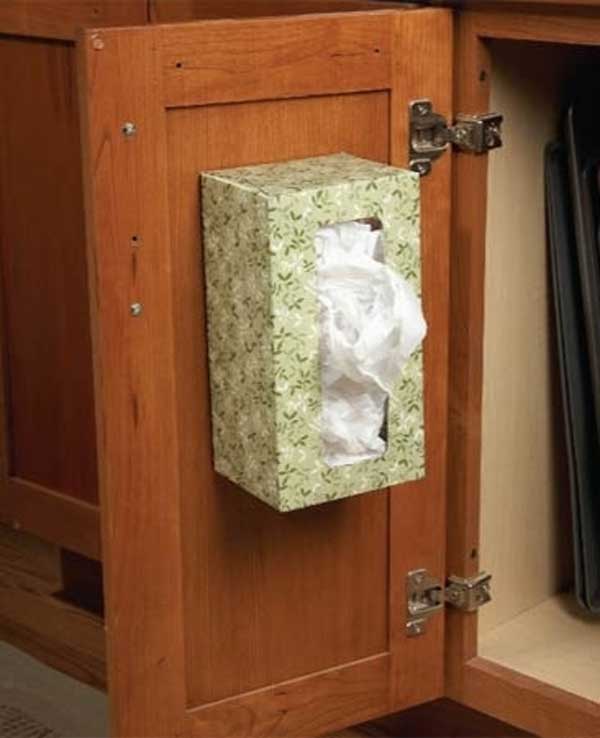
| Option 1. In a bottleCut the bottom of the bottle, but do not cut it off completely. Pack the bags tightly into the bottle. Attach the resulting dispenser to the inside of a cabinet door or wall. | |
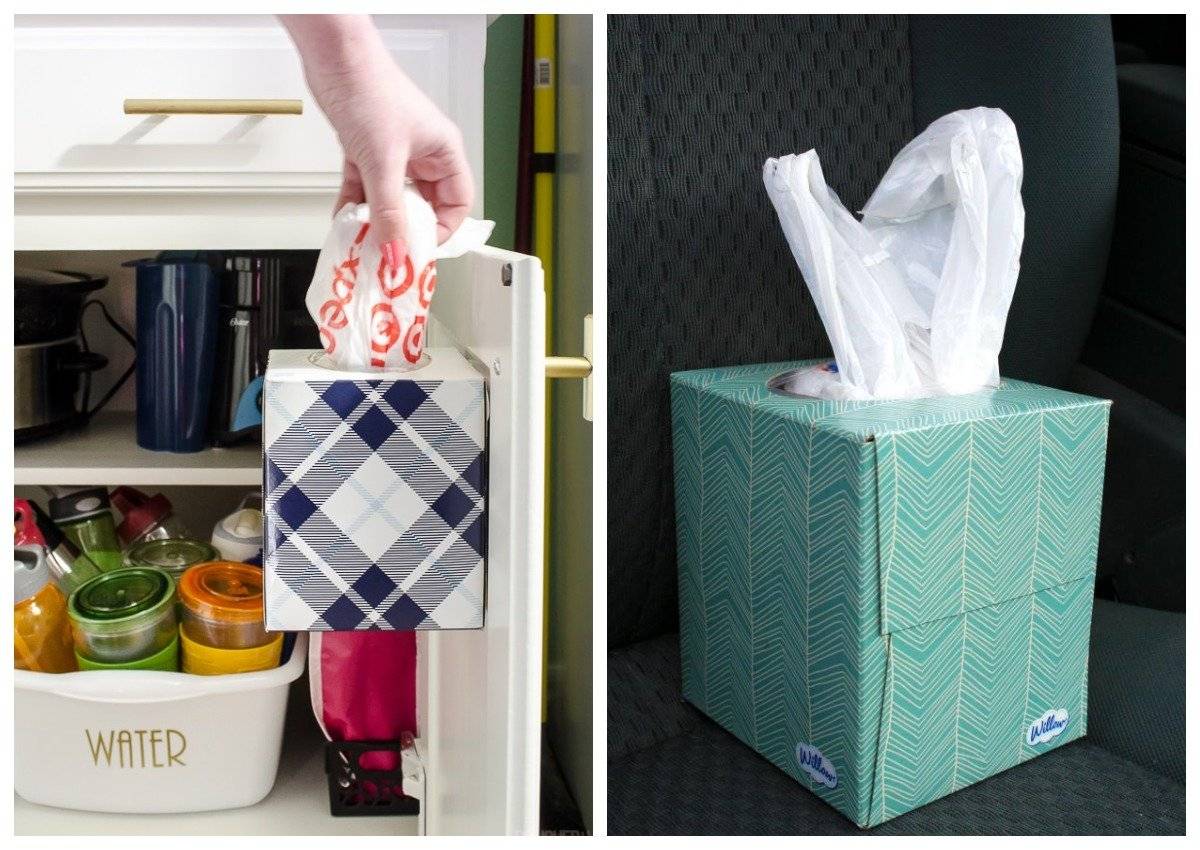
| Option 2. In an old box Take an empty tissue box and place the bags in it. Pull the next bag through the free handles of the first. Fill the entire box in this way. | |
| Option 3. In jars It is convenient to pack the packing bags into a box of napkins in the form of a jar, connecting them according to the above principle. | |
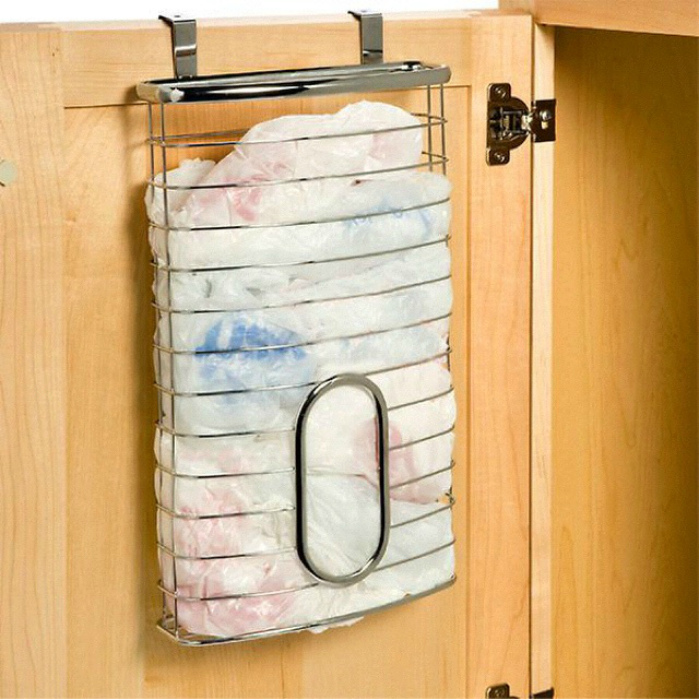
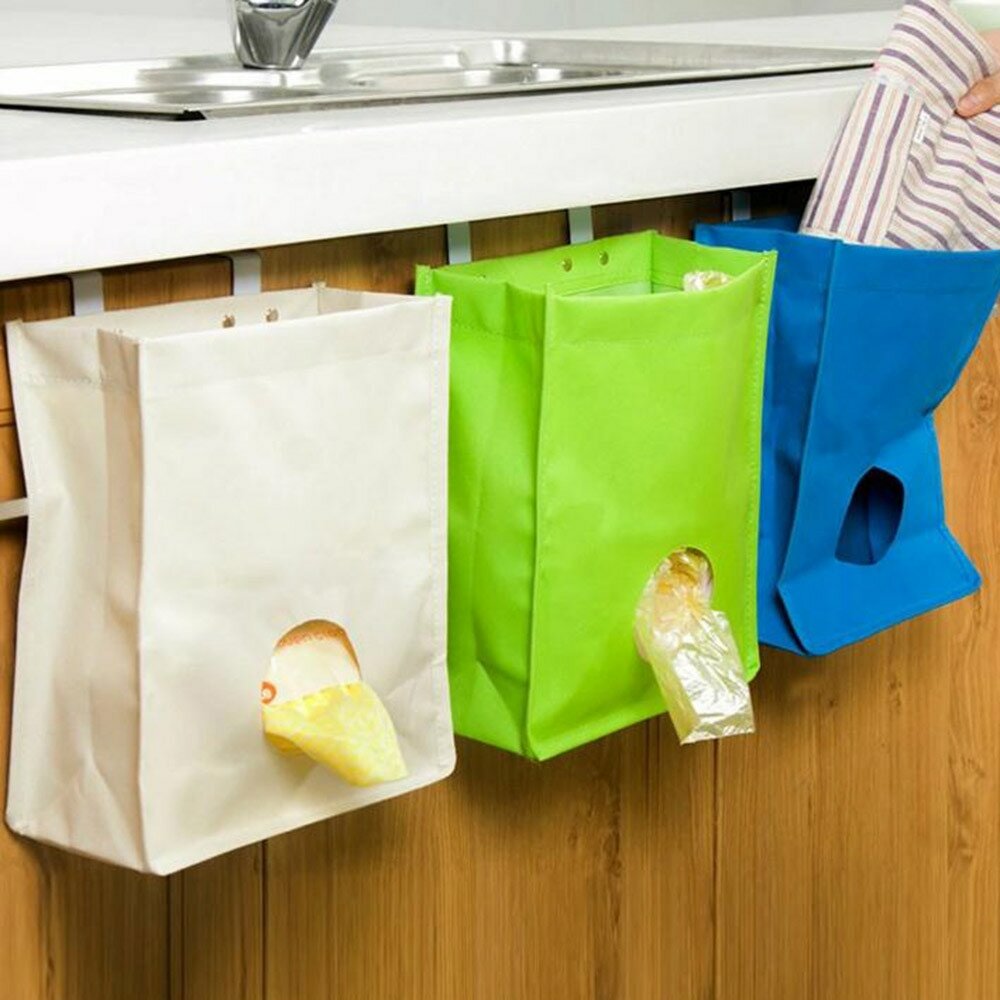
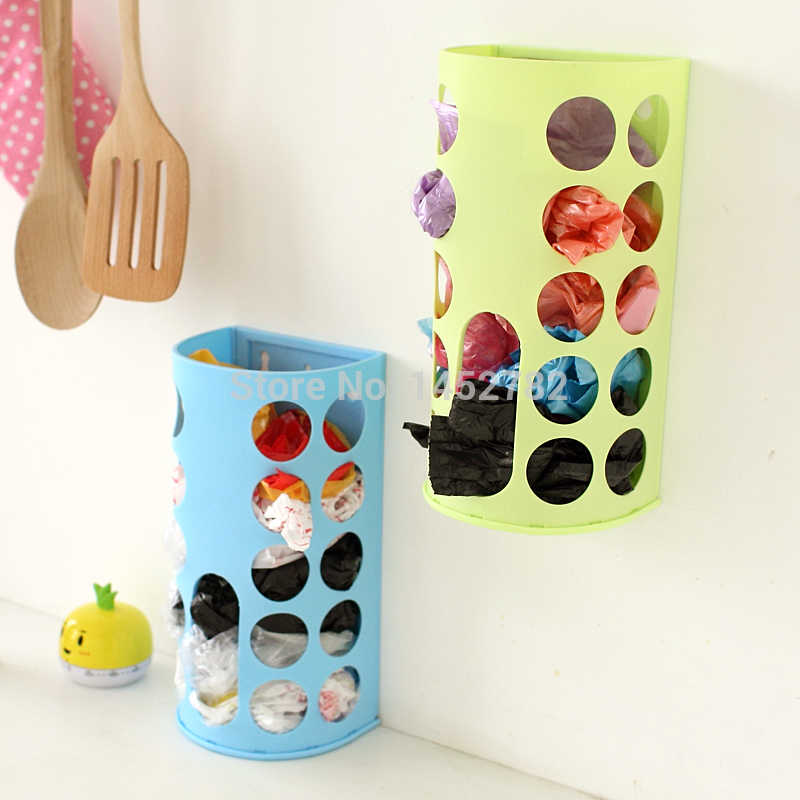
| Option 4. Shop You can buy an inexpensive dispenser and hang it on the wall. All you need is to add new bags in time. |
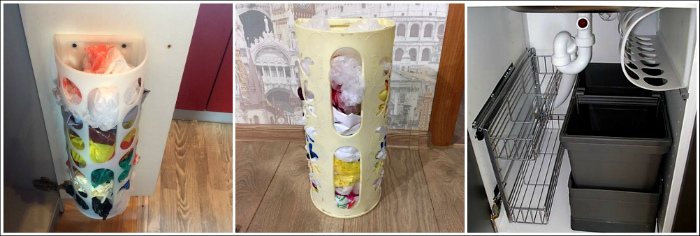
How to make a bag box yourself? You will need old empty packages, scissors and glue:
- make 2 holes - bags will be placed in the first, and removed from the second;
- then glue the structure in a convenient place.
In the photo - an example of a homemade organizer.
conclusions
Now you know that plastic bags can be folded compactly in three different ways. To keep small bags always at hand, use special storage organizers.
Optimize the arrangement of devices on the desktop
It's easy to move items around on your worktop. However, most people live with an uncomfortable desktop for so long that they no longer notice it. Take some time to look at your work kitchen table and answer the following questions.
- Do you have kitchen appliances that you take out of the kitchen cabinet and use every day? Could these items find a permanent home on the desktop?
- Are there household appliances that you rarely use, such as a mixer or food processor, on your work table? Why not move those little-used appliances to your kitchen cabinet or pantry?
- Do you have an appliance that you love to use every day (like a juicer), but that doesn't have room on your desk and is too heavy to take it out every morning?
- Maybe you have all the tools you need on your desktop, but you don't feel comfortable using them?
Spend eight minutes moving kitchen appliances around where you use them. For example, create a breakfast area on your desktop, where there will be a coffee maker and a toaster or mini oven.Put your mugs and everything you need to make coffee in the cupboard above these appliances and you'll save time and do less unnecessary things in the morning. How many other areas besides the breakfast area can you create?
Get rid of cryptic and redundant tools
In addition to the meat shrouded in mystery in the freezer, every average kitchen has a lot of mysterious tools - objects whose purpose you will never be able to understand in your life. These gizmos are brought to us as gifts, we ourselves buy them for no reason at all. In addition, our kitchens hold space-eating collections of the same items. How many garlic presses, potato peelers, and bottle openers do you have?
I don't know how many drawers you have in your kitchen or what they contain, so it's up to you to decide if you can complete this task in eight minutes or devote eight minutes to each drawer.
As you open each drawer, make a decision quickly. In the case of multiple instances of the same tool, keep the best one. Then throw the extra copies in the trash or put them in a charity bag (but only on the condition that you donate them as soon as possible). Or, if you can think of a legitimate place for one of those extra tools, like a picnic basket or cooler bag, put it there. As for mysterious items, give them to someone or throw them away, but be sure to free up space.
How to fold packages correctly?
 In order for the folded bag to be triangular, it is folded lengthwise 4 times.You should get an even strip, it is folded into corners so that the corners roll over one another, if there are handles, they are hidden in a pocket. If free time is running out, then you can fold the bags into squares or rectangles (this depends on the shape of the package). First it is folded lengthwise, then across.
On a note! Compactly folded packages take up much less space.
Another convenient way is called a tube. First, the package is folded lengthwise several times to make a strip, and then wound around the finger. So that it does not turn around, the ends are fixed at the help of pens or stationery gum.
Jewelry stand photo
AT this video you you will see how you can make a multi-tiered stand for your jewelry and all sorts of cosmetic little things, such as varnishes and glosses. To begin with, you will need a plate, a cup, a wine glass and a candlestick frame, which you connect with super glue, strictly observing the central axis. Coat your structure with paint: use spray paint and then acrylic paint. Dry the paint for 4-6 hours and then top coat with a protective clear coat in a spray. Decorate your stand with fabric roses, rhinestones, beads. Ribbons and lace - to your taste and imagination.
The execution technique in this video is the same as in the first one, the only significant plus is the use of a lace napkin as a stencil when painting, very elegant and beautiful. And don't forget to use gloves when painting)
A beautiful and very original thing, a modern version of the box - a picture-holder for jewelry. It is very easy and simple to do, and it looks just great.
This stand is perfect for your necklaces, bracelets and headbands.Again, use a candlestick long enough to hang your beads. We attach sticks to it, on which your jewelry will be held. We glue and paint everything. Decorate as you wish.
This is no less complex and not as multi-tiered option. All the same candlesticks, plates, glue and paint.
Excellent stand for jewelry: bracelets, headbands, watches. To make such a thing is very easy and simple. To do this, you will need: a cardboard roller from a paper towel, a plastic stand for CDs, scissors, glue and a piece of black velvety fabric.
Have you ever seen beautiful jewelry stands in the form of small mannequin dolls? Somehow they are even called, but it doesn’t matter))) So, such a holder for jewelry can be made from an ordinary Barbie. Well, you can watch the whole process of alteration from the video of the master class
These were very easy ways to create boxes and stands for your jewelry. They will help you keep your room tidy and store all your valuable accessories. So don't waste your time and get creative.


Post Views: 1,796
In the arsenal of every woman who follows fashion, there are many different jewelry that allow you to make the image stylish and unique. But, unfortunately, this raises the eternal problem of the beautiful half of humanity - there is nowhere to store all the rings, bracelets, necklaces, beads. Therefore, the issue of acquiring a receptacle for all women's "treasures" is quite relevant. We suggest you make a stand for jewelry with your own hands.
How to make a cardboard jewelry stand?
The simplest option, which does not require serious effort and expensive material, is a cardboard jewelry stand in the form of a tree. To do this, you can use boxes from shoes, household appliances - the main thing is that the cardboard is dense. In addition, you will need:
- hole puncher;
- scissors;
- scotch;
- acrylic paint;
- pencil.
Insert earrings from your collection into the holes of the tree: isn't it a wonderful accessory?
Ideas for quickly putting things in order in the closet
clothing
Sweatshirts
Cashmere and silk blouses can hang on a hanger or lie on a shelf. High-quality fabrics do not wrinkle, but you can’t put more than 4 in a row. Below should be denser and heavier things, and on top the lightest and thinnest. If you have thick sweaters, then put them on the shelves.
Skirts and trousers
It is customary to place trousers and skirts on the crossbar. Thus, a lot of things are placed in a small area and it is convenient to examine and select them all at once.
Suits, blouses and shirts
Hang shirts, blouses and suits on a hanger. In this case, these things will not be wrinkled and will always be ready for use.
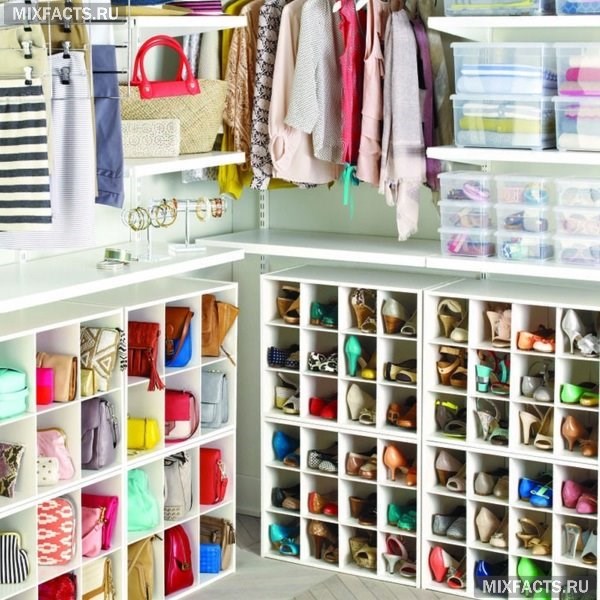
Shoes
There should be space for shoes in a large closet. It should only be kept clean. That is, after going outside, shoes need to be washed and dried, and then put on the shelves. It is advisable to put shoes on the shelves below or place them on the crossbar.
On the bar, on clothespins, you can perfectly hang high boots. When stored hanging up, the boots are easy to take on and keep their shape perfectly. If there is not enough space for shoes, you can make cells from pieces of large format PVC pipes.
A smart solution is to place shoe boxes under the bar where short items hang.
when there is order in the closet - it will not be difficult to find the right thing
Underwear and socks
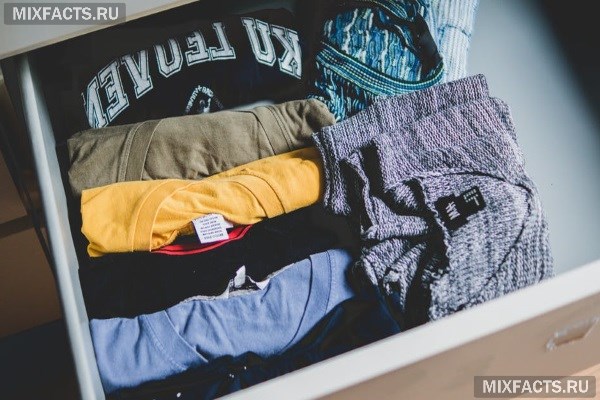
It is not easy to keep order in the closet if it has a lot of drawers. In order to organize a large number of items, you need to deftly and compactly roll them up and arrange them vertically. True, in this system, dividing elements will be required to distinguish one object from another. These can be tubes or partitions made of cardboard. Usually cardboard parts are left after shopping.
Try to clean up the drawers and you will see how convenient can it be storage of scarves, underwear, socks, T-shirts and T-shirts.
Fold things in drawers diligently so that there are no creases and you can take any accessory at the right time, and then easily put it away.
Accessories
A modern woman needs a whole arsenal of bags for all occasions, of different colors and textures. In order for these items to be in their place and always available, do not take up much space, you need to competently approach their storage.
Select a pair of spacious upper shelves for bags. The main thing is that these accessories keep their shape and do not wrinkle. It's good to fill them with paper. Then the bags will be like new and always ready for use. In addition, accessories can be stored on a long hanging rack. It looks like a two-sided organizer, where there are many pockets for bags.
Bags can be stored in different ways, but it is better to do it in such a way that the entire assortment is on the review, but you can easily take one of them, and at the same time all the others do not fall out of the closet.
Scarves and shawls are stored folded in transparent containers. Cashmere and wool must be protected from spoilage by parasites. Special sachets protect accessories from moths.It is more convenient to store underwear in retractable small drawers. Lay out the linen so that when you pull out the drawer, the whole arsenal is in front of your eyes.
The smallest accessories and decorations can be placed in the cells from under the eggs or ice making molds. Jewelry is perfectly located in caskets or hanging pockets.
Getting rid of unnecessary things
An important aspect of cleaning in the closet is the timely cleaning of unnecessary things that only seem to be needed. Start periodically sorting through the items in the closet and ruthlessly part with everything unnecessary. Definitely don't throw away your everyday, favorite things. And also, do not get rid of those clothes that are designed for the holidays and fit perfectly on the figure.
Definitely need to dispose of what you have not worn for years. Items that are stained or don't fit are also to be discarded. Do not store or wear clothes in poor condition - with a lot of pellets, stretched, faded.
It is important to arrange such cleaning from time to time, otherwise there will be little space in the wardrobe, which is undesirable. Things must breathe, and this is possible only if there is a spacious closet
Clothes in good condition that don't fit you can be sold or given to other people.
convenient arrangement of things in the closet makes life easier
Idea 8. Universal knife holder
A knife holder is a very useful tool in the kitchen that helps keep your workspace tidy and keeps your knife blades sharp longer.

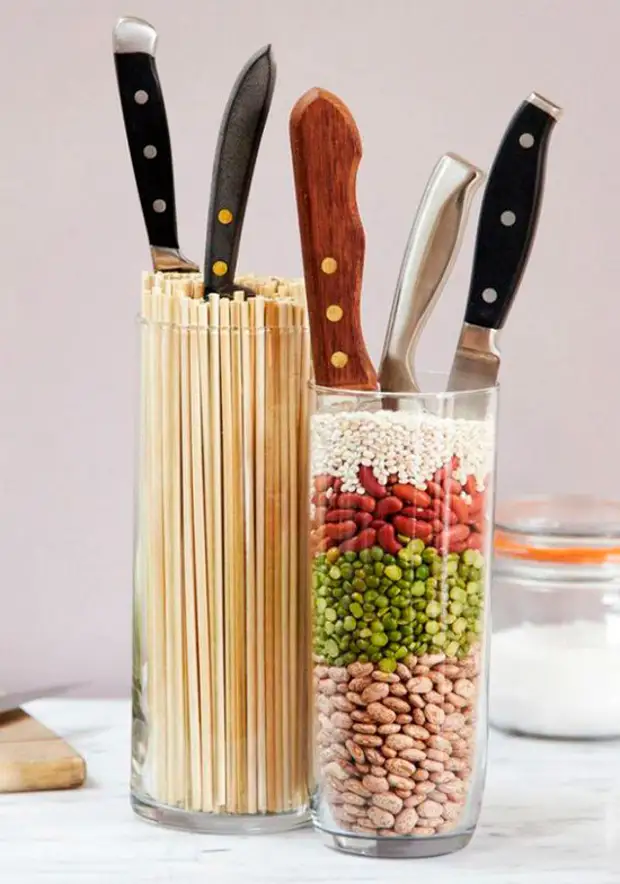
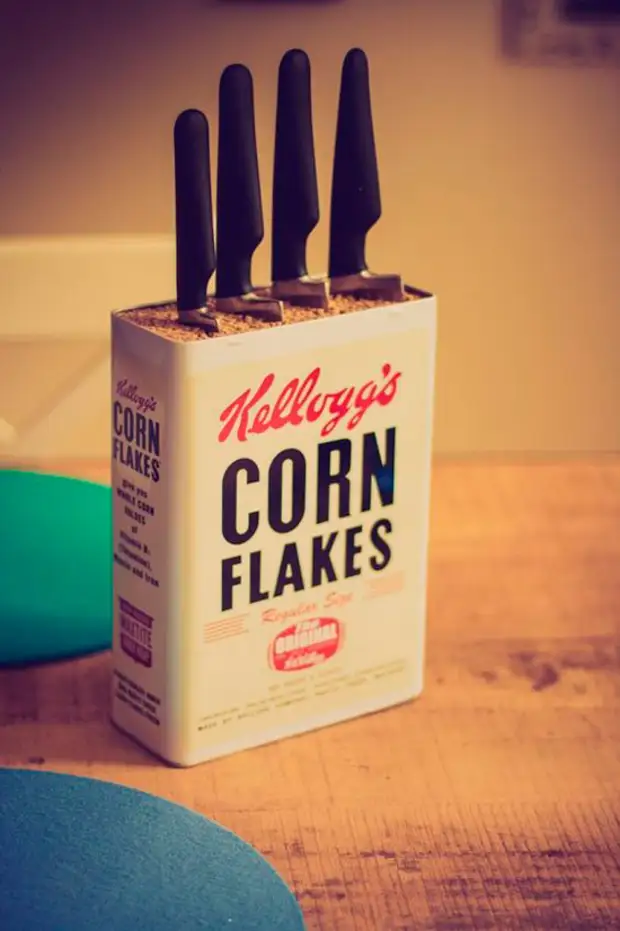
Making a knife holder with your own hands is very easy - just pick up a small vase and fill it tightly with bamboo / wooden skewers, colored beans or ... colored spaghetti, as in our master class.
To make a knife stand, prepare:
- A container or vase is the height of the blade of your largest knife. The shape of the container can be any, but without any bends;
- Spaghetti, lots and lots of spaghetti;
- Several large ziplock bags (or just large bags that can be tightly tied into a knot);
- Alcohol (for example, vodka);
- Liquid food coloring in your desired color (or multiple colors if you want to make a multi-color filling)
- baking sheets;
- Aluminum foil or an old oilcloth tablecloth;
- Paper towels;
- Kitchen scissors.
Instruction:
- Make sure your container is clean and dry, then fill it tightly with spaghetti. When the container is full, take out the spaghetti and add a couple more bunches of pasta to this pile as a spare (in case of replenishing broken sticks).
- Divide the spaghetti evenly among the bags and pour enough alcohol into them so that it can wet all the sticks. Next, add 10-40 drops of food coloring to each bag.
- Seal or tie your bags, then put them in additional bags to avoid leaks. Slowly shake and turn the bags to mix the dye into the alcohol and pasta. Next, lay the bag on one side and leave for 30 minutes, then turn the bag over again and leave it for another half hour. Continue soaking the spaghetti in this way (no more than 3 hours) until it reaches the desired color.
- Cover your baking sheet with aluminum foil, then a layer of paper towels (or oilcloth). It is advisable to wear gloves to protect your hands from staining. Remove the spaghetti from the bags, after draining all the liquid, lay them out on a baking sheet in a single layer and leave to dry. From time to time, spaghetti needs to be sorted out to dry them evenly.

Once your spaghetti is COMPLETELY dry, start putting them in the container. Shake the filled container and flatten the spaghetti. Insert your knives to determine the optimum filling density, add pasta or remove excess if necessary. Now, using kitchen scissors or other very sharp scissors, cut the spaghetti to the desired length without removing it from the container (best done over the sink)


It is important that spaghetti does not exceed the height of the container by more than 2-3 cm, otherwise they will break quickly.
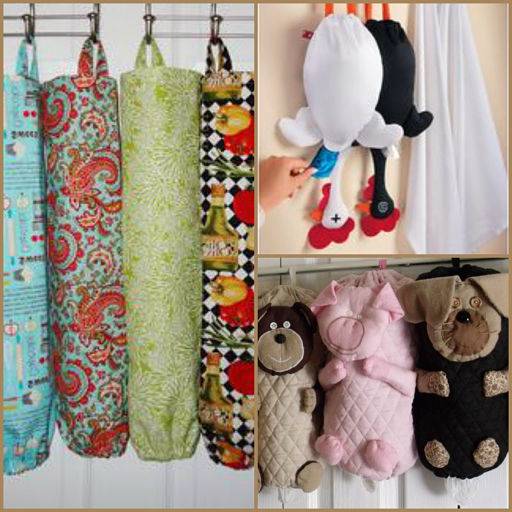
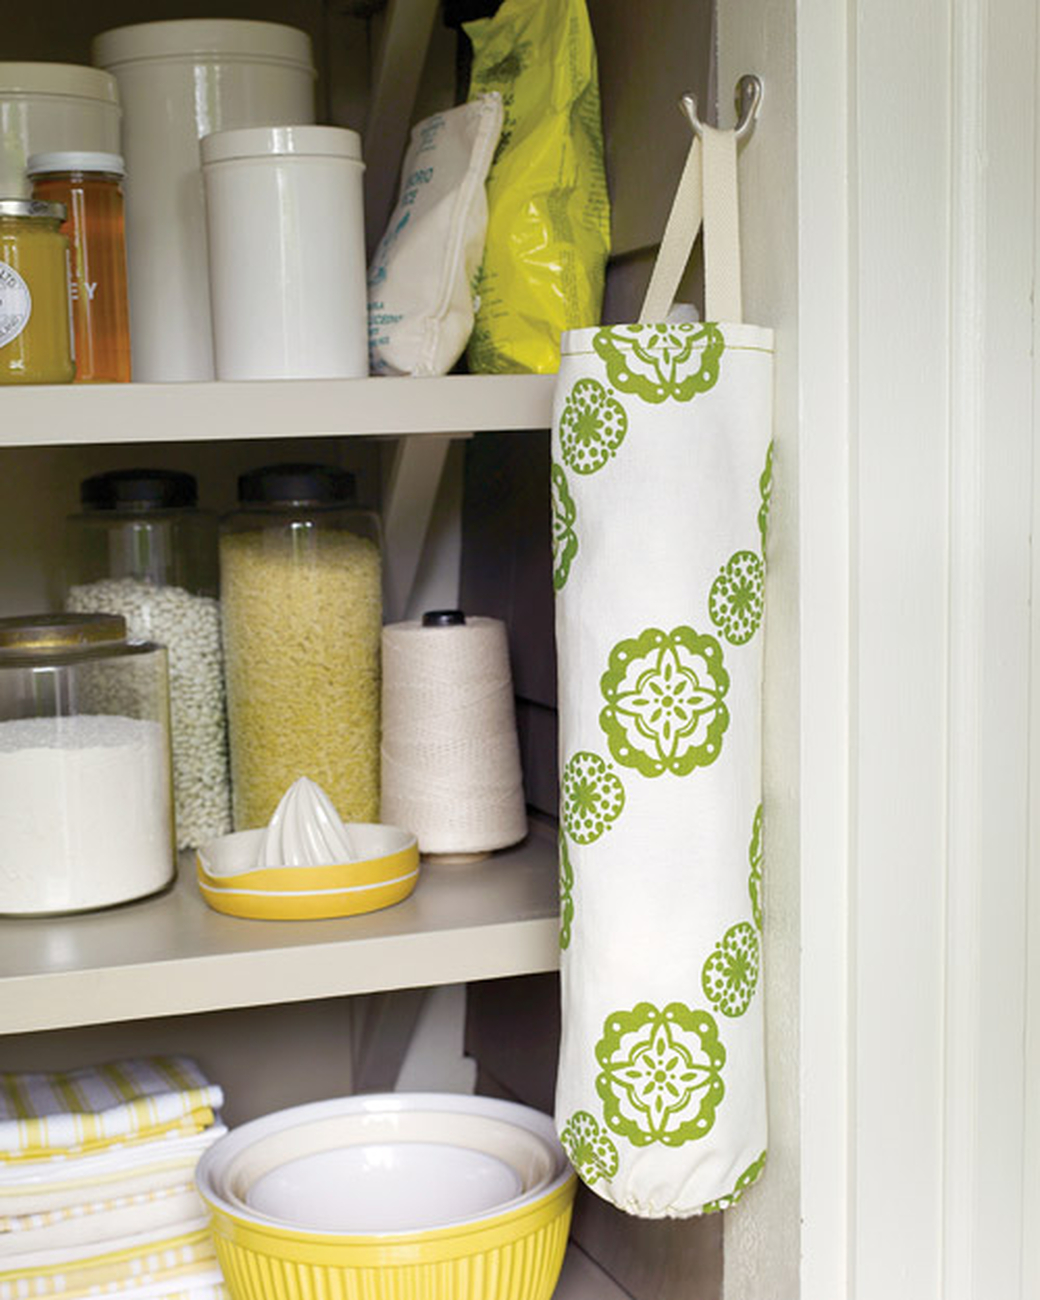
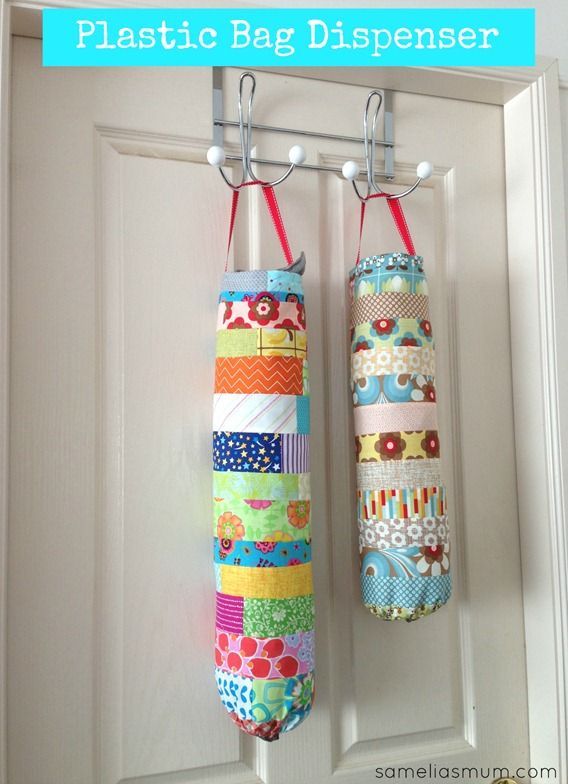
Bag dolls
This way of storing various little things is ideal for those housewives who love needlework and unusual, original and creative products for the home. There are several options for fakes:
Knitting. Very beautiful dolls or animal toys can be knitted from threads using knitting needles or a crochet hook. Examples of organizers for storing small items in the kitchen, provided for convenience pictured below. You can also try to make them yourself by inventing your own toy options.
Here you can fantasize to the fullest and invent something that will complement the interior of the house.
It is important that the product is capacious and has a special opening for folding bags.
The organizer can be made so that later the toy is useful for puppet theater, and not just for kitchen needs.
Sewing. For such organizers, any fabric that is available at home is used. It can be plush, satin, fur, cotton, or a combination of these materials. Also, to give the toy a more beautiful look, buttons for eyes and other materials for decoration are used.
Such an animal doll will give a good mood and hide bags in itself. It will look very nice if you make several of these crafts, but different ones.
A sewn ordinary fabric bag will be no less effective.
Check spices and herbs for freshness
My mother could never understand why people buy something in small quantities when buying a lot is cheaper. Dry spices and herbs have a shelf life of six months to a year. Do a smell test! Set a timer for eight minutes and sniff each container of spices and herbs in turn to check for freshness. Write down the names of the ones you want to replace. If you need to buy several types of spices in bulk, purchase several glass spice jars from the same store. Here's a little tip to help you find the spices you need in no time: store them in alphabetical order.
How to organize the package storage system?
That is why they "breed" in our homes at a tremendous rate that most people visit stores daily, bringing a new package home every day. As a result, a mountain of unnecessary bags accumulates in the drawer very quickly.
Typically, packages are stored in one of the following ways:
- bags nested in one;
- special shelf;
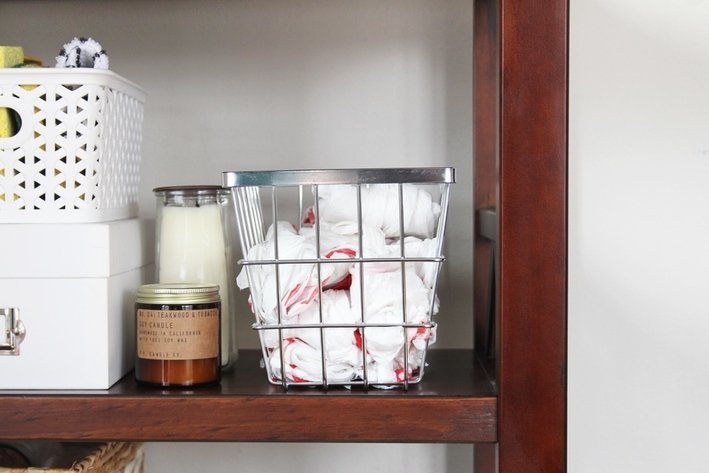
- basket;
- drawer.
I suggest organizing the magazine bag storage system to see how much usable space is "eaten up" by this sloppy pile of bags. And most importantly, how beautifully and neatly they can be folded so as not to be annoyed every day from the mess made in the kitchen.
Idea 1. Cutting board tablet holder
Watching your favorite TV shows on a tablet or peeking into a recipe book while cooking will become easier if you make a special stand for this from ... an ordinary cutting board. Making this DIY kitchen craft will take no more than two hours, and it will be used every day.
To make a holder for a recipe book or tablet you will need:
- You can either use an old cutting board or buy a new one (wooden is best, but bamboo works too). Its size should not be much larger or smaller than the tablet.
- A small wooden plank, or better a molding fragment (it will hold the tablet / book).
- Another block of wood or plywood from which you can cut a sharp triangle;
- Paint or stain of the desired color, for example, to match the countertops, facades or kitchen apron;
- Brush for painting or rags for staining;
- Jigsaw or saw;
- Wood glue or any other strong adhesive.
Instruction:
-
Using a saw or jigsaw, shorten your plank or molding to the desired size (the width of the board), sand the edges with sandpaper, then simply glue on the bottom of the board.
- Cut out a piece of wood for a stand in the shape of a sharp triangle with a right angle as in the photo below and glue it too.
The angle of inclination of the holder will depend on the inclination of the hypotenuse of the triangular bar
- Paint the entire piece following the paint manufacturer's instructions and leave to dry.
- If desired, the handle of the resulting stand can be decorated with a jute rope or ribbon. Thus, when the stand is not needed, you can hang it on a hook.
Also, the craft can be further decorated - for example, artificially age as in this master class, draw inscriptions, burn out the drawing, cover with slate paint. In the next selection of photos, you can get decor ideas for original cutting boards.


Ready-made shopping baskets from the store
Here it is only for taste or interior preferences. In such blanks it is convenient to fold both T-shirt bags and huge branded bags. They are also placed anywhere: both in plain sight and away from the eyes, both at hand and in a specially designated place.
Storage in containers or boxes
Here you can also show your imagination and use those materials that are definitely not useful in the house.
For such fakes, a large cardboard box may come in handy. In it, you can simply put different bags, sorting by size, folding one into one or on top. On top of the box you need to make a hole through which you will pull out the bag. For such an impromptu organizer, you can allocate space on a shelf in a kitchen cabinet.
A plastic box is also suitable - it can be made a stylish accessory that will complement and decorate the interior.
The third option is a large plastic bottle
It is important to cut off the bottom, it is through it that the bags will be placed inside, and through the neck they will be removed. Leave the lid on if desired.
You can attach it anywhere.If you have time and ideas, you can decorate the bottle at your discretion and make it an original kitchen accessory.
How to properly store bags in the kitchen is a question that many housewives ask. An almost ready-made accessory that can be used is a package of napkins, it is small, so it does not take up much space.
If you show imagination, then original crafts can be made even from a container from under the air conditioner, simply by cutting out the figures and decorating them. Good luck and inspiration!


