- At what distance is it installed in the room
- Eurostandard installation
- Soviet standards
- Minimum height from floor
- At what height are sockets installed?
- Adding refrigerant and starting
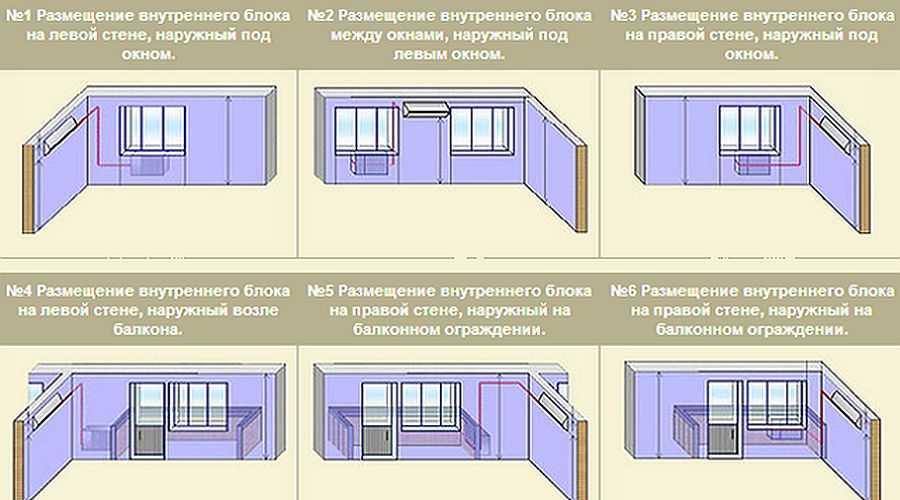
- Split system connection options
- Network load calculation
- Which cable to choose for the kitchen
- Air conditioners in a one-room apartment
- Corner installation of the air conditioner
- Vacuuming the system and its connection
- Height of sockets in the kitchen
- Network connection rules
- Air conditioning options in a private house
- Types of switches
- Switches with built-in motion sensor
- The principle of operation of switches with a motion sensor
- Remote switches
- The principle of operation of remote switches
- Video: remote switch
- Touch switches
- Video: touch switch
- Rules and requirements
- Network connection
- Living room
- 1. At the door
- 2. In the TV zone
- 3. In the sofa area
- 4. At the desktop
- Where is it better to install air conditioning in a two-room apartment
At what distance is it installed in the room
We will analyze European, Soviet options for mounting connectors, find out the height from the floor.
Eurostandard installation
 This term became popular after the introduction of the definition of "European-quality repair". Some users are comfortable with the following location of sockets and switches:
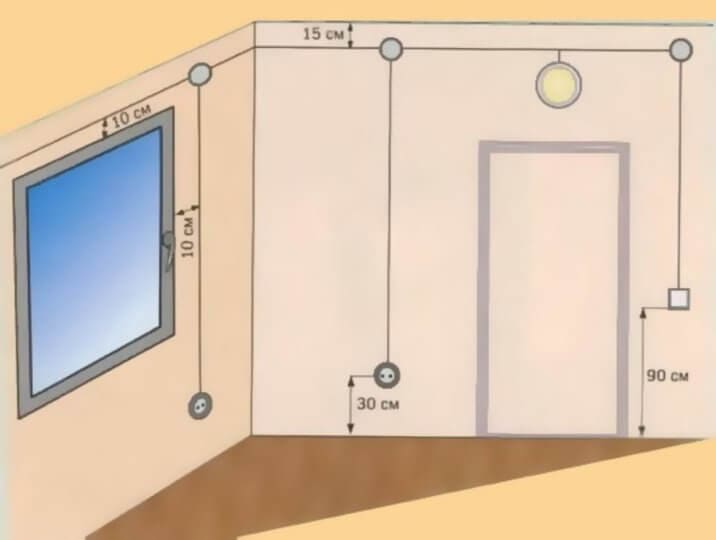
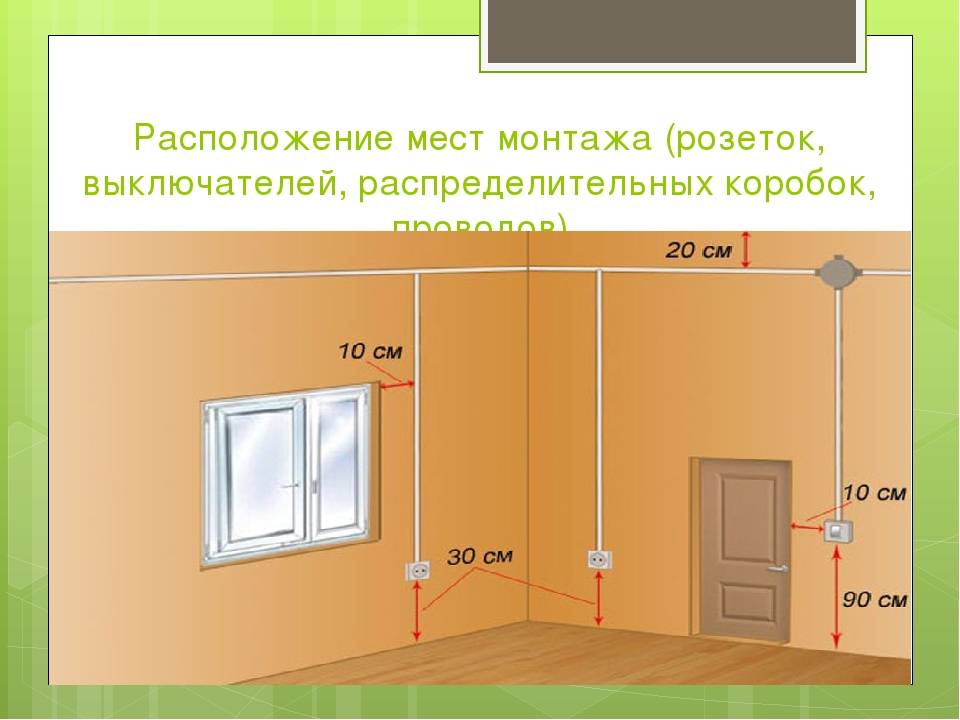
- switches at a distance of 90 cm from the floor surface (passing by and without raising his hand, a person fixes the lighting in the room);
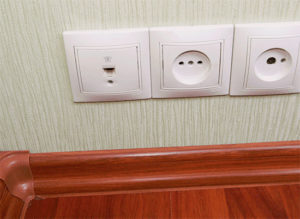
- mounting electrical sources at a height of 3 cm from the floor (at this distance, you can hide the wires and conveniently use household appliances).
When choosing euro sockets, you need to know that the diameter of the pins and the length between them is greater than that of Russian models. The current strength of imported devices is 10-16 amperes, Russian - no more than 10. Therefore, more powerful devices can be inserted into such connectors.
Soviet standards
Previously, sockets were fixed at a height of 90 cm from the floor, switches - at a distance of 160 cm. These indicators are no worse than the European standard and have a number of advantages:
- the plug can be inserted into the electrical socket without bending down;
- small children do not reach the connector, because it is installed at a height;
- such a location is convenient for equipment that does not need to be constantly connected to the network (air conditioners).
Minimum height from floor
 The rules for the installation of electrical installations and the design of residential buildings do not contain clear requirements for the location of sockets and switches with regards to flooring, walls and other elements.
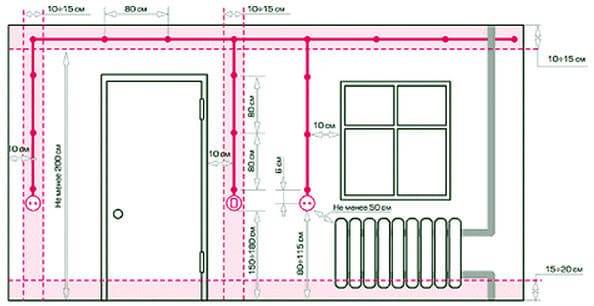
The Rules for the Installation of Electrical Installations stipulate that the distance from the devices and the gas pipeline must be more than 50 cm. In the bathroom, it can be placed at a distance of 60 cm from the sink.
At what height are sockets installed?
The joint venture states that electrical installations must be installed anywhere at a height of up to 1 meter.
The distance from the sockets is not indicated for connecting electric stoves and air conditioners. In schools, kindergartens are placed at a height of 180 cm from the floor. The recommended length from the floor covering is 1 meter.
The height and distance are determined by the owner of the premises. In some cases, the rules apply:
- sockets are placed no closer than half a meter to the gas pipeline;
- in the kitchen and in the bathroom, electrical installations are placed at a distance above 60 cm from the surface of the floor, water supply.
Plug sockets in houses must be protected by a special device that will block access to them when the plugs are pulled out.
 After the installation of connectors for electrical appliances and switches is completed, the PUE indicates the need for work regarding electrical measurement. They will allow you to identify violations, possible malfunctions and completely secure the process of use in everyday life.
For competent and convenient placement of connectors and switches, it is first recommended to determine in which direction the door opens. Then the switches are placed on the side of the handles on the door leafs. They do this at a distance of 80 cm to 1 meter, depending on the height of the residents.
The placement of electrical installations is associated with the type of premises:
- in a long corridor, on a staircase, sources are mounted at the beginning of the path and at the end;
- in the living room and bedroom it is comfortable when the switches are located at the entrance to the room and next to the sofa, bed, in order to simplify the process of using the lighting.
The length of electrical installations from the floor must be chosen taking into account the location from which they will be accessible. For example, at the entrance to the room, a height of 90 cm is chosen, next to an armchair, a bed - 60 cm, so that it is convenient to reach out with your hand.
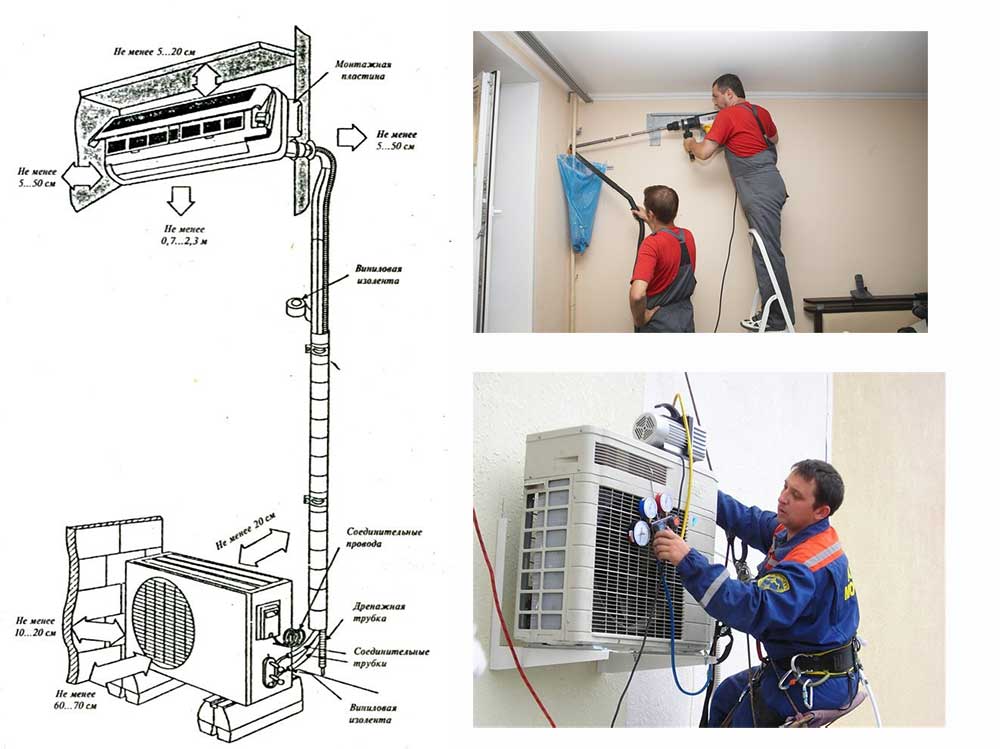
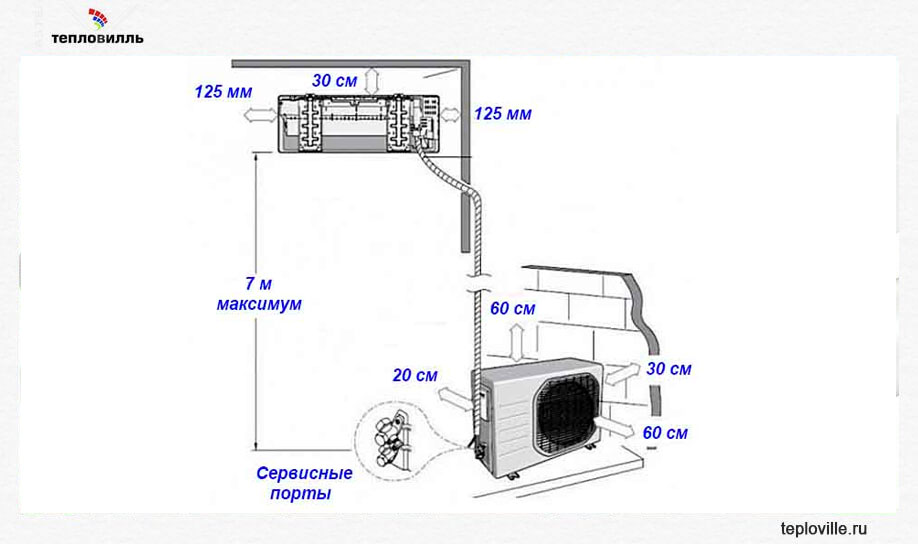
Adding refrigerant and starting
After the vacuum in the device is created, it is possible to fill the system with refrigerant.In the case of split air conditioners, the outdoor units are filled at the factory with an appropriate amount sufficient for the piping length specified by the manufacturer. If the unit will be installed with more than 10 m, you need to determine the amount of additional refrigerant and add it before opening the valves of the outdoor unit. The volume per extra meter depends on the capacity of the system and the diameter of the pipeline. For 1⁄4 inch pipe, the amount of additional refrigerant is 20 g/m.
After filling with freon, the air conditioner is started using the remote control and the cooling mode is set, the pressure readings on the pressure gauges connected to the service valve of the air conditioner are monitored. The pressure measured by the manometer during cooling operation is the suction pressure. For the R410 A coefficient, it should be about 7.5 bar, which corresponds to a refrigerant evaporation temperature of +2 degrees.
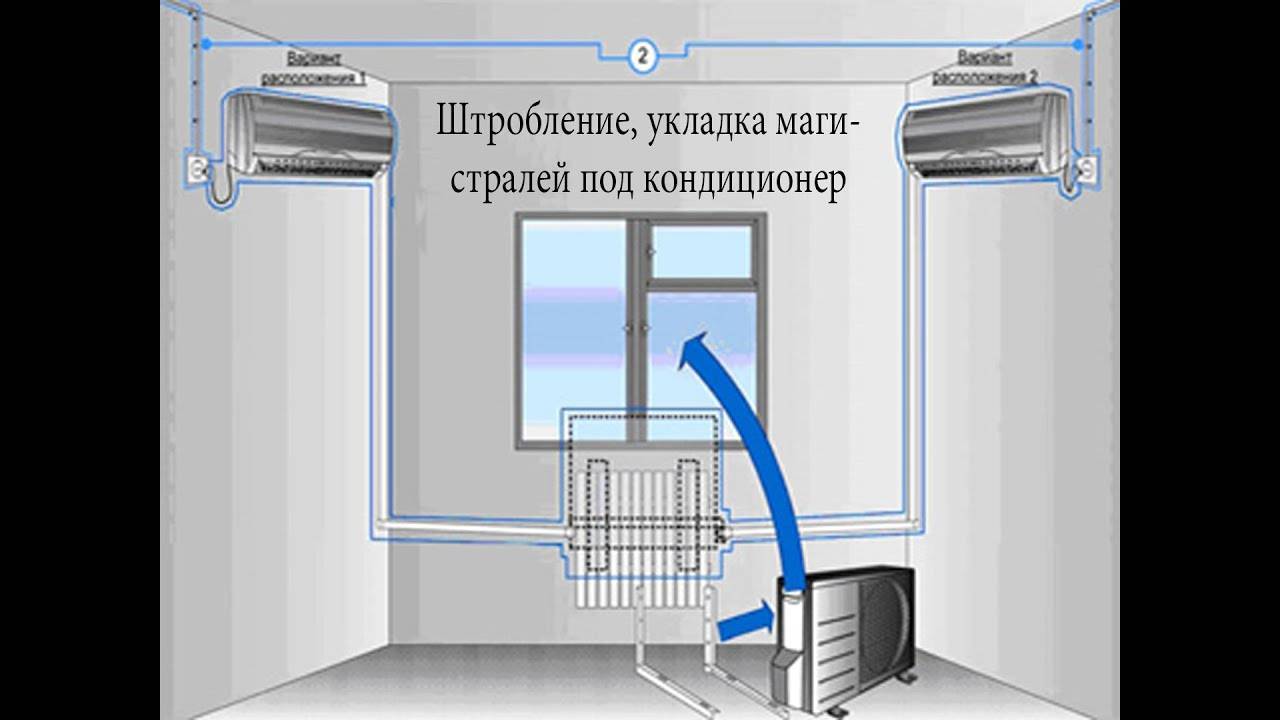
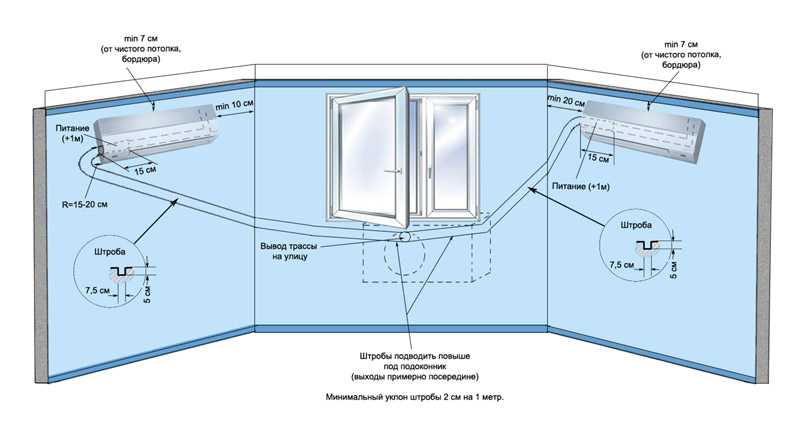
Split system connection options
Connecting an outlet designed for a split system to a common network can occur in several ways.
- The first connection method is carried out through the distributor of the room in which the air conditioner will be located. In this case, you will not need to use the socket and plug of the device. The connection method is feasible if the general wiring of a certain apartment can withstand the power of all devices that will be connected to it at a time. Make sure all pins are securely connected, don't come off and are well protected. Terminal blocks can be used to connect the cable. The air conditioner is rarely connected directly to the mains. Usually use a plug with a cord.
- A hidden connection method is used when installing a split system at the time of a major overhaul. In such cases, with the help of a perforator, strobes are beaten in the wall from the side that is less noticeable relative to the device, into which the wiring is hidden. This cable is connected to the air conditioner outlet. The method is optimal based on its aesthetics and safety. To connect to the network use a hidden installation.
- The open method is used at the moment when the air conditioner is installed upon completion of the repair work. One end of the wiring is connected to the distributor, the other - to the outlet. The cable runs along the wall. So that it does not spoil the view too much, you can use a decorative cable channel. Nests are usually used overhead type.
- Many people think about whether an outlet for an air conditioner is needed, if there are already enough of them in the room. If you want to connect to an outlet that supplies low-power equipment and is located far from the air conditioner, the problem can be solved using a loop. You will need to put the socket where it will be convenient to connect the air conditioner, and stretch a cable from it to the main power point. This option is feasible provided that the main node is powered by a network that can withstand a high rated load, otherwise the risk of overload and burning of the wiring increases.
Network load calculation
Location is not the only factor to consider when installing an electrical outlet for an air cooler
It is also important to correctly determine the power of the future connection point.
To ensure reliable power supply to the air conditioner and eliminate the risk of an accident, it is necessary to correctly calculate the power of the electrical wiring line to which the air conditioning device will be connected.To do this, you need to know the maximum power consumption of the air conditioner (the highest indicator of power consumption during operation). Usually this information is contained in the technical data sheet of the device.
The power of a household air-cooling appliance depends on the area of the refrigerated room and varies between 800-1800 watts. Accordingly, during operation, this equipment creates a load on the network at the level of 3-10A. This means that a standard socket outlet with a rated load not exceeding 16A is sufficient to connect the household air-cooling appliance to the mains.
The exception is high-power air conditioners installed in very large rooms. For such devices, high-power power points are purchased or direct connection is made without the use of an electrical outlet. It should be remembered that the electrical outlet, regardless of the power level, must be grounded.


All of the above calculations are relevant if a separate line is laid under the air conditioner, to which other electrical appliances are not connected. If the line is used to connect other household appliances, then the maximum power of these devices must be added to the maximum power of the air conditioner. If the total indicators exceed the level of permissible load on the network, then the simultaneous inclusion of these devices is prohibited. Experts advise connecting the air conditioner to a separate line, this will avoid overloading the wiring.
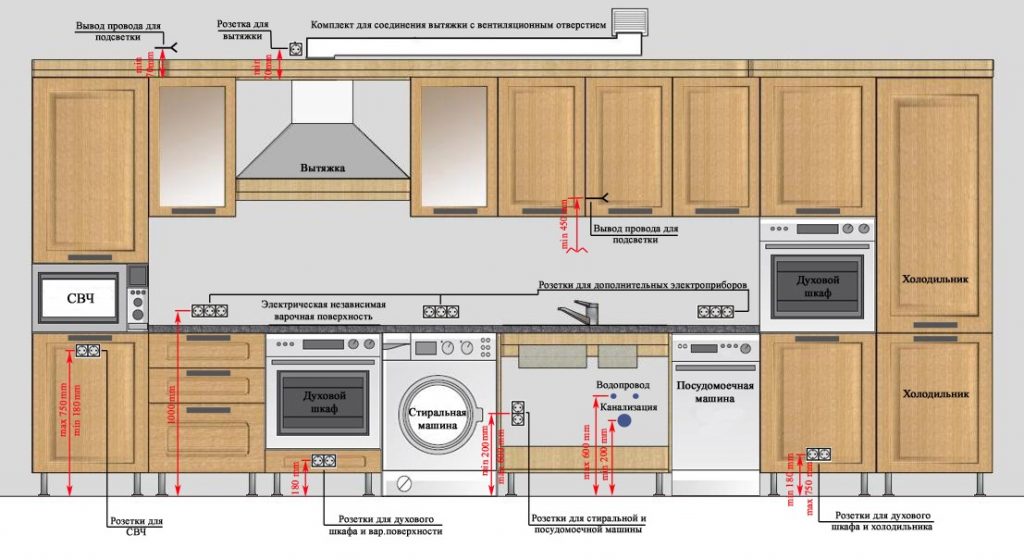
Which cable to choose for the kitchen
Next, you need to calculate the cross section of the common supply wire of the electrical panel and the outgoing wiring to each pantograph.Follow the rules here:
with a load of devices up to 3.5 kW - copper cable VVGng-Ls 3*2.5mm2
with a load of devices up to 5.5 kW - copper cable VVGng-Ls 3 * 4mm2
with a total load of all devices up to 10 kW - copper cable VVGng-Ls 3*6mm2
with a total load of all devices up to 15 kW - copper cable VVGng-Ls 3*10mm2
Why the VVGnG-Ls brand should be, is detailed in the article below:
Even if you have a house with an old grounding system (without a third protective conductor), still do the wiring with a 3-wire cable. This will save you from additional costs for reconstruction and replacement of wires in the future.
In extreme cases, the third wire will be reserved for zero or phase, in case of a possible break or other damage.
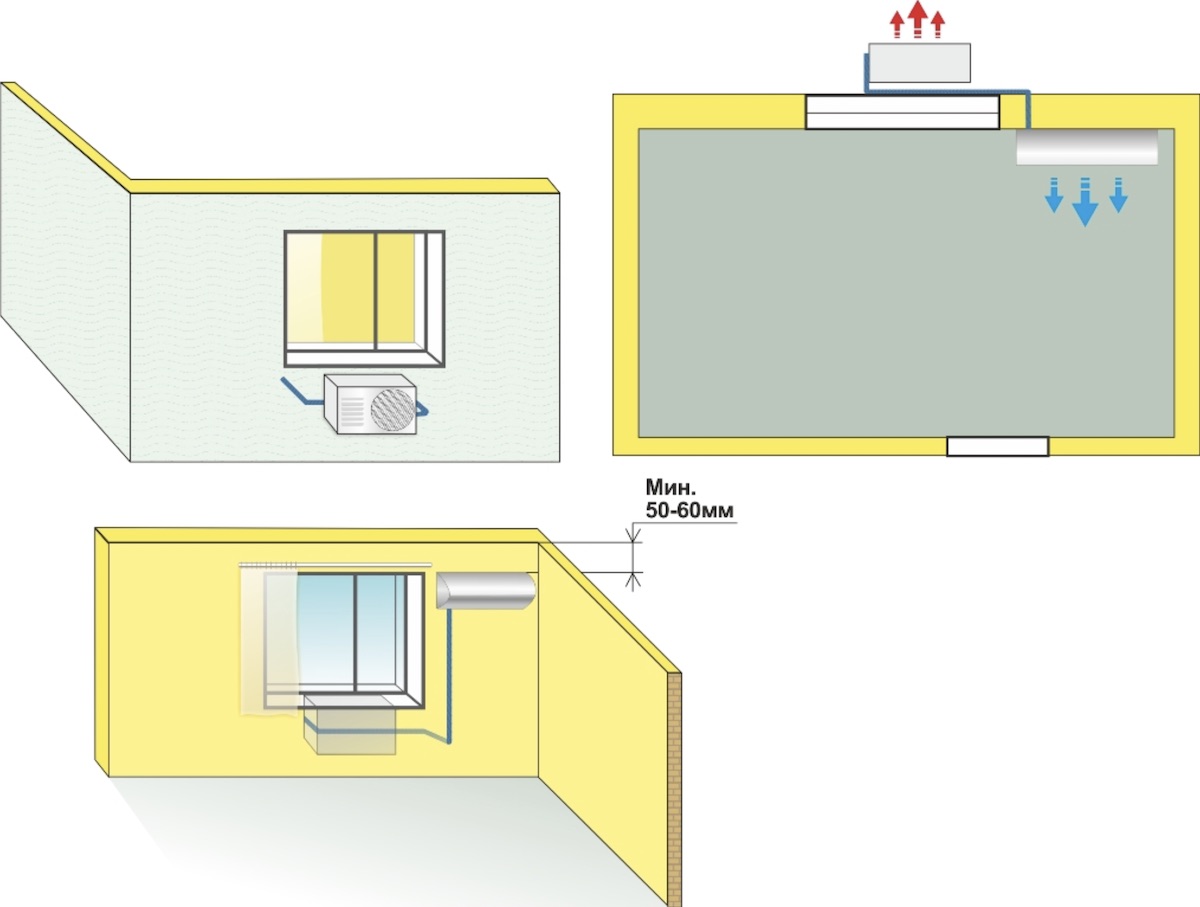
Air conditioners in a one-room apartment
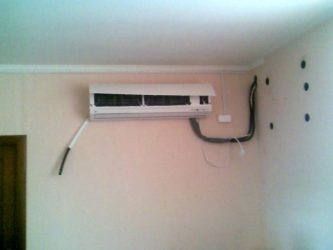
 air conditioner in the gap between the wall and the window
Many buyers are often mistaken about the possibility of high-quality cooling / heating of both the room and the kitchen with one indoor unit. Even when the device is placed in the hallway, which is equidistant from the rest of the premises, coolness or heat will not flow there enough. When the stove or oven is turned on, the coolness will instantly go away, and in the hallway it will always be very cold on the contrary.
An air conditioner with increased power is also not an option, since it will often work in stop-start mode, and this renders the main part of the system, the compressor, unusable.
Then how install air conditioning in the apartment with one room and which type to give preference to? There are three options here:
- installation of two split systems separately in the kitchen and the room;
- installation of a multi-split system with one outdoor and two indoor units;
- installation of a ducted air conditioner (in the odnushka, a low-pressure model is enough).
The only disadvantage of the first option is the presence of two external modules on the facade of the building. Installing a ducted air conditioning system is quite acceptable, but it will cost much more. In addition, you will have to pull the air ducts, mount them in a false mezzanine or wall, and most importantly, this can only be done in apartments with high ceilings.
With a ducted air conditioner, such a nuisance can arise as the spread of kitchen aromas throughout the apartment, because the air duct system connected to all rooms will mix the air taken from them, and then distribute it also to all zones. This air conditioner is ideal for several rooms in the apartment.
 standard odnushka in Khrushchev
If funds are very limited, then you can install one wall-mounted split system, but in such a way as to cover all the premises as much as possible. In an apartment with zones as in the picture, usually the best option for installing an air conditioner is above the doorway in the room. The air will be reflected from the opposite wall and enter the corridor and kitchen in 30% of the total air masses circulating in the apartment.
As an option - the installation of the block opposite the opening. But in this case, only 30-40% of the cooled / heated air will remain in the room, and 60-70% will disperse to the rest of the zones. This arrangement of the air conditioner is more suitable for a small room, where the temperature change is felt much faster, and the divergence of flows is better.
Do not buy a window air conditioner in a small room. Even modern models are noticeably noisy, which is unacceptable for the sleeping area. It is better to choose an air conditioner for a small room with less power.Devices up to 2-2.5 kW are hung in a room with an area of \u200b\u200bup to 15 m².
A window monoblock can replace a split system in the kitchen. It works properly on areas up to 15-18 m². But you will have to find a special place to collect splashing condensate, because under the window there may be a pedestrian walkway or seating area.
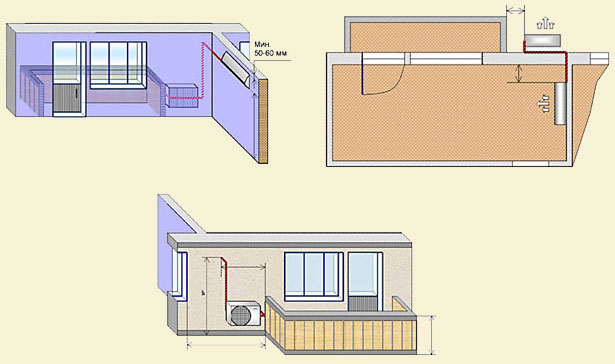
Sometimes the question arises of the correct placement of the air conditioner in a room with an adjacent balcony. There are no deviations from the rules in the installation of the indoor unit. It is recommended to hang the outdoor module on the facade or on the side of the balcony/loggia. Mounting option inside possible, but only if there is no glazing. An elongated track is laid between the blocks, which passes through the balcony to the street under a slope.
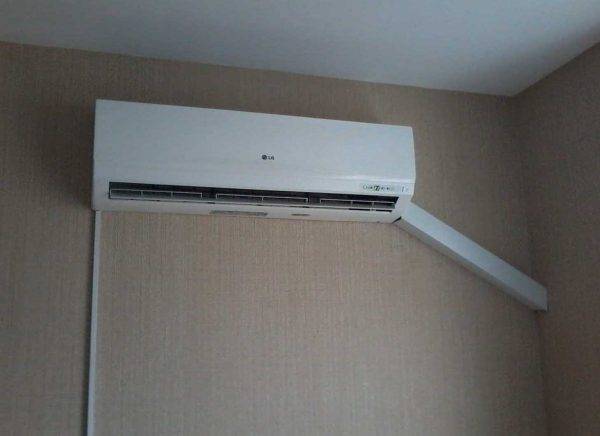
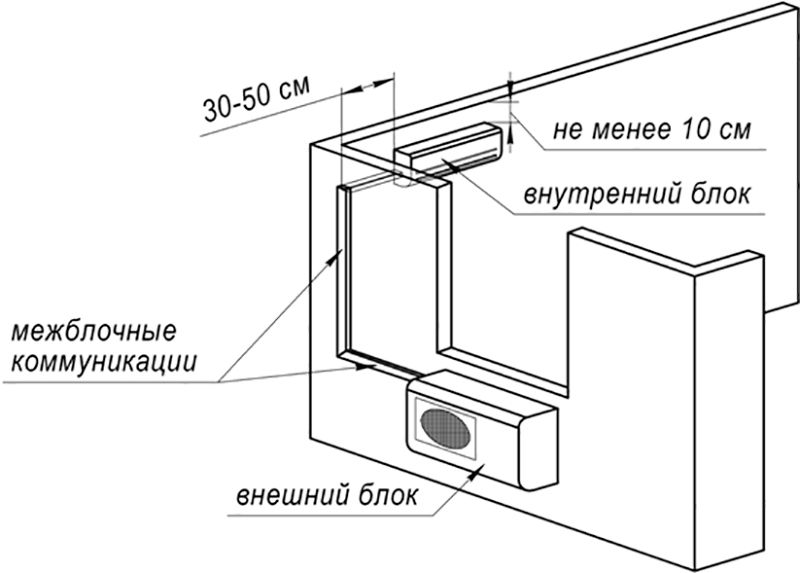
Corner installation of the air conditioner
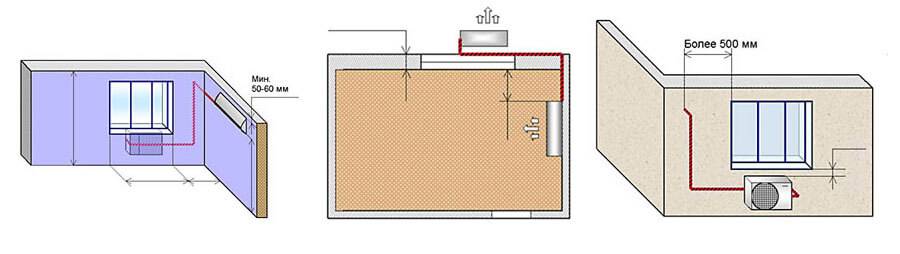
You can install the air conditioner in the corner of the room where another way is simply impossible due to the architectural features or the size of the room. Some manufacturers have corner models of split systems with a very attractive design and compact dimensions. But this is the least desirable location of the air conditioner in the kitchen or room, since in any case, the distribution uniformity will suffer and the formation of different temperature zones cannot be avoided.
At the same time, sometimes the question arises of where to place the air conditioner in the room, if there is an opening 70 cm wide between the window frame and the wall, and there is no other place to choose. In this case, corner mounting is justified. When the landlord chooses this option, then the location of the doorway should be taken into account - you can not hang the device in front of him, as the air will go to another room.
Vacuuming the system and its connection
After the system is fully assembled, it must be evacuated - that is, to expel all the air that is in it. Vacuuming can be done in two ways:
- improvised (by the “zilch” method) - when the displacement of air and the filling of the system with freon is achieved by sequentially opening and closing the ports for connecting the route;
- technological vacuuming - for this you need to connect a vacuum pump to the route and leave it to work for 5-7 minutes.
After completing all the above steps, the system is ready for operation.


Thus, self-assembly of an air conditioner at home does not require complex engineering knowledge and skills from the contractor, but as a result of these actions, the contractor has the opportunity to save some money and acquire new skills.
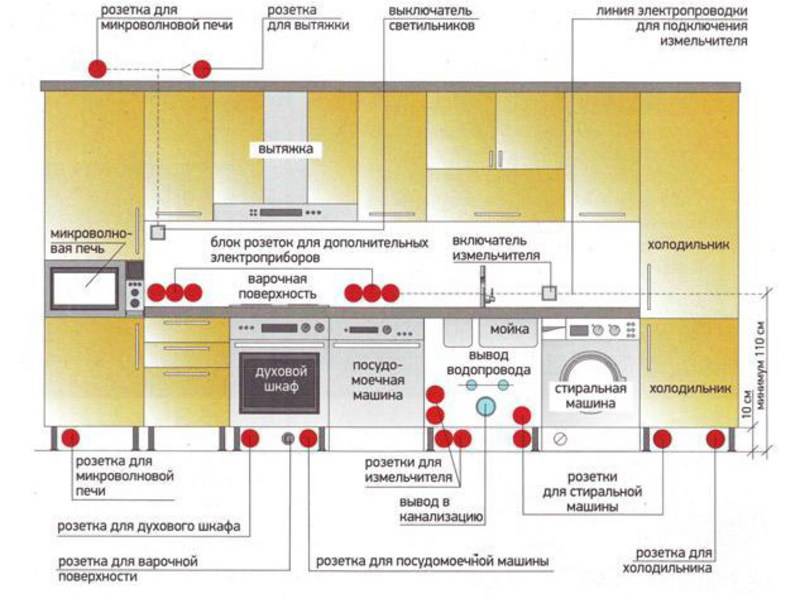
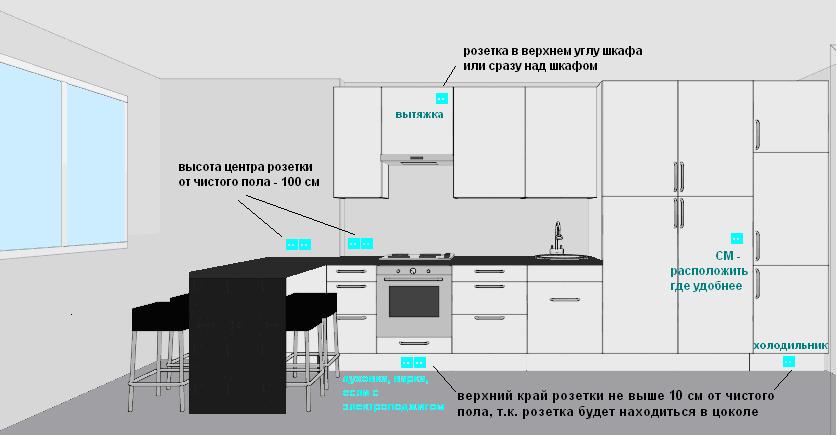
Height of sockets in the kitchen
In this room, up to half, and sometimes more, of the total number of home appliances is concentrated. At the same time, part of the equipment is built-in or stationary, with part they work exclusively on the table. Therefore the question location of sockets in the kitchen - diagram and placement height - it is worth considering separately.
The diagram above shows one of the options for the location of the power supply elements of a linear type kitchen. It should be noted that with the angular placement of furniture and appliances, the general principle of placement is preserved.
But for an island-type kitchen, the power supply device is a little more complicated - you will need to draw a conclusion through the floor, under the floor covering, or bring cables from the ceiling in order to provide electrical appliances located away from the walls with electricity.For permanently installed appliances - stoves, dishwashers, hoods - sockets are also made stationary, hidden (usually they are hidden on tables and cabinets). For small, periodically connected equipment, it is convenient to make a semi-hidden socket, which in the usual position is located under the table top, and, if necessary, turns up and down with sockets for plugs.
Naturally, such devices need high-quality protection against getting wet. This can be done independently by arranging a sealing gasket around the perimeter of the panel to be lifted. But it is better to purchase a ready-made factory-made device with a lifting mechanism and a protective panel.
Convenient is also the option with a lifting block of sockets, usually hidden under the countertop, and it is suitable for both island kitchens and ordinary, wall-mounted ones.
In this case, of course, the lower socket is located at a distance from the tabletop that is not too convenient for connection, but this is compensated by the fact that there are no additional electrical “decorations” on the walls.
If you do not use the connection points hidden in the worktop, sockets in cabinets can be used for appliances with a permanent location. This option is most often used for medium-sized appliances - bread makers, slow cookers, food processors, coffee machines, and so on.
The device can be connected permanently or only as needed. You can protect equipment from dust, dirt and moisture by lifting, swinging, sliding or lifting-turning doors, as shown in the photo above.
If the equipment is “hidden” in the lower cabinets, that is, below the level of the table top, you can arrange pull-out shelves with holders for the cable of the electrical appliance, which does not allow the wire to get between the working elements of the furniture and at the same time keeps it in the right position. The socket in this case is placed on the kitchen wall (or the back wall of the cabinet).
Similarly, you can make sliding shelves for equipment placed above the level of the tabletop.
If the flush-mounted option is not suitable, the height of the sockets in the kitchen above the countertop is selected according to three criteria:
- Ease of use. A very small distance to the countertop makes it difficult to turn on the device, interferes with cleaning the surface;
- power grid safety. Sockets located almost close to the working surface fall into the risk zone - splashes, accidental wetting while cleaning the countertop, small debris can greatly complicate the operation of the device and even lead to a short circuit;
- instrument wire length. Most small, relatively stationary equipment has a short cable length, so you should not raise the sockets too high.
The optimal distance is considered to be 15 ... 30 cm from the level of the table, and for the convenience of laying cables, it is highly recommended to place all points on the same horizontal line.
There can be three such lines: the lower one for large stationary equipment, the middle one for sockets above the countertop, the upper one for connecting the hood and lighting cabinets.
Important: removing the outlet (or a group of them) from the sink by at least 50 ... 60 cm will help reduce the risk of short circuit.
The height of the outlet for the hood is selected either above the level of its placement, or below (under the cabinet in which it is built-in, or under the bottom panel of the hood itself.At the same time, the upper version of the location is more successful - particles of fat and soot that occur during cooking do not accumulate on the plastic external elements of the outlet.


It is quite convenient to arrange a group of electrical appliances on the same level with the rails.
In this case, the distance from the countertop is 35 ... 50 cm.
An interesting point: in order not to ditch or drill the wall for each electrical appliance separately, you can use a special mounting plate. Sockets for connecting equipment and switches are mounted on it in the most convenient manner, and the wires pass through the channels of the bar.
Network connection rules
There are different ways to connect air conditioners. You need to choose them depending on the network parameters, individual conditions:
- With junction box. The new power point in the room is connected to the junction box in the same place where the split system will be installed. If it is decided to turn on the device through the box, the plug, electrical outlet will not be needed. Difficulties with this option will arise if the total power of the room's appliances is higher than the network can withstand. The socketless method implies the presence of very reliable wire connection contacts using high-quality terminals. Due to a number of inconveniences, this connection method is rarely used; usually, a cord with a plug or a socket is used to turn on the device. If the junction box is located far from the future location of the air conditioner, you can connect the outlet using a loop from another electrical point located nearby.
- Hidden way to turn on. Since with this technique you need to ditch the walls, it makes sense to use it at the stage of apartment renovation.Using a perforator, you need to make gutters in the wall, lay the wires in the holes obtained. One end of the wire is connected to the junction box, the other to the electrical outlet. Then all holes must be carefully repaired, plastered, and finished. The socket is made directly next to the air conditioner, it will be very convenient to turn it on. Wires with a hidden method are not at all noticeable, the connection is reliable, safe. No external factor can cause wiring problems.
- Open way to enable. If it is not possible to make hidden wiring, there is only one option left - open wiring. Usually it is performed if the repair in the room is already completed. From the junction box, the cable is laid along the wall directly to the air conditioner. It is allowed along the plinth with a cable channel, a wall cable channel is mounted (this is necessary to give a more aesthetic appearance to the room). If desired, the cable can be fixed with small nails without a cable channel.
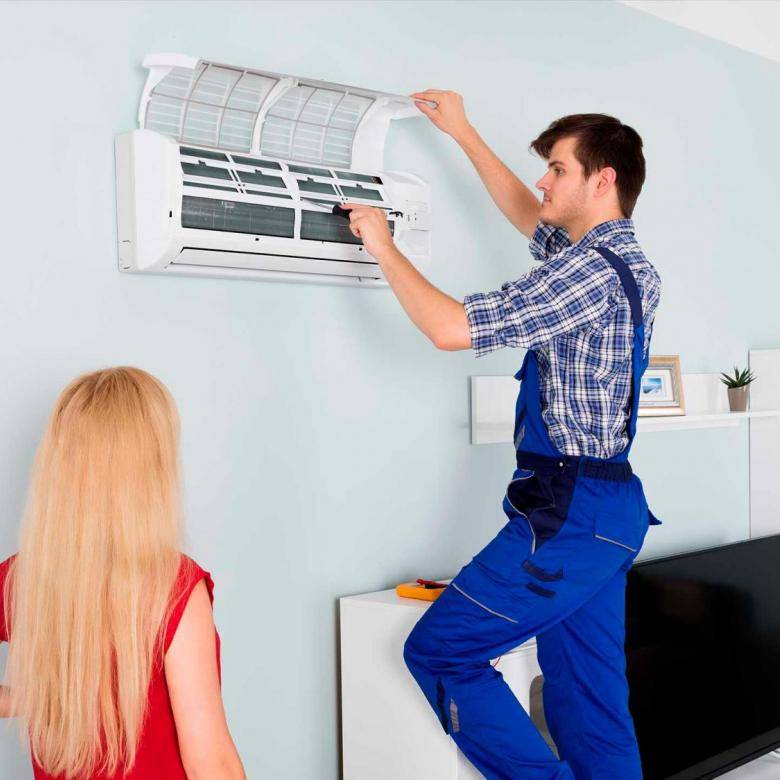
The air conditioner itself has 2 blocks - external, internal. Experts install the external block outside the house, the internal one - in the room. The unit, which is located outdoors, is powered by the internal one, the latter is connected to the network. Both cords are always included with the device, you need to buy the socket yourself. To connect both blocks, do the following:
- remove decorative panels;
- remove terminal protection;
- dismantle cable clamps;
- insert cables into designated holes;
- the ends of the cables are cleaned of braid, fixed with terminals;
- return decorative panels to their original place.
After the device can be connected to the network, use it.Proper installation, providing the necessary network parameters is a guarantee of comfortable use of the split system.
Air conditioning options in a private house
When planning and calculating the air conditioning system in a private house, they are usually guided by the same rules as in other rooms - the size of the area, sources of excess heat, the number of people living, etc.
But when building a new house, there is a chance to thoroughly think over the location of both furniture and ventilation and air conditioning systems so that the control sensors are correctly placed and do not misinform the climate system.
When choosing an equipment model for a private house, many more options are considered (many types of air conditioning in ordinary apartment buildings are difficult to install).
Therefore, in addition to standard split systems, channel and cassette air conditioners are often mounted using an attic or attic. They use universal ceiling-floor or multi-systems (for country houses from 150 sq. M. VRF and VRV multi-zone systems).
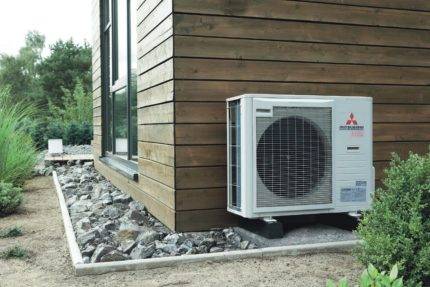 Installation of an outdoor unit in a country house is often done on a blind area, on a veranda or on a flat roof, in this case it is better to choose inverter air conditioners with a reduced noise level.
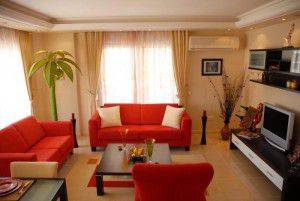
And finally, to choose where to install the air conditioner correctly so that it looks harmonious in the apartment, several proven decorating methods will help:
- decoration of the air conditioner;
- disguise behind a decorative screen;
- placement in a niche or on an open shelf.
If there is no niche in the wall, if there is no screen or shelf in the right tone, simple alternative design options are possible.
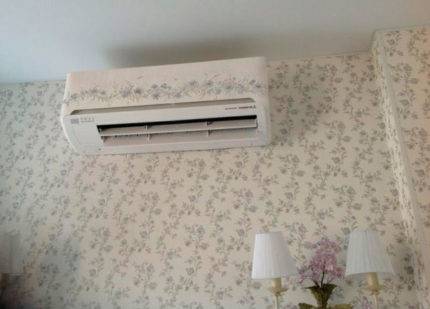 The method of decorative painting helps to achieve a harmonious combination of the air conditioner and the interior. The drawing is varnished, does not fade, retains its original appearance for a long time.
Photographic printing is pasting the facade of the air conditioner with individual stickers to match the environment. With artistic painting, the master paints the body of the air conditioner with acrylic paints or a special spray gun. In any case, the air conditioner will be in harmony with the design of the room.
The principle of installing an air conditioner is generally simple, but the details and little things are important, they will help the equipment work more efficiently, and we will feel more comfortable.
Types of switches
Switches are manually operated switching devices and are used to turn lights on and off. They have different designs and functions, which led to their division into types.
Switches with built-in motion sensor
Switches with a motion sensor are mainly used on flights of stairs and when creating street lighting networks. They are quite easy to use: in order to start using these devices, it is enough to install and configure them according to the instructions.
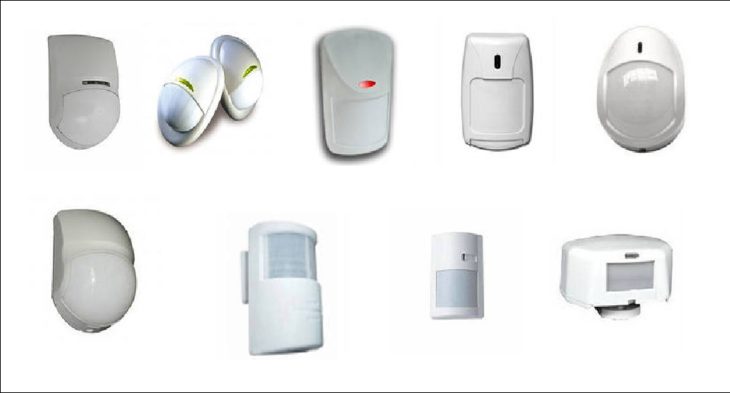 The appearance of switches equipped with a motion sensor may differ, but functionally they are very similar
The basis of switches with a motion sensor are electronic components that constantly analyze changes in the level of illumination of an object (apartment, street or house), as well as any movements in the zone of operation of the sensor.
The principle of operation of switches with a motion sensor
The operation of a motion sensor switch is based on the continuous scanning of infrared (IR) radiation, covered by the field of view of the sensor (sensor), which is usually made of pyroelectric materials. Basically, these switches are wide viewing angle and installed on ceilings. In addition to monitoring the presence of living objects, they have the ability to change the intensity of lighting, and can also be used in various internal security systems.


 The switch sensor turns on the lighting when moving objects appear in the zone of its action
Remote switches
The remote switch is a set consisting of a compact control unit and a remote control (there may be several). The device itself is quite similar in appearance to a simple flat-type switch. A distinctive feature of the remote switch is the ease of installation, since in order to install it, it is not necessary to carry out preparatory work (strobe or drill walls), carry out hidden wiring. It is enough just to find a convenient place, take a few screws and double-sided tape and attach the device.
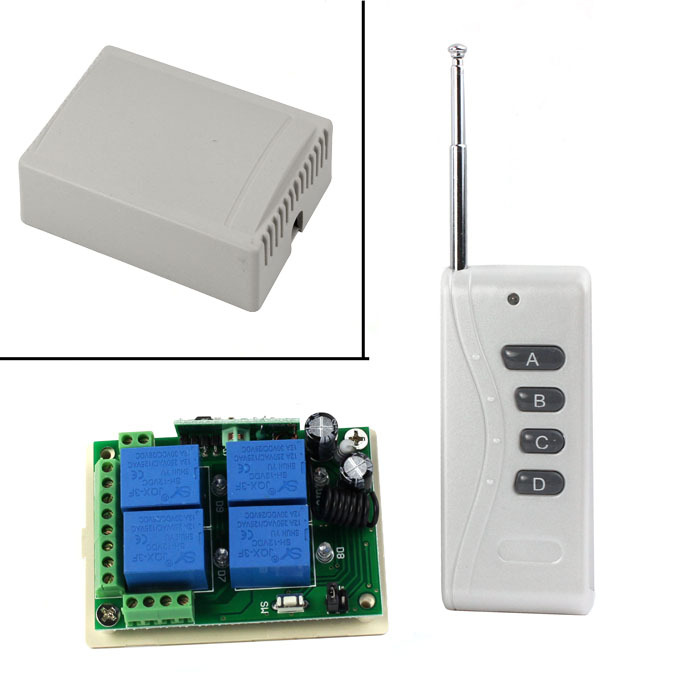 Installing a remote switch does not require complex electrical work
Principle operation of remote switches
The operation of remote sensors is based on the principle of reception / transmission. The user presses the power button on the remote control, thereby creating a radio signal, which then receives a relay that closes or opens, depending on the command given from the remote control, a circuit in phase that is supplied to the light source.Depending on the state of the circuit, the light turns on and off. The coverage area directly depends on the design features of the dwelling, as well as on the materials that were used in the construction. In general, the coverage area of remote sensors is from 20 to 25 m. The transmitters are powered using conventional 12 V batteries (usually enough for 5 years).
Video: remote switch
Touch switches
Small and compact devices constructed from multiple touch panels for ease of use. In order to use the switch of this type, it is enough to touch its screen once.
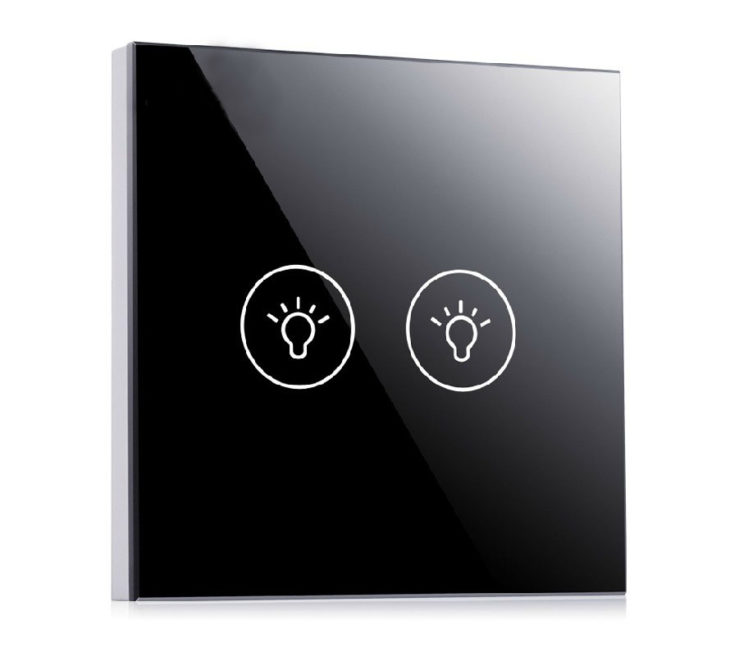 Touch switches operate with a light touch of a finger
These switches include:
- touch panel (an element that responds to touch and initializes the sending of a command for further processing);
- control chip (engaged in processing and converting the command);
- switching part (provides power switching).
Due to the use of electronic components, it is possible to remotely control lighting devices and connect additional elements: motion, temperature and light sensors.
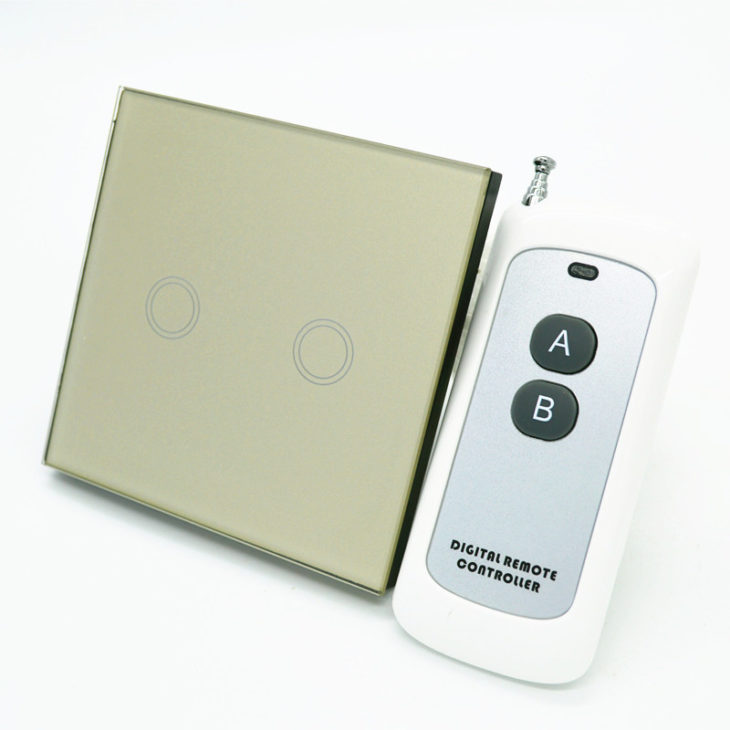 Touch switches can be equipped with a remote control
Video: touch switch
Before purchasing a switch of one kind or another, you should familiarize yourself with the selection criteria, which will be described below.
Rules and requirements
Usually it is in the range of 0.8 - 1.8 kW, depending on what area is to be cooled. 16 amp socket - ideal, but only for small spaces.
The best option for a chiller would be to install a separate power point. Be sure to carry out grounding.
It is preferable to choose wires with copper
Make sure that they can withstand the maximum load that can be applied at the same time, and that they are protected by the machine.
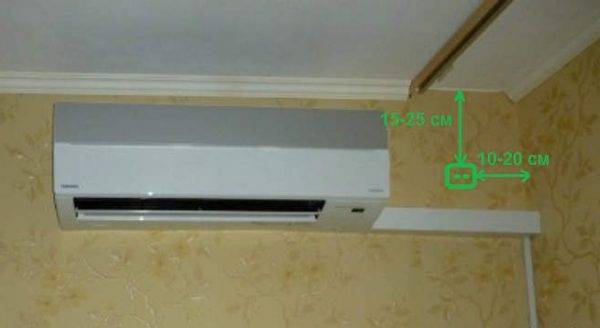
There are no specific rules that govern the placement of the outlet. Each room is considered on an individual basis.
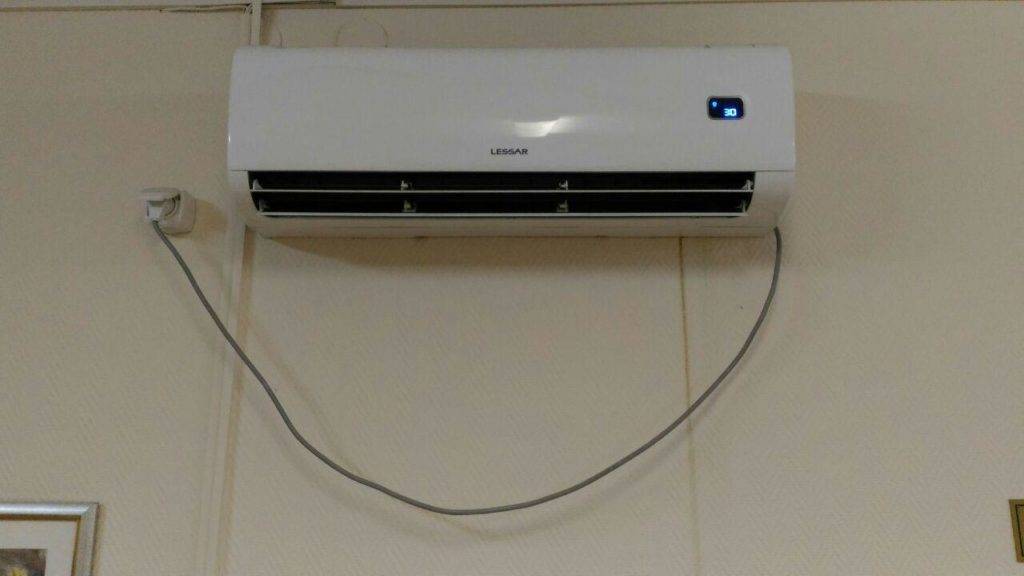
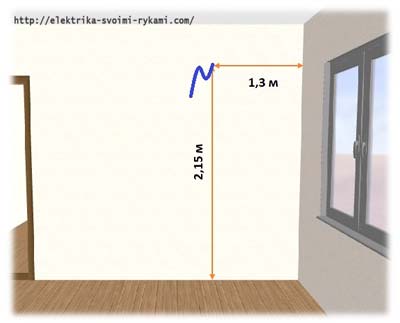
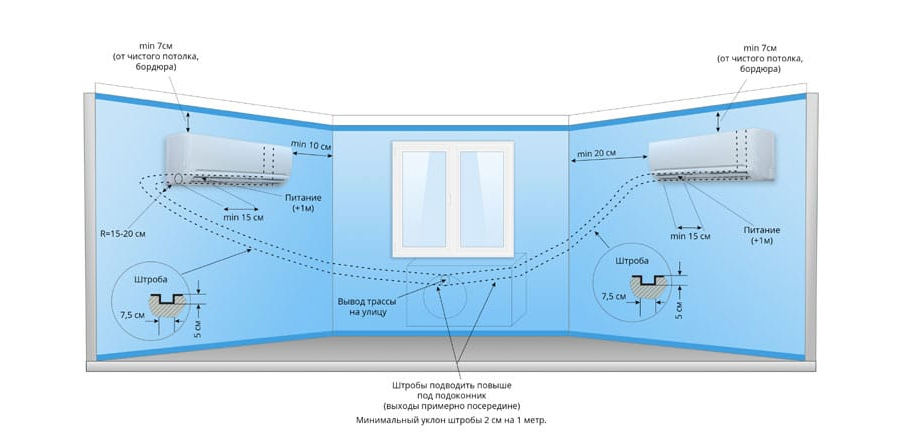
The location of the furniture and the connection with other electrical appliances matters. We are used to the fact that the inside of the air conditioner is located under the ceiling, and since the socket should be close to it, it is placed 0.3 meters below the ceiling.
You have the right to place the power supply point in a different place, but you must also consider where the wire will hide. In most cases, the length of the wire is less than 1 meter.
Be guided by this parameter during installation so that you do not have to use an extension cord.
Network connection
Before connecting to the network, connect outdoor and indoor unit conditioner. Work is carried out in the following order:
- the outer panel is removed;
- the protective cover is removed from the terminals;
- the cable clamp is dismantled;
- the cable is installed in the hole on the rear surface of the cooler;
- the ends of the cable wire are stripped and tightened in the terminals;
- the wire is attached with a clamp;
- a decorative cover is installed.
If a separate line is laid, the following recommendations must be followed during installation to power the cooling device:
- access to the wiring should be provided during the repair work;
- it is necessary to lay the wire in horizontal or vertical planes;
- the distance between adjacent wires should not be less than 3 mm;
- connection is carried out with special terminals or bolts.
- In order for the air conditioner to work efficiently for a long time, when choosing an outlet, one should take into account not only its quality characteristics. It must be suitable for the load used and have a reliable connection to the cooling system.


Living room
1. At the door
For the location of switches and sockets at the living room door, the same rules apply as in the kitchen: height 75-90 cm, free access for all family members with different heights.
An outlet is also needed in the entrance area: for a vacuum cleaner or a heater. On average, the height from the floor should be 30 cm, from the doorway - 10 cm.
2. In the TV zone
TV is a must for many in the living room. The TV area needs several outlets. The average location height is 130 cm, then they will not be visible behind the equipment. You will need 2 electrical outlets and one outlet for TV and Internet.
Design: Studio NW-Interior
3. In the sofa area
When planning sockets in the living room, you need to consider the location of floor lamps, electrical appliances, as well as additional sockets for a laptop and phone. The average height of the location is from 30 cm.
Often, when planning outlets in living rooms, they forget about appliances such as air conditioners, electric fireplaces, air humidifiers and game consoles. Consider the appliances you have, those that you plan to purchase, and based on this, plan the number of outlets.
4. At the desktop
Often the living room is also a work area. In this case, more outlets will be needed. Provide 2-3 pieces in the place where the desktop will stand.It is more convenient to place them above the table so as not to climb under it every time to turn it on / off, but not everyone likes this solution aesthetically. If you have a desktop computer, you can put sockets at the bottom - it is unlikely that you will constantly turn it on and off.
Design: ItalProject
Where is it better to install air conditioning in a two-room apartment
It is not uncommon to hear such a question. In part, I have already given the answer, expressing my opinion. Namely, I said that it is more efficient to install an air conditioner in a particular room, and not in the corridor. So, in which rooms is it better to install the device? I will give a few recommendations with which you can determine the placement of blocks for a specific case.
"Dvushka" often consists of three "living" rooms - a living room, a bedroom and a kitchen. Determine where we rest and sleep the most. I believe that the bedroom in this regard should take precedence. Since any person spends almost a third of his life in a dream! If the apartment is also a place of work, then we determine for ourselves where we spend the most time.
We calculate the second priority room according to the same principle. If you find it difficult to choose, then I suggest staying in the living room (where we also have a lot of rest).
After we have determined the priorities for the rooms, WE CONSIDER YOUR FINANCIAL POSSIBILITIES AND WISHES. If you plan to get by with one air conditioner, then we put it according to your needs (I recommend in the bedroom).
If the budget allows, then a great solution would be to install "condeys" in the two main rooms (bedroom and living room, for example). And at the same time it is better to take into account a small margin of power.For example, if the living room and bedroom each have an area of 15 square meters, then you can put 2.7 kW in each of the "nine" (although the "seven" in terms of power of 2 kW would be quite suitable for each of the rooms!). This replacement will not cost much more, but in this situation, life-giving coolness will “reach” even into the corridor and into the kitchen.
If there is no money at all, then install air conditioners in every living room (bedroom, living room, kitchen).


