
- Ceiling socket options
- The main types of connection points
- No. 1 - classification of products by type of material
- No. 2 - division into types according to the method of installation
- No. 3 - for decoration
- Choice of "your" outlet
- How to install a socket on the ceiling?
- What is the secret of the great demand for overhead sockets in the store
- Rules for the selection and use of ceiling sockets
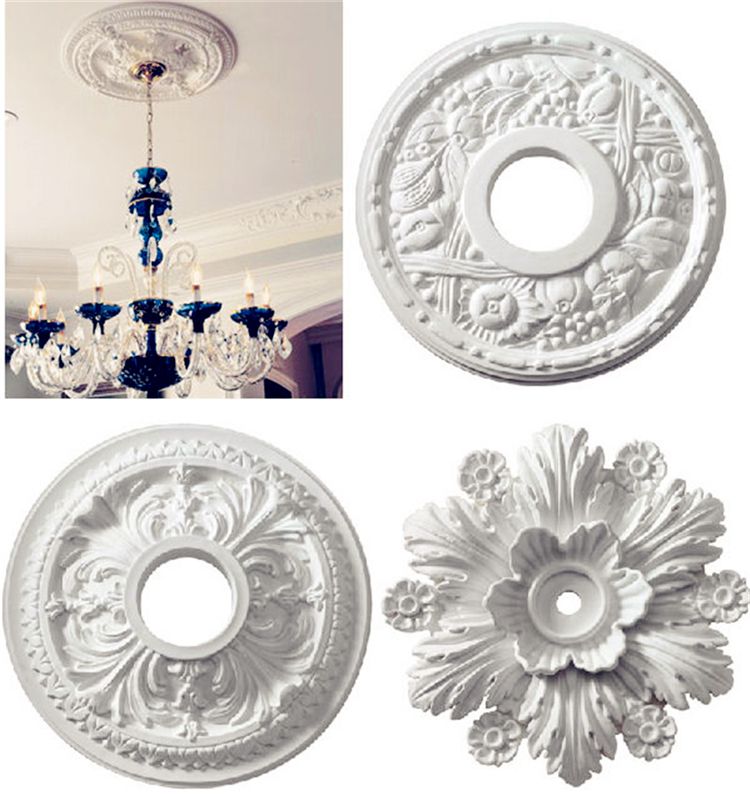
- Gypsum ceiling rosettes
- Ceiling polyurethane sockets
- Styrofoam ceiling sockets
- Criteria for choosing the right option
- Fixing a chandelier to a stretch ceiling before and after its installation
- Selection rules and application
- Ceiling Mounting Methods
- Stage # 1 - preparatory work
- Styrofoam ceiling sockets
- Preparatory stage
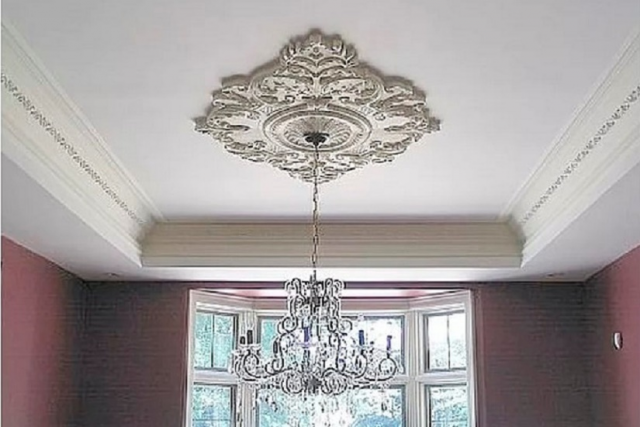
- Creative use of traditional elements
- Even more original solutions
- Stage # 3 - fixing the gypsum base
- Features of mounting mortise sockets
- Conclusion
Ceiling socket options
The ceiling socket is a monolithic or prefabricated structure fixed on the substrate, which covers the unsightly place where the chandelier is attached to the surface and the connection points of the electrical wires leading to it.
The concept of "socket" is borrowed from the French.At the dawn of its appearance, ceiling models looked like symmetrical stylized flowers or wreaths of greenery with leaves diverging diametrically from the center.
Image gallery
Photo from
Decorative function of the ceiling rose
Masking and protection of electrical wiring
The option of linking the decor of the ceiling and the room
Use in composition
Today, the choice of textures and colors is much wider. These can be heraldic ornaments, geometric patterns, abstract compositions with an unpretentious pattern that fit perfectly into modern style solutions.
Their form can be very diverse:
- round;
- oval;
- square;
- polygonal;
- with curved edges.
If in the old days such functional decorative elements were used exclusively for decorating ceilings, today they are often used to design side lighting.
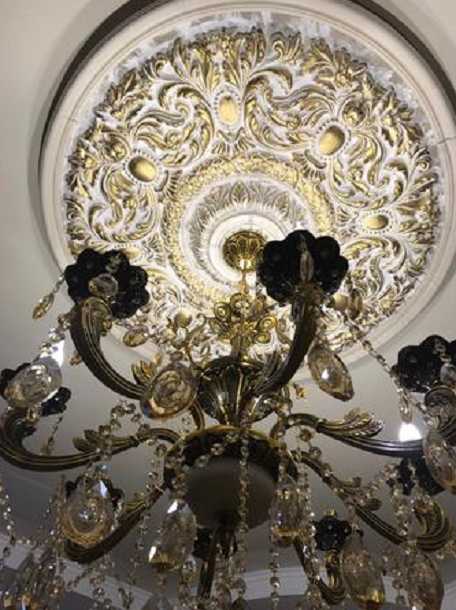
A well-chosen socket is able to emphasize the originality of the design of the lighting fixture and ennoble the interior.
Using several small rosettes of different sizes, but with a similar repeating pattern, it is convenient to compose original installations.
This is interesting: Erismann wallpapers in the interior - we tell you the main thing
The main types of connection points
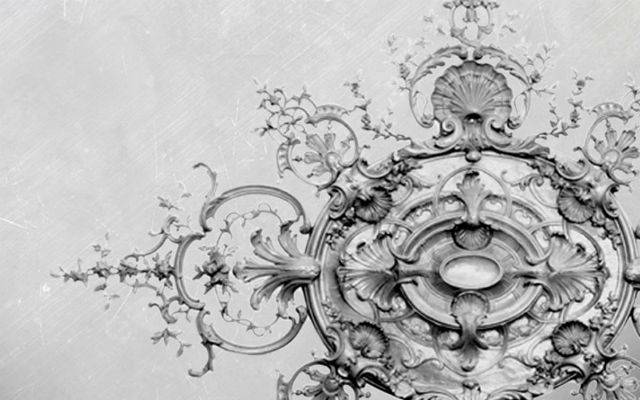
Stylized rosettes can be perfectly combined with cornices, borders and fillets, acting as a worthy addition to the interior, or they can take on the role of a bright decor accent.
No. 1 - classification of products by type of material
The first models of ceiling rosettes were made mainly from gypsum, less often from wood. The production of modern gypsum products is based on centuries-old traditions.
The only difference is that special modifying additives are used to improve the plasticity of the material.
Gypsum is a rather plastic material, the properties of which are used by craftsmen when working out even small details, giving volume to the relief of the product.
Sockets made of gypsum are famous for their excellent technical characteristics. They are "indifferent" to the effects of the environment and do not require serious care.
Synthetic products are no less popular: polyurethane and foam sockets on the ceiling.
Synthetic polymer is resistant to deformation under the influence of temperature changes, so that sockets made from it can be installed in unheated and damp rooms.
The main advantage of polymeric materials is their lightness, which greatly simplifies the installation process. But they do not have such a clear detail of the drawing as plaster models.
Unlike gypsum counterparts, polymer products do not chip or crack in case of accidental violation of the installation technology
The only drawback of polymer products is a short service life. After five years, they begin to turn yellow. The defect can be eliminated only by applying a new layer of paint, or by completely replacing the element that has lost its presentability.
A separate niche in the market is occupied by products that have the texture of a noble stone, for example, marble.
Models made of natural material are used to embody traditional architectural forms in a modern interior, which were still inherent in royal castles and palaces.
No. 2 - division into types according to the method of installation
Depending on the installation method, there are:
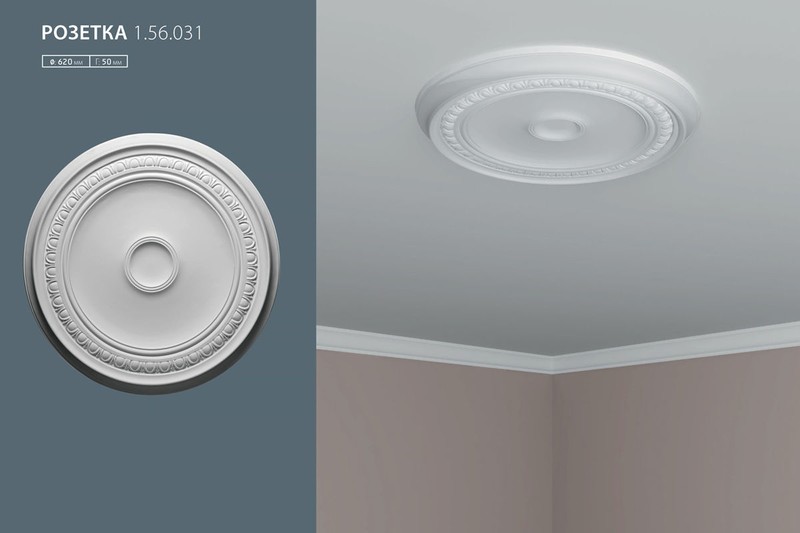
- Overhead sockets for masking electrical outlets are products with a smooth base on which decorative elements are located.
- Mortise models are patterns laid out on a substrate, which, after installation is completed, are perceived together with the ceiling surface as a whole.
Mortise-type models in front of overhead counterparts benefit in that, due to the inconspicuousness of the joints, they look like a natural continuation of the ceiling.
Image gallery
Photo from
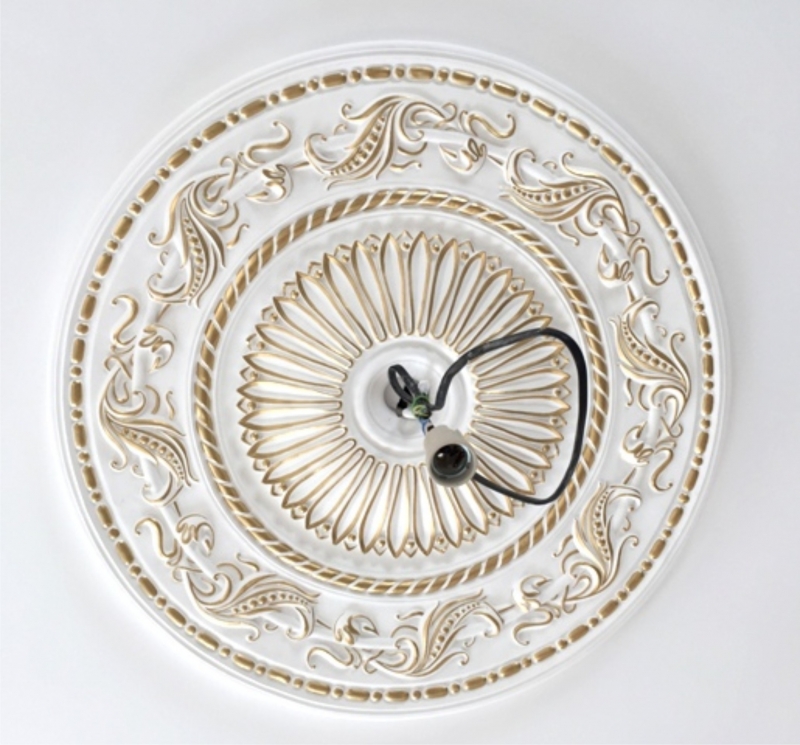
According to the method of installation, the sockets under the chandelier are divided into overhead and mortise. Overhead view is much easier to work with
Installing an overhead outlet consists in fixing it to the ceiling with adhesive, with screws or glue with screws in the complex
Mortise rosettes are a spectacular ornament applied to the substrate
A mortise socket is much more difficult to install, but as a result, it practically “merges” with the ceiling surface, forming the effect of finely made stucco
Surface-mounted ceiling outlet
Fixing overhead models with glue
Exquisite mortise ceiling product
Aesthetic design of the mortise socket
No. 3 - for decoration
Depending on the decorative design, ceiling sockets are of two types:
- Profile models with a smooth surface. They are made on the basis of a stretched profile and represent a form that includes several flat geometric shapes of various sizes inscribed into each other.
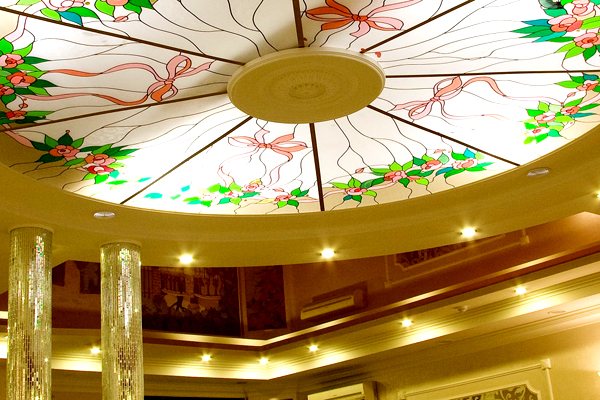
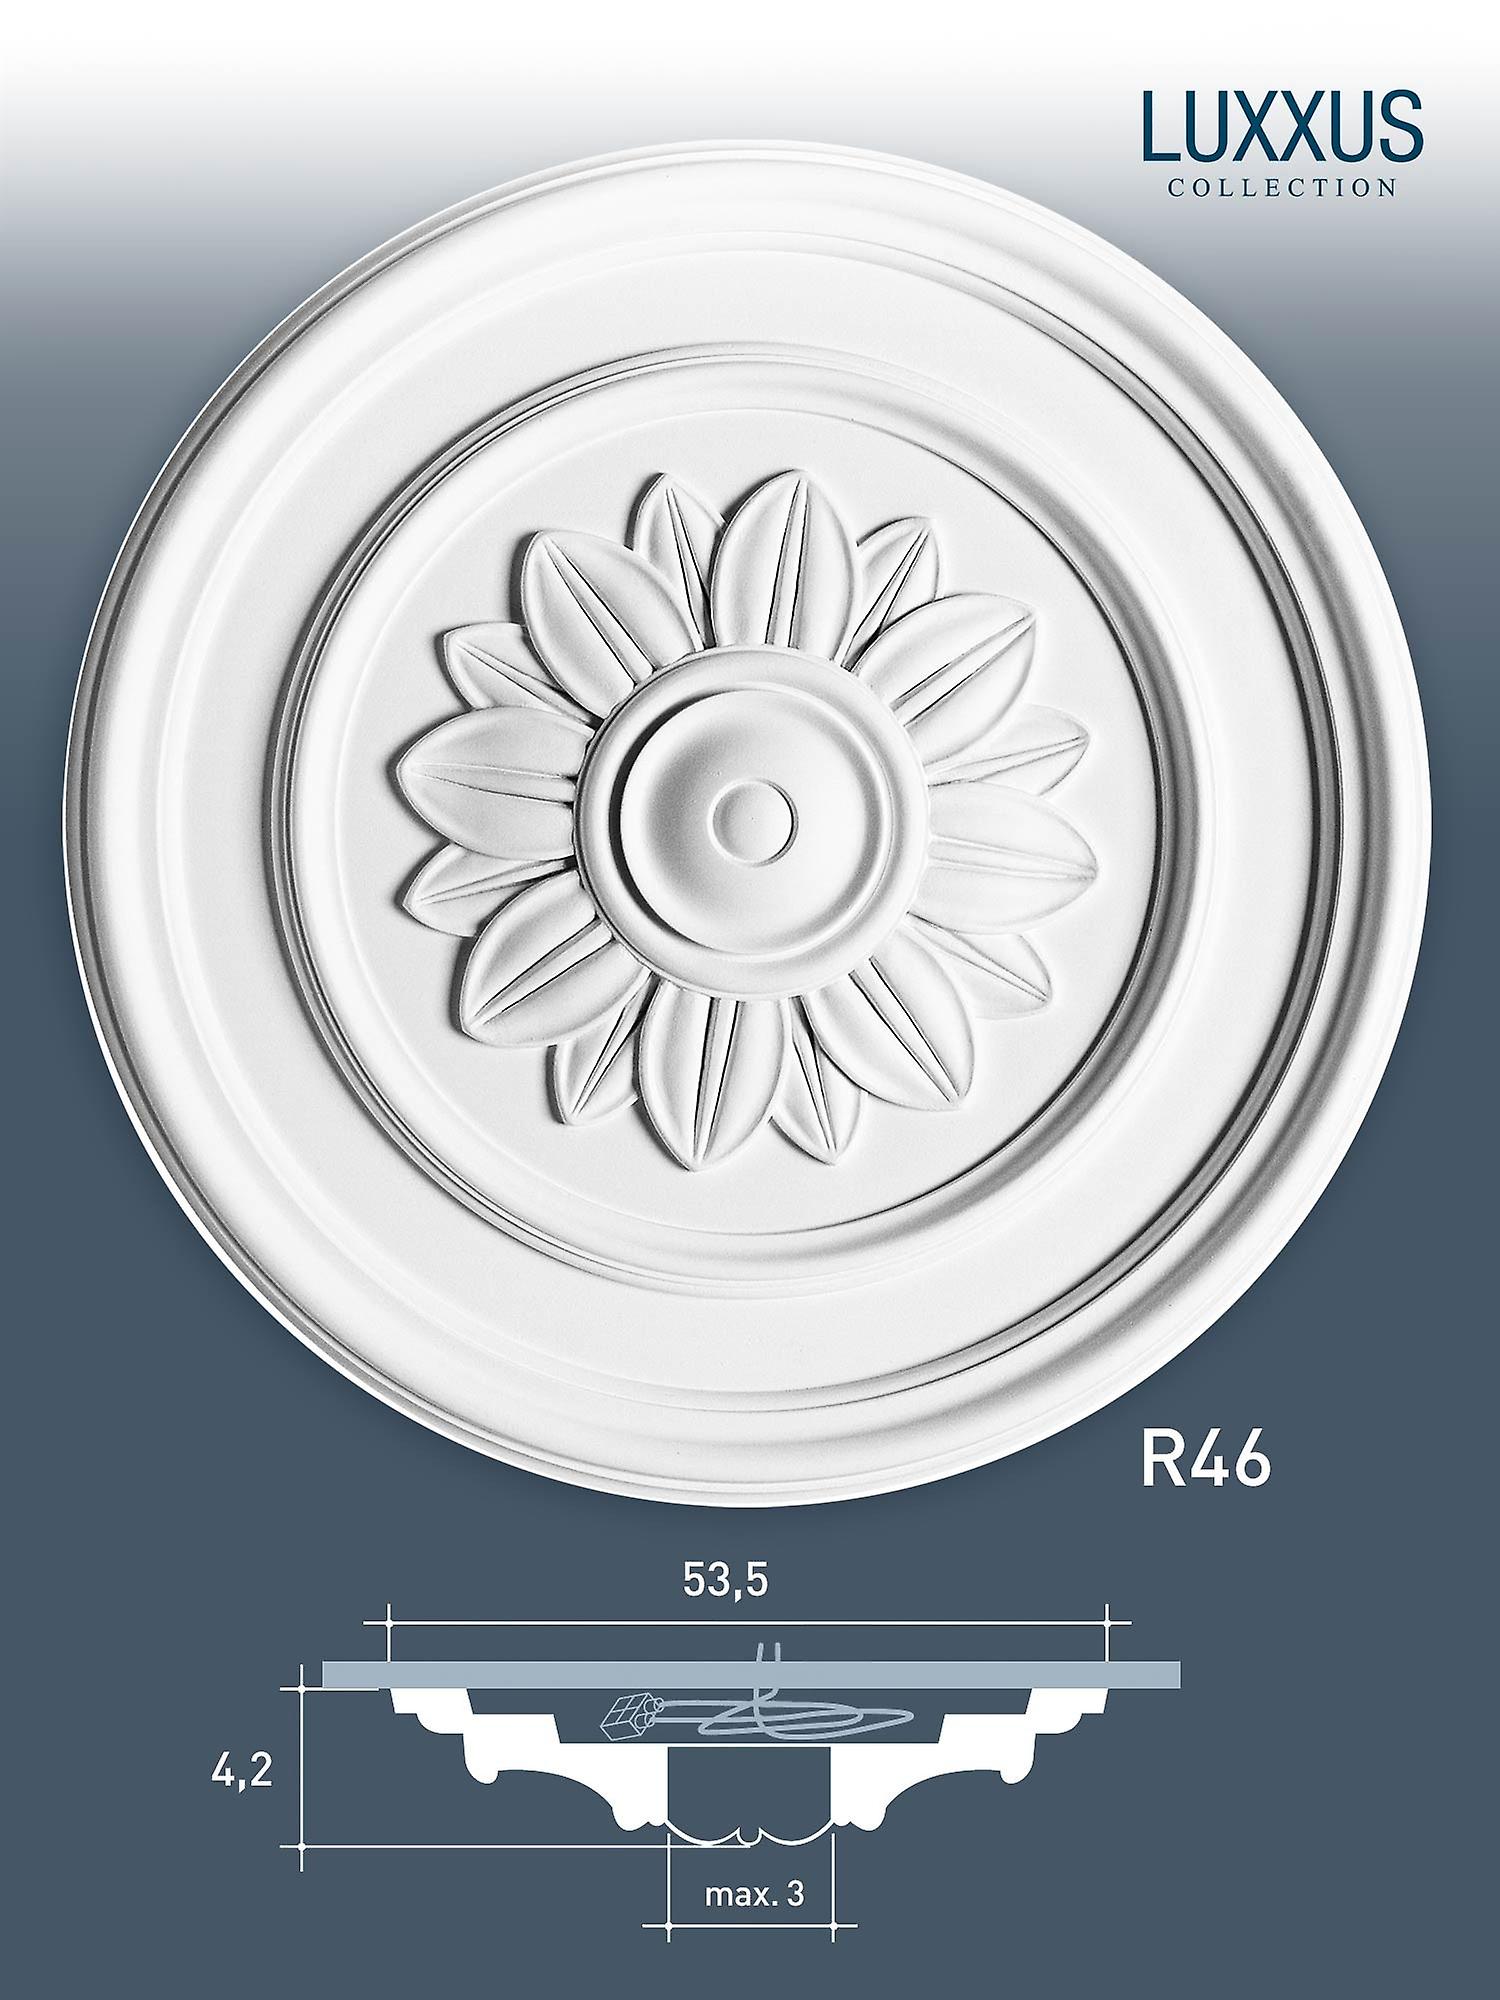
- Rosettes with stucco surface and embossed shapes. In models of this type, the smooth base of the product is decorated with individual details and decorative elements.
By installing an electric point, decorated with many elements, you can design a three-dimensional picture or a lace ceiling under a chandelier. Beautifully designed stucco will easily mask all the errors and imperfections in the design and layout of the room.


Rosettes with a stucco surface are often decorated in some style, so that they can be used to emphasize the theme of the interior.
Dome-type sockets are often found on sale. They have a concave shape. But such models are mounted only in suspended structures, thereby creating the illusion of a vast space and at the same time improving the acoustics of the room.
Ceiling rosettes of a concave shape in the form of a square, rhombus or rectangle look interesting. Such structures are called caissons. They are mounted according to the type of cassette ceiling.
Embossed models, complemented by stucco elements, give the surface lightness and volume, making it more airy and elegant.
Choice of "your" outlet
The choice of model can both emphasize the sophistication of the room, and spoil the space with the incompatibility of various interior details. Before proceeding with the choice, experts advise measuring the diameter of the chandelier. It must be greater than or equal to the size of the stucco element.
Even in a small room, the decor must be at least 40 cm in diameter, otherwise it will be lost. In this case, it is necessary to select other elements that are combined with stucco on the ceiling. For example, ceiling moldings or curbs.
The style of the outlet and the chandelier must be combined, otherwise the whole structure will look ridiculous and will bring dissonance into the design of the room.
You can pick up not only sockets for the chandelier, they can be used as a separate element of decor in the interior of the room:
- decorative ceiling rosettes are available with a special base. They are completely ready for installation, they look like a finished decorative element. They can be both with a smooth and with a relief surface. The most expensive of all the types offered;
- relief models can be produced as separate elements, from which designers make up compositions on the same basis;
- dome sockets are able to give the room volume, make it visually higher. Arranging them in a circle along the ceiling and, having built in appropriate lamps, the room is given a completely new original look;
- ceiling caissons also have recesses, like domed ones, but in the shape of a square. They are used to illuminate the ceiling, but are more often used as separate decor items.
How to install a socket on the ceiling?
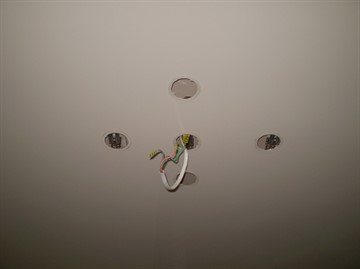
The ceiling socket is installed under the chandelier. Gypsum products do not require the installation of an additional system for fastening. They are attached to the ceiling with self-tapping screws. A special hook for hanging a chandelier and an electric cable are passed into the overhead molding. It is pre-attached to the ceiling in the floor slab.
Read next: Socket with remote control: use cases
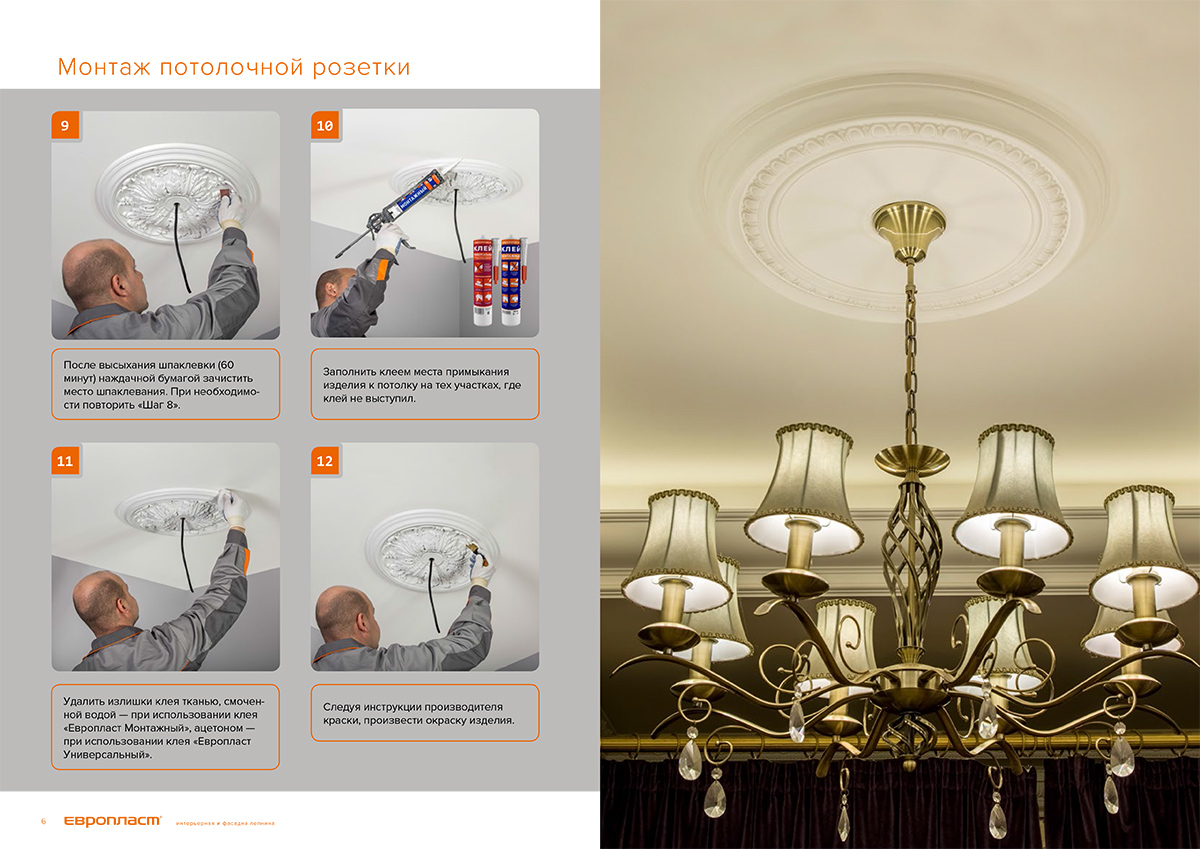
In order not to damage the decorative elements, a soft rag is placed under the support. Heavy massive products are additionally fixed with self-tapping screws in several places; sockets with a diameter of 10 cm or more require additional fixation with self-tapping screws. The number of fasteners depends on the size of the socket. The head of the self-tapping screw should sink into the recess, the head is carefully masked with plaster mortar.On a wooden ceiling, products are fixed only with self-tapping screws in the amount of 6-10 pieces.
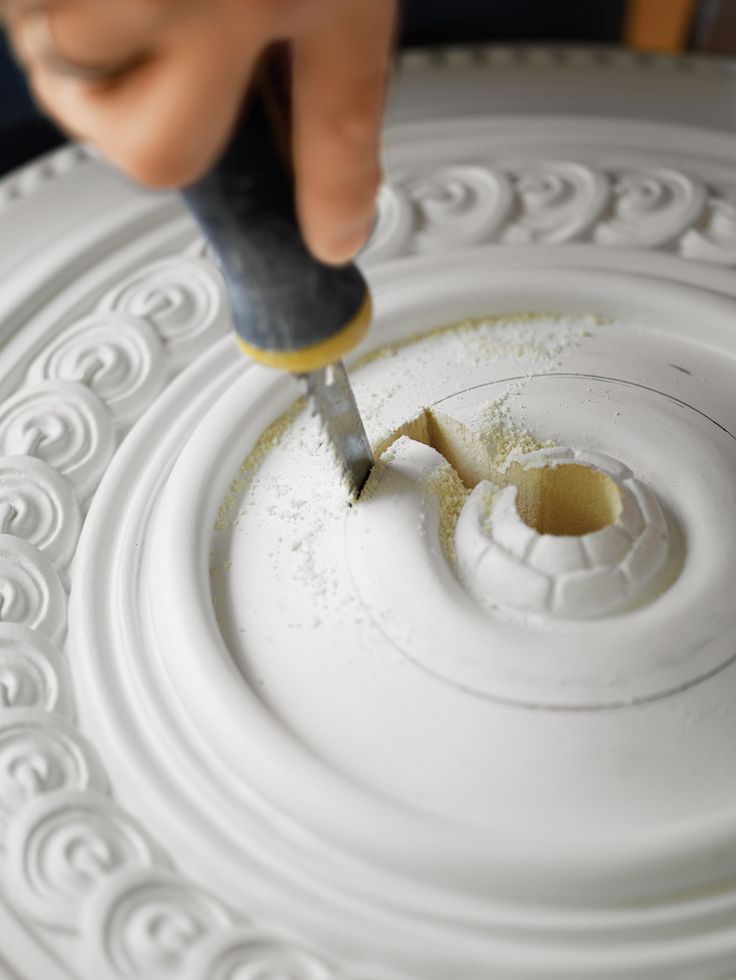
Ceiling mortise socket is initially applied to the ceiling for marking. She is outlined with a pencil. Next, the required amount of coating for the tie-in is cut out in the ceiling. The depth of the cut should correspond to the thickness of the solution on which the socket will be glued. Cracks and small potholes after cutting are sealed with gypsum mortar. The product is installed as described above. Gypsum elements are fixed to the reinforced concrete base with wire-wrapped screws.
For very heavy sockets, fastening systems are used - nags. The place for installing the nag on the decor is selected even, without ornament. Through holes are drilled and grooves 15 mm deep are cut along the front of the product. Self-tapping screws are screwed into the ceiling in these places. A wire is attached to the hat so that two mustaches are formed.
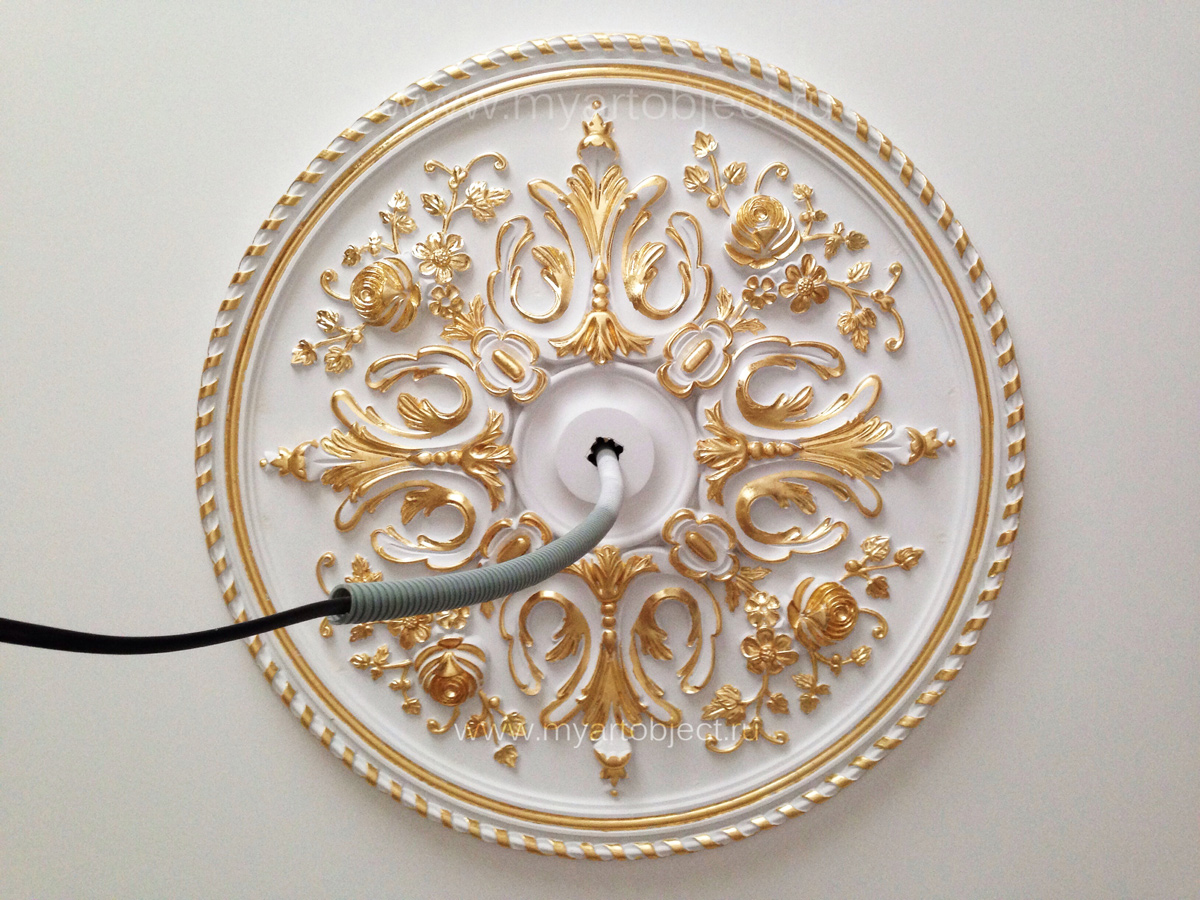
Ceiling rosettes made of polyurethane are attached with glue. Initially, a hole is cut out in the center of the product with a knife to bring out the hook and cable. The hole diameter is made small, the fastening system must be closed with a cap. Glue or "Liquid Nails" is applied to the wrong side of the decor. A hook and a cable are passed through the hole, applying the stucco molding to the ceiling. Hold until the glue hardens. After that, they hang a chandelier on the hook, connect it, close the hole in the stucco molding with a cap.
What is the secret of the great demand for overhead sockets in the store
Overhead sockets and switches are in demand because of their availability and price-quality ratio.Overhead sockets have recently greatly expanded their range and sockets with four sockets for a plug, as well as with an angled base for mounting on a plinth, have appeared on the market.
The price of an overhead double socket with grounding ranges from 200 rubles. The price depends a lot on the color. if you choose wood texture, then you will have to pay about 30%.
The price of a retro socket starts from 1000 rubles, the difference is immediately noticeable. And this is the amount for one outlet without overlays and substrates.
Overhead sockets and switches, in addition to their price, also have advantages over retro sockets in a variety of colors to match the texture of wood, which is the main selection criterion for the average buyer.
The quality of plastic overhead sockets in the middle price segment is very high. A large selection of the number of sockets for a plug in one product, a variety of designs and, of course, an affordable price allows them to remain by far the most in demand and popular in markets and shops.
Rules for the selection and use of ceiling sockets
Previously, rosettes were made only from gypsum mass. However, modern technology has complicated the manufacturing process. And now, depending on the styles, manufacturers began to produce polyurethane products or foam ceiling sockets.
Gypsum ceiling rosettes
Stucco originates from the time of the Roman Empire. Therefore, under a production basis has centuries of experience.Of course, the technological process has undergone significant changes, and modern manufacturers add modified additives to the mass to bind individual components, but this finishing option continues to be available to most consumers.
Gypsum sockets do not require painstaking care from you, they are resistant to environmental influences.
Due to the malleability of the material, it is possible to create products of the original form from gypsum. And the strong construction and ease of installation add pluses to the treasury of the advantages of gypsum variations.
Ceiling polyurethane sockets
Unlike gypsum, polyurethane does not crack over time, tolerates temperature fluctuations, high humidity, and is light in weight. Products from it are not afraid of installation in damp and not heated rooms.


To organically fit polyurethane ceiling sockets into the interior, they can be painted in any shade.
The main disadvantage is a short service life. After 5 years, polyurethane foam sockets will begin to turn yellow, and it will no longer be possible for them to return to their previous appearance. You will have to purchase a new model.
However, they have a much wider choice of gypsum products, while they are much cheaper.
Styrofoam ceiling sockets
This material is also involved in the production of similar decorative elements for the ceiling.
It costs much less than other types of ceiling rosettes, and its appearance is represented by a smooth, even surface, without visible granules characteristic of foam designs. The main advantages include low weight, flexibility, ease of installation, low price.
Criteria for choosing the right option
A high-quality approach to choosing a ceiling outlet will make it a real highlight of the interior. The main rules are:
- Compliance with the diameter of the outlet to this indicator for the ceiling chandelier.
- The appearance of the product and its decor must match with other elements of the ceiling.
- The height of the room and the total area of the room also affect the diameter of the outlet.
The table shows the standard proportions:
| Ceiling height | 2.5 m | 2.7 m | 3m |
| Square | Product diameter, mm | ||
| 12 sq. m. | 300 | 400 | 450 |
| 16 sq. m. | 450 | 450 | 500 |
| 20 sq. m. | 500 | 550 | 700 |
| 25 sq. m. | 550 | 700 | 800 |
If you decide to make an interior in a classic style, then among all the possible options, stucco should now occupy a leading place in your shopping cart. Products made of polyurethane and foam will fit well into a modern interior. They can be painted in colors that match the style or in any other shades.
When choosing a ceiling outlet, remember that it must be made of the same material as other decorative elements.
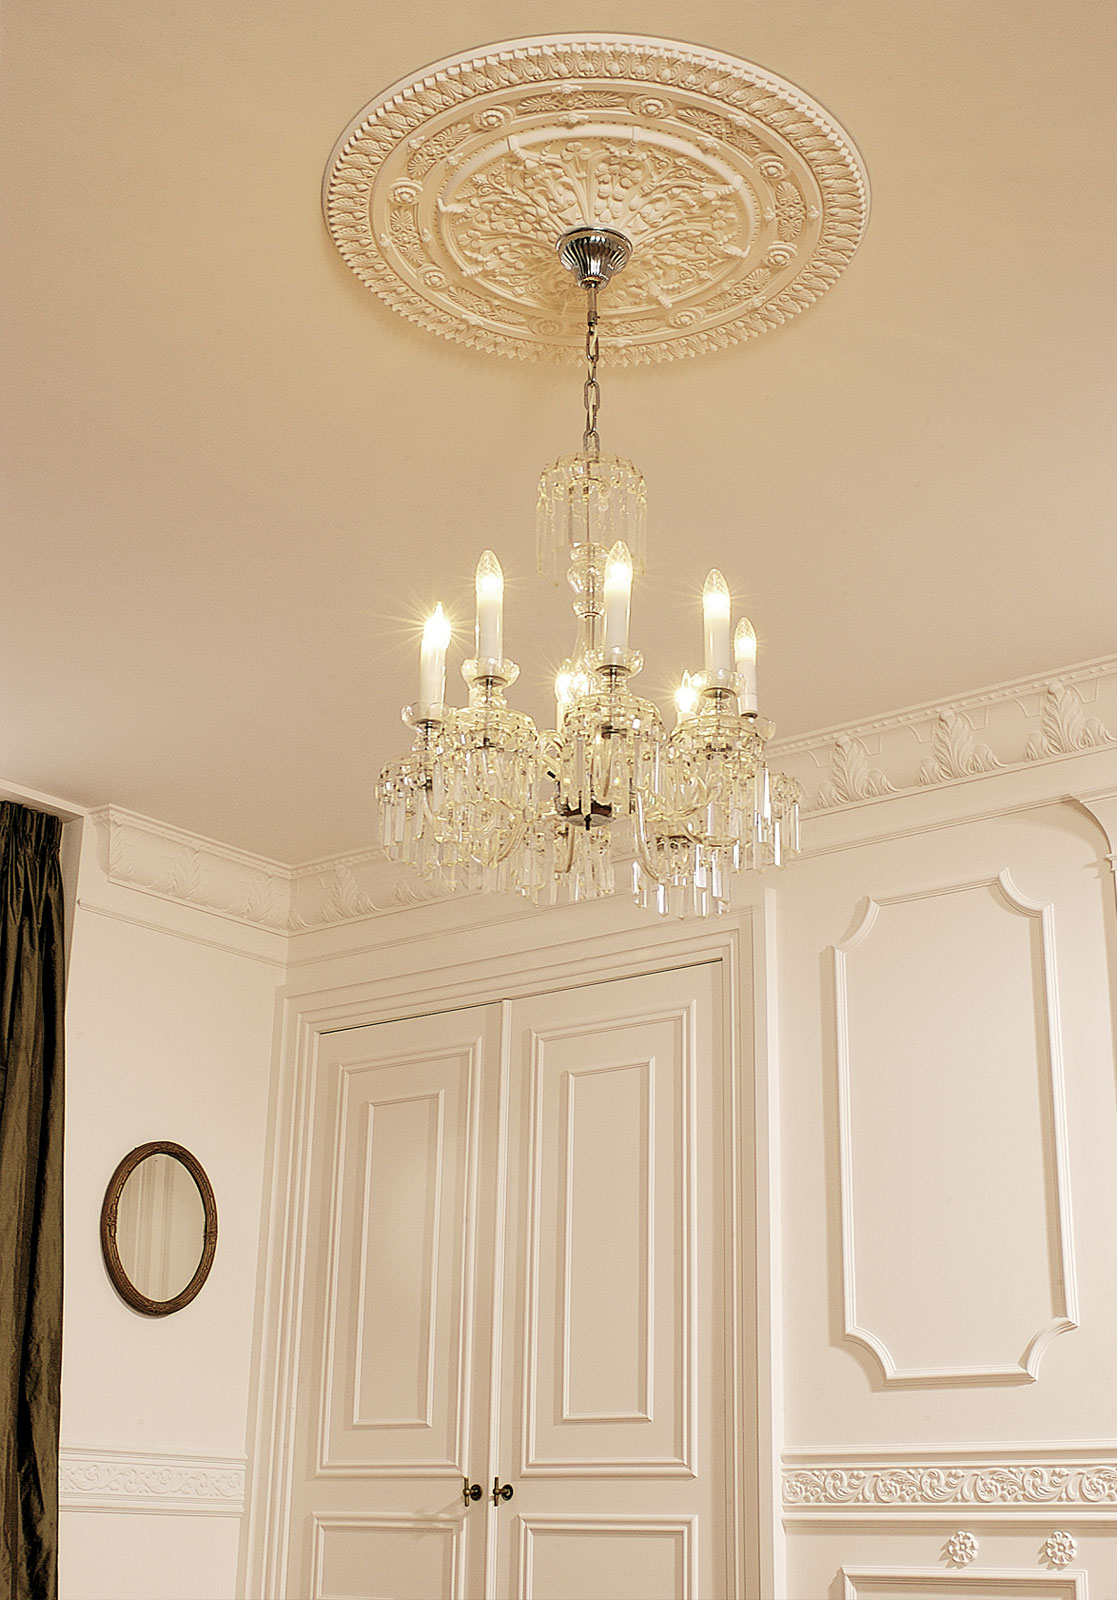
Fixing a chandelier to a stretch ceiling before and after its installation
Working with polyurethane foam products is quite easy. The soft material is easy to cut and easy to fix on the surface.
To mount a polyurethane foam ceiling socket in the center with a sharp knife, a hole is made in the decorative product for the removal of the electrical cable and the installation of the hook
The hole diameter is made small so that the fastening system is completely covered by the cap.
To ensure adhesion strength at the time of the glue hardening, the stucco molding must be pressed as tightly as possible to the surface.Excess glue that has come out along the edges must be immediately removed with a brush dipped in water or a cotton napkin.
After the glue has hardened, the chandelier is hung on a mounting plate or hook. The wires are connected in one of the above ways.
Chandeliers come with three types of fastening:
- on the hook;
- with mounting plate;
- with cross bar.
1. The simplest will be the hook attachment device. To do this, at the installation site of the chandelier, it is attached to the draft ceiling in any suitable way before the installation of the canvas itself. Its level of location is determined by the characteristics of the suspension of the chandelier and the height of the panel.
There is also electrical wiring. Cut a hole in the ceiling after tensioning it, after gluing a thermal ring of a suitable diameter onto the canvas. But no more than the decorative cap of the chandelier, which hides the design of the suspension, can close.
In order not to catch the height of fixing this cap by eye, a platform is often made under it, located at a distance of 0.5 - 1 mm above the level of the stretch ceiling itself.
In this case, the cap will simply rest against the platform. Obviously, this should be done before the installation of the ceiling itself. Given the low technical responsibility of this part, it can be mounted on bent U-shaped strips. At the same time, it is not necessary to accurately measure the distance to the cloth, because it can be adjusted even after tensioning it. A hole is drilled in the site itself for the hook and wires for connecting the chandelier.
2. Mounting the chandelier on the bar is a little more difficult. In this case, a hole in the ceiling sheet is also made after gluing the thermal ring, and the holes for attaching the strip are made in place.They will not damage the panel, but you can also, for self-complacency, cut thin plastic patches under the places where the self-tapping screws pass, glue and then drill them.
Selection rules and application
Basic rules for choosing a decorative rosette for a chandelier.
Ornament and shape should be in harmony with the overall design of the room. The disharmony of the elements creates heaviness and excessive workload of the design.
Chandelier models should be taken into account (dimensions, shape)
It is important that the size of the outlet does not differ too much, a larger size is welcome rather than a smaller one. Small sockets are used in wall decoration or coupled with wall sconces.
Dimensions and stucco depends on the height of the ceilings, the area of \u200b\u200bthe room.
Recommended standards for selecting the diameter of the outlet
| Ceiling height in meters | 2,5 | 2,7 | 3.0m |
| Room area | Ceiling rosette diameter, mm | ||
| 25 square meters | 550 | 700 | 450 |
| 20 square meters | 500 | 550 | 500 |
| 16 square meters | 450 | 450 | 700 |
| 12 square meters | 300 | 400 | 800 |
The use of polyurethane sockets is quite wide:
- Apartments (room, kitchen, bath).
- Hotels (reception, rooms).
- Saunas (rest room, swimming pool).
- Restaurants and bars.
- Clubs, beauty salons.
- Medical centers, sanatoriums.
Ceiling Mounting Methods
It will not be difficult for a home master to fix the selected model on the ceiling.
Lightweight foam models are attached to a special glue or "liquid nails". Before mounting, if the decor is intended to install a lamp, a hole is cut in the middle for the output of wires and a hook or mounting hardware. The hole should be no larger than the decorative cap of the lamp. A wire and a hook are threaded through it.


A layer of glue is applied to the surface of the socket, from the wrong side, and the structure is pressed against the ceiling. The element is held until it sets with the ceiling surface, after which the lamp is connected.
Gypsum decorative rosettes are also attached, only a gypsum mortar is taken as an adhesive. The pressing time must be increased, since such elements weigh much more and the gypsum mortar is not able to grab instantly.
In this case, you can use a prop. In order for the relief patterns not to be damaged, a soft layer is placed between the support and the socket.
Heavy massive elements are additionally attached to self-tapping screws
You need to work with great care so as not to damage the decorative components. Self-tapping screws at the end of the work are masked with gypsum mortar. Choosing and installing a ceiling outlet is not difficult
The main thing is that the decor elements are combined with the design solution of the entire room.
Picking up and installing a ceiling outlet is not difficult. The main thing is that the decor elements are combined with the design solution of the entire room.
Stage # 1 - preparatory work
Before starting installation, it is necessary to de-energize the room by turning off the machine of the corresponding lighting and power branch in the switchboard.
To make sure that there is no voltage in the network, you need to touch the indicator screwdriver to the output ends of the wires. It shouldn't glow.
After that, by applying the outlet itself to the surface, the ceiling is marked.
A metal hook fixing the chandelier is passed into the central hole of the stucco molding, and an electric cable coming from the shield is inserted
To install the hook in the intended place, first, using a pobedite drill, make a hole 7-8 cm deep. A plastic chop is deepened into it so that it fits as tightly as possible against the walls, and then a metal hook is screwed in.
To prevent dust and sand from entering the punch chuck at the time of drilling the hole, put a disposable cup on the drill before starting work
To attach the mounting plate, it is first applied to the installation site so that it does not interfere with the wiring, and the dowel hole points are marked.
When planning to hang a massive chandelier, we recommend using cruciform mounting plate forms. It has a larger coverage area and more holes for fixing to the ceiling.
Dowels are deepened into the holes drilled by the perforator, and then the bar is mounted, fixing it by screwing in the screws
A properly fixed mounting plate will guarantee the reliability of fastening the installed lighting fixture.
Styrofoam ceiling sockets
An alternative option, the most affordable for most owners, is the purchase and installation of a decorative polystyrene foam lining. A remarkable property of the material is considered to be extremely low weight, sufficient strength and, most importantly, the flexibility of the decorative overlay.
The quality is truly invaluable, when carrying out a budget or cosmetic option for repairing an apartment, rarely one of the owners decides to clad the ceiling surface with drywall just to seal the ceiling with stucco. The socket made of polystyrene under the chandelier becomes without problems even on the most crooked ceilings.
The strength of pressed polystyrene is enough to work with it without fear of breaking or damaging the openwork pattern. The only serious drawback of the polystyrene decorative overlay is the solubility of the material under the action of alkyd enamels, varnishes and nitro paints.
The cost of PPS lining is half that of polyurethane decor, and the service life reaches 10-12 years.
Preparatory stage
Do the following beforehand:
- determine the location of the lamp. Usually the chandelier is mounted in the center, respectively, stretch the cord along the diagonals of the ceiling and mark the point of their intersection on it;
- lay wires to the marked place. A VVGng-ls or NYM cable with a core cross section of 1.5 mm2 is used. It is placed in a plastic corrugation attached to the ceiling with brackets;
- between the guides fixed on the wall, nylon cords are pulled. They are placed at the height of the future stretch ceiling through the location of the chandelier.
Cords will help install the mount at the design level.
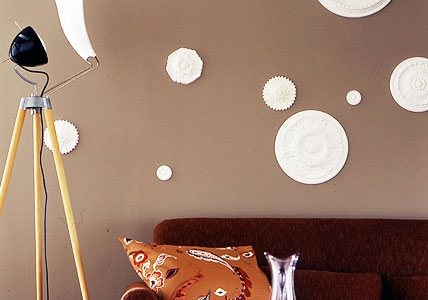
Creative use of traditional elements
Creative use of traditional elements
Ceiling rosettes look original as wall decor, not the ceiling.
The advantage of this idea is that it is the most simple and economical way decorate the room. The cost of polyurethane sockets is low, and with the help of them it is easy to create a romantic decoration that is appropriate in any modern interior.


Wall decor from ceiling rosettes is appropriate in different rooms - in the living room, bedroom, hallway and even in the kitchen.
If the interior is made in the classical style, you need to assemble the composition from the sockets strictly symmetrically. In other cases, fantasy can not be limited. And choosing sockets with a similar pattern, but of different sizes, it is easy to make an original installation.
It will look especially impressive on a dark background. Decorate with such details a strip above the TV or a wall above the sofa, and you will see how interesting a separate functional area begins to work.
It opens and immediately attracts attention, distracting the eye from the unsightly corners of the room.
However, there are even more original solutions that will be useful to anyone who wants to get away from existing standards.
Even more original solutions
Sockets on the wall
Here are the main ones:
- Try attaching ceiling rosettes to a strip of burlap fabric, and you will get an interesting art object that will easily become the centerpiece of any apartment. Or fix a beautiful ceiling rose in the center of the wall and place photo frames around it. You won't see a gallery like this anywhere else.
- Buy a bulky ceiling outlet with a large hole in the center. Insert a mirror into it, and it will have a very effective frame. You can use this medallion in other ways. If onlyabout Most of the walls are covered with wallpaper, and one remains painted, hang ceiling rosettes on it with a large hole in the middle and insert pieces of wallpaper into it.
- You can simply paint the socket in a contrasting color and hang it on the wall. This option also looks very impressive.
- The wall looks no less attractive, over the entire surface of which various-sized sockets are glued.If you first attach them, and then paint the entire wall in one color, such a finish will look just great, and most importantly, unconventional.
- Ceiling rosettes can be used as a backdrop for wall lights, as well as a seasonal or themed door decoration. To do this, just paint them and tie a large ribbon. Such an accessory can come in handy for decorating your home at Christmas or Easter.
- From ordinary stucco, it is easy to make a panel that will look great in the bedroom above the bed, or a clock in the French old style. The main thing is to turn on your imagination, and ideas will come by themselves.
As you can see, non-standard solutions can surprise and make you touched by such an unusual use of traditional decor details. And a lot of things you can do yourself without buying expensive accessories.
Stage # 3 - fixing the gypsum base
To fix the base from the wrong side, a gypsum solution is applied to it. It is easiest to spread the solution evenly over the surface with a spatula.
When working with a gypsum mortar, it should be borne in mind that it hardens within a few minutes, so it must be diluted in portions
The base with the applied solution is pressed to the surface and fixed in this position for several minutes until it acquires the desired strength. For fixing, you can use a prop.
To minimize damage to decorative relief elements, soft rags are placed under the support.
If it is necessary to hang a massive product, self-tapping screws 10 cm long are used for additional fixation. They are screwed at 6-10 points at an equidistant distance.
When screwing in the screws, they try to deepen the cap so that later it is easy to mask it with a plaster mortar.
Features of mounting mortise sockets
To fix the mortise socket, the base of the product is applied to the surface and marks are made along the contour with a pencil.

According to the intended contour in the building structure, a recess is cut down for arranging a niche for tie-in; the depth of the cut is determined, focusing on the height of the base of the outlet and the thickness of the solution
All potholes and cracks formed during the cutting process will not be difficult to repair with gypsum mortar. To fix gypsum elements on a reinforced concrete base, screws are used, supplemented with a wire winding.
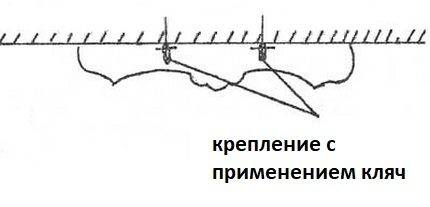
To fix heavy structures, fastening systems are used, referred to as nags. The place for installing the nag should be flat, devoid of embossed ornaments.
The work is performed in the following sequence:
- For mounting fasteners, through holes are drilled in the socket, and grooves 15 mm deep are made in the front of the product.
- Self-tapping screws are screwed through the holes made.
- Pieces of galvanized wire are screwed to the caps of the self-tapping screws in such a way that the “whiskers” diverge in different directions.
- The installed structure is covered with a layer of gypsum mortar.
- The "whiskers" diverging in two directions are led into the holes and fixed. Cut off excess wire. The grooves are covered with plaster mortar.
The number of such nags is determined, focusing on the weight of the outlet and the design features of the ceiling itself.
For socket D150-200 mm two or three self-tapping screws are enough, products with a circumference of 60 cm - three or four fasteners, structures measuring 70 cm or more - five or six nags
To avoid corrosion, it is desirable to cover the cut ends of the wire with a layer of varnish. The gaps between the installed socket or ceiling base are filled with gypsum mortar. The furrows formed after the gypsum has hardened can be easily eliminated by cleaning them with sandpaper.
Conclusion
If desired, you can make a ceiling socket with your own hands, of a strict form, without any pattern. To do this, you will need to select a foam blank that is suitable in size, and use a wire cutter to make a conical slope, waves, triangles on the polystyrene foam tile. The plastic surface is carefully cleaned and painted with white acrylic paint. The shape and size of the figures does not matter, anyway, on the ceiling, the overlay looks completely different than in the hands of the owner.


In each apartment, a chandelier is installed as the main lighting fixture on the ceiling.
However, it is not enough just to choose the right product, it is important to complement it with decorative elements so that the room acquires final harmony and comfort. A ceiling socket serves as such an addition. In the article we will talk about the main types of these items, selection criteria and features of mounting on the ceiling with our own hands
In the article we will talk about the main types of these items, selection criteria and do-it-yourself installation features on the ceiling.


