- Organizational issue when replacing the riser
- Sewer installation
- Bathroom wiring diagrams
- United bathroom
- Bathroom
- Toilet
- Know when to replace
- Solution of organizational issues
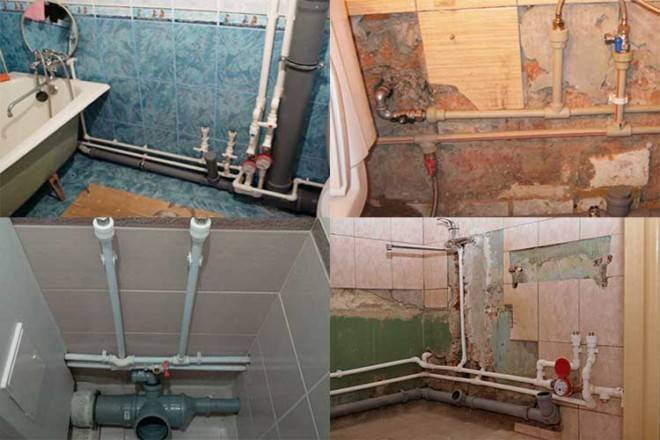
- Options for laying pipes in the bathroom
- How to connect a bathtub to the plumbing
- Stages of installing a new water supply
- Removing old pipes and installing new ones
- Dismantling of old pipes
- Features of entering communications into the apartment
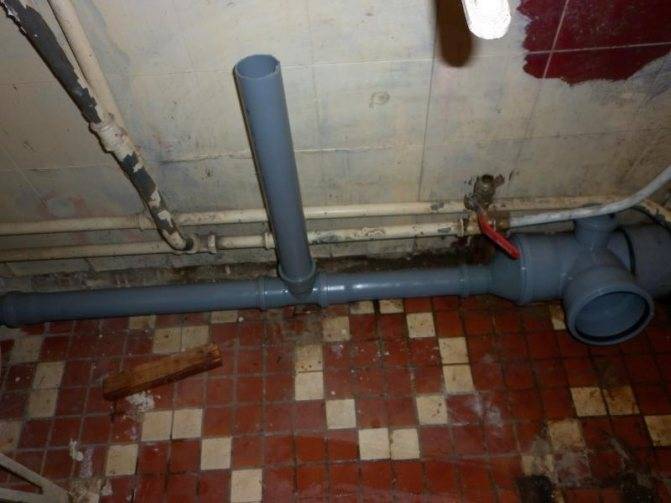
- Sewer connection
- Types of sewer and water pipes
- Recommendations and errors
- Drain line repair
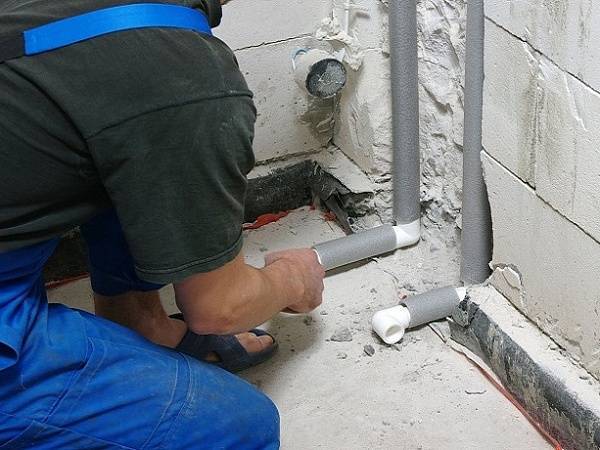
- Pipe installation instructions
- Installation of a new riser
- Conclusions and useful video on the topic
Organizational issue when replacing the riser
Installing new equipment is impossible without dismantling the old one. In this case, the issue of replacing the riser in the bathroom raises the difficulty, since it affects the neighbors above and below.
It is not enough to change a piece of pipe in one apartment, it is also important to perform work in ceilings, where there are also structural elements. They are fraught with a considerable threat: cement damages pipes over time, which can cause leaks, which are quite difficult to identify and eliminate.
To resolve the issue with neighbors, you can do the following:
- Get a written confirmation from the neighbors below that in the event of a leak in the old riser, they will not make any claims.Try to give tenants living upstairs to sign a document on guarantees of payment for possible damage caused by a rush of old communications. Very often, this approach brings results, and the neighbors agree to joint repair work.
- You can contact the housing office with a proposal to make a full payment for the replacement of the riser. In this case, the mission of persuading intractable neighbors is assigned to representatives of the management company.
It should be remembered that even in a privatized apartment, all central communications in it belong to public utilities.
Sewer installation
Do-it-yourself sewer wiring is much easier than installing water lines. The main nuances of the internal drainage system are:
- slope to the riser 2 cm vertically per 1 m of length;
- the use of gray socket pipes for internal sewage;
- the direction of the sockets from the riser;
- pipe diameter 110 mm for the toilet, 50 mm for horizontal lines, vertical sections;
- the use of oblique tees with a 45 ° upper branch pipe in the middle of the line, a 90 ° bend for connecting a plumbing fixture far from the riser;
- use of 45° bends for sewer bends in one horizontal level.
Sewer pipes are laid from the cross of the riser towards the toilet, sink and other plumbing in stages:
- installation of a 110 mm section to the toilet;
-
installation of a tee with a transition to a diameter of 50 mm;
- wiring of the engineering system along the wall to the farthest consumer.
Depending on the location of the riser, household and plumbing fixtures, the layout of the bathroom, the pipes can go in one direction or diverge in different directions.This changes the type of fittings and their number for the assembly of horizontal lines.
The electrical cable is embedded in the wall higher than the plumbing and drainage system. This reduces the likelihood of a short circuit in the event of a break in the sewer, cold water / hot water pipes.
By analogy with water outlets, sockets of sewer pipes and fittings can be embedded in walls. All plumbing drains are connected to tees, outlets through pipes, corrugations with a diameter of 40 mm only after siphons with hydraulic locks.
The exceptions are toilet bowls, urinals, bidets, in the bodies of which siphons are built constructively.
To prevent sewer smell, corrugated or rigid pipes are attached to the internal sewage fittings through rubber cuffs with a “ruff”.
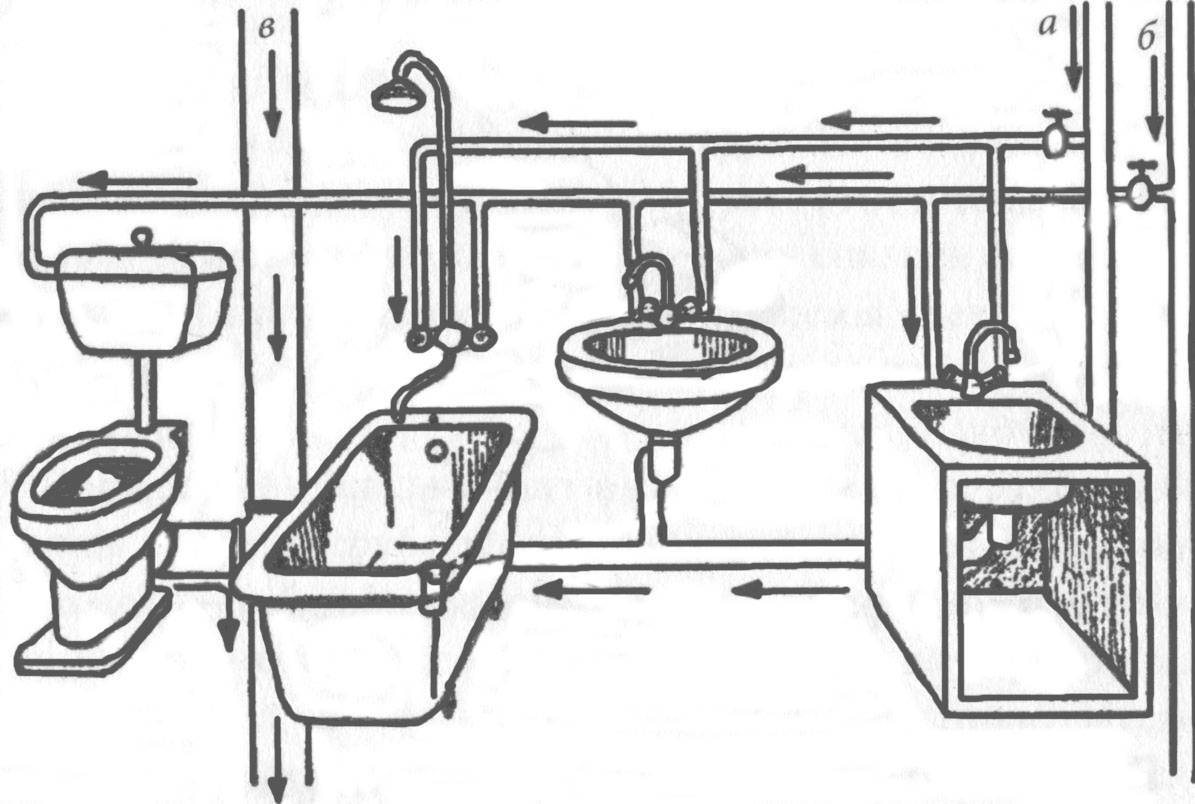
Bathroom wiring diagrams
The choice of piping scheme in the bathroom directly depends on the number of consumers and whether the bath and toilet are arranged separately or together. An improperly designed connection will cause the toilet or some other element of the system to be inoperative when the shower is running.
It is necessary to connect the points of analysis to the water supply so that the simultaneous operation of all plumbing is ensured. To do this, it is worthwhile to determine in advance which plumbing devices can work simultaneously, and which ones will never turn on in parallel. Correct connection options may be as described below.
United bathroom
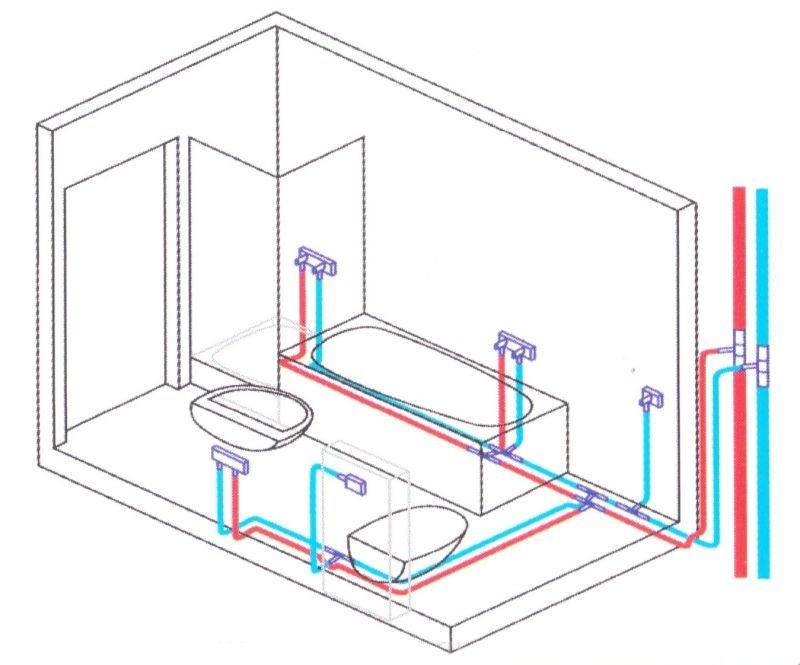
In a shared bathroom, the bathtub and toilet are in the same room and there is hardly room for anything else besides the sink.
If the toilet and bath are in different rooms, then they are connected to the water supply system in a different way.
Bathroom
If you place a bathtub, a washing machine, a shower cabin, a heated towel rail and something else in one room, then there will definitely be situations in which their work will intersect.
In order to avoid problems with water pressure, it is logical to arrange a sewerage manifold in the bathroom to connect these consumers individually.
Toilet

In the case of placing the toilet in a separate room, the toilet is connected directly to the cold water riser. The location of the toilet in an individual room allows you to use it simultaneously with other consumers who are in the bathroom. The filling time of the drain tank is short, so its effect on the water pressure is small.


Whatever the choice of piping in the toilet, it is also worth determining how to optimally lay them.
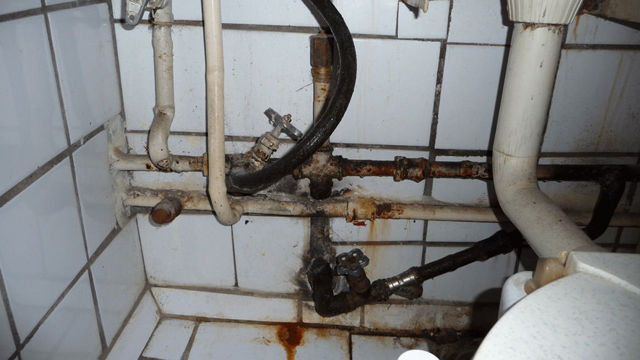
Know when to replace
This may be due to the following circumstances:
- physical wear expressed in the formation of leaks;
- clogging of old metal pipelines with corrosion products and lime deposits on the walls, which can lead to a complete blockage of the gap in them;
- vibration of the pipeline system during pressure drops, which can lead to the complete destruction of the water supply system.
Let's determine which pipelines are installed in the bathroom. To do this, pay attention to the temperature of the water in them. She may be:
- hot - for domestic needs;
- cold - in the order of general water supply for various household needs and mixing with hot water to the desired temperature;
- hot heating systems;
- since, on average, more than a cubic meter of water can be spent per person only for household needs, the task of removing used liquid through a gravity sewer system is relevant (in private homes in the summer season, this amount increases to 3 cubic meters).
Not so long ago, for the installation of pipelines in the bathroom, steel water and gas pipes were used, made in accordance with GOST 3262-80 in sizes from a quarter of an inch and above.
For a bathroom, products up to an inch and a quarter in size were usually chosen as the optimal size. Before you change the pipes in the bathroom yourself, you need to carefully read the steps of the process. We will review them below.
Solution of organizational issues
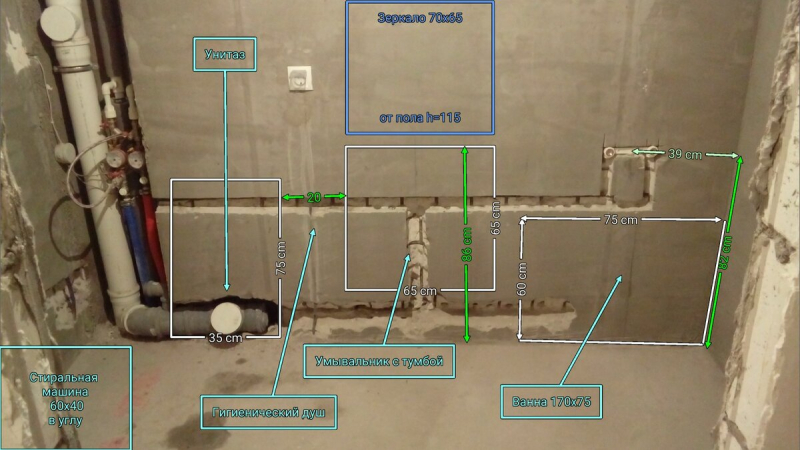
It is necessary to provide a scheme for laying pipes, make the necessary measurements. It is necessary to draw up a project on paper, it is advisable to write down all the data, decide on the scheme for laying water supply.
For laying pipes, you need to make measurements.
It is required to calculate the number of shut-off valves, jumpers, tees, holding anchors. Then you need to decide on the material of the products, the method of their installation (threaded or soldering).
When replacing sewers, special attention is paid to the riser in an apartment building. Here It is necessary to warn the neighbors from above that they do not use the toilet during this period
Options for laying pipes in the bathroom
If the toilet in the apartment or cottage is not combined with the bathroom, then special problems with the preparation of the layout of the pipelines are unlikely to arise. As a rule, there is only one toilet in it and there are two risers, from which it is necessary to bring a couple of pipes to this single plumbing fixture.
However, there is usually a kitchen and a bathroom next to the wall, where pipelines also need to be laid. Here with their wiring, basically, there are difficulties when replacing pipes.
Plumbing is connected to water sockets in a rigid or flexible way (through outlet hoses), toilets are connected to the sewer only according to the first option or corrugation
There are two technologies for laying pipes in the bathroom:
- outdoor.
- Hidden.
The first method is easier to perform, and the second is better in terms of aesthetics. With hidden laying of pipelines, you will have to ditch the walls, and this is dirt and additional time for preparation.
The best option is to lay pipes in the toilet according to the external scheme, and then cover them with a decorative box. Moreover, the risers will still have to be covered with decor. If you leave them open, then the interior of the bathroom will look ugly.
With a hidden gasket, any leak subsequently immediately turns into a headache. We have to start all over again. You will have to remove the lining, break the walls and change the pipes again.
A good option for outdoor installation with decorative false walls and boxes. The latter have inspection hatches and can be easily removed if necessary, if you need to get to leaking pipelines.
The sewer pipe is laid with a slope to the riser to ensure gravity flow. According to the rules for piping in bathrooms at the installation sites of plumbing fixtures, tees are inserted into it with the location of the sockets towards the movement of drains.


According to building codes the slope of the sewer pipe is selected based on the diameter of the pipeline. The smaller the section, the more the latter must be inclined.
For an intra-house sewer pipe with a diameter of up to 50 mm, the slope is 3 degrees (3 cm in height for each linear meter). For products with a cross section of 50-110 mm, it is recommended at 2 degrees, and for analogues of 110-160 mm - at the level of 0.8 degrees.
Plumbing is connected to the water supply:
- in a sequential manner;
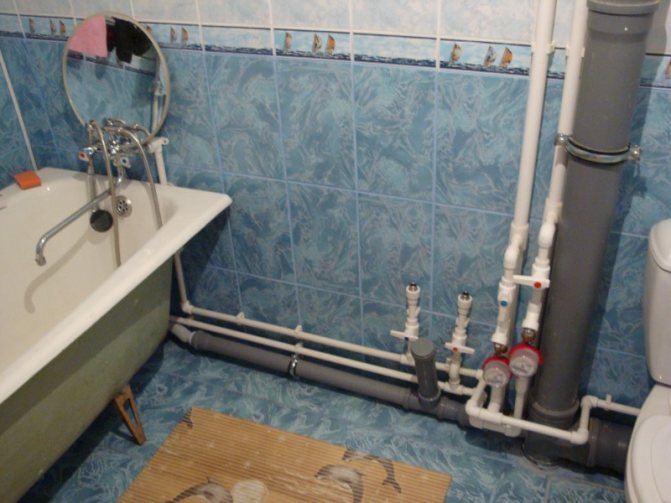
- through the collector at the riser.
The collector option is more expensive, but the pressure on each water outlet with such a wiring is always the same. In this case, the water pressure in the taps and shower does not jump when you turn on the washing machine or fill the toilet tank.
When using a collector scheme for supplying water from a riser to plumbing fixtures, you will have to install a lot of pipes, and all this economy is usually located just in the toilet
Water sockets are attached directly to the walls or on traverses (metal plates with holes for fasteners). In this case, the outlet for the toilet in the toilet is easiest to do with a hose.
On a water supply pipe passing by with cold water, a tee is simply inserted with an outlet having an external or internal thread. Ideally, pipes should be installed parallel everywhere, without crossing each other.
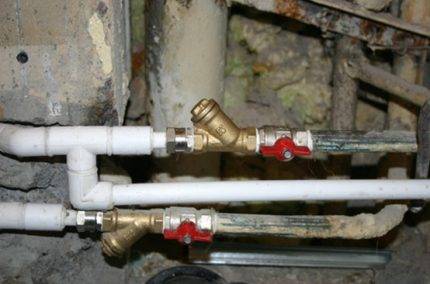
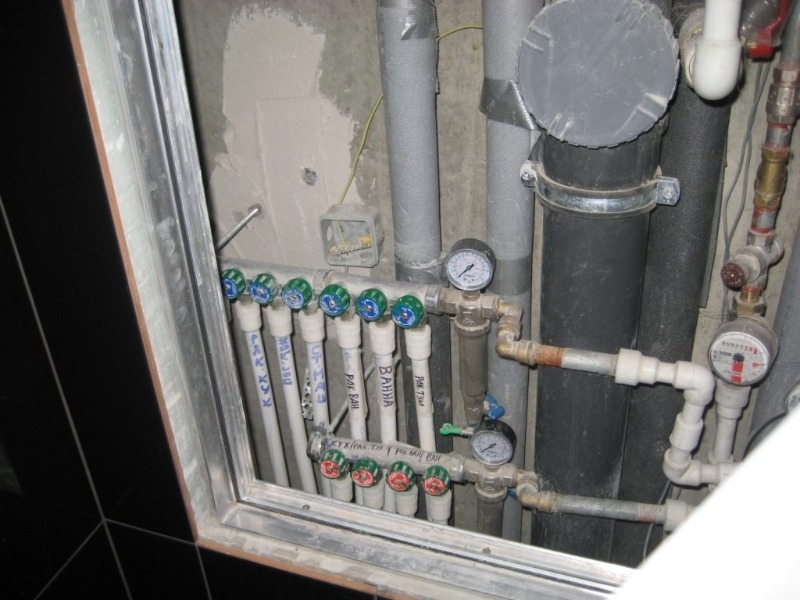
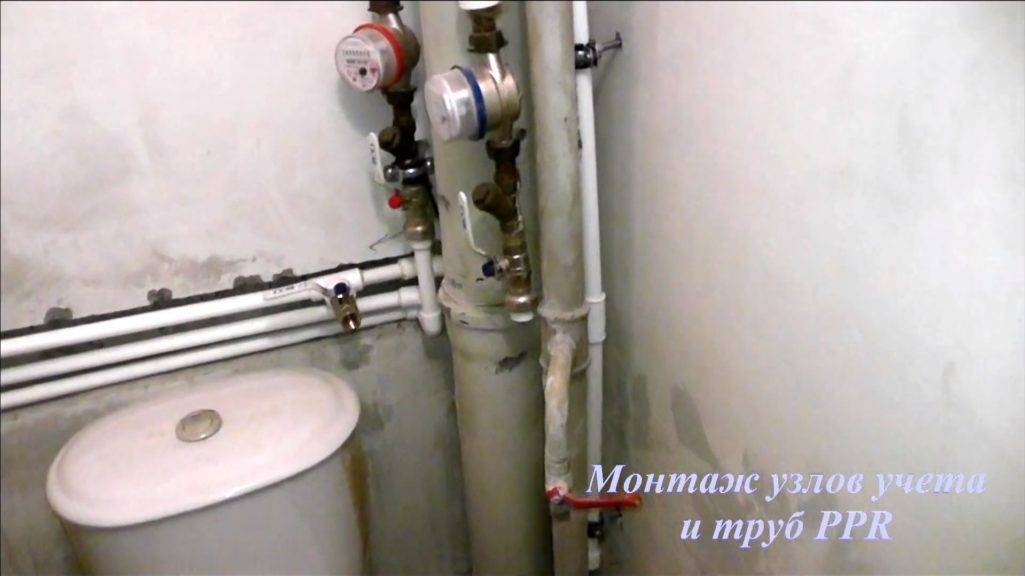
A stopcock is installed immediately from the riser and at the end of each water supply outlet. This is necessary so that, if necessary, you can turn off only one plumbing fixture to replace or repair it.
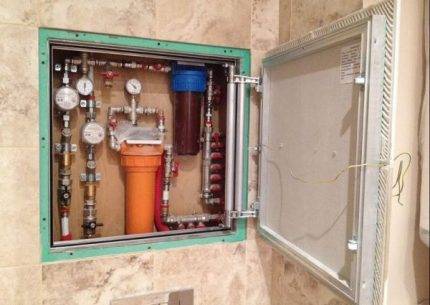
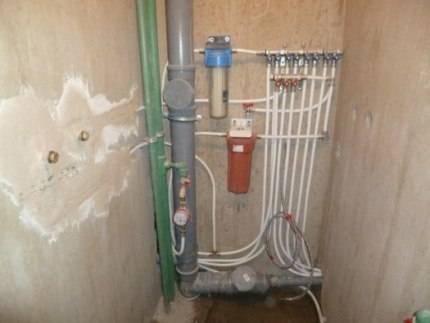
From the water supply riser, a ball valve is first installed, then a coarse filter, and only then a meter. The simplest and cheapest filter is a mechanical filter without backwash (with a small straight or oblique “process”, with a sump mesh inside).
On it, from time to time, you will have to unscrew the lid with a wrench to rinse the stainless steel mesh that accumulates sand and rust. The auto flush filter is large. It must be connected to the sewer, and a bypass must be installed in parallel with it.
If there is not enough space on the toilet wall, then it is better to refuse this option. All this in the complex is called the "input node". After it there is already a pipe for connecting plumbing or a collector.
How to connect a bathtub to the plumbing
After installing the sewer connection, the mixer is mounted. With it, the bath will be connected to the water supply. Water outlets are holes in the wall to which outlets from the central riser are connected.
Mixer design
-
FUM tape is wound on eccentrics. After they are screwed into the socket with neat, smooth movements. From the inside, the “boots” are not sealed - there will be a gasket that will do an excellent job of protecting against leaks. Only after that, glasses or reflectors are installed on the open parts of the eccentrics;
-
Special gaskets must be included with the mixer. They are mounted on the protrusions of the eccentrics and the crane itself is mounted on top of them;
- A shower hose is connected to the faucet. Its fasteners are also sealed with rubber gaskets, and the thread is FUM tape. If desired, you can immediately install a holder for a shower "rain";
- Then his work is checked. Be sure to inspect the eccentrics - nothing should drip from them. If water flows out of the joints, it is necessary to press the parts of the structure more tightly.
The best way to check is to turn on the water and take half a bath. With this pressure, all fragile connections will immediately show themselves.Detected leaky fasteners are tightened and treated with sealants.
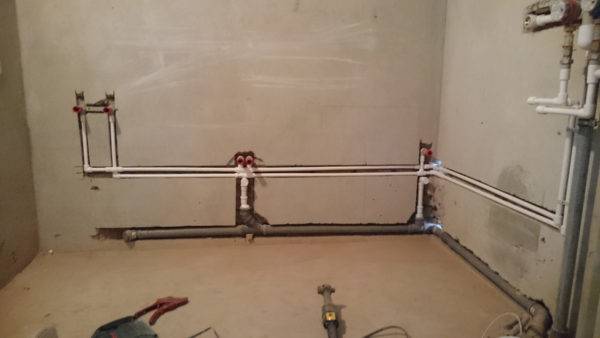
Stages of installing a new water supply
Before installing a new water supply network, we draw on a schematic diagram, displaying all the details of the updated design. On the plan, we indicate the dimensions and ratios of parts, the number of joints and turns, the length and diameter of the pipes. The finished scheme is the key to a successful and economical project. Only after a detailed study can you start installing a new network. Do-it-yourself installation of a new water supply system includes the following steps:
- With the help of a grinder and a stone circle, we cut special channels in the walls into which a new water supply will be laid. The depth of the openings must be at least 15 cm, and the width is 0.5-1 cm more than the diameter of the pipes. Laying the water supply network in the wall will allow you to save free space in the bathroom.
- We process the walls of concrete channels with a chisel, removing sharp edges and excess parts of the stone that can damage the pipes or interfere with their installation.
- We cut a new thread on an old metal pipe. To do this, we select the appropriate diameter of the plate and wind it on the remains of the iron base. To carry out this work, you will have to make an effort, but its result will be an excellent carving.
- We wind the corner adapter onto the new thread and direct it into the previously made recesses in the wall.
- We connect an emergency shutdown valve to the adapter, and we mount a new pipe to it. As the main option, we will use metal-plastic. Therefore, we connect the edge of the pipe directly to the tap and fix it.
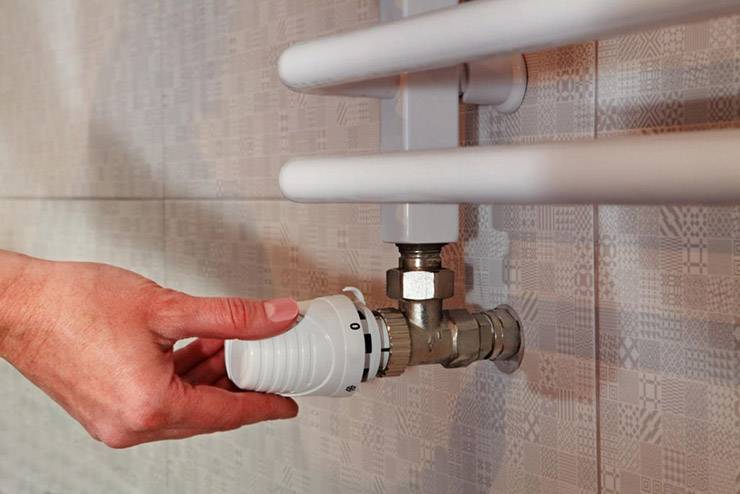
- We make the appropriate distribution of cold and hot water, as well as laying the layers for plumbing.Before each final element of the system, we install taps that will allow you to easily turn off the tap or toilet in case of a breakdown.
Taps for connecting plumbing
- We seal the pipes with plaster or immediately close them with the chosen type of finish, leaving only taps for taps, a toilet bowl and a heated towel rail outside.
The result of such actions will be not only a complete renewal of the water supply network, but also the liberation of space. In conditions of small areas, this step will make it possible to make the room visually larger and optimize it.
Installation of water outlets
Removing old pipes and installing new ones
To remove old communications, shut off the water and distribute connections for its drainage. Remove the threads and remove all taps and couplings, cut the welded joints with a grinder. If something is hard to get to, use a hammer drill equipped with a chisel.
When everything is removed, you can proceed with the installation.
If the fitting on the riser is threaded, attach a control valve, filter and water meter to it.
Pipes must be attached to the elements using soldering. Install the sleeves and barrels, then turn on the soldering iron, while maintaining a temperature of about 260 degrees.


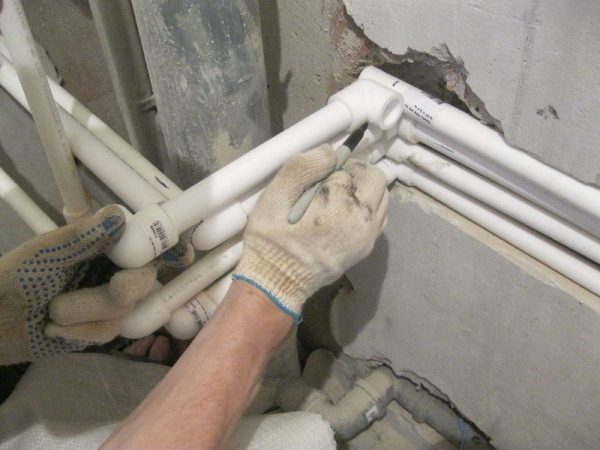


Do not cut them into sections in advance, but rather connect them gradually to get the right size. They should be cut with a hacksaw, while cleaning the cuts with a clerical knife.
Parts heat up within a few seconds. After you have removed the two parts from the soldering iron, they should be connected immediately, pressing all the way, but without strong pressure.
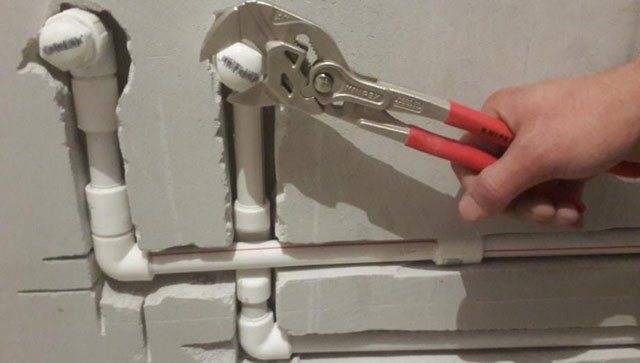
Pipes must be installed along the walls with plastic clamps, which are pressed against the wall with self-tapping screws. This will allow you to securely lock and snap the locks.
Check the quality of your work by opening cold water for 25 minutes. Then for the same time turn on the hot. See how the connections will behave, threaded and soldered. If there are leaks, they will need to be replaced immediately.
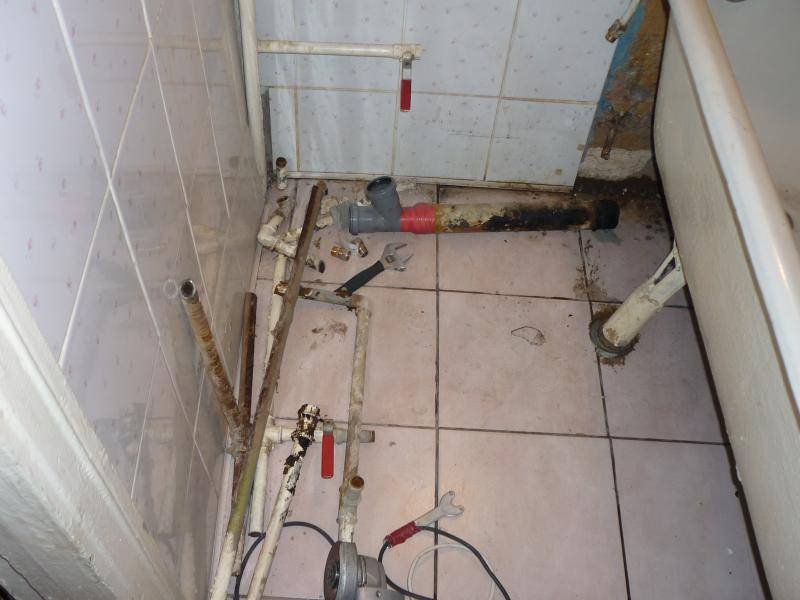
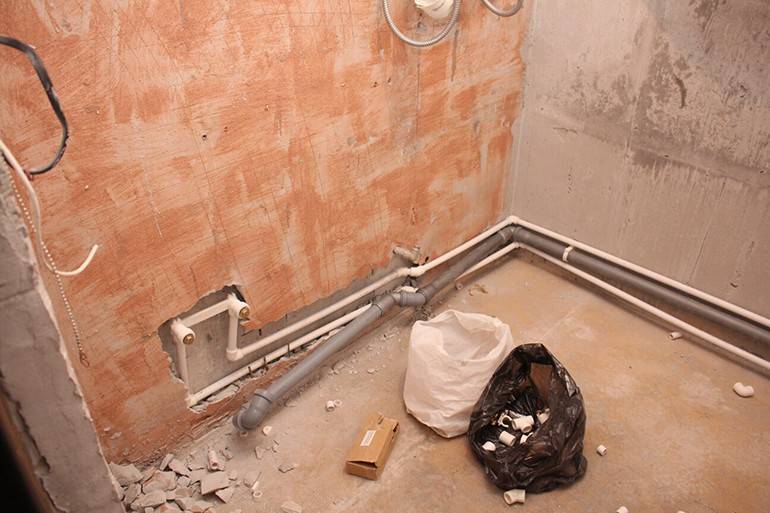
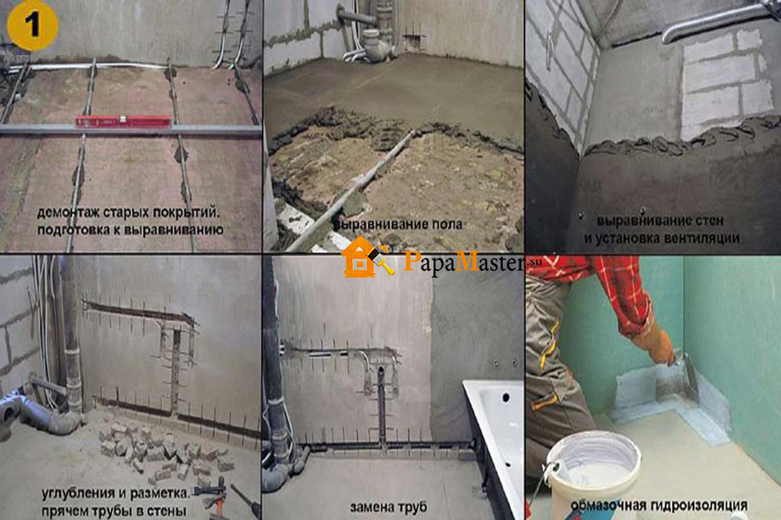
Dismantling of old pipes
Before you change the pipes in the bathroom, you should dismantle the old pipes, which can be done quite quickly using modern tools, the main of which is a grinder.
First of all, closed sections of the sewer and pipeline are opened, for which, along with a grinder, a tool such as a puncher may be required. In the absence of the necessary tools, you can use the old proven method - dismantling with a hammer and chisel, in which it is recommended to wear special gloves.
The dismantling of old pipes includes the following steps:
- First of all, the inputs are dismantled, for which they shut off the water in the riser of the apartment, since it may also be necessary to replace the inlet stopcocks;
- After shutting off the water, the old inlet taps are screwed or cut off with a grinder from the inlet pipe by the old pipes, after which the thread is cut and new shut-off valves are screwed on;
- The screwed inlet taps are closed, after which water can be turned on in the riser so as not to cause inconvenience to neighbors;
- Water is drained from old pipes in all possible places so that it does not interfere with the dismantling process. All water consumers, such as a washing machine, faucets and others, are disconnected from the pipes;
- Similarly, all sewer consumers are disconnected;
- Previously, installing pipes in a bathroom involved attaching them to the walls with dowels using a gun. Such dowels are quite difficult to remove from concrete, so their heads should be removed with a grinder so that nothing sticks out of the walls and does not interfere with the subsequent laying of tiles;
- If it is necessary to grind, the grinder disc is replaced with a disc for stone, brick and concrete, temporarily changing it back to a disc for metal if reinforcement is found in the wall.
Features of entering communications into the apartment
The layout of the apartment serves simultaneously for supply / overlap, cleaning, tracking leaks, distributing water between consumers and performing other functions depending on the needs of the homeowner. Pipe routing is also applicable to sewerage.
At the beginning of the system there should be a tap that opens the flow of water or shuts it off in case of an emergency.
Open and shut off the water should be a smooth turn of the lever, otherwise you can cause water hammer, which damages the plumbing.
After the emergency tap, it is recommended to install a leakage protection with automatic shut-off valves. The next step is to purify the water with a filter. It is better to install self-cleaning models. The filter will not pass the coarse impurities contained in the water, which will extend the life of the plumbing equipment.
Optional devices can be installed in the wiring. These include gearboxes, pressure gauges and counters. The wiring diagram has two varieties.
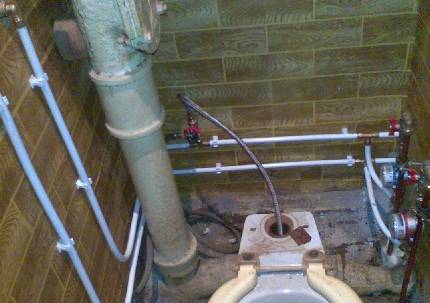
Sewer connection
In any bathroom, there is already a drain for sewerage, but in private self-builds this may not be the case.If this is your case, then before installing the bath, you need to drill three holes in the floor - for sewerage, hot and cold water. Further, the corresponding pipes are connected to them. Only after this is the plumbing fixture installed.
Step-by-step instructions on how to connect the bath to the sewer:
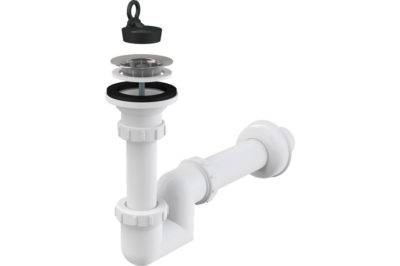
A corrugation and a siphon are used to connect the sewer outlet and the bath
Before installing them, it is important to check the level of the bath, the location of the drain pipe and its diameter. Only after that the necessary plumbing details are selected;
Overflows are installed first. There are two of them - through passage (through, central) and shut-off
Through is mounted in the drain of the bath, and locking in the side end. Before installing a through overflow, you need to assemble the siphon;
There are two of them - through passage (through, central) and shut-off. Through is mounted in the drain of the bath, and locking in the side end. Before installing a through overflow, you need to assemble the siphon;


Assembling a siphon with your own hands is very simple. A black rubber gasket is inserted into the structure itself. A nut is installed in the central overflow, it must be pushed into the hole by 3–4 mm. After you need to press the gasket in the siphon
For this, an overflow is screwed into it.
Please note that plastic threads do not need to be sealed, so FUM tape is not used. Next, the output to the corrugation is set
It is mounted in the top of the siphon, above the water lock, a cone gasket must be installed on this branch pipe
It is pressed with a plastic nut;
There are two corrugations in the bath: drain and sewer. The drain has a small diameter, it is installed on the side overflow. This corrugation is also connected to the siphon with a gasket and a nut.The sewer corrugation is also connected by a threaded method with a nut, and the overflow is similarly fastened;
Each siphon has a cleaning hole, which is closed with a solid nut. The connection must be sealed with a rubber gasket (white or yellowish). This is necessary for urgent repairs when the drain is clogged;
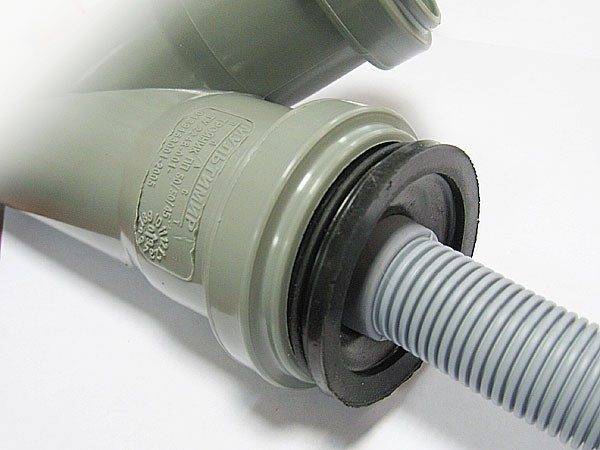
If you have a plastic pipe to exit the sewer, then most likely it already has a gasket. If not, you need to additionally seal the mount. To connect a plastic sewer corrugation from a bathtub to a cast-iron or other pipe, you will need a special adapter;
After completing the collection of the siphon constructor, you need to check how it will be installed. Overflows are installed in the intended places. To do this, a double elastic band is placed in the central hole of the bath, and a single thin one in the side hole. Next, a siphon is installed and tins are attached to the holes. With the help of a bolt, the mesh takes root. A transitional overflow is also attached;
To connect the sewer and corrugations, the side surfaces are lubricated with silicone sealant or soap. This will make it easier to connect the pipes. After they are additionally treated with a sealant. It is desirable to stretch the corrugations without kinks, otherwise water will not pass through them well.
This completes the process of connecting the bath to the sewer. Check the connection points of the siphon and overflows - water should not drip from them. The described method is the simplest and most affordable. Connecting brass structures is done in a similar way, but such siphons are 3 times more expensive than plastic ones.
Video: How to connect a bath to a sewer
Types of sewer and water pipes
The reliability of any design depends on the correctly selected and installed material. Each product has its own characteristics and nuances in the work. Types of plumbing products are:
- Metal product. They are made of steel or copper, in appearance they can be seamless, welded, with or without built-in threads at the ends;
- Cast iron product has high strength and reliability, most often used for outdoor sewage. Susceptible to rust.
- Plastic product. Lightweight material, easy to assemble. It has high strength, does not corrode. The disadvantage is sensitivity to high or low temperature.
- Asbestos cement product. It is light in weight and highly resistant to chemicals. Most often they are used in exhaust systems. Among the shortcomings, one can note the stratification of the material and the possibility of the formation of pins during transportation.
- Ceramic product. An excellent replacement for cast iron construction, ceramics are waterproof, resistant to mechanical damage, thanks to the applied coating inside and out.
- Metal-plastic product. It is highly resistant to corrosion processes, easy to install, able to withstand any temperature changes. This material is most often used if they want to replace pipes in the bathroom or the heating system.
Recommendations and errors
When removing old pipelines and sewers, pipes should not be cut to the very wall. Be sure to leave a gap 10-15 cm long, which is necessary for future threading. If you cut the pipes at the very base, then for threading you will have to hollow out part of the wall.
In places of branches, taps must be installed, which in emergency situations will allow you to turn off a faulty element of plumbing or equipment. In the absence of a valve, the system will have to be closed and the whole system will be lowered, which presents additional difficulties.
Too much tension or, conversely, loosening the nuts is a common mistake that is fraught with serious consequences. Pipes embedded in the wall will certainly begin to leak, which leads to soaking of concrete and damage to decorative finishes.
Therefore, when tightening the nuts, special care must be taken and moderate force must be applied.
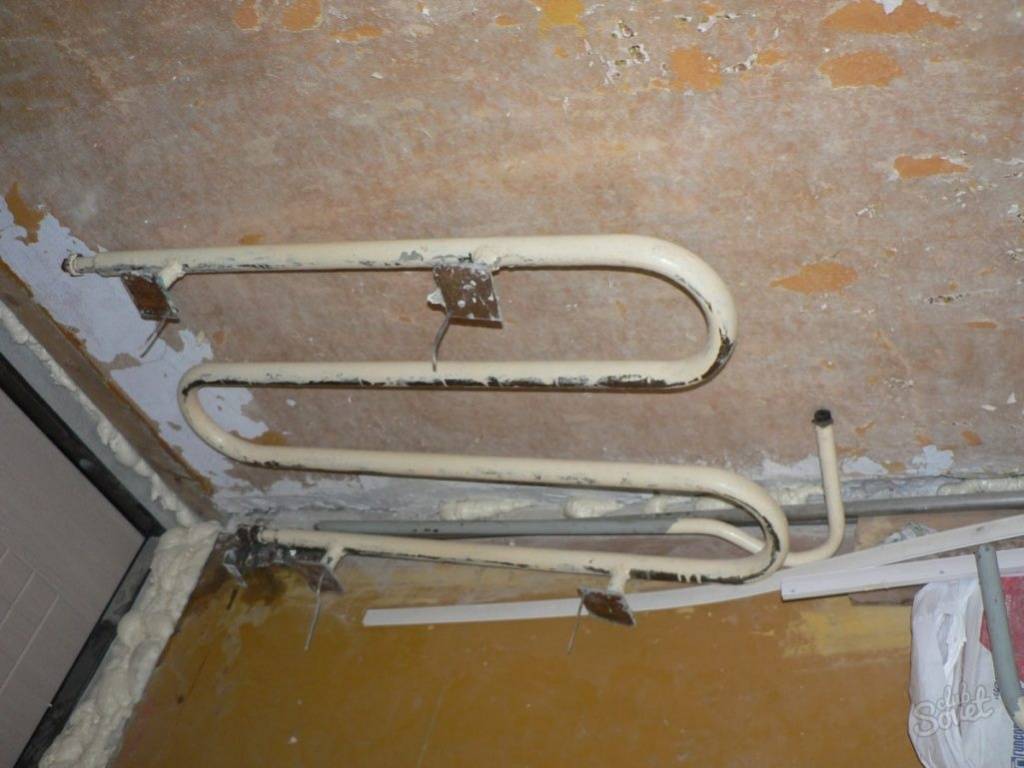
Drain line repair
The replacement of the sewer pipe in the bathroom should be carried out after the dismantling of the old line. It is not difficult to remove old structures, a grinder will help us with this. This tool allows you to significantly reduce the time spent on dismantling.
- First, turn off and take out plumbing fixtures.
- If the sewer line is arranged by a hidden method, then access to it must be freed. For such work, you will have to stock up on a puncher.
- Next, the water supply to the housing is cut off, and the old sewer pipes are cut off with a grinder.
- The most difficult stage in this work is the dismantling of the cast iron riser. This task is best left to professionals. Because erroneous actions can harm the neighboring sewer riser.
Pipe installation instructions
 The main reason for upgrading the pipeline is to improve the quality of the water passing through the pipes
Before starting work, it is advisable to lay out all the necessary parts on the floor at their installation sites: this will help identify the missing elements and reduce installation time in the future.
Pipeline replacement work includes:
- Threading on old inter-apartment risers and installing adapter flanges on them.
- Connection to a flange for the removal of a small section of pipe, with a ball valve installed at the end. After this stage, you can set the tap to the "closed" position and put water into the riser.
- Connection of couplings, tees, angles, bends. All threaded joints are wound with FUM tape or linen.
- Step-by-step soldering of pipe sections.
- Connection of pipes to the shut-off valve on the riser.
- Fastening the system to the wall or in the strobes with clamps or clips in increments of 50–55 cm.
- Connecting plumbing equipment to the system with flexible hoses.
Installation of a new riser
After the old riser is dismantled, you can proceed with the installation of a new pipe. It is done like this:
- Provisional assembly is carried out, starting with the tee. This assembly is made without cuffs. The riser includes (in the direction from below): a compensation pipe, one (or two with a significant ceiling height) pipe, a plastic adapter for connecting to a pipe coming from an apartment located above. If the fitting assembly was successful, then you can proceed with the installation of the riser.
- At the first stage, you need to outline the installation locations of the clamps that will be used to fasten the riser. There must be at least three clamps. The lowest one is placed at the upper edge of the compensator, the upper one is placed at the level of the socket of a long riser pipe (if you have to build up the pipe with an additional segment, then it is installed above the upper clamp). The middle clamp is located approximately in the middle of the pipe.
- When assembling, each connection must be coated with a sealant using special plumbing compounds that do not include acid.
- A rubber adapter cuff is put on the upper part of the plastic pipe. The opposite end of the cuff is put on a pipe located near the ceiling. The connection is coated with silicone sealant. A plastic adapter is put on top of the cuff.
- Another adapter is put on a tee or pipe socket from below.
- Now you need to measure and cut the pipe in height. In this case, it must be borne in mind that a compensator must be installed on the pipe.
- Insert the lower end of the pipe into the adapter.
- Now you need to fix the new riser with metal clamps fixed on the wall. When installing the clamps, it is recommended to use rubber gaskets so that the fixation is not too rigid.
- On this, the installation of the riser is considered completed.
So, replacing a sewer riser in an apartment is not a very difficult job, but it is very time-consuming, requiring considerable physical effort. In addition, when dismantling, you need to be extremely careful in order to prevent the destruction of the socket and the riser pipe itself in the apartment below. The best repair option is the simultaneous replacement of pipes in all apartments located in one riser. In this case, it will be possible to carry out dismantling without fear of damaging someone else's property.


Conclusions and useful video on the topic
You can visually see the process of laying pipes in the presented video.
The process of replacing the plumbing and sewerage in the bathroom is quite within the power of the master, who has some skills in working with plastic pipes. Carefully following the instructions and using high-quality materials, such operations can be completed quickly enough.
Newly made communications made of modern plastic will reliably serve for a long period of time.
Want to talk about how you personally changed the pipes in the bathroom? It is possible that you know the technological subtleties that will be useful to site visitors. Please write comments in the block below, post photos and ask questions on the topic.


