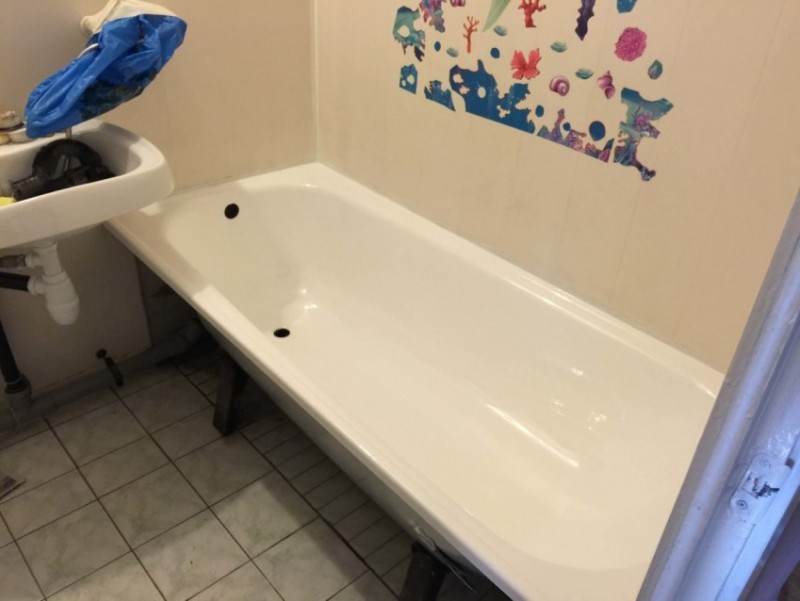
- Acrylic bathroom restoration photo
- Giving a second chance to an old cast-iron hot tub
- Why paint a bath
- Vadik is learning how to prepare a bathtub for acrylic coating
- Simple bathroom painting tips
- Acrylic to restore the bath: what you have to face
- Bright colors
- Paint selection
- Coating Requirements
- Other recovery methods
- Enamel restoration instructions
- Preparation for work
- How to restore the surface with enamel?
- How to update a bathtub with liquid acrylic?
- Silicone water dispersion
- Advantages of acrylic coating
- Advantages and disadvantages of acrylic
- Bathtub restoration with epoxy enamel
- Enamel bath restoration tools
- enameling process
- Preparatory work
- Enamel application
- How to remove streaks and sagging of enamel during application?
- When is the bath ready for use?
- Composition and technical characteristics of enamel and acrylic
- Consumption per 1m2
- Bath enamel
- Preparing the surface for restoring the enamel of the bath
Acrylic bathroom restoration photo


We also recommend viewing:
- Bathroom rod
- Bathroom glass
- Wiring in the bathroom
- Bathroom panels
- Bathroom enamel
- Pipes in the bathroom
- Soap in the bathroom
- Bath towels
- Plaque in the bathroom
- Bathroom lighting
- Bathroom plumbing
- Liquid Acrylic for Bathroom
- bathroom leak
- Bathroom installation
- Drywall in the bathroom
- Bathroom frame
- Bath suction cups
- Long bathroom faucets
- How to choose a bathroom
- Bathroom paint
- Bathroom Sealant
- Blockage in the bathroom
- Bathroom restoration
- Bathroom screen
- Bathroom fixtures
- Washing machine under the sink
- Washing machine in the bathroom
- bathroom fan
- Bathroom installation
- Bathroom cornice
- Bath salt
- Round bath
- Bathroom dimensions
- Bathroom Rosa
- Socket in the bathroom
- Bathroom sunroof
- Bath toys
- Shower curtain
Please repost
Giving a second chance to an old cast-iron hot tub

We paint the bathroom with enamel
I helped Vadik make the second bath. It was very old, the surface was covered with cracks. Acrylic composition would not cope with them. Fills and reinforces small defects with a two-component composition for coating the surface with enamel. It is difficult to work with him. It is made from epoxy resin. You need to mix in the exact proportion and apply quickly. The hardening time is 30 - 45 minutes and you may not have time.
In order for the two-component enamel to flow into cracks, the bath must be heated. Many simply pour hot water into it. But while they disconnect the drain, the metal cools, especially aluminum.
At home, I heated the bath with a heat gun after disconnecting the tide. The room was hot and I had to work quickly.
Accurately measuring the proportions, he connected the composition in a container. Vadik mixed it well with a drill with a nozzle at low speeds. Then I took the brush and applied the first strokes to the bead. It is better to paint the sides with enamel, applying the composition from top to bottom and rubbing horizontally.
You can pour epoxy enamel on the sides and rub the flowing streams. But given the rapid hardening, an even layer and gloss is not guaranteed. At home, you have to work in close quarters.This excludes the active help of an assistant.
After the acrylic or epoxy coating has dried completely, the ebb is put in place. During operation, make sure that the paint does not flow into the hole for the siphon. It will be almost impossible to clean the drops after drying.
With the right work done, the new enamel will last on the bathroom for more than 10 years. To create a certain style, you can add coloring pigments to the composition. But this will not increase the service life and old stains will quickly appear and spoil the appearance. It is better to decorate the outer surface of the font beautifully and brightly.
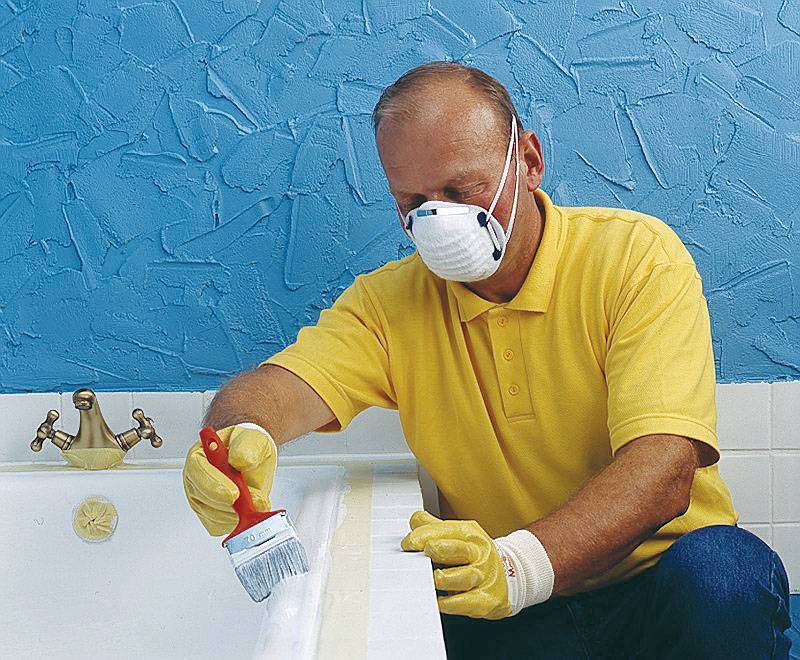
The old bath has lost its presentable appearance, and the purchase of a new product is not included in your plans? An excellent solution to the current problem is painting the bath with your own hands. You just need to prepare everything you need for work, read the manual and consistently follow each step of the instructions received.
First of all, prepare protective equipment. You will need:
- respirator.
The usual "petal" for such work is not suitable. Buy a good respirator with a built-in organic absorber cartridge; - rubber gloves;
- apron;
- flute brush.
The tool must be exclusively made of natural bristles. The optimal brush size is 7-10 cm. It is impossible for the brushes to come into contact with anything greasy before starting work, including hands; - sanding attachment
for electric drill and electric drill; - tweezers;
- paint knife;
- acetone.
Instead of cetone, you can use the 646th solvent. The use of white spirit is unacceptable, as well as other solvents containing saturated hydrocarbons; - rag.
Any fabric that does not leave a lint, for example, cotton, will do.Microfiber cloths are also great. These are usually used for wiping glasses glasses.
Why paint a bath
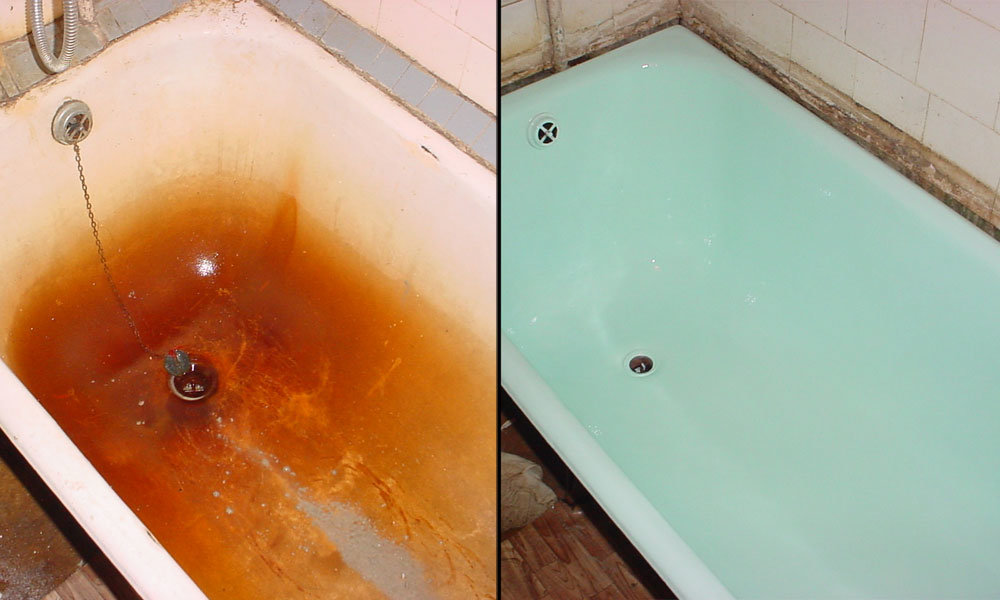
With prolonged use, yellow marks and rust begin to appear on the surface. You can find cracks and chips in the enamel. Even the best cleaning products cannot cope with such defects.
After restoration, the outer surface will not only be restored, but in many respects will exceed the characteristics of enamel.
Therefore, the owner has several options for how to deal with the problem:
- Purchase of a new model. But this may turn out to be unprofitable, expensive and it will take an additional waste of time to deliver the product and carry out its installation;
- Installation of the liner according to the "bath to bath" method. The technology consists in using a special acrylic product, which is placed inside the old bathtub. So it turns out that the liner with a flat surface hides defects. Costly method, the cost can be compared with the acquisition of a new model;
- Product painting. It is required to choose the appropriate composition and carry out the processing, following the rules. The most budgetary method to solve this problem.
The disadvantages of this method include the toxicity of the compounds: it is recommended to work in a respirator.
Coloring also allows you to experiment with design, changing and updating the color of the product. This method can completely cope with defects, such as cracks, chips, traces of stubborn dirt, rust. Naturally, if the product is so heavily rusted that holes have formed on the surface, then staining will not help.
During its use, over time, streaks and various kinds of defects begin to appear on its surface, associated with the natural aging of its coating.
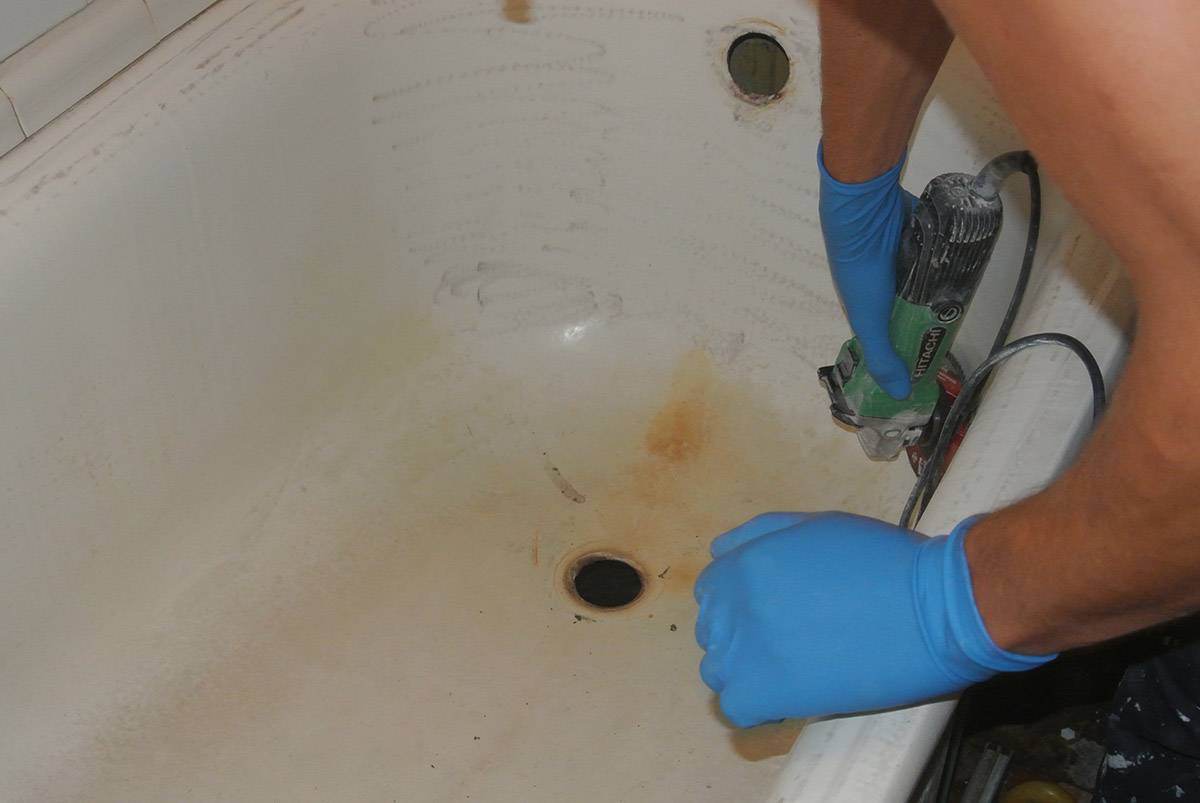
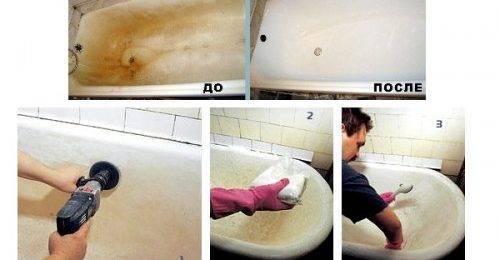
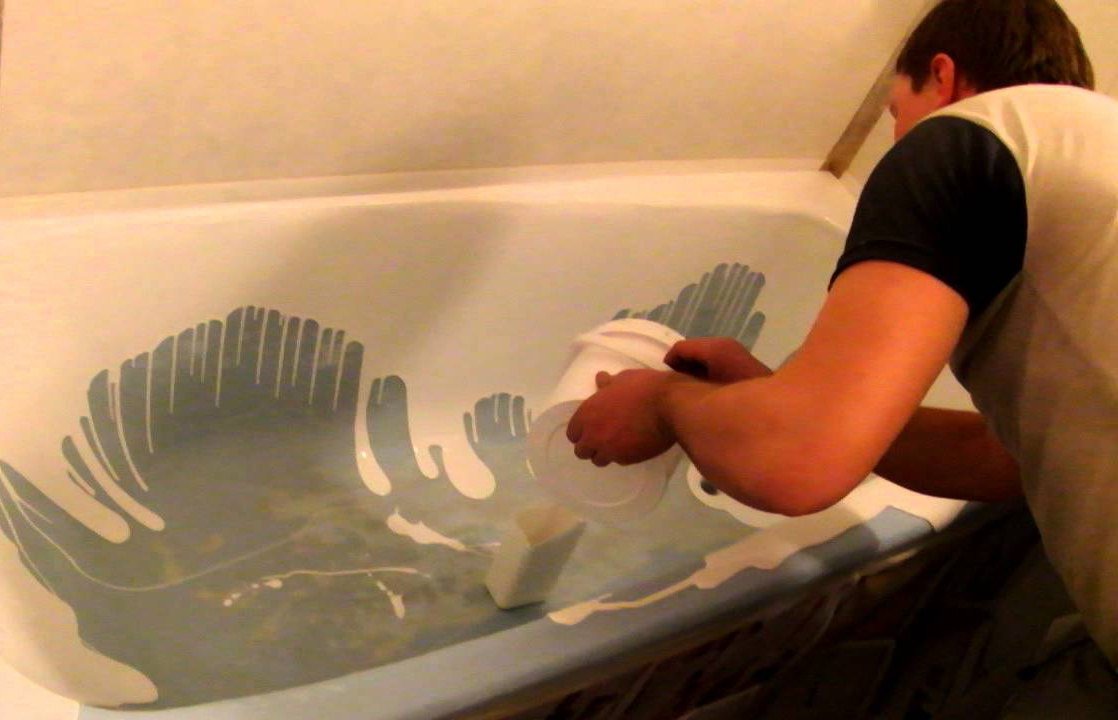
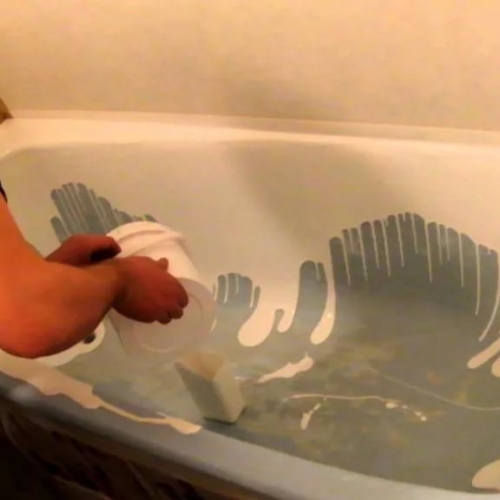
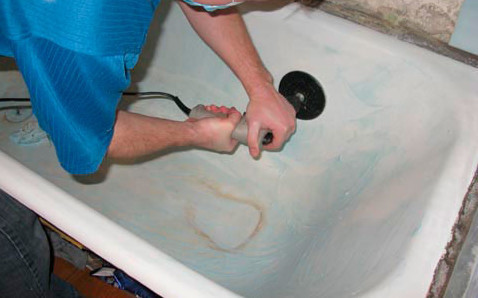
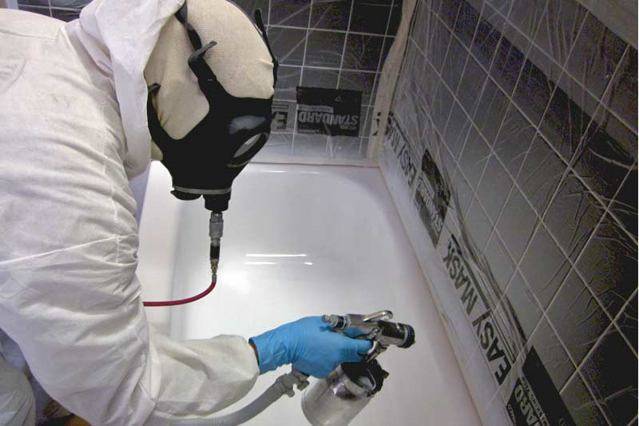
Vadik is learning how to prepare a bathtub for acrylic coating

We paint the bathroom with our own hands
We decided to paint the bath at home with acrylic. You can make the coating with other compositions, but Vadik had little experience, and I have time. Therefore, a friend did everything on his own, under my guidance.
- I washed the bathtub with active detergents containing aluminum as an abrasive.
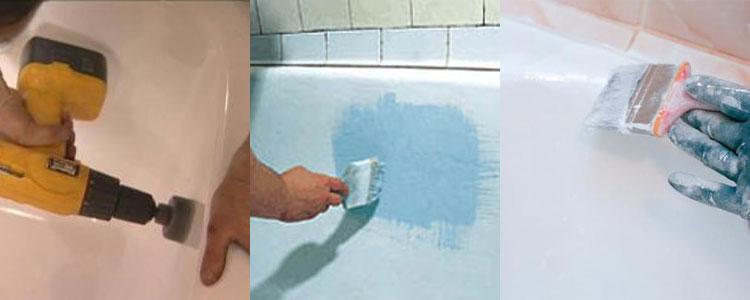
- Then I cleaned the surface, partially removing the old remaining enamel coating. To improve adhesion, I roughened the entire surface.
- He removed all the dust with a vacuum cleaner and washed the font with water.
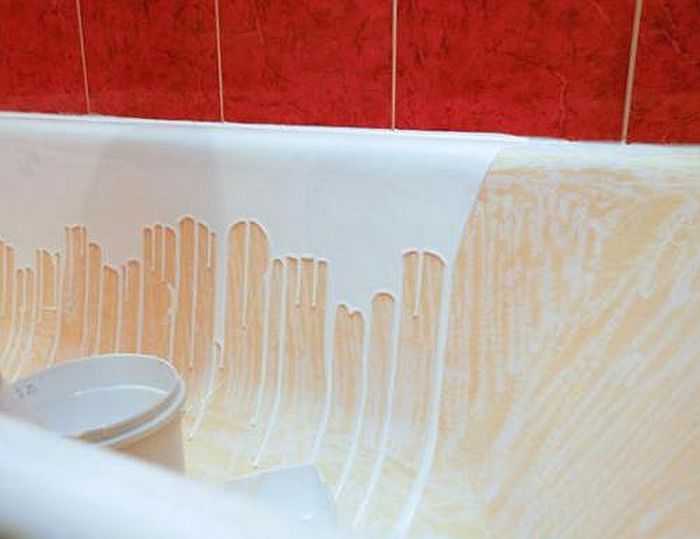
- After that, I first covered the sides with acrylic, then gradually moved to the sides and bottom. With a wide, coarse brush, he painstakingly rubbed the plastic enamel. After waiting a bit, I applied a second layer on the wet.
When I arrived, Vadik was so diligently cleaning the surface with a petal circle on the grinder that he had to be reminded that it was possible to wipe the walls through. They are thick and strong, but not endless.
For quick drying, I advised a friend to heat the bath and the air in the room. After that, close the door so that there are no drafts and dust does not get on the damp surface.
Simple bathroom painting tips
After preparing the paint composition, it is necessary to take only the amount of the mixture that will be needed in the next hour. Otherwise, the composition will harden and deteriorate.
The surface of the bath does not absorb paint, the composition only envelops it. Therefore, only a small amount of the mixture is applied to the brush to even out the layer.
 After watching the training videos, you can get acquainted in more detail with the stages of painting the bathtub with enamel with your own hands.
After surface treatment, it is important to treat the bath with care. Avoid serious damage, clean regularly and make sure that there is no ingrained plaque, rust
The restoration process is simple. And if you follow all the recommendations and rules, you can get a smooth, beautiful bath cover.


Acrylic to restore the bath: what you have to face
So, the first thing to consider in the preparatory process is the cost. A huge number of companies and private craftsmen offer to restore the bathtub cover using acrylic. But the price depends on the following factors:
- skill level of employees. A good professional cannot be cheap.
- Scope of work performed by specialists. If this is just repairing bathtubs with acrylic without sealing the seams and the bathtub-wall joint, then they won’t take much for this type of work.
- Coating option: manual method, bulk or insertion. The first method does not guarantee strength and durability, and the third is a renewal of the coating using an acrylic liner.
Looking through the feedback from users, we can highlight several unpleasant features of the work:
- The smell of acetone. Updating the bathtub with acrylic by pouring involves the use of solvents, so it is best to remove children and pets from the apartment.
- Preparatory work. It is necessary to take out the furniture, free the room from accessories and other trifles before the arrival of the master.
- Drying time of acrylic coating. As a rule, the final hardening occurs for 4-5 days. The bathroom is strictly prohibited.
Each restoration method has its own advantages and disadvantages.But if you want to repair the bathtub with acrylics with your own hands, you should familiarize yourself with the options in a little more detail.
Bright colors
Paint selection
Figure 2. Bathroom update with bright elements.
How to make a bathroom stylish? It is not at all necessary to carry out repairs, you can purchase unusual accessories or decorate the walls in an extraordinary way. Before starting such work, it is recommended to use special shade combination tables. For example, various shades of green are suitable for a modern interior. It can be a swamp color, bright green, olive, khaki. You can combine them with beige, burgundy, ocher or mustard tone.
A real celebration of color can be arranged using:
- Glass blocks to create a decorative partition, as in fig. 1. She can distinguish between the bathroom and the rest of the room.
- Tiles already on the walls can be decorated with a special self-adhesive film. Today, specialized stores offer a large selection of films of various shades. Various figures or rectangles are cut out of it to make the walls brighter and more attractive.
- Instead of standard boring furniture, bright shelves and cabinets are installed. Towels are better to take bright colors, with drawings. Beautiful rugs are laid on the floor, the shower curtain is chosen to match the rest of the decor. An example is shown in Fig.2.
Coating Requirements
There are many types of paint and varnish coatings (LKM) on the market and there is something you can paint a bathtub with. There are restrictions that prohibit painting the bath:
- The composition of the paintwork materials should not contain toxic substances that can interact with water, detergents and oxygen;
- The texture of the paint should be dense and firm, with a glossy effect. This paint fits perfectly on the surface of the old cast iron.
Paintwork - that's what you can paint the bath. But you need to test in advance for color. To do this, it is worth applying one coat of paint before painting the cast-iron bowl, on a clear glass and allow to dry. You can evaluate the quality of the tone like this: look from the back of the glass.
Other recovery methods
A popular method of restoration is the fastening of acrylic liners. This is a way of working that is not suitable for independent use. The procedure is performed like this:
- Cup measurements are taken.
- An acrylic liner is created according to measurements on special equipment.
- The product is delivered to your home.
- The master installs the liner in the bath bowl and seals it with a special composition.
- At the end, plumbing fixtures are connected according to new sizes.
The durability of the liners is 20 years. But the duration of use of sealants and adhesives that are used in the installation of the product is several times less. As a result, moisture gets between the bathtub and the liner, an unpleasant smell of rot appears.
«>
Prices for liners vary depending on the manufacturer - 4-5 thousand rubles. But it also happens that the price does not include the invitation of a measurer and other work, which is why the final price increases. As a result, it is equal to a complete replacement of the bathroom with a new one, since the dismantling of the tiled walls is necessary.
Thus, with the help of bathroom restoration, it will be possible to improve living conditions in a short time without performing major repairs. Since this work is simple, you can do it yourself. You just need to do it carefully.
Enamel restoration instructions
In order for the bath to last as long as possible after repair, it is necessary to properly prepare its inside and observe the modes of application and drying of the coloring composition.
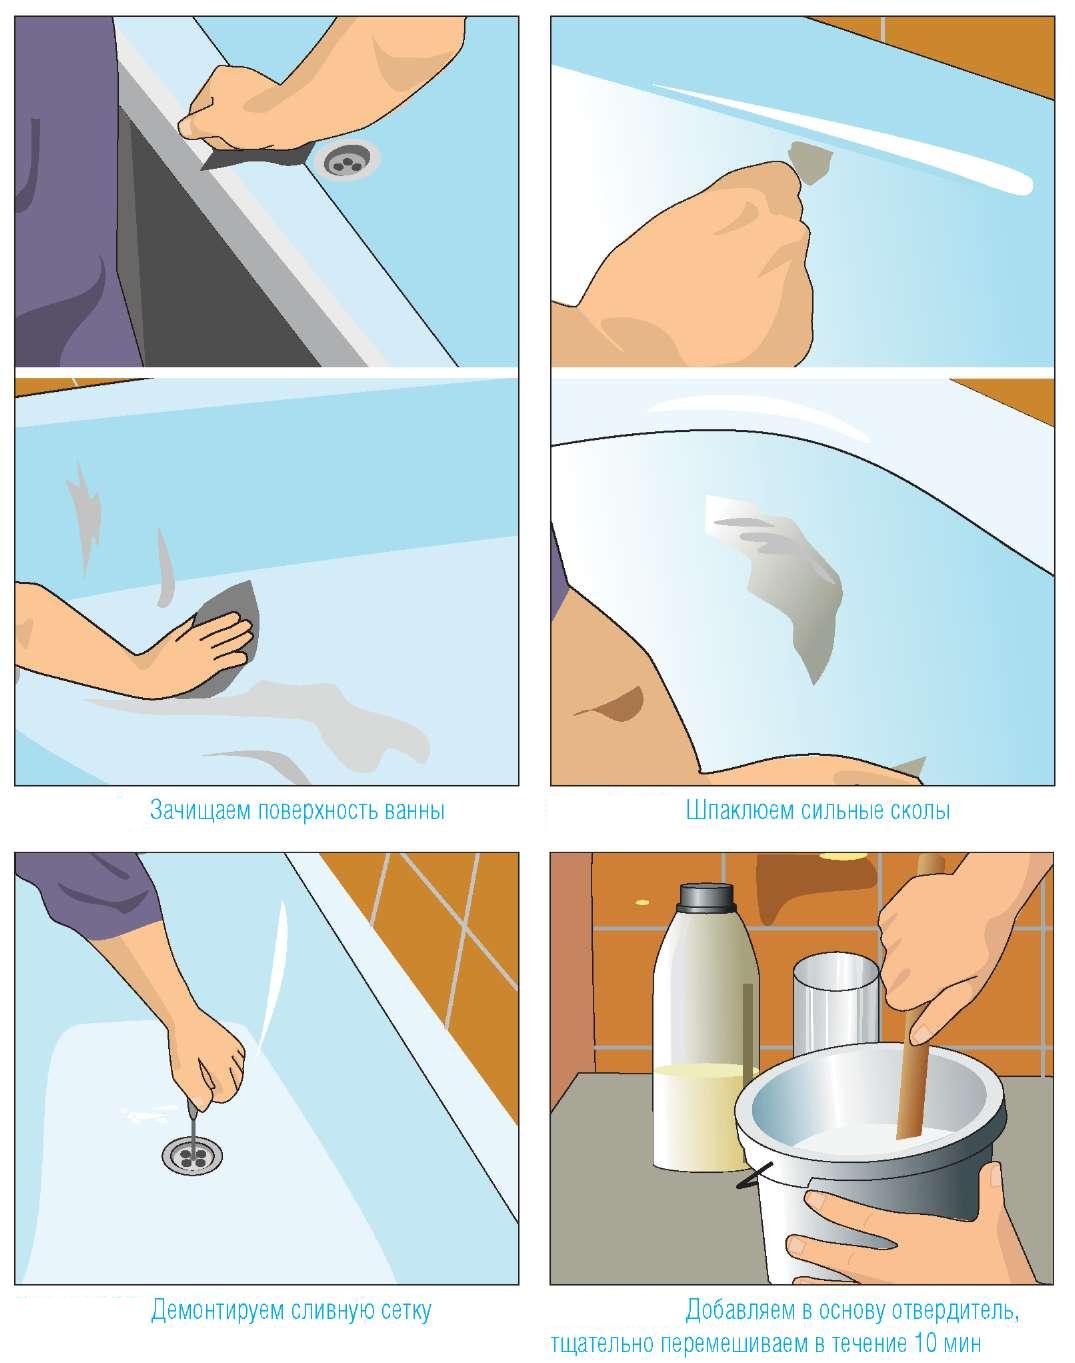
Preparation for work
Before you start painting old sanitary equipment, you need to properly prepare both the room and the coating inside the bowl. Since you will need to clean off the destroyed layer of paint, you can not do without dust. Therefore, small-sized furniture and household appliances are removed from the bathroom. If this is not possible, protect the items from dust with plastic wrap.
The surface to be painted is prepared as follows:
Manually with a coarse-grained sandpaper or using an angle grinder, the surface is cleaned. It is good if you can completely remove the damaged layer of paint before the primer
In this case, it is important to ensure that the metal becomes absolutely smooth.
Rusty smudges are treated with a rust converter. You can also use oxalic acid by mixing it with water until a thick slurry is obtained.
The cleaning agent is applied to the place of contamination, and after 20 minutes, together with the remnants of the old paint, it is washed off with water.
For degreasing use gasoline or acetone.
Pour hot water into the bowl and leave to warm up for 15-20 minutes.
Carefully wipe the inner surface of the product with a cotton rag. It is important that the coating is completely dry and free of sticky threads or lint.
To dry at this stage, you can use a hair dryer or fan.
How to restore the surface with enamel?
To make the new bathtub coating as smooth as possible, it is necessary to treat the surface with a primer before painting.You can do without this procedure, but then the new coating will turn out to be not too even and will not last so long.
The work is carried out in several stages:
- With a rubber spatula, a layer of soil is applied to the cast-iron surface and left to dry completely, after which it is cleaned with fine sandpaper.
- Three or four coats of paint are alternately applied with a roller or brush. Before applying a new layer, be sure to wait for the previous one to dry. Drying time depends on the material used for painting, and is indicated by the manufacturer in the instructions.
- At the end of the work, the completely dried surface is wiped with a solvent, which will give the product a glossy sheen.
To fix the result, after 3-4 days, you can treat the coating with any polishing agent.
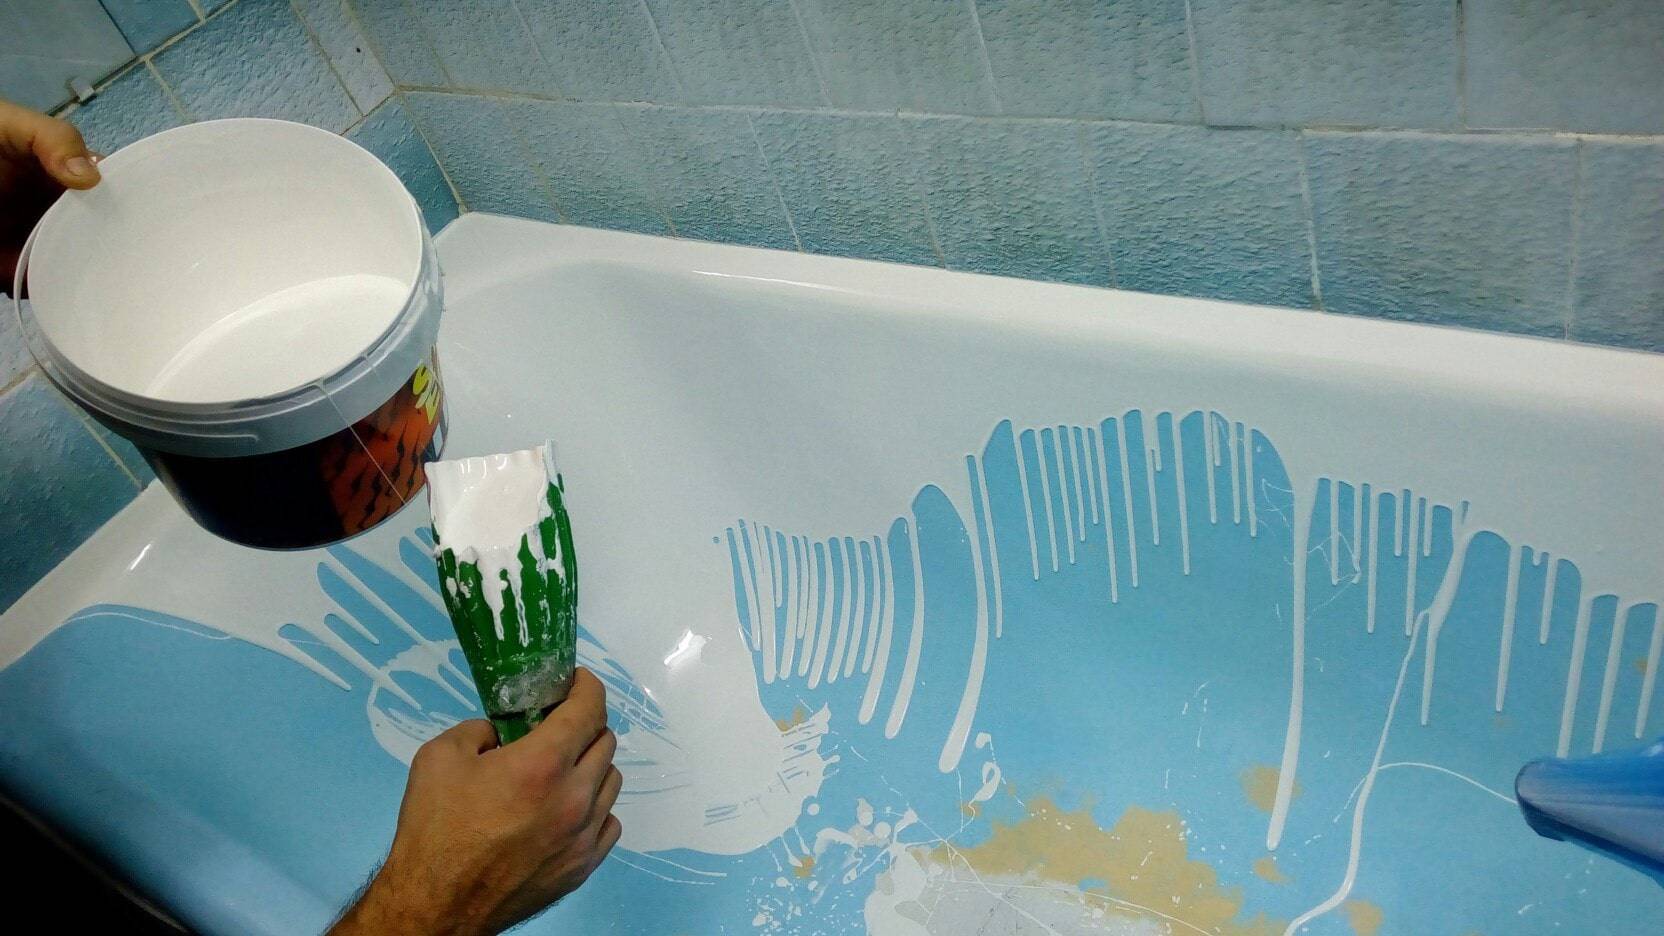
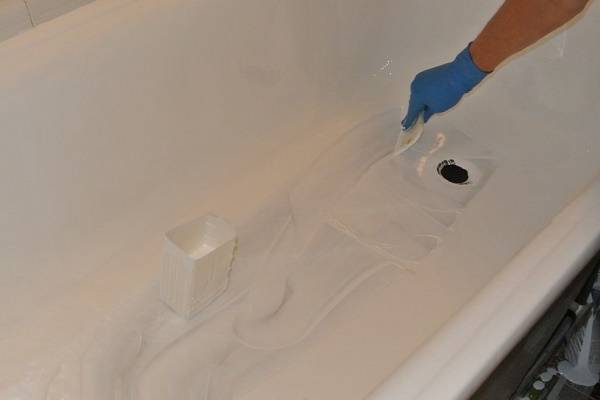
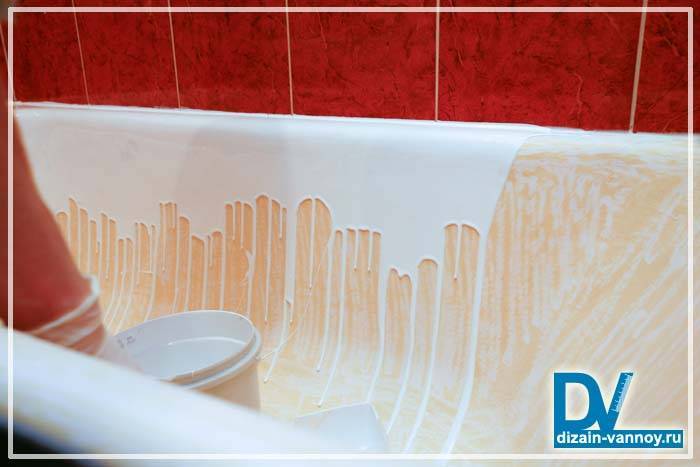
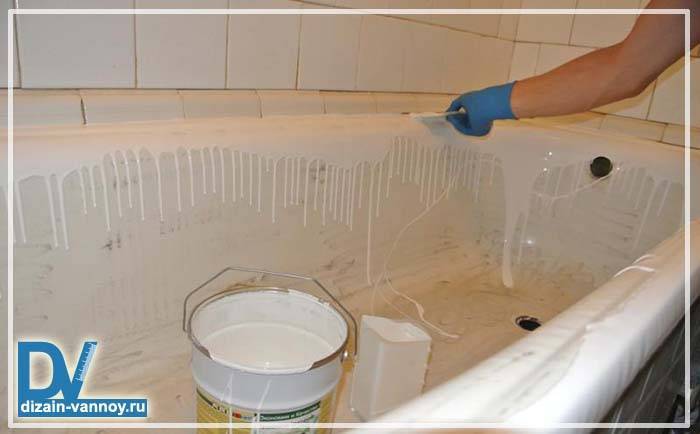
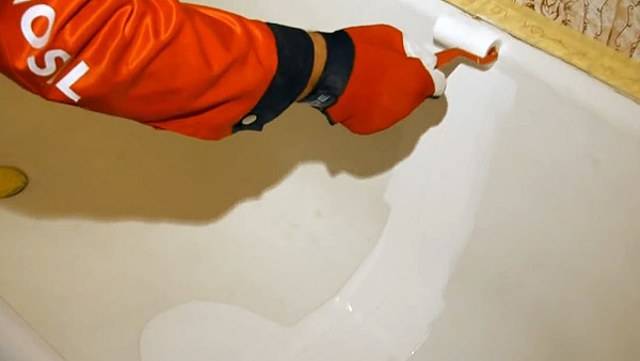
How to update a bathtub with liquid acrylic?
Liquid acrylic (stacryl) consists of acrylic and a hardener. When applied to a cast iron surface, this substance forms a strong film 6 mm thick. The viscous fluid mixture has the property of delayed polymerization, so you can carry out work without hurrying and without fear of a quick solidification of acrylic.


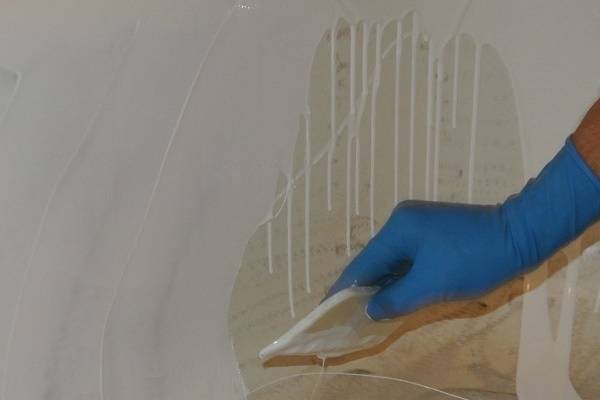


Glass restoration involves the following steps:
- After the cleaning of the inner surface of the sanitary ware is completed, it is necessary to remove the siphon and place a container under the bottom to collect the flowing paint.
- The acrylic mixture is prepared according to the manufacturer's instructions.
- Liquid acrylic is poured from the farthest corner, moving evenly in a circle. Do not smooth out the sagging and remove the bubbles - they will disappear on their own during drying.
- Acrylic, accumulated at the bottom, can be carefully leveled with a spatula.
The acrylic mixture is polymerized from 1 to 4 days. The longer the polymerization time, the stronger and more durable the coating.
If the work on the restoration of the sanitary ware is carried out carefully and fully complies with the instructions, the service life of the new bathtub will be at least 20 years.
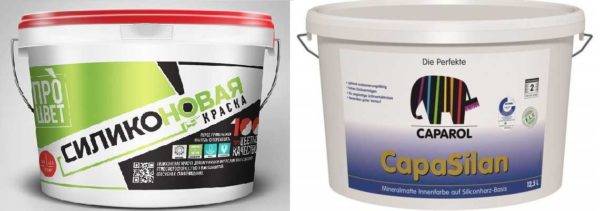
Silicone water dispersion
Silicone paint, as well as latex and acrylic, are water-based compositions. This means that it is also odorless and applies well. However, it has its own characteristics. Here are her virtues:
- Good adhesion. It can be applied on concrete, putty, brick, wood, stone, etc.
- Does not require a perfect surface, hides roughness, small cracks.
- Can be used at high and low temperatures.
- The film repels water, but passes steam and gas. That is, walls or ceilings coated with silicone paint “breathe”.
- Prevents the development of fungi and microorganisms.
- Easy to wash.
- It tolerates sunlight well.
- Long service life (up to 25 years).
If you need such paint for the bathroom so that the walls and ceiling "breathe" - choose silicone paint. It is good in problem areas where there is mold or fungus.
Silicone bathroom paints are a good choice
There are also disadvantages:
- Price. Not the cheapest paint. But looking at the service life, you understand that the costs are justified.
- It is undesirable to use this paint on metal: it is vapor-permeable, which leads to the fact that the metal quickly rusts. When painting reinforced concrete, measures are required to protect the reinforcement - impregnation with anti-corrosion compounds.
Silicone paint is applied, like any water-based paint, with a roller or brush. To reduce the consumption of an expensive composition, it is advisable to pre-prime the surface. The primer must also be silicone-based. Works begin at positive temperature (usually above +5°C) and normal humidity. Apply the composition to clean, dry walls or ceilings.
Advantages of acrylic coating
Restoration of a bathtub with liquid acrylic has a number of positive qualities. These include:
- Extends the life of plumbing fixtures. Acrylic film on the surface of the bath bowl protects its surface from mechanical damage;
- Additional thermal insulation;
- cosmetic effect. Thanks to him, the bath acquires a perfectly even coating with a snow-white tint.

After updating the bathtub with acrylic, the following requirements must be considered. They include:
- Do not use abrasive chemicals. The fact is that they quickly destroy the acrylic film. In the future, this is accompanied by the appearance of new chips and cracks on the surface of the bathing bowl;
- Acrylic coating is unable to cope with mechanical stress;
- It is forbidden to use hygienic substances with a high content of coloring pigments. They are able to penetrate the acrylic coating, which is accompanied by the appearance of various shades on the enamel of the bathroom bowl.

Advantages and disadvantages of acrylic
The material used for pouring is a two-component composition: in one container - liquid acrylic, and in the other - a hardener. Immediately before the start of the restoration work, the compositions are mixed and the surface is poured with the mixture. Advantages of liquid acrylic:
- Service life - 15-20 years.It does not deform, does not react to chemicals, is resistant to corrosion, humidity, temperature changes.
- Low thermal conductivity. Therefore, the water cools slowly, only 1 degree in half an hour.
- The surface is easily cleaned with soapy water and a soft sponge.
- Aesthetics. The bath after restoration with acrylic is glossy, snow-white, if desired, the composition can be tinted.
- The material is non-toxic, environmentally friendly.
- Restoration is financially more profitable than buying new plumbing.
- The coating is non-slip.
- Bacteria and microbes do not linger on the surface, so mold does not form.
- Liquid acrylic can update bathtubs of any size and shape.
- Impact resistance.
- The soundproofing properties of the bowl are improved.
Despite the long list of positive properties, there are also disadvantages:
- It is difficult to work with this material without experience.
- The composition hardens within 24-36 hours. Moreover, during this period it is subject to pollution.
- Some formulations have an odor.
Acrylic is difficult to remove if applied incorrectly.
Bathtub restoration with epoxy enamel
The oldest way to restore cast iron baths is to apply new enamel. It has been widely used for over 20 years. The process of applying enamel is somewhat reminiscent of the painting we examined, but the composition is completely different. There are only 2 categories of compositions: professional and for self-restoration.
Professional epoxy enamel formulations are more liquid. They are applied in several layers, so the process is quite long and laborious. Do-it-yourself formulations are thicker and easier to work with.
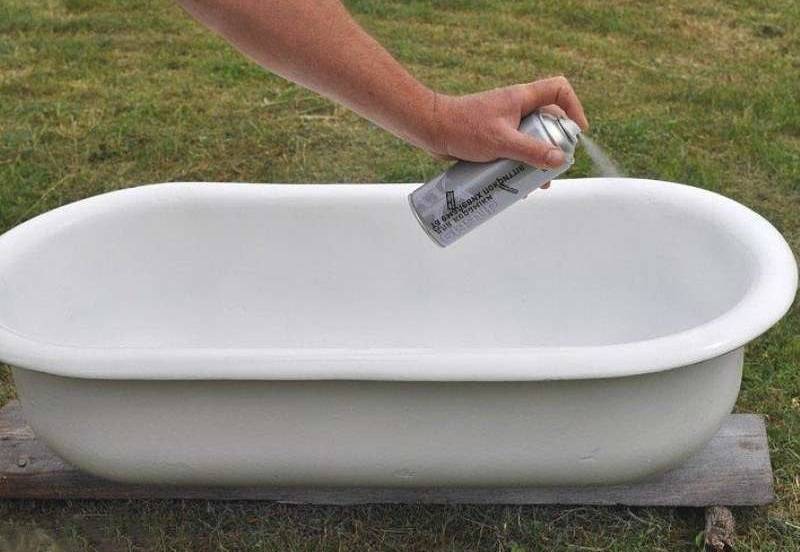
Bath enamel, which is sold in aerosol cans, is easy to apply, but it will last a maximum of a year.
Advantages of bathtub restoration with epoxy enamel:
- a fairly cheap way;
- no need to dismantle the bathroom;
- suitable not only for cast iron, but also for steel baths.
The disadvantages of this method:
- dries for a long time (up to a week);
- long and laborious process;
- bad smell;
- the coating is very sensitive to shock;
- the service life of a new enamel rarely exceeds 5 years;
- does not cover dents and chips;
- even if everything is in order with the enamel and you have not damaged it in any way, after a few years it will turn yellow.
Enamel bath restoration tools
To restore a bathtub with epoxy enamel, you will need:
- spray gun or roller, if professional enamel is used, or a flute brush, if enamel is for self-application;
- a paint knife and tweezers will be required to carefully remove the brush hairs that have come out;
- drill with a grinding nozzle.
enameling process
The process of applying enamel to the surface of the bathroom can be divided into the following stages:
- Preparatory work.
- Direct application of enamel.
- Drying.
Preparatory work
The preparatory work is the same as when painting with bathroom paint, so we will not repeat them. You can read above.
Enamel application
Enamel before application should be prepared according to the instructions on the package. You do not need to immediately mix the entire composition, do it in batches, as it starts to set quite quickly (40-45 minutes), and applying in 2 layers takes quite a long time.
If you apply a professional composition, then you can use the spray gun. But for home application, it is still better to choose special mixtures that are thicker and suitable for application with a regular flute brush.


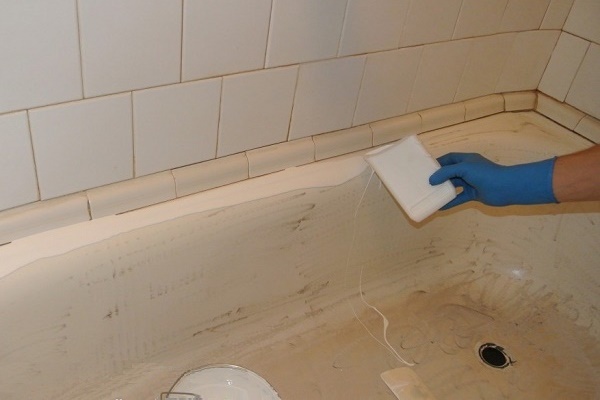
To apply enamel to the surface of the bath, moisten the brush with plenty of water and draw a vertical strip from the bottom to the edge. After that, rub the enamel on the sides as hard as you can. The next strip should be drawn side by side so that its “rubbing” is enough to reach the already treated area, and by repeated rubbing you cover about half of the previous strip. So, with an overlap, the first layer is applied. Wait 15-20 minutes and apply the next one.
The second layer is applied from the same place as the first. The direction of application must exactly match the first layer. Only in this way the coating will turn out beautiful and uniform.
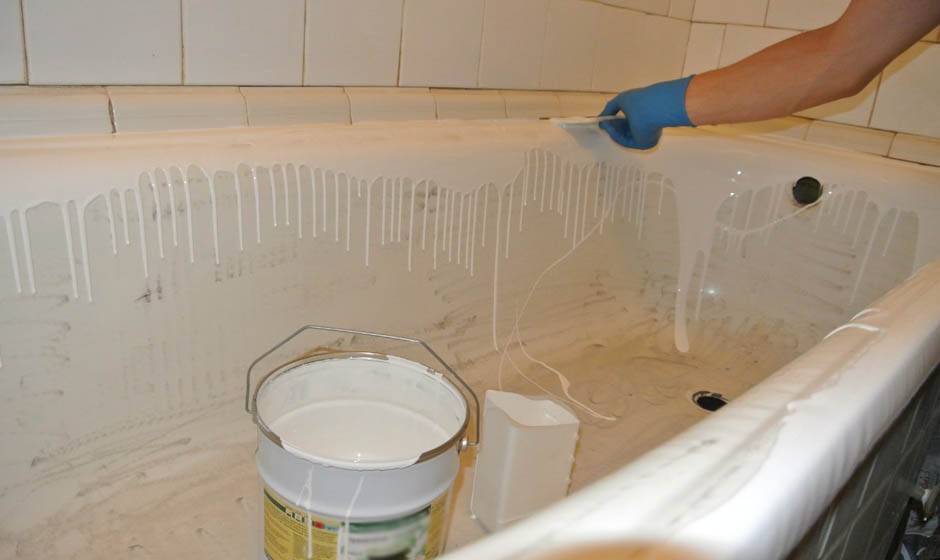
How to remove streaks and sagging of enamel during application?
During the application of enamel on the walls of the bathroom, streaks and sagging of the material often form. Their appearance should be controlled. Usually they become noticeable 10-15 minutes after application, so keep an eye on the areas covered while working.
To remove streaks, it is necessary to make a brush stroke without material up to the place of smearing. The sags that form on the edges of the drain holes must be removed after the enamel has hardened. For this, a painting or mounting knife is used.
When is the bath ready for use?
After applying the enamel, it is necessary to close the bathroom for 3-7 days, until the new coating is completely dry. The longer you pause before the first use, the less likely the enamel will peel off.
Composition and technical characteristics of enamel and acrylic
Before considering how to cover the bath with acrylic or enamel, and which is the best of these two components, it is necessary to disassemble the main components of the substances, and in addition, the characteristics of the compositions:
- It should be understood that acrylic enamel is on sale, which includes acrylic directly.
- Separately, each composition contains auxiliary components in the form of hardeners and synthetic additives.
- Often, special components are used in the composition of substances, which impart viscosity to the composition and subsequent hardening.
If restoration or painting of the bath is required during restoration, then it is better to use enamel than another two-component composition for the bath. All this is due to the fact that, unlike acrylic, enamel is much cheaper, even though it contains acrylic components. In addition, the method of restoring bathtubs with acrylic involves the use of a special liner, the choice of which is significantly complicated by finding the appropriate size, and also a suitable shape.
Comparing these methods of bath restoration, it is important to take into account that acrylic, unlike enamel, dries much faster. Additionally, when selecting material for reconstruction, it is necessary to rely on the fact that the compositions differ significantly in consumption per square meter of bathing tank area
Consumption per 1m2
When choosing enamel or acrylic for a bath, and distinguishing which is better, it is important to consider the material consumption per square meter. Consider the main points associated with the use of a certain amount of material:
- on average, when using a sprayer, about 150-250 grams of enamel is spent to cover a square meter;
- if enameling is carried out with a brush, then the consumption of the component can increase to 300-500 grams per square meter;
- if acrylic is used, then the average consumption is 400-600 grams per square meter of space;
- when using a ready-made acrylic liner, these parameters are not taken into account, since a one-piece liner is used here.
Given all these points, you can choose for yourself the best reconstruction option for a metal or cast-iron bath, depending on which design option is used.
This is interesting: Technologies for galvanizing metals at home
Bath enamel
How to paint a bathtub inside? In addition to paint and acrylic, the construction market that sells bathtubs should be consulted for enamel.
There are two types of composition:
- For professional bath treatment with your own hands. This composition is liquid and is applied in several layers;
- For manual processing at home. The mixture is thick, which will allow you to distribute it over the surface of the bath without problems.
Enamel is divided into three main categories:
- One-component composition. Effectively smoothes unevenness and fills cracks due to the paste-like consistency;
- How to paint a cast iron bath? Two-component composition. The coating is well applied, but becomes dense after 6-7 days. The second component is a hardener, so the mixture must be thoroughly mixed before painting the bath with enamel;
- Three-component composition, which includes: hardener, base and catalyst. It is supplied to stores complete with tools and instructions. Drying time up to 5 days. After its application to cast iron, it is impossible to contact and allow drafts.
Restoring the surface of a cast-iron bath with your own hands using enamel has some advantages:
- It is not expensive to restore a bath;
- The composition is suitable for cast iron, metal.
From disadvantages of painting a cast-iron bath acrylic can be distinguished by the following:
- The service life of such a surface is not more than five years;
- The wear resistance of this composition is minimized;
- Enamel does not hide visible defects on the surface of cast iron;
- After a few years, this enamel turns yellow and cracks.
A cast-iron bathtub inside at home can only be cleaned with mild detergents without the inclusion of abrasives. Too hot water can also destroy the surface of such a bath.
The bath inside at home needs to be restored:
- The temperature of the room where the work will be carried out should not exceed twenty degrees Celsius;
- Around and under the bath, it is necessary to lay a cellophane film, since the enamel is applied by pouring;
- Place a tin can or an unnecessary container under the drain hole so that the enamel does not drip onto the floor.
Preparing the surface for restoring the enamel of the bath
First you need to very carefully remove the old enamel from the bath, remove all chips and scratches. Using scouring powder and sandpaper, clean the surface of the tub. Do not rush into this work, because how long the new layer of enamel will last depends on its quality.


The resulting mixture is washed off with water, and the bath is examined again so that there are no small pieces of enamel left. To be completely sure, you should clean it again. Then the cleaned bath must be rinsed very well and degreased, and then dried. The dried surface is examined again.If there are large chips, you can take a special glue and level the surface of the bath with it, which should become smooth and dry.
Priming of the surface of the restored bathtub
The next step in the restoration of bath enamel is the surface primer. Now the building materials market offers products for priming various surfaces. You can use an aerosol primer, working with it will not cause much trouble, and you can easily prime the surface of your bath.
You can take a special mixture to restore the surface. In any case, when choosing a primer, you need to read the instructions for use and choose the appropriate option depending on the properties of the enamel that will cover the bath.
Priming must be done with high quality so that there are no smudges and bubbles, which during operation can cause exfoliation of the new layer. The bathtub must be completely dry when finished.
Applying a new layer of enamel to the bath
The final and especially important stage in the restoration of the bathtub enamel is the application of a new layer of enamel. This is done with a brush with natural hair, you can make a soft swab from a piece of cloth. Many people prefer a tampon, because after applying with a brush, hairs can remain that will ruin the look of a new bath. Enamel is applied in several layers, and each layer is thoroughly dried. Do not forget to first study the instructions supplied with the enamel, given by the manufacturer.
The enamel layer will become absolutely solid in five to six hours, but for this the air temperature must be at least twenty degrees. But it is recommended to use the bath after applying all layers only after a week.At the factory, enameling is carried out in a special way, which means it is much stronger, but with proper operation and good care, your bathtub will last a long time.
It should be noted that to restore the enamel of the bath, it is much faster and more convenient to use enamel in an aerosol package, but such a coating will serve much less than enamel from a jar.
And finally, a few tips for use:
- do not use cleaning powders and solutions containing acid to wash the bath;
- do not soak laundry in the bath, especially with bleach.
By following all the tips and recommendations when using a bathtub with restored enamel, you will extend its service life, which will give you great pleasure.
New Tips:
- Order of metal-plastic windows and their installation
- Installing a hot tub - the main stages and subtleties of connection
- What mounting plumbing modules are
- How to choose the right range hood for your kitchen
- Hot water column - which one to choose for a country house
Previous Tips:
- Types of toilets - which toilet is better to choose
- Installation and dismantling of the kitchen sink yourself
- How to install a bidet yourself
- Siphon installation independently and its types
- Installing a bathtub - tips from an experienced plumber
Next tip >>


