- Advantages and disadvantages of false ceiling
- Tools
- How Armstrong ceilings work
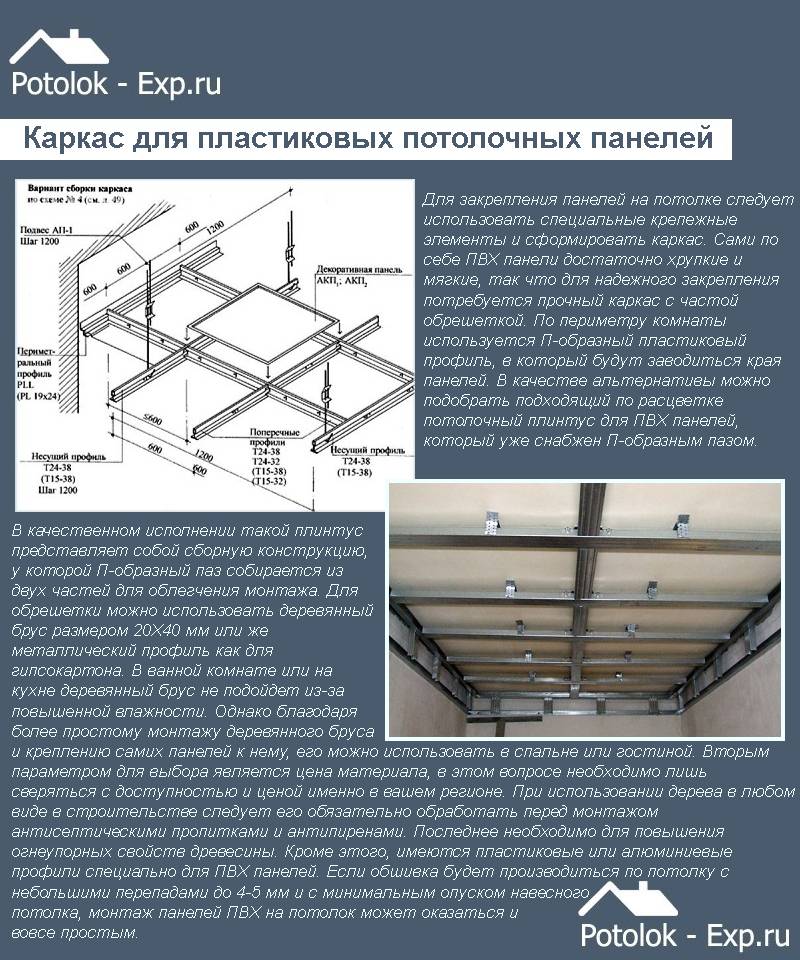
- Features of PVC ceiling panels
- Finishing
- Fitting and installation
- Advantages and disadvantages
- Advantages of plasterboard finishing
- Training
- Calculation of the number of canvas and auxiliary components
- materials
- Required Tools
- Surface finish
- Installation of a single-level false ceiling: what to do
- False ceiling installation.
- markup
- Preparatory stage
- How to calculate the number of fixtures
- Peculiarities
Advantages and disadvantages of false ceiling
Naturally, any type of decorative finish has both advantages and disadvantages.
Among the advantages of suspended ceilings are:
- The ability to hide any imperfections in the draft ceiling - the presence of cracks, cracks, chips and potholes, bumps and level differences.
- Aesthetic appearance - thanks to this decor, the room can be transformed and decorated.
- Great scope for imagination - you can vary the height and levels of ceilings, combine several types of material;
- It is possible to install any type of lighting - both the main fixtures and additional lighting, based on the initial project.
- Ensuring high-quality sound insulation and insulation.
- Convenient and effortless care - just wipe off the dust with dry rags.
- A variety of finishes on the ceiling surface.
- It is easy to disguise all communications inside the suspended ceiling structure.
Nevertheless, even such seemingly ideal suspended ceilings in all respects are not without a number of shortcomings.
The most significant among them are:
- The design of the ceiling, as a rule, "steals" about 7-8 cm or more of the height of the room, since it is necessary to fix the frame for its installation.
- Depending on the complexity of the execution and the size of the room, the installation of a false ceiling can take quite a long time - usually several days.
- The cost of acquiring materials for false ceilings can be quite significant, especially if not the simplest and cheapest materials are purchased.
- If any communication lines were drawn above the ceiling, they must be accessed by making a special window.
- Since drywall does not have high moisture resistance, it is not recommended to use such material in rooms with high humidity, for example, bathrooms or bathrooms, pools or baths.
Tools
Before directly describing how to make a false ceiling, you need to figure out what tools you may need in the course of work.
It is necessary to prepare:
- laser or hydraulic level;
- long rule with level;
- pencil, ruler and measuring tape;
- wood saw;
- electric drill or hammer drill;
- drill for concrete, diameter 6 mm;
- a hammer;
- screwdriver;
- sharp clerical or construction knife.
In the center of the ceiling, we will install an overhead lamp.Therefore, the electrical wire is pre-fitted. Since the wiring on the loggias or balconies was not installed in the houses of the old building, you will have to do it yourself. To do this, a strobe is made in the wall, into which you can hide the wire. After that, such a groove is covered with plaster. The lighting wire is laid in a corrugated sleeve. This element will protect the wiring from deformations and ruptures associated with thermal expansion in the plaster.
As an alternative to corrugation you can use the channel from plastic. The channel box is attached to the walls.
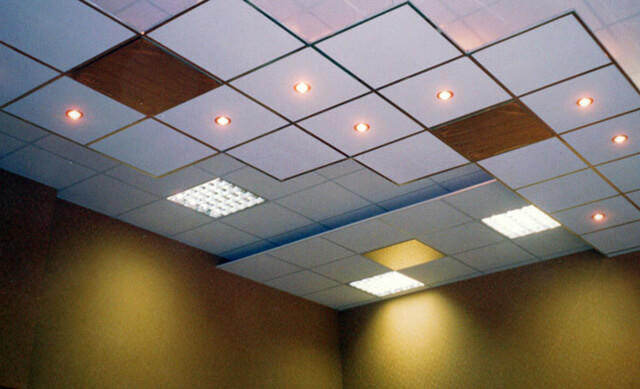
How Armstrong ceilings work
Armstrong-type suspended ceilings assume the presence of a rigid frame made of metal profiles, forming 60 × 60 cm cells, inside of which are placed slabs of soft or dense organic material of a suitable size.
For the production of rigid boards, materials such as:
- metal plates - solid or perforated;
- plastic;
- wooden sheets;
- mirrors or glass.
But soft slabs for suspended ceiling Armstrong are made from organic or mineral materials. Mineral slabs have been used less and less in recent years, since they contain mineral wool microparticles in their composition, which adversely affect the respiratory tract.
But organic plates for mounting the Armstrong ceiling are often and actively used. They are easy to use, have a low weight, and are safe for health, since they are made on the basis of recycled cellulose raw materials.
To assemble Armstrong suspended ceilings, you will need the following components:
- Bearing profile in the shape of the letter T, 3.7 m long. Such profiles are placed parallel to the short wall of the room.If the length is not enough, it is increased using special fasteners. The excess profile is cut off.
- T-shaped longitudinal profile, its length is 1.2 m. It is fixed on the carrier profile in increments of 60 cm.
- T-shaped transverse profile 60 cm long.
- Wall profile in the shape of the letter L, 3 m long. It is mounted around the entire perimeter of the room, the horizontal is checked by the level.
- Ceiling suspension with rod and hook. The bar is fixed to the ceiling with anchors or dowels, and the hook is hooked onto the supporting profile. Using a clamp, the level of the frame is adjusted.
- Dowels or anchors for mounting the suspension.
- Plates measuring 60 × 60 cm.
- Trimmed tiles to fit the ceiling to the dimensions of the room.
You can buy an Armstrong profile for a suspended ceiling in several versions - metal-plastic or metal, powder-coated. The width of the profile can be 15 and 24 mm, depending on what material the plates will be used from. For heavy boards made of glass, metal or wood, it is better to take a wider profile, but organic boards can be laid on narrower planks.
If desired, home-made wooden or cut-out MDF panels can be used as ceiling sections.
Features of PVC ceiling panels

Colors of plastic wide panels
The composition of the finishing polymer panels (if these are conventional models) includes two thin plates. They are separated from each other by a certain distance. This space is filled with stiffeners, which significantly strengthen the material. The same elements connect the inner plate to the outer one.


And on the sides of such panels are connecting elements. With their help, the previous panel is fastened with the next, adjacent one.Connections are made according to the tenon-groove principle. This connection technique allows:
- greatly facilitate the installation of panels;
- hold individual plastic elements clearly in the same plane;
- hide gaps if fastening is done correctly.
Finishing
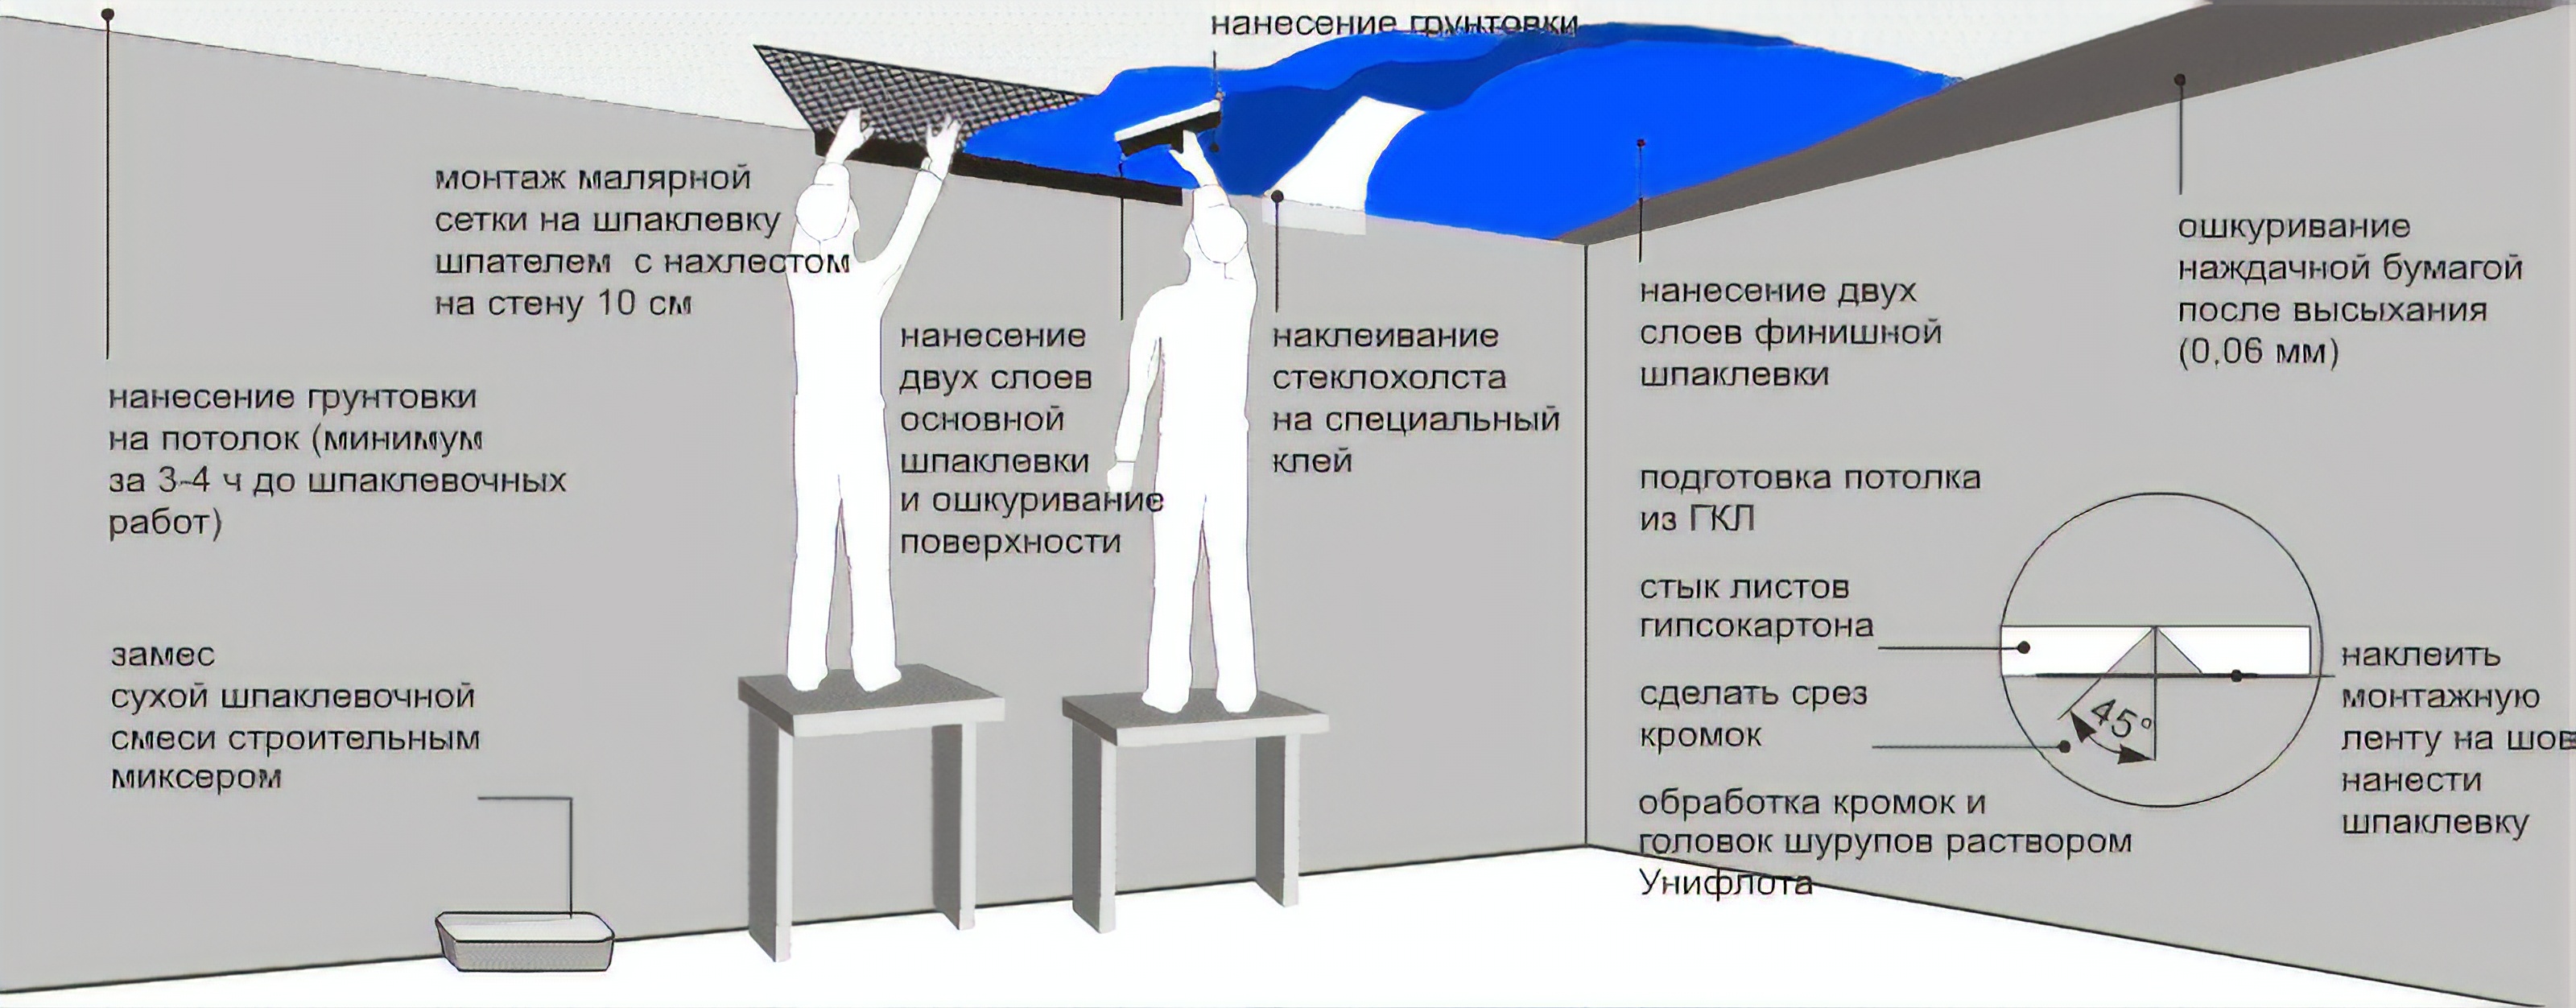
The process of how to assemble a suspended ceiling does not end with the installation of drywall. The entire surface of the ceiling after that still needs to be finalized. Any type of finish is chosen to your liking - simple or textured plaster, painting, wallpapering or other options. However, in any case, it is necessary to treat the surface - putty seams, joints and recesses from self-tapping screws. First, the surface is primed, and then covered with putty.
After the first layer of the starting putty dries, a reinforcing mesh (sickle) is laid at the joints and seams and another layer of the mixture is applied. If the seams between the sheets are too wide, they are filled with putty mixture. In addition, during the grouting process, you will surely notice any flaws on the drywall - scratches, peeled paper, and so on. These defects also need to be laid with a sickle and puttied.
In order for the putty to better adhere to the material, it is better to make the edges of the drywall at the joints slightly rounded. Then the mixture will penetrate as deeply as possible into the space between the sheets. The reinforcing tape and putty layer must be leveled along the thickness of the drywall. This is possible because the sheets are slightly narrower in thickness at the edges so that the reinforcing mesh can be drowned.
If the drywall was cut on its own for mounting on the ceiling, then first the cut edge must be cleaned with a planer or knife at 45 ℃. Thus, a wedge-shaped furrow will be obtained, into which putty and reinforcing tape will freely enter. In this case, the putty will grab the drywall well.
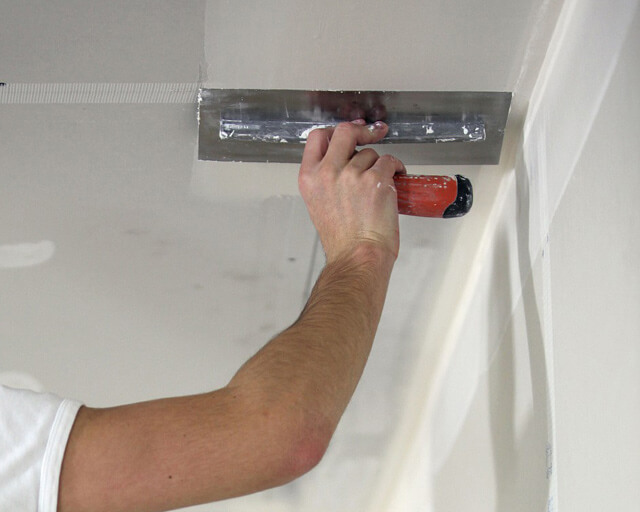
When the entire surface of the drywall is covered with the starting putty and dry, you can apply the final layer of the finishing putty mixture.
Thus, the technology, as suspended ceilings are made, includes surface preparation, wiring for lighting, frame assembly, drywall fixing, lighting installation and surface finishing.
Fitting and installation
GKL ceiling calculator.
After all the arithmetic operations, you can purchase the material. Buy with a small margin, as there may be problems with marriage during operation.
Often there are situations where the room does not meet the standards. It can be of a non-strict geometric shape, this is especially common in private homes. Then the owners have to face difficulties.
Of course, a suspended ceiling calculator will greatly facilitate the work, which will help calculate the amount of material. But if you did not use it for some reason, it is better to resort to the help of specialists. It will cost a little money, but it will save you nerves and time.
Installation of a suspended ceiling is best done with an assistant. First of all, the main profile is attached along the perimeter of the walls, then, on suspensions, additional slats are fastened. Based on the drawing, the first panels are fixed, then the subsequent ones.
All trimmed fragments are installed last, and in a strictly symmetrical order. Cut pieces are best placed closer to the walls. Consider the distance between the main ceiling and the suspended ceiling, because you have already purchased fixtures that have a certain height.


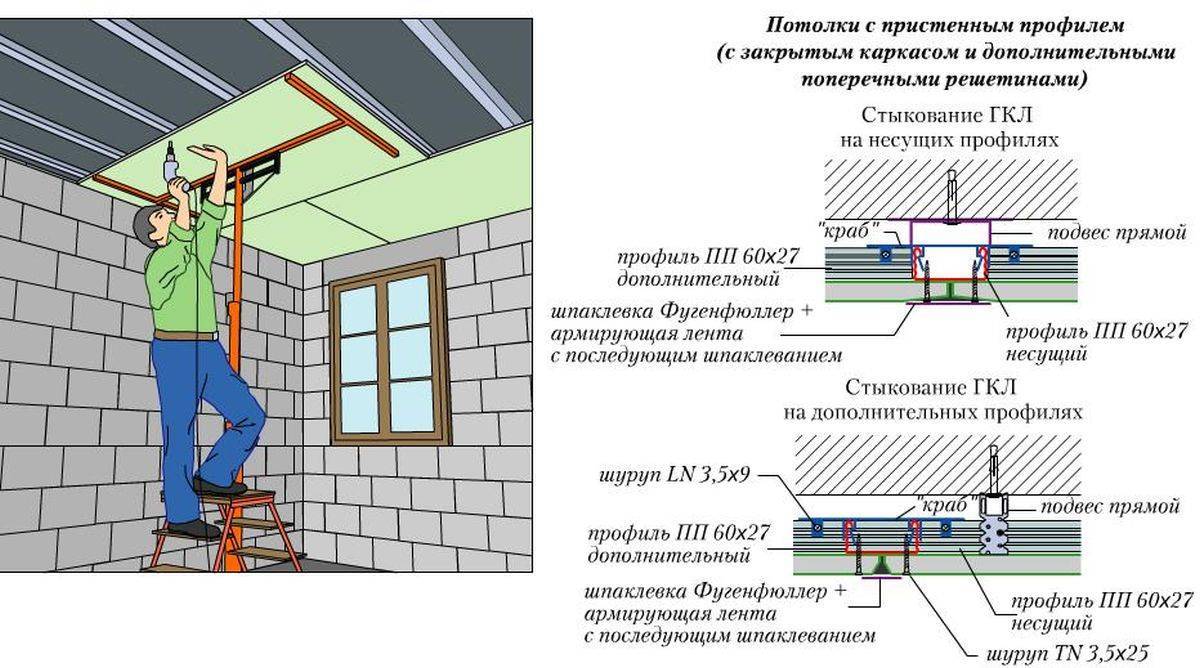

The electricity supply should be ready already at the stage of fixing the profile strips.
Thus, the calculation of suspended ceilings must be made before their installation. If you doubt your abilities - hire trained specialists, they will do everything quickly and efficiently.
Advantages and disadvantages
Most often, the installation of the Armstrong ceiling is performed in public institutions, when decorating offices, trade enterprises, cafes, and they also fit well into the decor of apartments.
Among the advantages of these ceiling structures are:
- low cost;
- no need for preliminary preparation of the basic foundation;
- a sufficient degree of sound and heat insulation;
- a wide variety of plates allows you to implement any design solution;
- simple installation of suspended ceiling Armstrong, which does not require the participation of professionals;
- the ability to make communications and ventilation systems invisible;
- providing easy access to the interceiling space for inspection and repair;
- trouble-free installation of lighting devices;
- it is possible to dismantle and reuse the elements of the system, since it is completely collapsible.
Armstrong has few shortcomings:
- it lowers the height of the room by no less than 20 centimeters, so it is not always possible to use it in apartments;
- the ceiling cannot be mounted in a room with a non-standard configuration;
- the design will not protect furnishings in case of leakage from above;
- it does not tolerate high moisture, from which organic plates begin to soak and undergo deformation.
The popularity of such ceiling systems, due to numerous advantages, does not decrease. Do-it-yourself installation of the Armstrong ceiling is quite simple both in the office and in the living room.
Advantages of plasterboard finishing
Even if you don’t fantasize, drywall will help in leveling walls and ceilings, it’s no secret that surface distortions range from 5 to 8 cm. The sheets will hide all the bumps, cracks and seams between the panels.
In addition, such a finish will hide all communication devices, wires, etc., as well as increase the sound insulation of the apartment and thermal insulation.
Ceiling installation is easy and fast. That is why this method of repair is very popular in our time. This is a fire resistant material.
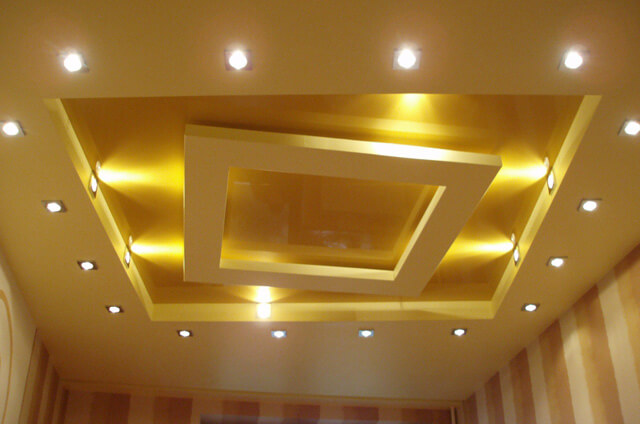
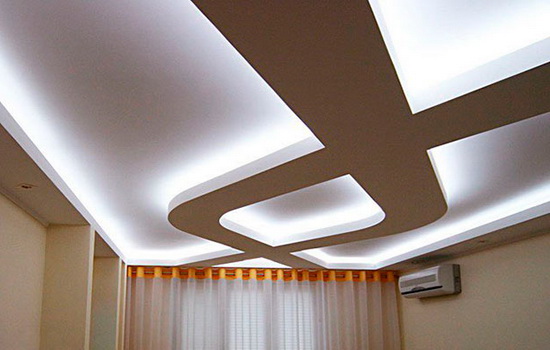
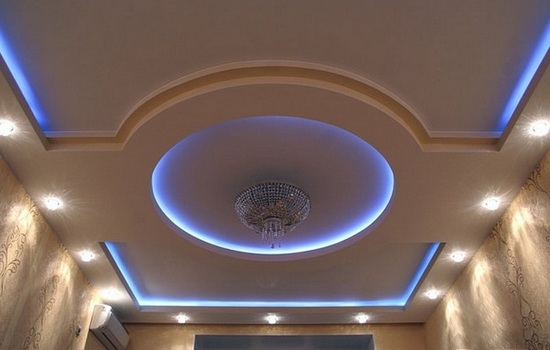
Sheets of cut drywall will allow the realization of any design fantasies with the construction of one, two or three level ceilings with lights hidden under them.
Ceilings are suitable for any room in the apartment, even for the bathroom, they use a special moisture-resistant drywall. They are environmentally friendly, do not have harmful components, consist of cardboard, which is reinforced with reinforced fibers and gypsum.
True, there are also disadvantages, drywall is not very resistant to water, if neighbors flood you from above or the roof leaks, the ceiling will have to be changed.
And also a single-level design can “steal” from 5 to 8 cm of the height of the room, which must be taken into account when planning the construction of a ceiling of two or three levels.
Training
take measurements at the end of all finishing work, including the application of a decorative layer on the walls.
Advice
If the room is irregular in shape, then it must be divided into several sectors, and then draw a surface diagram. The diagram indicates all key points, including the installation locations of spotlights, a central chandelier or several pendant lights, pipes.
here
Calculation of the number of canvas and auxiliary components
To determine the area of \u200b\u200bthe canvas, calculations are performed according to school formulas. If the room is of a complex shape, then it is better to entrust the calculations to the masters,
materials
To arrange a stretch ceiling you will need:
- baguette metal or plastic;
- fasteners, most often dowels;
- canvas fabric or polyvinyl chloride;
- lighting;
- wiring;
- ceiling plinth, decorative lacing or mounting tape.
Required Tools
To install a stretch ceiling, you will need the following tool: 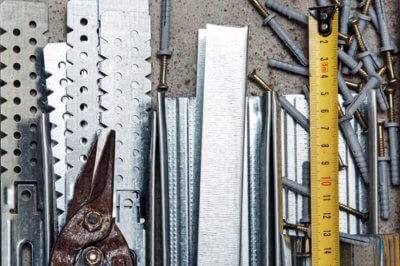
- tailor's ruler from 1 m long, tape measure;
- roulette;
- pencil;
- chopping cord, chalk;
- laser or building level with alcohol capsules;
- cutting scissors for cutting fabric;
- metal rule 3 m long;
- a spatula that will be used to tuck a fabric into a baguette;
- perforator, screwdriver;
- miter box;
- stationery knife or scissors for metal;
- heat gun (for mounting PVC films);
- ladder.
To apply paint you will need:
- a set of brushes;
- stencil;
- rag to remove excess paint.
Attention
Instead of a heat gun, a technical hair dryer is often used, but this is true for small rooms.
Surface finish
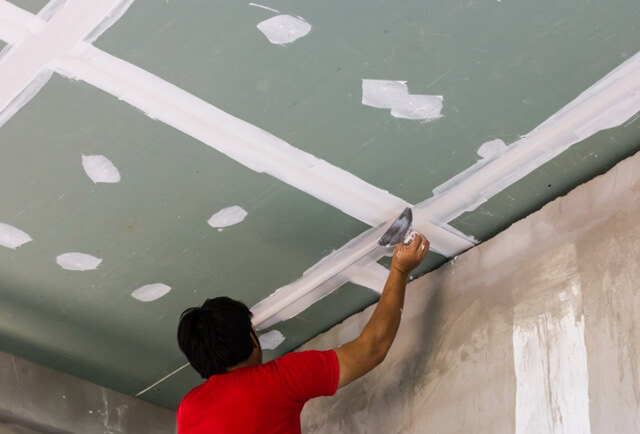
The false ceiling is also good because it allows you to use a variety of finishes. It can be finished with plaster, painted, wallpapered, etc. But before that, it is necessary to close up the remaining seams. After treating them with a primer and waiting for it to dry, seal all seams, joints, pits from self-tapping screws with a strong putty.


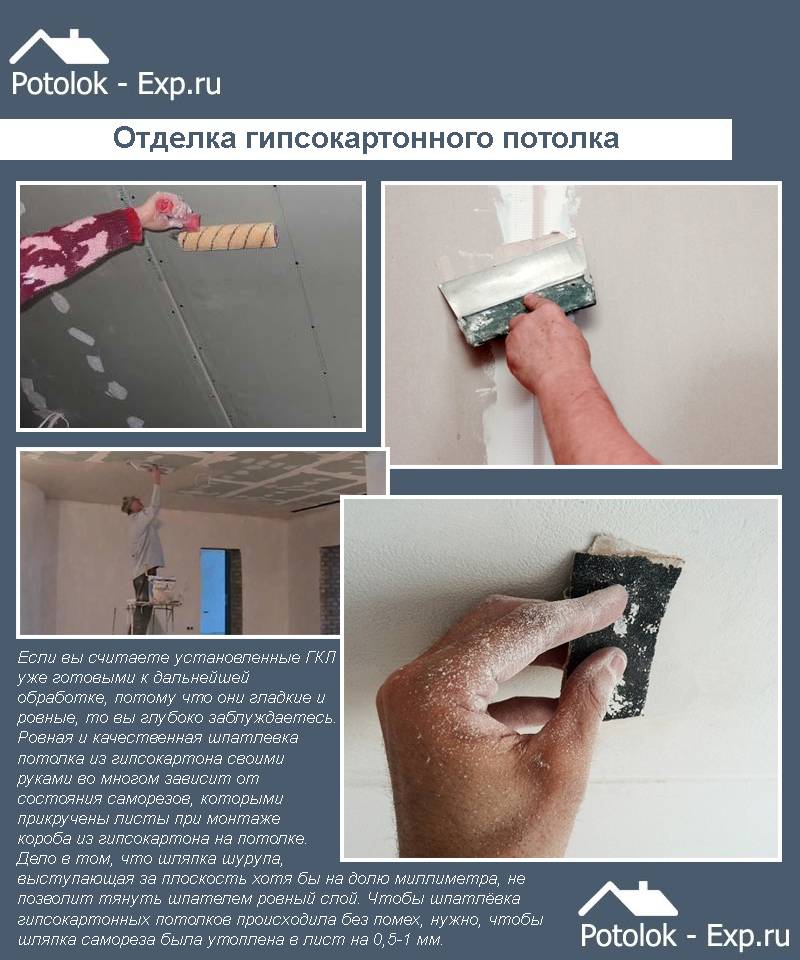
Plasterboard ceiling finish
After waiting for the putty to dry, glue all the seams and joints with a sickle, and then coat them again. The widest seams between drywall sheets must be filled with putty material and wait for it to dry completely. It is possible that during the work on sealing the drywall on the ceiling, you will find any damage - for example, a torn paper layer that exposed the core of the sheet. Such problem areas should be eliminated in advance. You can, for example, apply a sickle and apply an even layer of putty on top.
For joints, it is better to leave the rounded edges of the sheets. In principle, this point has already been thought out by the manufacturers - the edges of the sheets have a rounded shape, due to which the putty will fill the seams to the maximum. The sickle tape and putty layer must be applied at the level of the drywall sheet. For what? The fact is that the edges of the drywall have a narrowed thickness so that the tape can be drowned under the level of the surface of the sheets.
How to properly seal the seams of drywall sheets, the edges of which are cut off on their own? First of all, it is necessary to chamfer, that is, plan the cut edge of the sheet with a special planer or knife at an angle of 45 °. As a result, a wedge-shaped groove is formed at the junction of two sheets, in which the sickle tape is easily “drowned” and the putty material is reliably grasped.
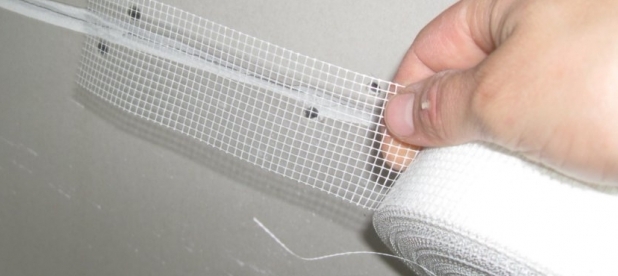
Serpyanka tape for reinforcing seams
Then, having puttied the entire surface of the usual one, apply a finishing putty on it. The ceiling is ready.
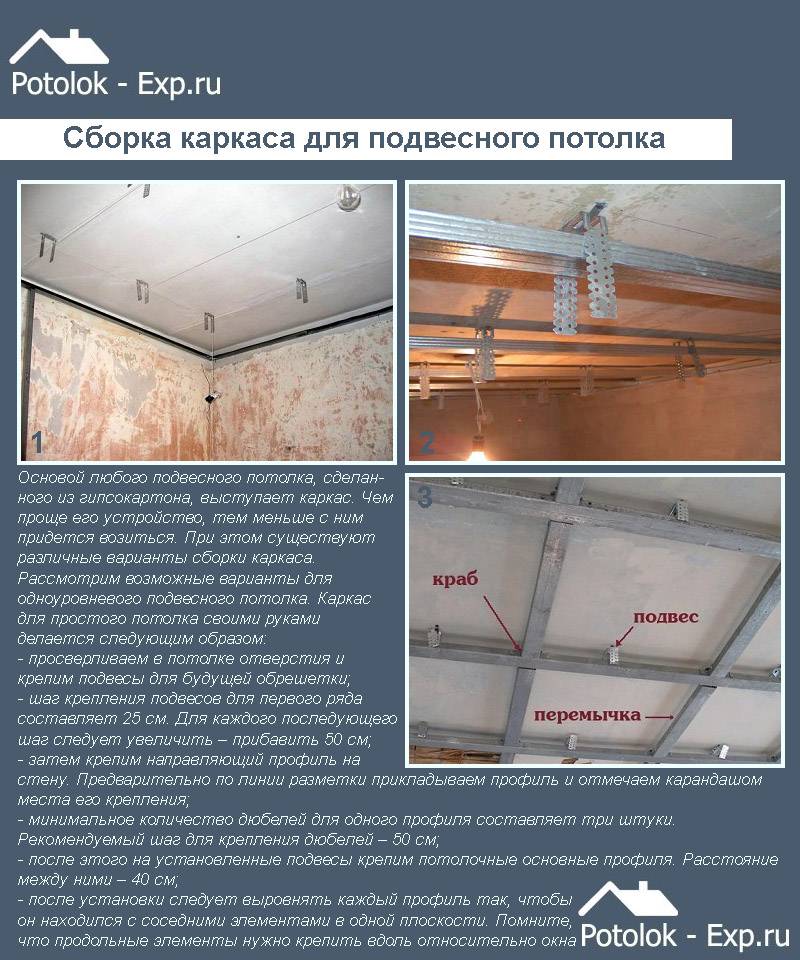
Installation of a single-level false ceiling: what to do
When everything is planned and all materials are purchased, you can proceed directly to work.
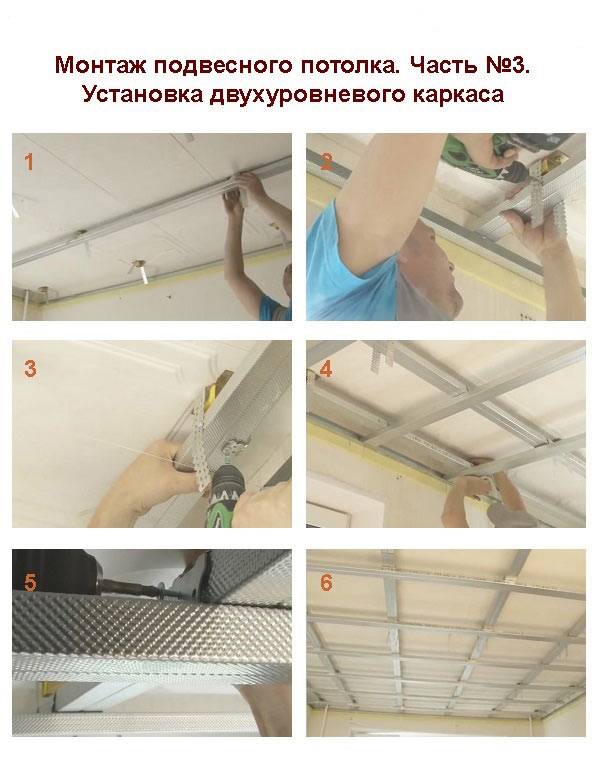
In general, the design is assembled in the same order in which we drew the diagram, so you already practically know how to install a false ceiling. But let's look at everything in order and in more detail.
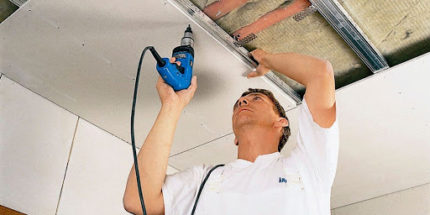
- Clear up space. Remove or cover furniture from the room, remove the old chandelier, insulate the wires from it.
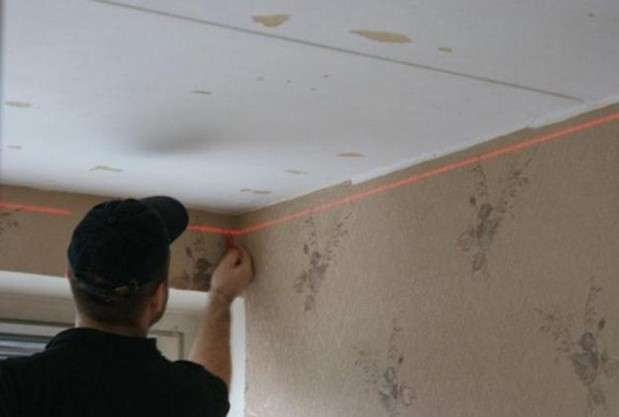
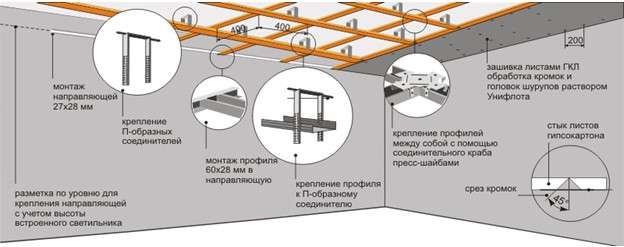
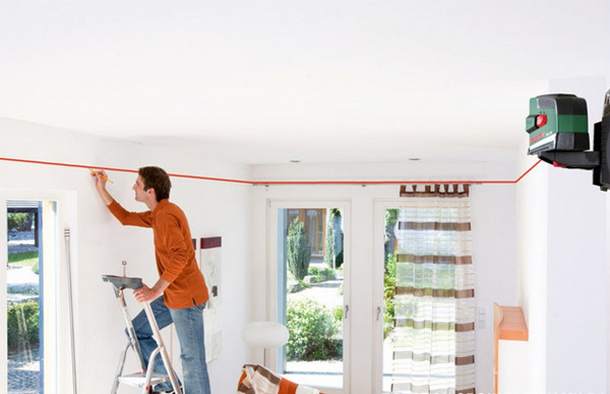
Mark the perimeter. Use a tape measure to find the corner where the ceiling is lowest. There, put a mark at a height of 5-15 cm, depending on the planned lighting fixtures (the height of the built-in lamp is +2 cm for wiring). By level, mark such marks in each corner, and then on the walls. Connect all the marks with a solid straight line. It must be strictly horizontal, according to the level. This will be the height of your new ceiling.
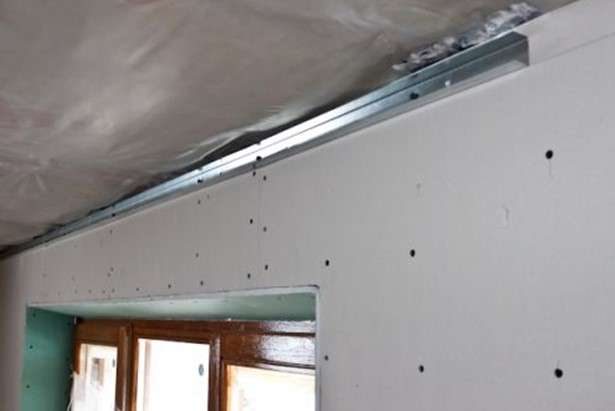
Attach profile PN 28/27 (UD 27) to the walls with dowel-nails so that its lower edge coincides with the drawn line. To do this, pre-drill holes in the wall every 40-50 cm according to the holes in the profile. If there are no holes in it, make the last one no further than 10 cm from the edge. Don't forget to stick the sealing tape on the back side of the profile adjacent to the wall.
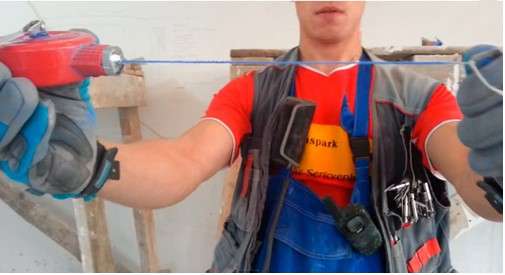
If there is a paint cord for marking, transfer long lines from the diagram to the ceiling under the profiles (long longitudinal).

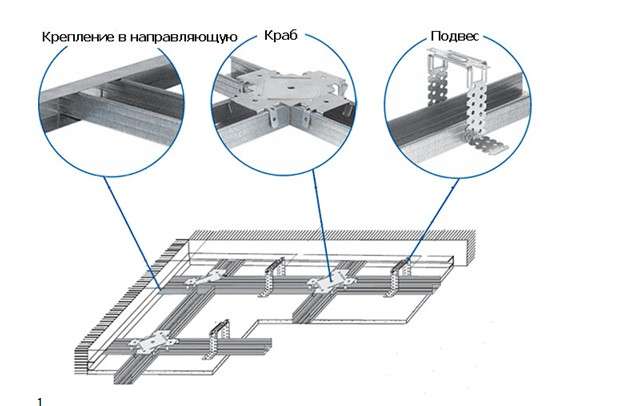
Fasten the hangers using dowel-nails, according to the diagram, every 60 cm for each profile.If you are using perforated aluminum hangers ("pawns"), they should be mounted across the profile lines, and then bend the ends down.

Fasten the profiles PP 60/27 (CD 60) to the rails and hangers using metal self-tapping screws. Fasten the 2 outer profiles on each side first, and then the middle ones. Check that everything is level and the middle does not sag.
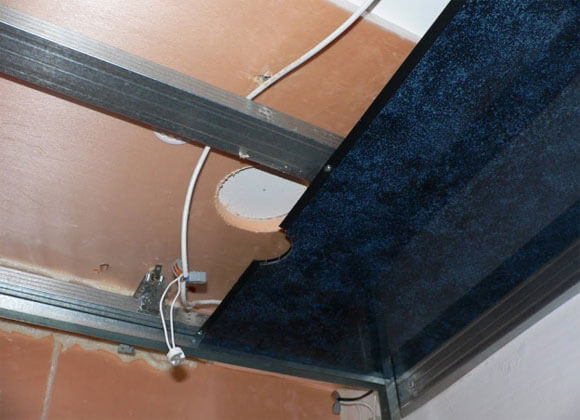
It's time to take care of the lighting wiring, as well as the mount for the central chandelier, if you have one.
If necessary, spread sound and heat insulating material between the profiles, such as mineral wool. Attach it to the main ceiling with dish-shaped dowels.
Using scissors for metal or a grinder, cut the remaining profile into jumpers of such a length as the distance between the main guides.
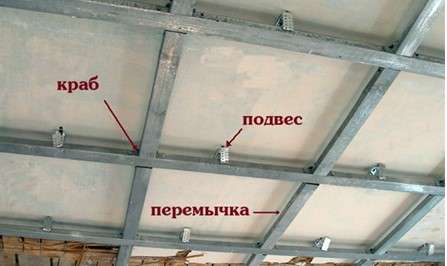
Fasten the jumpers to the main profiles using crabs according to the diagram (or every 60 cm). Secure with screws to secure.
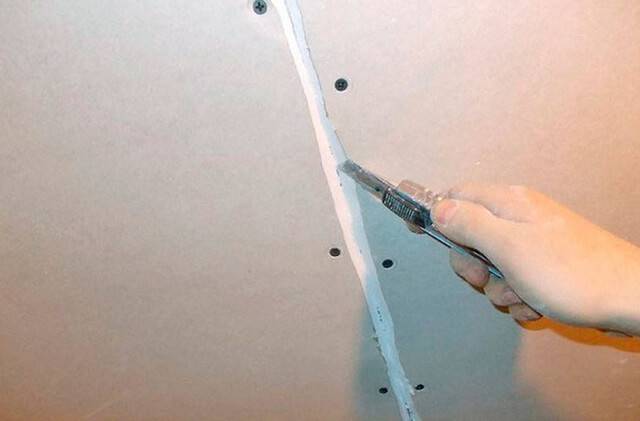
Cut the drywall into suitable pieces, don't forget to cut out the holes for the light fixtures. Drywall can be cut with an ordinary clerical knife: using a guide, cut a line on the paper on one side of the sheet, and then turn it over, bend it along the cut, breaking the plaster layer. All that remains is to cut the second layer of cardboard along the fold and trim the gypsum cut.
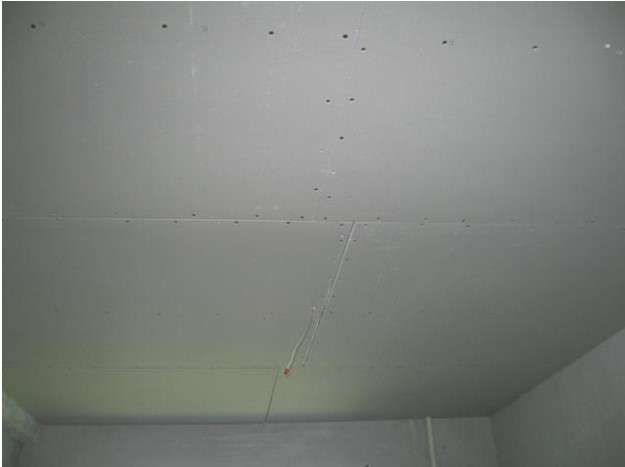
Fasten drywall sheets with rounded edges outward to the prepared frame with wood screws every 20-30 cm along the profiles, “sinking” the head of each screw by 0.5-1 mm.
Treat all joints with a primer, let it dry. Align with putty through the serpentine tape all the seams, screw caps, joints with the walls.
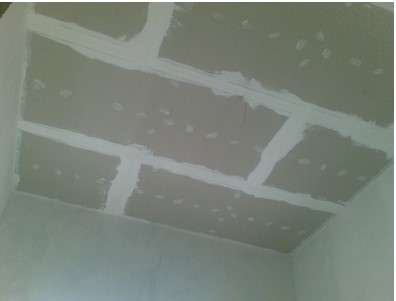
After the joints have dried, apply a layer of finishing putty to the entire ceiling.
Ready! You can already admire the results of the work done, and when the putty dries out, paint it or wallpaper it, install lighting fixtures.
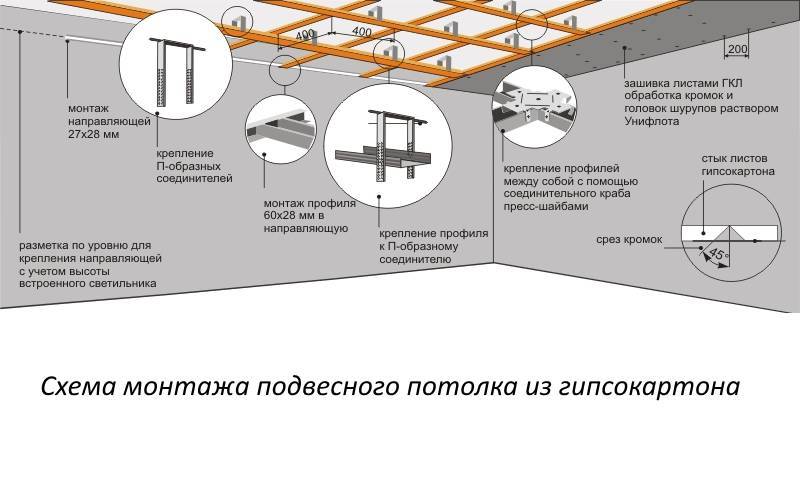
False ceiling installation.
The technology for installing a false ceiling is not very complicated and in essence resembles a children's designer, but despite this, from
You will still need certain knowledge and skills.
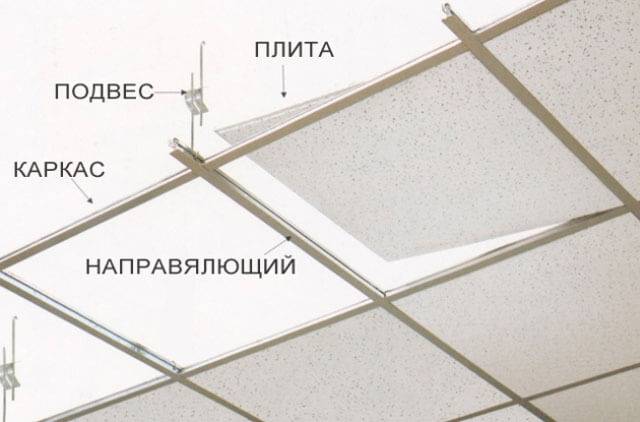
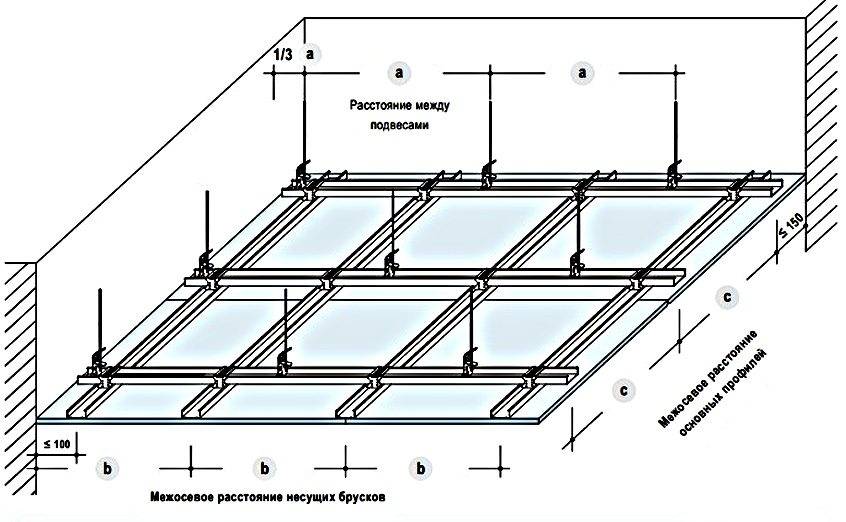
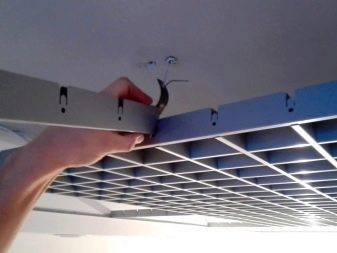
| Suspended ceiling installation diagram |
When mounting the frame, “T” shaped
main beams, with a spacing of 1200 mm along the longitudinal axes. Each last suspension holding the main load-bearing beams must be
placed at a distance of no more than 450mm from the adjoining wall. Further, to obtain modules with a size of 1200x600mm, install
cross beams 1200mm long, connecting them to the main bearing beams, at a distance of 600mm from each other. Cut cross beams
longer than 600mm require additional support. Modules with a size of 600x600mm are obtained by mounting flush-mounted
600mm long crossbeams centered between 1200mm long crossbeams. As a result of the work carried out, a grid is formed with
cell sizes corresponding to the dimensions of the plates.


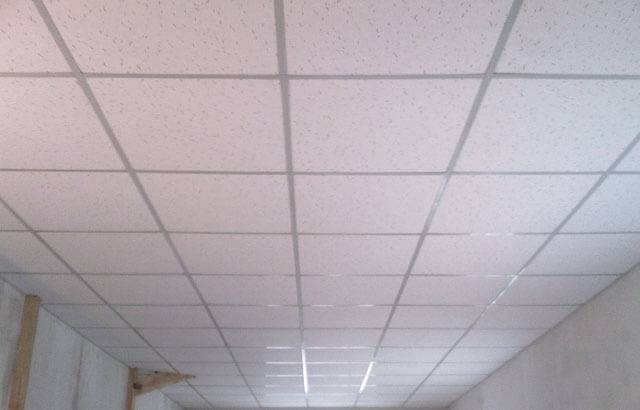
The section of the guide profile determines how the ceiling tiles will be mounted.
If during the installation of ceiling tiles it is assumed that the metal profile of the guide can be seen, then the tiles with their edges simply
laid on top of the so-called visible suspension system. If the metal profile of the guide is to be hidden, then this
In the case of installation, plates are used that have a longitudinal groove along their edge, where the guide is inserted. In this case
Ceiling plates are joined together tightly, without gaps. After installing the false ceiling, its edges around the perimeter of the room are framed
wall plinth, giving the whole structure a finished look.
When installing suspended ceilings, it is recommended not to use glue, which later allows the ceiling to be dismantled
without much effort, with the preservation of the plates.
markup
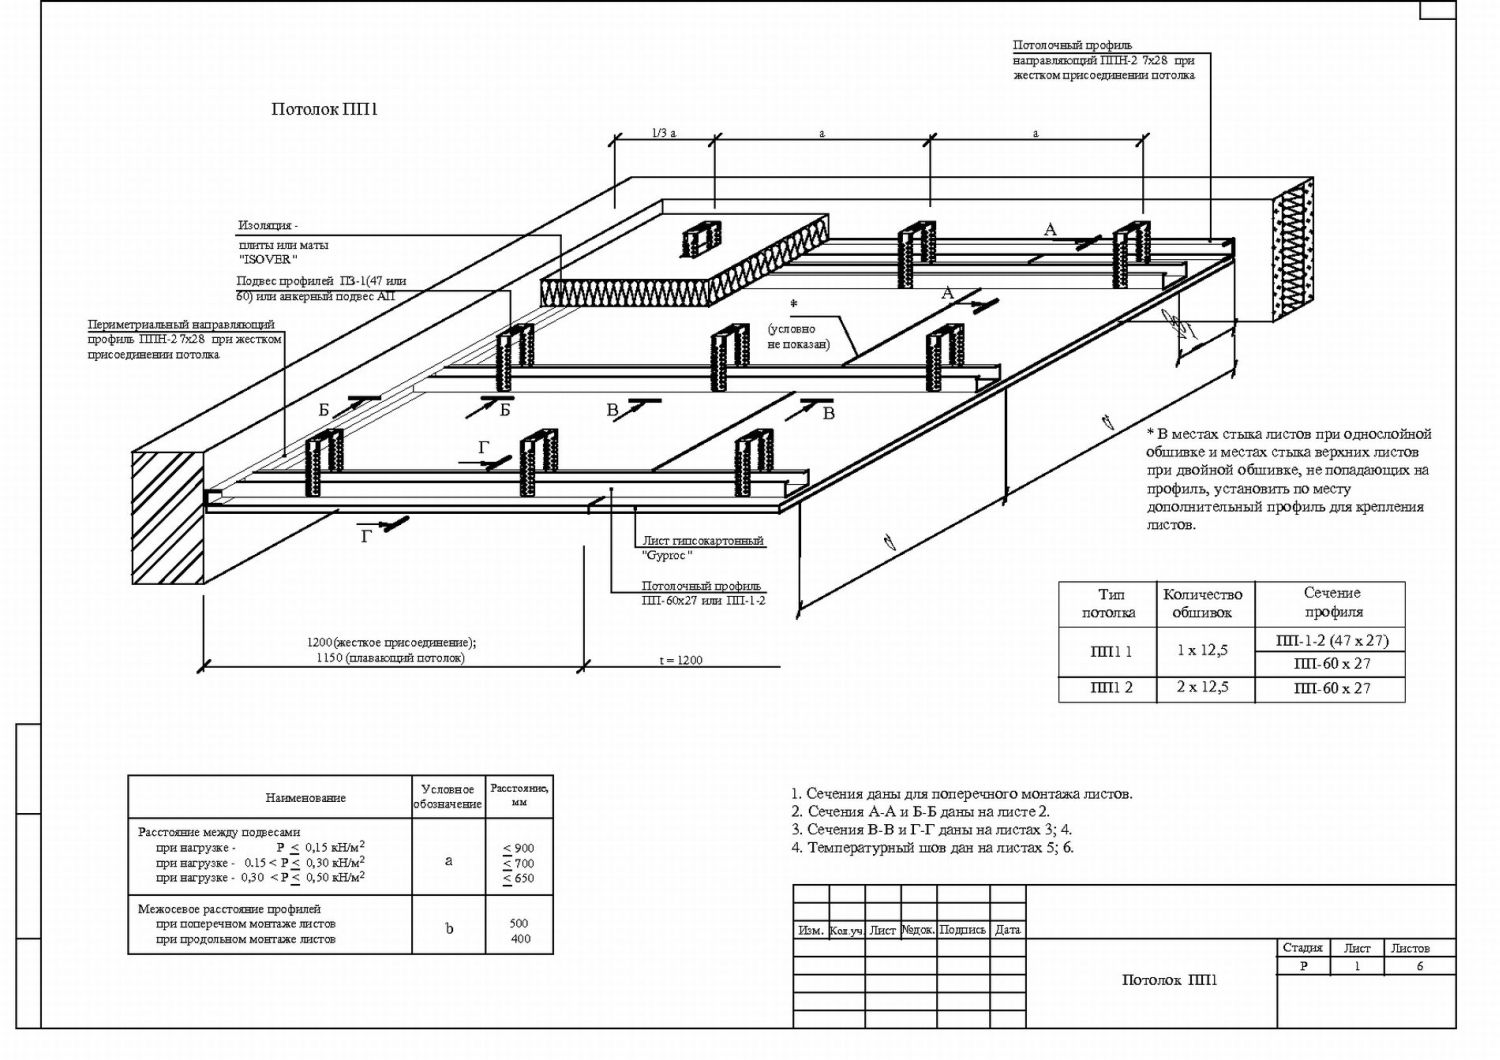
Installation of a plasterboard ceiling is unthinkable without preliminary marking. The goal is a perfectly flat horizontal line, perpendicular to the floor and running along the perimeter of the entire room. It will serve as a guideline for setting the start profile. To correctly markup, you must:
- Decide on the height of the plasterboard ceiling. For a design with spotlights, the surface will have to be lowered by at least 8 cm, if they are not used, a gap of 4-5 cm will suffice.
- Find the lowest point of the base ceiling surface. To do this, you need to measure the height of the ceiling in all corners and in the center of the room. The smallest height is marked on one of the walls with a tape measure and a pencil, then the distance is laid off from it, by which the plasterboard ceiling will be lowered.
- The resulting height is transferred to each wall, the points are connected by a horizontal line using a chopping cord.
For marking under the main profiles for a plasterboard ceiling, you need to consider 2 points:
- The edge profiles should be at a distance of 20–25 cm from the walls.
- Step between profiles - 40 cm.
Hangers can be placed at a distance of 50 cm from each other, extreme - 25 cm from the walls. To mark the anchor points, attach the hangers to the ceiling and mark 2 points for each.
Preparatory stage
The beauty of the Armstrong false ceiling, as well as other options for such finishes, is that it hides all the imperfections of the ceiling. The preparatory stage in this case will be to remove the old coating if it has begun to peel off or may fall off, damaging the suspended ceiling slabs. If the old paint is holding up well, you can leave it alone. All cracks and cracks in the draft ceiling can be covered with alabaster or cement mortar to prevent the penetration of cold.

If there is a danger of leaks from the ceiling in the room, it must be waterproofed, since Armstrong soft plates are sensitive to moisture.
There should be a gap of 20-25 cm between the draft ceiling and the Armstrong system. If desired, heat and sound insulation plates can be laid in it. For fibrous insulation, a wooden crate is needed. It is fixed with an offset relative to the Armstrong false ceiling frame. After laying the insulating layer, it is covered with a vapor barrier membrane. If expanded polystyrene is used, then it is attached to glue or dowels with wide caps.
How to calculate the number of fixtures
The Armstrong ceiling system is very convenient in that it makes it possible to adjust the number of lighting fixtures. However, it is much more convenient to initially provide the desired level of lighting in the room, so as not to return to this issue in the future.The fact is that the installation of additional lamps requires changes to the previously laid wiring. As a rule, a partial dismantling of the system is carried out for this.
On average, when calculating the components of the Armstrong false ceiling, they proceed from the ratio of one lamp / 5 m2. In practice, deviations from the norm in one direction or another are possible, depending on the level of general lighting.
Given the specifics of the design of the Armstrong ceiling, in addition to the exact number of lighting fixtures, it is important to determine in advance the location of their placement on the surface of the finish. In office premises, they try to place light sources above desktops.
For retail space uniformity of illumination is necessary. From an aesthetic point of view, too heaped placement of fixtures looks ugly.
The easiest way to calculate Armstrong ceilings (in terms of determining the required number of fixtures) is to apply the principle of averages. In this case, the number of lighting fixtures needed is calculated, focusing on the area of \u200b\u200bthe room. With the further placement of all fixtures on the ceiling surface, they try to maintain symmetry. The goal here is uniform lighting of the room.
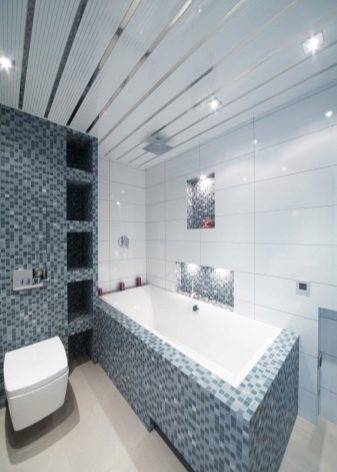
Peculiarities
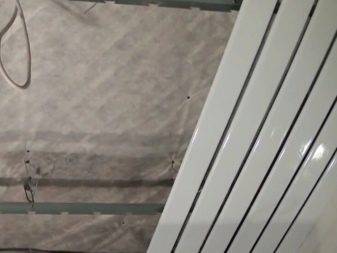
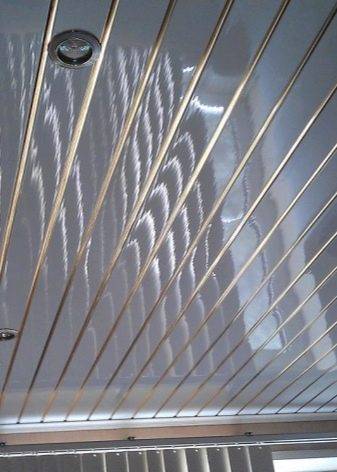
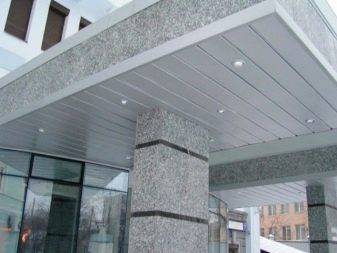
The appearance of slatted ceilings has been indicated quite recently, but they have already won the love of many Russians. The explanation for this is their high strength, easy operation, durability, which makes ceiling installation accessible to everyone.
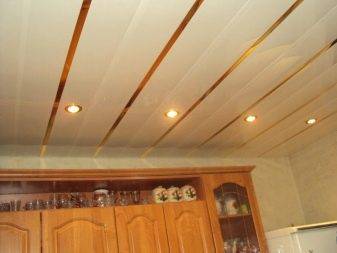
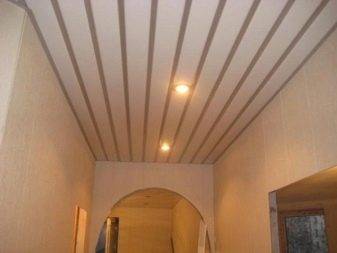
The advantages of rack ceilings include:
- moisture resistance, which allows you to install them in the bathroom, bath, laundry, kitchen, where high humidity often occurs;
- thanks to the use of non-combustible materials as a coating, the ceilings are protected from the effects of fire;
- saving electrical energy: since the surface layer of slatted ceilings reflects light, it is therefore possible to use lower power lighting;
- environmentally friendly materials, so no hazardous substances are released into the environment;
- simple maintenance of ceilings. Wiping with a damp cloth is sufficient to clean them;
- the strength of the materials used, thanks to which they are also suitable for outdoor spaces;
- ease of installation work;
- aesthetics of ceilings;
- durability - the service life reaches up to 50 years, and they have a warranty period of only 20 years;
- it is possible to replace damaged areas without dismantling the supporting parts;
- suspended ceiling looks attractive and stylish.
It should be noted that the rack structure is a suspended structure. This makes it possible to level the surface of the ceiling without the use of special compounds, such as plaster.


There are practically no drawbacks to rack structures. These include only the fact that the repair work is not carried out in a very practical way. If one panel breaks during operation, you will have to disassemble the entire coating to replace the defect. Another drawback: when installing a rack suspended structure in any room, its height will slightly decrease. This is an insignificant minus if you do not place any engineering devices under the structure.