- Installing a washbasin on brackets
- Installing a washbasin on a cabinet
- Recommendations for the selection of furniture
- Mounting technology
- Step 1
- Step 2
- Step 3
- Step 4
- Model Selection Tips
- Buy or do it yourself?
- Types of cabinets under the sink
- Installation
- Choice of accommodation
- Making calculations and markups
- Purchasing materials and preparing the necessary tools
- Installing a cabinet with a sink
- Shell testing
- Washbasins on a semi-pedestal
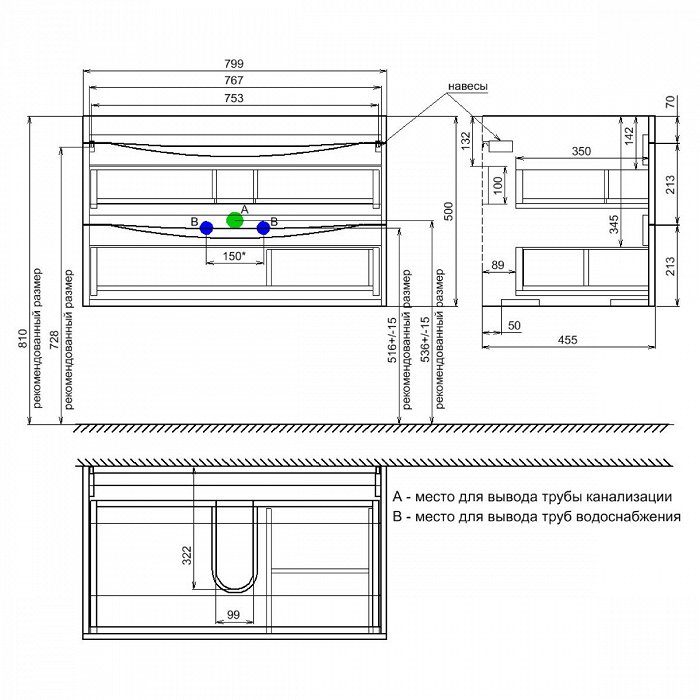
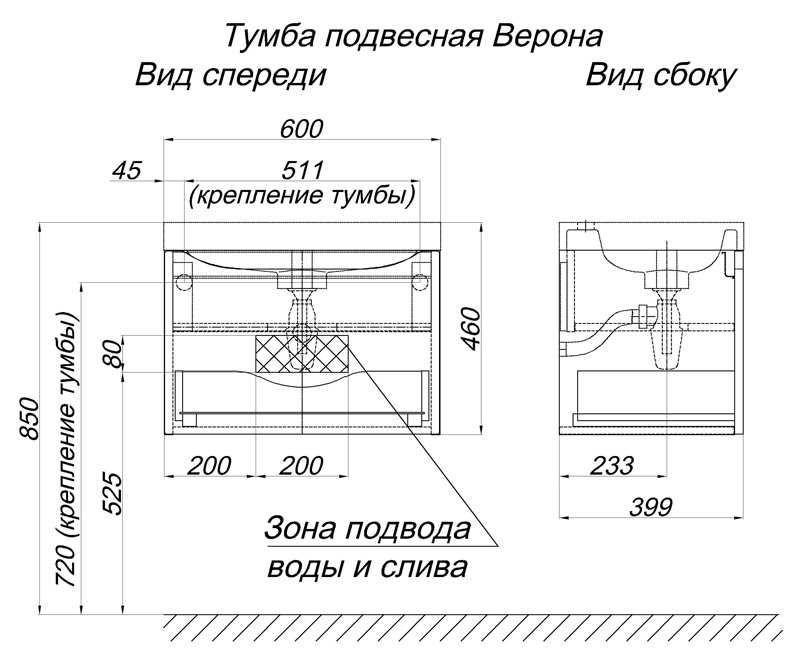
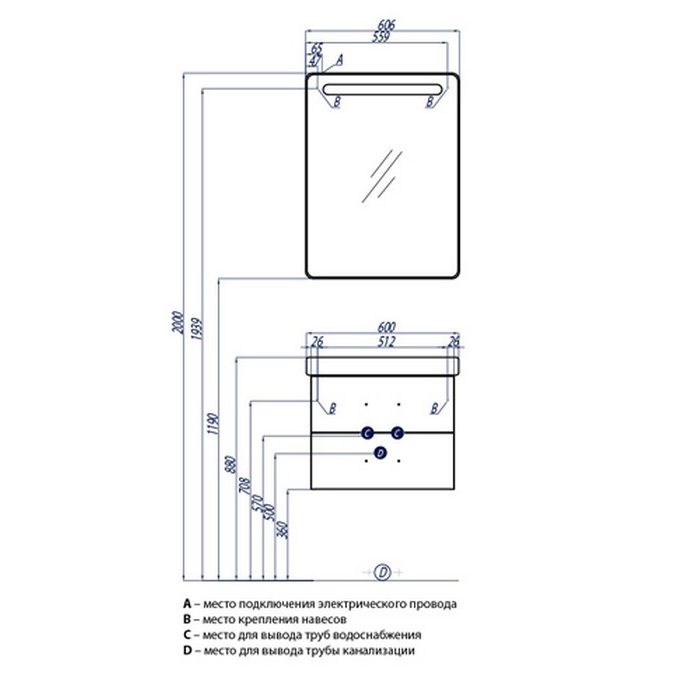
- Dimensions
- Peculiarities
- How to dismantle old equipment?
Installing a washbasin on brackets
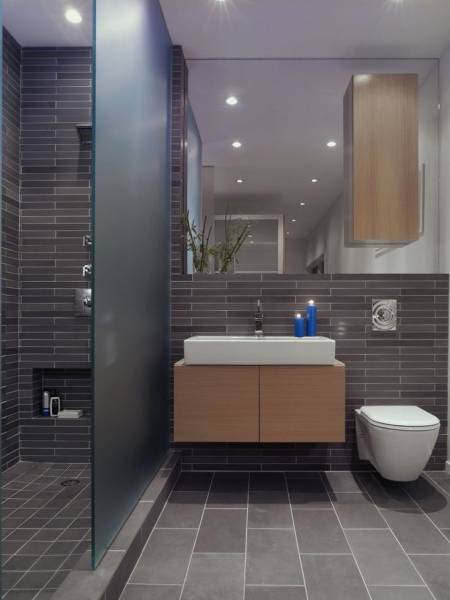
The washbasin on brackets is one of the most popular types of washbasins, especially in small bathrooms, where this technique allows you to visually enlarge the space. It is not difficult to cope with the installation of this type of sink.
Initially, it is necessary to mark the wall: using a ruler or a hydraulic level, the height required from the floor is measured, and a line is drawn with a pencil - the place of installation of the sink. Now, down from the resulting line, we set aside a segment, the length of which is equal to the width of the side faces of the shell, and also make a mark on the wall. Now we try on the brackets to the sink, and then we apply the resulting system to the wall to check the correctness of the lines drawn.
After making sure that the markup is done correctly, through the fixing holes we mark on the wall the places where it will be necessary to mount. Now we drill holes at the marked points, insert plugs or dowels there and fix the brackets with self-tapping screws. Now it remains to install the sink, connect the siphon and install the mixer. As a result, the washbasin should not stagger, and it is better to seal the gap between it and the wall with a sealant so that water does not get there.
Installing a washbasin on a cabinet
In the case of installing a washbasin on a pedestal, the process is as simple as possible, since the pedestal takes on the main load of the sink, so fixing to the wall can be neglected. In addition, all pipes are neatly hidden under the sink, and as a result, the bath gets a nice stylish look.
It is immediately clear that if the cabinet was purchased unassembled, then it must be assembled according to the scheme, which, as a rule, is included in the kit. But now it’s not about that, but about how to put a sink on an already assembled pedestal. The washbasin, by the way, can be recessed into the cabinet, or stand on it: from the point of view of design, there are many options, but from the point of view of technology, the totality of work carried out is the same.
So, first you need to install a mixer on the washbasin, and it is recommended to use modern single-lever models that are more convenient and economical to use. At this stage, it is necessary to use gaskets in order to avoid leaks in the future. It remains only to attach the faucet to the underside of the sink using a washer, gasket and nut.You need to fasten it firmly, but do not overdo it, since if excessive force is applied, the gasket can be deformed, which will nullify all efforts and lead to a leak.
When the mixer is installed, the turn of the siphon installation comes: as a rule, the diagram and the sequence of work are presented in detail on the package, so even a beginner can cope with the task with the proper approach. True, it is worth considering a few nuances. So, it is better to once again carefully check the installation sites of all rubber seals: the presence of burrs on them can cause leakage, therefore, in order to avoid further problems, it is better to remove them immediately. Gaskets are subjected to exactly the same verification procedure.
Of course, pay attention to the state of the gaskets: dry rubber, for example, will not cope with its functions, and it will still have to be replaced soon, so it’s better to immediately find and use normal gaskets, and you must put them on in such a way that so that the cone is directed in the opposite direction from the nut
Now you can proceed to the next stage, when the cabinet moves to the installation site, and the washbasin is tried on the cabinet so that it does not interfere with the summing up of all communications. If everything fits well, and you don’t need to cut anything, then we put the sink on the cabinet, and proceed to attach the entire structure to the wall. To do this, you can use anchor screws, but such a fastening makes you drill a hole in the tile, and even for a washbasin with a reliable support in the form of a pedestal, it may even be superfluous.That is why it becomes more practical to use silicone, with which the sink is glued to the wall: the fastening strength is not inferior to the previous method, but after using silicone, it is better not to turn on the water for an hour.
Completion - connection of water supply and sewerage. It is better to start by connecting the water supply to the faucet: this is a simple process, of course, if you do not decide to connect the faucet directly to the water pipes. A corrugated metal hose and a flexible hose are attached to the mixer with the help of union nuts and rubber gaskets. Try not to overtighten the nuts so that they do not accidentally cut out the seals, otherwise you will have to tinker. If everything went well, then you can proceed to connecting the sewer: you need to connect the corrugated hose from the siphon and the socket of the sewer outlet, and to make this connection airtight, gaskets or special cuffs are usually used.
This completes the process, you can turn on the water and check the quality of the work done.
Recommendations for the selection of furniture
The cumulative requirements for a cabinet installed under the sink in the bathroom are:
- The overall compatibility of the cabinet with the materials and colors of the entire design in the bathroom. This item means that if all elements of furniture and plumbing are made in a soft style with smooth lines - strict rectangular furniture will look out of place, and with a classic design of a bathroom with luxury and wealth, the cabinet under the sink should be presentable at best, but by no means simple.
-
High-quality and functioning fittings of the product, i.e.handles, legs and door hinges must be made of either plastic (can be gold-plated) or chrome-plated metal.
- Painted with a color coating should have a perfectly flat and smooth surface.
In terms of functionality, it is desirable to install a cabinet under the sink with the following parameters:
-
With a laundry basket to save space in a small room.
- With height-adjustable shelves, so that during operation it is convenient to easily adjust the height of the shelves to the dimensions of cleaning products and detergents.
- A roll-out option, with the possibility of rearranging the cabinet to any place in the bathroom, however, it is necessary to take into account the location of all communications (water and sewer pipes), which are located, as a rule, in most cases permanently.
- The locker must have a basement height or be on legs. Such a cabinet will be convenient both in caring for it and in its simple operation.
Other requirements for installing a cabinet under the sink are:
- A heated floor laid in the bath, which will facilitate the cleaning procedure, while providing the necessary ventilation of the room, which is an important point for a room with high humidity.
- Corner version of the cabinet, if the room for taking water procedures is very small in size.
Regarding the choice of location in the bathroom sinks with cabinets. It is desirable to determine it even at the stage of laying pipelines for cold, hot water supply and sewerage. Since the place under the sink will be mounted based on the existing parameters, as well as the purchased furniture.The room must be measured in advance and divided into segments, so that both the existing plumbing fixtures and furniture, and the newly acquired elements correspond to the location planned for them in it.
Mounting technology
After communications are connected to the installation site of the sink, installation begins. Consider the main stages and nuances of installing a sink and floor stand with your own hands.
Step 1
If the stand was delivered unassembled, it must first be assembled, strictly following the manufacturer's instructions, which indicates the order in which all elements are assembled. For work, you will need a set of screwdrivers of different sizes, as well as a hex.
Step 2
The next step is to assemble the sink, which includes connecting the faucet and siphon.
The installation of the mixer is carried out in the following order:
- Flexible hoses are connected to the mixer and tightened with a wrench.
- On the base of the mixer, the sealing ring supplied in the kit is installed in a special groove.
- The hoses are passed through the hole in the sink, and on the reverse side of the mixer, depending on the model, it is fixed with two or one mounting pin.
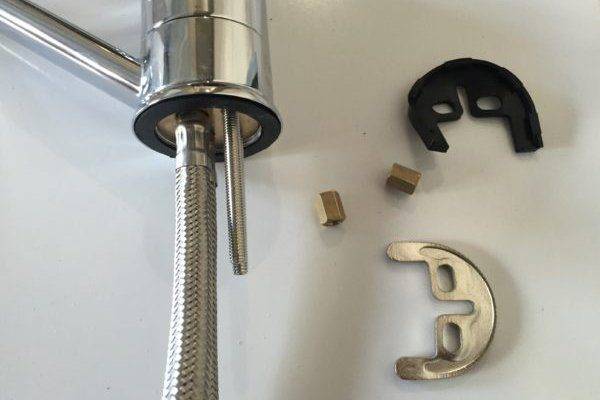 Horseshoe washer and seal for attaching the faucet to the sink.
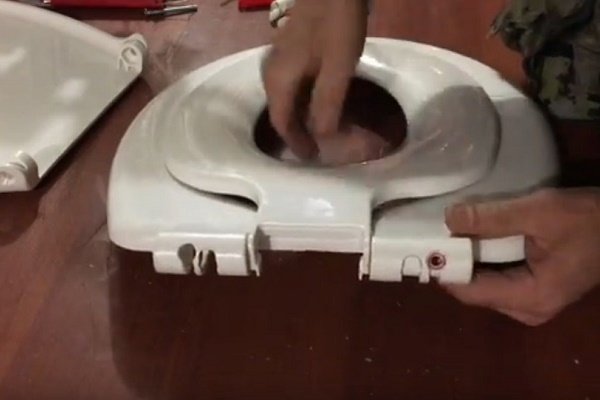
Then a siphon is attached to the sink:
- On the upper side, a metal mesh with a plastic pipe is fixed with a long bolt.
- A bottle siphon is screwed to the nozzle from below. Fixation is carried out using a plastic nut and a conical washer, which is first put on the pipe.


Step 3
The sink with the siphon and the mixer installed on it is installed on the curbstone. Most often, the sink is additionally fixed to the cabinet with sealant or double-sided tape.But it is possible that the kit includes fasteners from the manufacturer. Fastening the bowl to the wall with studs is not required, but it is better to fix the bedside table with a couple of dowels to the wall through the back wall to avoid displacement.
Then the assembled structure is moved to the wall in the planned place and leveled using adjustable legs. If this option is not provided, and the bedside table is unstable, plastic substrates of the required thickness are placed under the legs.
Step 4
When the bedside table with a sink is installed, communications are connected: a flexible siphon hose to the sewer outlet, and flexible mixer hoses to the end fittings of the water supply.
After that, the cabinet doors are hung (it is recommended to install them last so that they do not interfere with the connection). For hanging the doors, furniture canopies are used, which make it possible to adjust the closing density and the gaps between the doors.
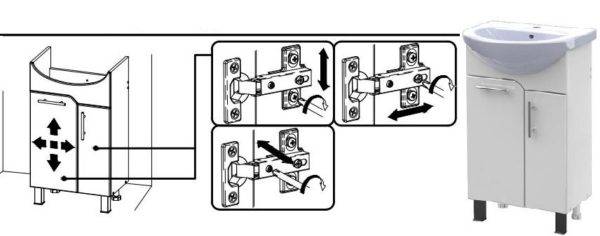 The closing density of the doors and the gap between them can be adjusted using furniture hinges.
The final touch is filling the seam between the wall and the edge of the bowl with white sealant. This will prevent water from leaking behind the washbasin, damage to walls and cabinets, and also eliminate the formation of mold in hard-to-reach places.

Subject to the above recommendations, self-installation of a washbasin with a floor cabinet will not cause difficulties. But, despite the seeming ease of the process, you need to approach the installation responsibly, since the mistakes made often lead to various problems: leaks, unpleasant odors and other unfortunate consequences.
Model Selection Tips
Before proceeding with the manufacture of cabinets, it is important to decide what shape and size it will be. In many ways, its parameters will be determined depending on the place where it will be located, as well as on the size of the room and the wishes of the master.
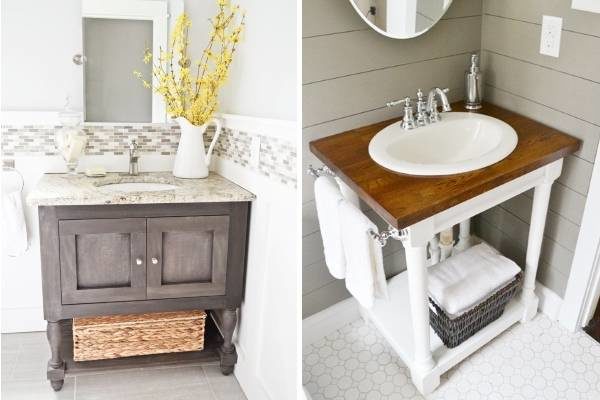
Washbasin cabinet
It is important to consider that if the bathroom already has a sink, then the cabinet can be made under it if it is not equipped with it initially. In this case, the easiest way is to make a floor structure.
If the sink is in a corner, then it is easier to make an angular cabinet.
The laying of plumbing communications can affect the size and shape of the cabinet. Sometimes they can be hidden behind furniture or, on the contrary, you will have to select furniture so that plumbing does not become an obstacle to its installation. In many ways, the size of the bathroom itself can also affect the parameters of the cabinet. If shelves are planned in the pedestal, then even before they are installed, you need to understand if the pipes interfere. If they interfere, then the shelves will need to be adjusted to the dimensions or cutouts should be made in them for communications.
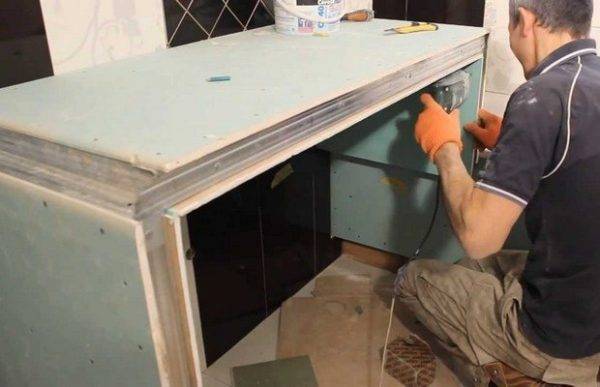
We make a countertop in the bathroom of drywall
Of course, you need to take into account the style of the room.
It is important to choose the most suitable color of the material from which it will be made, as well as figure out how it can be decorated.
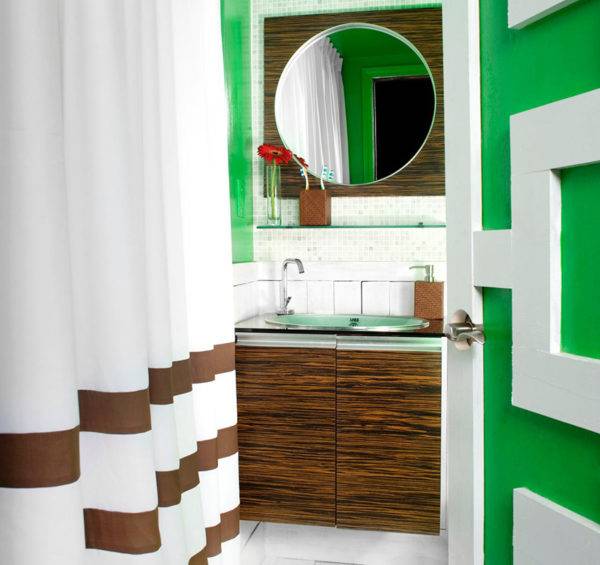
The laconic design of the cabinet is the highlight of this interior.
Buy or do it yourself?
You always want to make a bathroom not only beautiful, but also necessarily functional. And this will help well-chosen furniture and other interior items. As a rule, a lot of bottles, jars, rags are always stored in this room, which are needed not only for taking care of yourself and your appearance, but also for cleaning the premises.And when it's all just compiled at random and on anything, then the picture is impartial. Where it is better to use any furniture for storing items.


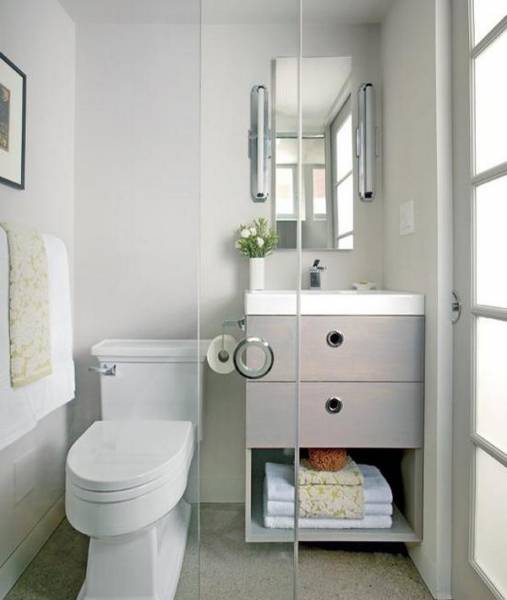
Small cabinet under the washbasin - do-it-yourself options
One of these interior items is just a cabinet under the sink. Usually, it not only hides a drain that goes from the sink itself to the sewer pipes, but also has a lot of shelves hidden behind the doors. And on these shelves you can just put all kinds of bottles and boxes - there they will not catch the eye and interfere with someone with their presence.
Of course, the easiest way to just buy a cabinet for the sink. Now all kinds of products are made from a variety of materials, having any shape and size. But it cannot be denied that our apartments are such that they do not always meet any standards. And for this reason, choosing a cabinet under the sink is often not easy. In this case, you should just think about how to do it yourself.
Built-in vanity unit
It is important to understand that not everyone can make a cabinet - you need to have certain work skills. But if there is a desire, then even a beginner will definitely succeed in the cabinet.
You just need to put in more effort and study all the necessary information in advance. Yes, and it is better to choose the model as simple as possible - complex options the first time without proper skills may not work.
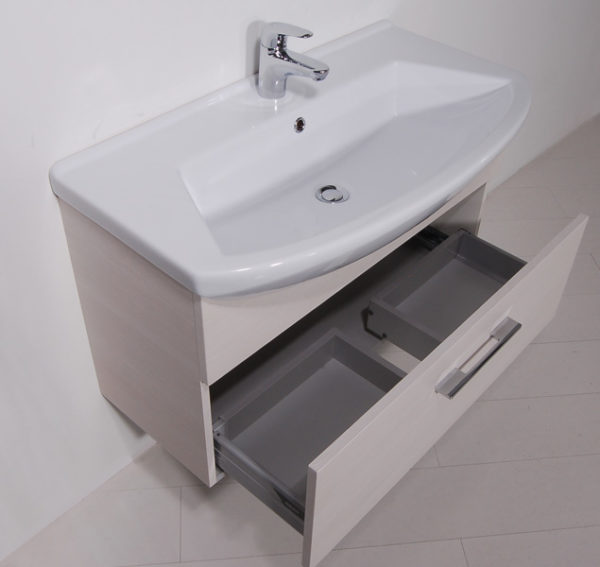
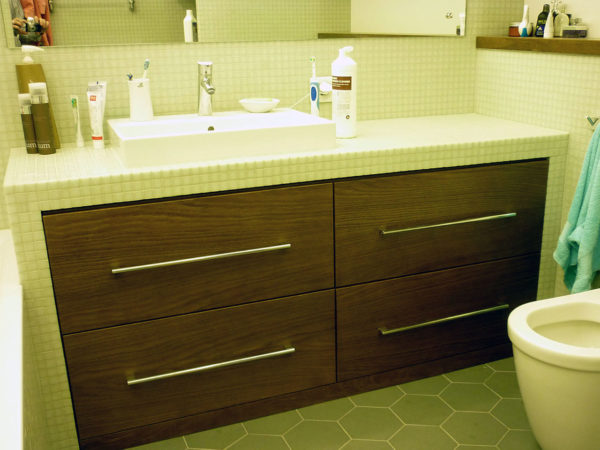
Cabinet with drawers under the sink
Types of cabinets under the sink
Floor cabinets for a washbasin can be divided into two types according to the type of construction:
- Rectangular: are considered classics and the most common option. Suitable for bathrooms of any size. Compact rectangular sink. Wide washbasin with cabinet for large bathrooms.
- Corner sinks are a more interesting and individual option. In small bathrooms, such sinks allow you to optimize and save space, and in large rooms they emphasize style and status. Compact corner sink allows you to optimize space as much as possible. Premium corner sink for large bathrooms.
Installation
Installation of a cabinet with a built-in sink consists of several stages. To successfully pass all these stages, you need to follow some rules.
Choice of accommodation
Usually a new sink is installed in place of the old one. In this case, you do not need to puzzle over how to conduct water supply and sewerage. If you want to install a cabinet in a new place, you will have to solve this problem. In addition, the furniture itself should fit comfortably there, and its cabinets should open and close freely. If you are going to buy a wall-mounted vanity unit, make sure the wall is strong.
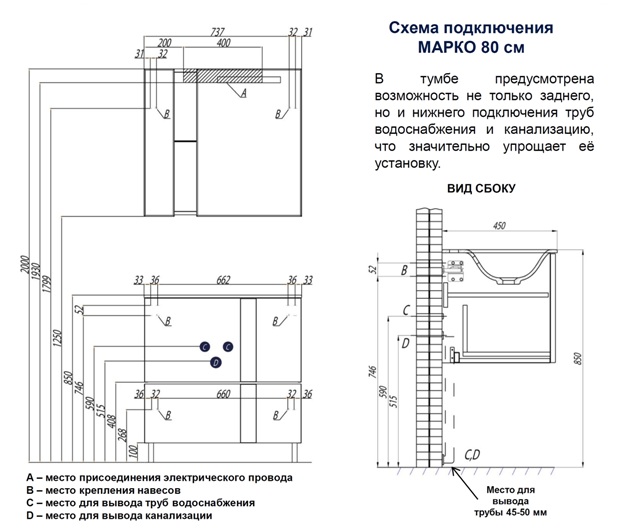
Making calculations and markups
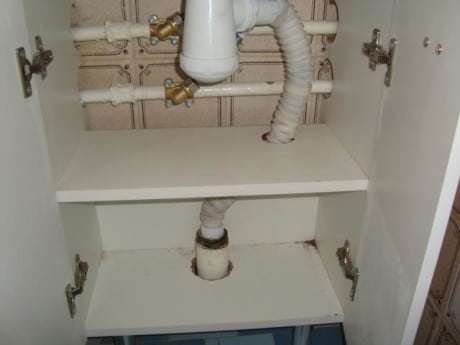
Making calculations and markups makes it possible to conduct pipes exactly, without prejudice to the pedestal itself. Fittings, that is, the connecting parts of pipelines, must be above the middle shelf. Incorrect measurement can lead to the fact that they will rest against walls and furniture shelves. This also applies to the sewerage system. For a drain pipe that comes out of the floor, you will have to drill a hole in the bottom and shelves of the cabinet. Then the corrugated hose will stretch from the bottom to the top.Therefore, it is better to accurately measure everything in advance and pass all the pipes through the wall.
Purchasing materials and preparing the necessary tools
During the installation process, you will definitely need:
- wrench;
- FUM tape;
- screwdrivers of different sizes;
- screwdriver;
- mixer;
- siphon;
- corrugated plastic hoses.
If you purchased the furniture unassembled, you will first need to assemble it with a screwdriver. The attached furniture assembly instructions will help you with this. During this procedure, make sure that each part is firmly connected to the other. Because after you install the sink on it, it will no longer be possible to tighten the screws harder.

Installing a cabinet with a sink
Having gone through the previous steps, and having successfully prepared all the necessary items and tools, you can begin the process of installing furniture with a sink:
- Turn off the water supply. Connect the faucet with hoses and attach the faucet to the sink. The best faucet option for a cabinet is a modern single-lever model.
- Use FUM tape (fluoroplastic sealing material) to seal the connecting parts.
- Install a siphon on the drain hole.
- Attach the sink to the surface of the cabinet.
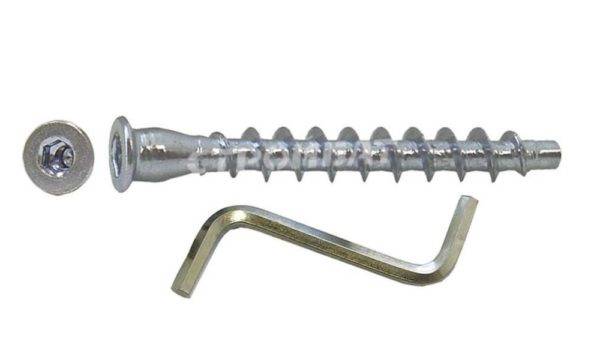
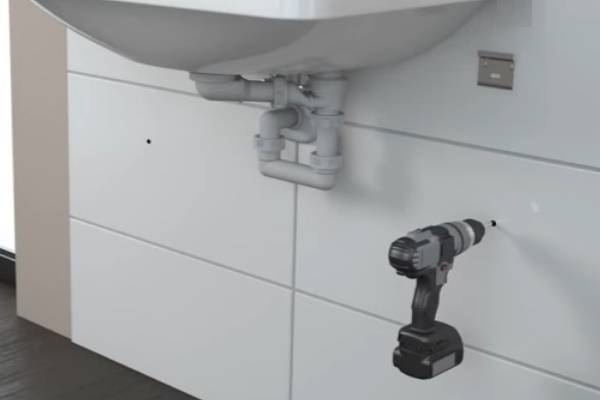
- Move the assembled furniture to the place of installation. Do not install the sink cabinet close to the wall, as lack of ventilation can cause mold to grow. If you need to attach it to the wall, do it using special bolts. But before that, do the calculations and make marks.
- Move the pedestal away from the mounting location and drill at the marked points on the wall. Insert the dowels there, return the cabinet back and secure it with bolts.
- Connect the sewer pipe and the water supply system.This completes the installation process.
In the process of installing furniture with a washbasin, difficulties sometimes arise. For example, if the sewer hose prevents the furniture from fitting snugly against the wall, then it will be necessary to saw off part of the shelf, bottom or wall of the cabinet. To do this, use a hacksaw or jigsaw. Or, for example, the sink does not have holes for bolts to install it on the wall. In this case, you can stick it with silicone glue.


Shell testing
After completing the assembly and installation of the cabinet with a washbasin, check the performance of the entire structure. First check the reliability and stability of the cabinet, then turn on the water and check that there is no leak anywhere. If everything works properly, then you can safely hand over work or enjoy new furniture.

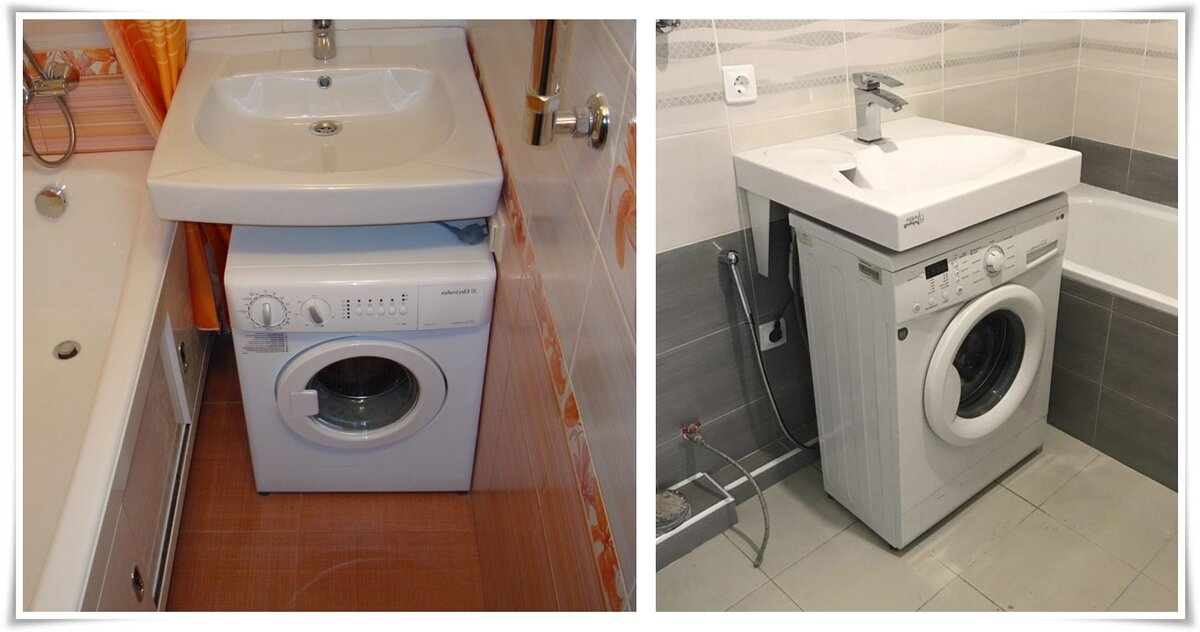
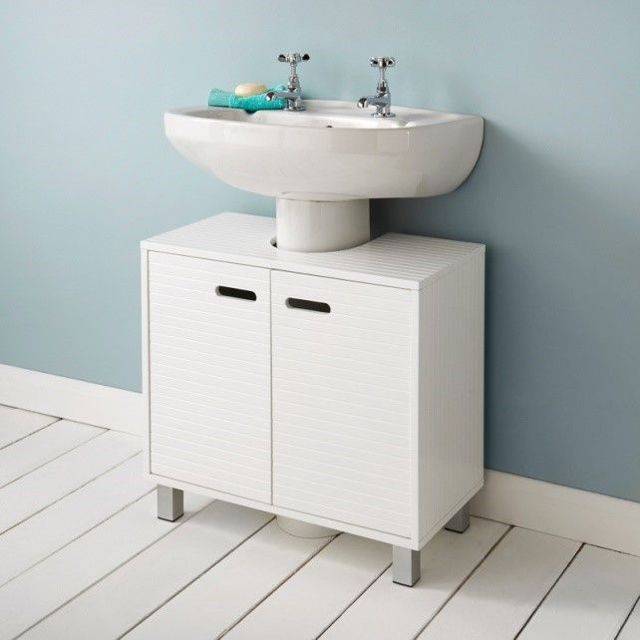
Washbasins on a semi-pedestal
Unlike a full-fledged pedestal, a semi-pedestal does not perform load-bearing functions, but only hides communications that fit the bowl. Such sinks look sleeker and more compact, but require a completely different way of summing up communications, which should come out of the wall at the level of a decorative semi-pedestal.
The advantages of this type of washbasin include saving space, which is important for small bathrooms, as well as the ability to independently determine the installation height.
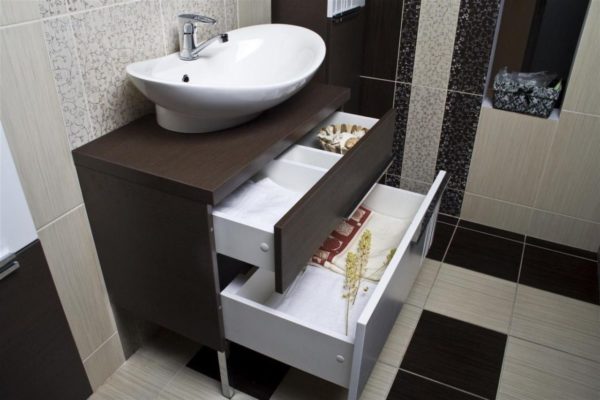
The semi-pedestal performs only decorative functions, hiding the supply lines.
Mounting Features
Since the semi-pedestal does not support the bowl, special powerful brackets are used to attach the sink, which are attached to the wall with dowels and self-tapping screws or anchor bolts.
When the brackets are securely fixed to the wall, a washbasin is hung on them, after which they are connected to the sewerage and water supply. The semi-pedestal can be mounted in one of two ways:
- Hanging with spring suspension. For this, special holes are provided in the lower part of the bowl, into which loops of a metal spring are threaded. Then bolts are put on the ends of the loops, after which the semi-pedestal is hung and fixed with nuts.
- Fastening to the wall with studs. To do this, after mounting the sink and connecting the communications, the semi-pedestal is applied to the wall in the right place, the attachment points are marked through the mounting holes. Then holes for dowels are drilled at the marked points, into which the studs are screwed. The semi-pedestal is put on the pins and pressed with nuts using plastic washers.
Some models are equipped with a towel holder that can be attached both to the bottom of the sink and to the wall using dowels and screws.
Washbasin with half pedestal and towel holder.
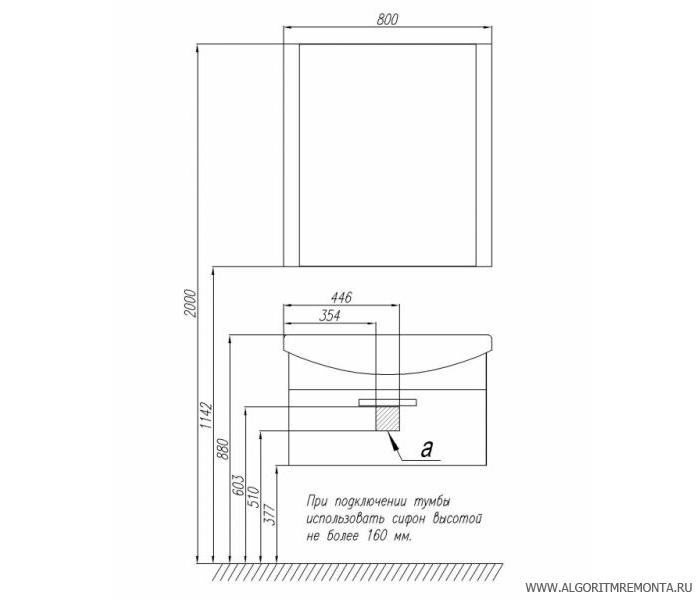
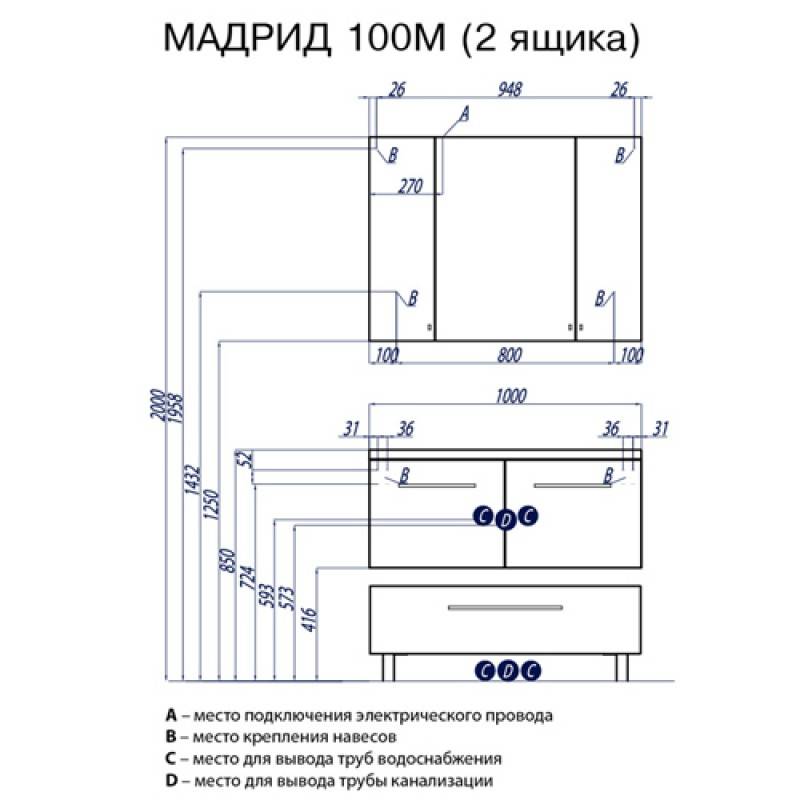
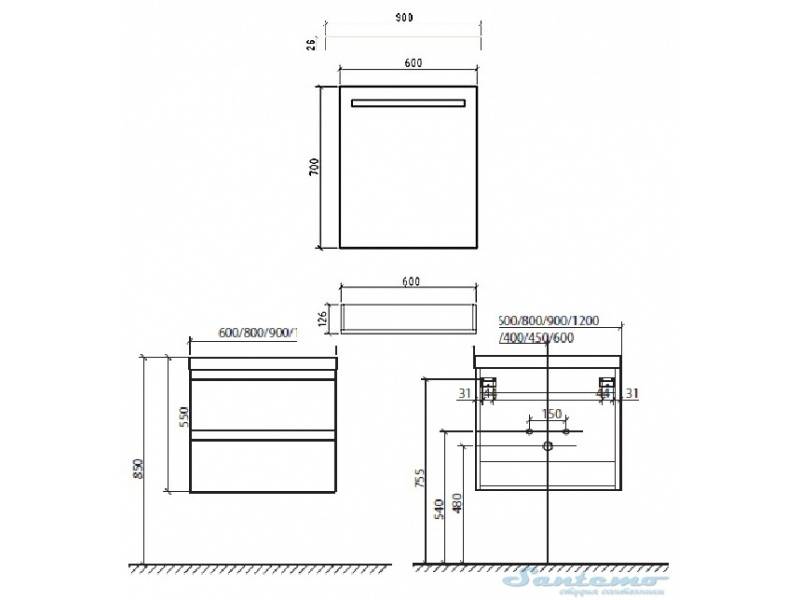
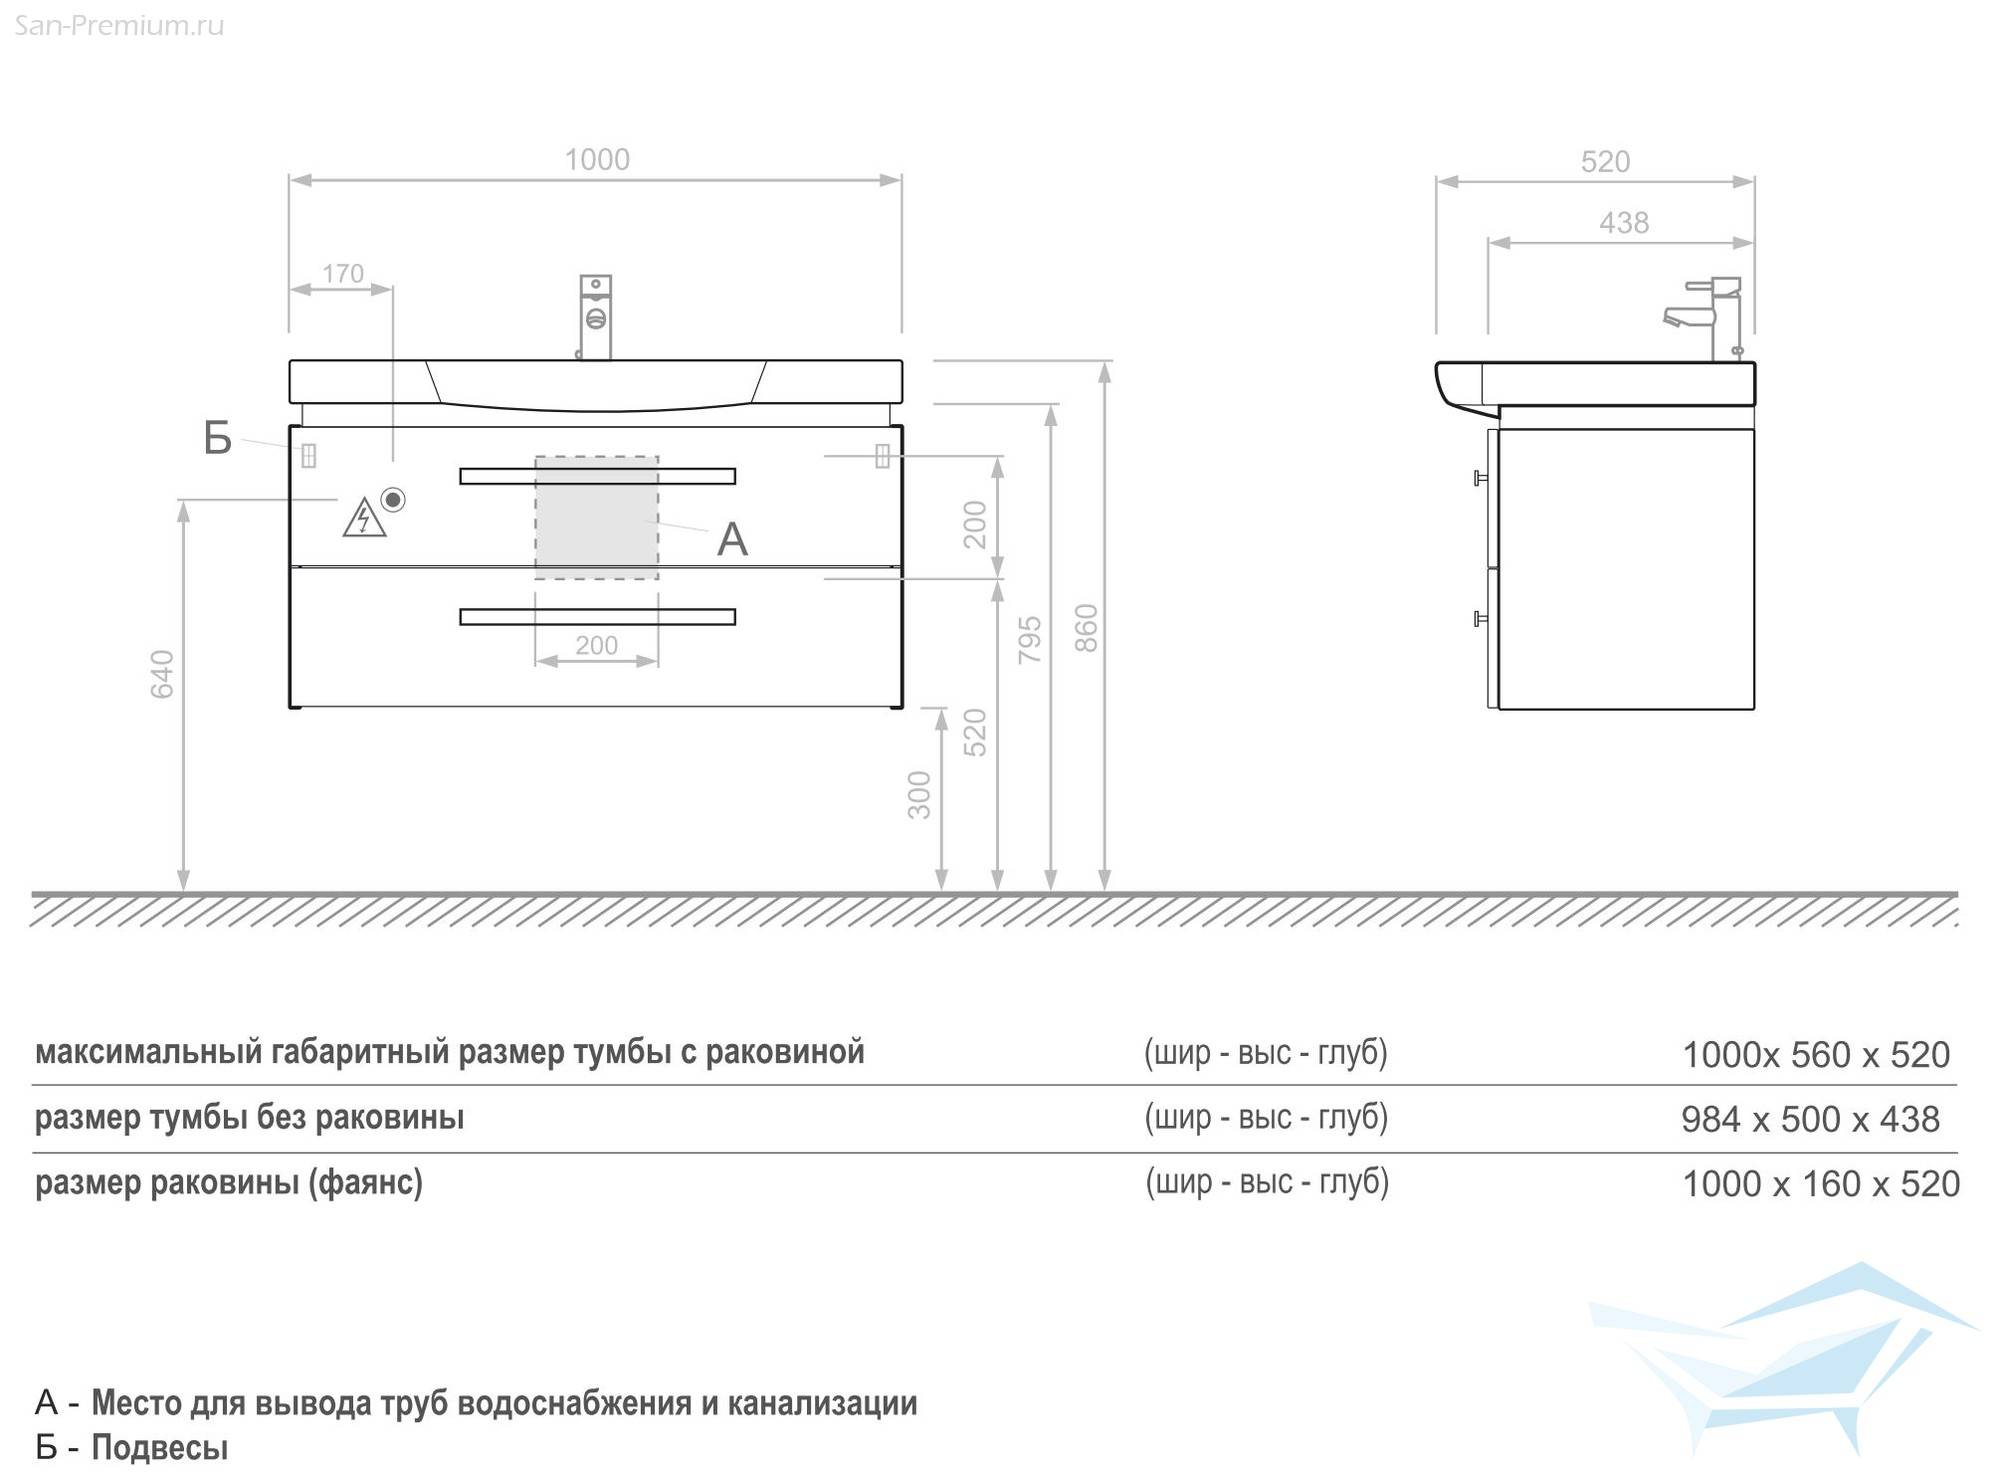
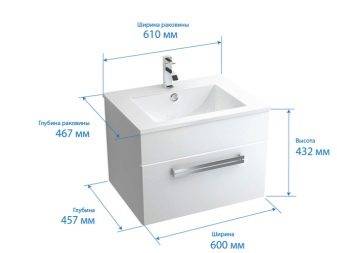
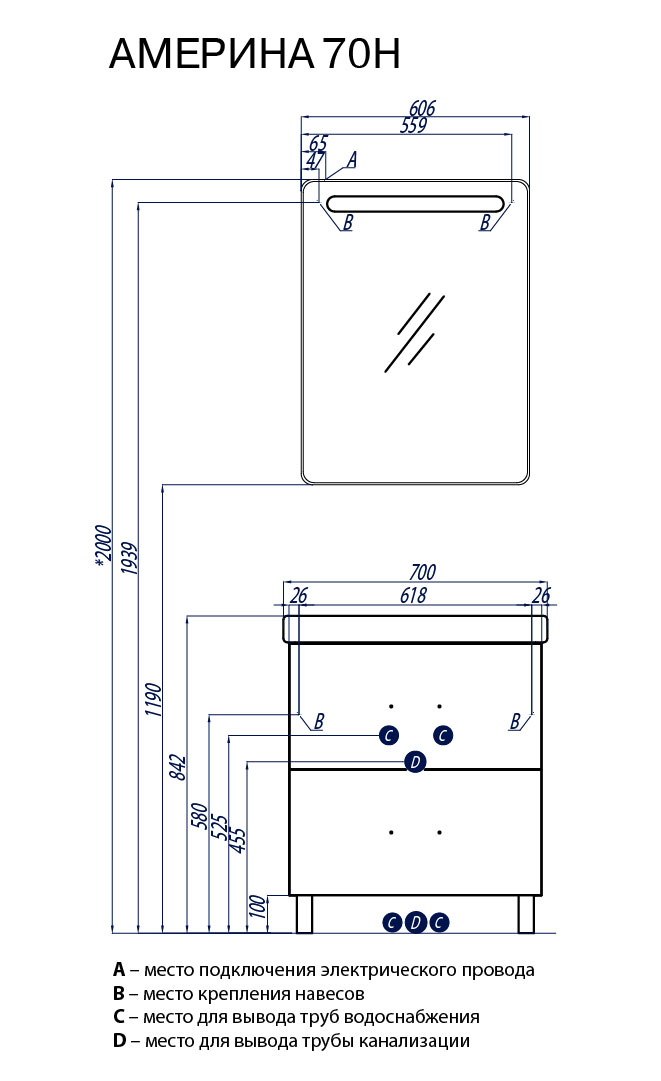
Dimensions
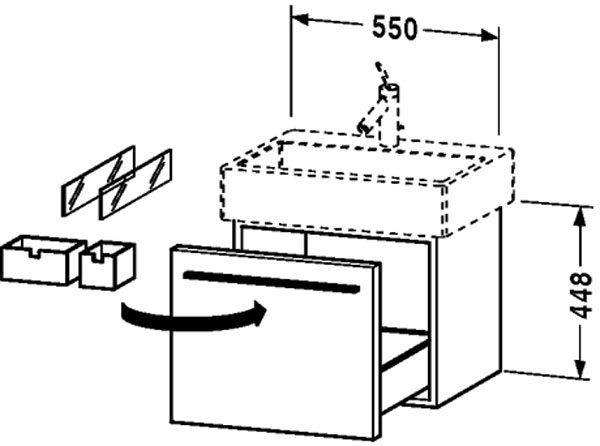
To date, manufacturers produce a variety of sizes of cabinets with sinks: from compact, suitable for installation in small bathrooms to luxurious large specimens with double bowls, installed in large areas. But any model is evaluated by three parameters: height, width and depth. The width of the model is indicated by a value indicating the amount of space occupied horizontally. The depth indicator indicates how many centimeters the model will protrude from the wall.And the value indicating the height indicates how many centimeters vertically it will be needed to install it.
When choosing a cabinet for the bathroom, all three parameters must be taken into account, and it is even better to make preliminary measurements of the intended installation site.
As a rule, manufacturers produce models where the main variation in values falls on the width, in increments of 5 cm.
- For small bathrooms, models are offered with a width of 40 or 45 cm. But there are also mini models, which are usually triangular in shape and are intended for installation in a corner, their width does not exceed 30 cm.
- Standard models have a width of 50 to 65 cm, but 60 cm is considered optimal.
- A cabinet with a sink less than 50-55 cm is not very convenient to use, there is a high probability of water getting outside the plumbing fixture.
- Models with a width of 70-75 cm are more suitable for more spacious bathrooms, and products with a width of 80-90 cm are an excellent option for a very spacious bathroom.
Installation height from 90-100 cm is suitable for men, for ladies this norm fits into 85-95 cm, well, and the value of 80-85 cm is considered optimal.
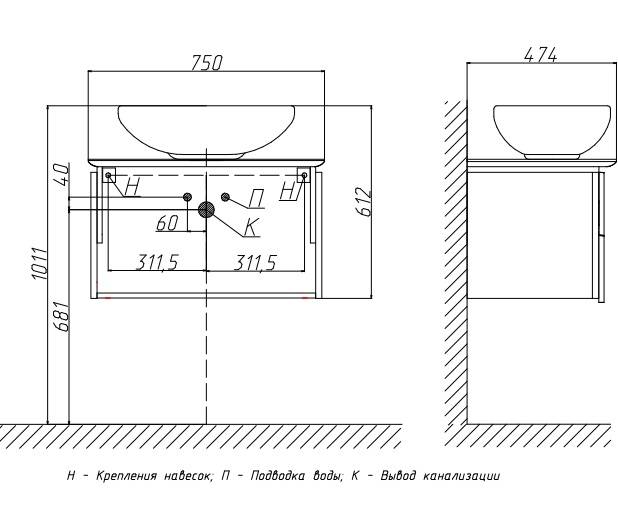
The height of the water outlets is directly related to the height of the sink. With the standard placement of the sink at a distance of 85 cm from the floor, the water outlets are installed at a height of 62 cm from the finishing coating. The depth of a standard product varies between 48-61 cm.


Peculiarities
The washbasin is a unique type of construction that fulfills both functional and aesthetic properties in modern life.Despite the fact that the sinks come in different sizes and appearance, they all have one feature in common - the need for a quality installation. In order for the accessory to look beautiful in design and reliably serve for many years, you need to follow all the norms of installation work, correctly calculate the size and choose a place where you can put it. Therefore, at first, the space allotted for the sink is accurately measured, its width can be from 60 to 250 cm. In addition, the installation of the sink depends on the design features of the product, as there are models with and without a mixer.
Before installation, it is also important to determine the shape of the sink, and it is advisable to do this even at the stage of repairing or building a room, otherwise it will be difficult to “fit” the product to the finished water and sewer outlets. To date, there are several types of sinks, for each of which the installation is characterized by its own characteristics.
To date, there are several types of sinks, for each of which the installation is characterized by its own characteristics.
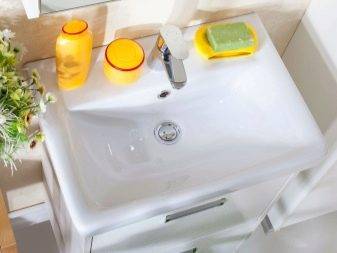
Suspended. The accessory is attached to the wall using brackets, as for the mixer, it can be located both on the product itself and on the wall. Such models perfectly save space, but they need to be supplemented with a small cabinet, where all communications are usually hidden.
- On a pedestal. The sink is mounted directly to the wall using brackets, but unlike the hanging version, the communication systems are hidden under a special design - a pedestal. There are accessories with a partial and full pedestal, their only drawback is the limitation in height, which cannot exceed 80 cm.
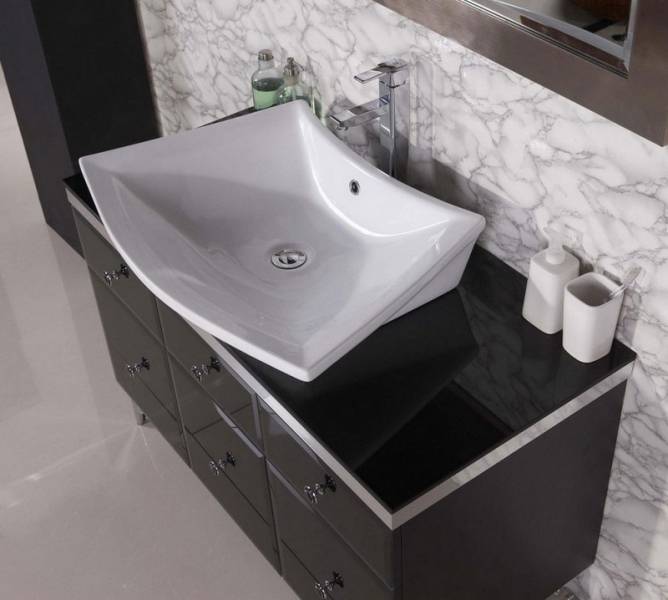
- Embedded.Such sinks are installed in bedside tables and countertops by inserting or attaching to the frame. This type of product is characterized by a beautiful design, but they take up a lot of space, so they are not suitable for rooms with a small area.
In addition, the sinks differ in the material of manufacture, which also requires a special approach and installation technology. The most popular are products made of porcelain, ceramics and faience, they are expensive, but of high quality. There are also marble models on the market, they look respectable, but are difficult to install and maintain, the material has a porous structure that can collect dirt and dust. Glass sinks made of heavy-duty raw materials deserve special attention.
Their fastening should be done carefully so as not to damage the appearance
For kitchens, stainless steel sinks are usually purchased, they are easy to install, inexpensive and durable. Their only drawback is the instability to abrasive products, in addition, they create noise from the water. Such shells are of simple and double form. These models can be built into countertops and cabinets, installation takes a minimum of time, and it is quite possible to do it yourself.
How to dismantle old equipment?
To dismantle a device that has served its time, you must first turn off the water, then loosen the mixer. To do this, unscrew the nut fixing it. The equipment is disconnected from the supply pipes, carefully removed and cleaned.
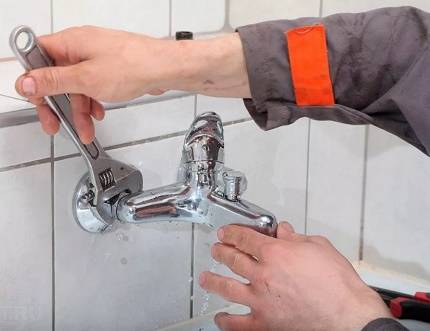
Having unscrewed the taps, it is necessary to make sure that stagnant water or water coming from the pipeline does not leak through the control valve
After that, the drain elements are dismantled:
- Nuts are unscrewed from the lower outer part of the plumbing element.
- Disconnect the siphon glass from the drain outlet, free it from water and clean it from accumulated dirt.
- Remove the liquid from the drain and manually unscrew the lock nut by turning it counterclockwise.
If the siphon is to be replaced during the dismantling of the equipment, it must be separated from the drain pipe. To do this, unscrew the lock nut located at the junction of the drain and the water seal, carefully lift the drain and drain the siphon.
Before removing the drain with the installed gasket, the wedge-shaped spacer washer must be pushed aside. At the final stage, it remains only to pull out the outlet pipe with the attached siphon from the sewer socket.


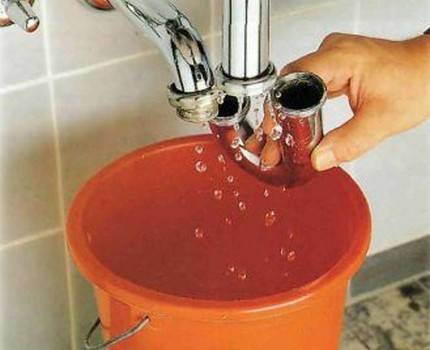
So that the accumulated water does not drain to the floor when disassembling the elements, it is advisable to install a bucket or any storage container under the siphon
After completion of work, in order to prevent the spread of an unpleasant odor, the sewer pipe hole is carefully closed with a cork or a piece of fabric folded several times.
If you have to dismantle a sink attached to the wall using combined stands, you should look for attachment points on the sides, closer to the bottom of the washbasin. If the bowl does not have a floor support, when unscrewing the nuts, the sink should be held with your hands so that it does not fall to the floor under its own weight.