- Wall preparation
- Self-installation of socket boxes in drywall
- Dimensions of drywall sockets
- Dimensions and features of drywall sockets
- Peculiarities
- How to choose
- Installation of sockets in drywall
- Wall marking
- Creating holes
- Box mounting
- How to install a socket in the wall?
- How to make a hole for a socket in drywall?
- How to make a hole for a socket in a wall of plaster, brick and concrete?
- What to do if there is no crown?
- How to get the wire into the socket?
- How to cover the socket in the wall?
- How to put the sockets exactly?
- How and when to make holes in the plasterboard
- Tips
- What to look for when buying
- Installation of a socket in a concrete base
- Step 1 - markup on the wall
- Step 2 - Punching a Hole in the Concrete
- Step 3 - Installing the box into the wall
- Step 4 - combining several sockets
- Conclusions and useful video on the topic
Wall preparation
Many people began to finish these surfaces with drywall in large quantities, since in this case it is possible to significantly speed up the repair work, as well as to give them evenness without the use of bulk materials, which, with significant wall defects in old buildings, will require a significant amount to be used.
It is possible to install drywall sheets on a profile that has a width of 5 cm, leaving behind sufficient space for further placement of insulation, sound insulation and wires. When carrying out these works, there is also a need to install socket boxes.
Note! Having a poor understanding of electrics, it is best to resort to the services of specialists who will be able to lay electrical cables with high quality, since mistakes made during self-laying can in the future cause a short circuit that can lead to a fire. It is advisable to purchase socket boxes together with drywall, as in this case it will be possible to save a significant amount of time by selecting suitable mounting boxes
It is advisable to purchase socket boxes together with drywall, since in this case it will be possible to save a significant amount of time by selecting suitable mounting boxes.
Ordinary drywall sheets easily ignite in a fire. The only exception is fire-resistant material, which is mainly pink or red in color and has a special marking.
For this reason, when purchasing socket boxes, you also need to pay attention to their fire safety standards.
Important! When choosing sockets for installation in drywall constructions, it is necessary to consider only those products in which the rim is made of metal, which, if the voltage is too high, will ensure the passage of current through itself and the operation of the fuse protection in the shield. In addition, there will be a power outage, which will eliminate the possibility of possible negative consequences.
In order to still make a high-quality installation of a socket box in drywall, it is necessary to properly prepare the walls:
- First of all, it is recommended to apply putty, due to which the surface becomes more durable and begins to perfectly retain its shape during drilling.
- Further, after the hardening of the putty composition, it is necessary to carefully open the material with a primer. After absorbing the applied mixture, the drywall will stop crumbling during further processing.
Having carried out these actions, you can begin to determine the future locations of the mounting boxes.
Self-installation of socket boxes in drywall
In modern construction, gypsum plasterboards are often used. This material is used for the installation of hollow walls and interior partitions. Accordingly, the layout of the installation of electrical equipment has also changed. In particular, additional fittings for electrical sockets and switches.
Previously, these elements were mounted into the wall, for this installation box was inserted into the punched hole, where it was fixed with a solution. This option is not suitable for hollow structures, so special socket boxes designed for drywall have appeared on the market.
Note that the socket box is an indispensable element when installing electrical equipment. It is used to install sockets, switches, dimmers, thermostats. In addition, they can be soldered electrical wiring
The workflow is intuitive, however, there are certain nuances that it will be useful for the home master to know.We’ll clarify right away that expensive equipment or special skills are not required for installing socket boxes in drywall.
I am glad to welcome you friends on the blog "Electrician in the House". In today's issue, we will analyze in detail the topic of how to install a socket in drywall.
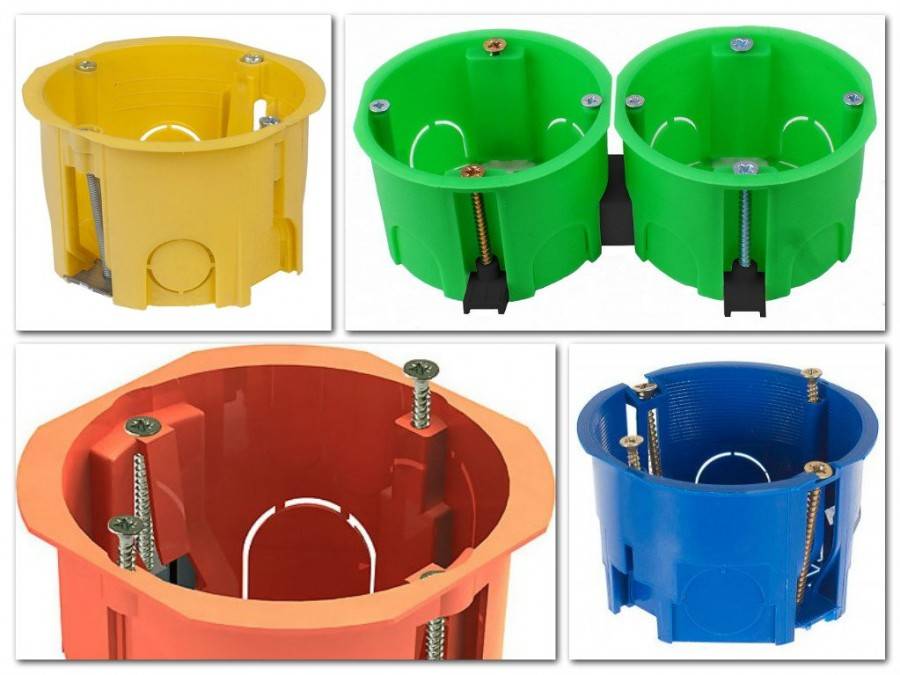
Dimensions of drywall sockets
Before proceeding with the description of the installation process, it makes sense to understand the features of the product. We note right away that a conventional socket box is not suitable for installation in plasterboard partitions; only a certain type of product intended for such cases is used here. Among the established manufacturers, the following brands can be distinguished:
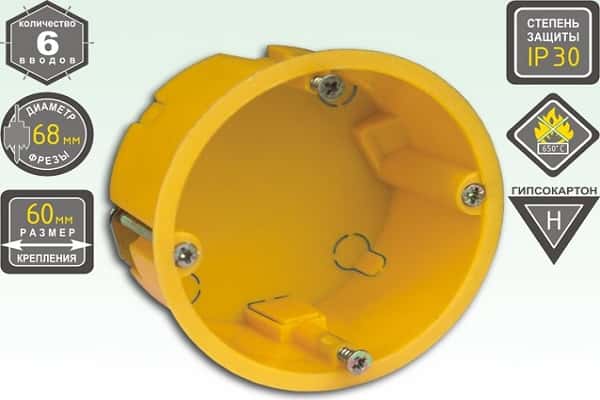
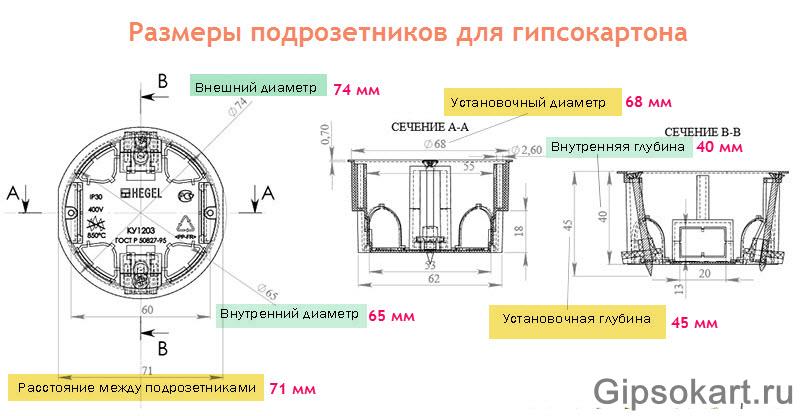
These products are classified by planting depth and outer diameter. These parameters are labeled as H and d2, respectively. Standard drywall socket diameter - 68 mm. In addition, models with an outer diameter of 60, 64, 65, 70 and 75 millimeters are on sale.

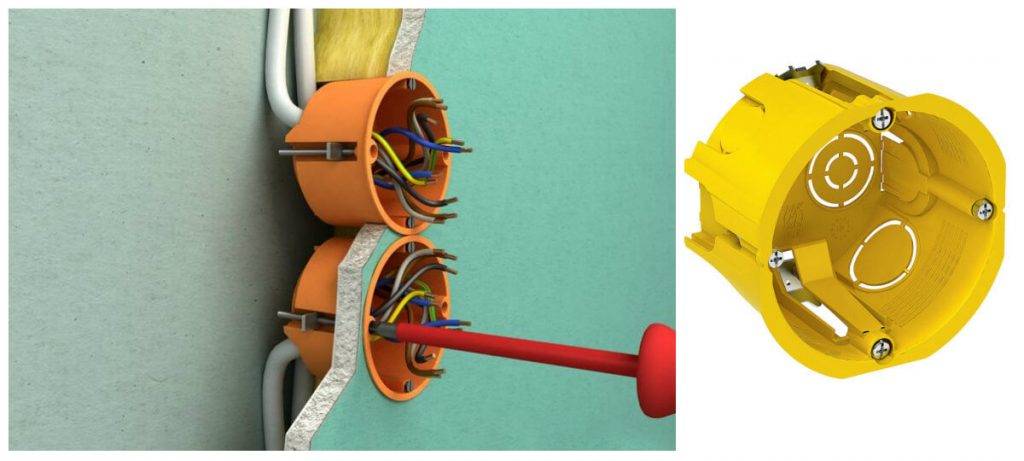


If we talk about the depth of planting, then here you can find the following sizes: 40, 42, 45, 60 and 62 mm
Socket boxes are selected individually, depending on the installation location. If possible, and the thickness of the partition allows, we recommend choosing models with a planting depth of 60-62 mm. Such designs are much more convenient when disconnecting wiring, especially if the circuit excludes the installation of junction boxes. In this case, the wires are disconnected in the socket, so every extra millimeter will play a decisive role.
In addition, in products with a large seating depth, it is much easier to connect wires and install electrical equipment.
In today's article, for example, I will use the Schneider Electric drywall sockets of the IMT35150 modification. These products have a standard outer diameter (68 mm), planting depth is 45 millimeters.
The body of the Schneider Electric IMT35150 socket box is made of non-combustible plastic. It uses a combined material polypropylene + flame retardant, which is able to withstand temperatures up to 850°C. The case is quite durable, equipped with a wide front edge. There are plugs of various diameters designed to enter wires of any section.
To fix the socket in the partition, two metal paws are used. The use of metal clamps provides a large area of adhesion to the surface, while the plasterboard coating is not damaged. To fix the paws, screw screws are used, which, when tightened, securely press the box to the surface.
For a change, let's take a look at the Polish drywall sockets from Pawbol Euproduct. The plastic is very hard and durable to the touch. Only thin metal paws are used here.
Dimensions and features of drywall sockets
At the moment, there are many product options for sale, the main difference of which is in dimensions. The most common options:
- Installation box depth - H. Measured in millimeters. There are values from 40 to 62 mm, the most convenient dimension is 6.2 cm. This is due to the fact that the volume of such a part allows you to place the wires when installing the main part, and not pull them out from under the frame. But the depth must be consistent with the opening of the crate.
- External diameter - d.Products with a diameter of 68 mm are in demand, but there are options from 60 to 75 mm. It is taken into account that it is this indicator that determines the dimensions of the mounting hole, which is drilled in the GKL slab.
 Despite the variety of materials and manufacturers, the dimensions of all round socket boxes intended for installation in drywall are clearly fixed, in accordance with GOST
The setting data of the selected element is indicated on the wrong side. Also, among the designations inside or outside, melting point indicators should be present, highlighting the flame-resistant material.
Drywall sockets have the following features:
- The presence of two paws (staples) at the edges. They provide reliable installation and prevent the box from falling out. Fixing parts can be made of plastic or metal. The second type is an excellent solution if the foot opens only after being inserted into the hole when screwing in the screw. The clip must have sufficient contact surface.
- Variety of forms. There is a square, round or rectangular variety, which makes it possible to choose the right element.
- Several stubs. They are located on the back or side of the product and open only before installation, taking into account the cable entry point.
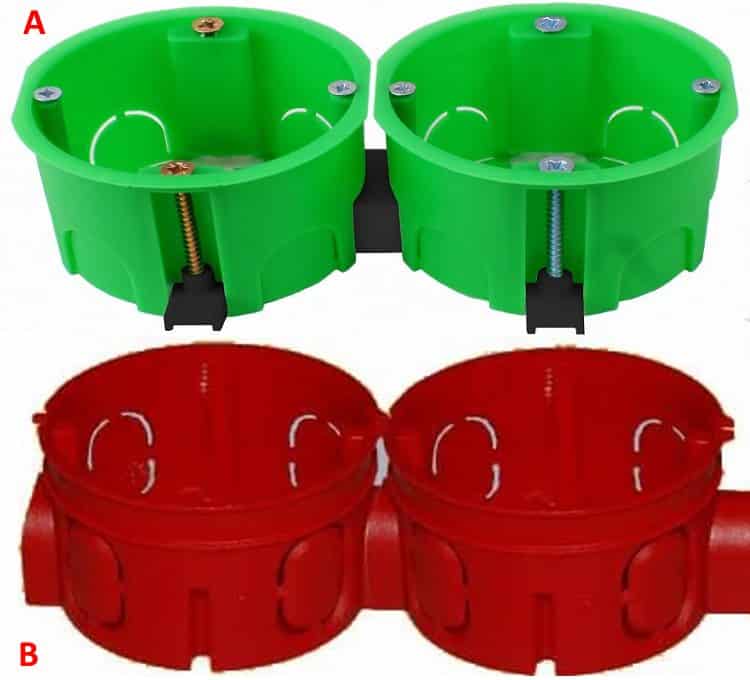
Unlike devices built into concrete walls, parts for plasterboard sheets on the outside have 4 visible screws: two move the legs, and the rest are needed for laying the metal strip.
Peculiarities
Of course, installing sockets in drywall is much easier when compared with other materials, but, for all its advantages, it also has imperfections. In particular, it crumbles extremely easily and when working with it, the use of ordinary self-tapping screws is not allowed.
Also, when working with drywall, it is unacceptable to use impact power tools - all work is done using a drill and a special drywall tool (for example, knives or jigsaw files).
When mounting sockets in drywall, you should use specialized installation boxes, called socket boxes (glasses). Installation boxes for plasterboard walls differ from concrete auxiliary equipment by the presence in their design of special fasteners that are pressed against the drywall.
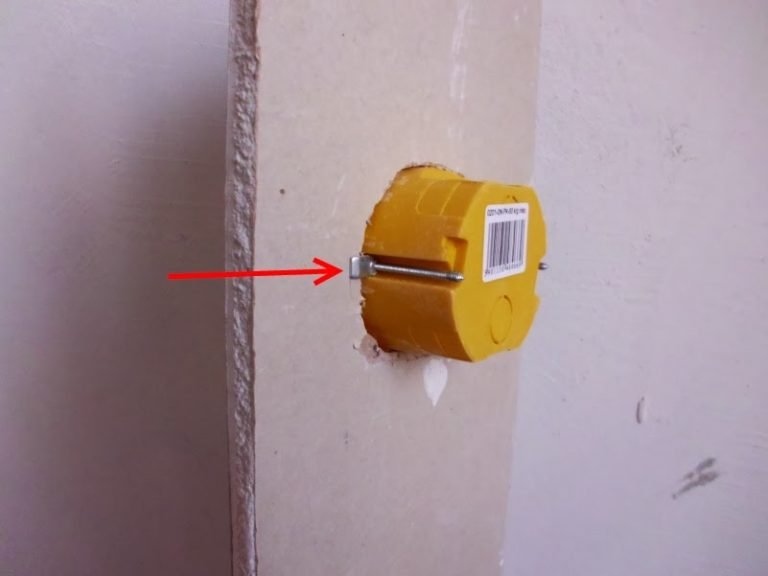
Drywall sockets are produced, as mentioned above, with a special mounting method. Outwardly, they look like a plastic cup. There are 4 screws on the front side. Two of them are above the others. They are necessary for fastening specifically the steel frame of the outlet itself.
Other screws, which are located just below, are responsible for mounting the socket box itself into the drywall. At the bottom of the glass are specialized holding presser feet. Their location can be adjusted with these screws. When the screw is tightened, the foot is attracted to the GKL. Such a device ensures reliable installation of the socket and guarantees that the socket will not pop out of the wall at the first opportunity.
Two methods of wiring and sockets are practiced in the GKL:
- at the construction stage;
- at the finishing stage.
This is interesting: Drywall thickness - the minimum size of the plasterboard for the wall, what is the width of the sheet and what is better for wall covering
How to choose
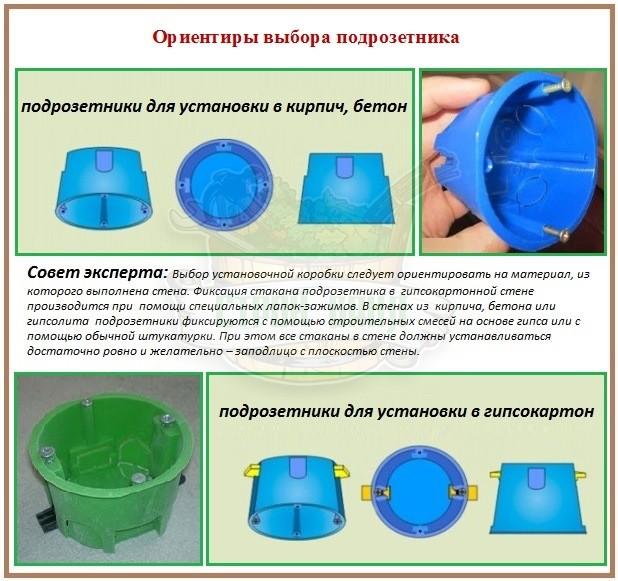
 Before as to purchase a particular model, you need to decide on some features. Firstly, in which wall is it planned to install it:
- Solid walls (concrete, brick, gas, foam blocks). For such floors, the most common socket box for concrete is suitable, without any additions.
- Hollow walls (drywall, chipboard, plywood, etc.). They will require socket boxes with special clamping feet.
There are also universal models that, if necessary, can be used for any walls.
Secondly, you need to calculate how many outlets you need to install at one point. In addition to single sockets, you can buy double, triple, etc.


Thirdly, choose the desired shape and size. The round shape is considered standard, but square ones are also found. About the dimensions you need to know the following:
- outer diameter. There are - 60 and 68 mm.
- Installation depth. Also two types - 40 and 45 mm.
The most popular dimensions are 68 × 45. They fit most of the manufactured sockets and switches.
Installation of sockets in drywall
Fixing the mounting modules is not difficult if the work is divided into stages.
Wall marking
The correct location of the power supply system for electrical equipment depends on this event. Process diagram:
- Since the wiring is pulled behind the drywall surface, the layout of the outlets must be thought out in advance. When compiling, the location of interior items and devices that require power is taken into account so that the connection points are conveniently distributed.
- According to the scheme, the seat is determined. From the site of the reference point, which can be the floor, the edge of the wall or another object, several points are marked, with the help of a level they are brought to one position and connected.
- On the resulting line, it is necessary to make a notch - the center of the future hole.
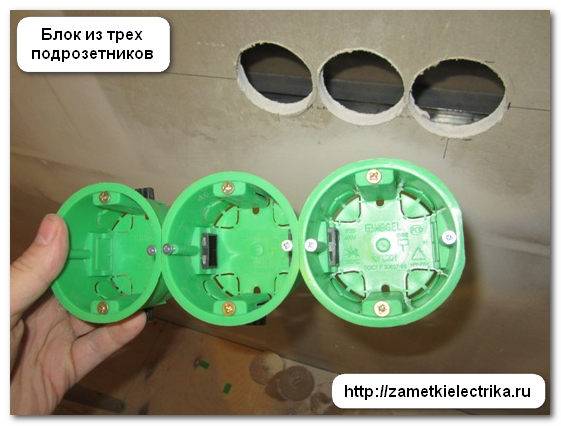
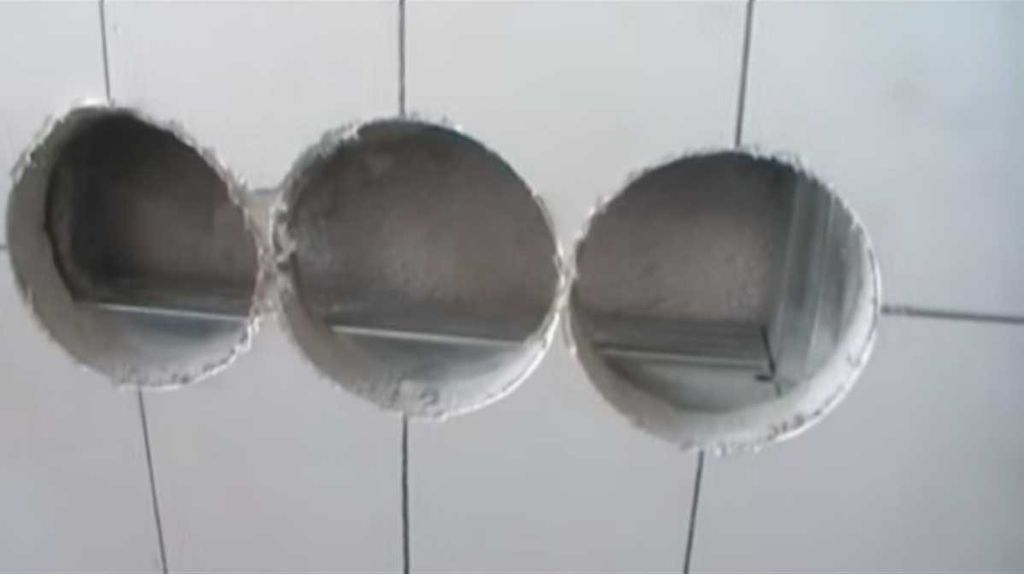
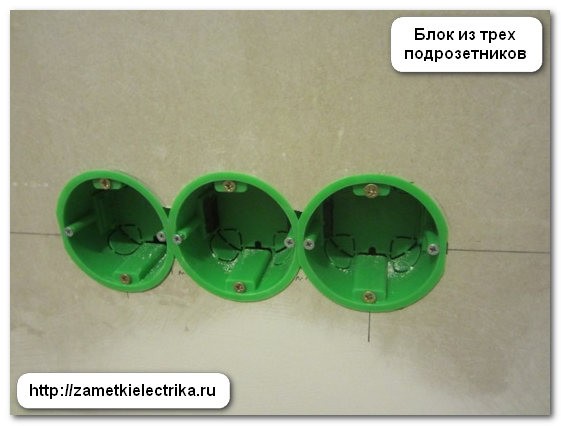
- If it is required to fix several boxes in a single block, then a distance of 71 mm is laid off from the first point. It is taken into account that this distance is suitable for products with a diameter of 68 mm.
To avoid errors that will lead to a skew of the mounted structure, it is advisable to check the correct marking.
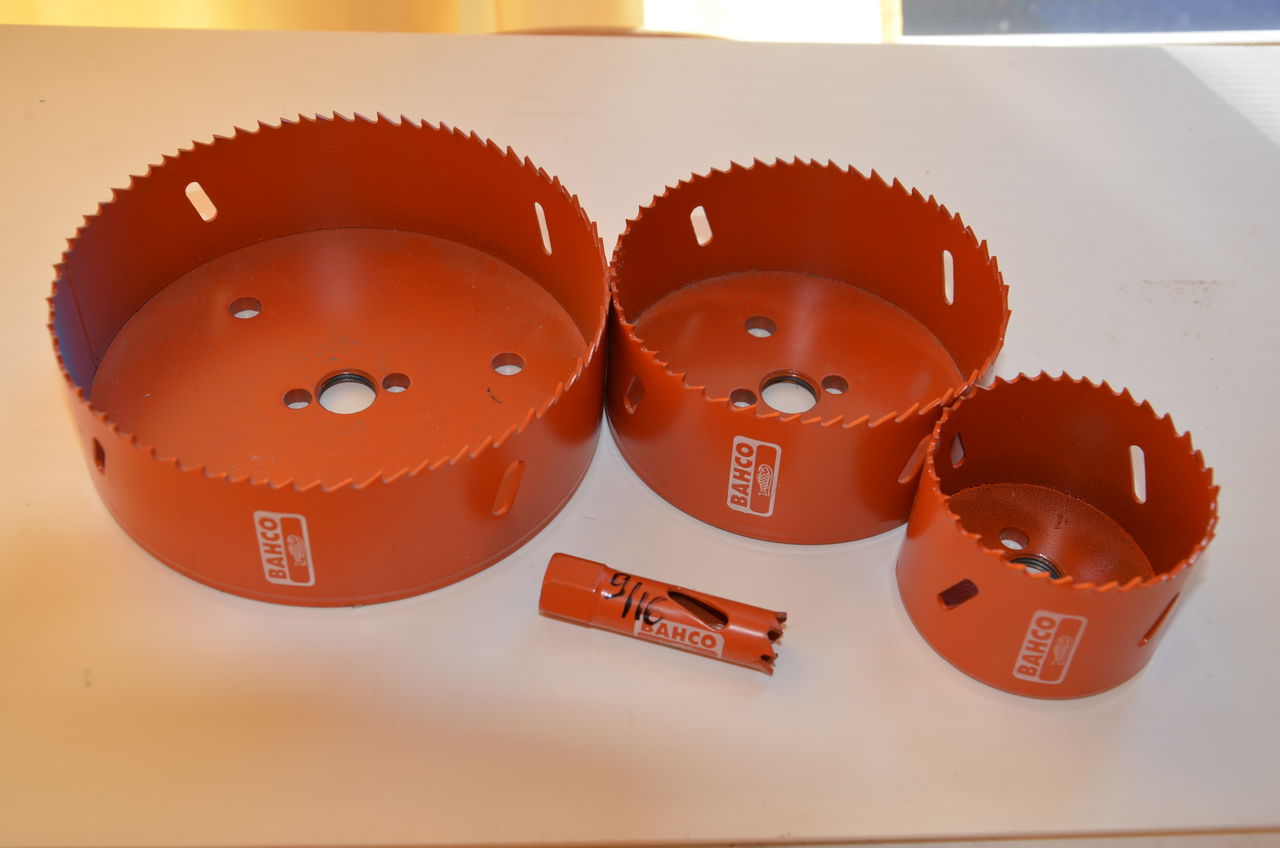
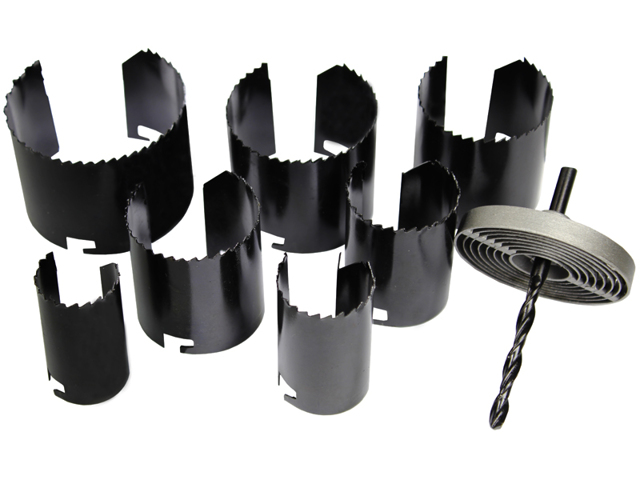
 There are several tools for arranging round holes in drywall, but the gear nozzle has proven itself best.
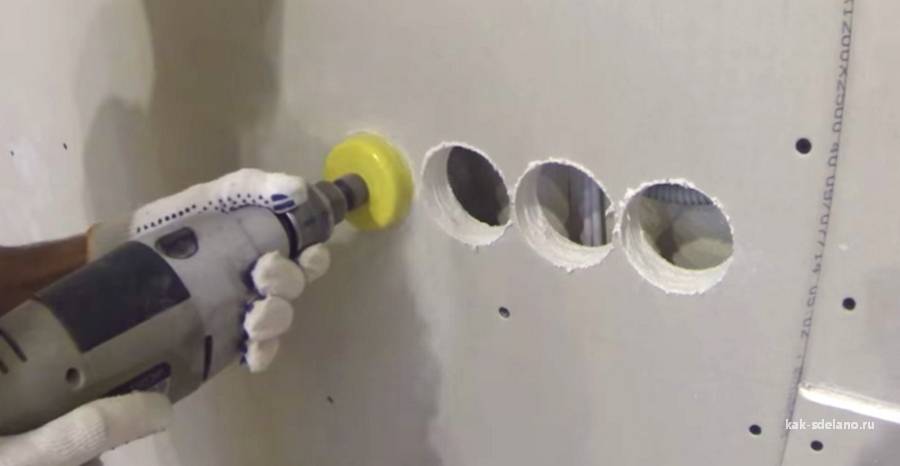
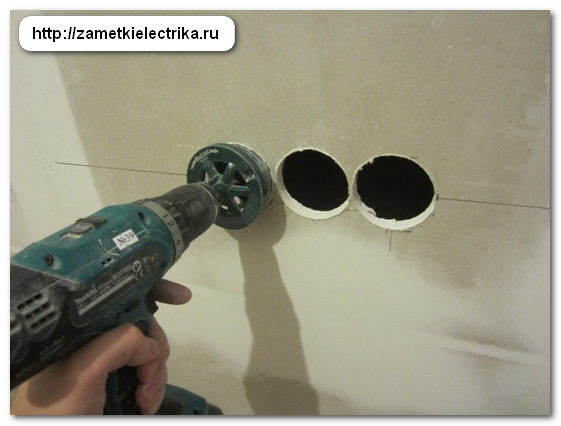
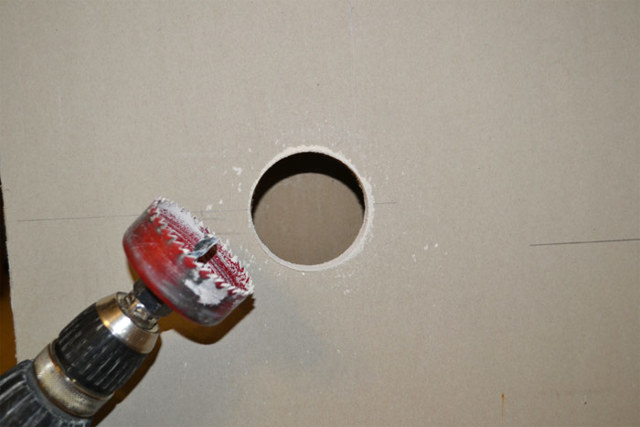
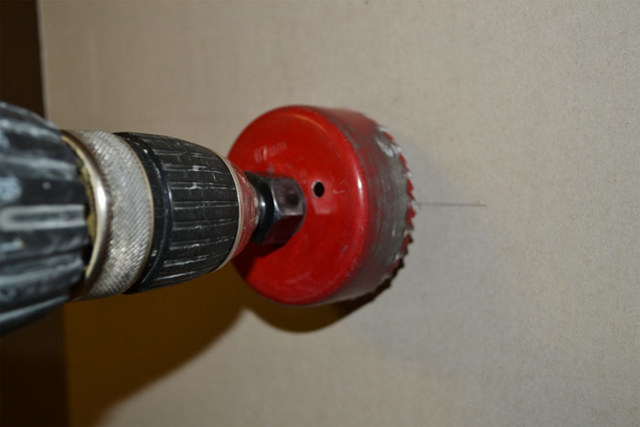
Creating holes
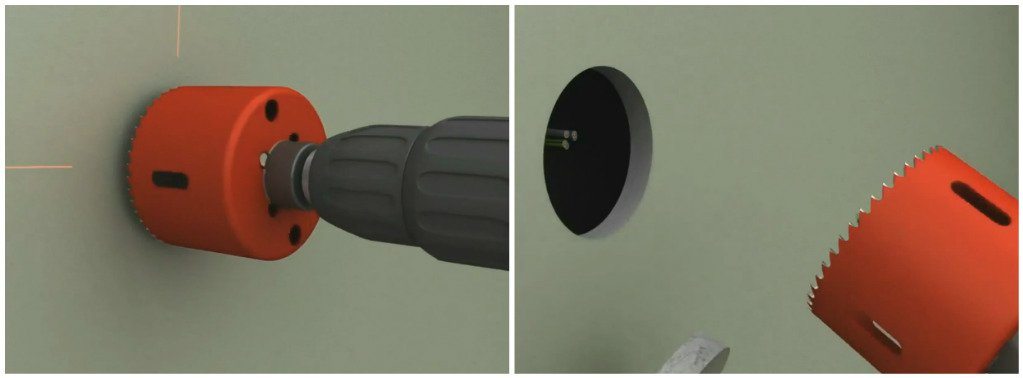
After marking all surfaces with a drill with a set of drywall crowns, seats are made for socket boxes. The nozzle is selected based on the diameter of the selected module. Alternatively, you can use a ballerina or cut out the section by hand.
Drilling a hole with a crown is much faster and easier, so this is the best solution. Work technology:
A centering drill is set along the notches on the main line.
Deepening is carried out without haste at low speed
It is important to ensure that the nozzle does not lead to the side, so the tool must be held perpendicular.
After the teeth of the crown have passed the coating, the speed is increased.
If you plan to create an elongated module, then drilling is carried out along the remaining points. When manually sawing out, the edges do not always turn out to be perfectly even, so they will need to be finalized
When hand sawing, the edges do not always turn out perfectly smooth, so they will need to be finalized.
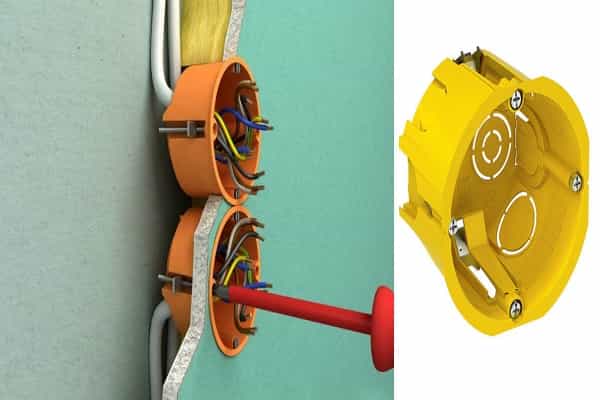
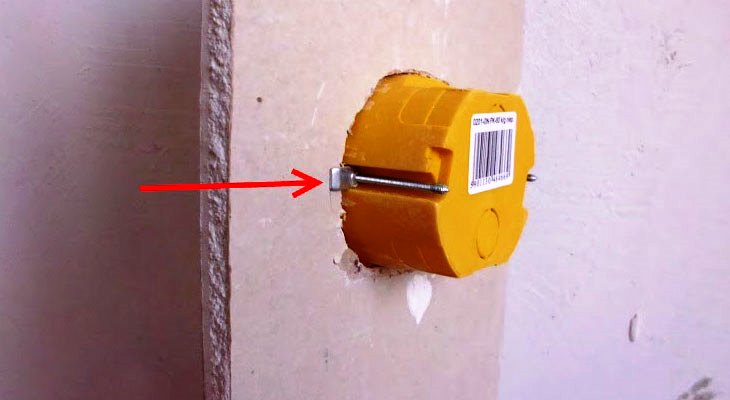
Box mounting
Installing the socket box is not difficult if the product is of high quality, and the previous work was completed without errors. Procedure:
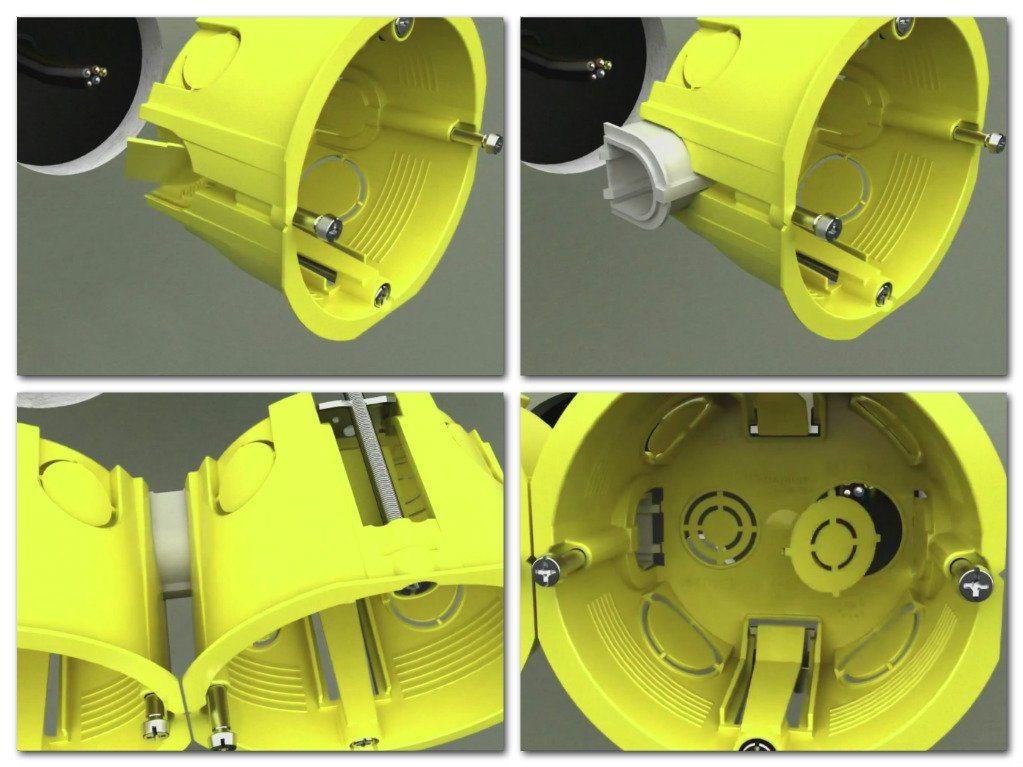
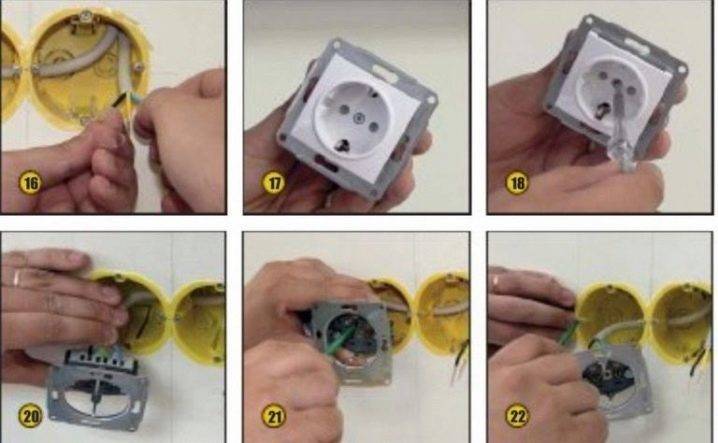
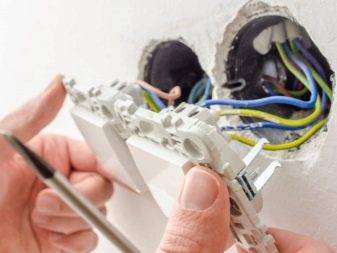
- The wires are removed, the plugs are disconnected on the body, through which the cable is passed.
- Inserting the module is required without any extra effort. If the paws in the design do not recline, then the product must be placed sequentially, slightly bending the bracket.
- If several modules are installed, then after drilling, the partitions between the holes are cut off. Using the connector, the elements are joined and placed in the connector.
- The box is leveled, the fixing screws are screwed in. Tightening should not be too strong so as not to push through the drywall.
 The installation of the box is carried out in 2 stages and does not cause any particular difficulties even for beginners, the main thing is not to pinch the screws, otherwise the presser feet will break
After checking the level, you can connect and put the filling.
How to install a socket in the wall?
Any installation always begins with a markup, so before you install the socket in the wall, you need to correctly mark its location. We measure the required distance from the floor: sockets are usually placed at a height of 30-40cm, switches - 90-100cm, although there are exceptions. We draw a cross with a pencil and start drilling.
How to make a hole for a socket in drywall?
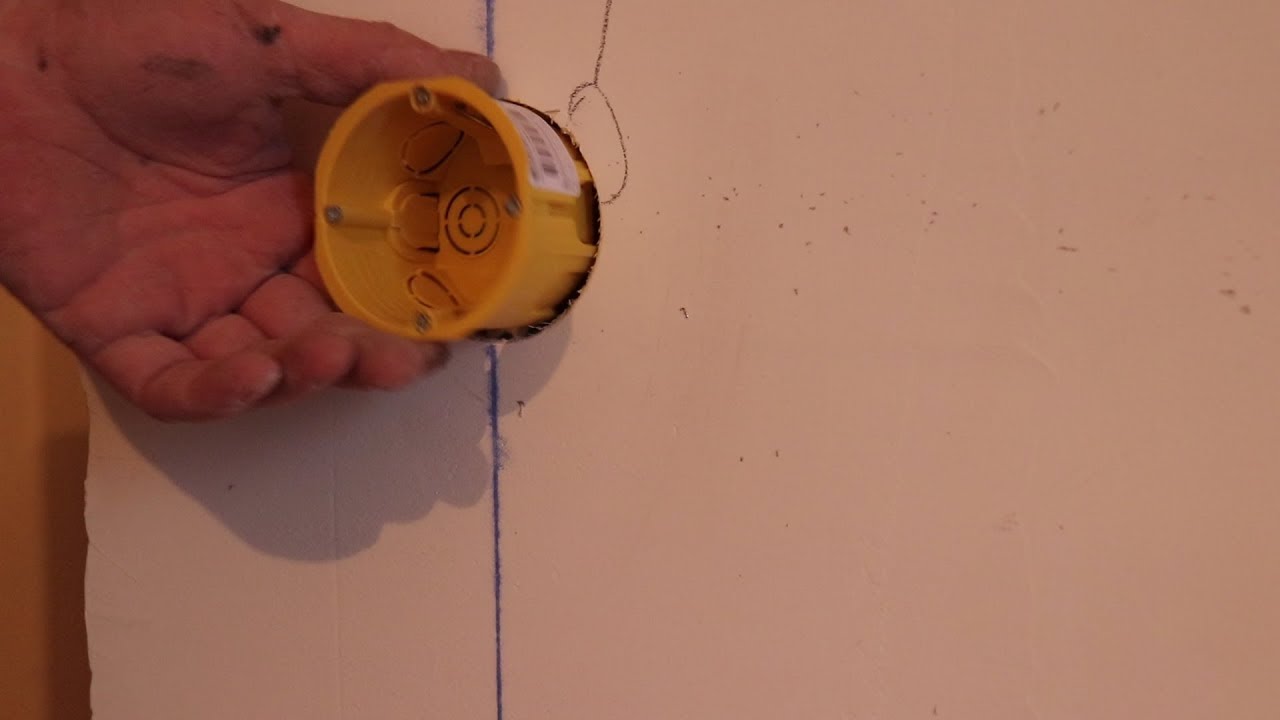
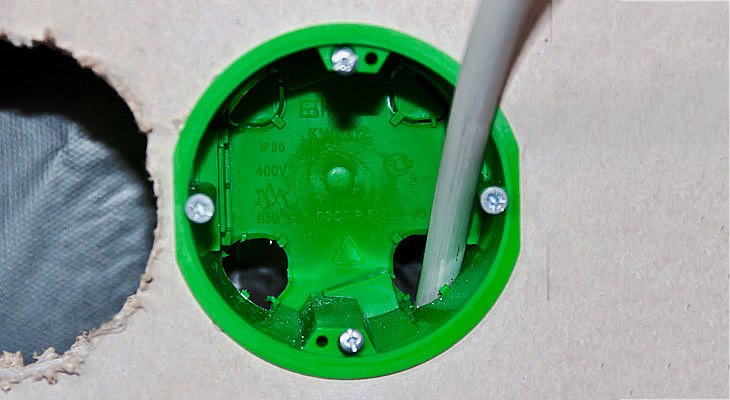
If you plan to install a socket on a drywall wall, then we take a hole saw with a diameter of 68 mm and drill a hole. Then we insert the socket into the wall and fix it. To do this, we twist the screws, and they, in turn, press the socket box against the drywall sheet with the help of paws.Sometimes a chamfer is made in the resulting hole to slightly deepen the socket. If this is not done, then the outlet may not stand close to the wall.
How to make a hole for a socket in a wall of plaster, brick and concrete?
To drill a hole in a solid brick or plaster wall, you need a special crown for concrete. It is inserted into the puncher and drilling is performed. In this case, it is desirable to use a combined chiseling and drilling mode. You can drill a hole in a wall of plaster or brick using a simple puncher.
The technology for drilling a hole for a socket in a concrete wall is performed in the same way as in plaster or brick. However, this will require a more powerful puncher.
What to do if there is no crown?
How to install a socket in the wall without this crown? Very simple! We circle the box with a pencil and start making holes along the contour using a perforator. Then we insert a pike or spatula into the puncher and begin to connect the holes. Thus, the recess we need is hollowed out. We take the socket and try it on: it should be flush with the wall or it can be slightly recessed. If it bulges out, you need to hammer it further. When the recess is ready, we fasten the socket to the wall with using a dowel and a screw.
It is not difficult to cut a hole for a socket in drywall without special tools. To do this, holes are made along the marked circle with a small drill, and then a hole is cut with a saw from a hacksaw for metal.


How to get the wire into the socket?
Before you install the socket in the wall, you need to make a hole in it for the wire.The holes are already marked on the body of the socket, so you just need to cut out the excess with a knife or carefully break it out. You need to cut from the side from which the wire will come in. Then everything is simple: we start the wire so that it is exposed to 15-20 cm.
How to cover the socket in the wall?
The hole that is hollowed out in the wall is always slightly larger than the socket itself. Therefore, after installation, you need to cover it around it. In addition, something will also be required to fix the socket in the recess. For this, any dry mix on a gypsum basis is suitable. I prefer to use alabaster for a number of reasons. In many building stores, it is sold in small packages - 1-3 kg. It costs 20 - 40 rubles. Nothing by today's standards. The total curing time is approximately ten to twenty minutes, which allows you to quickly use the outlet or switch.
How to put the sockets exactly?
The technique of fixing the socket box in the recess with the help of alabaster is very simple. Having prepared a mixture of water and alabaster, we apply it inside the recess, and then we need to press the socket box there. Further using a level, rules or a metal corner, we align the plane of the socket with the plane of the wall.
How and when to make holes in the plasterboard
It is necessary to know in advance exactly where the power cables are connected. You can make notes in advance on a sheet of drywall, so that later you know where to make a hole. It is best to put a cross, which will indicate the center of the future hole.
A drill with a special crown will quickly and accurately drill the required hole. You need to hold the tool evenly and perpendicular to the drywall wall. However, there are some nuances.This scheme is good when it comes to interior partitions, because they have enough space due to the frame to fit the socket box.
There should not be a profile at the socket level. Usually, the installation depth for the socket box is 45 mm. If the drywall frame made is very small, then installation will not be possible without drilling the wall. I am glad that most often people already make the correct frames from metal profiles so that they do not have to hammer the wall.
If the profiles were not used (glue or foam was used for mounting the GKL), then you will have to ditch the drywall in order to run the wires. In this case, the process will be no different from installing an outlet in an ordinary wall.
Here's how to make a hole in drywall for an outlet.
A hole can be made not only with a crown. With the help of a compass, a circle is drawn on the sheet, indicating place for a hole. Then, with a drill with a conventional drill, holes are made along the inner border of the circle. Next, the core is carefully cut out with a knife, and the protrusions are trimmed with the same knife. The hole will come out a little clumsy. However, you do not need to buy a crown, and all the irregularities will be hidden by the rosette.
Installing sockets in drywall with such a simple hole will not cause additional problems. Fixation will be successful if the hole is the right diameter, despite the fact that the circle is not perfect. Regardless of how the hole was made, it is necessary to chamfer the circumference with a knife. The glass should fit snugly into the hole, and not stick out of it.
Tips
In order for the installation of sockets in drywall to be carried out as correctly as possible, it is advisable to adhere to the following recommendations:
- Take into account the presence of an empty space between the drywall and the main surface of the wall (it must be at least 4.5 cm and the glass must be freely placed in the base). You can deepen the base base with a puncher or chisel.
- Even at the stage of mounting the structure from the GKL, at the place of the planned installation of the socket, it does not interfere with the wiring to be brought out with a margin of 20-30 cm.
- When installing several devices, use the building level for the correct marking and installation of sockets.
- It is necessary to conduct electrical wiring inside the structure only in the protection of electrical wires from possible mechanical influences (in a corrugated hose) in order to minimize their damage during installation or operation.
- It should be borne in mind that when creating holes, you can come across a metal profile on which the GKL is based. To prevent this from happening, use a powerful magnet. Attach it to the wall, and lead along the surface, so find out if there is a metal profile behind the ceiling.
- If nevertheless there was contact with a metal structure, then one should not despair. Since there is no need to move the holes for the sockets to another place. A fragment of a profile that impedes work is cut off with iron scissors or knocked out (bended) with a simple chisel.
When making repairs, you, most likely, thoroughly calculated everything. But after a certain period of time, it may be necessary to install an additional switch, you will need to hang a picture or change the location of wall lamps. And then chaotically laid wiring can be a fundamental problem.Since a puncher or an electric drill can safely damage hidden electrical wiring and make a short circuit. To avoid such surprises, position the electrical wiring parallel to the floors, adding a few 90 degree turns. It is desirable to fix the laying scheme: sketch a plan, sketch, or just take a picture at least on the phone. Then in a few years, you will be able to drill walls at any point without obstacles and doubts. without any undesirable consequences for electrical wires.
Mounting an outlet in a drywall wall is quite simple and can be done with your own hands. Following all the above recommendations, such a procedure as installing electrical outlets in a gypsum board wall will be implemented most correctly and as soon as possible.
About, how to choose and install socket box in drywall, see the next video.
What to look for when buying
The following factors are taken into account when choosing a socket:
- Material. Due to the fact that the fastening technology involves a built-in installation, the products should not melt or ignite when heated. Electrical wiring is prone to fire, especially at the junctions, so it is better to give preference not to cheap plastic parts, but to products made from propylene or other non-combustible materials.
- The correctness of the form. Poor-quality products may have distortions and displacements of the walls, which does not allow the socket to be inserted correctly into the box.
- Screw movement.To securely attach the installation module to drywall, the screws must attract the tabs well, preventing slipping or scrolling.
- Availability of quick release plugs. A pre-drilled hole for the cable eliminates the need to shape it yourself.
- The ratio of the dimensions of the box and the socket. In order to supply all parts without complicated fitting, it is better to give preference to one manufacturer.
- The ability to use a connector. This part allows you to quickly get a double or triple block by docking single boxes.
 Among the variety of drywall sockets, round models are considered the most functional, since most of them have special connectors that allow you to collect blocks with unlimited sizes.
Quality products must have the necessary safety and compliance certificates.
Installation of a socket in a concrete base
If you have already decided where you will have sockets, you can proceed with the installation work, which consists of several stages.
Before installing the socket in concrete, markings are made, then a hole is made in the wall and a gypsum mortar is prepared.


Step 1 - markup on the wall
The sequence of markup work is as follows:
- measure with a tape measure the distance from the floor to the intended installation location of the socket;
- if the flooring has not yet been laid, then you need to add another 5 cm;
- using the building level, draw two lines: horizontal and vertical with an intersection point at the place where the box will be installed;
- put the glass against the wall and circle it with a pencil.
If two or more socket boxes are to be installed, then first a horizontal line is drawn using the building level. It should be located at the distance from the floor at which the sockets will be placed.


Find the center of the first box and draw a vertical line through it. Then set aside exactly 71 mm and draw a second vertical. This place will be the center of the second glass. The marking of the following socket boxes is carried out in a similar way.

Step 2 - Punching a Hole in the Concrete
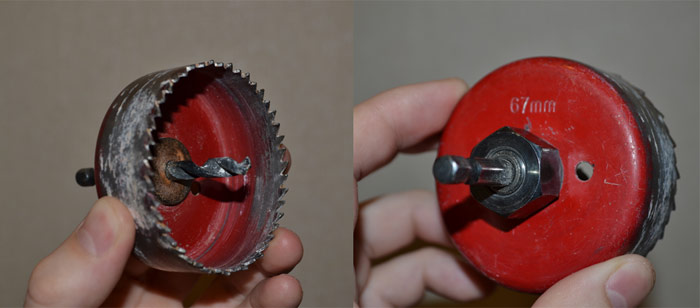
There are several ways to make holes in a brick or concrete wall. The simplest of them is with the help of a crown for concrete with victorious teeth, with which it, crashing into the wall, makes a circle of the desired size.
In the center of the crown there is a drill made of pobedit for making a central hole.
Since standard sockets have an outer diameter of 67-68 mm, a crown with a diameter of 70 mm is suitable for work. The nozzle is put on a puncher or drill, set on a marked line and a hole is made.
Then the nozzle is pulled out, and the entire remaining layer of concrete is knocked out of the hole with a chisel and hammer.

If there is no crown for concrete, then you can make a hole with a drill with a drill bit. First, a central hole is drilled to the entire depth of the nozzle, and then holes are made along the circumference line with the same drill.
The more of them, the easier it will be to gouge a hole of the desired diameter and depth with a chisel with a hammer or perforator.
Another way is to make a square hole with the help of a grinder with a diamond blade. First, the center lines are cut, and then along the entire perimeter of the socket. The process, as always, ends with a chisel with a hammer.
Step 3 - Installing the box into the wall
After the hole is made, it must be cleaned well and a socket box inserted into it for fitting. It should freely enter in width, and in depth there should be a margin of about 5 mm for the solution.
If everything worked out as it should, now you need to top or bottom part of the hole (depending on the location of the electrical wiring in the room) to make a passage for laying the wire.

The socket also needs to be prepared. We turn it over with the bottom side, where the slots for the wires are located and cut one of them with a knife. We get the wire there and insert the box into the wall to check.
To fix the glass, we prepare a solution of gypsum or alabaster, which should have the consistency of sour cream. It is worth considering that the solution of these materials hardens very quickly, and you have no more than three to four minutes to complete the process of installing the socket. After five minutes, the mixture will no longer be suitable.
Two minutes before laying the box in the wall, the hole is wetted with water. After the liquid is absorbed, a layer of gypsum is applied to its walls with a spatula. A wire is threaded into the glass, its back part is also smeared with a solution, and the socket is inserted into the hole.
Adjust the position of the box so that its edge is flush with the wall and the screws are horizontal.

Step 4 - combining several sockets
How the marking of two or more socket boxes is performed was described above. Making holes is done in the same way as for a single box. The only difference is the need to combine the holes with each other. This can be done with a chisel or grinder.
Before installation work, the socket boxes must be docked with each other using a side fastener. Installation into the wall is carried out similarly to the installation of a single glass.
An important point that you need to pay attention to when attaching a block of boxes is the strict alignment of the socket boxes horizontally while they are fixed in the wall with a gypsum mortar. It is necessary to carry out this part of the installation only with the help of the building level.

Conclusions and useful video on the topic
You can see how the socket boxes are installed in a concrete wall in the following video:


The whole process of mounting the block of sockets in drywall is described in detail in the video:
Installation of a plastic lining on the plinth is shown in the video:
To find out how the socket boxes are installed in the tile, watch the video:
p> Installation of socket boxes, although at first glance it seems very simple, but has its own difficulties and nuances that must be taken into account during operation, so that after a while you do not have to re-dilute dirt and reinstall loosened devices.
The durability and external type of socket or switch.
Did you put a socket box in a concrete or brick wall at home with your own hands? Or maybe they mounted a socket in drywall? Share your experience, tell us about the difficulties that arose during the installation process. Many beginners will need your advice - leave your comments below this article.


