- Mounting the exhaust fan timer
- Fan with built-in humidity sensor
- Scheme of arrangement of natural ventilation
- How does air get into the bathroom?
- Where does the steam and smells from the bathroom go?
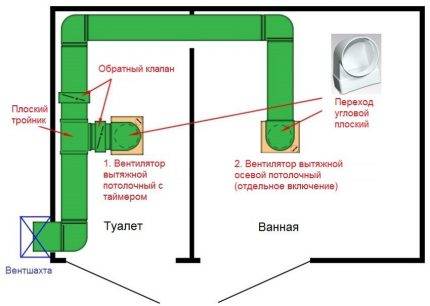
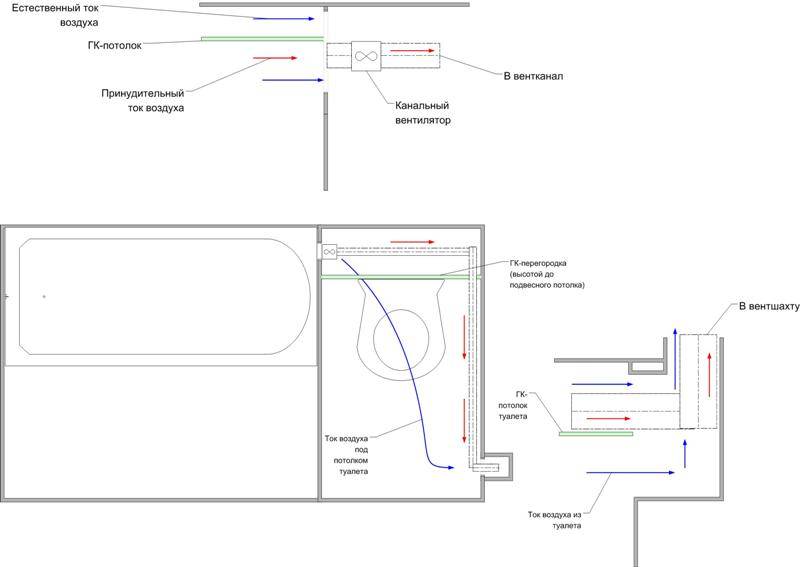
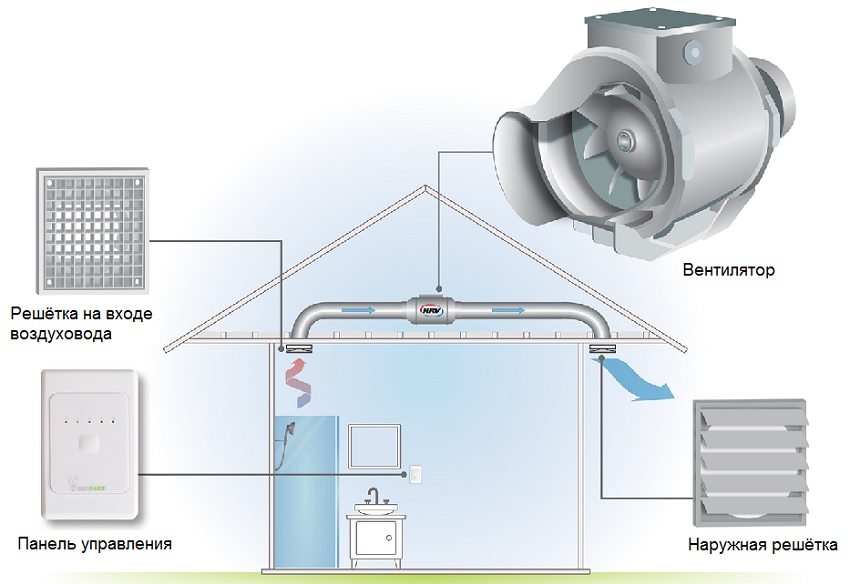
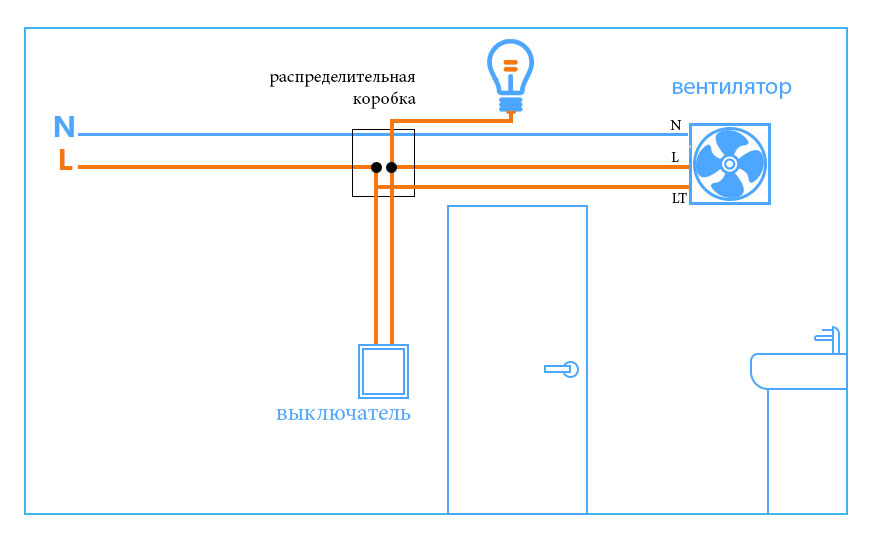
- Ventilation device for two rooms
- Fan installation procedure
- Determination of the optimal connection scheme in the bathroom and toilet
- Features of mounting the hood
- bathroom ventilation requirements
- What is the difference between forced ventilation and natural ventilation?
- Connection via two-gang switch
- Finally
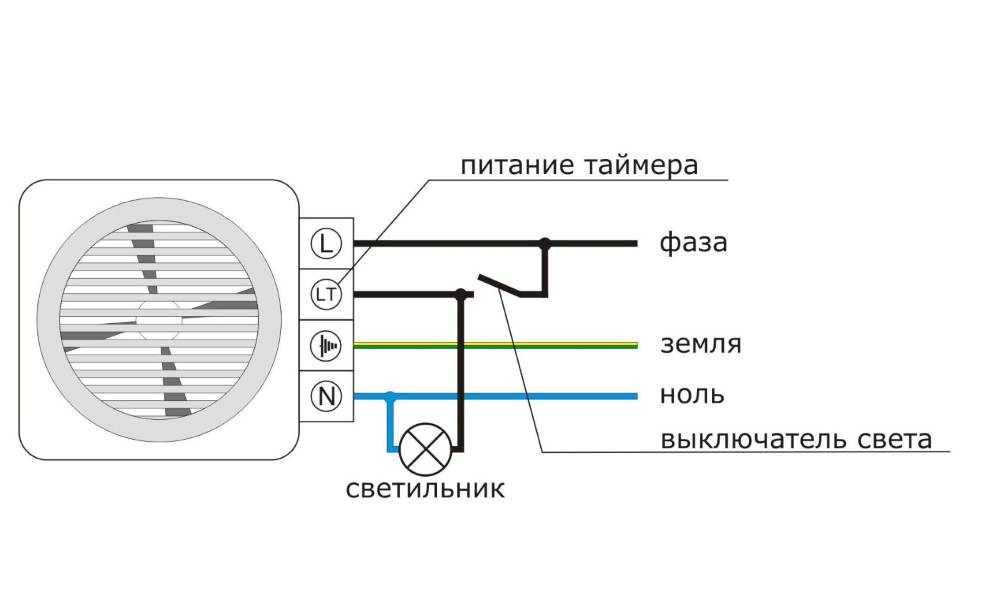
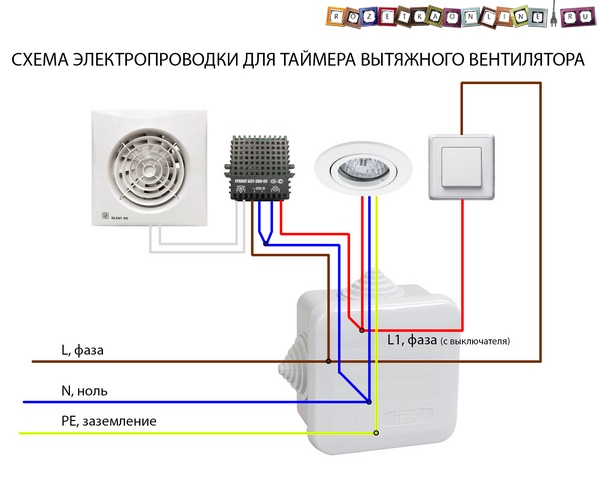
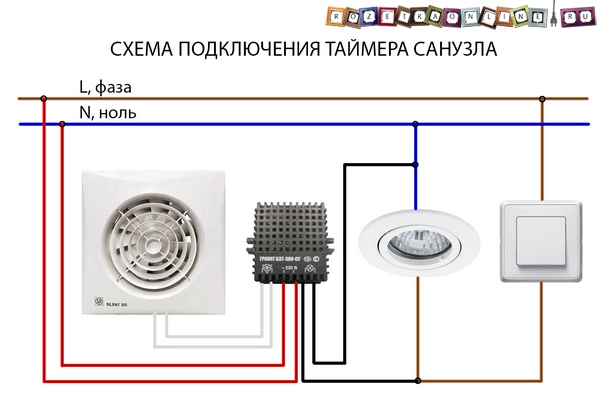
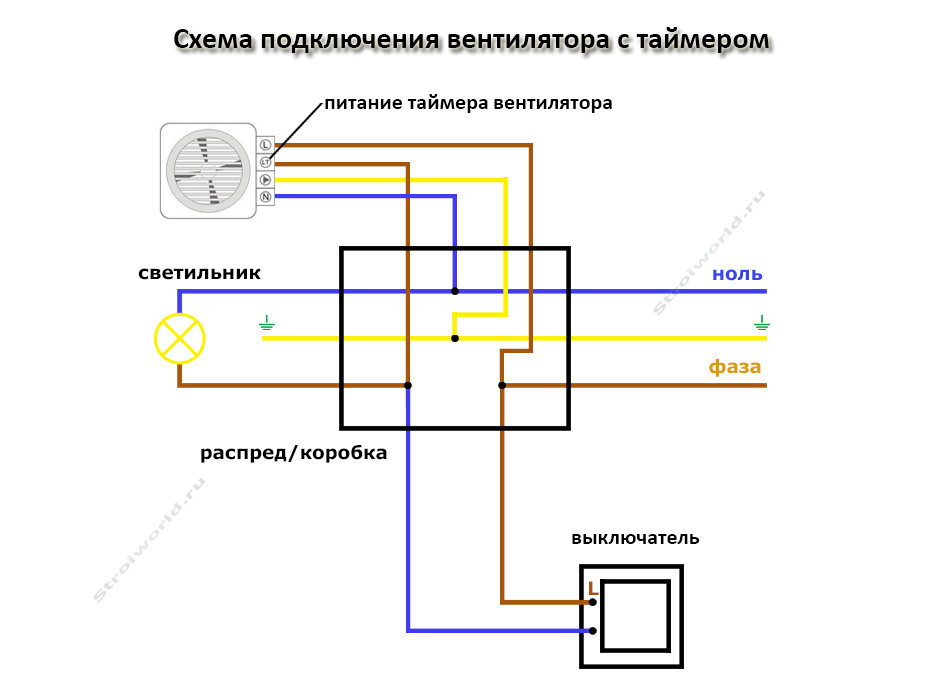
Mounting the exhaust fan timer
So, the first thing to do is to turn off the electricity supply to the installation site with the appropriate circuit breaker in the electrical panel.
Now we are preparing the timer for connection according to the scheme indicated above. Since the wires of the device are stranded, it is most convenient to use WAGO clamp terminals for installation.
First of all, we connect one red and one black wire together, placing them in one terminal socket - these will be the contacts for connecting a common zero.
Now we connect the timer to the power cable, according to the diagram. It should turn out like this:
RED remaining free wire - connect to PHASE
BLACK remaining free wire - connect to the PHASE coming from the switch
COMBINED RED AND BLACK wires - connect TO COMMON ZERO
The remaining TWO WHITE wires are connected directly to the exhaust fan.
Since the wires are quite short, they need to be extended.
Details about installing an exhaust fan, we have already written HERE. The timer itself, most often, is hidden behind the fan, in the ventilation duct.
After the connection of the timer is completed and the fan is installed, you can turn on the power supply and check the operation of the timer. This completes the connection.
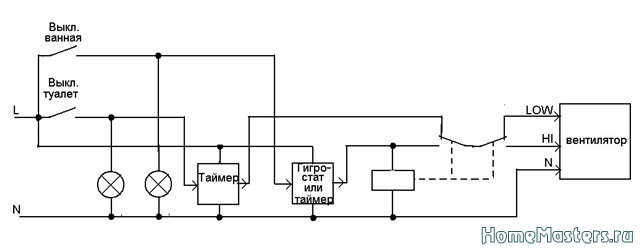
Fan with built-in humidity sensor
There are 2 ways to connect appliances equipped with a humidity sensor. One of them is designed for automatic operation.
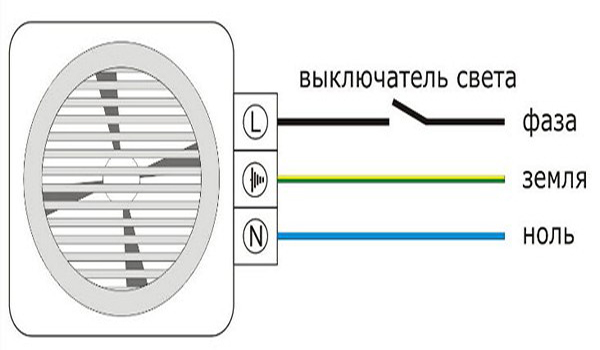
- Zero is applied to the N terminal.
- On L - phase.
- The fan is connected both through the switch and directly.
The appliance will operate continuously if the humidity in the room remains above 60%. If it drops to 50%, the device turns off. In this mode, the timer is not activated.
The second version of the connection scheme implies an extended mode of operation. As in and in the previous version, a phase is applied to L, and zero to N. A jumper is installed between terminal 1 and L, on which the switch is mounted.
When the circuit is closed, the device turns on and works for a certain time, provided that the humidity is below 50%. If it is higher, the device will continue to work until the moisture level drops to normal levels. Only then does the timer start.
Scheme of arrangement of natural ventilation
For the effective operation of the natural ventilation system in a country house, it is necessary to organize the inflow of fresh street air and the outflow of air masses through the ventilation shafts. In a house with wooden windows, fresh air can seep through microscopic cracks in the frames.


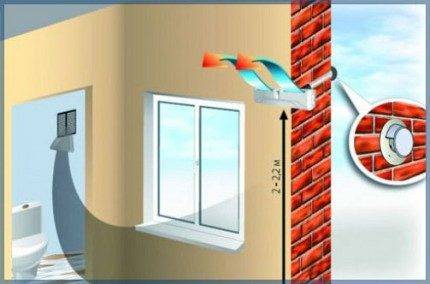
The optimal height of the ventilation inlet valve in the outer wall of the house is considered to be a distance of 2 to 2.1 meters. It is advisable to install climatic valves for a regular influx of outdoor air into plastic windows with multi-chamber double-glazed windows. These devices on windows can be replaced by supply valves installed in load-bearing walls under window sills above radiators or on the side of window openings.
At the same time, cold air flows coming from the street will be mixed with warm air heated by batteries. This means that unpleasant and dangerous drafts will not appear in the house.
How does air get into the bathroom?
Portions of new air enter the bathroom from other living quarters of the house through a 2-2.5-cm gap between the floor and the door leaf, provided for when installing the door to the bathroom. Another option for air to enter the bathroom is to purchase and install special doors, in the bottom of which there are ventilation holes in the form of grilles or round windows. Sometimes, for these purposes, the bathroom door is not tightly closed, especially when it is not being used.
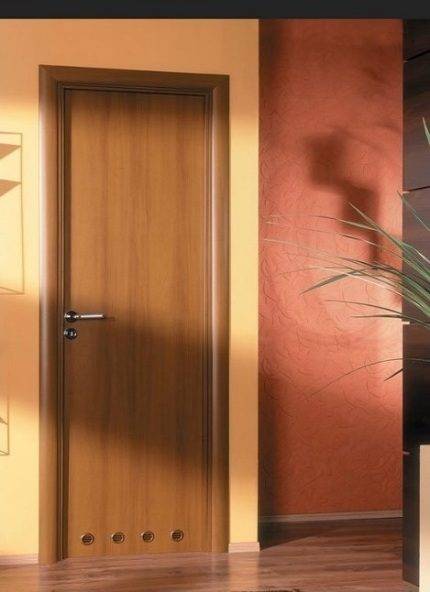 Interior doors for the bathroom, equipped with four round openings, closed with decorative lattice elements
Where does the steam and smells from the bathroom go?
The exhaust ducts are ventilation shafts directed vertically upwards.The bathroom should have its own separate ventilation duct, the side exit to which is designed at the top of the wall in the sanitary room.
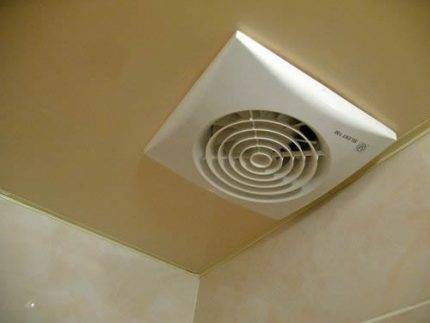
Direct access to the ventilation duct is cut directly into the ceiling of the bathroom. It is in these channels that steam is drawn in, as well as all extraneous odors. The ventilation window is closed with a decorative grille. In no case should ventilation windows be sealed with wallpaper or other finishing materials.
With proper installation of natural ventilation in the bathroom, there will be dry air. Due to the timely removal of moist air, you will not face the problems of mold and rotting of the materials from which your house is built.
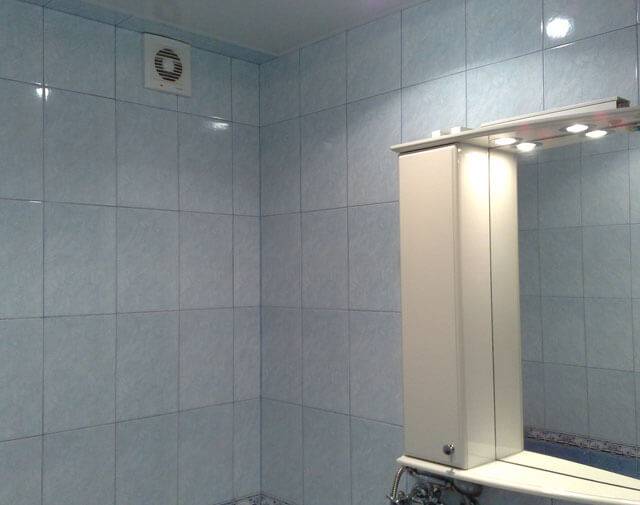
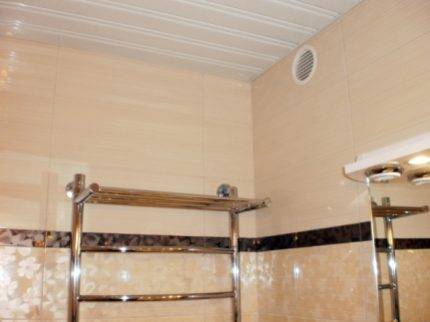 The ventilation window in the bathroom wall has a round shape and is covered with a light decorative grille to match the white ceiling.
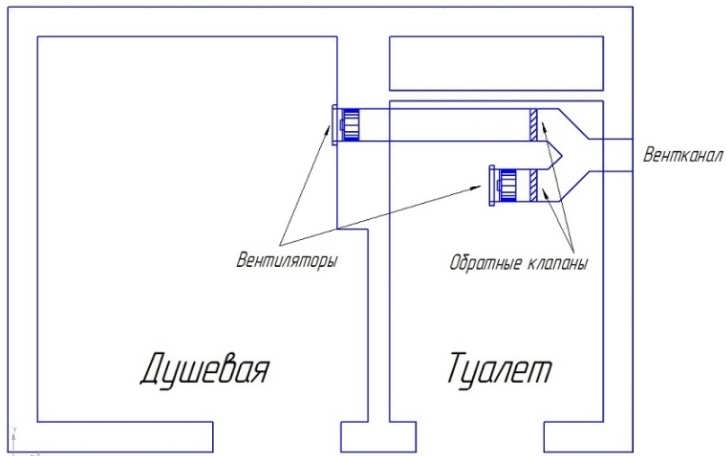
Ventilation device for two rooms
In a two-story cottage house, through the ventilation shaft coming from the bathroom located on the first floor of the object, it is possible to organize air exhaust from the premises on the second floor.
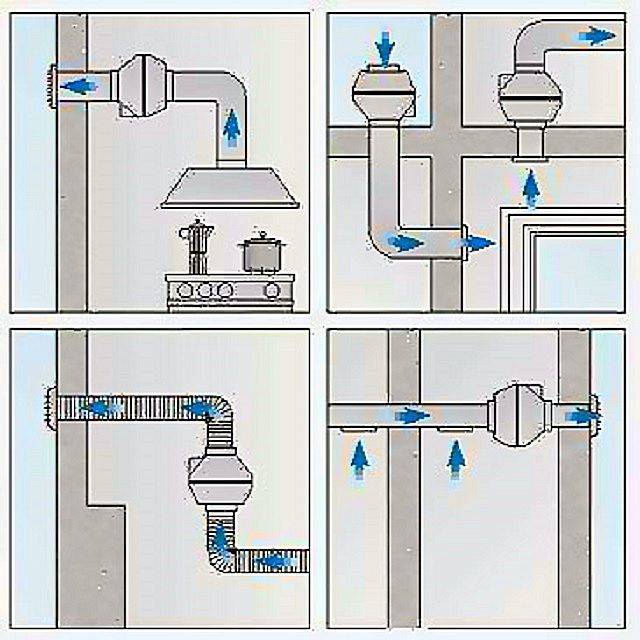
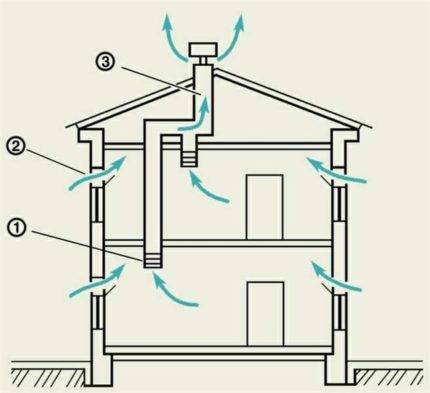 At the same time, they cut into the ventilation duct not immediately at a right angle, but through a small elbow, part of which runs parallel to the exhaust riser.
It turns out that air is drawn in through a hole located below the entrance to the ventilation shaft. This is done in order to prevent suction of the elongated moist air from the bathroom into the living room on the second floor.
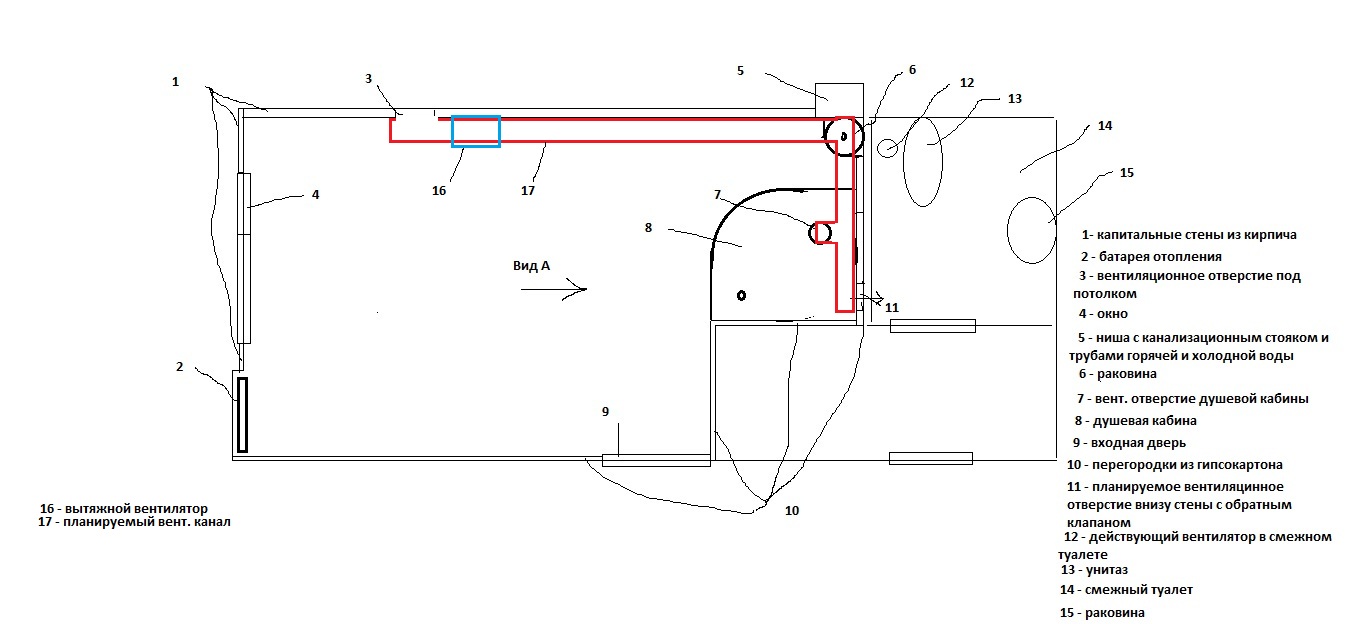
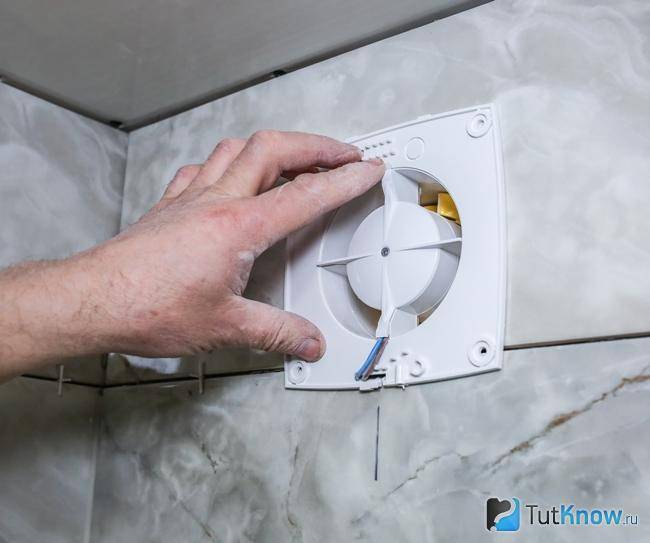
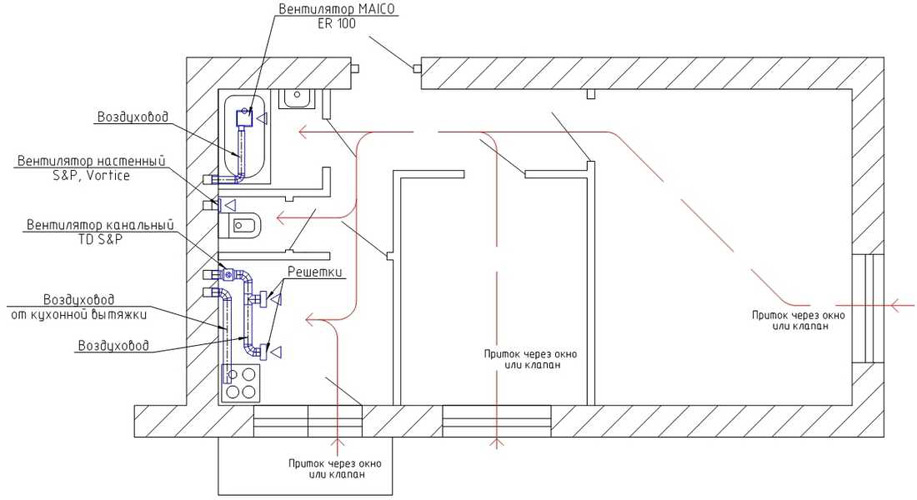
Fan installation procedure
As in any construction work, the ventilation system must first be designed.It is better to do this at the very beginning of the bathroom renovation in order to be able to hide all communications in the walls and under the ceiling.
If we are talking about a bathroom in an apartment where there is already a hole in the wall into a common ventilation duct, you just need to turn natural ventilation into forced ventilation. To do this, it is enough to determine the model of the fan and the scheme for connecting it to electricity.
 The exception is apartments in which the ventilation shaft is adjacent to only one of the rooms of a separate bathroom - a channel will be required there
In a private house, you usually have to build a system from scratch, leading the ventilation pipe to the street through the roof, less often through the wall. In this case, it is necessary not only to think over everything, but also to draw up a plan, according to which it will be convenient to count the necessary materials and carry out installation.


It is worth checking the presence of natural draft in the existing mine, and in case of its complete absence, contact the ZhEK for cleaning. For effective air exchange, it is better to place the hood opposite the door or the flow valve, if any.
The next step is to buy everything you need. It is even worth buying in advance what will be installed at the very end of the repair, because another fan model may not connect to the wires already connected.
Having figured out how to connect the purchased fan and choosing a ventilation scheme, you can start repairing the bathroom.
During the decorative finishing of the walls and ceiling, wires are laid in corrugated insulating tubes, if necessary, a ventilation duct is constructed and the size of the hole for the fan is adjusted. Wiring and installation of switches are also carried out at this stage.
 An alternative option, available only in a private house, is the installation of a duct fan. During its installation, only a special plate is screwed to the wall, and the main body with the engine snaps into the side fasteners.
The fan itself is installed after finishing. The installation order is:
- Make sure that the wires for the fan are de-energized.
- Remove the front panel, insert the case into the hole and mark the mounting points on the tile with a marker.
- Drill holes with a drill with a drill bit for ceramics, hammer dowels into them. This stage can be neglected completely or only a part of the provided fasteners can be used. Plastic fans weigh a little, usually liquid nails or polymer glue are enough to fix them.
- Even when mounting on self-tapping screws, the perimeter of the fan housing must be smeared with silicone or another polymer to absorb vibrations and prevent noise.
- Insert the body into the hole, check by level (for models with a square face) and press firmly until the sealant sets.
- Connect the wires to the terminals of the device and fix so that there are no bare areas left.
- Turn on the ventilation, check the operation in all provided modes.
- Install front panel.
This order is universal, suitable for overhead fans of any model. It also does not matter whether the fan is installed in the wall or in the ceiling - only the installation of duct models differs.
 Some models have a control board with the ability to set the operating mode for the bathroom or toilet, as well as setting the timer
If the fan design includes a timer, hygrometer, mode switch or other equipment, do not forget to set it before the decorative panel is put on.
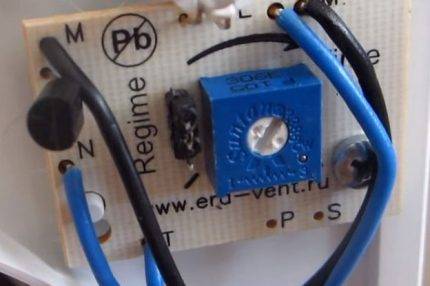
Often, from the factory, the timer adjusting screw is turned to a minimum - select the required duration of work experimentally.
There may also be a mode switch that looks like 3 or 4 metal pins with a removable jumper on two of them.
In the "toilet" mode, the fan starts immediately, at the same time as the light is turned on, and runs for the time set by the timer. In the "bathroom" mode, the start signal is to turn off the lights, so noise and drafts will not disturb you in the shower.
 After adjusting and adjusting don't forget to close openings on the cover to protect the board from moisture, if provided by the design
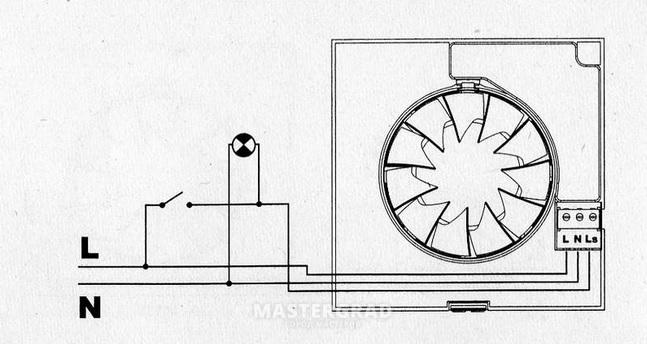
The built-in hygrometer can be set to a certain level of humidity at which the fan will start.
Determination of the optimal connection scheme in the bathroom and toilet
As practice shows, ordinary apartments in a new building need a more powerful system than natural ventilation from a bath through a toilet. In this case, a significant part of the moisture remains inside the dwelling. A bath without ventilation can only be in private homes when there is a window in the bathroom. The use of a forced system provides for the need to select the optimal operating mode of the hood.
Often, the fan is connected to a light switch, which allows you to orient the operation of the device according to the time a person spends in the bathroom. However, this is not always enough, so a separate switch is equipped for the fan.As practice shows, people often forget to turn on / off the equipment. The most optimal solution in this case is the introduction of a humidity sensor into the ventilation circuit. This makes it possible to transfer the device to offline mode.


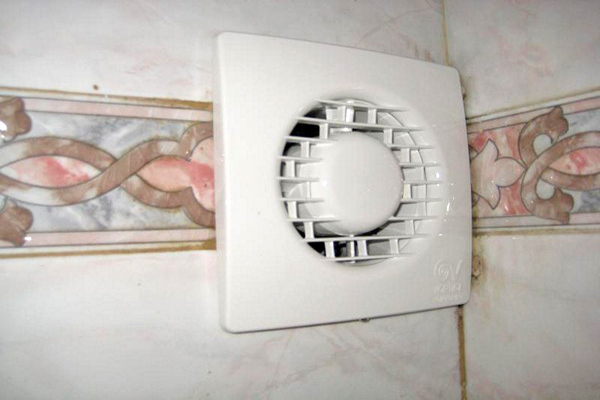
Features of mounting the hood
 Before proceeding with the installation of the ventilation system in the bathroom or toilet, you need to determine the location of the exhaust fan. The design of the hood should be placed opposite the door in the upper part of the wall or on the ceiling. In this case, you need to worry about the presence of electrical wiring, of course, if the fan is not equipped with a battery. After choosing a convenient place, you can proceed to the installation, during which experts advise adhering to the following recommendations.
It is better to mount ventilation for a bathroom or toilet during the repair process in an apartment.
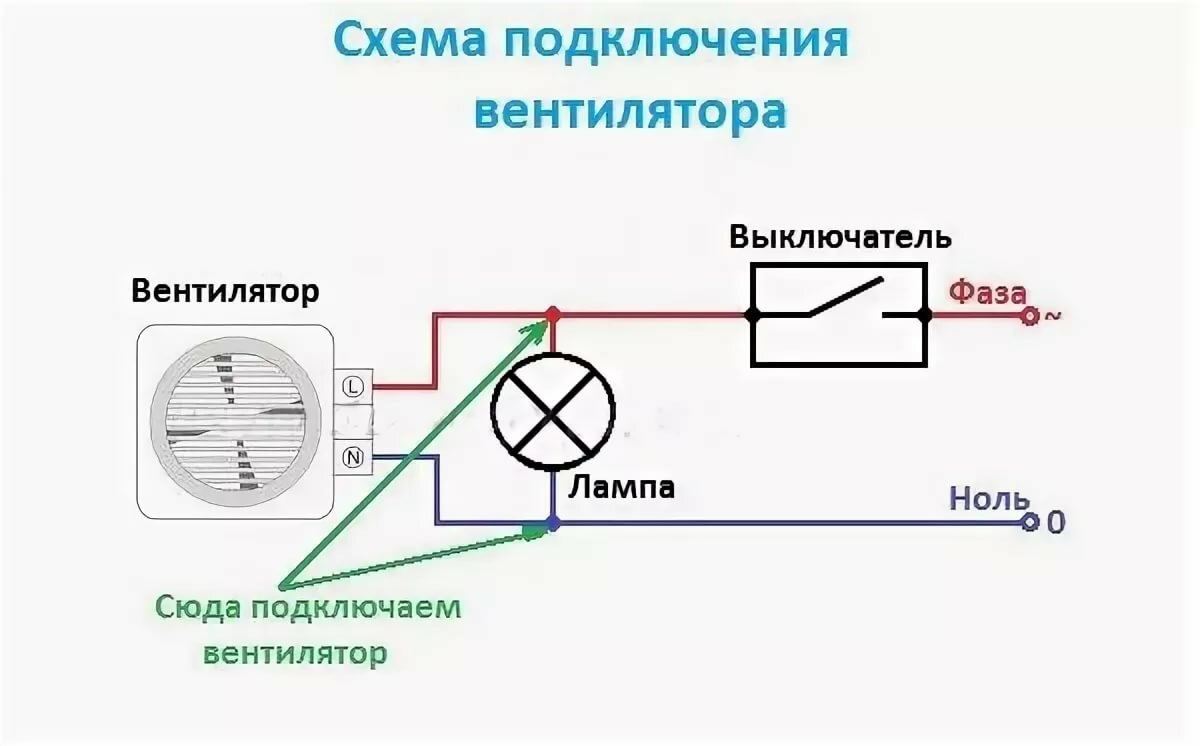
It is better to connect the fan from the light switch.
The wiring going to the fan can be hidden in the strobes.
To greatly simplify the installation process and protect the fan from external influences, a plastic pipe is inserted into the hole in the wall, which is easily fixed with cement mortar
But before that, you need to connect the device.
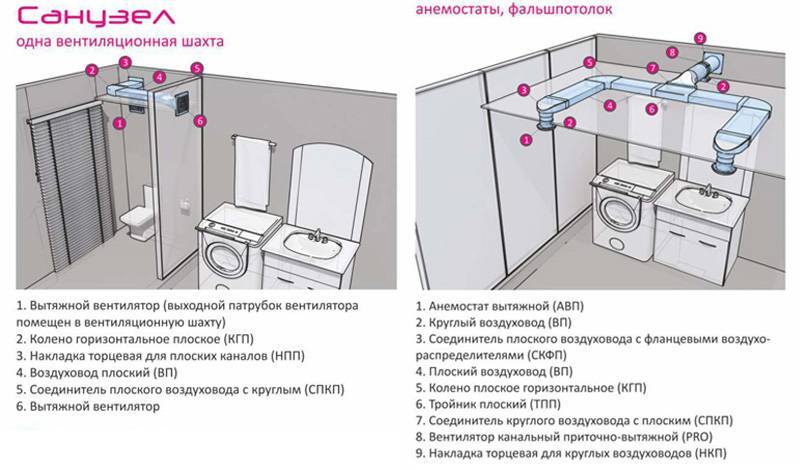
If the ceiling height in the bathroom or toilet is sufficient, then you can use a more functional, albeit complex ventilation structure, built using plastic boxes, fixing the device itself directly above the toilet.
In the process of connecting the exhaust device, it is important to study in detail the instructions that came with the fan in order to properly connect it to the mains. The procedure for installing the hood for a bathroom or toilet should not cause any particular difficulties
To do this, you just need to dismantle the protective cover from the device, apply a special construction adhesive mixture to the body and press the exhaust device to the place prepared in advance and hold for a couple of minutes until the glue sets.
The procedure for installing a hood for a bathroom or toilet should not cause any particular difficulties. To do this, you just need to dismantle the protective cover from the device, apply a special building adhesive mixture to the body and press the exhaust device to the place prepared in advance and hold for a couple of minutes until the glue sets.
Also, during the operation of the device, it is important to clean the grate from dust and other dirt with a certain regularity. For this, a standard household vacuum cleaner or detergent and warm water will do.
bathroom ventilation requirements
About what should be an effective, practical and reliable air exchange system is said in a number of domestic by-laws:
- GOST 30494-2011, which describes what the indoor climate should be like;
- SP 60.13330.2012, which sets out the requirements and rules indicating what ventilation should be.
In addition, air exchange is mentioned in SP 55.13330.2016 and SP 54.13330.2016, but they refer to the Code of Rules indicated above.
The listed by-laws state that air exchange is necessary to maintain air quality at the required level.
It will be such if the content of harmful substances does not exceed moderate values. For example, when the amount of carbon dioxide in each cubic meter is not more than 400 cm³. An indicator of 400-600 cm³ is considered average, 600-1000 cm³ is not comfortable, but acceptable, and over 1000 cm³ is a very low air quality.
 According to the legislation, the parameters of the microclimate in the bathroom must comply with regulatory requirements. And for this, an effective air exchange system must be arranged in the room.
At the same time, when organizing air exchange in residential and office premises, including a bathroom, it should be remembered that it should contribute to the creation of comfortable living conditions.
In order to do this, the following must be supported at the required level:
- air temperature;
- the speed of air movement in the premises;
- air humidity;
- resulting temperature and its local asymmetry.
All these indicators comprehensively characterize the impact on a person of the above indicators, as well as thermal radiation. That is, the temperature in the bathroom should be 24-26 ° C, which is the optimal value. And it is guaranteed not to fall below 18 ° C, since the indicated value is considered the minimum acceptable. In this case, the resulting temperature should be in the range of 23-27 °C, and the permitted values of its asymmetry are between 17 °C and 26 °C.
 The consequence of improperly organized ventilation of the bathroom are various negative processes. For example, the appearance of mold, fungus on various surfaces
Relative humidity in the bathrooms is not regulated, but usually hoods are installed there, designed to remove air from the entire private house or apartment outside the building. What affects the characteristics of residential premises. Therefore, it must be taken into account that the humidity in the rooms where people are located should be in the range of 30-45% (in summer), and in winter it can reach 60%.


In any of these cases, the speed of air movement (optimal) should not exceed 0.15 m/s. The acceptable value of this parameter is 0.2 m/s.
In this case, significant differences in the above values are unacceptable. For example, living conditions can be considered optimal if the temperature fluctuates within 2 °C, and acceptable - with sudden changes that do not exceed 3 °C.
Temperature characteristics should also be similar throughout the height of the room. So, if the differences exceed 2 °C, then the living conditions cannot be called optimal.
 The photo shows a fungus whose spores will have to be breathed in if the ventilation system is inefficient. And this will be only one of the negative factors. Since almost everything that is used in the construction and decoration of housing releases harmful substances into the air: building materials, furniture, carpets, tiles and other finishing materials
And maintaining all the above characteristics without organizing an effective air exchange system is an impossible procedure.
What is the difference between forced ventilation and natural ventilation?
There are two types of hoods in the bathroom:
- Natural. In this case, door and window openings act as a source of fresh air. The peak of popularity of systems of this type fell on the middle of the last century. The efficiency of natural ventilation is rather mediocre.
- Forced. The core of the forced system in the bathroom is the exhaust fan in the toilet and bathroom. Communications of this type are able to provide full ventilation of the premises. This makes it possible not to release heat through open windows in winter.As a result, the necessary comfort is maintained in the room, despite the intake of portions of fresh air in sufficiently large volumes.
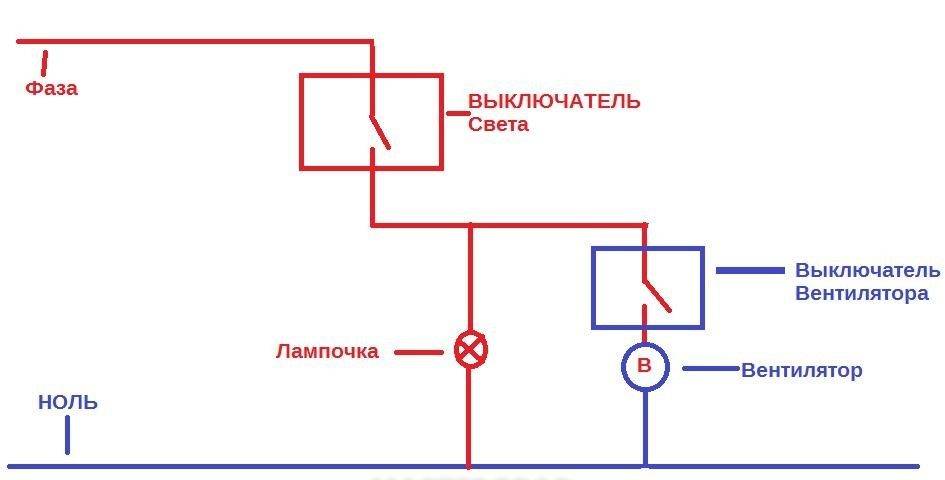
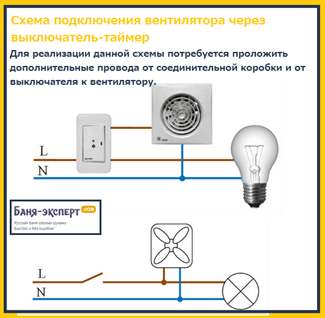
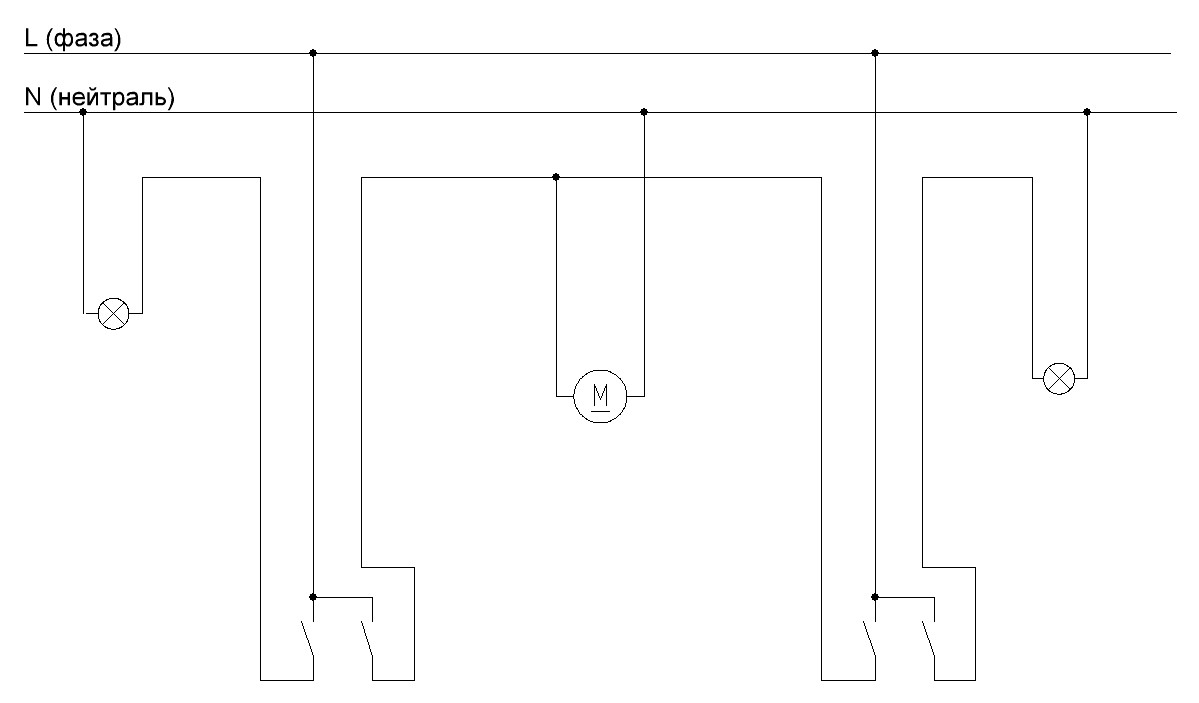
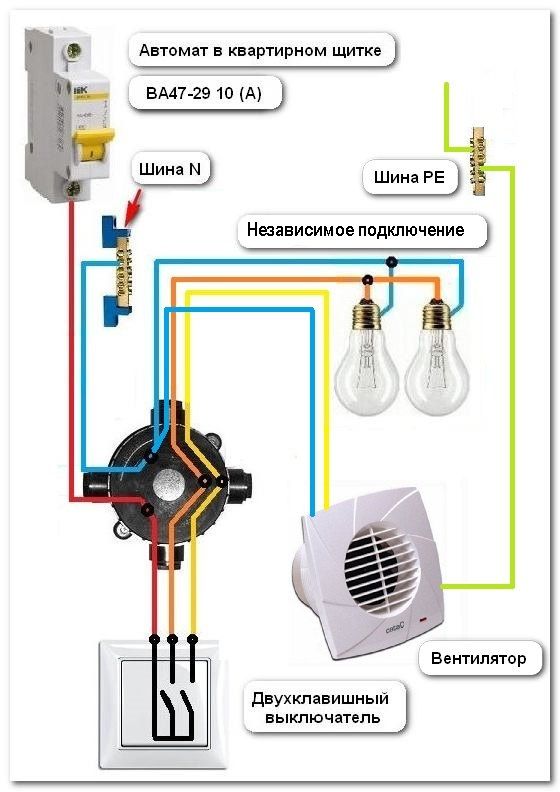
Connection via two-gang switch
Another suitable option is to connect the fan through the same light switch, but already a two-button one.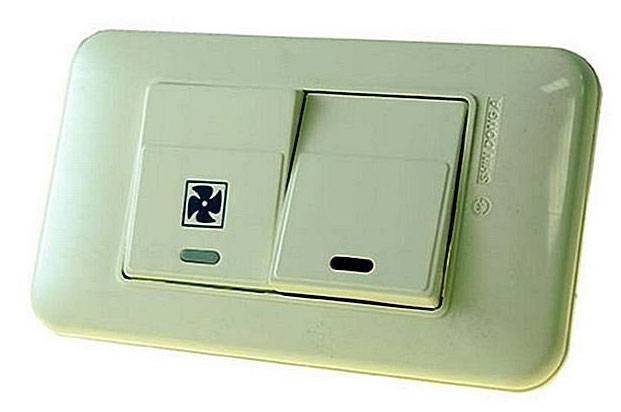
Here the diagram will look like this: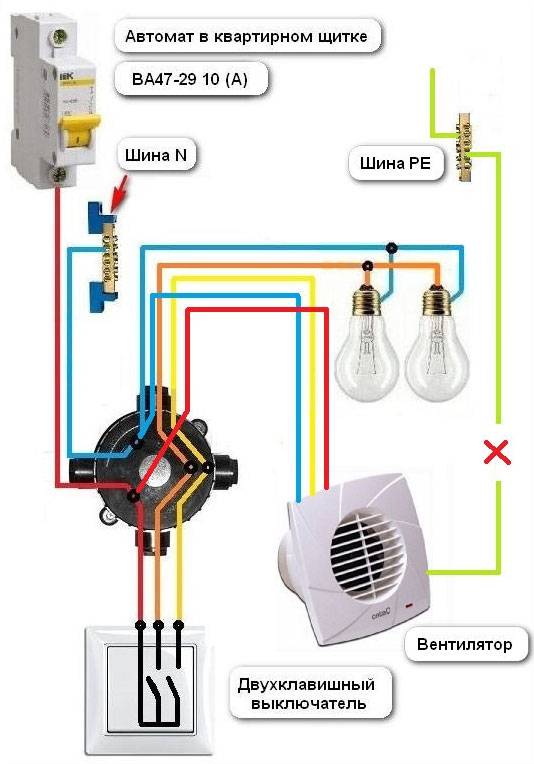
In fact, your hood will sit regardless of the lighting. But for this, most likely, you will have to change the one-key model to a two-key one. Plus, pull the extra cable from the junction box down.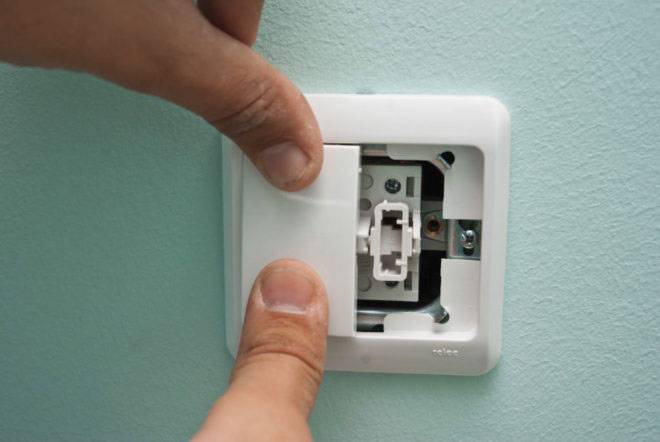
There are also "pitfalls" here. First, do not mix up the phase connection on the switch contacts.
And this happens all the time.
Secondly, do not forget that it is the phase that should break through this switching device, and not zero. Even with the correct initial connection, over time, the circuit may spontaneously change.
It is enough for some local electrician, in a common switchboard or access wiring, to accidentally swap two conductors L and N. And in your entire apartment, the “polarity” will automatically change on all switches.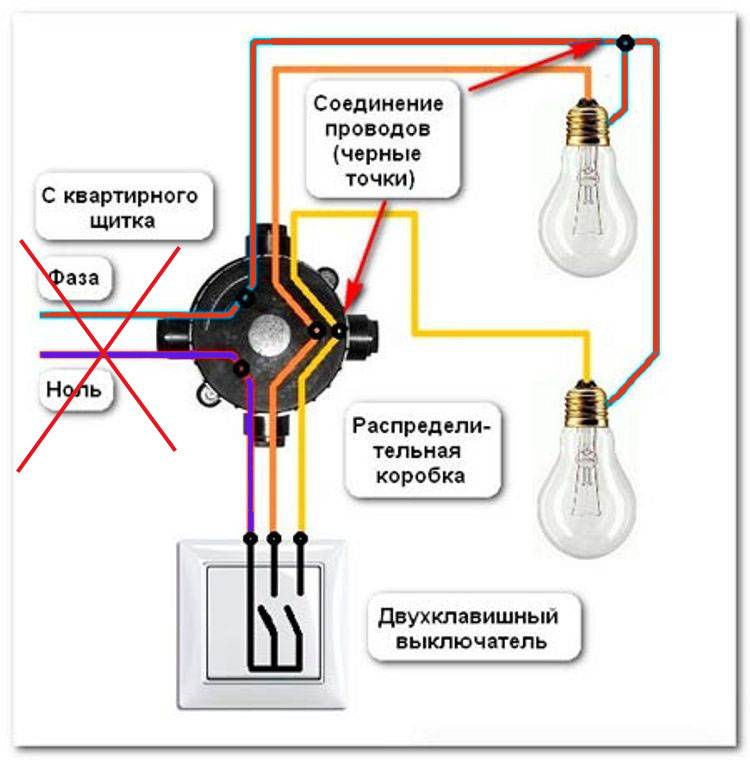
What will it threaten? Well, for example, when you turn on only one fan with the second key, you can blink, flash and go out the LED backlight in the toilet.
The effect is quite well-known for LED lamps. 
Finally
When installing the ventilation system in the house on your own, it is important to know how to properly connect the fan in the bathroom and toilet to the light switch or autonomously. This device will ensure the removal of excess moisture and the flow of fresh air, reduce the risk of mold, and also protect objects from rust.
Normalization of the microclimate will have a beneficial effect on human well-being
This device will ensure the removal of excess moisture and the flow of fresh air, reduce the risk of mold, and also protect objects from rust. Normalization of the microclimate will have a beneficial effect on the well-being of a person.

But in order for the air exchange in the room to be effective, it is important not only to choose the right fan itself, but also to choose the appropriate connection scheme, as well as to ensure the competent installation of the entire system.


