Mounting Features
The fan is connected to a two-wire wire. Remove the front panel from the device first. A strobe is laid from the switchboard to the ventilation hole. It must be strictly vertical or horizontal, without slanted lines.
The fan terminals are marked in English:
- L is the phase.
- N - zero core.
- T - to connect the signal wire. Used in models with a timer.
The veins vary in color. Zero is blue, the phase is in brown or white insulation. They must be correctly connected to the fan terminals and check the reliability of the contact. On the body of the device there are 4 holes for screws or self-tapping screws. Fasteners are included in the scope of delivery. The fan can also be mounted on tiles without drilling. Silicone glue is suitable for this. You can use liquid nails.
Ceiling installation
Ceiling hood in the bathroom
In some homes, an electric fan may be installed on the ceiling. In private houses, the ventilation duct is laid in the attic, so the ventilation system is also located there.
Installation on a stretch or suspended ceiling is more complicated. On the stretch ceiling, you will need to make a special stand, and the cooler can be screwed to the drywall using dowels. If the ceiling is already mounted, dismantling will be required. In order not to dismantle the ceilings, you can use one of two methods:
- pulling wires through a hole that will later need to be repaired;
- conduct wiring along the ceiling and hide it with a cable channel.
It is quite difficult to perform such an installation. The best option is to think over the ventilation system before repair work and prepare the place for installation in advance.
Wall Mount
The device is applied to the surface. Use a pencil or marker to mark where to drill. An impact drill or hammer drill is suitable for forming mounting holes. It is necessary to use drills with victorious soldering. After drilling holes of the required depth, plastic dowels are hammered into them.
The hood is inserted into the vent and fixed with complete screws. Then you can start connecting the device. The scheme depends on the characteristics and functionality of the model.
Wall mounting algorithm without drilling:
- The surface of the wall at the attachment point is cleaned.
- Silicone glue or liquid nails are applied along the contour
- The device is applied to the opening of the ventilation duct.
- A level is used to check the horizontal.
- The fan is fixed with adhesive tape for 2-3 hours.
The final stage is the power supply and the return of the decorative panel to its place.
Connecting the hood to electricity
This stage is the simplest. It is very good when you initially planned your kitchen, correctly laid the location of all sockets and electrical outlets.


How not to make a bunch of elementary mistakes and keep all the distances, you can find in a separate article. 
If you do not have a free outlet for the hood, you will have to mount it. For this you will need the following materials:
three-core cable VVGngLs 3*2.5mm2
In home wiring, use a cable of this particular brand (with the index Ls). 
ordinary socket for current 16A with grounding contacts
The hood itself, unlike other kitchen appliances, is a low-power device. Accordingly, it is not at all necessary to pull a separate wiring under it directly from the switchboard.
What can not be said about the hob or dishwasher. 
It turns out that you can connect this unit from a common outlet group from the nearest distribution box.
Pull a strobe or cable channel from the junction box to the place of the future outlet and mount the socket box. 
This outlet is located on top, almost under the ceiling, slightly above or to the side of the hood itself. The choice of a specific location will depend on the length of the cord and the requirement for a minimum installation height of the exhaust unit above the stove.
Often you have to cut a hole in the nearest kitchen cabinet for this case.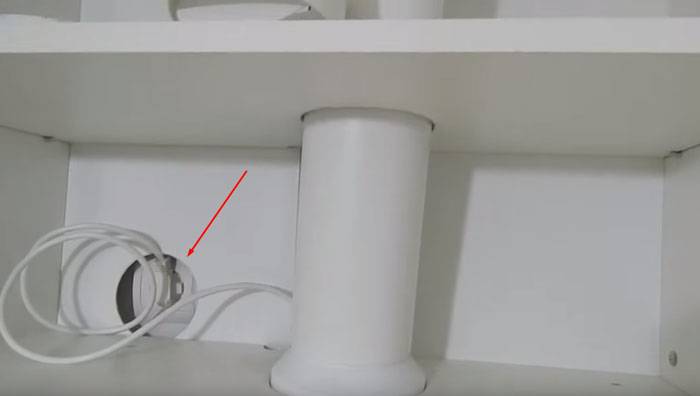
Next, remove the insulation from the cable, mark the cores and connect them together in the junction box.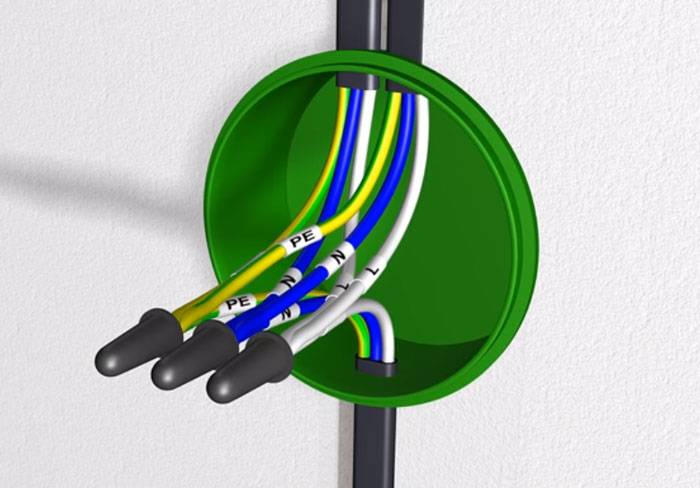
All that remains is to connect the outlet correctly.
The wiring for the kitchen unit is ready for you. Let's go to the duct.


Connection methods
Installing a future fan is half the battle, the main thing is to bring a power cable to it. If the bathroom has already been well renovated, this will be problematic. The ideal option would be to install a ventilation device at the stage of repair work, then the cable can be laid in the walls. Otherwise, you will have to come up with some kind of decorative design for it or plug it into a power outlet.
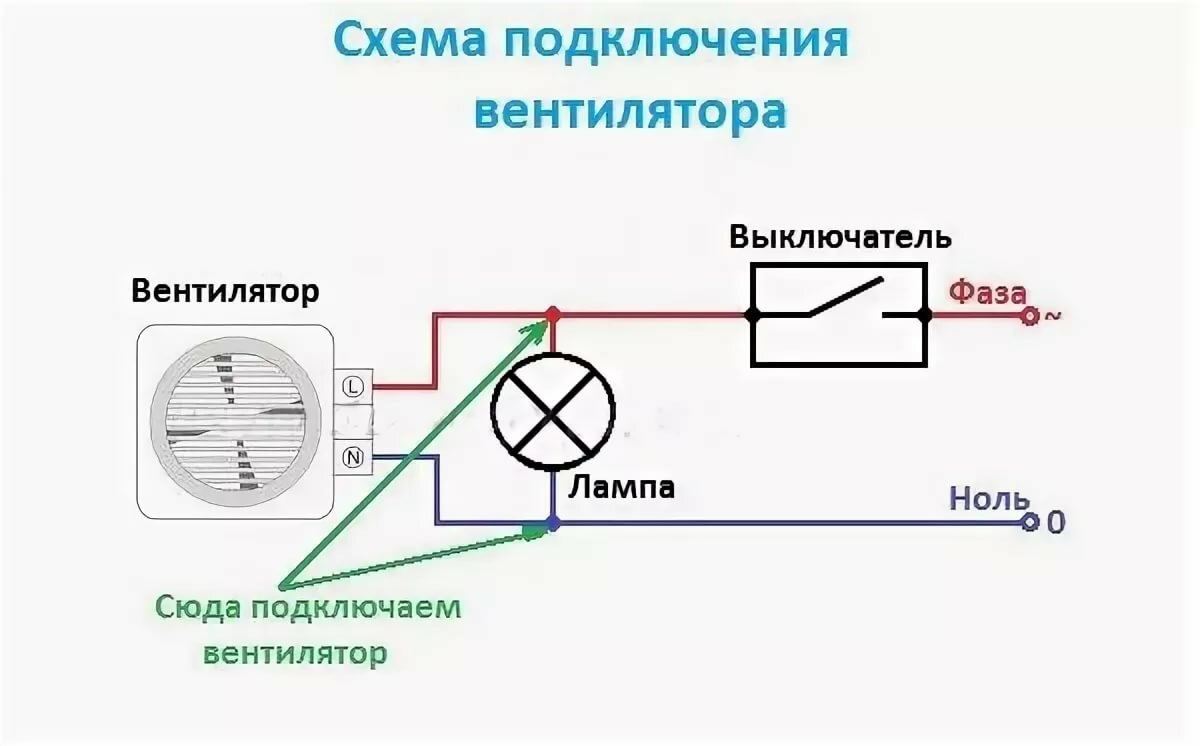
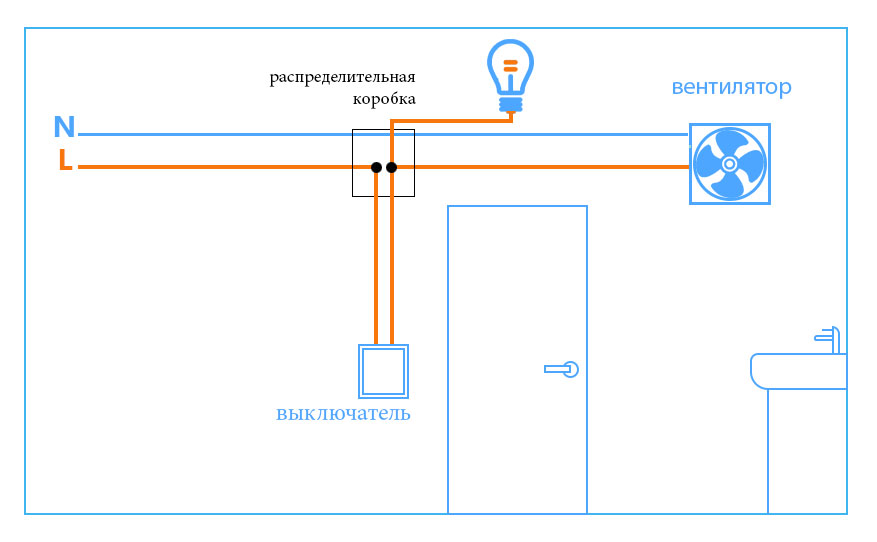
fan connection diagram in parallel with the lamp
Consider the options for connecting a ventilation device:
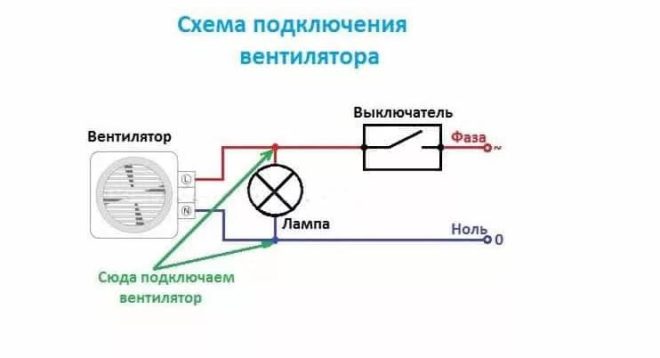
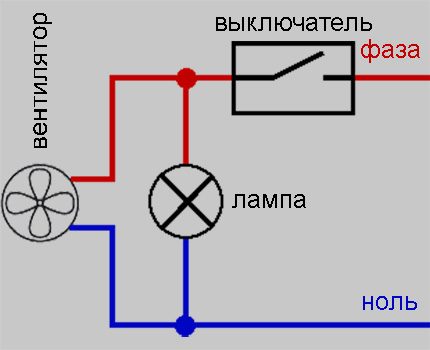
- Scheme of parallel connection of a fan with a light bulb. In this case, both the fan and the lamp will work from one switch at once. That is, the ventilation device will begin to rotate at the same time as the light bulb lights up, and will be in operation as long as the light is on. The undoubted advantage is the simple and cheap execution of such a scheme. However, there are many downsides. If the switch is off, then the fan is not working, and this is not enough to ventilate the room. You will have to turn on and additionally leave the light on for a while. On the other hand, the fan will always work when the light is on, and when a person takes water procedures, he does not need these drafts.
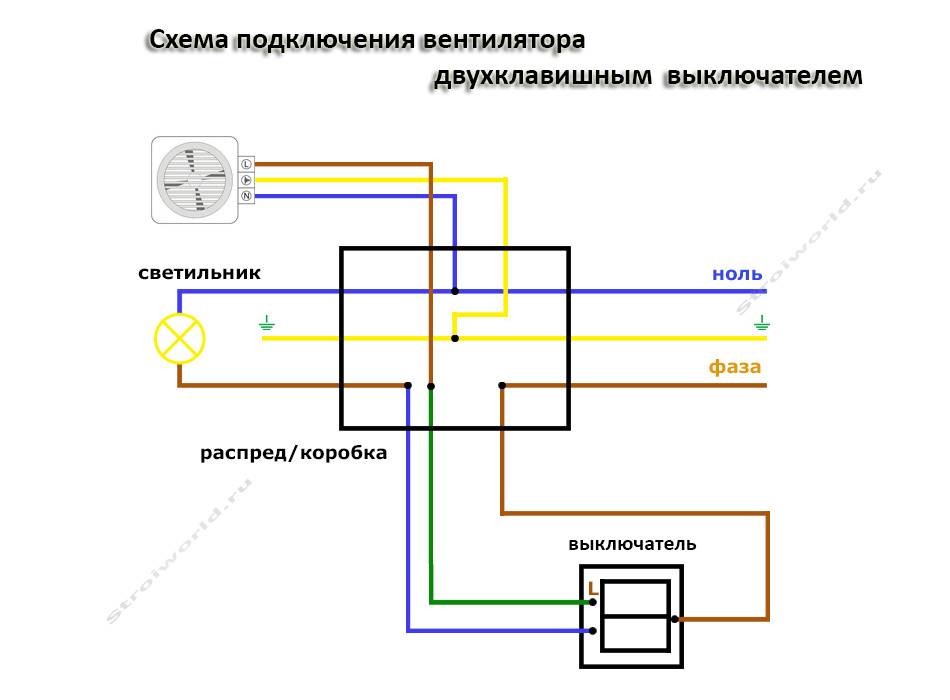
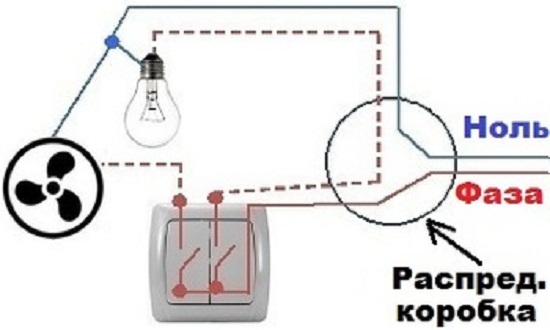
- Circuit from the switch. This method is definitely good, because it eliminates the stupid operation of the hood. That is, the device turns on and off only when it is needed. You can install a switch separately for the fan, or mount a 2-key switching device and power the lighting from one key, and the ventilation device from the second. This option will increase costs, as more cable is required.After all, the device is already connected directly from the switch by a separate line, and not parallel to the lighting.
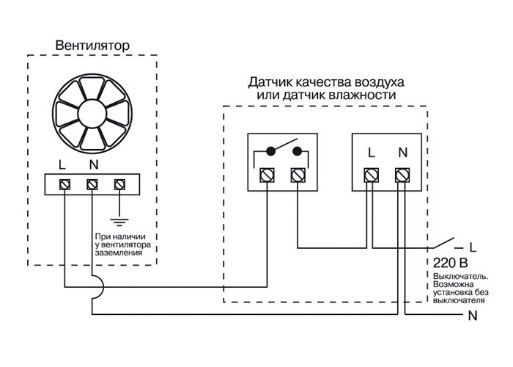
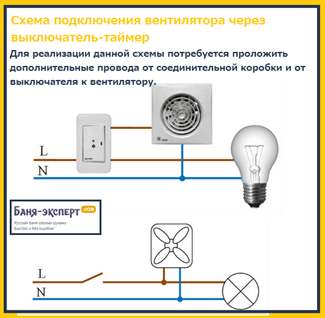
- The latest models of fans are already equipped with automation, in particular a timer. To connect such a device, you will need a three-core wire or cable, the third core is connected through a light bulb and is a signal. There are two options for the operation of such a fan. It can start at the same time as the lighting is turned on, and then turn off after a set time. Or vice versa, while the light is on, the engine does not start, and as soon as the light goes out, the fan starts to work, and then it turns off after a certain period of time.
There are also fan models that are initially equipped with their own switch. It has the shape of a cord that comes out of the case. Pulling this cord starts and turns off the device. But keep in mind that such models are quite inconvenient to maintain. Fans are usually installed near the ceiling, and this place is difficult to reach in order to reach the cord every time.
Various twist options
Unprofessional connection. This is a twist stranded wire with a single-core. This type of connection is not provided for by the rules, and if such a connection of wires is discovered by the selection committee, then the facility will simply not be accepted for operation.
However, twisting is still used, and here you need to know how the correct twisting of stranded wires is performed. It is often used in emergency cases when it is not possible to professionally make a connection, and the service life of such a connection will be short.And yet, twisting can temporarily be used only for open wiring, so that you can always inspect the junction.
Bad wire connection
Why is it impossible to connect the wires with a twist? The fact is that when twisting, an unreliable contact is created. When the load currents pass through the twist, the place of the twist heats up, and this increases the contact resistance at the junction. This, in turn, contributes to even more heating. Thus, at the junction, the temperature rises to dangerous values, which can cause a fire. In addition, a broken contact leads to the appearance of a spark at the place of twisting, which can also cause a fire. Therefore, in order to achieve good contact, it is recommended to connect wires with a cross section of up to 4 mm 2 by twisting. Details about the color marking of wires.
There are several types of twists. When twisting, it is necessary to achieve good electrical contact, as well as the creation of mechanical tensile strength. Before proceeding with the connection of wires, they should be prepared. Wire preparation is carried out in the following sequence:
- from the wire, the insulation is removed at the junction. The insulation is removed in such a way as not to damage the wire core. If a notch appears on the wire core, then it may break in this place;
- the exposed area of the wire is degreased. To do this, it is wiped with a cloth dipped in acetone;
- to create a good contact, the fat-free section of the wire is cleaned with sandpaper to a metallic sheen;
- after connection, the insulation of the wire must be restored. For this, insulating tape or heat shrink tubing can be used.
In practice, several types of twists are used:
simple parallel twist. This is the simplest and most common type of connection. With a good parallel twist at the junction, a good quality of contact can be achieved, but the mechanical forces to break will be minimal. Such twisting can be weakened in the event of vibration. To properly perform such a twist, it is necessary that each wire wrap around each other. In this case, there must be at least three turns; Twisting the usual two wires
Stranded twisting of three wires
winding method. This method is used if it is necessary to branch the wire from the main line. To do this, the insulation of the wire is removed at the branch section, and the branch wire is connected to the bare place by winding;

Connecting the wire to the main
- bandage twist. This type of twist is often used when connecting two or more solid wires. With bandage twisting, an additional conductor is used from the same material as the wire cores. First, a simple parallel twist is performed, and then a bandage from an additional conductor is applied to this place. The bandage increases the mechanical tensile strength at the junction;
- connection of stranded and solid wires. This type is the most common and simple, first a simple winding is performed, and then clamped;
Connection of stranded and solid copper wire
other various connection options.
Incorrect connection of the exhaust duct to the ventilation
The main problem during installation is to correctly connect the air duct and at the same time not disturb the natural ventilation in the apartment.
Some of the craftsmen generally advise taking the whole thing out into the street, through the nearest wall. However, according to SNiP, this is prohibited.
It clearly stipulates that such a hole cannot be placed closer than 8m from a neighboring window. Since this window is considered an outside air supply device.
Here, read the paragraphs of the set of rules SP54 and SP60.
That is, drill a healthy hole in the wall, spend a lot of nerves and money, and the neighbor will complain about you, and you will be OBLIGED to fix it all.
How is the connection for most consumers? An ordinary corrugation is taken, put on the outlet, stretched and attached to the flange, which is screwed to the ventilation hole.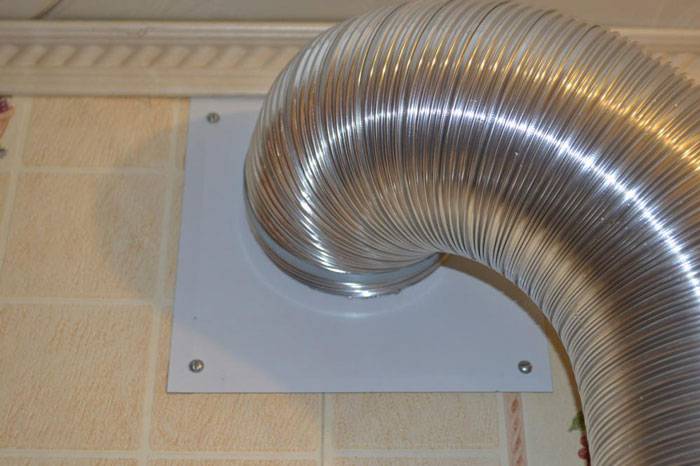
That's all. Simple, cheap and wrong. What are the disadvantages of this method? First, the noise.
When air passes through such a ribbed corrugation, it makes extremely unpleasant sounds.
But most importantly, when your device is turned off and does not work, natural ventilation is forced to draw air from the apartment through the hood. Not only can your box be clogged, but in the summer there is sometimes no traction at all (due to the same temperature at home and outside).
Moreover, in the air path, you actually put an oily grid, a motor, a turbine, etc. And yet, the air suction will not occur at the level of the ceiling, but at the level of the middle of the kitchen.
Although the sampling of all odors of waste products, just the same, it should be carried out from the maximum height.
This threatens the occurrence of fungus, high humidity. In the off-season, your doors will simply begin to swell and close poorly.


And there will also be a lack of oxygen and constantly feeling unwell.At the same time, someone gets into mysticism and begins to think that they have been damaged or an apartment with bad energy, but in fact, there it is - improper ventilation!
Initially, in Soviet times, when designing our multi-storey buildings, engineers expected that air would enter the apartment, among other things, due to leaks in wooden windows.
To correct the situation in such cases, it is recommended to put the supply valve on a plastic window.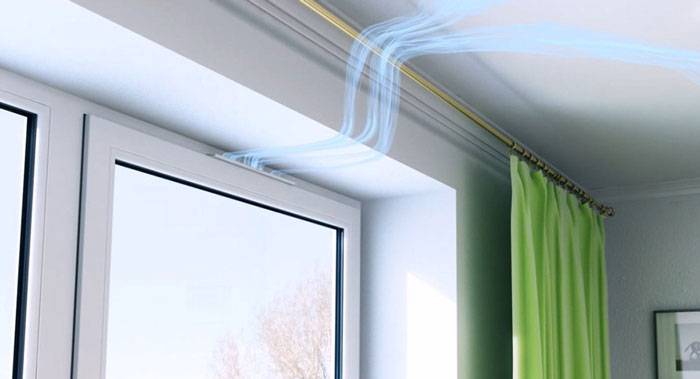
Instead of clogging, you can do everything more intelligently. What are the alternative options for this?
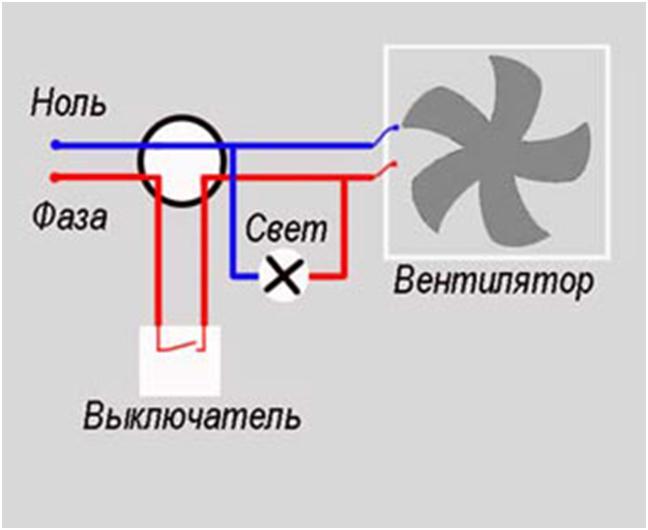
We connect the fan without a timer
This connection option is considered the simplest from a technical point of view. The switch is placed in front of the entrance to the bathroom or indoors. It is advisable to install it away from plumbing equipment, where splashing on electrical contacts is excluded.
Plastic axial fans do not have a terminal outlet for connecting a ground loop. Everything is limited to switching the phase with a zero core. Connections are organized in a switchboard or socket box up to 60 mm deep.
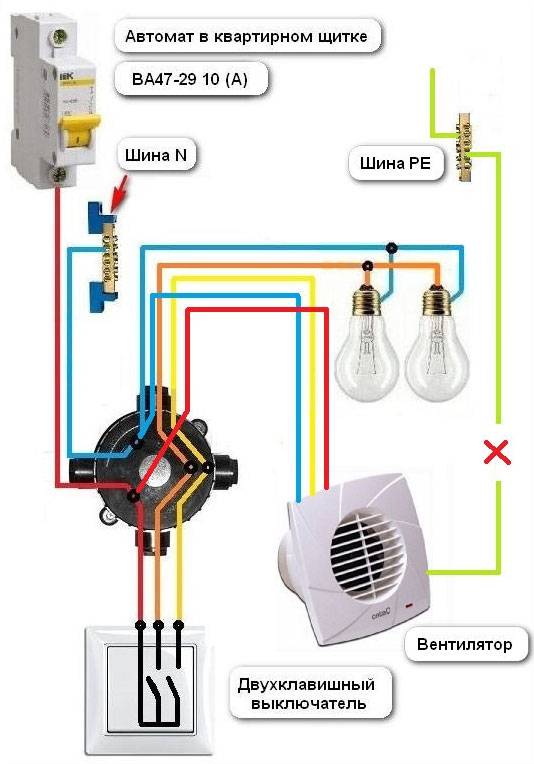
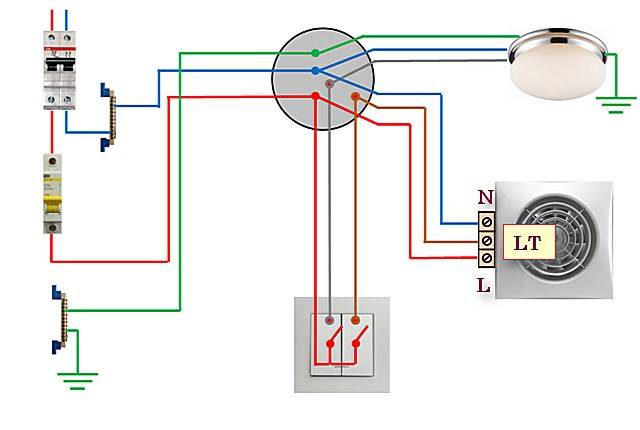
Single key switch (separate from light):
If a switch with one button is selected to control the operation of the exhaust fan, the wires are switched as follows:
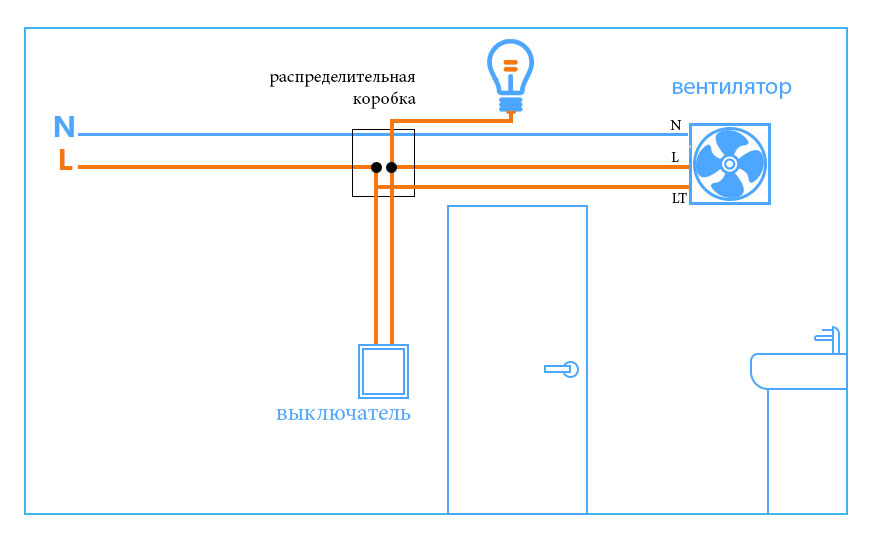
- the zero of the ventilation device is connected to the zero of the network wire;
- the phase end from the hood is connected to the line laid from the switch;
- the mains phase is connected to the input terminal of the switch.
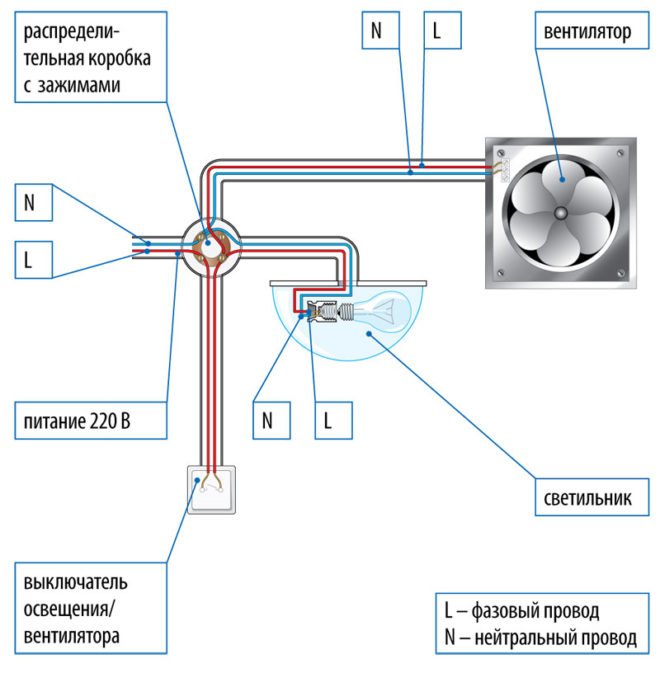
Connecting a fan to lighting
The simplest and most budgetary option for arranging forced ventilation in a bathroom is to connect the fan to the nearest light bulb, spending a minimum of wires and effort. In this case, the hood will work exactly as long as the light is on.
When connecting an exhaust fan in a bathroom or toilet according to this scheme, it is worthwhile to insulate the wire connections well
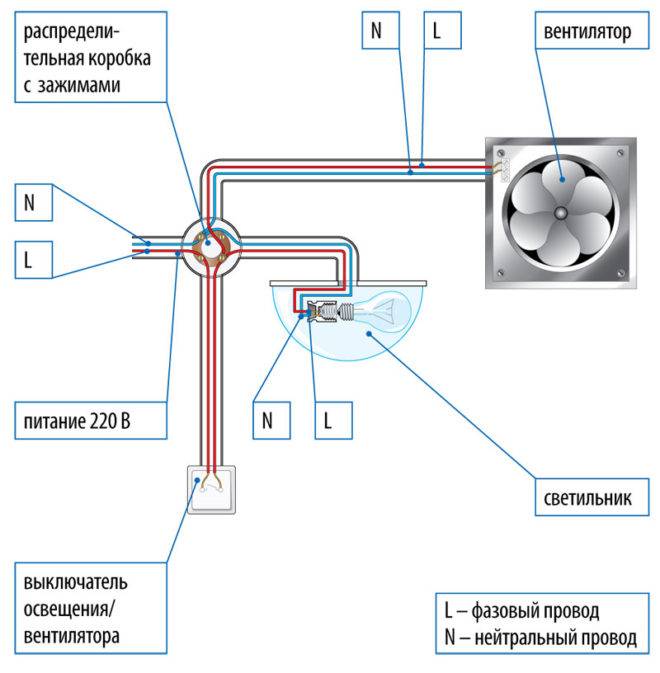
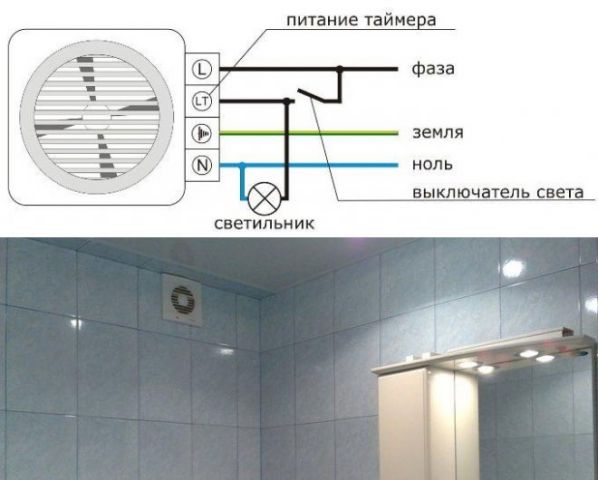
Installing a fan with three connection wires is somewhat more difficult. Such a unit requires constant power supply to the board, so both phase and zero are drawn to it directly from the box.
The switch opens the additional phase wire that controls the timer. All connections are described in more detail in the diagrams below.
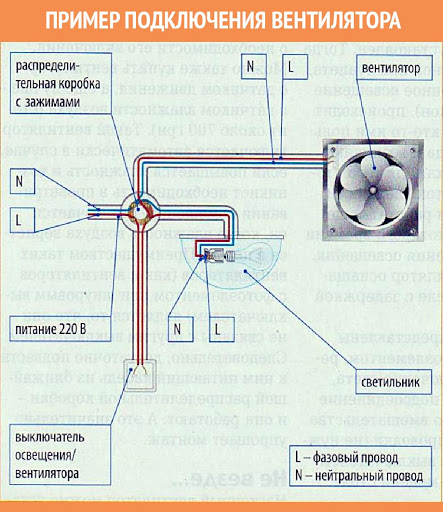
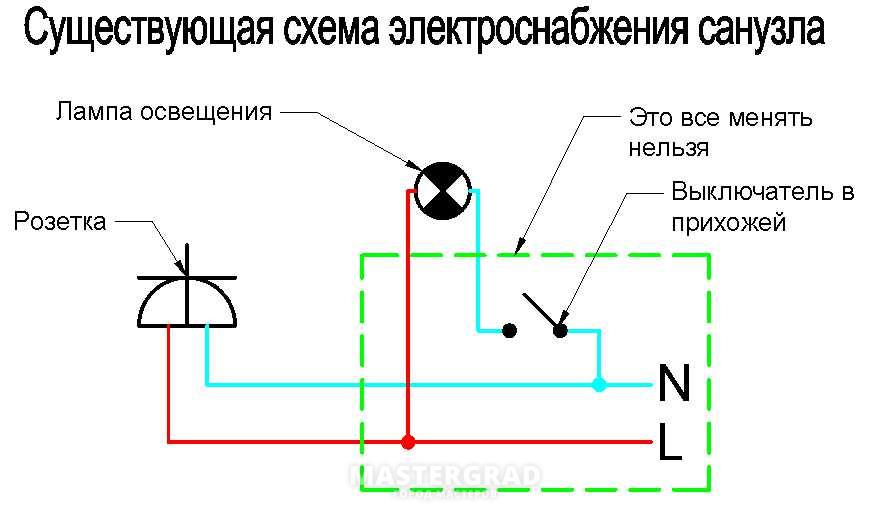
There are already 3 wires in the junction box: electricity supply from the shield (Gr. Osv), lighting power in the bathroom (Light) and to the switch, connected to the conductors of the phase from the first two
Of the three cores of the fan wire, one is closed directly to the phase coming from the shield - it will ensure the constant operation of the control board
The zero core is connected to the remaining zeros, and the third is connected to the wire coming from the switch - along with the phase that feeds the lighting
Connecting through a box is safer, since all connections are outside the bathroom, but has the same disadvantages in operation as connecting with a light bulb. On the one hand, you will never forget to turn on the hood, you will need few wires, and you can hide them even after wall cladding - into the ceiling.


On the other hand, few people like the draft and noise while swimming, and the operating time from the light for effective ventilation may not be enough.As a result, you have to leave the lights on after leaving the bathroom or toilet, and this is an additional consumption of electricity.
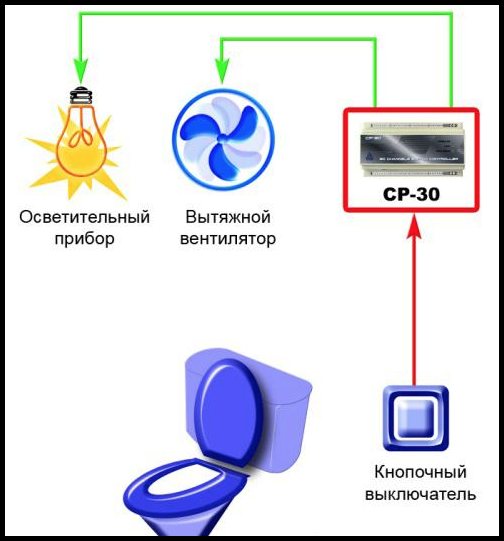
The presence of a built-in timer in the exhaust fan eliminates these shortcomings: in the bath mode, it will turn on only after the light is turned off and work for the specified time, and in the toilet it will start up along with the lighting.
With a cord
Fan with cord
Many fan models, initially, have their own switch. Often this switch is in the form of a cord extending from the housing. When manipulating the cord (pulling), the fan turns on or off.
It is worth paying attention to the fact that this way of turning on the device is, most often, inconvenient. This is due to the high location of the ventilation duct (under the ceiling). In addition, sometimes it is necessary to install the hood in hard-to-reach places, which is why direct access to it is very limited.
In addition, sometimes it is necessary to install the hood in hard-to-reach places, which is why direct access to it is very limited.
This method of switching on and off is most convenient in case of repair work. In addition, you can safely, in addition to the main cord, lay additional wires and install an independent switch for the fan. However, it should be borne in mind that when laying wiring outside of repair work, the aesthetics of the bathroom walls can be greatly affected. Also, do not forget about the need to connect the main wiring to the hood.


