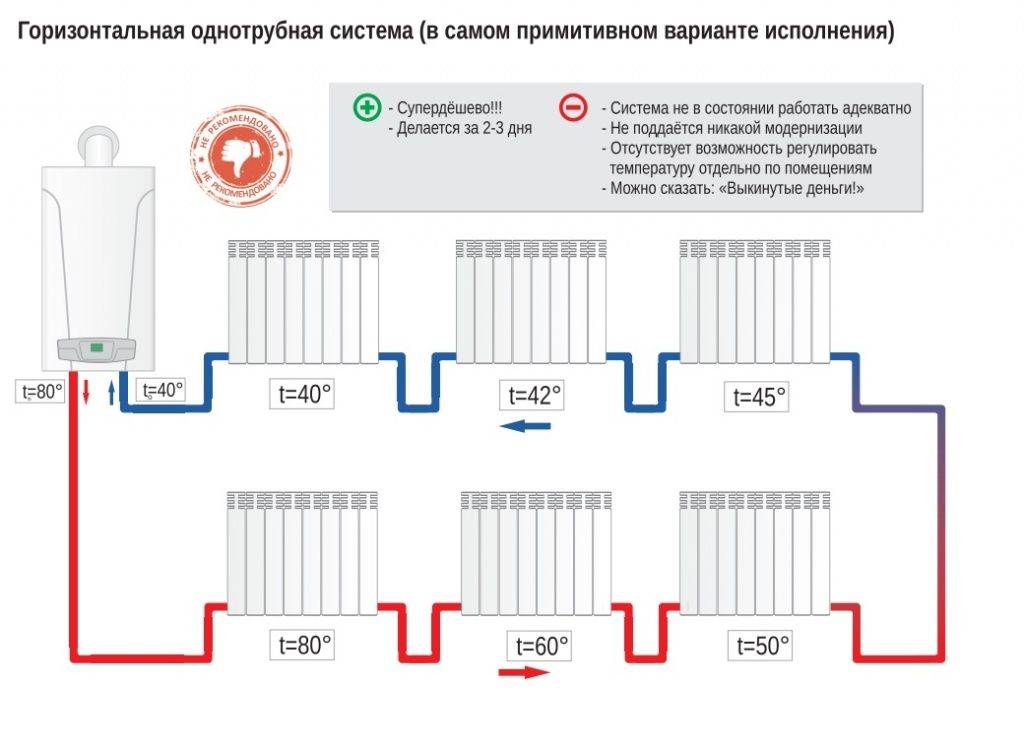
- One-pipe scheme (apartment option)
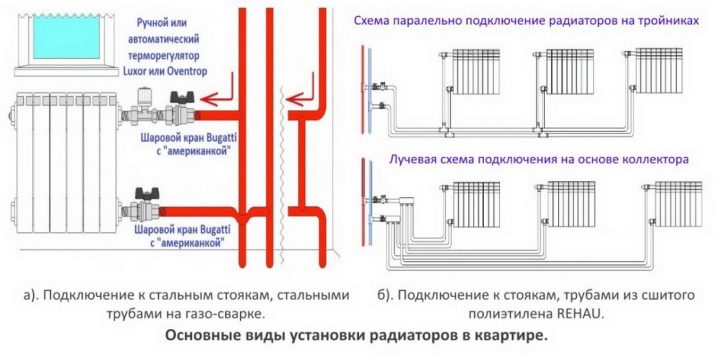
- Connection methods
- The choice of radiators
- Radiator connection diagrams
- Radiators with bottom connection
- Radiators with side connection
- Option number 1. Diagonal connection
- Option number 2. Unilateral
- Option number 3. Bottom or saddle connection
- Choosing a place and method of installing a radiator
- Coolant circulation methods
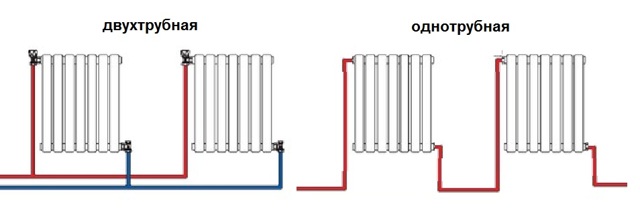
- Types of heating systems
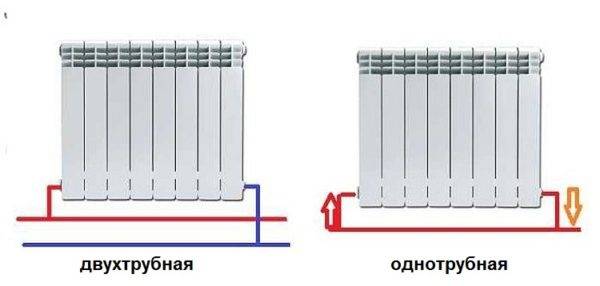
- Single pipe
- Two-pipe
- What is needed for installation
- leave a comment
- Proper connection of heating batteries: scheme and methods
- Types of heating systems
- Single-circuit heating
- Where is the best place to place the heating battery
- Variants of coolant circulation in the heating system
- Ways to connect heating batteries
- What is needed for installation
- Mayevsky crane or automatic air vent
- Stub
- Shut-off valves
- Related materials and tools
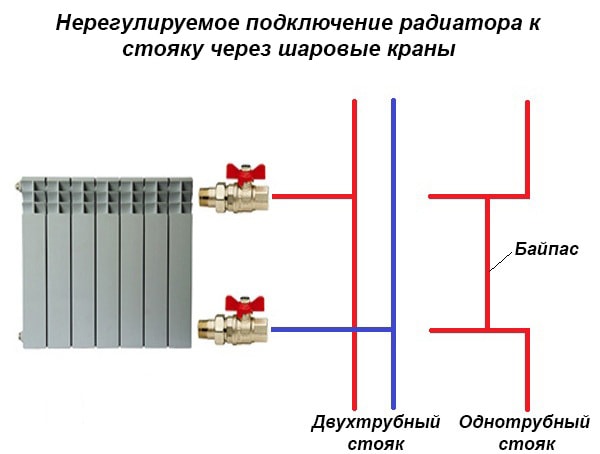
One-pipe scheme (apartment option)
Such a connection scheme is very common in apartment buildings (from 9 floors and above).
One pipe (riser) descends from the technical floor, passes through all floors and enters the basement, where it enters the return pipe.In such a connection system, it will be warm in the upper apartments, because, having passed all the floors and giving off heat to the bottom, the water in the pipe will cool down.
And if there is no technical floor (5-storey buildings and below), then such a system is “ringed”. One pipe (riser), rises from the basement, passes through all the floors, goes through the apartment of the last floor to the next room and goes down, also through all the floors to the basement. In this case, it is not known who was lucky. On the first floor in one room, it can be warm, where the pipe rises, and in the next room it is cold, where the same pipe descends, giving off heat to all apartments.
Connection methods
You can connect radiators to pipes in different ways, depending on the installation location and the laying of pipes in the room and, of course, the heating scheme:
When the connection method is selected (see diagram), you must:
- Wipe all joints and pipes with sandpaper and degrease them.
- Attach the radiator. This can be temporary fixing or installation, depending on the complexity of the location of the pipes of the heating system according to your scheme.
- We screw in the adapters, which, by turning, can be adjusted to the direction of the pipes to which the elements are connected. If, for example, they are located on the floor, then the adapter is screwed down with a thread, if the pipes go deep into the room, then the direction of the adapter changes. So the main thing is to look carefully at the layout of a single-pipe heating system.
- Pipe adapters, preferably made of domestically produced polypropylene, as experts advise, are attached to the main pipe with a soldering iron.
- We install the valve from above and the plug from below, as shown in the diagram, or vice versa.
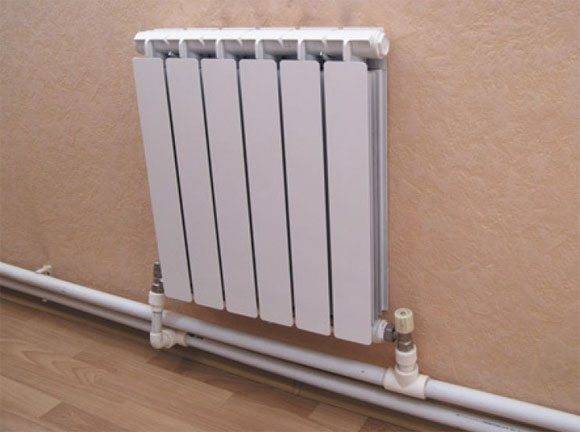
The choice of radiators
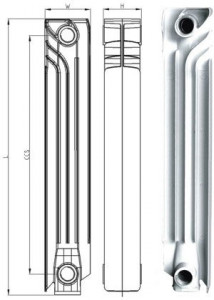
Paired with polypropylene, aluminum sectional radiators are traditionally used.
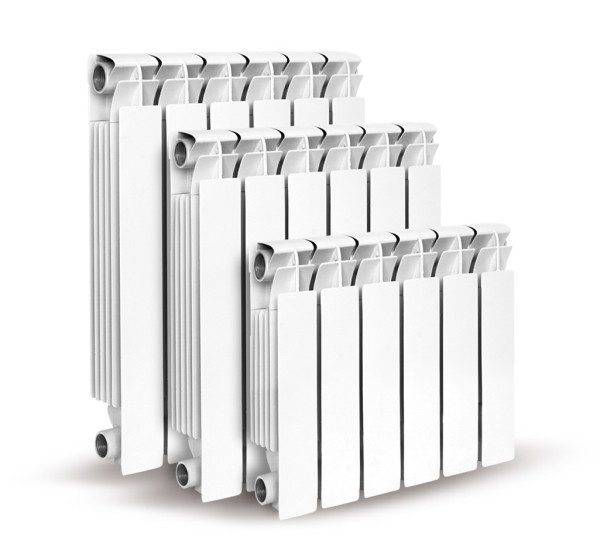
Aluminum radiators with different piping spacings.
What is the reason for such an unambiguous instruction?
What is worse than cast iron, steel or bimetallic products?
- The price of aluminum radiators is lower. than any analogues, except perhaps the registers made by hand from steel pipes.
- Due to the high thermal conductivity of aluminum, all the fins of the sections have the same temperature. which ensures maximum heat transfer with minimum dimensions of the heater.
- Overpaying for a bimetallic radiator with comparable thermal characteristics is meaningless. since the strength of any circuit is equal to the strength of its weakest link. In our case, polypropylene will be the weak link.
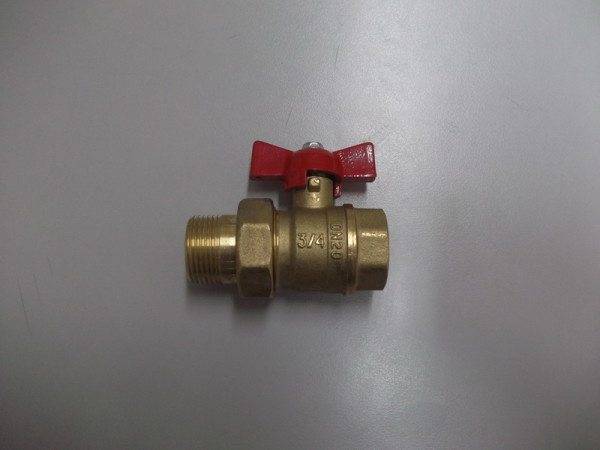
Connecting aluminum radiators with polypropylene pipes implies their complete set with shutoff valves. What and why?
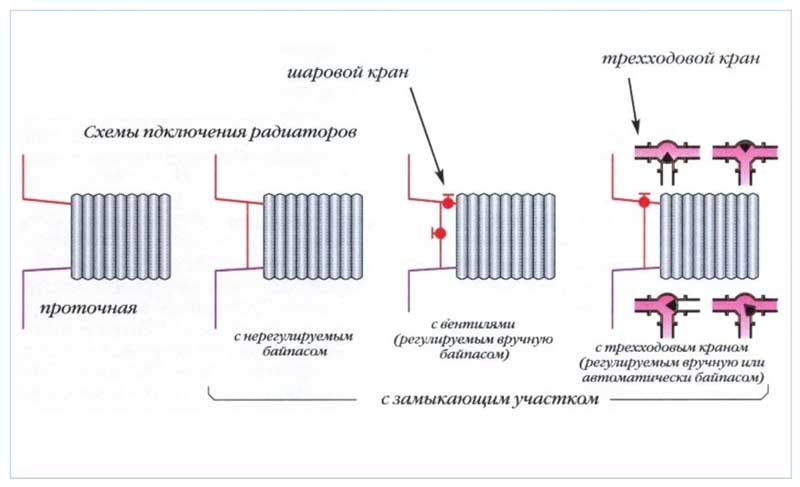
The simplest and cheapest option is a pair of valves. Better - ball: unlike screw and cork, they are extremely reliable, always maintain tightness and do not require maintenance. The valves perform a single function - they allow, if necessary, to completely turn off the heater for repair or replacement.
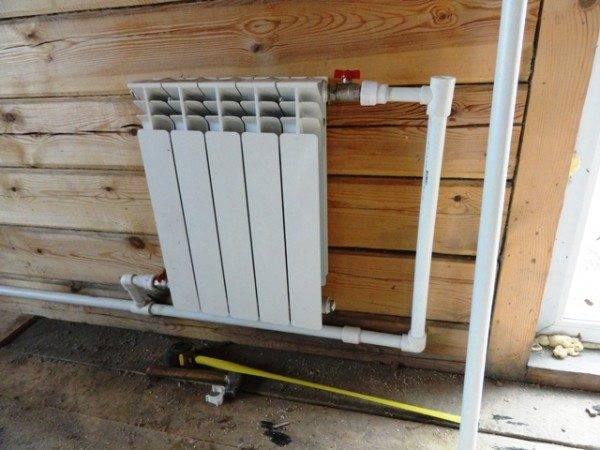
The battery is equipped with a pair of ball valves.
An advanced option is to complete the battery with a choke or a pair of chokes.
What are they needed for?
- The throttle allows you to manually reduce the heat output of the device at a high temperature in the room.
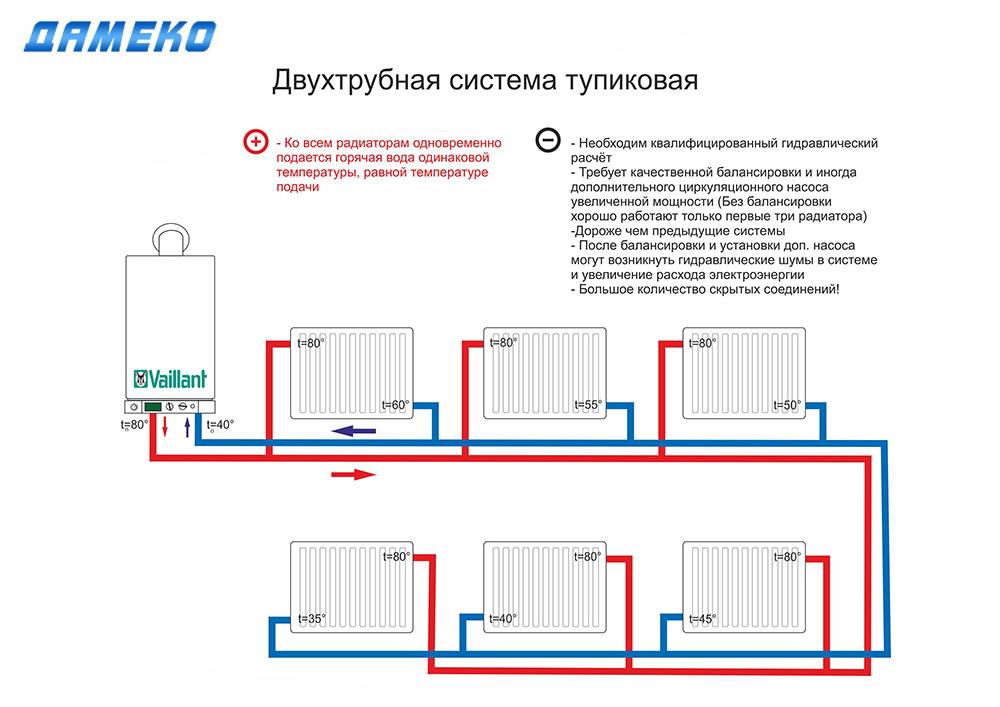
- A pair of throttles are used in cases where a two-pipe system requires not only adjustment, but also balancing - flow restriction through radiators closest to the boiler or pump.For balancing, a choke is usually used on the return supply, to adjust the temperature in the room - on the supply.
Finally, the most convenient in terms of ease of use (but also the most expensive) option is to connect the radiator to a polypropylene pipe using a thermostatic valve and a thermal head.
The thermostat uses the thermal expansion of some media already familiar to us: when heated (and the linear dimensions of the bellows in the thermal head housing increase), it closes the valve, limiting the flow of coolant; when cool, the valve opens. This ensures a constant temperature in the room with any change in external conditions - the weather outside or the parameters of the coolant.
The thermostat must not be placed in an updraft of warm air from a radiator or plumbing.
Note: in a two-pipe heating system, the thermostat is often equipped with a balancing throttle on the second supply line.
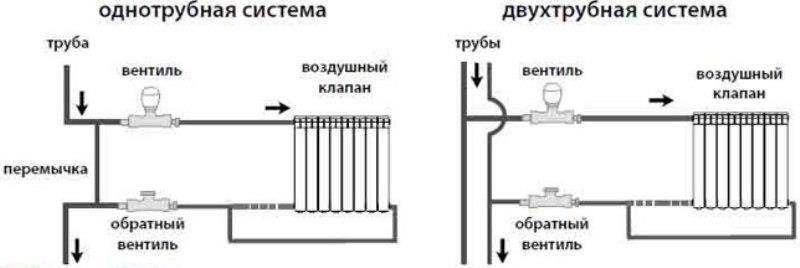
In addition to shut-off and control valves, with a lower connection, the radiators are equipped with air vents - valves for bleeding air after the circuit is discharged.
Air vents can be:
- Mayevsky cranes. Their advantages are compactness and low cost.
- Ordinary valves or taps installed in the upper radiator plug. They are convenient with high throughput: air is vented through the valve much faster.
- Automatic air vents that remove air bubbles from the circuit without the participation of the owner.
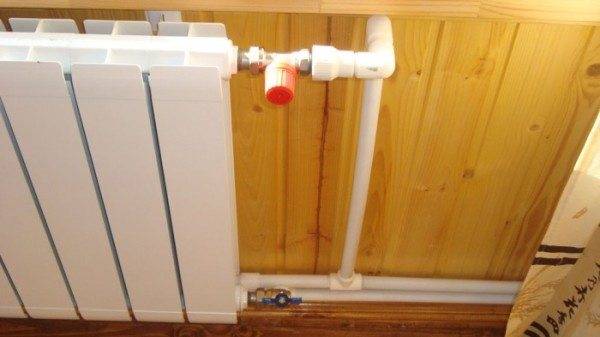
What fittings and how to connect a heating radiator with a polypropylene pipe?
Insertion into horizontal filling is carried out through a socket tee with a diameter transition.A typical filling diameter in a circuit of reasonable length with forced circulation is 25 - 32 mm; the outer diameter of the connection to a separate heater is 20 mm.


The tie-in to the filling is made by socket welded tees.
- 1/2" weld socket adapters allow the connection of valves, throttles or thermostatic valves.
- To connect shutoff valves with radiator plugs, American women are used - quick-release fittings with union nuts and rubber gaskets. They allow you to reduce the time of dismantling the radiator to 30 - 45 seconds.
In the photo - a combined solution: a ball valve with an American.
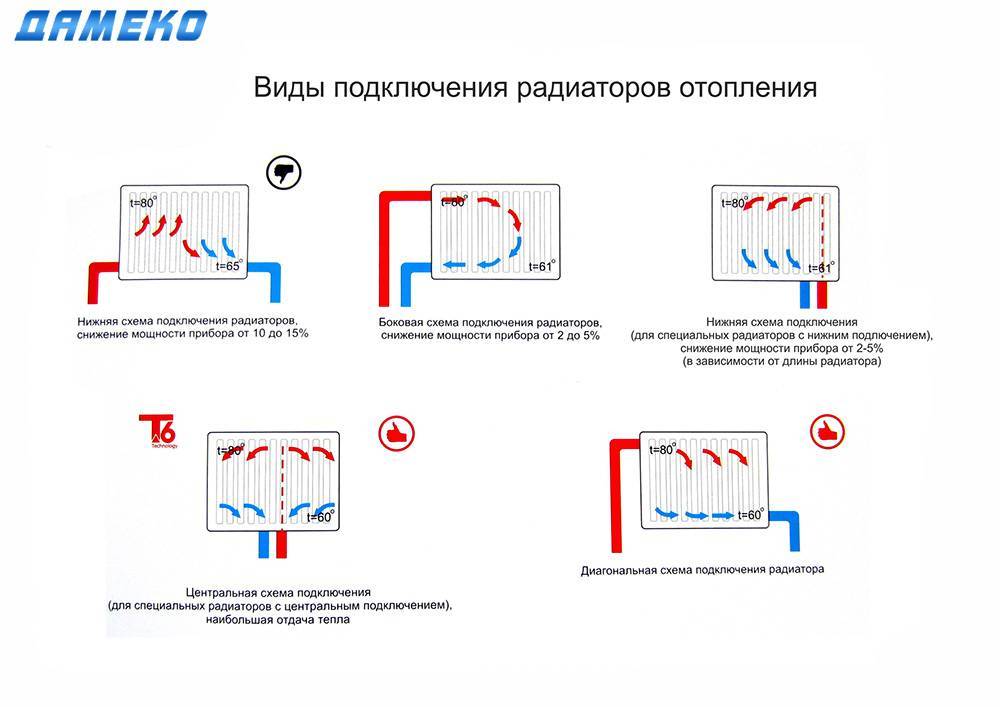
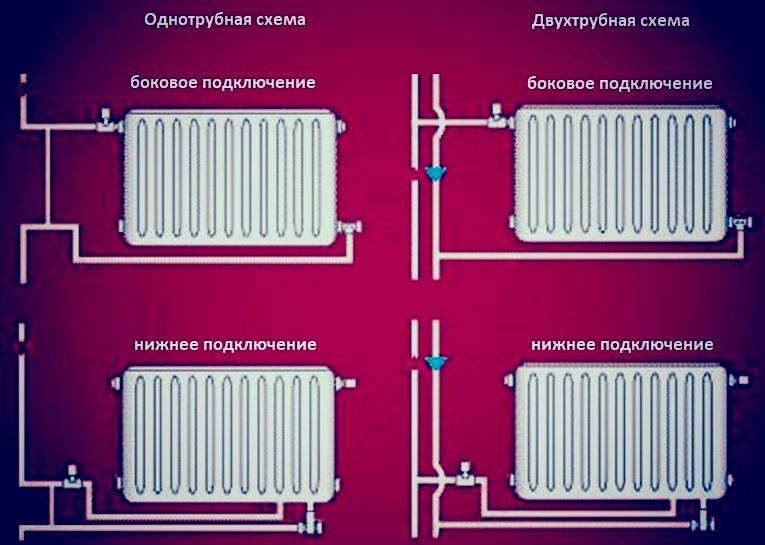
Radiator connection diagrams
How well the radiators will heat up depends on how the coolant is supplied to them. There are more and less effective options.
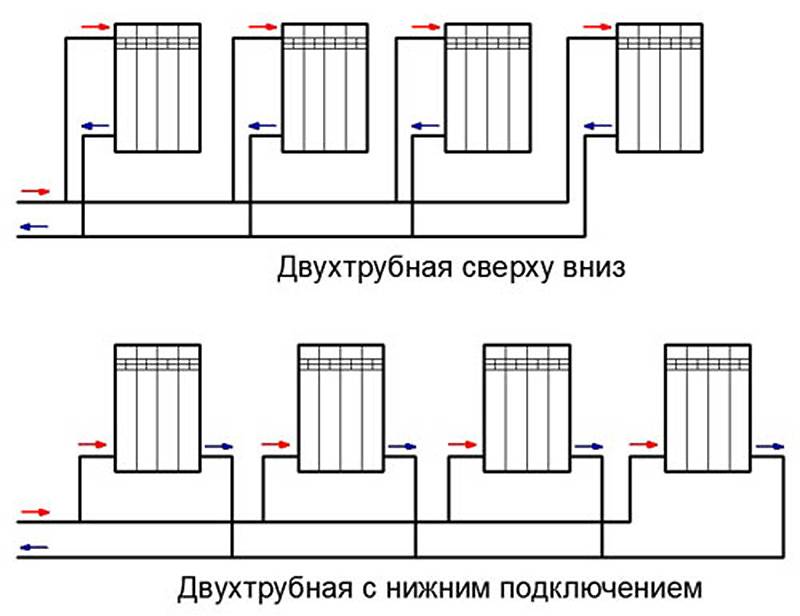
Radiators with bottom connection
All heating radiators have two types of connection - side and bottom. There can be no discrepancies with the lower connection. There are only two pipes - inlet and outlet. Accordingly, on the one hand, a coolant is supplied to the radiator, on the other hand it is removed.
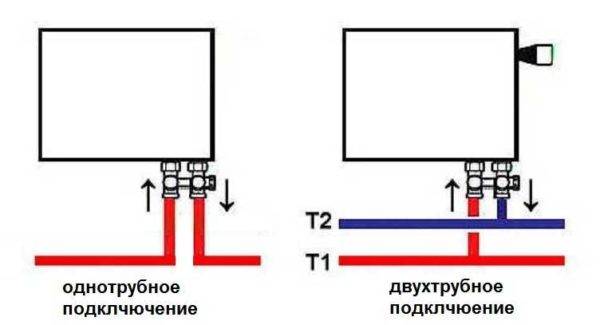
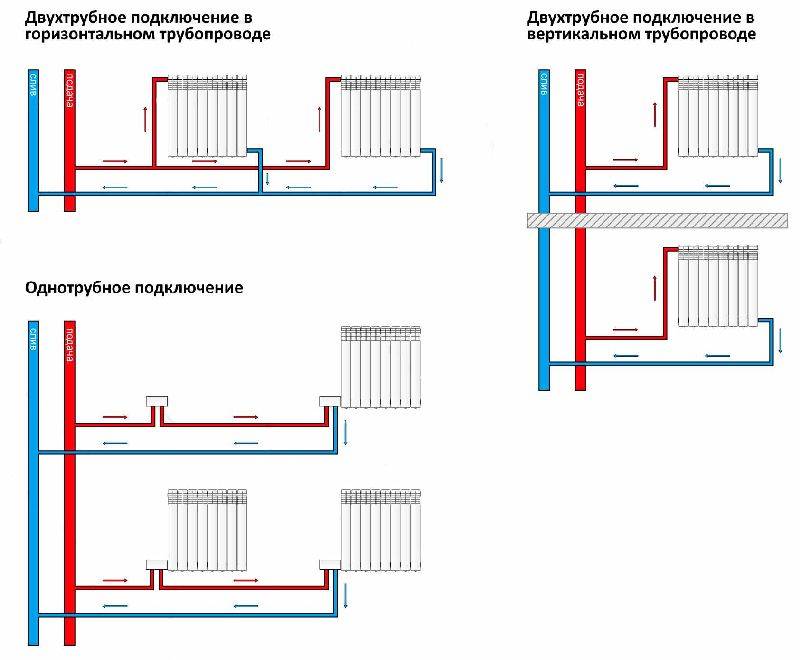
Bottom connection of heating radiators with one-pipe and two-pipe heating systems
Specifically, where to connect the supply, and where the return is written in the installation instructions, which must be available.
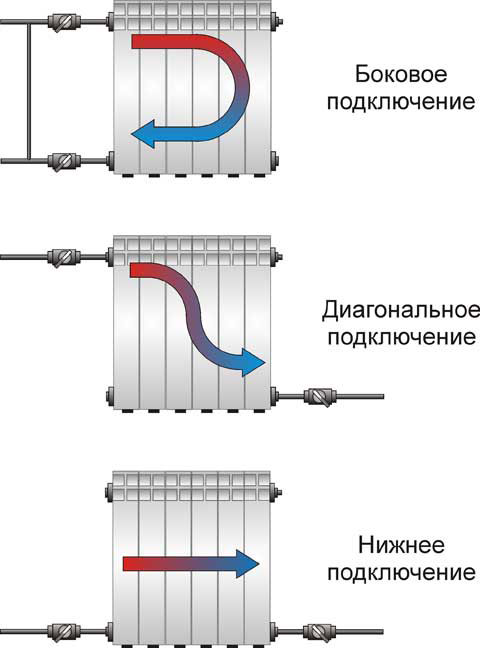
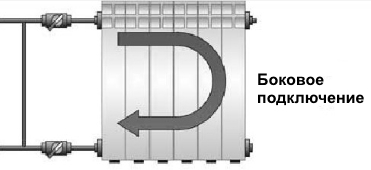
Radiators with side connection
With a lateral connection, there are much more options: here the supply and return pipelines can be connected to two pipes, respectively, there are four options.
Option number 1. Diagonal connection
Such a connection of heating radiators is considered the most effective, it is taken as a standard, and this is how manufacturers test their heaters and the data in the passport for thermal power - for such an eyeliner. All other connection types are less efficient at dissipating heat.

Diagonal connection diagram for heating radiators with a two-pipe and one-pipe system
This is because when the batteries are connected diagonally, the hot coolant is supplied to the upper inlet on one side, passes through the entire radiator and exits from the opposite, lower side.
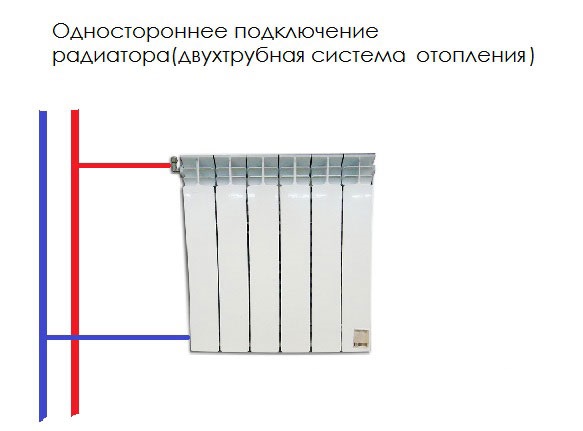
Option number 2. Unilateral
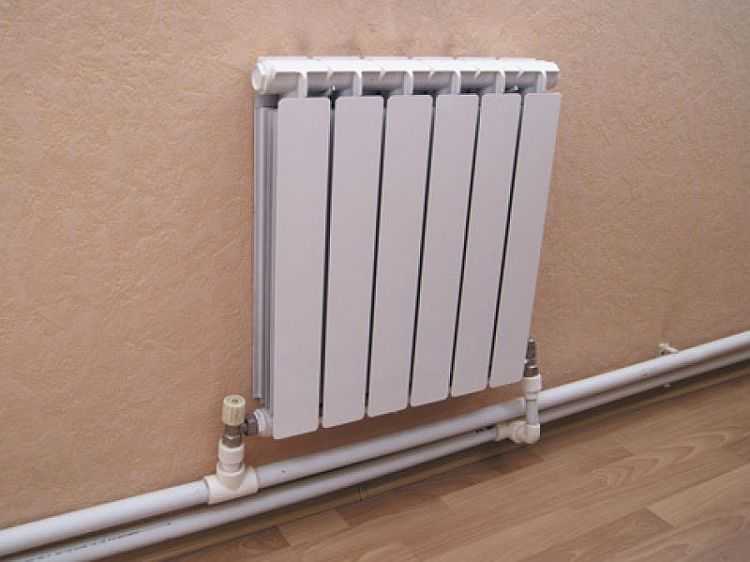
As the name implies, pipelines are connected on one side - supply from above, return - from below. This option is convenient when the riser passes to the side of the heater, which is often the case in apartments, because this type of connection usually prevails. When the coolant is supplied from below, such a scheme is used infrequently - it is not very convenient to arrange pipes.

Lateral connection for two-pipe and one-pipe systems
With this connection of radiators, the heating efficiency is only slightly lower - by 2%. But this is only if there are few sections in the radiators - no more than 10. With a longer battery, its farthest edge will not heat up well or even remain cold. In panel radiators, to solve the problem, flow extensions are installed - tubes that bring the coolant a little further than the middle. The same devices can be installed in aluminum or bimetallic radiators, while improving heat transfer.
Option number 3. Bottom or saddle connection
Of all the options, the saddle connection of heating radiators is the most inefficient. Losses are approximately 12-14%.But this option is the most inconspicuous - the pipes are usually laid on the floor or under it, and this method is the most optimal in terms of aesthetics. And so that the losses do not affect the temperature in the room, you can take a radiator a little more powerful than required.


Saddle connection of heating radiators
In systems with natural circulation, this type of connection should not be done, but if there is a pump, it works well. In some cases, even worse than the side. Just at some speed of movement of the coolant, vortex flows arise, the entire surface heats up, and heat transfer increases. These phenomena have not yet been fully studied, therefore it is not yet possible to predict the behavior of the coolant.
Choosing a place and method of installing a radiator
The options for connecting heating radiators depend on the general heating scheme in the house, the design features of the heaters and the method of laying pipes. The following methods of connecting heating radiators are common:
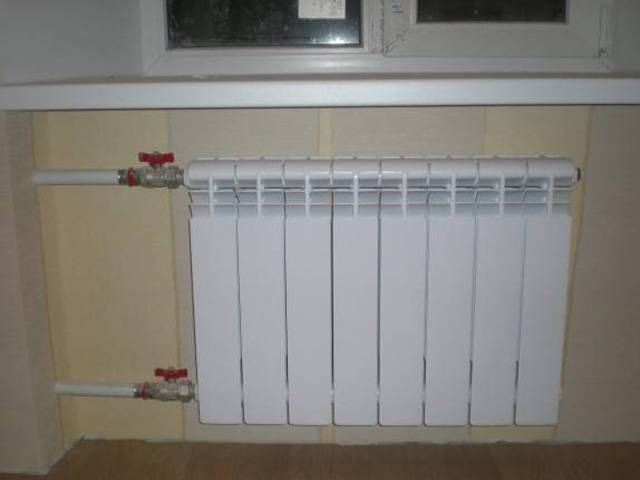
- Lateral (unilateral). The inlet and outlet pipes are connected on the same side, while the supply is located at the top. The standard method for multi-storey buildings, when the supply is from the riser pipe. In terms of efficiency, this method is not inferior to the diagonal one.
- Lower. In this way, bimetallic radiators with a bottom connection or a steel radiator with a bottom connection are connected. The supply and return pipes are connected from below on the left or right side of the device and connected through the lower radiator connection unit with union nuts and shut-off valves. The union nut is screwed onto the lower radiator pipe.The advantage of this method is the location of the main pipes hidden in the floor, and heating radiators with a bottom connection harmoniously fit into the interior and can be installed in narrow niches.
- Diagonal. The coolant enters through the upper inlet, and the return is connected from the opposite side to the lower outlet. The optimal type of connection, providing uniform heating of the entire area of the battery. In this way, correctly connect the heating battery, the length of which exceeds 1 meter. Heat loss does not exceed 2%.
- Saddle. The supply and return are connected to the bottom holes located on opposite sides. It is mainly used in single-pipe systems when no other method is possible. Heat losses as a result of poor circulation of the coolant in the upper part of the device reach 15%.
WATCH VIDEO
When choosing a place for installation, several factors are taken into account that ensure the correct operation of heating devices. Installation is carried out in the places least protected from the penetration of cold air, under window openings. It is recommended to install a battery under each window. The minimum distance from the wall is 3-5 cm, from the floor and window sill - 10-15 cm. With smaller gaps, convection worsens and battery power drops.
Typical mistakes when choosing an installation location:
- Space for installation of control valves is not taken into account.
- A small distance to the floor and window sill prevents proper air circulation, as a result of which heat transfer decreases and the room does not warm up to the set temperature.
- Instead of several batteries located under each window and creating a thermal curtain, one long radiator is chosen.
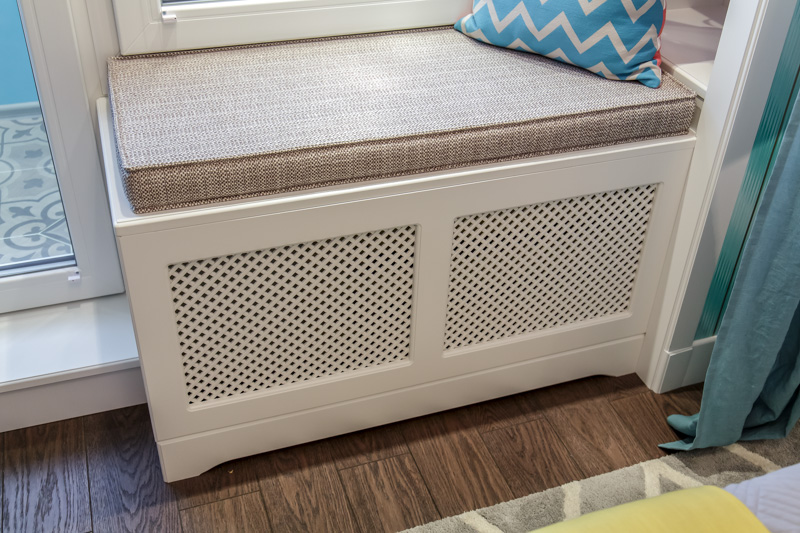
- Installation of decorative grilles, panels that prevent the normal spread of heat.
Coolant circulation methods
The circulation of the coolant through pipelines occurs in a natural or forced way. The natural (gravitational) method does not involve the use of additional equipment. The coolant moves due to a change in the characteristics of the liquid as a result of heating. The hot coolant entering the battery, cooling down, acquires a greater density and mass, after which it falls down, and a hotter coolant enters in its place. Cold water from the return flows by gravity into the boiler and displaces the already heated liquid. For normal operation, the pipeline is installed at a slope of at least 0.5 cm per linear meter.
Scheme of coolant circulation in the system using pumping equipment
For forced supply of coolant, the installation of one or more circulation pumps is mandatory. The pump is installed on the return pipe in front of the boiler. The operation of heating in this case depends on the electrical supply, however, it has significant advantages:
- The use of pipes of small diameter is allowed.
- The main is installed in any position, vertically or horizontally.
- Less coolant required.
Types of heating systems
Installation of heating systems is carried out in different ways. But the main node is the installation that produces heat. With its help, the temperature regime of the heat carrier is formed, which is transferred to thermal devices by natural or forced circulation.
Conventionally, such a network is divided into two types, since it is assembled using a single-pipe or two-pipe interchange
The first option can be mounted independently, and for the second type you will have to perform complex calculations, taking into account the mass of operating parameters of all technical units
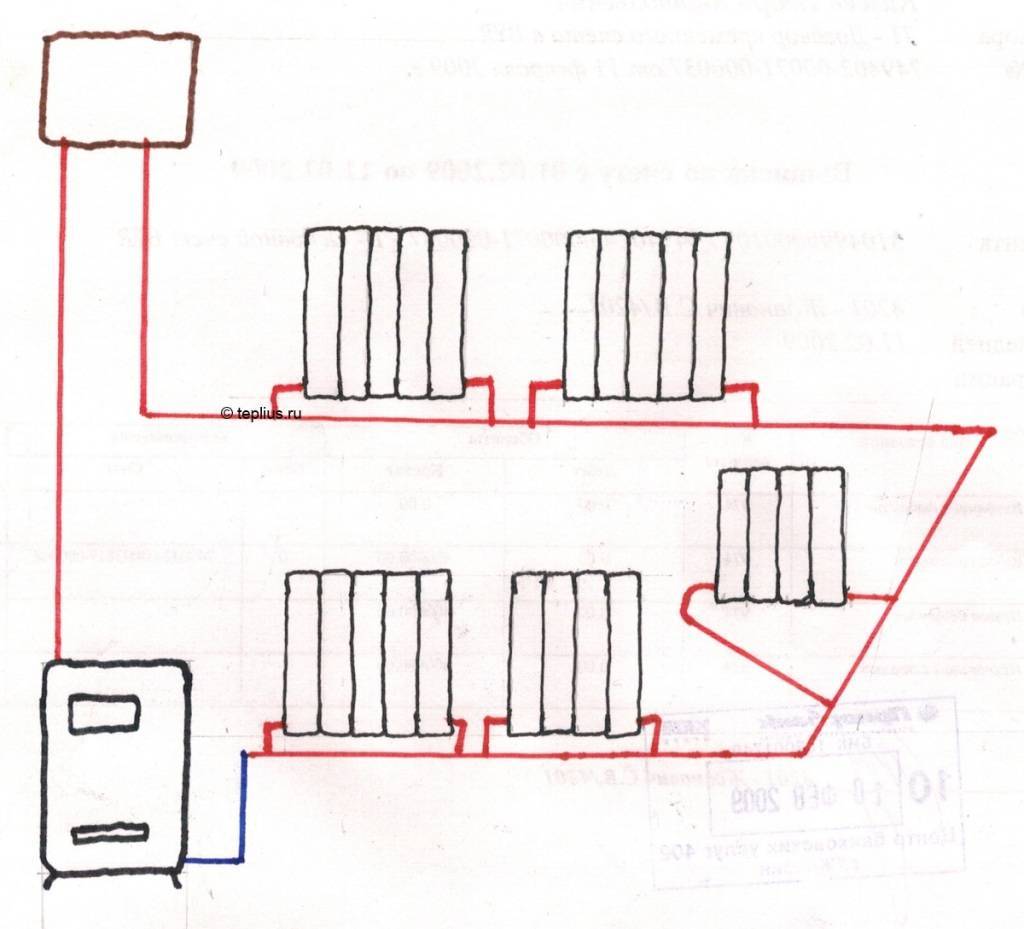
Single pipe
This type of installation has been used for a long time. Significant savings result from the absence of coolant return risers.
The principle of operation is simple. The coolant is transferred through one closed system, which includes a heating installation and appliances. The binding is made in one common contour. A hydraulic pump is used to ensure the transfer of the coolant.
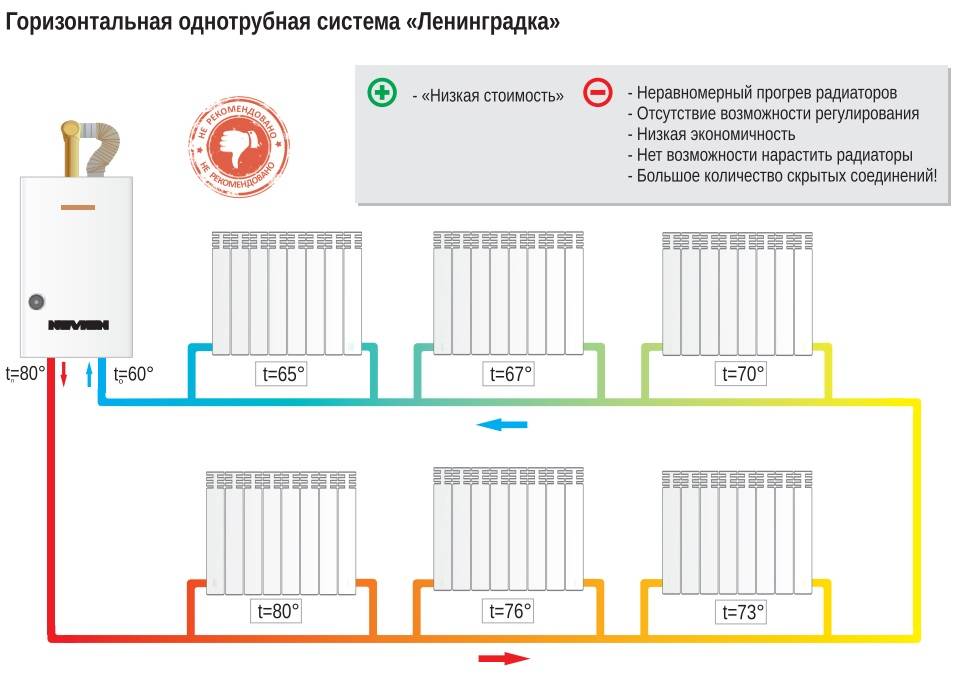
 What does a single-pipe heating system look like?
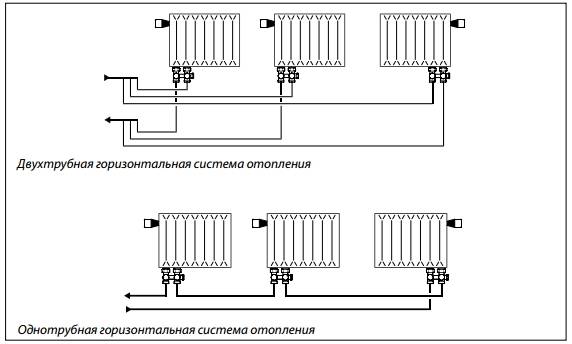
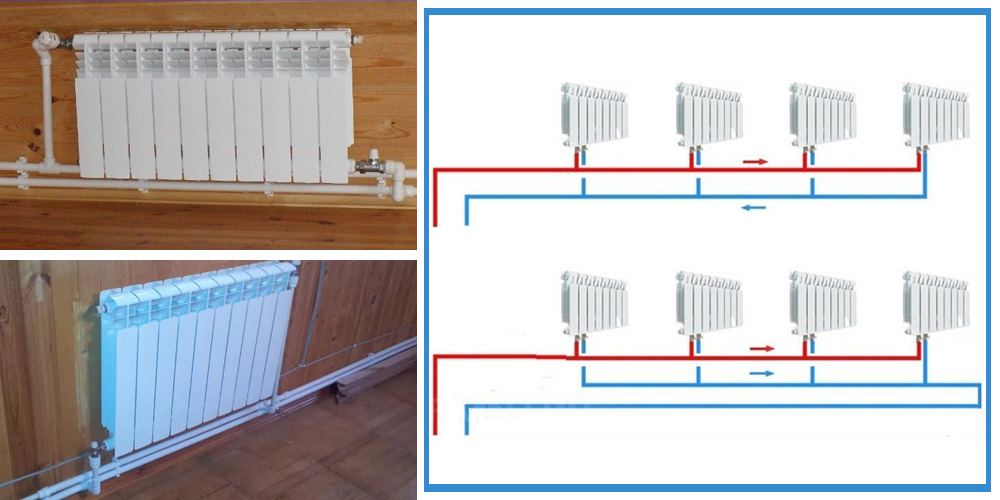
Schematically, a single-pipe heating system is divided into:
- vertical - used in multi-storey buildings;
- horizontal - recommended for private houses.
Both types do not always give the desired effect in the work. Radiators connected in series cannot always be adjusted so that all rooms are equally warm.


No more than a dozen batteries are connected along the vertical riser. Failure to comply with this rule leads to the fact that the lower floors in the house will not warm up well.
A serious disadvantage is the need to install a pump. It is he who is the source of leaks and forces him to periodically replenish the heating network with water.
For the normal operation of such a network, an expansion tank will have to be installed in the attic.
Despite the negative aspects, there are also positive aspects of such heating, which perfectly compensate for all the shortcomings:
- new technologies have made it possible to solve the problem of uneven heating of the premises;
- the use of devices for balancing and high-quality shutter equipment allows you to perform repair work without shutting down the overall system;
- installation of a single-pipe system will be much cheaper.
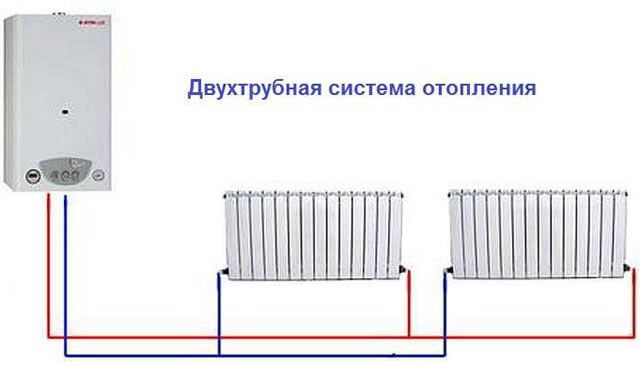
Two-pipe
In such a network, the coolant moves up the riser and is fed into each battery. After that, he goes back to the heating boiler.
With the help of such a system, it is possible to organize uniform heating of all radiators. During the circulation of water, large losses in pressure do not occur, the liquid moves by gravity. It is possible to repair the heating network without stopping the supply of heat to the facility.
 Two-pipe heating system
If we compare the systems, then the two-pipe one will be much more effective. But it has a major drawback - the assembly requires twice as many pipes and component materials, which affects the final cost.
What is needed for installation
It is also called one-sided. Branch pipes are equipped with wall-mounted models that run on gas or electricity.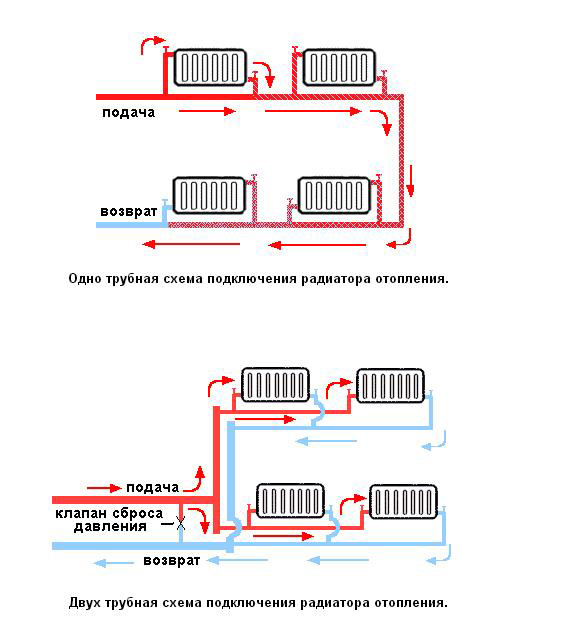
Structurally, this device is a completely simple hydraulic circuit.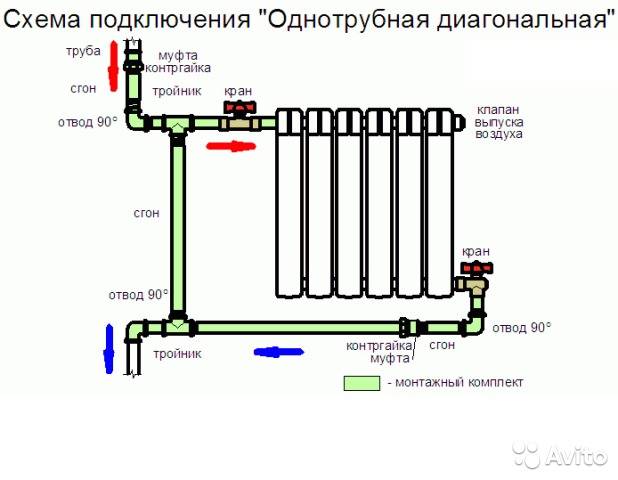
It, like most modern batteries, is most often painted with white enamel and does not spoil the appearance at all. Such strapping is reliable, saves material, labor and financial costs.
Everything would be fine if not for one - but ... The disadvantage of this system is that it is not possible to regulate the temperature of heaters, batteries and radiators without installing additional structural elements. Proper development of the heating scheme is the key to constant heat in the house.With any scheme for connecting the heater to the pipes, only two holes will work - for the inlet and outlet of hot antifreeze water. At the same time, the price of the device is significantly reduced.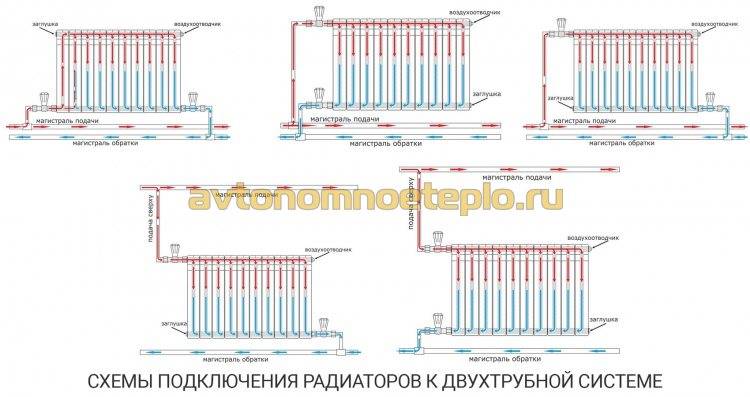
The main condition is the installation of a jumper before connecting to the pipeline, called bypass, and taps, so that it is possible to remove the radiator without disturbing the entire system. Only in this case it is possible to ensure that the system will perfectly cope with the tasks in a private house or apartment. Compared to a single-pipe heating system, in which the radiators are connected in series, in a two-pipe heating system, the heating radiators are connected in parallel independently of each other. You will also need equipment for connecting pipes and fittings, but it depends on the type of pipes.
leave a comment
Two-pipe heating systems In this system, two lines of pipes are used, warm water is supplied through one, and the cooled water is returned to heating through the other. The main advantage of such pipes is the ability to deal with the bad influence of an aggressive environment and, as a result, getting rid of blockages and blockages. Natural or forced movement of water? Being in such a place, the devices create a good thermal curtain in the window area. The specifics of the bottom connection The scheme, which uses the bottom connection, is most often used to solve design problems.
Such strapping is reliable, saves material, labor and financial costs. Options for mounting heating systems Heating requires a minimum length of pipes and the correct location of radiators. Then, the device requires the installation of a plug, a Mayevsky valve or another element to remove air.An increased pressure of the heat carrier is required. In this case, you will need a special device that stimulates the movement of water or antifreeze through the pipes.
There are several ways of distributing pipes and connecting radiators, we will consider only the most common of them: One-sided connection of heating radiators To date, the most common side connection of heating radiators remains the most common. Two-pipe system The design of a two-pipe system involves the use of two pipelines, one for the supply of the working medium, the other for the return. The circulation pressure increases, allowing the water to evenly heat the room.
Connection diagrams for heating radiators.
Proper connection of heating batteries: scheme and methods
The correct connection of heating batteries implies the device of not only an efficient, but also an economical heating system, which is far from always possible.
Therefore, in order to figure out how normal heating in a room should function, you should first of all consider which scheme for connecting heating batteries is the most common and productive. This will help connect the entire system as correctly as possible and enable it to work for a long time (in more detail: “How to connect a heating radiator - methods and options”).
Types of heating systems
Before talking about how to properly connect heating batteries, you should consider in detail which system options are most common today.Even having studied numerous photos of these communications, one way or another, it is required to understand the principle of their work and understand the features of the functioning of each of the parts of a particular system.
Single-circuit heating
This option provides for the supply of coolant to a heating device, which is usually located in a multi-storey building. Such methods of connecting heating batteries are the simplest, since their implementation does not require any serious building skills (read: “Single-circuit heating system - possible implementation schemes”). The main drawback of this design is the lack of control over the heat supply, since this system does not provide any special devices like a temperature sensor that perform this function. That is why the volume of heat transfer is strictly fixed and is prescribed in advance at the stage of drafting the future system.
Where is the best place to place the heating battery
Regardless of what appearance this or that heating system has, its main purpose is, first of all, to heat the room. If you connect the heating battery correctly, then this device will prevent cold air from entering the room from the outside, which explains the need for a room radiator in the space under the windowsill.
Even before considering how best to connect heating battery, you should decide what the layout of all the heating devices in the room will be (read: “Which scheme for connecting heating radiators is optimal”)
It is very important to place all radiators so that they stand at approximately the same distance from each other, in which case it will be possible to ensure the most efficient heat transfer.
- from the bottom of the window sill - 100 mm;
- from the floor - 120 mm;
- from a nearby wall - 20 mm.
Variants of coolant circulation in the heating system
In order to decide how to properly connect the heating battery, do not forget that the coolant, which is water, can circulate both autonomously, that is, naturally, and forcibly. In the first case, a special circulation pump is used, the main function of which is to move the coolant through the pipes. The installation of this pump is usually carried out in the area of \u200b\u200bthe heating boiler, but sometimes it may already be part of the basis of its design.


This is due to the fact that the heating boiler operates exclusively on electricity, due to which the cooled coolant is displaced from the system.
Ways to connect heating batteries
To finally figure out how to connect heating batteries, you should consider the following ways to connect them:
- Single sided mounting option. This serial connection of heating batteries implies the installation of an inlet pipe and a discharge pipe of the same part of the battery:
- feeding is carried out from above;
- the withdrawal is made from below.
Such installation is carried out as follows: the water supply comes from above, and the outlet is from below, only this is done from different sides.The maximum amount of heat lost in this case is 2%.
What is needed for installation
Installation of heating radiators of any type requires devices and consumables. The set of necessary materials is almost the same, but for cast-iron batteries, for example, the plugs are large, and the Mayevsky tap is not installed, but, somewhere at the highest point of the system, an automatic air vent is installed. But the installation of aluminum and bimetallic heating radiators is absolutely the same.
Steel panel ones also have some differences, but only in terms of hanging - brackets are included with them, and on the back panel there are special metal-cast shackles with which the heater clings to the hooks of the brackets.
Here for these bows they wind up hooks
Mayevsky crane or automatic air vent
This is a small device for venting air that can accumulate in the radiator. It is placed on a free upper outlet (collector). Must be on every heater when installing aluminum and bimetallic radiators. The size of this device is much smaller than the diameter of the manifold, so another adapter is required, but Mayevsky taps usually come with adapters, you just need to know the diameter of the manifold (connecting dimensions).
Mayevsky crane and method of its installation
In addition to the Mayevsky tap, there are also automatic air vents. They can also be placed on radiators, but they are slightly larger and for some reason are only available in a brass or nickel-plated case. Not in white enamel. In general, the picture is unattractive and, although they deflate automatically, they are rarely installed.
This is what a compact automatic air vent looks like (there are bulkier models)
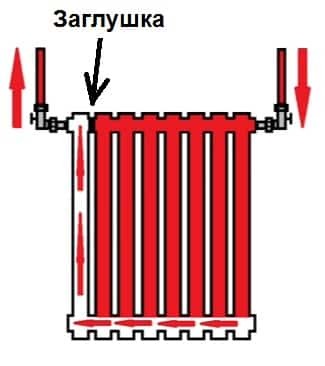
Stub
There are four outlets for the radiator with lateral connection. Two of them are occupied by the supply and return pipelines, on the third they put a Mayevsky crane. The fourth entrance is closed with a plug. It, like most modern batteries, is most often painted with white enamel and does not spoil the appearance at all.
Where to put the plug and the Mayevsky tap with different connection methods
Shut-off valves
You will need two more ball valves or shut-off valves with the ability to adjust. They are placed on each battery at the input and output. If these are ordinary ball valves, they are needed so that, if necessary, you can turn off the radiator and remove it (emergency repair, replacement during the heating season). In this case, even if something happened to the radiator, you will cut it off, and the rest of the system will work. The advantage of this solution is the low price of ball valves, the minus is the impossibility of adjusting heat transfer.
Taps for heating radiator
Almost the same tasks, but with the ability to change the intensity of the coolant flow, are performed by shut-off control valves. They are more expensive, but they also allow you to adjust the heat transfer (make it smaller), and they look better outwardly, they are available in straight and angular versions, so the strapping itself is more accurate.


If desired, you can put a thermostat on the coolant supply after the ball valve. This is a relatively small device that allows you to change the heat output of the heater. If the radiator does not heat well, they cannot be installed - it will be even worse, since they can only reduce the flow.There are different temperature controllers for batteries - automatic electronic, but more often they use the simplest one - mechanical.
Related materials and tools
You will also need hooks or brackets to hang on the walls. Their number depends on the size of the batteries:
- if the sections are not more than 8 or the length of the radiator is not more than 1.2 m, two attachment points from above and one from below are sufficient;
- for every next 50 cm or 5-6 sections, add one fastener from above and below.
Takde need a fum tape or linen winding, plumbing paste to seal the joints. You will also need a drill with drills, a level (a level is better, but a regular bubble one is also suitable), a certain number of dowels. You will also need equipment for connecting pipes and fittings, but it depends on the type of pipes. That's all.