- Pros and cons of a pumping station
- Types and features of installation of caissons
- What equipment is needed for arranging the structure
- How to connect a pumping station in a private house?
- Plant commissioning and testing
- How is the pumping station set up?
- Connection of a pumping station
- Water supply from a well for permanent residence
- Connecting the pumping station to the water supply
- Well connection
- Self-assembly and connection
- Main types of wells
- Ordinary well
- Abyssinian well
- medium depth
- Artesian
- Video lesson and conclusion
Pros and cons of a pumping station
The pumping station has its advantages and disadvantages. First of all, it is very convenient - all the main mechanisms are arranged in a single unit, and therefore it is easy to purchase, adjust, install, and maintain.
Requires a minimum of additional spending. The system has an innate immunity to water hammer - pressure surges when opening and closing flow taps.
There are only two cons, and both are minor. The installation is noisy. The second relative minus is the impossibility without additional mechanisms for lifting water from depths above 8-10 meters.
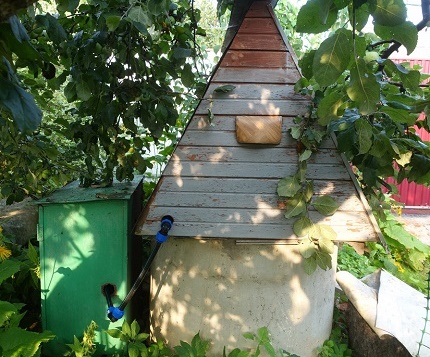
The use of a pumping station for drawing water from a well is advisable if the depth of the water surface in it is not more than 7 - 8 m. The equipment can be located in a nearby box or in a well shaft
Noise is neutralized by the conditions of installation and placement. The lifting depth can be increased by introducing an additional device - an ejector.
They are of two types. Built-in and external, portable. Built-in is more productive, but increases the noise of the whole structure
As already mentioned, this drawback is treated with attention to installation and placement.
 The pumping station does not require many additional parts and mechanisms - it’s only better to install a cleaning filter after the station, and not before
Types and features of installation of caissons
The uninterrupted operation of the well is designed to provide a caisson, an insulated waterproof container with the necessary equipment inside.
Usually a pump, shut-off valves, measuring instruments, automation, filters, etc. are mounted in it. Buildings are made from different materials. The most common:
Plastic. They are distinguished by excellent thermal insulation, which allows even without additional insulation to maintain the temperature inside the caisson at the level of 5C. Durability, excellent waterproofing characteristics, which makes it possible to avoid additional costs for insulation work, reasonable price, especially in comparison with other options. In addition, the system is quite easy to install due to its low weight. The main disadvantage is low rigidity, which can provoke deformation of the structure and damage to equipment. However, it is easy to deal with it by filling the container around the perimeter with cement mortar with a layer of 80-100 mm.
Plastic caissons have excellent thermal insulation, which allows them to be installed without additional insulation.
Steel. Most often, the arrangement of a water well is carried out with just such a design.The material allows you to make a caisson of any desired shape, while not requiring much effort. It will be enough just to weld the parts together and treat the structure from the inside and outside with a special anti-corrosion coating. For a high-quality container, metal 4 mm thick will be quite enough. You can also find ready-made structures on sale, but their purchase will cost much more than self-production.
There are various forms of steel caissons - for various needs
Reinforced concrete. Very strong and durable installations, previously extremely common. Due to their shortcomings, today they are used much less frequently. Their cost is very high, and special equipment is required for installation, which is due to the large weight of the equipment. For the same reason, over time, the concrete caisson sags, deforming the pipelines inside it.
Concrete has insufficient thermal insulation, which can cause water in the pump to freeze in severe frosts, and poor waterproofing, since concrete is hygroscopic
Here is an approximate scheme for installing equipment in a caisson and connecting communications:
Scheme of installation of equipment in the caisson
If you are going to complete the arrangement of the well with your own hands, it is worth getting acquainted with the stages of installing the caisson. They are almost the same for any type of structure, with slight nuances depending on the material of the equipment. Let's consider the stages of installing a steel tank:
Pit preparation. We dig a hole, the diameter of which is 20-30 cm greater than the diameter of the caisson. The depth must be calculated so that the neck of the structure rises about 15 cm above ground level. This way, it will be possible to avoid flooding the tank during the flood and heavy rainfall.
Casing sleeve installation.We make a hole in the bottom of the container. It can be positioned traditionally in the center or shifted as needed for equipment installation. A sleeve 10-15 cm long must be welded to the hole. Its diameter must be greater than the diameter of the casing pipe. Be sure to check that the sleeve can be easily put on the pipe.
Installation of nipples for the withdrawal of water pipes. We weld them into the wall of the container.
Caisson installation. We cut the casing pipe at ground level. We put the container on the bars above the pit so that the sleeve on the bottom of the container “dresses” on the pipe
We check that the axes of the caisson and the casing exactly match, then carefully remove the bars and carefully lower the structure down the casing. We install the container in the pit strictly vertically and fix it with bars. We weld the pipe to the bottom, while sealing the caisson
Through the nipples we start water pipes into the structure
We weld a pipe to the bottom, while sealing the caisson. Through the nipples we start water pipes into the structure.


Backfilling of the building.
The caisson is “put on” on the casing pipe and carefully lowered into the pit
It should be noted that, in principle, it is possible to equip a well without a caisson, but only if a heated building is located near it, in which the equipment is located.
The convenience of such a system is undeniable - all nodes are easily accessible. However, the disadvantages are also significant: it takes up a lot of space in the room and most often makes a lot of noise.
What equipment is needed for arranging the structure
To equip an artesian well with your own hands, you will need:
- water lifting equipment;
- cap;
- hydraulic tank;
- additional equipment for pressure, level, water flow control;
- frost protection: pit, caisson or adapter.
When buying a submersible pump, it is important to correctly calculate the required power. The model is selected according to performance and diameter. You can’t save on this equipment, because
the performance of the entire water supply system of the site depends on it
You can’t save on this equipment, because. the performance of the entire water supply system of the site depends on it.
The best option is a model in a high-strength hermetic case, equipped with sensors, filter units, and automation. As for brands, Grundfos water-lifting equipment deserves special attention.
Typically, a submersible pump is installed at a height of about 1-1.5 m from the bottom of the hydraulic structure, however, in an artesian well, it can be located much higher, because. pressure waters rise above the horizon.
The immersion depth for an artesian source should be calculated based on the indicators of static and dynamic water levels.
To keep artesian water crystal clear, the production pipe must be protected from debris, surface water and other adverse environmental factors. This structural element is used to securely fasten the submersible pump cable.
The head consists of a cover, clamps, carabiner, flange and seal. Models of industrial production do not need to be welded to the casing, they are fastened with bolts that press the cover against the seal, thus ensuring a complete seal of the wellhead.Features of mounting homemade heads depend on the design of the devices.
The hydraulic accumulator is an important unit of an autonomous water supply system. It is necessary to ensure the normal operation of the water supply, protect the pump from constant on-off and prevent water hammer. The battery is a water tank, additionally equipped with pressure sensors and automation.
When the pump is turned on, water first enters the tank, and from it is supplied to the draw-off points. The water levels at which the pump turns on and off can be controlled using pressure sensors. On sale there are hydraulic tanks with a capacity of 10 to 1000 liters. Each well owner can choose the model that best suits their system.
The well must be protected from freezing. For these purposes, you can make a pit, install a caisson, an adapter. The traditional option is a pit. It is a small pit, the walls of which are reinforced with concrete or brickwork. From above, the structure is closed with a heavy lid with a hatch. It is undesirable to install any equipment in the pit, because even with good waterproofing, the walls still let moisture through, the design is not airtight.
A more modern and technological analogue of the pit is the caisson. This design is best purchased at a specialized store. Industrial production caissons are pre-designed to accommodate all the necessary equipment. Plastic models are well insulated and airtight. Metal caissons often need additional insulation.
For a single-pipe artesian well, an arrangement using a pitless adapter is suitable.In this case, the function of the protective structure is performed by the casing pipe itself. The adapter can only be installed if the column is made of metal. There are serious difficulties with the operation of a plastic pipe, and the service life of the structure may be short-lived.
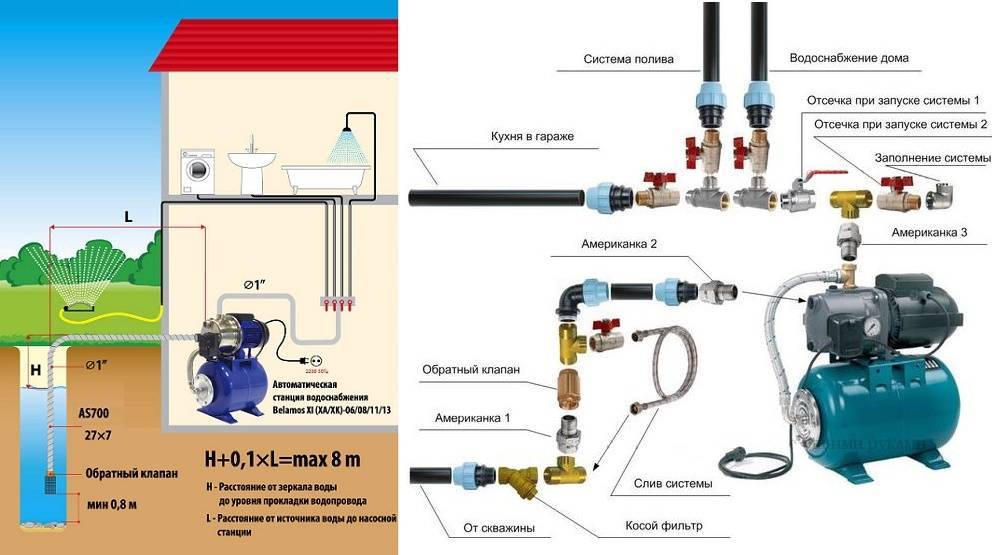
How to connect a pumping station in a private house?
The most important boon of civilization, with which the owners seek to equip their country house, is the water supply system. Moreover, the arrangement of such a system can now be afforded not only by those who live where the water supply networks pass, but also by the owners of houses, dachas and cottages that are located far from civilization. To do this, on the territory of a suburban area, it is necessary to dig a well or drill a well, and then, using a pumping station, organize an autonomous uninterrupted water supply to the entire house. If you decide to connect such a system with your own hands, you may need our step by step guide and video instruction.
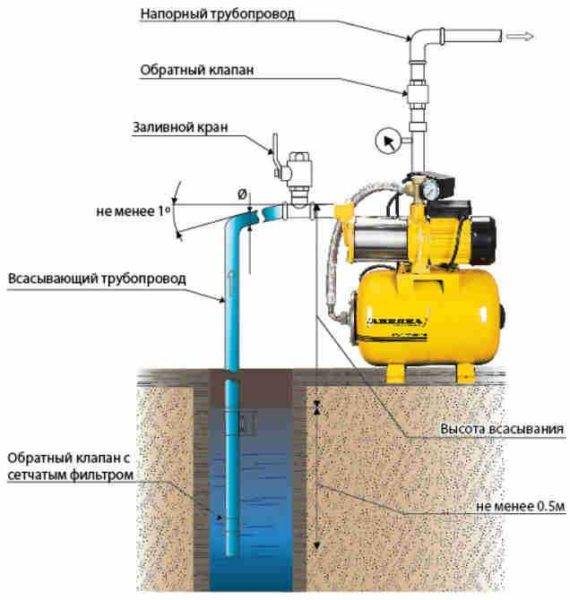
Plant commissioning and testing
The first start-up after installation or the restoration of the system's performance after a long "dry" period is simple, although it requires certain manipulations. Its purpose is to fill the system with water before the first connection to the network.
This is a simple procedure that does not require special skills. There is a plug on the pump that needs to be removed.
A simple funnel is inserted into the hole, through which the system is filled - it is important to fill in the supply pipe and the pump with a hydraulic accumulator. A little patience is required at this stage - it is important not to leave air bubbles. Pour water up to the neck of the cork, which is then twisted again
Then, with a simple automobile pressure gauge, the air pressure in the accumulator is checked. The system is ready to start
Pour water up to the neck of the cork, which is then twisted again. Then, with a simple automobile pressure gauge, the air pressure in the accumulator is checked. The system is ready to start.


To make it clearer how to test a pumping station, we have prepared 2 galleries for you.
Part 1:
Image gallery
Photo from
Fittings (elements for connecting water pipes or hoses to the unit) are not included in the kit, so they are purchased separately
We connect a pipe to the upper hole of the accumulator, through which water will go to the points of analysis in the house (shower, toilet, sink)
By means of a fitting, we also connect a hose or pipe for taking water from a well to the side hole
Do not forget to equip the end of the intake pipe with a check valve that ensures stable operation and the required pressure.
Before pouring water into the pipe, we check the tightness of all connections - the tightness of the fittings and the quality of the tightening of the union nuts
To test the quality of the pumping station, we fill the tank with clean water. When installing the pump at the well, we check whether the water level allows the use of the pump
Before starting work, pour 1.5-2 liters of water into the pumping equipment through a special hole
Step 1 - installation of the pumping station at the selected location
Step 2 - Installing the Water Supply Fitting
Step 3 - connecting the system that provides the house with water
Step 4 - connecting the pipe leading to the well
Step 5 - install a check valve at the end of the pipe (hose)
Step 6 - Leak Testing the Complete System
Step 7 - Filling the tank with water (or checking the water level in the well)
Step 8 - a set of water to create the desired pressure
Part 2:
Image gallery
Photo from
For the station to work, it remains to connect the power supply. We find the power cord, unwind it and plug it into a 220 V outlet
Do not forget to press the "Start" button, which is usually located on the side of the case
We turn on the pressure switch to start the pump, and wait for the pressure gauge needle to reach the desired mark
When the pressure in the accumulator reaches the desired level, it will automatically turn off.
To check the correct functioning of the pumping station, we turn on one of the taps, for example, in the bathroom or in the kitchen
We monitor the operation of the pumping station, pay attention to the speed of water supply, pressure force, performance
When the water in the tank (or in the well) runs out, the dry-running protection automatically turns on and the pump stops working.
Step 9 - Lowering the end of the hose into the water
Step 10 - connecting the station to the power supply system
Step 11 - Introduction to the working state by pressing the button
Step 12 - start the pressure switch
Step 13 - the accumulator is gaining the set pressure
Step 14 - opening the tap at the water supply point
Step 15 - Check Station Functionality
Step 16 - Automatic Dry-Run Shutdown
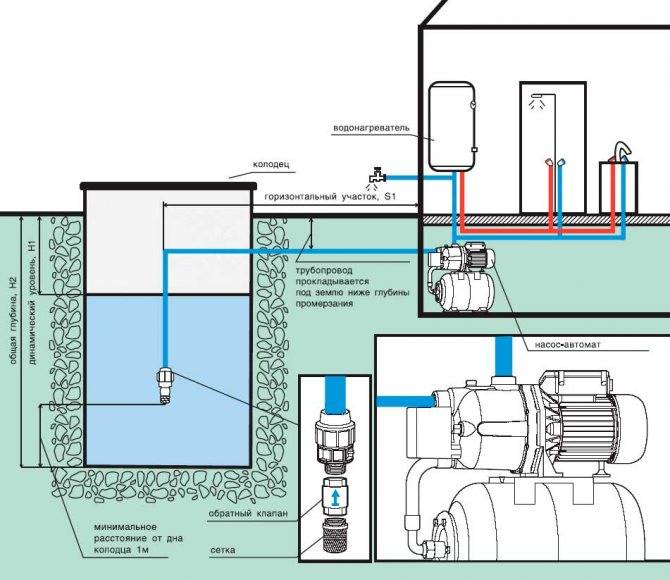
How is the pumping station set up?
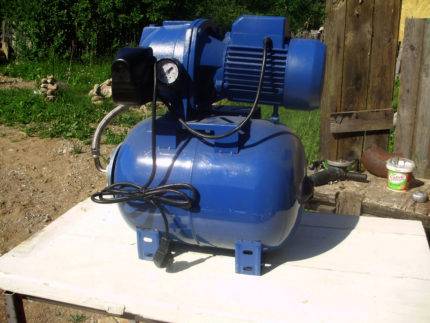
To organize an autonomous water supply at home from a well or a well, it is worth purchasing additional elements and combining them into a full-fledged pumping station. In addition to the pump, you will need a hydraulic tank, as well as a pressure switch.This relay turns the pump on and off, depending on whether the tank is empty or full.
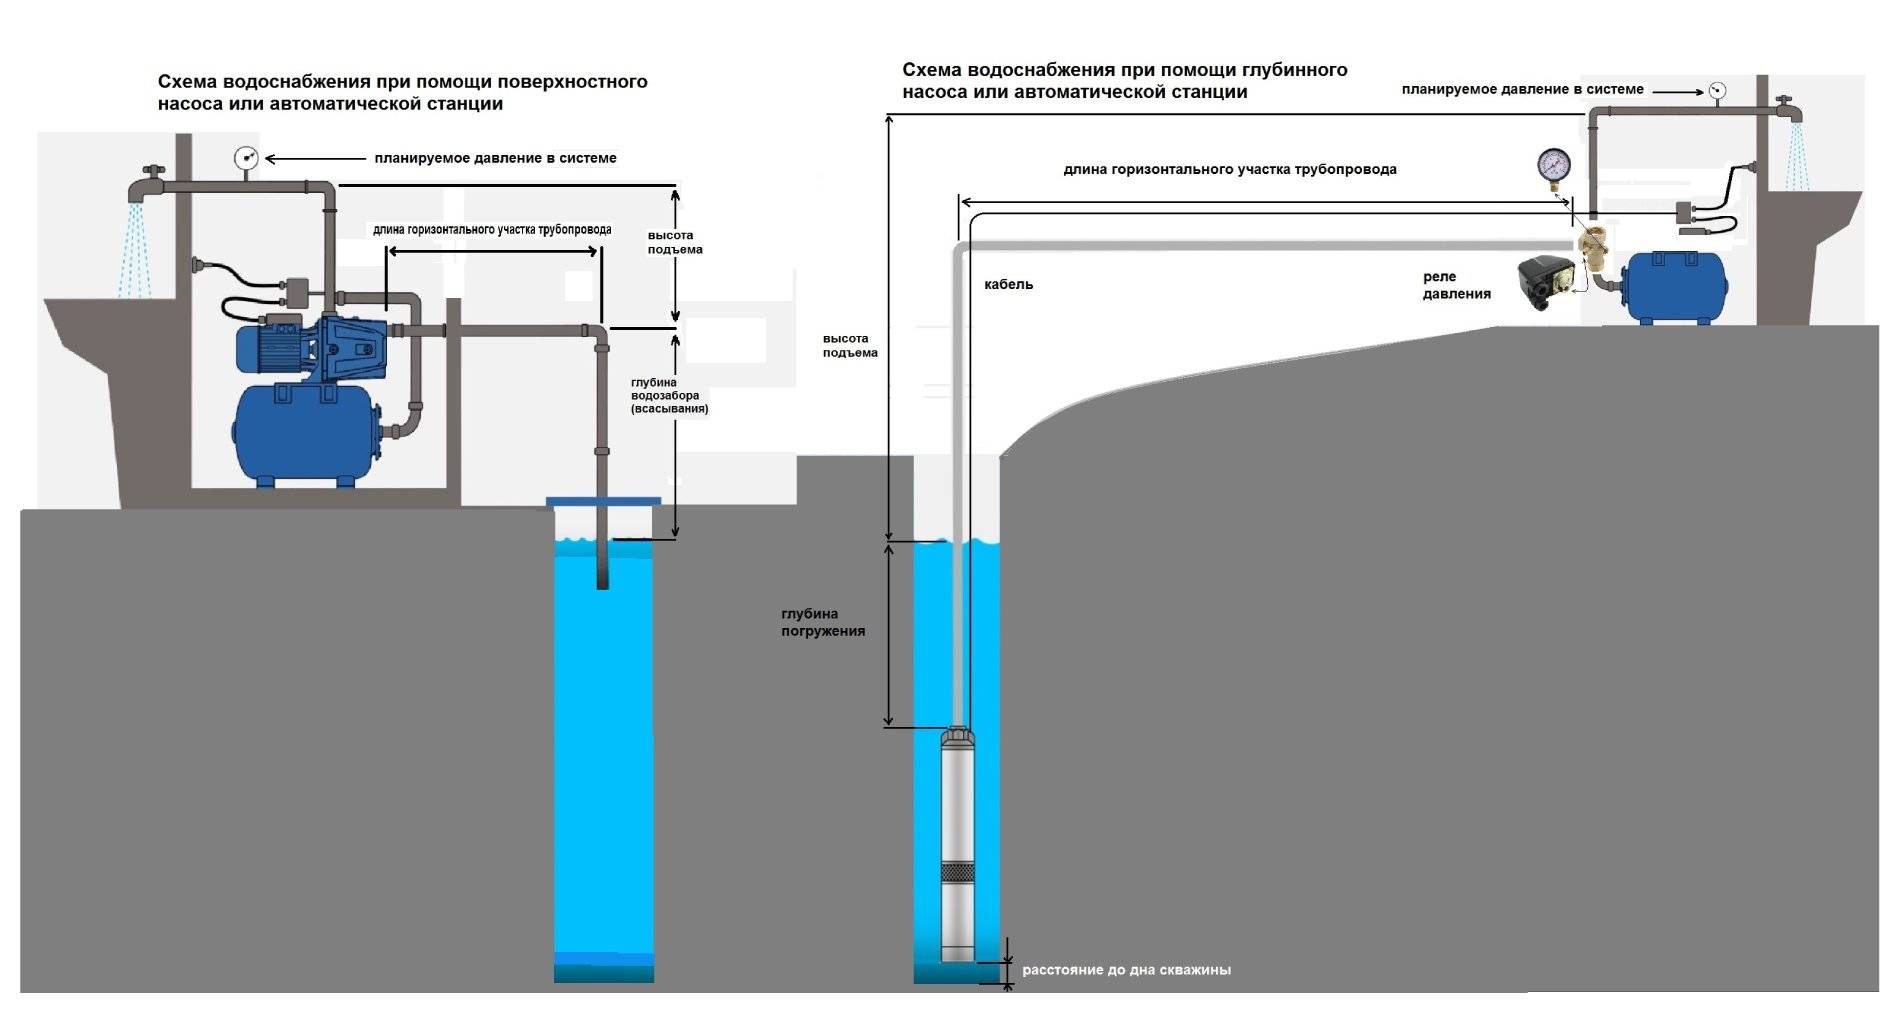


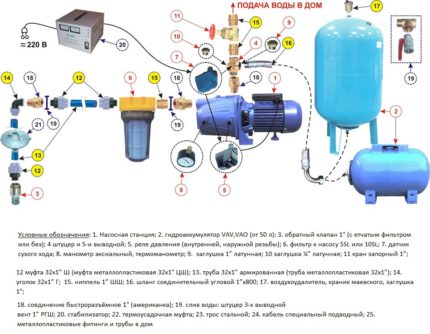
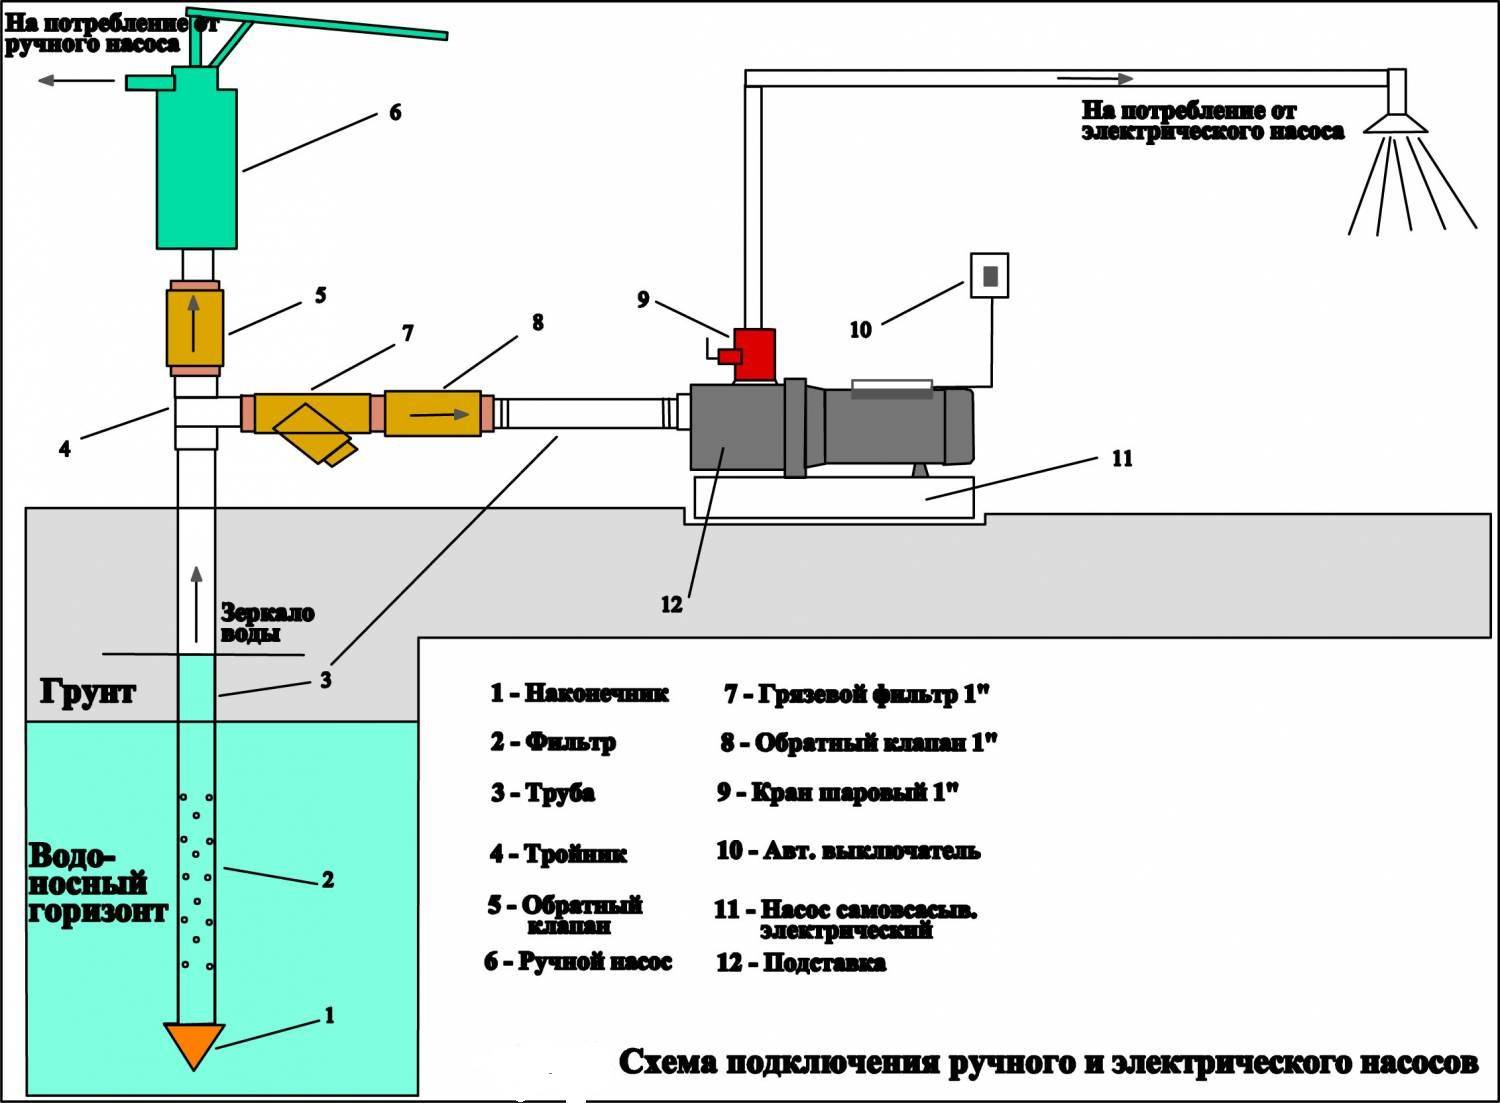
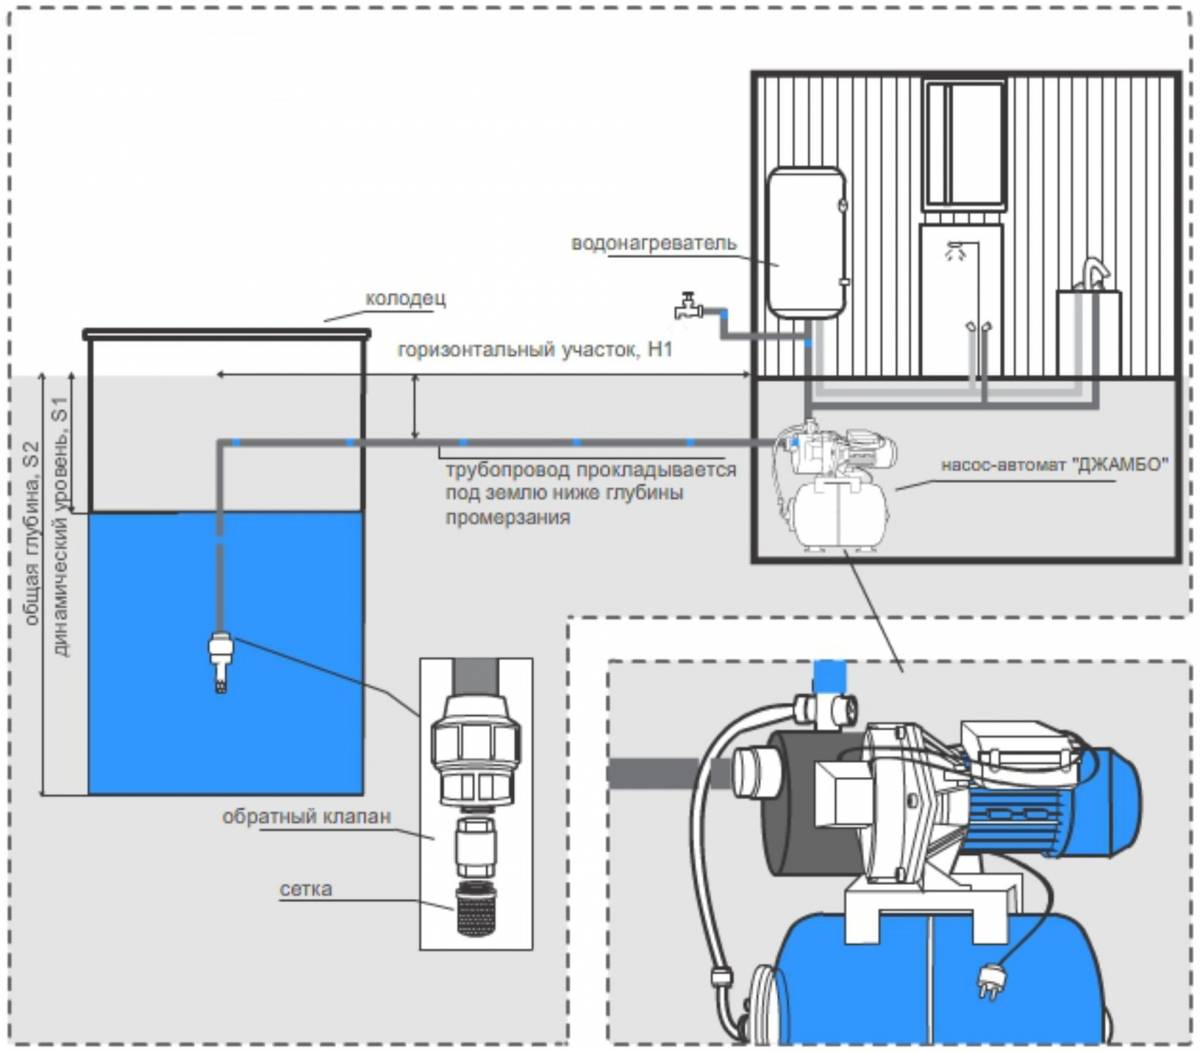
 The diagram shows a detailed procedure for water supply of a private house from a well using a surface pump as part of a pumping station
As a result, a certain supply of water will always be available in the house, and the idle operation of the pump is completely excluded. This significantly extends the resource of its work. In addition, the presence of a hydraulic tank compensates for possible water hammer, which has a positive effect on the condition of the water supply system as a whole.
Additionally, it is also recommended to purchase a pressure gauge (if the hydraulic tank is not equipped with it). Of course, you can purchase a pumping station equipped with all the necessary components. The order of installation of an industrial production station and a self-assembled station do not differ too much.
Surface pumps are often used as part of a pumping station along with a hydraulic accumulator and a pressure switch that automates the operation of this set of devices.
A hydraulic accumulator or hydraulic tank is a container equipped with a special rubber membrane. As the tank fills, this membrane expands, and when it is empty, it contracts. Such a device is considered highly efficient for autonomous water supply.
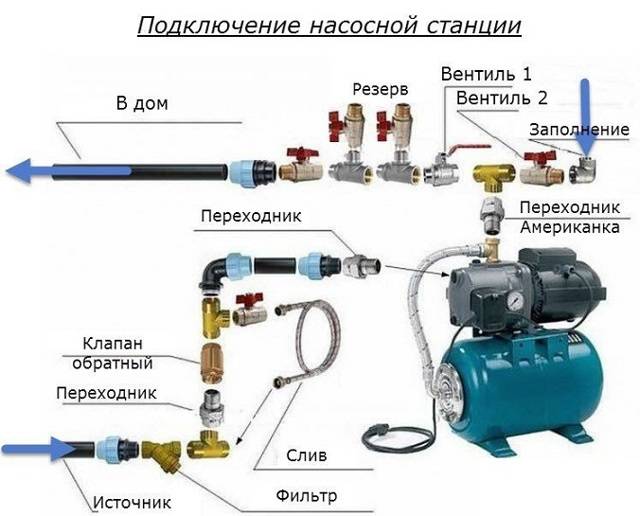
Connection of a pumping station
Choosing equipment and a place for installation is half the battle. You also need to correctly connect everything into a system - a water source, a station and consumers. The exact connection diagram of the pumping station depends on the chosen location. But anyway there is:
- Suction pipeline that descends into a well or well. He goes to the pumping station.
- The station itself.
- The pipeline going to consumers.
All this is true, only the strapping schemes will change depending on the circumstances. Let's consider the most common cases.
Water supply from a well for permanent residence
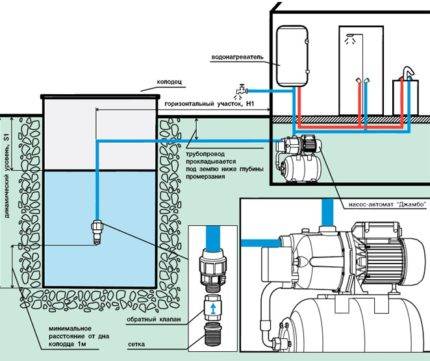
If the station is placed in a house or in a caisson somewhere on the way to the house, the connection scheme is the same. A filter (most often a regular mesh) is installed on the supply pipeline lowered into a well or well, a check valve is placed after it, then a pipe already goes. Why the filter - it is clear - to protect against mechanical impurities. A check valve is needed so that when the pump is turned off, water under its own weight does not flow back. Then the pump will turn on less often (it will last longer).
Scheme of installing a pumping station in a house
The pipe is brought out through the wall of the well at a depth just below the freezing level of the soil. Then it goes into the trench at the same depth. When laying a trench, it must be made straight - the fewer turns, the lower the pressure drop, which means that water can be pumped from a greater depth.
To be sure, you can insulate the pipeline (lay sheets of polystyrene foam on top, and then fill it with sand, and then with soil).
Passage option not through the foundation - heating and serious insulation are required
At the entrance to the house, the supply pipe passes through the foundation (the place of passage should also be insulated), in the house it can already rise to the installation site of the pumping station.
This method of installing a pumping station is good because if everything is done correctly, the system works without problems. The inconvenience is that it is necessary to dig trenches, as well as bring the pipeline out / in through the walls, and also in the fact that it is difficult to localize damage when a leak occurs.To minimize the chances of a leak, take proven quality pipes, lay a whole piece without joints. If there is a connection, it is desirable to make a manhole.
Detailed scheme of piping a pumping station when connected to a well or well
There is also a way to reduce the volume of earthworks: lay the pipeline higher, but insulate it well and additionally use a heating cable. This may be the only way out if the site has a high level of groundwater.
There is another important point - the well cover must be insulated, as well as the rings on the outside to the freezing depth. It's just that the section of the pipeline from the water mirror to the outlet to the wall should not freeze. For this, insulation measures are required.
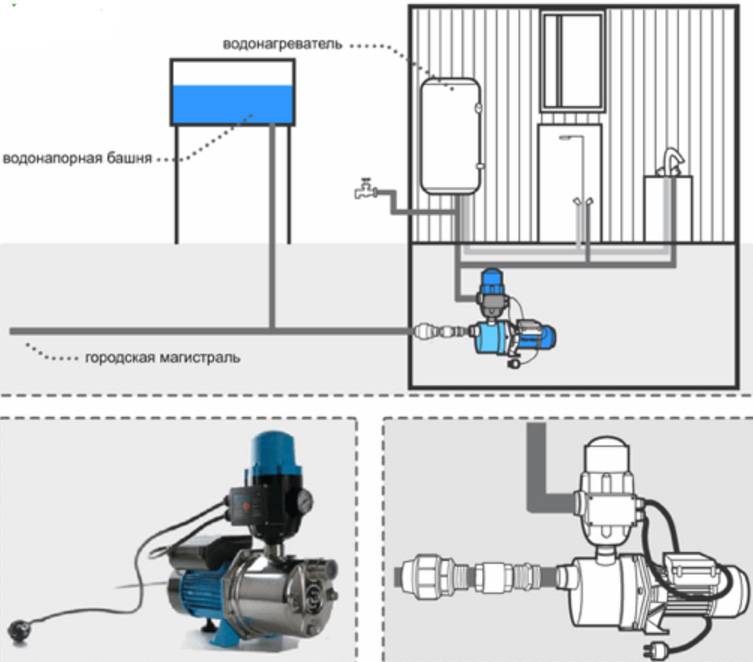
Connecting the pumping station to the water supply
Often a pumping station is installed to increase the pressure in the water supply system with centralized water supply. In this case, a water pipe is connected to the station inlet (also through a filter and a check valve), and the outlet goes to consumers.
Scheme of connecting the pumping station to the water supply
It is advisable to put a shut-off valve (ball) at the inlet so that if necessary you can turn off your system (for repairs, for example). The second shut-off valve - in front of the pumping station - is needed to repair the pipeline or the equipment itself. Then it also makes sense to install a ball valve at the outlet - in order to cut off consumers if necessary and not drain water from the pipes.
Well connection
If the suction depth of the pumping station for the well is sufficient, the connection is no different. Unless the pipeline exits at the point where the casing pipe ends.A caisson pit is usually arranged here, and a pumping station can be installed right there.
Pumping station installation: well connection diagram
As in all previous schemes, a filter and a check valve are installed at the end of the pipe. At the entrance, you can put a filler tap through a tee. You will need it for the first start.


The main difference between this installation method is that the pipeline to the house actually runs along the surface or is buried to a shallow depth (not everyone has a pit below the freezing depth). If the pumping station is installed in the country, it's okay, the equipment is usually removed for the winter. But if the water supply is planned to be used in winter, it must be heated (with a heating cable) and insulated. Otherwise it won't work.
Self-assembly and connection
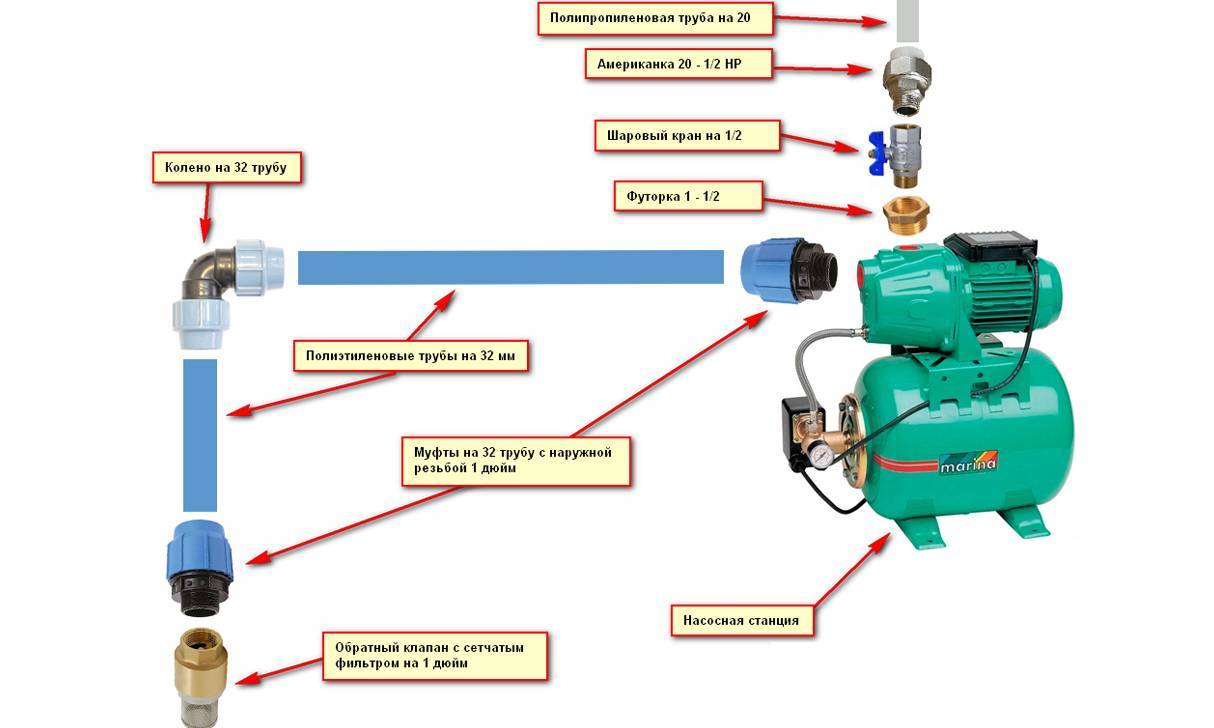
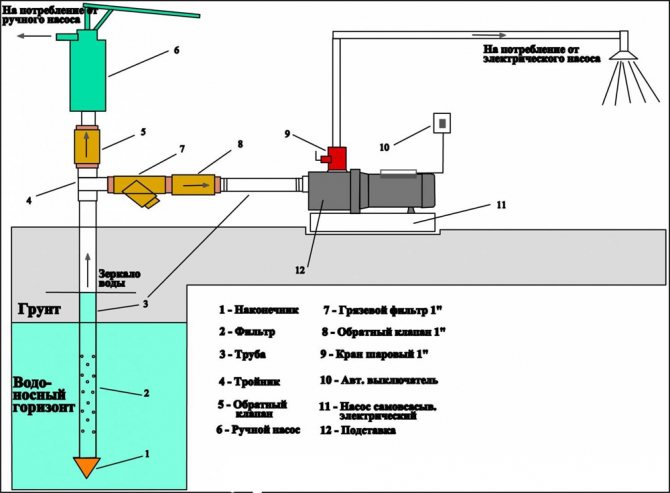
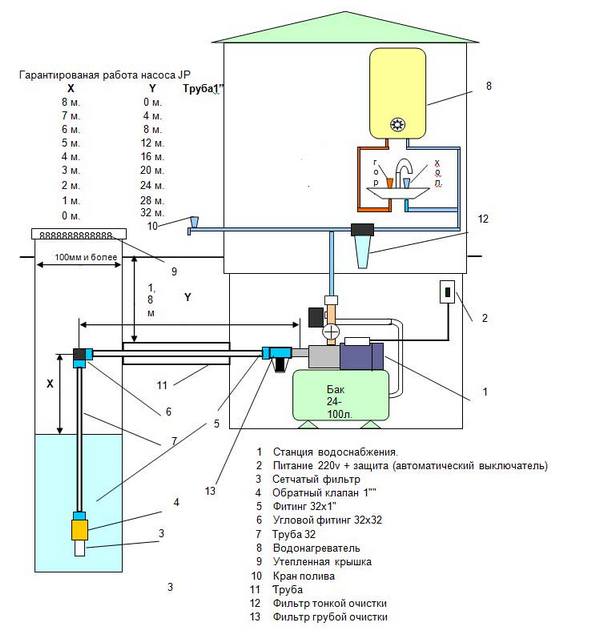
The two outputs available at the pumping station are designed to connect it to the well and to the water supply system of the house. First, they begin to connect the unit to the well. For this, a polyethylene pipe is taken, the diameter of which should be equal to 32 mm. The pipe, of course, must be solid, which will eliminate the possibility of leaks. Therefore, it is better to buy a pipe with a small margin, if anything, the excess can be cut off. One end of the pipe is lowered into the well, and the other is connected to a pump mounted directly in the station. If necessary, the polyethylene pipe is insulated using materials manufactured by Termoflex as a heater.
A metal mesh is attached to the end of the pipe lowered into the well, which serves as a coarse filter.A non-return valve is also fixed there, which is necessary in order to ensure that the pipe is constantly filled with water. Only in this case the pump will be able to pump water from the well. To secure the check valve and the filter, a coupling with an external thread is used.
The second end of the polyethylene pipe is attached to the pump using the same coupling. First, an American tap is connected to the outlet of the station, then a coupling with an external thread is connected to it, and then a polyethylene pipe is connected using a collet connection.
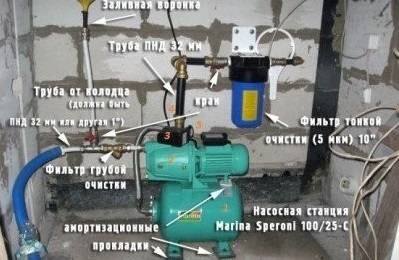
Scheme of connecting a compact pumping station to a well and a pipeline of a private house water supply system, indicating the most important connections
The pumping station is connected to the pipeline using the second outlet, which is usually located at the top of the unit. At the same time, an American crane is also connected to the station with a threaded connection. Then a polypropylene combined coupling is screwed into the tap, the diameter of which is 32 mm, and the angle is 90 degrees, the length of the external thread is 1 inch. A strong connection of a polypropylene water pipe with a coupling is ensured by soldering these elements.
As you can see, the installation and connection of the pumping station to the well can be done independently. If you do not want to delve into the intricacies of the installation work, then hire specialists.
Main types of wells
To date, there are several massive, time-tested structures that will ensure the flow of water from workings in the ground. Selection of the type of well is a responsible matter, which should be based on the results of hydrogeological surveys. The use of the type of well is dictated, along with the conditions on the site, by the needs of the owners for water.After all, the water supply schemes of a summer country house with a garden and a vegetable garden and a two-story house for year-round living of two families will be very different.
Ordinary well
This attribute of country life, familiar to everyone at least from movies and cartoons, is the easiest way to get water. Its depth rarely exceeds 4-5 meters, two or three cubes of water always accumulate at the bottom. When connecting a submersible pump and water conduit equipment to the house, it is quite possible to use a well for water supply. True, intensive use of such water will not work, and its quality leaves much to be desired.
Abyssinian well
This name hides a system of thick-walled pipes with a mesh or perforated filter at the end. Pipes are hammered into the ground by a special device, colloquially referred to as a "woman". The intake end with the filter reaches the aquifer. At the top, either a manual or electric pump is arranged. The performance of this needle well is slightly greater than that of a standard well, and its installation is cheaper, but since there is no storage in the system, you will have to forget about intensive flow.
It is generally accepted that the water from the Abyssinian well is technical and is suitable only for irrigation. However, with a favorable hydrogeological situation, it may well be clean. Of course, you should not drink it without filtration and boiling, but you should wash and wash in it, since it is quite soft.
medium depth
Its second name is a well in the sand. For it, drilling is already being used to the aquifer sandy layer. Typically, the depth of this formation is 15–30 meters. To strengthen the structure, casing pipes are used - steel, and now cheaper and non-corrosive polymer pipes.Wells in the sand provide fairly clean water, which, however, is also better to pass through a filter and disinfectant. A well of medium depth has its own service life. Its failure is not even connected with the strength of the structure, but with the fact that the filter on the water intake is silted up. Over time, it becomes impossible to clean it, and you have to drill a new well. The average normal service life is about ten years. With active use, it is reduced.
Artesian
The deepest of domestic wells and serves much longer than all the others - about 80 years, or even more. But it has a tangible minus - high complexity and a large amount of work make the price very high. It's all about the depth at which drilling is carried out. An artesian well reaches a depth of more than 100 m. It passes through several soft and hard layers - loam, clay, water-bearing sand, until it reaches limestone or even harder rocks with aquifers.
A deep well in a stone does not need end casing and filters - after all, the water comes directly from the rocks, where sand is no longer found. In addition, at such a depth, water is under pressure and enters the system by gravity - a pump is already needed to supply water to the room. On the other hand, such water withdrawal already requires state registration. Well, the complexity of the work carried out determines their high cost.
Video lesson and conclusion
There is an opening at the top front of the centrifugal pump, which has a cap for filling water. This is necessary for the passage of fluid through the pumping station. As soon as the water leaves, it will be possible to close the hole.
As you can see, everything is not so difficult.Everything can be seen in the photo.
Before buying a station, the instructions should be carefully studied, you should not take it back to back in terms of consumption, make an allowance towards increase. The price of the unit may be different, but do not chase cheapness, give preference to proven and reliable brands.


