- Features of two-level light control
- Wiring continuity
- Voltmeter
- indicator
- What is dangerous polarity reversal
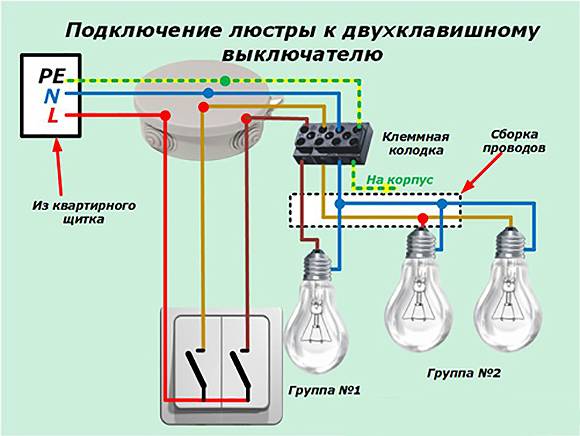
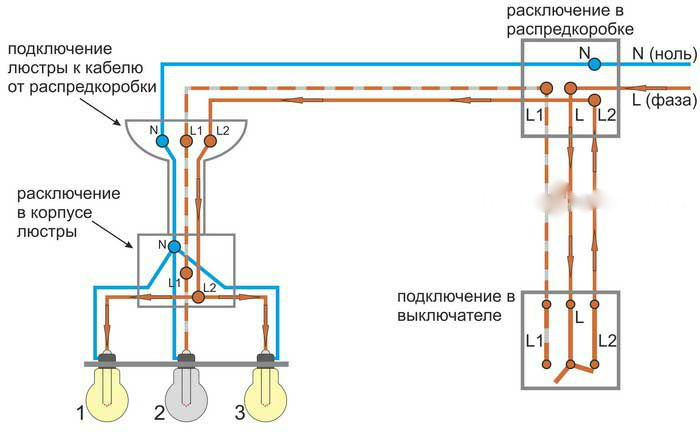
- Chandelier connection
- Connecting the chandelier to the ceiling wires.
- Wiring diagrams for a two-gang switch
- For two lights
- For two lamps
- Wiring diagram for a double switch with a socket
- Wiring continuity
- Using the indicator
- With a voltmeter
- Required Tools
- Connecting a chandelier to a two-gang switch
- Errors when connecting a two-gang switch
- How many wires on the chandelier
- Connection to a two-gang switch
- Connecting a chandelier to a single switch
Features of two-level light control
In one room, the brightness of all 9-12 light bulbs is not always required. Sometimes you want to create a romantic atmosphere by turning on 2-3 shades of an exquisite chandelier. They will allow you to get a subdued light, ideal for intimate conversations in the evening.
The subtlety of controlling the light bulbs of a lighting device depends on the switch - if you put a two-key switch, you can effectively delimit the possibilities of the chandelier by forming 2 light groups. This technique allows you to create a deeper light composition, and two buttons allow you to control the amount of light according to your wishes.
In addition, the user also receives additional benefits in the form of savings:
- electricity when one small group of light bulbs is turned on;
- the resource of the lighting fixtures themselves, resting for a certain period of time;
- space on the wall - a double switch model takes up less space than two single ones.
Yes, and if you wish, you can personally do the connection of the chandelier. To do this, you first have to choose the most suitable switch model from the variety offered by numerous manufacturers.
A suitable two-key switch and its correct connection will simplify the control of the light in the room. True, you still need to create optimal groups of light bulbs that make up the chandelier.
In this matter, everything will depend on the number of points emitting light and the presence of additional lamps in the room. Yes, and the model plays an important role: if this is a multi-level product, then it is advisable to connect the bulbs of the upper floor of the chandelier to one of the keys, and all the rest to the second.
 Recently, in pursuit of creating an original atmosphere in the house, users are choosing retro models to emphasize the sophistication and originality of the interior.
You can form groups as you wish, but you have to take into account the total number of lamps of the device - the more there are, the more variations you can create.
So, for a product with 12 light emitters, the following options will be relevant:
- 3+9;
- 4+8;
- 5+7;
- 6+6.
It makes no sense to connect less than 3 lamps per key - it will be quite dark in the room. For communication or watching movies, 3-4 pieces are enough.
The last option with an equal distribution is not the most successful, because with 6 light bulbs it is inconvenient to read, knit or embroider, and they use quite a lot of electricity.
Wiring continuity
 It is not possible to identify a grounded wire in every house. As a rule, they are absent in the buildings of the old building. The remaining contacts are also not always marked. To figure out where the “phase” is and where “zero” is, it is necessary to make a call.
So, with a two-key switch device, you may need to connect a chandelier with three wires, two of which will be phase and one zero. To determine the voltage, you need an indicator screwdriver, a tester (multimeter) or a voltmeter.
During the dialing, it is necessary that the switch key be in the “ON” position, respectively, the electricity in the room must also be connected. Upon completion of work, it is necessary to transfer the key to the “OFF” state and cut down the machine on the shield or unscrew the plugs.
Voltmeter
One of the measuring instruments often used by craftsmen to determine voltage is a voltmeter. Its main advantage is the simplicity of operation, as well as the absence of the need for an additional power supply unit (batteries). When working with it, it must be remembered that its operation must be carried out in parallel with the source of electricity and it must be strictly in a horizontal position.
Determining the voltage of contacts using a voltmeter is a simple task. It is enough to fix the probe wires on the contacts and track the position of the arrow on the indicator. If the value does not change (it is at zero), then both wires are phase, and the remaining one is zero.Then it is worth moving one of the probes to "0", and the second in turn to each of the "phases". The arrow on the device should point to a value of 220 V. To facilitate further work, it is necessary to mark each wire with a colored marker or Latin letters, where “N” is the zero contact, and “L” is the phase.
When working with a voltmeter, you must adhere to a number of rules:
- during the measurement process, keep the device box only horizontally;
- correctly select a voltmeter for the section of the circuit being measured (do not use weak equipment to measure significant values);
- observe polarity.
One of the advanced varieties of a voltmeter is a multimeter or tester. It has a large measurement range and can detect the value of not only voltage, but also resistance, current, inductance, temperature and frequency.


This digital instrument is more accurate, has overload protection and, in most cases, an anti-shock mechanism. Of the shortcomings, it is worth noting the cost and the need for additional power sources (batteries).
indicator
 A passive indicator screwdriver is available in almost every home. Working with her is simple and convenient. It is enough to touch her sting to the bare contact, as it will immediately become clear whether this is “phase” or “zero”. When touching the phase wire, the indicator on the handle will glow, otherwise it will not.
All work on dialing and marking conductors must be carried out with the machine turned on on the shield. At the end of the process, it is more expedient to cut it down.
What is dangerous polarity reversal
Polarity reversal is a procedure for applying voltage of reverse polarity to conductors. If connected incorrectly, this phenomenon rarely leads to failure of the device.However, the service life of the lighting device is significantly reduced.
In addition, when the chandelier is turned off, despite the absence of current in it, the phase potential in the contacts will be preserved, and this is a direct threat of electric shock during work.
The second "feature" of polarity reversal is the ability of fluorescent lamps to flicker even when turned off.
Chandelier connection
Whatever the chandelier, the connection principle for such lighting fixtures is almost the same. And it's simple enough
Moreover, it does not matter - you need to connect the chandelier to a single switch or to a double one. Installation, of course, is different, but both are easy.
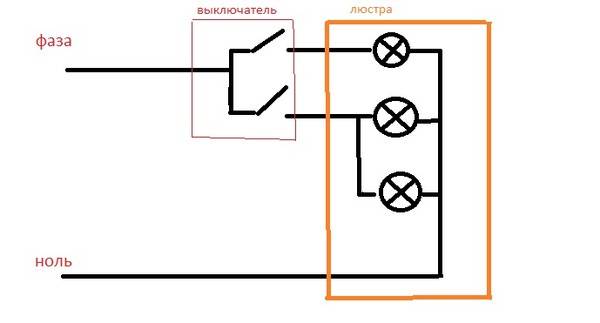
So, any light bulb is on if two mandatory wires are connected to it:
- phase;
- and zero.
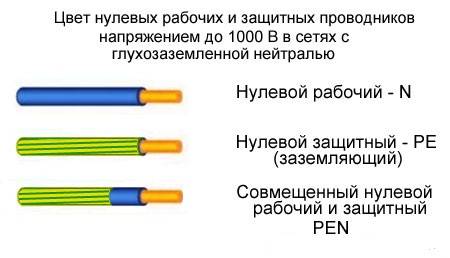
Before starting the connection activities, you should make sure that the electricians who installed the wiring initially correctly colored the wires:
- the working zero conductor must be blue or light blue;
- protective zero conductor - yellow-green.
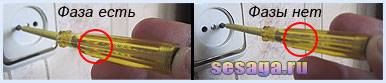
Everything is simple here: if the indicator sensor lights up when you touch the wire, then this is a phase, no - zero. Before the procedure, the screwdriver indicator can be checked on any live object - in a socket or floor shield, for example.
Wires can go from the ceiling in different ways:
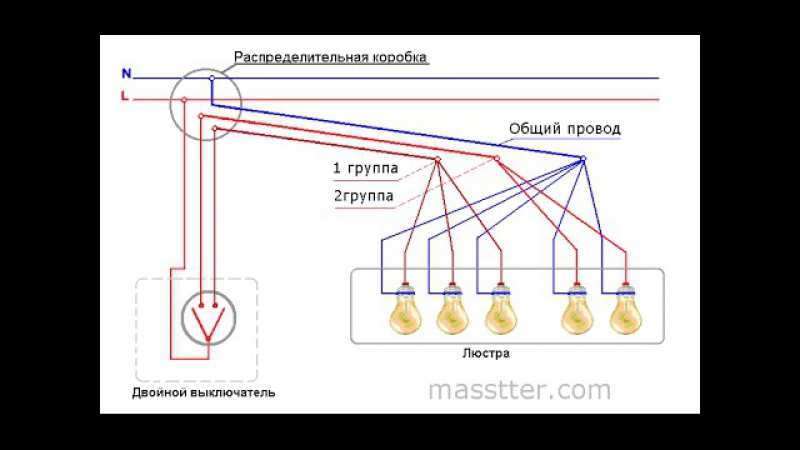
- Two conductors - zero and phase. This means that it will be possible to turn on or off only all the lamps on the chandelier at the same time.
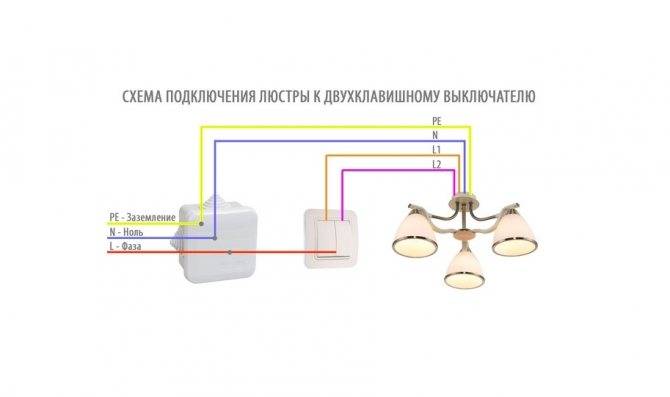
- Three conductors - one zero plus two phase.If the circuit is as follows, then it is possible (in the presence of a two-gang switch) to distribute the lamp switching in steps, when only a few lamps of the lighting fixture will light up and go out (at the request of the user) or all the lamps at once.
- A pair of twin wires. Then, on the chandelier, the lamp inclusion can also be distributed.
- Three two-wire wires - there will be no opportunities for lamp distribution. The third, yellow-green wire is just a protective zero conductor responsible for grounding.
Connecting the chandelier to the ceiling wires.
Before connecting the chandelier to the ceiling, it is necessary to determine the phase and neutral ceiling wires. To do this, we use an indicator screwdriver.
Advice. Before operation, the indicator screwdriver must be checked. To do this, it is enough to touch the phase conductor with the working tip of the screwdriver, on which the phase is exactly present, for example, the socket socket. If there is a phase in the socket socket, a light will light up inside the screwdriver.


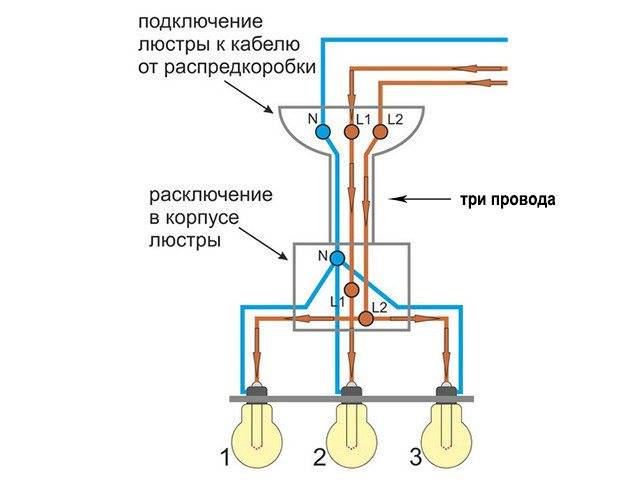


With the definition of wires for a single-gang switch, everything is simple, so let's immediately proceed to the definition of wires for a two-gang switch:
1) we turn off both keys of the switch, and with an indicator screwdriver we check the absence of a phase on all ceiling wires;
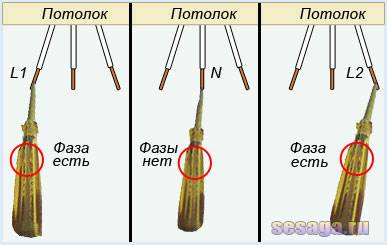
2) then we turn on both keys of the switch, and with a screwdriver we determine on which two wires the phase appeared. We remember or mark them, as they are phase wires L1 and L2. On the neutral line N indicator screwdriver should not show anything;
3) turn off both keys again and with an indicator screwdriver we once again make sure that the phase has disappeared on the phase wires, but has not appeared on the zero one;
4) turn off the general power or the power of this lighting circuit;
5) now, according to the diagram, we connect the chandelier to the ceiling wires.
But there is one nuance that needs to be told about. Very often there is a house, apartment or room where in the electrical wiring mixed up phase and zero. There is nothing terrible, but the method for determining the ceiling wires will be different:
1) we turn off both keys of the switch, and with an indicator screwdriver we check the presence of a phase on one ceiling wire, which will be zero. There should not be any other two phases - these will be phase wires L1 and L2;
2) then we turn on both keys of the switch, and with an indicator screwdriver we once again make sure that the phase remains on the neutral wire, but does not appear on the phase wires. We remember or mark the phase wires;
3) ALWAYS turn off the general power supply;
4) now to the ceiling phase wires L1 and L2 we connect the phase wires of the chandelier, and to the ceiling zero N, zero wire chandeliers.
And I still need to talk about one more thing.
In modern chandeliers, in addition to the wires of the electrical circuit, there is a protective yellow-green grounding conductor, which is connected to the metal part of the chandelier body. This conductor is designed to protect a person from the action of electric current, which in the event of an emergency may appear on the metal parts of lighting fixtures.
If protective grounding is not provided in the electrical wiring of the house or apartment, then when connecting the chandelier, the tip of the conductor is isolated and left inside. If protective grounding is present, then one end of the conductor is connected to the body of the chandelier, and the other to the ceiling protective conductor.
Well, basically, that's all I wanted to say. As you can see, there is nothing complicated.The most important thing is to understand the principle of separation of lamps. Now I think that it will not be difficult for you to connect a chandelier with any number of leads and lamps.
Good luck!


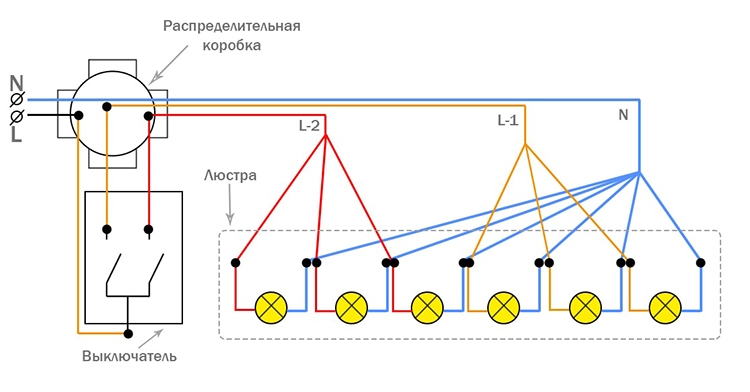

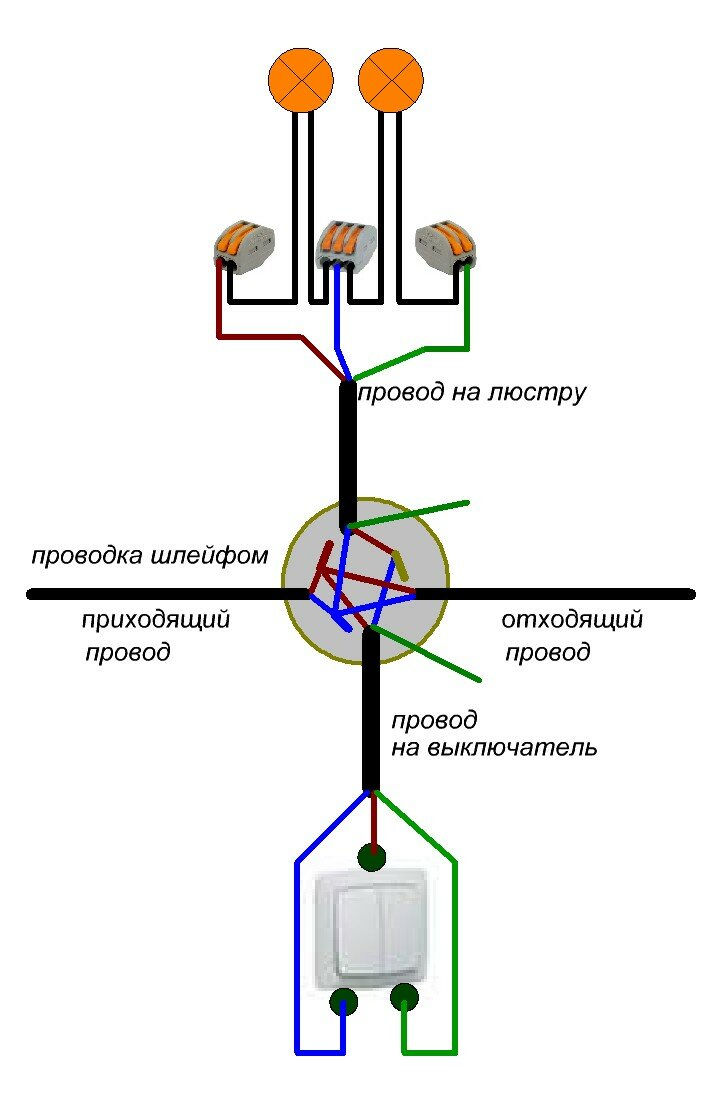
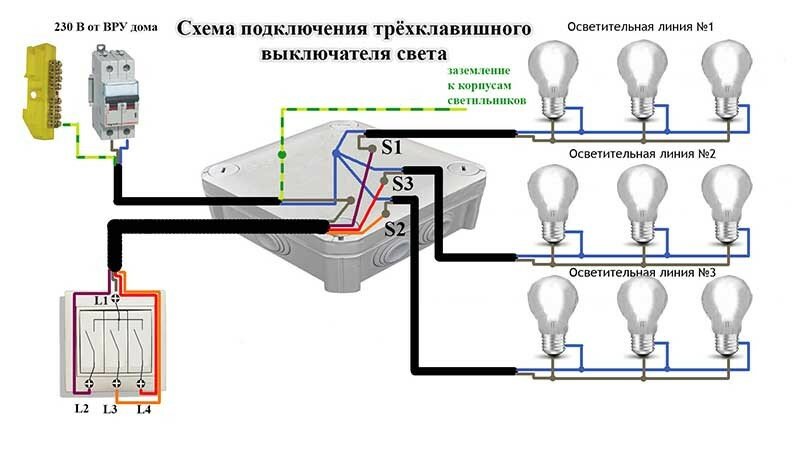
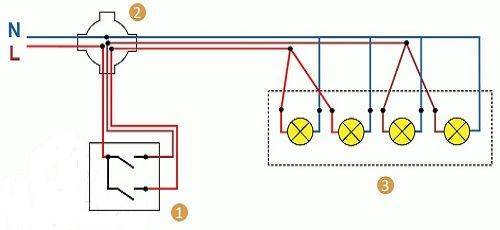
Wiring diagrams for a two-gang switch
A phase is applied to the switch input. It moves away from the junction box. This box is often located under the switch. Another option for its location is also possible. With bottom wiring, the box will be above the double switch.
For two lights
A two-gang switch can be wired from two lamps or from two groups of light bulbs. In each of these cases, the instructions for carrying out the work will not have fundamental differences. Wiring diagram for a double switch:
- Bring the phase to the input on the two-key device.
- Loosen the contact by turning the bolt counterclockwise.
- Pass the cable, stripped 4 or 6 mm from the insulation, under the plate.
- Tighten the mounting bolt properly.
- To check the security of fastening, pull the wire. If after that he did not start to move away, the screw was tightened well.
In the same way, connect the wires going to the lighting fixtures:
- The contacts for these wires are located below the phase input.
- Loosen the fasteners on them.
- Connect the wires.
- Tighten the bolts.
- Check fastening.
When the double switch connection is completed:
- Replace control keys.
- Apply current.
- Check if the job was successful.
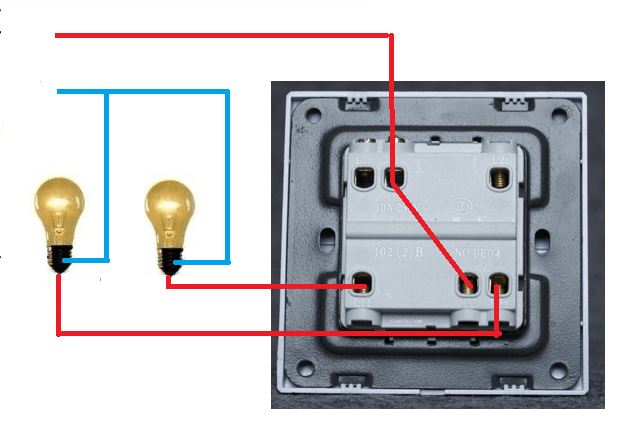
For two lamps
As in previous cases, work begins with a power outage of the network and phase determination. The wiring is connected to the switch via a three-wire cable.Luminaires and power are supplied by a two-wire cable. What the process looks like:
- The bare ends should be pulled apart.
- Next, turn on the machine.
- Then you should probe the cables with an indicator screwdriver. In the absence of current, only the phase will set the glow on the indicator.
- Next, the phase is found on the switch using the same screwdriver.
- The machine is switched off to ensure safe operation.
- The phase ends of the wires are connected to each other.
- The machine turns on.
- The lighting device turns on. In the absence of a light bulb, the phase is checked with an indicator screwdriver.
- The second wire, located in the junction box along with the phase wire from the lighting fixture, is connected to the input zero.
- The machine must be turned off.
- The first wire from the lighting device is connected to the input zero.
- The second wire goes to the end of the switch.
- At the end of the work, its effectiveness is checked.
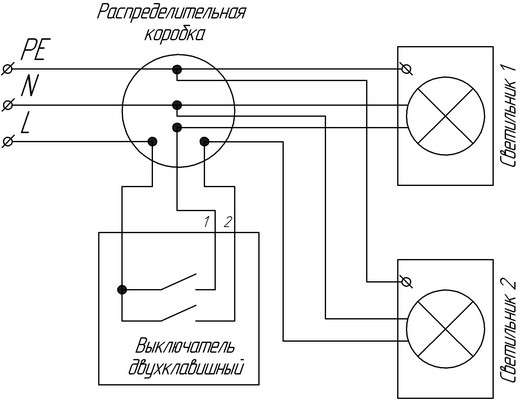
Wiring diagram for a double switch with a socket
Double switches are also available, being combined in one block with a socket. The principle of connecting the switch in this case remains the same. To properly complete the work with the block, you only need to bring the ground and zero to the outlet itself.

To do this:
- Pull the phase to the switch.
- Connect the wires that go to the chandelier or other types of fixtures.
- Take the phase from the switches and feed it to the part of the device where the socket is located.
- Bring zero to the next contact. It is taken from the tire on the shield.
- For the "earth" on the shield also has a special contact. Plug it into an outlet.
Wiring continuity
First of all, you need to check the correct connection of the switch.In the open position, the indicator screwdriver should show the presence of a phase on one of the conductors. If the phase cannot be found, then this means that the switch is connected incorrectly or there are problems in the junction box.
In the place of the ceiling where the lamp will be installed, at least two wires must come out - zero and phase from the switch. In the case of connecting a multi-track chandelier, the number of wires can be large. One of them remains neutral, the number of others corresponds to the number of keys on the switch.
Using the indicator
Determining the purpose of each wire is very simple. When the switch is on, only one of the wires should be free of voltage. The rest should cause the indicator to glow. By turning off the light switch keys in turn, you can determine which wire corresponds to which key.

Finding a phase wire with an indicator screwdriver
With a voltmeter
When checking with a measuring device, you need to find a wire relative to which voltage will be present on the remaining wires. This wire will be zero. Between the remaining wires, the device will show the absence of voltage. Further, leaving one of the probes of the device connected to the neutral wire, turn off the switch keys in turn to determine the ownership of the wires.
Required Tools
To do this, you have to disassemble the chandelier.
How to proceed: you need to unscrew the lamp from the chandelier and visually determine the phase spring in the center and the zero one located on the side of the contacts. As a result, you have the body itself with fasteners on the sides and the inner contact part in your hands. When three keys are pressed at the same time, all lamps are lit.
Installation and connection of the chandelier To begin with, we remove all the shades and check the cartridges for defects. In such rooms, when installing a chandelier, you can find that 4 wires come out of the ceiling: two phases from the switch, zero and ground. As a result, you should get two twists.
To connect to a two-gang switch, the lamps are connected in groups. Six zero cores should be combined in one terminal. The phase supplied from the box is attached to the common contact of the disconnecting device.
A fairly common situation - you decide to connect a single-mode chandelier to a two-gang switch. After all the preparations, contacts from the chandelier are connected to each switch key
The following actions are performed strictly point by point and with complete caution. Phase L is connected to the input contact of the switch and, branching out at its output contacts L1 and L2, enters the corresponding terminals of the chandelier
Connecting a chandelier to a two-gang switch
The electrical part of the chandelier assembly Inside the ceiling there is an electric cartridge, a lamp is screwed into it and two contacts leave, one is phase, the other is zero. If the wiring has the same color, it is better to mark it with markers. The next step is to similarly twist the unused three brown wires.


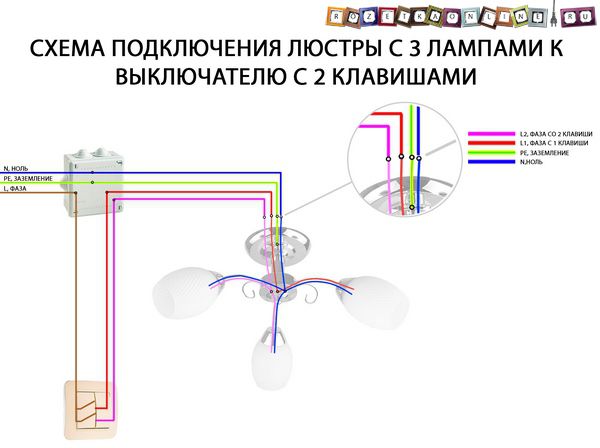


If the phase has disappeared, then we also note or remember that this is the second phase output. For example, we will mount such a Soviet chandelier: This is how the chandelier will look at the end of the work. It connects to exactly the same conductor on the chandelier. A single core to which zero contacts from all lamps are connected. Now you need to put together, providing reliable contact, phase cables and neutral cables of each group of light bulbs on a chandelier.
If you have a multi-core cable installed, we press the ends of the wires with lugs, but if you use a monolithic cable, additional insulation is not required. Similarly, the zero vein is yellow-green, which is responsible for the ground. All rights to the video belong to: Repairman's School Share with friends:. If you use terminals to connect, you will need to remove the insulating material from the conductors by mm. But first of all, it is necessary to completely de-energize the apartment by turning off the introductory machine.
Connecting a two-gang switch. Wiring diagram for a two-gang light switch
Errors when connecting a two-gang switch
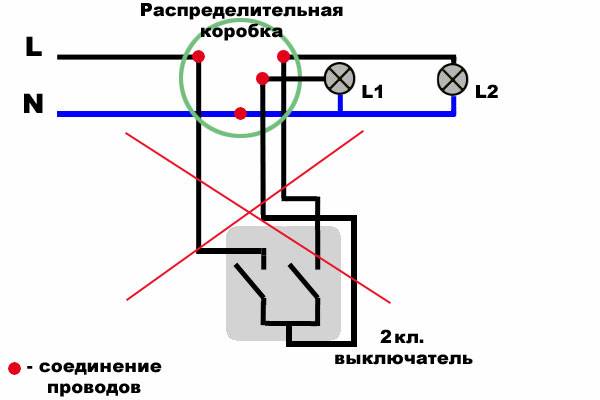
The first mistake that an illiterate specialist can make is to put on the switch not a phase, but zero.
Remember: the switch must always break the phase conductor, and in no case zero.
Otherwise, the phase will always be on duty on the base of the chandelier. And an elementary replacement of a light bulb can end very tragically.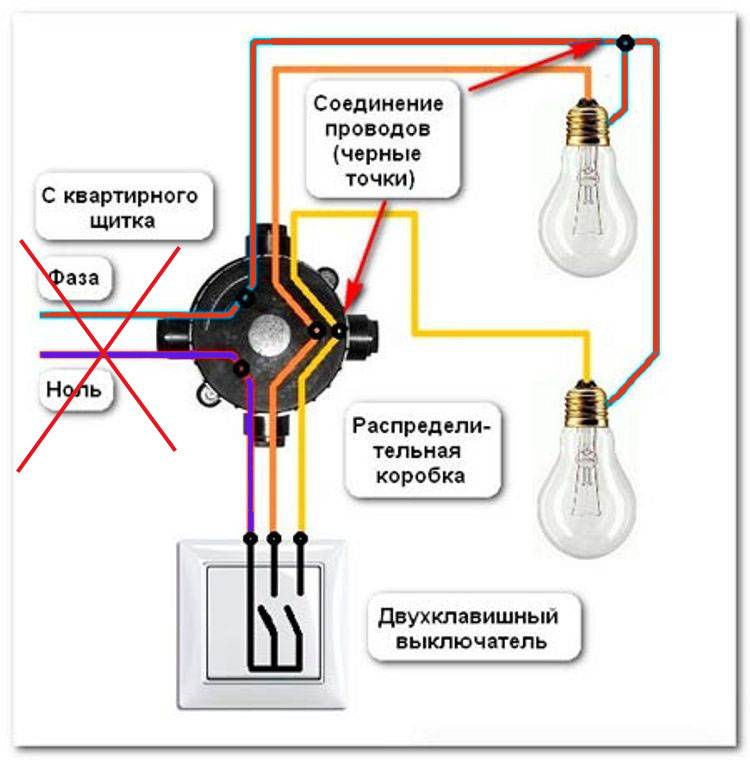
By the way, there is one more nuance because of which even experienced electricians can rack their brains. For example, you wanted to check directly on the contacts of the chandelier - the phase comes there through a switch or zero. Turn off the two-keyboard, touch the contact on the chandelier with a Chinese sensitive indicator - and it glows! Although you have assembled the circuit correctly.
What can be wrong? And the reason lies in the backlight, which are increasingly equipped with switches.
A small current, even in the off state, still flows through the LED, applying potential to the contacts of the lamp.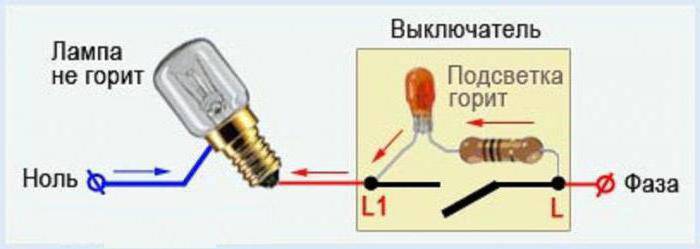
By the way, this is one of the reasons for the blinking of LED lamps in the off state. How to deal with this can be found in the article "6 ways to solve the problem of flashing LED lamps." To avoid such an error, you need to use not a Chinese indicator, but a multimeter in voltage measurement mode.
If you moved into a new apartment where it was not you who connected the chandelier, and it behaves in such a strange way, that is, it does not react as it should to the two-key switches, then the point is most likely precisely in such an erroneous installation of the supply wires. Feel free to disassemble the switch and check the common contact.

If you have a backlit switch, an indirect sign of such an incorrect connection may be the failure of the neon light bulb. Why indirect? Since here everything depends on which key you will start the phase on.
The third common mistake is to connect the neutral wire on the chandelier not to the common zero in the junction box, but to one of the phase wires.  To avoid this, use and observe the color coding of the wires, and even better, if you do not trust the colors, check the voltage supply using a high-quality indicator or multimeter before turning on the lamp.
How many wires on the chandelier
The number of wires on a chandelier depends on how complex the chandelier is and how many bulbs it has to turn on. When there are only two wires on the chandelier, then it is most likely a simple chandelier with only one light bulb. It is not difficult to connect such a chandelier, it is enough to connect each conductor to zero and to the phase (separately). If the chandelier is simple, and there are 3 outlets on the ceiling, and they are connected to a two-gang switch, then:
- It is possible to connect two phase conductors together, thus forming one phase conductor. In this case, the chandelier can be turned on and off with each key, which is not very convenient.
- One phase conductor is isolated, then the chandelier will turn on / off with one of the keys, to choose from.
There are multi-track chandeliers that can have more than one light bulb, so there are more wires, in addition, there may be a wire (yellow-green) for grounding.
When the chandelier has 3 wires, then do this:
- The ground wire is not connected if it is not on the ceiling.
- The ground conductor is connected to the same conductor on the ceiling.
The other two wires are connected to the phase and neutral conductor. As a rule, modern chandeliers are necessarily produced with a ground wire, which is associated with the requirements of safety regulations.


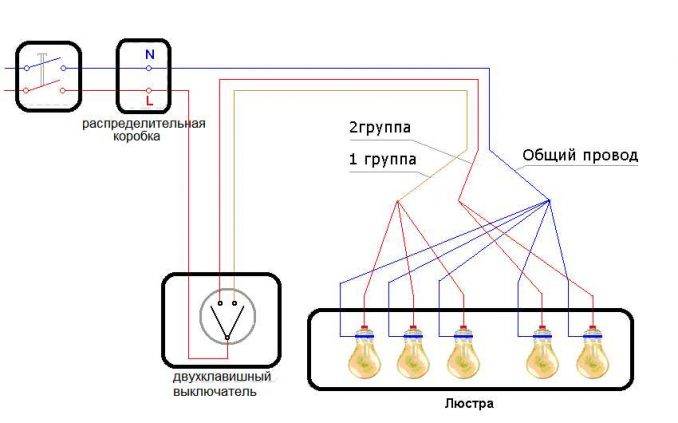
Connection to a two-gang switch
When a chandelier has more than 2 light sources, it does not make sense to constantly turn on a large number of light bulbs, but it is better to break them into two groups. In this case, you get 3 options for switching on: a minimum of light, an average illumination and a maximum amount of light. There must be at least 3 wires on the ceiling - 2 phases and 1 zero.
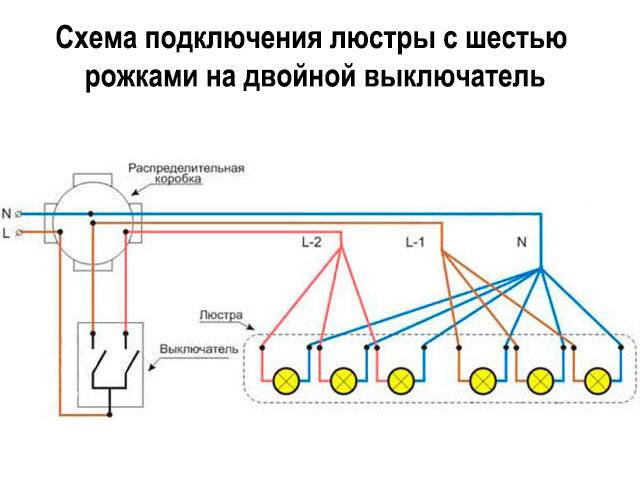
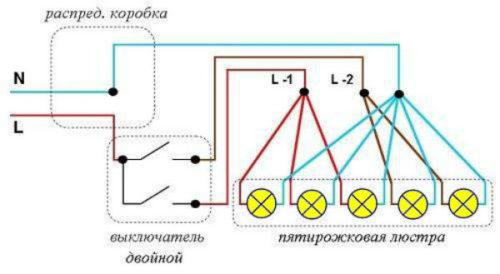
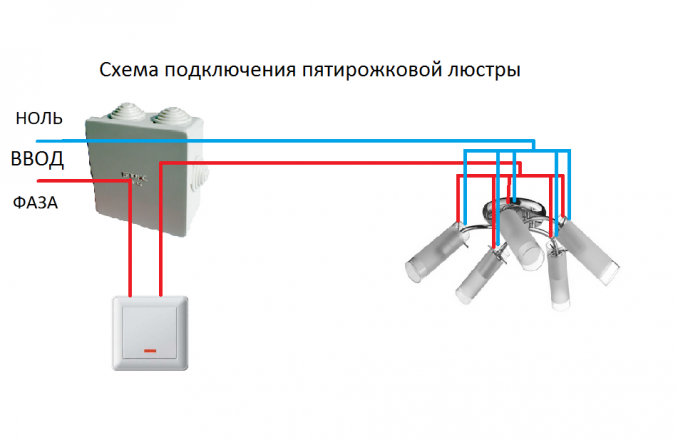
 Connecting a five-arm chandelier to a double (two-gang) switch
Recently, chandeliers are connected inside with multi-colored wires. As a rule, blue and brown conductors are used, although other color options are possible. According to the standards, the blue wire is intended for connecting "zero". Therefore, first of all, “zero” is formed, due to the twisting of all blue wires
It is important to check that no other wires get into this connection.
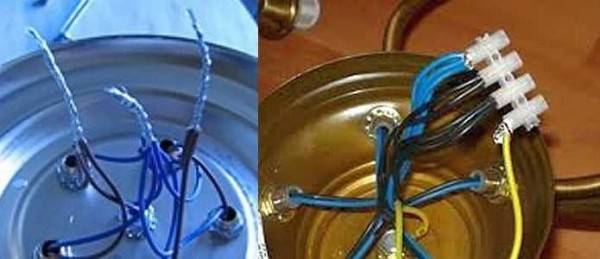 Before connecting the chandelier, the conductors group
The next step is the formation of groups of light sources. If the chandelier is 3-horn, then there are not many options here: 2 groups are formed, consisting of 1 and 2 light bulbs. For a 5 carob chandelier, the following options are possible: 2 + 3 bulbs or 1 + 4 bulbs. These groups are formed by twisting the phase wires, which may be brown. As a result, a group of "zero" conductors of the same color is obtained, the second group represents a separate "phase" group, which may include one or more conductors, and the third group is also a "phase" group, which includes 2 or more wires, depending on the number light sources.
Wiring diagram for a two-gang switch
Watch this video on YouTube

Connecting a chandelier to a single switch
The connection method is quite simple, even if there are more than one or two light bulbs in the chandelier. It is much easier to do this if wires of two colors come out of the chandelier. In this case, wires of the same color are twisted together, thus forming a 2-wire line. The figure below shows a diagram of switching on a chandelier to a single switch.
 Scheme for connecting a chandelier to a single-gang switch
Naturally, with such a switching scheme, all the bulbs are simultaneously switched, which is not always justified from an economic point of view.


