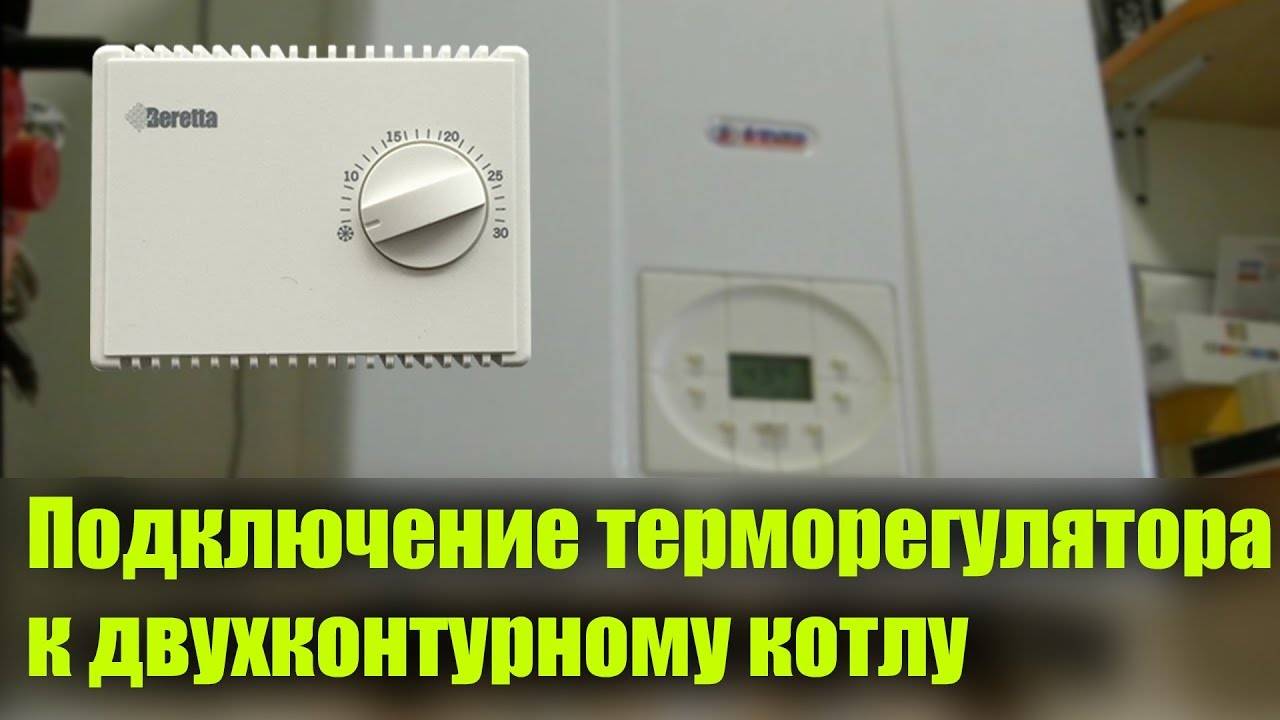
- How to choose a room thermostat for a heating boiler
- Wired or wireless
- Temperature setting accuracy
- Possibility to set the hysteresis value
- The presence of a programmer
- Availability of Wi-Fi or GSM module
- Security systems
- General principles for connecting a thermostat
- Connecting a mechanical thermostat
- Installation of an electronic thermostat
- How to connect a wireless thermostat?
- The best known manufacturers and models: features and prices
- BAXI KHG
- TEPLOCOM TS-Prog-2AA/8A
- TEPLOCOM TS-Prog-2AA/3A-RF
- TEPLOLUX MCS-350
- Step-by-step instructions for connecting a thermostat to a gas boiler
- Installation and connection of the thermostat
- Connecting a two-wire cable to the thermostat
- Connecting a single-core cable
- Connection and installation of the thermostat
- Connecting the two-wire cable to the thermostat
- Connecting a single-core cable to the thermostat
- What is a thermostat for a heating boiler
- What is it needed for
- Thermostat for heating element and connection of heating element with thermostat
- How to connect a room thermostat
- Wiring diagram
- Selection of a place for installation
- Installation and connection
- Homemade external thermostat for the boiler: instructions
- How to install and adjust the regulator
How to choose a room thermostat for a heating boiler
Wired or wireless
Wired models are not limited in functionality, can be installed in any room (up to 20 meters from the boiler), are cheaper, but require a wired connection to the boiler. The wire itself is usually provided in the kit.
Wireless thermostats consist of a control panel with air temperature sensor (essentially a regular thermostat) and a receiver that receives a signal from the remote control and transmits it to the boiler in a wired way. Accordingly, the receiver is installed in the boiler room, and there may be more than one thermostat, for example, in several rooms. The advantages of wireless communication are obvious: there is no need to lay a wire through the whole house.
From the thermostat to the receiver, the signal is transmitted via a standard channel of household appliances with a frequency of 433 or 868 MHz and does not affect any other household appliances or any other electronic devices in the house. Most models transmit a signal over distances up to 20 or 30 meters, including walls, ceilings or partitions. It is worth considering that batteries are required to power the wireless thermostat, usually 2 standard AA batteries.
Temperature setting accuracy
Mechanical and electromechanical thermostats are quite cheap, but they have a high error in the context of home heating - from 2 to 4°C. In this case, the temperature adjustment step is usually 1°C.
Possibility to set the hysteresis value
Hysteresis (lag, delay) in the context of the heating system and the thermostat is the difference between the temperature on and off the boiler with a uniform flow of coolant.That is, if the temperature is set to 22°C on the thermostat, and the hysteresis is 1°C, then when the air temperature reaches 22°C, the boiler will turn off and start when the temperature drops by 1°C, that is, at 21°C.
In mechanical models, the hysteresis is usually 1 or 2°C and cannot be changed. In electronic models with the ability to adjust it, you can set the value to 0.5°C or even 0.1°C. Accordingly, the smaller the hysteresis, the more stable the temperature in the house.
The presence of a programmer
An example of a programmable thermostat showing a temperature graph on the main screen.
The programmer is the ability to set the boiler operation template for a time period from 8 hours to 7 days. Of course, manually lowering the temperature before going to work, leaving or going to bed is quite troublesome. Using the programmer, you can create one or more work patterns once and, depending on the temperature and hysteresis settings, save up to 30% of fuel each subsequent month.
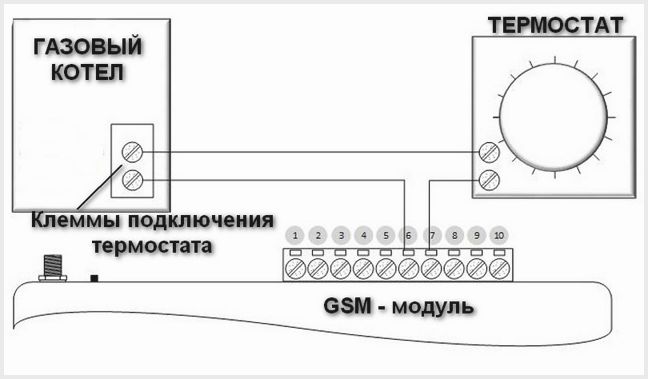
Availability of Wi-Fi or GSM module
Wi-Fi enabled controllers can be connected to a home network and controlled via a smartphone app. A rather tangible advantage is the GSM module, with which you can not only turn on the heating system in advance and heat the house even before arrival, but also control the operation of the system during a long departure: in case of any malfunctions, a corresponding notification will be sent to the phone.
Security systems
Protection against overheating or freezing of the heating system, protection against stopping the circulation pump, protection of the pump against acidification in the summer (incl.1 time per day for 15 seconds) - all these functions seriously increase the safety of the heating system and are often found in boilers of medium and high price segments. If such systems are not provided by the boiler automation, the issue can be resolved by choosing a thermostat with their presence.
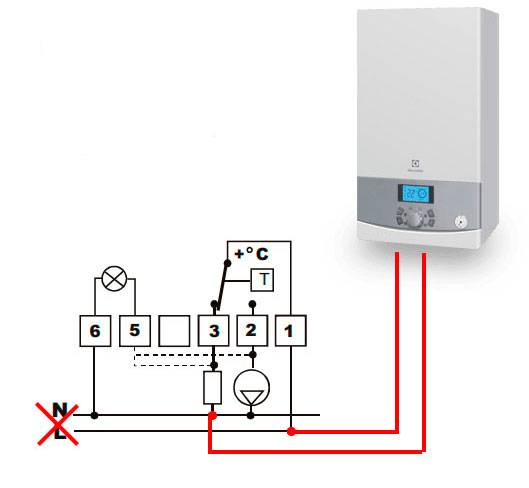
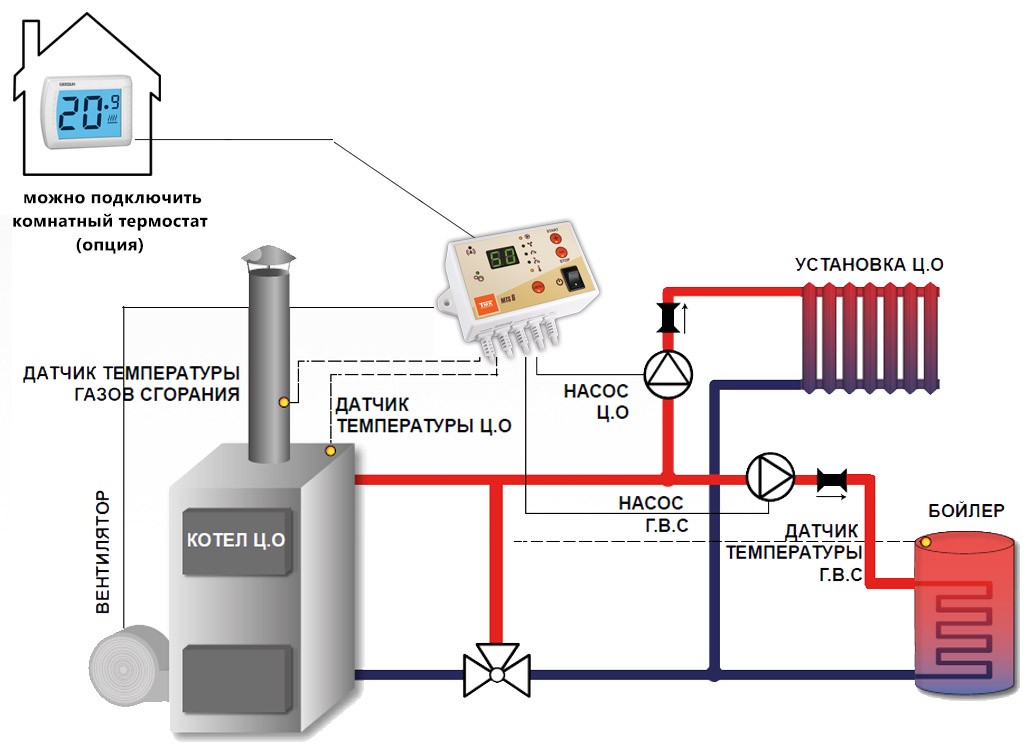
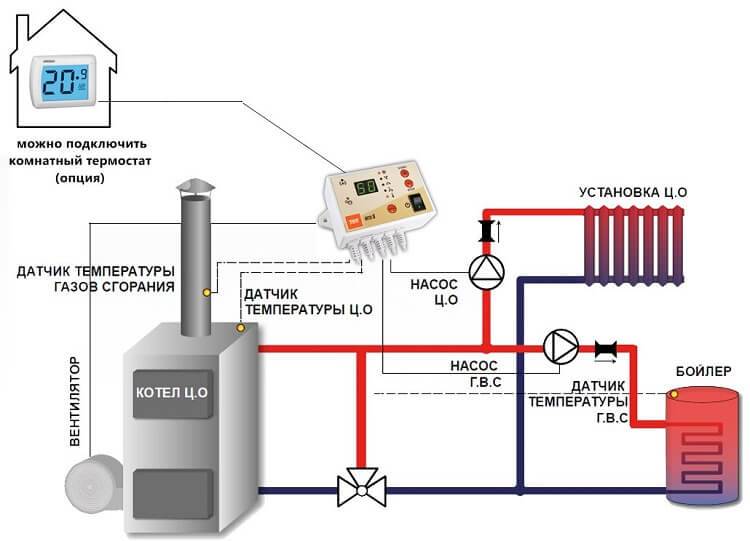
General principles for connecting a thermostat
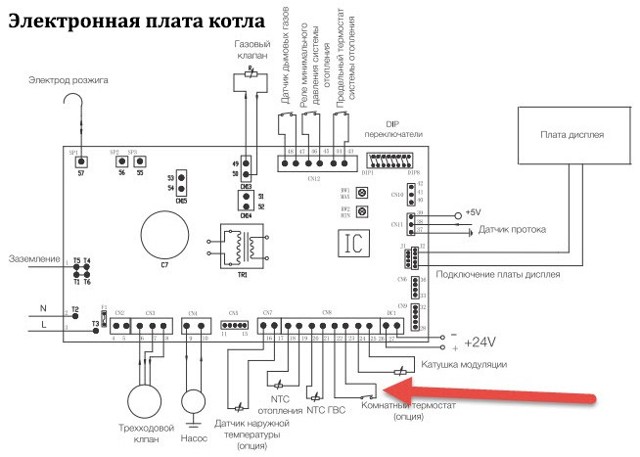
The method and schemes for connecting the thermostat to the heating equipment itself can be found in the technical data sheet of the gas boiler. Modern equipment, regardless of manufacturer, requires connection points for a thermostat. The connection is made using the terminals on the boiler or the temperature controller cable included in the delivery.
In the case of using a wireless thermostat, the measuring unit should only be placed in a residential area. This may be the coldest room or the room where the largest number of people most often gather, the nursery.
Installing a thermostat unit in a kitchen, hall or boiler room, where the temperature is not constant, is not practical.
The thermostat should not be exposed to sunlight, it should not be located in a draft, next to heating appliances and electrical equipment that emit a large amount of heat - thermal interference has a bad effect on the operation of the device
Connection of various types and models of thermostats may have its own characteristics, installation is carried out in accordance with the manufacturer's instructions, which is attached to the device.
The recommendations include a comprehensive description of the regulator's operation, the method and wiring diagrams. Next, we will tell you how to properly connect the thermostat to a gas boiler and about the installation features of the most typical models of the regulator.
Connecting a mechanical thermostat
The mechanical type thermostat is distinguished by its reliability and simplicity of design, low cost, and long-term operation.
At the same time, it supports only one temperature mode, which is set by changing the position of the knob at the temperature scale mark. Most thermostats operate in the temperature range from 10 to 30°C.
To connect a mechanical thermostat to an air conditioner, use the NC terminal, to gas or any other heating equipment - the NO terminal
The mechanical thermostat has the simplest principle of operation and works through the opening and opening of the circuit, which occurs with the help of a bimetallic plate. The thermostat is connected to the boiler through the terminal box on the boiler control board.
When connecting the thermostat, pay attention to the marking - it is present on almost all models. If there are no symbols, use a tester: pressing one probe to the middle terminal, check the side terminals with the second and determine a pair of open contacts
Installation of an electronic thermostat
The design of the electronic thermostat assumes the presence of an electronic board that is responsible for controlling the device.
The control signal is the potential - a voltage is transmitted to the boiler input, which leads to the closing or opening of the contact. It is necessary to supply a voltage of 220 or 24 volts to the thermostat.


Electronic thermostats allow for more complex settings of the heating system. When connecting an electronic thermostat, a power wire and a neutral are connected to it. The device transmits voltage to the boiler input, which starts the operation of the equipment
An electronically controlled thermostat is used to organize the operation of complex climate systems. It will help in managing not only an atmospheric or turbine gas boiler, but also a pump, an air conditioner, a servo drive in the heating system.
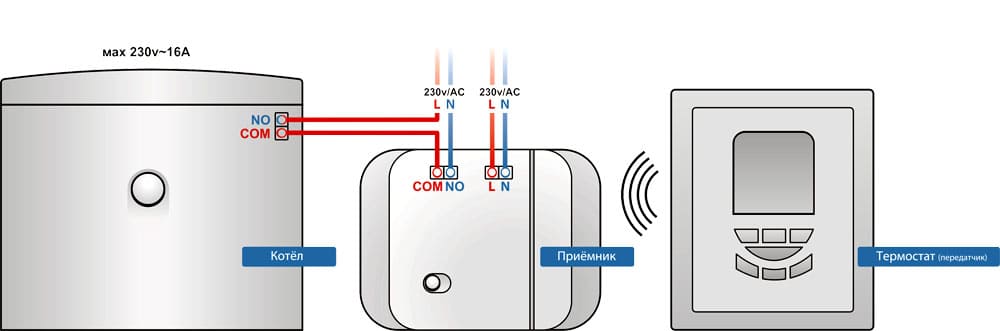
How to connect a wireless thermostat?
The wireless temperature controller consists of two blocks, one of which is installed in the living room and acts as a transmitter. The second block is mounted near the heating boiler and connected to its valve or controller.
Data transmission from one block to another is carried out via radio. To control the device, the control unit is equipped with an LCD display and a small keyboard. To connect a thermostat, set the sensor address and install the unit at a point with a stable signal.
The connection diagram of the thermostat by breaking the circuit - the equipment is turned on at the moment the current appears. A similar scheme is used when connecting a mechanical thermostat
The main disadvantage of a wireless temperature controller is that the remote unit is powered by batteries, which have a limited resource and therefore require frequent replacement. To ensure uninterrupted operation, the device is equipped with an alarm function that warns of the need to replace the battery.
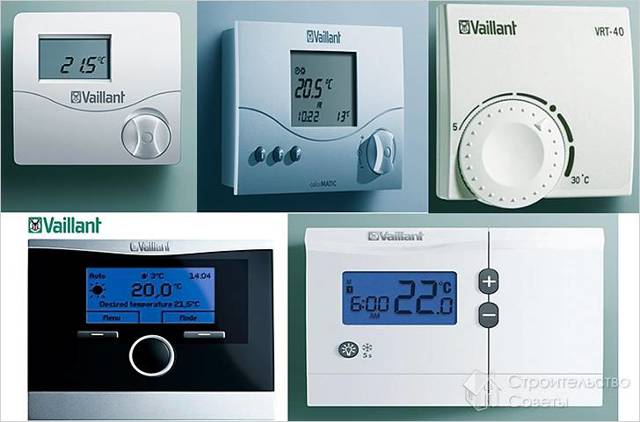
The best known manufacturers and models: features and prices
BAXI KHG
A well-known simple mechanical thermostat without additional functions and settings. Among mechanical analogues, it is distinguished by Italian build quality and reliability, a standard hysteresis of 1 ° C, and a minimalistic pleasant design.Disadvantages are standard for all mechanical devices - high error, temperature step of 1°C, not 0.5°C, constant hysteresis.
Cost: 1 350-1 500 rubles.
TEPLOCOM TS-Prog-2AA/8A
Wired programmable electronic thermostat. It is distinguished by the presence of almost all the functions available today for a small price, in fact the best choice in terms of price-quality ratio.
It has a good contrast display, the ability to set the minimum and maximum temperatures, pump protection mode, overheating and freezing protection, system malfunction indication, hysteresis setting, programming of temperature graphs for 7 days, etc.
The disadvantages are a wired connection and, despite this, powered by 2 AA batteries, they are enough for 1-1.5 years of operation.
Cost: 3,300-3,400 rubles.
TEPLOCOM TS-Prog-2AA/3A-RF
The programmable thermostat is absolutely similar to the previous model, but already with a wireless connection at a frequency of 868 MHz, which means an increase in the reception range up to 100 meters. The receiver is connected to the boiler by a wired connection. The disadvantage of this model is a rather high price, since wired counterparts for this price can have built-in Wi-Fi and GSM modules, and there are sensors for underfloor heating in the kit.
Cost: 5 400-6 500 rubles.
TEPLOLUX MCS-350
One of the best room thermostats for heating boilers. It has almost all modern control and protection functions, 24/7 programming mode, detailed consumption statistics.It is distinguished by the presence of a touch LCD display with automatic locking, the presence of a Wi-Fi module that allows you to control the system from a smartphone, an additional remote temperature sensor in the kit (up to 32 sensors can be connected in total).
Thanks to Wi-Fi, the thermostat can be installed in any inconspicuous place and controlled from a smartphone, but even with an open installation, it will harmoniously fit into almost any interior.
Cost: 4,590-6,000 rubles.
Step-by-step instructions for connecting a thermostat to a gas boiler
The installation of a thermostat on a gas boiler can be divided into two stages: installing the device itself on the wall in the room and connecting it to the heating boiler.
Installation of the device on a wall should be carried out in accordance with the instructions attached to it. When the thermostat is fixed at the required height, it is necessary to lay a wire from it to the boiler. When laying wires, you can use both open and closed methods. When connecting the control device to the heating equipment, it is necessary to proceed in the following order:


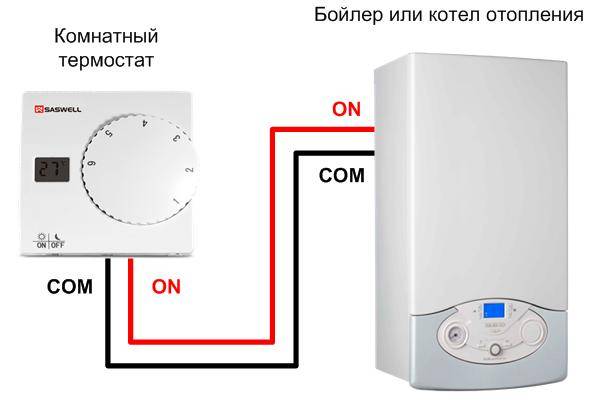


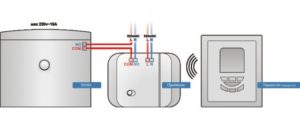
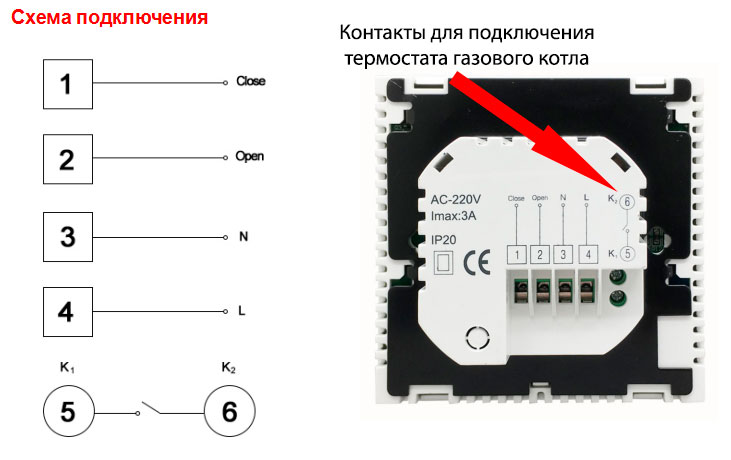
- One end of the cable is connected to the regulator contacts marked as NO and COM. On wireless models, the connection terminals can be found in the relay box.
- The marking and the place of connection of the second end of the wires can be found in the instructions for the gas boiler.
- The connectors and gas control board can be accessed by removing or sliding the front panel.
- There may be a jumper between the terminals required for connection. It should be removed, but not thrown away.
- Connect the other end of the wire connected to the thermostat to the terminals.
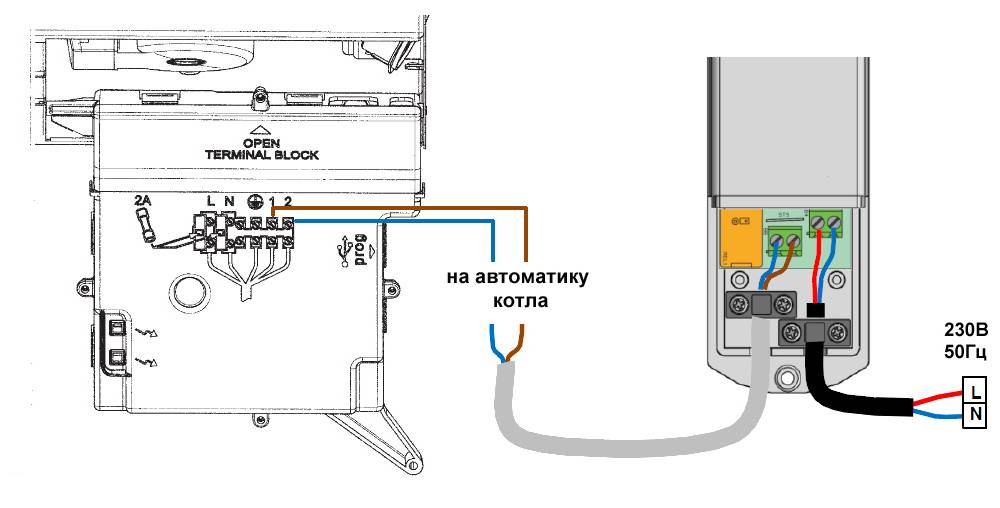
- If the thermostat is wireless, a three-wire power cable with a ground loop must be connected to the second relay unit.
Important! If the marking on the thermostat differs from the standard, you can find the necessary terminals using a tester. Between the terminals you need, the circuit must be open
It is also important to remember that some models of heating equipment do not work with thermostats. They have a gas valve that responds only to mechanical influences, so electrical adjustment of the operation of such a heating boiler is impossible.
Most often, these are produced non-volatile models of gas equipment.
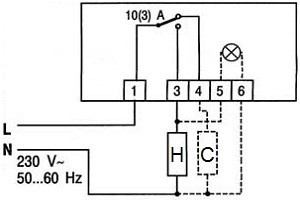
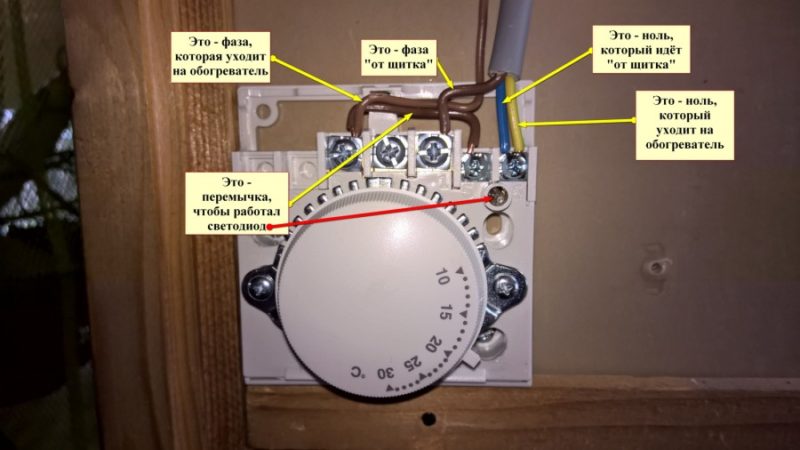
Installation and connection of the thermostat
The thermostat is usually mounted into the wall like a normal switch. For it, a place is chosen near the existing electrical wiring, for example, near the outlet. First, a recess is made in the wall, a thermostat mounting box is installed there, wires (phase and zero) of the mains and a temperature sensor are connected to it. The next step is to connect the thermostat.
On the side of the thermostat are "nests". The wires of the network (220V), the sensor and the heating cable are brought here.
General thermostat connection diagram
It is useful to know that the wires that are connected when installing the thermostat are color-coded:
- white (black, brown) wire - L phase;
- blue wire - N zero;
- yellow-green wire - ground.
Connecting a warm floor to electricity is performed in the following order:
- To "nests" 1 and 2 connect network wires with a voltage of 220V. Polarity is strictly observed: wire L (phase) is connected to pin 1, wire N (zero) is connected to pin 2.
- A heating cable for underfloor heating is connected to contacts 3 and 4 according to the principle: 3 contact - wire N (zero), 4 contact - wire L (phase).
- The wires of the temperature sensor (usually built into the floor, that is, determining the temperature in the thickness of the floor) are connected to "sockets" 6 and 7. The principles of polarity do not need to be observed here.
- Check the thermostat is working. To do this, turn on the -220V power supply, set the minimum temperature on the device and turn on the system of heating elements (by turning the knob or pressing the button). After that, the heating mode is changed to the maximum, that is, the thermostat is “programmed” to the highest temperature that is possible for it. The correct operation of the device will report itself with a click, which will indicate the closing of the heating circuit.
Connection schemes may vary slightly, depending on the types and models of thermostats. Therefore, so that the user does not make a mistake, as a rule, all contacts are written on the device case.
When connecting the thermostat, follow the connection diagram shown on the device case.
Small differences in connection dictate the features of underfloor heating cables. According to their structure and number of cores, they are divided into single-core and double-core. Accordingly, there are some nuances in their connection schemes.
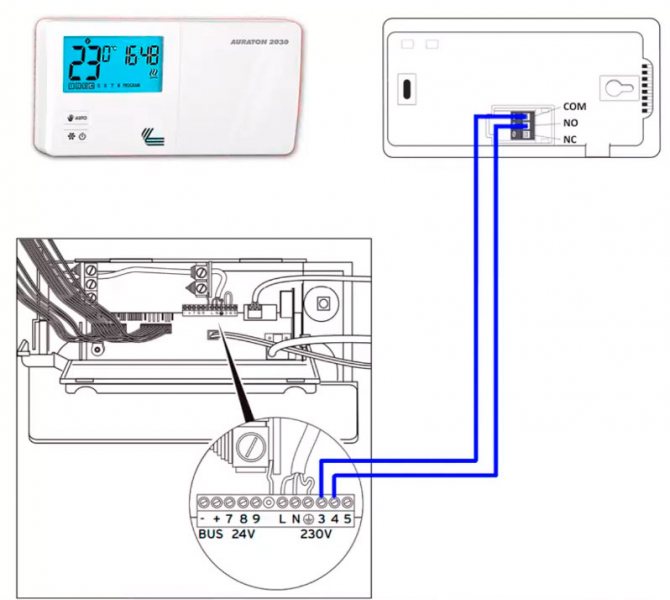
Connecting a two-wire cable to the thermostat
A two-core heating cable has two current-carrying conductors under a protective sheath. This type of cable is more convenient than a single-core design, since it is connected to the thermostat only from one end. Consider a typical connection scheme:
Diagram for connecting a two-core cable to a thermostat
We see that 3 wires are adjacent in one two-core cable: 2 of them are current-carrying (brown and blue), 1 is grounding (yellow-green). A brown wire (phase) is connected to pin 3, blue (zero) to pin 4, and green (ground) to pin 5.
The kit for the thermostat, the diagram of which we have just reviewed, does not include a ground terminal. With a ground terminal, installation is greatly simplified.
Two light green wires through the PE terminal are connected to the ground loop
Connecting a single-core cable
In a single-core cable, there is only one current-carrying conductor, usually it is white. The second wire - green - is the grounding of the PE screen. The connection scheme can be like this:


Scheme of connecting a single-core cable to a thermostat
White wires are connected to thermostat contacts 3 and 4 (both ends of a single-core cable), contact 5 is connected to a green ground wire.
Connection and installation of the thermostat
There are two options for connecting the thermostat. These are ways to connect two-core and single-core wires.
Connecting the two-wire cable to the thermostat
A two-wire wire is used when the TR requires full power from the mains for the operation of a closed-loop control system for heating a certain volume. These are integrated circuits built on microprocessors.
The data received from the sensor in the form of a change in current strength, resistance values are analyzed by the device. As a result, commands are sent to the starter of the heating elements with a specified time interval and a boundary threshold for heating a particular space.
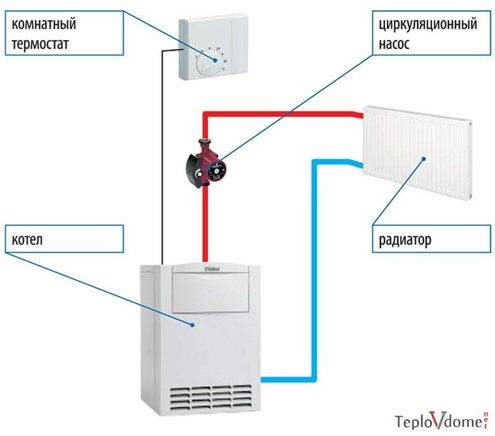
Note! An example of connecting a two-wire wire is a diagram of how to connect a thermostat to the circulation pump of a water heater. Scheme of connection to the circulation pump
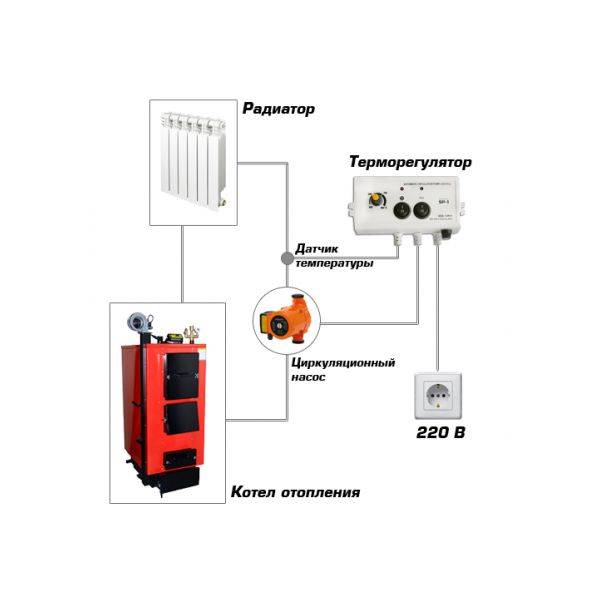 Scheme of connection to the circulation pump
Connecting a single-core cable to the thermostat
A cable from one core is used in the connection diagram of thermostats in the case when the device itself is installed in the break of the phase wire leading to the positive terminal of the heating element. That is, the cable serves as a phase break in the mains current supplying the heating elements.
What is a thermostat for a heating boiler
The room temperature controller allows you to reduce fuel costs. The product is a control unit that allows you to adjust the power of the boiler and turn it off if necessary. The thermostat for gas boilers allows you to minimize human participation in the operation of the unit.
What is it needed for
The room thermostat processes the information coming from the sensors. Based on the information received, the boiler power is reduced or increased. It is possible to completely turn off and turn on the burner.
The control unit takes into account the air temperature in the room.
There are models on the market with the possibility of programming for a day or a week. This allows you to turn on the boiler and increase its power without the presence of an operator. So you can reduce the power of the boiler plant during hours when there are no people in the room and warm up the room before they arrive.
Thermostat for heating element and connection of heating element with thermostat
At low temperatures outside the window, this is good.Control method It can be of two types: Mechanical, when the physical characteristics of the opening contacts change.
Plugging in. For electric boilers, such thermostats are a mandatory addition. Depending on the installation location - directly on the unit or in the actual area of the room, remote devices, the thermostat responds to changes in the temperature of the heater case or the air in the room and switches the heater on and off, maintaining the preset mode.
At the same time, it is imperative to control the area in which the heating equipment is located and not leave it unattended.
The design of controlled temperature controllers can be of two types: capillary - a special relay in the form of a narrow cylinder, in which there is a cylindrical capsule with a liquid having a high coefficient of thermal expansion - the capsule closes and opens contacts with a change in temperature using a drive of a special design; used in liquid-filled radiators; bimetallic plate - an element combined from two dissimilar metals with a significant difference in the coefficients of thermal expansion - the halves of the plate, when heated, elongate so much that they bend in the landing socket and open the electrical circuit, and after cooling, they again take their dimensions and close the contacts. In both cases, the control is carried out manually, by setting the required temperature on the controller case. Group 3: electronic This type of thermostat for hot water boilers belongs to the volatile category.
The lever mechanism of the thermostat, which is located in the box, when cooled, acts on the contact group - the thermostat opens. This option is the most expensive of all presented. Range adjustment is done by resistor R3.
The best option would be to buy the same device that has become unusable. With its implementation, many of the most important shortcomings of the previous methods are eliminated. Having assembled the adjustment-switching unit, you must first check the correctness of the installation, and only after that proceed with setting up the entire system.
Let us consider in more detail the temperature-regulating devices, standard and remote, installed on infrared heaters.
When choosing devices in this category, it is necessary to pay attention to the following points: Housing material. The maximum current that the new thermostat will have to handle
For example, the use of an outwardly similar temperature sensor K.5 instead of K.5 will result in freezing of the rear wall in the refrigerator chamber and a change in the temperature regime of the refrigerator. In addition to standard regulators, mandatory for installation and optimizing heater control, controllers are produced for additional equipment of heaters in order to increase their efficiency and functionality.
Three-wire switching is used when heaters or any other load are designed for operating voltage V. The load of this microcircuit is a PC fan. The control device, whose power is usually 3 kW, has 4 terminals - two for connecting to the circuit breaker on the electrical panel, and two for connecting to the heating unit.As the amount of steam increases, so does the pressure inside the tank. The outdoor thermostat has a thicker body, which is closed on all sides with plastic plates.
Connecting a Chinese thermostat
How to connect a room thermostat
The installation of the thermostat is carried out in strict accordance with the operating instructions supplied by the manufacturer. Violation of the installation rules can lead to the failure of the thermostat. Depending on the design, the installation method of the product differs.
Wiring diagram
Depending on the technical characteristics, a 220 volt household network or a DC power supply can be used as a battery.
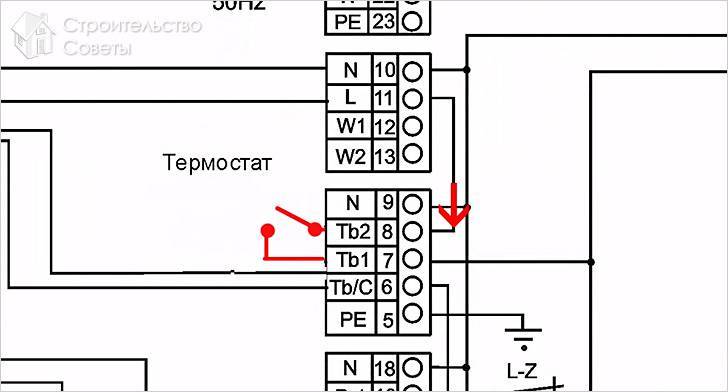
 Schematic connection of the regulator to the boiler with a boiler
To connect to the electrical circuit, you must follow the instruction manual. For the correct inclusion of an electrical appliance in the network, it is better to contact specialists.


Selection of a place for installation
It is recommended to mount the device in places with an average air temperature in the room. Installing the product near window or door openings, ventilation shafts and air conditioners may adversely affect the correct determination of the temperature indicator.
Mounting height on vertical surfaces plays an important role when choosing a mounting location. Cold air descends, the upper layers have a higher temperature. The product should be mounted at a height of 1.5 to 2 m.
When choosing an installation site, it must be taken into account that for normal operation the device must have unhindered access.
Installation and connection
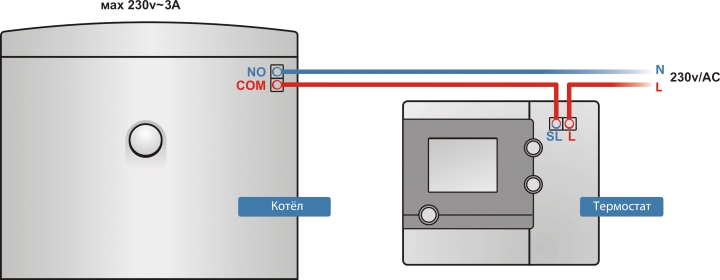
Before connecting a room thermostat to a gas boiler, you must carefully study the operating instructions. Wireless models are easy to install. It is necessary to connect the receiver to the boiler automation, and install the transmitter on the vertical surface of the room.
Installation of wire structures is carried out in several stages:
- Open the gas boiler panel, blocking access to automation.
- Connect the wire to the control board of the boiler according to the instruction manual.
- Mount the wiring in an open or closed way to the installation site of the room thermostat.
- Attach the controller to the wall.
- Connect the wires coming from the gas boiler to the device.
- Connect the thermostat to the household power supply.
After starting, it is necessary to check the operability of the product and set the required mode of operation. The setting of the room regulator differs depending on the design of the appliance.
Connecting a room thermostat to a gas boiler reduces the degree of human participation in the operation of the heating system. The ability to adjust allows you to maintain a comfortable temperature in the room and save fuel.
Homemade external thermostat for the boiler: instructions
Below is a diagram of a home-made thermostat for a boiler, which is assembled on Atmega-8 and 566 series microcircuits, a liquid crystal display, a photocell and several temperature sensors. The programmable Atmega-8 chip is responsible for compliance with the set parameters of the thermostat settings.
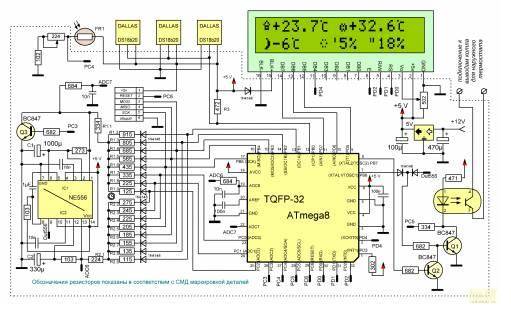
In fact, this circuit turns the boiler on or off when the outside temperature drops (rises) (sensor U2), and also performs these actions when the temperature in the room changes (sensor U1). Adjustment of the work of two timers is provided, which allow you to adjust the time of these processes. A piece of circuit with a photoresistor affects the process of turning on the boiler according to the time of day.
Sensor U1 is located directly in the room, and sensor U2 is outside. It is connected to the boiler and installed next to it. If necessary, you can add the electrical part of the circuit, which allows you to turn on and off high-power units:
Another thermostat circuit with one control parameter based on the K561LA7 chip:
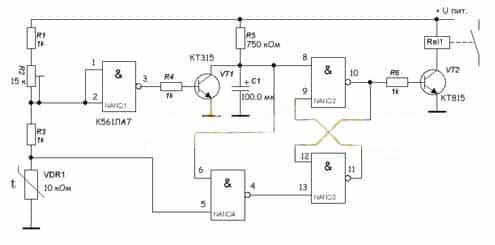
The assembled thermostat based on the K651LA7 chip is simple and easy to adjust. Our thermostat is a special thermistor that significantly reduces resistance when heated. This resistor is connected to the electricity voltage divider network. This circuit also has a resistor R2, with which we can set the required temperature. Based on such a scheme, you can make a thermostat for any boiler: Baksi, Ariston, Evp, Don.
Another circuit for a thermostat based on a microcontroller:
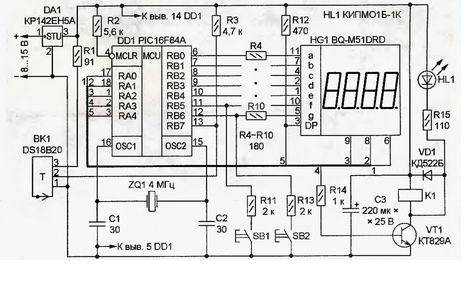
The device is assembled on the basis of the PIC16F84A microcontroller. The role of the sensor is performed by a digital thermometer DS18B20. A small relay controls the load. Microswitches set the temperature that is displayed on the indicators. Before assembly, you will need to program the microcontroller. First, erase everything from the chip and then reprogram, and then assemble and use it to your health.The device is not capricious and works fine.
The cost of parts is 300-400 rubles. A similar regulator model costs five times more.
A few last tips:
- although different versions of thermostats are suitable for most models, it is still desirable that the thermostat for the boiler and the boiler itself be produced by the same manufacturer, this will greatly simplify the installation and the operation process itself;
- before buying such equipment, you need to calculate the area of \u200b\u200bthe room and the required temperature in order to avoid “downtime” of equipment, and changing wiring due to the connection of devices of higher power;
- before installing the equipment, you need to take care of the thermal insulation of the room, otherwise high heat losses will be inevitable, and this is an additional expense item;
- if you are unsure that you need to purchase expensive equipment, then you can conduct a consumer experiment. Get a cheaper mechanical thermostat, adjust it and see the result.
Modern technologies allow you to equip a warm floor in several ways, depending on which connection you plan to use. Underfloor heating water systems have proven themselves to be highly reliable and economical. Easy to install are electric heating floors, the wide popularity of which is due to the possibility of placement under any coating. Of course, all the positive aspects take place only when using high-quality equipment and its proper installation.
Since part of the work on energy saving and convenience is assigned to the thermostat, special attention should be paid to its installation and connection.
A modern thermostat can be programmed to change the temperature not only by the hour, but also by the days of the week
The use of a thermostat allows you to use any heating device without the risk of overheating and failure. That is why thermostats are built into electric irons, kettles and water heaters. Cable, rod and film underfloor heating were no exception. Thanks to the installation of an adjusting device, you can not only change the temperature under your feet, but also program the operation of additional heating to save energy.
All existing thermostats can be divided into two types:


The sensor of the electronic thermostat is installed in the controlled area, and the control unit is mounted separately
How to install and adjust the regulator
In most cases, installing a thermostat with your own hands entails emptying the water jacket of the boiler. This will not create a big problem if the piping of the solid fuel boiler is done correctly and the water heating system can be cut off with taps. Otherwise, you will have to drain the entire coolant. After that, the plug is removed from the sleeve, and the device is screwed in instead of it and the system is again filled with water.
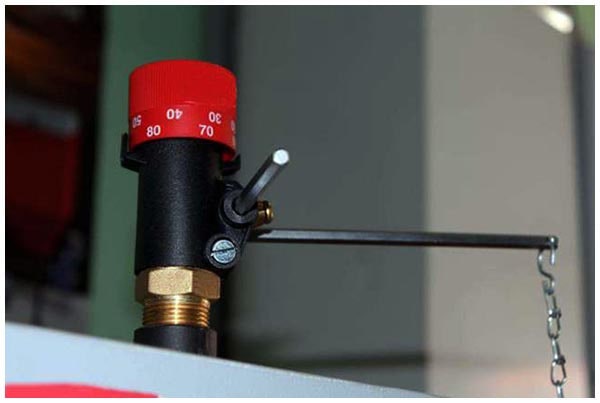
To adjust the draft regulator, you need to fire up the boiler and follow the instructions:
- Without attaching the chain to the door, open it for air access.
- On the adjusting handle, loosen the screw - lock.
- Set the handle to the position corresponding to the required temperature, for example, 70 °C.
- Watching the boiler thermometer, connect the chain drive to the damper at the moment when it shows 70 °C. In this case, the damper should be ajar by only 1-2 mm.
- Tighten the fixing screw.
Next, you should check the operation of the thermostat in all modes, up to the maximum. In this case, it must be taken into account that some time passes between the moment the damper closes and the coolant temperature drops and do not rush to reconfigure the device. Solid fuel heat generators are characterized by a delay, because firewood or coal in the firebox cannot go out at one moment.