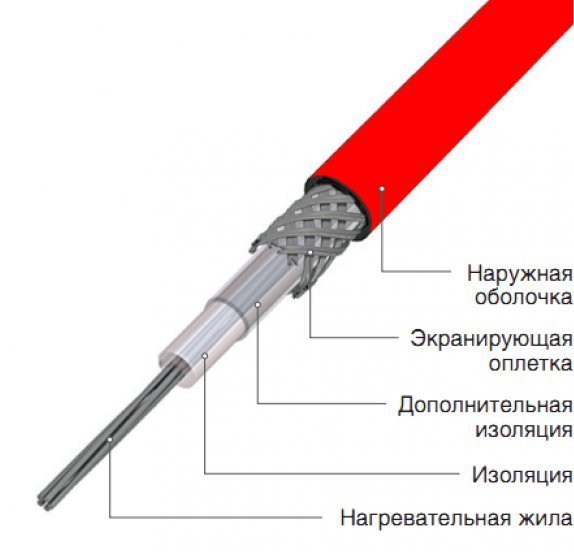
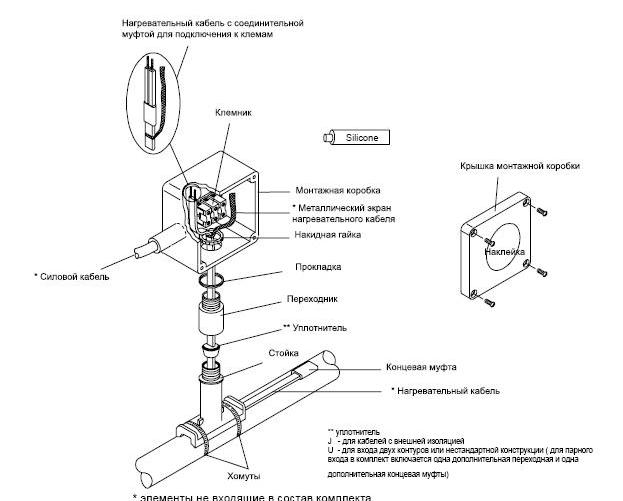
- Termination of the end of the heating cable
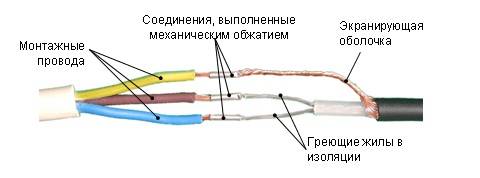
- Connection
- Self-regulating cable installation
- Can I use self-regulating cable for underfloor heating?
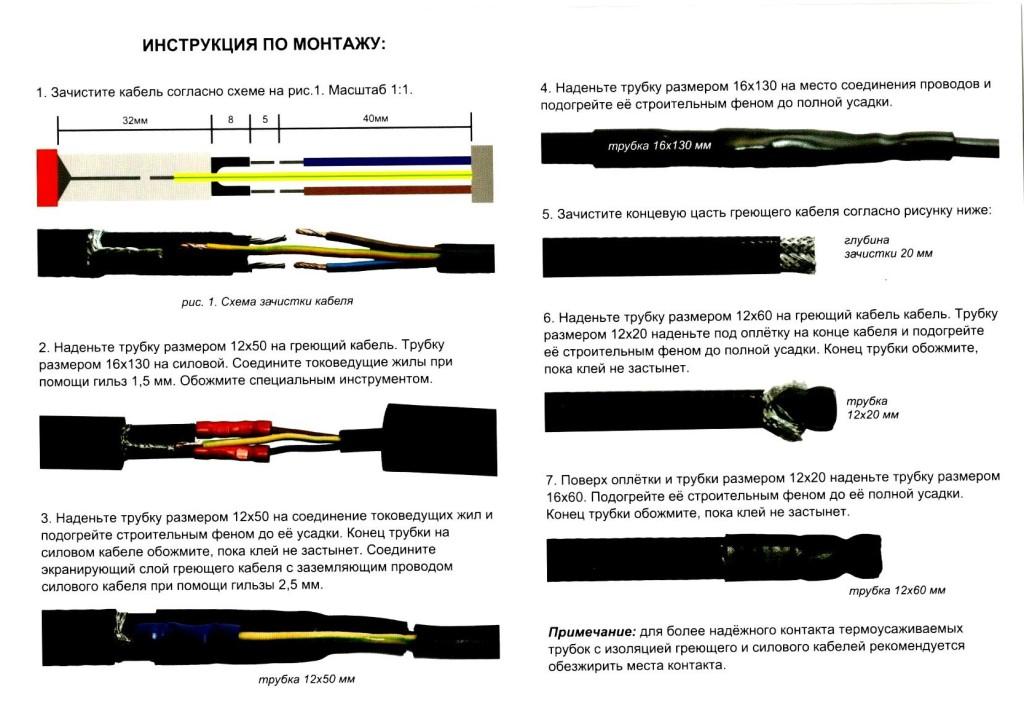
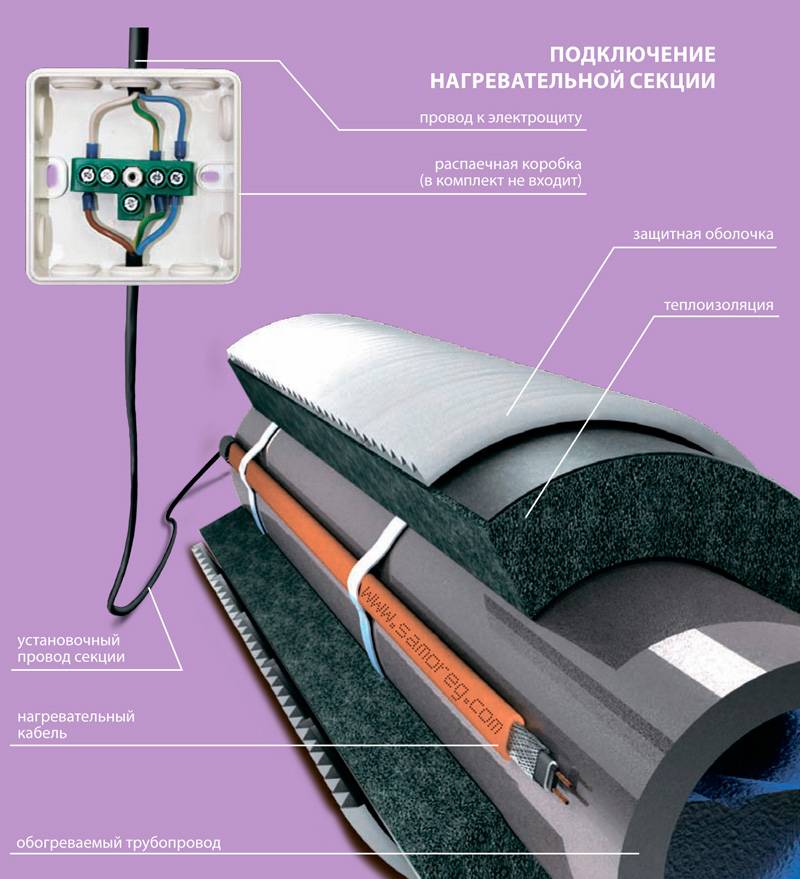
- Heating connection instruction
- Cable system fixing
- Protective cover fastening
- Mains connection
- Checking and commissioning
- Installing a thermostat
- How to make a heating cable with your own hands?
- Scope and technical characteristics
- Cable types
- resistive
- self-regulating
- How to choose the right heating system
- Heating cable marking
- How to choose a self-regulating heating cable for plumbing
- How to determine how much cable power is needed
- Top 5 best manufacturers
- Self-regulating cable
- How does it work
- Connecting to the network alternative way
- Self-regulating pipe heating: installation methods
- TOP 5 best warm cable manufacturers
- The pipe is frozen - the reason
Termination of the end of the heating cable
In the previous three ways, we figured out how to connect one end of the cable, but we still have the second one. You need to install an end sleeve on it.
The order of work here is much simpler. Remove the outer insulation from the cable.
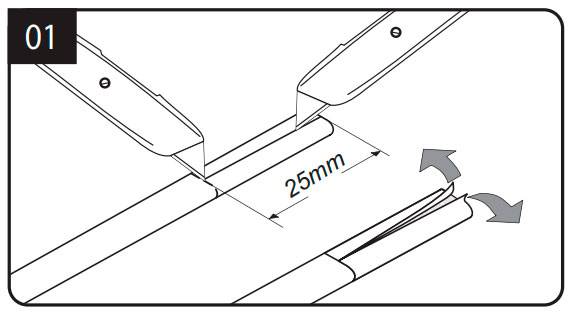
Next, remove the braid. This can be done in two ways.
Mistake #11
Someone advises to bite it completely “flush”.
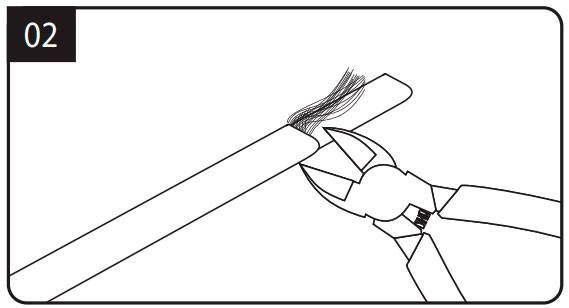
But in this case, the remaining sharp tips sticking out perpendicular to the cable can easily damage the insulating layer of the tube.
Therefore, it is better to cut off a small piece and bend the braid back.
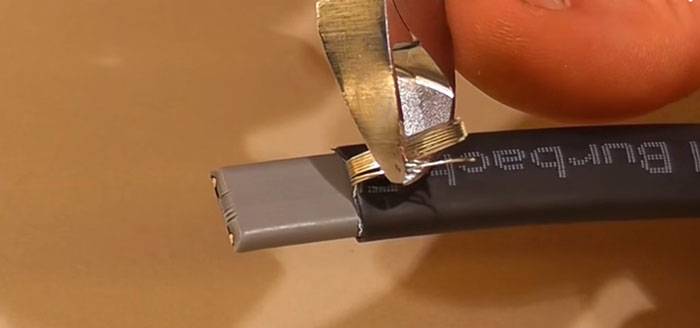
The matrix itself and the cores do not need to be stripped.
Mistake #12
But leaving the end in its original form is not recommended.
What to do with it? In the middle of the matrix, bite out a small triangle with side cutters, or cut off one core, making a kind of step.
What does it ultimately give?
the end of the cable during operation will not participate in the work and heat the thermotube attached to it
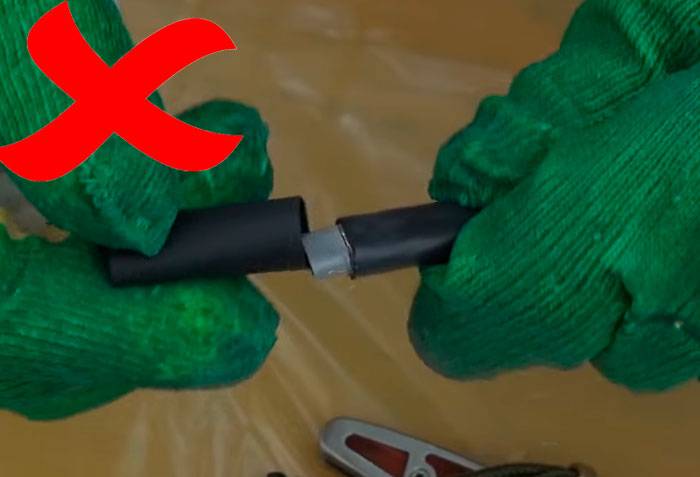
you eliminate the accidental short circuit of the wires between each other
And they must be isolated from each other. Do not confuse self-regulating cable with resistive.
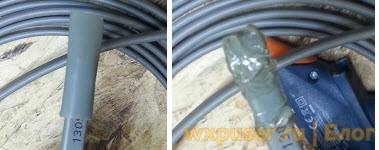
After the done manipulations, put on a short piece of the coupling on the inner insulation and plant it. The tip of the coupling must necessarily extend beyond the cable by 10-15mm.
While it is hot, you need to press it with pliers.
On top of the inner, pull on the large outer sleeve. It should completely cover the braided area and, in turn, protrude beyond the inner sleeve by 10-15 mm.
Heat the whole thing with a hair dryer and crimp the ends with pliers. If your cable will run inside a water pipe, then after terminating it, be sure to lower it into a bucket of water and check the insulation resistance.
If the results are unsatisfactory, the coupling will have to be redone.
Connection
Connection is carried out in the following order:
- the end of the cable is freed from insulation for a length of 3 cm;
- cutting the shielding braid with wire cutters, fold it into a bundle;
- if the cable is self-regulating, cut out the semiconductor matrix to free the ends of the conductive wires;
- strip the ends of the cores of the wire used to connect to the network;
- by crimping with sleeves, the grounding core of the wire is connected to the shielding braid of the heating cable, and the phase and zero are connected to the beginning and end of the resistive core (unregulated) or to conductive cores (self-regulating).
It remains to connect the heater to the switchboard.
Self-regulating cable installation
You can install this type on a heated pipe or inside. Sometimes both methods are combined.
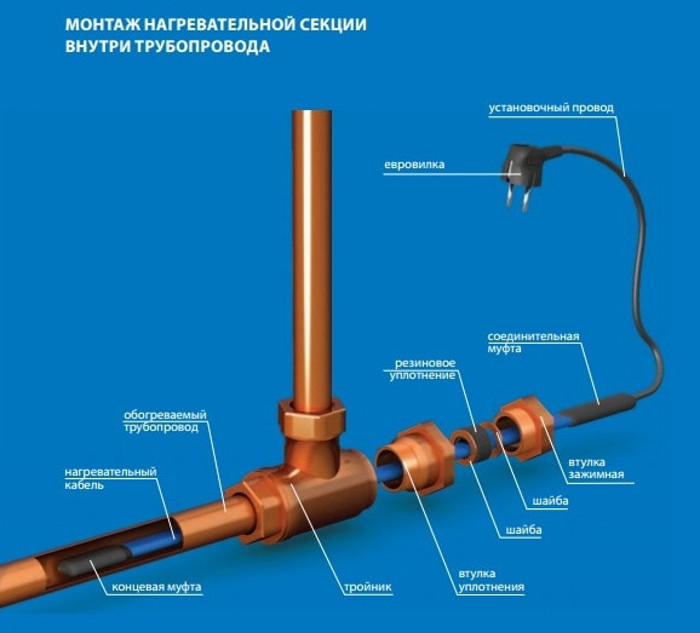 Installing the cable in the pipeline
The internal method of installing a heating cable for plumbing is used for systems that are already functioning. Before buying, the length of the area requiring heating is measured
The cable is carefully lowered into the pipe and connected to the mains. The area in which the heating system is installed, it is desirable to mark the outside with paint
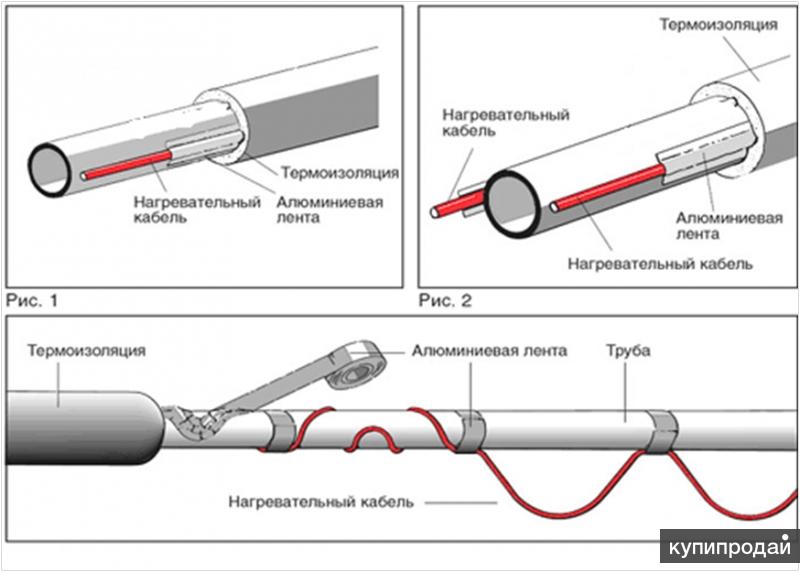
For outdoor installation, you can use the kit or the product supplied in the bay. The cable is mounted along the pipe (in one or more lines) using aluminum tape or in the form of a spiral under thermal insulation.

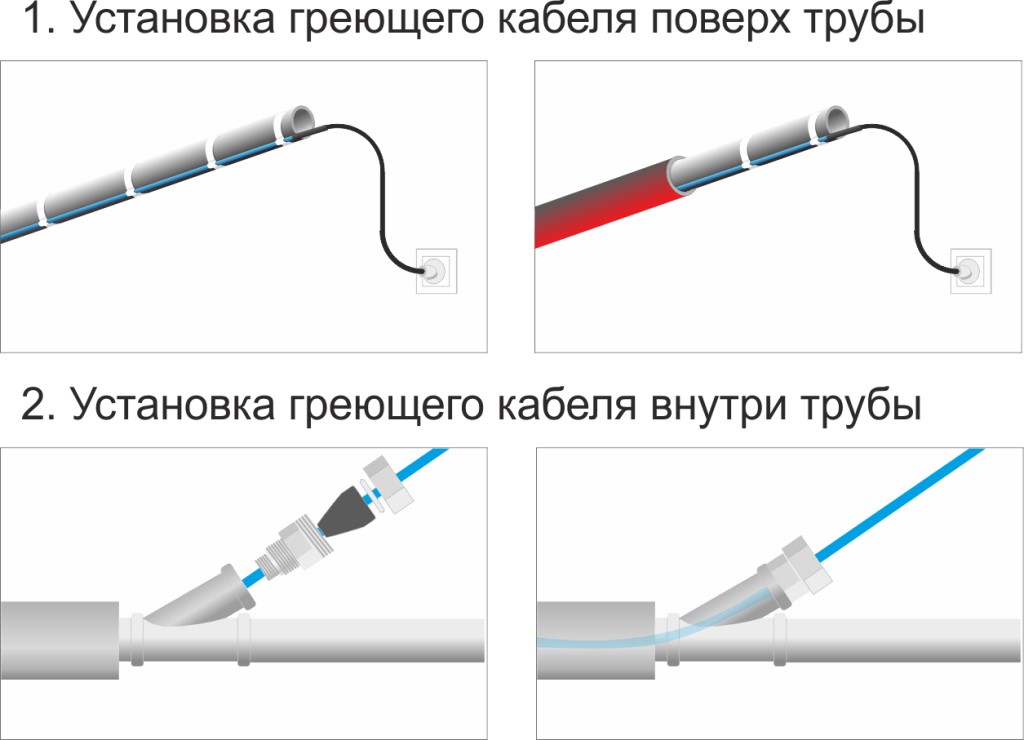


If a bay is bought, the question arises of how to connect the heating cable. The problem is solved by a wire with a plug that allows you to connect to the power supply. The cable in one thread is located at the bottom of the pipeline. To increase efficiency, it is laid in a spiral, or several self-heating lines are mounted.
If the pipeline is long, you have to decide how to connect the heating cable. There is a short guide for this:
- cut and remove insulation;
- heat with a hairdryer and remove the core;
- connect the wires by crimping or by soldering.
Heat shrink tubing is used as insulation.
If a kit is purchased, the question of how to connect a self-regulating heating cable does not arise.
If the product is in the bay, you need:
- connect the beginning with a cord with a plug;
- seal the end.
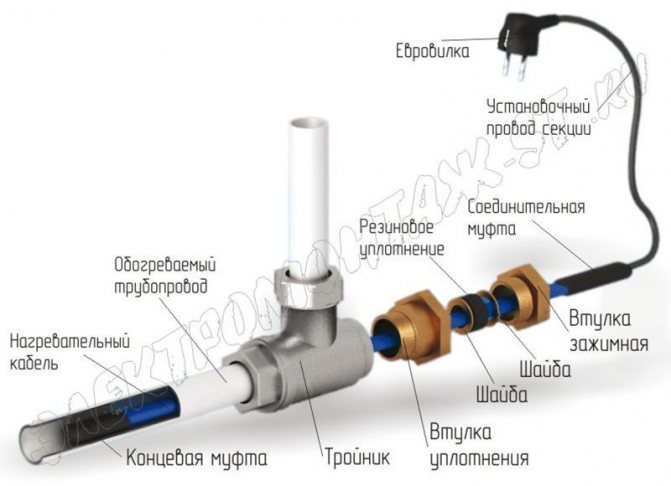
To connect the heating cable with a cord with a plug, you must:
- cut the outer insulation without damaging the braid;
- remove the insulating layer;
- unweave and twist the braid into a vein;
- cut the inner insulation;
- heat with a hair dryer and separate the matrix;
- put on the cores connecting sleeves and heat shrink tubes;
- put heat shrink on the cores of the supply cord;
- connect the cores of the cord and crimp with a clipper;
- connect the ground wire of the cord and the braid.
The next question is how to properly seal the end? It is necessary to remove the outer insulation, unwind and cut the braid, put heat shrink on the inner insulation, heat and crimp. After cooling, the outer sleeve is put on.
Attention! The self-regulating electric cable turns on at +3°C. If the temperature of the medium in the pipe is 4°C, it will not turn off
To save energy, a temperature sensor is mounted on the pipe, which allows you to set the desired temperature.
If it is necessary to heat the pipeline, it is important to choose the right electrical cable. If the installation is carried out independently, the problem of how to check its operation is solved by the purchase and installation of a temperature sensor
Can I use self-regulating cable for underfloor heating?
The main function of a self-regulating heating cable is to reduce the supply of electricity when the required degree of heating is reached, while the quality and uniformity of surface heating does not suffer.This feature allows you to successfully apply the model in the construction of underfloor heating in any premises, from living rooms to bathrooms and toilets.
In addition, if there are underfloor heating with a self-regulating cable, you can rearrange the furniture in the apartment, as it has the ability to regulate the level of heating, unlike resistive. That is, it is permissible to reduce heating under heavy furniture. With a resistive wire, it is impossible to change the heat supply, thereby overheating of the surface may occur, which will lead to the exit of the system from standing.
It is worth noting the simplicity of the construction of a self-regulating floor, since this electric cord can be cut anywhere, and you can close the end yourself. At the same time, all connections, with proper installation, can last more than one year.
Naturally, like any electric floor, self-regulating, you need to connect to the power supply observing all standard protection methods. That is, the system must have a circuit breaker and an RCD, the leakage current in which is not more than 30mA. The samreg cable must have a screen and a power of 30 - 40 watts. At the same time, the laying step of the heating element is 15 - 20 cm.
Previously, this function was not possible due to the small size of the film. Today, Korea produces infrared film with 30% self-adjustment capability.
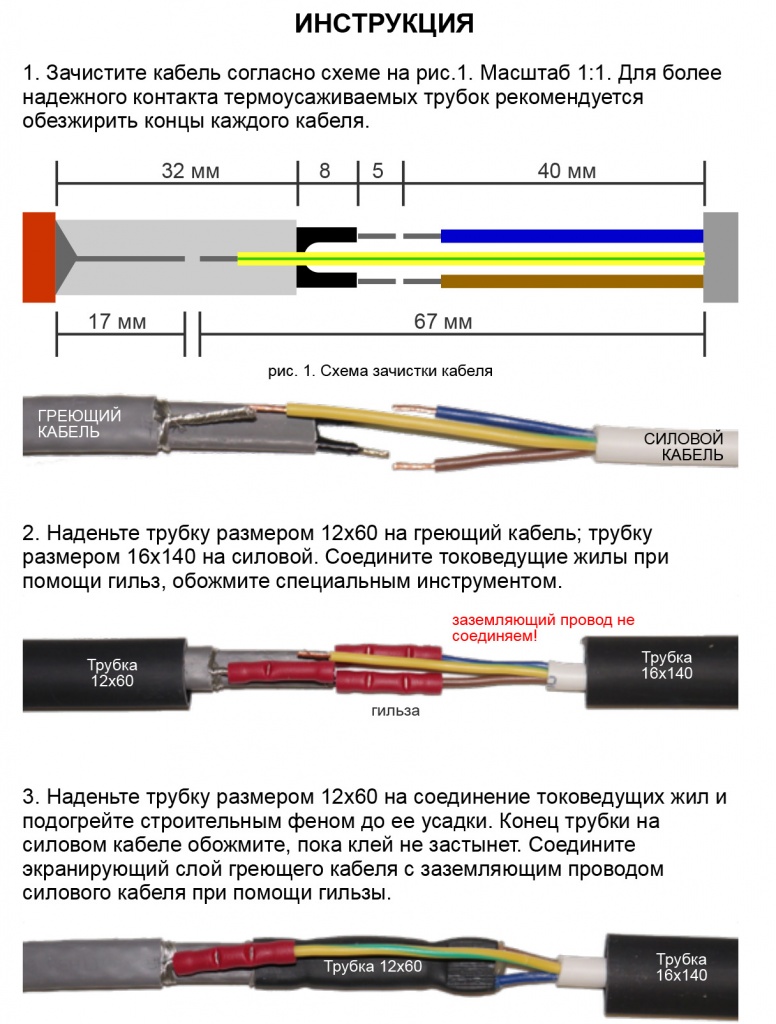
Heating connection instruction
In fact, figuring out how to install a heating cable with your own hands is not difficult. You can install such an element on both plastic and cast-iron water pipes. First, preparatory work is carried out. In addition, you need to purchase all the necessary tools and materials.
Heating cable installation instructions in full screen mode
First, a heating cable is mounted, the connection diagram is often indicated by the manufacturer in the documentation that comes with the heating element. The next step in the installation of such a system is the installation of a casing for protection. The last step is to connect the cable to the network and check its operation. In addition, it is possible to install the heating cable inside the pipe. This will increase its efficiency.
You need to immediately purchase all the tools and materials necessary for installation, incl.
- connecting sleeves;
- pliers;
- roulette;
- crimper;
- building hair dryer;
- mounting knife and adhesive tape;
- wire cutters;
- heat shrink tubing.
After that, end sealing should be carried out. The free end, which will not be connected to the network, must be freed from protective insulation and cut off with a step. After that, it is necessary to isolate its heat-shrinkable tube. Some systems are already prepared for installation.
This option is more convenient, so it is recommended for people who want to install the heating cable correctly, but do not have experience in such work.
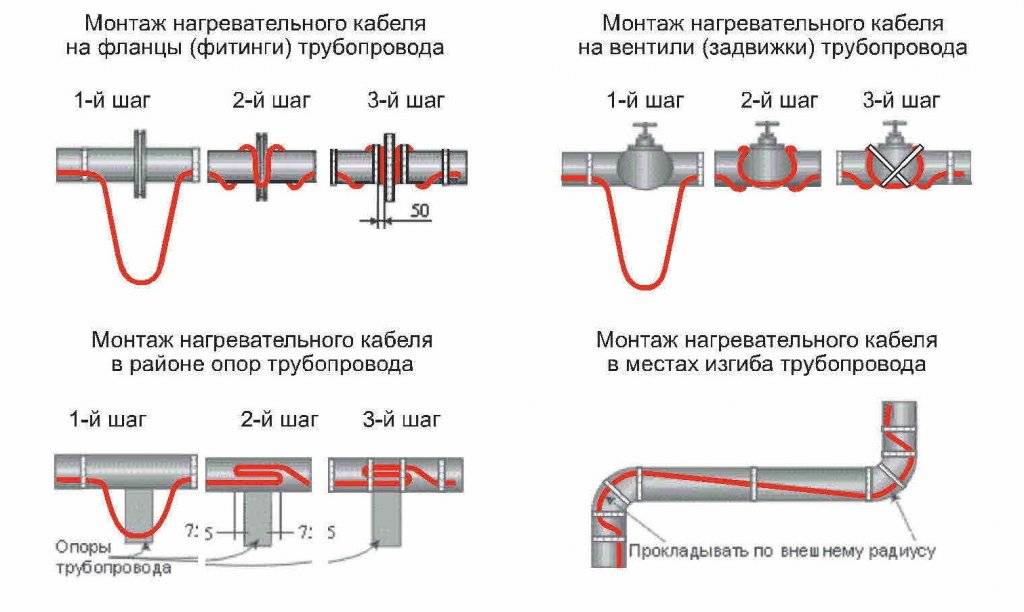
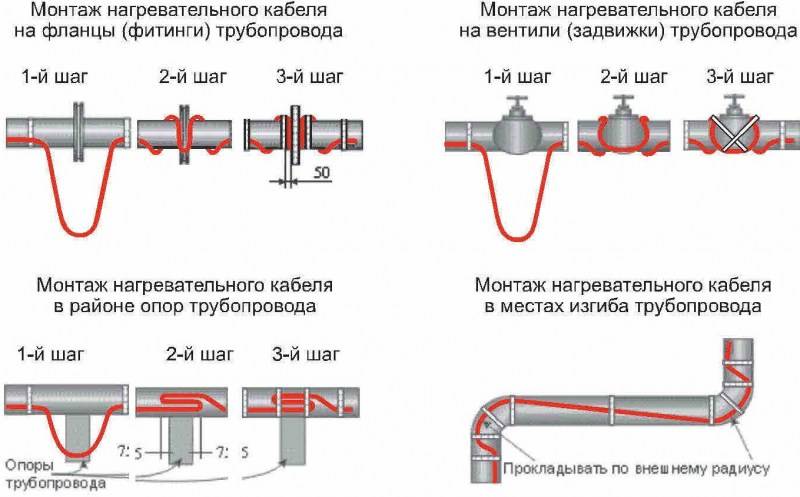
Cable system fixing
The simplest layout option is a straight line. In this case, the cable is fixed parallel to the pipe. This mounting option is suitable for heating pipes located indoors, which will additionally be covered with a layer of insulation. In this case, only a small part of the pipe is thermally affected, but this will be enough to prevent ice from forming inside it.
Using the table, you can quickly select the step length for laying the cable through the pipe.
In this case, several cables are located on the pipe at once. This option is recommended if the pipe, even with the additional installation of a heat-insulating layer, will be exposed to elevated temperatures in the winter. Due to this arrangement of heating elements, more uniform heating is achieved.
For fixing, use a metal adhesive tape. When mounted in a straight-line way, it is fixed with a tape along its entire length. When laying the heating element in a winding method, the pipe is wrapped around in increments of at least 30 cm to fix it.
Often self-regulating heating cable is installed in a coiled way. In this case, the conductor wraps around the pipe with a step of 20-50 cm. This method provides good heating of the pipe, but leads to an increase in the consumption of the element.


Protective cover fastening
After the self-regulating cable is installed, you can begin to form an insulating layer. It is necessary not only to prevent heat loss, but also to protect the heater from mechanical damage.
If the instructions that come with the heating system indicate the need to install one or another heater, you must follow it.
If there are no manufacturer's recommendations, you can use roll isolon, mineral wool or foam rubber. The entire pipe is wrapped with the selected insulation. You can fix the material with tape-adhesive tape or twine. Additionally, it is desirable to treat the insulation with mastic or other waterproofing compound.
Mains connection
Connecting the cable to the network is carried out by special elements that must be purchased in advance. Scheme with RCD Scheme with RCD 2
First, the free end of the heater must be freed from insulation. The insulating screen should be twisted into a bundle and the conductor cores should be stripped. Cores and power cable are connected. A heat shrink is fixed over the junction.
Checking and commissioning
The heater must have a separate line. After that, you need to turn on the system and wait until the element heats up. If no faults are found, then the installation was done correctly.
Installing a thermostat
To save energy and more rational operation of the warm floor, you should use a thermostat. It must be installed before laying the heating elements. It is mounted in a convenient place, departing from the floor at least 30 cm. In the wall, you need to make a niche for installing the box and draw a strobe to the base of the floor, in which a corrugation or pipe is placed. The corrugation must pass along the base of the floor for another 0.5–1 m, connecting wires from the heating elements are placed in it.
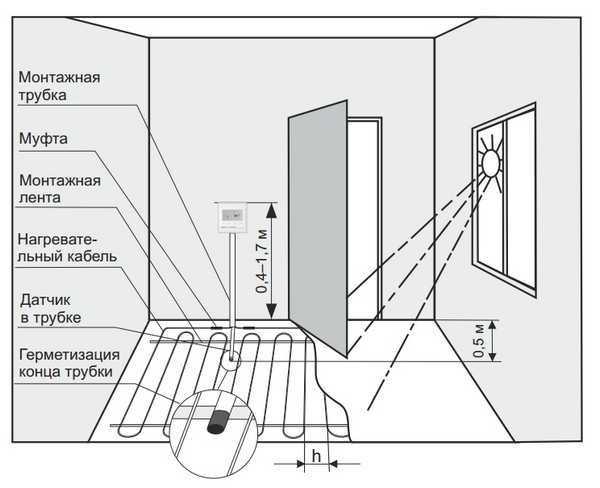
The right place to mount the thermostat
The ends of the cable must be led to the thermostat in such a way that the sleeves remain in the screed.
How to make a heating cable with your own hands?
You can buy heating elements in specialized or hardware stores, but you should be aware that their cost is quite high. With some dexterity and certain technical skills, you can try to make a heating cable with your own hands. To do this, it is enough to use the right material. A power telephone cable can become a replacement for a branded heating cable. It is similar to heating in form and characteristics. This cable is thin, strong and tough. It has reliable insulation and can be used in humid environments.
It is clear that a heating system made of telephone cable will be deprived of many important functions. For example, it will be impossible to implement a self-regulatory process. In addition, there is no special food insulation in the system. However, all the above useful qualities are not particularly needed, so you can safely use a home-made heating cable. Do-it-yourself installation is not at all difficult. First, determine the place of its laying - that is, outside the pipe. Attach the wire to the surface very tightly. The pipe with the cable is usually wrapped tightly with foil, on top of which aluminum tape is wound, it is he who presses the heating element to the base. Such heating for pipes can be arranged not only for water supply, but also for sewage. It is necessary to provide maximum protection for all heating cables, protect them from moisture. To do this, you can use heat and waterproofing. For one-time or periodic work, a do-it-yourself heating cable made from a power cable can be used in a country house or in a place where people live intermittently.
In conclusion, we can say that the heating system for heating the water supply, which is the heating cable, is its necessary component for full functioning throughout the year, and especially in winter.
Scope and technical characteristics

Self-regulating cable is used not only for heating pipelines. They can heat almost everything - from huge tanks to air conditioner drainage pipes.
Main areas of application:
- Frost protection, maintaining the required temperature of tanks, pipelines, tanks of industrial production.
- Protection of the roof from icing, storm drains from freezing, preventing the formation of icicles.
- Protection of water pipes, sewerage of private houses from freezing when they are not deep enough.
- When installing a warm floor (the cable is poured into concrete), arranging heated greenhouses (laying into the ground).
- Using leftovers to provide comfort in the home - warm footstools, sofas, etc.
There are several main technical characteristics of a self-regulating cable:
- nominal voltage;
- linear power;
- maximum operating temperature;
- minimum operating temperature;
- minimum allowable bending radius;
Cable types
Before installation, it is important to study what heating wires are and how to install them. There are two types of cables: resistive and self-regulating
There are two types of cables: resistive and self-regulating.
The difference between them is that when an electric current passes through the cable, the resistive one heats up evenly along the entire length, and the feature of the self-regulating one is the change in electrical resistance depending on temperature. This means that the higher the temperature of the self-regulating cable section, the lower the current strength will be on it. That is, different parts of such a cable can each be heated to the desired temperature.
In addition, many cables are produced immediately with a temperature sensor and auto control, which significantly saves energy during operation.
Self-regulating cable is more difficult to manufacture and more expensive. Therefore, if there are no special operating conditions, then more often they purchase a resistive heating cable.
resistive
A resistive-type heating cable for a water supply system has a budget cost.
Cable differences
It is divided into several varieties, depending on the design features. Each of them has its own advantages and disadvantages:
| cable type | pros | Minuses |
| single core | The design is simple. It has a heating metal core, a copper shielding braid and internal insulation. From the outside there is protection in the form of an insulator. Maximum heat up to +65°С. | It is inconvenient for heating pipelines: both opposite ends, which are far from each other, must be connected to the current source. |
| Two-core | It has two cores, each of which is isolated separately. An additional third core is bare, but all three are covered by a foil shield. External insulation has a heat-resistant effect. Maximum heat up to +65°C. | Despite the more modern design, it is not much different from a single-core element. The operating and heating characteristics are identical. |
| Zonal | There are independent heating sections. Two cores are isolated separately, and a heating coil is located on top. The connection is made by means of contact windows with current-carrying conductors. This allows you to create heat in parallel. | No cons were found, if you do not take into account the price tag of the product. |
Resistive wires of various types
Most buyers prefer to lay the wire "the old fashioned way" and purchase a wire with one or two cores.
Due to the fact that a cable with only two cores can be used for heating pipes, a single-core version of the resistive wire is not used. If the owner of the house unknowingly installed it, this threatens to close the contacts.The fact is that one core must be looped, which is problematic when working with a heating cable.
If you install the heating cable on the pipe yourself, then experts advise choosing a zonal option for outdoor installation. Despite the peculiarity of the design, its installation will not cause serious difficulties.
Wire design
Another important nuance in single-core and twin-core structures: already cut and insulated products can be found on sale, which eliminates the possibility of adjusting the cable to the optimal length. If the insulation layer is broken, then the wire will be useless, and if damage occurs after installation, it will be necessary to replace the system throughout the area. This disadvantage applies to all types of resistive products. Installation work of such wires is not convenient. It is also not possible to use them for laying inside the pipeline - the tip of the temperature sensor interferes.


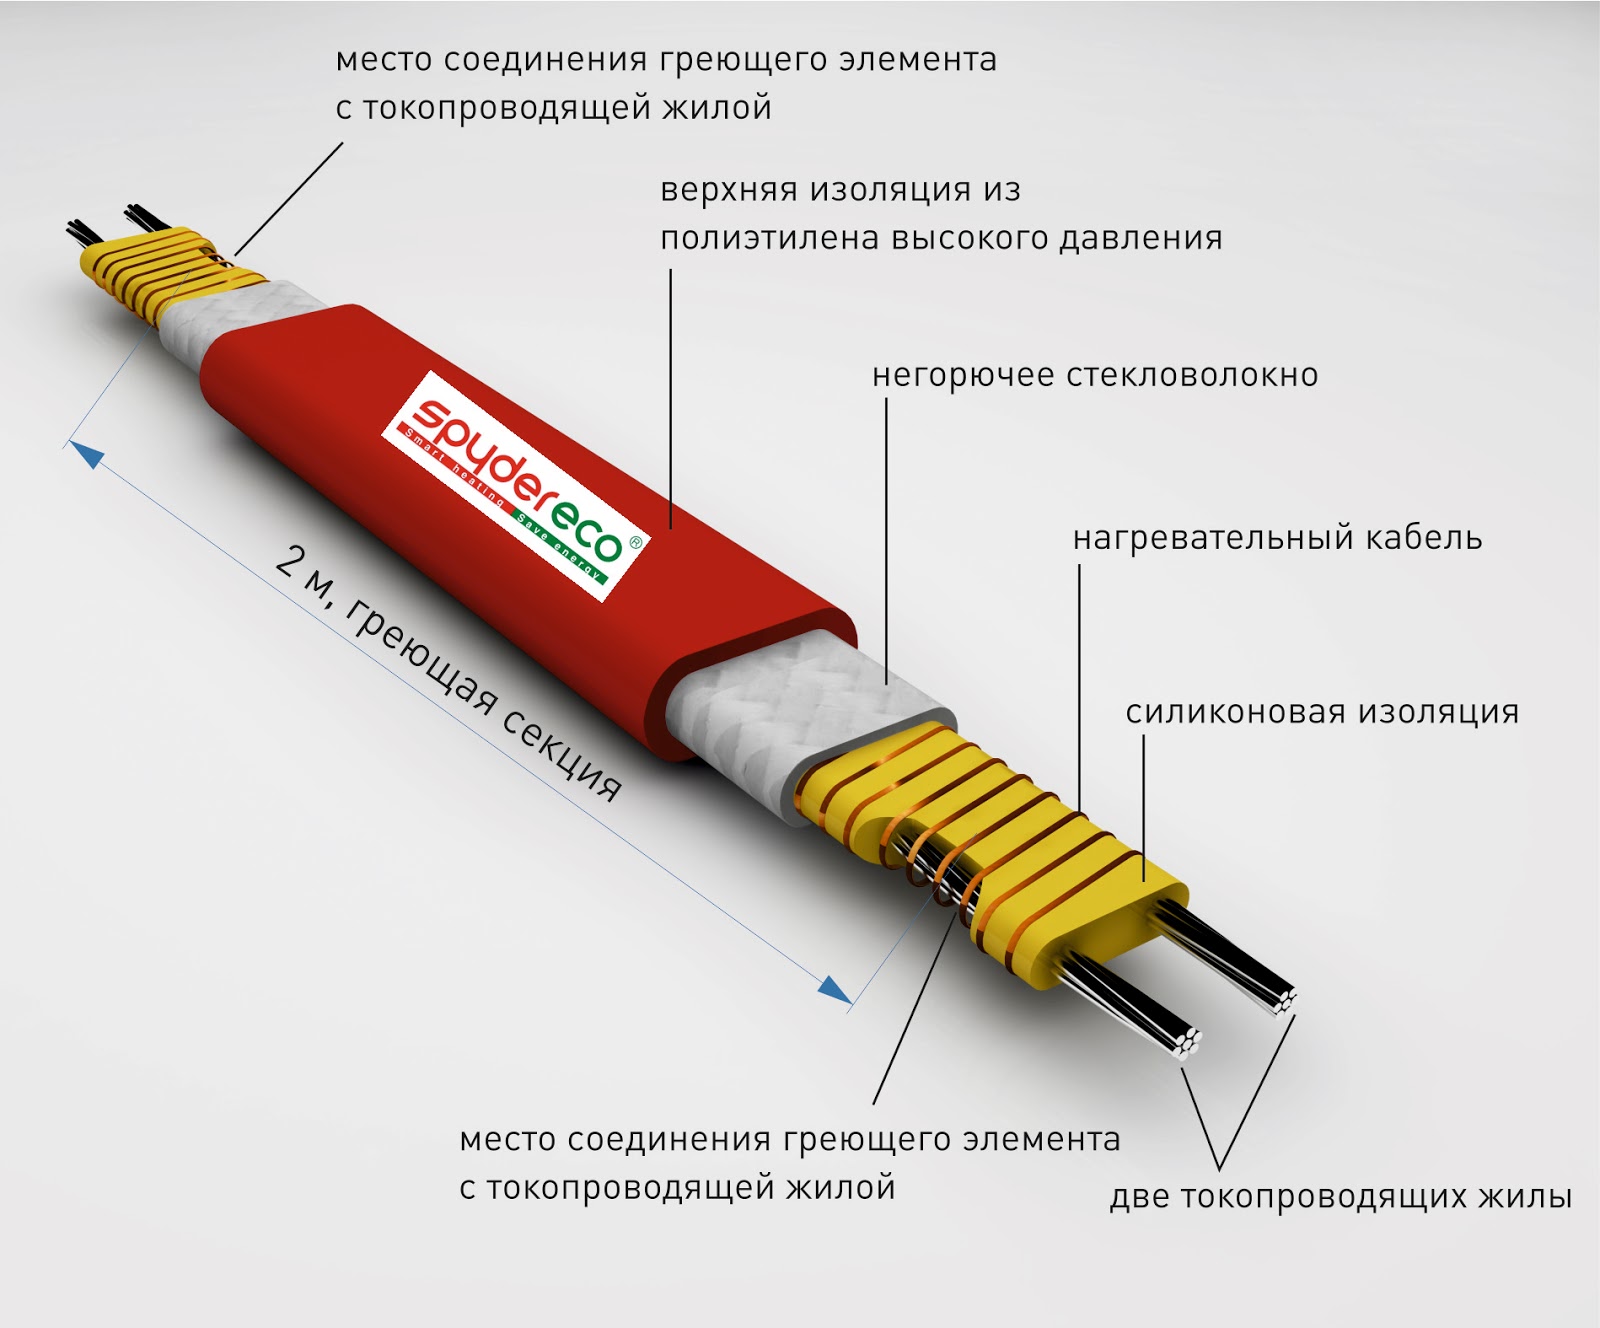

self-regulating
Self-regulating heating cable for water supply with self-adjustment has a more modern design, which affects the duration of operation and ease of installation.
The design provides:
- 2 copper conductors in a thermoplastic matrix;
- 2 layers of internal insulating material;
- copper braid;
- external insulating element.
It is important that this wire works fine without a thermostat. Self-regulating cables have a polymer matrix
When turned on, carbon is activated, and during an increase in temperature, the distance between its graphite components increases.
Self-regulating cable
How to choose the right heating system
Such systems differ primarily in the type of heating element. There are options with the use of cable or film heaters. The second method has much in common with the "warm floor" system.
An important difference is that the film must be located inside the roofing pie, because it is not designed for serious loads and is poorly adapted to mechanical damage. But the cable, on the contrary, can be on the surface of the roofing material
But the wire can fit inside. This is usually used when installing a heating system for flat roofs, and also during the construction of high-rise buildings. Cables are used exclusively for heating gutters and pipes.
The cable is used for external heating of the roof
Characteristics of different types of heating elements:
Self-regulating wire
This is a matrix with polymer insulation and two strands of wires inside. It also includes a metal braid and an additional layer of insulating material. If it gets warmer outside, then the number of conductive paths inside the matrix decreases and, as a result, the temperature of the heater decreases. There are many advantages to this type of heater. Firstly, cable installation is quick and does not require much experience. Secondly, the matrix itself is resistant to overlaps and spot heating, thanks to the temperature self-regulation system. Thirdly, such a cable can be used in combination with absolutely any roofing materials. An important plus is that the system selects the optimal temperature and thereby prevents the consumption of excess electricity.It is possible to install such heaters without the use of weather sensors, and also with the help of a self-regulating cable it is possible to heat gutters.
Self-adjusting wire most easily mounted on the roof
resistive wire
Heating occurs due to the resistance of the conductor. Such a cable can be two-core and single-core. The insulation is made from a layer of polymer, and on higher quality models a nichrome core is used.
When installing such a cable, you need to pay attention to the fact that both the beginning and the end of each wire must necessarily converge at one point. There is one rather serious disadvantage of such a heating system: in the event of a point damage, the entire anti-icing complex fails.
Installation is inconvenient, because the resistive cable cannot be cut. This method is suitable for heating large areas of the roof.
The resistive system is more complex, it is better to entrust it to an experienced master
Film heater
Represents a flexible film, with veins from a carbonic conductor. It heats such material with the entire surface, since conductive strips are often located over the entire area of the heater. It is very convenient to transport and store, because such a film is sold in small rolls. This material is attached only under the roofing, so it can only be used in the case of roof reconstruction or during the construction process. Installation of such a heater should be entrusted to specialists. In the event of local damage, the heating system does not fail, but loses efficiency. During the repair process, it is always possible to replace the damaged section of the film heater.I would like to note that the film is very safe, it does not self-ignite. Uniform heating of the surface gives good energy savings.
Film heater mounted on the inside of the roof
When choosing materials, you should pay attention to their cost. The most expensive is to use a film heater
Self-regulating cable costs a little less, and the most budget option is resistive wire. But I would like to note that roof heating using a self-regulating cable is more economical and will provide good benefits in the future. Also note that the installation of an anti-icing system on the roof surface is possible only if there are snow retainers. Otherwise, the entire network will simply be torn down during heavy snowfall. Various improvements and options make the whole complex more expensive, but the choice is always yours. Remember that you should order a heating system for the roof, based on the characteristics of your particular roof.
The heating system is selected based on the type and characteristics of the roof


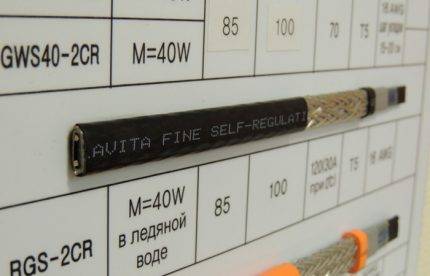
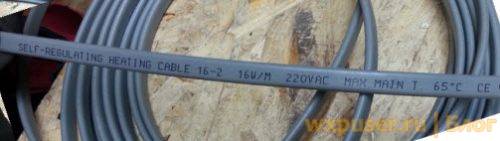
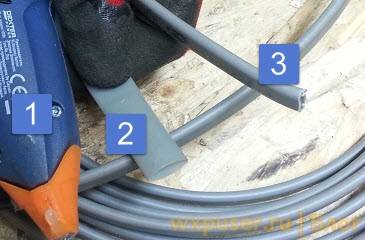
Heating cable marking
Knowing how to decipher the designation of the heating cable, you can accurately choose the right option for yourself.
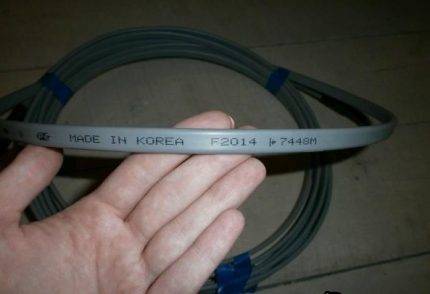 The entire length of the heating cable for the water pipe is marked. Here are the main dimensions. The country of origin is also indicated.
So, the marking applied to the Raychem self-regulating cable, 10BTV2-CR can be read as follows:
- 10 - power in W/m;
- BTV2 - brand of cable designed for voltage 220 - 240 W;
- CR - Indicates that the cable is constructed with a tinned copper braid and an outer polyolefin insulation.
The presence of a copper shield and an outer insulating layer in the cable structure is also indicated by the letters ST, CF. If these symbols are not in the marking, then this is a semi-finished product.
On cables supplied by Thermal Systems, you can find out the type of sheath from the designation. The abbreviation TSA…P indicates the presence of a weather-resistant polyolefin shell.
But TSA ... F - indicates that the cable sheath is made of corrosion-resistant fluoropolymer.
If the self-regulating cable is not shielded, its protection class is 0 (zero). It can only be used in conditions where there is no moisture, conductive dust and does not contradict clause 1.1.13 of the EMP.
 Manufacturers usually provide tables. According to them, you can orient yourself regarding the power consumption per meter of running pipe. When installing a cable in a pipe, an average of 10 W / m is consumed, and for outdoor installation - at least 17 W / m
Cable marking without braid may look like this: SRL 30-2. In this case, it is a SRL brand cable, with a power of 30 W/m, planned for 220 V.
The HS-FSM2 label also lacks the CR symbols, which indicates that this cable does not have a shield.
How to choose a self-regulating heating cable for plumbing
Keep in mind that continuous operation of the heating wire is not recommended. The reason is its limited resource. If you turn on the cable for a long time in a relatively warm climate, it will fail prematurely.
A wire with a higher power is used to heat the pipeline when the ambient temperature drops significantly below 0°C. However, even when installing the cable with the maximum load on the power supply, electricity costs will be moderate.
How to determine how much cable power is needed
Determining the power of a heating self-regulating cable:
- For installation inside communications, it is recommended to use the 5 W / m option, and the pipes must pass under the soil layer. Only under these conditions can one count on a sufficient temperature increase with such a wire.
- If you plan to install communications under a layer of soil, but the heat source will be located on the side of the outer walls, you need to use a wire with a power of 10 to 15 W / m. More precisely, you can determine if you know the exact depth of the pipes.
- To heat communications that pass above the ground, it is necessary to use a cable with a power of 20 W or more, since in this case the pipe and its contents are exposed to a stronger effect of low temperatures. In addition, increased air humidity and precipitation contribute to an increase in the negative impact on communications, the likelihood of their icing in this case increases.
The power of a wire is determined by the number of conductive paths in it. The higher the value of this parameter, the colder the pipe can be heated using such a cable. To maintain the temperature of a warm pipe, it is sufficient to use a wire with an average number of conductive paths. For communications with a hot coolant, a wire with a low heat dissipation rate should be used. It is distinguished by the minimum number of conducting paths.
The low-temperature cable is characterized by high elasticity, minimal thickness. This allows you to wrap it more tightly on communications.When choosing, you also need to focus on physical parameters, for example, length.
It cannot be less than 20 cm and more than 100 m, only in this case sufficient efficiency of the heating wire is ensured. If the coiled installation method is chosen, the ability of the cable to bend should also be taken into account.
Top 5 best manufacturers
To install a reliable heating system for communications, you need to use high-quality materials. The wire is constantly in contact with moisture, which increases the risk of breakdown. For this reason, preference is given to a cable of high-quality assembly, which means that materials from common manufacturers are chosen:
- Ensto (Finland);
- Nelson (America);
- Lavita (South Korea);
- DEVI (Denmark);
- FreezStop (Russia).
Self-regulating cable
It is used to protect the water supply from freezing and to maintain the temperature in the DHW system. It can also be used to thaw snow or ice in gutters when constructing storm sewers.
How does it work
There are two copper conductors in the cable, between which there is a polymer resistor made of coal dust.
When a voltage of 220 volts is connected, the current passing through this resistor heats it up to a certain temperature.
When heated, coal dust expands and its resistance increases. As a result, the load current decreases and the heating power decreases.
The constantly repeating cycle of heating-cooling creates the effect of self-regulation.
The total load varies along its entire length depending on the ambient temperature for each section of the cable. That is, if the temperature of the medium increases, then the released power decreases, and vice versa.
Thus, self-regulation prevents overheating of hotter areas. It can be lengthened or shortened anywhere along the route, since the voltage supply to it occurs in parallel. This capability simplifies cable design and installation on site.
During installation, do not exceed the maximum power for different temperatures during cable operation. It can be bent with a radius of at least 25 mm and only on the flat side.
The use of a heating cable for any water supply that runs along the street is necessary. But there are many problems associated with this, one of which is fragility. Therefore, very often, when laying pipes shallow in the ground, a gasket is used inside the pipes.
Very often, this type of cable performs its functions in a very narrow range, and therefore you have to turn it on and off manually.
If you do not connect thermal sensors, then you can get by with manually turning the heating system on and off. And the energy savings with this method of heating control will still be noticeable.
The only problem is knowing when to turn on the cable. To do this, there is the easiest way - you need to measure the temperature of the pipe and water in the water supply or in the well during the beginning of cold weather. If both indicators are approximately equal, then the pipe does not need to be heated.
When to turn on the heating is up to you, but it is advisable to do this with a large difference in the measurement results, based on the street temperature.
Connecting to the network alternative way
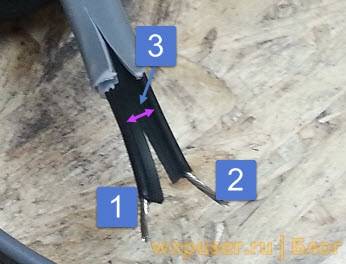
Take this cable:
The heating conductor (3) and the conductors (1 and 2) carrying current must not be shorted
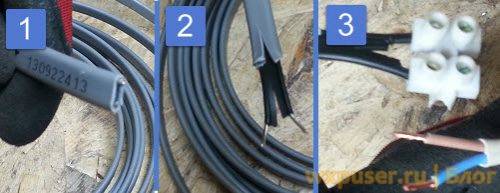
- This is what the end looks like.
- Cleaned up.
- With the help of such a terminal block connected to the wire.
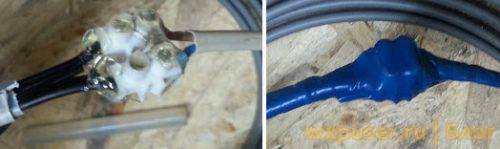
The opposite side must be insulated. It is forbidden to bridge the wires. And you need to make sure that they do not overlap in any environment. To do this, you can buy a special plug. They cost around 300 rubles apiece. But you can do everything yourself from improvised means, such as heat shrink tubing and a heat gun.


- Thermal gun.
- Heat-shrink tubing.
- End of insulated cable.
The stub is made as follows. Put on heat shrink tubing. Warm it up with a hairdryer. After we fill the entire structure with a thermal gun.
The same procedure can be done with the terminal block to which the cable power is connected. You can also wrap everything with electrical tape just in case. If the operating conditions are harsh.
Self-regulating pipe heating: installation methods
Heating of the pipeline with a cable from the outside is carried out as follows: the cable is fixed in the lower part of the pipe or wrapped around the pipe in a spiral manner. To fix the cable, use aluminum tape and wrap it around the entire heated section of the pipe.
To increase the efficiency of the heating cable, it should be used in combination with waterproof insulation (for example, made of polyethylene foam).
The second method - warming from the inside - is suitable in cases where access to the water supply is difficult. Before inserting the heating element into the pipe, it is necessary to install a saddle. After installing it, we screw in the pipe tie-in and through it we introduce the cable into the pipeline as required by the instructions.
An important limitation: insulation from the inside can only be used if the pipe diameter exceeds 20 mm. For thinner pipes, refer to the external insulation method.
TOP 5 best warm cable manufacturers
The leading manufacturers of heating cables are:
- The Swedish company Thermo Industri AB is engaged in the production of cables for heating domestic and main pipelines. For the manufacture of systems, automatic equipment is used, which improves product quality and reduces the cost of products. The manufacturer offers thermal regulators and additional devices that ensure reliable operation of pipe heaters.
- Eltrace products are produced by a company with French roots. The company specializes in the production of heating elements with automatic temperature control. For domestic use, a series of Tubes-heat products is offered. The Traceco range is suitable for mounting on industrial pipelines. But the use of products in the private sector is also allowed.
- Thermon products are manufactured by an American company. The equipment is characterized by ease of installation and low power consumption. The company offers products with self-regulating temperature.
- The Danish company Devi offers resistance-type heaters, as well as self-regulating equipment. The company has been specializing in the production of heating elements for over 50 years. The products are of high quality and easy installation.
- The Russian manufacturer Teplolux (SST) produces heating elements for pipes and floors. Products are distinguished by a reduced price with high quality workmanship.
If the site uses non-standard piping. Then the owner will need to independently create a heating circuit or contact the company.When arranging an electric heating circuit, one should remember about safety and provide for the installation of protective elements that eliminate the risk of electric shock.
Heating cable review and test, don't miss the video:
How to connect the heating cable to the network:
Helpful2Useless
The pipe is frozen - the reason
All heating cables work properly only if they comply with voltage ratingsspecified in the product data sheet. If you have problems with the voltage at home, and it rarely rises above 180-190V, then do not be surprised that the selected power may not be enough, and one day the pipe will still freeze.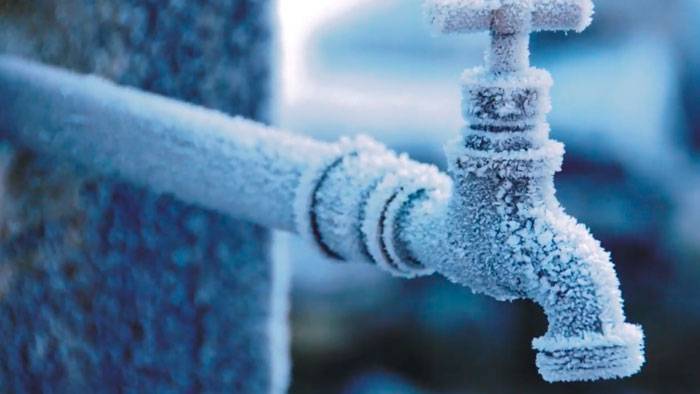
And why sometimes the cable itself dies? Self-regulators are afraid of frequent switching on and off. Usually they have a finite number of such commutations.
They also fail due to improper connection to the 220V power cable. Poor quality termination and moisture ingress into the shell is another reason.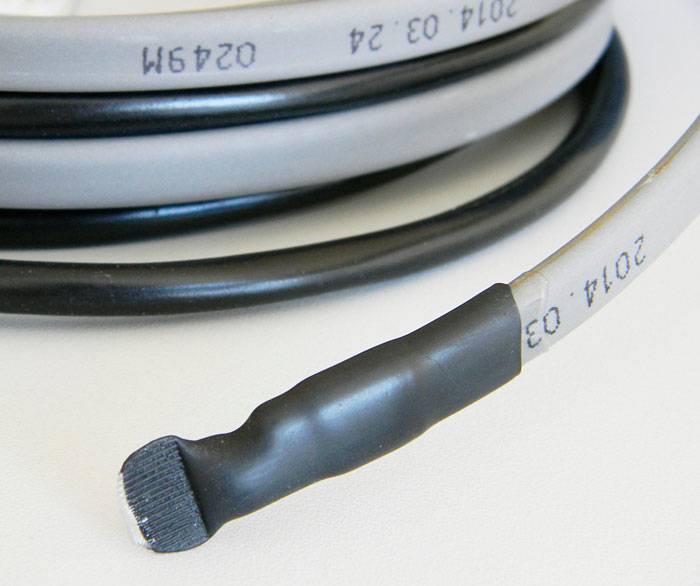
For tight entry of the food cable into the pipe, glands are used.
When choosing them, pay attention to the shape of the cable. They are round or flat.
Under a certain brand, they use their own gland. Pick the wrong one, you'll get a leak.


