- Is it easy to install a hydraulic accumulator
- How a hydraulic accumulator works
- What should be the pressure in the accumulator
- Pre-check and pressure correction
- What air pressure should be
- Pumping stations
- Prices for popular models of pumping stations
- How to choose a pumping station
- Accumulator care
- The device and purpose of the hydraulic tank
- Preparation for work
- Pressure setting
- Pumping air into the accumulator
- Correct selection
- Purpose
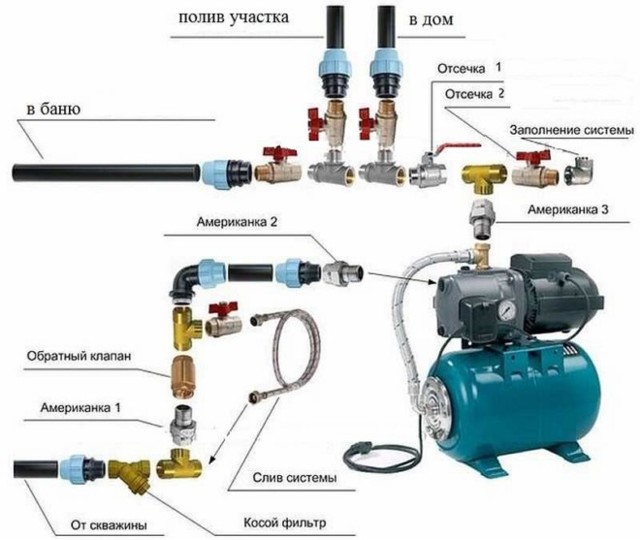
- Connection rules, diagram
- How to set up plumbing equipment
- Video description
- Video description
- Conclusion
- Standard device with surface type pump
- 1 Description of sensor and pumping system
- 1.1 Adjusting the pressure switch for the accumulator
- 1.2 How to set up a pressure switch at a pumping station? (video)
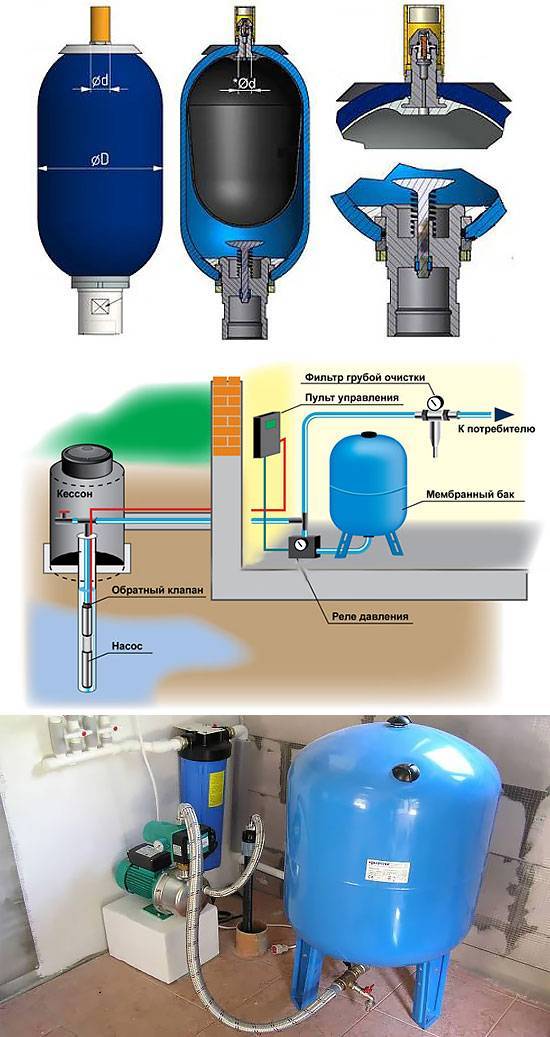
- Schemes of pumping stations.
- Why do we need a hydraulic accumulator, its difference from an expansion tank
- Surface pump installation
- Definition of critical pressure
- Pressure switch connection
Is it easy to install a hydraulic accumulator
Summer residents immediately panic when they hear that the accumulator must be connected to the water supply system. They think that pipes can suddenly burst and then the entire summer cottage, together with the house, will be filled with water. This is not true.
The installation of the accumulator takes place according to the standard and proven scheme. A lot of summer residents integrated their tanks along it. And they did an excellent job. To do this, they purchased all the necessary components in the form of nipples, pumps and fittings.
To put it in the right place, you need to determine the water flow parameter for the whole house. Determine the power of the pump and the volume of the accumulator. It is also worth knowing the location of the main water supply units.
Next, you must write a list of what you need to buy to install the tank:
- hoses;
- Pipes;
- Fitting;
- Nipples;
- Cranes and so on.
Then look at the installation diagram and just do everything as indicated there.
At first glance, it seems that installing a tank is a difficult task. This is not true. Decide on a place, look at the schemes that the water supply has. Buy the connection parts and simply connect the tank to the general water supply.
How a hydraulic accumulator works
Before you connect the accumulator to the water supply, you need to understand the principle of its operation. The principle of operation is to perform the following tasks:
- By means of a water pipe, the receiver is filled with water, or rather, a rubber membrane. Water supply can be carried out not only from the water supply, but also from a well or a well.
- The control relay, which is responsible for the lower and upper pressure thresholds, turns off the power supply to the electric motor with the pump as soon as the set parameter reaches a certain value. The pressure in the receiver can be set independently, but it is undesirable for this parameter to exceed 6 atmospheres.
- As soon as the rubber tank is filled to a certain pressure, the pump is turned off.When you open a faucet in the house, water flows from the receiver. The more water capacity is consumed, the faster the pressure will drop to the lower limit.
- As soon as the pressure in the tank drops to the lower value, the relay will work, which will give a signal to the electric motor to turn on the pump. Water is pumped up to the upper pressure threshold, after which the engine is turned off again.
If there is a need to use a large amount of water, for example, if a person fills a bath or takes a shower, then the pump will work continuously until the tap is closed. The smaller the tank, the more often the electric motor will operate to fill the receiver. When choosing a receiver, it is worth considering that each part has its own resources. The larger the volume of the receiver, the less wear on the pump, valve flange and motor. If the volume of the receiver is insignificant, and water has to be used very often, then the service life of the working elements will depend directly on how often the need for water will arise.
What should be the pressure in the accumulator
Compressed air is in one part of the accumulator, water is pumped into the second. The air in the tank is under pressure - factory settings - 1.5 atm. This pressure does not depend on volume - and on a tank with a capacity of 24 liters and 150 liters it is the same. More or less may be the maximum allowable maximum pressure, but it does not depend on the volume, but on the membrane and is indicated in the technical specifications.
The design of the hydraulic accumulator (image of flanges)
Pre-check and pressure correction
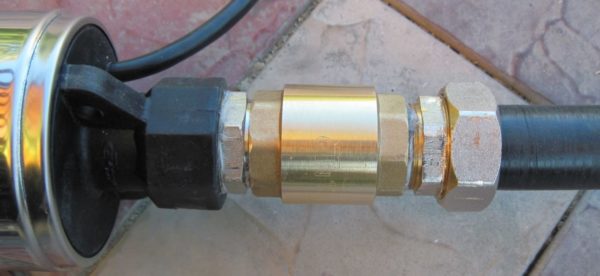
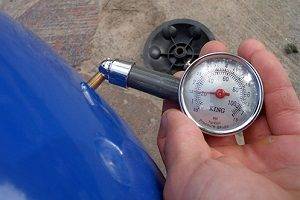
Before connecting the accumulator to the system, it is advisable to check the pressure in it.The settings of the pressure switch depend on this indicator, and during transportation and storage the pressure could drop, so control is very desirable. You can control the pressure in the hydraulic tank using a pressure gauge connected to a special inlet in the upper part of the tank (capacity from 100 liters or more) or installed in its lower part as one of the piping parts. Temporarily, for control, you can connect a car pressure gauge. The error is usually small and it is convenient for them to work. If this is not the case, you can use the regular one for water pipes, but they usually do not differ in accuracy.
Connect pressure gauge to nipple
If necessary, the pressure in the accumulator can be increased or decreased. To do this, there is a nipple at the top of the tank. A car or bicycle pump is connected through the nipple and, if necessary, the pressure is increased. If it needs to be bled off, the nipple valve is bent with some thin object, releasing air.
What air pressure should be
So the pressure in the accumulator should be the same? For the normal operation of household appliances, a pressure of 1.4-2.8 atm is required. To prevent the tank membrane from rupturing, the pressure in the system should be slightly more tank pressure 0.1-0.2 atm. If the pressure in the tank is 1.5 atm, then the pressure in the system should not be lower than 1.6 atm. This value is set to water pressure switchwhich works in tandem with a hydraulic accumulator. These are the optimal settings for a small one-story house.
If the house is two-story, you will have to increase the pressure. There is a formula for calculating the pressure in a hydraulic tank:
Vatm.=(Hmax+6)/10
Where Hmax is the height of the highest draw point. Most often it is a shower.You measure (calculate) at what height relative to the accumulator its watering can is, substitute it into the formula, you get the pressure that should be in the tank.
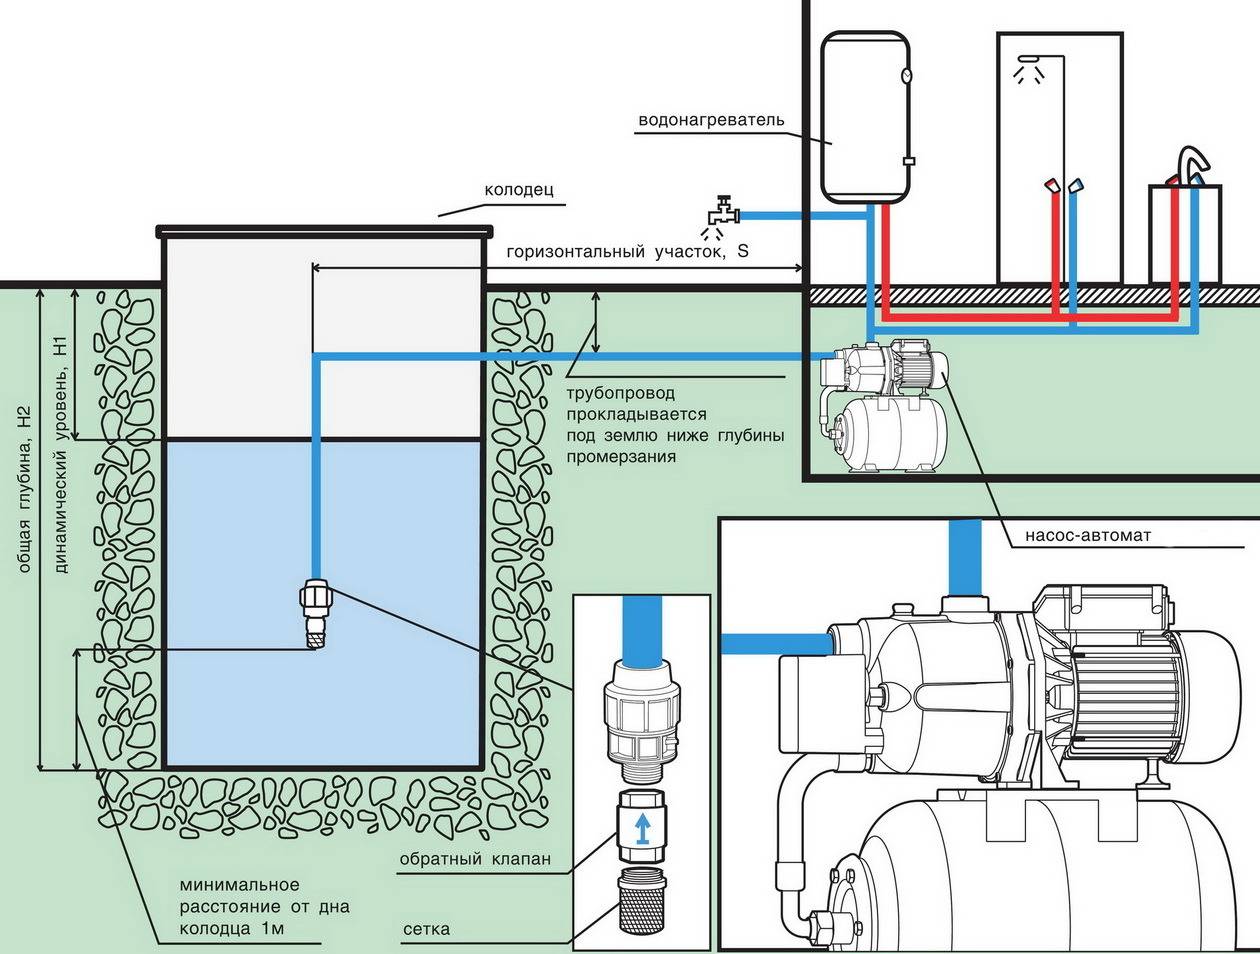
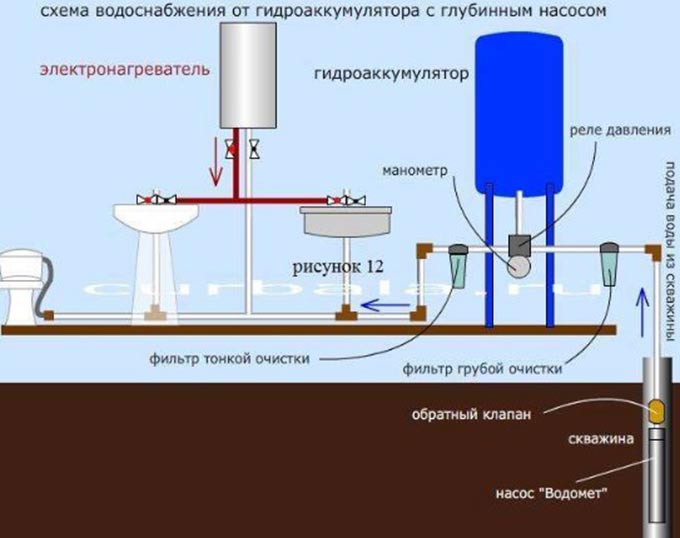
Connecting a hydraulic accumulator to a surface pump
If the house has a jacuzzi, everything is more complicated. You will have to select empirically - by changing the relay settings and observing the operation of water points and household appliances. But at the same time, the working pressure should not exceed the maximum allowable for other household appliances and plumbing fixtures (indicated in the technical specifications).
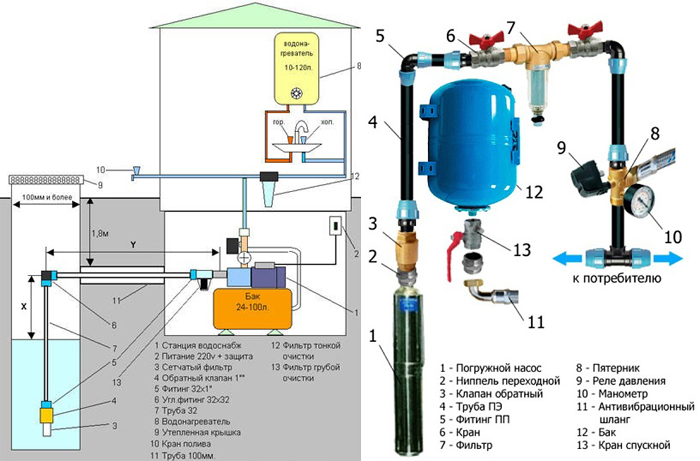
Pumping stations
Pumping stations are the easiest way to ensure the nominal pressure and pressure in the water supply of a private house. The best option for their location is at a distance of up to 8 - 10 meters from the water intake point. With a greater distance (for example, if the pump is installed in the house), the load on the electric motor will be increased, which will lead to its faster failure.
Prices for popular models of pumping stations
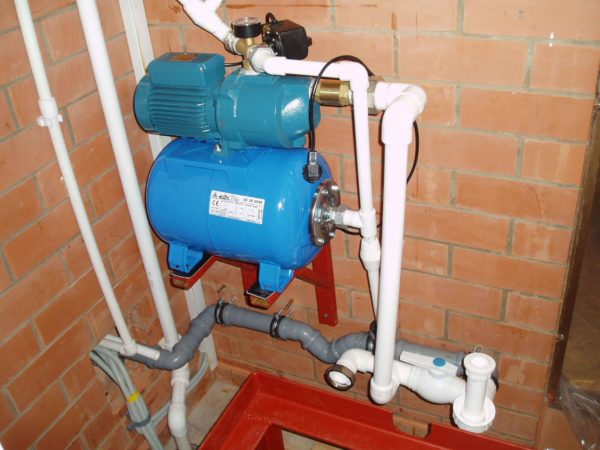
Pumping stations
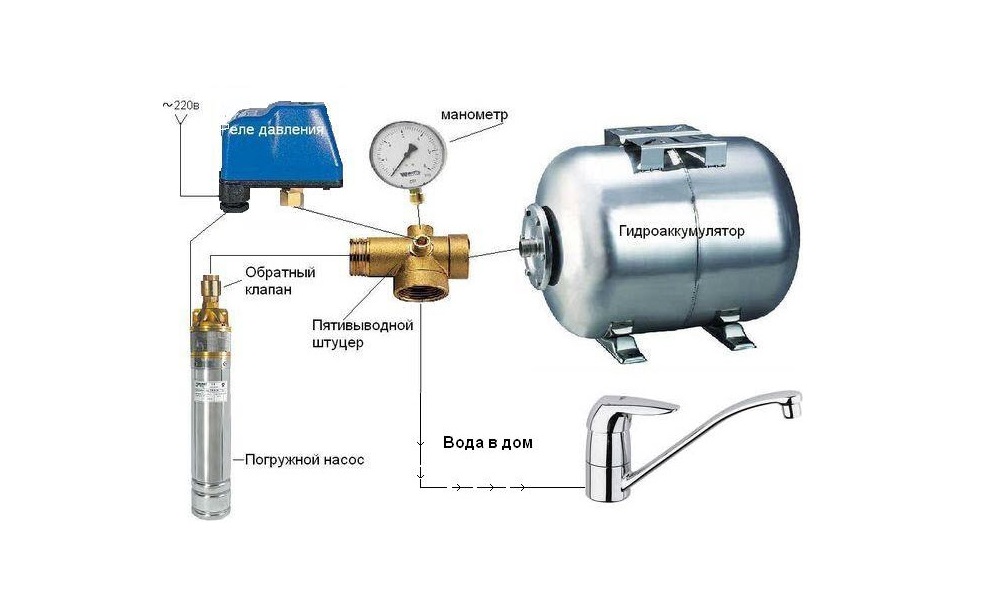
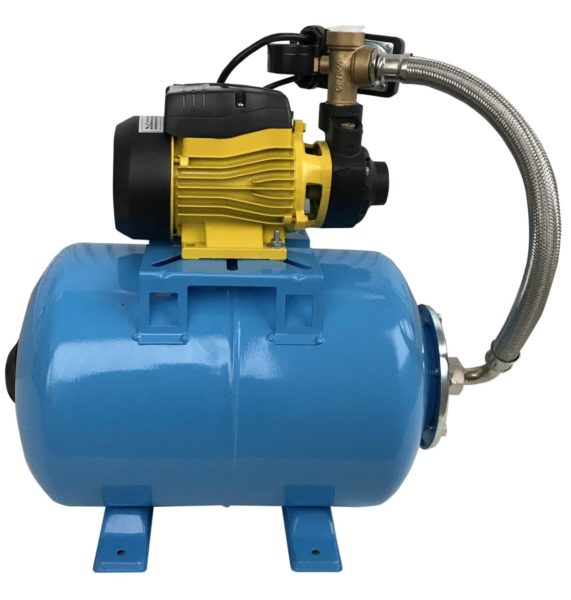 Pumping station. Consists of a relay that responds to pressure and a hydraulic accumulator that provides a smooth change in pressure in the water supply system
If it is planned to install a filter station, then the pump is placed directly at the point of water intake (in the caisson, having previously provided it with waterproofing). Only in this case, the station will be able to provide the required pressure in the system without drawdowns at the time of switching on/off.


But it is recommended to refuse pumping stations without a hydraulic accumulator (pressure switch). Although they are cheap, they do not provide stable pressure inside the water supply, and at the same time they fail quite quickly (and they are also vulnerable to voltage drops).
 It is recommended to place pumping stations in the house only if there is no more than 10 meters to the source of water intake. In other cases - in the caisson right next to the well or well
How to choose a pumping station
When choosing pumping station should focus only on its technical characteristics (namely, performance and the maximum possible pressure in the system), as well as the size of the accumulator (sometimes called "hydrobox").
Table 1. The most popular pumping stations (according to reviews on thematic forums).
| Name | Basic characteristics | Average price, rub |
|---|---|---|
| Werk XKJ-1104 SA5 | Up to 3.3 thousand liters per hour, maximum delivery height 45 meters, pressure up to 6 atmospheres | 7.2 thousand |
| Karcher BP 3 Home | Up to 3 thousand liters per hour, feed height up to 35 meters, pressure - 5 atmospheres | 10 thousand |
| AL-KO HW 3500 Inox Classic | Up to 3.5 thousand liters per hour, delivery height up to 36 meters, pressure up to 5.5 atmospheres, 2 control sensors are installed | 12 thousand |
| WILO HWJ 201 EM | Up to 2.5 thousand liters per hour, delivery height up to 32 meters, pressure up to 4 atmospheres | 16.3 thousand |
| SPRUT AUJSP 100A | Up to 2.7 thousand liters per hour, delivery height up to 27 meters, pressure up to 5 atmospheres | 6.5 thousand |
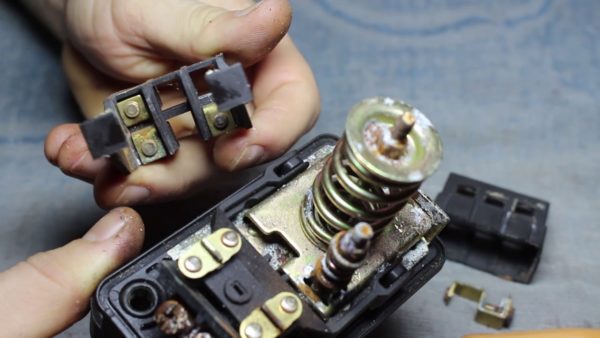 Relay for switching on the pumping station. It is with its help that the pressure at which the pump turns on and off is regulated. Relays should be cleaned of rust regularly if the station is located in a place with high humidity
For most household needs, including watering a small plot of land, these pumping stations will be more than enough.They have an outlet under the pipe from 25 to 50 mm, if necessary, an adapter is installed (such as "American"), and then there is a connection to the water supply.
 Reverse valve. It is installed before entering the pumping station. Without it, after turning off the pump, all water will be “discharged” back
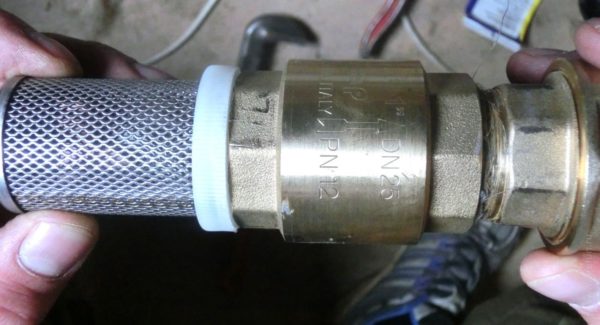 Such valves, which come with a mesh for pre-cleaning, should not be installed either. Often clogged with debris, jammed. It is better to mount a full-fledged coarse filter
Accumulator care
To extend the life of the GA, you must follow the following rules:
- monitor for leaks - they may occur due to poor tightness or vibrations transmitted from the pump;
- check the air pressure inside - its fall can cause rubber rupture and fluid leakage from the air valve;
- immediately respond to malfunctions in the system, since the problem may not only be in the pump or GA.
In order to detect the problem in time, experts recommend checking the parts for wear every six months. To do this, disconnect the hydraulic tank from the system, drain the liquid and remove the ring holding the membrane - in this place, rubber tears most often occur, after which air begins to flow into it
Replacing a pear is not difficult, it is important that it be selected in the same way as the first one and meet the technical specifications
The device and purpose of the hydraulic tank
A hydraulic accumulator, which is otherwise called a hydraulic tank or a membrane tank, is a sealed metal container in which an elastic pear-shaped membrane partially filled with water is placed.In fact, the membrane, placed in the body of the hydraulic tank and attached to its body with a flange with a pipe, divides its capacity into two parts: water and air.
As the volume of water in the hydraulic tank increases, the volume of air naturally decreases. As a result, the pressure in the water supply system increases. When the pressure parameters set by the user are reached, it is fixed by a relay, which systematically gives a command to turn off the pump.
Image gallery
Photo from
A hydraulic accumulator is a metal tank, inside of which an elastic membrane in the form of a flask is placed, filled with water. The rest of the space between the flask and the body is occupied by gas or air
The change in the volume of water in the flask and air in the body is fixed by automation, which controls the on / off cycles of the pump
Hydraulic tanks are used both as part of systems with a submersible pump, and in tandem with a surface pump. In both cases, they are required to automate the operation of the system.
Hydraulic accumulators are installed either at the inlet of the water supply to the house, or near the water well directly in the caisson
A non-return valve is installed on the inlet pipe to the hydraulic tank, which prevents the outflow of water back into the mine after the pump stops
The optimal place for installing a pressure gauge is considered to be the outlet from the accumulator, which is required to control the pressure parameters in the system
In the arrangement of dachas and small country houses, hydraulic tanks with a capacity of 12 to 24 liters are used. To work in tandem with submersible pumps, the volume is taken more, calculated based on the technical characteristics of a particular unit
If for the normal operation of an autonomous system a water reserve of 300 - 500 liters is required, then the circuit with a hydraulic tank is supplemented with a large hydraulic accumulator, a ready-made or home-made storage
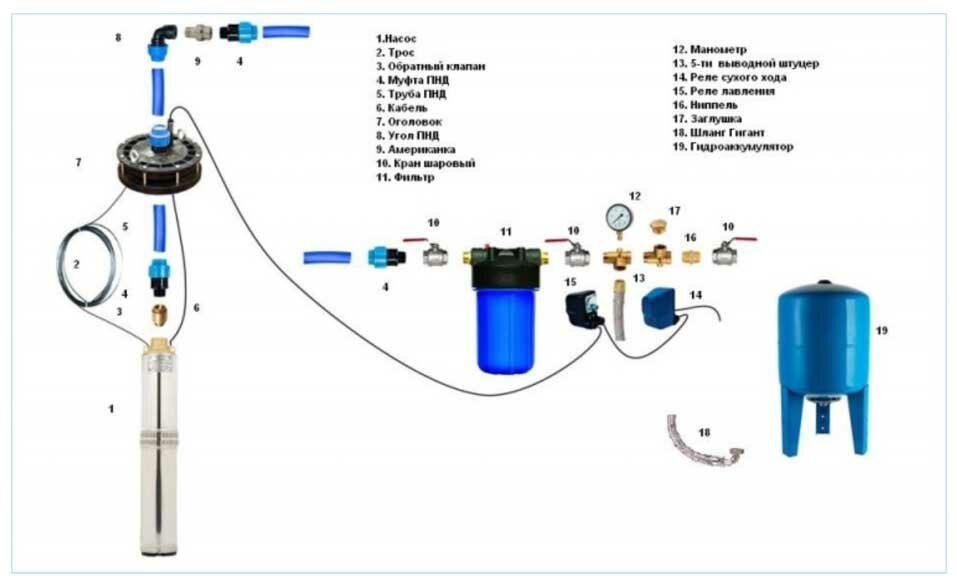
Components water supply systems with hydraulic tank
Hydoaccumulator as part of a pumping station
Installing a hydraulic accumulator in a caisson
Hydraulic accumulator at the inlet of the water supply to the house
Check valve location
Place of installation of the manometer
Accumulator Volume Standards
Water reserve system
The body of the tank is made of metal, but water does not come into contact with it: it is enclosed inside a membrane chamber, which is made from durable rubber butyl. This bacteria-resistant material helps water not to lose the qualities that sanitary and hygienic standards require. Drinking water, when interacting with rubber, retains all its wonderful properties.


Water enters the membrane tank through a connecting pipe equipped with a threaded connection. The pressure pipe and the outlet of the connecting water supply should ideally have the same diameter. This condition allows avoiding additional hydraulic losses inside the system pipeline.
In those accumulators that are part of domestic water supply systems, air is used. If this device is intended for industrial use, gas is pumped into it
To regulate the pressure inside the device, a special pneumatic valve is provided in the air chamber. Air is pumped into the compartment allotted for it through a conventional automobile nipple. By the way, through it you can not only pump air, but, if necessary, bleed its excess.
Air is pumped into the membrane tank using a compact automobile or simple bicycle pump for this purpose. When water enters the rubber bulb, compressed air resists its pressure, preventing the membrane from breaking through. The pressure inside the accumulator is also regulated using compressed air.
The hydraulic accumulator consists of the following elements: 1 - a metal case, 2 - a rubber membrane, 3 - a flange equipped with a valve, 4 - a nipple through which air can be pumped, 5 - air under pressure, 6 - legs, 7 - an installation platform for the pump
Preparation for work
How does a water accumulator work? It is charged by the pump to a certain pressure and then feeds the consumer system with water until the pressure drops to the lower limit.
The pump then turns on again. In order for everything to work correctly, it is necessary to make settings and check the filling of the tank with air.
Pressure setting
Russian manufacturers set, as a rule, the pump on pressure is 1.5 atm, and it is turned off at 2.5 atm.
Foreign relays are set to 1.4–2.8 atm. There are parameters that are unusual for a private house: 5–7 atm. In this case, make sure that the relay can be adjusted in the desired range: 1–3 atm. Information about this is in the product passport. After purchase, set 1.5–2.5 atm.
You can set the regulator to other numbers, but it makes no sense. After all, the main household consumers are designed for 2 atm: a shower, a washbasin, a washing machine. Only a few, such as a jacuzzi, require 4 atm. At 6 atm and above, the seals in the system and consumers fail.
The difference between the pressure on and off the pump should be no more than 1.5 atm.A large difference leads to a strong stretching of the membrane (cylinder) and a shortening of its service life.
If the pressure is indicated in bars, nothing changes in the settings, because 1 atm = 1.01 bar.
Pumping air into the accumulator
You can measure the air pressure in the storage tank for water supply with a wheel pressure gauge, and pump it up with a car pump.
How much you need to pump up is indicated in the passport and on the body of the accumulator. But it is better to use other numbers so that the device works correctly. The air chamber should contain 0.2–0.3 atm less than the pressure at which the pump is turned on.
For example, if the relay is set to 1.5–2.5 atm, then the air chamber is pumped up to 1.2–1.3 atm. This is done with the water pressure in the system released.
Correct selection
An interesting nuance: the name of this equipment does not depend on its design, but on the field of application. When it comes to water supply, the tank is called a hydraulic accumulator. And a container built into the heating with the same structural characteristics will be called a membrane or expansion tank.
But it is important to take into account the information specified by the manufacturer. Each product has its own operating temperature and pressure:
- up to 4 atmospheres and up to 120 degrees Celsius - for heating;
- up to 12 atmospheres and up to 80 degrees - for water supply.
By volume, not the cheapest tank is selected, but corresponding to the parameters of the system.
To normalize the pressure in the heating system, a number of devices are used. But the most important of them is either a hydraulic accumulator.Its design makes it possible to automatically stabilize the pressure indicators of the coolant when the temperature regime changes.
Purpose
The accumulator is installed only for closed-type heating systems. They are characterized by high water pressure, which occurs due to its heating. Therefore, when the permissible indicator is exceeded, a compensation system is necessary. This is what the accumulator is for.
It is a steel structure, which is divided into two chambers inside. One of them is designed to be filled with water from the heating system, and the second serves as an air compensator. To set the optimal pressure indicator in the air chamber, a valve is provided in the accumulator. With its help, the degree of air injection is changed, thereby adapting the device to the parameters of a particular heating system.
The chambers are separated by an elastic membrane or rubber balloon. When the temperature of the water in the pipes rises above the critical one, a pressure jump occurs. The liquid, expanding, begins to put pressure on the walls of the separating membrane. She, in turn, under the influence of this force increases the volume of filling the water chamber. This leads to normalization of pressure within the entire system.
Connection rules, diagram
When installing a hydraulic accumulator, certain rules should be followed. First of all, it is necessary to select a site in the heat main where it will be installed. Experts recommend mounting the expansion tank in the return pipe with chilled water. But at the same time, it must be installed before the pumping equipment. The general installation scheme is as follows.


As you can see, a safety valve is installed to protect the line from the pressure drop of the liquid at the outlet of the heating equipment. It performs the same functions as a hydraulic accumulator, but is designed for higher pressure surges. An expansion tank is necessary to normalize the operation of heating with small pressure drops.
Before starting installation, consider the following features:
- Choice of installation location. The main requirement for it is free access to the device. This applies in particular to the air chamber control valve.
- In the area between and the expansion tank there should not be other shut-off or control valves. It can make significant changes in hydraulic resistance.
- The temperature in the room where the accumulator is installed must not be below 0°C.
- Its surface should not experience mechanical stress or external influences.
- The operation of the pressure reducer to release air from the chambers must be set according to the parameters of the heating system.
Guided by these rules, you can independently install an expansion tank. But at the same time, you should follow the rules for connecting, use products made of high-quality material and calculate the optimal volume of the tank.
For the calculation, it is necessary to know the total volume of the heating system, the optimal and maximum pressure in it, as well as the expansion coefficient of water. The formula for calculating the size of a membrane type hydraulic accumulator:
- e - coefficient of expansion of water - 0.04318;
- C is the total volume of the heating system;
- Pi is the initial pressure;
- Pf is the maximum pressure.
Consider an example of a calculation for heating with a total volume of 500 liters, an optimal pressure of 1.5 bar, and a maximum of 3 bar.
This technique will allow choose and connect expansion tank for a closed heating system.
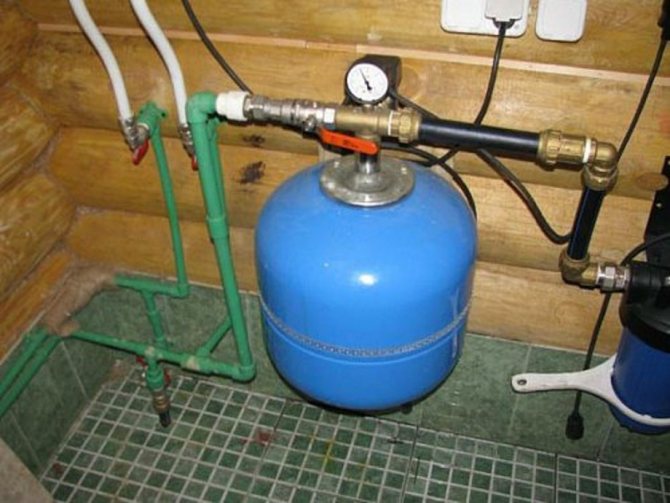
How to set up plumbing equipment
How to install a hydraulic accumulator for water supply systems is understandable, but you need to carefully set up all the equipment so that the resulting system functions effectively
The key element to pay attention to is the pressure switch. Externally, the device, although it looks simple, but it can take several hours to fix it.
As a rule, a specialist copes with the task quickly, but if there is no special knowledge, then you can ruin the device.
Video description
How to adjust the accumulator, see the following video:
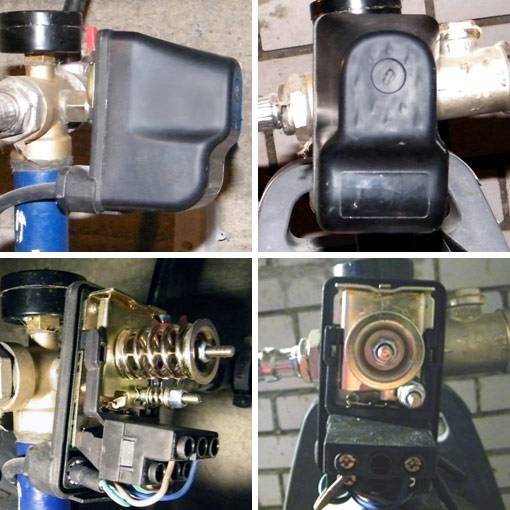
To set up the pressure switch, no matter how trite it may sound, first of all, the cover is removed from the device. There is a plug on the lid itself, which many mistakenly take for an adjusting screw, but this is not so - the lid must be removed.
Under the cover we see two bolts - large and small - with springs put on them, which in turn are fixed with nuts.

To properly adjust the pressure switch, you need the appropriate knowledge and experience, so it is better to entrust this procedure to a specialist
The tension of the larger spring is responsible for shifting the pressure range at which the pump will turn on and off. Those. if the spring is removed at all, then it will be, for example, 1-2 atm, and if you start tightening the spring, then 2-3 atm, respectively, and so on.
The tension of the smaller spring is responsible for the width of the pressure range itself - if the spring is removed, it will be 1-2 atm, and if you start tightening it, then 1-3 atm, and so on.
In general, the tension of the springs is responsible for turning the pump on and off when a certain pressure is reached. The norms noted in the instructions for the device state that the difference between the modes is 2 atm. The tension of the springs should be adjusted to the desired value. This is done as follows:
- Weaken both springs as much as possible.
- We turn on the pump and look at the pressure gauge - at what pressure indicators it turns on and off.
- If the lower threshold is insufficient, then tighten the larger spring and check the pressure until it reaches the desired value.
- Check the upper pressure limit. If it is insufficient, then we tighten the smaller spring and check the pressure until it reaches the desired value.
- When adjusting the smaller spring, the lower pressure limit is usually slightly raised and the tension of the larger spring needs to be slightly loosened. But in any case, you must first look at the readings of the manometer.
Video description
Visually see the entire process of setting up the pressure switch in this video:
Despite the seeming simplicity, setting up a pressure switch is a rather difficult task for a non-specialist, but if this is done correctly, then the adjustment work can be considered complete.
In addition to the direct adjustment of the hydraulic tank, much depends on the correctly selected connection scheme. And if everything is done correctly, then in a country house there will always be a stable pressure of water.
Conclusion
A hydraulic accumulator is a special device whose task is to stabilize the pressure in the plumbing system.
It is important to properly install the accumulator for water supply systems, but you should also carefully consider the choice of device. In the process of work, many different parameters are taken into account, starting with the installation site of the device and ending with the choice of the volume of the container
It is also important to understand how the unit itself is arranged. This knowledge will allow you to assemble a reliable and stable plumbing system.


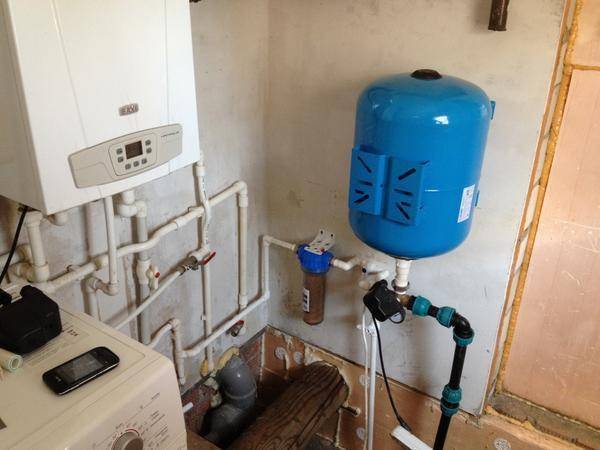
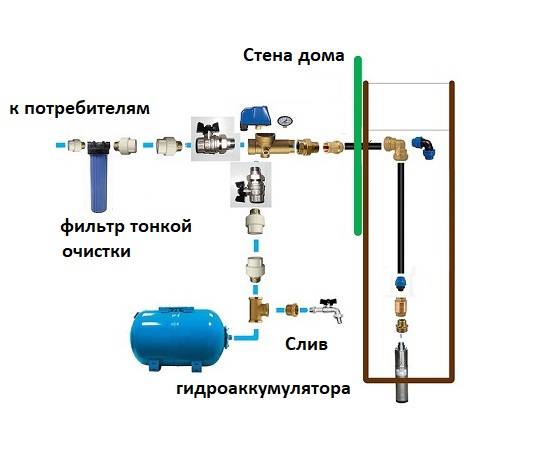
Standard device with surface type pump
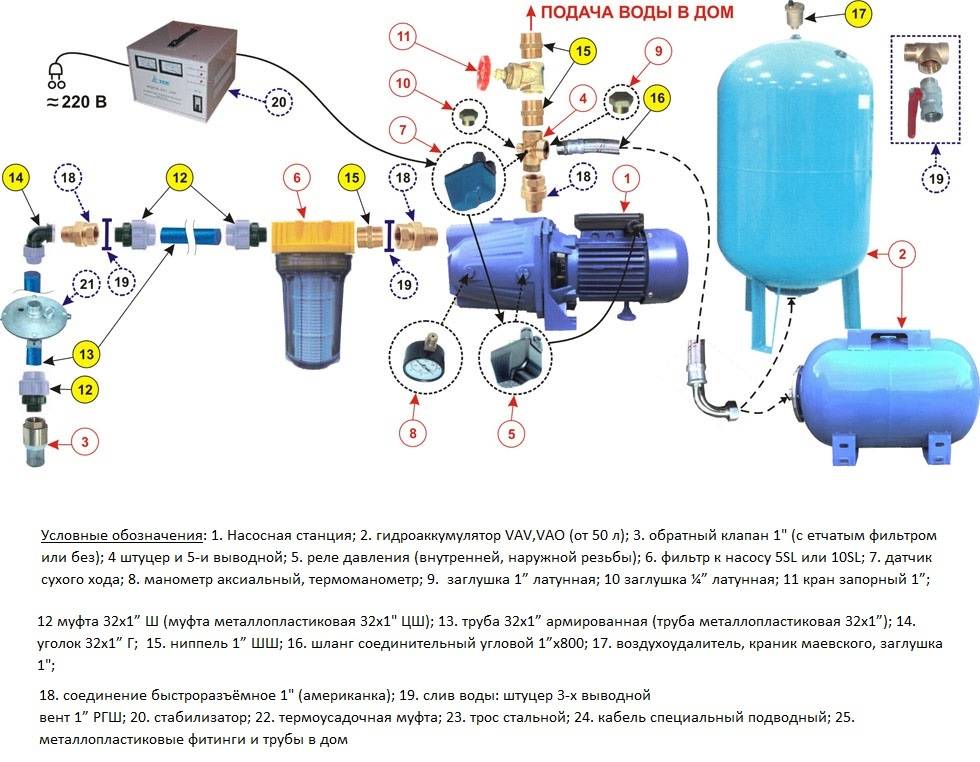
Most often, an autonomous water supply system of a private house involves the presence of a hydraulic accumulator and a surface pump. In this case, the manufacturer offers prefabricated integrated pumping equipment, which already includes a hydraulic tank. However, the possibility of placing the membrane tank together with the pump in a caisson or in a heated utility room is not excluded.
Therefore, it is important to understand how to connect a deep pump to a hydraulic accumulator.
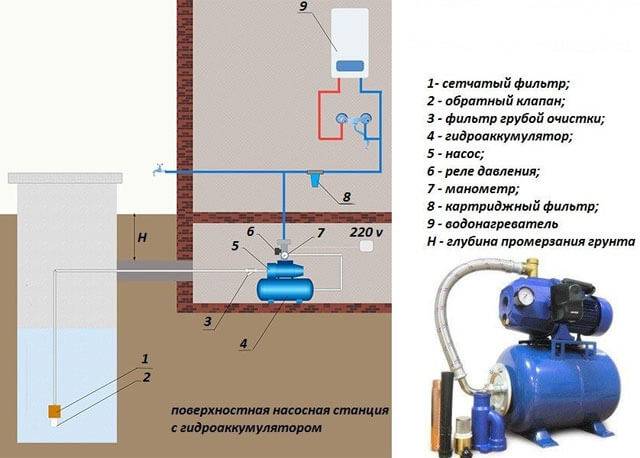
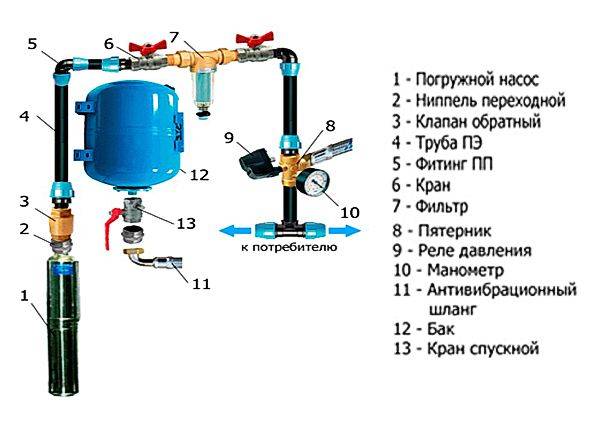
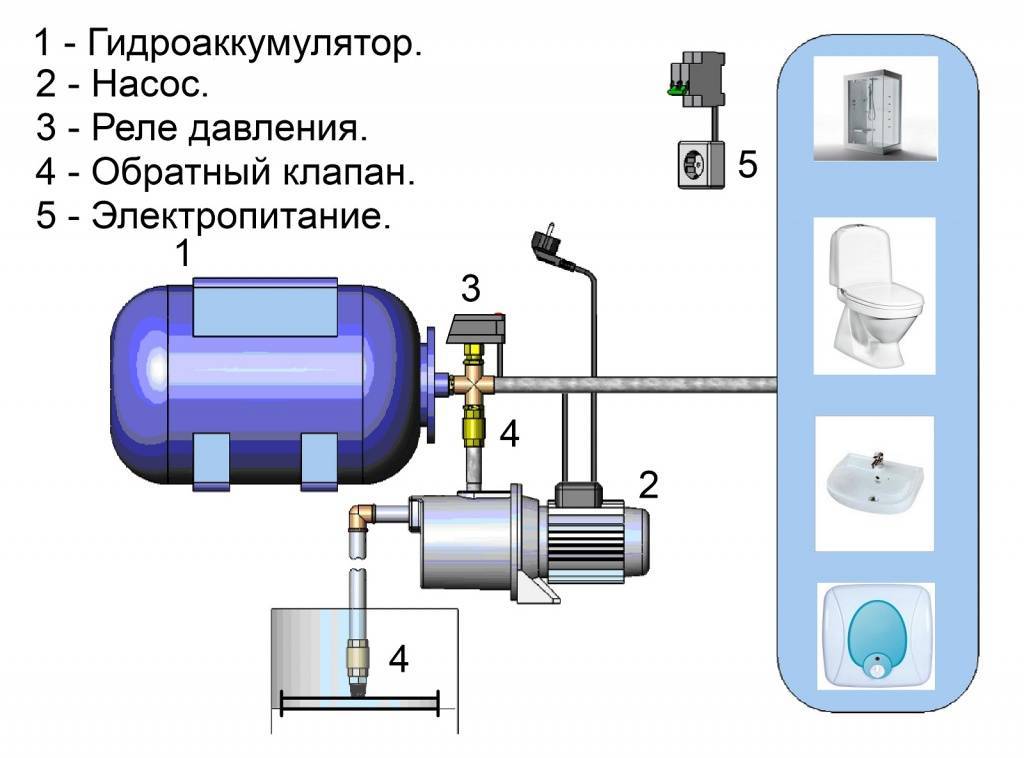
The connection scheme is most often the same. A check valve is installed in front of the hydraulic tank, which excludes the possibility of changing the water flow, then there is a pressure switch that reacts to the slightest changes in water pressure. A mandatory element in such a system is a pressure gauge, with which you can control the operating parameters of the entire system.
1 Description of sensor and pumping system
Water pressure sensor - an electrical device that provides pressure control in the accumulator for a pumping station. It also monitors the pressure of the liquid in the pipeline and turns on or off the water supply to the accumulator tank.
This happens due to the short circuit of the wires. Exceeding the allowable threshold opens the contacts and the relay turns off the pump. A drop below the set level closes the contact of the device, including the water supply. You can manually adjust both the upper and lower thresholds.
Basic concepts of a pressure switch for a system with a hydraulic accumulator:
- Rvkl - lower pressure threshold, power on, in standard settings it is 1.5 bar. The contacts are connected, and the pump connected to the relay begins to pump water;
- Roff - the upper pressure threshold, switching off the power supply of the relay, it is better to set it to 2.5-3 bar. The circuit is disconnected and an automatic signal stops the pumps;
- delta P (DR) - an indicator of the pressure difference between the lower and upper thresholds;
- maximum pressure - as a rule, does not exceed 5 bar. This value is displayed in the characteristics of the control device for water supply systems and does not change. Exceeding this will result in damage to the equipment or a reduction in the warranty period.
The main element of the pressure switch for the accumulator is a membrane that responds to water pressure. It bends depending on the pressure and tells the mechanism how much the water pressure in the pumping station rises or falls. The bend switches the contacts inside the relay. A special spring counteracts the onslaught of water (which is tightened for adjustment). The smaller spring determines the differential, that is, the difference between lower and upper threshold pressure.
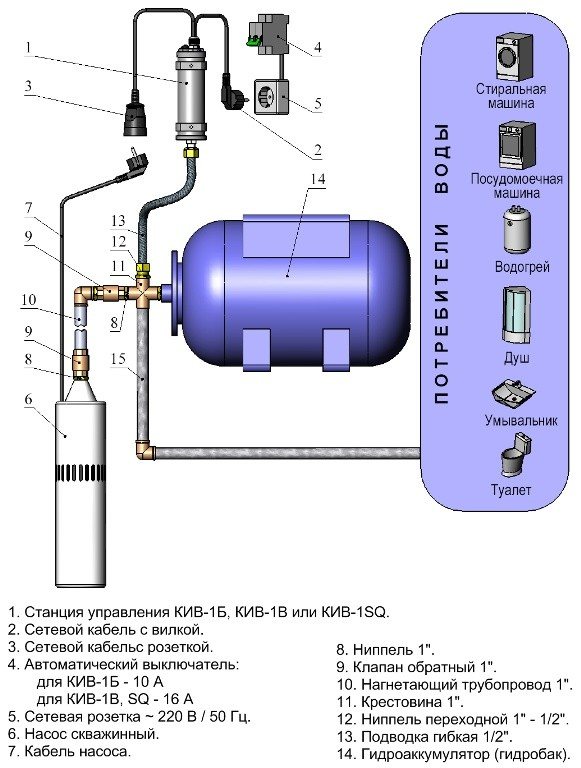
A hydraulic accumulator and a pressure switch form a reliable system for providing water supply to any premises, outbuildings, fields and more. Automation for the pump is also a necessary part - thanks to it, it becomes as simple as possible to control the collection of water and quickly pump liquid into the tank and into the pipes.
You can always connect an additional accumulator, as well as relays, automation, sensors and pumps.
1.1
Adjustment of the pressure switch for the accumulator
Before connecting the equipment to the tank, you should check the operation of the relay and adjust it. It is recommended to take readings with a mechanical pressure gauge. It is more points and less prone to internal breakdowns, due to which its readings may not correspond to reality.
The following will be instructions on how to properly set up the pressure switch. First of all, you need to familiarize yourself with the passport of the device, the pump and the accumulator tank in order to find out the pressure limits for these elements of the pumping station. Best when buying familiarize yourself with these parameters in advance and adjust them to each other.
- Open the water intake (faucet, hose, valve) so that, thanks to the pressure gauge, you can see the pressure at which the relay trips and the pump turns on. Usually it is 1.5-1 bar.
- Water consumption is turned off to increase the pressure in the system (in the accumulator tank). The pressure gauge fixes the limit at which the relay turns off the pump. Usually it is 2.5-3 bars.
- Adjust the nut attached to the large spring. It defines the value at which the pump is switched on. To increase the switching threshold, tighten the nut clockwise; to decrease it, loosen it (counterclockwise).Repeat the previous points until the switch-on pressure does not correspond to the desired one.
- The switch-off sensor is adjusted with a nut on a small spring. She is responsible for the difference between the two thresholds and the setting principle is the same: to increase the difference (and increase the shutdown pressure) - tighten the nut, to reduce - loosen.
- It is not recommended to turn the nut more than 360 degrees at one time, as they are very sensitive.
1.2
How to set up a pressure switch at a pumping station? (video)
Schemes of pumping stations.
 The most common scheme of a pumping station is when all its elements are assembled together, as one of the readers wrote: “pump on a barrel”. In this case, the automation unit is placed at the pressure of the pump, and water is discharged to the accumulator through a separate pipe or flexible connection. It turns out that it is possible to put a pump and a hydraulic accumulator (GA) in different places, simply by replacing the outlet to the GA with a longer one.
 But the best option would be to put the automation unit on the HA by connecting the block manifold to the pump with a pipe. Then we get a distributed pumping station, where the pump can be, for example, in a well (or in a well for a submersible pump), and the HA is located in a warm house.
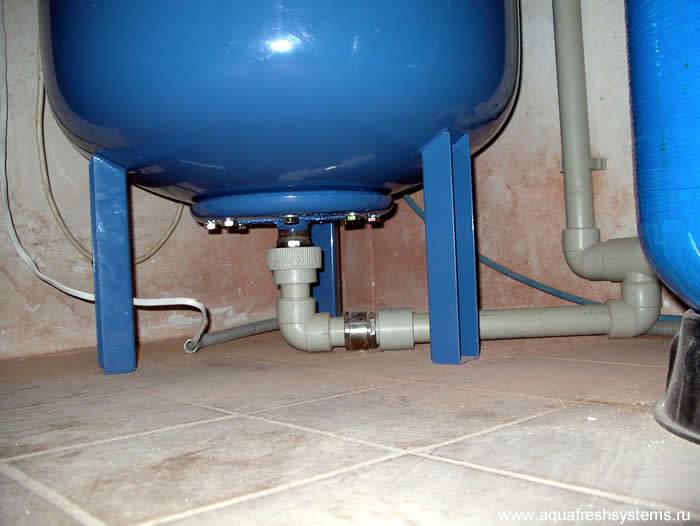
 Continuing to improve our scheme, you can find the most convenient place for the automation unit. To me, such a place seems to be a cold water distribution manifold, where the automation unit will maintain a constant pressure (after all, this is exactly what we need). The accumulator, in this case, can be placed under the bathtub or in any other free place in the bathroom, and the pressure pipe will come from the pump.The pump itself can be placed closer to the water supply and away from the house so as not to hear its noise, or buy a submersible pump (again, no noise in the house).
Hello, dear readers of "San Samych". It seems to me that there is no need to repeat the common truth that the pump is the "heart" of the water supply system ...
Technologies in the field of pumping equipment today allow a private homeowner to fully take on the tasks of providing water. Models of pumping stations with compact dimensions cover irrigation needs, and powerful units with increased productivity realize the rise of water to the second floor. To maintain a stable pressure in the circuits, developers are increasingly using a hydraulic accumulator. This solution has many obvious advantages, but such power additions are not always appropriate from the point of view of operational rationality. In turn, a properly selected pump station without accumulator can provide the target object with water with minimal financial and technological costs.
Why do we need a hydraulic accumulator, its difference from an expansion tank
Hydraulic accumulators are often confused with expansion tanks, despite the fundamentally different problems that these devices solve. An expansion tank is needed in heating and hot water supply systems, since the coolant, moving through the system, inevitably cools and its volume changes. The expansion tank is configured with a “cold” system, and when the coolant warms up, its excess, which is formed due to expansion, has somewhere to go.
The accumulator is needed for completely different purposes: if it is not installed in the water supply system, the pump will be activated every time any tap is opened. If this happens often, then not only the pump, but the entire system wears out faster, since each time the pressure rises in jumps - a so-called water hammer occurs.
As a result, the accumulator is installed in order to get rid of water hammer and extend the life of the system as a whole. In addition, the accumulator has other functions:
Creates a certain supply of water (useful if the power is turned off).

If there are frequent interruptions in water, then the accumulator can be combined with a storage tank
- Reduces pump start frequency. The tank is filled with a small amount of water. If the flow rate is small, for example, you need to wash your hands or wash your face, water starts to flow from the tank, while the pump remains off. It is activated after there is very little water left;
- Maintains stable pressure in the system. In order for this function to be performed properly, an element is provided, called a water pressure switch, capable of maintaining a given pressure within strict limits;
All the advantages of hydraulic accumulators make this device an indispensable element of any autonomous water supply system in country houses.
Surface pump installation
At its core, the connection scheme does not change, but there are some nuances that are important to know. Before connecting, it is necessary to calculate the working and minimum pressure.Different systems may require a different water pressure indicator, but the standard for small water supply systems with a small number of water intake points is a pressure of 1.5 atm
Different systems may require a different water pressure indicator, but the standard for small water supply systems with a small number of water intake points is a pressure of 1.5 atm
Before connecting, it is necessary to calculate the working and minimum pressure. Different systems may require a different water pressure indicator, but the standard for small water supply systems with a small number of water intake points is a pressure of 1.5 atm.


If the system has equipment that requires high pressure, this figure can be increased to 6 atm, but not more, since higher pressure will be dangerous for pipes and their connecting elements.
Definition of critical pressure
This value is set using a relay, after which the pressure in an empty accumulator must be measured.
The result should be lower than the critical value by 0.5 - 1 atm. After that, the system is assembled.
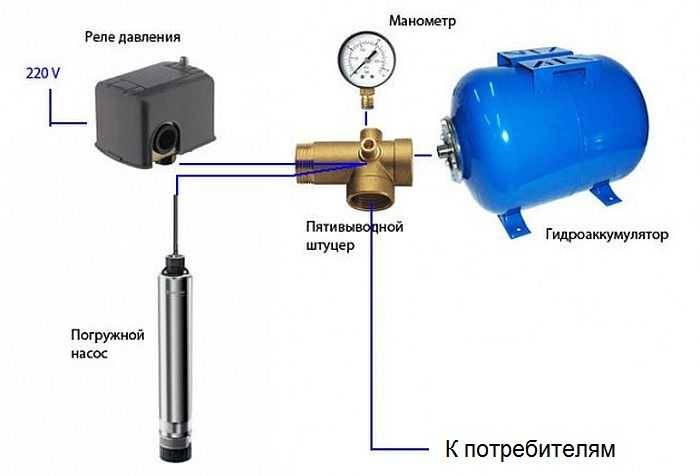
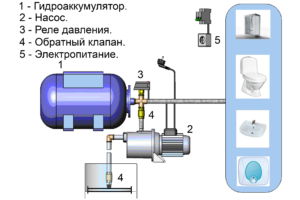
Its center, as in the previous case, will be a five-socket fitting, to which they are connected one after another:
- the accumulator itself;
- a pipe from a pump connected to a water source;
- household plumbing;
- relay;
- manometer.
Pressure switch connection
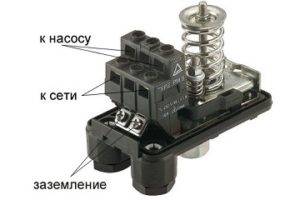
It needs electricity to function.
The top cover is removed from the device, under which there are contacts for connecting the relay to the network and to the pump.
Usually the contacts are signed, but may not have designations. If you are not sure where something is connected, it is best to contact a professional electrician.