- Safety measures when dismantling heating surfaces
- Why do you need electric ignition?
- Connecting a Bosch electric hob
- Connecting a gas hob: the relevance of choosing a hose
- Safety First
- Installation and connection of new equipment
- Dismantling the gas stove
- Faucet replacement
- Installation and connection of a new gas stove
- Leak test
- Acceptance of work by the gas service
- Functional features
- How to connect the hob - step by step instructions for installation and connection (80 photos)
- Connection methods
- How to connect the hob and oven?
- Connection subtleties
- How to mount the panel in the countertop
- Connecting an electric or induction hob
- Do-it-yourself connection of the installed panel
- Gas
- Electrical
- induction
- Without kitchen set
- Tools
- Ratings
- Which is better to choose a water heated towel rail: manufacturer rating
- Rating of the best wired headphones of 2020
- Rating of the best mobile phones for games
- Where to install the stove
Safety measures when dismantling heating surfaces
When removing the hob, be sure to do everything correctly. During this process, the following safety precautions are required:
- the operation of a built-in electrical appliance provides only for cooking and heating food;
- it is forbidden to use the induction panel for defrosting and cooking products packed in metallized packages;
- protection in full from contact with current-carrying elements is ensured by compliance with current electrical safety standards;
- if the device does not work correctly or works with deviations from the specified parameters according to the factory instructions, contact the service center;
- if cracks, chips, cracks appear on your hob, it is necessary to de-energize the device in order to avoid electric shock;
- during cooking, dishes and burners become very hot, it is necessary to limit access to the device to small children and ensure complete safety in relation to thermal and electrical burns;
- it is strictly forbidden to contact the electric cable with the hob;
- it is not recommended to put any flammable and combustible materials on the surface of the cooking structure, this can lead to fire;
- it is also forbidden to eliminate blockages and pollution with alcohol-containing liquids;
- it is forbidden to repair equipment independently or by persons who do not have a special license to perform this type of work.
Why do you need electric ignition?
Scheme of electric ignition of gas stoves.
This function is necessary for people who cook on a regular basis with a gas stove, but do not want to use matches or a lighter. With the help of electric ignition, you can turn on the gas on the hob or in the oven in a matter of seconds.
Currently, self-respecting manufacturers produce stoves with a built-in electric ignition function. After all, this feature allows housewives to cook even easier and safer. Naturally, before acquiring this technique, it is necessary to have at least the slightest idea of how exactly its mechanism is arranged.
Connecting a Bosch electric hob

This device is usually connected using a four-wire cable and terminals, which are located in a box on the back of the hob. In addition, there must be a special circuit on the surface of the device. To avoid errors, it is necessary to connect the device taking into account the information indicated in the above figure. If you need to connect a power plug to a wire, you first need to carefully study its marking. In a socket in which there are three contacts, it is necessary to connect two cores of the black and brown phases into one. Thanks to these simple steps, it will be possible to connect the Bosch electric hob.
However, the device can be connected directly to the shield. The main thing is to carefully study the instructions and determine the number of phases in the home network.
Connecting a gas hob: the relevance of choosing a hose
All work that is carried out with gas is already dangerous a priori - it is best to carry it out under the supervision of an experienced specialist (or a person who is thoroughly versed in this matter).
One of the important points in such work is the choice of hose. Be sure to heed the following recommendations in this matter:
- It is worth subjecting it to a visual inspection before buying - the part should not have any defects.
- The hose must be accompanied by a certificate, which is issued in the store upon purchase.
- The hoses themselves are of two types - corrugated metal or rubber. The first will look like selfie or have a metal braid (be with yellow risks). Rubber ones look habitually monophonic products.
Safety First
A gas leak is an extremely dangerous situation that can lead to serious poisoning, explosion, property damage and death. This happens infrequently, and the cause of misfortunes is usually common - errors when connecting devices and violation of their operating conditions.
The set of rules and safety standards boils down to ensuring that all connections of gas pipes and appliances are tight, the number of such nodes must be kept to a minimum. Having studied the rules for installing gas household appliances, even a home craftsman will cope with such a task.
 High-quality equipment is not cheap, so you should not save on the correct connection of the device. Installation work will cost about 2000 rubles, taking into account materials
During the work, it is necessary to follow the procedure for connecting the equipment, use suitable materials, follow the instructions exactly. At the end of the work, all connections are checked. Compliance with the rules will allow you to get the desired result - a safely installed and connected gas oven.
When installing a built-in gas oven with your own hands, the most common violation is the use of a tee for a gas pipe to which the hob is already connected.
Inexperienced craftsmen believe that if it works with plumbing, then it will work for a gas supply system.The result is three joints that must be carefully sealed.
According to the rules, the connection of the oven and the hob should be carried out separately, bringing its own pipe to each appliance. The number of connections in this case will be reduced to two.
In practice, the use of a tee can be quite safe.
If the threads are properly sealed, it doesn't really matter if two connections are made on connection or three
 Do not connect gas appliances through a tee, without the use of a dielectric gasket and a shut-off valve for each individual consumer
But this method is contrary to the existing rules for installing a gas oven. If during the inspection a representative of the gas service finds such a tee, the owners of the apartment or house face a completely legal fine.
Therefore, from the very beginning it is necessary to take this moment into account in order to connect the oven correctly. In addition, a dielectric gasket should be used, and a shut-off valve should be installed for each appliance that consumes gas.
Installation and connection of new equipment
The gas stove replacement scheme is as follows:
- dismantling of obsolete or unusable equipment;
- crane replacement;
- installation of a new plate;
- its connection;
- tightness check;
- acceptance of work by the Mosgaz service in Moscow, Lenoblagaz in St. Petersburg, and so on.
Dismantling the gas stove
To dismantle obsolete equipment, you must:
- turn off the valve located on the pipe to turn off the gas supply;
- check the absence of gas by turning on one of the burners;
- disconnect the gas supply;
- disconnect the stove from electricity (if necessary).
After performing these operations, the stove can be removed from the kitchen.
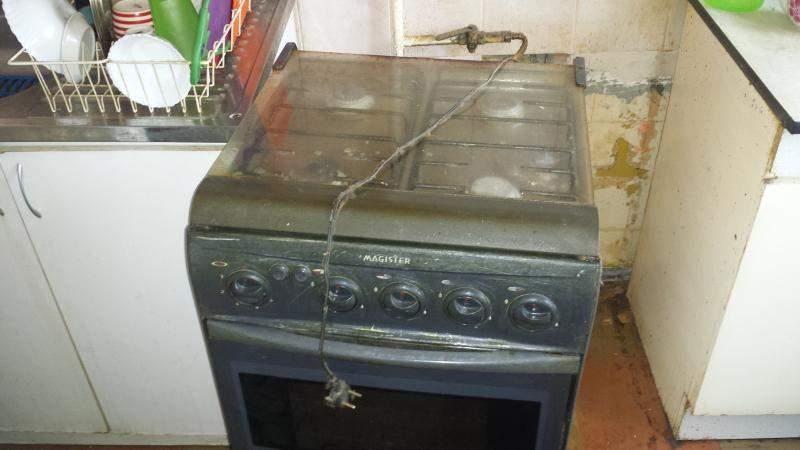
Disconnection of old equipment from gas and electricity supply
Faucet replacement
If the gas valve does not meet the safety requirements or does not shut off the gas supply completely, it is recommended to replace the valve before installing new equipment.
As a rule, the installation of equipment and its connection by the gas service is carried out, since in order to increase the level of security, it is recommended to disconnect the entire entrance from the gas supply. However, if it is possible to block in an individual living space, then having certain skills and all the necessary equipment, the work can be done independently.


The replacement of the crane is carried out according to the following scheme:
- crane dismantling. In most cases, threaded valves are installed on gas systems in apartment buildings, the dismantling of which is quite easy. However, in old houses, welded valves can also be installed, the dismantling of which is carried out with the help of a grinder (only after turning off the carrier supply);
If the work is carried out without turning off the gas and by one person, then after dismantling the valve, a special plug is installed on the pipe. If there are two or more workers, you can plug the pipe with your hands.
- if the thread on the gas pipe is damaged or missing, since welded equipment was installed, then the next step is to cut the thread using special equipment;
- thread sealing;
- removal of the plug and installation of a new faucet.
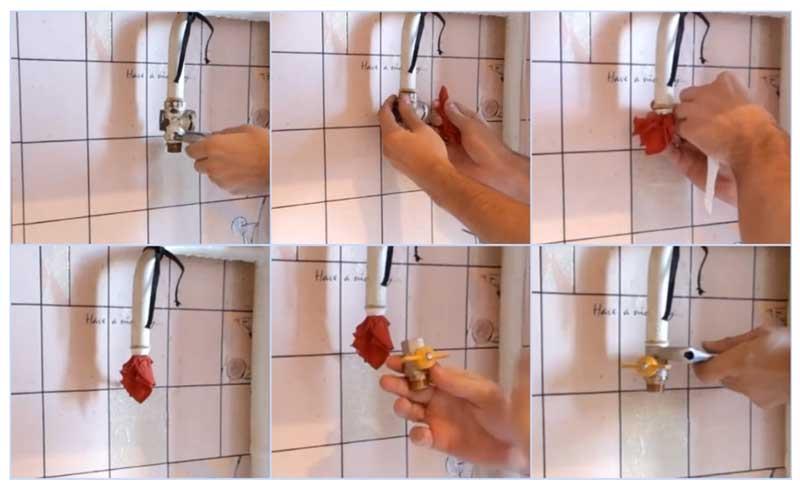
Procedure for replacing a gas valve
Installation and connection of a new gas stove
A new plate is being installed on the prepared site. When installing, it must be aligned horizontally. For this, most modern stoves of the Hephaestus type are equipped with adjustable legs. In the absence of such a function, the exposure is carried out using various gaskets.
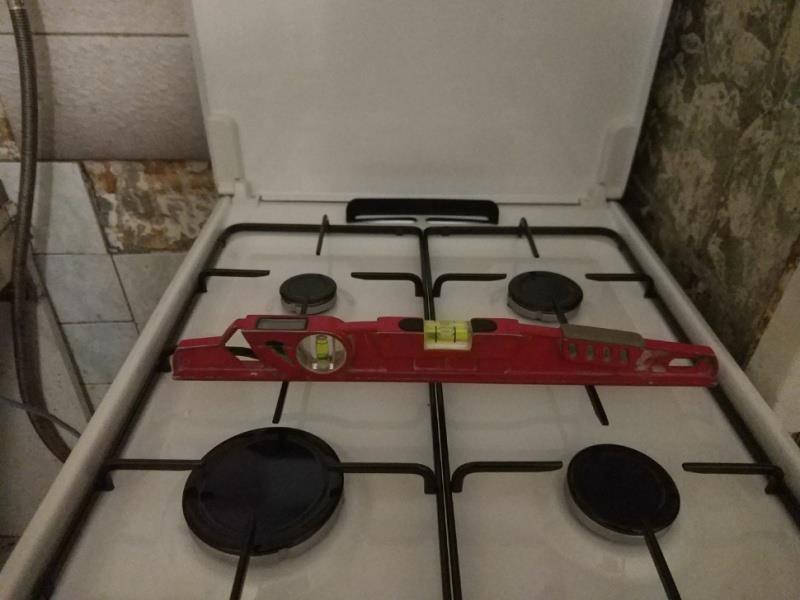
Level alignment
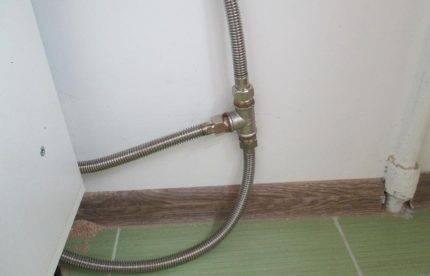
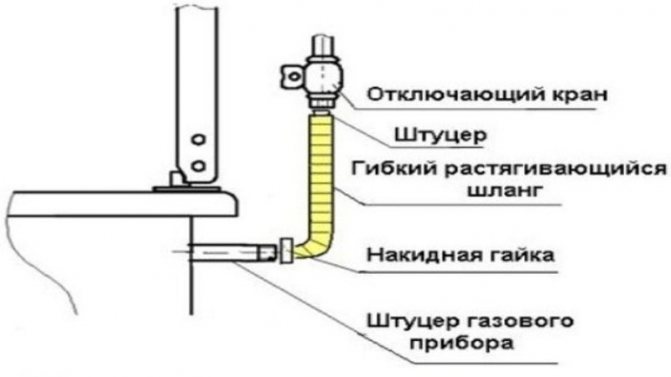
Next, the flexible connection is connected to the plate and pipe. For this:
- the thread on the eyeliner (pipe) is sealed with the selected material;
- the eyeliner is fixed;
- in a similar way, it is connected to a gas stove;
Connecting the gas hose
- if necessary, the stove is connected to the power supply system.
How to install and connect a gas stove yourself, look at the video.
Leak test
After completion of all work, it is required to check the connections for tightness. The operation is performed in the following order:
- preparation of soap solution;
- applying the solution to the connecting nodes.
If the solution begins to form bubbles, the connection is not tight and the problem must be corrected before the system is put into service. The absence of bubbles indicates the complete tightness of the system.

The presence of a leak in the gas supply system
Acceptance of work by the gas service
After all the work has been completed, an application is sent to the gas service to put the stove into operation. At the appointed time, specialists will check the correct connection and tightness. Based on the inspection, permission will be given to use the gas stove or an order to eliminate the identified deficiencies.
If you perform all the work according to the attached instructions and in a well-ventilated area, then you can completely avoid negative consequences during the work and save on paying for the services of specialists.
Functional features
One of the main functions is burner gas controlwhich is intended for safe use. Gas stoves are equipped with a timer, a digital display, inside the oven there is a thermometer that shows degrees. The presence of additional functions leads to an increase in the price, but they are far from always used, for example, this applies to the alarm clock and the Internet access zone.
A gas stove with electric ignition is necessary for those who are constantly engaged in cooking and do not want to use matches or a lighter. This feature helps to ignite the gas in a matter of seconds. Today, all well-known manufacturers produce models with built-in electric ignition.

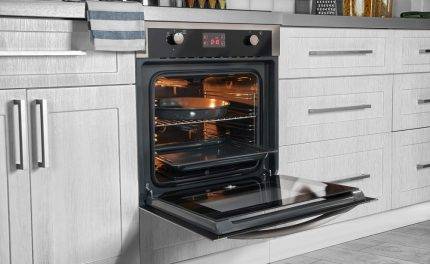
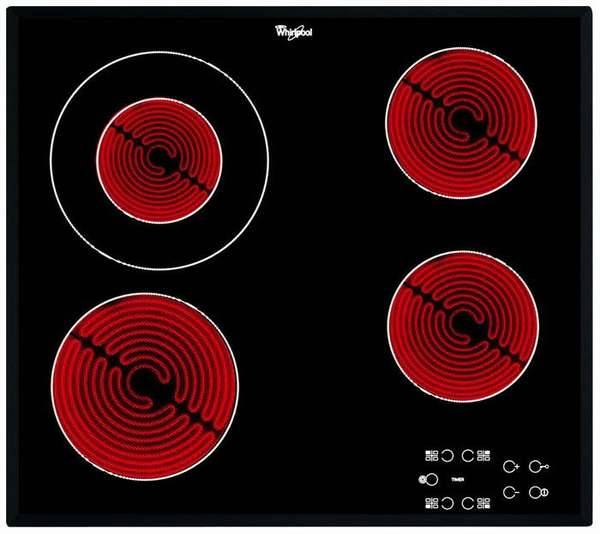
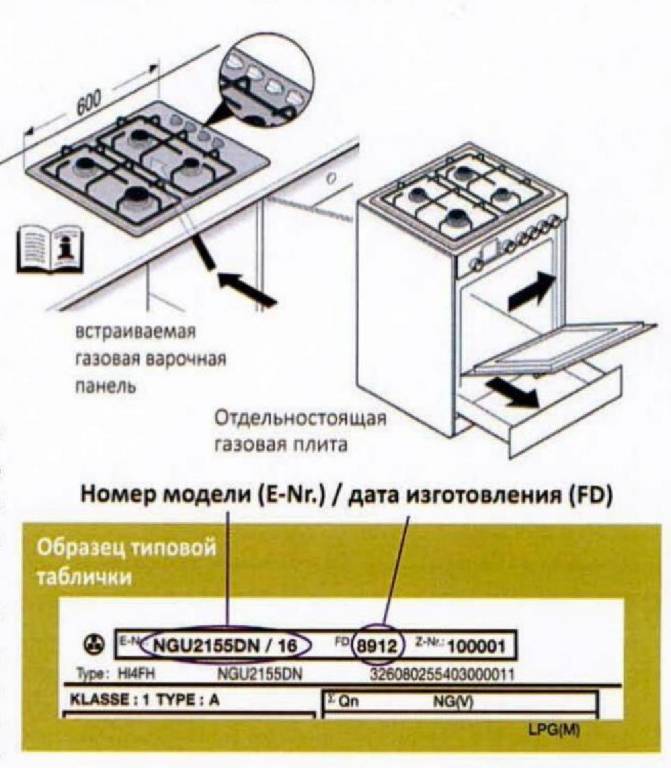
How to connect the hob - step by step instructions for installation and connection (80 photos)
Technological kitchens are hard to imagine without energy-consuming appliances. The main assistants: a stove, a refrigerator and a sink are indispensable attributes of the current kitchen space. If connecting the refrigerator is simple, you only need a socket into which the plug is stuck, then you need to connect the hob carefully.
The appearance, design and principle of operation of the plates placed on the countertops are varied. The gallery shows photos of hobs from different manufacturers.
Three basic types are on sale: electric, gas and combined. The names explain the principle of operation, the first ones use electricity, the second ones heat the burners by burning gas, the third ones use both heat sources.


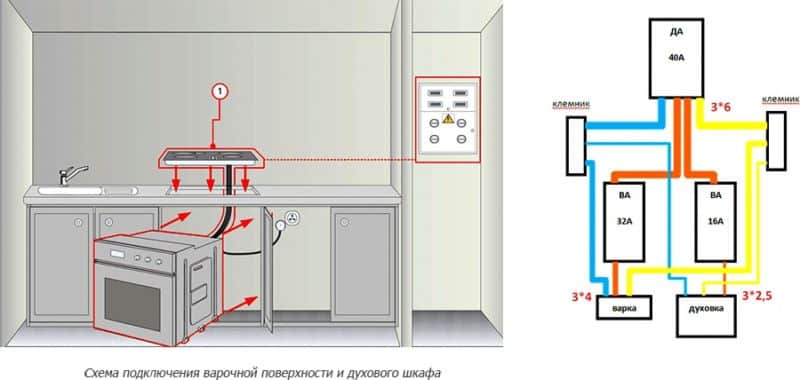


Before buying, you need to make an electrical wiring calculation based on the power consumption of the stove and oven. Apartments in old houses will not withstand a heavy load, there is not even a simple grounding there. In this case, the machine with an increased rating will not save either, the wiring will overheat.
An electric hob of any type must be connected by a separate electrical wiring line directly from the switchboard.
The kitchens of the new apartments are equipped with separate wiring for stoves, circuit breakers and grounding. The cross-sectional area of the conductors is at least 3.5-4 mm.
Connection methods
A well-thought-out kitchen design will help you decide how to connect the hob to the mains. Two ways:
Directly. Run the wire from the switchboard to the panel terminals. The cross section of the cable is selected depending on the power of the plate.
The wiring made must be protected, additionally have a switch to turn off the stove in an emergency. The length should be sufficient and convenient when connecting, and not hang out.
Wiring can be hidden and lead outside near the connection point. Exposed wiring is simply attached to the wall.
Through an outlet. In new apartments designed for the use of electric stoves, the power outlet is already installed in the kitchen.
The selection of the plug is made according to the rated current for the mounted kitchen appliances, therefore, when buying a stove and oven, you should find out their electrical characteristics from the seller. The plug and socket inputs are connected to the terminals according to the marked diagrams.
Networks in houses are single-phase and three-phase. Based on this factor, a power outlet is taken with 3 or 4-5 connection leads.
A flexible multi-core connection cable is required, with a conductor cross section no less than that of the wiring. It is necessary to calculate the length of the cable from the socket to the connection point, there should not be excessive tension, sagging, twisting into rings.
The cable must not be heated by heating stoves, ovens and other hot objects. It is strictly forbidden to place the connecting wire on the floor.
How to connect the hob and oven?
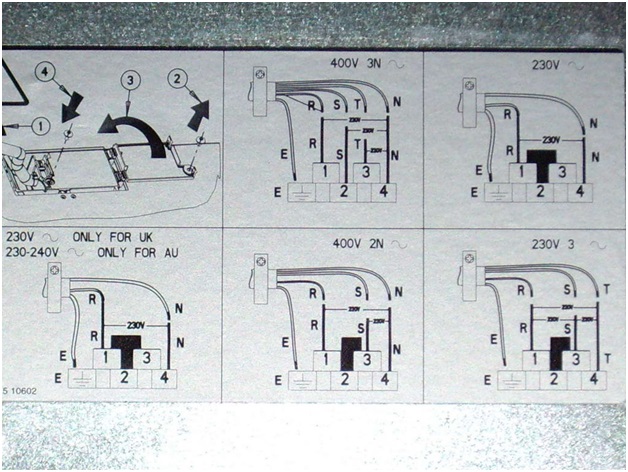
An independent electric oven is connected separately, the combination panel is connected to the oven through the terminals according to the attached diagram. Manufacturers of kitchen appliances make connections and terminals in their own way. But everyone has “earth, zero and phase”, only the number of phases varies.
If the apartment wiring is single-phase, the stove is connected by first connecting the ends of the phase with a jumper. Manufacturers supplement the equipment kit with jumpers suitable for connection.
The installation instructions show how to connect the hob yourself. The schemes are shown on the instrument case from the back side. From several options for cases of a different number of phases and conclusions, you should choose the appropriate one.
Example. Electrolux cooker models are equipped with two phase terminals. They can be connected to two separate phases or pre-connected with a jumper and connected to one phase in single-phase apartment wiring.
Connection subtleties
Use insulated wire with the required number of cores and rated cross section.
Pre-check the installed sockets, builders are people too, they can make mistakes.
Follow the connection order:
- earth-earth;
- Zero zero;
- Phases one after another, if there are many of them.
How to connect a gas hob to electricity? The useful electric ignition function does not require a non-standard connection. A simple electrical outlet will do the job.
The requirements for the connecting cable remain the same: no stretch, no sag, no heat.
Connecting the hob requires a lot of skill, if you are not confident in your abilities, call an electrician.
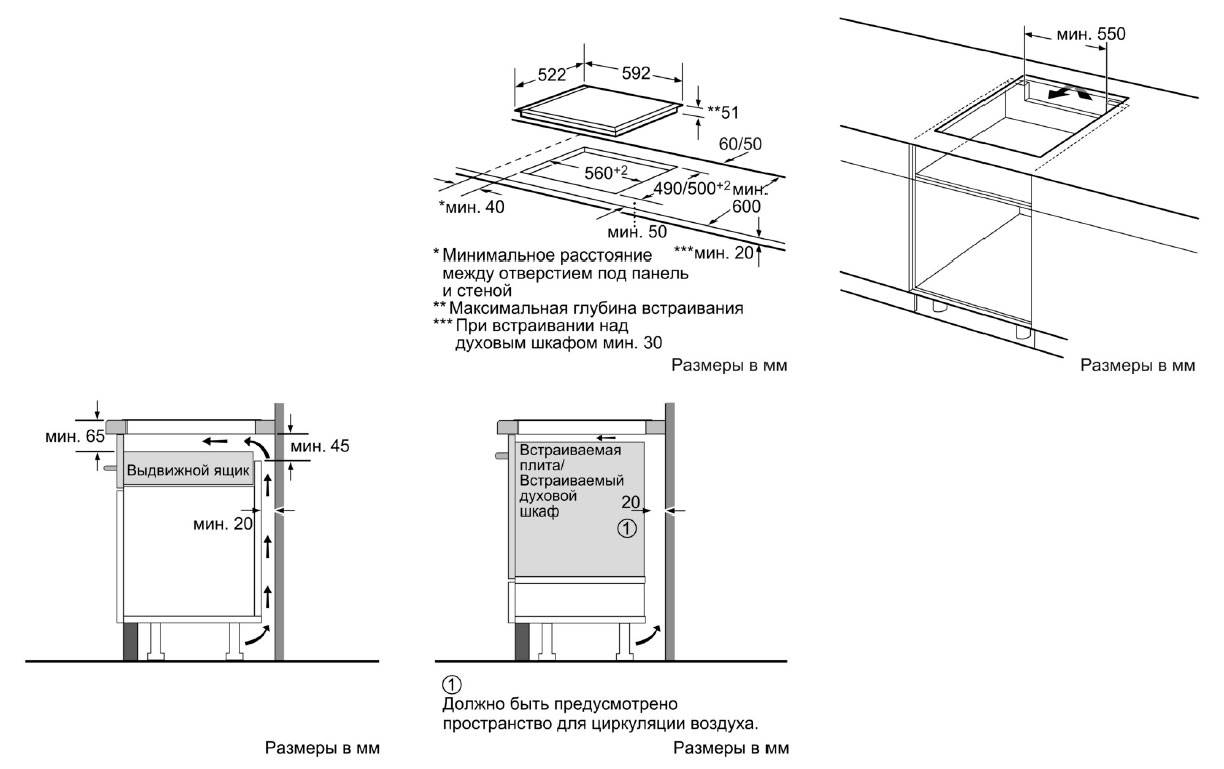
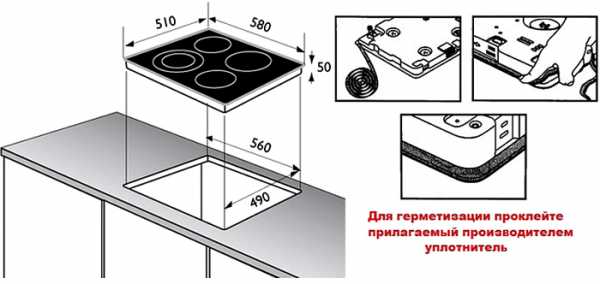
How to mount the panel in the countertop
Independent connection of the surface first requires competent installation of the panel in the prepared cutout of the kitchen set.
Installation is carried out in several stages:
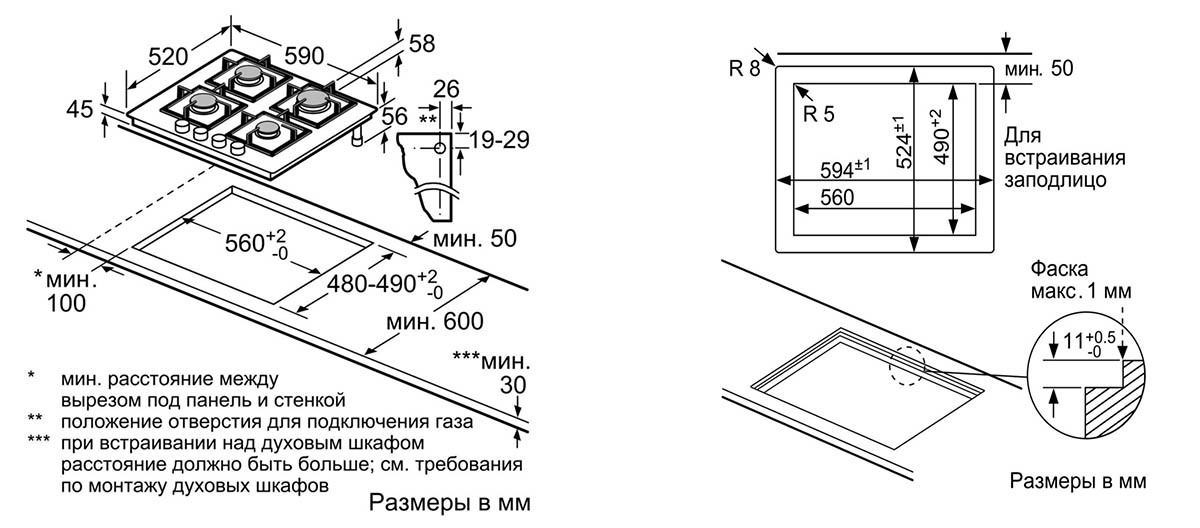
- We determine the future place. Dimensions are determined by a ruler. It is most convenient to use a blank made of cardboard.
- Draw the shape of the panel on the board. A maximum of 1 mm may be left to allow easy entry of the product into the panel.
- Drilling panel borders. Pre-drill in the corners of the marked shape. Diameter 9-10 mm. The drill must be taken wooden or metal.
- The next step in installing the hob in the countertop is to cut out the hole using a jigsaw. The tool is inserted into the finished hole, pressed against the board with force, and then start the cutting process. In this case, the brush should be pressed along the marking lines at low speed.
- Attach it securely from below to the top of the table with a set of clamps. Then remove the remains of the tree.
- The remaining gap must be filled with a special silicone sealant.
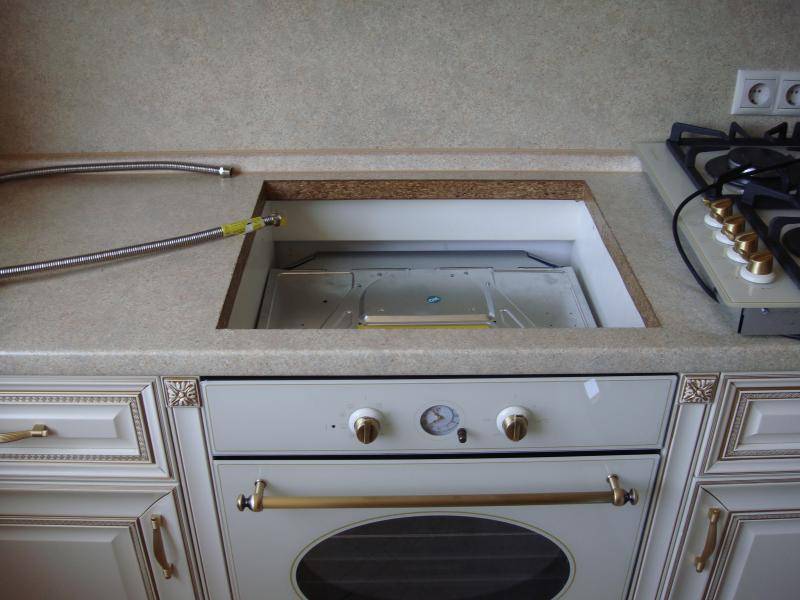
The process of installing a gas panel
After installing the device in the headset, you can begin the process of connecting it to the electrical network.
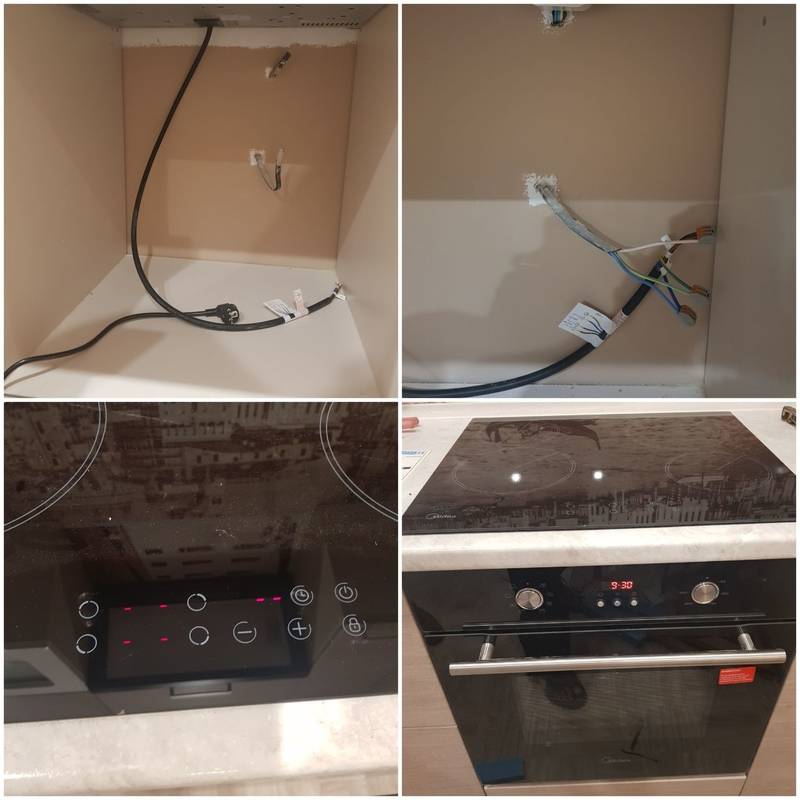
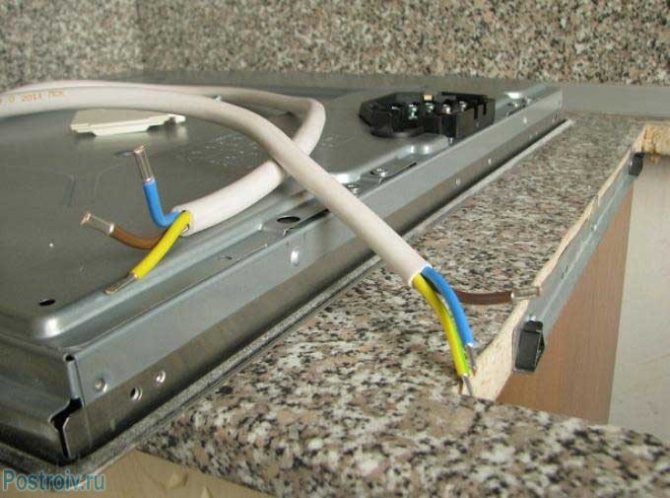
Connecting an electric or induction hob
How to connect an electric hob, for example, Electrolux, or other manufacturers? Connecting an induction cooker to the mains, which is a type of electric type panel, will be identical. In fact, models with an electric and induction principle of operation differ only in the surface of the hob and in the principle of operation.


In induction, instead of the usual burners, there is a plane that heats the dishes only at the points of contact with the hob. Because of this, on the induction one should cook only in dishes with a perfectly smooth and even bottom.
Let's move on to the installation. Below is a diagram of the connection of the hob glued by the manufacturer on the back of the tile.
Step 1: First you need to decide how the hob will be connected to the mains. Will it be a special socket for the electric stove or will you need to run a separate power line from the meter? The second is more preferable. If you already have a socket for an electric stove in your apartment, then, of course, it does not make sense to pull a separate power line and it is easier to put a special socket on the outgoing wire.
Don't be disappointed by the electrical wire supplied with the hob. If its cross section is less than 4 mm and it is not copper, feel free to go to the store and buy a new one for replacement. On the reverse side of the hob, its power will be written. If you see power over 7 kW, then the wire cross section must be taken at least 6 mm. The wire itself must be three-core: phase, neutral and ground.
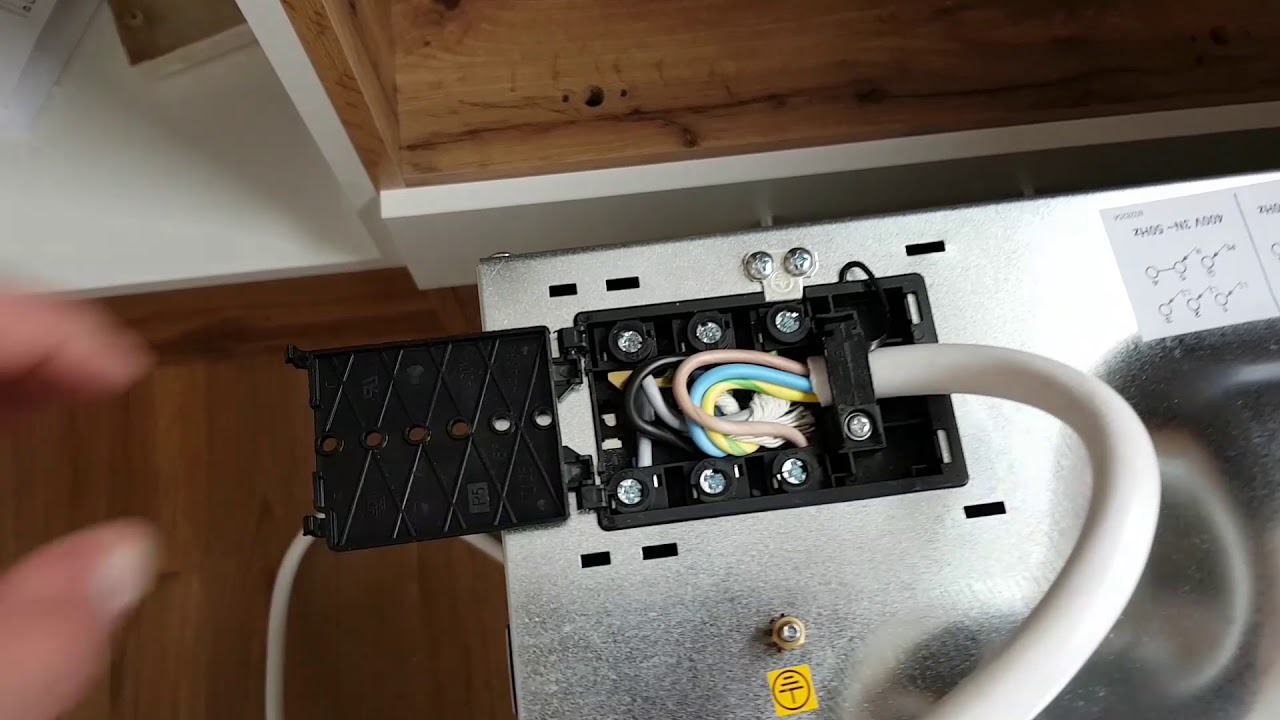
In the event that the manufacturer has responsibly treated the supplied spare parts and the wire turned out to have the necessary characteristics, then in order to connect to the power line from the shield or to the oven, you will need to purchase a special terminal block.
Step 2: How to connect the hob to the mains? This will require stripping the cable of each stranded wiring by 1 cm for further connection to the terminals. For convenience, it is recommended to crimp stripped wires using sleeve lugs and crimping pliers. Pliers are not recommended.
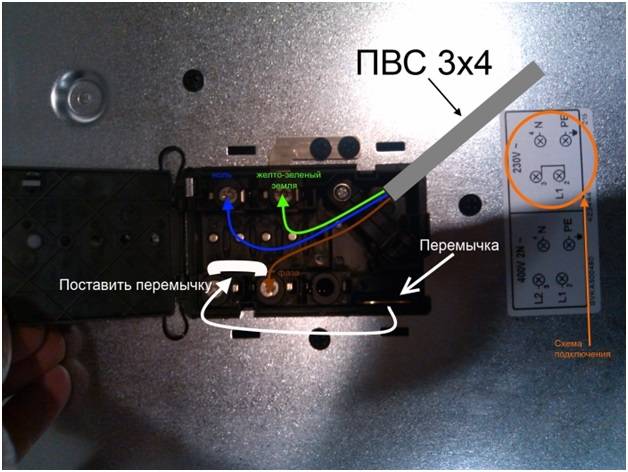
Step 3: Now look under the terminal block cover. As a rule, there are by no means 3 terminals. Foreign designations L1, L2, L3 denote three phases, respectively, N is neutral, and PE is ground. Since we have only one phase in our apartment buildings, the jumpers supplied with the hob will help you. We connect jumpers all three phases on the terminal block. In the wire, these are black, brown and white cables, respectively. The blue or white-blue wire is responsible for the neutral, and the yellow-green wire is for grounding.
If necessary, several wires in the cable are twisted in accordance with the voltage they produce. When connecting wires to the terminals, install them on the left side and twist clockwise. So, you will save the core from being squeezed out from under the terminal.
The yellow-green wire should be left a little longer than the rest. Then, with excessive mechanical tension on the cable, the protective conductor will be the last to break. Therefore, he will perform the function assigned to him to the maximum.
Step 4: After connecting all the wires, close the terminal block cover and try what you got. If you have an outlet for an electric stove, do not forget that it is necessary to turn on the plug in it when the apartment is completely de-energized. Only after connecting the electric hob, you should again apply current to the housing in order to avoid a sharp power surge.
Testing the performance of the hob before installation in the countertop has a very practical purpose, since the fixing must be done with a sealant.
Also read articles:
Do-it-yourself connection of the installed panel
After completing the installation work, for the operation of the hob, it remains to make the connection. Features of connecting equipment depend on the variety used.
Gas
The connection of this type of equipment to the gas distribution network and the performance of related work is carried out by employees of specialized organizations. It is not allowed by law to install and connect a gas stove on your own. Incorrect connection, bypassing the established requirements, often leads to equipment failure. Gas equipment specialists must comply with the following rules:
- pre-check the characteristics of the equipment, including the type and pressure of gas, the presence of grounding, the voltage level;
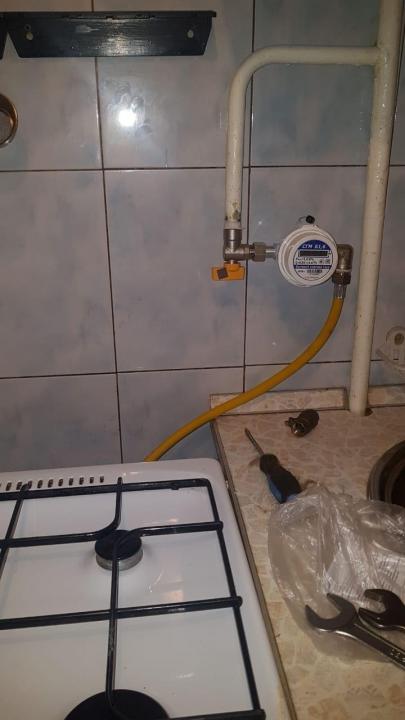
- use a flexible hose to connect to the gas line;
- control access to the shut-off valve.

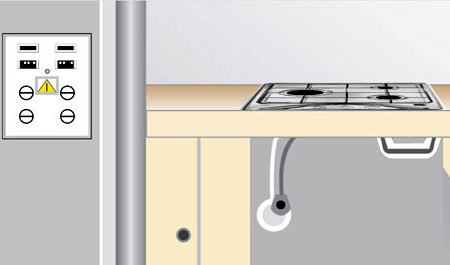
Electrical
To connect the electrical variety, just make sure that there is voltage and plug the plug into the outlet.
It is important to make sure that the cross section of the wires is suitable for electrical power. Otherwise, you will need to draw a separate line to the equipment from the input shield
induction
To connect the induction cooker, you will need to buy a three-core network cable that can withstand the power of the equipment. On the underside of the induction panel there is a special box with terminals for connecting wires. On the surface of the box or inside there are schematic symbols that indicate where to connect the wires.
Without kitchen set
If it becomes necessary to temporarily install a hob without a kitchen set, you will need to build a frame from a square pipe. It is not allowed to use wooden bars, since such a design is a fire hazard.
2 id="instrumenty">Tools
To make a self-connection, in addition to a hose and a ball valve specially designed for domestic gas systems, you will need to purchase sealing material.
Set of tools
You will also need to dilute a medium-concentrated soap solution, so that with the help of a brush dipped in it, you can check the joints for tightness and only the likelihood of gas leakage.
Leak test
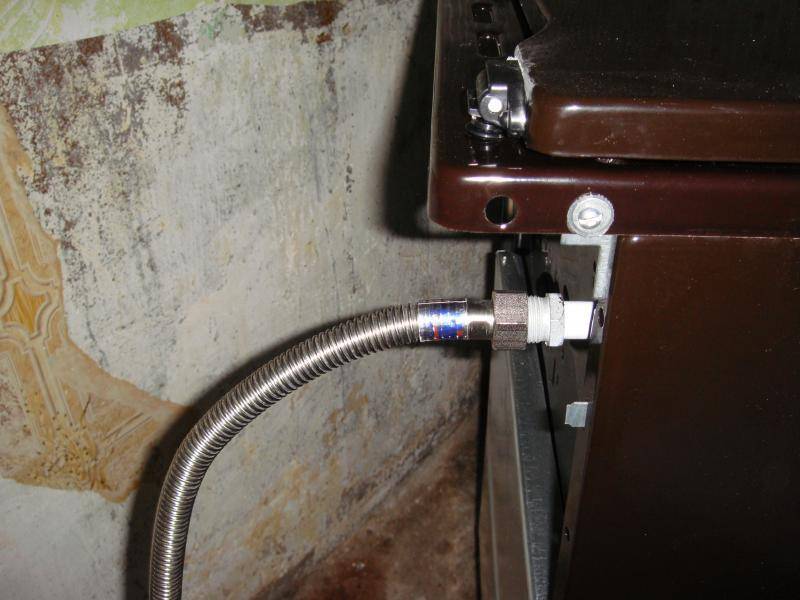
The main connection element is a hose, the physical characteristics of which must take into account the specifics of its application. It must be a certified product that meets the requirements for gas equipment and related items. The hose must be strong and flexible.


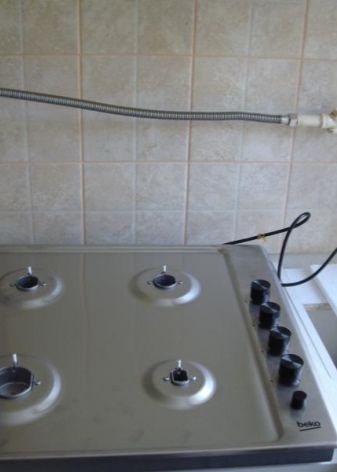

Bellows hose
The market is not the place to buy a gas hose. To do this, there are specialized stores and branded points of sale, where you can get qualified advice about the product and a check that guarantees an exchange if a defect is found during installation of the equipment. Given the specific operating conditions, it is clear that not every hose will fit. Those designed for water (with a red and blue mark) in the gas system will become unusable in less than a month. Gas hoses are presented in three varieties. An important indicator for all types is the flexibility and strength of the product.
The best gas hose is the one for which there is a certificate. It should clearly state the service life of the product and the conditions under which it is operated.
PVC hose
The most popular variety is rubber hose. It is characterized by high strength, flexibility and affordable cost. For its manufacture, vulcanized rubber is used.
Gas adapterRubber hose
The corrugated metal-plastic tube is called a bellows hose. It is characterized by excellent performance properties - it is also resistant to intense pressure and its differences, it is elastic, equipped with a strong protective sheath. The cost of such a hose is higher than that of other analogues, but the recommendations of gas service workers are reduced to the use of this particular type of hose to ensure a high-quality and safe connection.
Bellows gas hose
Special requirements apply to the gas connection hose:
- hose length is limited and does not exceed 1.5 m;
- us all over the hose must have the same diameter;
- the product must be smooth, without twisted sections;
- the product must have a long service life, confirmed by certificates;
- on the surface of the product there must be no cracks, cuts, suspension and other defects.
A metal pipe is rarely used as a connection element due to the high labor intensity of the process and the need to use specialized professional equipment.
The principle of connecting with a pipe
Ratings
Ratings
- 15.06.2020
- 2976
Which is better to choose a water heated towel rail: manufacturer rating
Types of water heated towel rails: which one is better to choose, rating of manufacturers and overview of models. Advantages and disadvantages of towel dryers. Features and installation rules.
Ratings

- 14.05.2020
- 3219
Rating of the best wired headphones of 2020
The best wired earbuds for 2019 A brief overview of popular devices designed for a variety of purposes. Pros and cons of budget gadgets.
Ratings

- 14.08.2019
- 2580
Rating of the best mobile phones for games
Rating of the best mobile phones for games and the Internet. Features of choosing a gaming smartphone. Main technical characteristics, CPU frequency, amount of memory, graphics accelerator.
Ratings
- 16.06.2018
- 862
Where to install the stove
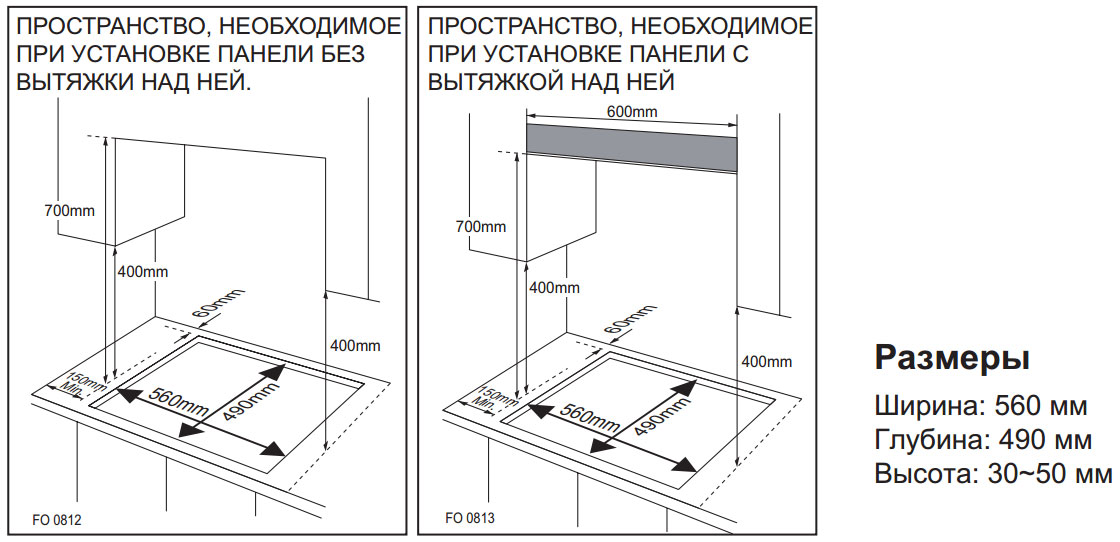
The floor under the gas stove must be flat so that the hob is located in a strictly horizontal plane - this will positively affect the safety of the stove and the quality of cooking.
Rules for leveling the slab in height
Most stoves are equipped with legs with a height adjustment function.This makes it possible to install the equipment on and on uneven ground. If the floor is curved and the legs are not adjustable, then you can continue lining the required height under them from a solid material - chipboard, thick cardboard.


Cranes must be in good working order, easy to turn and be freely accessible for an adult
The second thing to consider is free access to valves and connecting nodes. This will allow you to quickly take action to eliminate malfunctions or gas leaks.
Gas hose location
The third rule is to choose the right place for installing the stove. For each model, the manufacturer recommends a gap between the rear wall of the plate and the wall of the room. The size of the gap is indicated in the instruction manual for the device.