- How to properly ground an electric stove
- What should never be done
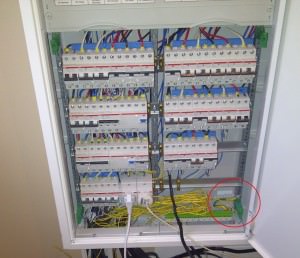
- Study of the housing shield
- Creating a ground loop
- Passive Defense
- Connection step by step
- Connecting the cable to the electric stove
- Plug installation
- Phase detection in an installed outlet
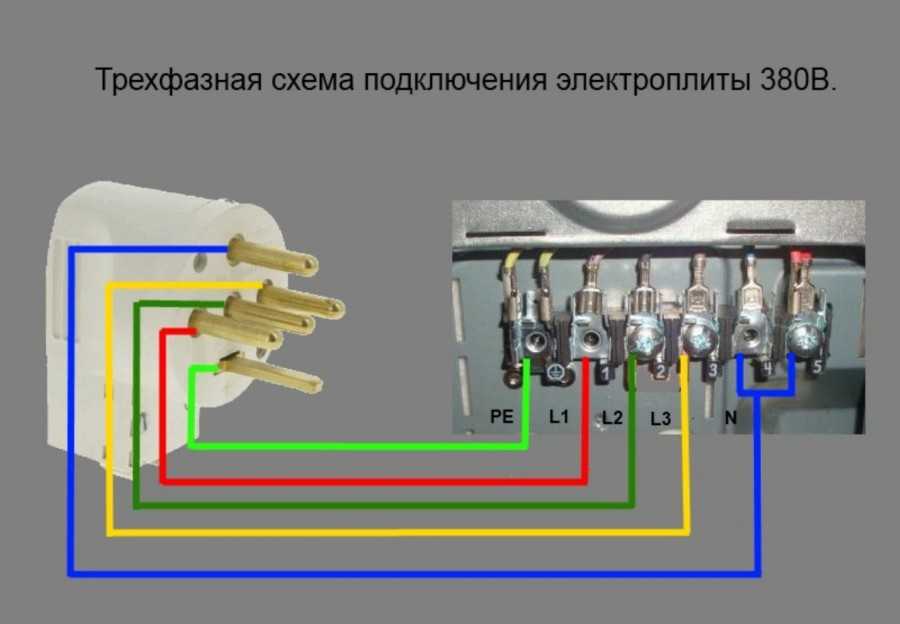
- Complete wiring diagram through a socket
- Connection without socket
- Connecting the Electrolux hob (4 wires) to a three-phase power supply
- Theoretical part.
- Grounding guide
- Residual current device and automatic
- We connect the electric stove
- First step
- Second step
- Third step
- Fourth step
- Fifth step
- sixth step
- seventh step
- Connection to a single-phase network
- General requirements
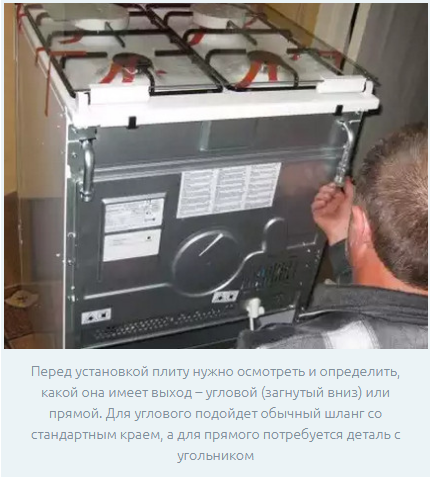
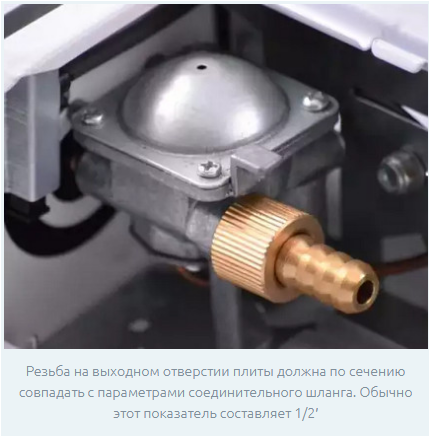
- How to connect the stove to the system
- Types of modern gas hoses
- Basic Hose Requirements
- Pipe connection
- Features of connecting an electric hob
- Step-by-step instruction
- Conclusions and useful video on the topic
- Conclusion
How to properly ground an electric stove
An improperly grounded electric stove is dangerous. There may be high voltage on its case. It is imperceptible until a current circuit passes through the user's body. For example, when touching the body of the stove with one hand, and the battery with the other.Of course, the surfaces of all modern electrical appliances are covered with enamel or powder coating with the addition of plastic. But this does not mean that connection rules can be ignored.
In outdated electrical networks, this is often done by connecting the apartment zero point to the ground contact. This is fraught with emergency situations. If this line burns out in the shield, a high voltage will be supplied to the device.
It is even more dangerous when inexperienced electricians take over the job in networks where cables are not color-coded. In this case, the phase with zero is often interchanged. Such a "grounding" immediately forms a high voltage on the body of the plate. Electric shock can happen to a person at any time.
There are several options for grounding a household stove. Where to stop - everyone decides individually.
What should never be done
There is an opinion among some inhabitants that central heating pipes made of metal will be an excellent point for connecting the ground. Under no circumstances should you use this option. Connecting the ground outlet to the battery pipe creates a danger to all residents of the house.
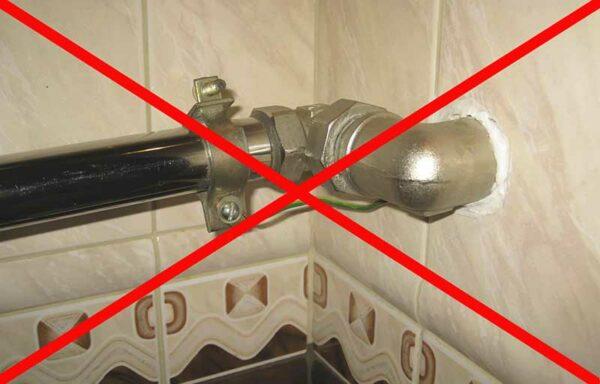
There are cases when people received an electric shock. There are also fatal accidents, the neighbors below the negligent owner of the electric stove received serious electrical injuries. Even if the device is located on the first floor, and the current path does not pose a clear danger, the water inside the pipes is a conductor. And the risk of electric shock to residents of the house remains quite high.
Study of the housing shield
You can find out if the shield of the apartment is grounded or common in the stairwell at the company servicing the house or at the housing office.If there can not give a definite answer, it is better to find a different way to solve the problem. But if the user receives accurate data, preferably documented, it is enough to drill a hole in the metal tire of the shield and screw a bolt into it. Having fixed the yellow-green wire of the plate on it, the latter is safely grounded.
Creating a ground loop
Grounding rules for real estate objects are subject to strict regulations, which describe both the design of the bus, and its resistance and other parameters. However, for domestic conditions, when protecting the plate, the system can be simplified. To create a ground loop, proceed as follows.
- Three metal rods with a diameter of 16 mm or more and a length of 250 mm or more are driven into the ground along the wall of the house at a distance of half a meter to a meter from each other. Alternatively, you can use steel corners.
- A ground loop is created by welding to the free ends of the rods (corners) of a steel strip 40-50 mm wide, 5 mm thick.
- 8 mm steel wire is removed from the contour along the wall. At one end it is welded to the strip, at the other it has a plate with a hole for the bolt.
- The wire is brought out to the level of the window of the apartment.
- From the inside, along the floor or above, the plate grounding cable is output.
- The wire is connected to the plate with a bolt at a height of at least 250 mm from the ground.
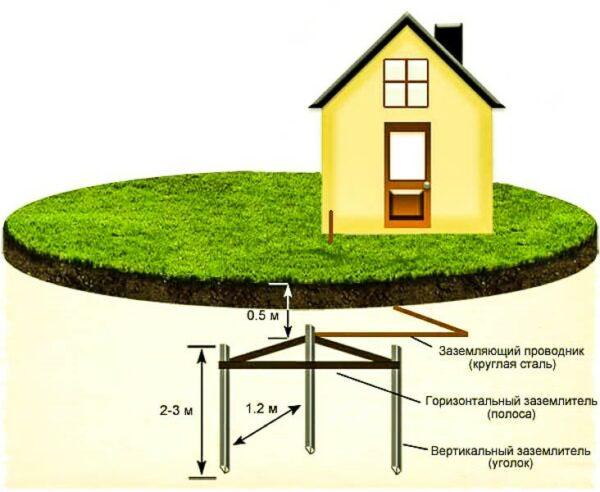
A self-made contour must be checked. To do this, it is worth inviting a specialist in regional power grids. The domestic circuit must have a resistance of no more than 8 ohms. If this parameter is greater, additional bars will need to be driven in. The optimal value of the ground loop is 4 ohms and below.
Passive Defense
What to do if grounding the stove does not work? In this case, preventive measures against electric shock are applied.
- The stove is placed in such a way that it is impossible to simultaneously touch its body and taps, batteries, and other metal objects.
- On the floor near the stove, in the working area, a dielectric coating is laid. This is rubber, linoleum, at least a dense dry rug.
- Automatic machines with a thermal release are replaced by differential ones. The latter respond to leakage currents of 30 mA and quickly break the circuit in the event of an emergency.
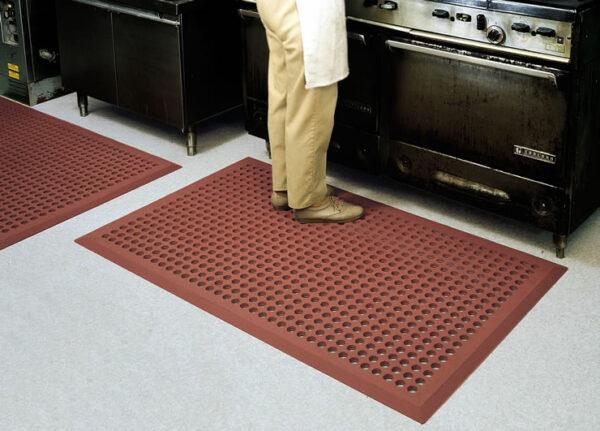
Dielectric mat will protect against electric shock
Naturally, the stove should be handled with extreme care. The lack of grounding threatens not only the health of the owner of the device. The stove itself can become a source of, for example, a fire, causing significant material damage.
Connection step by step
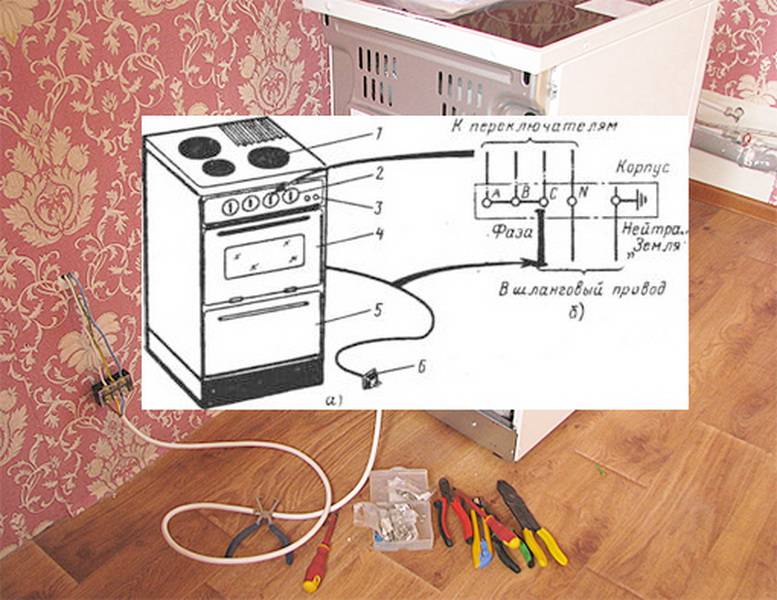
If a power outlet is connected to the wall, all that is required of the user is to connect the wire to the electric stove and install the plug, taking into account the phase in the outlet. If the socket is not used, the cable from the shield is connected directly to the appliance or connected to the wire coming from the device through the terminal box, depending on the needs of the user.
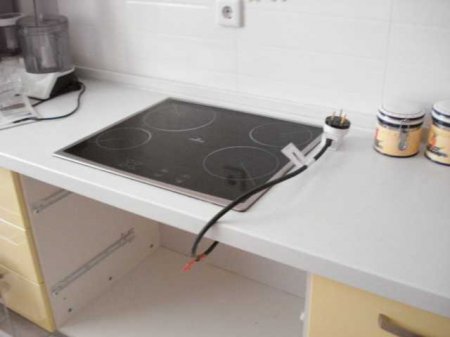
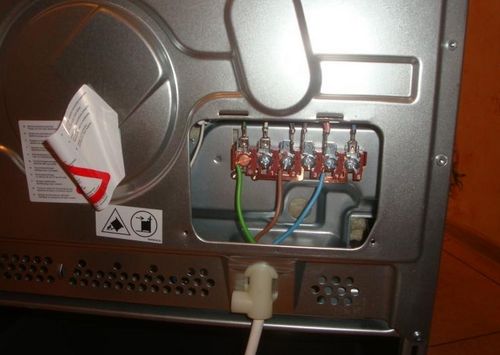
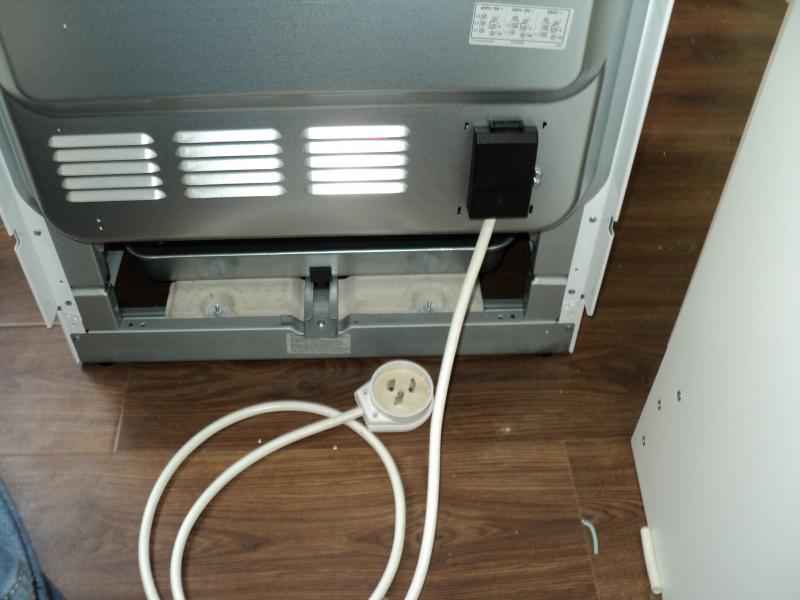
Connecting the cable to the electric stove
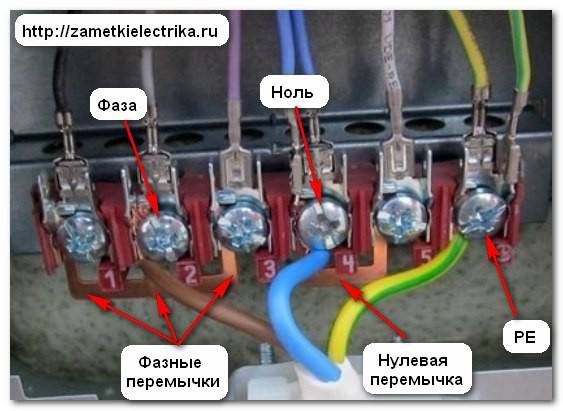
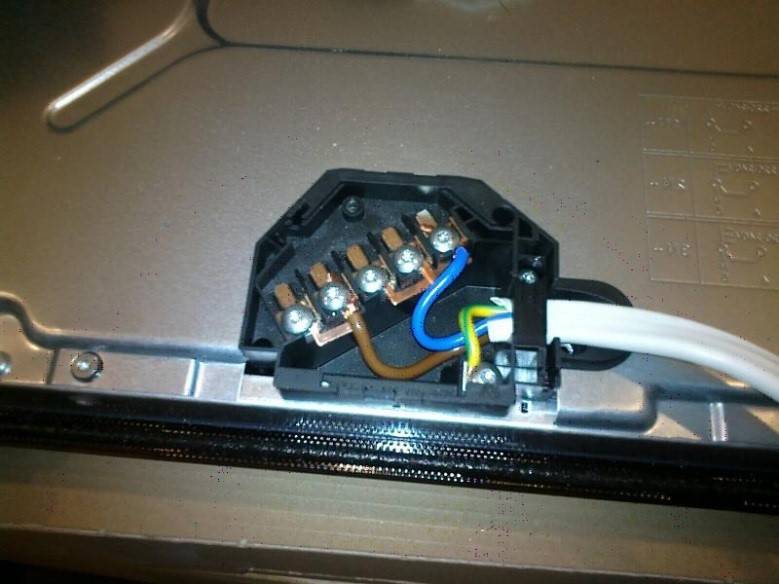
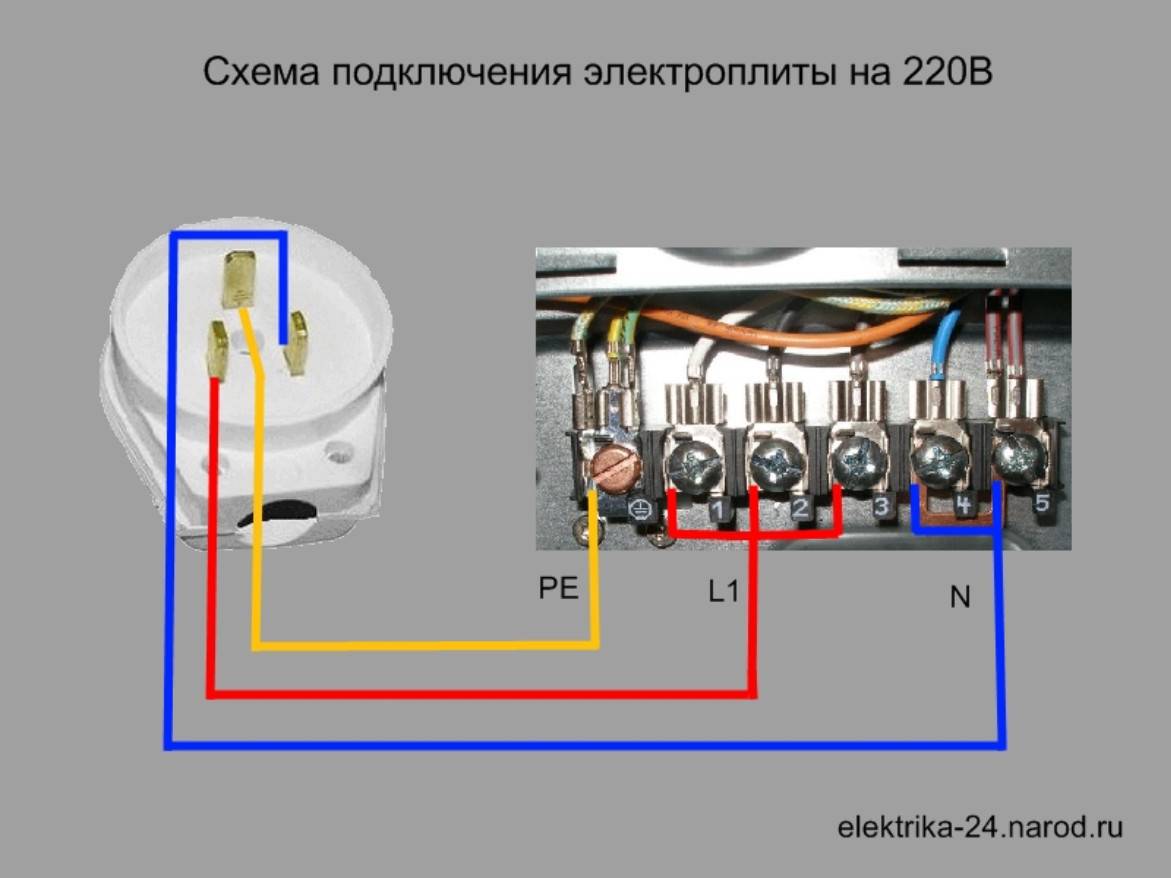
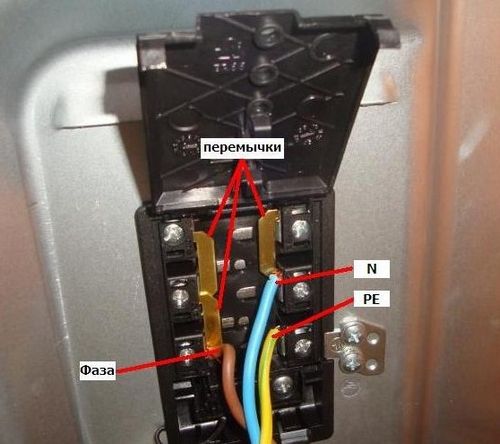
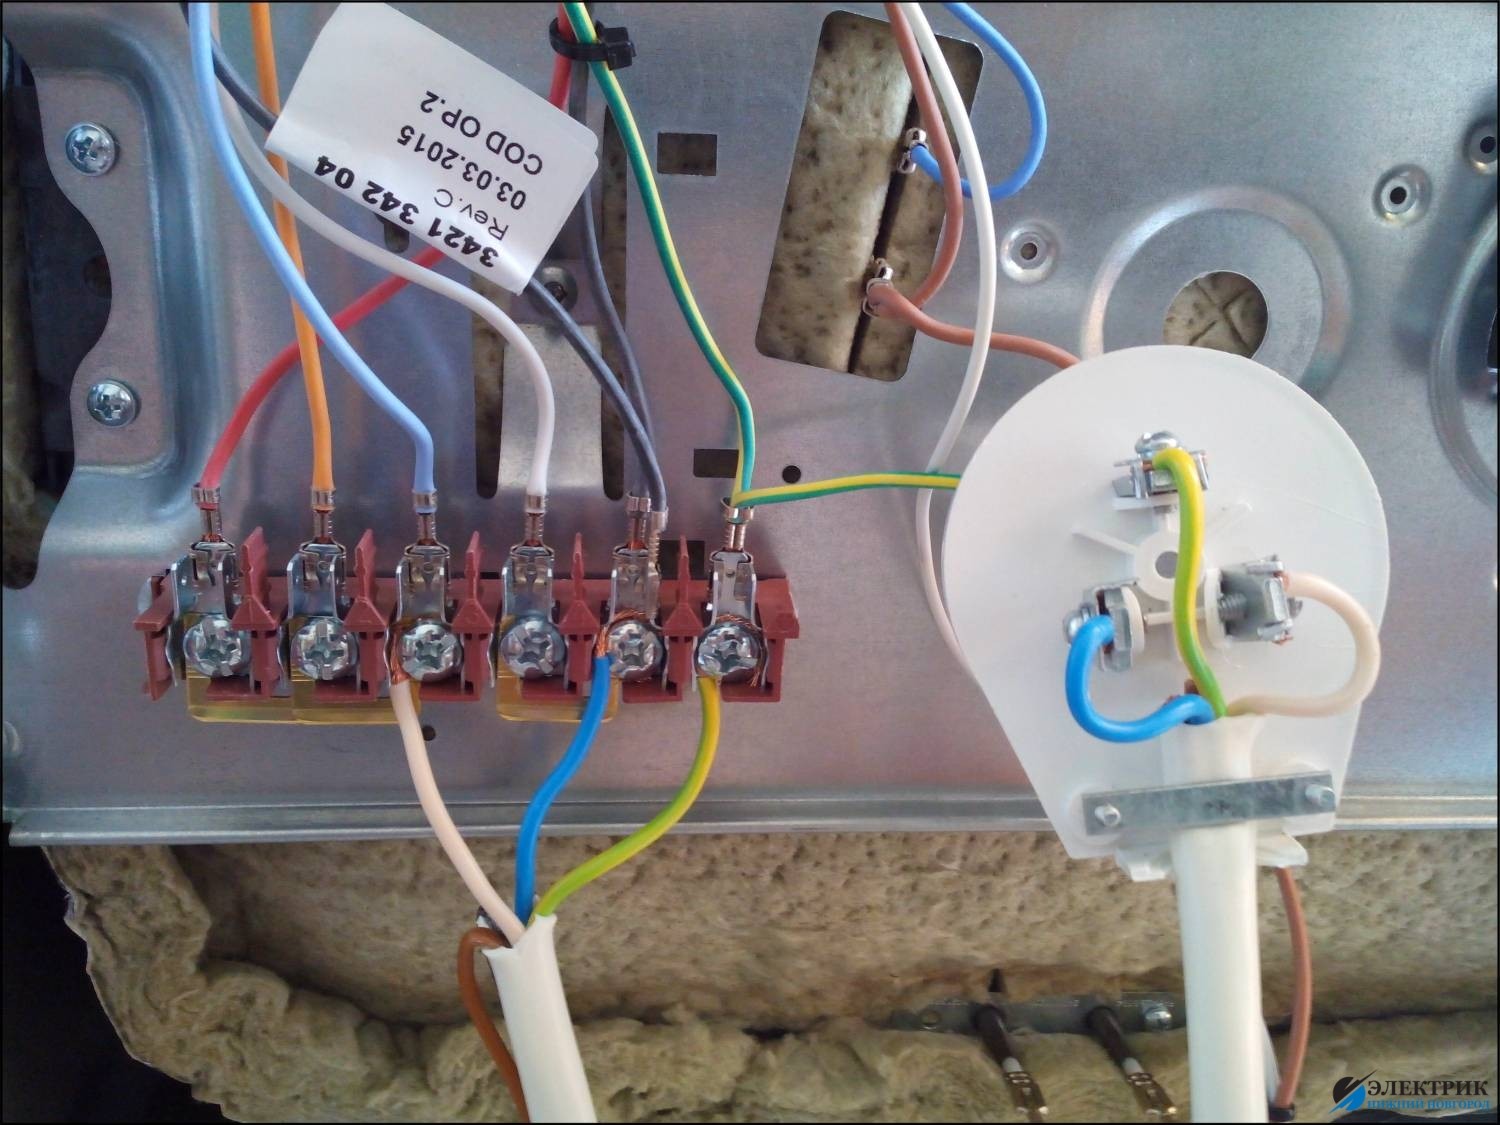
To connect the electric cable to the stove, you need to turn the device with the back side towards you. There is a terminal box on the back, which can be accessed by unscrewing and removing the protective cover. Next, you need to insert and secure the cable to avoid accidentally pulling it out. For this, a special clamp on the body is designed. You should stretch the cable, make sure that the wires reach the terminals, and fix it securely.The next step is to install jumpers according to the instructions and the number of cores in the cable used, and then connect the wires. Diagrams for three-, four- and five-wire cable are provided in the user manual.
After the wires are connected, you need to double-check the correct connection according to the diagram, tighten the terminals, and then put the cover back and close it.
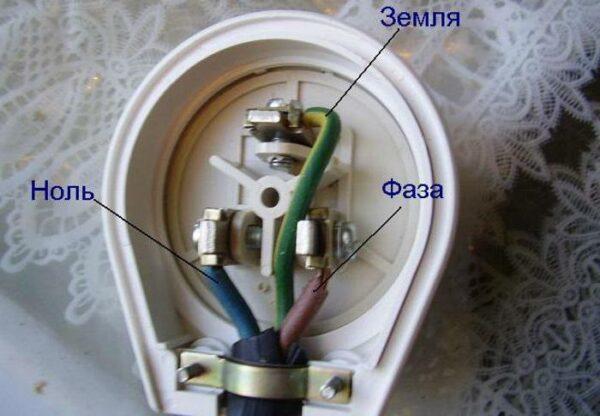
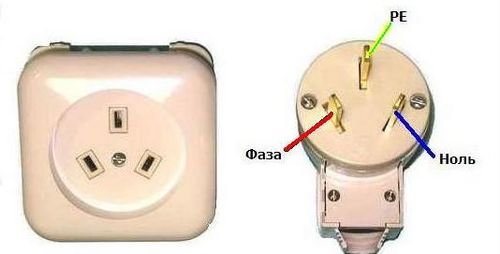
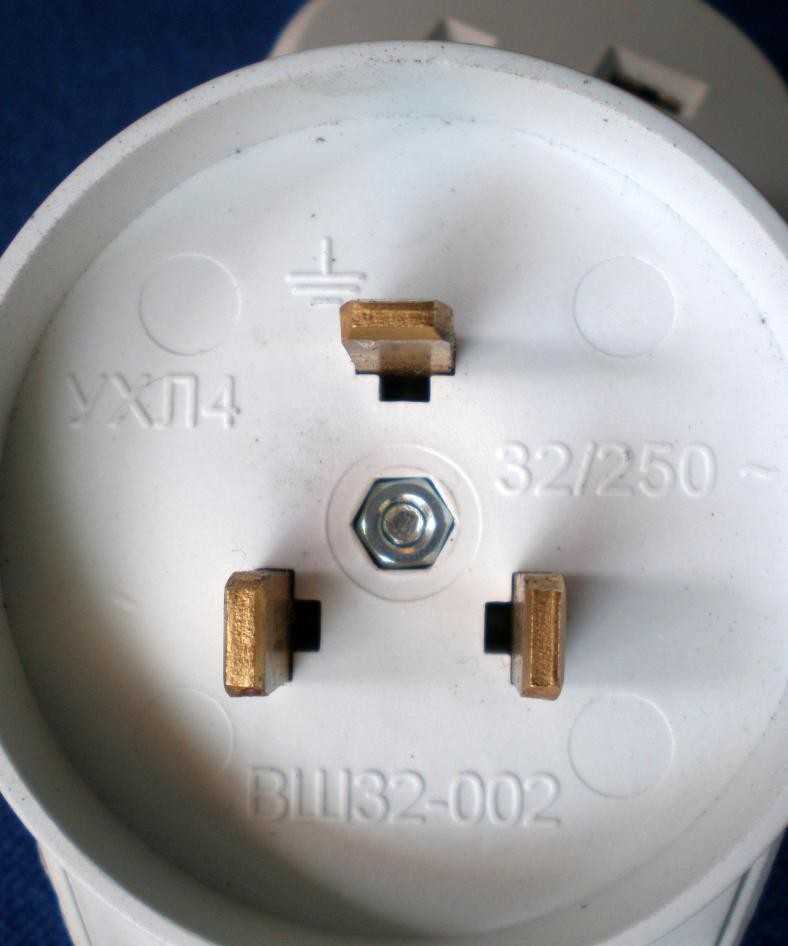
Plug installation
To connect the cable to the plug, you need to disassemble its body and pass the wire inside, and then fix it with a special clamp to prevent accidental pulling out. Next, you need to remove the insulation from the cable to a length sufficient to fix the cores. It should be remembered that in power outlets, the ground wire is attached to the upper (lower) terminal, and the phase and zero are attached to the extreme terminals according to the phase and zero in the outlet. For better contact, the cores are crimped with lugs.
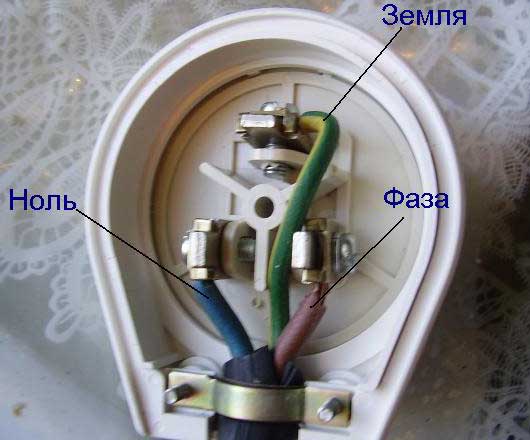

Phase detection in an installed outlet
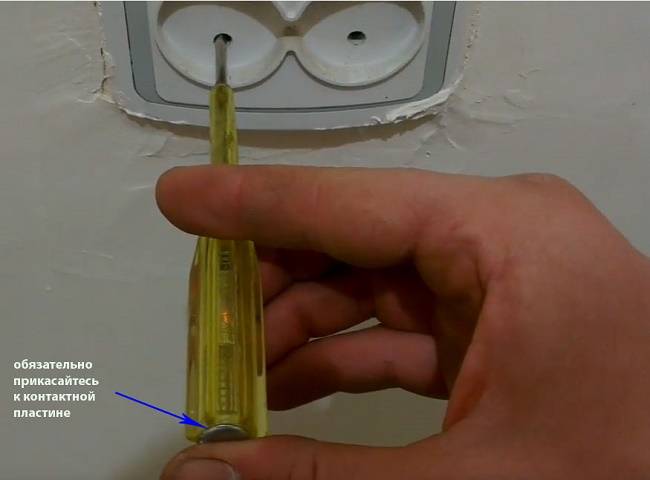
To determine the phase in a wall-mounted outlet, you need a regular indicator screwdriver. It is necessary to touch it to one of the contacts, while simultaneously touching one of the fingers of the contact plate at the top of the tool. If the light inside the screwdriver lights up, this means that the contact is a phase. If nothing happens, the contact is zero.


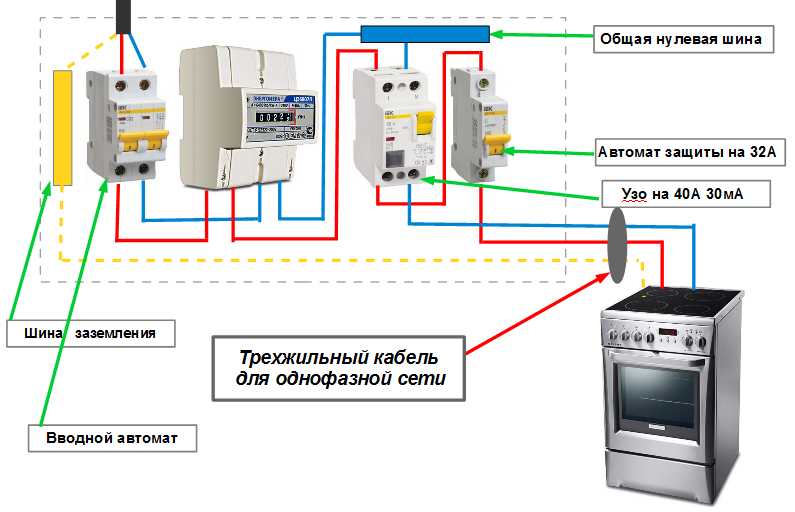
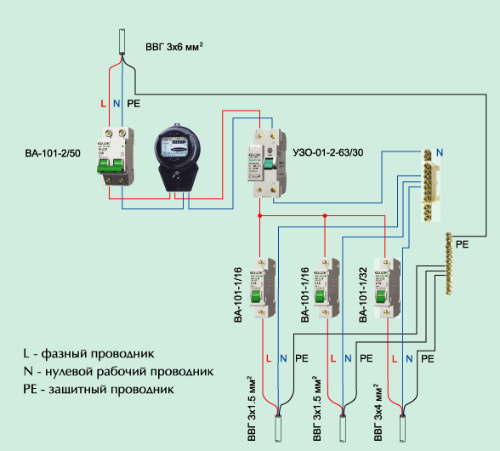
Complete wiring diagram through a socket
The connection diagram through the socket is as follows.
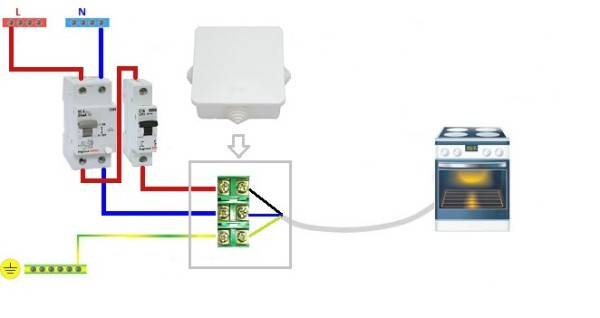
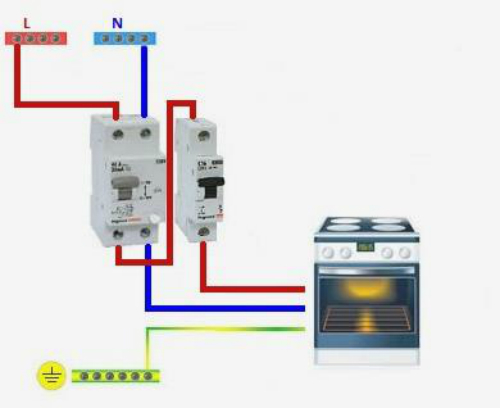
An automatic machine is installed in the shield, immediately behind it is an RCD. From it, the cable is pulled to the place where the socket will be placed.The wire can be hidden inside the wall by making a strobe groove, or run over the surface, hidden from prying eyes into the cable channel.
Next, a power outlet is installed. It should not be near metal structures, water source and heating devices. Also, you should not place the outlet very close to the floor, you need to be aware of the possibility of flooding.
In the outlet, grounding is attached to the upper or lower contact, phase and zero - to the left and right, the order does not matter
But at the same time, it is important to remember where each of the wires is, so as not to make mistakes when attaching the plug and not mix up the wiring.
Next, a power cable is connected to the plate, to which the plug is attached, taking into account the location of the zero and phase in the outlet. After that, the plug is connected to the socket.
Now you need to conduct a test run - sequentially turn on the machine, RCD, stove.
Connection without socket
Connecting to the mains without a socket is carried out in a similar way. An automatic machine is installed, then an RCD, a cable is connected and pulled to the place where the electric stove will be located. A box is mounted in the wall (or on top of it), in which a block with terminals is placed. Cables from the electric stove and the machine are connected to it.
It is important not to make a mistake and connect the wires correctly - phase to phase, etc.
When connected directly to the electrical panel, the cable from the RCD is led to the stove and connected according to the user manual and the diagrams proposed in it.
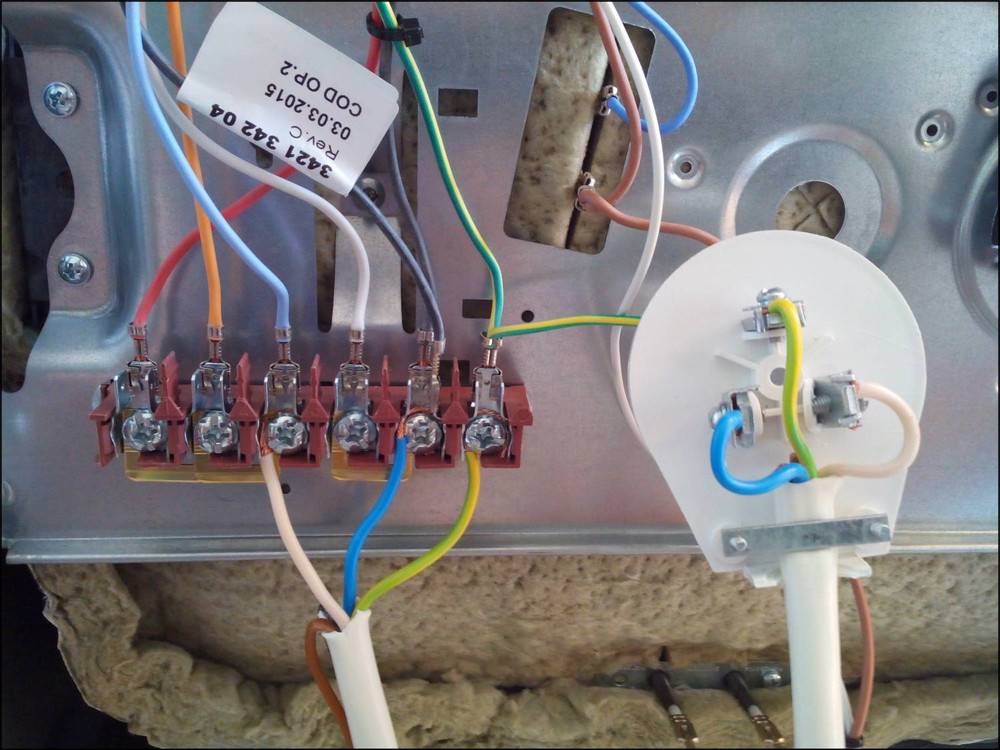
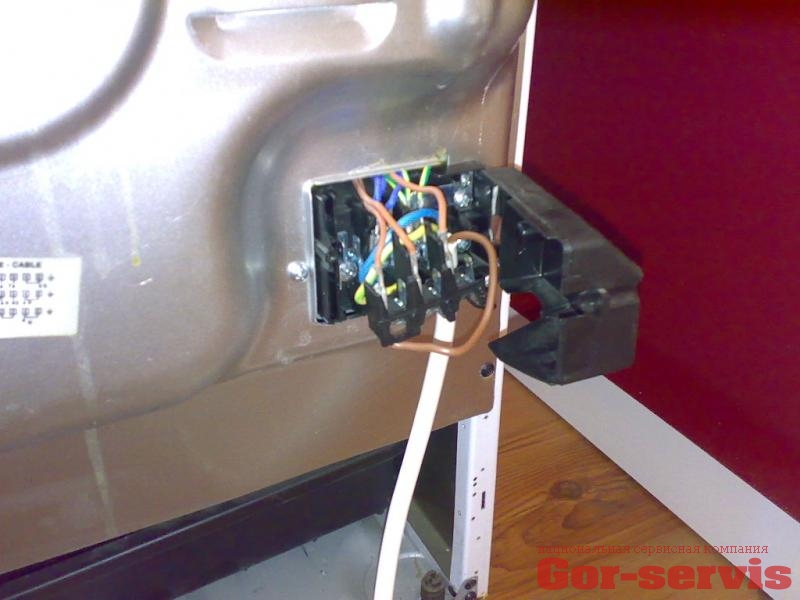
Connecting the Electrolux hob (4 wires) to a three-phase power supply
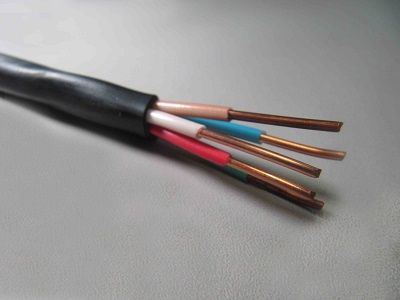
Most models of hobs manufactured by Electrolux are sold complete with a cord.However, this is not always an advantage, as many people get confused when connecting the device to a three-phase electrical network. This is due to the fact that the cord contains 4 wires: zero, ground, and two phase lines. Before starting the installation, you need to study all the nuances of the work.
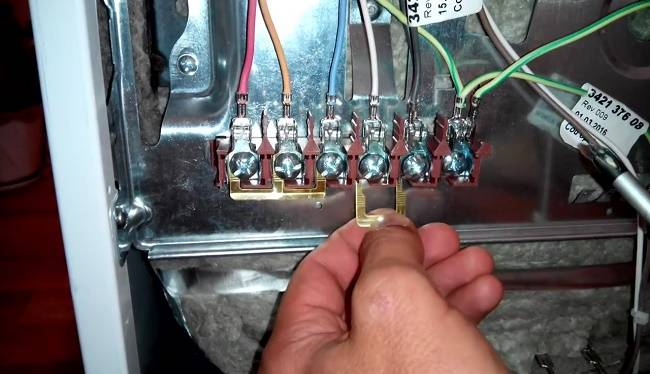
Connecting the Electrolux hob should begin by opening the cover, which is located on the back of the device. This will allow access to the terminals. At the next stage, you will need to find the "ground" exit, which has the traditional yellow-green color. In close proximity to it there should be a jumper with 2 inputs.
Then, using the jumper that was discovered earlier, you need to combine the two sub-phase outputs. They are designated by Latin letters L1 and L2 (black and brown)
It is important to remember that only the brown cable is used to connect the plug. In turn, the black line will need to be carefully insulated

Before you start installing the Electrolux hob, you need to study all the nuances of work
Theoretical part.
So, the electric hob is connected to a specially branched high-level ground outlet with a capacity of 25 to 32 A. As for the wires, they must be copper, with three cores, and have a cross section of at least four millimeters. Today, however, electrical wiring is designed to connect four-core cables. Speaking of sockets that are designed to connect hobs, they are classified as follows:
- three-pin;
- four-pin.
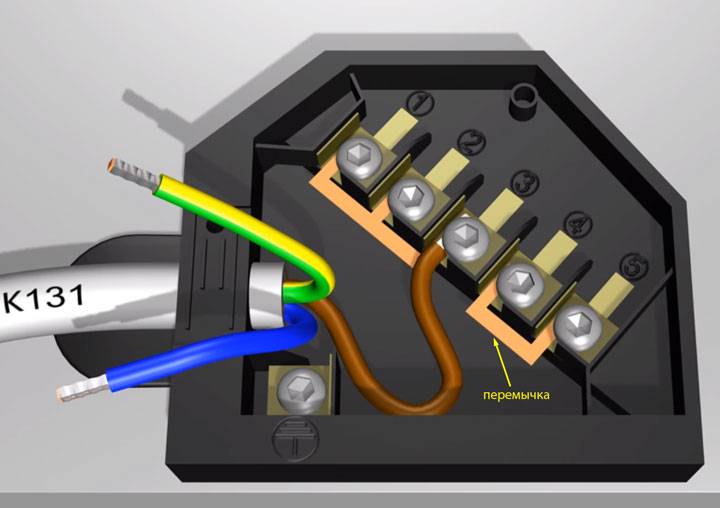
Of course, if you have a ready-made plug, then connecting the electrical panel is greatly simplified.But in order to connect the wire to the outlet, you need to know the special specifics of this process. Let's say that the power supply of the hob has 4 cores (phase, phase, zero, ground), while there are 3 of them in the wall. This indicates that the stove requires a jumper between the phases on the terminal block in order to connect to a three-core cable.
So, we act as follows: between the black and brown wires we install a copper jumper, which is usually included, after which we connect one of the phases to the phase conductor of the apartment wiring (should be black, brown, white). As for the ground and zero conductors, they remain untouched.
It is important! The socket into which you are going to connect the electric hob, first disassemble and carefully check, because in some cases there is a mismatch between the contacts and wires of the tile, as a result of which, after connection, it may happen that the socket sparks or starts to melt.


Grounding guide
 When working in old-style networks, even experts often make gross mistakes. An example is the case when grounding is performed on the operating zero bus. In a situation where the current is cut off by the wire, it is supplied to the appliance and the user will be shocked. Also, you can often find a situation where the "zero" lived and the phase is confused.
The result of such connection will also result in electric shock to the user. However, it is impossible to refuse to connect "zero".
First, you should find out if the shield has a ground. To do this, you can use the help of an electrician or visit the Housing Office, another service organization with a similar question.
The answer to the question must be given clearly, supporting documentation must be provided. Otherwise, you should not believe the words.
Residents of the first floor or their own house can solve the problem as follows:
- Outside, three pipes with a length of 250 centimeters and a diameter of at least 16 millimeters are dug in.
- They are connected to each other.
- The wire terminated with a tip from the shield is led to the dug-in pipes.
- We connect the zero bus.
In a similar way, you can create a circuit that removes electricity.
If it is not possible to create a diversion circuit, follow the instructions below:
We muffle the wire that is responsible for "zero".
When installing the plate, make sure that it does not come into contact with other electrically conductive elements, such as pipes.
A dry mat should be placed near the stove, which has dielectric properties.
We change the usual machine to a differential model with a limit of 30 A.
Be careful when using the stove.
Residual current device and automatic
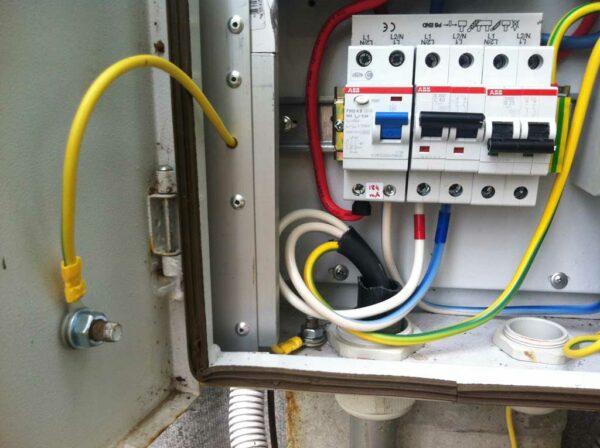
RCD and auto disconnect are a mandatory element of the kit, which is used to independently connect any household appliance to the network. Their presence will protect the device from power surges and premature failure:
- They are placed side by side on the mounting rail to the counter.
- The nominal value of the RCD must be greater than the machine.
- The RCD is connected to the meter by the upper phase and zero mounts, respectively.
- The lower terminals are used to connect to the machine and are brought to zero.
- If a single-pole machine is used, the zero terminal of the RCD is connected to the zero bus.
- When bipolar, it is connected by a zero terminal to the corresponding contact of the machine.
- The phase and neutral cores of a three-core wire are placed on the lower mounts of the machine.
- If the machine is a single-pole neutral wire goes to the corresponding bus.
- Yellow green or green is for grounding.
We connect the electric stove
We connect the electric stove
The connection order remains the same for networks with any number of phases. There are only a few nuances, which you will learn about later. The connection will be made through the socket.
First step
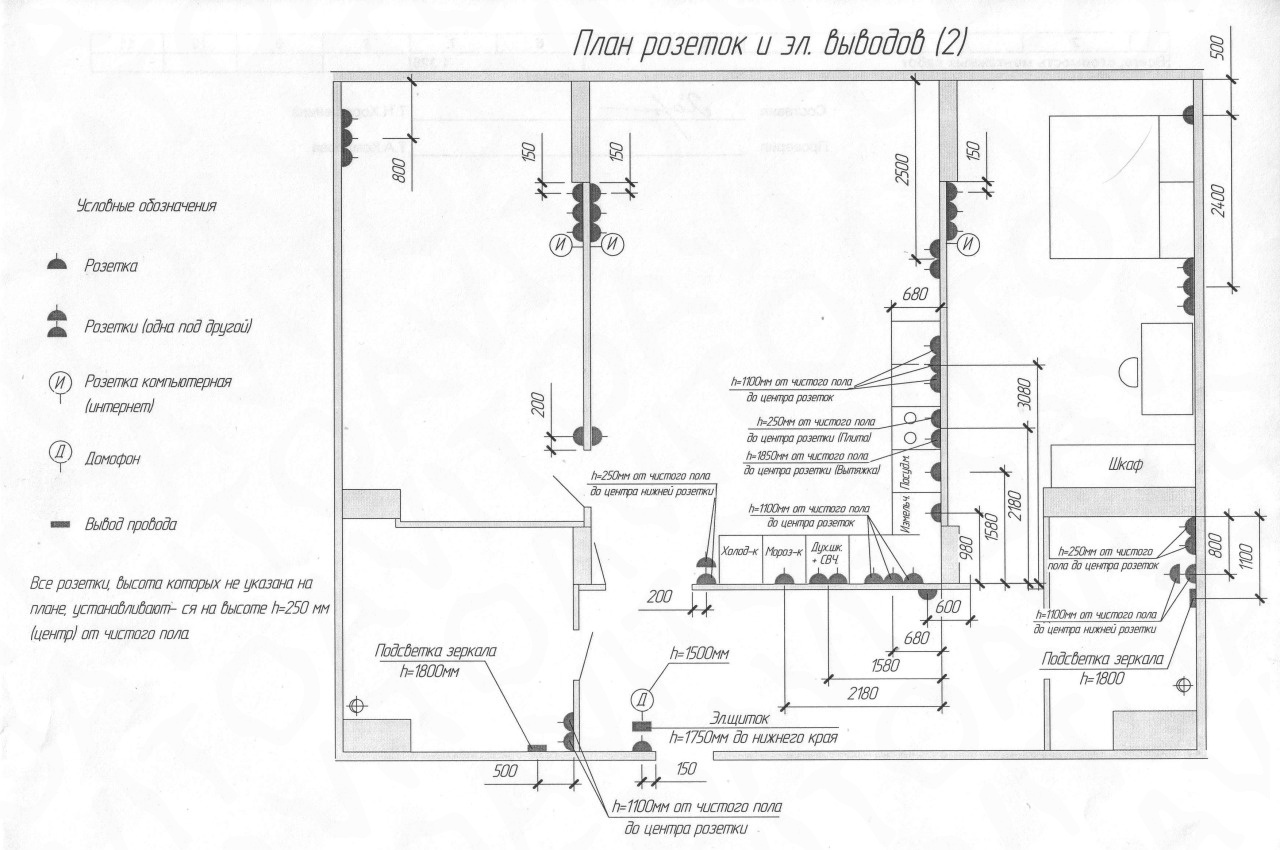
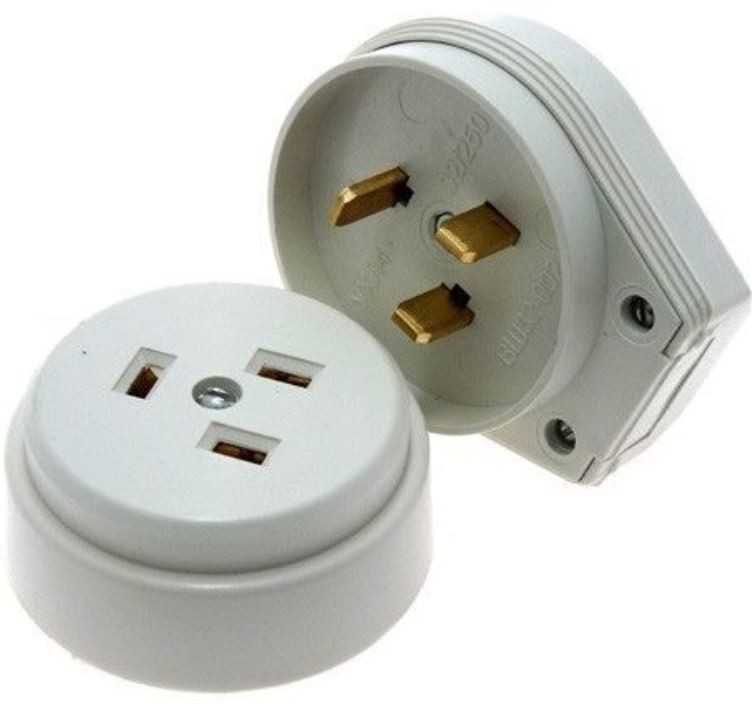
Choose a place to install the device. The electric stove is classified as a high power electrical appliance. To ensure its reliable and safe operation, we install a socket outlet with a grounding contact on the wall closest to the stove. In this case, the current rating of the socket should be 32-40 A. There will be three contacts in the socket for a single-phase electrical network, and five for two- and three-phase networks.
Socket
Second step
We install a separate circuit breaker in the shield. If the network is two- or three-phase, we put a three-band switch for 16 A. In the case of working in a single-phase network, we mount a single-band machine. The circuit breaker rating should be 25-32 A.
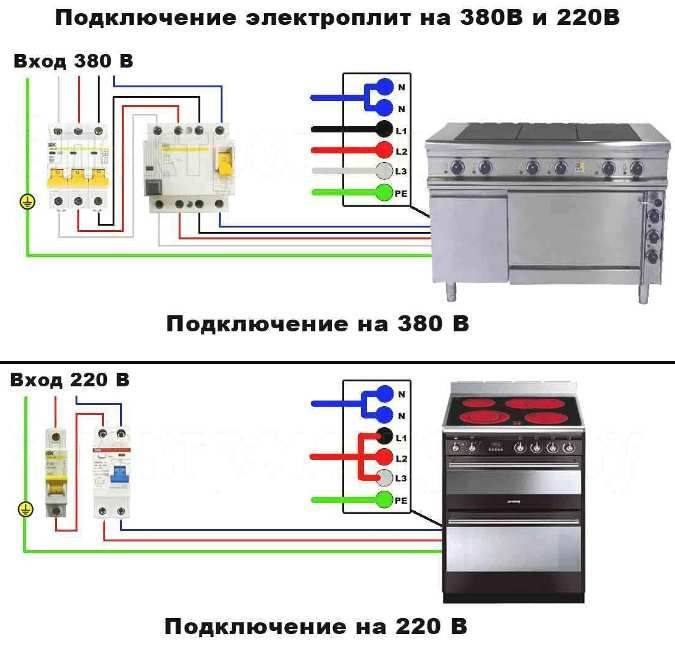
Single-phase electric stove connection (most common)
Third step
We mount the wire for connecting the electric stove. In two- and three-phase networks, we use a 5 × 2.5 cable of the VVGng brand; for connection in single-phase mode, we use a 3 × 4 cord of the same brand. We pull the wire from the electrical panel to the socket of our electric stove.
Power cable VVGng 5×2.5
Fourth step
We connect the wire to the outlet in accordance with one of the above diagrams. Close the outlet cover. We work very carefully, observing the established standards. If the connection is made using a three-core cable, then we connect the brown wire (it can also be white) to the phase connector of the installed electrical outlet, let the blue wire (may be white with a blue stripe) to the “zero” connector, and connect the yellow-green wire with ground connector. The wires of a five-core cable are most often colored brown, white and red. The order of their connection, as well as the marking features of socket connectors, was considered earlier in the description of the circuits.
Fifth step
We connect the plug to the flexible wire of the electric stove
At the same time, be sure to pay attention to the features of the marking of the plug. The element is connected in the same way as an electrical outlet
sixth step
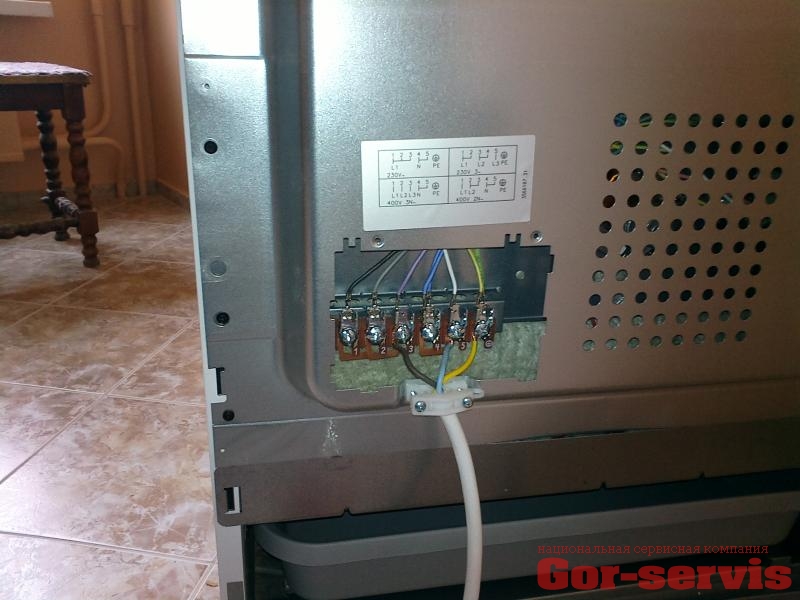
We connect the flexible wire to the stove. At this stage, much depends on the model of the device being installed and the number of phases in the home electrical network. In general, manufacturers provide connection diagrams for their plates in the attached instructions or on the back covers of the units. Follow the manufacturer's recommendations.


It is recommended that the ends of the flexible wire be irradiated before installation in the terminal clamps - this will ensure the most reliable contact.
seventh step
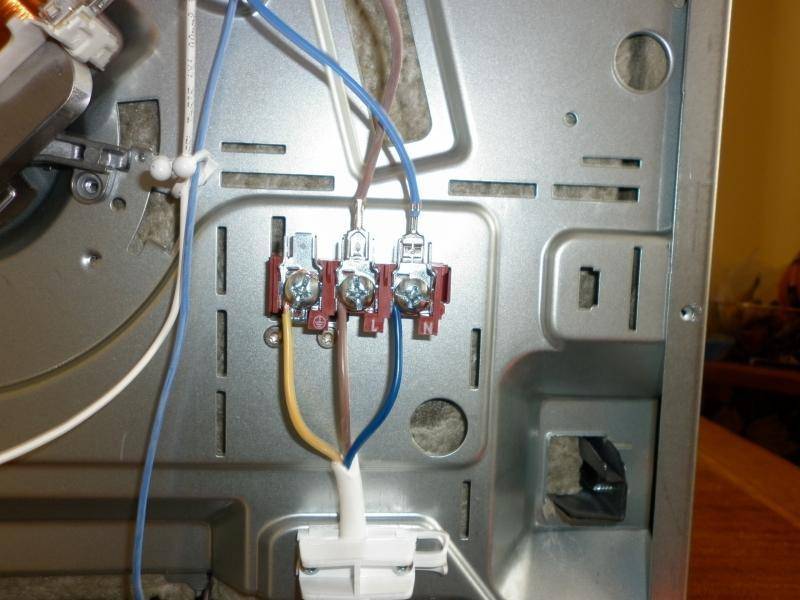
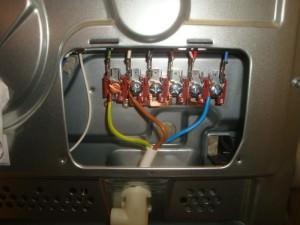
We separate the power cable of the electric stove in the shield, after which we clean the ends of the wires. We connect the phase conductors of the supply cable to the strip terminals of the machine. We connect the “zero” core to a common bus for all zero conductors. Only the yellow-green core remained unconnected.In modern systems, such wires are connected to ground buses. Older TN-C type networks do not have earth bars. What to do? Read on.
Arrangement of jumpers in the Hans electric stove
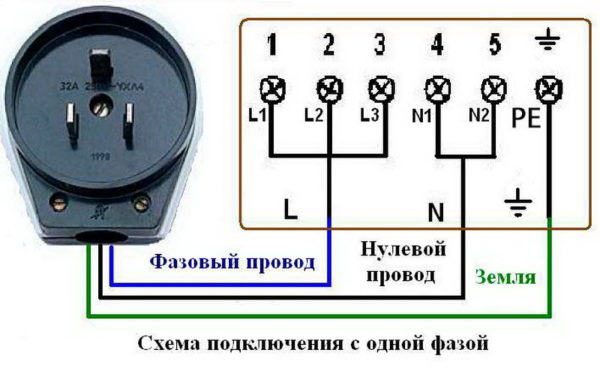
Connection to a single-phase network
Before starting work, be sure to read the instructions for installing sockets for electric furnaces, as this process requires at least a little preparation.

The plug for a 220 volt power supply is equipped with three pins:
- phase;
- zero;
- protective (grounding).

In practice, their generally accepted color marking is provided, so the phase wiring is painted red, white or brown, the zero working cable is blue, the ground cable is yellow.
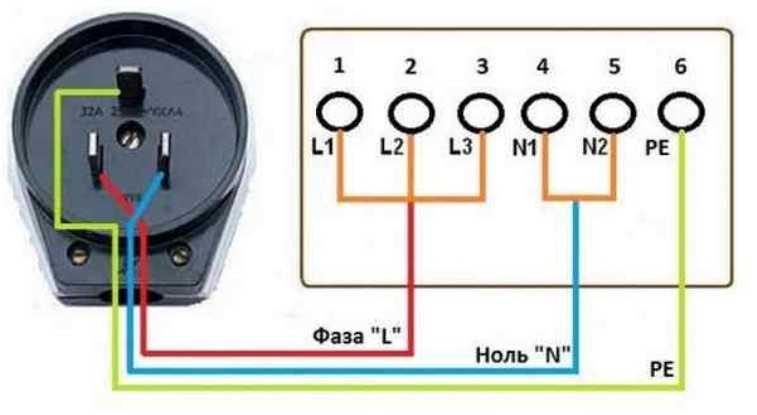
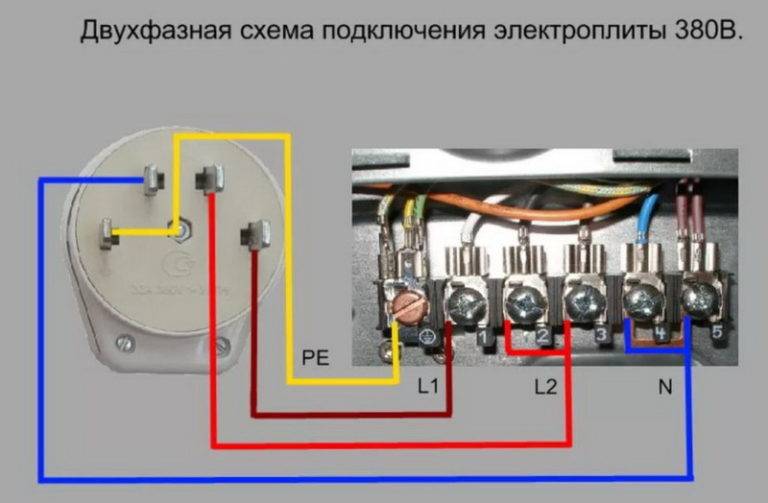
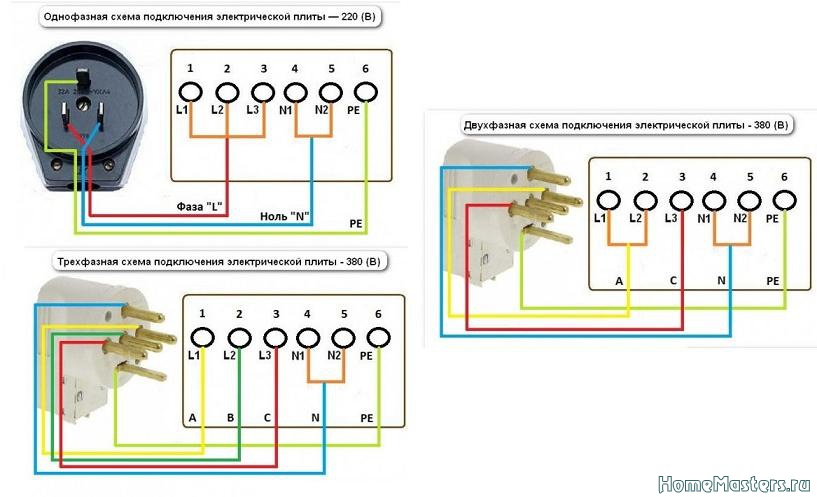
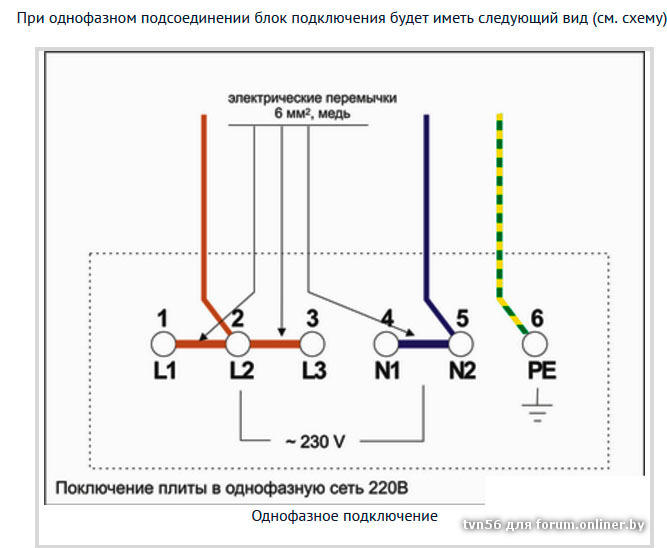
These pins must be connected to the matching pins on the plug. After that there is a direct connection to the tile. On its back wall there is a panel necessary for connecting to the network. There are 6 terminals on the panel, marked with special designations L1, L2, L3; N1 and N2; PE.
Contacts marked with the Latin letter L are used to connect a phase output to them. If the connection is single-phase, be sure to make a jumper between the existing terminals and add a wire from the power supply to one of them.
Contacts N1 and N2 are required to connect the neutral cable. A jumper is placed between them, if this is not provided by the plate manufacturer, and the cable is connected to one of the terminals.
The PE contact is used to connect the protective (grounding) wiring. This is considered the final stage of the preparatory work.

General requirements
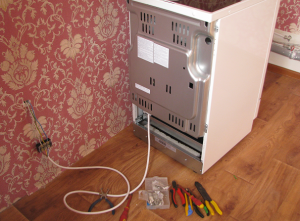
It is not possible to correctly connect an electric stove or hob with your own hands without observing certain equipment requirements.In an apartment, this can be done much easier and faster.
Usually, in an apartment of a standard high-rise building, the connection of such devices to the network is carried out by an already mounted separate wire, through a specially provided socket. This will save time and allow you to quickly connect the stove or hob.
The owners of a private house will have to do all the work related to the wire, and the installation of other equipment will have to be done on their own or with the invitation of a specialist. In this case, you should use:
- a three-core cable with a copper section from 4 to 6 mm, depending on its length;
- a separate machine for an electric stove for installation in a shield for 32 or 40A in accordance with the wire section;
- protective shutdown device;
- available grounding method.
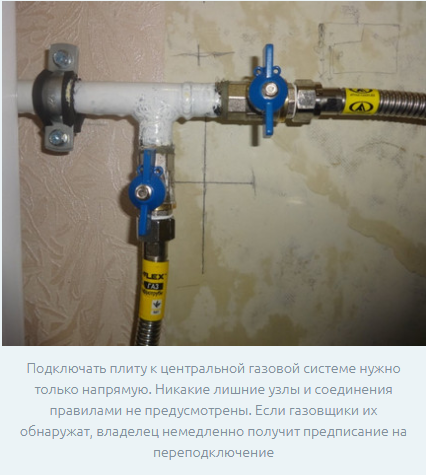
How to connect the stove to the system
It is important to use hoses designed specifically for delivering gas from a centralized riser to consumers. It is important that they are strong and flexible.
At the same time, they can't be crushed. Check the tightness and availability of a quality certificate.
This document indicates that the product is manufactured in accordance with the requirements of current GOSTs and international safety standards. Purchase only certified products from trusted suppliers.


Some still decide to perform an independent installation of a gas stove with a connection to a metal wiring. However, the installation of the pipeline is a labor-intensive procedure, and has a number of disadvantages. There is no way to move the stove. The slightest distortion can cause depressurization.
Connections can be welded or threaded, and this will require specialized expensive equipment and skills to work with it. The same FUM tape or Loctail 55 thread is used as seals.
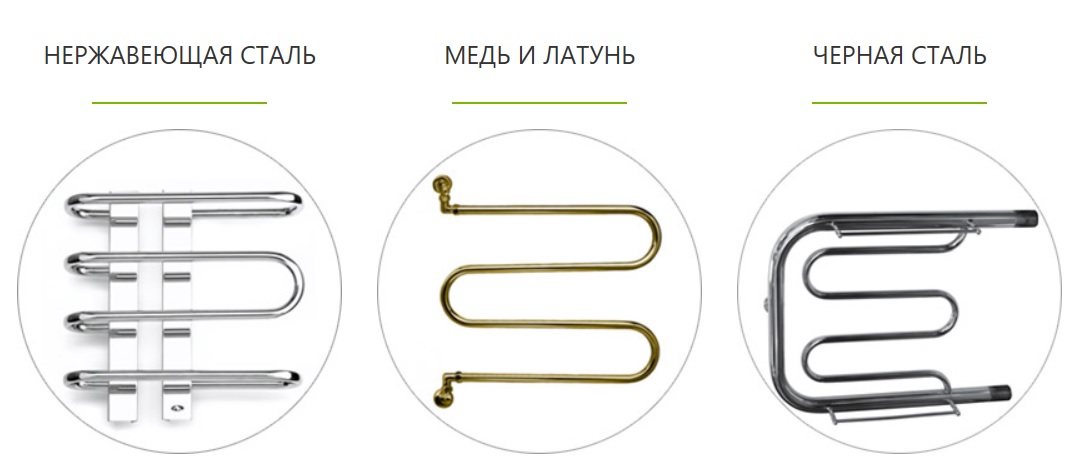
Types of modern gas hoses
Water hoses are highlighted by color:
- Blue for cold.
- Red for hot.

Gas, on the other hand, has a yellow color or marks. Trying to ignore such a classification is not worth it, and it will not work. The water tubes will last a maximum of two weeks and will need to be replaced. Well, if the leak does not lead to sad consequences in terms of poisoning or explosion.
But even here there is a characteristic classification of hoses according to flexibility and strength. You will have to choose before you install the gas stove, so that you do not have to do unplanned repairs later.
Rubber modifications are preferred due to low cost. Such a hose is quite flexible and durable. It is operated at temperatures from -35 to +50 degrees Celsius. Therefore, the installation of a gas stove in the country is carried out using a rubber tube.
This is convenient when a tank is connected to it, standing outside the house in a special iron box, or if the portable tank is in the kitchen. It can be moved without the risk of depressurization.
But there is an improved model. This is a rubber tube with an armored metal braid, which is additional protection against mechanical influences. The metal will not allow the hose to break, bend, and the permeability will always be sufficient.
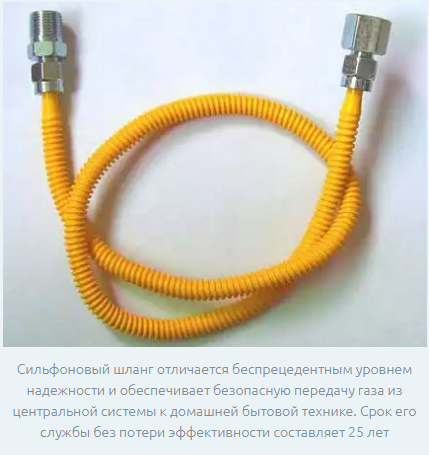
Therefore, leakage during the prescribed service life is practically excluded, and is possible only at the junctions, where the system is connected to the central wiring or a gas cylinder through special adapters. Bellows modification is a new milestone in the industry. In this case, the possibility of stretching is provided, however, within acceptable limits.
Basic Hose Requirements
There are a number of conditions that are mandatory for all cases. According to the rules for installing a gas stove in an apartment:
- The length of flexible connectors (routes) does not exceed one and a half meters.
- Jointing of several segments is not allowed. One piece tube is used.
- It is strictly forbidden to bend, twist, press down the hose.
- There should be no notch, corrosion, cracks, even minor damage.
- After the expiration of the maximum service life set by the manufacturer, a replacement is required.
For safety reasons, the metal braided hose must not be leaned against electrical conductors, hard surfaces, objects made of burning materials. Let it sag freely behind the tile without touching anything.
Pipe connection
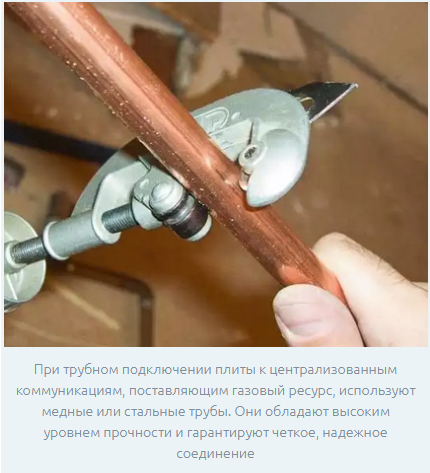
Although considered obsolete, a rigid riser mount is often chosen for its reliability and durability. However, the complexity and the need to use specialized skills and tools is often an insurmountable obstacle for those who decide to do it themselves.
Another reason to abandon the idea is the stationarity of the structure.The tile cannot be moved away for cleaning, transferred to a new place without laying a new route from solid-rolled steel pipes.
Features of connecting an electric hob
All modern hobs are divided into types depending on the principle of operation. According to this indicator, electric, induction and gas appliances are distinguished. Connecting each of these types of equipment has its own characteristics. Panels operating from the mains require mandatory grounding for any number of phases.
With self-assembly of such a panel, minimal knowledge in the field of electrics will be useful. For a beginner who does not have such experience, it will be much more difficult. You will need to study in detail the design features of the device and follow the instructions for connecting the electric hob. Typically, electronic models have all the parts you need to get the job done.
It is important to remember that when working with electrical engineering, you should remember the safety rules. Before starting the connection, it is imperative to de-energize the apartment (shutdown is performed on the panel)
All work must be done carefully. Checking the final result avoids many problems.


Connection Bosch hobs to the mains, as well as other modern devices, is usually produced using a four-core cable. It is worth noting that electric models are gradually fading into the background. They were replaced by more functional induction devices. Their peculiarity lies in the fact that they do not heat up themselves, but act directly on the dishes.

For proper installation and connection, it is necessary to study the passport for the product being installed, as well as the manufacturer's recommendations for installation and maintenance.
Step-by-step instruction
 First, let's highlight some of the nuances:
- You should create a plan for the future food chain.
- According to the plan, we mark the future location of the electrical cable, socket and circuit breaker.
- We carry out the creation of a gate for an electric cable. It is recommended to deepen a few centimeters, since concrete, brick have good dielectric properties, and also do not ignite. Such a recess will protect the cable from mechanical damage, and finishing materials from fire during insulation breakdown.
- We carry out the creation of a landing hole for the outlet. It is worth remembering that the more accurately it was done, the better the socket mount. Otherwise, it may wobble.
- After the previous work has been completed, we lay the cable, connect it to the outlet. At the same time, we note that the connection of several pieces of cable is not allowed.
- We connect the power plug to the stove according to the above diagrams.
- If the machine is connected to the network, it must be installed in the electrical panel.
- We connect the cable to the machine or other power source.
When carrying out work, it should be remembered that the network must be de-energized. To do this, the circuit is first disconnected from the energy source, and then the presence of current on all branches is checked using an indicator or a multimeter. It is worth remembering that when cutting the cable, you should leave the ends with a margin.
 Connecting the power plug or cable directly (not recommended) can be done as follows:
- We open the back cover of the plate and get access to the terminals through which power will be supplied.
- A massive block is hidden under the back cover. We carry out unscrewing the bolts by half.
- We clean the ends of the wire strands so that there are enough of them to trace around the bolt. At the same time, it is worth noting that their large length is the main mistake. Under some circumstances, there is a possibility that the strands will touch and a short circuit will occur.
- We bend the ends of the veins and throw them on top of the bolts. We breed the veins to the maximum distance.
- We twist the bolts without transferring excessive force. Excessive force can lead to a violation of the structure of the villi. However, the cores must have a strong connection.
- We close the lid.
Possible difficulties:
- The formation of the correct niche for the outlet. For perforators, special nozzles were created that allow you to create a niche of the required shape and size.
- Often you will encounter a situation where there are no jumpers in the kit that are necessary to complete the work of connecting the stove. You can create a jumper yourself, for which you can use a small piece of the wire used. This feature means that the jumper will have a cross section selected taking into account the minimum allowable value.
- You can meet a situation where the cut cable is not enough. In this case, it is worth remembering that the presence of connections between pieces of cable in this case is not allowed. This feature is due to the fact that it is at the joints that the greatest resistance and heating are created.The insulation used may not be able to withstand the load.
Some problems cannot be fixed on their own. Previously, a common occurrence was the situation when a common machine for an apartment or house could not withstand the load. Its replacement can only be carried out by employees of the power grid.
Conclusions and useful video on the topic
The video below shows the step by step installation of the hardware. The video touches on individual nuances of installation, compliance with rules and regulations:
Installing a household hybrid gas stove, complemented by an electric oven, is, by and large, not difficult. Another question is that the connection of this kind of equipment should be carried out according to specially established rules, which determine the moments of safety. Therefore, it is not possible to independently perform connection work (forbidden by the rules), even if there are some skills, knowledge and skills.
Do you have a different opinion about connecting a hybrid cooker to an electricity and gas supply system? Share it in the comment block. If you have questions on the topic of the article that we have not considered above, ask our experts and other site visitors, participate in the discussions.
Conclusion
Before turning on the stove, check the connection of all burners of the electric stove (their connection diagram is in the instruction manual). Such scrupulousness will save you from a short circuit, which may occur due to the fact that the wiring connection in one of the terminals has loosened during transportation.
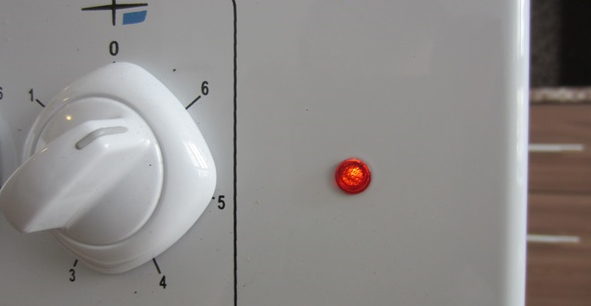
After installing the plate at the place of permanent deployment, turn it on - the indicator located on the control panel will notify you of the correct operation.
That's the whole method of self-connecting an electric stove, which is not too different from connecting any electrical household appliance. An induction hob is connected in the same way. Everyone should watch this video before getting started: