- Types of towel dryers
- Installation of an electric towel warmer
- Connection order
- Towel rail mounting errors
- Best Answers
- Scheme 3
- What is required for installation?
- Tools
- Principle of operation
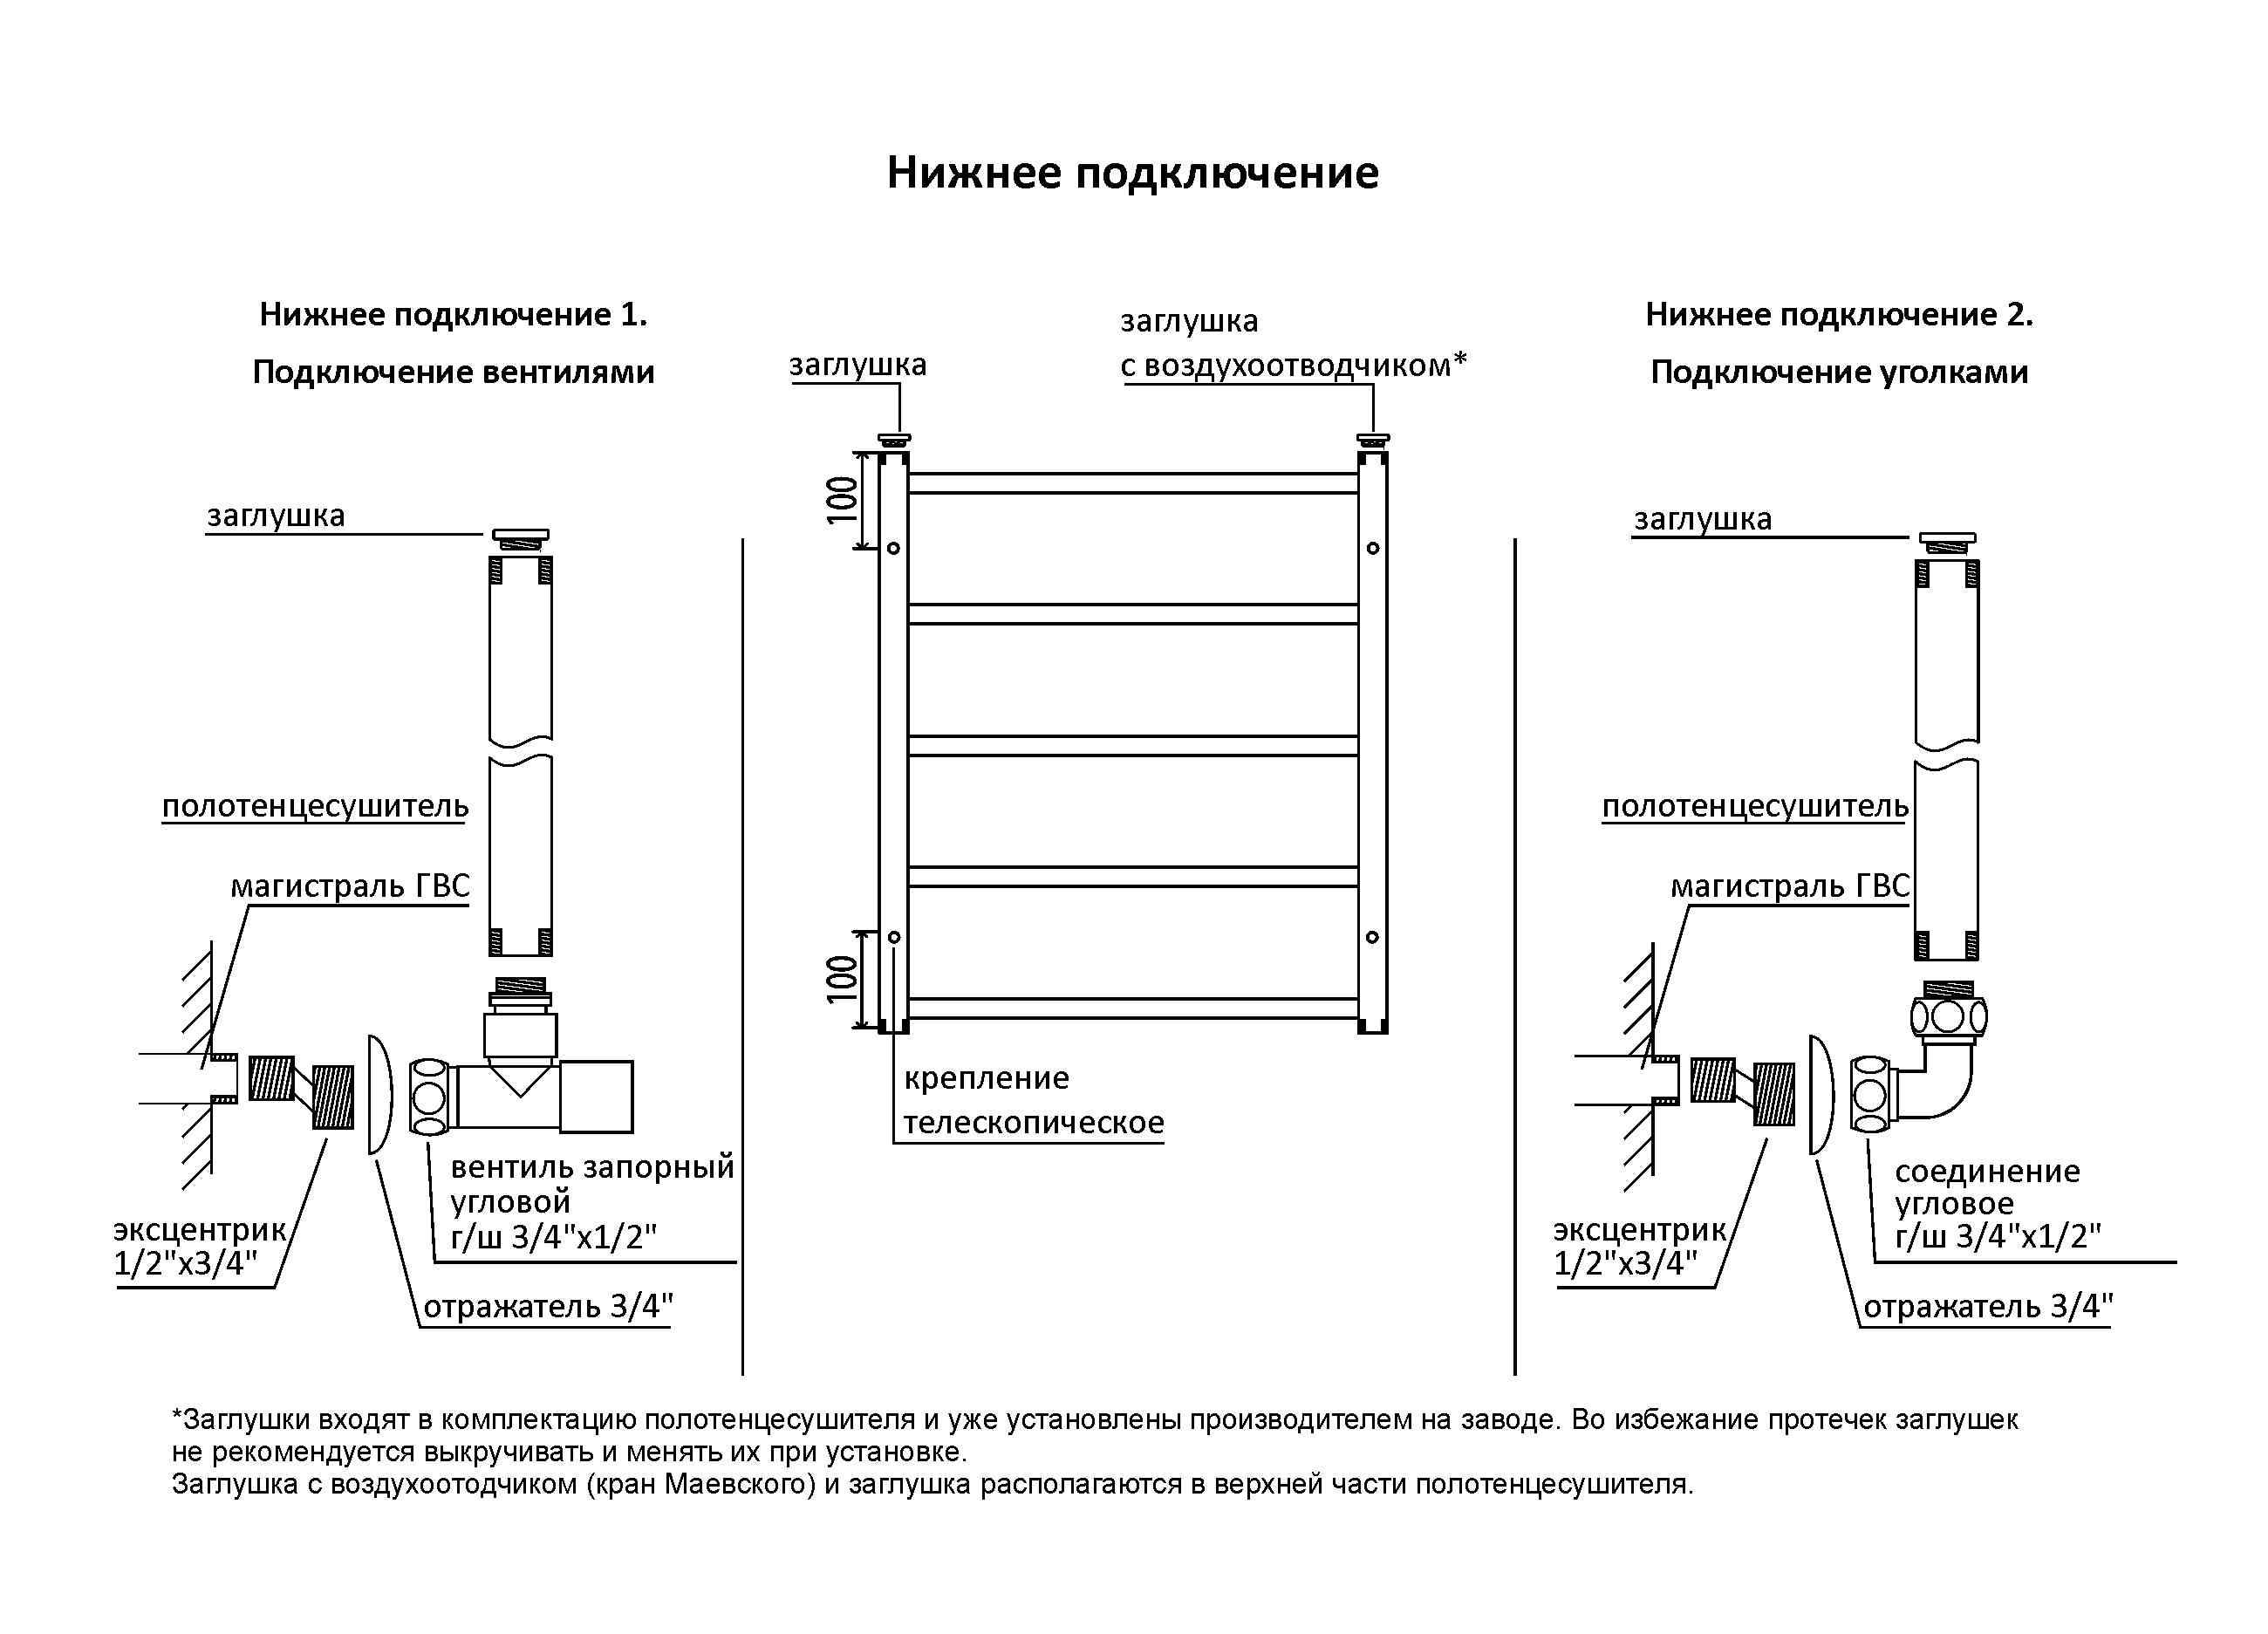
- Connection diagrams in the apartment
- Existing Options
- How to choose the right way?
- What schemes should be avoided?
- Scheme 1
- Permissible options for the execution of scheme No. 1
- Making a water heated towel rail from metal pipes with your own hands
- What is necessary
- materials
- Tools
- Work order
- Dismantling the old device
- Features of electric towel warmers and their installation
- Installation Recommendations
- Installation and connection: step by step instructions
- Connecting an electric towel warmer
- How to install and secure
- Installation sequence
- Connecting an electric towel warmer
Types of towel dryers
A heated towel rail is installed in almost every bathroom. Its main purpose is to dry clothes. At the same time, the device can perform the function of both the main and additional heating of the room.
The classification of heated towel rails is carried out according to the type of coolant:
- Water devices. There are two options for connecting such a dryer.The first is that this device is connected directly to the heating circuit, and it is heated by the circulation of a liquid coolant in the house heating system. The second is the installation of a heated towel rail for hot water supply.
- Electric dryers for towels. The device does not require connection to the heating system. The heated towel rail requires an electrical outlet in the bathroom.
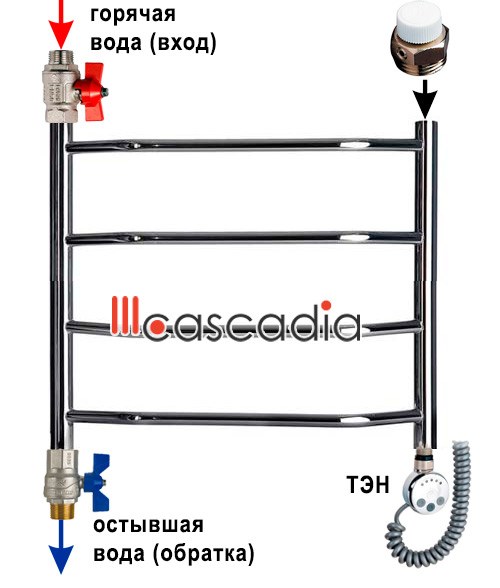
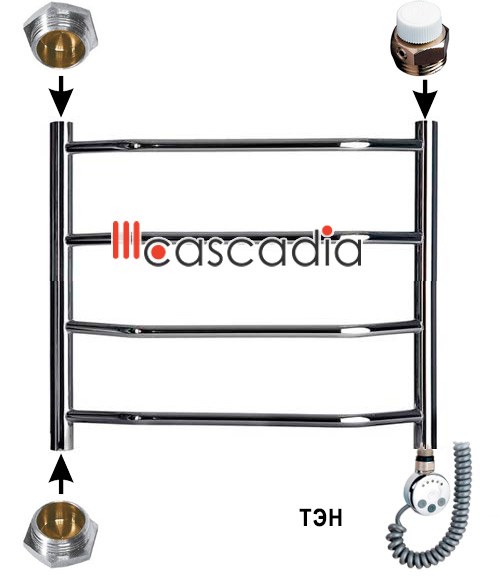
- Combined devices. Such a towel dryer can simultaneously function from electricity and from water rooks. The product is connected to the heating circuit, and a heating element is connected to it.
Electric and combined dryers can be used at any time of the year. Devices connected to the heating system operate only during the cold season. When the heating is switched off, the water drying process is stopped. An exception is the connection of the device to year-round hot water supply.
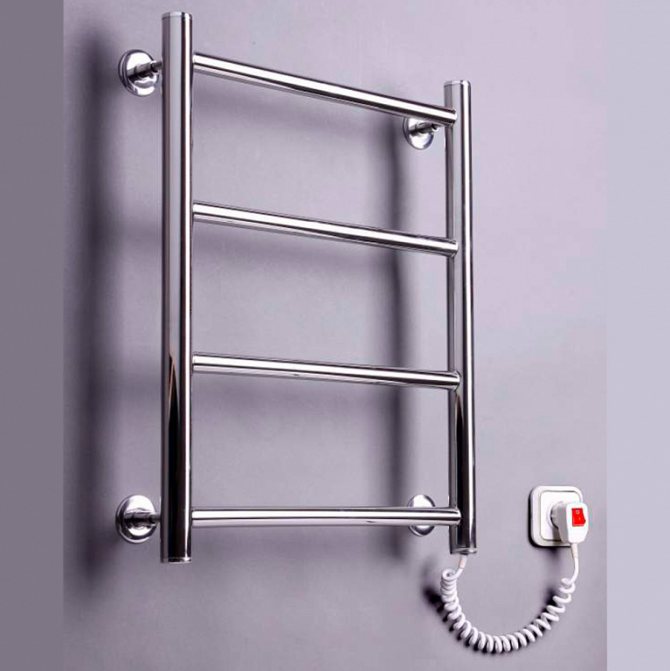
Towel warmers are produced in various sizes and configurations. Simple models are shaped like a zigzag or ladder. The simpler the design of the dryer, the easier it is to install.
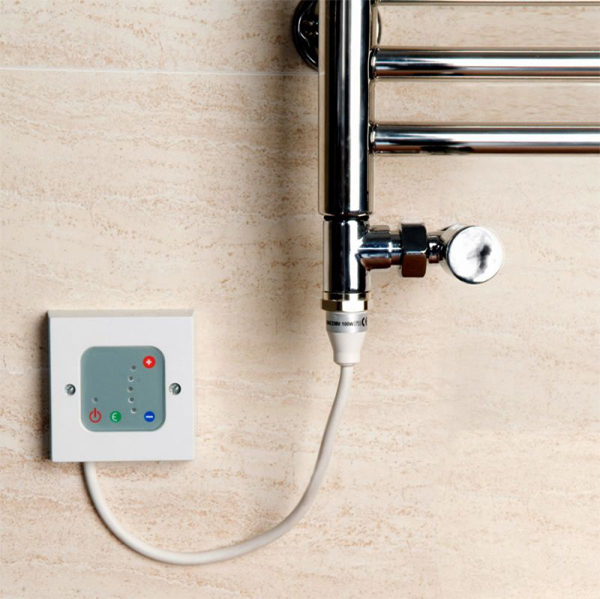
Installation of an electric towel warmer
Installing electrical equipment in a wet environment requires protective measures to be taken for safe use. This is a separate RCD, grounding and the installation height of the heated towel rail socket is at least 70 cm from the floor. The connection is made by installing the latter inside or outside the bathroom.
The electrical socket must be protected by a sealed housing and a cover with a rubber seal. It is permissible to place the device on a wall with a minimum load from moisture, but not bordering the street.This is due to the difference in temperatures, due to which the possibility of condensation in the seat is high.
The most reliable option is the laying of serviced communications in the body of the wall.
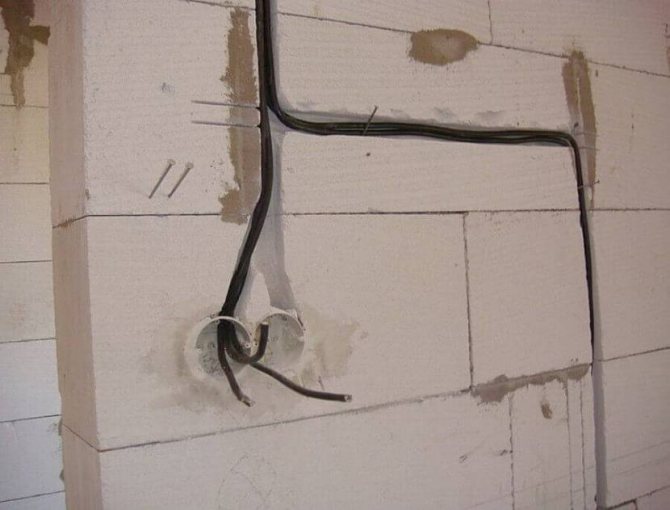
Concealed wiring with socket
To do this, form strobes and recesses for the outlet, through holes for bringing the latter out. Filling voids with plaster and finishing materials will protect the wiring from contact with moisture. Outdoor mounting with a high degree of insulation is also acceptable. The cable for installing a heated towel rail is placed at a height of more than 10 cm from the floor, so that later it leads to a short circuit.
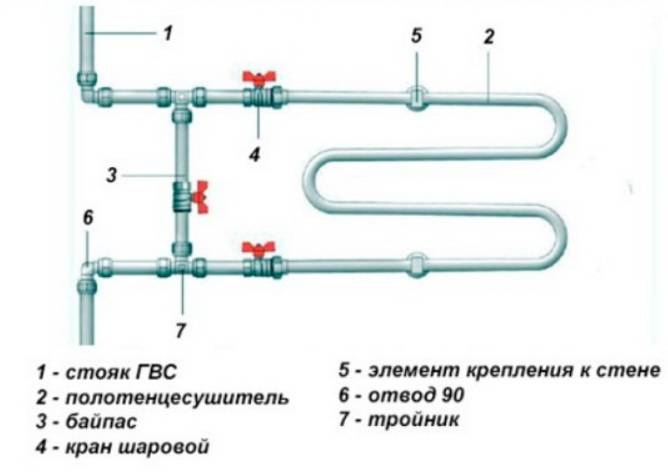
Connection order
The cable, machine and socket are selected with a small margin of power relative to the connected equipment. So, for example, 1.8 kW is divided by 220 V, they get 8.2 A. The cable must be with a copper core with a cross section of at least 1 sq. mm. With regard to furniture, they withstand 750 mm, an angle - 300 mm, a floor - 200 mm.
Hanging heated towel rails are applied to the area allowed for installation, the position of the brackets is marked. Mounting holes are drilled and the equipment is fixed to the wall. Stationary floor models are fixed to the base in the same way. The next step is to connect to the power supply. The socket should be at a distance of 25-35 cm to the side of the appliance.
The correct location of the outlet for the dryer in the bathroom Source maxi-svet.by
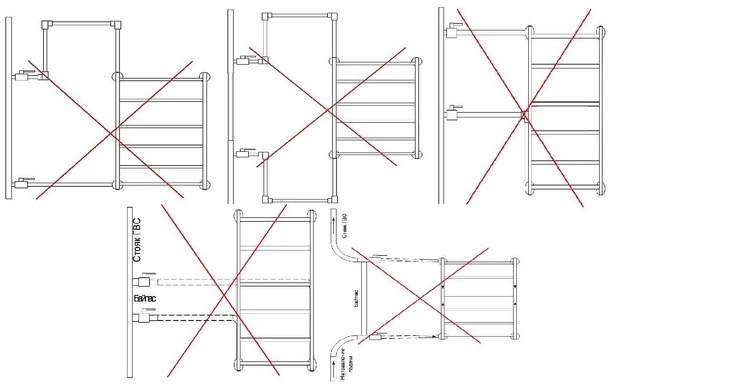
Towel rail mounting errors
- It is impossible to narrow the entrance and exit with the help of fittings, or in other ways.
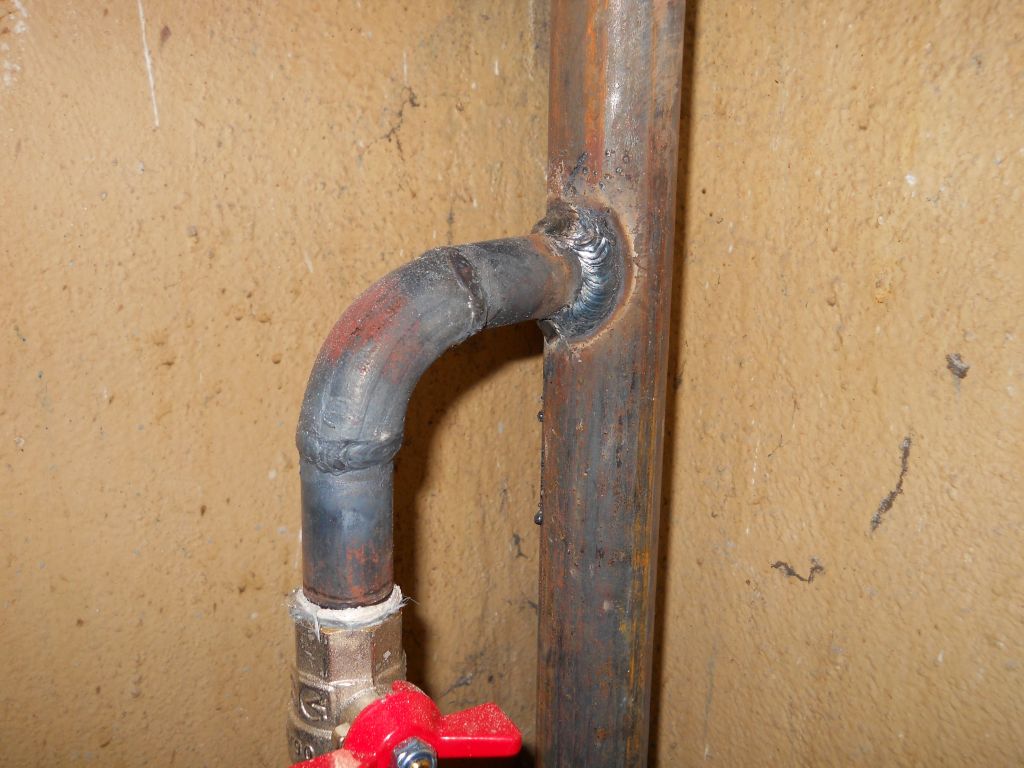
- The use of locking devices on the riser is prohibited. They can be inserted into the circuit only if it is a branch of the HVO system, and not its direct part.The problem is solved with the help of a bypass - a bypass pipe. Cranes must always be accessible.
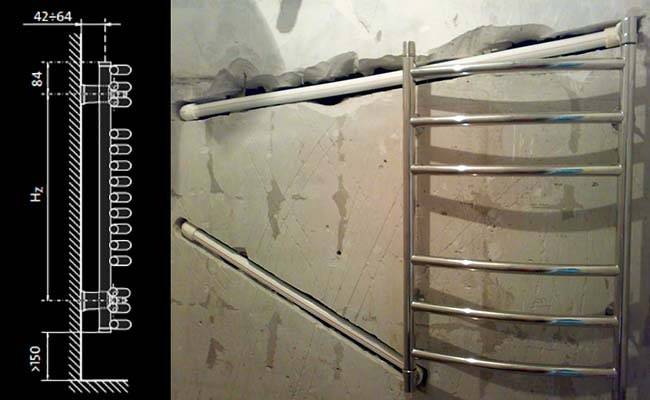
- The distance to the walls should be no more than 3.5 cm with a coil diameter of up to 2.5 cm. The maximum distance for products with a diameter of 2.5 cm or more is 5-7 cm.
- The lower tie-in cannot be made below the branch pipe included in the body, and the upper one - above.
- The maximum slope of the coil is 2 cm per meter of length.
- Horizontal connection is possible only with a piping diameter of 32 mm and a distance from the tie-in of no more than 2 m.
- According to SNiP, the recommended height of the radiator above the floor level is 120 cm. This is nothing more than a recommendation.
For the device to work properly, the correct wiring diagram is required. If a part of the ladder battery is placed below the riser, the circulation in it will stop. The flow will go along the "step" located at the entrance level.
Another mistake is the inlet pipe bent upwards. Air will gradually accumulate in its upper part. Sooner or later it will create a traffic jam and the system will stop working.
Best Answers
*FOX*not*SISTER*:
If you have it from hot water, it should always be hot, but in some houses for some reason the heated towel rail is from the heating system, then it will be cold when the heating is turned off.
Maria:
Yes. It always stays hot.
How I Want So I Live:
We are always warm, hot in winter, but I don’t know how to do it
Elena:
no, of course, it's the same battery - only in the bathroom)
Yuri Frolov:
Yes, it is heated not from heating, but from hot water. That's how it is in our house, anyway.
Alexey Kulikov:
Towel dryers, as a rule, are connected to the hot water supply riser. Very rarely - to heating.
Marina Sakharova:
See what's heating it up.If from hot water, then it should (if it comes from the tap hot). If from heating or from electricity, then it should not.
Arkady:
Maybe he's on hot tap water.
Fabull:
It's actually a hot water return, you can check it on the top floor.
Chufistova Maria:
must, when we don’t have hot water, the dryer is cold, otherwise it’s always hot
Lollipop:
hot, correctly answered, depends on hot water, not heating.
Helena Iskra:
The heated towel rail is powered by hot water, not heating
Sergey Ivanov:
If it is powered by hot water, then yes, but if it is from heating (as a rule), then no.
Igor Shkurny:
In 90%, the towel hangs on the hot water supply and is not connected with heating!!!
ludwig:
now read that I am writing a towel from water (hot riser) if there is circulation, it is always hot, but if it is from heating, then it is hot only when it is flooded
Scrapmaster Honored:
We have a separate riser from the central heating. It does not heat up when there is no pressure in the radiators. If you connect to hot water, you need to dump chilled water somewhere so that the towel is hot. Most often this is done by residents of the upper floors ...


Albert Belkov:
Yes, in a cooperative nine-story brick building with its own boiler room - so ...
Old Plinth:
Maybe an electric towel?
Vladimir Sokolov:
should always be hot! looping goes regardless of heating! My parents had a cold in the morning, so from my submission (I am a welder-plumber of 12l of experience) they got a REO, they did it, although at first they refused, like it should be! have been looking for a long time (well, like) replaced the return faucet, now the only 1 riser in the house is hot!
Natalia Victorovna:
and took the temperature... yourself... maybe heat, glitches, it seemed ....ARVI walks now, maybe he got sick
first figure out why your towel is powered
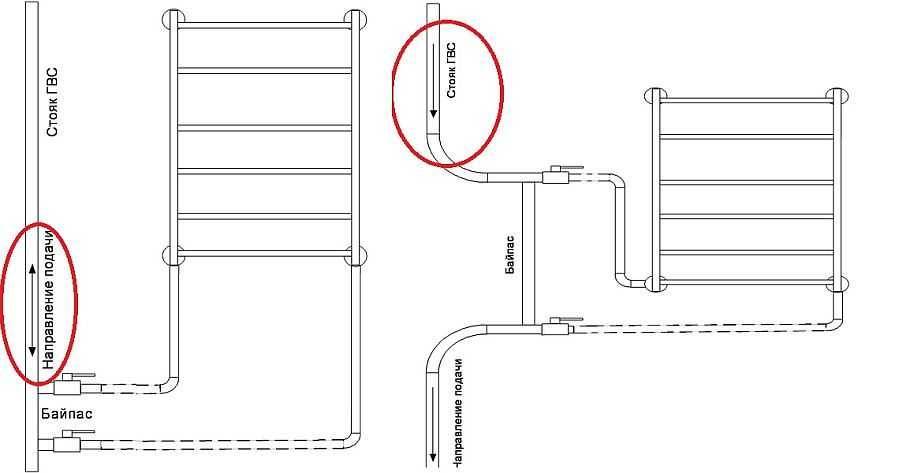
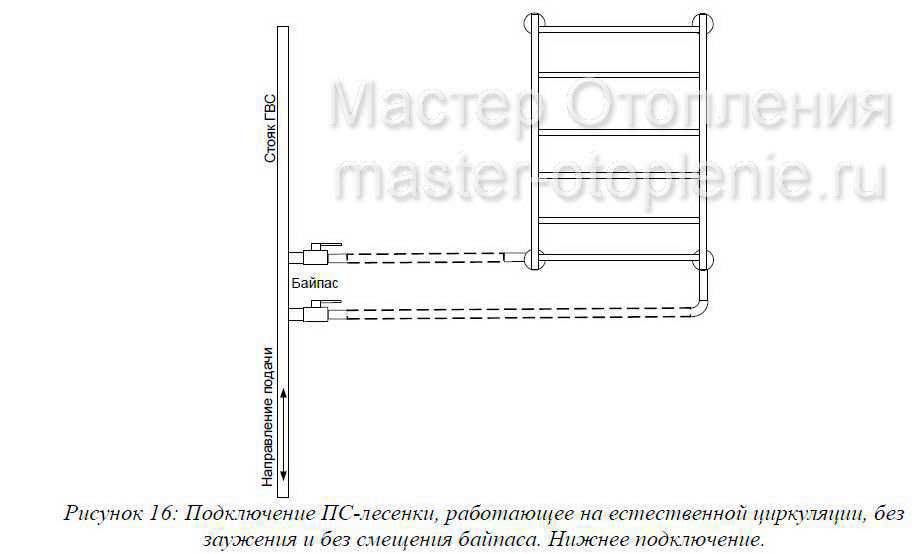
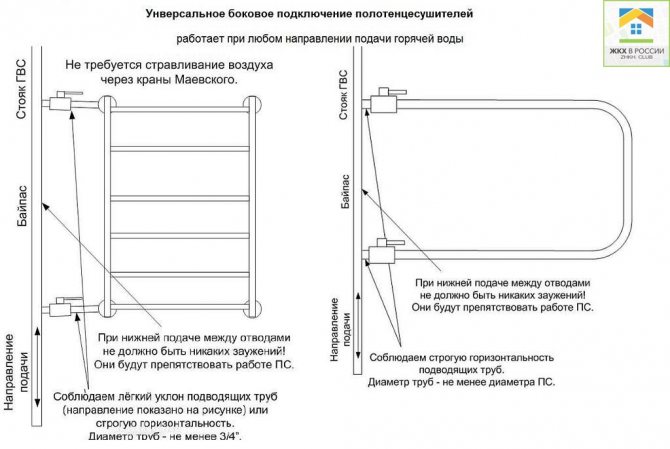
Scheme 3
(Side and diagonal connections with reduced and/or offset bypass)
The vast majority of plumbers believe that there must be a narrowing between the taps on the heated towel rail - otherwise nothing will work. Firstly, this is not the case (see the diagrams above), and secondly, in the case of a lower water supply in the riser, the narrowing will prevent the heated towel rail from working.

Lateral connection of a ladder, working on a combination of forced and natural circulation, with a narrowing of the bypass

Lateral connection of a ladder, working on a combination of forced and natural circulation, with a bypass offset

Side connection of the U / M-shaped heated towel rail, working on a combination of forced and natural circulation, with bypass offset

Lateral connection of the U/M-shaped heated towel rail, operating on a combination of forced and natural circulation, with narrowing of the bypass

Diagonal connection of the ladder, working on a combination of forced and natural circulation, with a narrowing of the bypass

Diagonal ladder connection, working on a combination of forced and natural circulation, with bypass offset
Diagonal options for connecting a heated towel rail do not have any advantages over the side ones.
Note that the direction of supply in the riser is now unambiguously indicated by the top. With the bottom feed, these options are categorically not recommended!
Benefits of the scheme:
Benefits of the scheme:
- Works great with top feed in the riser.
- It is not required to bleed air from the device after turning off the water.
- The distance of the towel warmer from the riser is up to 8-10 meters.
The disadvantages of the scheme:
Stable operation is guaranteed for top feed only.
Conditions for the scheme to work:
- Strictly top feed in the riser! In general, you should consider the direction of supply always unknown (despite the statements of local plumbers) and use any of the universal schemes that do not depend on the supply.
- The lower outlet of the riser must be below or on a par with the bottom of the appliance, and the upper outlet of the riser must be above or on a par with the top of the heated towel rail.
What is required for installation?
Before starting any work, it would be quite a good idea to sketch out a wiring diagram or, in extreme cases, a small freehand sketch of the placement of the unit, choosing the most appropriate option for connecting the device to the pipeline network.
The simplest schemes correct connection of the heated towel rail do-it-yourself at universal ladder devices:
Are you planning a bathroom renovation? We are ready to answer some of your questions: how to choose a good one bath. how to install a washbasin in the bathroom. how to choose a good bathroom faucet.


Learn how to install and connect an electric storage water heater here.
Tools
To replace or install a water heated towel rail, you will need a set of plumbing tools, the composition of which depends on the type of water pipes in the apartment. Considering that copper, polypropylene and other modern types of pipelines are still rare, we will describe the toolkit for standard ¾ 'steel pipes:
- Keys. gas No. 2 or No. 3; adjustable - "crocodile"; adjustable wrench.
- Pipe cutter or hacksaw for metal.
- Thread-cutting dies ¾ 'with lever knob.
- Electric drill with a perforator, concrete drills.
- Angle grinder with a cutting disc for metal - "Bulgarian".
- Fastening tools: hammer, screwdrivers, pliers.
- Marking tool: tape measure, level, pencil.
In addition to a set of tools, installation and consumables are also required for work:
- Turns, bends, couplings, spurs and possibly other types of fittings.
- Shut-off valves, ball valves are best.
- Linen tow plumbing, or mounting FUM‑tape.
- Installation and fasteners. brackets, screws, dowels, anchor bolts, etc.
Having prepared everything you need, you can get to work.
All work on the heating pipeline is best done in the summer, when the system is turned off, there is no pressure in it and you can easily drain the water from the riser. But in this case, having completed the work, it will be impossible to test its quality: you will have to wait for the start of the heating season.
Principle of operation
The heated towel rail has a tubular design, depending on the type of energy source it can be:
- water, heated by water from a hot water supply or heating system;
- electric, where the heat of an electric heating element is used.
In multi-storey buildings, water dryers are connected to the central pipeline and are rigidly tied to the functioning of the hot water or heating system. During the summer shutdown of hot water, water devices do not work. In private housing construction, it is possible to dry clothes in the bathroom only during the heating season, since the heating of the coolant directly depends on the mode of the boiler room.
Electric heated towel rails work from a network with a voltage of 220 V.Heating elements are built into the devices:
- Tubular heating elements that transfer energy to circulating water or oil. Due to the accumulation of heat, such structures maintain the desired temperature for a long time.
- Heating cables, where thermal energy is generated by a conductor with high resistance.
The convenience of an electric dryer lies in autonomy - its operation does not depend on the presence of heating or hot water supply, binding to a riser.
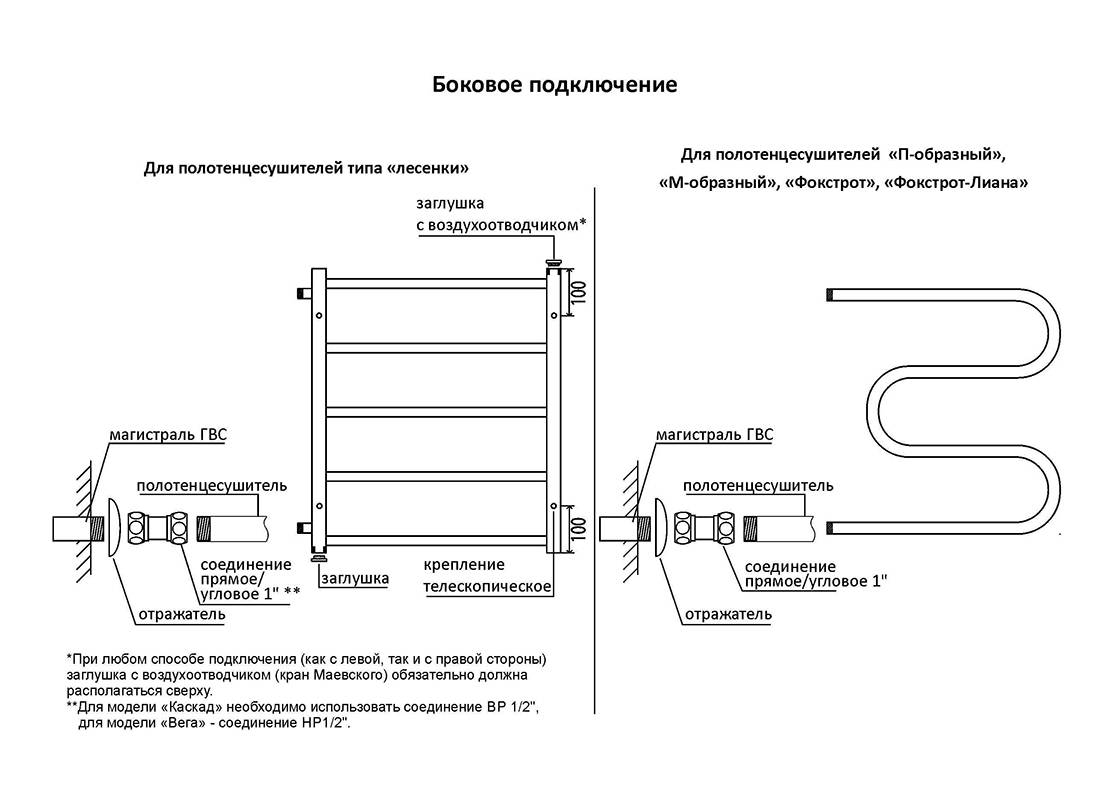
Connection diagrams in the apartment
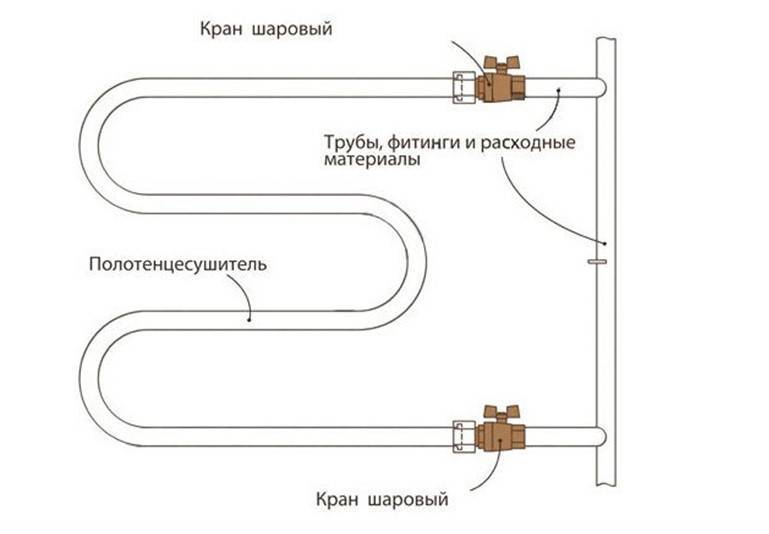
The operation of a heated towel rail requires constant circulation of water. If its shape is close to standard U- or M-shaped types, only one connection option is possible.
If a modern substation design with several connection points is used, you will have to choose the best option. This issue should be taken seriously, since it will be extremely difficult to correct the mistakes made.
Existing Options
There are several ways to connect a substation to a hot water riser. All of them concern only complex structures with 4 connection points (in the form of a ladder).
Depending on the configuration of the room, the size of the substation and other factors, different schemes can be used:
- Upper. The forward and reverse branches are connected to the upper points of the substation.
- Lower. The forward and return pipelines are connected to the lower connecting elements.
- Lateral. For connection, one upper and one lower connecting elements are used, located on one side of the device.
- Diagonal. Upper and lower connecting elements are used, located on different sides of the ladder.
- Center. This connection option is less common.The ladder has only 2 connection points located on the upper and lower rungs.
All options have their pros and cons. name unambiguously the best way to connect difficult, since many factors that affect the operating conditions of the device must be taken into account.
How to choose the right way?
The choice of the optimal method of connection is due to the need to get the most out of the heated towel rail and eliminate the loss of thermal energy. To do this, it is required to ensure the circulation of water, the absence of stagnant or airy areas.
It is necessary to take into account the size of the device, the width and the number of crossbars
In addition, the direction of supply (from above or below), the pressure in the system and the speed of water movement should be taken into account.
 Most experts consider side mounting to be the best option.
It has minor drawbacks, but it allows you to get a minimum of heat energy losses and ensure efficient water circulation.
The bottom connection can be used in any direction of flow in the riser. The upper type of connection creates the risk of water stagnation in the lower part of the device, where the cooled layers fall.
Designs with a central location of nozzles are considered the most successful, but they are much less common on sale.
Sometimes the bypass is offset relative to the common spine of the riser. This is done only in systems of private houses, since there is a danger of changing the flow parameters.
All these options apply only to devices in the form of a ladder. Conventional U- or M-shaped towel warmers have only two connection points and are connected in a single way.
What schemes should be avoided?
First of all, it is necessary to avoid the use of complex bends, curved and forming vertical loops. They form air bubbles that prevent the movement of water. In addition, it is necessary to withstand the slope of the bends.
Often, apartment owners, wanting to hide pipes, lay them in a concrete floor screed or under a suspended ceiling. This creates long loops where stagnant areas form and air accumulates.
In systems with low working pressure (usually, this happens in autonomous lines of private houses), it is necessary to take into account the direction of supply. Often there are situations when forced circulation begins to compete with natural circulation.
Hot water enters the substation, cools down in it and begins to fall down. In such cases, the flow either passes along one path without heating the rest of the heated towel rail, or stops altogether.
Scheme 1
(Side or diagonal connection, unconstricted unbiased bypass)
This scheme provides the supply of coolant to the upper part and the release of the cooled coolant back to the riser from below. Circulation through the heated towel rail is provided only by the gravitational pressure of the water cooling in it.
Ladder side connection, running on natural circulation, without constriction and without displacement of the bypass
Diagonal connection of the ladder, working on natural circulation, without constriction and without displacement of the bypass
The diagonal option for connecting a heated towel rail does not have any advantages over the side one.
Lateral connection of the U/M-shaped heated towel rail, running on natural circulation, without constriction and without offset bypass
This wiring diagram is universal:
- Works with any direction of supply in the riser.
- Does not depend on the circulation rate in the riser.
- It is not required to bleed air from the heated towel rail after turning off the water.
- Distance from the riser - up to 4-5 meters.
Conditions for the scheme to work:
- The lower outlet of the riser must be below the bottom of the heated towel rail or on a par with it, and the upper outlet of the riser must be above the top of the appliance or on a par with it.
- With a bottom feed, there should definitely not be any narrowing between the taps. It will interfere with the operation of the heated towel rail up to complete inoperability! At the top feed, it is permissible to narrow the bypass by one step of the diameter of the riser (this option will be discussed in detail a little later), but it is not required for the operation of the device.
Connection according to this scheme with bottom feed in the riser is very critical to the quality of installation. Any narrowing between the taps, which, for example, occur when the polypropylene welding technology is violated, harms its work. These are nozzle overheating, exceeding the heating time of the pipe and fitting, pushing the pipe into the fitting with excessive force without depth control. Narrowing can occur if there are welds on the riser between the bends or if there are displacements of the riser pipe relative to its axis between the bends.


Why does the narrowing/displacement between the taps at the bottom feed interfere with the operation of the heated towel rail? Because it creates an additional pressure drop due to the movement of water in the riser (at the lower outlet - more than at the top), which counteracts natural circulation, which pushes water back into the riser through the lower outlet.
Important note: since natural circulation is provided by cooling the water in the appliance, with this connection there will always be a temperature difference between the top and bottom of the heated towel rail. However, in a well-mounted device, it is only 3-4 ° C, which cannot be felt by hand - above a certain threshold, the temperature is perceived as “equally hot”. If the difference is greater, then either an installation error was made, or the temperature of the hot water supply system was overestimated.
Try to measure the temperature of the hot water in the system, as well as the temperature of the top and bottom of the heated towel rail
If the difference is greater, then either an installation error was made, or the temperature of the hot water supply system was overestimated. Try to measure the temperature of the hot water in the system, as well as the temperature of the top and bottom of the heated towel rail.
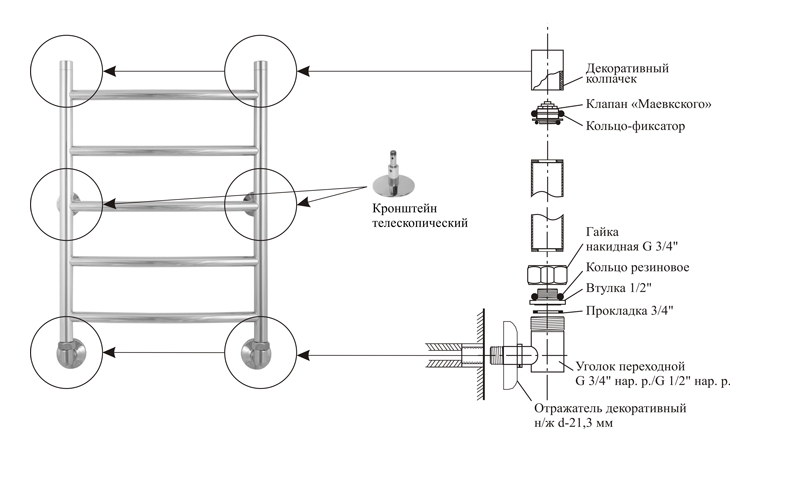
Permissible options for the execution of scheme No. 1
Lateral connection (correct example)
The entire heated towel rail is vertically placed strictly between the outlets, the correct slopes of the supply pipes are observed, and no working conditions are violated.
Lateral connection (example of a conditionally permissible design)
The heated towel rail is located above the top outlet. You will need to bleed air from the upper left corner of the instrument.An ordinary radiator will not allow this to be done without very inconvenient tricks (for example, loosening the union nut of the upper water outlet), air will stand above the dotted line, and the device will not work.
For the full operation of this option, it is mandatory to install an air valve strictly in the upper corner for water supply. Only a few models of heated towel rails allow you to do this, in particular, the Sunerzha brand of the “+” series (“Bohemia +”, “Galant +”, etc.).
The air valve in the opposite corner from the water connection point cannot bleed all the air out of the appliance!
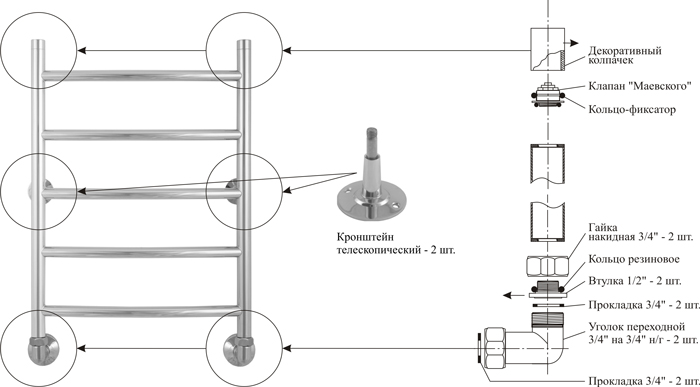
Making a water heated towel rail from metal pipes with your own hands
In order to make a water heated towel rail, you first need to take measurements and make a drawing of the future unit. In the manufacture of a radiator, its power should be calculated. For 1 sq. m. bathroom should be 150 watts of thermal energy. You also need to consider:
- The size of the heated room.
- humidity.
- ventilation and heat loss.
The calculation of the size of the heated towel rail relative to the heated room is given in the table:
| Height/width, cm | Heated volume premises sq.m. |
| 50/40 | 4.5 — 6 |
| 50/50 | 4.5 — 6 |
| 50/60 | 4.5 — 6 |
| 60/40 | 6 — 8 |
| 60/50 | 6 — 8 |
| 60/60 | 6 — 8 |
| 80/40 | 7.5 — 11 |
| 80/50 | 7.5 — 11 |
| 80/60 | 7.5 — 11 |
| 100/40 | 9.5 — 14 |
| 100/50 | 9.5 — 14 |
| 100/60 | 9.5 — 14 |
| 120/40 | 11 — 17 |
| 120/50 | 11 — 17 |
| 120/60 | 11 — 17 |
An example of a drawing of a heated towel rail with an initial size of 80 / 57.7 cm, designed for a heated room of 7.5 - 11 square meters, see the figure below.
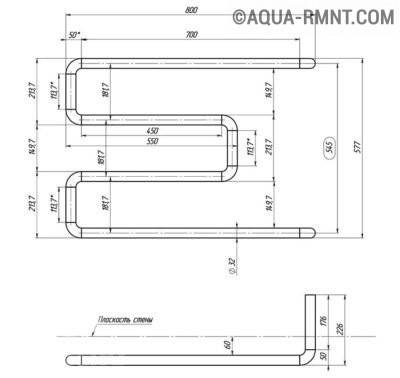
Dimensions of the water heated towel rail
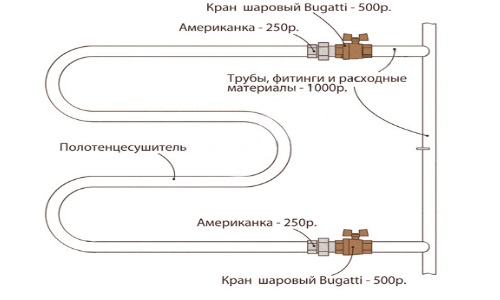
What is necessary
materials
- pipe with a diameter of 32x2 mm, length 3 m;
- corner pipe outlet with a diameter of 32x2 mm - 6 pcs.;
- bushings for "American" - 2 pcs.;
- "American" - 2 pcs.;
- towel dryer fastening elements - 2 pcs.;
- decorative washers - 2 pcs.;
- hairpin M8 -200 mm;
- nut M8 — 2 pcs.
Tools
- Welding machine;
- Electrodes (argon welding);
- Cylinder with argon;
- Bulgarian;
- Cutting discs;
- Grinding wheels;
- Felt circles;
- Roulette;
- Marker or marker.
Work order
Consider the manufacture of a heated towel rail from metal pipes based on the above drawing as an example.
-
We mark the required length of pipes with a tape measure and mark with a marker.
-
Cut off blanks with the help of grinding and felt wheels are immediately cleaned and polished to perfect condition.
-
We weld the prepared bends to the edges of the pipes (length 117.7 mm). You will get three parts that look like a telephone receiver.
-
According to the drawing, we weld two pipe sections (450 mm) to the manufactured parts and connect them together.
-
At one end of the pipe blank with a length of 700 mm, we weld a branch, and a pipe segment (176 mm) to it, the other end is connected to one of the branches of the assembled structure. We perform the same procedure with another piece of pipe 700 mm long.
- We grind the seams with the help of grinding wheels until all the welding scars are equal to the rest of the structure.
- We check the quality of the connections with water or air.
-
Install fasteners.
- We check and cut the length of the free parts and adjust them to the riser bends. They should ideally connect with the help of "American women".
-
We grind and polish the seams, check the connections again.
Dismantling the old device
You should start by disassembling the old heated towel rail. For this:
- Having agreed with the neighbors at the entrance and the management company, we block the heating riser and drain the water from it.
- If the old structure was welded to the pipes of the riser, we cut it off with a grinder. In the case of a detachable connection, unscrew the fastening couplings.
- In rare cases, when the installation dimensions of the new device coincide with the old ones, we can assume that we are very lucky. Most often this is not the case and you have to cut pipes even with a collapsible connection.
- The cutout in the riser must be greater in height than the distance between the inlet pipes of the new heated towel rail by the length of the spurs and couplings required for inserting the bypass.
- When cutting, we take into account not only the installation dimensions of the new device, but also the possibility of cutting threads on pipes.
- We remove the old device from the wall by cutting off its brackets with a grinder or a hacksaw.
Features of electric towel warmers and their installation
Electrical appliances can work all year round, but they consume additional electricity. There are models that need to be fixed on the wall, and there are options that allow you to put a heated towel rail in the bathroom or any other room and not think about when to do it - before or after laying the tiles.
To install the device, it is better to choose the place most remote from water sources (showers, sinks, bathtubs). The scheme for installing heated towel rails powered by electricity provides for a distance of at least 60 cm from sources of moisture, and this requirement must be met.
Related videos
Installation of a heated towel rail
Click Play to view
After the place is chosen, it is necessary to outline the attachment points. Drill holes, insert dowels into them and attach the towel dryer. There are floor models, in which case you can put the device, if necessary, in the kitchen or bedroom, and not just use it in the bathroom in a panel house or other dwelling.


Special attention is required to connect the device to the network. It is best to remove the connection point from the bathroom
If this is not possible, then a waterproof outlet must be used.
Installation Recommendations
The heater should be installed after the completion of finishing work - laying tiles, sheathing with plastic panels or other material. If the old coil is replaced with a new heated towel rail, it is first dismantled, repaired (if necessary), then installed and connected.
We will give some tips on how to properly place the heated towel rail in the bathroom and fix it on the wall:
- Try to place the water dryer closer to the riser if you plan to connect to the DHW system. When connected to heating, the location of the heater does not play a role.
- There is a requirement for the installation of an electrical appliance - the minimum distance between the socket (wiring) and the edge of the bath (sink, shower) should be 60 cm.
- At what height to hang a heated towel rail. There are no clear requirements here, the optimal indentation from the floor lies within 900 ... 1200 mm. Choose the height for ease of use. The exception is electric heaters, which are placed at least 60 cm from the floor.
-
Always read the installation and operating instructions for the product. The manufacturer will definitely provide a drawing with dimensions and indicate all technological indents, if any.
- It is allowed to install the dryer above the washing machine. If the latter is loaded from above, then the electric heater should not interfere with the free opening of the lid.
- To hang the coil on the wall, use standard decorative brackets and dowels.An exception is installation on drywall or a partition made of porous materials; special fasteners will be needed to withstand the weight of the heated towel rail.
- When marking the holes, try not to get into the seams between the tiles, it is better to step back from the edge of 0.5–1 cm. Otherwise, the lining may crack during drilling.
- Do not place an electric dryer directly above the bathtub.
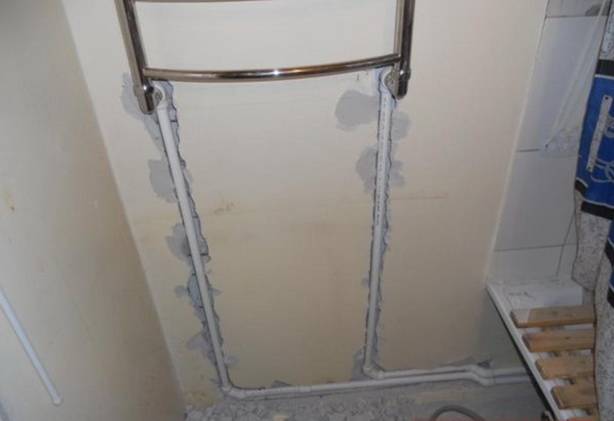
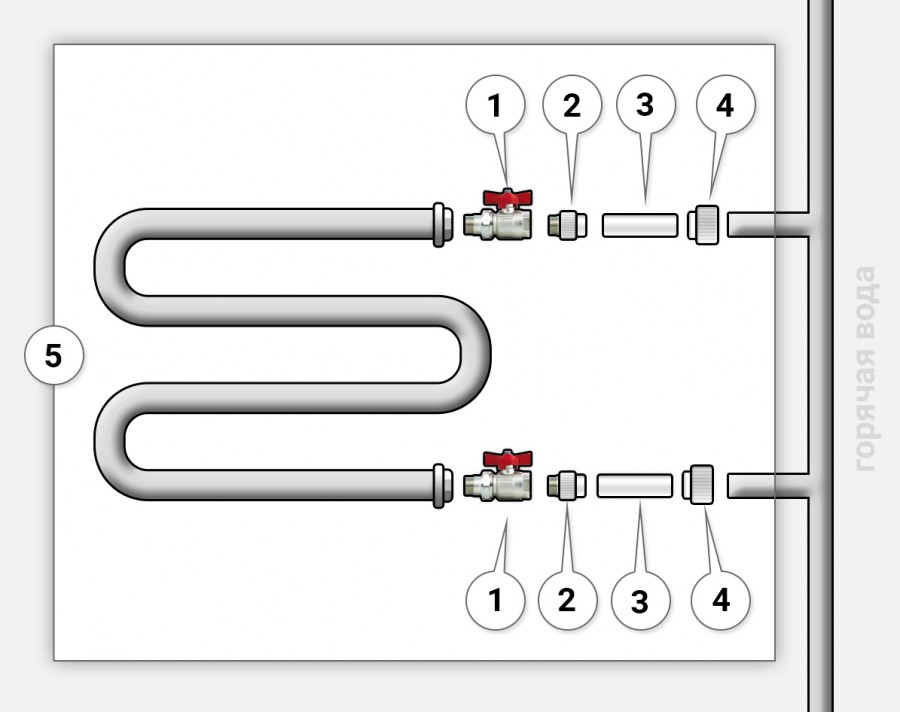
Installation and connection: step by step instructions
Before starting the installation, it is useful to lay out on the floor both the device itself and all the fittings for it, in order to once again clarify all the dimensions. To do this, you can even dry-assemble all the connections. Nobody canceled the proverb about measuring seven times!
- We mark the installation dimensions of the new heated towel rail on the wall.
- Having chosen the location of the future unit on the wall, it is necessary to carefully examine it for the passage of internal communications, both pipeline and electrical. Special devices - metal wire detectors - can help with this.
- We drill holes, insert dowels and hang the device on the wall, fixing it with screws or bolts.
- We cut the threads on the cut ends of the pipeline.
- We prepare the jumper-bypass by carefully marking and installing tees-outlets for the heated towel rail and a shut-off valve on it.
- During operation, we seal all connections with sanitary tow or Teflon tape.
- We install it in the cutout of the riser using spurs, straight couplings and lock nuts, so that the tee outlets are exactly opposite the inputs of our device.
- Spurs of different lengths are used to adjust the installation dimensions of pipeline sections and simplify their connections.They have cut threads at the ends: short on one side and long on the other.
A lock nut and a coupling are screwed onto the long one. A tee, angle or valve is screwed onto the pipe on one side. They are screwed with a short thread, which is then connected to the other side of the pipe by a coupling with a long threaded end and fixed with a lock nut.
We fasten shut-off ball valves to the taps, and connect the inputs of our unit with them.
We open the ball valves to the heated towel rail, and close the valve on the bypass.
We open the general valve of the riser. If there is water pressure in the system, carefully check the connections made for tightness.
All! Our new heated towel rail is ready to go. In this video you can watch the process of dismantling and installing a new heated towel rail in the bathroom with your own hands:
Work on the pipeline system of an apartment building should be carried out after agreeing them with the management company, only with sufficient experience or under the guidance of a qualified craftsman.
Modern heated towel rails can be quite complex in design. such as doubles. Before installing them with your own hands, you should study all the technical specifications and installation rules.
You also need to remember that some units must be selected for galvanic compatibility with metal pipelines of the materials from which they are made.
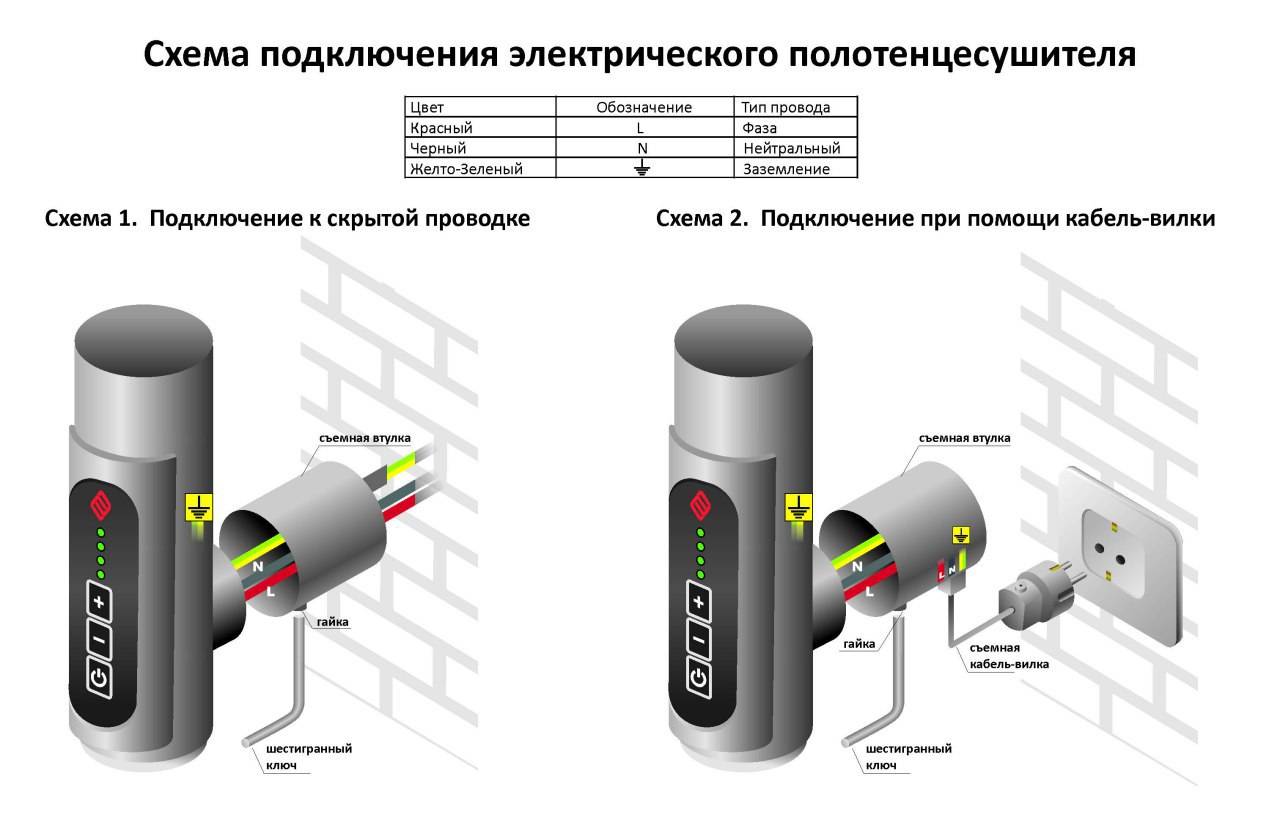
Connecting an electric towel warmer
The electrical version of the device is connected most simply. Sometimes it is literally enough to insert the plug into the socket.But only if there is a high-quality protected socket, and the design of the device, and its low power, imply such a connection, which is necessarily specified in the instructions.
If the instruction attached to the device prescribes the connection of an electric heated towel rail with a separate solid cable to the protective relay on the shield, with the installation of an enabling device, then this must be done. It is understood here that the device is a permanently operating, increased power.
Unreliable contacts in the circuit are not allowed - over time they will heat up, ignite. The cable is used of the appropriate quality and cross-section of cores, laid in accordance with the rules.
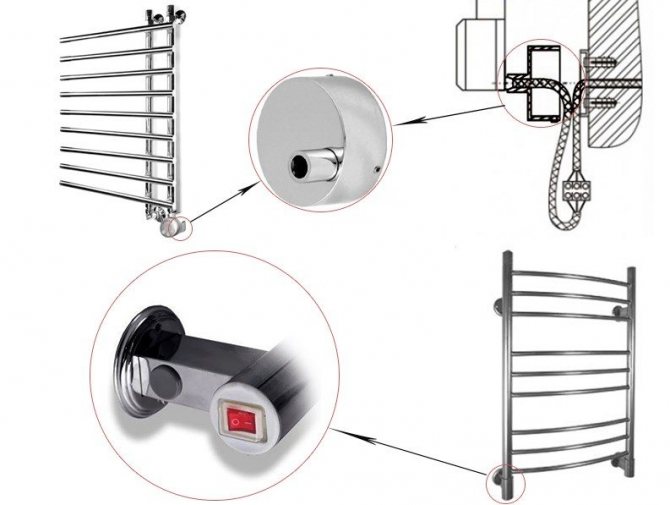
How to install and secure
The heated towel rail is installed at a certain distance from the wall, such that it is convenient to hang towels on it. The device is hung on the wall on brackets, which are usually supplied.

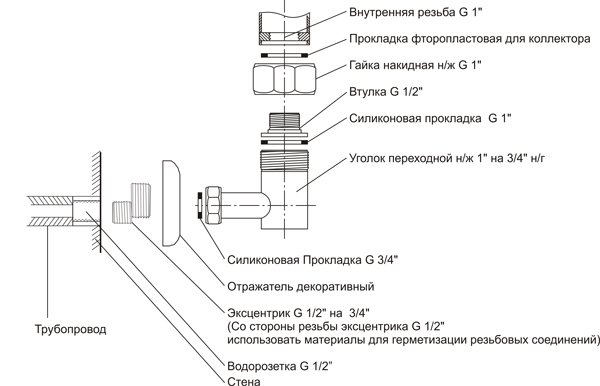
Models designed for hidden piping are not rare. With a fixed exact distance of the leads coming out of the wall.
Then the instrument kit necessarily contains hydraulic eccentrics, with the help of which geometric inaccuracies are leveled. Another threaded fitting connection is added.

Variants of a “simple snake” are possible when universal brackets are needed - from radiators, while at least 4 of them are installed. - under the upper bend of the pipe and under the lower one, so that the structure is reliable and does not stagger if the supply pipes are soft.
In the case of installation on a steel connection, one safety crimp is usually installed on the opposite side of the connection.
The height from the floor may vary, but as a rule, the heated towel rail is installed in the middle part of the wall, the height from the lower bend of the pipe to the floor is about 100 cm.
Installation sequence
The installation instructions are studied, all the prescribed actions are performed for the specific model of the heated towel rail.
Connection points are being prepared - pipes are connected, shut-off valves are installed on them, then they are supplied (as a rule) with American women for the possibility of quick installation / dismantling of the device. The distance between the leads must match the device model.
The position of the brackets, fixing points are marked, holes for dowels of the appropriate diameter are drilled using a perforator.
Corner adapters, eccentrics (if equipped), then Americans are screwed onto the outlets of the heated towel rail.
As an option for individual models, adapters are first screwed onto a smaller pipe diameter corresponding to the wiring, for example, 1/2 inch, which reduces the cost of the entire structure as a whole.
During installation, a seal is used - linen and special grease, threaded connections on metal fittings are tightened only on linen (plumbing thread) using keys.
The heated towel rail is hung on the brackets, the Americans (eccentrics) are connected. The system is filled with coolant.


Connecting an electric towel warmer
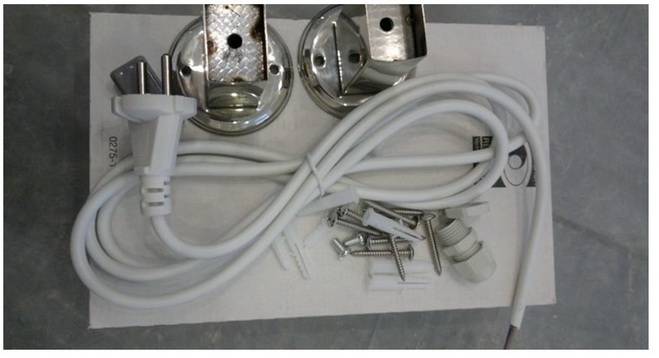
An electric dryer is a household heating appliance that does not require a connection to the water supply. Installation of equipment is much easier, but it is imperative to ensure complete isolation of electricity, since in the bathroom any current leakage can be life-threatening.It is necessary to make grounding and connect an RCD to protect against voltage surges.
Mostly recommended output sockets outside the bathroom, but the device without a thermostat can be connected to a socket in the bathroom. If necessary, it can be unplugged to reduce power consumption. The socket should be with a moisture-proof housing and a cover for insulation, and the wires should be hidden in a strobe. It is forbidden to install the socket on a wall facing the street, as this may cause short circuits due to condensation.
Important! If you do not know how to work with electrical wiring, it is better to entrust the work of connecting an electrical appliance to a professional electrician.