- How to connect a shower stall to the sewer
- Checking the connection of the shower cabin
- Recommendations from qualified plumbers
- Connecting the shower cabin to the sewer
- Features of the preparatory stage
- It is worth clarifying two main points:
- How to connect the shower cabin to the mains?
- Problems with the construction of the sewer system
- old pipes
- Correct slope
- Leaks
- Smell
- Lack of water in the water seal
- Sagging corrugated pipe.
- Damage, deterioration of tightness and blockage.
- Connecting the bath to the sewer
- Checking the correct connection
- Installation diagram for do-it-yourself connection
- Sewer connection
- Water supply
- How to connect to the mains
- Boiler connection
- Installation diagram for do-it-yourself connection
- Sewer connection
- Water supply
- How to connect to the mains
How to connect a shower stall to the sewer
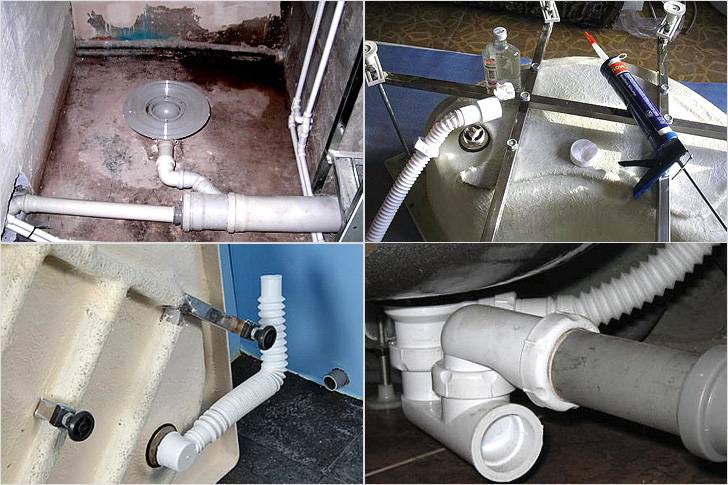
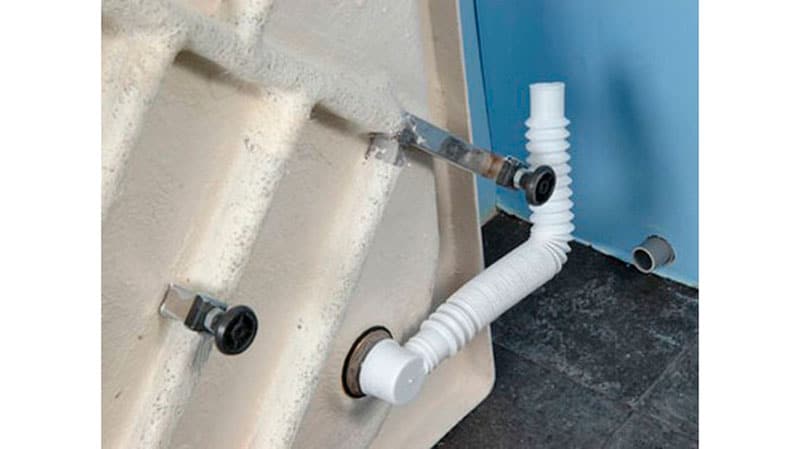
Do-it-yourself connection to the sewer is made at the time of installation of the shower tray, as it is necessary to select pipes that are suitable in diameter and connect them correctly to prevent leaks.
Usually, a siphon is included in the package, allowing you to connect to a sewer pipe without additional problems.Otherwise, you will have to select the appropriate design and dimensions of the siphon yourself.
Then you need to put the pallet on the intended installation site and measure the height from the bottom of the pipe to the floor, which will be available for installing the siphon and communications for draining water into the sewer.
Most manufacturers of shower stalls leave enough space for mounting the siphon, but in some cheap models, the space may be back to back and it will not be possible to simply drain water by gravity.
That is why, in order to do the installation with your own hands, it is not recommended to purchase any plumbing devices and materials in advance.
There are the following types of siphons:
- Bottle. It is a cylindrical tank with water outlet in the end part just below the level of the inlet pipe.
There is a removable cover at the bottom of the cylinder to allow the removal of accumulated solids. Among the advantages are ease of installation and maintenance, as well as good protection against clogging of pipes.
However, the design is quite large and it is not always possible to install it under the booth pallet.
In addition, it is necessary to provide unhindered access to the siphon, which is not always provided for by the design of the pallet.
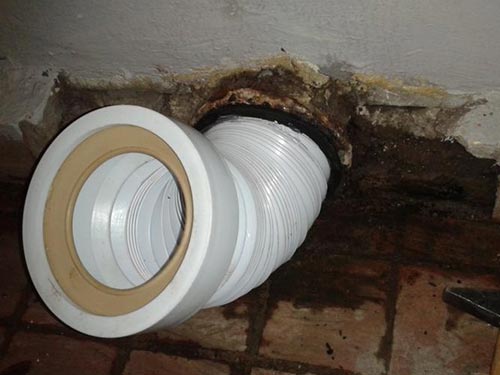
- Knee. It is a corrugated pipe, bent in the shape of a U or S.
It has a simple design and is easy to install even in a minimum amount of space.
But as it becomes clogged, the withdrawal speed, unlike the previous type of siphon, will deteriorate, which can lead to some discomfort during operation.
Corrugated walls will contribute to the accumulation of hair and fats on the walls, so additional cleaning by chemical or mechanical means will be required.
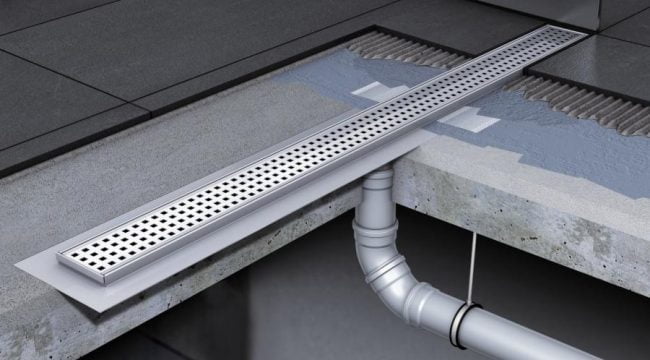
- Drain ladder. A structure that is a cubic or other form of volume for drain water, which is mounted at floor level or in a special technical opening.
Possesses the increased compactness and simplicity of execution. It does not have additional protection against overflows and therefore the height is up to 80 mm.
Installation is made on flat pallets. Allows you to install a shower cubicle even if there is a minimum of space in the bathroom and under the tray.
The design of the siphon should be with a minimum number of joints and connections. This is due to the fact that over time, the seals wear out and leaks can occur in them.
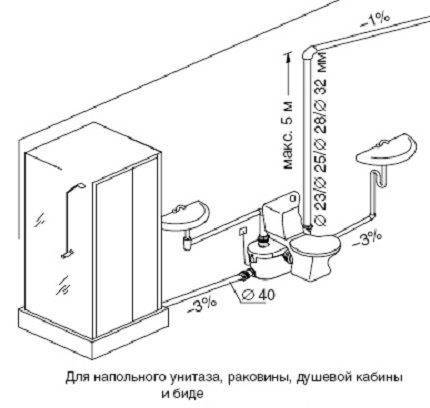
When choosing a siphon, it should be taken into account that before the drain point it is necessary to ensure a pipe slope of 30 mm per linear meter for pipes with a diameter of up to 100 mm.
Therefore, in order to reduce the cost of connecting to the sewer, it will be necessary to organize a gravity system by reducing the distance to the point of connection to the main pipe.
Otherwise, you will need to install an exhaust pump to organize forced pumping of water.
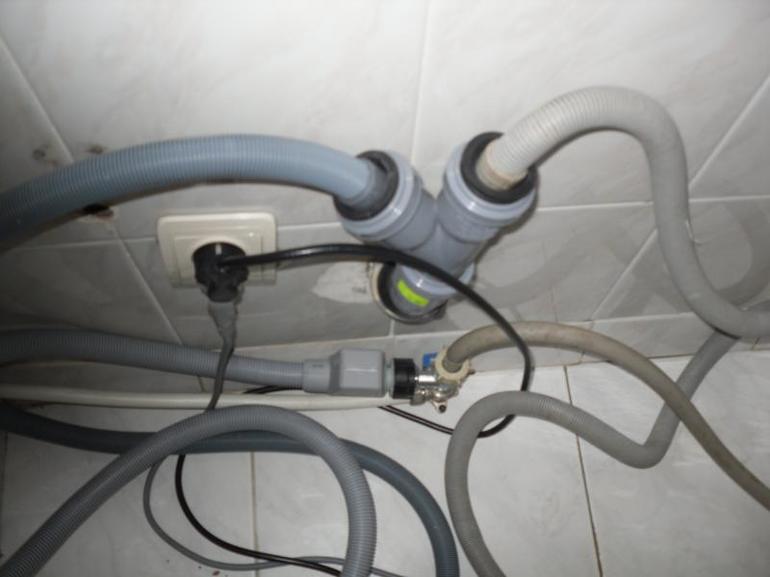
The connection of the shower cabin to the sewerage is carried out in the following sequence:
- Before installing the pallet, turn it upside down.
- We fasten a siphon with a flexible hose to the drain hole.
- We carry out the installation of the pallet in its place, set the position according to the level, fix it to the floor.
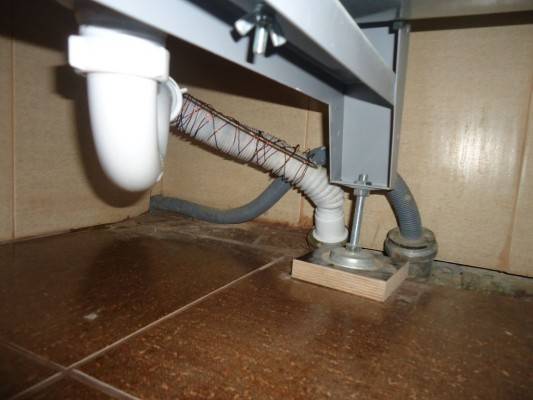
- We choose the height of the siphon so that its lower part is 50-70 mm below the entrance to the sewer pipe. The higher the height, the higher the drain speed.
- We connect the drain hose to a tee or sewer pipe. In this case, the connection is carefully sealed with a special compound or silicone sealant.
- We check the absence of leaks by pouring about 10 liters of water into the pan.
Checking the connection of the shower cabin
The final step is to check the correct connection of the shower stall to the water supply. When checking, open the taps and inspect the joint seams for the presence or absence of leakage.
If a leak is detected, this indicates that the connection of the drain hose to the water supply is leaking. Even the appearance of a small amount of moisture indicates a weak connection. To prevent further leaks, it is necessary to seal these places with a sealant or, having replaced the seal, reassemble the connection elements.
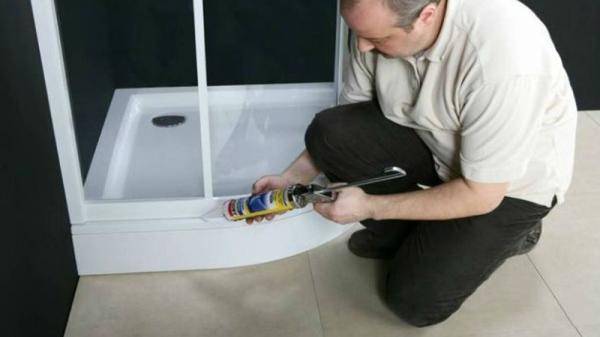
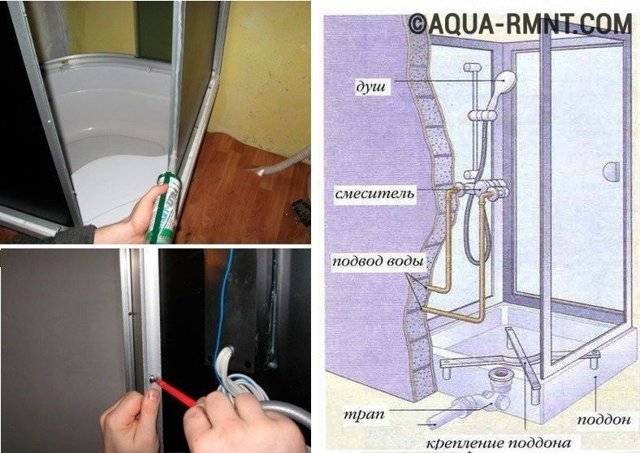
Photo 2. Sealing the seams with silicone. To prevent leaks, it is necessary to coat all joints in the cabin with sealant.
Criteria for the correct installation and connection of the shower:
- The pallet has a solid base, does not make creaking sounds, stands exactly without swings.
- Panels are installed without cracks and chips.
- The design of the shower room should not have sharp corners to avoid injury when taking water procedures.
- All seams must be sealed.
Important! If during the test it is found that the drain is obstructed, then the problem must be corrected by reconnecting
Recommendations from qualified plumbers
Even if the assembly is made without flaws, it is advisable to check all the tightened bolts. After a complete installation, the connecting elements will not be available.


Will be interesting: Smells at the castle with a sewer pipe
It is not clear what will take place behind the hidden panels.But it is better not to bring the matter to the flow. The main thing is to ensure tightness and treat all joints with a hermetic substance. No connection should allow water droplets, even after several years of regular use.

There are times when the drain area is far from the sewer. To solve this problem, an additional installation of the pump will be required. The system works without unnecessary noise, and the dimensions are just right for placement under the base. The bathroom area with the installed booth should be complemented by good ventilation. This moment is very important, especially if the system is supplemented with a "steam room"
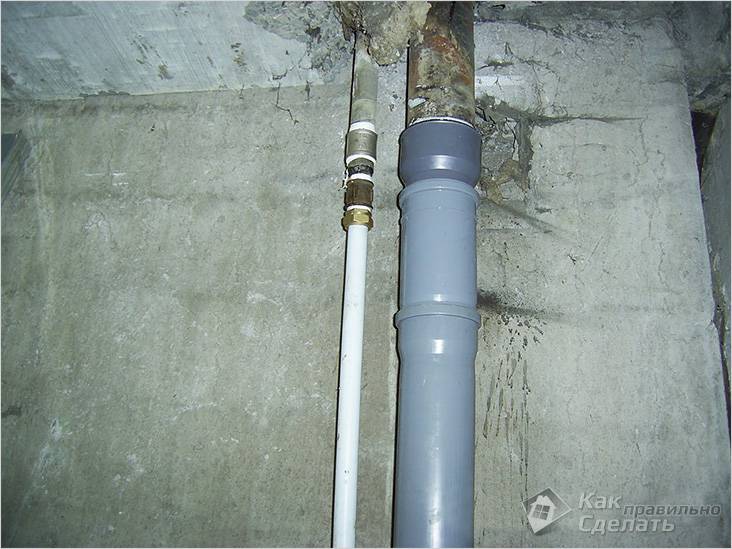
All piping elements must be located at a minimum slope. This guarantees the flow of water. Sewer pipes are laid, tilting them to the riser. Water pipes are tilted towards the box. This is done so that when the water is turned off, its droplets do not accumulate.
In some budget booths, the drain is made from silumin alloy. The service life of such a system is up to three years. It is better not to save on this and spend more money on buying a stainless steel drain. In addition, a high-quality normal plastic siphon is always supplied to it.
Water pipes that are laid to the booth are recommended to be supplemented with ball shut-off valves and dirt traps. The water that enters the system is not always clean and sterile. Watering can nozzles or holes will definitely become clogged, which will provoke new problems.
Connecting all the details yourself is not at all difficult. It is enough to study the manufacturer's recommendations, and strictly follow the instructions.The main thing is to check everything three times before starting the system. A lot depends on her work - the integrity of housing, the repair of neighbors, etc.
Reading now
- Features of installing a shower without a shower cabin
- The subtleties of choosing a faucet for showers and stalls
- Types of flexible piping for connecting mixers
- We reveal the intricacies of saving water for the family budget
Connecting the shower cabin to the sewer
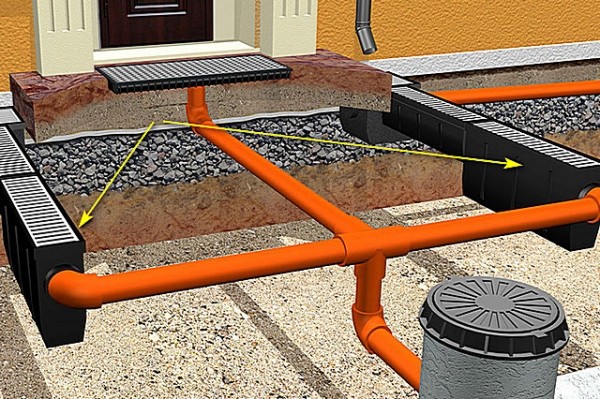
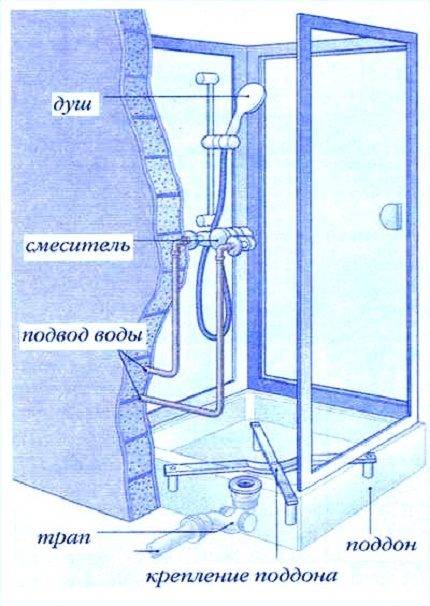
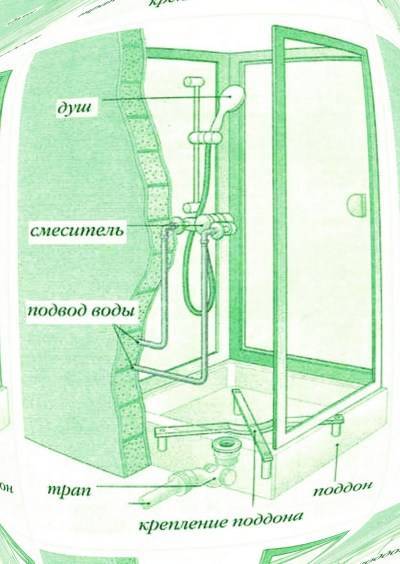
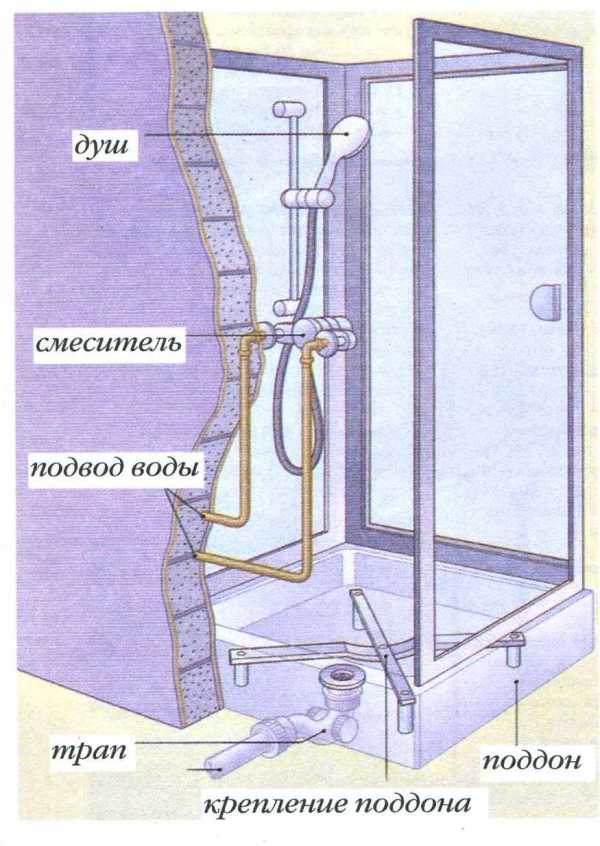
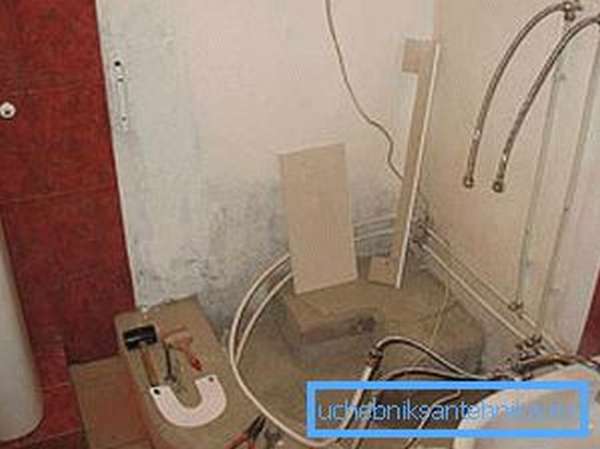
In order for the waste water to freely go into the sewer, you need to properly install the drain pipe in accordance with the instructions:
- first you need to remove the elements of the apron;
- then you should lift the shower tray by its back;
- a hose must be placed on the drain elbow of the structure at the bottom of the pallet;
- its other end is fixed in the drain hole located in the bathroom floor;
- the end of the fiber-reinforced hose is inserted into the side nipple at the knee of the drain hole;
- the pallet is installed in a place previously prepared for the installation of a shower stall.
The bottom of the structure must be installed horizontally, for which a long level is used. The location of the pallet can be adjusted using supports, which are then fixed with lock nuts.
In order for the do-it-yourself shower stall to be installed correctly and its elements to fit snugly against each other, it is necessary that the ceiling in the bathroom is even, and the junction angle of two adjacent walls is 90 degrees.
When creating a sewer for a shower cabin, flexible hoses should be used, the length of which exceeds the required dimensions. The fact is that if you need to move the structure, you do not need to attach another hose.In order for water to be discharged into the sewer network faster, the pipe should be placed at a slight slope. When the structure is mounted far from the location of the drain, a shower cabin sewer pump with magnetic valves is installed.
If the shower tray is located high above the sewers, the waste water will go down the drain quickly. To connect to the shower stall drainage system, you need to choose high-quality plumbing pipes that have special connections that correspond to the dimensions of the outlet openings of the structure. All joints should be treated with special sealants.
Before you assemble the shower cabin further, you need to perform a control drain. When the structure is independently connected to the sewer system, it is easier to eliminate the mistakes made until the installation work is completed.
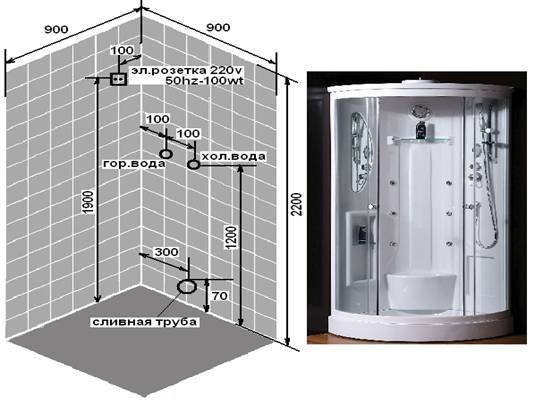
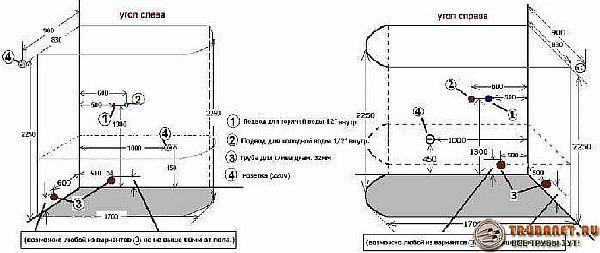
Features of the preparatory stage
The scheme for connecting a shower cabin to the water supply implies the first and most important stage in the start of work - preparatory. The final result depends on its proper organization, the duration of the use of the cabin without service and replacement of hoses.
It is worth clarifying two main points:
The specifics of the water supply and the place where it is planned to install a shower cabin. To make it easier for yourself before connecting, it is enough to bring the pipes to that section of the bathroom where the hydrobox will be located
Experienced experts advise placing ball valves in the output points that stop the water supply in the event of an emergency.
Particular attention should be paid to cabins where there is a hydromassage function.
It doesn’t matter what power the suspension pump, through which the water is taken
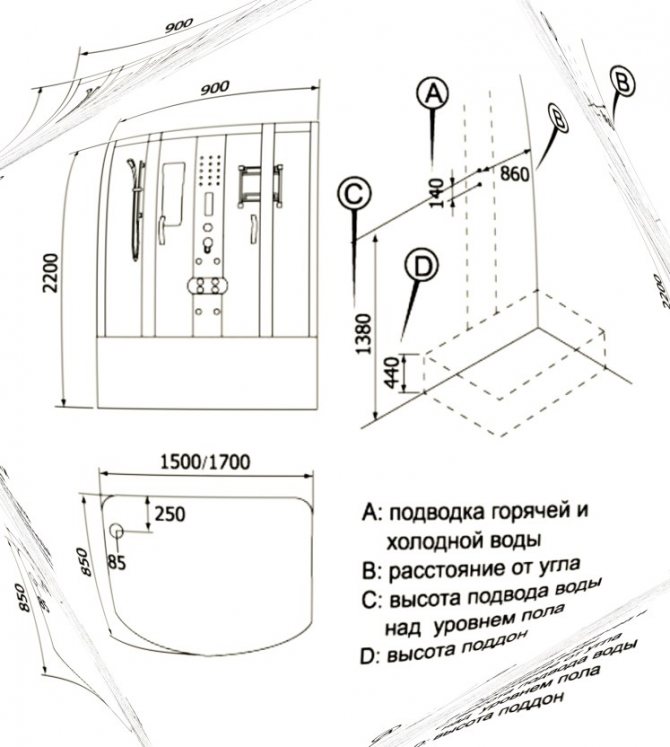
Scheme connecting a shower cabin implies it the exact location is under the bottom of the device. In this case, the water intake point should be located at the same height from the floor.
Standard water pressure indicators imply an indicator of 15 bar
If the cabin is of a standard type and is not equipped, for example, with a steam generator, its owner should not worry. You can take a shower anyway. But if there are additional functions, it will be necessary to install a tank (not supplied with the cabin from most manufacturers).
The water supply will be ensured by the presence of a pump that works in any situation.
When choosing the latter, it is important to pay attention to its technical characteristics and correctly correlate them with the design features of the cabin itself.
How to connect the shower cabin to the mains?
Do-it-yourself connection of the shower cabin to the mains should be done, paying special attention to electrical safety. This is due to the fact that the bathroom refers to rooms with high humidity.
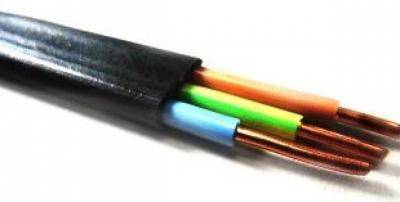
Therefore, double insulated cables, waterproof sockets and junction boxes that meet the IP44 standard or higher must be used.
At the initial stage, it is necessary to find out the current load of the shower stall or its power consumption, since the choice of cable section depends on this. This information can be reflected in the attached instructions, on the manufacturer's website or obtained from a consultant upon purchase.


Usually, the cable is laid in the form of hidden wiring before the final finishing of the room, so you need to choose a suitable shower stall in advance and carefully study its power parameters.
Then you need to use the table for determining the cross section of the cable cores.
Selection of the cable section depending on the power consumption or current strength.
Cable marking is selected as follows: VVG or NYM. They feature double insulated solid copper cores and are highly flexible. That is, they are maximally protected from moisture and it will be easy to mount them even in conditions of lack of space.
The table also shows the nominal circuit breaker current, which will allow you to select a suitable automatic protection device simultaneously with the cable.
After determining the connection parameters, you need to draw up a diagram and calculate the amount of cable. Do-it-yourself connection can be made directly in the bathroom or outside it.
The first option is more functional by placing an outlet in the bathroom, which will allow you to connect electric shavers or a radio.
However, in this case, it will be necessary to use protected sockets, the cost of which is an order of magnitude higher than conventional, special junction boxes, as well as hidden cable laying, which can only be done until the repair is carried out.
In the second option, all work is greatly simplified through the use of special boxes or cable laying under the plinth with the output of the plug into the living room or corridor, where the humidity level is minimal.
The degree of electrical safety is also increasing. Which method to choose, you have to decide for yourself.
Hidden installation do-it-yourself wiring is done as follows:
- At a distance of 10-15 cm from the ceiling, with a marker on the walls, we mark a horizontal line from the nearest switchboard to the location of the outlet.
In front of the shower stall at the connection point, we mark a vertical line up to a level of 2.2-2.3 m from the floor.
In this place, you will need to install a built-in outlet, for which we make a suitable hole in the wall with a puncher with a crown-type nozzle.
For an external type of socket, additional holes will not be required to be drilled.
- Using a puncher or drill with a bayonet nozzle, we cut vertical and horizontal grooves.
The main rule for laying the cable is to observe the parallelism or perpendicularity of the direction relative to the horizon, so that during the overhaul there would be no difficulty in finding it.
The diameter must be sufficient for laying a circular section box. It is permissible not to use the box, but in this case, if the insulation burns out or other non-standard situations, to replace the cable, you will have to break the exterior finish and re-groove the grooves.
- With our own hands we carry out the installation of the box with the cable already stretched in it.
- We seal the groove with putty or cement mortar with wall alignment.
External cable laying is carried out in a plastic box or under a plinth located under the ceiling, provided that a solid wire without connections is used.
Therefore, we mount the machine in the switchboard on a DIN rail. We connect the laid cable to it in special clamps
In this case, it is important not to confuse the phase, zero and ground
To do this, we connect in series the cores with the same color of insulation.
Attention!
If there is any doubt about the correct connection, it is recommended to call an electrician.
In the bathroom, connect the outlet to the cable outlet and securely fix it in the prepared connector or fix the external one. We connect the shower cabin after checking the quality of the installation of electrical wiring.
Problems with the construction of the sewer system
old pipes
In the course of work on the sewerage device, a number of problems can be encountered. For example, at the stage of dismantling, you may encounter old pipes "tightly" fixed to the wall. This is especially true for residents of old apartment buildings. In this case, you need to carefully remove the old finish so as not to damage the elements of the general sewer system.


Correct slope
When laying new pipes, the slope, which we have already mentioned, must be observed. But the fact is that during the installation work, the structure being created is subjected to a slight displacement. To prevent this process, you should use clamps with latches.
Leaks
Another problem is the presence of a continuous leak as a result of testing and reconnecting the pipe to the fitting. In this case, an adhesive-based sealant is used. It is applied to the joints. The rubber band is inserted into the fitting. After drying, the sewer system is tested again.
Smell
A fairly common problem for the bathroom is an unpleasant smell. It can be caused by various reasons:
- lack of water in the water seal;
- damage to the sewer pipe;
- deterioration of the tightness of the pipe and drain connections;
- accumulation of debris at the bottom of the siphon.
Lack of water in the water seal
The first reason for the lack of water in the water seal may be a poorly installed pipe in the siphon. The pipe simply does not reach the water, and the smell passes by it. This problem is solved by lowering the nozzle 2-3 cm into the water.
Sagging corrugated pipe.
This defect could occur if the pipe is not secured with spacers or electrical tape.
Prolonged non-use of the bathroom is also one of the factors that cause unpleasant odors. The water in the siphon just evaporated. To remove an unpleasant odor, turn on the water and ventilate the room.
Damage, deterioration of tightness and blockage.
When a crack forms in the pipe, dirty water enters the floor and wall. As a result, stains and mold appear, which lead to the appearance of an unpleasant odor. The crack is sealed with a sealant, and the pipe is wrapped with tape. The sealant is also used to restore the tightness of the drain and pipe connections.
Cleaning the siphon from debris accumulated at the bottom is done by unscrewing the bottom of the siphon and washing it. For preventive purposes, chemical agents intended for cleaning sewers are periodically used.
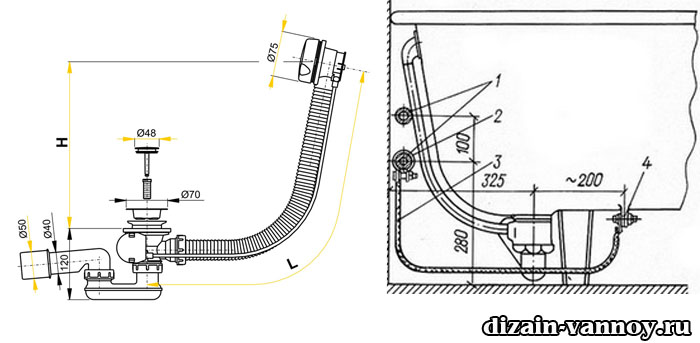
Connecting the bath to the sewer
To connect the bath to the pipes, it is better to use a siphon with overflow. Its installation requires compliance with two requirements:
- Creating an optimal height difference between the outlet and the drain pipe. The specific size of the difference depends on the height of the outlet of the siphon.
- Providing access to the siphon, which is necessary for the periodic cleaning of the weir assembly.
As for the pipe that will connect the bath to the sewer, the best option is hard plastic products.They should have two knees, which will provide optimal rotation of the elements. If it is not possible to connect the drain units with rigid pipes, then corrugated pipes are used. When joining pipes of different diameters, adapters are used.
Connecting the bath to the sewer consists of the following sequential steps:
- all rubber gaskets fit into place;
- the siphon is assembled and the overflow pipe is connected to the bath;
- fasteners are screwed in;
- with the help of a pipe and a pipe, the siphon is connected to the drain hole;
- joints are sealed at the points of contact between the bathtub and the wall.
The connection of all plastic elements occurs without the use of open-end or gas wrenches. The work is done manually. Otherwise, there is a risk of damage to the plastic thread.
After the completion of the installation work, a preliminary testing of the sewer system is carried out. It is necessary to turn on all plumbing fixtures and stock up on 2-3 buckets of water. When the plumbing begins to drain waste water into the system, buckets of water are poured into the sink, tub and toilet. If there are leaks, it will be necessary to redo the fastening of the sewer elements in such places.
Checking the correct connection
This is the final stage in the work, which cannot be ignored. This will help not to spoil the impression of the cabin installation event, the flow of water will not pour out suddenly from the connecting sections of the hose while taking a shower.
This is easy to do - you need to open the taps alternately with hot and cold water and carefully inspect the hoses for leaks.If the back wall, together with the water flow system, is in a hard-to-reach and dark place, all manipulations are performed using a bright flashlight.
Sometimes small droplets of water, barely visible to the human eye, can form at the junctions. This indicates an insufficiently tight connection or the absence of a fum tape. Experts recommend re-disassembling all connections and performing all the manipulations again, in which the installation scheme of the shower cabin will be used.
If moisture is noticeable even after this process, then the problem is in the hoses (if the choice fell on the manufacturer of low-quality consumables for installing this type of cabin). It will help to buy new flexible products for plumbing, which can be selected at any hardware store or on a virtual counter of Internet resources.
How to connect a shower cabin to the water supply is a question that worries many craftsmen who want to save money on such an important, but expensive process. If you follow the scheme exactly, there will be no problems, even if the novice master works without an assistant.
Attention to detail and slowness in the implementation of each action is the key to the long-term use of a multifunctional shower cabin in any room.
Save on your wall so you don't lose:
Do-it-yourself winter shower for giving with heating - In the summer, a heated shower is sure to come in handy at the summer cottage. He provides to
Do-it-yourself do-it-yourself toptun shower in the country: we make a heated shower tank - Many owners of suburban areas are probably thinking about how to build a shower in their country house.
Warm shower in the country: do-it-yourself shower cabin for giving One of the important buildings on a suburban area that you can build yourself is a shower cabin.
Shower cabin assembly diagram: shower cabin assembly procedure and how to properly assemble a shower cabin - Installing a shower cabin in the house is a win-win option that is justified in every respect. Cons.


How to make a shower cabin with your own hands without a pallet - Having gathered to improve the bathroom, everyone may have a question - how to make a shower room.
Installation diagram for do-it-yourself connection
-
Turn off the water in the riser, all taps must be opened to relieve pressure in the water supply system.
Photo 1. Shutting off the water supply. Must be done before installing the shower enclosure.
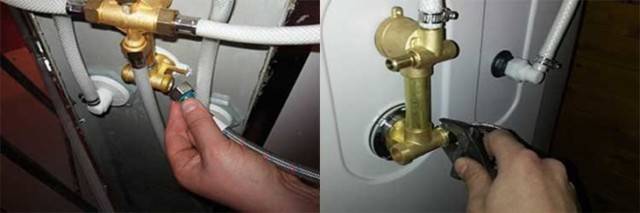
- Dismantle the old shower room, if any. Using pliers, loosen the fasteners, unscrew the coupling, put compression fittings on the taps.
- Lubricate the threads of the compression fittings, then screw on the adapter to connect to the cab.
- When connecting the shower to the plumbing system, apply silicone sealants. After that, install the anchors, following the instructions.
- Install screws. Connect adapters and flexible hoses together, tighten tightly with pliers.
After these works are completed, the test of the functionality and tightness of the shower system begins. To check for leaks, tap water is opened. If any, the leaks are additionally sealed with silicone.
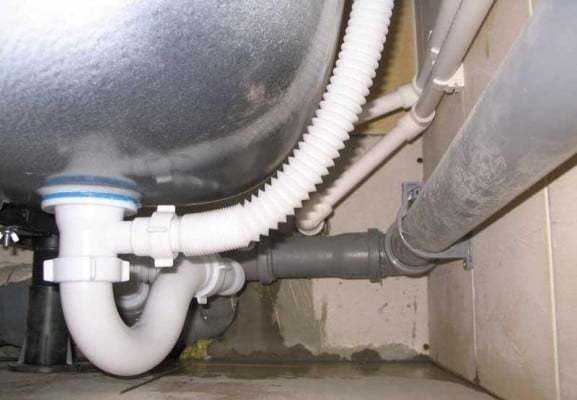
Sewer connection

- to mount a drain to the pallet;
- install a siphon;
- connect the corrugated pipe to the drain for supply to the sewer.
Important! The siphon is an indispensable device to prevent the release of an unpleasant odor from the sewer pipe.
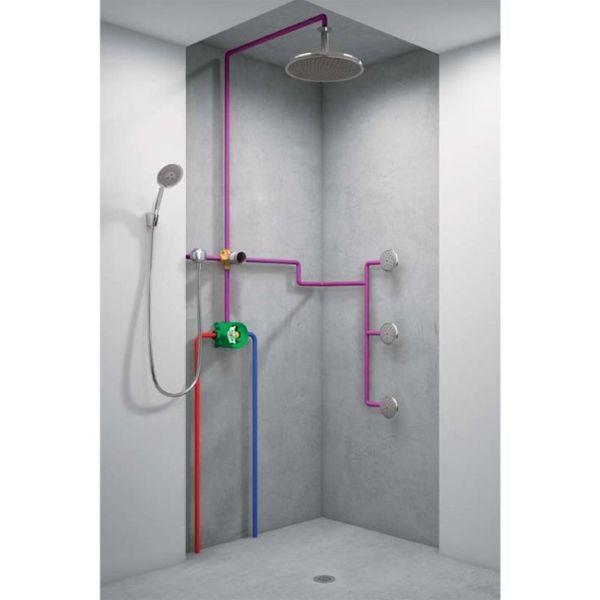
Water supply
- block the riser with water;
- open hot and cold water taps to reduce the pressure in the plumbing system;
- dismantle the remaining equipment (faucets, showers);
- screw eccentric bushings onto the ends of the water pipes as adapters and adjust the mixer to their center lines;
- eccentrics are replaced with flexible reinforced hoses if a panel is to be connected;
- wrap tow or fum-tape on the thread, tighten the washers on the fittings.
How to connect to the mains
After the absence of leakage has been confirmed, connect the cabin to the mains.
It is imperative to observe safety precautions when installing devices.
Rules for connecting to the electrical network:
The electrical cable must be copper and double insulated wire
If possible, connect devices with different energy consumption to different phases.
For longer operation of the shower cabin, the best option is an automatic switch-off device when the maximum level of energy consumption is reached.
It is very important to have a high-quality ventilation system, air circulation in the bathroom will get rid of excess condensate on the walls.. Important! In the event that the power supply unit is attached to the pallet from the bottom side, then the cabin frame must be mounted. The appliance must not be placed on the floor
The appliance must not be placed on the floor
Important! In the event that the power supply unit is attached to the pallet from the bottom side, then the cabin frame must be mounted.The appliance must not be placed on the floor
Boiler connection
The boiler is a very convenient and useful device. Especially in summer, when hot water is turned off, and you really want to take a warm shower. Therefore, connecting the boiler to the water supply for many owners is a rather urgent issue. The choice of water heaters on the market today is very large. There are storage and flow models. Among the most popular manufacturers of these devices are Ariston, Electrolux and Thermex. It is not difficult to buy a boiler, the main thing is to install it correctly.
To connect the heater on the device itself, there are two threaded fittings. The fitting with a red ring is the outlet for hot water, and with a blue ring it is cold. Sometimes there is a third fitting for draining water from the tank, if you need to dismantle the device. The boiler can be connected using flexible hoses, polypropylene or metal-plastic pipes.
The connection scheme for all options is the same and includes the following work:
- Install shut-off valves at the cold water inlet and hot water outlet.
- Install check valve.
- Equip the tank drain system.
Knowing what's right connect the boiler to the water supply, you can ensure the constant availability of hot water in the apartment.
As a rule, the boiler is located in the toilet. And since the device can take up quite a lot of space (it all depends on its volume), many owners install a special hanging toilet (installation). Such a design takes up almost no space. And when cleaning the room does not create problems. In addition, connecting the installation to the water supply is very simple. They carry out the installation of the drain to the sewer and mask it with a panel.
Installation diagram for do-it-yourself connection
-
Turn off the water in the riser, all taps must be opened to relieve pressure in the water supply system.
Photo 1. Shutting off the water supply. Must be done before installing the shower enclosure.
-
- Dismantle the old shower room, if any. Using pliers, loosen the fasteners, unscrew the coupling, put compression fittings on the taps.
- Lubricate the threads of the compression fittings, then screw on the adapter to connect to the cab.
- When connecting the shower to the plumbing system, apply silicone sealants. After that, install the anchors, following the instructions.
- Install screws. Connect adapters and flexible hoses together, tighten tightly with pliers.


After these works are completed, the test of the functionality and tightness of the shower system begins. To check for leaks, tap water is opened. If any, the leaks are additionally sealed with silicone.
Sewer connection

- to mount a drain to the pallet;
- install a siphon;
- connect the corrugated pipe to the drain for supply to the sewer.
Important! The siphon is an indispensable device to prevent the release of an unpleasant odor from the sewer pipe.
Water supply
- block the riser with water;
- open hot and cold water taps to reduce the pressure in the plumbing system;
- dismantle the remaining equipment (faucets, showers);
- screw eccentric bushings onto the ends of the water pipes as adapters and adjust the mixer to their center lines;
- eccentrics are replaced with flexible reinforced hoses if a panel is to be connected;
- wrap tow or fum-tape on the thread, tighten the washers on the fittings.
How to connect to the mains

After the absence of leakage has been confirmed, connect the cabin to the mains.
It is imperative to observe safety precautions when installing devices.
Rules for connecting to the electrical network:
The electrical cable must be copper and double insulated wire
If possible, connect devices with different energy consumption to different phases.
For longer operation of the shower cabin, the best option is an automatic switch-off device when the maximum level of energy consumption is reached.
It is very important to have a high-quality ventilation system, air circulation in the bathroom will get rid of excess condensate on the walls.. Important! In the event that the power supply unit is attached to the pallet from the bottom side, then the cabin frame must be mounted
The appliance must not be placed on the floor
Important! In the event that the power supply unit is attached to the pallet from the bottom side, then the cabin frame must be mounted. The appliance must not be placed on the floor