- Specifications
- Viewing angle
- Range
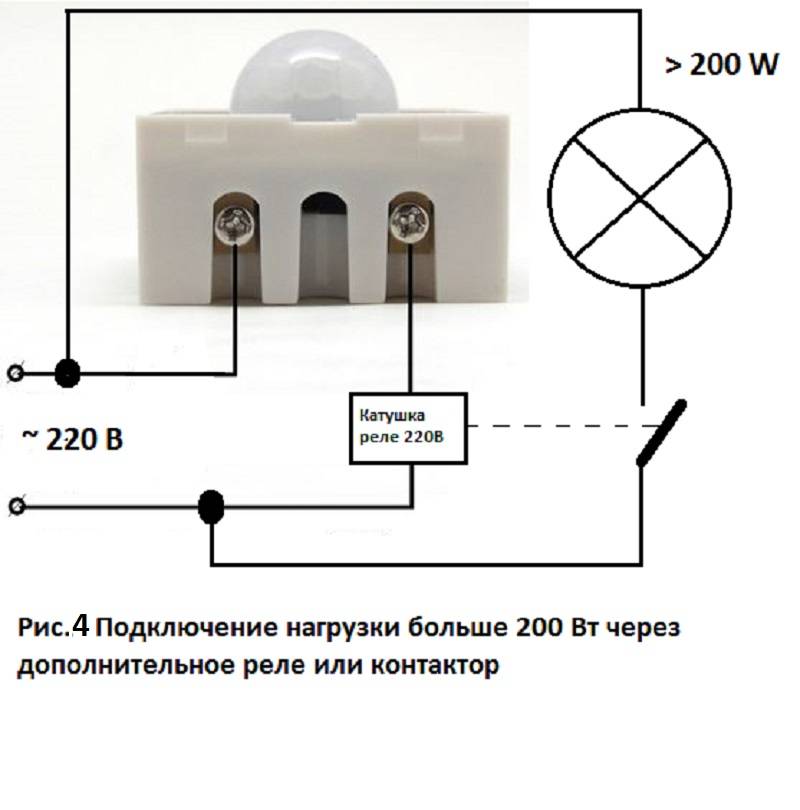
- Power of connected lamps
- Method and place of installation
- Additional functions
- The principle of operation of the infrared sensor for the lighting system
- Setting the motion sensor for lighting
- 1. Time setting - "TIME"
- 2. Adjustment of operation from the level of illumination - "LUX"
- 3. Setting the sensitivity to the sensor operation - "SENS"
- Three-wire motion sensor connection diagram
- Mounting
- Sensitivity setting and adjustment
- Advantages and nuances of use
- Flaws
- Adjusting the operation of the motion sensor to turn on / off the light
- Adjustment (setting)
- Tilt angle
- Sensitivity
- Delay time
- Light level
- Connecting the Motion Controller to a Lighting Fixture
- Adjusting parameters with knobs
- Time
- illumination
- Sensitivity
- Microphone
- Device installation work
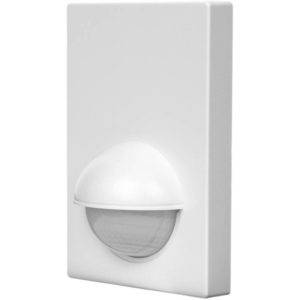
- The best sensor models for turning on the light
- Navigator 71 967 NS-IRM05-WH
- Camelion LX-39/WH
- Rev Ritter DD-4 Control Luchs 180
Specifications
After you have decided which motion sensor you will install to turn on the light, you need to select its technical characteristics.
In the technical characteristics of wireless models, there is also the frequency at which they operate and the type of batteries.
Viewing angle
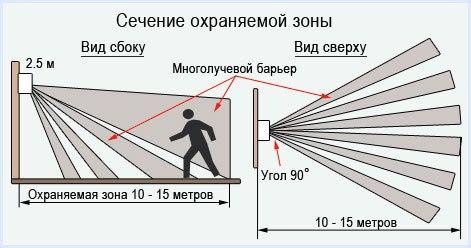
The motion sensor for turning on the light can have a different viewing angle in the horizontal plane - from 90 ° to 360 °. If an object can be approached from any direction, sensors with a radius of 180-360 ° are installed, depending on its location. If the device is mounted on a wall, 180° is enough, if on a pole, 360° is already needed. Indoors, you can use those that track movement in a narrow sector.
Depending on the installation location and the required detection zone, the viewing radius is selected
If there is only one door (utility room, for example), a narrow-band sensor may be sufficient. If the room can be entered from two or three sides, the model should be able to see at least 180 °, and preferably in all directions. The wider the "coverage", the better, but the cost of wide-angle models is much higher, so it is worth proceeding from the principle of reasonable sufficiency.
There is also a vertical viewing angle. In conventional low-cost models, it is 15-20 °, but there are models that can cover up to 180 °. Wide-angle motion detectors are usually installed in security systems, and not in lighting systems, since their cost is solid. In this regard, it is worth choosing the height of the device installation correctly: so that the “dead zone”, in which the detector simply does not see anything, is not in the place where the movement is most intense.
Range
Here again, it is worth choosing taking into account whether a motion sensor will be installed in the room to turn on the light or on the street. For rooms with a range of 5-7 meters, it will be enough with your head.
Range of action choose with a margin
For the street, the installation of more "long-range" ones is desirable. But look here too: with a large coverage radius, false positives can be very frequent. So too much coverage can even be a disadvantage.
Power of connected lamps
Each motion sensor for turning on the light is designed to connect a certain load - it can pass a current of a certain rating through itself. Therefore, when choosing, you need to know the total power of the lamps that the device will connect.
The power of the connected lamps is critical if a group of lamps or one powerful lamp is turned on.
In order not to overpay for the increased bandwidth of the motion sensor, and even save on electricity bills, use not incandescent lamps, but more economical ones - gas discharge, fluorescent or LED.
Method and place of installation
In addition to the explicit division into street and "home" there is another type of division according to the installation location of motion sensors:
- Body models. A small box that can be mounted on a bracket. The bracket can be fixed:
- on the ceiling;
-
on the wall.
- Embedded models for concealed installation. Miniature models that can be installed in special recesses in an inconspicuous place.
If lighting is turned on only to increase comfort, cabinet models are chosen, since with equal characteristics they are cheaper. Embedded put in security systems. They are small but more expensive.
Additional functions
Some motion detectors have additional features. Some of them are overkill, others, in certain situations, can be useful.


- Built-in light sensor.If the motion sensor to turn on the light is installed on the street or in a room with a window, there is no need to turn on the light during daylight hours - the illumination is sufficient. In this case, either a photo relay is built into the circuit, or a motion detector with a built-in photo relay (in one housing) is used.
-
Animal protection. A useful feature if there are cats, dogs. With this feature, false positives are much less. If the dog is large, even this option will not save. But with cats and small dogs, it works well.
- Light off delay. There are devices that turn off the light immediately after the object leaves the area of action. In most cases, this is inconvenient: light is still needed. Therefore, models with a delay are convenient, and even more convenient are those that allow this delay to be adjusted.
These are all the features that might be useful
Pay particular attention to the animal protection and shutdown delay. These are really useful options.
The principle of operation of the infrared sensor for the lighting system
The basis of the motion sensor is an infrared photocell with an electronic signal processing circuit. The sensor responds to any changes in infrared radiation in the controlled area. Since people and pets have a higher temperature than the environment, the detector immediately notes their appearance in the tracking area. To prevent the photocell from reacting to stationary heated objects, several technological methods are used at once:
- infrared filter eliminates the influence of visible light;
- segmented Fresnel lens divides the field of view into many narrow beams;
- the electronic circuit highlights a signal characteristic of the thermal "portrait" of a person;
- multi-element photodetectors are used to prevent false positives.
While moving, a person crosses the narrow lines of visibility formed by the lens. The changing signal from the photocell is processed by the electronic circuit and triggers the sensor.
It is the Fresnel lens that is responsible for the directional pattern of the motion sensor. Moreover, the line is formed both in horizontal and vertical planes.
The detection range depends on the sensitivity of the photocell and the power factor of the amplifier. The retention time after actuation is also determined by the electronic filling.
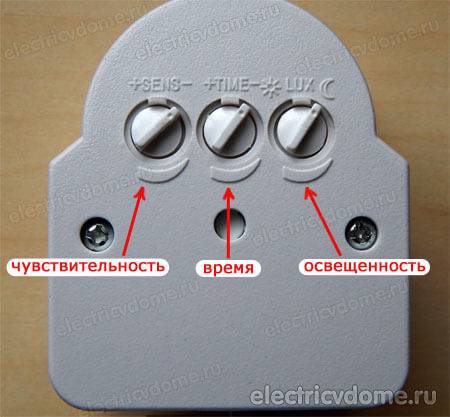
Setting the motion sensor for lighting
Setting up a motion sensor is another important nuance of the operation of this device. Almost every sensor with which you can control the lighting has additional settings that allow you to achieve its correct operation.
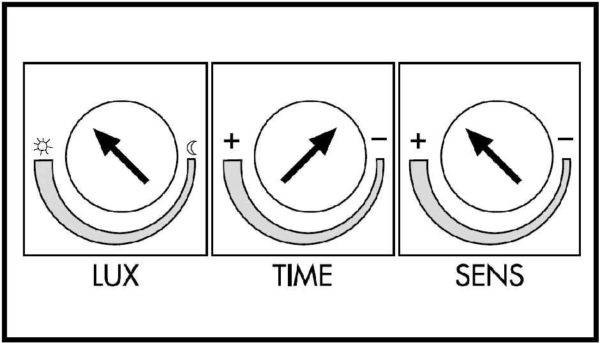
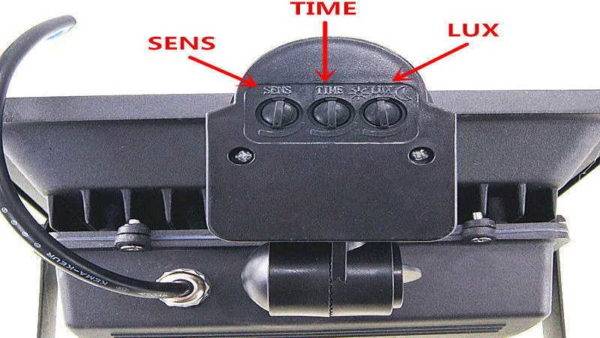
Such settings have the form of special potentiometers designed for adjustment - this is the setting of the turn-off delay "TIME", the adjustment of the illumination threshold "LUX" and the regulator for setting the sensitivity to infrared radiation "SENS".
1. Time setting - "TIME"
With the "TIME" setting, you can set the amount of time that the light will remain on after motion was last detected. The value setting can range from 1 to 600 seconds (depending on the model).
The “TIME” regulator can be used to set the time delay setting for the activated motion sensor. The limits within which the trip setpoint is located are from 5 seconds to 8 minutes (480 seconds).The speed of movement of a person in the area of sensitivity of the sensor plays the most important role here.
When a person passes through this space relatively quickly (for example, a corridor or a staircase in an entrance), it is desirable to reduce the “TIME” setting. And, conversely, when staying for a certain time in a given space (for example, in a pantry, car park, utility room), it is better to increase the “TIME” setting.
2. Adjustment of operation from the level of illumination - "LUX"
The "LUX" adjustment is used for the correct operation of the sensor in the daytime. The sensor will trigger when motion is detected at a lower ambient light level than the threshold value. Accordingly, the sensor operation is not fixed at a higher level of illumination compared to the set threshold value.
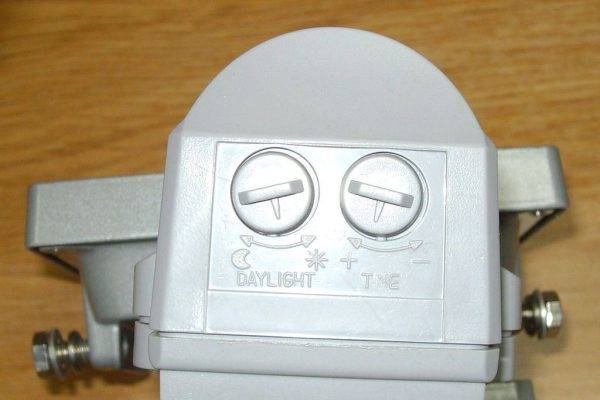
Drawing on which shows how to set up the motion sensor with your own hands. There are three knobs on the back of the sensor for adjustment: trigger sensitivity knob, time knob and dimmer knob. Experiment and you'll be fine.
The “LUX” regulator sets the operation threshold according to the level of ambient illumination (from twilight to sunlight). The division of the scale on which you can set the “LUX” setting, if your room has a large number of windows and the predominance of natural light, should be minimal or medium.
It is recommended to set the “LUX” setting to the highest division of the scale if there is natural light in your room or if there is a small amount of it.
3. Setting the sensitivity to the sensor operation - "SENS"
You can adjust the sensitivity to triggering, depending on the volume and distance of the object, using the "SENS" knob. The reaction of the sensor to movements directly depends on the level of sensitivity. With a very large number of sensor activations, it is desirable to reduce the sensitivity, and adjust the brightness of the IR illumination, to which the motion sensor should respond.


You should increase the sensitivity if the sensor does not respond to you. If the lighting turns on spontaneously, you can reduce the sensitivity. If the sensor was configured in the winter season, then it is likely that it will need to be reconfigured in the summer, and vice versa, with summer settings, it will need to be reconfigured in winter.
And lastly, only by setting up the controlled zone as much as possible, you can get a guarantee that he will “see” you. To do this, adjust the optimal head tilt position of this sensor. Here, it will be sufficient to check the response of the sensor to movement at some point located in the distance.
Related content on the site:
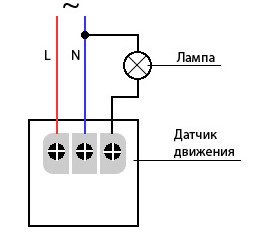
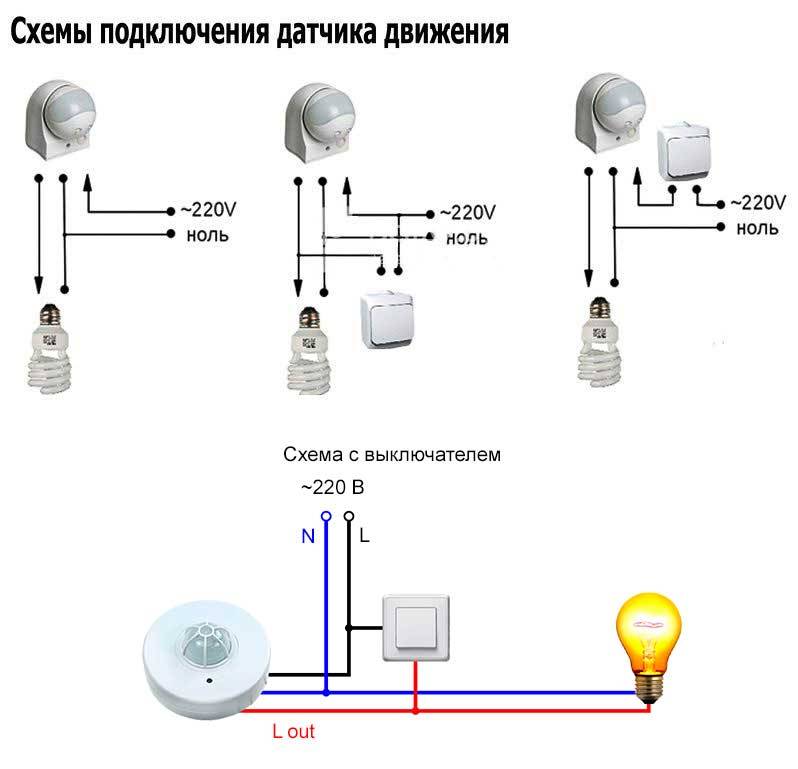
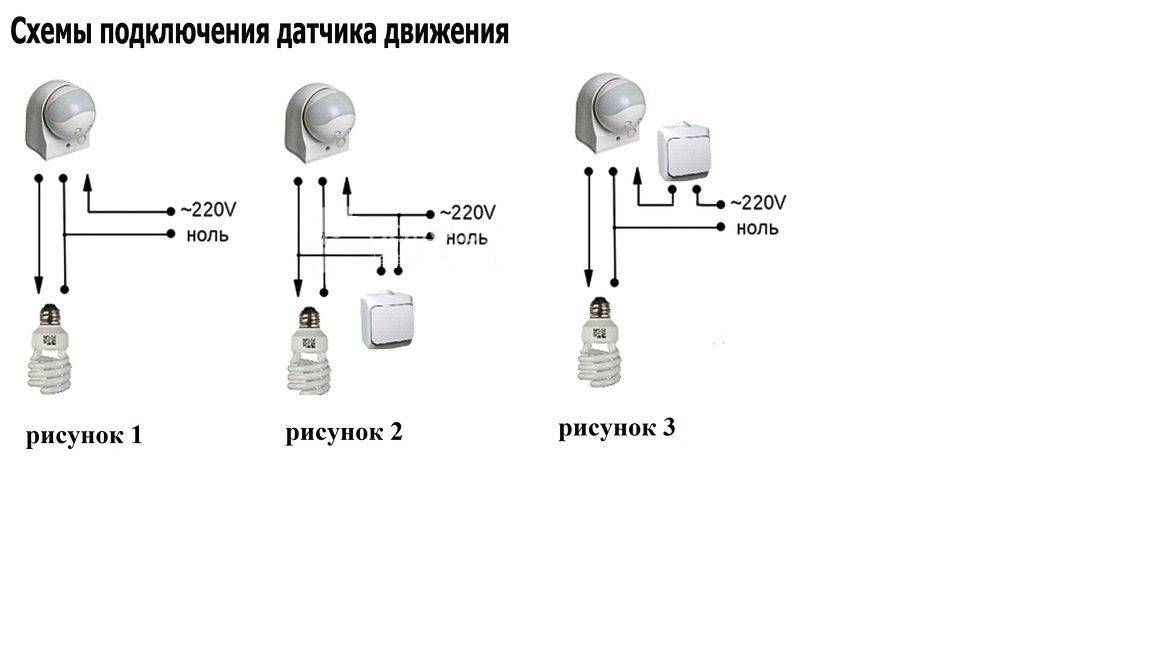
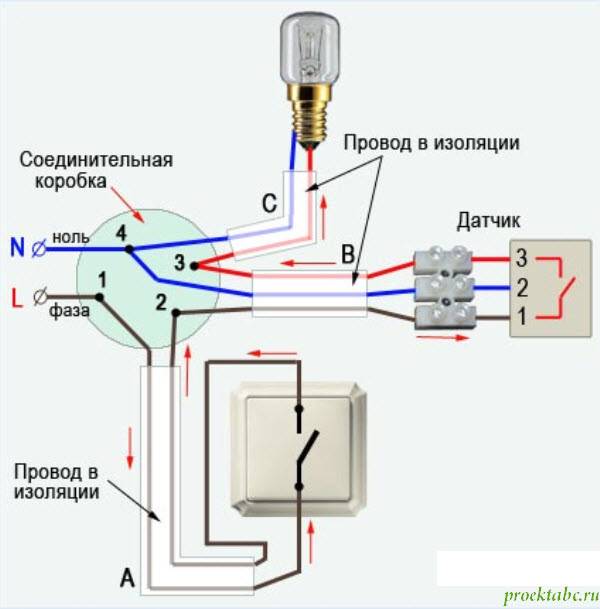
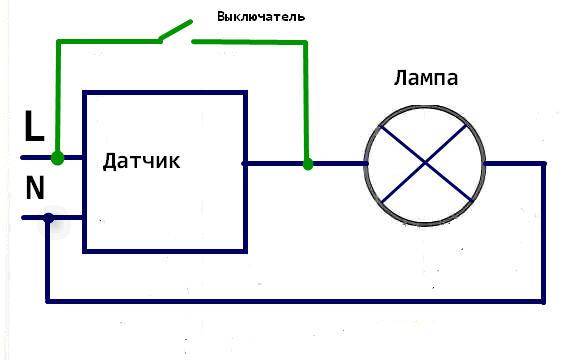
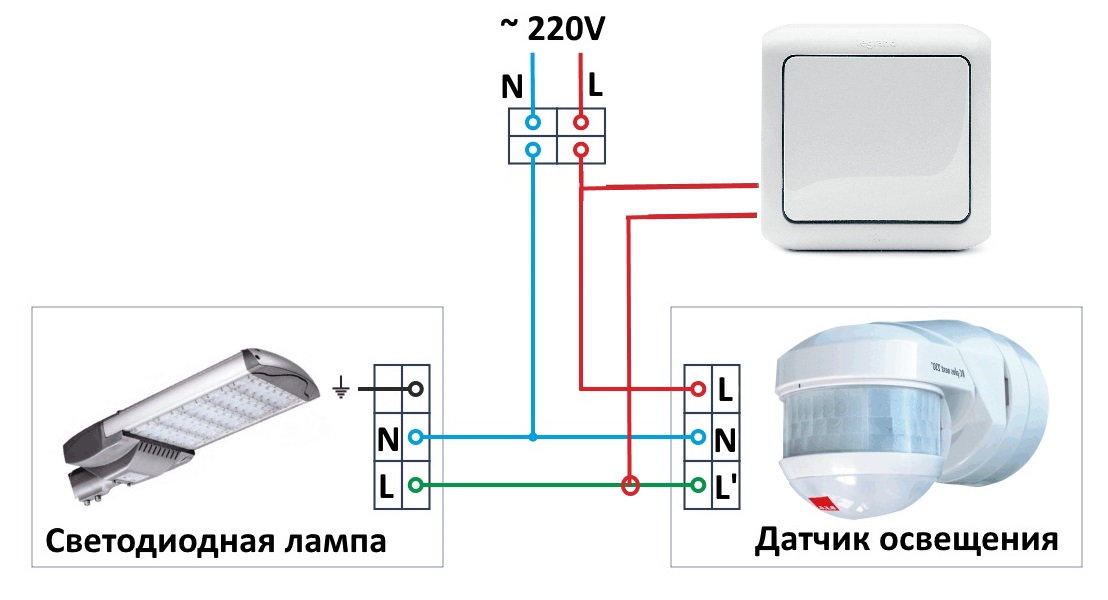
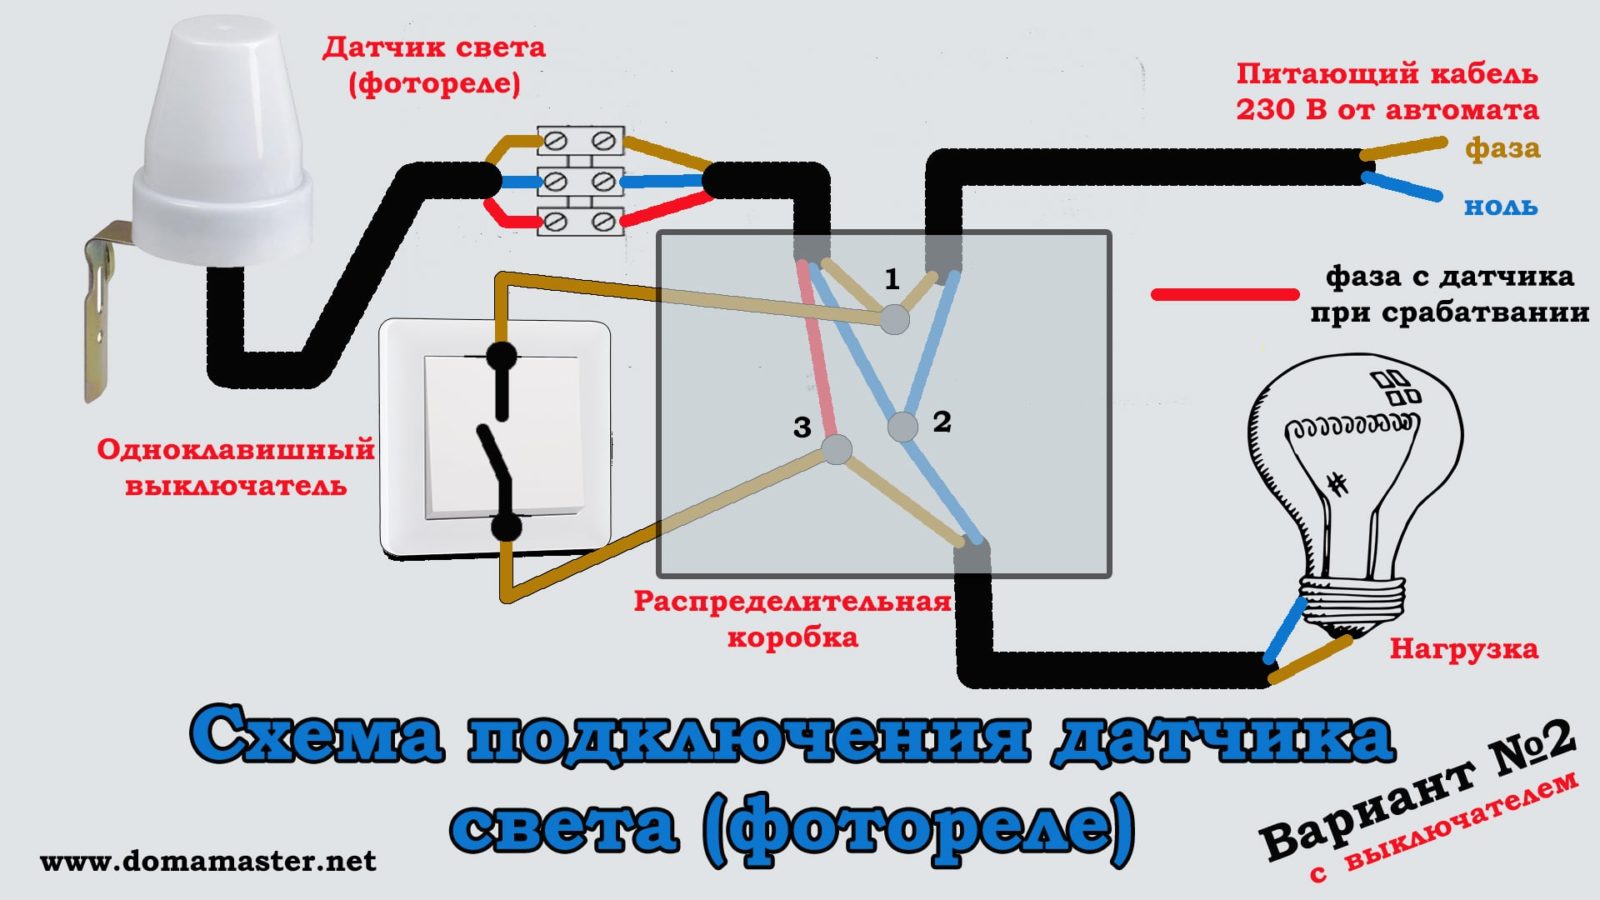
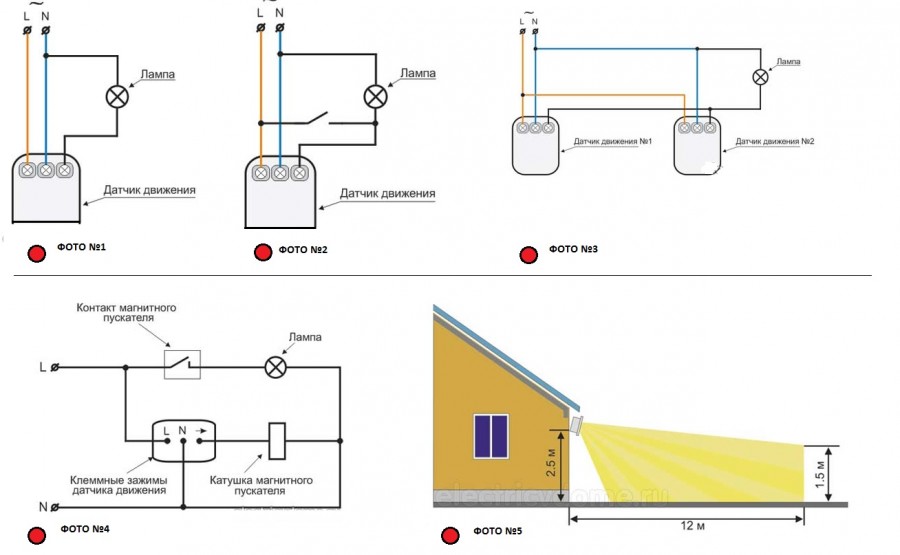
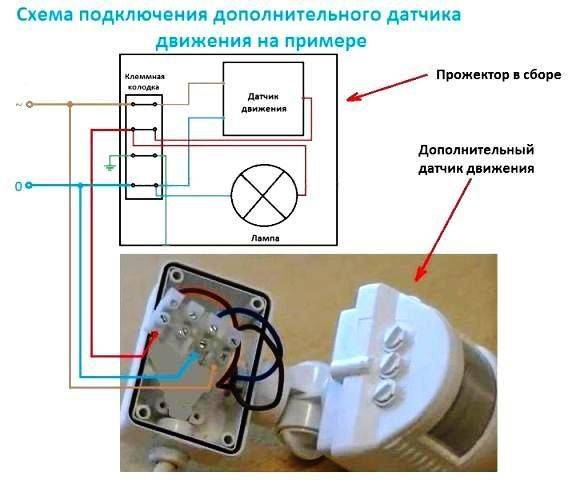
Three-wire motion sensor connection diagram
Sensors with three terminals are usually used in the IR sensor design. A fairly common manufacturer of inexpensive infrared motion sensors is IEK. Without any problems, you can find good products on Aliexpress.
More expensive products are made according to a similar principle, the connection diagram of a lamp with a sensor is similar to a sensor model from any manufacturer. The devices must have a degree of protection IP44 against the ingress of solid objects over 1 mm and drops of moisture. If the motion sensor needs to be moved outside the house, then installation is possible only under the visor.
If you want to protect the device from rain and snow, look for a model with IP65 dust and moisture protection and temperature control for your climate. Most IR sensors can only work down to minus 20 degrees Celsius.
To connect a three-wire IR motion sensor, a full phase and zero are started. For the correct placement, you will need all the same basic 4 elements:
- Circuit breaker (which is in the switchboard).
- Junction box (in which the main installation).
- Sensor (a wire from the distribution box is connected to it).
- Luminaire (second wire from the junction box).
The connection of the sensor with three wires will be carried out with the plant in a junction box of three cables:
- There are three cores from the machine: L (phase), N (working zero), zero protective or ground (PE).
- There are three wires on the lamp, if the body of the lighting device is made of metal.
- Three wires per sensor.
How to connect a motion sensor to a light bulb using three wires is discussed in detail in the diagram.
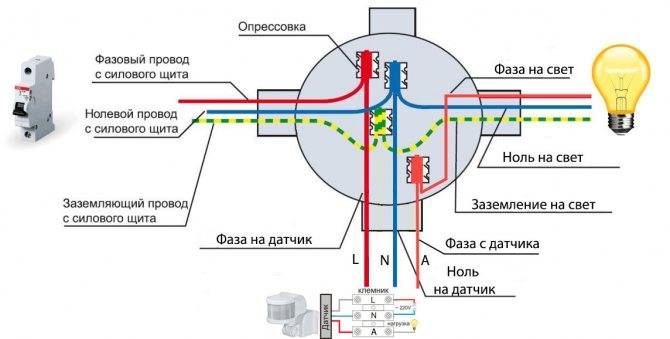
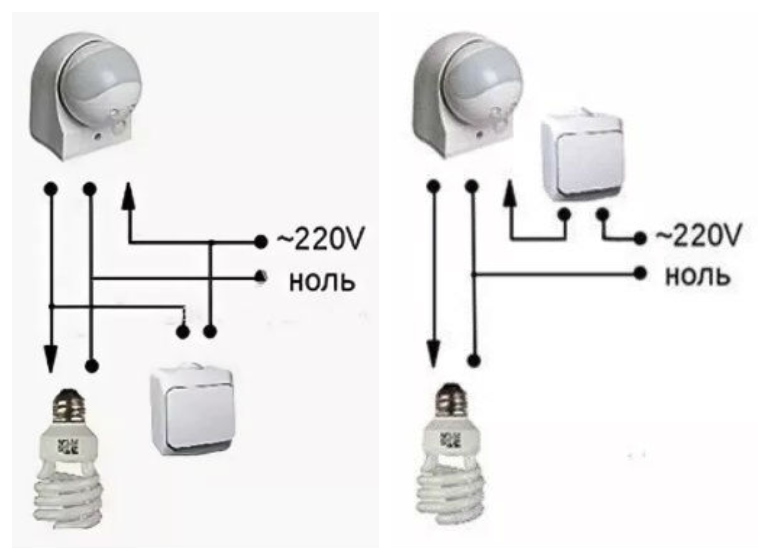
Zeros (N) are collected in one point (as in the case of the previous scheme). The ground from the circuit breaker is also connected to the ground of the luminaire (zero drive or PE). Phase-zero is now applied to the motion sensor with three terminals:
- Two inputs - for 220V power supply, usually signed as L (phase) and N (zero).
- One output is denoted by the letter A.
Mounting
To install a three-wire motion sensor:
-
Loosen the two screws in the case. The terminals are located under the rear cover.
- Some models are already removed from the case with three wires of different colors. By color, you can determine what it means: earth (A) red, zero (N) blue, phase (L) brown.But if the cover opens without much effort, it is recommended that you verify the correctness of a certain marking personally by looking at the inscriptions next to the terminals.
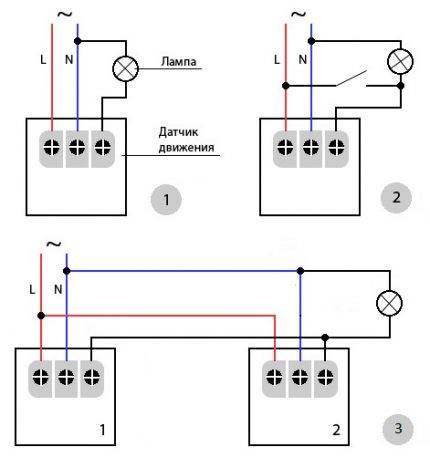
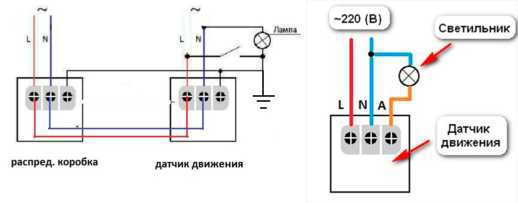
- A simplified diagram of connecting a motion sensor to a light bulb looks like this:
- A bit of clarity here in this picture.
- You can do without a junction box for connecting wires and lead all the wires directly into the sensor box if it is spacious enough inside and has its own terminal block. Phase-zero was applied from one cable, and phase-zero was taken out from the other.
- It turns out a simplified, but the same three-wire circuit, only without a junction box.
Sensitivity setting and adjustment
After successfully connecting a lamp with a motion sensor, you need to correctly set its parameters:
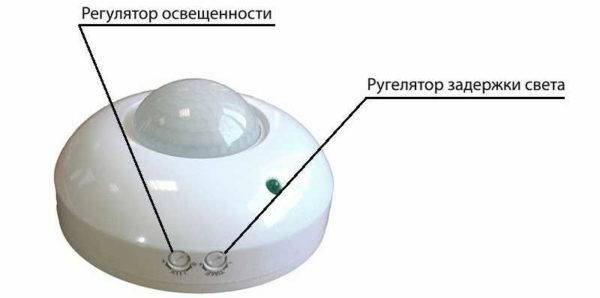
- On the back of the case, find the main controls. LUX with the positions of the month and the sun is responsible for triggering depending on the illumination. Do you need the sensor to turn on in a room with a window only when it is cloudy or the sun sets? Turn the regulator towards the moon.
- Set the turn off time with the second knob. The delay can be set from a few seconds to 5-10 minutes.
- The angle of rotation of the entire sphere allows you to adjust the detection of animals.
Advantages and nuances of use
To prevent the sensor from responding to animals, do not turn the sensor head down towards the floor. Expose it so that it captures the movements at the level of the head (shoulders) of all the inhabitants of the house. Usually at this level, the capture of animals does not occur.
If it is necessary that the sensor temporarily does not work, then direct its head to the ceiling. Therefore, motion capture is not possible. Motion capture by the sensor depends on the tilt angle.In reality, the maximum distance reaches 9 meters. But according to the passport it can be higher.

The sensor for detection uses infrared rays. If you move from beam to beam, the device notices activity and reacts. When you walk directly into the beam, the sensitivity of the sensor is minimal and the device may not immediately respond to you.
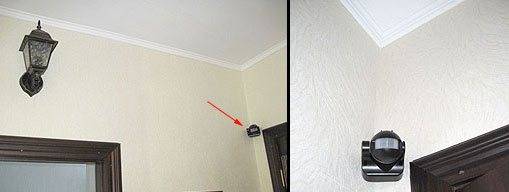
For this reason, the installation of motion sensors is not carried out directly above the doorway, but slightly to the side. For example, in the corner of the room.


Flaws
The disadvantage of the three-wire circuit for connecting the motion sensor to the lamp is the lack of forced light on. If the sensor for some reason fails, problems with its correct operation will begin. To avoid this, it is recommended to add a switch to the circuit.
Adjusting the operation of the motion sensor to turn on / off the light
The first step is to set the time on the device. The sensor allows you to select a period from a second to 10 minutes. It will be easier to decide over time if you listen to the following tips:
- the optimal period for supplying light to the stairs is a few minutes, because they rarely stay longer in such a place;
- the normal period of time for supplying light to the utility room is 10–15 minutes, because something often has to be taken from such a room.
On the sensor, it is supposed to set the response delay after fixing the movement of the object. This value can range from a few seconds to 10 minutes and is determined by how fast a person moves. For example, a corridor is crossed quickly, so it is better to mount a sensor in it with a reduced “Time” parameter.
 Without configuration, the device will not work properly.
The level of illumination, dependent on the "Lux" controller, should be adjusted in such a way that the sensor performs its task at times when the room is less lit than usual. A room where a lot of light enters from the windows is recommended to be equipped with a motion sensor with the “Lux” control set to the initial or middle position.
The sensitivity of a device that triggers certain actions in response to human movement is controlled by the "Sens" knob. This value is affected by the remoteness of the device from the moving object and the weight of the person who made the sensor work. Therefore, if the light sensor turns on for no reason, it is required to make the sensor less sensitive. And it is worth thinking about increasing the reaction rate of the device only if there is no action from the sensor while a person passes by it.
The motion sensor has a complex design, which has to be adjusted to specific operating conditions. Ignoring the rules is fraught with the fact that the device will work contrary to the wishes of the owner of the premises.
Adjustment (setting)
After installation, the motion sensor to turn on the light must be configured. To adjust almost all parameters on the case there are small rotary controls. They can be rotated by inserting a fingernail into the slot, but it is better to use a small screwdriver. Let us describe the adjustment of a motion sensor type DD with a built-in light sensor, since they are most often installed in private homes to automate street lighting.
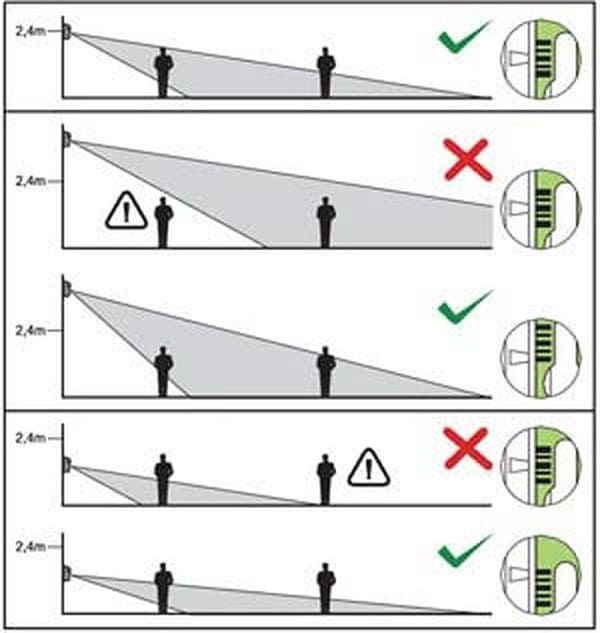
Tilt angle
For those sensors that are mounted on the walls, you first need to set the angle of inclination. They are fixed on swivel brackets, with the help of which their position is changed.It must be chosen so that the controlled area is the largest. It will not be possible to give exact recommendations, since it depends on the vertical viewing angle of the model and on the height at which you hung it.
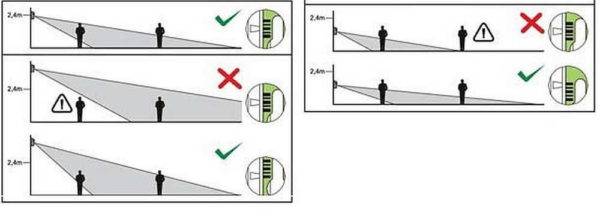
Adjustment of the motion sensor begins with the choice of the angle of inclination
The optimal installation height of the motion sensor is about 2.4 meters. In this case, even those models that can span only 15-20° vertically control enough space. Adjusting the angle of inclination is a very rough name for what you have to do. You will gradually change the angle of inclination, check how the sensor works in this position from different possible entry points. Easy, but tedious.
Sensitivity
On the case, this adjustment is signed SEN (from English sensitive - sensitivity). The position can be changed from minimum (min/low) to maximum (max/hight).
Basically, the settings look like this
This is one of the most difficult settings, since it determines whether the sensor will work on small animals (cats and dogs). If the dog is large, it will not be possible to avoid false positives. With medium and small animals this is quite possible. The setup procedure is as follows: set it to a minimum, check how it works for you and for smaller inhabitants. If necessary, gradually increase the sensitivity.
Delay time
Different models have a different turn-off delay range - from 3 seconds to 15 minutes. It must be inserted all the same - by turning the adjusting wheel. It is usually signed by Time (translated from English as "time").
Glow time or delay time - choose what you like best
Everything is relatively easy here - knowing the minimum and maximum of your model, you approximately choose the position. After turning on the flashlight, freeze and note the time after which it will turn off. Next, change the position of the regulator in the desired direction.


Light level
This adjustment refers to a photo relay, which, as we agreed, is built into our motion sensor to turn on the light. If there is no built-in photo relay, it simply will not be. This adjustment is signed LUX, the extreme positions are signed min and max.
They can be located on the front or back of the case.
When connecting, set the regulator to the maximum position. And in the evening, at that level of illumination, when you think the light should already turn on, turn the knob slowly to the min position until the lamp / lantern turns on.
Now we can assume that the motion relay is configured.
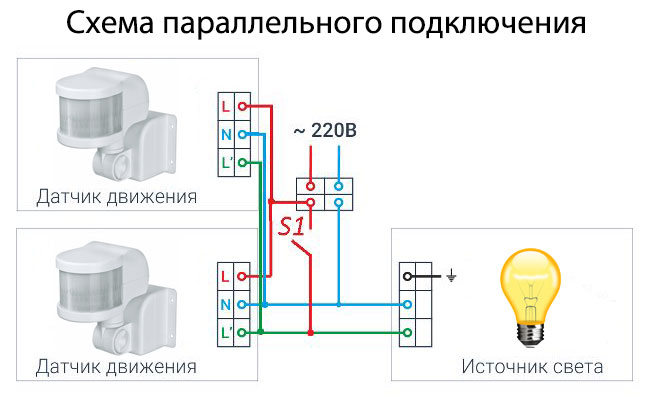
Connecting the Motion Controller to a Lighting Fixture
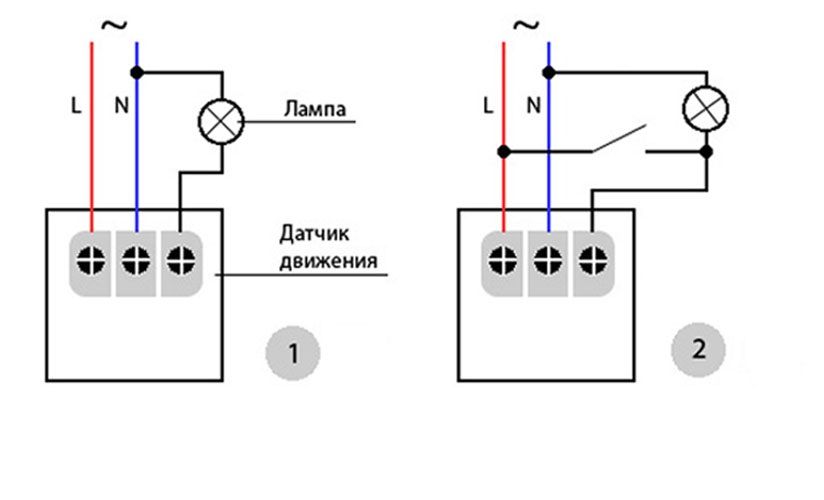
Connecting the motion sensor according to the scheme is a simple operation that resembles connecting an ordinary switch. This is logical, because this device, like a switch, opens and closes the contact through the electrical circuit where the lighting device is located.
According to the diagram, there are 2 types of sensor power wire: phase (brown wire) and zero (blue wire). When a phase comes out of it, it is transmitted to one of the two ends of the lamp in the lamp and vice versa. When the controller is activated, the relay contact is closed, which leads to the transfer of the phase.
To connect the motion controller to the luminaire according to the scheme, you need:
- remove the back cover and find the terminal block.3 wires coming out of the device body are connected to it;
- after looking at the diagram indicated in the instructions or on the case, connect the wire from the sensor to the corresponding wire in the device case;
- after connecting the controller, put on the back cover;
- to connect the wiring in the junction box, where there are 7 wires (3 from the motion sensor, 2 from the lamp, as well as zero and phase), the phase wire of the power cable is connected together with the phase wire from the motion controller. After that, the “0” wire from the power cable is connected to a similar wire from the lamp and sensor. The last step is to connect the 2 remaining conductors.
Adjusting parameters with knobs
The case of any brand of motion sensor is equipped with special switches for setting parameters. Their number depends on the model and purpose of the device. There are from 2 to 4 pens, next to which the following information is always applied:
- letter designations;
- direction of rotation of the switches to make adjustments;
- picture depicting the purpose of the adjustment.
Before proceeding with connecting the sensor, it is necessary to study which knob affects certain parameters and in which position it should be set for the normal functioning of the device.
Experts recommend that you first change the factory settings to individual ones, necessary in each case. To do this, in calm conditions, preferably at the table, the markings on the body are studied, and with the help of the switches, the required values \u200b\u200bare set. The following parameters are preconfigured: time, illumination, sensitivity and microphone.
Time
The time regulator is marked "TIME" on the case.Its main task is to determine the duration of the timer in the on state, when the light will be on. The minimum value is 5 seconds, the maximum is 420 seconds. You should not set a large value, since the sensor will be triggered every time a person moves in the detection zone. Due to the fact that the device is constantly restarting, the countdown is made from each new movement. If a person walks around the room or gestures with his hands for several minutes, the light will be on all this time, despite the fact that the timer is set to 5 seconds.
illumination
The designation "LUX" on the case is responsible for the level of illumination at which the equipment is triggered. The knob allows you to adjust the light threshold in such a way that the sensor will not respond to movements in the room during daylight hours. You can adjust from 5 to 10 thousand Lux. The first time is to set the maximum values.
Sensitivity
The "SENS" knob is responsible for the sensitivity and determines the range of the device. This function is absent in many motion sensors due to practical necessity. A sensitivity control may be required if only one side of the room is to be monitored. When installing, the maximum value is configured (up to 12 meters).
Microphone
The “MIC” marking indicates the presence of a microphone in the device and is responsible for determining the noise level at which the device turns on. This feature is not widely used in home motion sensors due to low noise immunity.So, the crying of a child in the next room or a car passing outside the window can provoke the inclusion of a light in the room. The microphone is often used as a defense because it has a huge detection area. If the sensor has a "MIC" knob, then it should be set to the minimum values.
Device installation work
After all the knobs on the case are adjusted and the necessary parameters are set, you can start choosing a place to place the motion sensor. The device is temporarily fixed on a small board, with which you should move around the room and determine the most suitable place. A blinking indicator will also indicate the operation of the device.


At the installation height of the motion sensor
It is best to connect the light sensor to the electrical wiring in the junction box or where the chandelier is connected to the wires (on the ceiling or wall). It will be quite problematic for an unprepared person to deal with the wires in the junction box. In old houses, it is difficult even for professional electricians to perform these works. Therefore, it is better to place and connect motion sensors next to chandeliers or lamps.
It is important not to forget that before carrying out any work with electrical wiring, it should be de-energized - turn off the corresponding switch in the switchboard. This will help prevent the possibility of electric shock.
The best sensor models for turning on the light
Here is a list of models that have already been tested by practice. And they have earned the trust of users, both professionals and at the household level.
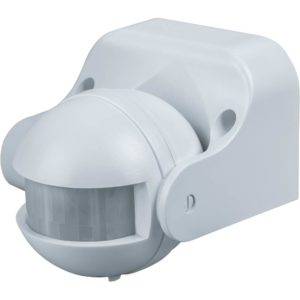
Navigator 71 967 NS-IRM05-WH
Detects, registers heat flows, constantly monitors them.Compatible with any kind of lighting equipment. To turn the lighting system on and off, it supports brightness threshold adjustment. The turnaround time also changes. The total operating range is up to 12 meters. Sensor head with a viewing radius of up to 180 degrees. 1.8-2.5 meters is the recommended installation height, which is also tied to the connection of other devices.
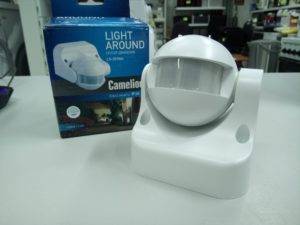
Camelion LX-39/WH
A wall meter that can additionally save electrical energy. Registration and analysis of heat flow are the main features of the device. The installed device operates under different conditions.
Rev Ritter DD-4 Control Luchs 180
Very thin device that can be mounted on any wall surface. Registration of movement and observation take place at the maximum level of visibility. The maximum power of connected devices is up to 1200 watts. Assumes a different viewing angle, while the invalid range is small.