- The reasons
- Flickering when the switch is on
- Too low mains voltage
- low quality light bulb
- Small smoothing capacitor
- How to solve dim light problem
- Recommendations for choosing a diode lamp
- Independent search for the cause of the malfunction
- Switch light problem
- Why does the LED lamp glow when the switch is off
- Poor quality insulation
- Using illuminated switches
- Low quality bulb
- Wiring problems
- Features of the power supply scheme
- Fixing Problem #1
- We remove the backlight
- We leave the backlight, changing the parameters of the power circuit
- We create a circuit with less resistance in parallel with the lamp
- Solving Problem #1
- How to fix the problem
- Why the LED lamp barely burns - reasons
The reasons
What should I do if the LED lamp is on when the switch is off? "RadioKot" - a forum dedicated to electronics, contains a lot of useful information on this topic. According to the members of the forum, there may be several reasons for the weak light after turning off.
- Incorrect wiring connection.
- The switch has a neon backlight.
- The LED light is of poor quality.
- The LED lamp has additional options (slowly fading lamp).
LED lamps are arranged in such a waythat their main job is constant tension. Inside the device is a rectifier, which receives current. Sometimes it happens that after turning off the lamp is dimly lit or flickers. Wiring problems, poor quality of the LEDs used are the main reasons for this phenomenon. If the device uses a resistor, it keeps the diodes glowing. They accumulate electricity, so even after the lamps are turned off, they emit a weak light.
This happens when the illuminated switch is open. In this case, the current to the lamp comes from the switch itself. It does not affect the network load. The current performs the function of charging the capacitor. When the charge reaches a certain level, it flashes and turns off. Thus, the process proceeds in a circle, and there are short flashes in the lamp or LED strips.

If you don't want to experience flickering light during or after turning off, choose the right lamp. Conscientious manufacturers on the packaging always indicate instructions that indicate the principle of operation of LED lighting devices and recommendations for correct operation. Undesirable use LED bulbs together with illuminated rocker switches, photocells, brightness controls, timers. All this interferes with the operation of the product and causes periodic flashing.
Unfortunately, lighting fixtures are often faked. When buying, try to carefully study the packaging in which the lamp is located. The cause of burning after turning off, as well as flashing, is sometimes an incorrect installation. If this problem bothers you, try fixing it yourself. Check if the light bulb is screwed in securely (when the power is off).Remember that the simultaneous use of switches with neon lights (they are needed to recognize their location) and LEDs is not recommended.
Flickering when the switch is on
 In the process of searching for answers to the question of why the included LED lamps flicker, it must be taken into account that there are several reasons:
- faulty starting device;
- low voltage/voltage fluctuations;
- low quality LED lamp;
- small capacitance of the smoothing capacitor.
If the energy-saving bulbs light up after starting, they immediately blink and go out, the reason is in the starting device. Most often, a replacement starter or chandelier is required.
Too low mains voltage
 When flickering after the lamp lights up completely, you need to determine one of several reasons. To determine the voltage level, it must be measured periodically. If the indicator is below 5% and jumps, you must contact the energy company. If no measures are taken, there is another option - installing a stabilizer for the whole house.
You can also correct the situation if you buy light bulbs with a high-quality driver and equip the lighting system with a dimmer. When it is turned on, not at full power, the lighting will blink. Only after turning the knob to the nominal value, the LED lamp will work normally.
Sometimes it happens that the flickering stops if light bulbs designed to operate at a voltage of 180-250 V are used.
Special attention must be paid to lighting systems powered by a 12 V power supply. The switched on LED starts blinking if there is not enough power
Similar situations occur when replacing halogen bulbs with LEDs connected in parallel. Answering the question of what to do, one thing can be said - buy another power supply.
low quality light bulb
A cheap LED lamp, equipped with power supplies without a resistor, flashes not only when turned off, but also after it turns on. The only option is to buy light bulbs with a KP (ripple factor) established by SanPiN 2.2.1 / 2.1.1.1278-03.
Small smoothing capacitor
 A capacitor is a current filter. The full charge depends on the capacity. To calculate it, based on the load and input / output voltage, you can use online calculators. If there is not enough capacity, an alternating current enters the contacts of the LED lamp, the brightness of the glow increases, the human eye perceives this as a flicker.
Theoretically, it is possible to improve performance, but in practice this is not always possible. It is necessary to open the base, unsolder the capacitor and solder a new one. When choosing, it is necessary to take into account the dimensions - the new part must fit in the base. It is also advisable to drill several holes to remove excess heat.
How to solve dim light problem
Recommendations may vary depending on the magnitude of the problem:
If a cheap LED lamp was originally purchased, then it is possible to eliminate the glow only by installing a product from a reliable manufacturer and of high quality.
When the problem lies in the backlit switch, there are many ways to fix it. The simplest solution is to change the switching device to a model without illumination. And you can cut off the corresponding backlight power wire, this is done after opening the switch
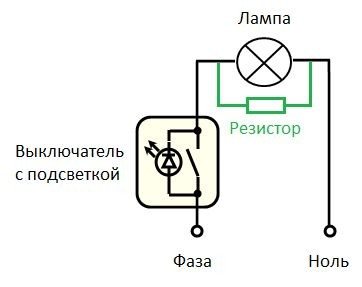
But in some cases it is important to keep this function. Then it is necessary to install a resistor in parallel in the desired section of the circuit.
The hardest thing to fix is the wiring problem.
To do it right, of course, it is recommended to find the source of the leakage current. But, as already mentioned, this will entail other difficulties. But as a result, when the light is turned off, the diode lamps will not burn. But you can go the other way, easier. To do this, a load (an incandescent lamp, resistor or relay) is connected in parallel with the diodes that glow. It is important that the resistance of this element is less than that of LED emitters. As a result, the leakage current will go, for example, to an incandescent lamp. But due to the small resistance, it will not burn.


As you can see, there are many ways to solve the problem of emitters based on diodes, which, although dimly, still shine when turned off. It is necessary to determine, if possible, the most probable cause of this phenomenon.
Recommendations for choosing a diode lamp
The main advice - you need to pay attention to the lighting products of reliable and trusted manufacturers
It is important to remember that high-quality diode light sources cannot be cheap. This will avoid a number of problems, among the most common of them is a dim glow when the load is off, a short service life
This will avoid a number of problems, among the most common of them is a dim glow when the load is off, a short service life.
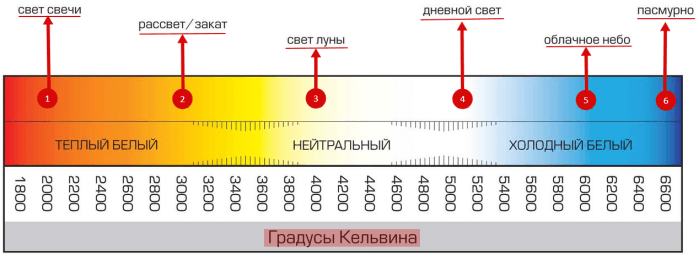
Colorful temperature
Effective lighting, among other things, is also based on the compliance of the main parameters of the light bulb with the conditions in which it will work. When choosing, the power of the product, luminous flux, color temperature, color rendering index, glow angle are taken into account.
If the light source is lit when the load is off due to a rather poor quality, then when choosing a new product, its dimensions should be taken into account. In particular, we are talking about the size of the radiator.
This is an auxiliary design element that contributes to a more efficient removal of heat from the light source.
Before buying, you need to pay attention to the correspondence between the dimensions of the radiator and the power of the lamp. If the product is characterized by a small cooler with significant power, then this design option should not be taken.
The most reliable radiators are made of graphite, ceramics, aluminum
Moreover, it is important that this element is not type-setting.
It is also necessary to pay attention to the quality of the connection between the base and the lamp body.
It is important that there are no notches along the edge of the holder and, in general, it should be characterized by the complete absence of play. Another key point is the level of light pulsations.
High-quality lighting elements emit a uniform glow
Another key point is the level of light pulsations. High-quality lighting elements emit a uniform glow.


Thus, if the lighting system immediately after installation gives a weak glow of diode-based lamps, it is recommended to check the circuit, switch and other factors.The fact is that when, with the load disconnected, the lighting elements still burn, albeit dimly, this may indicate problems with the wiring, which is already quite serious. To pinpoint the cause, all possible factors should be considered.
Independent search for the cause of the malfunction
If the energy-saving lamp used in a lamp or other product starts blinking, then you need to start fixing the problem immediately. Since each lighting device has a resource limit on the number of inclusions.
That is, each such cycle reduces the operating time, and if they are repeated often, then in just a few days the service life will be reduced by many months, or even years. In addition, as mentioned above, with faulty wiring, there may be a threat to the health of the owner of the home, his family, friends, which should not be allowed.
Troubleshooting should be performed only by a trained master, and with a special tool in compliance with all safety measures provided for by the governing documents. You should start the troubleshooting procedure with the simplest methods that do not require costs. And if they do not give a result, then move on to more complex ones.
So, first of all, you need to check the performance of the light bulb itself. Why can it be rearranged to another place, tested with neighbors, acquaintances. If the blinking continues, then you just need to replace the lighting device. When, after installing the lamp in a new location, the malfunction does not appear, then the switch should be replaced. In order not to waste money, you can take it for testing from another place and, preferably, that it be without a backlight.When the cause is identified, you should simply buy and install a new switch.
If this does not work, then the owner of the premises should look for a problem in the wiring.
But when doing any electrical work, it is important to remember that they are all potentially dangerous. Therefore, it is necessary to comply with measures to prevent and prevent risky situations, have sufficient skills and have the appropriate tool. To find out the reason for the glow of the LEDs after turning off the power, the information in the following article will help, which analyzes all the options for the occurrence of such situations, as well as ways to eliminate and prevent them
To find out the reason for the glow of the LEDs after turning off the power, the information in the following article will help, which analyzes all the options for the occurrence of such situations, as well as ways to eliminate and prevent them.
Switch light problem
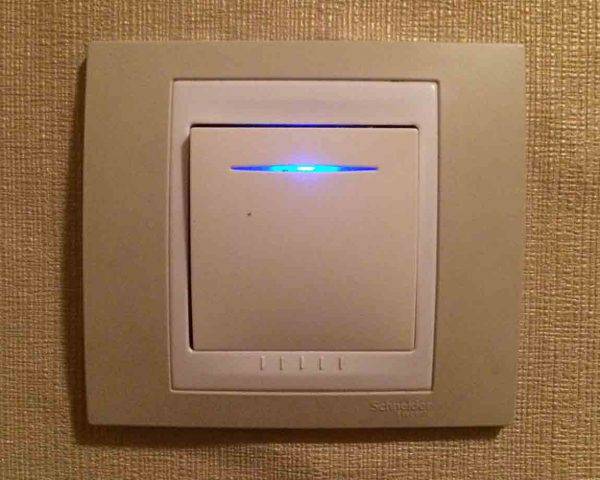
Most often with the question "Why do LED lamps continue to burn when the switch is off?" are addressed by people using indoor switches with backlight. A miniature neon bulb (sometimes an LED) located inside the housing does not affect the operation of the lamp when the light source is an incandescent or halogen lamp. If you screw an LED bulb into the lamp, then often it will continue to burn dimly even after the voltage is removed.
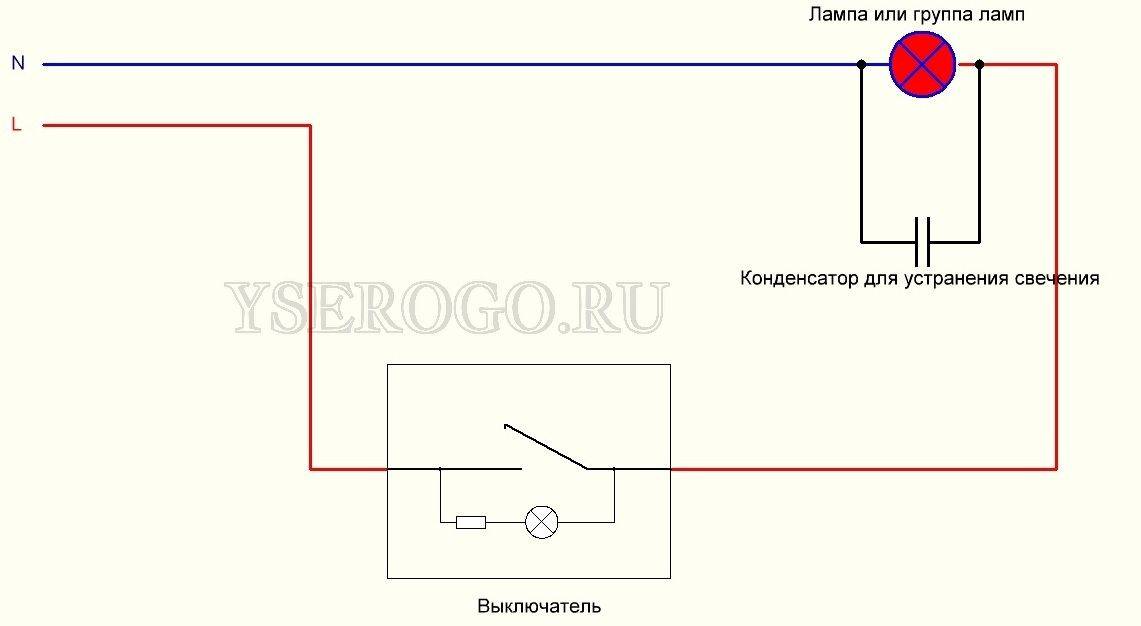
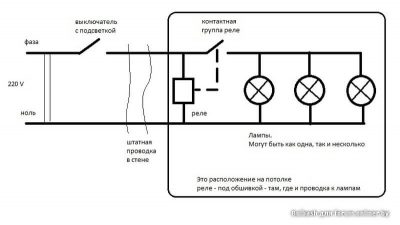
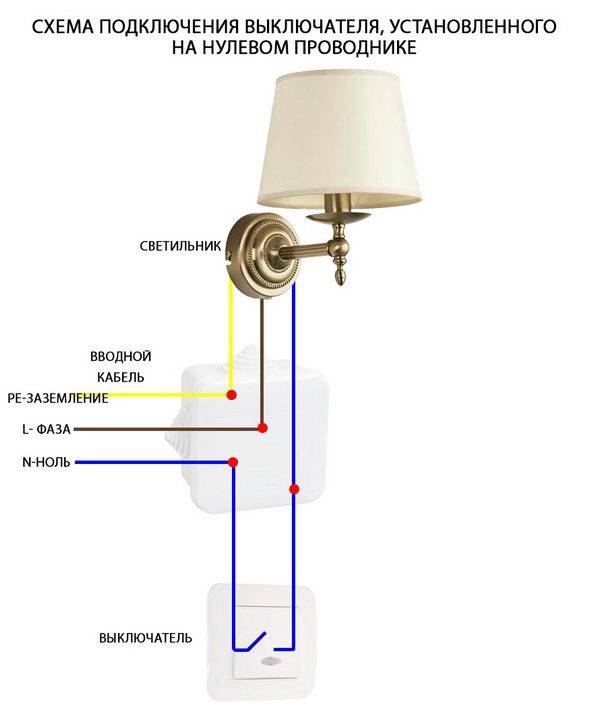
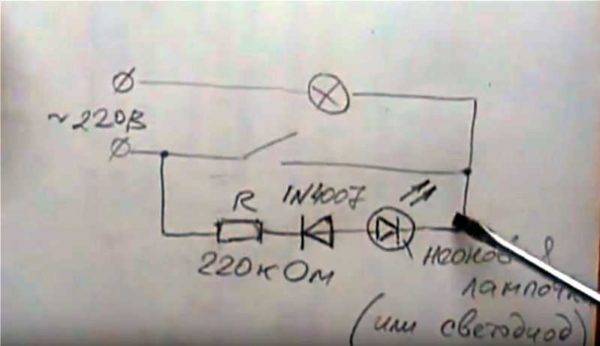
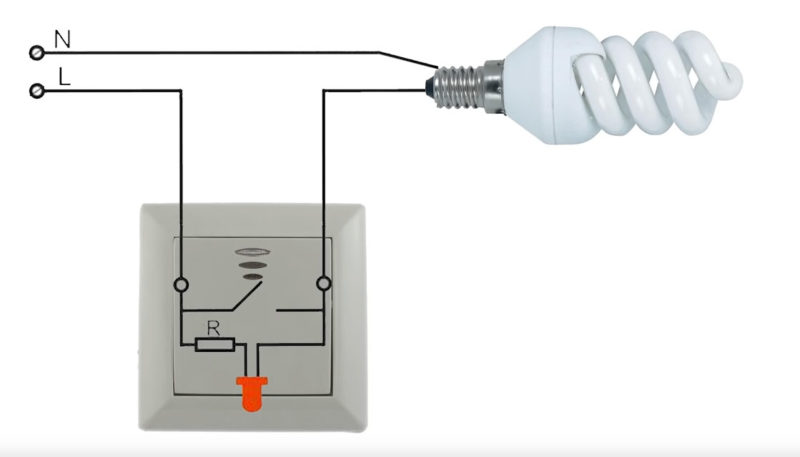
Why this happens becomes clear if you carefully look at the diagrams for turning on the light bulb through the backlit switch below. It follows from the diagrams that at the load L1 after the lighting is turned off, there is still a small potential that penetrates through the circuit of the neon light bulb (Fig.
Designations on the diagrams:
- HL1 - LED or neon backlight;
- D1 - diode limiting the reverse voltage;
- L1 - LED lamp of the main lighting;
- S1 - illuminated switch.
There are three ways to fix this problem:
- Replace the existing switch with a regular one or remove the backlight from it with your own hands.
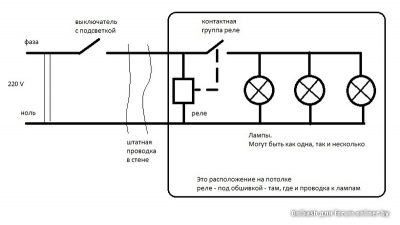
- Install a resistor (fig. 3) or a capacitor (fig. 4) in parallel with the load. The radio element can be placed in the junction box, in the lamp socket itself, or on the back of the switch, if both the phase and neutral wires pass through it. In the first case, you will need a resistor R2 with a rating of 50 kOhm and a power of 2 W or a power of 0.5–1 W, but with a resistance of 1 MΩ. The compactness and cheapness of the resistor, in this case, is an indisputable plus. But there is also a negative point - active power consumption and slight heating. The second option with capacitor C1 is devoid of the negative moments of the resistor and is able to compensate for mains interference from other electrical appliances in the room. Installation requires a non-polar capacitive element. It is recommended to use a capacitor with a capacitance of 0.1 to 1 uF, capable of withstanding a voltage of 630 volts.
- It is not difficult to remove the barely noticeable glow of several LED lamps if they are powered from one switch. To do this, one of the LED-lamps must be replaced with a low-power incandescent lamp. The tungsten filament will act as a shunt resistor, passing harmful current from the backlight through itself. As a result, none of the lamps connected in parallel will glow when the switch is off, since there is not enough current to ignite the filament.
Why this happens becomes clear if you carefully look at the diagrams for turning on the light bulb through the backlit switch below.
The lamp may not turn off completely for months. At this time, the crystal is aging, its brightness decreases, and a resource is being developed. Having figured out why the LED lights are dim after turning off the light, you can try to fix the problem yourself. This will require basic knowledge of electrical engineering and the ability to use tools. In the absence of skills, it is better to call an electrician.
If the lamp cannot be completely turned off due to the LED light switch, the first tip is to replace the device. A model without additional features will not cause a glow. A device with an LED element is installed in another place where it will not create difficulties. Another way out is to remove the backlight. The switch body is untwisted, the wire to the chip is cut with a tool. Before starting electrical work, turn off the mains power on the shield.
If an LED is needed, a constructive solution is sought.
- Replace one of the LED fixtures with an incandescent lamp. She will take the free current. This method is only suitable for devices with multiple horns. The disadvantage of the method is that the energy-saving effect of lighting is reduced.
- A more time-consuming option is to install a resistor in parallel with the lamp in the circuit. Its resistance should be up to 50 kOhm. The current will go to the resistor, the capacitor will remain without a charge. The radio component is purchased in a specialized store. When mounting the legs, the parts are fixed on the terminal with wires.
The problem with the wiring is solved by replacing the section with poor-quality insulation. To find the damaged area, you will need a special device - a multimeter. With open cable installation, finding damaged insulation is not difficult. Hidden placement of wires will require the dismantling of a decorative coating or plaster. Depending on the state of communications, a separate section or the entire wire is replaced. After installation, the strobes are sealed with gypsum mortar.
Why does the LED lamp glow when the switch is off
There are several common causes for LED lights to glow when the switch is off:
- Poor quality of insulating materials.
- Using a backlit switch.
- Poor quality light bulb.
- Electrical wiring problems.
- Features of the power supply circuit.
Poor quality insulation
Insufficiently high-quality insulation in any of the sections of the electrical circuit often causes problems with light. This failure has the most serious consequences, because in order to fix it, it will be necessary to break the finishing layer on the walls in order to replace the insulation.
To test the insulation for leakage current, a high voltage is applied to the network for 1 minute. This is necessary to simulate the conditions under which breakdowns occur in the electrical circuit.


Using illuminated switches
The answer to the question of why the LED lamp glows when the switch is off lies in the use of a backlit switch. In the interior of such a device there is a light diode with a current limiting resistor. The reason for the glow of the lamp is that even when the contact is disconnected, voltage is still passing through them.However, the light bulb does not glow at full power, since the circuit has a current-limiting resistor.
The lamp shines either constantly (if the current is sufficient) or intermittently (blinks because the current is too low). However, even in the latter case, the current is sufficient to recharge the capacitor. As soon as sufficient voltage accumulates in the capacitor, the stabilizer microcircuit turns on, and the light immediately lights up. The operation of the lamp in this mode leads to its rapid wear, since the number of operation cycles for microcircuits is finite.
In this case, there are several methods to fix the problem of a luminous light bulb. The easiest way is to remove the backlight from the switch. To do this, dismantle the case and remove the wire directed to the resistor or light diode. It is also possible to replace the switch with another one that does not have a backlight function.
Another way to solve the issue involves soldering a shunt resistor in parallel with the light bulb. You will need a 2 watt resistor with a resistance of up to 50 kOhm. If you do this, the current will go through this resistor, and not through the light bulb power supply driver. Installing a resistor is not difficult. It is only necessary to remove the cover and fix the resistance legs in the terminal block for connecting network conductors.
It is enough to connect one resistor to the switch, you do not need to hang them on each lamp.
In the absence of sufficient knowledge in electrical engineering, you can do it easier. To do this, put an ordinary incandescent lamp in the lighting device. The spiral of the light bulb, when turned off, will thus serve as a shunt resistor. However, this option is only suitable if there are several cartridges in the lighting device.
Low quality bulb
Often the cause of the malfunction is an insufficiently high-quality lamp. In this case, there is only one way to solve the problem - replacing the product with a better one.
Wiring problems
If errors are made during the installation of electrical wiring, one of the consequences of this may be the glow of the lamp when the switch is already off. This situation happens when zero is confused with the phase, and even after disconnection, the wires remain under phase.
The situation should be corrected not only to get rid of a luminous light bulb without the need. This is also to avoid electric shock when replacing the lamp.
Features of the power supply scheme
In order to provide a brighter glow and reduce the ripple of light, a capacitor with a high capacitance is sometimes added to the power supply circuit. This results in the fact that even when the switch is turned off, there is still sufficient charge in it to allow the LEDs to light up.
Fixing Problem #1
After you understand why the energy-saving light blinks when the switch is off, it's easy to suggest a solution to the problem:
- Open the circuit for the passage of microcurrents by removing the backlight on the switch.
- Change the parameters of the backlight power circuit so that the current is insufficient to charge the capacitor.
- Wrap the currents in a circuit with less resistance.
-
Replace the switch with a non-illuminated model or install other lamps.
The method is quite simple, but it works. If single bulbs flicker, the phenomenon will have to be dealt with by other methods. With the replacement of switches and lamps, there will probably be no questions, but with other methods they may be.
We remove the backlight
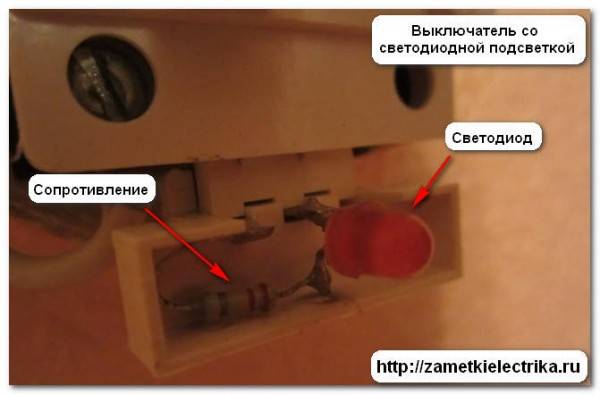
In switches with built-in lighting, there is a board on which there is an LED or a small neon lamp, resistance and contacts (usually in the form of springs). This board is located under a small plastic cover on the back of the switch housing. To get to it, you need to disassemble the switch.
We disassemble the switch to get to the cover
The cover can be pry off with a fingernail or a screwdriver. Having removed it, on the reverse side we find a board.

A small backlight board is installed on the back of the cover.
We take this fee. It is not attached to anything, just hook it up and remove it from the latches. We put the cover without a board in place, assemble the switch and check its operation. Everything should work, except for two things: the backlight does not turn on when the light is off and economical or LED lamps do not blink.


We leave the backlight, changing the parameters of the power circuit
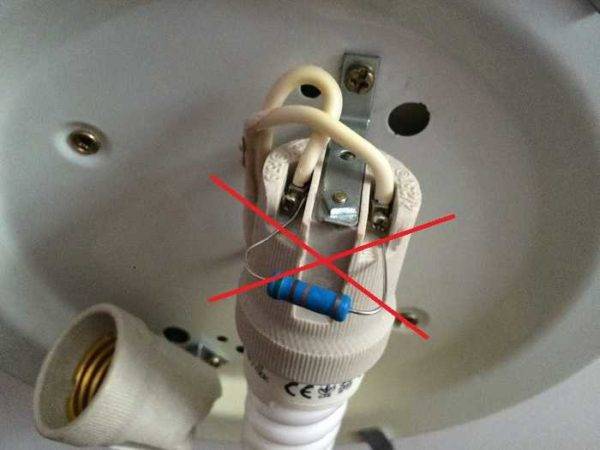
Not all illuminated switches are made using circuit boards. More budget models are made simpler: a resistance is soldered to the diode and this circuit is installed in parallel with the switch keys (as in the photo below).
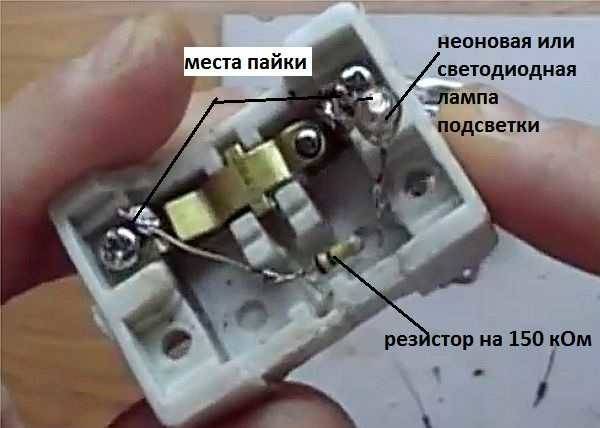
The backlight on the switch can be assembled like this
In this case, you can solder / bite out the LED and the resistor and get a regular switch without backlight. But you can change the parameters of this circuit so that the backlight will work, and the lamps will not blink or burn when the light is off. To do this, you will have to replace the resistor - put the resistance:
- not less than 220 kOhm, if the backlight is with a neon lamp;
- not less than 470 kOhm or 680 kOhm with LED backlight (selected on site).
Besides? a 1N4007 diode is built into the circuit behind the resistance, cathode to the resistor.The second input of the diode is soldered to the backlight. As a result, the power circuit will look like the figure below.
Enhanced Backlight Circuit
To eliminate the blinking of the lamps and keep the backlight on the switch, we unsolder the old resistor, put a new one along with the diode. After that, the switch can be assembled and put in place.

We remove the blinking of the lamps when the light is off
In most cases, the problem disappears. If the lamp is still flashing, it is necessary to replace the resistance with a larger one. This is rare, but...
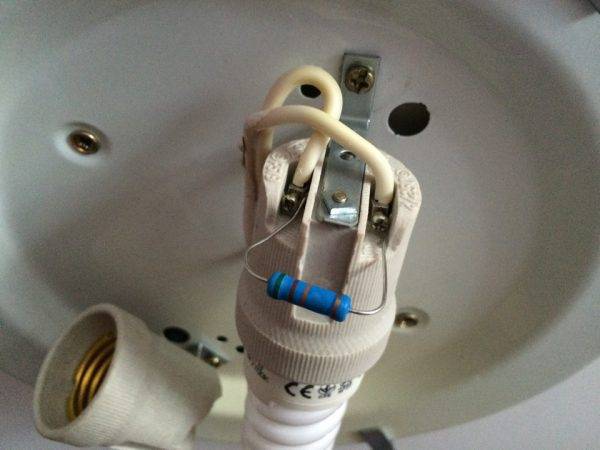
We create a circuit with less resistance in parallel with the lamp
If you connect a resistor in parallel with the lamp, the current will go to heat it up, the lamp capacitor will remain without a charge, there will be no blinking. The resistor is usually taken at 50 kOhm and a power of 2 W, wires are soldered to it, and then insulated, leaving only two wires outside for connection. You can wrap it with electrical tape or use heat shrink tubing.
First, the junctions of the conductors and the legs of the resistance are insulated, then another layer of insulation is applied, which also covers the resistor. The currents are small, if there is heating, it is quite insignificant, but with such a two-layer insulation, this alteration is safe.

Carefully isolate all areas without insulation
There are two ways to install this resistor: in a junction box or directly on a luminaire
It is only important that it is connected in parallel with the lamp
Here you can see where you need to connect the resistor, but do it as it is not worth it in the photo: the terminals and the resistor case are not insulated - electric shock is not ruled out when replacing the lamp
You connect the previously prepared insulated resistor to the same places - this is much safer. In the junction box, the connection is similar. You need to find two wires that go to the lamp, and connect additional conductors to the same contacts. After such an alteration, the light will not flash. But if you are not strong in electrics, be very careful.


Solving Problem #1
Now that the cause of the problem has become clear, we can offer a rather simple way to solve it, the use of which will effectively and in a short time get rid of the unpleasant blinking of the lamp.
The procedure to eliminate the cause is as follows:
- The circuit through which the microcurrents pass is opened. This removes the board on the switch-off element.
- The parameters in the circuit itself, which performs the backlight, are replaced. This is done in such a way that there is not enough current to charge the capacitor.
- The currents are directed through a circuit of lesser resistance.
- Replacing the switches with another model where there is no backlight or the lamps themselves need to be replaced.

Chandeliers for several lamps do not lose their popularity when installed in living rooms and other rooms.
How to fix the problem
If the LED lamp is on when the light is off, how to fix it? Solutions are different. It all depends on the nature of the problem itself.
- For example:
- A cheap low-quality LED lamp always glows in the dark after it is turned off. To fix this problem, you need to replace it with quality products from a trusted manufacturer.
- If the lighting element is lit due to the fact that a backlit switch is used, then this problem can be solved in different ways.
- For example, the easiest way out is to change the switch in the house to a regular one, without lighting. You can simply cut off a certain wire that powers the backlight. This can be done after the switching device has been opened. But there is another way out - to maintain such a function, it is enough to put a resistor in parallel on a certain section of the electrical circuit.
- If the LED light is on and the reason is in the wiring, then it will be extremely difficult to solve such a problem. To eliminate it, it is necessary to find the place of current leakage. But this can lead to certain difficulties. But when the light is turned off, the bulbs will not burn.
A variety of methods allows you to solve the problem of the glow of emitters with diodes so that they will not glow in full when the switch is turned off. The main thing is to understand the root cause of the problem. We hope that now it has become clear to you why the LED lamp glows after turning off and what to do to correct the situation!
Removing the backlight will be the easiest and fastest solution to this problem. To do this, it is necessary to disconnect the wires from which the backlight is powered, before that, having previously opened the switch cover.
Alternatively, you can still cut off this wire, but first be sure to find out where the power wire is located so as not to confuse.
Having done this, the current charging the capacitor will not flow, after which the lamp will no longer glow dimly or blink;
If you want to avoid this problem, then before buying a switch, pay attention to the presence or absence of a backlight. If it is not, then the main problem will not appear;
A good option would be to connect a conventional lamp in parallel, using this option will prevent the energy-saving light source from burning in the off mode. This is achieved due to the fact that the current to recharge the capacitor will go to the filament;
There are switches that have a mandatory backlight needed for any purpose.
How to be in this case, and what actions to take?
This is achieved due to the fact that the current to recharge the capacitor will go to the filament;
There are switches that have a mandatory backlight needed for any purpose. How to be in this case, and what actions to take?
A good solution to fix this problem would be to connect a resistor in parallel, which will help create additional resistance in the desired section of the electrical circuit. The main advantage of this method is its cheap price; you can buy a resistor in absolutely any radio engineering store.
It is worth noting that the resistor will not adversely affect the normal operation of the LEDs. But when the switch is turned off, the backlight will work, and accordingly, the resistor will consume current, which goes to charge the capacitor. Also do not forget to insulate the resistor, for this it is best to use heat shrink tubing.
Why the LED lamp barely burns - reasons
There are several reasons why an LED lamp or lamp shines dimly:
- Use of low quality components. Unscrupulous manufacturers can install a weak radiator (it will cause the LEDs to overheat and fail), or use an unsuitable CHIP element. All this leads to a decrease in the brightness of the light flux.
- Natural degradation of LEDs. This process happens sooner or later with any LED lamps. Usually the degradation period is written on the package. If the period of dim appearance coincides with the manufacturer's declared data, it is time to change the lamp.
- Low mains voltage. A rare but occurring factor. This can be checked with another lamp. If it shines in the lamp just as dimly, you need to call an electrician.
- Incorrect selection of lamp characteristics. Carefully study the instructions for the lamp - it indicates what power and brightness the light source should be. Or focus on the indicators of the old lamp.
In order not to ask yourself why the LED lamp is barely lit, choose only products from trusted manufacturers - for example, retrofit lamps from LeDron. The product warranty will allow you to simply change the lamp if you come across a product with a factory defect.


