- Why the boiler does not heat water for the heating system
- Violation of tightness of joints and threaded connections
- Connecting to sources
- Causes and elimination
- Incorrect operation of the pressure regulator
- Checking the pressure accumulator
- Checking the injection pump
- Installation of water supply system components
- Pump station pressure regulation
- What pressure should be in the pumping station in the pear?
- What pressure should be in the expansion tank of the pumping station?
- Why does the pressure drop in the pumping station?
- Why does the pumping station not build up pressure and turn off?
- Why does the pressure in the pumping station not rise?
- The pumping station does not hold pressure and constantly turns on
- The principle of operation and the device of the station
- Other reasons for not shutting down
- Blockages in the water supply system
- Mixer
- Tank
- Eyeliner
Why the boiler does not heat water for the heating system
There can be many reasons why a gas boiler does not heat water for heating. The main ones and ways to eliminate these causes consider below.
The boiler turns on, but the heating does not heat.
Possible causes and their elimination:
first of all, you should check whether air has accumulated in the batteries, using taps, you need to remove air from the system. Install an air vent to prevent air build-up.
Faucet to vent their battery
It functions on the principle of an expansion tank, without reducing the pressure in the system. After a long downtime of the unit, check the valve, it may become clogged with scale;
- clogged batteries, what to do in this case? It is necessary to drain the water from the cooled batteries. If you see that water is flowing out with debris, and sometimes black liquid may pour out, you need to flush the system to clean water;
- improperly made connection and piping. The pipe diameter may be incorrectly selected, shut-off valves are incorrectly installed, the heat exchanger is incorrectly connected. Check the manufacturer's recommendations in the instructions and correct the errors;
- at reduced pressure, the unit also does not heat well, add water to the system;
- the appearance of scale in the heat exchanger. It is necessary to flush the heat exchanger from plaque. Not in all models it is easy to remove the heat exchanger from the device. Where this is problematic, you can clean it without removing it. To do this, the boiler must be turned off, cool.
Connect the pump hoses with the filtration system to the inlet and outlet and flush the heat exchanger with a special cleaning fluid. After that, be sure to rinse the boiler with clean water to remove chemical residues, otherwise the remaining particles of the agent can lead to corrosion of the heat exchanger, pipes and radiators.
Flushing the heat exchanger
The use of reagents as additives to the coolant significantly reduces the formation of scale. But not all models are allowed to use antifreeze. Manufacturers Ariston (Ariston), Arderia (Arderia), Navien (Navien), Buderus, Viessmann (Vismann), Electrolux (Electrolux) prohibit the use of antifreeze, recommending the use of distilled water.
In the instructions for the models Rinnai, Baxi (Baxi), Vaillant (Vaillant), Celtic (Celtic), Ferroli (Ferolli), AOGV 11 6, Beretta (Beretta), Bosch (Bosch), Neva Lux, Protherm (Proterm), Junkers, Koreastar (Koreastar), Daewoo is allowed to use antifreeze. It should be noted that not all antifreeze is suitable for these boilers.
- contamination of the heating water filter also becomes the reason why the boiler heats the batteries poorly - clean the filter under a strong stream of water, after turning off and cooling the boiler. If the contamination is strong and cannot be cleaned, replace the filter;
- the heating medium heating temperature is set too low, increase the temperature;
- incorrect operation of the circulation pump or its overheating also becomes the reason why your unit began to heat up the batteries badly, adjust its power;
- wrong battery design. Batteries must correspond to a specific heating mode, since each type of radiator has an individual heat transfer value depending on this mode.
Violation of tightness of joints and threaded connections
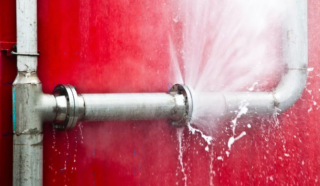 Leak in the pipe at the junction
The tightness of threaded connections is often violated in metal water pipes. The main reason is the violation of linen winding, corrosion, as well as depressurization of welds.
- If it is necessary to replace the linen winding, unscrew the threaded connections, remove the damaged plumbing linen and replace it with a new one, placing it between the locknut and the fitting (or other connecting element). After that, wrap a few turns along the thread, impregnating with silicone sealant or quick-drying paint. Instead of linen winding, you can use the thread "Tangit unilok" or fum-tape.
- Corrosion on the connecting elements occurs due to the fact that the paintwork at the joints is broken. In this case, replacement of threaded connections is required. If a leak is found in a non-separable section of the water supply, to repair it, the entire section will have to be replaced.
Repair of water pipes made of plastic is less time-consuming and is carried out in a short time. Tools and accessories for polymers are more affordable and budget. A separate plus is the absence of the need for gas and electric arc welding.
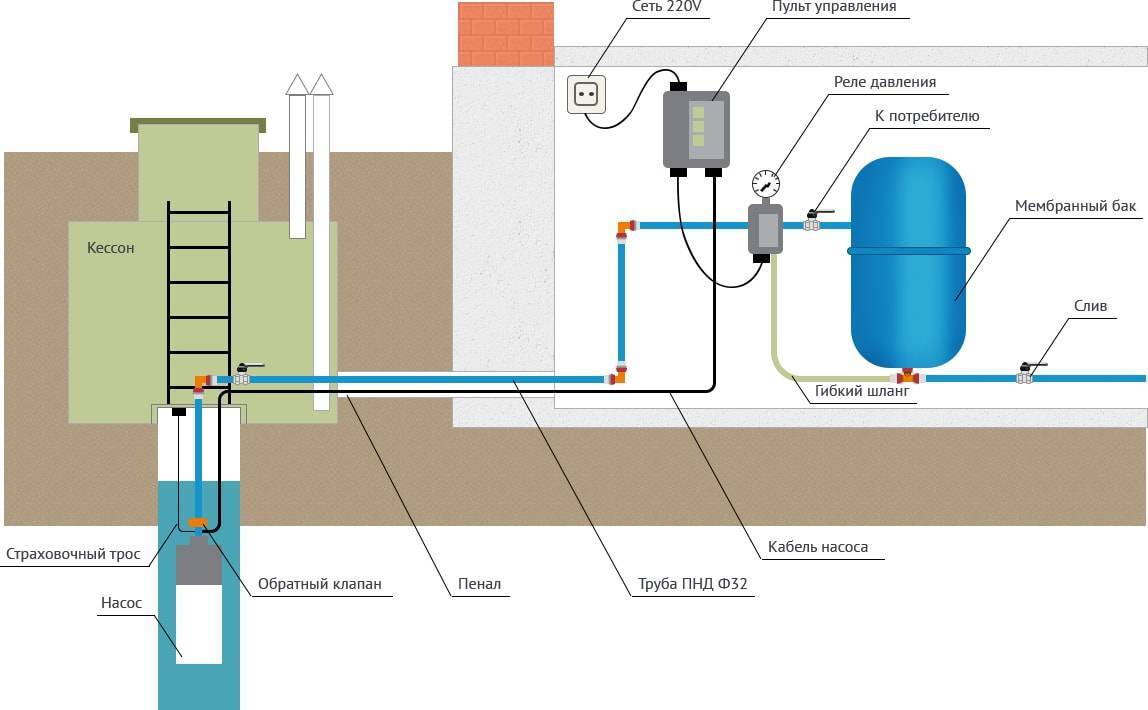
Connecting to sources
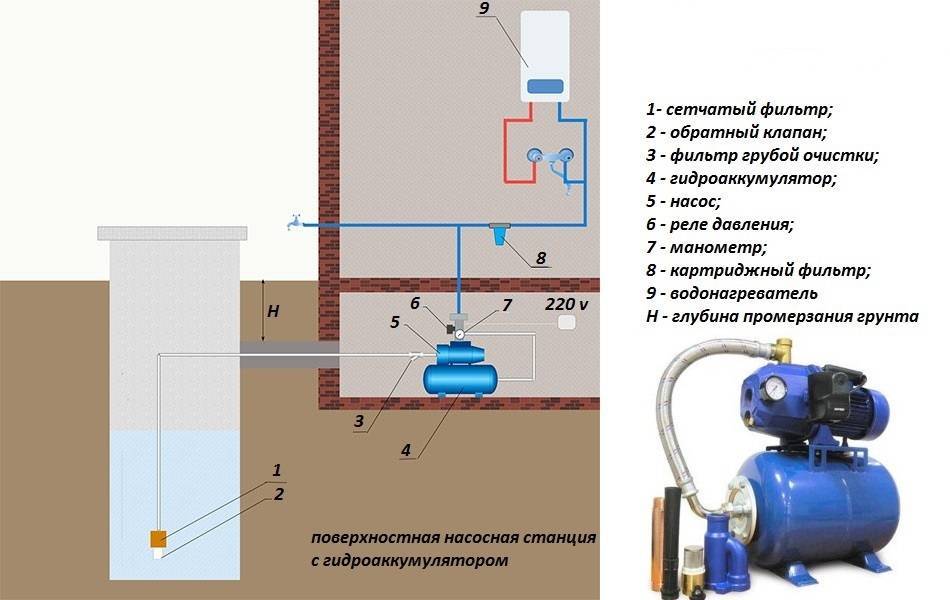
When connecting a pumping station to a well or well, you first need to assemble an ejector. It is a cast iron structure with three connection holes. A filter should be installed at the bottom of it. In the upper part, a plastic bell is put on the squeegee. Then the drive is assembled, which includes 2 parts. A bronze pipe is mounted on the outlet part of the drive, with the help of which a transition to a plastic pipe is made. The tightness of the connection is ensured by flax or sealant.


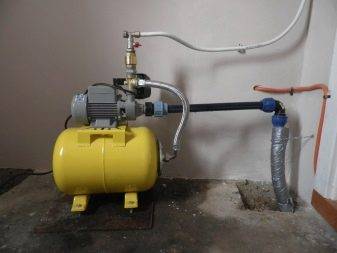
The pumping station is best located in a dry place.
The trench should go below the freezing layer of the soil. The pipeline is laid there. A cap is provided for the casing pipe. But you can take a knee with a smooth transition. Couplings are used to connect pipes to the ejector. Assembled, it is lowered into the well.
Algorithm for connecting the pump to the central water supply:
- A pipe is installed in a pre-prepared hole.
- The pipe from the central line is connected to the storage tank.
- From the tank, water enters the pump inlet, and the end of the pipe that leads to the house is connected to the outlet.
- Then the wiring is installed.
- At the final stage, adjustments are made.
Adjustment begins with the formation of the correct pressure in the pipes. To do this, you need to pour about 2 liters of water into the snail. Next, turn on and off the pump. When turned off, the pressure in the system should be 2.5-3 bar, and when turned on, 1.5-1.8 bar.
When setting up, the chemical and physical state of the water is taken into account. It may contain harmful impurities that adversely affect the operation of the station. It is best to install a filter.
Causes and elimination
And when there is visible confirmation of this in the form of streaks, it is necessary to shut off and de-energize the system, and then eliminate the leak. But when the system is sealed, then there is no exact answer to the question of why the pumping station often turns on. This may be due to improper operation of the pressure switch, accumulator or pump.
Incorrect operation of the pressure regulator
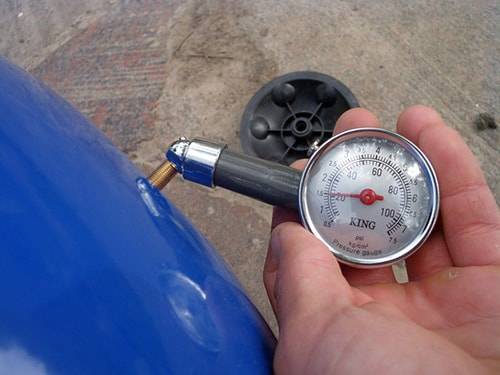
First of all, they check the reliability of the readings of the built-in pressure gauge, if the modification implies its presence. For verification, you can use a car tire pressure gauge. If there is a deviation from the norm specified in the technical passport for the pumping station.
The pumping station turns on very often because the lower allowable threshold is too high. Another reason is premature shutdown, when the system is not filled with liquid to the desired pressure, and the sensor is triggered. In these cases, the pressure switch of the water supply system must be replaced or repaired by service center employees. Until the warranty expires, maintenance is free.
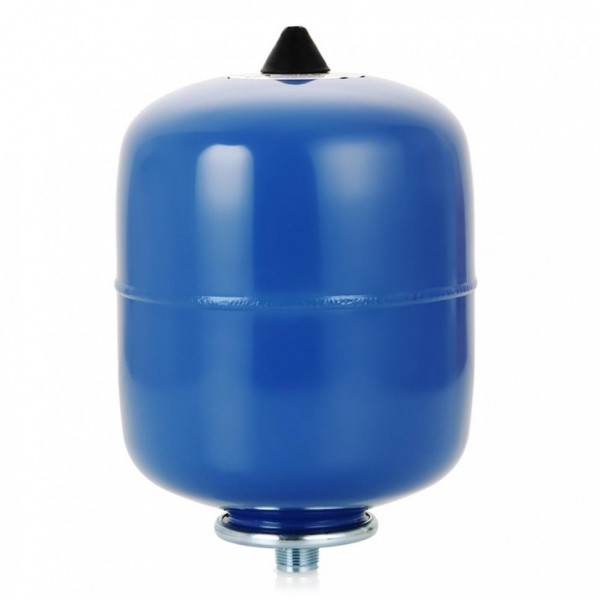
Checking the pressure accumulator
If the hydraulic tank is damaged and has a leak, this is visible.Diaphragm defects and lack of tightness of the pear cannot be detected by visual inspection. But to make sure that this is the problem, there is no need to open the tank, and everything can be done with your own hands.
Press down on the valve nipple and note what comes out of the cut-off pipe. If it is air, then the failure is not in the hydraulic tank.
But when splashes fly out of the valve along with the gas, you will have to disassemble the device and change the membrane or pear, depending on the type of construction. By the way, a pipe buried in the ground may have a leak, and in order to identify this problem, you will have to dig it out.
Checking the injection pump
One of the reasons for the decrease in performance and frequent switching on is the low voltage in the electrical network. As a result, pumping equipment does not work at full capacity and does not create the necessary pressure. And as soon as the pressure drops to the lower limit, the pump starts again.


But it is possible that the pump does not hold pressure constantly due to a breakdown of mechanical components or depressurization of the working chamber. The device will have to be disassembled and inspected
Attention is paid to the wear of the blades, shaft, bearings, inner walls of the chamber. Debris trapped inside indicates a defective pre-filter
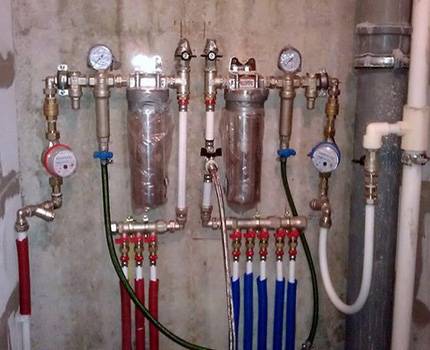
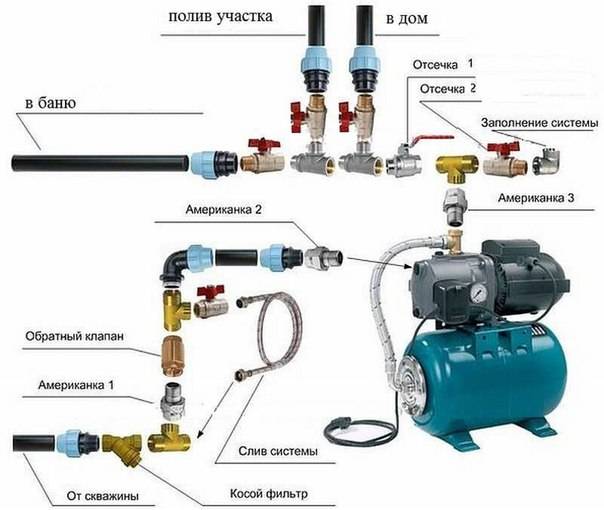
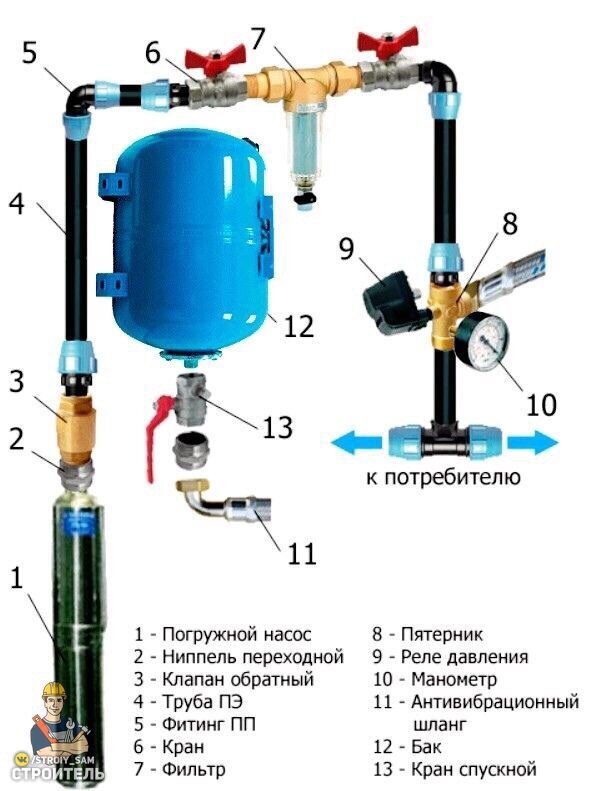
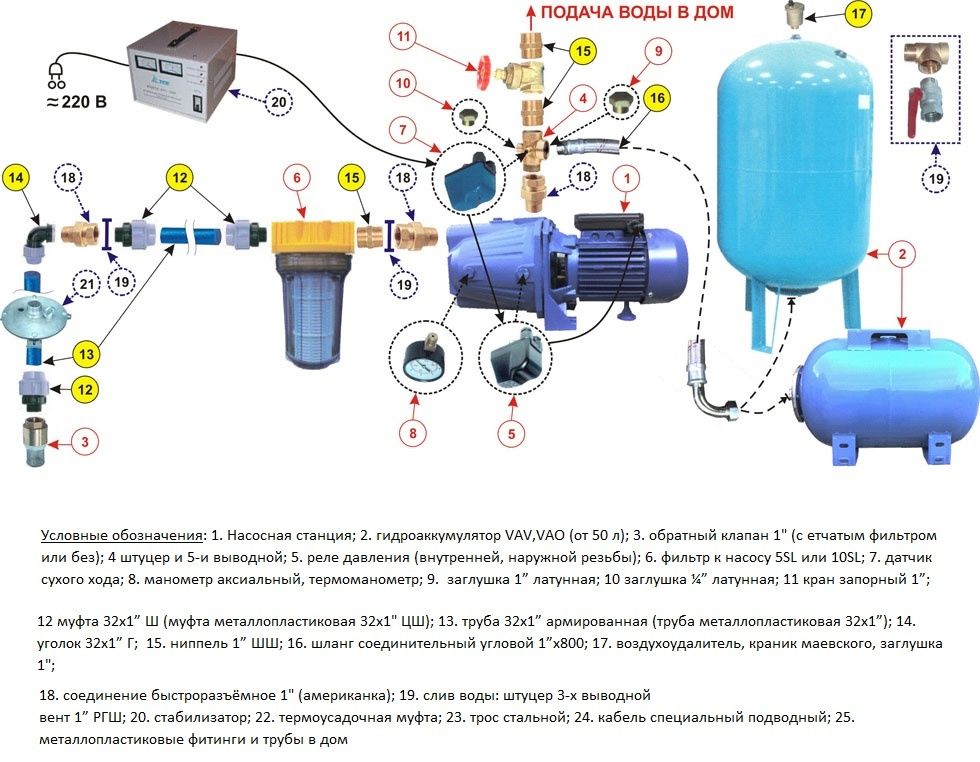
Installation of water supply system components
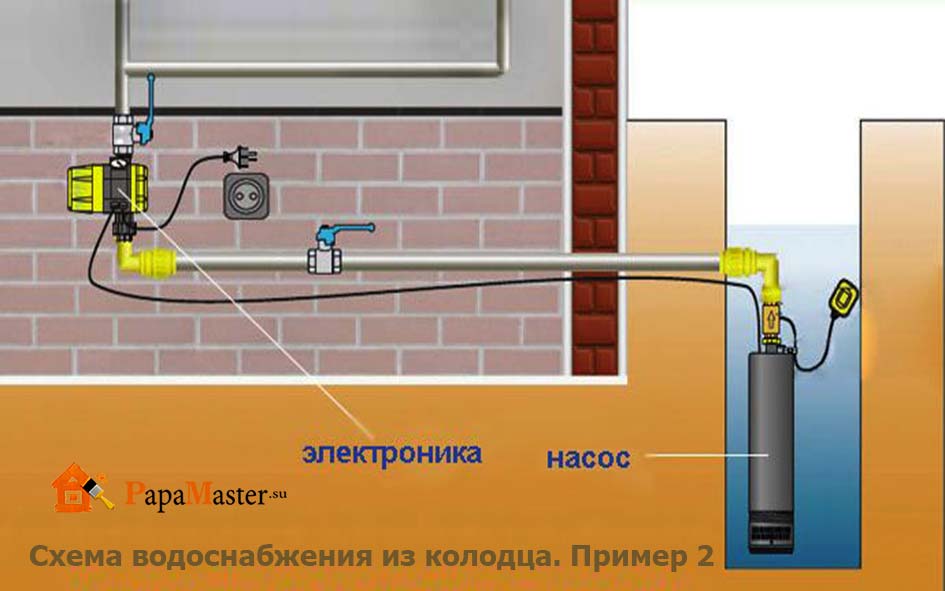
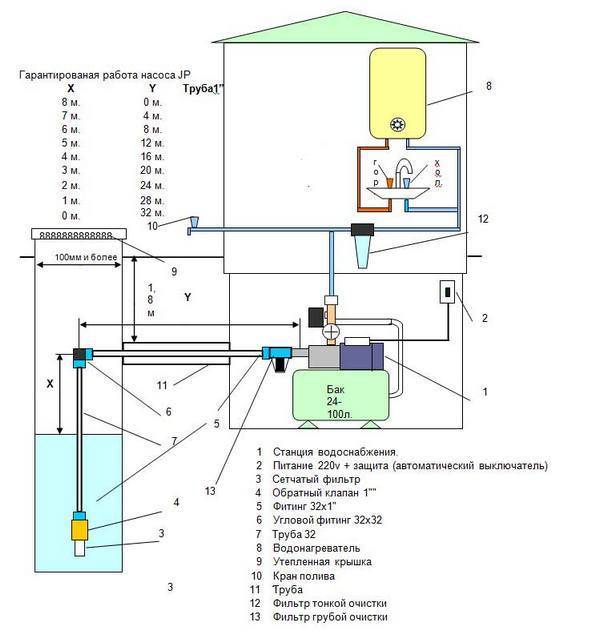
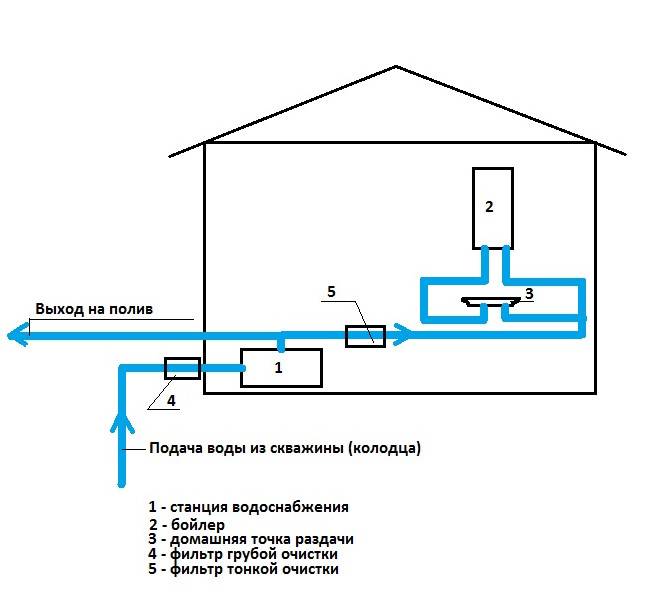
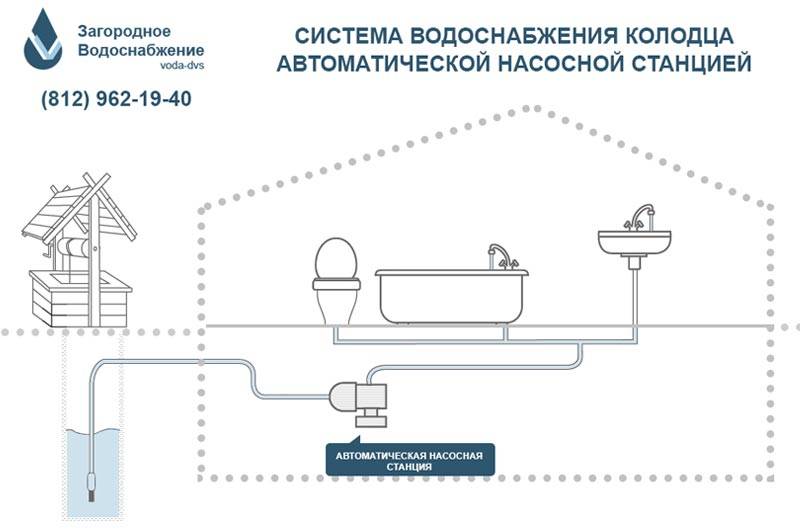
A typical layout of a plumbing system with a well or a well can be used for serial pipeline wiring.
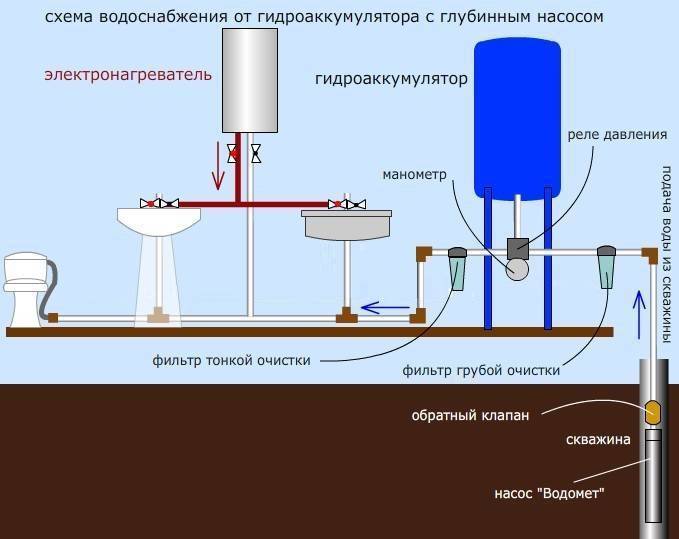
It consists of the following nodes:
- Pump equipment. For a deep well over 8 meters or a well, only a submersible pump is suitable. For shallow sources, assembled pumping stations or surface pumps can be used.
- Transition nipple.Needed for connection with the following elements of the system, which in most cases have a diameter different from the outlet from the pump.
- Check valve. Prevents water from flowing out of the system when the pump is idle, the water pressure drops.
- Pipe. Pipes made of polypropylene, steel, metal-plastic or other materials are used. The choice depends on the wiring (external or internal, hidden or open), the price of the material itself, ease of installation. The pipeline that brings water to the house is supplied with a heat-insulating layer.
- Water fittings. It is used to connect pipes, shut off the water supply, install the pipeline at an angle, etc. It includes: fittings, taps, water sockets, tees, etc.
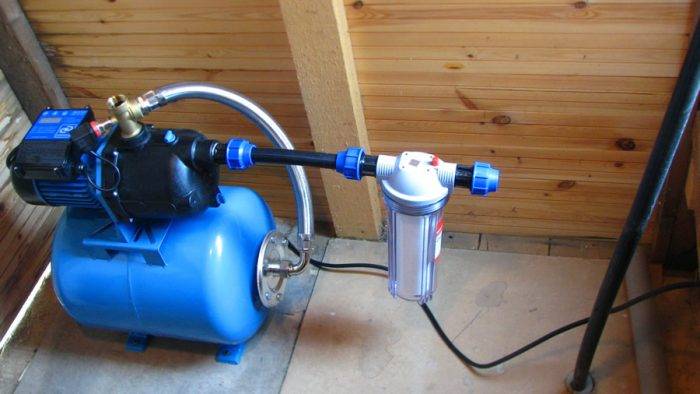
- Filter group. Designed to protect equipment from ingress of solid and abrasive particles, reduce the iron content in water and soften it.
- Hydraulic tank. Required to create and maintain a stable water pressure, to prevent frequent operation of the pump.
- Security group. It is necessary to control the pressure in the system - a pressure switch, a pressure gauge and a dry-running switch. Automatic control devices help maintain a stable pressure in the system and extend the life of the equipment.
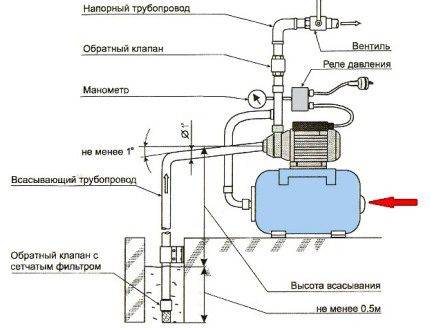
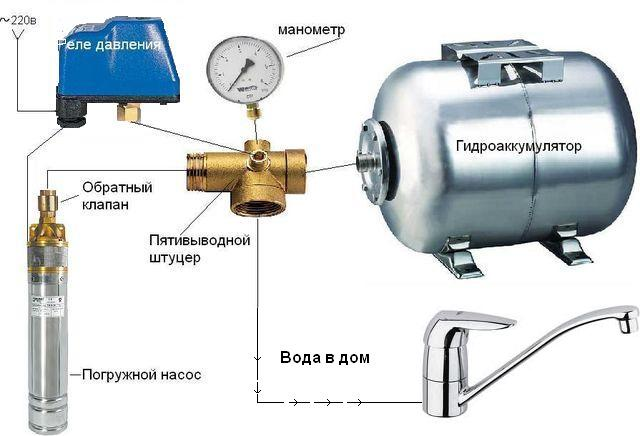
All elements of the system are connected in a certain sequence. More details can be seen in the diagram. Further, the installation of the system is described using the example of collector wiring, as more complex.
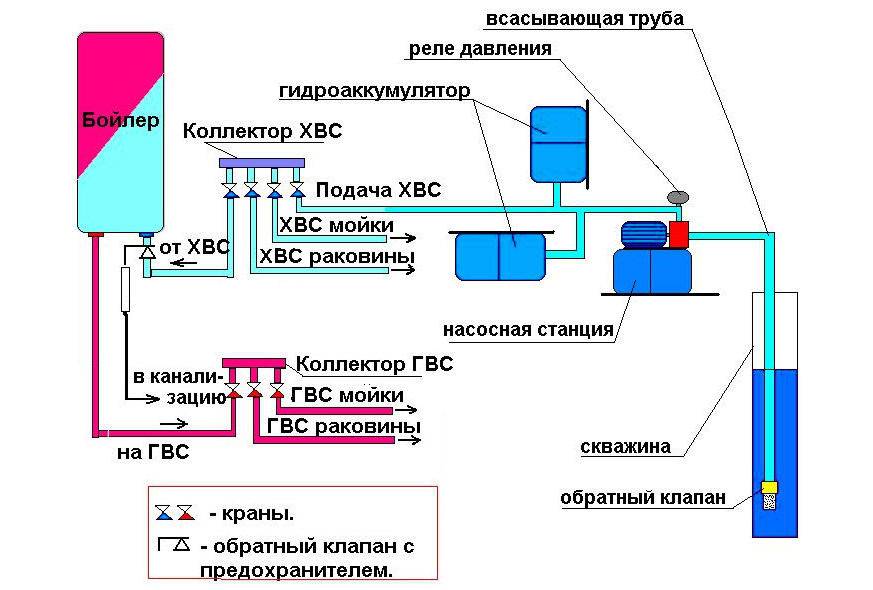
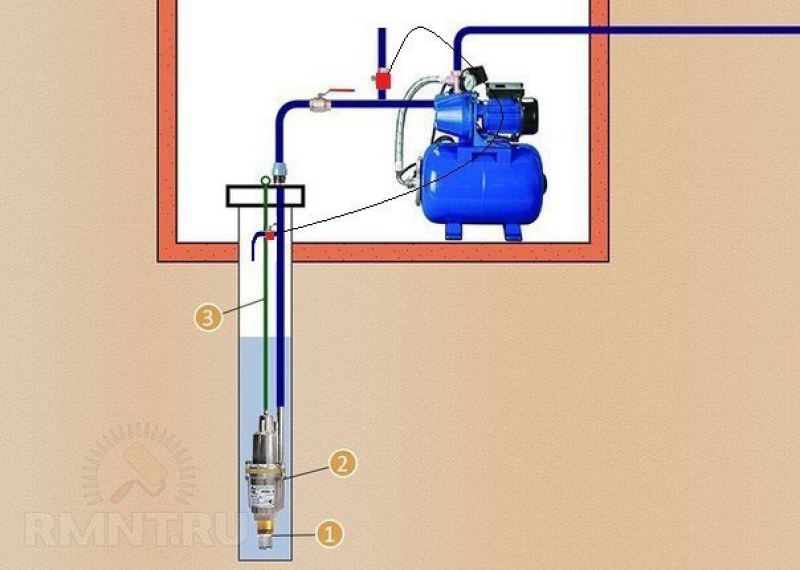
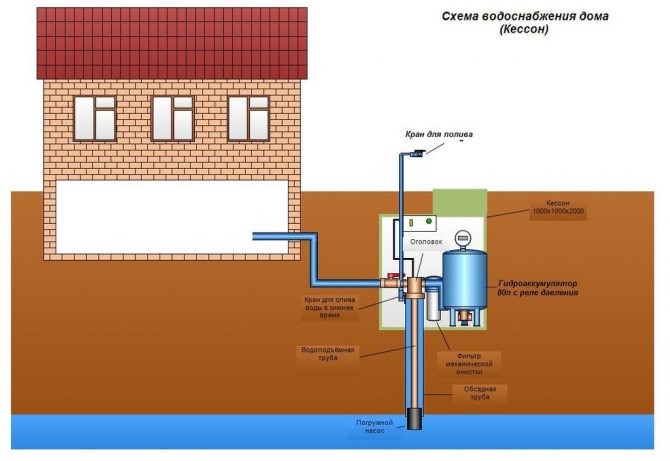
 A simple diagram of the water supply system makes it possible to imagine how the wiring should be carried out from the source to the extreme point of consumption (+)
The collector unit in a private house is installed in special rooms - boiler rooms or boiler rooms - specially designated rooms of a residential building, in basements and semi-basements.
In storey buildings, collectors are installed on each floor. In smaller homes, the system can be placed behind a cistern in a toilet or hidden in a dedicated closet. To save water pipes, the collector is placed closer to more plumbing fixtures, at about the same distance from them.
Installation of the collector assembly, if you follow the direction of the water, is carried out in the following order:
- At the connection site of the collector with the main water supply pipe, a shut-off valve is installed to turn off the entire system if necessary.
- Next, a sediment filter is mounted, which traps large mechanical suspensions that can lead to equipment failure.
- Then another filter is installed, which will remove smaller inclusions from the water (depending on the model, particles from 10 to 150 microns).
- The next in the installation diagram is a check valve. It blocks the return flow of water when the pressure drops.
After installing the above equipment, a collector is connected to the water supply pipe with a number of leads that corresponds to the number of water consumption points in the house. If not all plumbing fixtures are connected in the house yet, then plugs are placed on the unclaimed conclusions of the collector assembly.
Installation of water branches of hot and cold water supply systems is the same for central water supply.Installation in the house is a little different: one of the cold water outlets of the collector is connected to a water heater, from where hot water is sent to a separate collector unit
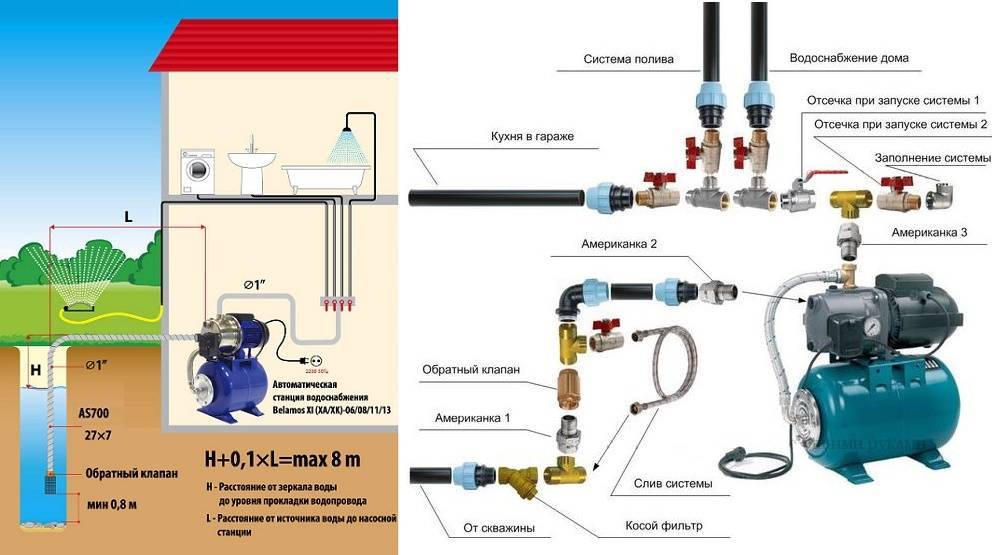
Pump station pressure regulation
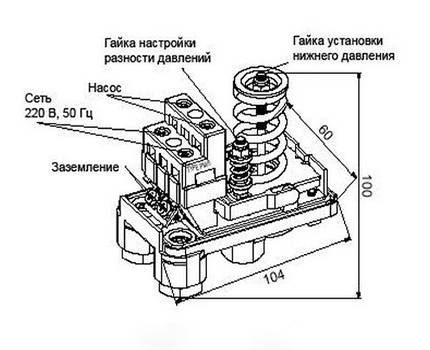
The pressure switch in units with pumps is considered the main part of its normal functioning, then each owner of the unit should know how the setting is carried out:
- Ensure the pump is in working condition and pump water up to the mark of three atmospheres.
- Switch off the device.
- Remove the cover, and slowly turn the nut until the element turns on. If you make movements in the direction of the clock, you can increase the air pressure, against the course - reduce.
- Open the tap and reduce the liquid readings to 1.7 atmospheres.
- Shut off the faucet.
- Remove the relay cover and turn the nut until the contacts actuate.
What pressure should be in the pumping station in the pear?
The hydraulic accumulator of the unit with the pump contains such an element as a rubber container, which is also commonly called a pear. There must be air between the walls of the tank and the tank itself. The more water there is in the pear, the stronger the air will be compressed and, accordingly, its pressure will be greater. Conversely, if the pressure drops, then the volume of water in the rubber container has decreased. So what should be the value of the optimal pressure for such a unit? In most cases, manufacturers declare a pressure of 1.5 atmospheres. When purchasing a pumping station, it is necessary to check the pressure level with a pressure gauge.
Do not forget that different pressure gauges have different errors.Therefore, it is best to use a certified automobile pressure gauge with minimal scale graduations on it.


What pressure should be in the expansion tank of the pumping station?
The pressure in the receiver must not exceed the upper limit of the liquid pressure level. Otherwise, the receiver will cease to fulfill its direct duty, namely, to fill with water and soften water hammer. The recommended pressure level for the expansion tank is 1.7 atmospheres.
Why does the pressure drop in the pumping station?
- The pump is not powerful enough or its parts are worn out.
- Water is leaking from the connections or there is a pipe rupture.
- The mains voltage drops.
- The suction pipe draws in air.
Why does the pumping station not build up pressure and turn off?
The main purpose of such units is to supply liquid from various sources with great depth, to create and maintain constant pressure indicators. However, during the operation of the devices, various problems occur. It also happens that the unit cannot build up the required pressure and turns off. The reasons for this may be:
- Pump running dry. This happens due to the fall of the water column below the water intake level.
- An increase in the resistance of the pipeline, which occurs if the length of the line does not match the diameter.
- Leaky connections, resulting in air leakage. With this problem, it is worth checking all connections and, if necessary, providing each of them with a sealant.
- The coarse filter is clogged. After cleaning the filter, you can try to apply pressure to the pumping station.
- Malfunction of the pressure switch. Adjusting the relay will help solve the problem.
Having found the cause of the malfunction of the pumping station, you can begin to eliminate it.
Why does the pressure in the pumping station not rise?

When the pressure gauge of the pumping station shows low pressure, and it does not rise, this process is also called airing. The reasons for this problem may be:
- If this is not a submersible pump, then the cause may be hiding in the suction tube, through which unwanted air can be sucked. Installing a "dry run" sensor will help to cope with the problem.
- The supply line is not tight at all, there is no density at the joints. It is necessary to check all joints and ensure that they are completely sealed.
- When filled, air remains in the pumping unit. Here you can not do without distillation, filling the pump from above under pressure.
The pumping station does not hold pressure and constantly turns on
- The rupture of the rubber tank in the accumulator, as a result of which the tank is completely filled with water, even where there should be air. It is this element that regulates the constancy of the pressure of the station. You can find the problem by pressing down on the liquid injection fitting. If the liquid begins to seep, then the problem is in the rubber container. Here it is better to immediately resort to replacing the membrane.
- There is no air pressure in the accumulator. The solution to the problem is to pump air into the chamber using a conventional air pump.
- Broken relay. In the case when the fitting is without smudges, then the problem is with the relay. If the settings do not help, you will have to resort to replacing the device.
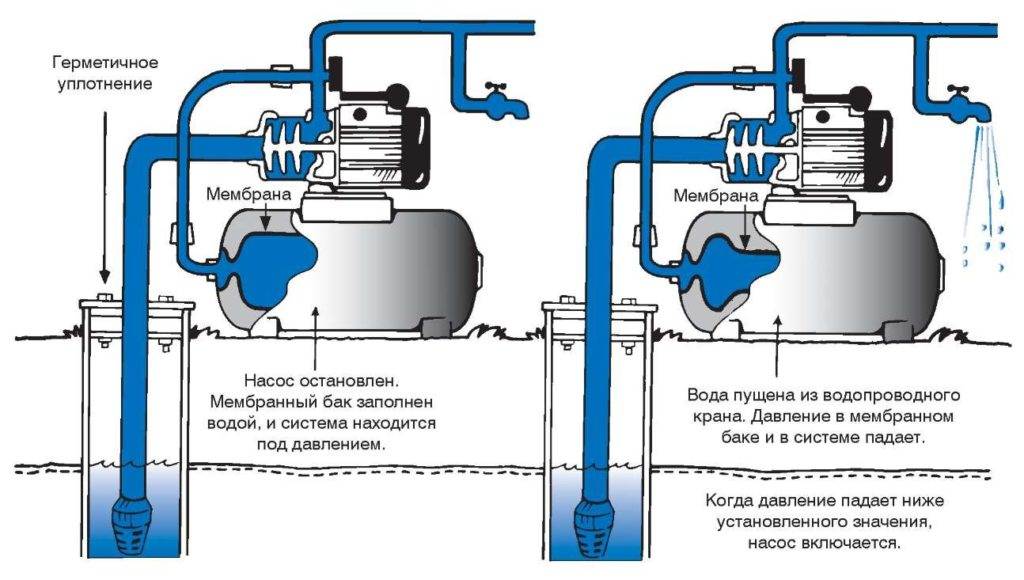
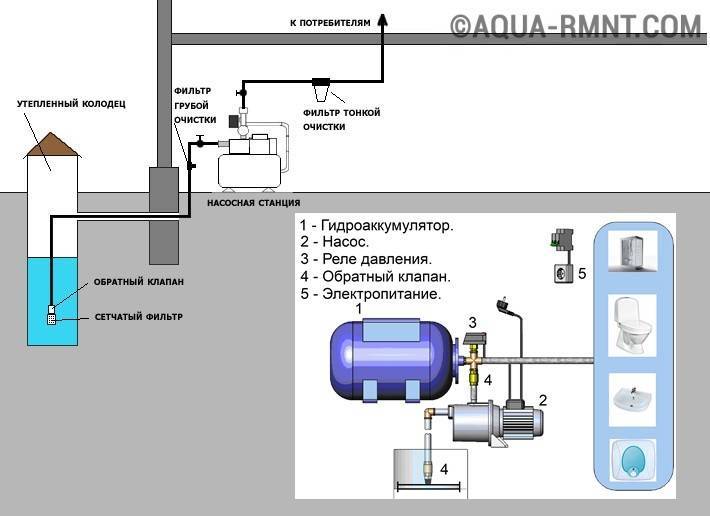
The principle of operation and the device of the station
Each water station, regardless of the pump used (submersible or surface), consists of a certain number of working units, which allows you to pump water with high quality
Each water station, regardless of the pump used (submersible or surface), consists of a certain number of working units, which allows you to pump water with high quality. It is necessary to know them in order to quickly identify possible causes of the malfunction equipment and understand why the automatic shutdown does not work.
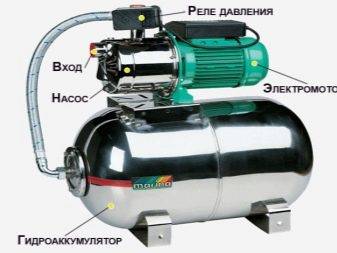
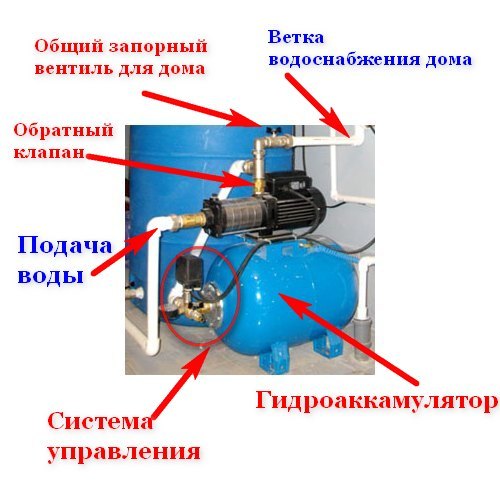
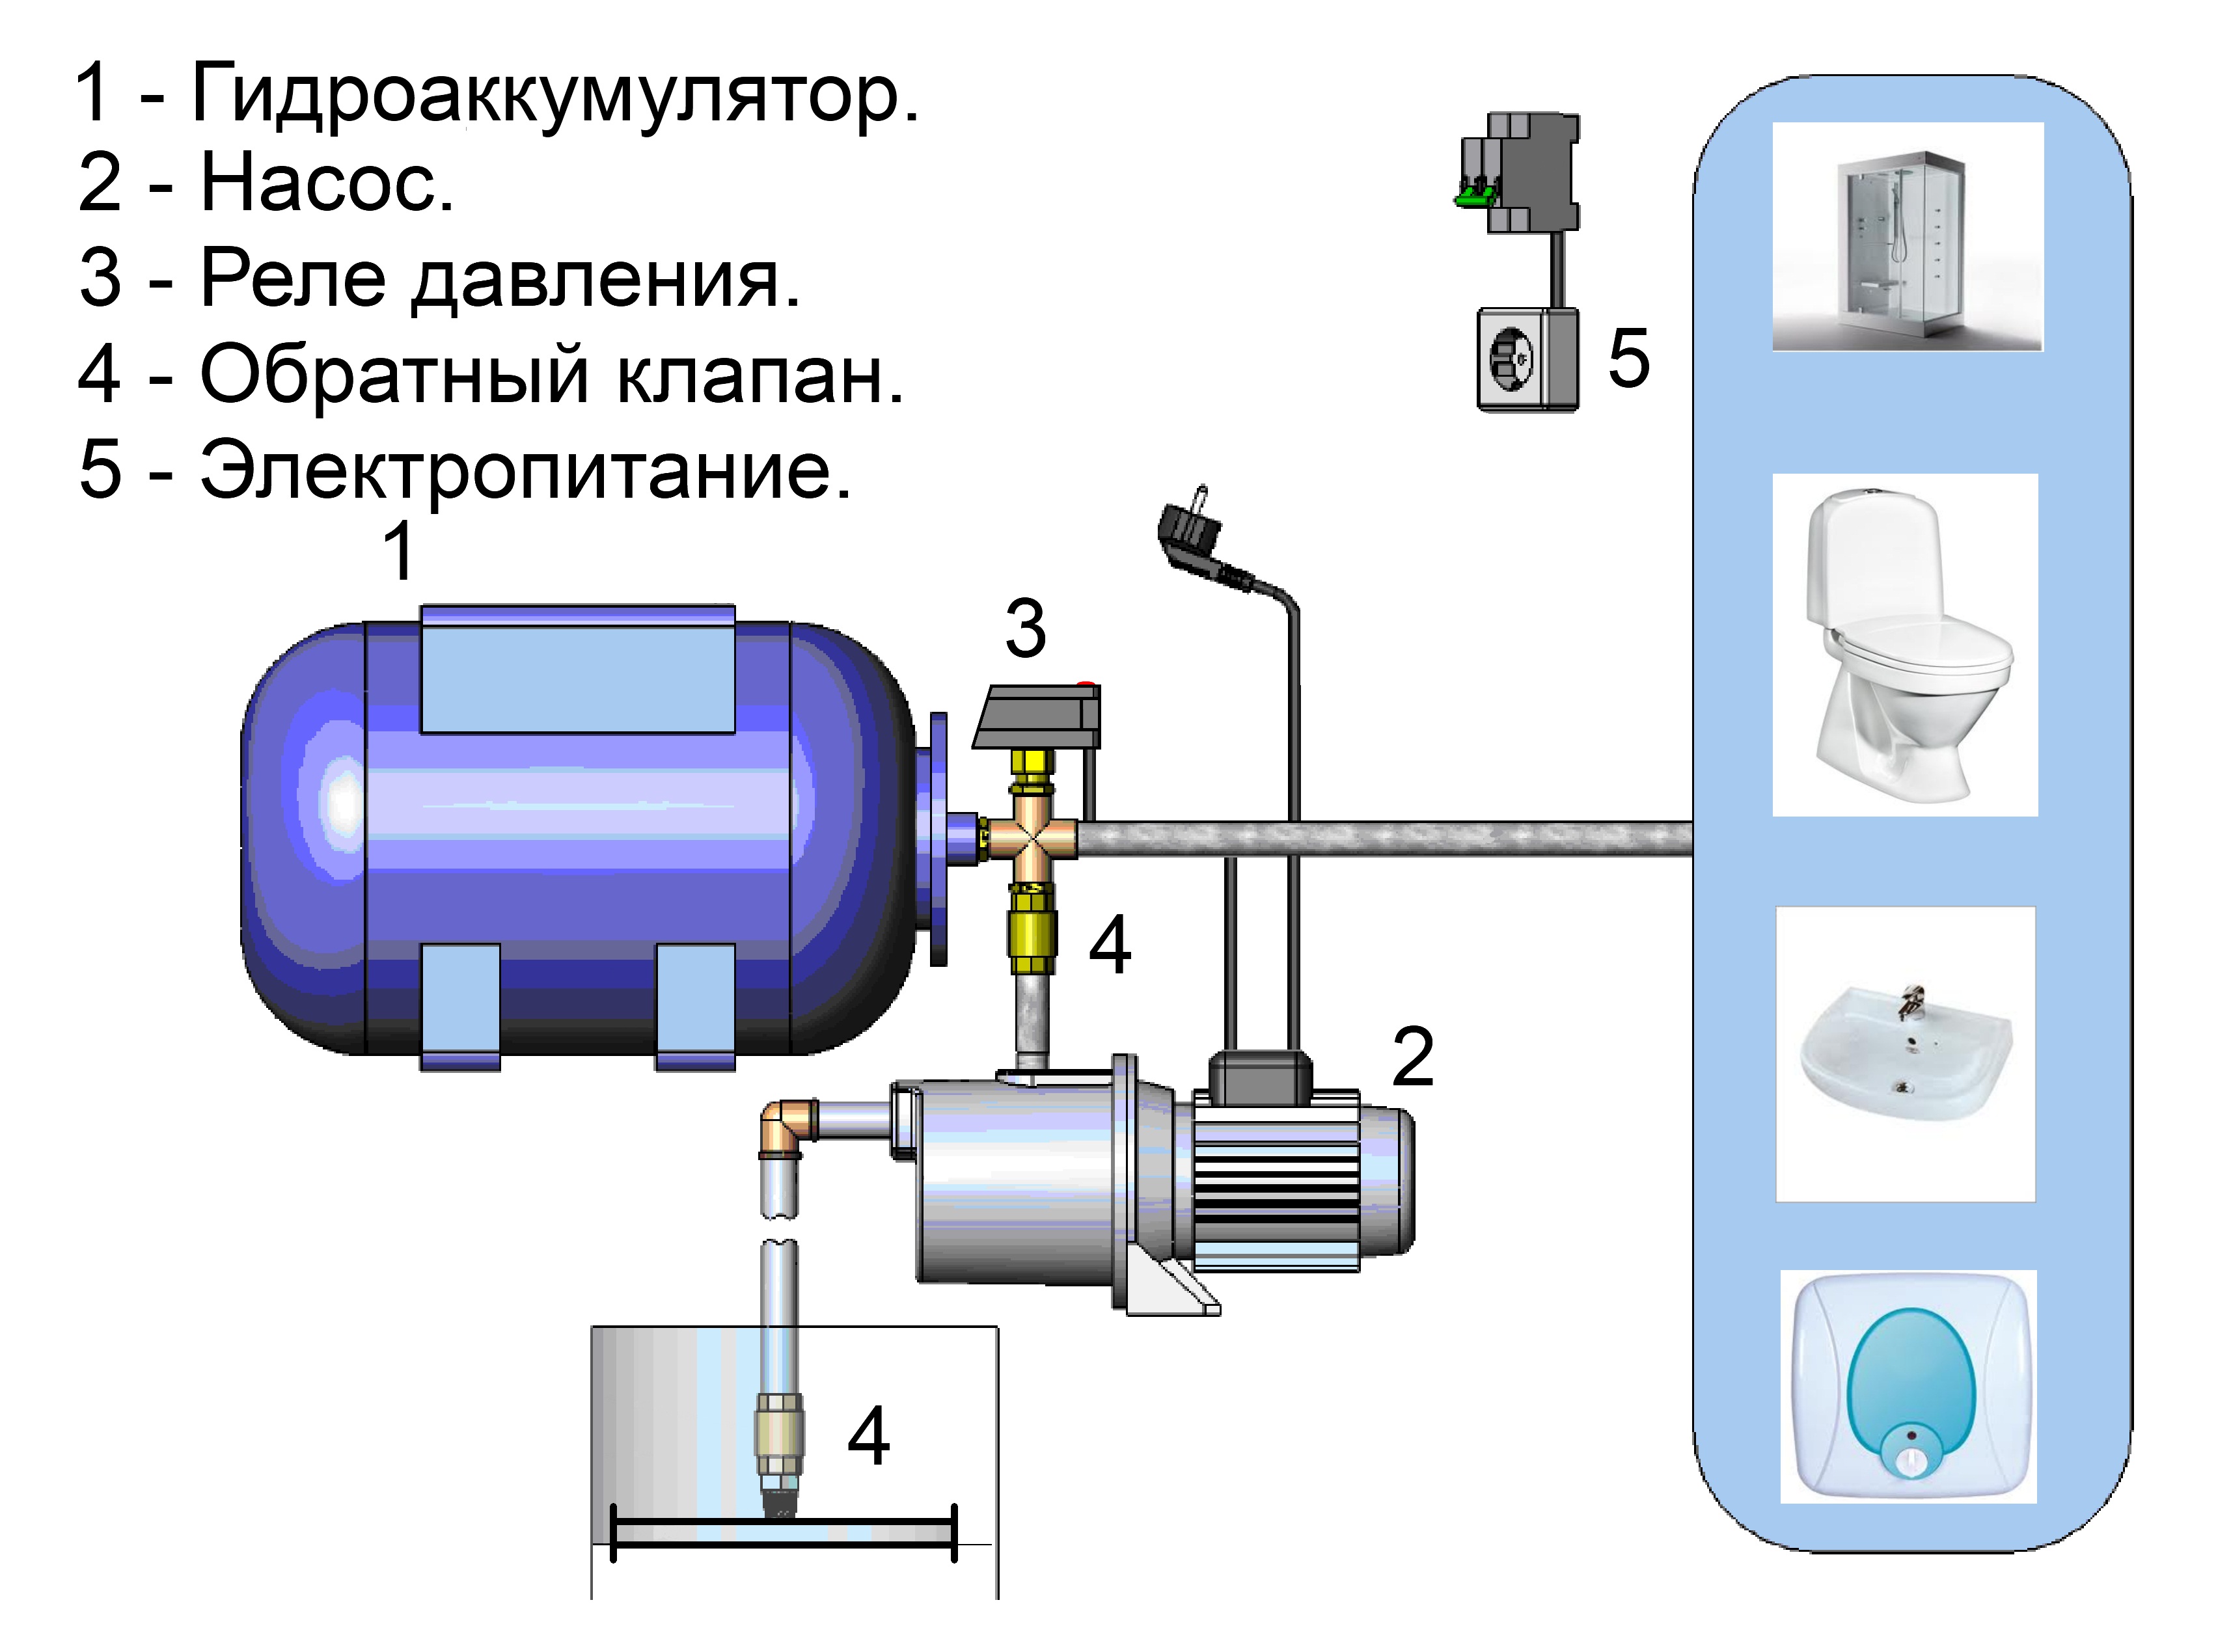
So, the pumping station consists of:
- The pump of the selected model. which pumps fluid from a source.
- Hydraulic accumulator. which provides both a supply of water in the required volume and its transportation through pipes under constant pressure.
- Pressure switch. This part controls the pressure levels in the system when water is drawn into the hydraulic tank and its outflow from the latter. In this case, the pressure switch sends a signal to the pump to turn on and off.
- Pressure gauge. which allows you to monitor the pressure in the system from the outside.
- Check valve. preventing the flow of water from the pump back into the well or well.
Important: it is necessary to assemble the pumping station strictly in a certain order to ensure its reliable operation. Incorrect installation of even one part can disable the entire installation.
Other reasons for not shutting down
Automation may not work to turn off for a number of other common reasons.
- Air leak - this is due to the fact that the settings are reset on the valve responsible for lowering the air accumulated in the system. For this reason, the working pressure can vary, and the result is that the pump pumps fluid non-stop and does not turn off. The only solution is to restore the correct settings.
- Power surges in the network, which occur not only due to accidents at substations, but also due to poor wiring, ignition of contacts, switching on of additional electrical equipment of high power. Such differences lead to failures and breakdowns in the operating cycle of the station. To avoid this situation, you can use voltage stabilizers (transformers or generators). If this is not done, with a constantly changing voltage, the pump will sooner or later be disabled.
- Oxidized contacts in the pressure sensor. Unfortunately, this option is also possible, and the station does not work normally for this very reason. Correction will require de-energizing, disassembling the equipment and inspecting all contacts. As a rule, after stripping and reassembly, the operation of the unit is restored.
- The wear of the impeller, especially if it is made of plastic, directly affects the continuous operation of the pump. This part of the station, located in the power unit, is destroyed over time due to the constant flow of small abrasive particles in the water. It is possible that initially, when drilling a well, the size of the grid that traps sand was chosen incorrectly, so larger fractions than are permissible get inside the station. The part will have to be changed, and for the future it is better to purchase a metal impeller.
- One of the serious malfunctions is the failure of the ejector, if the station is equipped with such a part. This is due to the fact that this important part is under the surface of the earth, and the repair is fraught with some difficulties. In some cases, the ejector just needs cleaning, but sometimes you have to replace it completely.
The conclusion suggests itself as follows - there are many reasons, serious and not so, that can complicate the operation of a water supply installation
In order for the pumping station to work smoothly and not be subject to wear due to shutdown problems, it is important to check all structural components at least once every 2-3 weeks and immediately fix even minor problems
For the reasons why the pumping station does not turn off, see the following video.
Blockages in the water supply system
They appear as follows:
- Water is not supplied or supplied with a minimum pressure to a separate mixer;
- Water does not flow into the toilet bowl;
- There is no cold or hot water in the whole house or on several appliances.
How to troubleshoot related problems?
Mixer
Reason number one is a clogged aerator filter on the gander. A fine mesh is quite capable of clogging even if there is a coarse filter at the entrance to the house.


The aerator makes the jet voluminous with minimal water consumption
Signs: weak pressure on both cold and hot water. At the same time, the pressure on other plumbing fixtures is normal.
Treatment:
- Unscrew the aerator;
- Take out the filter and rinse with water;
- If the filter is 6-8 stainless meshes, we throw out most of them, leaving 2-3 meshes;
- We assemble and install the aerator in place.
Cleaning a clogged aerator with sand and scale
Why does the supply of only cold or only hot water not work? Reason: sand, slag, scale and rust accumulated under the saddle of the crane box.
Treatment:
- With the water turned off, unscrew the crane box from the mixer body;

By unscrewing the crane box, you can clear the blockage under the saddle in the mixer body
- We pierce the blockage with a thick wire or a long thin screwdriver;
- We slightly open the valve and wait until the water takes out all the garbage into the sink, bathtub or substituted dishes. If necessary, clean the saddle again;
- We put the crane in place.
Tank
Why can't water flow into the drain tank?
The cause is almost always a clogged filling valve nozzle. The nozzle is always easily cleaned with an awl or thin wire, but the valve disassembly algorithm is different for each set of fittings.
Here are a couple of examples:
| Image | Description |
|
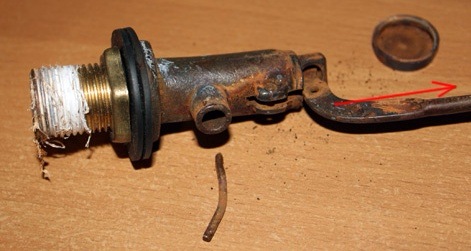
Soviet-style brass valve | At the brass valve, to access the nozzle, you need to remove the pin holding the rocker, remove the rocker and the shut-off valve. |
|
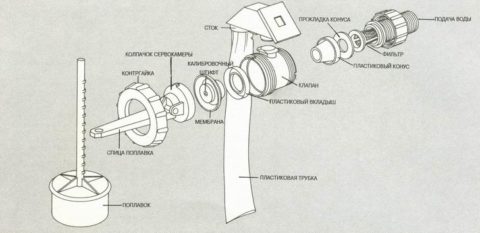
Plastic tank valve with side connection | At the plastic valve, you have to unscrew the union nut from the side of the float |
Eyeliner
If there is no cold or hot water in the whole house or on several appliances, repairing the water supply systems of a country house usually comes down to one of two operations:
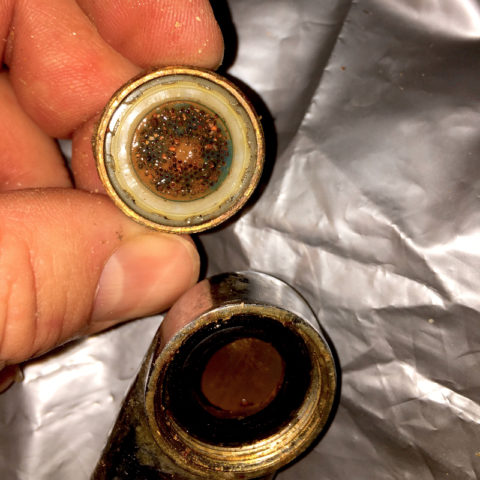
- Cleaning the blockage under the seat of the screw valve. To do this, you need to turn off the water to the valve (in the well at the entrance to the house, as an option - order a shutdown from the organization supplying water). The valve head is unscrewed, and the blockage is destroyed with a screwdriver, cable or any other suitable tool;
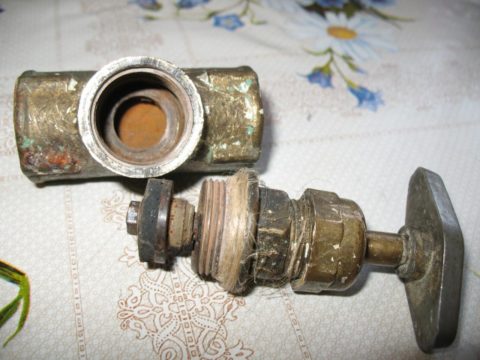
The valve head is unscrewed, freeing access to the seat
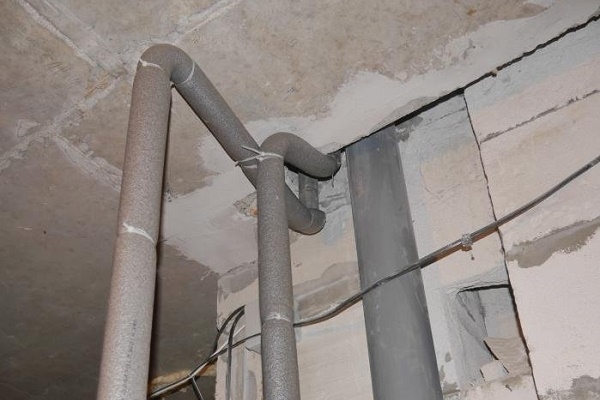
- Cleaning steel plumbing from accumulated deposits. Pipes are cleaned with a string or cable through the nearest threaded connection. The operation is very laborious and requires a certain skill, so the owners of clogged steel water pipes often prefer a complete replacement of the water pipe.
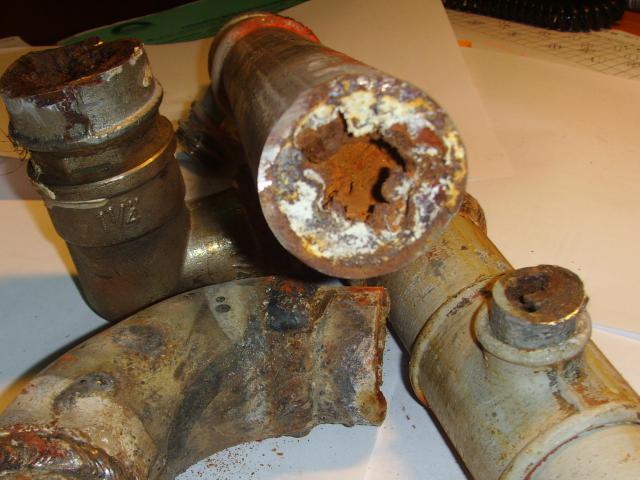
The photo allows you to assess the scale of the problem of overgrowth of steel pipes