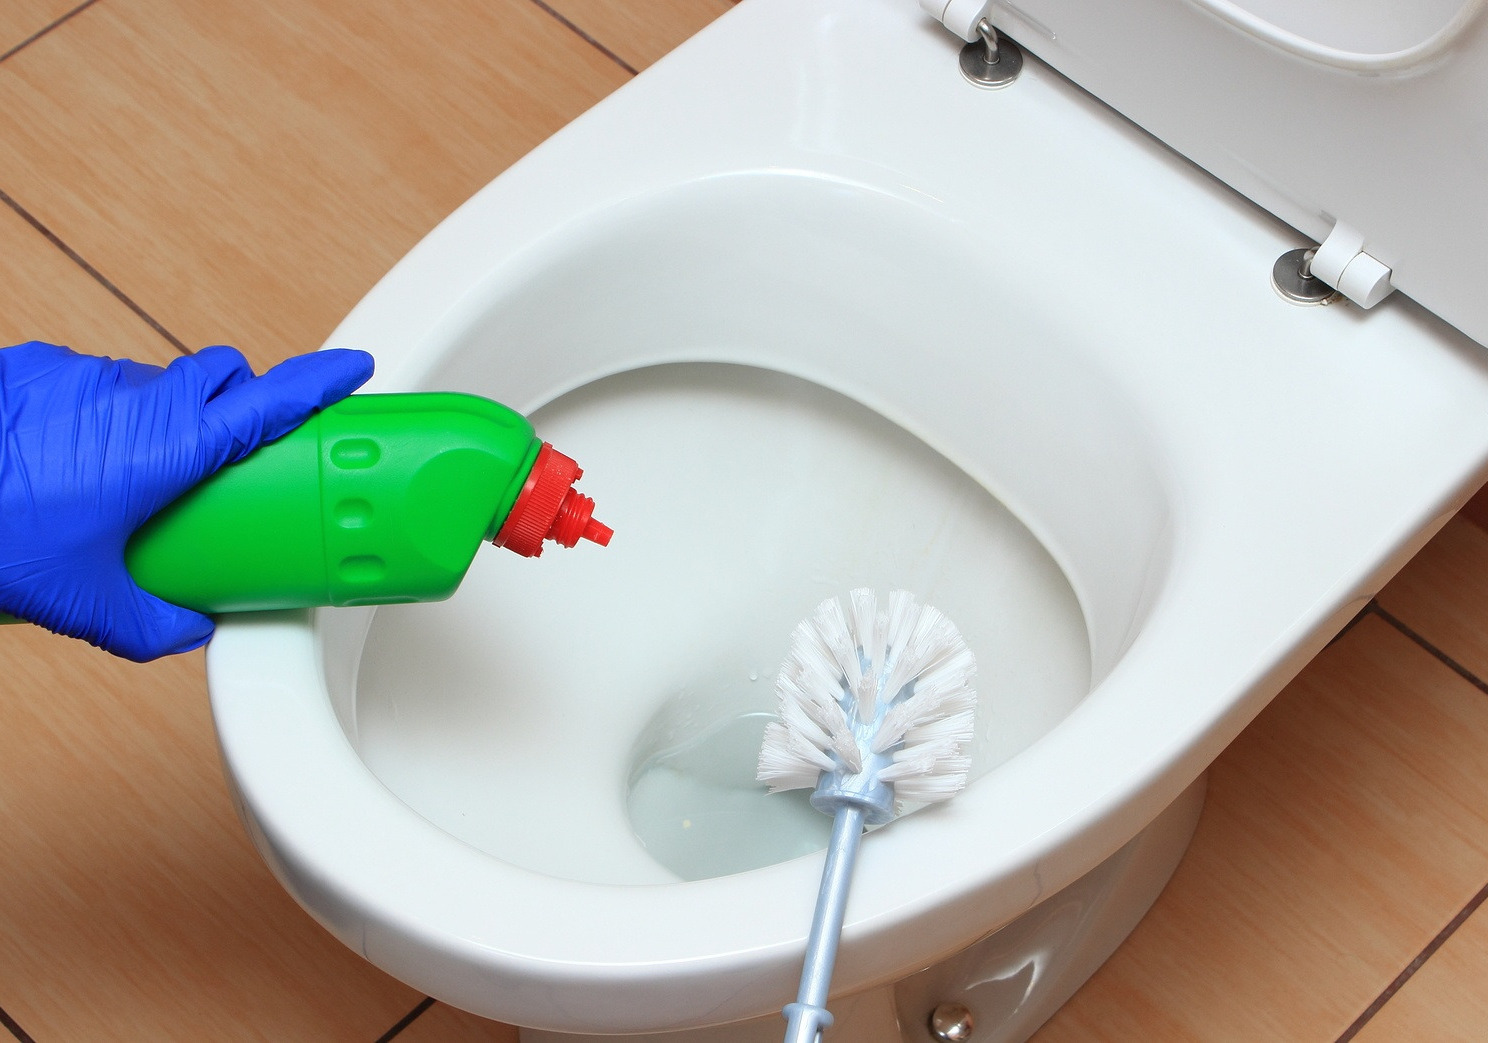
- Crane repair
- If water drips from the valve
- If water drips from the spout
- What to do if water drips between the faucet and spout
- Leak between faucet and sink
- Ball valve is the most popular option
- Single lever mixer device
- Fighting methods
- Ventilation
- thermal insulation
- Air humidity
- How to get rid of condensation on windows
- Heating and dehumidification
- Ensuring normal window glass temperature
- Ventilation and convection
- Window "chemistry"
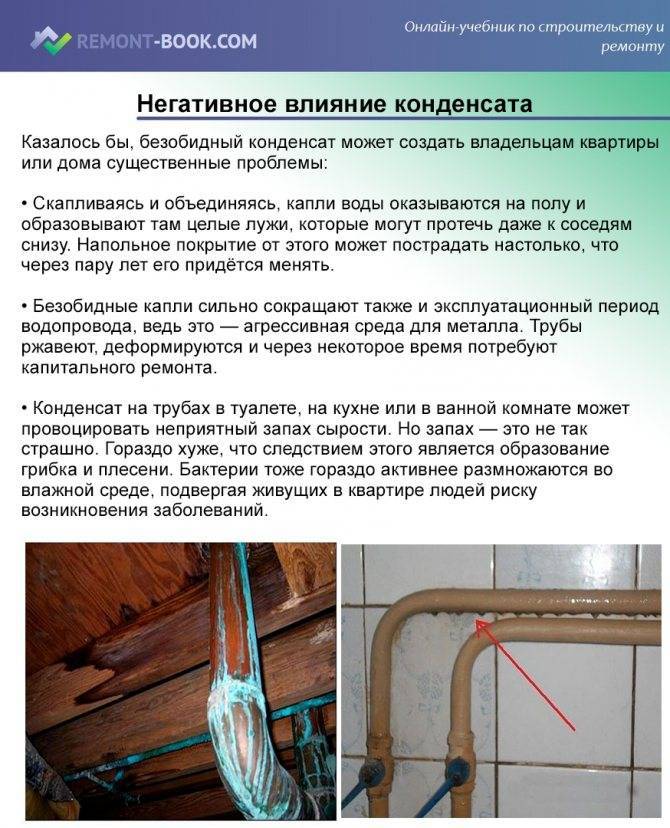
- THE PHYSICAL PROCESS OF CONDENSATE FORMATION
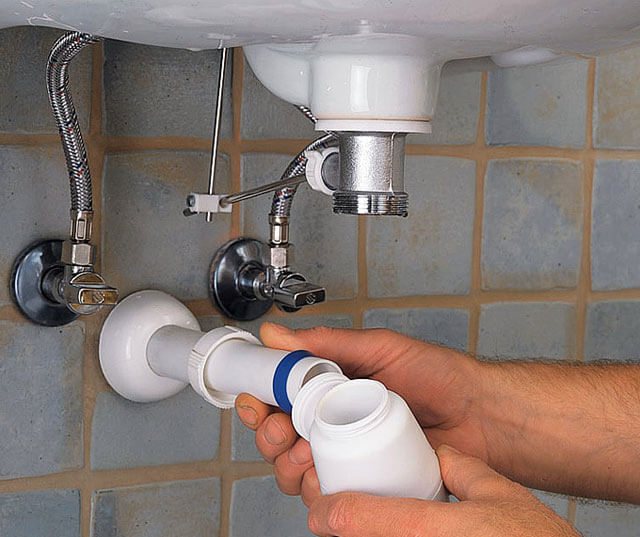
- Valve installation and adjustment
Crane repair
If water drips from the valve
Most likely the rubber gaskets on the faucet in the kitchen have worn out. Or the crane box does not fit snugly. It is necessary to carefully inspect the faucet, check the tightness of the faucet to the mixer. If the bushing valve is ceramic, then most likely the silicone gland is not tight. It needs to be compacted.
If everything is in order with the fit, then you just need to change the rubber gaskets. New ones can be purchased at the store. Disassemble the valve, remove the old destroyed gaskets, install new ones and reassemble the valve.
If water drips from the spout
This suggests that the axle box faucet in the kitchen has worn out and its edges no longer tightly block the water supply from the water supply. Most often, such a breakdown occurs with cheap cranes.Repairing the faucet in the kitchen in this case is also very simple: you need to purchase new crane box and put it in place of the old one. Replacing the valve will also help. If the leak does not stop, then the entire mixer will have to be replaced.
Important: do not screw the valves too tightly, otherwise the gaskets will wear out quickly and the faucet will start to flow again. Too much screwing can cause thread stripping and leakage.
Do-it-yourself faucet repair will save you a lot of money
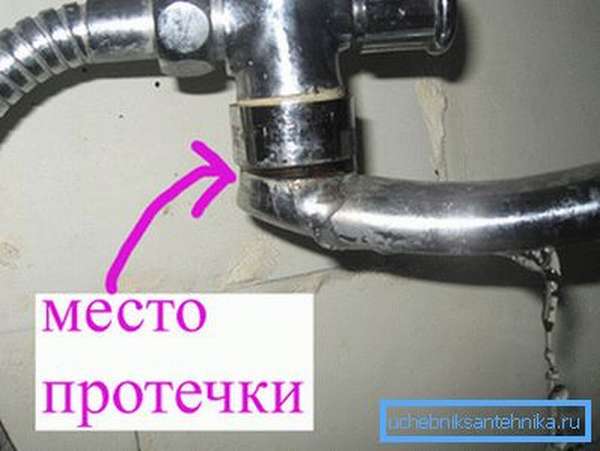
What to do if water drips between the faucet and spout
Perhaps the gaskets are worn out or the spout is untwisted. Tighten the valve and check the condition of the gaskets. If they are destroyed, then it is worth replacing them. Perhaps this defect is caused by the fact that the valve was installed incorrectly and the valve was tightened too much. Because of this, the gaskets were damaged. Repairing the faucet in this case is simple - replace the gaskets. Sometimes the gaskets are fine, which means bad hoses are being used. They need to be replaced.
Leak between faucet and sink
The mixer is poorly screwed or loosened during service. It is enough just to twist it so that water does not drip into the kitchen. Another cause of leaks is wear on the gasket between the sink and faucet. It is necessary to eliminate the cause of the leak - replace the gaskets and, for reliability, grease the place between the sink and the faucet with silicone sealant.
If the mixer is damaged: do not repair it, as this is pointless. It is better to purchase a new faucet and install it according to all the rules.
Ball valve is the most popular option
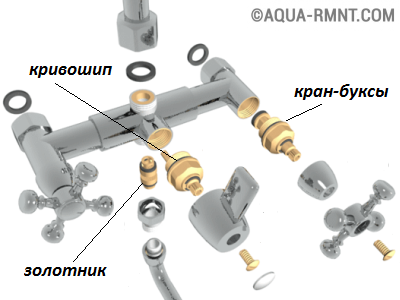
The most common mixer design today can be safely called a ball valve. It is a mechanism with one rotary handle.When moving the handle up and down, the pressure of water is regulated, to the right and left - its temperature. The popularity of such a device is explained not only by the simplicity and convenience of its operation, but also by increased reliability.
Single lever mixer device
In order to answer the question "how to repair a ball mixer", you need to understand how the system works. This is how the ball valve looks in section.
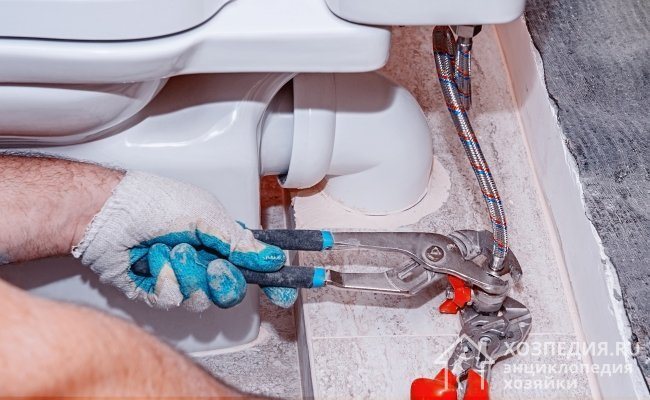
This is done according to the following algorithm:
- Shut off and drain the water;
- We dismantle the mixer;
- Pry off the decorative plug with a knife or screwdriver and remove it;
- We unscrew the screw;
- We remove the lever;
- We take out the cartridge and install a new one in its place;
- We make assembly.
That's all. Now your faucet will work like new for sure.


Blockage in the aerator
When the water in the bathroom flows in a thin stream, and in the kitchen it beats with a powerful stream, there is no need to talk about the fault of the water utility. So, how to fix a bathroom faucet if the water pressure has dropped? The most common and easily remedied cause of such a problem is a clogged aerator.
Checking if this is your case is very simple. Unscrew the aerator and open the faucet. If the water pressure returned to normal, the culprit was found. It is better to replace a very rusty aerator, but it is enough to rinse just a clogged one, directing a jet of water to its outer surface. Now install the part in place and you're done.
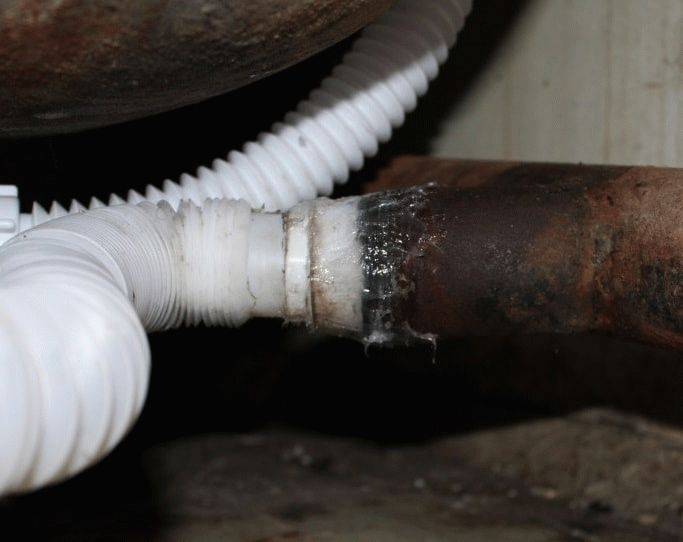
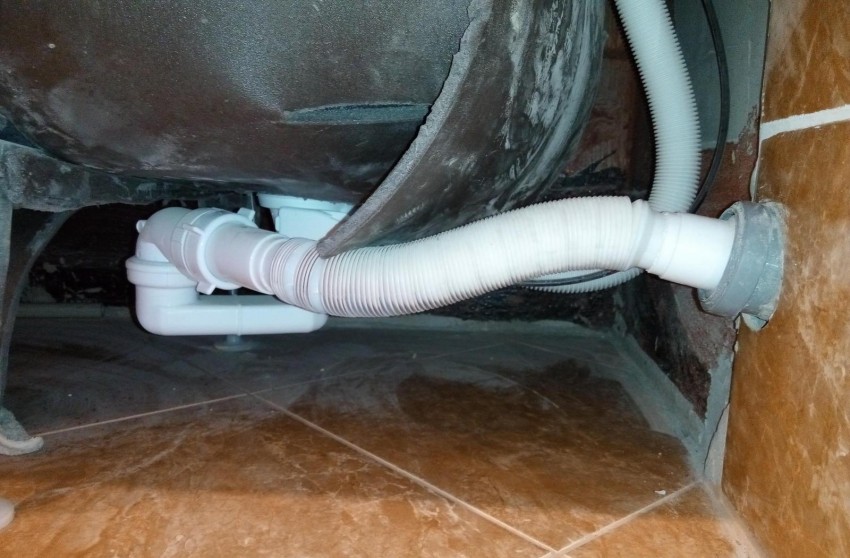
Blockage in a water pipe or hose
If simple manipulations with the aerator did not work, the pipe or hose is most likely clogged.Quite often, in houses with old metal pipes, rust that has fallen off their inner surface blocks the section, which leads to a drop in pressure in the mixer. Cleaning the pipes will help to cope with the problem, but it is still better to replace them with plastic ones. The inner surface of modern pipes made of polymers is very smooth and not subject to corrosion, which means it does not “overgrow”.
If there is no opportunity to replace the pipeline yet, arm yourself with a thin “snake” cable, disconnect the pipe from both sides and start cleaning.
Problems with the shower-bath switch
Now let's move on to the answer to the question of how to repair the faucet in the bathroom if the water supply to the shower stops by itself. The switch lever spontaneously lowers and water flows only through the faucet.
The cause of such a malfunction may be the wear of the spool gaskets. If only the top gasket is damaged, you will not have to remove the mixer. Since it is impossible to determine this “by eye”, for a start it is worth replacing it, and only then draw conclusions:
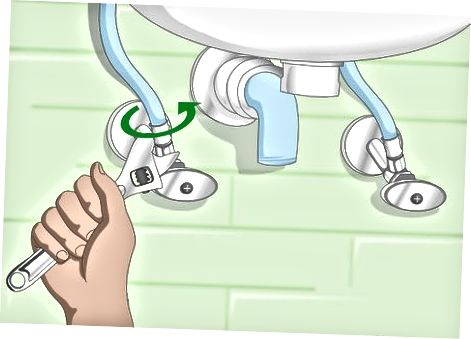
- Unscrew the union nut of the hose and remove it;
- We hook the gasket with a thin hook or awl;
- We moisten the new gasket with water and install it in place;
- We collect the mixer.
If the damage could not be eliminated in this way, you will have to change the bottom gasket:
-
- We block the water;
- Remove the flexible hose by unscrewing the union nut;
- Remove the spout and adapter;
- Remove the switch and remove the eccentric;
- We take out the spool;
Remove the bottom gasket with a thin screwdriver or hook (the top one has already been replaced);
If the top spool seal has already been replaced, this does not need to be done again.
- We put on a new gasket, moisten it with water and install the spool back;
- We collect the mixer.
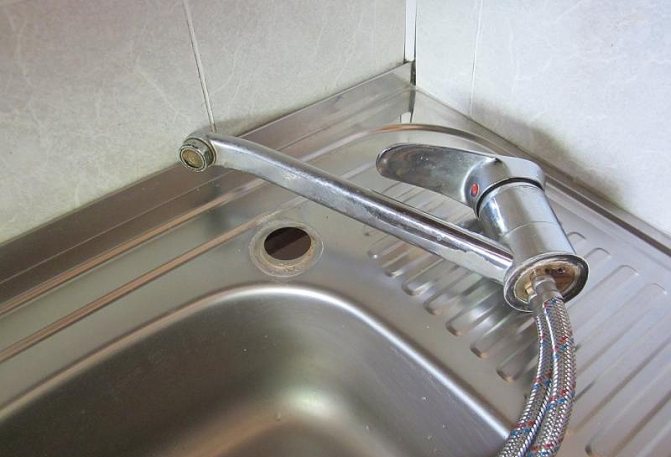
In the kitchen, the faucet is used much more actively than in the bathroom, so it fails much more often. In rare cases, the only solution to the problem that has arisen is the purchase of a new appliance and the invitation of a plumber, in the rest you can handle it yourself. Having decided to repair the mixer on DIY kitchen, you will save on the services of a specialist and gain important experience. You just need to arm yourself with theory and tools.


- Leakage from under the nut at the point where the water is poured out, from under the handle (lever) or mixer taps in working order.
- The correct movement of the lever or valves is violated (they stick, scroll, do not lock in the desired position, etc.).
- With normal water pressure in the system, the jet is not powerful enough.
- Water drips from a closed faucet.
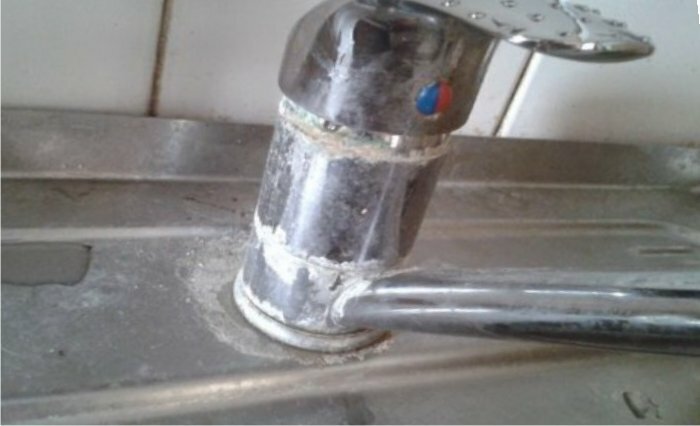
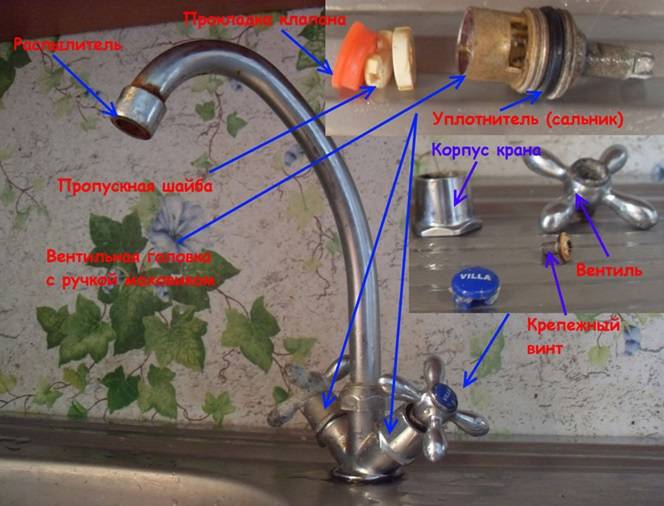
The most common problem is a leaky faucet. And here you need to know the "enemy" not only in person, but also from the inside. It's about mixers.
Fighting methods
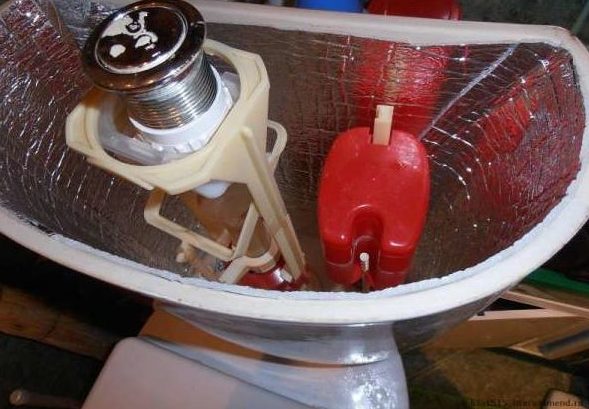
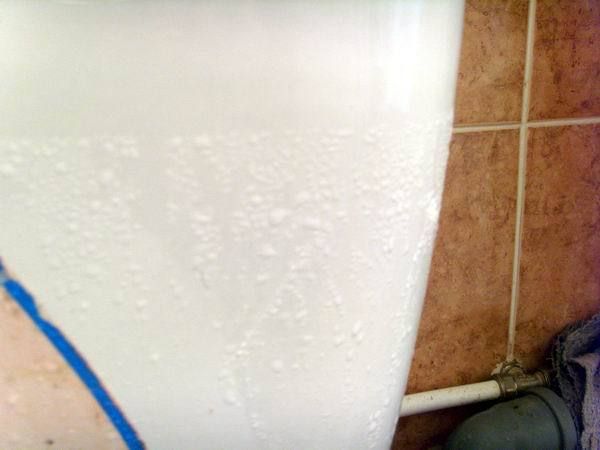
Various approaches can be used to deal with condensation. The main directions are the restoration of a normal microclimate with good ventilation in the toilet and the thermal insulation of water communications.
Ventilation
In some cases, the formation of condensate is mainly due to insufficient ventilation in the toilet. To verify this, you can leave the door to the room open all night and analyze the condition of the pipes in the morning. If the experiment showed that a previously wet surface became more noticeable drier, then the issue of ventilation cannot be dispensed with.
There are several approaches to the solution:
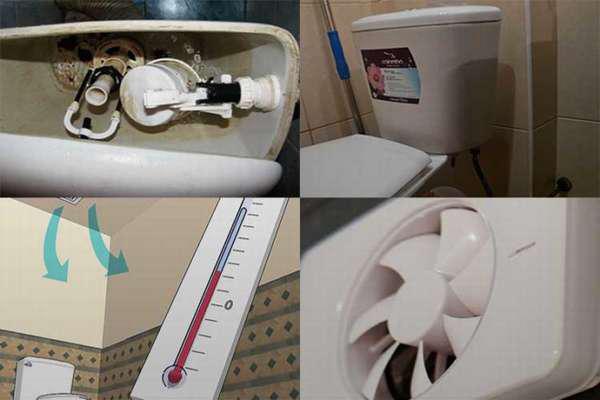
- You should check if there is a gap of 10-20 mm under the door in the toilet. It is necessary for air access to the toilet.
Ways to eliminate the defect are reinstalling the door or embedding special ventilation valves in it, which provide air flow.
- Ensuring the flow of air from the street more frequent ventilation. One of the options is to install a supply valve, which allows you to eliminate the problem without opening windows (it can be installed both in the wall and in the frame).
- Installation of exhaust ventilation, which will effectively remove moist air from the toilet. Install the device, as a rule, on half of the standard ventilation hole. The device can be turned on only when necessary, for example, after wet cleaning, and the rest of the time the ventilation will be carried out in the standard mode.
- The easiest and fastest way to remove excess moisture is to leave the toilet door ajar more often. This method can be used as a temporary.
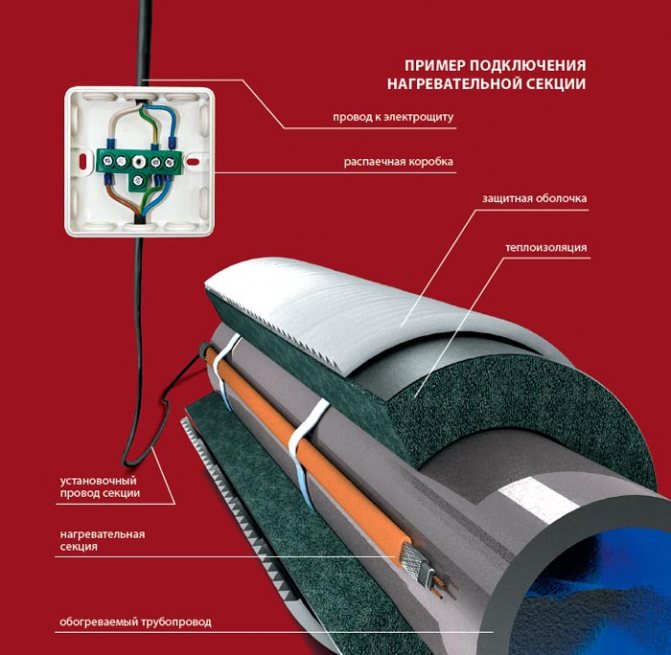
thermal insulation
High-quality thermal insulation is a very effective method of eliminating condensate. This measure is aimed at eliminating the root cause of the appearance of water droplets on the pipe - the temperature difference between the water in the water supply and the air in the toilet.
As a heat-insulating agent, foam covers made of synthetic materials are used. It can be thermoflex, polyethylene, etc. They are produced in a wide range for different pipe diameters.
Before buying a heat-insulating cover, it is necessary to measure the length and diameter of the pipe on which it is planned to be put on.
You can install covers yourself according to the following algorithm:
- clean the surface of water communications from dust and dirt;
- if there is rust on the metal, it must be dealt with even before the installation of thermal insulation;
- taking into account all the bends of the pipe in the room, blanks are cut - separate for each straight section;
- on the covers there is a basting running along which each blank must be cut;
- after cutting the blanks lengthwise, they are put on pipes, bringing the edges of the longitudinal cuts together with hands, without additional fixation;
- places of bends (turns) of pipes must be wrapped with electrical tape.
An alternative option is liquid thermal insulation. The composition should only be applied to prepared metal pipes - cleaned and primed. The method of application is chosen convenient: spraying, smearing with a brush. After the first layer dries, apply the second. The product dries quickly enough - about an hour.
Air humidity
Poor ventilation is not always to blame for high humidity in the toilet. The reasons may be the following:
- The presence of leaks. It can be, for example, constantly running water from the tank.
- With a combined toilet room with a bathroom - drying wet laundry.
- Lack (or complete absence) of heating devices. The solution is to install an additional coil.
- Complete filling of the coil with wet linen and rags. As a result, more moisture evaporates. To prevent this, the heated towel rail and hot water pipes should be as free as possible.
How to get rid of condensation on windows
There are several solutions. Let's break them down point by point.
Heating and dehumidification
The main "enemies" of condensate are devices that provide good air circulation and its low humidity:
- heating radiators;
- fans, fan heaters;
- convectors;
- air dryers.
The main “but” in the use of such devices is that the relative humidity in the room should not fall below the specified one.
Table 2. Regulatory indicators of temperature and humidity in the premises.


If we compare these data with the data in Table 1, it becomes clear that while maintaining the optimal relative humidity, there will be no condensate in the living rooms.
Heating devices help to “dry” the air. But this will be meaningless with a constant source of moisture - large masses of open water and wet soil. Consequence - it is necessary to remove or close large heated aquariums, reduce the number of indoor flowers.
Another source of moisture is a large crowd of people. The expression used in rooms with misted windows is well known - “breathed”. That is, if, with a generally normal operation of windows with a large number of people, condensation suddenly appeared on the windows, you don’t have to worry - as soon as everyone disperses, the situation returns to normal.
Ensuring normal window glass temperature
If the glass is not too thin, there is a sufficient air (or airless, gas in double-glazed windows) layer between the windows, there are no cracks and gaps in the frames - the window inside has a temperature close to room temperature. As a result, it does not fog up.
To achieve this result, you need:
- choose windows and other translucent structures with the required energy performance;
- take care of the absence of cracks and gaps between the frame and the sashes.
Of course, the climatic conditions of the region should be taken into account. So, for the Far North, triple frames and double-glazed windows of three glasses are the norm, but in the southern regions you can get by with two glasses, and this will be enough.
Ventilation and convection
Even the most successful window in all respects will not be able to remain warm enough on the inside if warm air does not circulate around it. Therefore, wide window sills, completely (and with a margin) overlapping heaters, battery powered screens, blackout curtains "on the floor", too deep window openings - all this contributes to the appearance of condensation.
What needs to be done:
-
limit the width of the window sill. If this cannot be done, install a window sill with a ventilation grill;
-
refuse to install batteries in niches, behind screens;
-
arrange the curtains so that they either do not cover the radiators (short, lambrequins, decorative), or stand at least 10 ... 15 cm from the edge of the window sill. Also, they should not touch the floor and the radiator.
It is, of course, difficult to provide such conditions without a major overhaul. But although it is quite possible to remove or outweigh the curtains.
Even more useful in this regard is the installation of forced ventilation (especially for wet rooms). It provides constant air circulation, elimination of excess moisture.
If the problem is with only one window, you can mount the ventilation valve only near it.
Window "chemistry"
Another, albeit dubious, remedy for condensate is glass treatment with special compounds. These include car "auto foggers" and some home remedies.


Automotive “chemistry” is alcohol-based sprays and liquids. They rub or spray the glass, thereby making it smoother, reducing the possibility for water droplets to linger on the surface.The smallest particles quickly collect into separate large drops and flow down, thereby providing visibility on the windows in the car. But if for transport clear visibility is a guarantee of safety, then for windows in a house this indicator is not so important. Water will still drain onto the windowsill, only faster.
A similar effect (albeit weaker) is given by folk recipes:
- rubbing glass with glycerin soap (or its solution), as well as a mixture of potassium oil, glycerin and turpentine (proportions 40:20:4);
- washing glasses with saline or chalk solution;
- wiping with alcohol compositions;
- use after washing newspaper or other paper with printing ink for rubbing - the ink has a water-repellent effect.
It should be noted that all these methods give only a temporary effect. Eliminate the causes of fogging windows.
THE PHYSICAL PROCESS OF CONDENSATE FORMATION
The physical essence of the process of condensate formation is that the maximum amount of moisture that air can contain in the form of gas (water vapor) depends mainly on its temperature. The lower the air temperature, the lower the amount of water vapor, i.e. water in gaseous form may contain air, and vice versa.
Thus, when the temperature of the air itself decreases or when the air comes into contact with cooled objects, a moment may arise when it the temperature drops to the dew point and, as a result, condensate (dew) falls out, i.e. that part of the water that is no longer held in the air in the form of a gas. There comes a moment of saturation of the air with water vapor and the "extra" water vapor falls out in the liquid phase in the form of condensate. This process is well illustrated by the scheme of condensate formation.
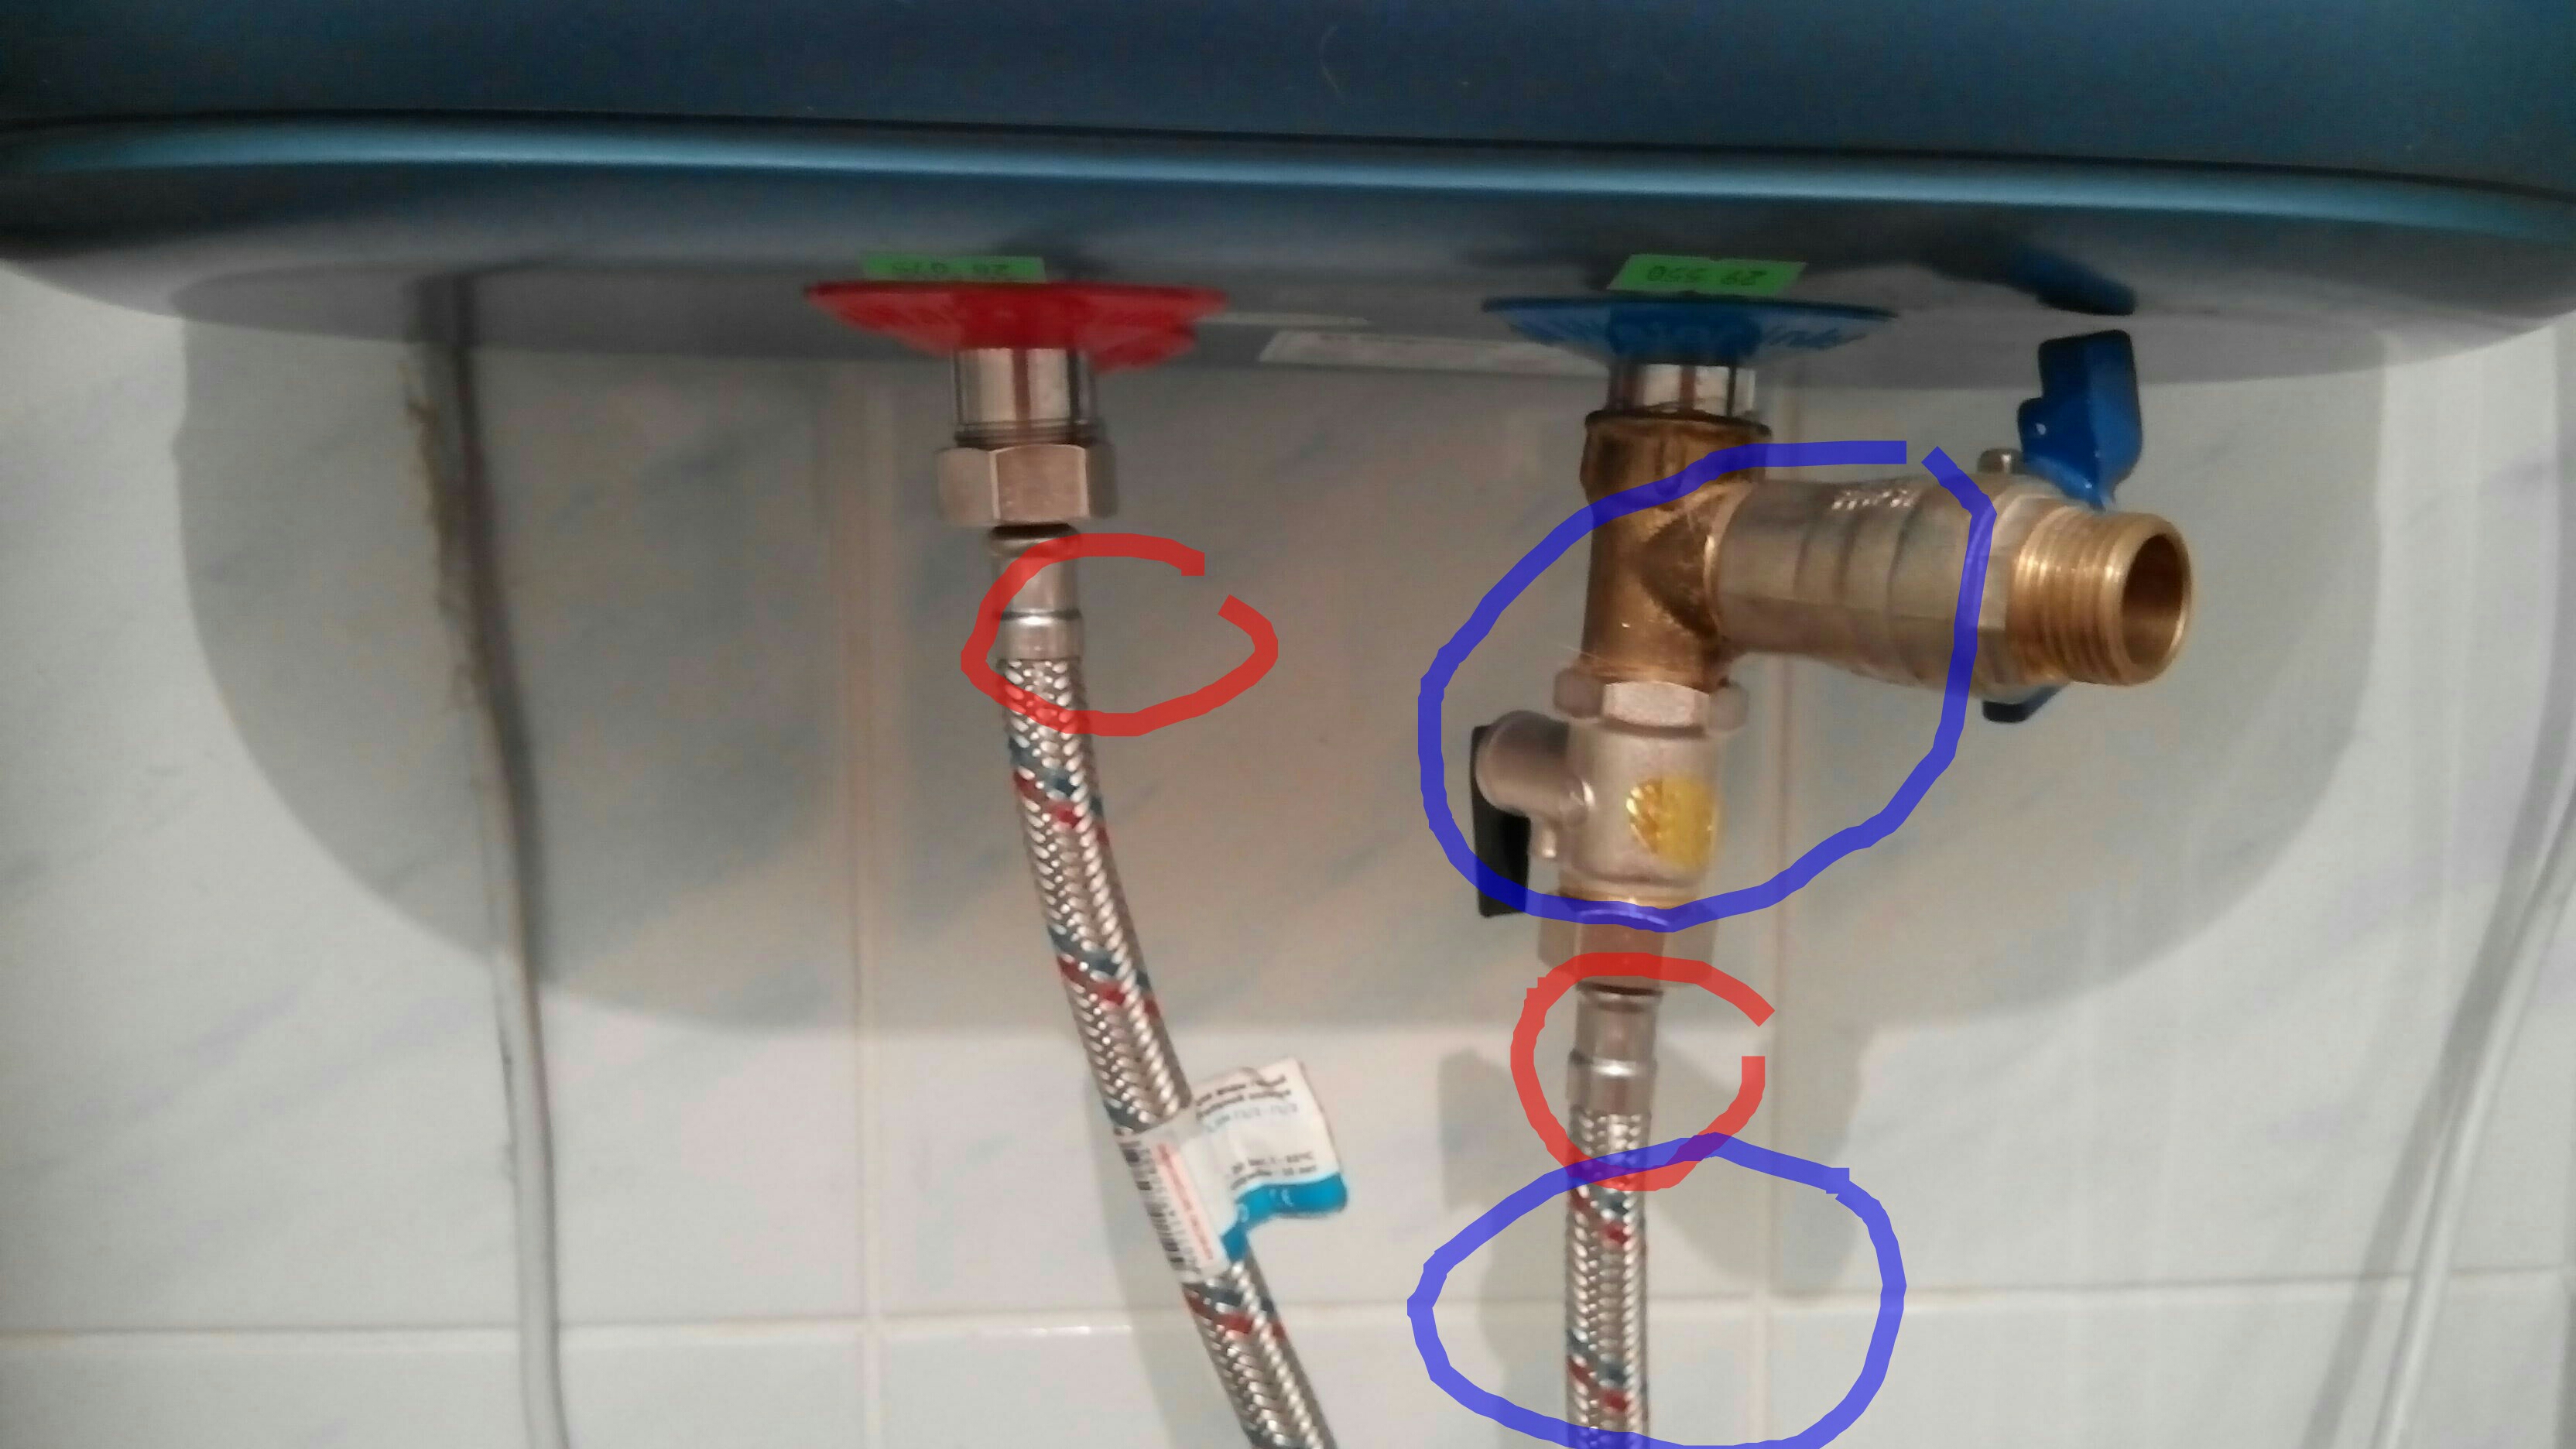
Valve installation and adjustment
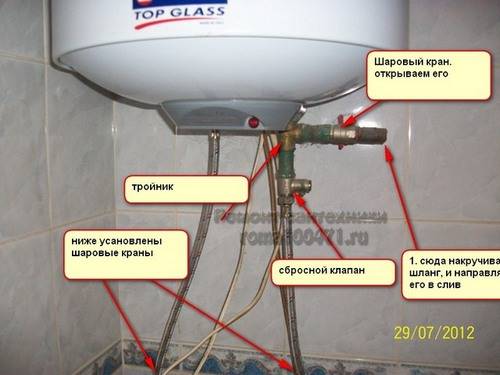
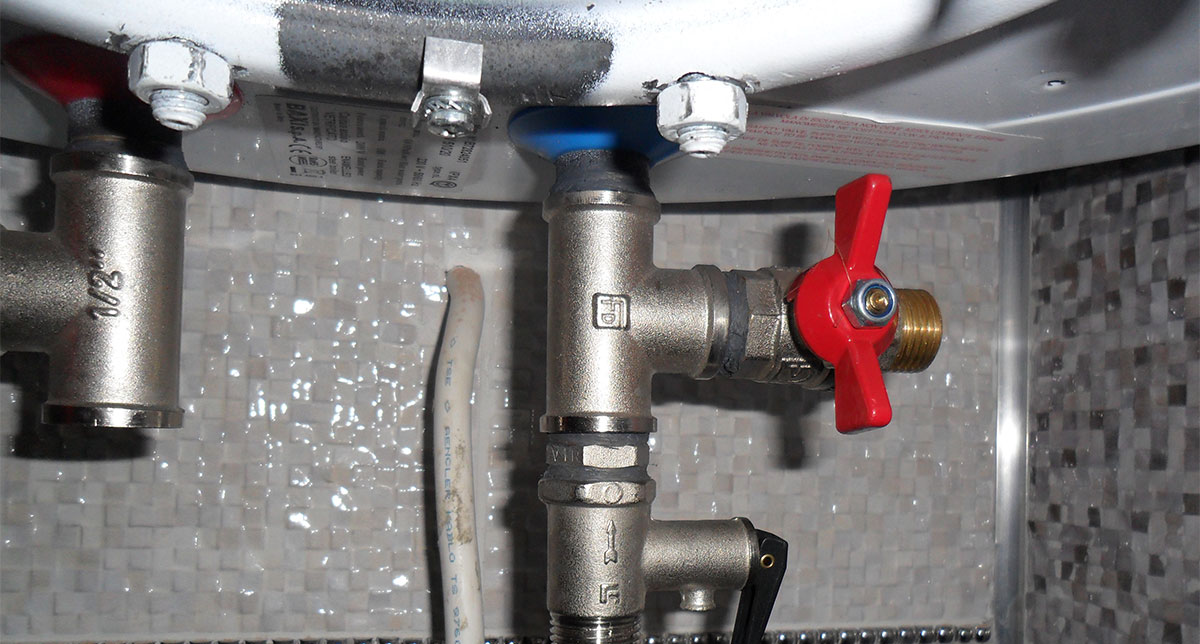
A safety valve is mounted on the cold water pipe
The check valve is attached to the cold water inlet. For the convenience of work, manufacturers mark it in blue. It is possible to fasten the tap at any stage of installation, but it is more expedient to do this before hanging the tank on hooks. When the heater is on the floor, it is much easier, more convenient and safer to work with it.
Installation should be carried out in the following sequence:
Unscrew the fixing screws and remove the plastic cover. So that it does not interfere with work, you do not need to remove the light bulb from it, and then put it in a safe place.
Inspect the thread on the inlet pipe of the tank, visually check its integrity. Clean the coils with a brush, remove the transport lubricant with a dry cloth.
Carry out the same procedure with the upper union nut of the valve. If there are burrs, they must be carefully removed with a knife or needle file.
Wrap tape on the FUM pipe. This must be done clockwise, shifting the thickening to the side. The layer thickness should be 1 mm at the cut and 3 mm at the start of the thread.
Take the valve, catch the edge of the thread and start screwing it on. The product should go tight and with effort
It is important that at the end of the rotation the nut does not rest against the side. This will indicate that not enough FUM tape has been wound. The procedure will have to be repeated.
The procedure will have to be repeated.