- The principle of operation of the baseboard heating system
- Installing the baseboard heating system yourself
- Advantages of baseboard heating
- Disadvantages of baseboard heating
- Types of heating skirting boards
- Heating device with water warm plinth
- Connection method
- Mounting Features
- Electric warm plinth
- Types of heating skirting boards
- Electric heating
- Water warm plinth
- Heating element length calculation
- What and how to connect
- System features
- Installing a water plinth
- Kinds
- Water
- Electric
- Installation of a warm plinth
- Assembling the water heating system
- Assembling the electric heating system
The principle of operation of the baseboard heating system
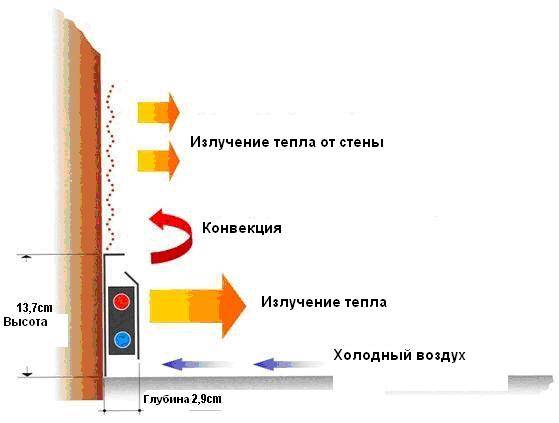
The principle of operation of skirting radiators is based not on air convection, but on the Coanda effect. Its meaning lies in the fact that a zone of low pressure arises near the surfaces, which is due to the free access of air from only one side and impermeability. A stream of air spreads over a large area, which develops only along the surface.
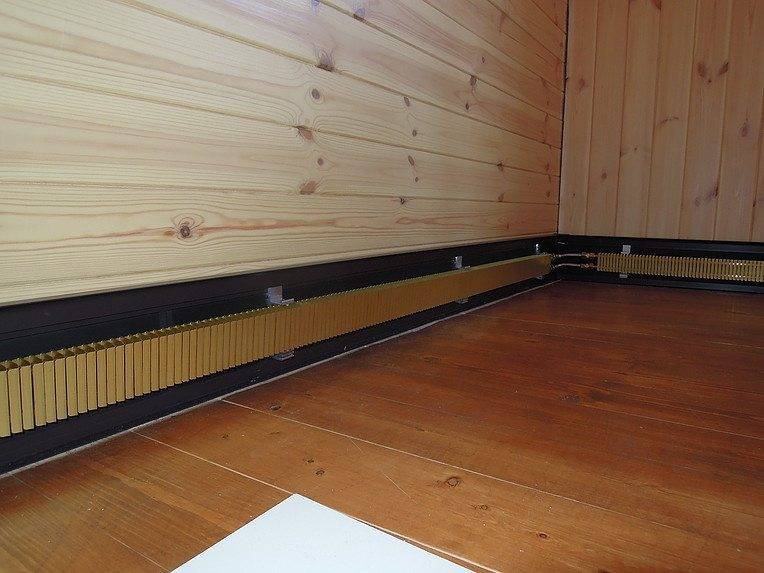
In the box, which is formed by aluminum slats, there are two horizontal holes along the entire length - near the floor and closer to the wall. The cold air flow enters the box, heats up and rises.So, air spreads over the surface of the wall. Due to this, infrared heat is distributed evenly over the material of the wall, thus heating the room and providing it with an optimal temperature, the same at the top and bottom of the room.
 The principle of operation of baseboard heating
Since convection does not take part in the operation of such heating, there is no need to overheat the heat carrier. The baseboard type heating system uses in the constructions such materials that have good heat conductivity - aluminum, copper, etc.
Installing the baseboard heating system yourself
A baseboard heating system is installed in much the same way as a traditional heating system. The difference is only in different nuances. Of course, it is better to entrust such serious work to professionals, but if you do not want to incur extra financial costs or like to make repairs yourself, then you can do everything yourself. The process of installing baseboard heating consists of the following steps:
- wall plate installation. Such a bar is placed above the floor and fixed to the wall with self-tapping screws or dowels;
- installation and connection of individual convector modules into one system. For this, special crimp fittings are used;
- connection of the system to the heating main. This is done by the distribution manifold;
- system health check. Before closing, be sure to check the system for leaks;
- covered with a decorative panel.
 Installation of a warm plinth
Advantages of baseboard heating
The positive properties of baseboard heating include the following points:
- lack of convection effect, which is usually accompanied by dust suspension;
- the presence of infrared heat, which is perceived positively by our body;
- heat is distributed evenly;
- heat does not accumulate near the ceiling, but the temperature is the same throughout the room;
- the problem of deposition of moisture on the walls and ceiling is removed, which would normally lead to mold;
- fast installation;
- there is no need to overheat the heat carrier, which will save resources;
- all elements of the system are suitable for repair, thanks to which it is possible to carry out repairs without opening the floor and walls;
- thanks to special thermostats, you can set the required temperature for each room separately.
We also note the fact that a baseboard-type heating system can also be used for cooling rooms. To do this, you just need to fill it with cold liquid.
Here it is important to keep the temperature of the liquid at a level that exceeds the dew point in certain conditions, since condensation will appear on the circuits.
Disadvantages of baseboard heating
Among the negative aspects in the arrangement of the baseboard heating system, one can single out such as:
- rather high initial cost, which also includes expensive installation. You can make plinth heating with your own hands, but the price of the elements of the heating system is due to the high cost of the materials from which they are made;
- you can not install different decorative overlays on the radiator, as they can significantly reduce heat transfer;
- radiators must fit very tightly to the wall, which often leads to warping of the film finish of the walls of the room;
- the room in which heating is installed with a warm baseboard must be kept more free, do not block the baseboards and walls with cabinet furniture.This may affect the heating efficiency.
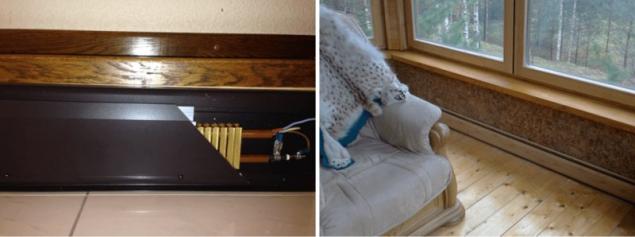
 Baseboard heating not very decorative
Types of heating skirting boards
The baseboard heating system can be of two types: with electric and water heaters. At the installation stage, a system with warm water baseboards is more complicated (requires a collector or beam connection), but during operation it is more economical. The electric warm plinth is mounted quickly - you just need to fix the heaters to the wall, immediately after installation it is ready for use. But heating costs, like any electric heating, are high.
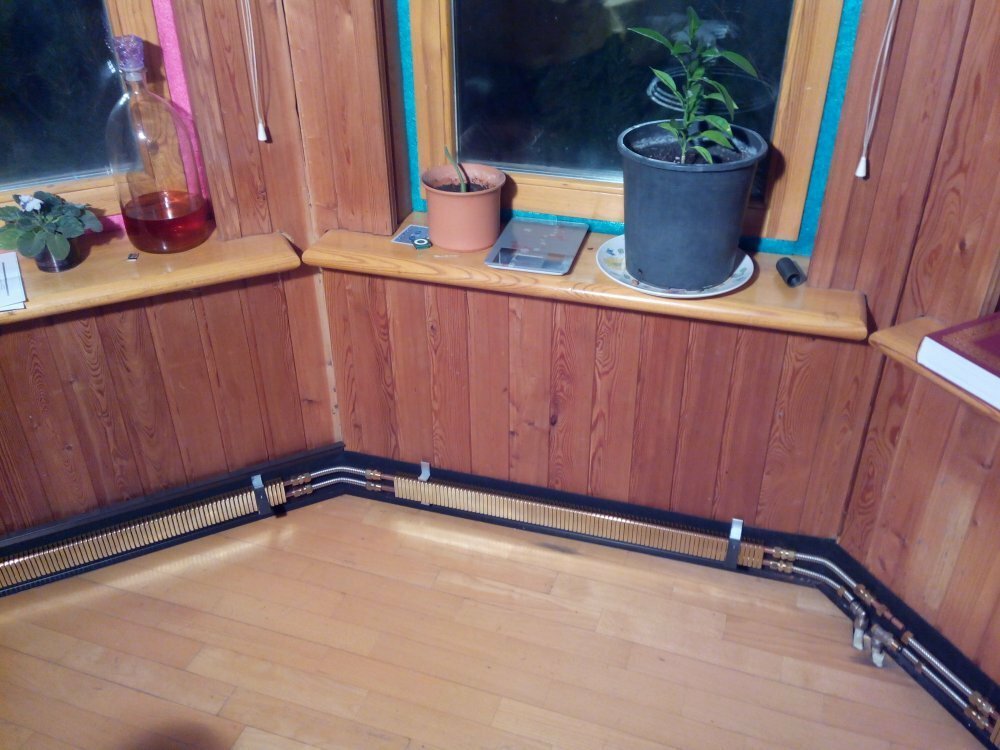
One of the most inconspicuous heating systems - warm (heating) plinth
Heating device with water warm plinth
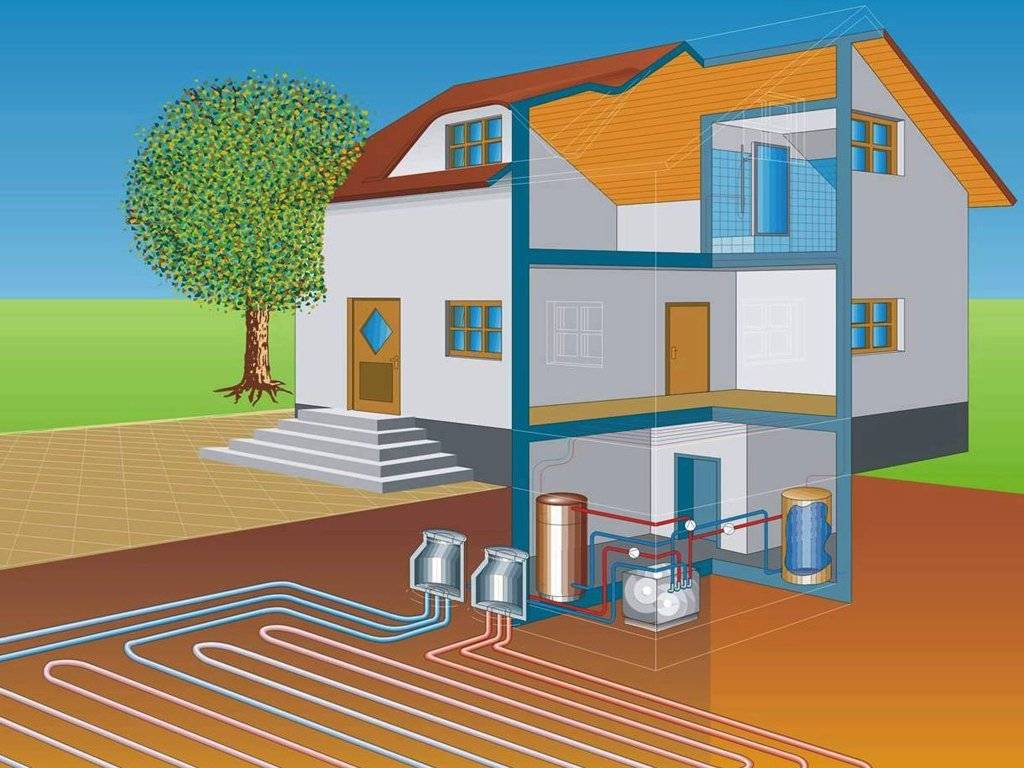
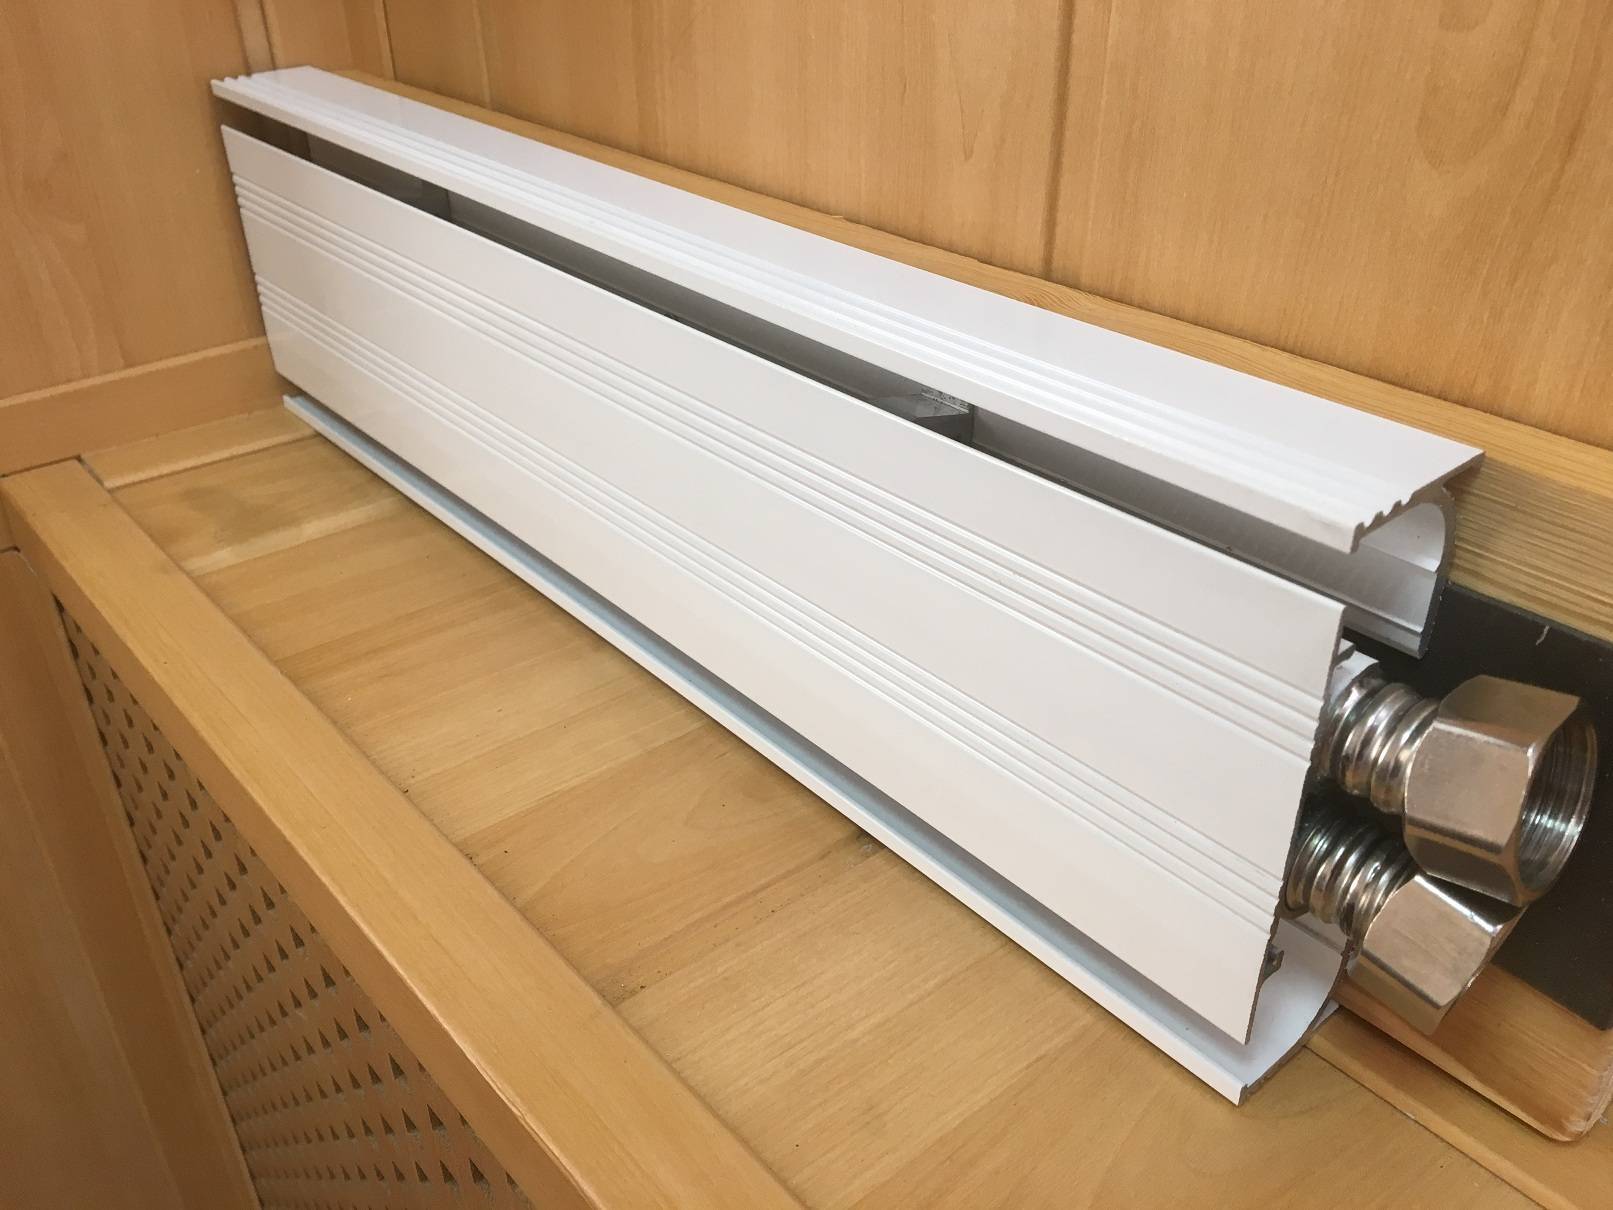
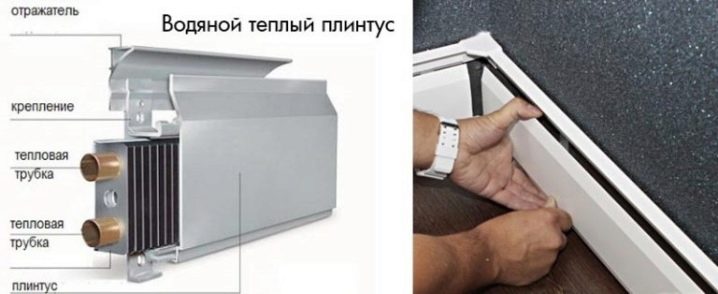
The system of water plinth heating differs only in the non-standard form of heating devices. The key components do not differ from the standard ones: you need a hot water boiler, a collector assembly and a pipe system with which a warm baseboard is connected.


There is also a combined warm plinth - with an electric heating element and pipes for the coolant
Please note: the optimal operating mode of the system is low-temperature. On the supply 40-50°C, on the return about 5°C lower. Therefore, it is necessary to select a boiler or build a system based on this
If the boiler is gas, the best choice is condensing. When installing any other, the system requires a heat accumulator and / or a mixing unit - to reduce and stabilize the temperature
Therefore, it is necessary to select a boiler or build a system based on this. If the boiler is gas, the best choice is condensing.When installing any other, the system requires a heat accumulator and / or a mixing unit - to reduce and stabilize the temperature.
Connection method
There are features in the choice of connection method. Serial connection of all baseboard heaters in the room is inefficient: until the coolant reaches the last ones in the heater branch, it will cool down greatly and they will remain cold almost all the time.
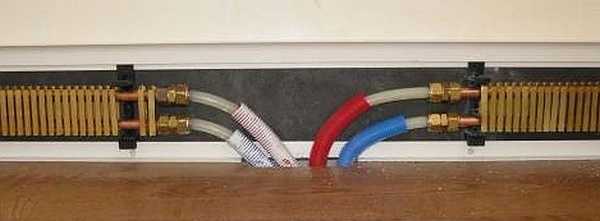
The beam connection diagram looks something like this
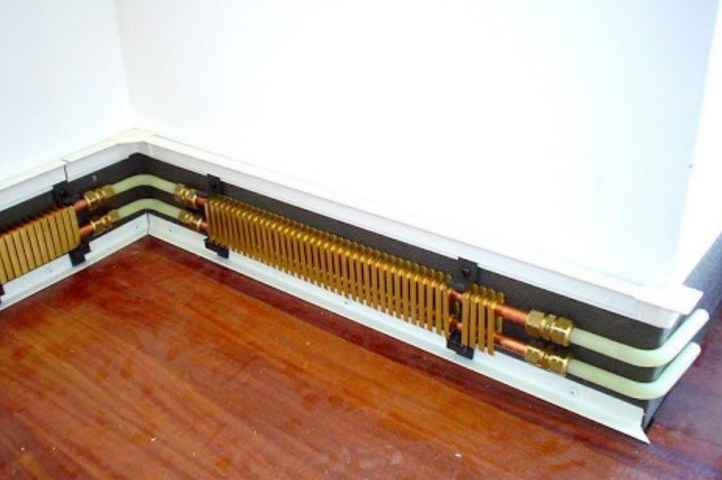
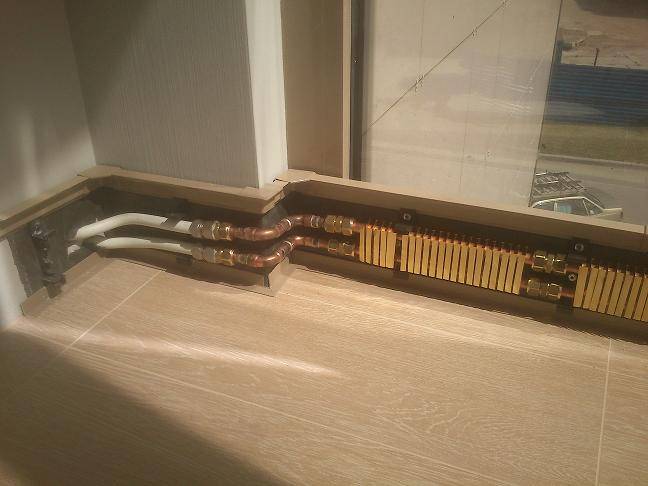
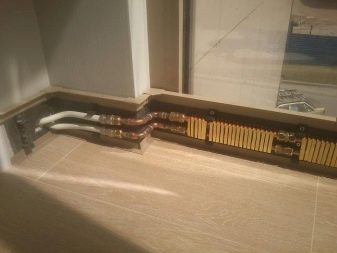
For a water heating skirting board, a beam system is used: devices are connected one at a time or in pairs. To do this, a collector assembly is built into the system, to which pipes are connected that go to heating appliances. The disadvantage of such a system is the high consumption of pipes. After all, two pipes go to each device (or a small group) - for supply and return. The pipe consumption is much higher, but the heat distribution is more even and the system itself is more reliable. Why is it more reliable? If pipes or radiators in one group are damaged, all others work normally.
Mounting Features
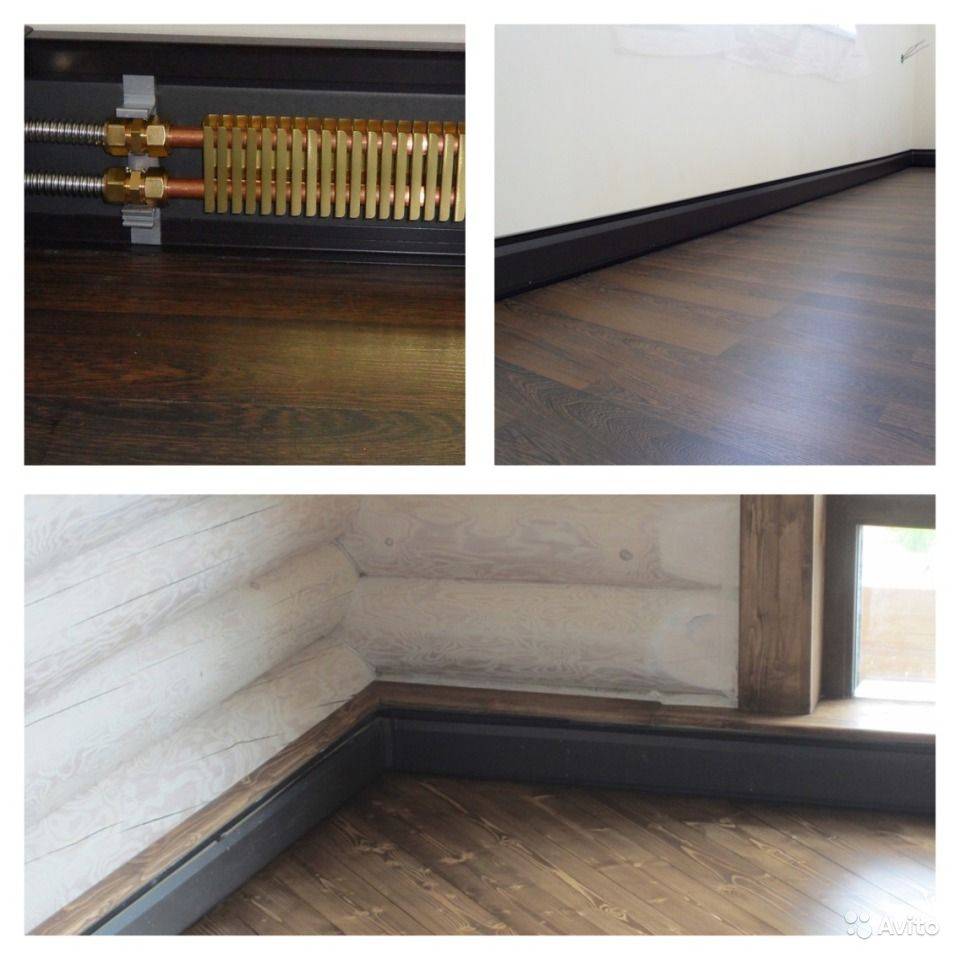
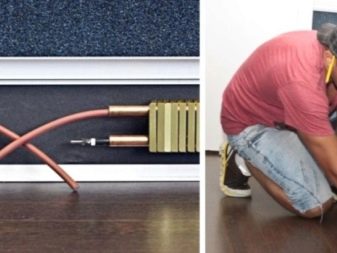
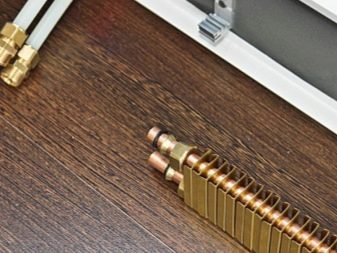
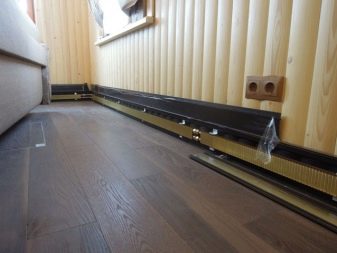
When installing water plinth heating, pipes are usually hidden in the floor. Laying them along the walls will not work, as the place is occupied by heating devices. That is, the installation of warm water baseboards is possible only at the repair stage - you will have to raise the floors.
Very attractive when installed.
Special polymer pipes are recommended to be laid in a screed - they are not subject to corrosion and have low heat transfer, that is, heat loss during transportation of the coolant will be small. But since the availability to repair these systems small, you need to take high-quality goods from well-known manufacturers, and this is not cheap.
Electric warm plinth
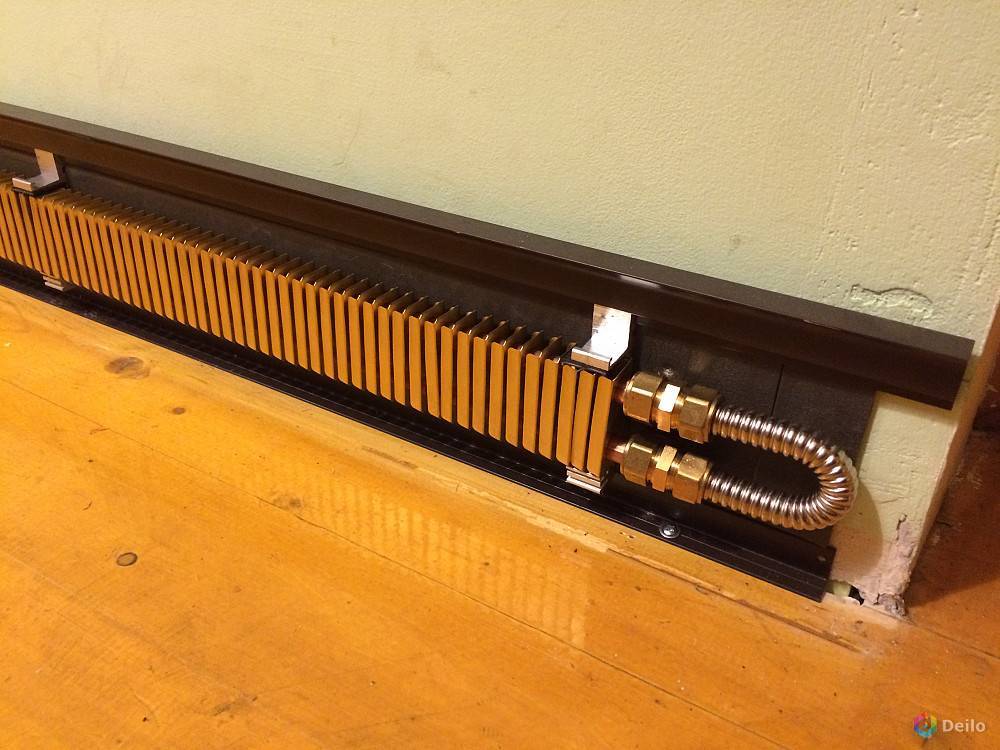
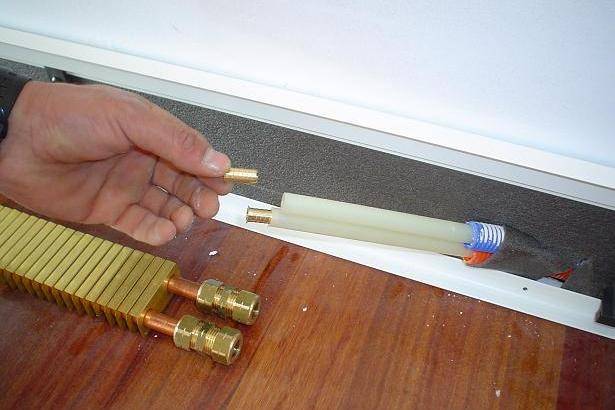
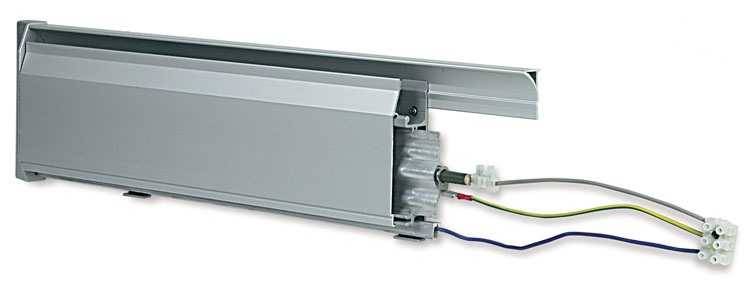
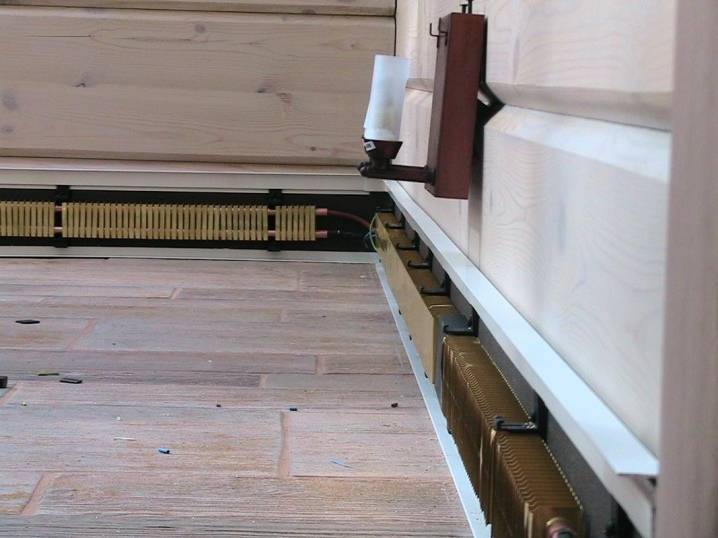
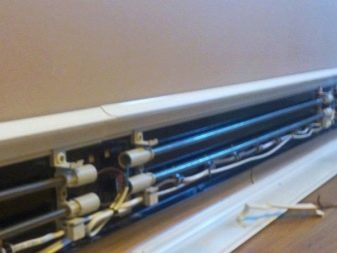
The electric warm plinth externally differs from the water one only in the presence of terminals for connecting the power supply. The rest is the same view. These are two tubes with aluminum/brass/copper plates fixed perpendicularly. A heating element is located in the lower tube - a heating element, wires for connection are laid in the upper tube.
The general device of the heating skirting board
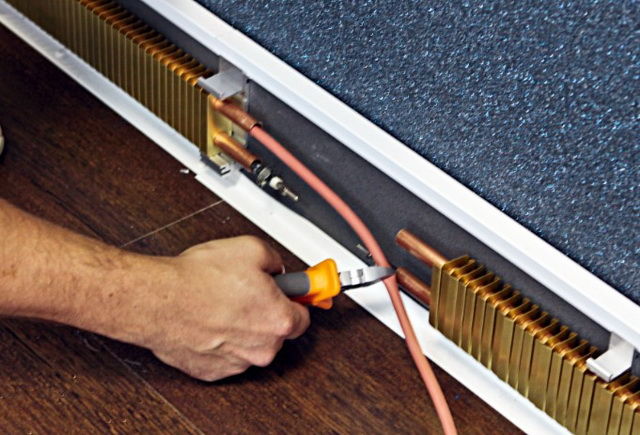
It is much easier to install and connect an electric warm plinth. You just need to fix it, stretch the wires and connect them to the terminals. To maintain the set temperature, a thermostat is built into the system, which turns the heaters on and off. The use of thermostats is desirable, as it optimizes work - saves electricity.
Installation is really simple, but you need to connect an electric warm plinth to a dedicated line with a properly selected circuit breaker rating and copper single-core wires of the appropriate section. So in this case, repairs are also required - it is customary to lay the wiring in the wall, and for this it is necessary to make strobes, that is, to break the walls.
Types of heating skirting boards
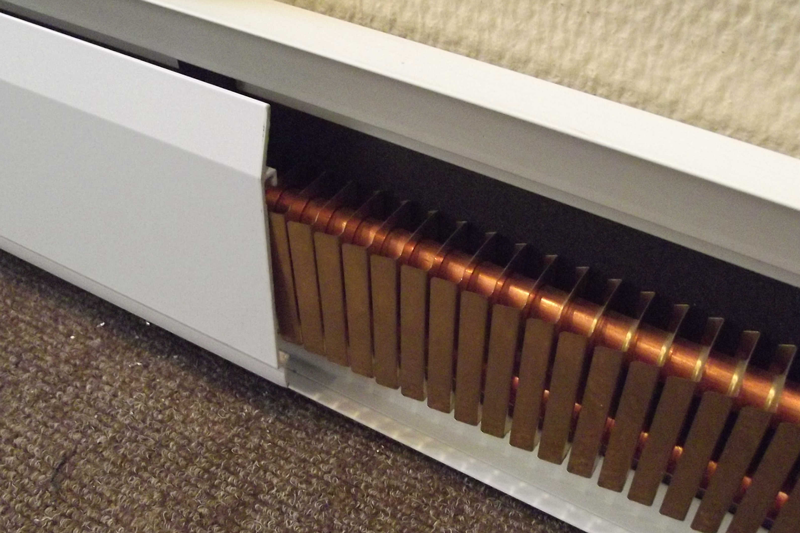
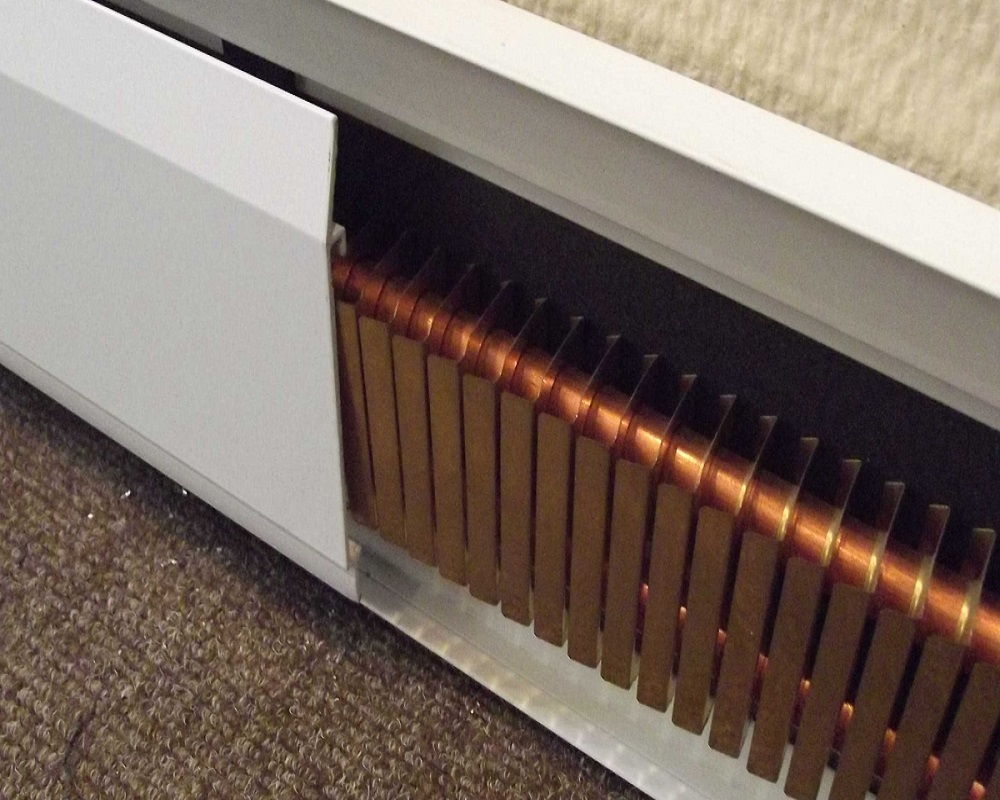
Structurally, the skirting heating system consists of a heating module covered with a decorative aluminum strip. The heating module consists of two copper tubes on which aluminum plates are put on. Copper is known to have high heat dissipation and high corrosion resistance, but it comes at a high price. Aluminum also transfers heat well, and is much cheaper. This combination of copper + aluminum is used in many heating devices and has proven its effectiveness.


Read about copper and copper-aluminum radiators here.
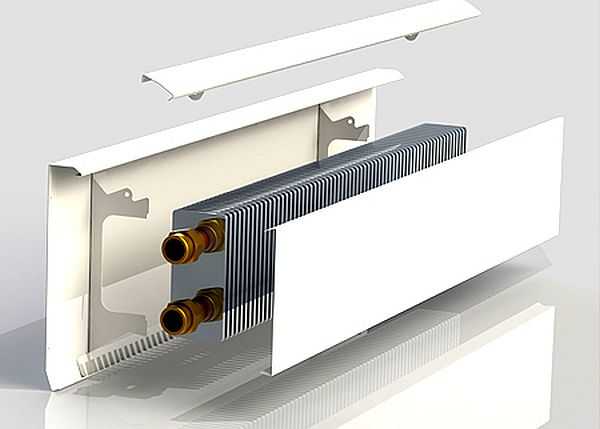
This is a baseboard heating design
There are two ways to heat the heat transfer module: using a coolant (water or antifreeze) and an electric heater element. On this basis, they differ.
Electric heating
Special low-temperature heating elements are inserted into the electric skirting boards. They heat up to a maximum of 60 oC. At the same time, their power is more than enough: one linear meter produces about 180-280 watts. Electric heaters are inserted into the lower tube, and a cable in a special sheath is laid in the upper one. With its help, voltage is applied to all sections of the heating element. The length of one is from 70 cm to 2.5 m, and the power necessary for heating the room is collected from different lengths of the heaters.
A special heating element is inserted inside the copper tube. This is how an electric warm baseboard is obtained
Water warm plinth
When using water or antifreeze for heat transfer, the same modules are connected into a single heating circuit. There is only one limitation: for maximum heating efficiency, the length of one contour should not be more 12.5-15 m (different lengths from different manufacturers).
If there are several circuits for installing a warm water plinth system, it is convenient to connect a collector (comb). You can use the most common model or with flow meters - this is your choice. Heating modules with a water heating method are recruited based on the required power for a specific thermal head of the system.
Heating element length calculation
Table of dependence of the power of a warm baseboard on the temperature delta (thermal pressure)
For example, at ΔT = 37.5 oC to compensate for the heat loss of a room of 1500 W, the heat output (according to this table) is 162 W.So, you need 1500/162 = 9.25 m of the heating element.
What and how to connect
Having collected the required length in total, distribute it around the perimeter of the room, combining it into closed contours. Between themselves, the segments of the heaters are connected in several ways:
- flexible pipes made of stainless steel with union nuts or under a press;
- copper pipes and fittings for soldering;
- copper or brass threaded fittings.
The most reliable way to connect is soldered copper pipes. This option is also suitable for central heating systems, since such connections can withstand up to 30 bar. The most difficult thing is assembly with threaded fittings: the dimensions and distances between the tubes and from the wall are small, it is very inconvenient to work. Flexible pipes must be chosen reliable: heating and hot water require good quality.
Connect the heating elements of the heating skirting boards with hoses, copper pipes
The piping from the boiler or the floor comb must be made of materials compatible with copper: polymer (polyethylene and reinforced polypropylene), metal-plastic or copper pipes.
System features
The system is compatible with boilers of any type on any fuel. But there is one feature: for normal heat transfer, a high speed of the coolant is required. With natural it will simply be ineffective


Therefore, it is important to choose the right pump.
Installing a water plinth
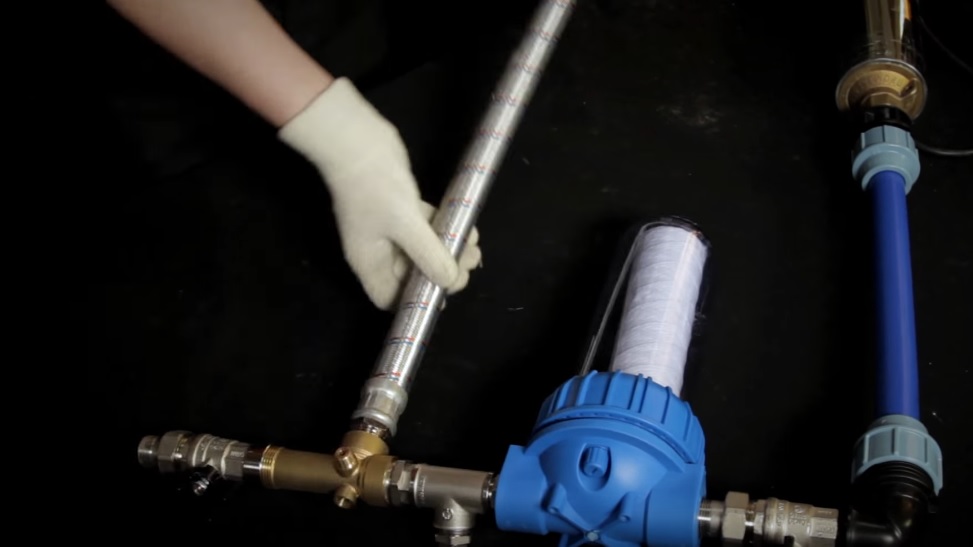
Having prepared a set of necessary tools, you can proceed with the installation warm water plinth with their own hands. First you need to lay pipes for supplying coolant.Installation starts from the corner where these tubes go. To simplify the process, we have prepared a detailed step-by-step instruction:
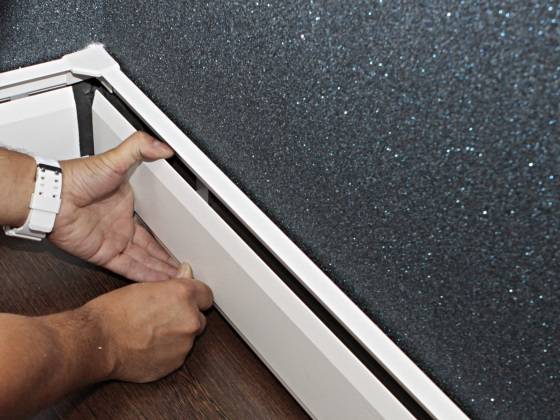
- Install the bottom bar.
- We eliminate the gap between the wall and the bar with a sealant.
- We fix the bar with connecting materials.
- We glue heat-insulating material on the wall.
- The excess is cut off with a knife.
- We measure the required height of the plinth.
- We install the first holder at a distance of at least 15 cm from the corner.
- The remaining holders should be installed at a distance of 40 cm from each other.
- We fasten the holders to the wall. If the material allows, then this is done with self-tapping screws. Otherwise, for each holder, it is necessary to mark the places for drilling, drill holes, install dowels in them, and only then screw the holder.
- Similarly, we attach the rest of the holders to the wall.
- We carry out the installation of all planks and fasteners in those parts of the room where a warm baseboard will be installed.
- We install the necessary decorative elements and adjust the holders.
- We lay out the radiators on the floor and measure the required distance.
- If some areas of the room are shorter than the length of the radiator, it can be cut off and some links removed to simplify the work.
- We start connecting the system from the place where the coolant is supplied. We put on fittings and gaskets for connection.
- We connect the radiator to the coolant supply system.
- Tighten the fittings with wrenches.
- We fix the radiator on the holders.
- We connect the radiator sections to each other, having previously installed the connecting elements.
- At the end sections, the radiator tubes are closed with swivel hoses.
- After completion, the first start-up of the system is carried out, and the presence of leaks is checked.If they are found at the junctions, they are eliminated by tightening the keys more tightly.
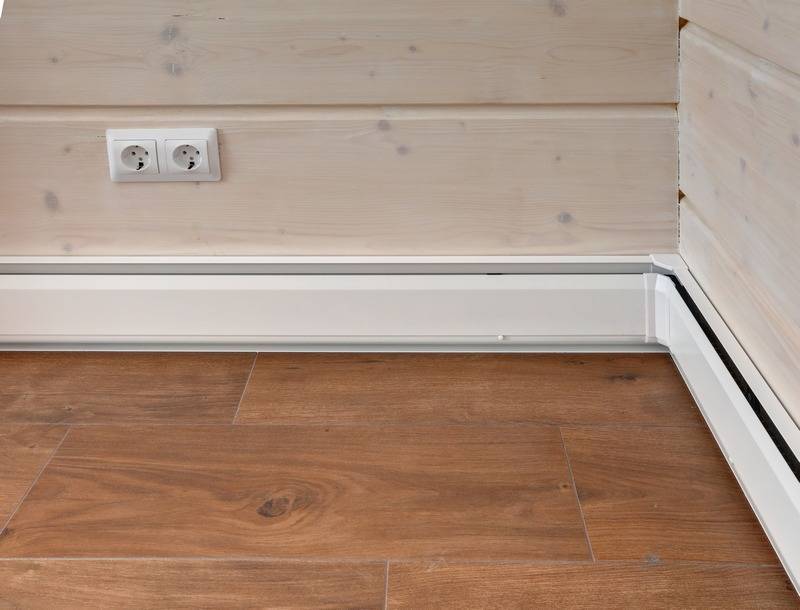
- If the commissioning work has shown the system to be in good condition and ready for use, you can complete the work by installing a decorative front panel.
- A heat-insulating tape is glued to the inside of the decorative element. It prevents overheating and promotes the release of heated air.
- The front panel is attached to the prepared base.
- For reliability, it must be attached with self-tapping screws.
- The protruding parts of the screws are hidden under the plugs.
It seems that the procedure is too complicated, but in fact, every person who previously used wrenches and a screwdriver can handle it.
A detailed analysis of the preparatory work and installation of the plinth can be seen in this video:
Kinds
Today, only two types of warm plinth are common - water and electric. Each of them is used in specific conditions for arranging rooms and furnishing the apartment itself. It is worth considering each of the types in detail.
Water
This installation option is quite common - it can be seen in the interior of some modern residential buildings, office buildings, even shopping centers. It is worth noting that the water type of warm plinth is widespread in many Western countries. Such interest is due to such factors as: ease of use and low maintenance requirements. A warm water plinth is an externally metal panel or box, inside of which a heating or heating module with mini-tubes for water supply and heating is placed.The outer or back side of the device is also equipped with a metal panel, which is already designed to protect the wall itself from high temperatures.
This method of connection by technicians is called beam. The difference between this type of warm plinth and electric is a wide range of possible installations in the interior. Water warm plinth can be mounted on attics, loggias, even on a balcony, while the heating efficiency does not decrease, and energy costs remain relatively small. Another feature of the water type is the speed of heating the air, since the physical properties of water make it possible to freely transfer even the hottest streams through pipes. However, it is necessary to constantly monitor the temperature level in boiler rooms.
Electric
If the water version of the warm baseboard is valued for its quick heating and ease of maintenance, the electric type is common due to the following characteristics:
- ease of installation work - unlike the water type, the electric one is installed on site, the installation process is simple and fast, because it is enough to fix the heating panels to the wall;
- the presence of more advanced heat regulation systems - most models of water skirting boards are not equipped with special devices for measuring temperature - for this it is enough to monitor the average water level in boiler rooms. The electric type is often equipped with specialized thermostats that look like conventional thermometers. Thermostats can work both automatically and can be adjusted manually, and their work is aimed at optimizing energy costs.

Here it is worth noting the negative aspects of using such a plinth:
- high energy consumption - when using any equipment with power supply, the question arises of cash costs. The electric type, unfortunately, even with thermostats consumes a large amount of energy;
- installation of the electric type is much simpler, however, the connection process itself can cause some difficulties - this is the preparation of a dedicated line with the correct rating;
- one potential downside for many buyers is the availability of power. The probability of wiring damage and fire is extremely small, however, for some this is a determining factor under certain operating conditions.
If the buyer liked the aquatic variety more, then do not despair and think that these species differ in appearance.
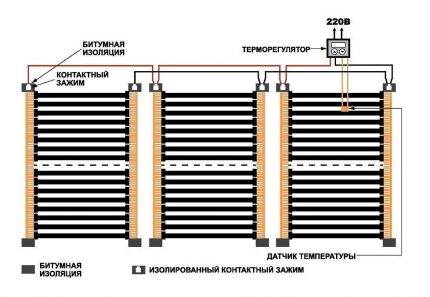
In addition to the presence of terminals or wire attachments to the electrical supply, these varieties are outwardly absolutely similar. It is worth noting such a type of plinth equipment as an infrared warm plinth. The peculiarity of this type is the use of a special film tape, which, under the influence of high temperatures, heats up and becomes a kind of source of infrared radiation, which provides additional and high-quality heating of the room.


Installation of a warm plinth
For installation, you will need a tool: adjustable wrenches in a set, a drill with an impact function (or a puncher), a hammer, wire cutters, pliers, scissors (to cut plastic). The plinth heating system is quickly mounted if the connection points are prepared in advance.
Even before purchasing the necessary equipment, you need to plan what power the heating elements need and how to place them around the perimeter of the room.
Assembling the water heating system
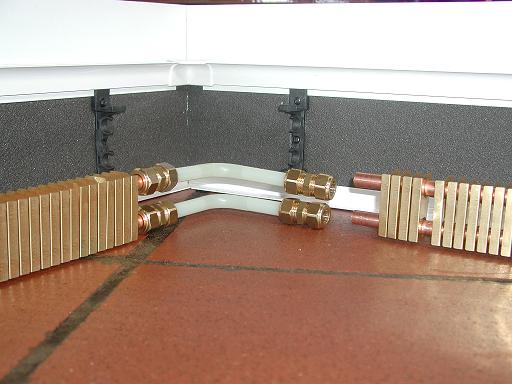
Stage 1. We measure the distance from the point where the distribution manifold will be located to the location of the plinth. We cut off two lengths of the protective pipe and two with an allowance of 20 cm - connecting. We insert the connecting one into the protective one, clog the ends with adhesive tape to protect against dirt.
Installation of a baseboard heating water system: red - main flow, blue - reverse. The return pipe must be higher
Stage 2. We pull the pipes along the floor without tension so that, if necessary, an extension can be laid next to one or more. We fix it with mounting tapes, cover it with a protective solution, protecting it from damage, and display it in the right place on the wall 6 cm above the floor and 10-15 cm from the edge of the wall or corner, fix it with cement.
Stage 3. After laying the final floor, we continue to work. We glue the insulating strip along the entire length. We stretch the aluminum edge (also along the entire length of the heating), closing the junction of the wall and floor. We screw it or fix it with adhesive tape, silicone.
Stage 4. We lay a special profile along the top line, put holders on it at a distance of 15 cm from the corners and every 40 cm along the wall.
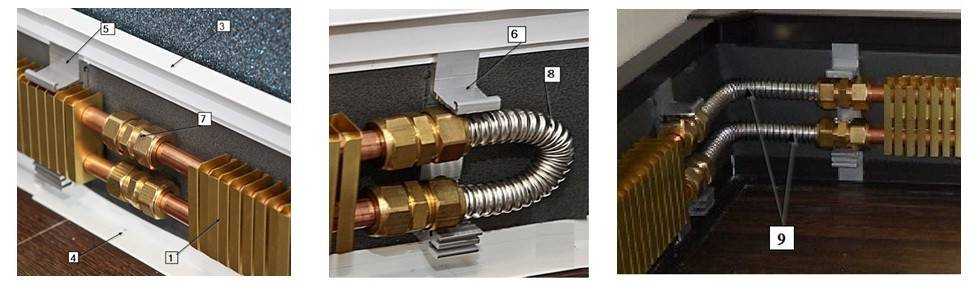
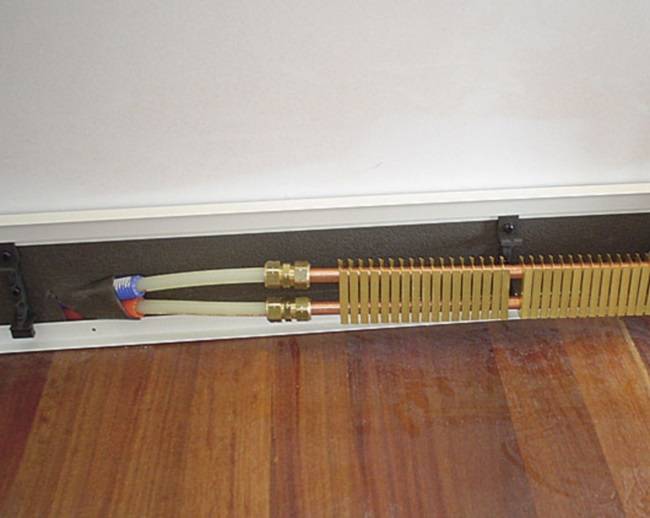
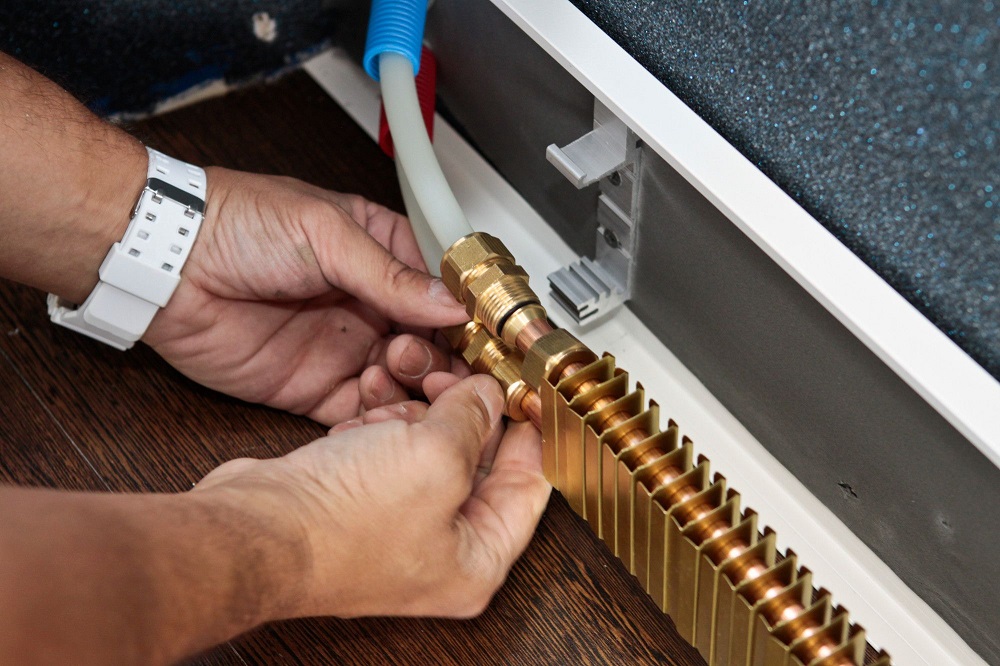
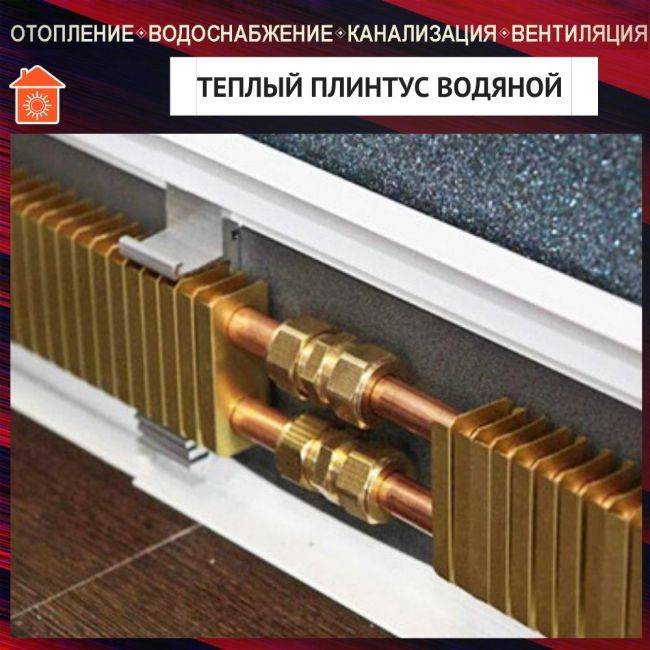
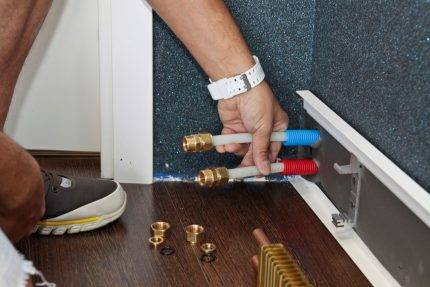
Stage 5. To connect the heating pipes and heating elements, we use couplings with nuts, bushings and gaskets, in the corners - 90º angled swivel tubes, at the ends - 180º end swivel tubes and plugs. Thermosections are interconnected by adapters.
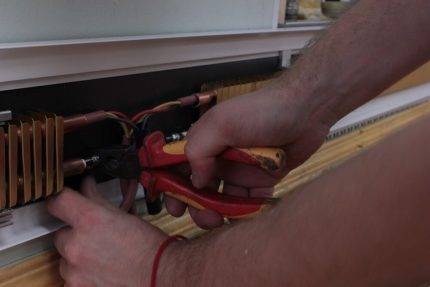
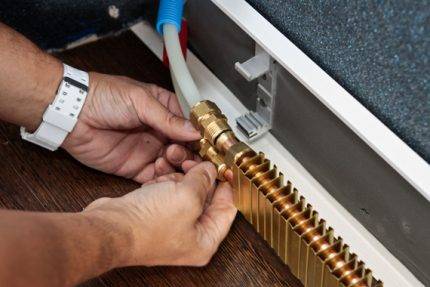 When connecting the heating module, it is necessary to remove 2-3 lamellas from the edge and put connecting nuts, crimping parts, rubber gaskets on the tubes
Stage 6
The connected heating sections are carefully pressed into the holders. We put on decorative panels (we attach with screws or snap them in) and decorative corner elements. We connect the system to the collector, fill in water, test at operating and maximum pressure
Like all collector systems, a heating baseboard requires a circulation pump that stimulates the movement of the coolant. Without a pump, it is difficult for heated water to circulate along an extended circuit. However, the use of technical devices is reflected in the overall cost of the system.
The plinth will work if all technological operations have been performed without violations. When leaking, problematic connections must be squeezed with a wrench. The coolant is supplied through the collector by a circulation pump from the boiler or from a common (centralized) heating system.
Assembling the electric heating system
For a warm baseboard in the electrical panel, you need to make a separate circuit breaker. Its power is determined by the number of heating modules.


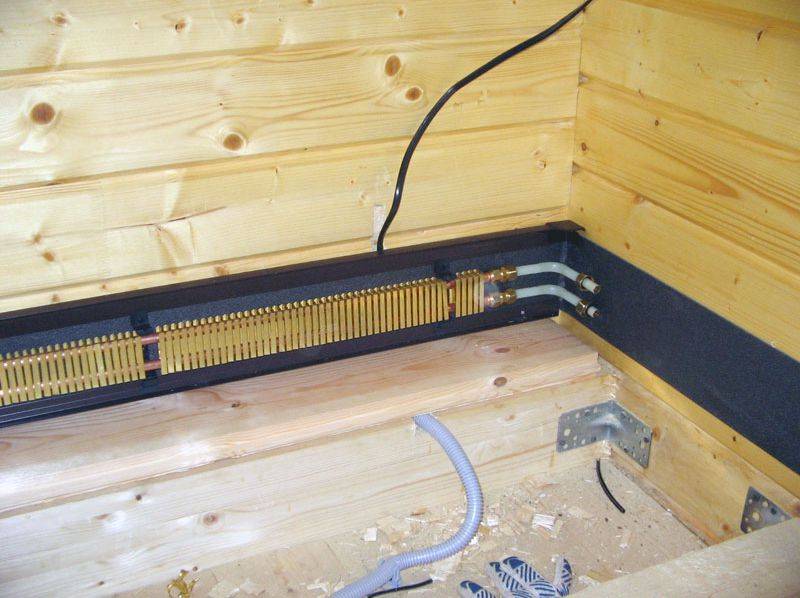
Stage 1. We supply power to the junction box, which should be near the location of the system at a height of 4-6 cm from the floor.
Installation of an electric heating system: most often, an electric system is used where it is possible to supply power of the required power, or in small rooms as additional heating
Stage 2. We stick an insulating tape on the wall.
Stage 3.We install the lower aluminum profile (edge) and the upper one, on which we put the holders at the same distance as for the water system - 15 cm from the corners and in increments of 40 cm along the wall. We install a remote thermostat. It should be located at a height of about 1.5 m opposite the system modules and at a distance of at least 2 meters from them.
Stage 4. We insert the electric heating elements (heaters) into the lower pipe of the heating module, fix the modules in the holders so that they do not touch the wall.
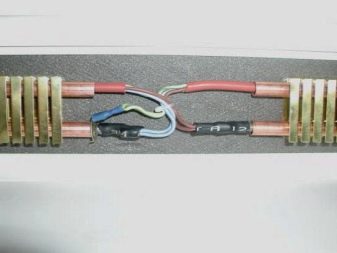
The electrical contacts of the heating elements have a thread, two nuts, a retaining ring on a spring, a heat shrink tube for additional insulation. The modules are connected in parallel with a heat-resistant power cable coated with silicone and heat-resistant up to 180°C.
Stage 5. From above we close the system with a plastic box.
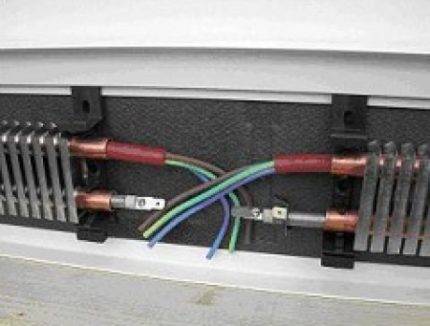
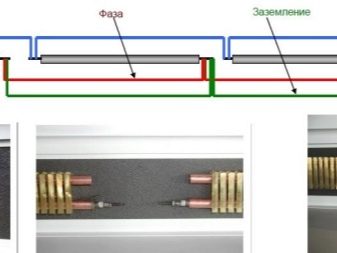
To connect the heating modules, a 3-core cable is used: brown core - phase, blue - zero, green (yellow) - ground. It is necessary to ground the cable
Connecting the installed heating system It is best to entrust the power supply to an electrician. He will check the reliability of the insulation with measuring instruments, supply electricity and adjust the thermostats.