- Transfer technical features
- We move the toilet
- simple case
- Dismantling
- Installation at a new location
- Difficult case
- Toilet remodeling
- Coordination of redevelopment with the transfer of the toilet
- What should you pay attention to?
- How to do the redevelopment of the bathroom with your own hands?
- Toilet moving technology
- simple case
- Difficult case
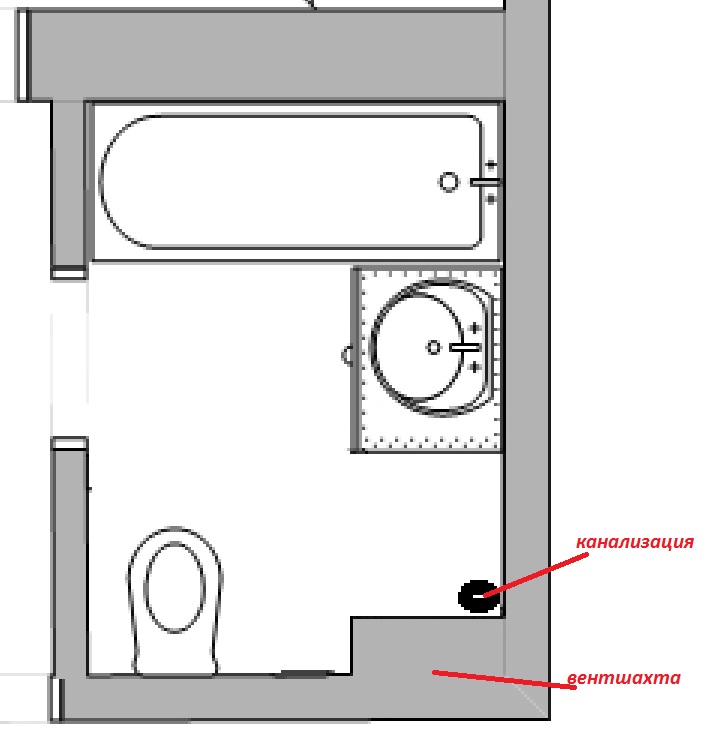
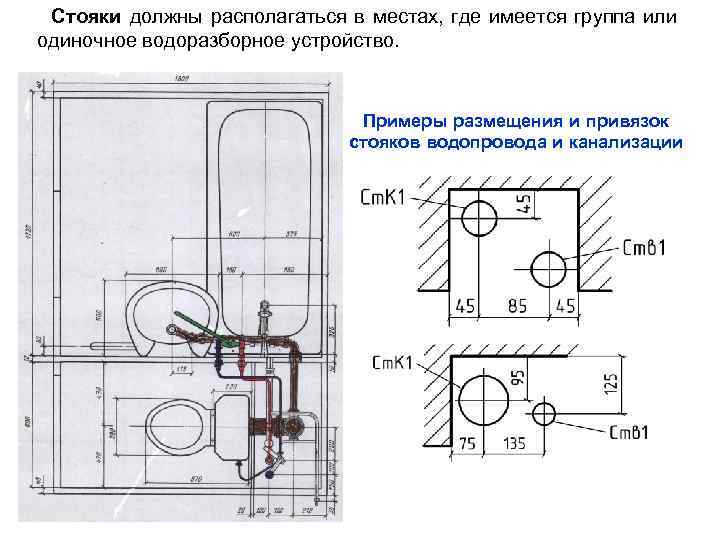
- Transferring the toilet from the center of the toilet room to the corner where the riser is located
- How to carry and deploy the toilet in a combined bathroom?
- Assembly and installation works
- Is it legal or not?
- Coordination of the transfer of the riser
- How often do you call a plumber?
- "Pitfalls" of these works
- How to choose a corner toilet
- Letter of the law
Transfer technical features
The second most popular option is moving toilets and toilets riser to the side without additional redevelopment.
In this case no approval is required.
But there are technological nuances that you need to pay attention to.
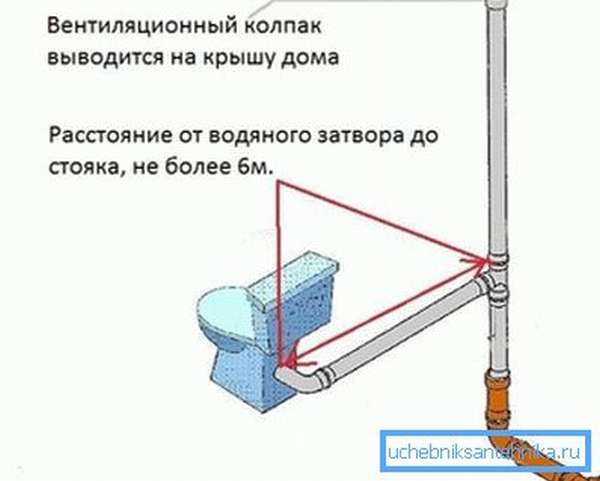
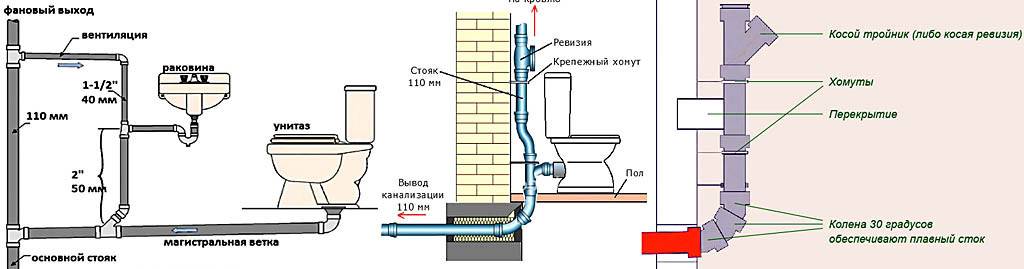
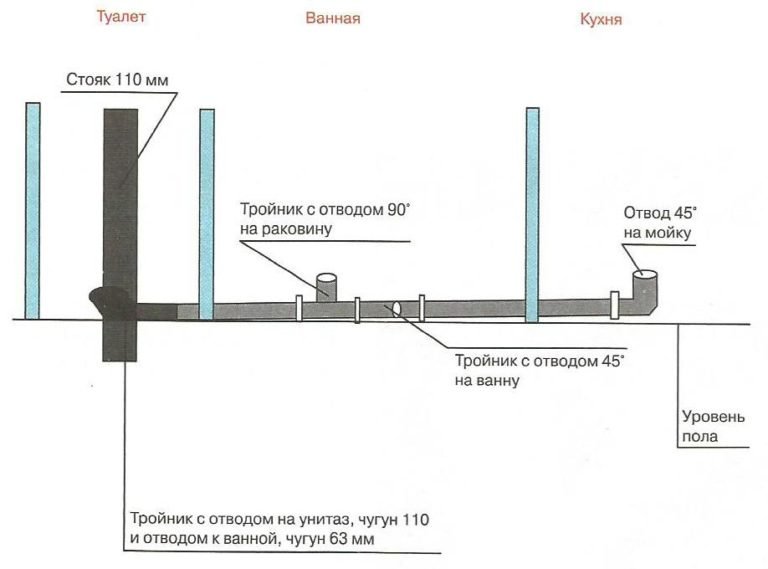
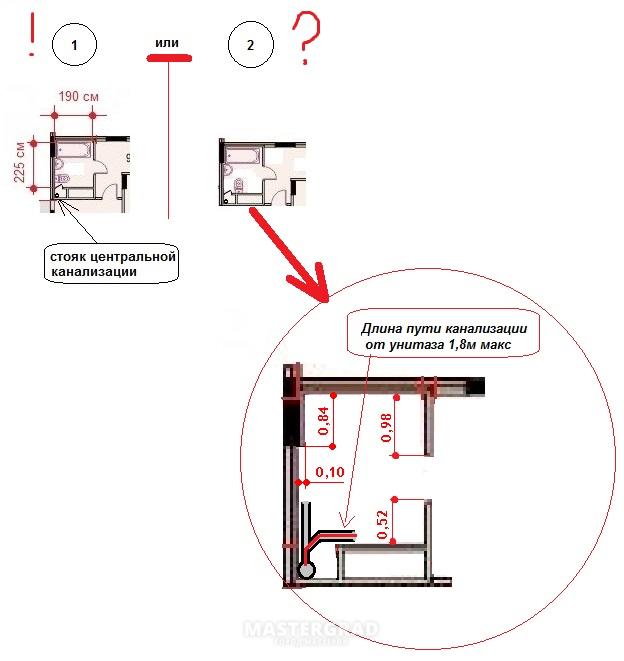
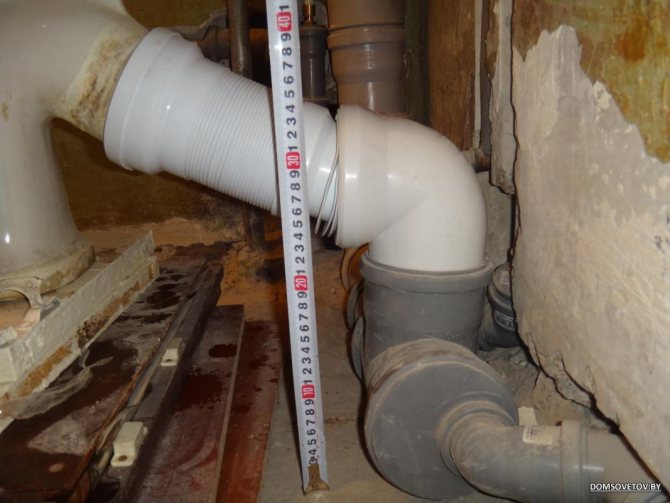
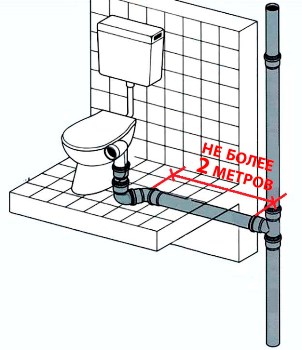
An increase in the length of the sewer pipe can provoke the formation of air jams and blockages. According to SNiP standards, the distance between the drain device and the sewer outlet should not exceed 1.5 meters.
If there is a direct outlet, the socket is mounted flush with the floor.
The opening of the toilet drain pipe must be located in relation to wall at an angle at least 45 degrees.
It is necessary to provide a mandatory clone of pipe fittings. A pipe with a diameter of 100 mm is laid in relation to the floor with a slope of 1.2 - 2 cm. Understating the indicator will lead to emergency situations. To comply with the standard, the toilet will have to be raised. In this case, the height level must correspond to the angle of inclination.
The pipe connecting the plumbing fixture and the riser should not have bends of more than 45 degrees. 90 degree corners are not allowed.
It's interesting: how change the faucet, given its size - consider together
We move the toilet
simple case
The toilet is unfolded or transferred to a small distance, about a dozen or two centimeters.
Dismantling
Dismantling the toilet is highly dependent on the installation method.
If the toilet was mounted on standard fasteners, and its outlet is connected to the sewer with a standard rubber cuff - everything is simple:
- Unscrew the screws securing the toilet to the floor;
- Pulling the toilet toward you strictly along the axis of the socket of the sewer pipe, pull out the toilet outlet from it.
In this case, it is not even necessary to shut off the water to the tank.
If the toilet is planted on glue or cement, and its outlet is smeared with the same cement in a cast-iron pipe, you will have to tinker:
Armed with a strong screwdriver or a narrow chisel, carefully remove the putty from the space between the socket sewer and toilet outlet. Be very careful: an unsuccessful move - and you have to go for a new toilet
 We have to carefully remove this putty, without splitting the issue.
When the release is released, we will need to loosen the toilet on the floor
A wide chisel is carefully, with little effort, driven in turn from different sides under the base of the toilet bowl. Sooner or later it will sway, announcing that the deed is done
Then, again, we feed the toilet towards ourselves, pulling out its outlet from the sewer socket strictly along its axis. If he gets stuck - do not pull harder, but slightly shake the toilet from side to side. Of course, before that it is better to turn off the water on the tank and drain the water.
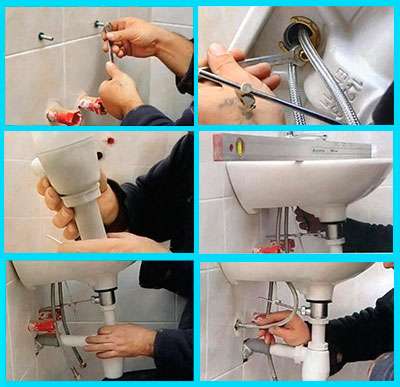
Installation at a new location
Since the distance to the sewerage and water pipes will be small, we will not need to alter the sewer system or build up the water pipe.
If the old flexible eyeliner is in good condition, we will not touch it. If it leaks or has insufficient length - just change it to an analogue. The operation is simple and, I think, does not require a separate description.
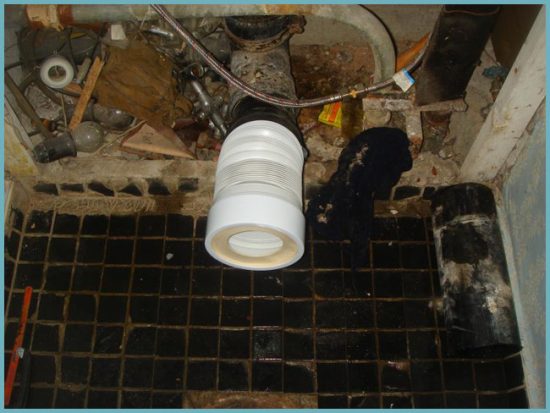
We will connect the toilet with the sewer with a corrugation. This corrugated pipe, in general, has rubber seals on both sides; but it's a good idea to stock up on sewer pipe silicone sealant.
In addition, you will need a set of fasteners for the toilet.
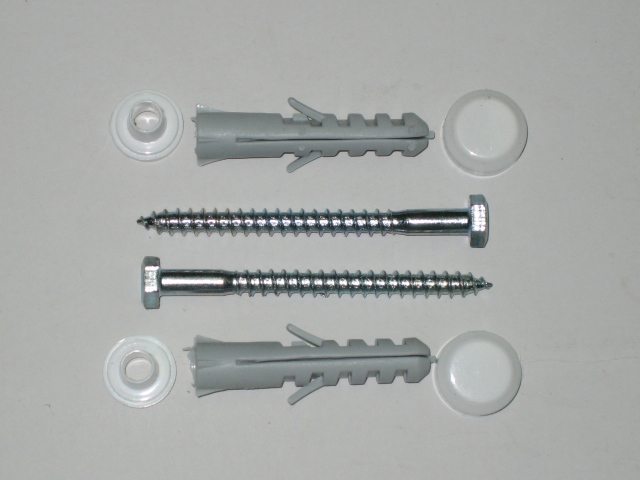 This is what the whole set will look like.
- Clean the toilet outlet and drain socket of debris and wipe dry.
- Mark new holes in the floor for the toilet mounts and drill them. If there is a tile on top, first pass it with a drill through a tile of a slightly larger diameter.
- Put the corrugation on the toilet outlet, after applying the sealant.
- Pull the toilet to the floor. He needs to stop staggering, nothing more. Cover the gaps between the base and the tile with cement mortar - this will prevent the lateral force from splitting the base of the toilet bowl, creating additional support for it.
- Insert the corrugation into the socket - again on the sealant.
- Enjoy.
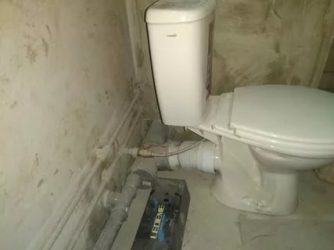
 As you can see, the result is quite satisfactory. Only the seat is slanted
Difficult case
We have already agreed that within a small room it is easier to connect water with a long flexible eyeliner. The transfer of the toilet bowl to a distance exceeding the length of the corrugation will be accompanied by an alteration of the sewer.


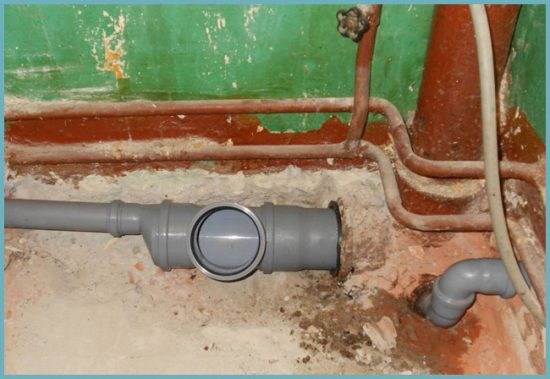
Dismantling and installation will be the same; in order to increase the sewerage, a plastic pipe with a diameter of 110 mm is used. The length and selection of corners depend only on the new position of the toilet.
The assembly of plastic sewerage is extremely simple. It is attached to the wall with clamps or laid directly on the floor.
As always, there are a few subtleties.
You will probably have to remove the outlet to the toilet from the tee or cross in order to lower the sewer to the floor level. With plastic, this will not cause problems; in the case of cast iron, it is better to preheat the next socket with a blowtorch or gas burner. In this case, the sealant-bond will burn out and the cement putty will crack. Further extraction of the pipe from the socket is a simple matter. It is better to mount the sewer directly from the riser. The tee was wrapped in a bag to get rid of odors.
- To insert a plastic pipe into a cast-iron socket - use a cuff - sealant. It is better to put it on a silicone sealant, first of all, well lubricating its joint with a cast-iron pipe.
- A slope towards the riser is required, but small: 1-2 cm per linear meter of pipe.
- If the joints of cast-iron pipes are filled with sulfur, they are also annealed with a blowtorch, but the smell will be monstrous. Ventilation of the room and a gas mask are required.
- Instead of accurately fitting the plastic sewer to the toilet outlet, you can also use corrugation. There is only one condition: it must be available for replacement. If this is not possible, it is better to do without it.
 With modern materials, this option will not create problems either.
Toilet remodeling
Often, homeowners who want to remodel their bathroom in an apartment are wondering if the transfer of the toilet bowl is considered redevelopment.
To answer this question, we turn to the Housing Code of Russia. Art. 25 explains that redevelopment is a change in the configuration of a dwelling that requires approval. That is, this is the demolition / construction of partitions, changes in load-bearing structures - interior walls and ceilings, the device or laying of openings.
Based on this definition, it is not clear that the transfer of the toilet is a redevelopment.
However, the same article states that in addition to redevelopment, the apartment can be reorganized, which includes any actions (installation, replacement or transfer) with engineering networks and plumbing equipment.
That is, it is clear that this is definitely not redevelopment. But installing a toilet is not always a redesign.
If there was no toilet in the room before, and it was not on the BTI plans, and then it was decided to install it, then this will be a reorganization, because it is necessary to make changes to the technical passport of the apartment. For example, in a large bathroom, they decided to install a toilet to make a combined bathroom.
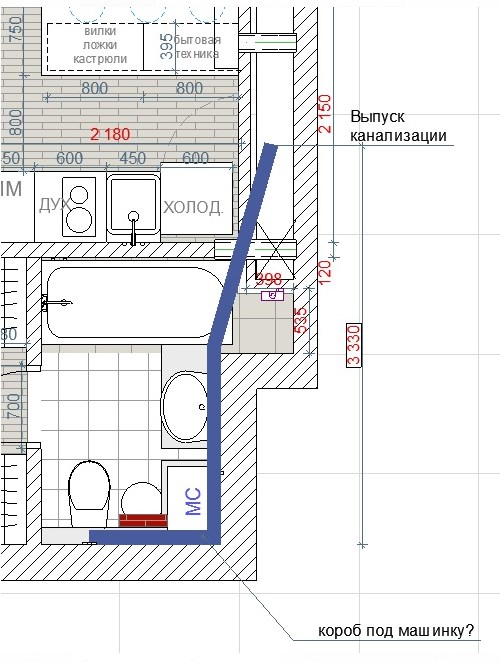
An example of a redevelopment project with the transfer of a toilet bowl when installing a combined bathroom and expanding it to the area of two corridors and a dismantled built-in wardrobe
And if the installation of a toilet bowl is simply connected with the replacement of an old sanitary ware with a new one without transferring it to another place in the toilet, then this is not a reorganization, since no changes will occur in the BTI documents. And such a toilet installation does not even need to be coordinated.
It must be said that in practice, rarely is anyone limited to transferring only one toilet bowl. Especially when it comes to standard apartments, where the toilet area is usually 1-1.5 sq.m. Where to transfer it?
To agree on such a full-fledged redevelopment of the apartment, which includes, among other measures, the transfer of the toilet bowl, it is necessary to develop a project.
If suddenly, you don’t need anything else, except for moving the toilet to another place, if the boundaries of the room remain unchanged, then such a reorganization still needs to be coordinated with the Moscow Housing Inspection, but instead of a project, you can prepare a sketch.
But since this option is extremely rare in practice, we will continue to talk about coordinating the redevelopment with the transfer of the toilet according to the project.
Coordination of redevelopment with the transfer of the toilet
To legitimize such a redevelopment, you need to have a technical passport of the apartment or a floor plan with an explication. If you do not have either, order any of these documents from the BTI.
Next, contact the specialists of a licensed design bureau to work with them in detail on the redevelopment of your apartment. They will listen to all your wishes and prepare a project in accordance with the current legislation (construction, sanitary, fire, etc.).
Redevelopment with the transfer of the toilet bowl, the combination of the toilet with the bathroom and the expansion of the combined bathroom to part of the corridor in the house of series II 68
Then you need to get permission from the Moscow Housing Inspection for redevelopment with the transfer of the toilet. To do this, they need to submit the project for approval. At the moment, the inspection personally does not accept documents for consideration. This can be done through the single window system of the nearest MFC.
The transferred papers are considered within 20 days. If everything is in order, a work permit is issued. As soon as they are completed, an inspector is invited to the apartment to accept the work and draw up an act.
On the basis of the act of completed redevelopment, the BTI corrects the technical accounting documents for the apartment.
What should you pay attention to?
To lay the sewer at the floor level, it is necessary to remove the outlet to the toilet from the tee or cross. With plastic pipes, everything is simple (everything is easily removed and cleaned). If the parts are cast iron, then you will have to resort to using a gas burner or a blowtorch to destroy the sealant and cement putty by heating. After that, you can easily remove the pipe from the socket.


It is recommended to start laying a new pipeline from the riser, observing the slope rules. The installation of plastic pipes in a cast-iron socket involves the use of a special cuff-seal. For better sealing, lubricate its joint with silicone glue.
The easiest way to connect to a new pipeline is with a corrugation, providing free access to it to control integrity. Instead of a corrugation, you can install a special adapter pipe, which will provide a more durable connection.
Add site to bookmarks
- Kinds
- Choice
- Mounting
- Finishing
- Repair
- Installation
- Device
- Cleaning
How to do the redevelopment of the bathroom with your own hands?
Quite often, both in a separate private house and in an apartment, one has to face the need to carry out repairs, finish something, some elements of the interior change to new. Often, households resort to redevelopment of a particular room. And in most cases, here you have to turn to professional designers and builders. After all, not every ordinary resident of a high-rise building is able to correctly calculate all the necessary partitions, the weight of the overall structure, and much more, on which the condition of the whole house and the safety of its inhabitants depend.
There is often a need for bathroom remodeling. In order to correctly transfer all water supply and other communications, it is necessary to carefully study the transfer rules.
But still there are several events that you can even handle with your own hands. And this is not only painting this or that interior element, wallpapering the walls and changing the flooring. Thanks to the advice of experienced craftsmen and minimal experience in construction and finishing work, it is quite possible to cope with such activities as installing a window, replacing pipes, and even moving a toilet bowl from one room to another. It is this element that more often than other plumbing migrates from one room to another.
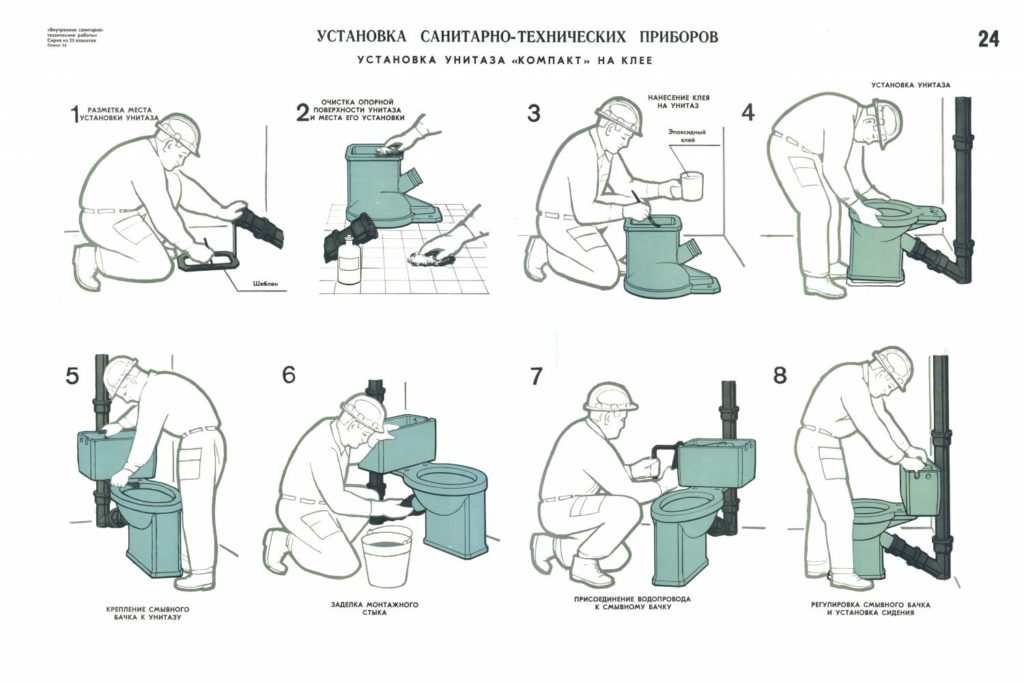
Toilet moving technology
The toilet can be moved not only to different distances, but also installed at different angles. Depending on these features, installation can be both simple and complex. Let's consider the process in detail.
simple case
After dismantling the old structure, you can proceed to the main work. The first step is to inspect the old eyeliner: if it is in disrepair or not long enough, you need to replace it.
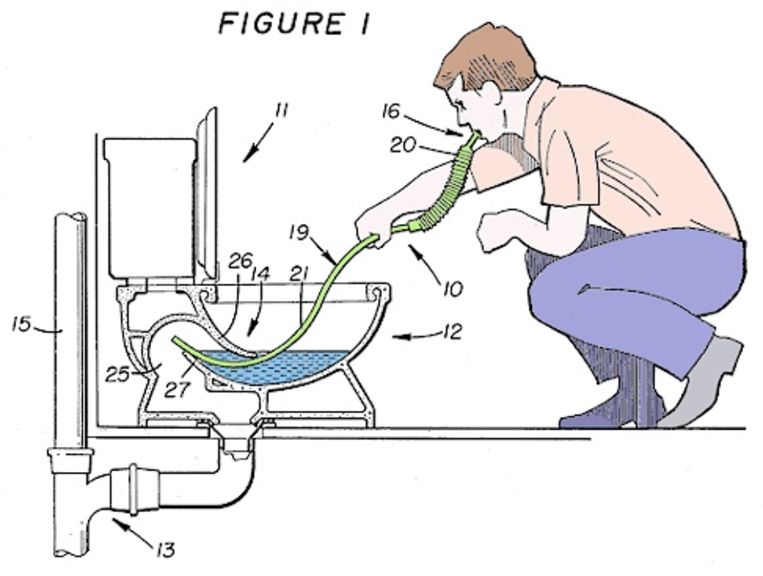
 Corrugation connection
Immediately before installation, we prepare additional elements: corrugation (for connecting the toilet outlet to the socket), steel fasteners (plastic washers are required).
Advice. Even if there are o-rings on the corrugation that you plan to use as a connecting element, be sure to use silicone sealant when installing it.
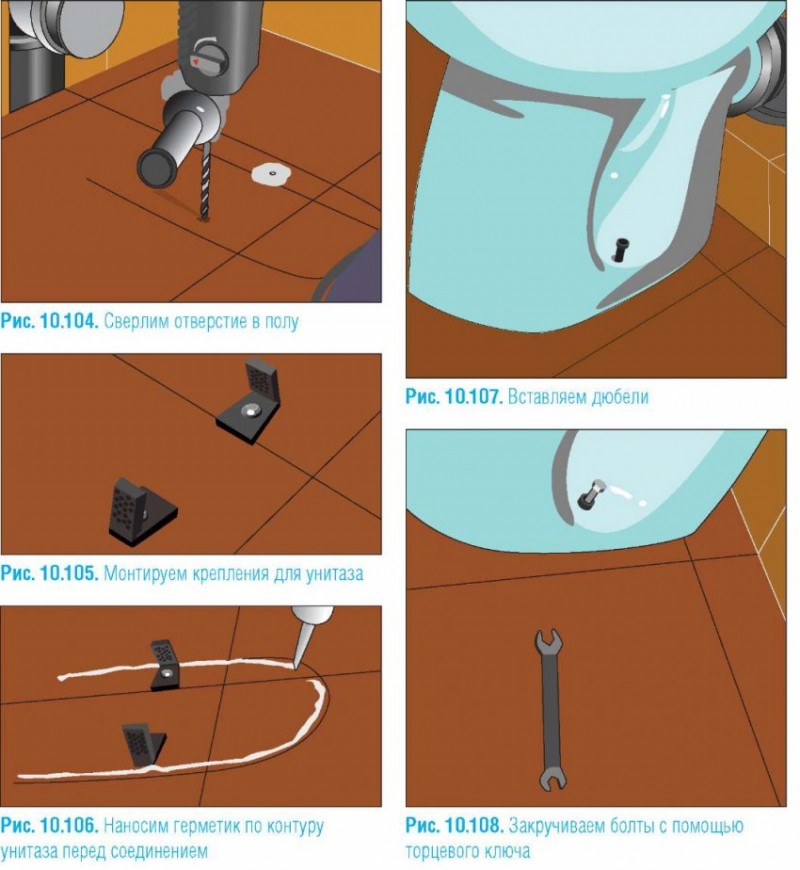
So, we proceed directly to the installation of the structure. Using a drill, we drill holes in the places marked in advance for fastenings. If the floor is tiled, use a slightly larger drill bit first. Then we carefully clean the connecting elements (bell and outlet) and wipe dry.
We apply sealant to the corrugation and put it on the outlet
We install the toilet, insert the fasteners and tighten them, acting very carefully. As soon as the structure becomes motionless, stop tightening the fasteners
If there are gaps in the floor, cover them up. Then we insert the second part of the corrugation lubricated with sealant into the socket.
Difficult case
If you plan to move the toilet to a distance that is longer than the corrugation, you will need to redo the sewer. Since the installation process of the structure in this case does not differ from the previous one, we will not consider it again. We need to consider in detail another process - the build-up of sewerage. For this purpose, a plastic pipe is most often used.As for the length, design features and the number of connecting elements, everything here depends directly on the new location of the toilet bowl.
 Sewage pipe
The pipe will be mounted directly on the floor or (using special clamps) along the wall
But there are other features to which special attention should be paid. In order to be able to lower the sewer to the floor level, it is necessary to remove the outlet to the toilet bowl from the cross
In the case of plastic, there should be no problems, it is much more problematic to do the above action with cast iron parts. Before removing the outlet, it is better to warm the socket with a blowtorch. This must be done without fail. Otherwise, the sealant will remain, and the putty will most likely crack. If the connecting elements are filled with sulfur, it must also be heated with a blowtorch.
After carrying out the above operation, the dismantling of the pipe and socket will become very simple. And further actions (direct installation of the structure) exactly correspond to the first case.
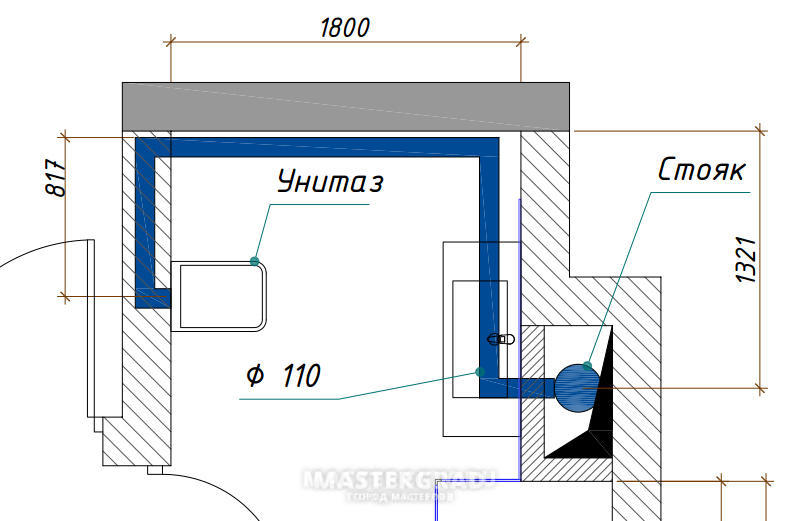
Transferring the toilet from the center of the toilet room to the corner where the riser is located
In most standard apartments of high-rise buildings built back in the days of the Soviet Union, the location of the bathrooms was not convenient enough. For example, installing a washing machine in a small room is almost impossible. The solution to this problem is to move the toilet slightly, moving it at an angle of 45 ° to the riser located in the corner of the room.

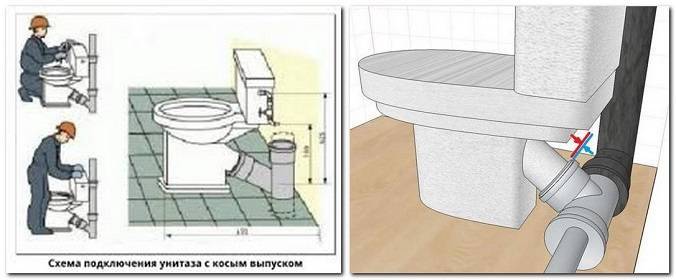
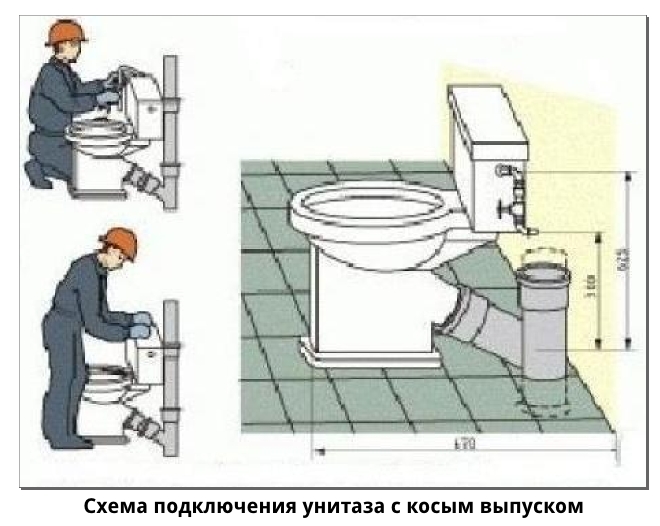
Types of toilet connection: in the wall, in the floor and with an oblique outlet.
Thinking about such a rearrangement, the first important decision will be the mandatory replacement, which has already served for a considerable number of years.now it’s not difficult, since there are a huge number of them in various plumbing stores and in various price categories. They differ not only in cost, but also in quality, shape and color, that is, the goods are presented for every taste.


Despite the fact that the back wall of the toilet will be installed in the corner of the room (close to the riser), you should not buy a model that has a corner drain tank, which seems to be specially designed for corner toilet installation toilet room. It is worth abandoning such models because the outlet of this toilet bowl in the combined bathroom rests against the wall and it will be impossible to make a suitable connection to it in this case.
To move the toilet bowl to a new location, it is better to pay attention to compact options of medium size, the width of the tank in which is 35-38 cm. Moreover, the width and length of the toilet bowl will not depend on the size of the tank, so everyone has the right to choose it, guided only by their own wishes and dimensions of the room.
How to carry and deploy the toilet in a combined bathroom?
First of all, you need to purchase some materials. For the reconstruction of the bathroom with your own hands you will need:
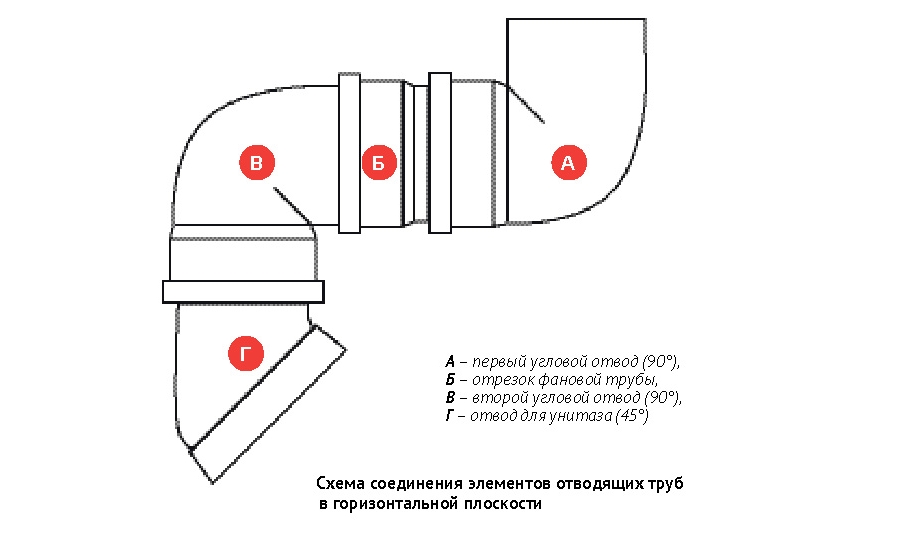
- 2 elbows made of 90° PVC, Ø 110 mm.
- 1 45° WC bend with outlet seal.
- A piece of a fan pipe with a socket, the diameter of which is 110 mm. It can be used as a transition elbow extension to move the toilet as close to the corner of the room as possible.
In parallel with this, it is necessary to solve the question of what to do after transferring the toilet with the floor that will remain in place of the former? This place will stand out on a tiled floor. The best option, but by no means the most economical, would be to combine the work of moving the toilet bowl with a general repair of the bathroom.
Assembly and installation works
Collect all the elements indicated in the list for the subsequent installation of this design. In order to fit it in size, experts advise removing the rubber seals not only from the corner bends, but also from the sockets. It is necessary to try to ensure that the ends of the knee exactly coincide with the release of the toilet bowl, which is installed in a new place. Do the same with the connection to the fan pipe. This can be achieved by pushing in and out of the connecting elements. As a result of such actions, it will be possible to choose the correct length of the straight section.
After the fitting work is over, it will be necessary to mark the connection lines on the bends with a felt-tip pen or a simple pencil. In this way, it will be much easier to assemble a structure fitted in advance to the existing dimensions. After that, disassemble the knee and coat the rubber cuffs included in the joints with silicone grease. After that, you should install them in their original place and reassemble the outlet structure. Now attach its outlet to the outlet of the toilet, and connect its opposite end to the fan pipe, which is located in the riser structure.
After these actions, it remains only to adjust the tap in height. Make sure that this design slopes evenly from the toilet to the riser at an angle of more than 2 °.Then, through the holes in the toilet pedestal, use a marker or pen to mark the points where your new toilet will be fixed. Next, install the drain tank. At the same time, be sure to check if it creates an emphasis on the wall. Then drill holes in the marks on the floor, insert dowels into them, with which the toilet will be fixed in place. This completes the relocation work. It remains only to bring all the plumbing into the room allotted for it.
Is it legal or not?
 The DHW riser belongs to the common house property. This means that all actions with it in one way or another may affect the rights of other owners, i.e. all residents of the house.
The work must be agreed with the management company, and the changes must be approved by the BTI and the architecture department, as the plan of the apartment changes.
The main document defining the rules for using the common property of an apartment building is Decree of the Government of the Russian Federation of August 13, 2006 N 491.
According to the requirements of this law, the actions of one owner of the apartment should not infringe on the rights of other people living in the house. This means that uncoordinated actions with life support systems, which primarily include DHW and cold water risers, as well as sewage, entail liability.
It is determined by the Housing Code of the Russian Federation (Article 29), which establishes various types of liability, up to the seizure and sale of a problem apartment.
As a rule, the transfer of risers is done over a short distance, within 1 meter (usually even less). Such a transfer is acceptable, and there are no problems when coordinating the work. However, some owners go much further and plan to move pipes to other rooms or corridors.
It must be borne in mind that the installation of plumbing fixtures above residential premises is prohibited. However, there is no such restriction for pipelines. At the same time, a tap is made from the riser to the water intake devices, which poses a certain danger of flooding the premises of the lower floors.
 When agreeing on the project, it will be necessary to justify the need and provide guarantees for the safety of residents of other apartments.
The transfer of the riser is prohibited if, as a result, the water supply regime worsens.
For example, when installing pipes of a smaller diameter, or when using unsuitable materials.
In addition, when replacing metal pipes with plastic ones, the requirements of the EMP are violated (the general potential equalization system changes).
This poses a danger to all residents of the upper floors. Another problem may arise in the fact that plastic pipelines are not able to withstand working or pressure pressure, which not all users are aware of.


The approval procedure requires a lot of time (usually at least 2 months), money and nerves. Often, officials, trying to play it safe, require a lot of unnecessary documents and certificates.
We must be prepared for a long walk through the authorities and not plan work ahead of time. Because of this, many owners make inconsistent transfers at their own risk.
Coordination of the transfer of the riser
The story that it is not necessary to coordinate the transfer of risers is a myth. Such work cannot be done without permission.
Let me remind you, I wrote about this in the article Who should check and replace the water risers, the water risers do not belong to you. This is a common house property, on which the life support of the residents of the house depends. Therefore, agreement is required.Unauthorized transfer, especially with consequences, threatens with serious consequences.
The issue of coordination depends on the type of ownership of your home. For homeowners, a reliable and correct solution would be preliminary coordination of work with the management company, a project for transferring risers may be needed.
To obtain permission to transfer risers to the Criminal Code, you must:
- Provide calculations allowing for the transfer of wastewater (a project not made “on the knee”);
- A written application to the Criminal Code from all homeowners.
How often do you call a plumber?
Poll Options are limited because JavaScript is disabled in your browser.
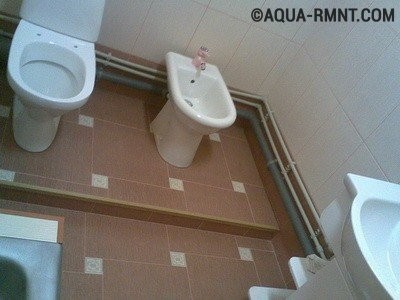
The transfer of the toilet is most often done due to the small area of \u200b\u200bthe bathroom. The owners have to use every centimeter of free space to expand the area. In most cases, this item of home toilet takes up quite a lot of space.
Now there are too many design ideas that are hindered by its location. Therefore, the toilet is deployed or transferred to a more suitable place.
Main reasons:
- increase in the usable space of the room;
- optimization of the area of the bathroom;
- implementation of design ideas;
- installation of sanitary equipment for the child.
The main reason for the transfer is the release of usable space in the plumbing unit. The owners want to move the toilet in such a way that they can install a washing machine, sink and other convenience items. And just a free area makes the room spacious and comfortable. This is especially true of panel houses, old "Khrushchev" and similar buildings, where the bathroom has a small area or is combined with a bathroom.
Also, the transfer will be needed when installing the toilet right in front of the door. This is inconvenient for using the whole room and dangerous for the equipment, as the door hits the toilet body. Ultimately, cracks appear on it, which gradually destroy the toilet bowl. In this case, the owners may suffer additional losses.
A popular reason to move the toilet to another place is the implementation of design ideas. The ideas of famous designers involve moving equipment closer to the wall or to the opposite corner. This makes it possible to free up room space for the designer's creative thoughts.
Particular attention should be paid to the children's toilet bowl - a full-fledged sanitary equipment, which is smaller in size and has a smaller volume of a drain barrel. It is best to transfer such a toilet to the opposite corner
"Pitfalls" of these works
Moving plumbing equipment some distance from the riser at first glance seems to be a very simple and hassle-free solution. But in reality this is not so. Increasing the length of sewer pipes suitable for equipment threatens with trouble. When flushed, an excessive vacuum will occur in them, which will provoke a breakdown of the water seal in all nearby plumbing fixtures. This process will be accompanied by extremely unpleasant odors from the sewer and gurgling sounds.
Often, only moving plumbing equipment some distance from the sewer riser can solve the problem of optimizing space in the bathroom.
Another problem is the increased likelihood of blockages.When moving the equipment, the length of the pipe that connects the device to the sewer riser increases. Accordingly, the path of impurities is lengthened. Theoretically, in any case, the drains will reach the sewer, but the likelihood of blockages increases many times over. Both problems can be solved with strict adherence to the requirements of the current SNiP. The document prohibits removing the plumbing fixture from the pipe further than 1.5 m.
Another important indicator is the slope of the pipeline. For parts with a diameter of 100 mm, it should be at least 2 cm per meter. Parts with a diameter of 50 mm must be laid with a slope of at least 3 cm per meter. This requirement must be strictly followed. Reducing the slope reduces the speed of drains, which can cause blockages. Too much bias is also undesirable. In this case, the water will pass through the pipes too quickly, leaving solid contaminants. They will gradually accumulate inside the pipes, preventing the free outflow of fluid.
Very often, the owner of the bathroom understands that in order to ensure a sufficient slope of the sewer pipe, the toilet will have to be raised, and the lifting height can be quite large. It all depends on the diameter of the pipe and the distance that the device needs to be removed. There can be two options for solving the problem: either raise the floor in the bathroom and mask the pipeline in it, or install a kind of podium under the toilet. Both options are quite viable, but in practice the second is most often used. As the least time-consuming and quite convenient solution.
To ensure the slope of the pipeline prescribed by SNiP, the equipment can be placed on a special podium
There is one more thing to keep in mind when planning the migration of equipment. The pipeline laid from the riser to the toilet must be a line without right angles. In cases where this is not possible, instead of a sharp 90° bend, two 45° turns should be arranged. This is necessary to minimize the risk of blockages.


SNiP sets quite strict requirements for the transfer of a plumbing fixture, and all of them must be met without fail, otherwise problems with the operation of the equipment cannot be avoided. At the same time, you need to understand that if the toilet needs to be moved more than 1.5 m, the recommendations of SNiP will not “work”. In this case, it is necessary either to transfer the sewer riser itself, which is practically impossible, or to equip a forced sewer. Last option can be used and at a smaller distance from the riser to the toilet, provided that there is no possibility or desire to bother with laying the pipe with the desired slope and raising the floor level in the bathroom.
How to choose a corner toilet
As with buying a regular version, when choosing a toilet with a corner cistern, you need to know what you should pay attention to:
When buying a similar toilet with a drain tank, you should pay attention to the tank mounting. It can be located in different ways: at an angle of 45 and 90 degrees
This is a rather important point, as it affects the appearance, functionality, as well as compatibility with the way you have installed the toilet itself.
Pay attention to the way you connect to communications. For example, the cold water inlet can be located on the back or side of the cistern.Various options will help you realize your idea and connect everything the way you want.
Design. The toilet bowl should be not only functional, but also harmoniously combined with the bathroom. In addition, there are models of different shapes and sizes, as well as in different colors.
The size. Choosing the right size is quite important. Firstly, it is necessary to choose the optimal size for the available free space, since too large a toilet will simply interfere. Secondly, the size should match the bathroom and sink. Too small a model will look extremely out of place. Thirdly, do not forget about the comfort of use. You should be comfortable using the toilet.
Material. There are quite a lot of materials currently on offer. Of course, faience is considered the most familiar, but more unusual warrants, for example, made of glass or aluminum, will help bring any design decisions to life and significantly diversify the room.
Manufacturer. In this case, we will talk about the quality of products. Products from Italy and Germany are considered the best. Actually, they will be the most expensive. But cheaper Chinese models can be of poor quality and fail quite quickly.
Additional functions. The main function of the toilet is already known to everyone. However, it can be supplemented with quite interesting solutions. For example, lighting that will help diversify the room. It can even be two in one, namely a toilet plus a bidet.
Price. Corner toilets are still more expensive than conventional options. This should be taken into account, since two options for the same price, for example, for 6 thousand rubles, will turn out to be of completely different quality.So when choosing, make sure that the space saved as a result will be worth the extra cost.
A corner toilet is quite a practical solution that will not only save space in small bathrooms, but also allow you to use interesting design solutions. It is also worth remembering that the corner option is a little more difficult to pick up, connect to communications, and it costs a little more.
In order to move the toilet, you should use options such as:
1. Transfer of plumbing equipment to a short distance - 10-20 centimeters.
2. Transfer of plumbing equipment over a considerable distance. In the event that the distance over which the toilet bowl is transferred exceeds the length of the corrugation, it is necessary to remake the sewer.
Letter of the law
Before you start redevelopment of the bathroom, you need to know what restrictions are indicated in the construction and sanitary rules and regulations, or rather those that relate directly to the bathroom.
Firstly, the complete transfer of the bathroom to another room is allowed only in two-level apartments. This is an elementary protection of the premises below from possible flooding.
Secondly, it is forbidden to change the size of the bathroom at the expense of the adjacent room, this does not apply to the combination of a bathroom and a toilet. If it is not possible to avoid such a combination, then certain work must be performed that accompanies this process.
Do not move sewer risers and dismantle ventilation ducts. Attaching plumbing fixtures to inter-apartment partitions is also prohibited.