- Useful tips
- Transfer technical details
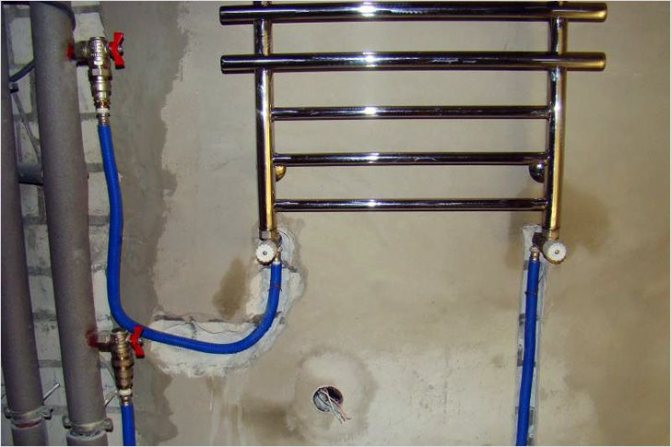
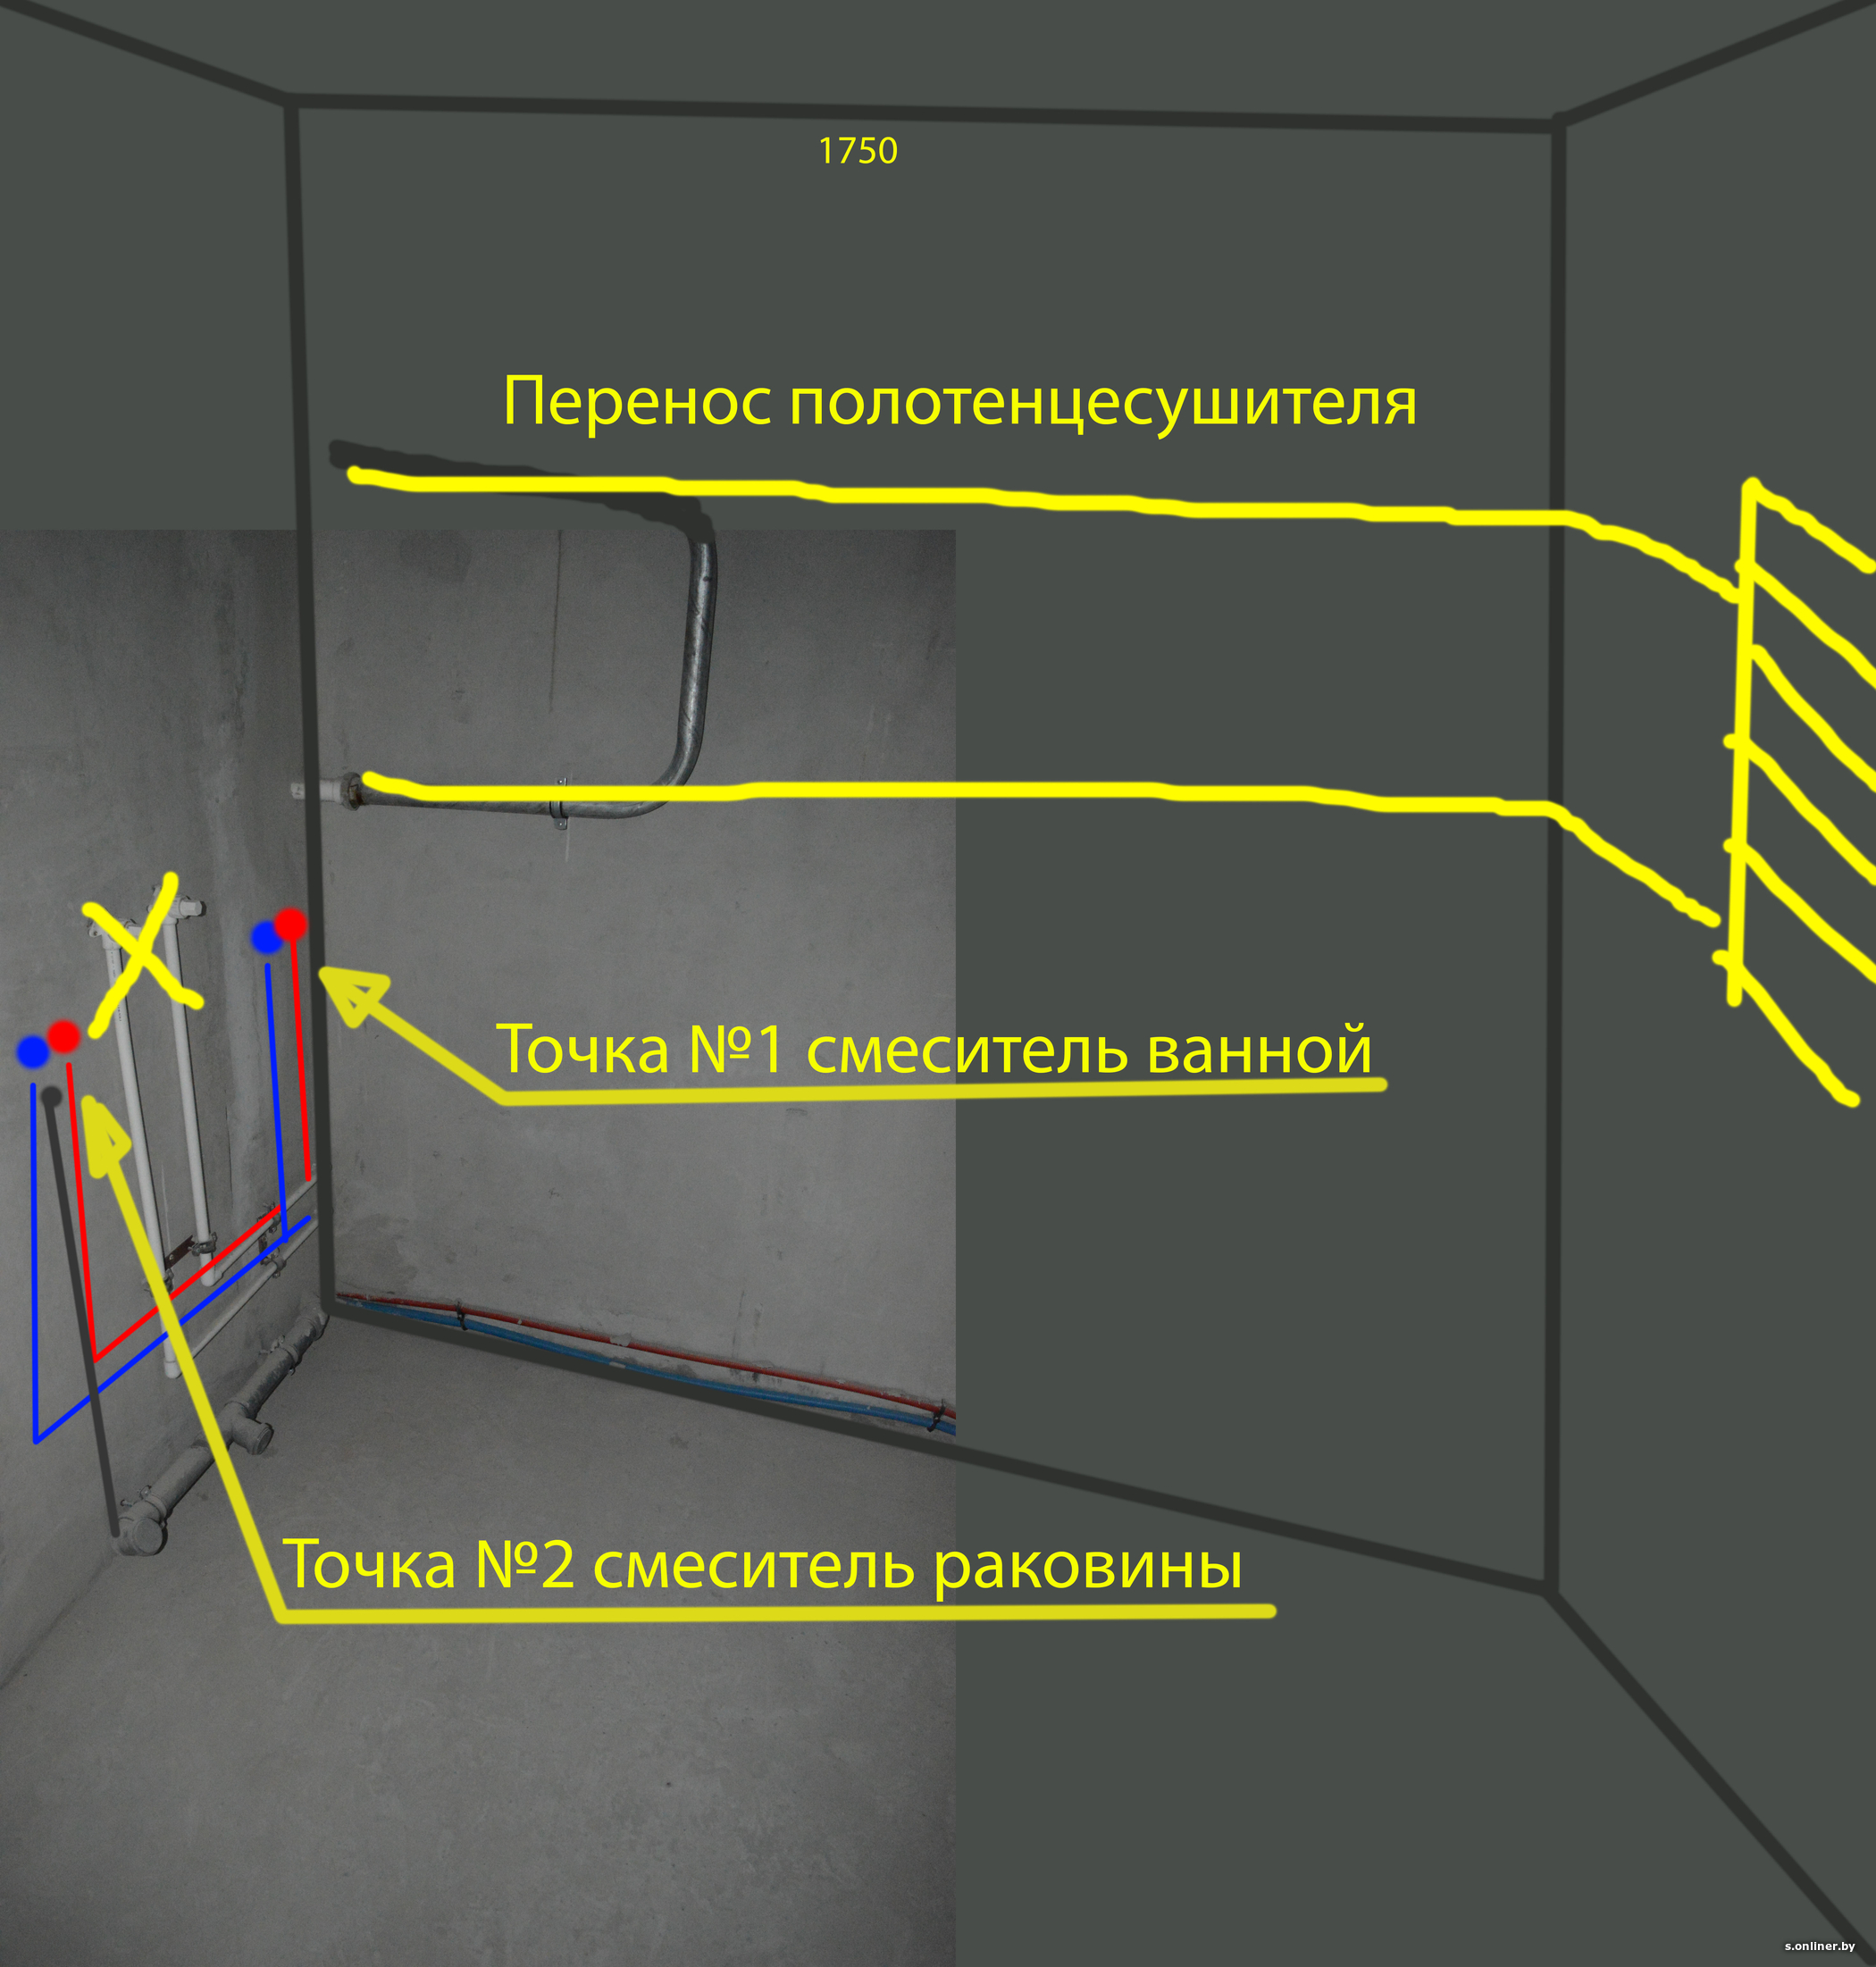
- Riser
- Wiring diagram
- Towel warmer transfer rates
- Installing a heated towel rail on another wall
- Transferring a water heated towel rail
- Transferring an electric towel warmer
- Moving the dryer to another wall
- water variety
- Electric towel warmer type
- Transferring a heated towel rail to another wall - an example of work
- Water heated towel rail: everything is somewhat more complicated
- A few practical tips
- Types of heated towel rails and their advantages
- Towel warmer transfer: Coordination
- water type model
- Design features of the water model
- Requirements for choosing a new model
- How to transfer a water model
- Removing the old model
- Installation of the riser pipe to the installation site of the new appliance
- Complex of preparatory works
- Types of heated towel rails
- Step-by-step instructions - how to transfer the DHW riser
- Tools and materials
- Preparation and coordination of works
- Dismantling the old
- Cart preparation
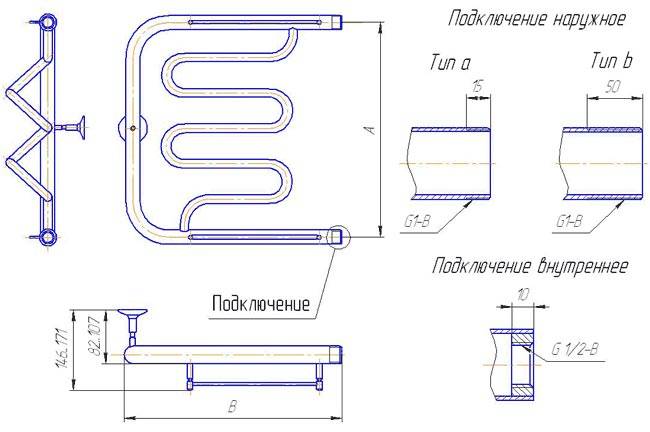
- Fittings
- Installation of inlet fittings
- Wiring connection
Useful tips
- The seamless steel model is recommended to be installed in apartment buildings. Such a model will withstand the increased pressure of the liquid in the pipeline, pressure surges, changes in the speed of the water flow.
- Brass appliances are installed in a house with autonomous water supply.
- It is worth considering whether it is possible to mount the device on the boundary wall with a living room, or transfer the heated towel rail to another wall.
- When installing pipes in a riser, either threaded connections are used, or welding is performed.
- It is undesirable to use a thread in hard-to-reach places: behind a decorative finish.
- The slope of the supply pipe is required in the direction of the movement of hot water. This will ensure that there are no traffic jams from the air.
- A distance of 3.5-5.5 cm is maintained between the wall and the middle of the supply pipe.
If you do not want to resort to the help of a specialist to move the heated towel rail in a water-type bathroom, then it is recommended to install an electrical appliance. But then the payment for electricity will increase. The choice is yours.
Transfer technical details
The need to move the heated towel rail inside the bathroom arises in several cases:
combining a bath with a toilet with the demolition of the partition between them;
- inconvenient location of the heater by default;
- transfer of plumbing, furniture inside the bathroom.
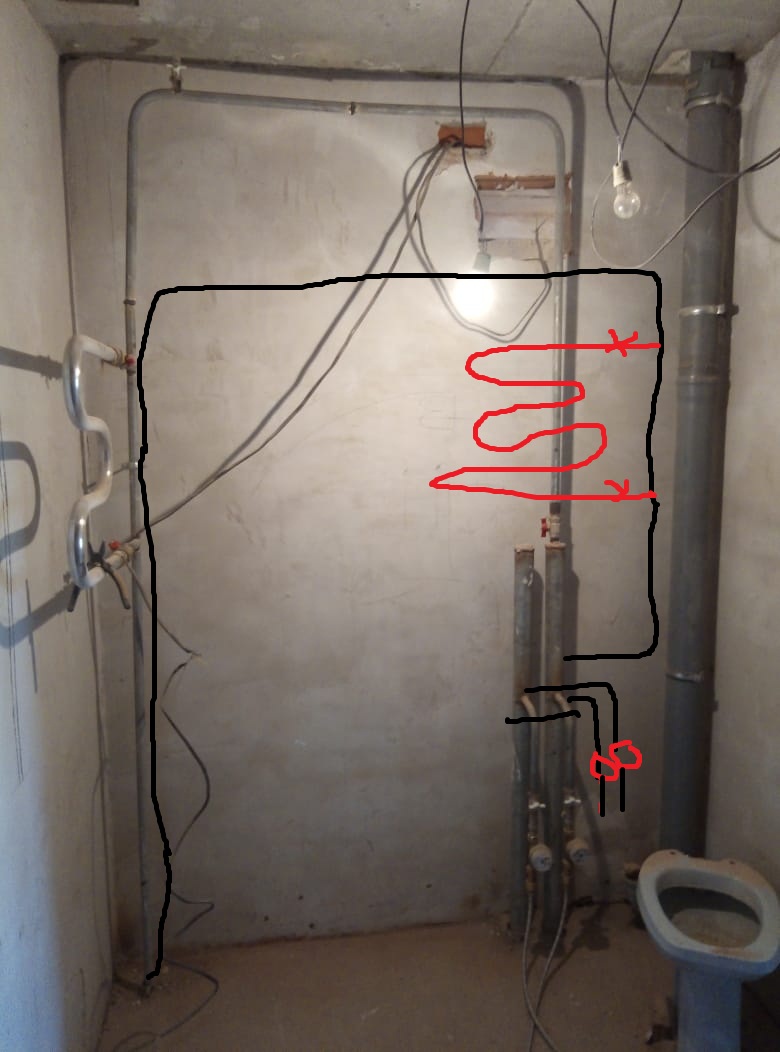
In the first case, it is necessary to obtain permission for redevelopment from the housing authority. After dismantling the partition, the riser must be moved to any of the remaining walls of the new room from its center. In the other two cases, the riser remains in its place, the "towel" register is transferred to the adjacent or opposite wall.
The performance of the heater and the quality of the design of the bathroom depend on the connection scheme. The correct choice of pipe material is the key to safety, long-term service life, and ensuring the maintainability of the system.
Riser
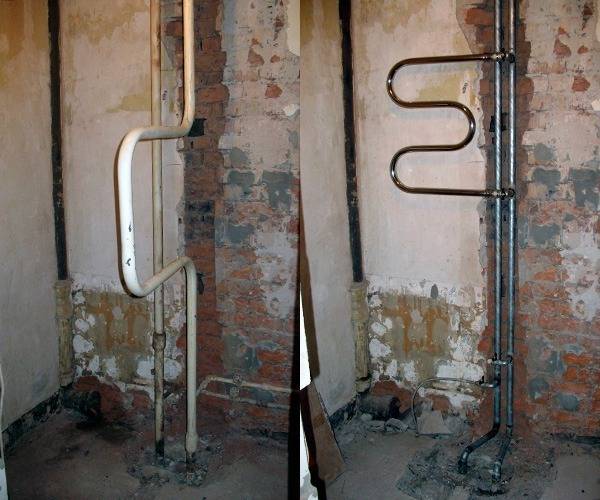
After the collapse of the partition between the bathroom and the toilet in order to combine the two rooms, in the combined bathroom, the riser must be moved to the remaining existing wall. This is the most difficult repair option due to the following nuances:
- at the lower / upper neighbors, the riser remains in place;
- taps are used for displacement;
- the lower outlet must be drowned in the lower floor slab, and the horizontal line must be embedded in the screed;
- the top outlet can be placed under the top floor slab without sinking it;
- in this case, in the combined bathroom, you will have to build a suspended panel, rack ceiling, make a plasterboard structure or use a PVC stretch fabric.
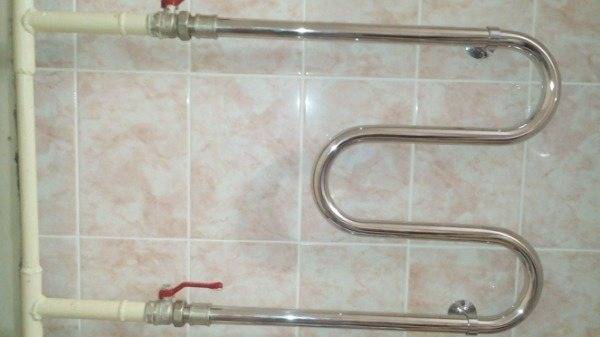
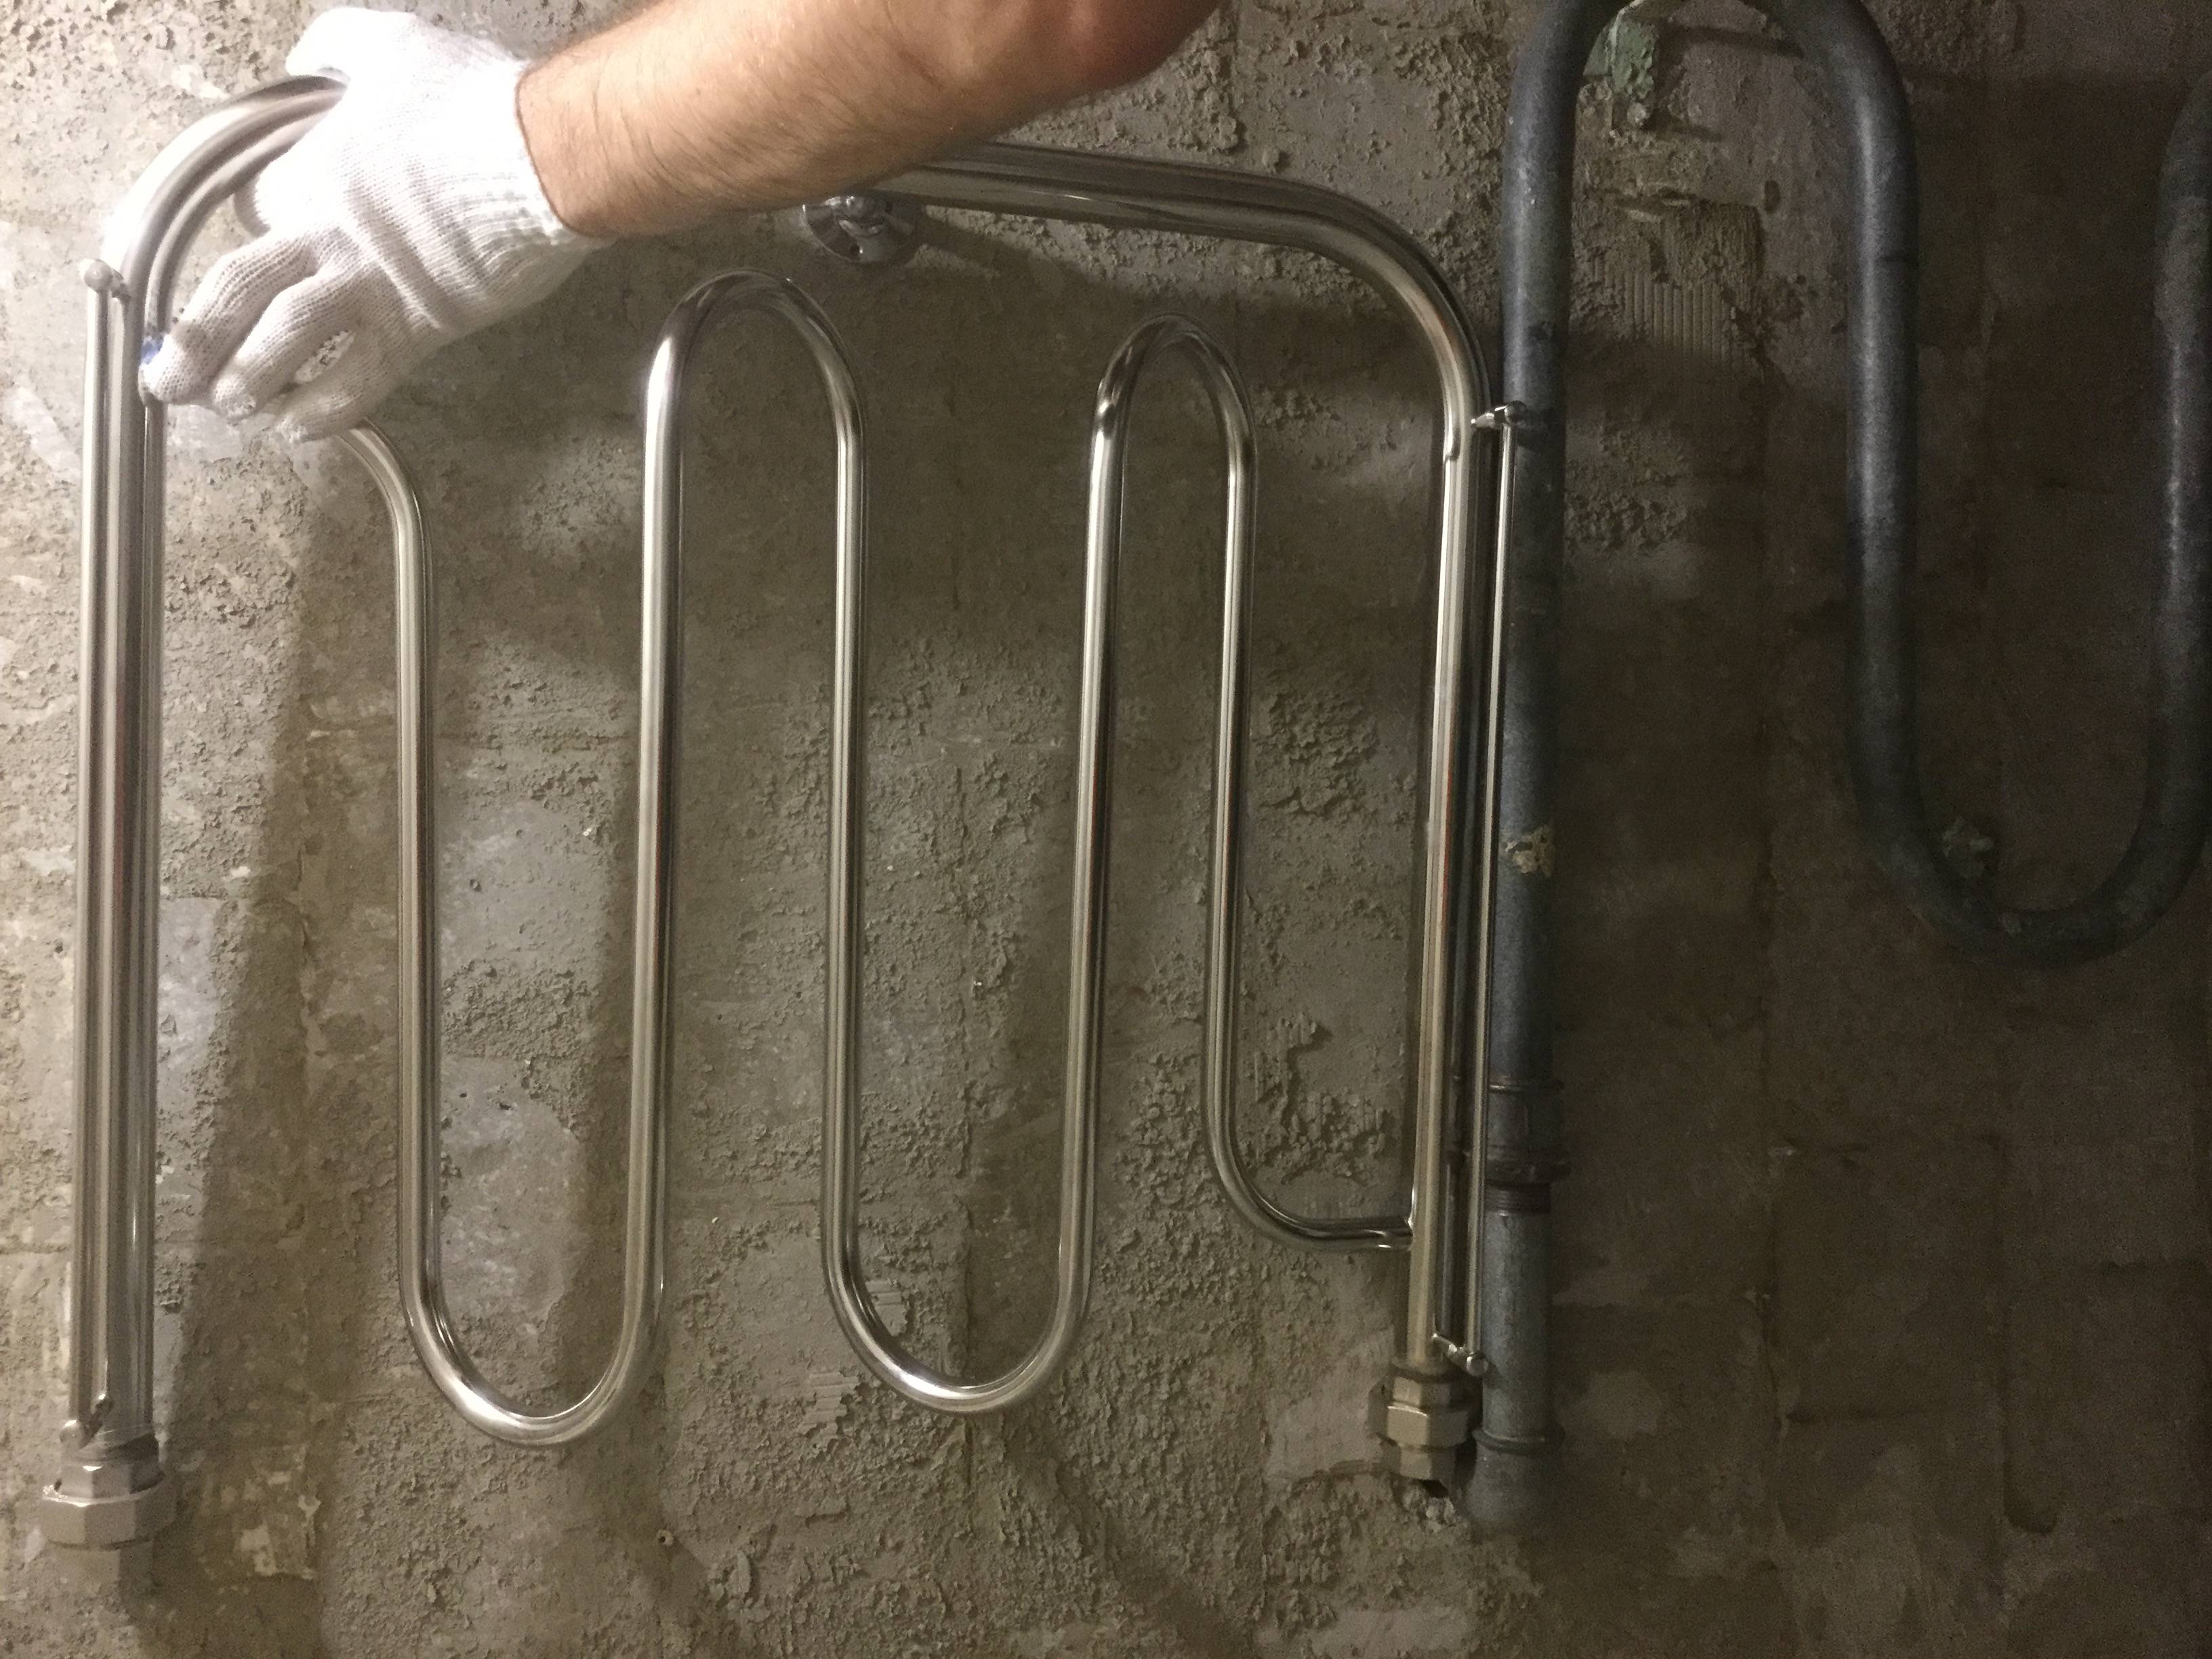
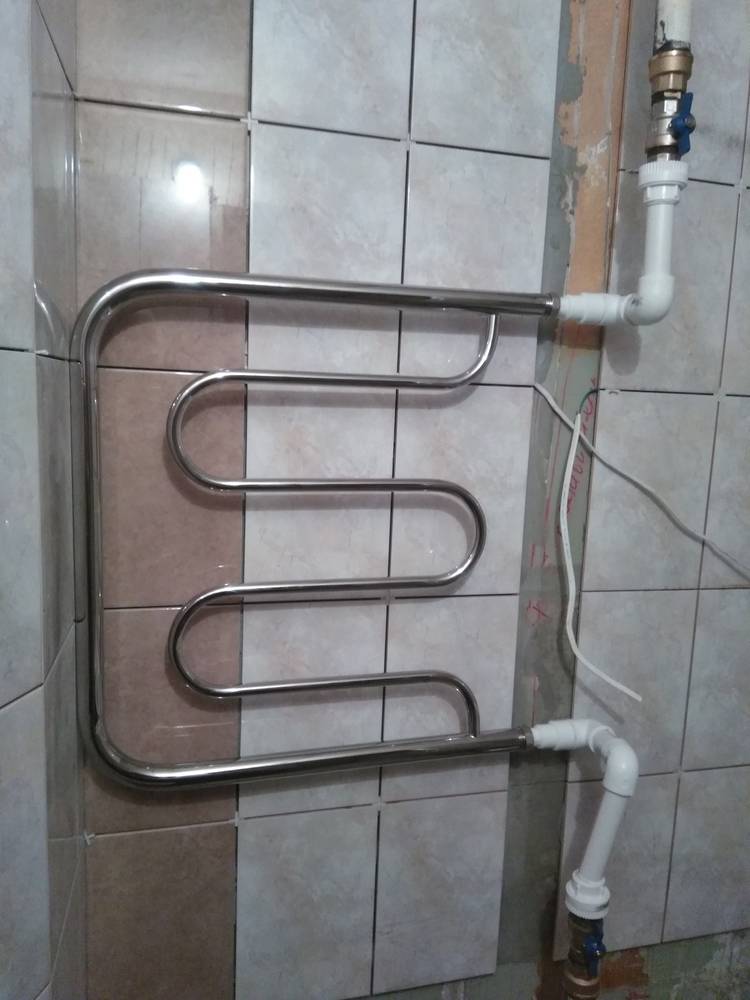
In this variant, it is recommended to use a classical configuration SS - U-shaped or W-shaped. In the "ladders" circulation problems are possible due to increased hydraulic losses in numerous branches / branches.
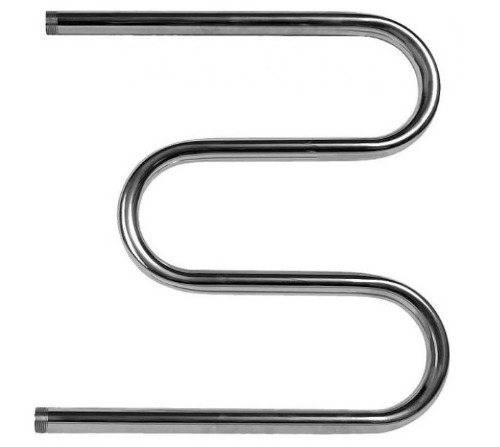
For U-shaped and M-shaped registers, the requirements are less stringent. For example, in the secondary real estate fund (“Khrushchev”, “Brezhnevka”, “Stalinka”), such heaters were mounted on a riser without a bypass.
Bypass is now a mandatory part riser for connecting a heated towel rail. That is, the heating element cuts into the riser with tees in parallel. For "ladder" type substations with large hydraulic losses inside them, the bypass part of the riser is made narrower - one standard size smaller.
In this case, hydraulic losses occur in the riser itself, the coolant enters the heated towel rail circuit more easily. Normal circulation is ensured.
Some models of heated towel rails are equipped with their own bypass.However, for the convenience of servicing the device during operation, taps or valves are installed in front of it. Therefore, the bypass in this case does not meet the requirements of the SP and SNiP standards.
Wiring diagram
The main requirements for ensuring the normal circulation of the coolant in an offset heated towel rail are:
- the top tie-in to the riser should be located above any top element of the "towel";
- the lower tie-in to the riser must be below the lower element of the heated towel rail;
- the routes of the horizontal supply and return lines between the riser and the substation must be straight.
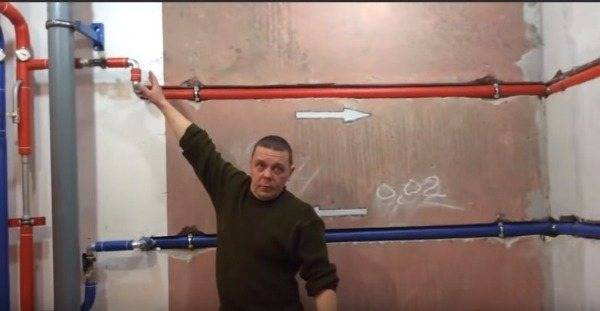
This will ensure that there are no "air pockets", the heater will normally start up without air pockets after draining the water from the system and then filling it with coolant.
Horizontal lines should not be hidden when moving the PS under the bathroom, they should be embedded in the screed.
Towel warmer transfer rates
The main goal of moving a heated towel rail is to locate it in a convenient place. To ensure the efficient operation of the device, the transfer process must be carried out in accordance with established safety standards.
When moving to another piece of wall in the bathroom in an electric drying room, the following requirements must be taken into account:
- the heated towel rail must be connected to a separate electrical wiring line;
- the network must be short-circuit protected;
- when connecting an electrical appliance in the bathroom, grounding must be provided;
- the piping must be securely insulated.
For safe use of the heated towel rail in a room with high humidity, its movement should be carried out in compliance with the distance:
- from the floor - 95 cm;
- from furniture - 75 cm;
- from water sources - 60 cm;
- about the edge of the wall - 30 cm.
Moving water drying requires compliance with its own rules:
- the connection must be made using heat-resistant pipes capable of withstanding high pressure;
- installation of a heated towel rail when connected to centralized heating or hot water supply should be carried out using a bypass;
- the diameter of the supply pipeline must match the cross section of the inlets of the riser and the heated towel rail;
- in order to ensure the correct operation of the dryer and avoid the formation of air pockets, when connecting the device, ensure that the slope of the supply pipe is at least 3 millimeters;
- placement of drying on a new section of the wall must be carried out taking into account a safe distance from sources of moisture, walls, floors and furniture installed in the bathroom;
- supply pipes should not have significant levels of drops that contribute to the formation of an air hydrodynamic lock.
 The connection of the heated towel rail must be carried out using heat-resistant pipes
In the process of transferring the heated towel rail, it is not recommended to combine threaded connections with welded pipelines. The design of the joints that are hidden in the decorative finish should be carried out by means of a welding machine. Self-moving drying should be carried out a short distance from the riser.


Installing a heated towel rail on another wall
So, what questions may arise if you decide to move the device? To begin with, let's find out if these manipulations are considered a redevelopment of an apartment, which requires special permission from the housing inspectorate.
On the floor plans of the BTI, such changes are not noted, therefore there is no corresponding regulation.But if you do not live in a private house, but in an apartment building, then you should remember that the dryer is powered by a common house heating system. And this means that it is imperative to coordinate your actions with both the house manager and the rest of the tenants in order to avoid annoying troubles in the future.
There are two possible scenarios for the development of events. For example, if you are planning to move only a heated towel rail, and do not carry out a total redevelopment of the entire apartment, then you just need to contact the management company, which will subsequently issue you a certificate stating that all the work was carried out with its help.
If your apartment is fully renovated, then you can not do without contacting the housing inspection. You will need to submit the relevant documents, where all changes will be registered, including the transfer of the heated towel rail. The Housing Inspectorate will review your project and agree on it, after which it will be possible to get down to business.
Transferring a water heated towel rail
There are two different types of this device: water and electric. To begin with, let's consider the features of transferring a water heated towel rail, since this is a more complex and time-consuming operation than in the second case.
If you have the necessary tools and skills, then you can cope with this task on your own, but you should act very carefully and carefully, because in case of failure it will be very difficult to correct mistakes.
The water device consists of the following parts:
- system through which water is supplied;
- special cork;
- brackets for wall mounting;
- air release valve;
- valves for shutting off water.
So, you should pay attention that the device can work both from the heating system and from the system that provides hot water to the apartments. Of course, the second option would be preferable, because heating is supplied for no more than six months, the rest of the year, the use of a heated towel rail in this case is out of the question
Also, in the event of any breakdown, the hot water supply system is much easier to shut off than the heating one. This will allow you to save energy and bring great comfort in the future.
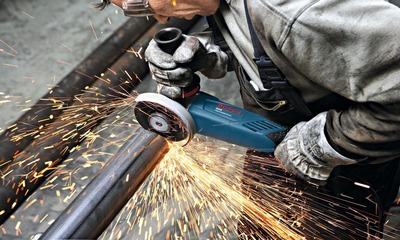
To carry out the transfer, you will need tools such as a grinder, a welding machine, etc.
Transferring an electric towel warmer
This case is much easier than the one described earlier. Ideally, it would be near the intended place of transfer of the power source - then you do not have to lay additional wire
This is what you should pay attention to before choosing a place on another wall for your heated towel rail.
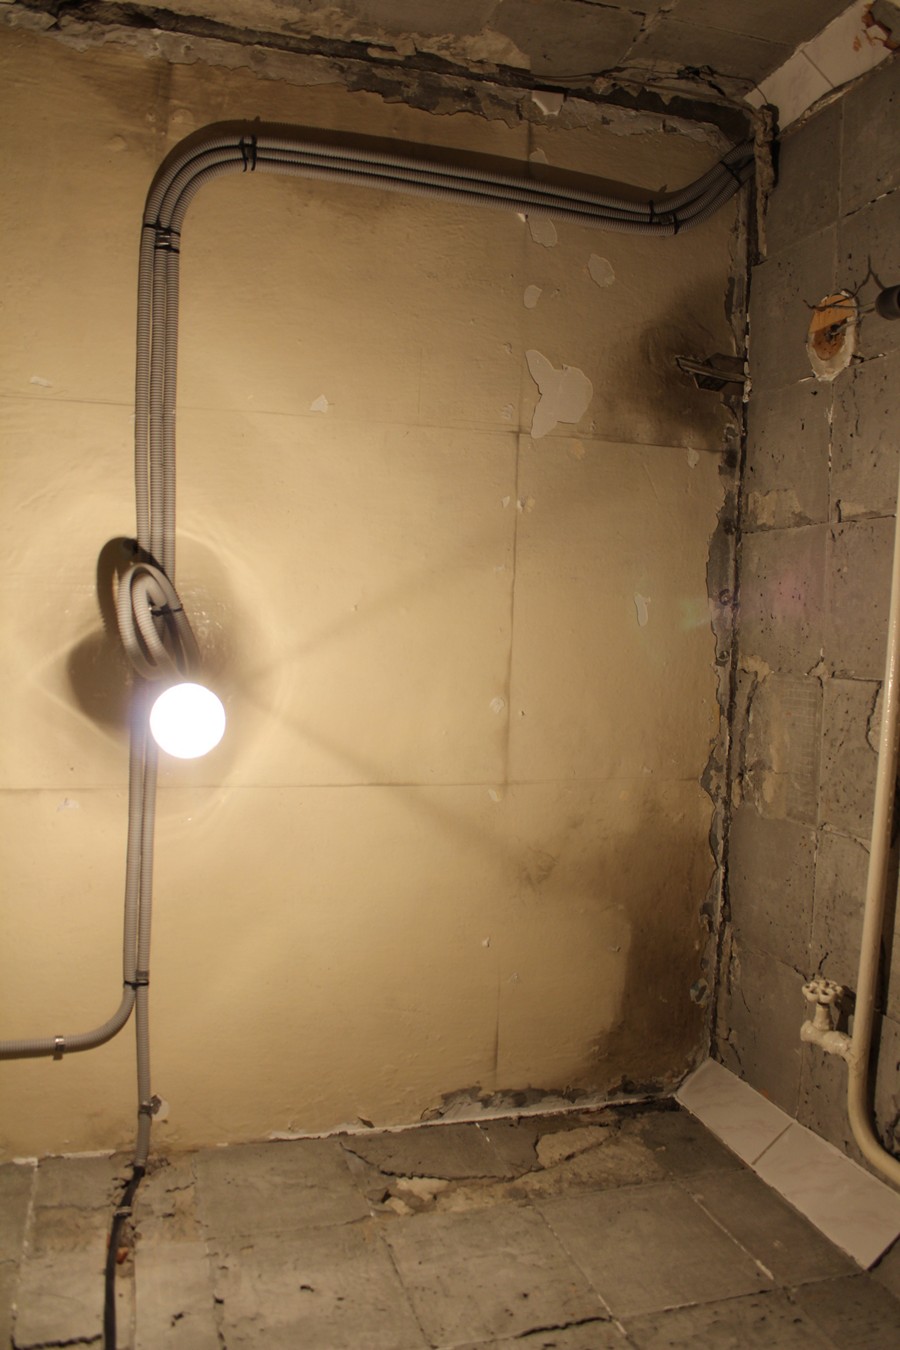
If you still need to lay the wire, then you will have another choice: how best to place it - under the cladding or directly on it. The first option is much more reliable, but also more difficult. If you need to do everything faster and less difficult, and the bathroom is not undergoing other repairs, then you can use the second option. This also eliminates the need to carry out finishing work after installing the heated towel rail in a new place.
In principle, the whole point of the work here comes down to the fact that you have to remove the device from the previous attachment point and transfer it to a new one, having previously drilled places for special holders with a drill.
Moving the dryer to another wall
Towel dryers are categorized according to the way the surface is heated:
- hot water flowing inside the line;
- using oil heated by a spiral connected to the electrical network.
water variety
To install a water heater, you must:
- Determine new equipment attachment points and mark the wall in accordance with the dimensions of the dryer.
- Turn off the water supply in the apartment or house. It is recommended to notify neighbors in advance about a temporary shutdown of water supply (for example, by placing an announcement on the door to the entrance or in the elevator car).
- Cut pipes with a grinding wheel or unscrew the mounting flanges (depending on the condition of the threaded connections).
- Loosen the screws holding the heater mounting brackets to the wall. Seal the holes in the tile with cement mortar or cover with decorative elements.
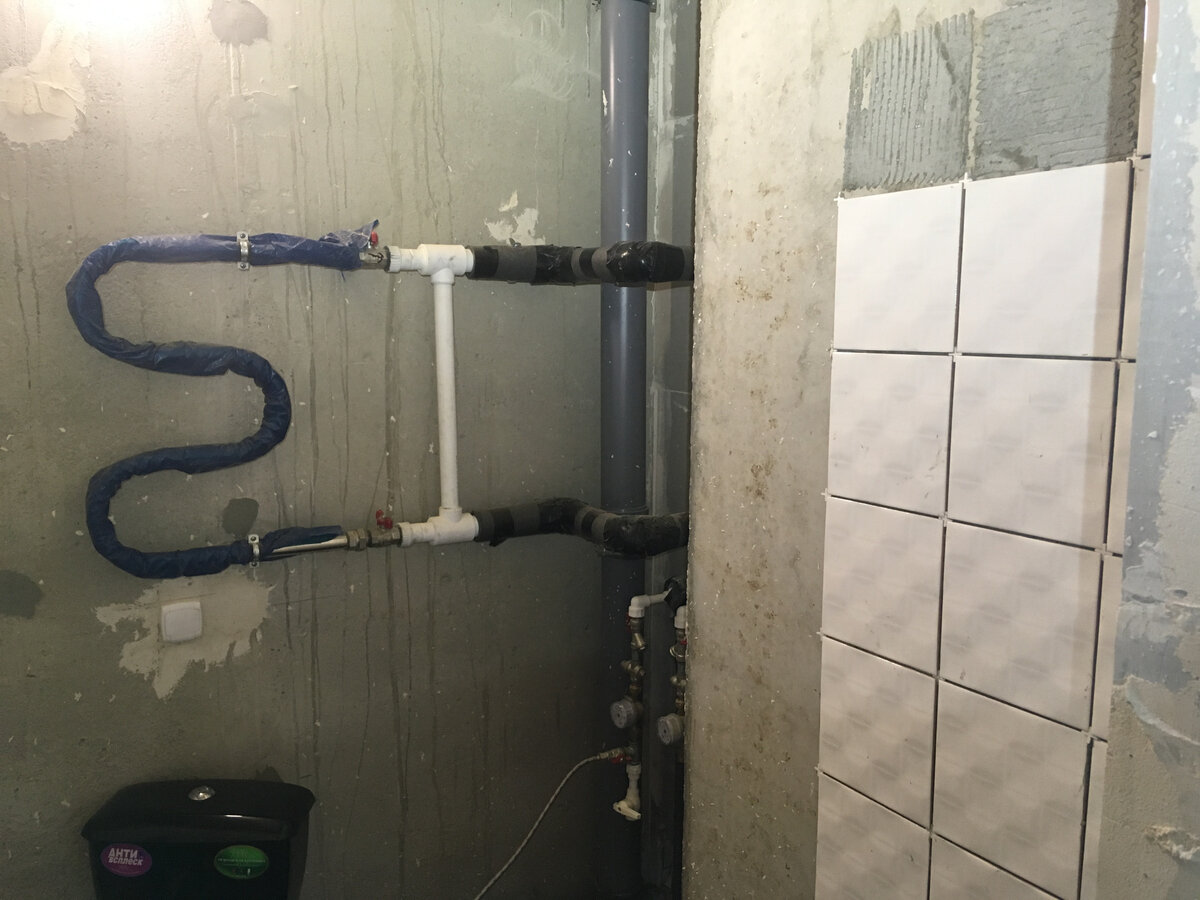
- Lay lines to the installation site of the equipment. If steel elements are used, then the parts should be connected by contact welding or special threaded couplings, the connection points are sealed with tow or synthetic tape. Plastic lines must be connected by soldering using a special tool. Ball valves are provided in the channels for supplying and discharging liquids, there is a jumper (bypass) in front of the valves, which allows you to keep the circulation of water when the towel dryer is turned off.
- Connect the heated towel rail assembly with couplings; a special “American” type connector is used to switch the metal line to the plastic pipes. The coupling is screwed onto the thread on the heated towel rail, and then soldered to the polypropylene lines.
- Install the mounting brackets that you want to fix on the wall surface with dowels and screws. Use an electric drill or punch to drill holes.
- Supply water to the lines and make sure there are no leaks. If water drops are found, the elements must be connected again.
- Close the water mains with a decorative box, in which inspection hatches are provided (for example, for access to valves). If the room is being renovated, then the pipes are embedded in the walls and covered with tiles.
Electric towel warmer type
The electric towel warmer is not connected to the water supply, which simplifies the transfer procedure. Since the equipment is connected to a 220 V AC mains, the installation point is located at least 600 mm away from faucets or shower heads. A socket with a waterproof housing equipped with grounding contacts is mounted on the wall. The power circuit is provided with an automatic fuse and RCD protection.
Electric towel warmer.
Algorithm of actions when installing an electric heated towel rail:
- Remove the heater from its old place, seal the holes in the partition with decorative plugs or fill with tile grout.
- Mark the fixing points on the wall surface. It is recommended to mount the heater at a distance of at least 950 mm from the floor surface and at a distance of 750 mm from the edges of furniture installed in the bathroom.
- Drill holes; for processing tiles, a special drill with a carbide tip is used.
- Install plastic dowels in the channels, and then screw the fasteners of the heating equipment with screws.
- Connect the power supply and check the performance of the heater in different operating modes. Do not operate the equipment with a leaky casing or a faulty temperature controller.
Transferring a heated towel rail to another wall - an example of work

The heated towel rail in the bathroom is a small device, but very useful.
In addition to dry and warm towels, apartment residents receive additional bathroom heating, which will make the room even more comfortable, help get rid of excess moisture, prevent mold, fungus, unpleasant odors, etc.


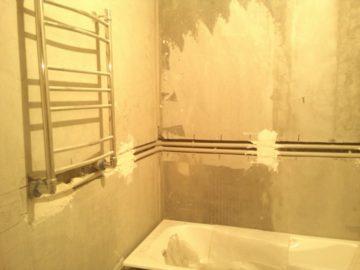
In many standard houses built back in Soviet times, this detail is provided for by the project. However, the device is often located extremely inconveniently, for example, directly above the washbasin. In this case, as well as with a radical redevelopment of the bathroom, it is necessary to transfer the heated towel rail to another wall.
Water heated towel rail: everything is somewhat more complicated
Here are the works carried out during the initial installation of a heated towel rail:
But these are when transferring (it will be necessary to transfer the entire riser):
If you still decide to transfer a heated towel rail that is heated by hot water coming from a central heating or hot water supply system, then your work order will be something like this:
It is necessary to turn off the hot water supply for a while. To perform this operation, a plumber from the ZhEK (or a similar organization) is usually invited, who knows exactly which lever and where to turn.
Tip: In order not to aggravate relations with neighbors, it does not hurt to warn them about the planned shutdown of hot water, reporting approximate terms of work.
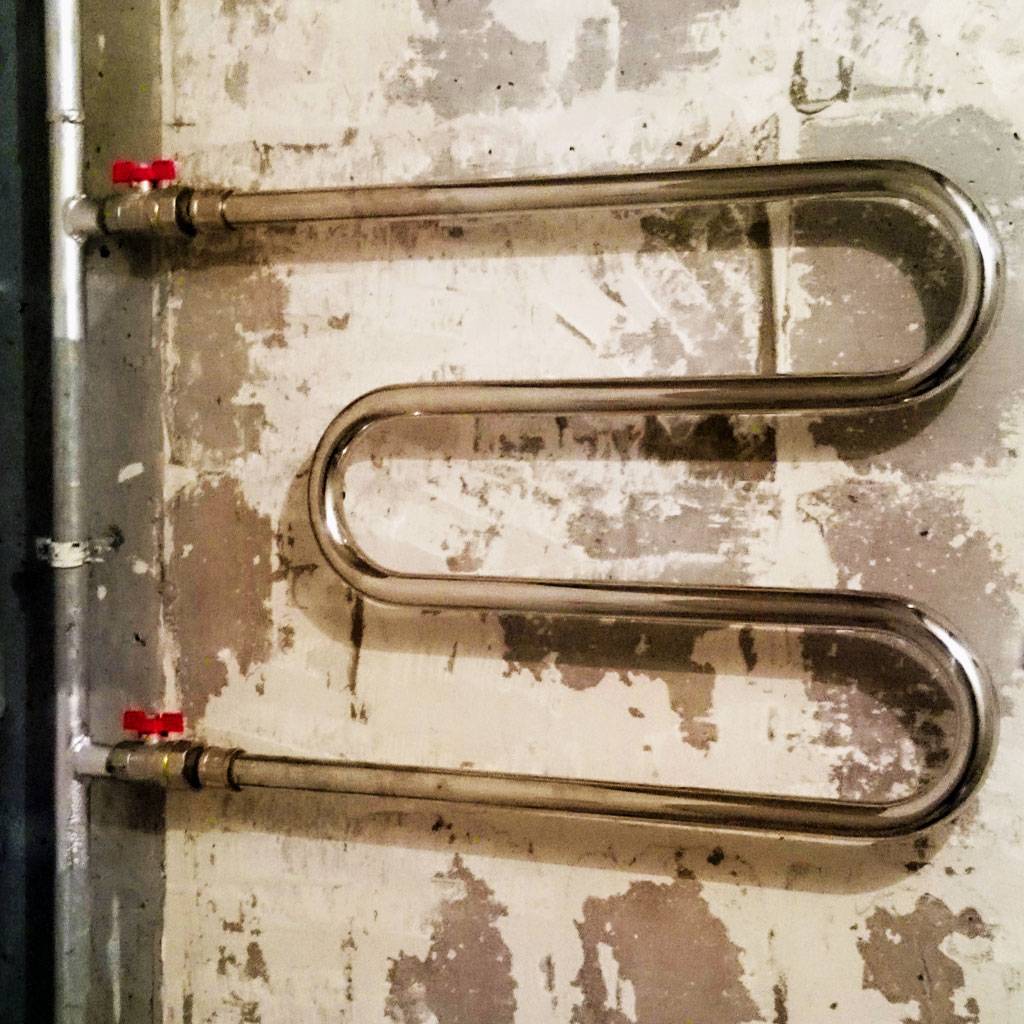
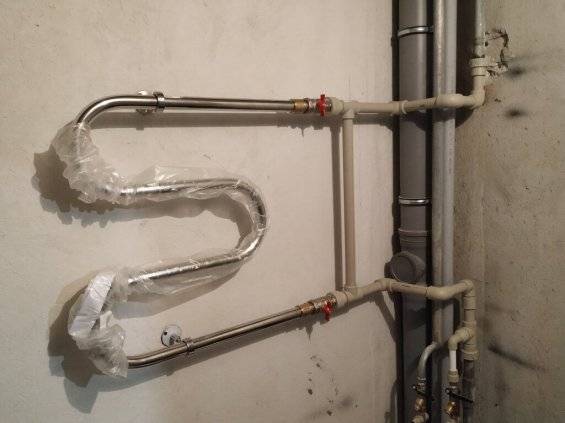
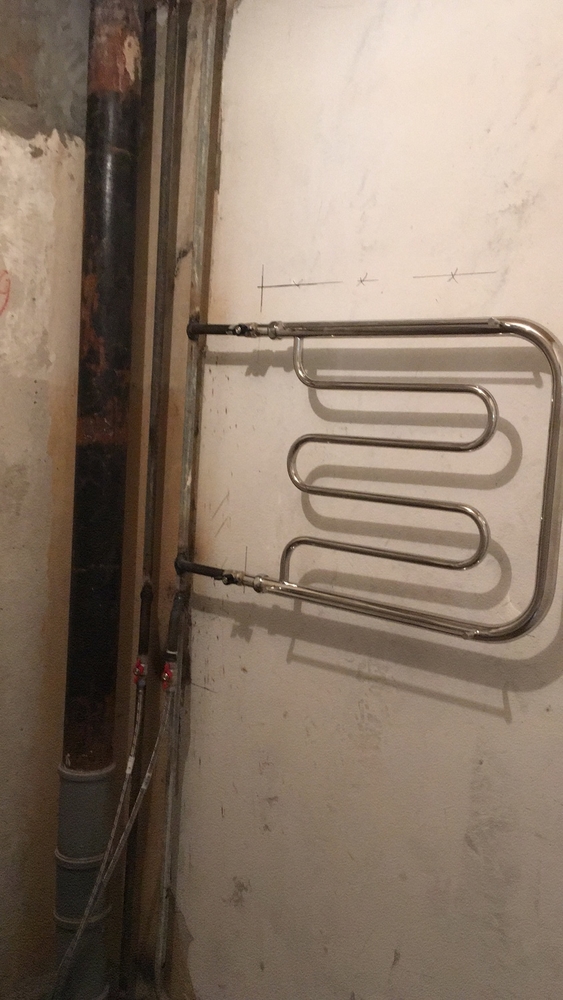
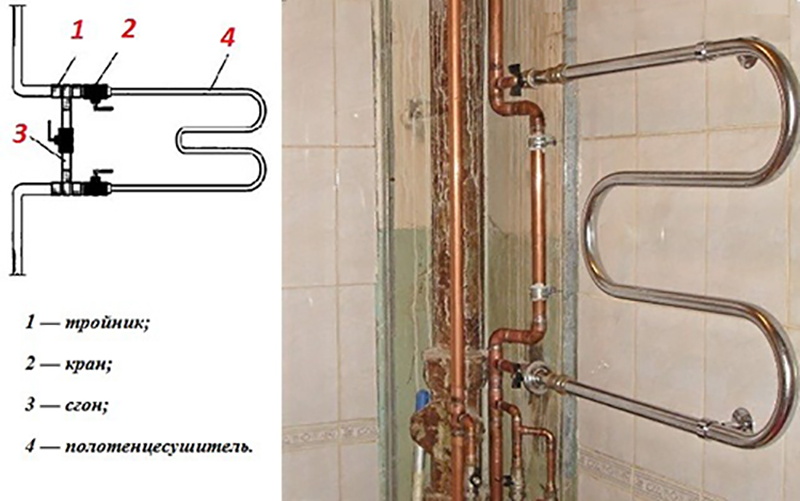
Mount a special jumper called "bypass", as well as a pair of ball valves. Thanks to this device, the maintenance of the heated towel rail will become many times more convenient. With the help of taps, the flow of water is diverted from the heated towel rail to the jumper. After that, you can freely remove the device, change gaskets, repair, replace it with a new model, etc.
The bypass is mounted from a piece of pipe, the diameter of which is one size smaller than the dimensions of the main pipe.
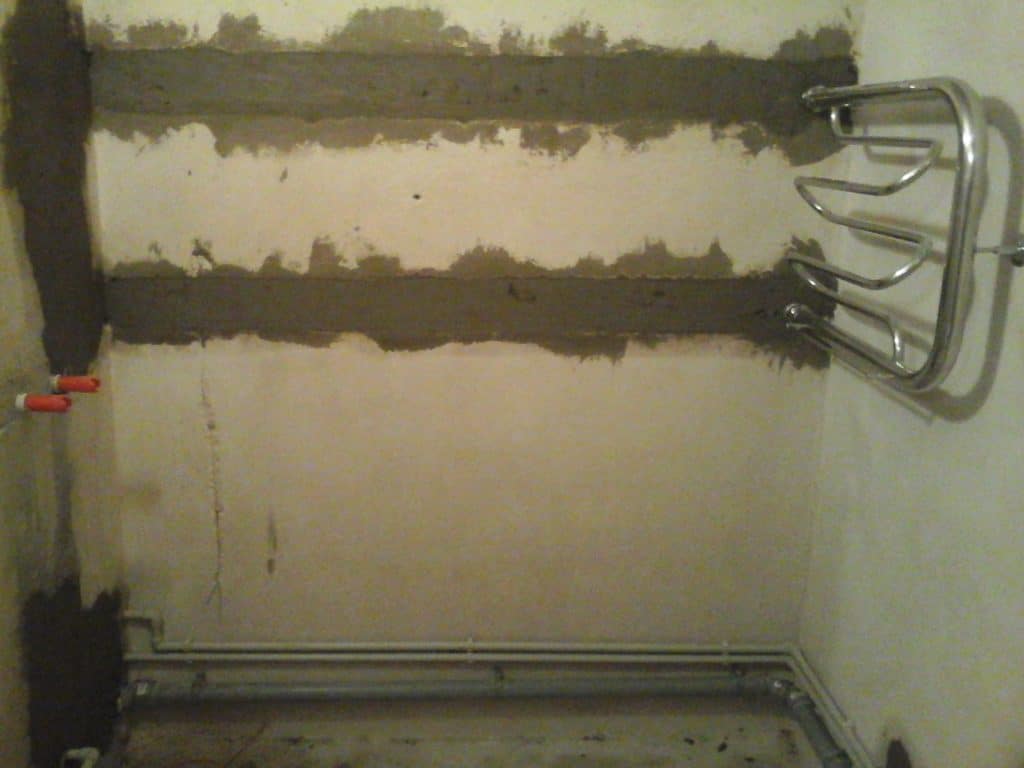
Lay pipes from the riser to the new installation site for the heated towel rail. If the distance is significant, it is necessary to seek the advice of a competent engineer who will carry out the necessary hydraulic calculations. The fact is that an incorrectly installed device will not heat up to a sufficiently high temperature.
Tip: Pipes can be recessed into the wall and hidden under decorative trim. This is a more time-consuming installation method, but the bathroom interior will only benefit from such a solution.
- It remains to fix the heated towel rail in the right place and attach it to the pipes.
- Then the system is checked and the final finishing work is carried out.
A few practical tips
To ensure that the transfer of a heated towel rail in the bathroom does not become a disaster, a number of nuances should be taken into account. For example, experts recommend purchasing a durable seamless pipe steel towel warmer. Such a model is designed for increased water pressure in the system, as well as for water hammer - a characteristic phenomenon for the urban water supply network.In private houses and cottages with autonomous and quieter water supply, you can use imported brass models designed for low pressure and careful operation.
Installation of a jumper-bypass facilitates the operation of the heated towel rail and possible repairs
An important point is the connection of the device with the system. There are two options: welding or threading.
A threaded connection is not recommended in combination with a welded riser, as well as in places that are inaccessible for maintenance, for example, if the connection is supposed to be hidden behind a decorative finish.
In addition to plumbing issues, a legal problem may also arise, since it is not possible to make such changes to the general house plumbing system everywhere. To resolve the issue, you need to make (i.e. order from specialists) the appropriate hydraulic calculations and coordinate them with the local management company, housing office, etc. In some places, such permission is not required, but if the transfer of the device is carried out with violations that affect the entire system, problems are inevitable.
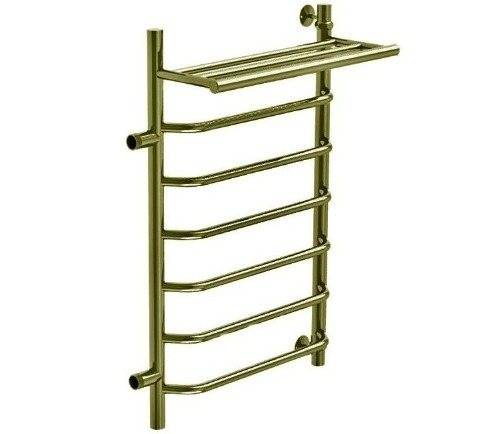
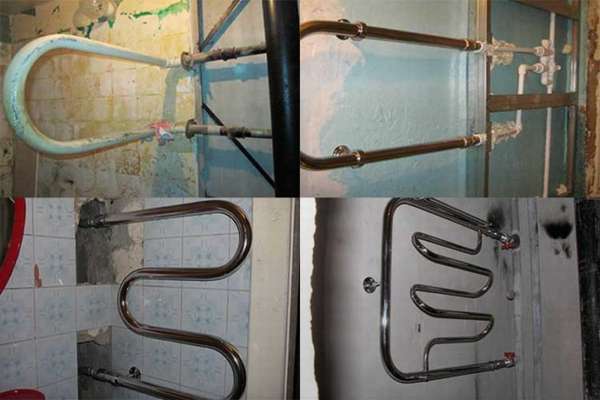
Types of heated towel rails and their advantages
Towel dryer
Let us clarify that there are several types of heated towel rails, each of them has advantages, they are not without some disadvantages.
Commonly used devices:
- Standard water - work when connected to the hot water supply of the house or its heating system. The problematic of such a device is associated with the possibility of operation only during the heating season or in the presence of hot water. Otherwise, the device will be useless.The second point is connection difficulties - its illiterate implementation can have a negative impact on the operation of the water supply or heating system of the whole house.
- Electric heated towel rails are metal tubular structures with an electric heater inside. A big plus of such a device will be the ability to work offline.
- Universal heated towel rail - Probably the most convenient and unpretentious option. Runs on both hot water and electricity. The only drawback is the price of such devices - almost 2 times higher than the standard models.
There are also very convenient portable electric models, they are installed on the floor, they do not require any installation, they can be used not only in the bathroom, but in the kitchen or in the room, as a heating device.
Towel warmer transfer: Coordination
At present, we have not developed any unequivocal opinion regarding such an event as the transfer of a heated towel rail.
In total, how in practice the transfer of a heated towel rail is agreed:
Option 1 You do not have redevelopment into apartments - you only plan to transfer the heated towel rail. In this case, it is necessary to carry out the transfer of the heated towel rail by the management company and obtain a certificate from them that the heated towel rail was transferred by their forces.


Option 2 You are undergoing renovations and redevelopment. In this case, in the project documentation, which is submitted for approval to the housing inspection, the transfer of the heated towel rail is not noted, but only work that entails a change in the BTI plan is noted.
The main requirement for transferring a heated towel rail is its installation on any wall, except for the walls common with neighbors, behind which there are living rooms. There is nothing more to add regarding the legal side of transferring the heated towel rail, so let's move on to the technical side of the issue.
Conclusion: the transfer of a heated towel rail as a separate practice does not require coordination. Neither a heated towel rail transfer project nor a sketch is required (Although management companies may require some kind of project documentation when transferring it)
Transferring a towel warmer
This is interesting: How to choose electric towel warmer for bathroom + connection - set out point by point
water type model
The mechanism for transferring a water heated towel rail is more complicated. However, it is possible to do the work yourself.
Design features of the water model
This type of dryer consists of the following elements:
- on top of the device there is a Mayevsky valve. Its purpose is in air release;
- there is a plug - a special plug;
- water is supplied through the supply system;
- water is blocked by valves specially built into the device. If there are none, you need to install them yourself;
- fasteners - brackets.
The operation of the dryer is carried out in some cases from the heating system, in another version from the hot water supply. The second option is more preferable:
- The heating season is short. Heating functions for a maximum of 6 months.
- When a breakdown or leakage of the dryer is detected, you must immediately turn off the water supply to the coil. With plumbing, this can be done quickly. With a heating system, this will be difficult to do.
- There are fewer impurities in the composition of the water of the plumbing system than in the liquid of the heating system. In addition, water stagnates in the heating system and becomes even more clogged.
Requirements for choosing a new model
The new model of the heated towel rail must meet the requirements:
- The new model is selected according to the level of pressure in the apartment's plumbing system.
- The model in dimensions changes in direct proportion to the size of the room. The large bathroom has a large heated towel rail.
- The model is selected taking into account the diameter of the outlet pipe. The indicator must correspond to the diameter of the inlet of the riser pipes.
- It is recommended to opt for a seamless pattern.
How to transfer a water model
A tool and additional details are being prepared for work:
- fastener - brackets;
- polypropylene pipes;
- apparatus for welding;
- Bulgarian;
- pipe cutter can be replaced with wire cutters;
- a set of keys;
- Ball Valves;
- prepare lerks for threading;
- FUM tape;
- fittings for connection.
Removing the old model
Dismantling does not begin until the water supply to the riser is shut off. The water drains completely. At this point, there should be a specialist from the housing department. He will give an answer whether it is possible to transfer the heated towel rail in the apartment to another wall.
- Cutting the pipes of the dryer starts from the bottom. Then the top tube is cut off. The remaining pieces remain long enough to mount a new model.
- The work is done with an assistant. Otherwise, the fallen dryer may hit hard.
- Fasteners are removed from the old model after trimming. The device is taken out of the room.
You can team up with neighbors to resolve the issue of replacement of pipes in the riser. If this is not possible, then it is recommended to do this in your apartment. It is recommended to use polypropylene pipes with a cross section of 25 mm.
Installation of the riser pipe to the installation site of the new appliance
Invite a specialist if the pipe laying distance is long. It is necessary to have knowledge of the correct laying of pipes, to observe hydraulic calculations.
- At the ends of the remaining pieces of pipes, stripping of old paint is done.
- Threading is being cut or welding is being carried out.
- A fitting (connecting element for propylene pipes) is strung on the resulting thread.
- The joints are treated with FUM tape and sealant.
- You can improve the maintenance of the new heated towel rail with the help of a special “bypass” jumper and ball valves. The latter may be needed to redirect the fluid flow to the jumper.
- Hot water is launched into the plumbing system. If there are no leaks, then the job is complete. System performance has been confirmed.
- The dryer is mounted on the wall with brackets.
Complex of preparatory works
The owners of electric models will have the least difficulties during the transfer. They are completely autonomous and manipulations with them do not require additional investments or approvals from supervisory authorities. The actual dismantling and installation of the device is extremely simple and most often consists in the fact that the device is removed from one wall and fixed to another. If necessary, the socket is additionally transferred or strobes are made for wiring. This is where all the work ends.
With water equipment, there will be much more trouble.To carry out the transfer of the heated towel rail, coordination with the authorities responsible for the operation and condition of internal communications and buildings will be required. This is due to the fact that the independent movement of heating appliances, and a water heated towel rail can be attributed to them, makes the owner responsible for changing the technical parameters of the system and its condition.
Water heated towel rail transfer diagram
Thus, in the event of problems, claims will be made specifically to the owner of the property. As a result, it is highly recommended that all changes to heating systems be formally approved.
Transferring a heated towel rail is best left to professionals.
When choosing new equipment, it must be taken into account that it should not give an additional load on the thermal system. Therefore, it should be only a certified device, correctly selected in terms of thermal power in strict accordance with the volume of the bathroom. The hydrodynamics of the heating pipelines should also not be disturbed. Therefore, the device is installed without the formation of an air pocket and without creating additional hydraulic pressure. All these conditions can be met only in the case of proper installation of the device, for which it is best to invite a specialist.


Mounting DIY towel warmer
Types of heated towel rails
All towel warmers are divided into three main groups:
- water;
- electrical;
- combined.
The last type combines the functions of the first and second.
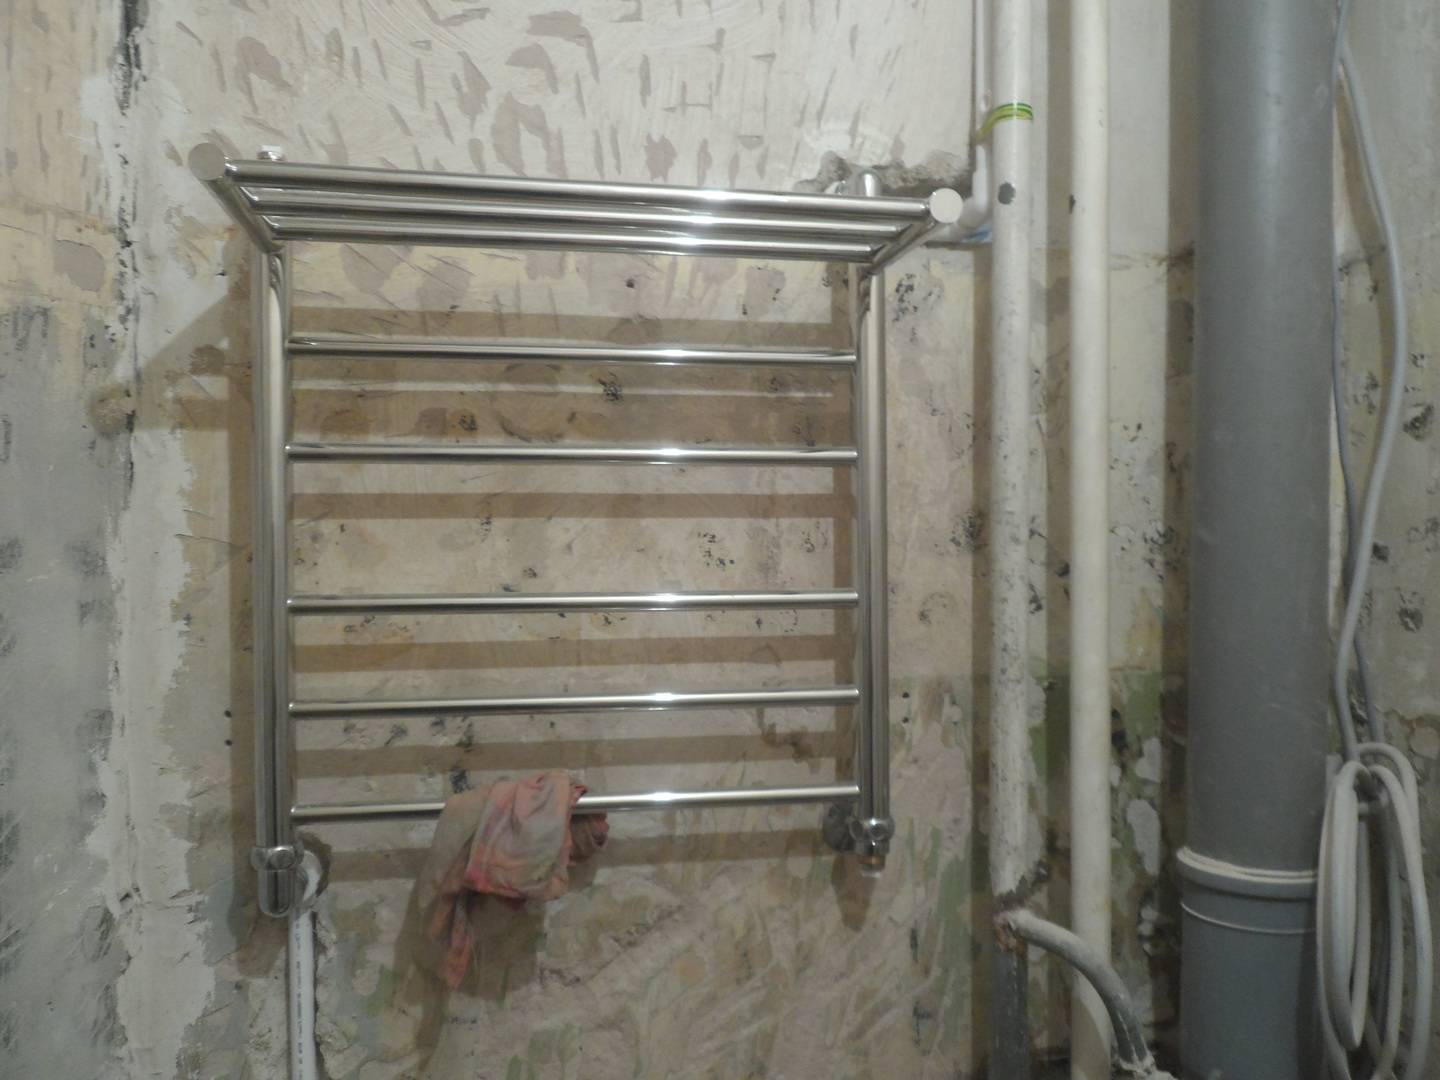
Most often, bathroom coils are available in an M-shaped or U-shaped configuration. Such devices have a rather low heat transfer, which is only 0.5 kW. Giving towel warmers a different look, manufacturers strive to achieve higher heat transfer, so in modern appliances it reaches 3 kW.
Scheme of a PM-shaped combined heated towel rail with shelves.
Water coils installed in the bathroom act as radiators, which is why they are most often called design radiators. They can be used in any bathroom, regardless of its interior. Water dryers are made of stainless steel, their surface can be polished, matte or painted. The color range of modern water heated towel rails is diverse, so they can be easily matched to any style of interior. In addition to stainless steel, ferrous metal, cast iron or non-ferrous metal are often used in their production.
Electric heated towel rails are ideal for those apartments in which hot water is turned off from time to time. Their advantage is that they do not need to be tapped into the plumbing system, so they can be installed on almost any wall in the bathroom. Most modern models are controlled using a special control panel. In addition, they can be programmed to maintain the desired temperature.
An electric coil is also used at a time when it is not possible to connect a water coil to an existing hot water supply system. An electric appliance allows you to heat the bathroom without resorting to inconvenient and at the same time expensive solutions.It is worth noting that the electrical device can be connected independently, without seeking help from specialists. To do this, it is enough to carefully study the instructions attached to the device and familiarize yourself with the rules and requirements that apply to the installation of electrical equipment in rooms with constant high humidity.

Wiring diagram for heated towel rail to the hot water or heating system.
In most cases, it is most convenient to use combined heated towel rails. When there is hot water in the pipes, they are used as a water heating device, and during the period of its shutdown - electric.
Related article: How to make your own bird feeder hands - photo and video
To choose the right heated towel rail for your bathroom, you can consult with experts who will select the best option for a particular case. But regardless of the type of device chosen, you need to remember that the heated towel rail provides additional comfort, warmth and convenience.
Step-by-step instructions - how to transfer the DHW riser
After the project is drawn up and the forthcoming work is agreed upon in the UK, BTI and other responsible organizations, the time comes for the direct execution of the work. Consider the procedure for transferring the DHW riser.
Tools and materials
It is necessary to prepare the following tools and materials:
-
Bulgarian for cutting the old riser and cutting the new pipe.
- Gas or adjustable wrench for installing shutoff valves on the outlet.
- Fittings (minimum set - 4 elbows and 1 branch tee).
- Ball valve or valve.
- Plumbing linen, FUM tape or other sealing material.
In addition, tools may be required to make holes in the wall, recesses in the floor. Please note that the manufacture of recesses in the ceiling plate is prohibited. Since this weakens its structural strength.
Preparation and coordination of works
These are the very first steps that are performed before the start of all work. A project is drawn up with a layout of communications before and after the transfer. This is a critical part of the work, which is recommended to be entrusted to knowledgeable and experienced professionals.
They will be able to immediately discard all obviously impossible or prohibited options, to carry out the project in accordance with all the rules.
With the finished project, you must contact the Criminal Code. After receiving their visa, they go to the BTI, where it will be necessary to make changes to the plan of the apartment. The final stage will be the architecture department, where the project is stamped “for execution”. After that, you can start work.
Dismantling the old
Before starting work, you must contact the Criminal Code to turn off the water supply. This is a paid service.
In addition, it is necessary to indicate how long the work will take so as not to create unnecessary inconvenience to the residents of the entrance.
After the water is turned off, it is necessary to open all the hot water taps and drain the remaining water from the riser.
After that, the cutting points are marked (usually under the ceiling and near the floor), and the riser is cut off along with the outlet. The old pipe is immediately removed so as not to interfere in the room.


Cart preparation
The next step will be the preparation of the supplies. This is cutting sections of a new pipe, 2 short horizontal segments (they determine the distance by which the riser will be displaced) and a vertical section, which is a riser.
In addition, the vertical section may have to be cut and a tee inserted into it to drain to the apartment dead-end DHW supply line.
This step is not necessary, because sometimes the bend is welded directly into the riser without the use of fittings (for example, when installing stainless steel pipes).
Fittings
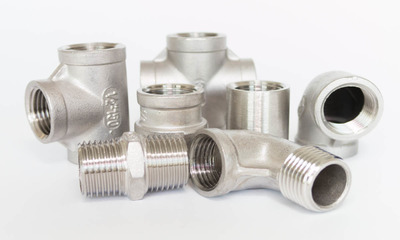
Fittings are elements that provide a branch, bend or other change in the direction of pipes.
They fully match the dimensions of the pipes, which allows you to create reliable and tight connections.
When transferring the riser, corner bends and a tee are used. The corners are attached to the ceiling and floor sections of the pipe.
Then horizontal pipe sections are welded, to which another pair of corner fittings is attached. After that, a vertical part with a branch (tee) is installed.
Installation of inlet fittings
The inlet fittings determine the boundary of responsibility - common house equipment remains on the side of the riser, and after the valve - the property of the owner of the home.
The stopcock is installed only on the outlet from the riser (horizontal section leading to the plumbing). Installation of valves on the riser itself is prohibited.
Valves or ball valves are used. The second option is preferable because these devices are much more efficient and durable.
When you need to quickly turn off the water, they are much more convenient. In addition, ball valves fail less often, which cannot be said about valve structures.
Wiring connection

The connection of the riser to the wiring is carried out after the installation of all elements, including the shut-off valves of the input, is completed.
Horizontal apartment wiring is connected to a ball valve (or to a DHW flow meter, if it is installed immediately after the valve).
This stage is the final stage, after which the work is considered completed.
After connecting the wiring, water is supplied (the valve is opened in the basement) and the riser is inspected.
The locksmith from the UK, who opened the water, should not be released yet, since leaks may be detected, requiring repeated shutdown and elimination of deficiencies. If there are no problems, the riser is put into operation.


