- Varieties of garage ovens
- Making a simple potbelly stove with your own hands
- Production of a tank for mining
- How to make an injector?
- Basic heat exchanger
- What is the chimney made of?
- What is important to consider?
- How to properly operate furnaces in mining, how should they be serviced?
- Making a classic potbelly stove
- Assembling an efficient potbelly stove
- Preparatory work
- Drawings and dimensions
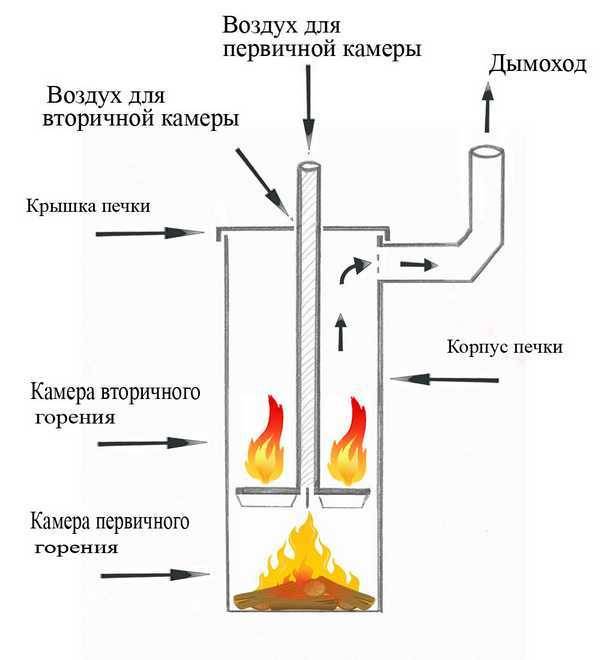
- The principle of operation of the waste oil furnace
- Alteration of a solid fuel stove for testing
- Important aspects of keeping warm in the garage
- Metal or brick: what to choose
- Metal
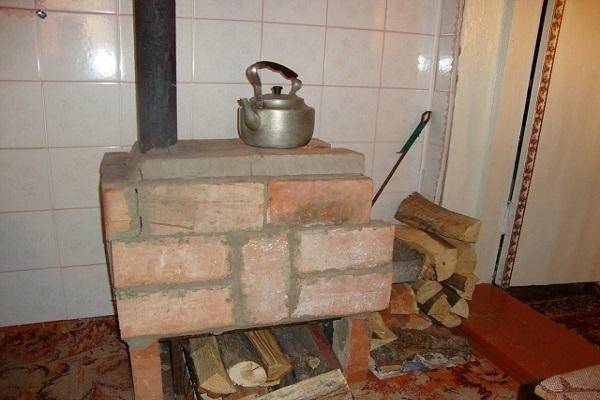
- Brick
- Cons and nuances of a waste oil stove
- Device and principle of operation
- Choosing a drawing
- Conclusions and useful video on the topic
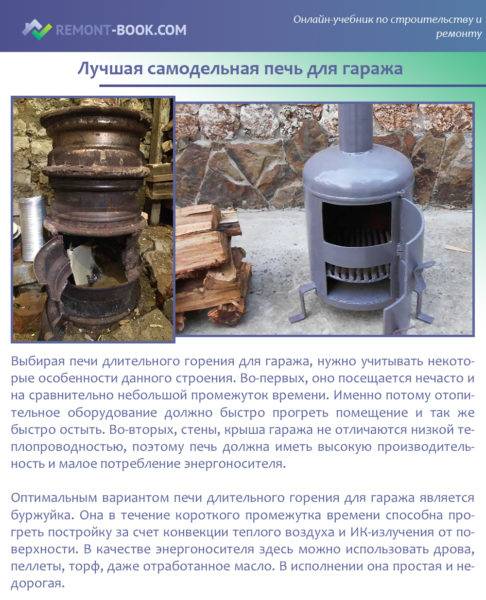
Varieties of garage ovens
To make a potbelly stove for a garage with your own hands, you first need to familiarize yourself with the possible models. The most popular types of garage stoves are brick and iron potbelly stoves. Heating appliances made from improvised means are not inferior to them - from a barrel, a gas cylinder, etc. Also, stoves are divided depending on the fuel used - wood, coal, waste oil, etc.
We recommend that you read more about the manufacture of potbelly stoves from rims and find answers to your questions.
Potbelly stoves “on working out” are often found in the garage, because every motorist always has unnecessary engine oil in large quantities. Such an oven does not emit unpleasant odors and harmful fumes. A used oil potbelly stove can quickly heat a small garage room. In terms of its power, it can be compared with an electric heater. This potbelly stove is suitable for those who do not want to spend extra time cleaning the ash pan, airing, etc. Indeed, during the operation of the furnace, the oil burns out completely, and the likelihood of an explosion or ignition is practically excluded.
A used oil potbelly stove is a popular model among garage workers. Often, its installation is due to the fact that motorists always have used engine oil at hand.
You can heat a wood stove with purchased blanks or ordinary firewood. The level of efficiency of such a potbelly stove is quite high. If there was no wood at hand, charcoal can also be served.
A potbelly stove in a wood-burning garage. As fuel, you can use small ready-made bars, fallen branches and trees, charcoal.
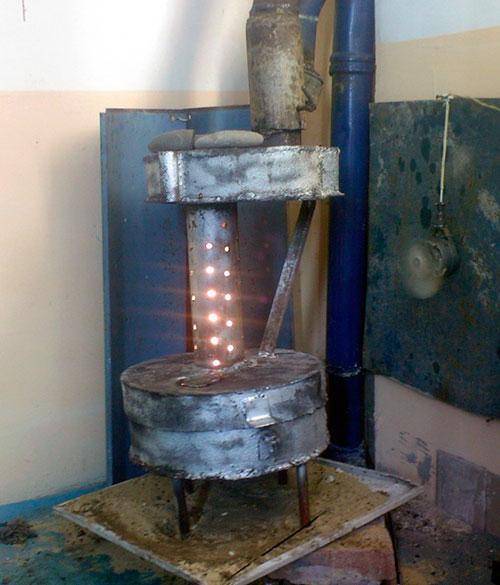
Making a simple potbelly stove with your own hands
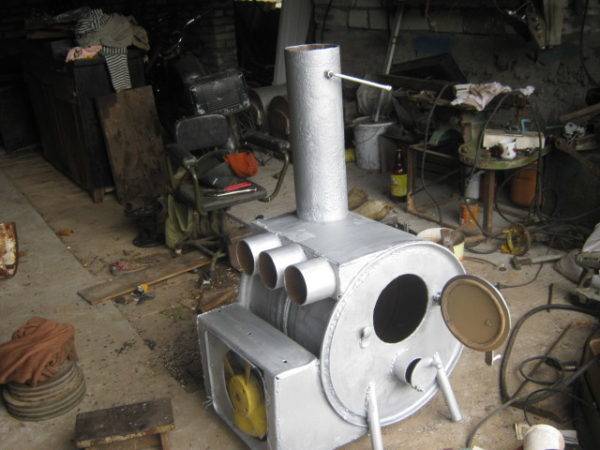
The basic design of a do-it-yourself potbelly stove consists of 4 parts:
- A fuel tank of arbitrary shape with a hole in the center, the diameter of which is equal to the corresponding size of the connected pipe. This is where the combustion starts. The metal for the manufacture of this structural element must have a thickness of at least 3 mm.
- Combustion chamber or injector, which is a vertical cylindrical container with a number of holes, connected through the hole to the tank.As a result of air supply through the perforated walls of the injector, the fuel that has entered the chamber burns out completely.
- Heat exchanger in the form of a tank located above the combustion chamber. A heated gas mixture enters it. The design can be of any size and shape. Ideally, this is a tank with a hollow platform on which food can be heated.
- Pipes for removal of a smoke providing effective draft.
To make a potbelly stove yourself, you need to have good welder skills. Welded seams must ensure tightness.
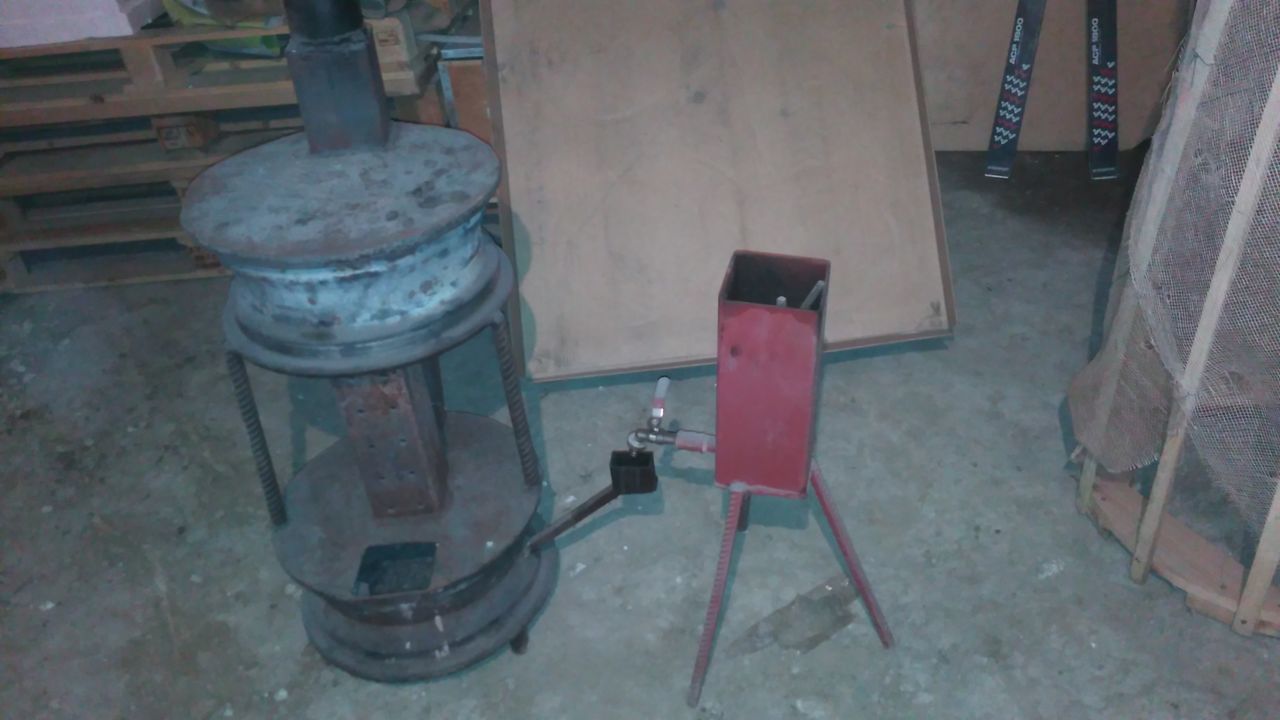
Production of a tank for mining
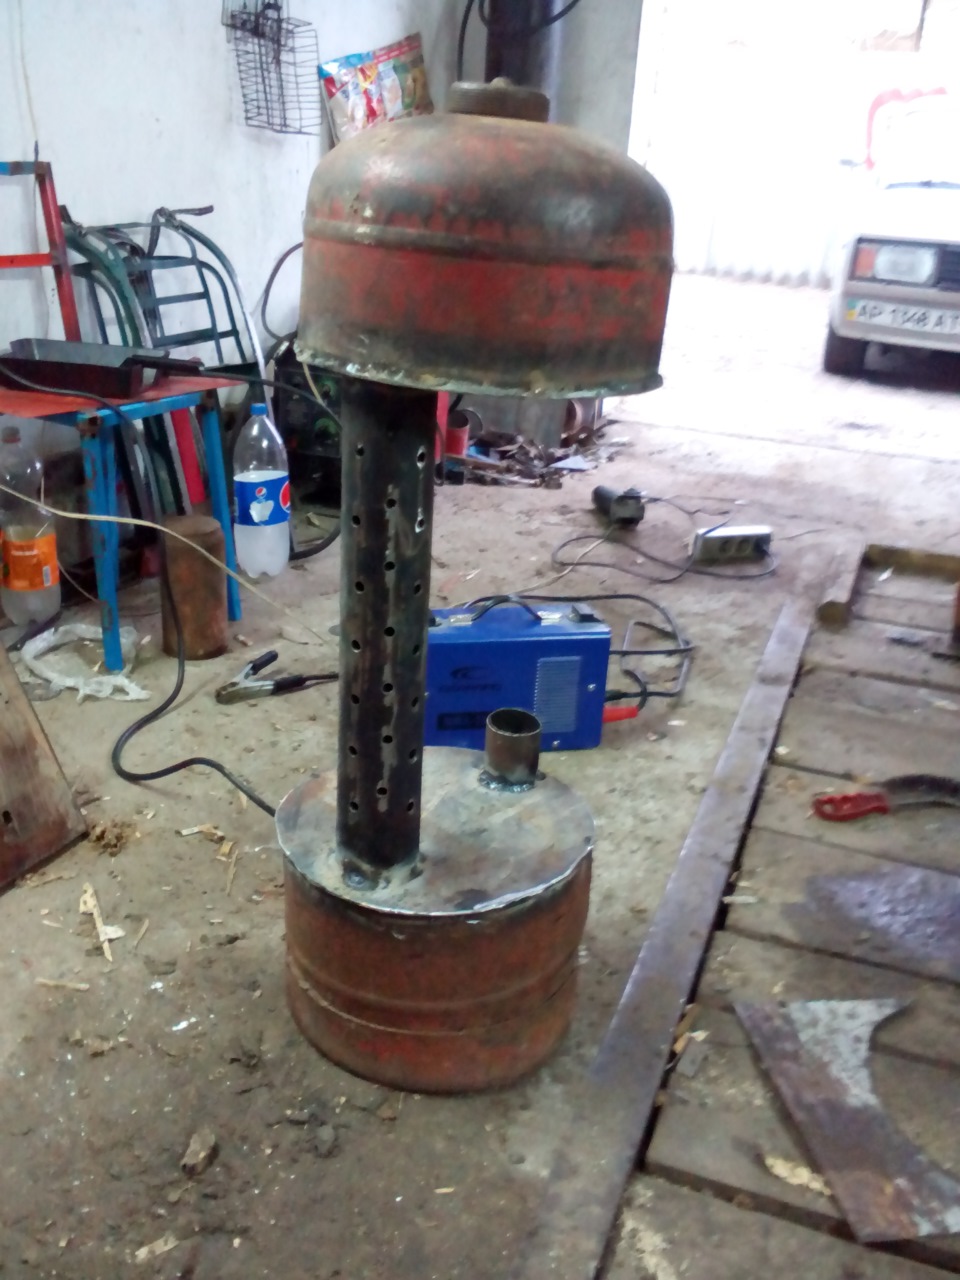
An unusable gas cylinder or a thick-walled canister can serve as an alternative to a welded tank, but in any case, 3 basic requirements are mandatory:
- The structure must be at least partially collapsible so that it can be periodically cleaned.
- The hole for connecting the injector must be located in the center.
- The hatch for pouring mining should be equipped with an adjusting damper on a bolted connection. With its help, the intensity of combustion is regulated.
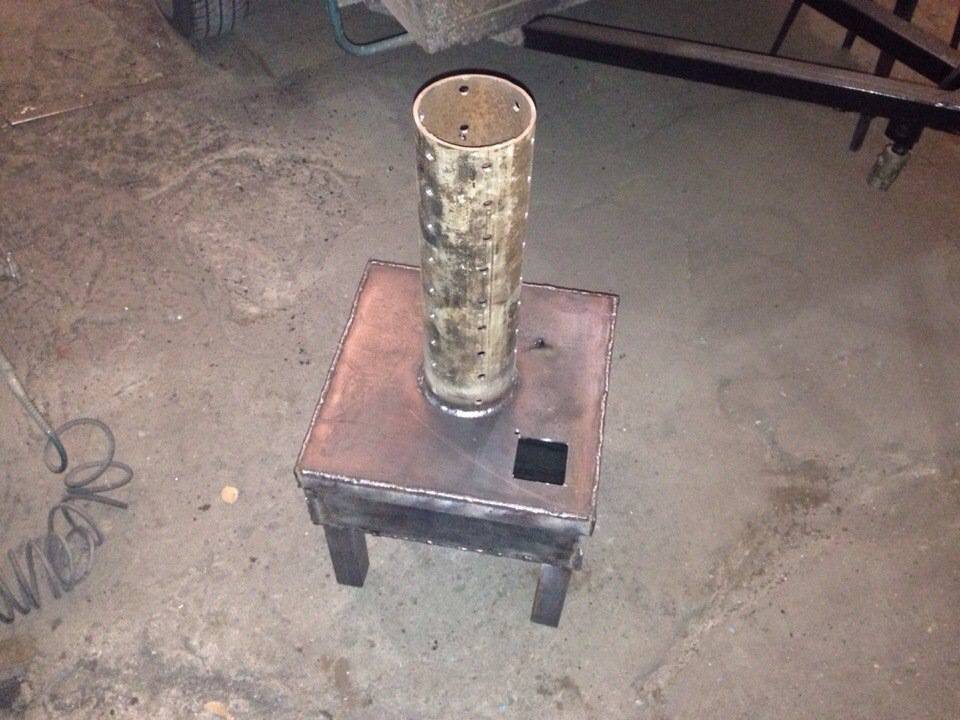
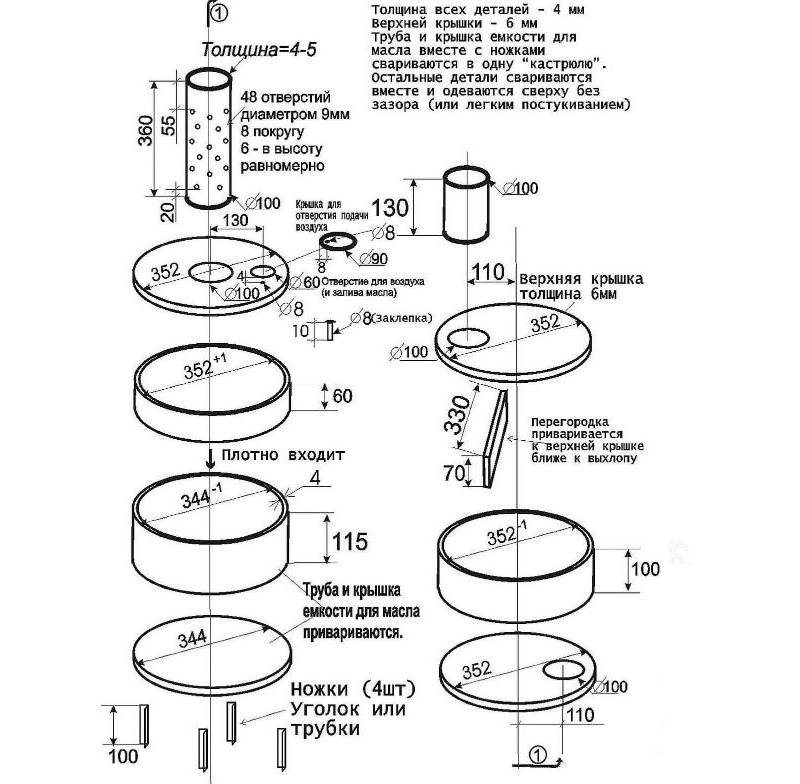
Craft the tank is the easiest of pipes large diameter. The bottom and legs are welded to one piece of pipe with a diameter of about 35 cm. In order to close the tank, they take a small piece of pipe of a slightly larger diameter, weld a lid to it, then make 2 holes in it - one control with a diameter of approximately 60 mm, and the other for the injector.
The height of the side of the 2nd part should be 1/3 of the height of the lower container. The total height of the tank, measured from its bottom to the central hole on the lid, is 10-15 cm.
Ignite the fuel in the tank using paper or cloth soaked in kerosene. They are set on fire and lowered into the container through the control hole.Mining will have to be constantly topped up to maintain a level of 2/3 of the tank height.
How to make an injector?
The optimal pipe diameter for making an injector is 10 cm, the minimum wall thickness is 0.8 cm. To calculate its height, take the length of the chimney pipe, divide it by 10. Subtract five percent from the result and get the required value. It should be between 36 - 38 cm. This is a condition for normal traction.
Holes made in the walls of the pipe in a checkerboard pattern or simply evenly distributed over the surface have a diameter of 0.9 - 0.95 cm. Indentations of 2 - 2.5 cm and 5.5 - 6 cm are made from the bottom and top of the pipe, respectively.
Basic heat exchanger
The minimum wall thickness of the heat exchange tank is 0.3 cm. It is made using the same technology as the fuel tank. It is better to make the top flat, and the hole for the chimney must be shifted, then it will be possible, if necessary, to put a frying pan or kettle on the stove.
A partition is made inside the hollow vessel, creating a labyrinth for better heat transfer. Moreover, the thicker this part, the hotter the surface of the potbelly stove will be. In order to clean the heat exchanger from soot, a special hatch is made on the side and closed with a lid.


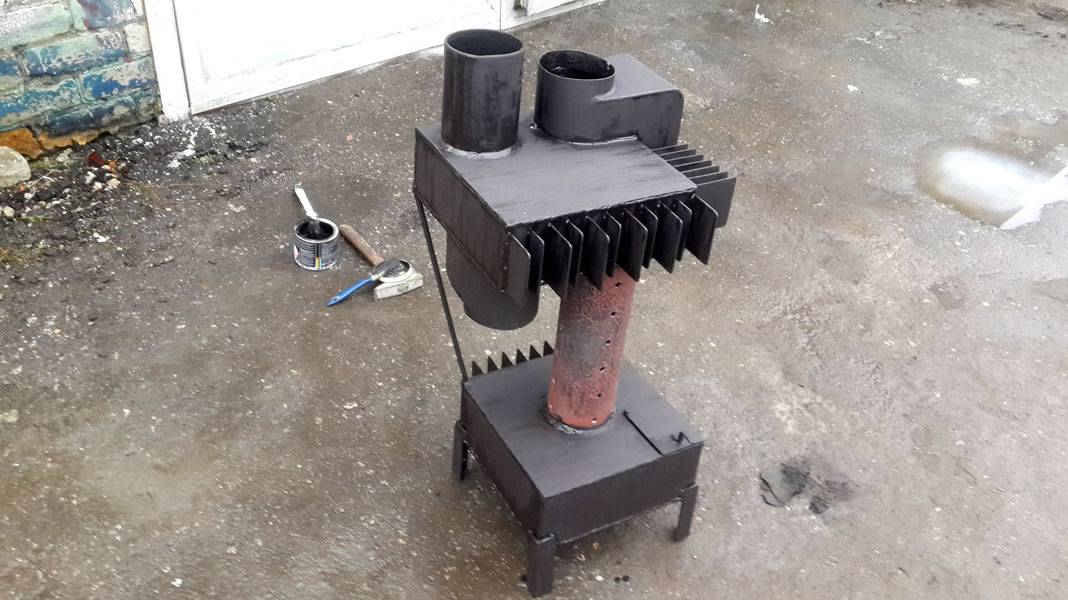


A channel is welded onto the hole intended for the chimney - a pipe with a height of 5 to 10 cm and a diameter of 10 cm.
What is the chimney made of?
In order for the combustion products exiting through the pipe to have the lowest possible temperature, that part of the pipe that is in the room must be made of steel. Due to this, the smoke gives up its temperature to the walls of the chimney, cools, increasing the residual heat transfer.
An ordinary tin pipe can serve as a continuation of the chimney from the outside, but it will have to be insulated to prevent the accumulation of soot during the cold period. Thermally insulated pipe is the best option, but more expensive. Joints of pipe sections do not need to be sealed.
The pipes themselves can be of different diameters, but the one with a smaller diameter is connected directly to the furnace. And about how to do it yourself chimney for stove, read on.
What is important to consider?
Any of the designs can be made independently, there would be a desire and some skills in working with tools and materials. So, in any case, metal is used as the basis for a long-burning furnace. The thickness must be at least 4 mm, otherwise the oven will quickly burn out. As for the chimney, it is recommended to make it composite, that is, from several parts - this will simplify its cleaning in the future. The metal for it must also be thick enough, otherwise it will not last long.
 Making stoves with your own hands will not present much difficulty for a person who has the necessary skills.
The body for the furnace can be welded from separate pieces of metal, and you can also use an old 200 l barrel or a pipe with a large cross section. Also suitable gas cylinders. A chimney will be mounted at the top of the stove, and a small hole will also have to be made, which will provide the air flow necessary for burning firewood. The diameter of the chimney should be about 15 cm, and the holes for air access should be about 10 cm. By the way, the chimney outlet can be made on the side.
It is also important to think about the load that will put pressure on the fuel.A heavy metal circle is suitable as a press, the dimensional parameters of which should be less than the diameter of the structure, but not much - a few millimeters are enough
The press also makes a small air duct for oxygen access.
How to properly operate furnaces in mining, how should they be serviced?
Rules for operation and maintenance waste oil furnaces exist. And they must be followed:
- It is forbidden to fill the fuel tank with used oil more than 2/3 of its volume.
- For ignition, it is better to use paper or rags. It is better not to use flammable liquids.
- The operating mode of the unit must be set by a special damper located in the lower fuel tank.
- Other liquid substances cannot be used as fuel, because the design is intended only for burning oil.
- The optimal location of the stove is away from the walls, closer to the floor. It is better not to install it on high stands.
- Do not leave the device in operation unattended.
- The room in which such an oven will be installed must be equipped with well-functioning ventilation.
- It is forbidden to store explosive and flammable substances near the device.
- Waste oil used as fuel must not contain water or antifreeze. They explode when exposed to extreme heat. Therefore, it is recommended to filter the oil before use.
- Do not add oil to the fuel tank until it has completely burned out. A new portion filled in will cool the mixture, which will stop burning.
- You can clean the stove by any available means. The frequency is determined by the degree of contamination of the device.
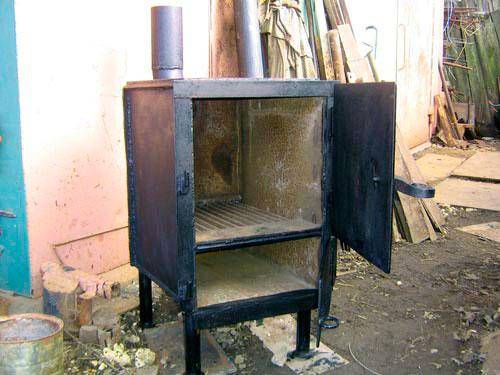
Making a classic potbelly stove
Since you need to make a potbelly stove in a rectangular shape, you will need sheet metal thickness not less than 3 mm. The work is performed in the following order:
- Blanks are cut from the sheet.
- The side walls are welded to the bottom.
- Weld the back wall.
- Inside, they outline the boundaries of the division of space into an ash pan, a firebox, a smoke circulation. At a distance of 10 -15 cm from the bottom, 2 corners are welded to install a removable grate, which is assembled from reinforcement with a diameter of 10 - 15 mm.
- In the upper part, 2 rods are welded, on which a reflector made of a metal sheet for smoke circulation will be laid. There should be a gap between it and the wall for the passage of smoke.
- Weld a cover with a hole for a sleeve with a diameter of 15 - 20 cm to install a chimney pipe.
- For easy removal of the grate and reflector during cleaning, the door with a latch and a handle is made in a size close to the width of the potbelly stove.
- From the bottom of the furnace body, legs are welded from a pipe with a diameter of 20 - 50 mm and a height of 8 - 10 cm.
- The chimney is made of 3 pipe sections with a diameter of 15 - 18 cm, connected at an angle of 45 °.
- A sleeve is welded into the opening of the cover.
- Before mounting in the chimney, a rotary damper is installed with a size smaller than the inner diameter of the pipe.
After installation, the potbelly stove is adjusted in height. The pipe is brought out through a hole in the wall or roof. Simplified designs are assembled without a grate and a reflector.
Assembling an efficient potbelly stove
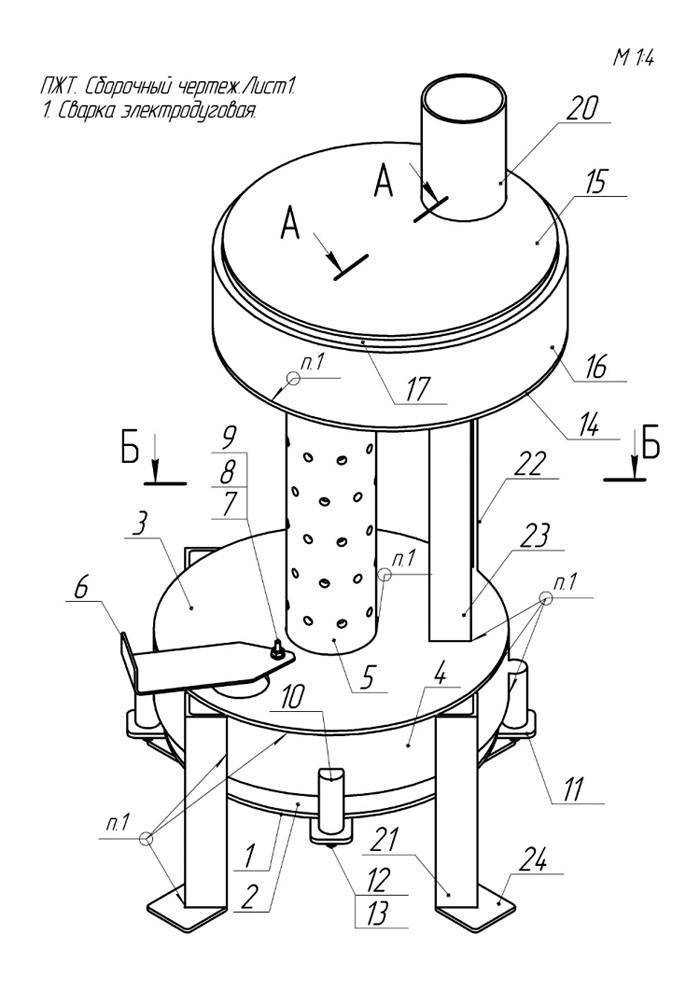
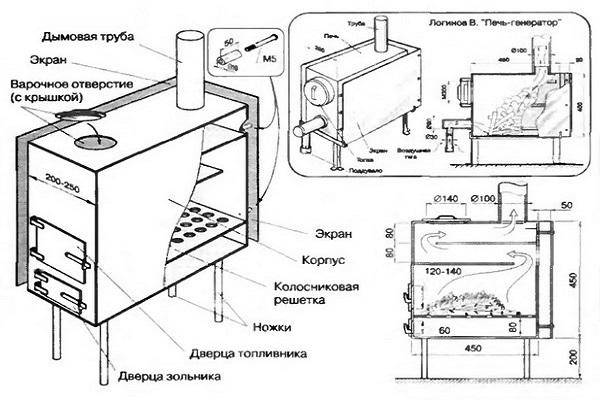
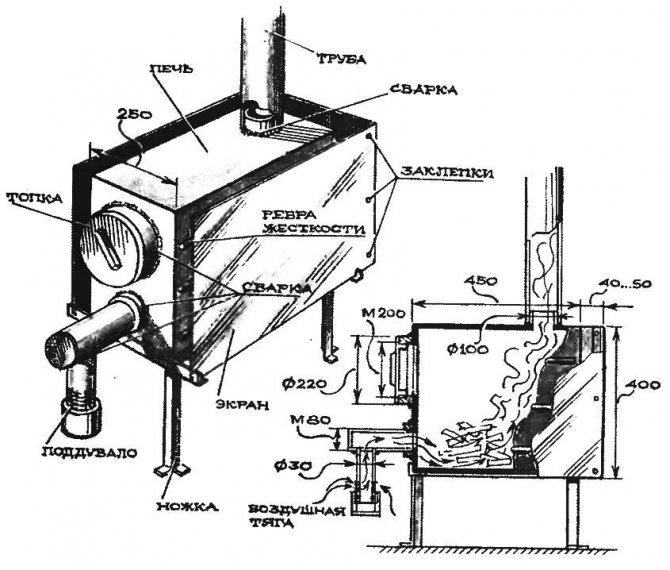
It is well known that conventional iron stoves are characterized by low efficiency (about 45%), since a significant part of the heat goes into the chimney along with the flue gases. Our design implements a modern technical solution used in solid fuel boilers - installation on the way of combustion products of two partitions. Going around them, the gases transfer thermal energy to the walls, which is why Efficiency goes up (55-60%), and a potbelly stove is more economical. The principle of operation of the unit reflects the drawing - diagram:
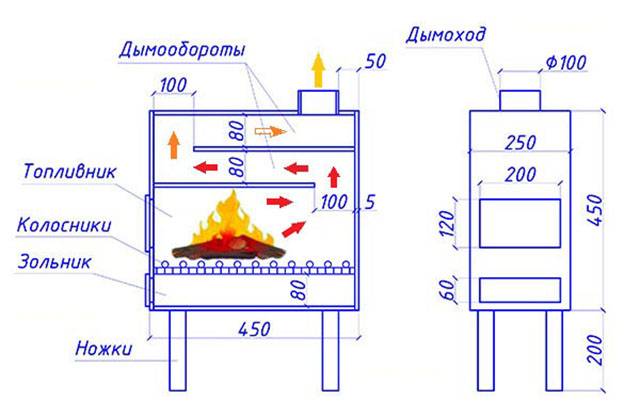
To make you will need sheet mild steel 4 mm in thickness, a piece of pipe Ø100 mm and rolled metal for legs and grate. Now about how to make an economical potbelly stove:
- Cut metal blanks according to the drawing and make openings for the doors of the firebox and ash pan.
- Weld a grate from corners or fittings.
- From the cut parts, make doors with locks.
- Assemble the unit on tacks, and then weld the seams solid. Install the flue pipe and legs.
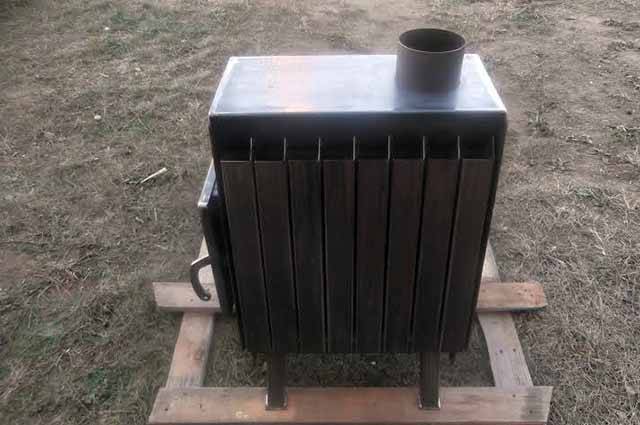
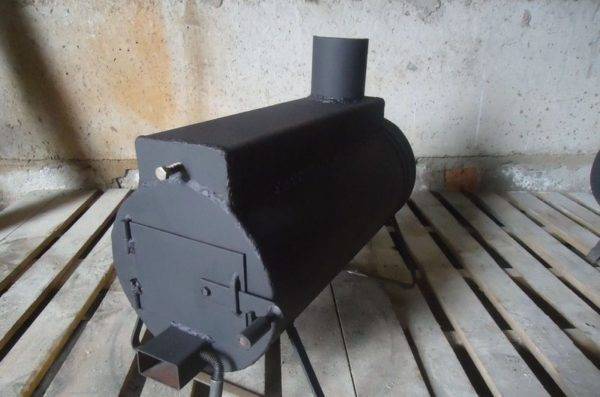
For better heat transfer, craftsmen practice welding additional outer ribs to the body, as is done in the photo.
Preparatory work
Preparatory work involves:
- determining the size of the future device;
- choice of material;
- location of the device.
Only after that they start the main work.
Drawings and dimensions
Each structural element is preliminarily thought out, determined by the dimensions:
It is important to choose the correct pipe diameter. In the drawings, it is noted that its diameter should be 2.5 times the volume of the furnace
The volume of the furnace is measured in liters, and the volume of the pipe is measured in millimeters.
It is advisable to install a metal screen around the stove at a distance of 60 mm. As a result, the heat will last longer. In addition, this design will protect against fire.
Under the stove, be sure to finish the floor. A metal sheet is installed, which should protrude 50 cm from all sides of the heater.This step should not be neglected. A sheet of metal will protect from fire and retain heat.
The chimney consists of two parts: vertical (1 meter) and inclined or completely horizontal (3-4 meters).


Given these dimensions, it will be possible to build a safe and useful heating structure for a garage room.
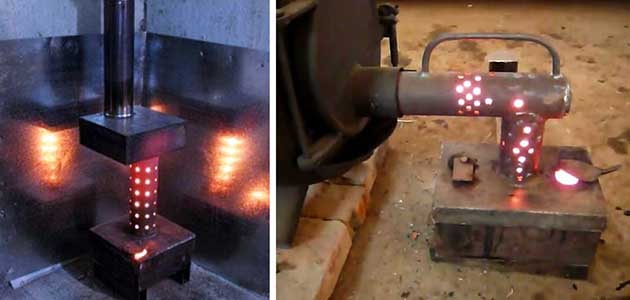
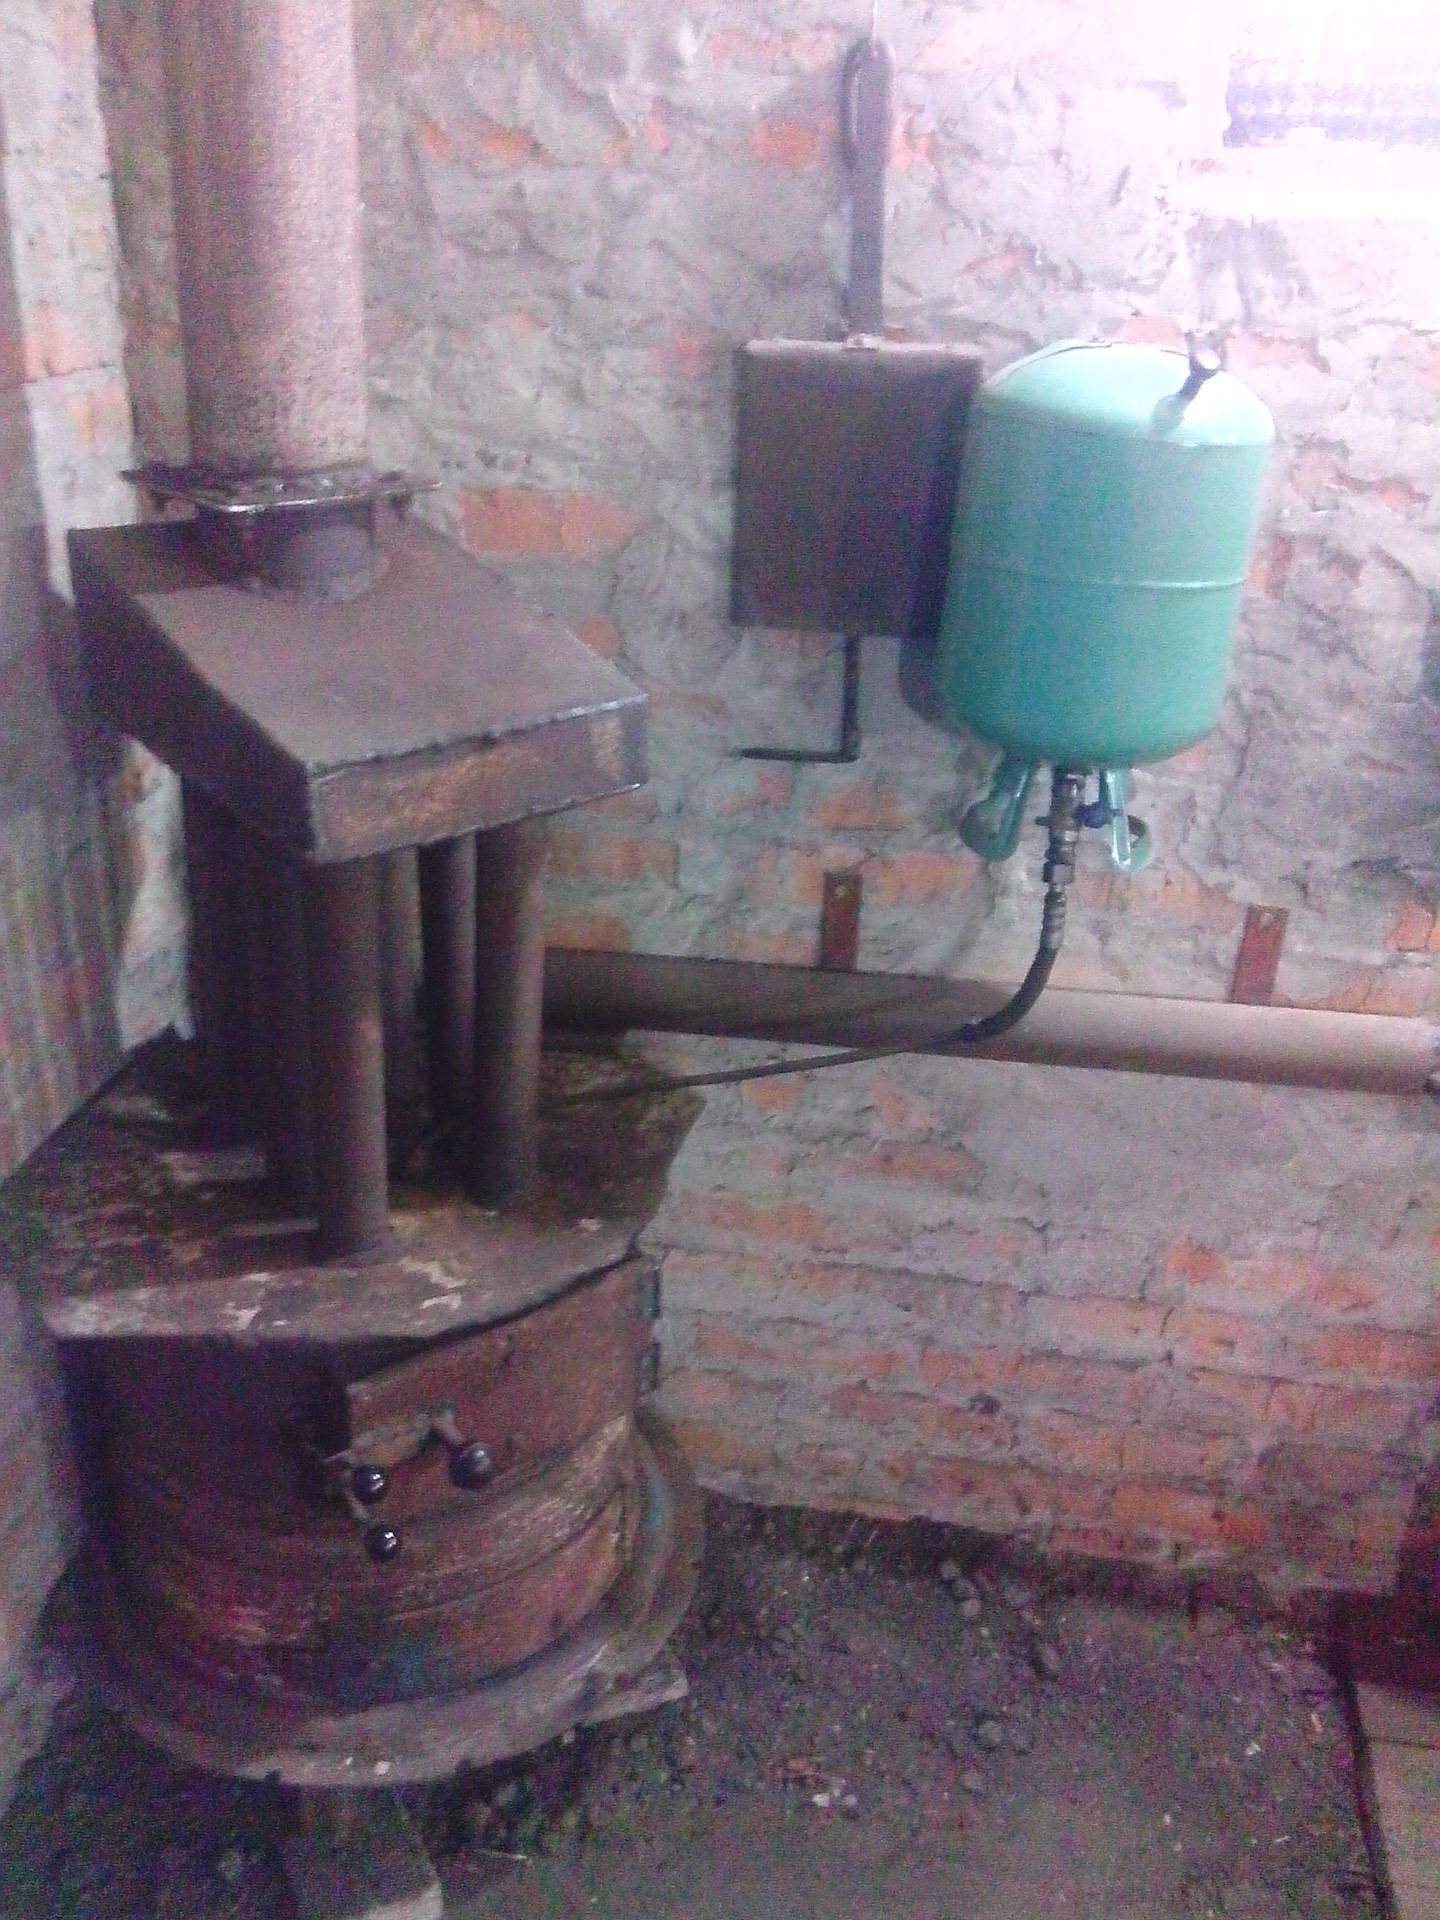
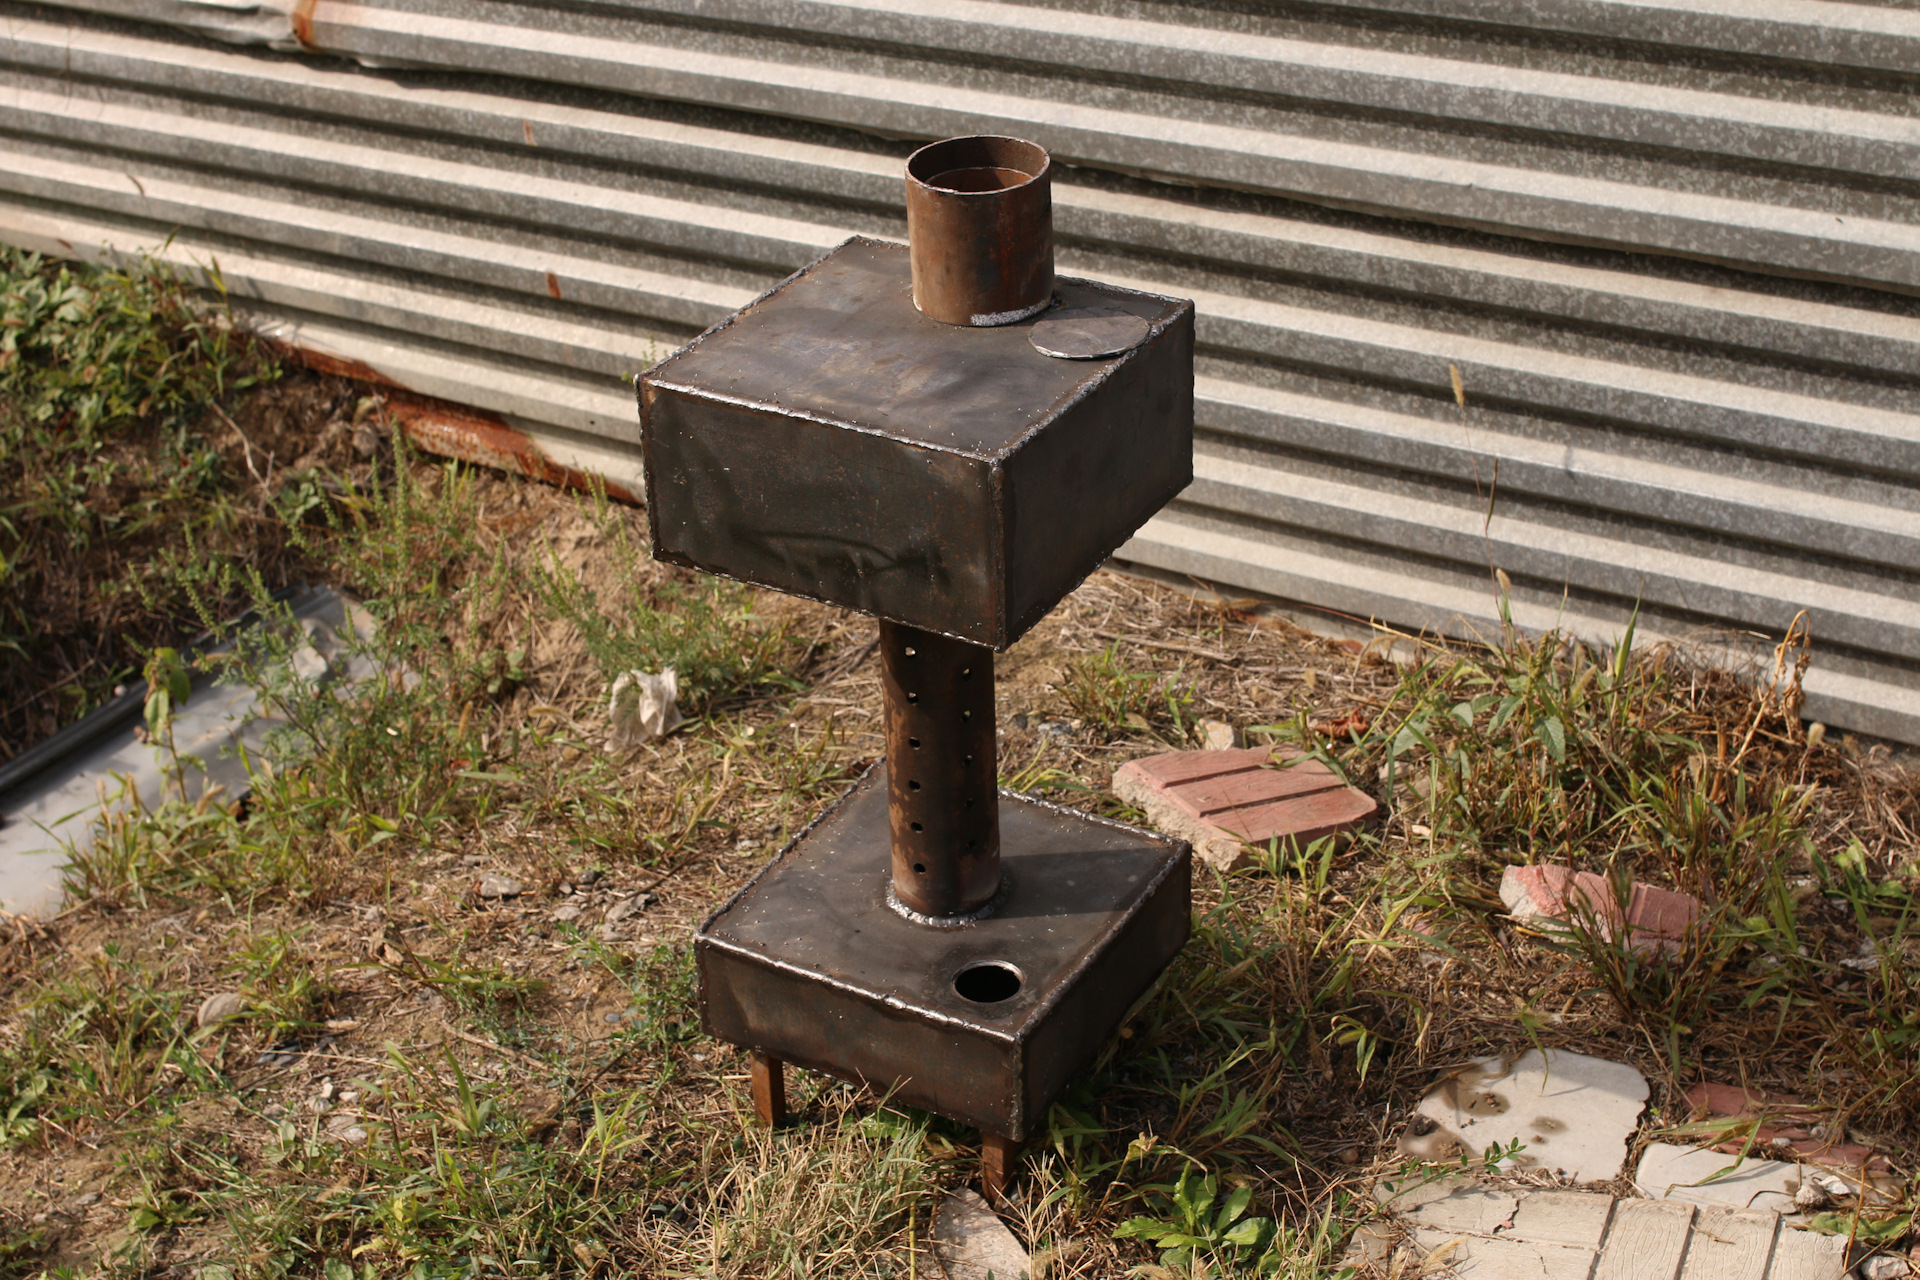
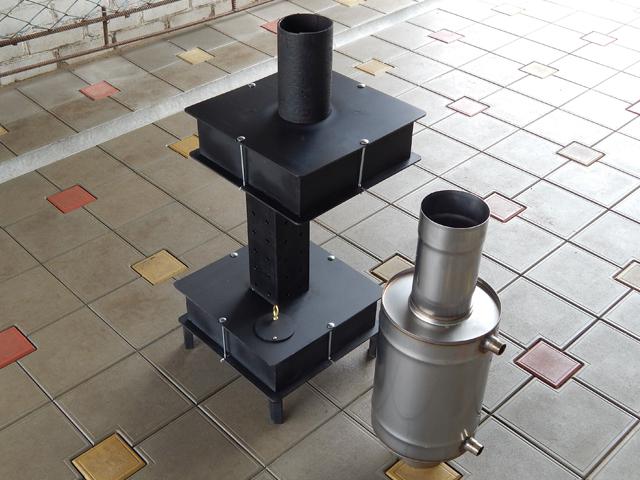
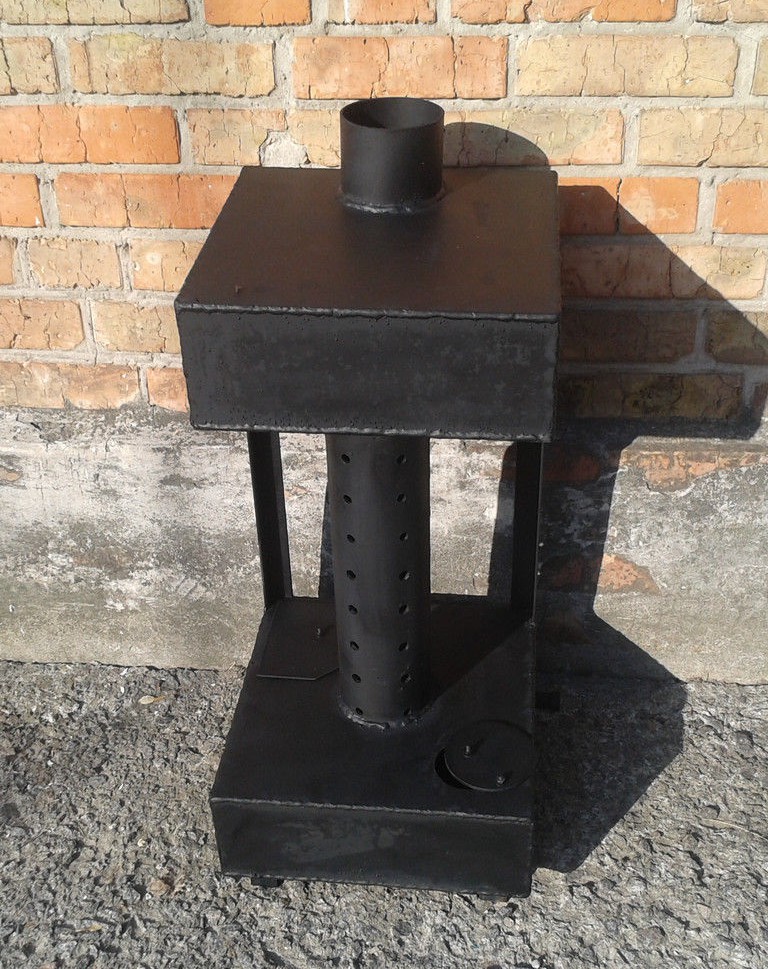
The principle of operation of the waste oil furnace
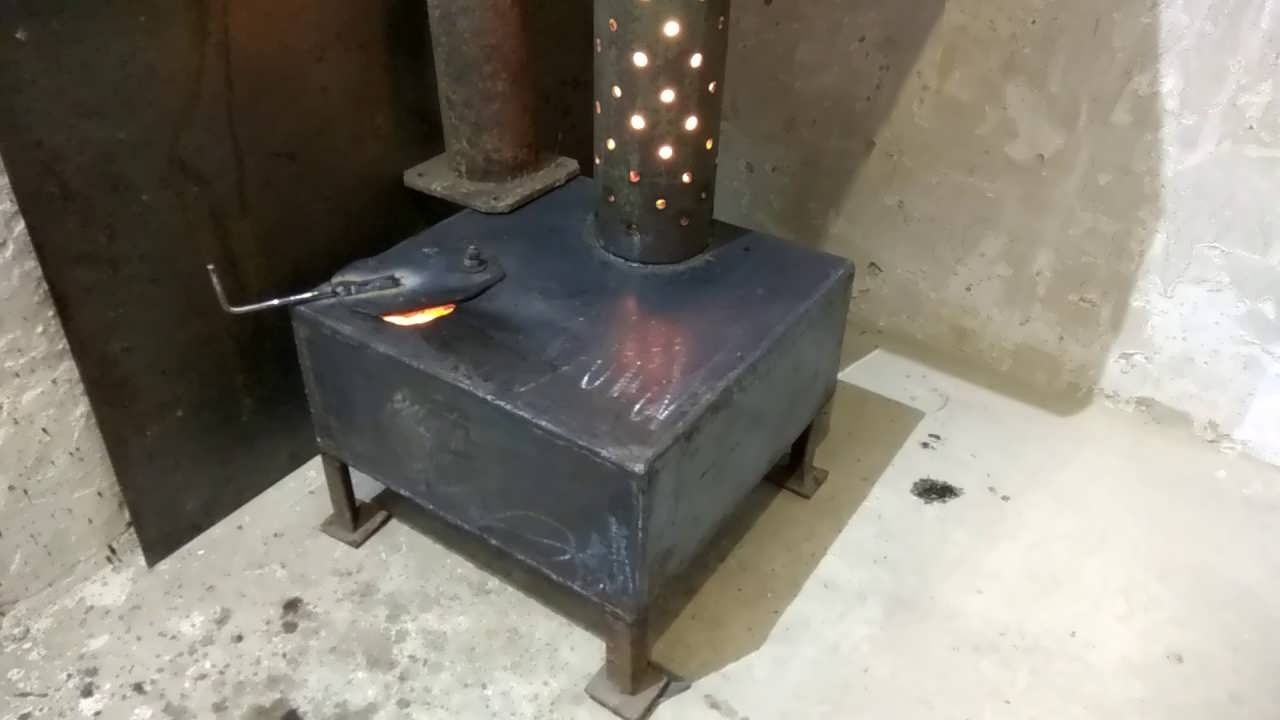
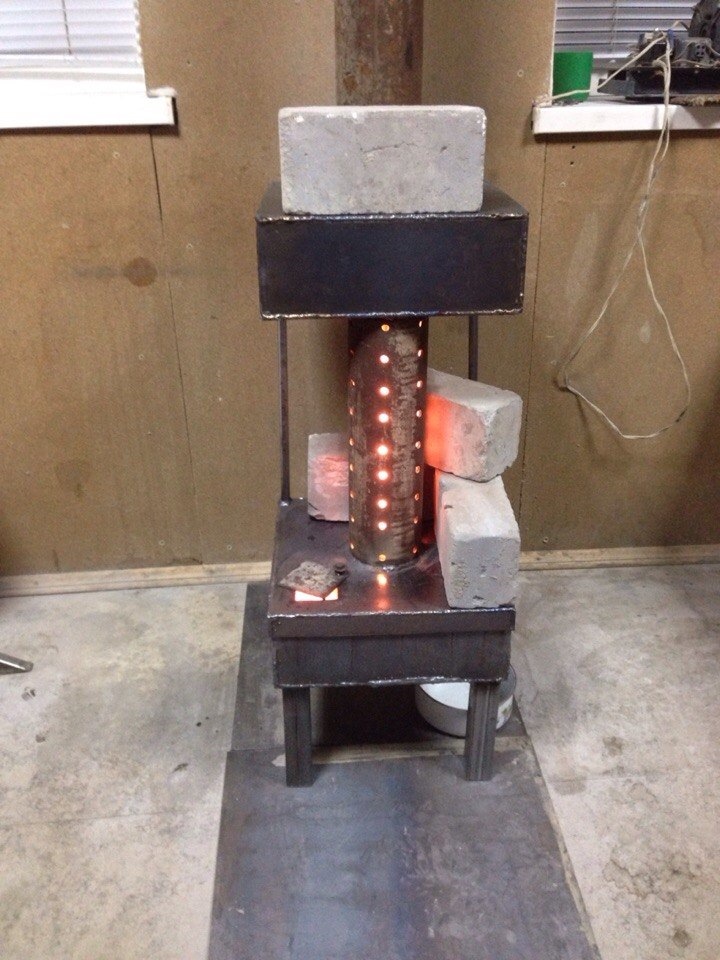
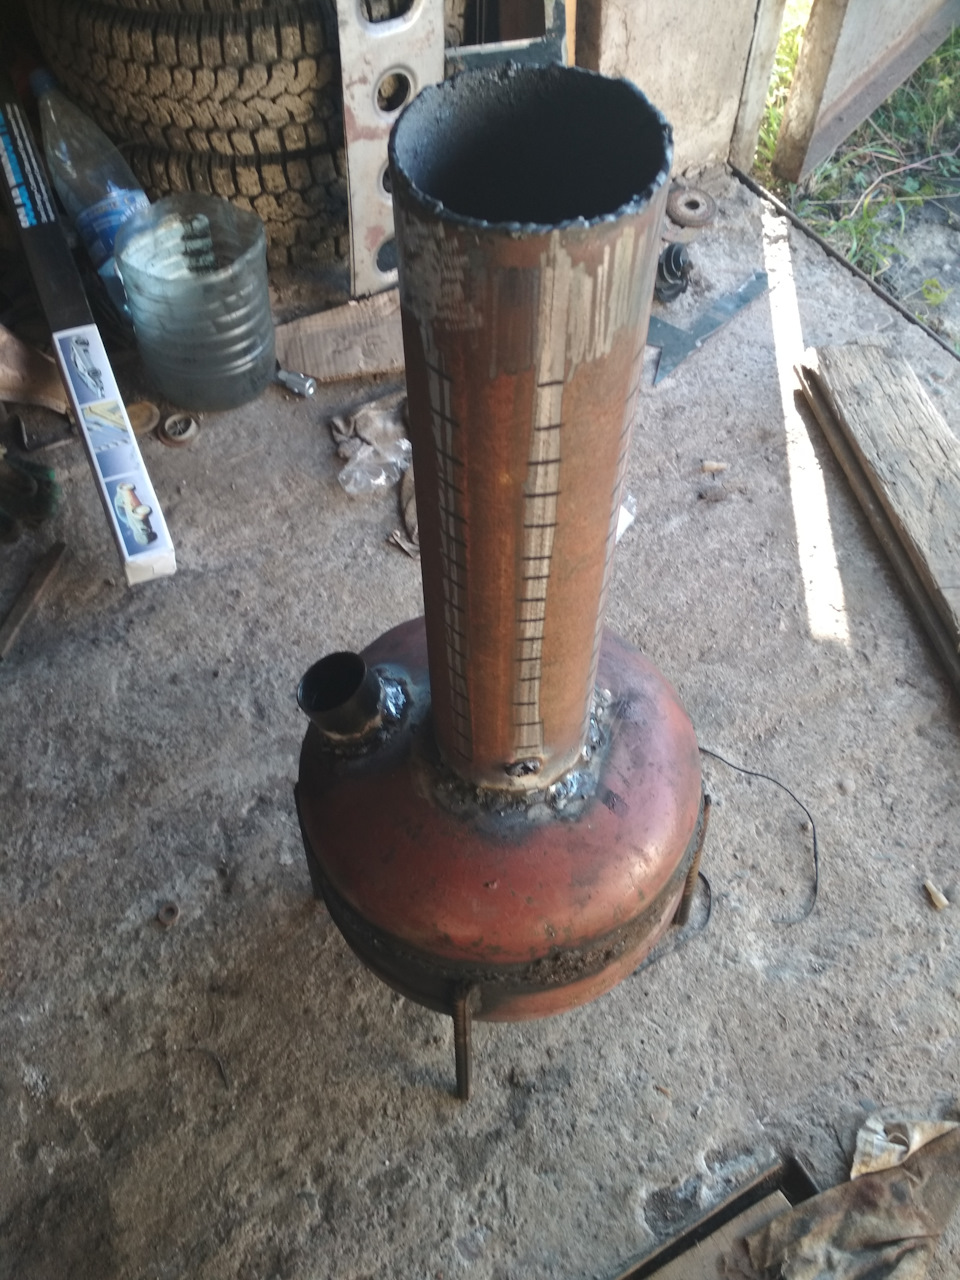
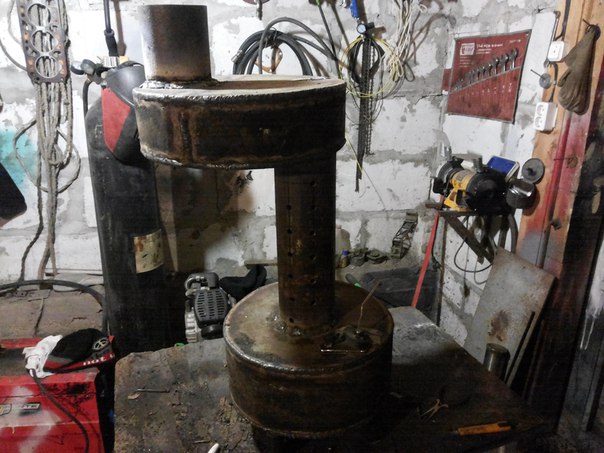
The design of the furnace is very simple, which will allow you to assemble it with your own hands without any problems. The unit consists of two tanks connected by a pipe. This pipe is previously "perforated" in the entire area. We need fairly large holes with a distance of 3-5 cm between them. The lower element acts as a "tank" - used oil is stored and ignited there. Further, the burning vapors of it rise up and burn out (extremely intense) in the upper chamber. It is there that the strongest heating occurs - a similar oven can be used not only to heat the garage, but also as a stove for cooking food. For greater convenience, we advise you to weld a metal plate that will stick out to the side - this can be done without problems with your own hands in 10-20 minutes. The plate is needed so that you feel comfortable while cooking, otherwise it will be very hot.
Alteration of a solid fuel stove for testing
When the farm already has a potbelly stove, but is not satisfied with the fact that it runs on solid fuel, you can upgrade it and it will become universal. For this, an attachment is made that resembles in its design a stove for processing in its lower part.
Here, too, there is a perforated pipe, but not straight, but bent at a right angle.It is connected to the side wall of the furnace, which acts as the final combustion chamber. If the door of the potbelly stove is welded and a hole is made in it for the pipe to enter, then the furnace will only work during mining.
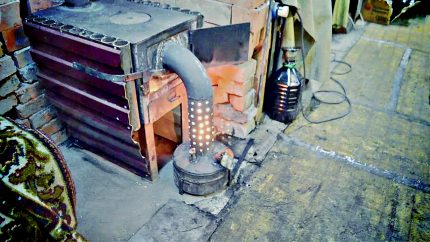
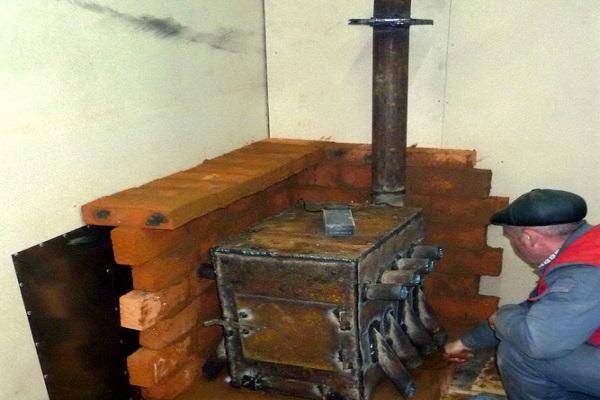
The modernization of this stove consists not only in supplementing it with a special attachment, but also in an original solution to protect nearby objects from fire using the convection principle. For this, pipes were welded to the side wall of the furnace. The cold air entering them from below cools the structure
So that you can was used for heating only technical oil, but also firewood, make two interchangeable doors. The standard one is hung when it is planned to lay firewood, and the upgraded one with the corresponding hole - when the stove will operate on waste oil.
Important aspects of keeping warm in the garage
Providing a traditional heating system in a garage is not easy, and quite expensive, but it is still necessary to maintain the optimum air temperature in such a building. After all, it is even better to store transport at a temperature of at least +5 degrees, and some work needs to be done at a temperature of at least +18.
For the most part, car owners, as well as motorcyclists, prefer to use small, economical stoves to heat the garage, which at the same time are highly efficient and allow you to warm up the room well.
It is also important that the stove not only saves the family budget, but is also safe and ensures that the garage heats up quickly. It is good if various wastes can also act as fuel - for example, oil waste or wood waste. This will also make the furnace a less unprofitable structure.
This will also make the furnace less unprofitable structure.
Heat losses in the garage are always high - it is rare that a building of this type is qualitatively insulated with good thermal insulation materials
It is also important to understand that in order to warm up a small floor space is often required much more heat energy than to heat the house. To heat a house on two floors, you will need a device with a power of about 10 kW, but a standard-sized garage can be heated by a design with a capacity of 2.5 kW. If there is a desire to make sure that the temperature in the garage is always about 16 degrees, then you need to install the unit for 2 kW
Sometimes, in order to save heat, motorists try to heat not the entire garage, but only the place where they directly work.
If there is a desire to make sure that the temperature in the garage is always about 16 degrees, then you need to install the unit at 2 kW. Sometimes motorists, in order to save heat, try to heat not the entire garage, but only the place where they directly work.


A garage oven is an important piece of equipment that will create optimal conditions even in the cold season.
Metal or brick: what to choose
There are two main materials from which stoves are made - metal and brick. Before making a device for heating a garage, it is recommended that you familiarize yourself with the features of each of them.
Metal
Often garages are equipped with stoves made of metal plates. The main advantages of iron products include the fact that they are not susceptible to low and high temperatures. Also, iron stoves cool down slowly and heat up quickly, which saves fuel for kindling.You can install metal equipment anywhere in the garage, as it is compact, unlike brick products.
However, the iron bourgeoisie has drawbacks, which are better to get acquainted with. The main disadvantage is that due to the use of such stoves, the air inside the room becomes too dry.
Brick
Most often, brick stoves are installed in country houses, but some use them to heat the garage. The main advantage of brick is that it retains heat for a long time. If you heat the garage during the day and turn off the heating at night, the room will not have time to cool down until morning. However, if the brick structure is not built correctly, it will not be able to maintain heat for a long time.
To heat a small auto garage, brick Dutch women are used, which are distinguished by a rectangular shape and small dimensions. Other types of brick stoves are not suitable for garages.
Cons and nuances of a waste oil stove
 Despite the fact that it is not difficult to make a potbelly stove with your own hands, having drawings at hand, not everyone will succeed. At first glance, the assembly scheme seems simple and understandable, but if you have never done anything with your own hands before, then it is much more profitable to spend several thousand rubles and buy a potbelly stove for working out on the Internet. Well, or simply order from the craftsmen. You just have to buy more oil and watch a video on how to properly operate this unit.
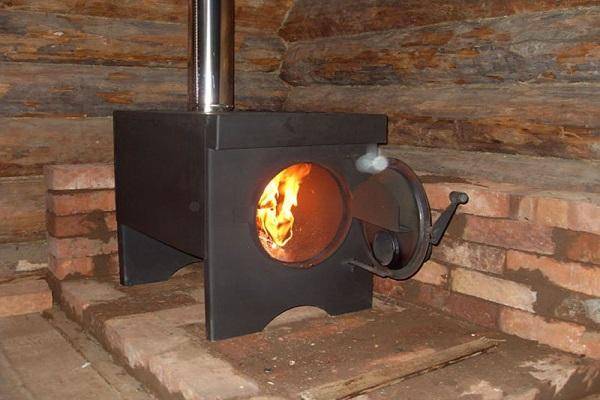
Another significant disadvantage is the impossibility of using such a stove in residential premises. Firstly, it is simply dangerous for the home due to its design.You can practically burn down the house with your own hands, since the living space implies the appropriate interior decoration (linoleum / laminate / wood floor, wallpaper on the walls, etc.), and the potbelly stove heats up to 400-500 degrees.
Plus, it can explode if you use low-quality oil. Therefore, it should never be left unattended. Better use it in places where it fits perfectly: garages, workshops, warehouses and other similar rooms with “bare” walls and floors.
Device and principle of operation
Today, home-made potbelly stoves designed for burning mining are built mainly according to two schemes:
- with a secondary chamber designed for afterburning pyrolysis gases;
- with flame bowl and oil drip.
It must be said that the heat generators of the first type were originally designed for liquid fuel, while the delivery of mining to the combustion zone makes it possible to create heat generators that use both machine oil and firewood.
The simplicity and high thermal efficiency of two-chamber bourgeois stoves brought them to the first place in popularity among home craftsmen. Today we will talk about the features of their device and teach you how to make a compact heating do-it-yourself device.
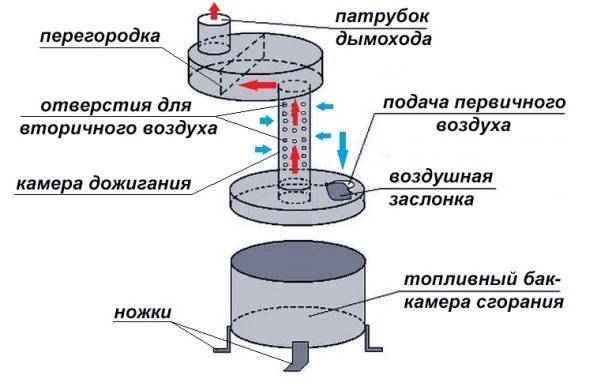
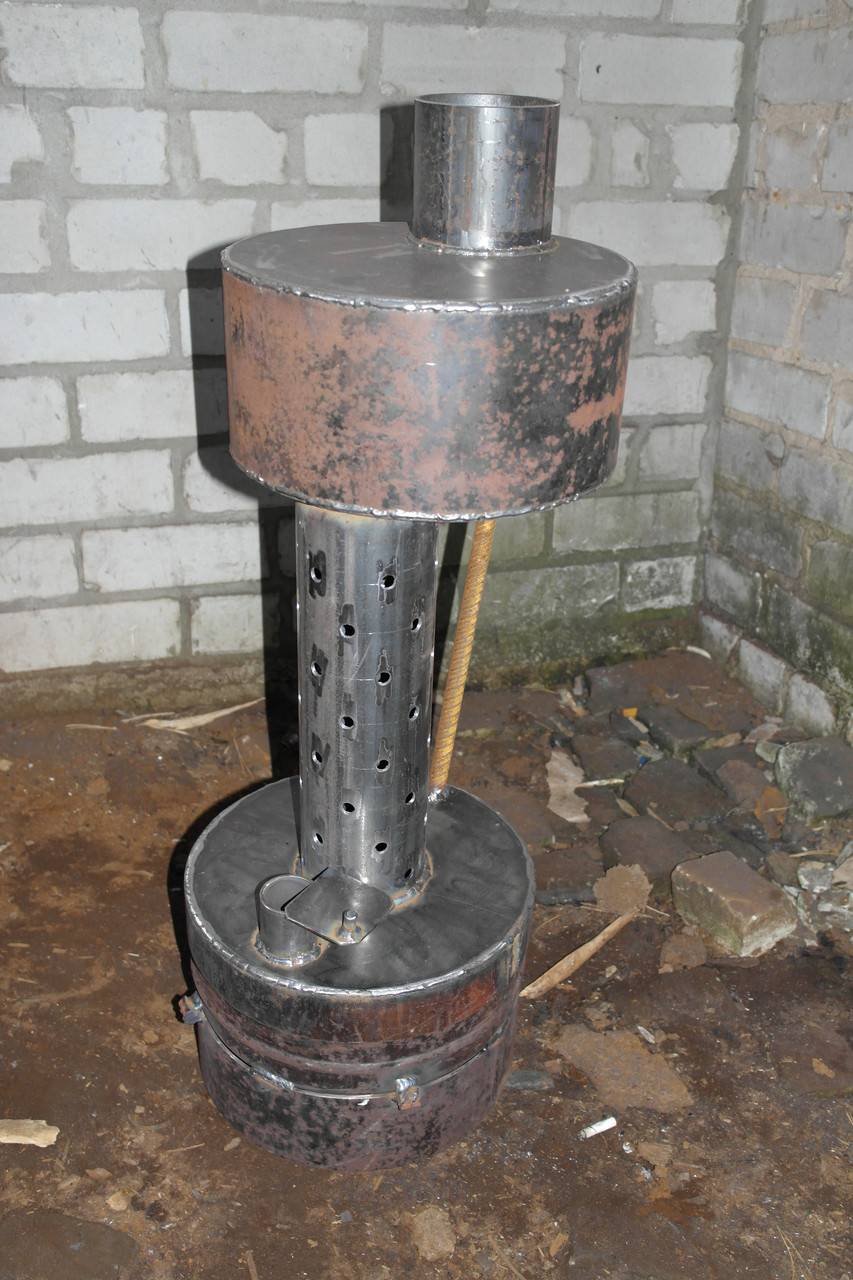
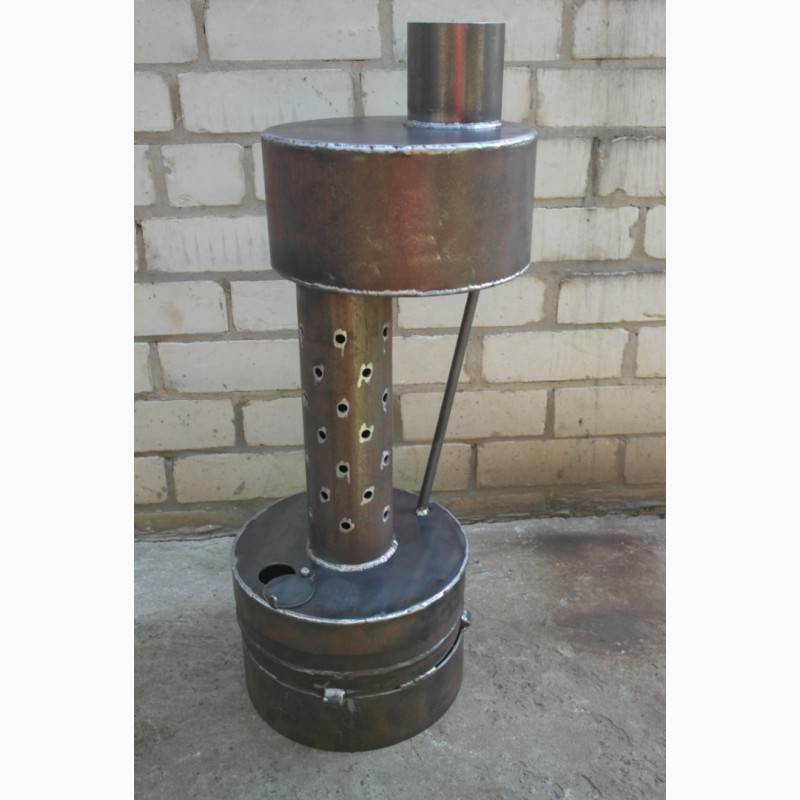
The design of a potbelly stove of a two-volume type
Structurally, the heat generator consists of two flat tanks located one above the other. Their cavities are connected by means of a large-diameter perforated pipe. The lower tank has a window for filling the unit with oil.In addition, the opening allows you to supply air to the primary combustion zone and adjust its amount with a rotary damper.


The upper tank plays a dual role - a convection heat exchanger and a chamber for afterburning volatile hydrocarbons. To reduce the flow rate of exhaust gases, a metal partition is installed inside the tank, and a pipe for connecting the chimney is installed in the upper part of the tank to remove combustion products.
It should not be surprising that such a simple design can burn mining just as well as specialized factory-made furnaces. After familiarizing yourself with the principles of the potbelly stove, you can understand why this happens.
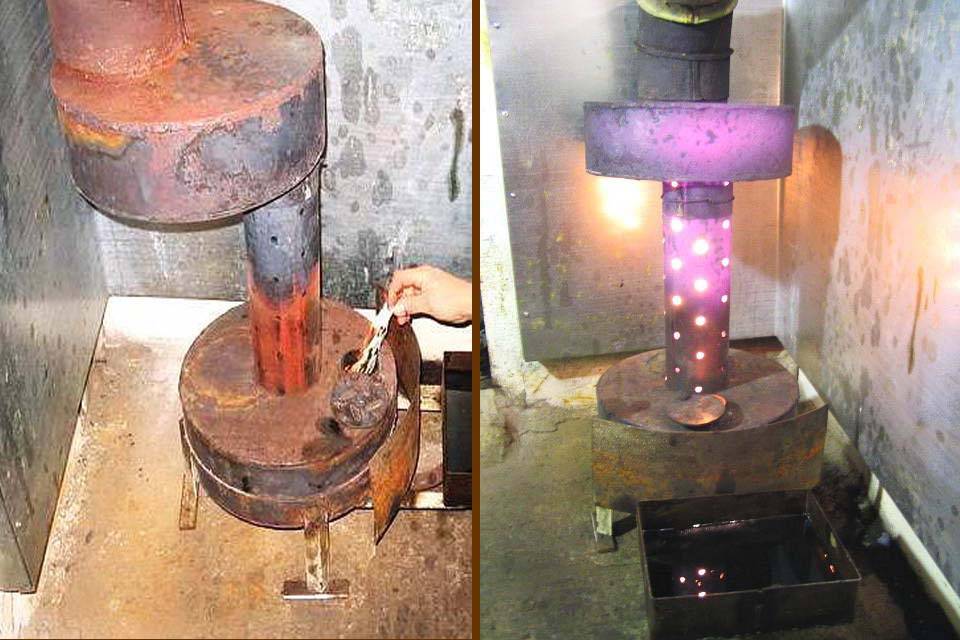
As mentioned earlier, the unit operates on the principles of pyrolysis combustion of heavy oil fractions. Since the ignition temperature of used automotive oil is high enough, the liquid poured into the lower tank is set on fire using a rag soaked in gasoline. As soon as mining ignites, the air damper is covered - the gap should be such as to ensure smooth, stable combustion. Oil heating contributes to the active release and ignition of combustible gases, which allows the device to quickly switch to operating mode. Thus, the primary combustion of the spent fuel occurs, which, with the maximum open air damper, causes a liquid flow rate of up to 2 liters per hour. As for the operation of the furnace in economy mode, it will require no more than 0.5 liters of mining per hour.
Thanks to the afterburning of pyrolysis gases, the design is characterized by performance and environmental friendliness
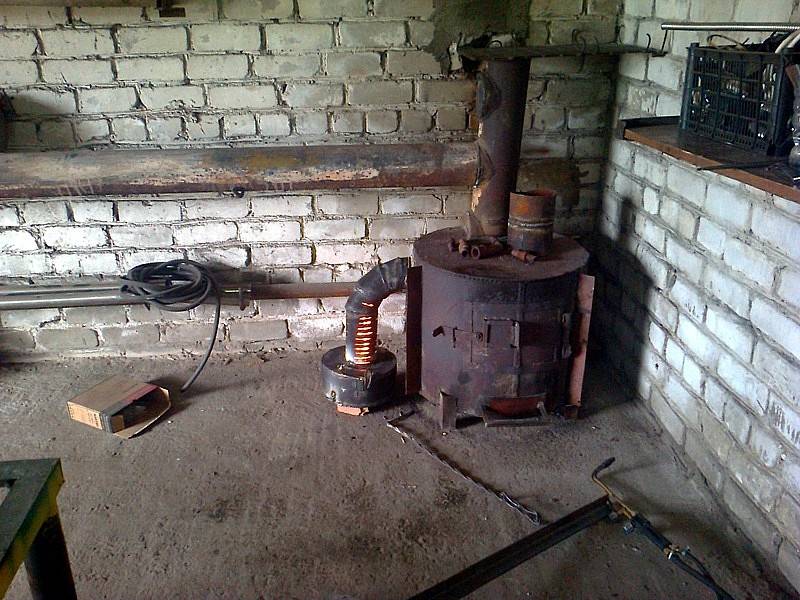
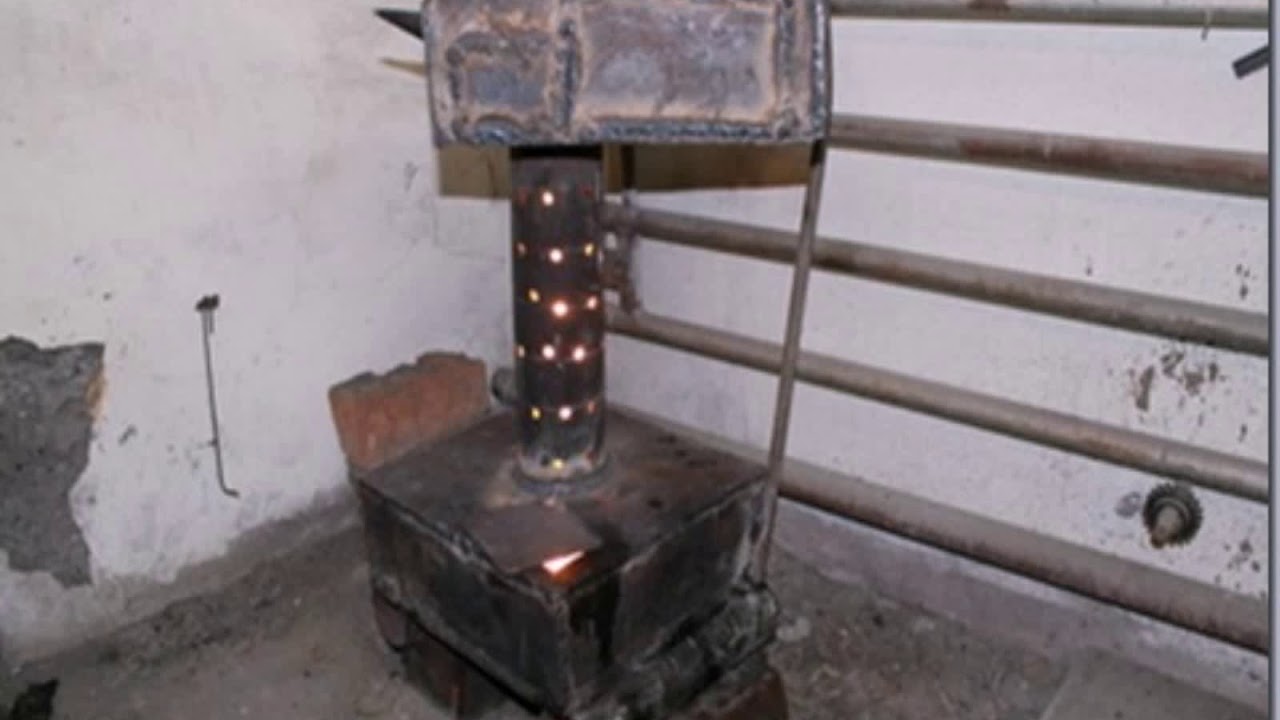
A home-made potbelly stove is equipped with a vertical perforated pipe for a reason - secondary air is actively sucked into its holes. Due to the saturation of oil vapors with oxygen, they burn out with the release of a large amount of heat. An equally important role is given to the upper tank. Its walls are red-hot, so heat transfer is carried out not only by convection, but also by radiation. In addition, high temperature contributes to the afterburning of pyrolysis gases. By the way, in order to prevent their premature release into the chimney, the same steel partition is installed on the flow path. Hitting it, the combustion products reduce their speed and mix, and the nature of the movement becomes turbulent. Due to this, the complete decomposition of stable chemical compounds into carbon dioxide and water is achieved.
To further increase the heat transfer of the unit, it is necessary to remove the residual heat of the flue gases. For this purpose, a chimney is laid along the entire wall of the room, which has a slight slope towards the outlet pipe of the furnace.
Choosing a drawing
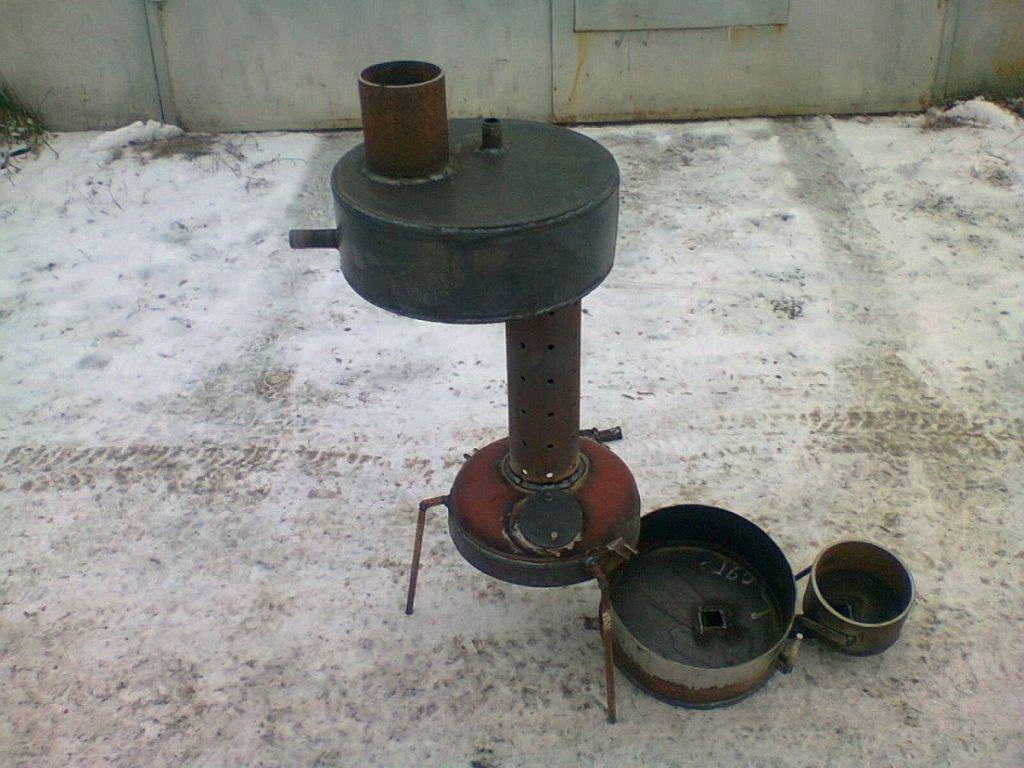
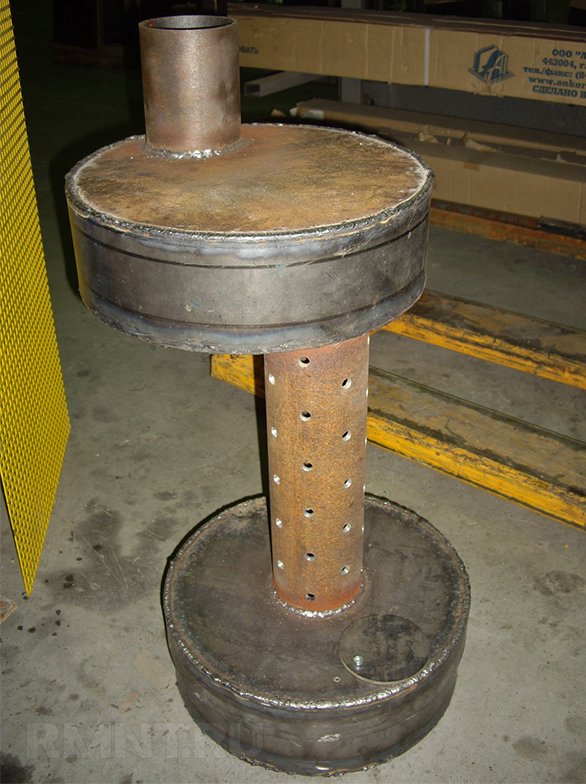
Drawing of the most efficient potbelly stove on used oil.
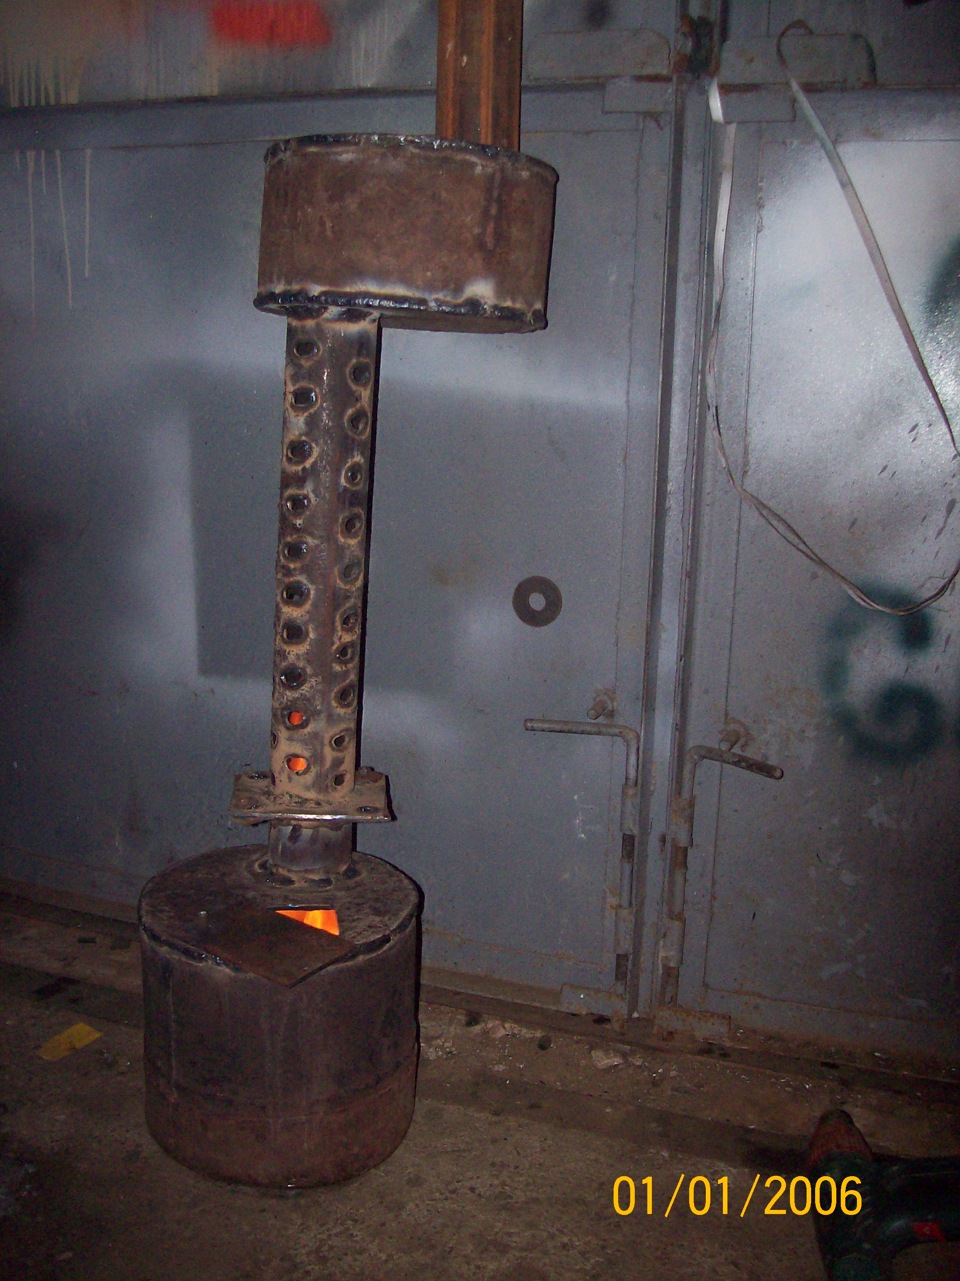
Let's deal with the details - we have a stove in front of us, consisting of three main parts. Part one, the lowest, is a container with a small hole for filling fuel and ignition. This container plays two roles - it acts as a tank and works as a primary combustion chamber. The lid of the container also serves as a kind of regulator of the intensity of combustion.
The next part is a tube with holes welded to the bottom tank. The holes are used for secondary air intake.It mixes with evaporating mining, resulting in a combustible mixture that burns to form a high-temperature flame. When the potbelly stove warms up and enters the operating mode, the pipe will literally buzz under the pressure of the fire. The final combustion takes place in the upper chamber.
The upper chamber of our potbelly stove is round according to the scheme. But nothing prevents you from making it rectangular (like the bottom one). By increasing the area of the upper surface, you can organize a kind of hob so that you can boil the kettle and warm yourself with a cup of warm drink. In the upper part of the second chamber of the potbelly stove, we see a small branch pipe - it serves to connect the chimney. That's the whole scheme - simple and unpretentious.
Conclusions and useful video on the topic
The author of this material talks about his experience in the manufacture of potbelly stoves, working on working out. Perhaps some of his statements are controversial, but in general there is a lot of useful information:
This author of the video shares his invention:
The potbelly stove has a simple design, but to make it yourself, you need drawings with exact dimensions. A design made by eye will not only not provide heat, but will also become a source of various troubles in the form of soot, splashed oil and numerous alterations. It makes sense to start manufacturing such a unit only when it is possible to provide it with fuel. Otherwise, its operation will be unprofitable economically.


Perhaps you already have experience in making a potbelly stove yourself? Please share your valuable tips with our readers. Leave comments in the block below.Here you can also ask a question of interest on the topic of the article, and we will try to promptly answer it.
The potbelly stove is a traditional wood-burning stove that was used to heat rooms 200 years ago. As a rule, in its standard form, it is a metal cylinder mounted on legs, and it contains a door, a pipe and a chimney.
With your own hands, such a design is created quite simply, and in modern versions of furnaces it can have a variety of sizes. It consists of a large number of different materials. You can watch a huge number of videos that are available on the Internet, they explain how to create certain versions of this product.
The main disadvantage of the potbelly stove is that heating is carried out only when the equipment is operating, so you need to constantly add firewood and make sure that the stove does not cool down.


