- How to properly fold a potbelly stove?
- Scheme and drawing
- Drying
- Making a firebox door
- metal sheathing
- Options for balloon furnaces
- Operation features
- The principle of operation of the stove
- Do-it-yourself three-way potbelly stove
- Materials and tools
- Step-by-step instruction
- Potbelly stove from a barrel
- Horizontal potbelly stove from a barrel
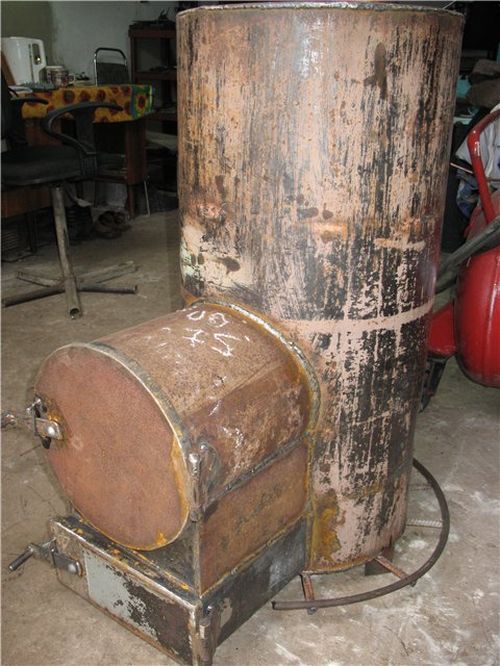
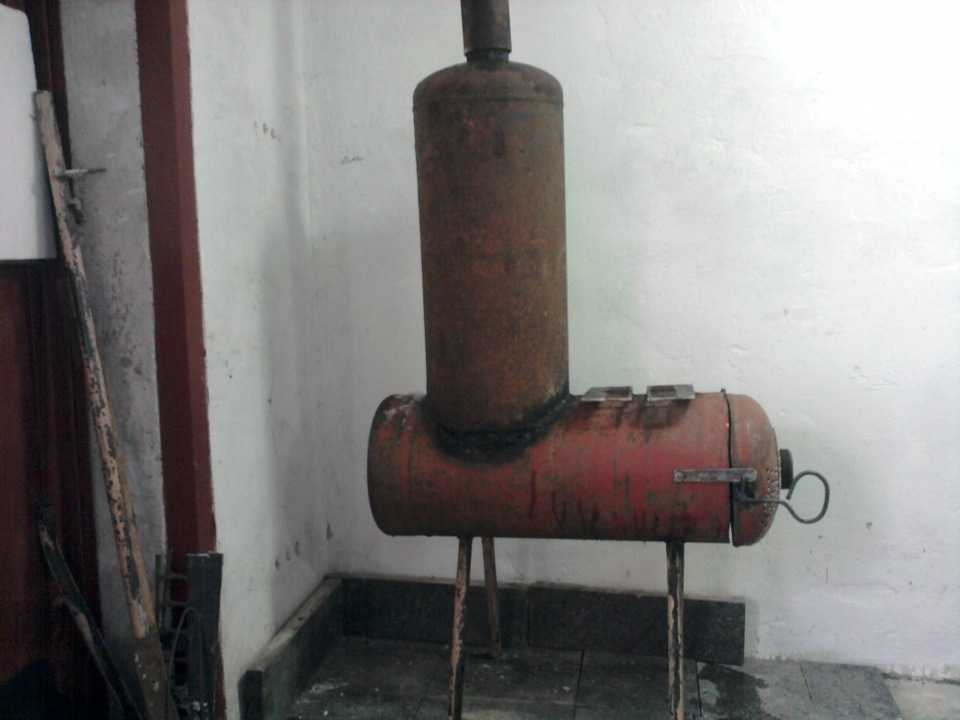
- Vertical potbelly stove
- Screen Design Guidelines
- Rules for installing a potbelly stove
- Methods and rules of calculation
- exact method
- Swedish method
- How to do it yourself?
- Rectangular oven
- From a gas bottle
- Working furnace
How to properly fold a potbelly stove?
Even a beginner can fold a brick stove-stove correctly on his own. To do this, you need to know and follow the simple rules that pechnoy.guru will provide below.
Scheme and drawing
Below we will consider how to fold a potbelly stove made of bricks with our own hands. The drawing and dimensions can be seen in photo No. 1:
Photo No. 1 - do-it-yourself drawing of a potbelly stove made of bricks
The ordinal layout of the bricks of the potbelly stove from is shown in photo No. 2:
Photo number 2 - ordinal layout of bricks (scheme)
We have decided on the materials and design of the furnace, the solution is ready. This design does not require a foundation device. For comfortable and safe work, heating must be placed in compliance with all fire safety standards.Having chosen a place, lay two layers of waterproofing. From above we make preparation from sand, 10 mm thick. Let's start laying:
- From above, without mortar, we lay a brick (see photo No. 2, first row). We strictly control horizontality with the help of a level.
- Installing the blower door. We fix it with a wire and wrap it with an asbestos cord.
- We continue laying (see photo No. 2, row No. 1).
- Next comes the fireclay brick (see photo No. 2). Grates will be installed above it.
- We put grates directly above the blower.
- We put the next row on spoons. Behind the wall we put without mortar (knockout bricks).
- Installing the firebox door. We fix it with wire and bricks.
- On top we put a row on the bed along the contour of the fourth.
- The next - again on a spoon. Behind we put 2 bricks.
- From above, the row should overlap the furnace door and end 130 mm above it.
- We continue laying, slightly shifting the bricks back. Before this, we lay an asbestos cord, on which we install the hob.
- Let's start the formation of the chimney from the next row. The design provides for the installation of a tube made of tin or corrugated aluminum. The pipe should not be heavy. Otherwise, the center of gravity may shift.
- On the eleventh row we put a valve to regulate the air flow. Do not forget to seal it with an asbestos cord and cover it with clay.
- Next, we put a chimney in the quadrangle, which we join with a metal one. The pipe must stand strictly vertically and not deviate to the side. For greater stability, it should be covered with three rows of bricks.
- We remove the knockout bricks that we put on the 4th row, clean the chimney from debris.
- Now the oven should be whitewashed. Any message will do. Experts recommend adding blue and a little milk.So the whitewash will not darken and fly off.
- We install a metal sheet in front of the firebox.
- Installing plinth.
An example of a finished brick potbelly stove
Drying
The reason for the appearance of cracks is excess moisture in the bricks, so the oven must be thoroughly dried. There are two stages of drying: natural and forced.
- Natural drying lasts at least five days. All doors must be fully open. To increase the intensity of the process, put a fan in front of the furnace or put it in and turn on a conventional electric incandescent lamp (but not energy-saving). It will not be possible to completely dry the oven with this method, so we proceed to the next step.
- Forced drying is carried out by burning dry firewood. Such a furnace is carried out once every 24 hours. It should be heated only with small dry logs. Slightly open the blower door and open the plug halfway.
When the firewood burns out, loosely cover the blower. And close the top plug, leaving 1-2 cm. When the coals burn out, open all channels. Do this for a week. On the first day, about 2 kg of firewood is burned. Then every day add 1 kg.
Making a firebox door
This element is the most complex in the entire design. The following table shows the standardized sizes of oven doors:
| The size | Blower, cleaning doors, mm | Openings for furnace doors, mm | |||
| length | 25 | 25 | 25 | 30 | 25 |
| width | 130 | 130 | 250 | 250 | 250 |
| height | 70 | 140 | 210 | 280 | 140 |
We manufacture the firebox door according to the drawings shown in photo No. 3:
Photo No. 3 - drawing of a door for a firebox and a cleaning chamber
metal sheathing
A brick potbelly stove can be additionally sheathed with metal. We will get a metal potbelly stove with all the pluses, but no minuses (except for weight). This design will protect the oven from cracking and chipping.This will greatly increase the service life. This will require sheet metal, 4-6 mm thick. The process is not particularly difficult. The metal sheet is marked out, the necessary parts are cut out with a “grinder” or a cutter. Next, the cladding is carried out and connected by welding and a metal corner.
This design is not only durable, but safer. However, it requires additional costs and labor.
Options for balloon furnaces
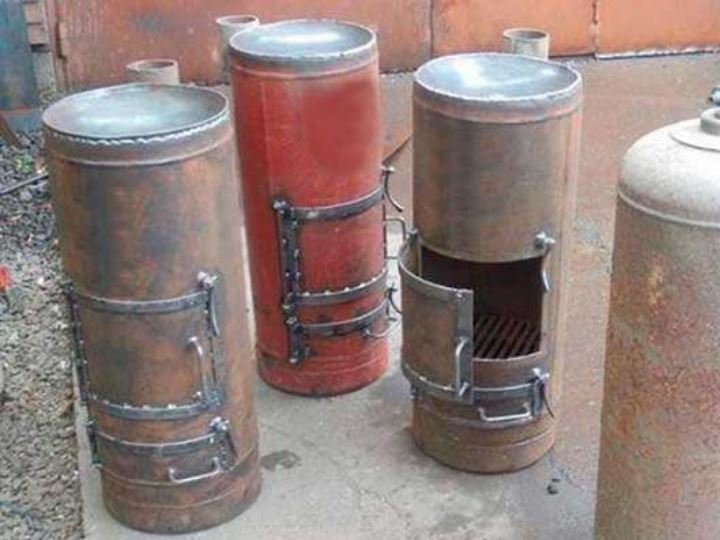
There are several basic options for such structures:
The simplest of them is an ordinary potbelly stove. For her, it is customary to use a 12-liter or 27-liter cylinder. For efficient heating, it is desirable to use a horizontal elbow for the chimney. The hardest part is attaching the door for the opening through which the fuel is loaded. Convenient for storage in a city apartment. Short-lived due to the gradual burnout of the walls of the cylinder.
Special long stoves. Work as furnaces of long burning. The basic principle of operation is that the fuel is constantly burning with little fuel filling. Then pyrolysis products are formed, which burn in a separate combustion chamber. To ensure combustion efficiency, it makes sense to preheat the air that enters the furnace. Oil garage stove provides for vertical installation. Used engine oil is used as fuel. Adjusting the combustion temperature The design looks like this.
"Rocket". Its name comes from the fact that sometimes it makes a noise similar to the roar of rocket engines. True, this can happen if the oven is not adjusted. Properly working design produces only a quiet rustle.Its design is not particularly complicated and a 50 liter gas cylinder is very convenient for its manufacture. This type has many important advantages. They heat the room well, are economical to use, and relatively easy to manufacture. They can be adapted to heat the couch. But, on the other hand, they must be done accurately and accurately. If the oven is poorly adjusted, it will be ineffective. Firewood is used as fuel (usually it is thinly chopped chips or branches). It enters through a pipe from above. Air enters through the hole at the bottom left. Combustion takes place in the downpipe. The wind is very strong here. The products of combustion rise up and exit through the pipe on the right, heating the room at the same time. Let's tell you what a furnace called "bubafonya" is. It uses a special principle of working with pyrolysis products. The combustion chamber is located vertically. Pyrolysis products are held back by a special metal "pancake", which limits the combustion space from above. The efficiency of this design can reach eighty-five percent. This oven is not designed to use wet fuel. Humidity should not exceed 12 percent. The stove is very economical in terms of fuel consumption. It is convenient to use for heating garages or other utility rooms.
A rocket furnace can be made not only with the help of gas cylinders, but also with the use of barrels, cans and other means.
Operation features
During the operation of the furnace, it is necessary to alternate the cycles of its kindling, including:
-
bookmark fuel;
-
ignition of the furnace;
-
directly furnace process with space heating;
-
cleaning of ash products from the furnace and blower section.
The most responsible stage can be attributed to the stage of laying fuel, which must be laid in a certain order to facilitate the ignition process. First you need to put paper and thin dry firewood on the grate, light a fire and close the door.


After the kindling material has ignited, larger logs can be added.
The wood must be loaded carefully to prevent the fire from dying out. At the end of the full laying of firewood, you need to tightly close the furnace door
The draft in the potbelly stove can be adjusted with a valve on the chimney or by slightly opening the blower door.
In the process of burning the furnace, do not touch its body, so as not to burn yourself.
To restore draft after a long period of burning, it is necessary to periodically disassemble the chimney and clean its elements from accumulated soot.
The principle of operation of the stove
Potbelly stove - a primitive version of a metal wood-burning stove. Such a device works extremely simply: firewood is laid in the furnace, they burn out, the furnace body heats up and gives off heat to the surrounding air. Smoke gases are removed through the chimney, and the ash is poured through the grate into the ash pan, which should be cleaned periodically.
One of the main advantages of a potbelly stove is the simplicity of design. There are no strict dimensions here, the main thing is that the body can withstand heat, and the chimney works properly. An experienced craftsman will make such a stove in just a couple of hours. And you can burn almost any dry tree in it: both logs and sawdust. On our website there is an article with a detailed description of the process of making a potbelly stove with your own hands.
They heat a potbelly stove with other combustible materials: diesel fuel, coal, peat, household waste, etc. If desired, on such a stove you can cook quite successfully. This point should be considered even before the start of the manufacture of the structure in order to make a flat hob.
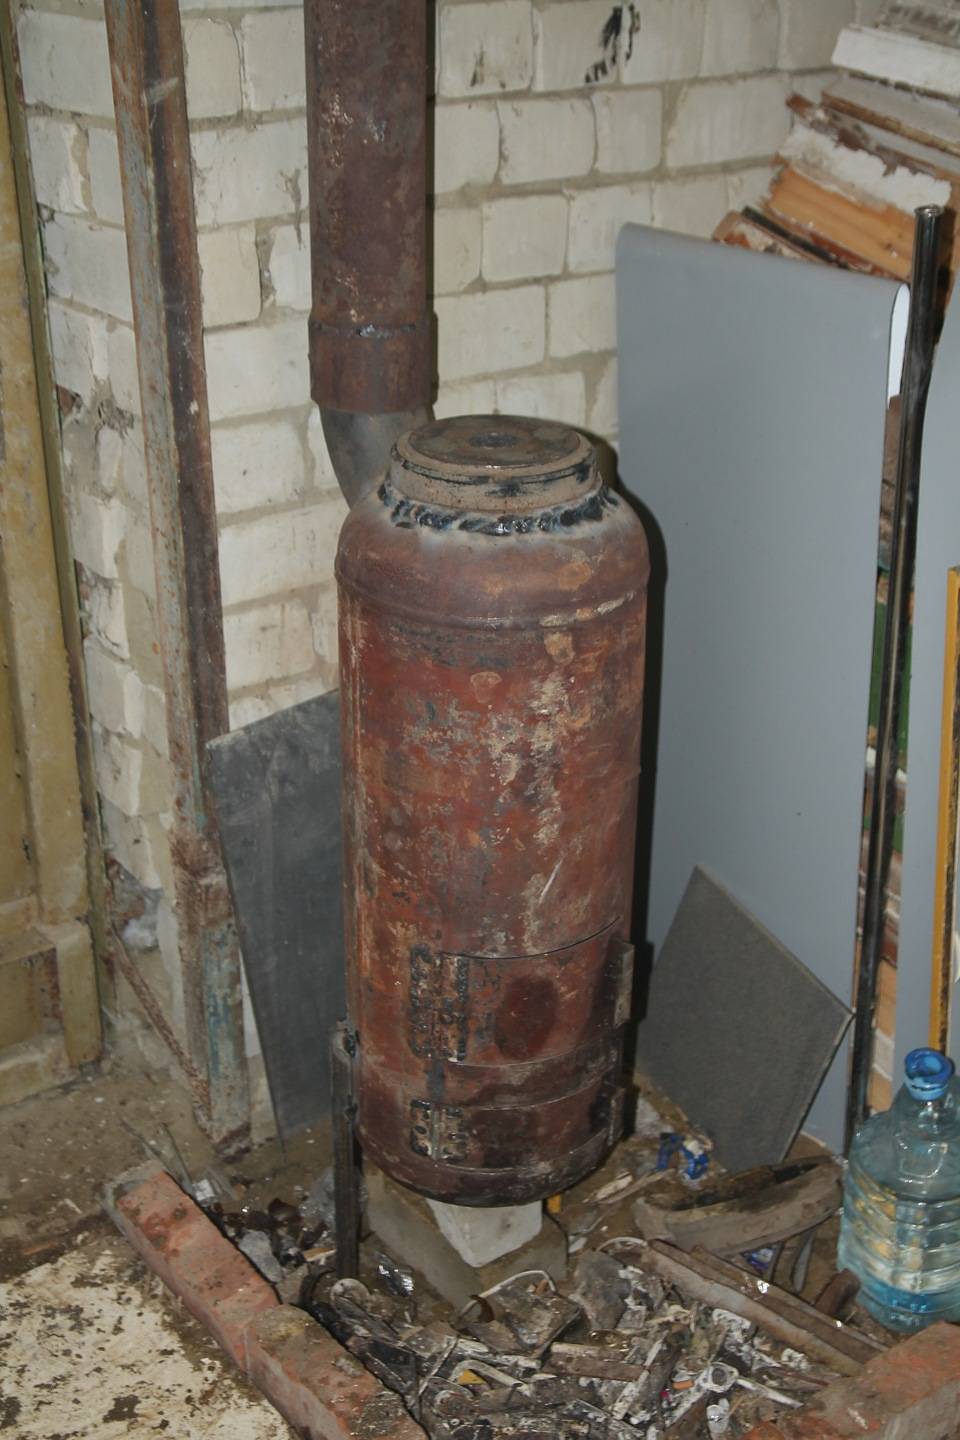
The potbelly stove is a combustion chamber made of thick metal with a loading door, a chimney, a grate and a blower. You can use an old gas cylinder as a housing
But one should also take into account the disadvantages of such a heating solution. For starters, this is a high risk of burns and fires.
For a potbelly stove, you need to choose a special place, finished with fire-resistant materials. It is desirable that she stand to the side, where no one accidentally touches the body and does not burn herself.
If desired, the upper part of the vertical potbelly stove from an old gas cylinder can be turned into a hob of modest size
Such a metal structure weighs a lot, so there is no question of any mobility of the device. It will be difficult to move the potbelly stove to heat different rooms.
Such stoves are usually used to heat utility rooms in which there is no electricity or where it is supplied intermittently: a garage, a barn, a workshop, etc.
From two gas cylinders connected perpendicularly, you can make an improved version of the potbelly stove, which allows you to save more heat and get high returns when burning fuel
Another problem is the low efficiency, since part of the thermal energy during the combustion of wood literally flies into the chimney. There are various ways to keep warm and modify the potbelly stove a little to make it work more efficiently.
Finally, you need to take care of good ventilation of the room in which the potbelly stove is installed, since such a device burns a large amount of oxygen during operation.
So, a potbelly stove consists of a metal case, the role of which is usually “invited” to an old gas cylinder. In the case it is necessary to make two doors: large and small. The first serves to load fuel, the second is needed as a blower through which air enters the combustion chamber to ensure the combustion process and traction.
A drawing of a potbelly stove from a gas cylinder allows you to make a device with specific parameters and calculated power, but such accuracy is not necessary
Below, at some distance from the bottom of the structure, a grate should be welded. It can be made from thick wire or just take a sheet of thick metal and cut long slots in it. The distance between the bars of the grate should be such that the furnace material does not spill down into the ash pan.
If the potbelly stove will be heated only with firewood, the grate gaps are made large, but when wood chips are supposed to be used, the grate should be made more frequent.
A curved metal chimney mounted on a potbelly stove from a gas cylinder allows you to keep more heat in the room and increase the efficiency of the design
The ash box can be welded from sheet metal or you can take a ready-made metal container of a suitable size and resistant to strong heat. Some people prefer to do without an ash pan at all, they simply scoop out the ash from the lower section as needed, although this is not very convenient. As a rule, the chimney for a potbelly stove is brought up to provide the necessary traction.
The standard design of a gas cylinder stove can be improved by increasing productivity by turning a solid fuel heater into a heater or hob:
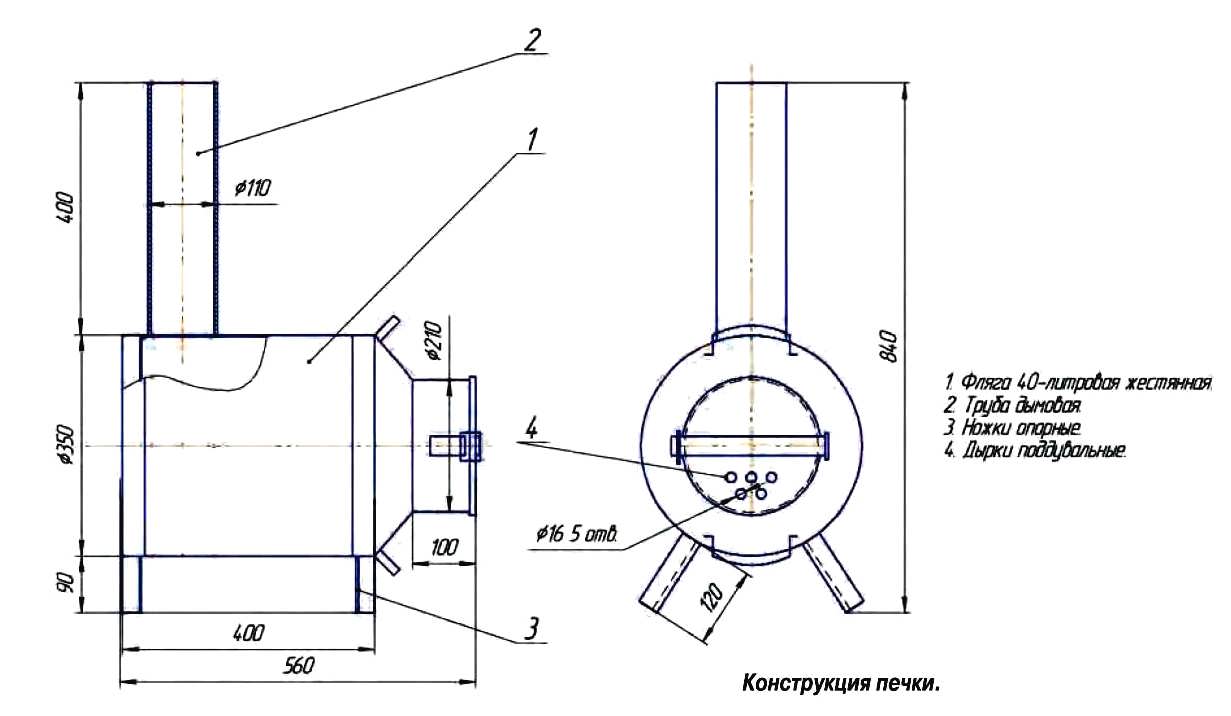
Do-it-yourself three-way potbelly stove
Three-way potbelly stove
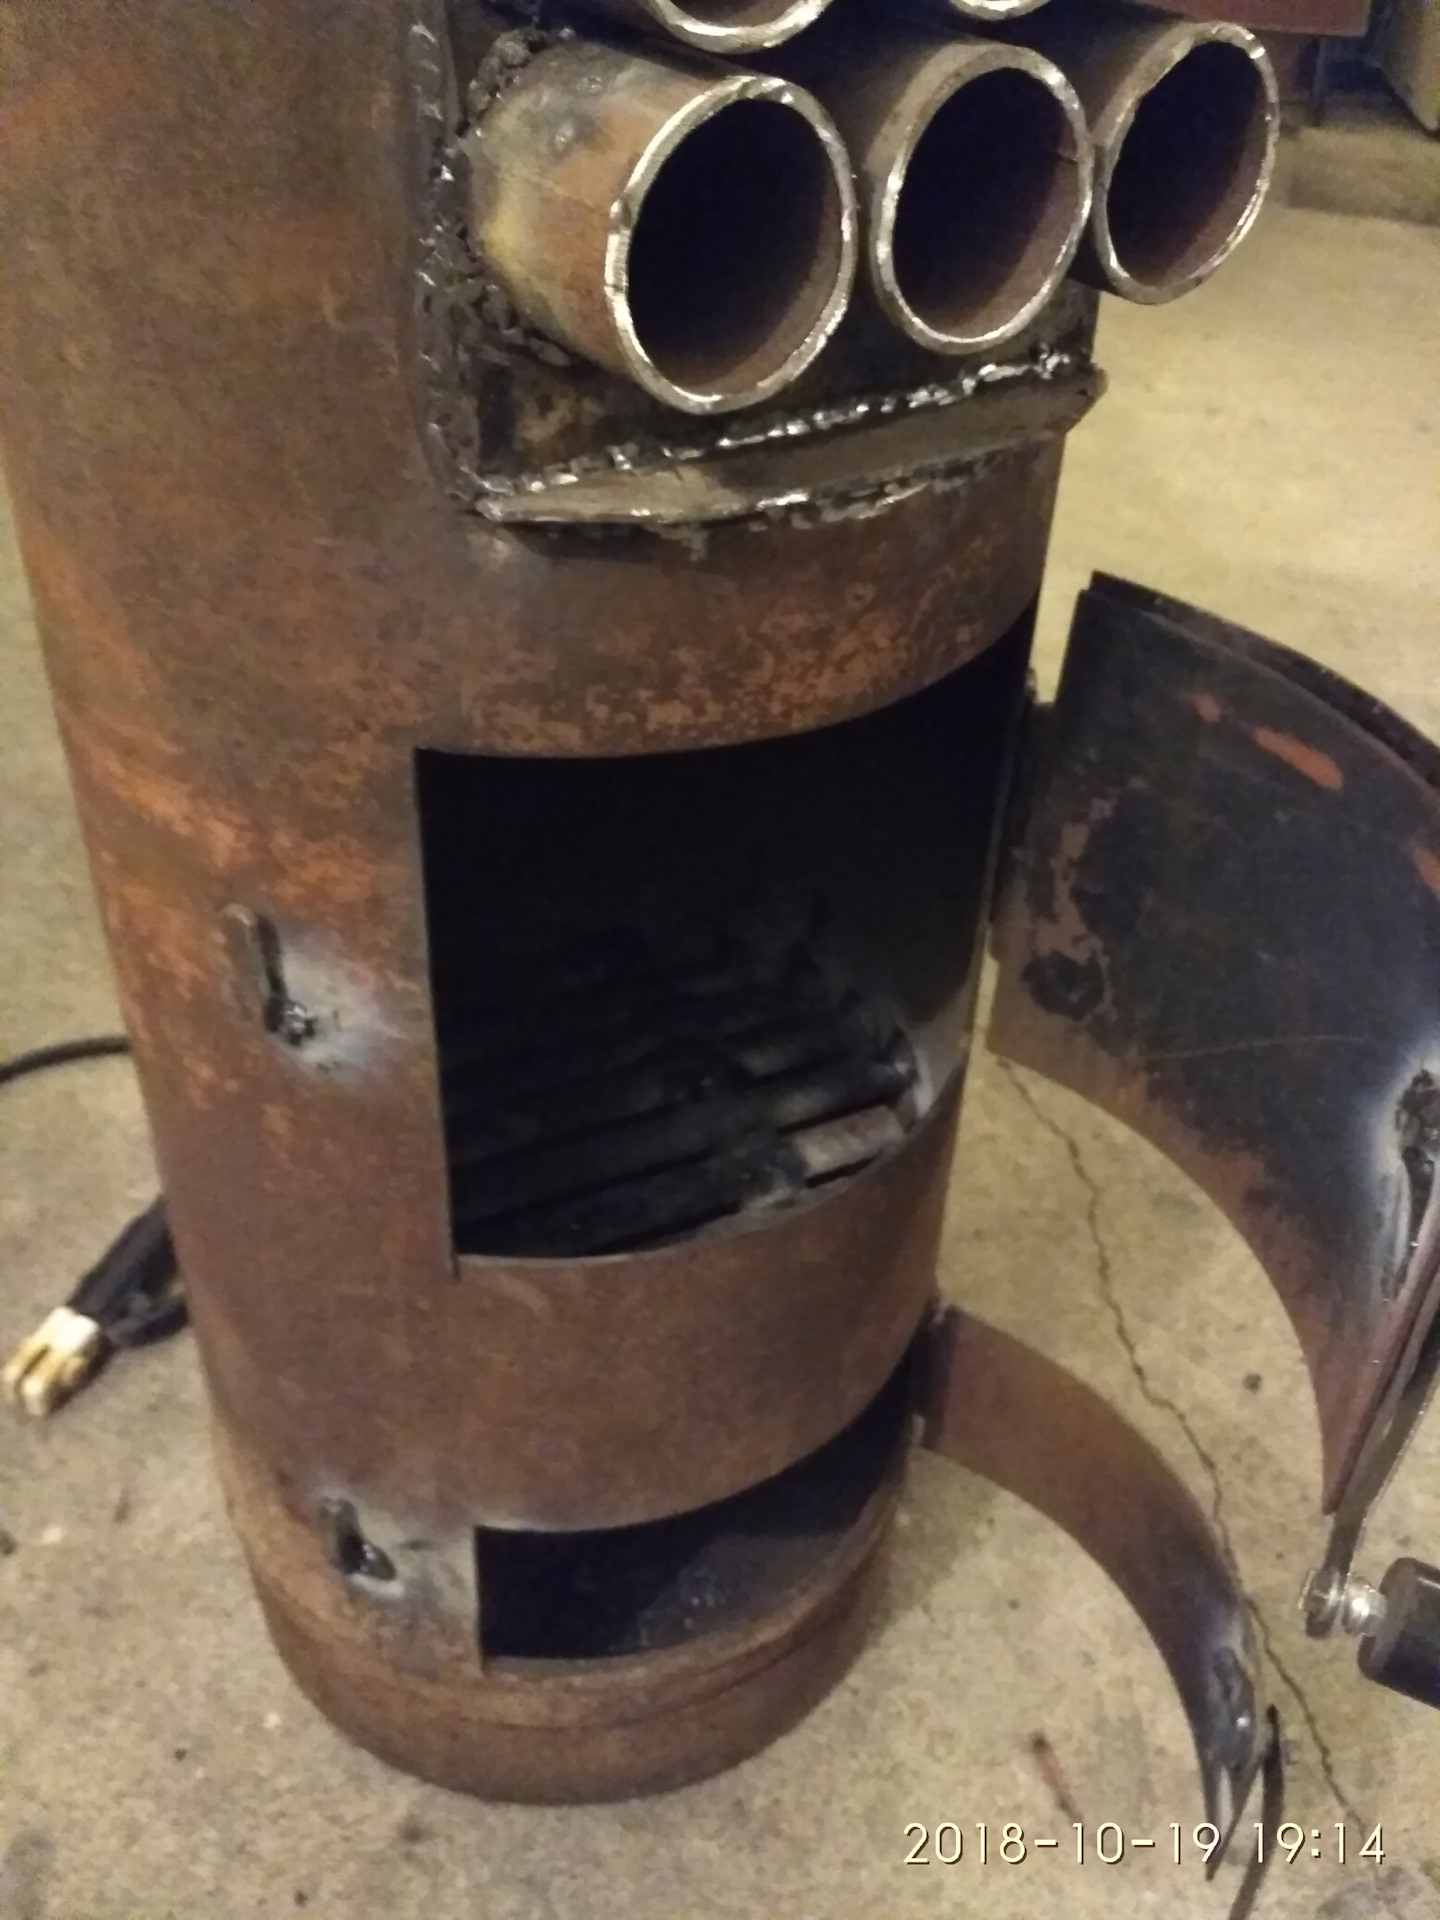
A three-way potbelly stove (pictured above) is two gas vessels of 50 liters welded to each other at a right angle. The principle of operation is as follows:
- The first is actually a horizontal potbelly stove from a gas cylinder on wood. It is equipped with all the details that are typical for a stove: a blower, a loading chamber for firewood, grates. Firewood is loaded here and fired up.
- The second vessel is a unique design in its simplicity and genius. It is divided by internal partitions in such a way that the smoke from the combustion of fuel, passing through it, changes the trajectory of movement three times. The speed slows down and the furnace body gives off more heat. In the end, through the outlet pipe, the smoke comes out.
- Additional ribs are used to increase the heating surface.
- As in a traditional oven, the air supply is regulated through a blower.
Expert opinion
Pavel Kruglov
Baker with 25 years of experience
Such a wood-burning stove from a gas cylinder is quite capable of delivering about 10 kW of heat. This is enough to heat a room of 100 m2. It can be a warehouse, a barn, a greenhouse or a garage. Such a simple design of the furnace is capable of producing an efficiency of up to 55%.


On such a potbelly stove from two gas cylinders, it is quite possible to cook food.
Before proceeding with the manufacture, we will figure out what materials and tools we will need and prepare the necessary drawings. Very good if you have the skills of a welder. If not, then any specialist in ready-made drawings will bring your project to life.A video that is easy to find on the Internet can also help.
Materials and tools
We will need the following tools:
- portable welding machine
- "Bulgarian"
- drill
- drill
- other tool.
The maintenance of the welding machine is not profitable, so it can be rented if necessary. The rest can always be found at the home master.
There are also few materials:
- electrodes
- cutting wheels
- 2 gas cylinders for 50 liters
- sheet 2 mm thick
- corner for the manufacture of "legs"
- fittings with a diameter of 20 mm
- others
Step-by-step instruction
Scheme of a three-way potbelly stove
- We make blanks from metal according to the drawing above.
- We cut out the necessary holes in the balloon. One is for the stove, the second is for the smoke outlet.
- Cut off the bottom of the second bottle. At the end, we cut a hole for a pipe with a diameter of 100 mm. We cut the balloon so that it fits snugly on the first one, as shown in the drawing above.
- Make a grate.
- We make a blower. We weld the legs, hinges and frames of the doors.
- We make doors. We seal all junctions.
- Scraps from the cylinder should be used for partitions in a vertical cylinder.
- Weld one cylinder to another, weld the chimney.
- Weld additional fins to increase the heating area.
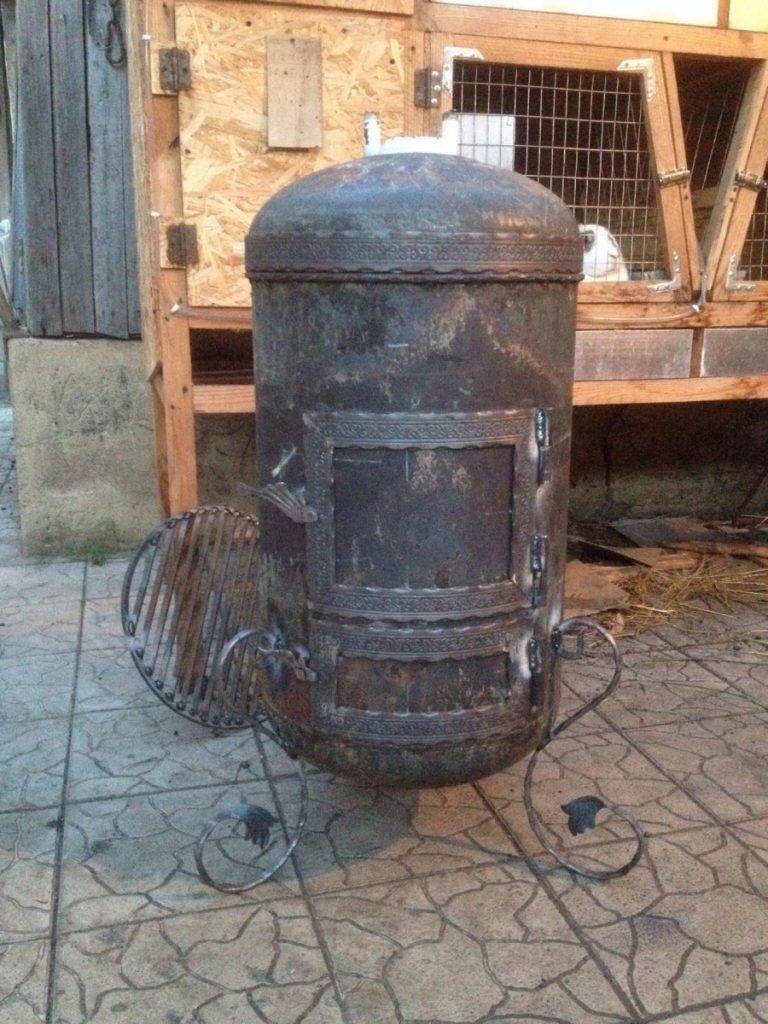
Potbelly stove from a barrel
A potbelly stove made from a barrel is more voluminous and takes up much more space than a cylinder stove. That is why it is able to heat a room with a larger area. Such a stove can also be horizontal or vertical, but both the first and second options are used to heat not only utility and technical premises, but also housing.
To make this potbelly stove, you will need a metal barrel, a steel sheet and a chimney pipe with a diameter of 100-150 mm.
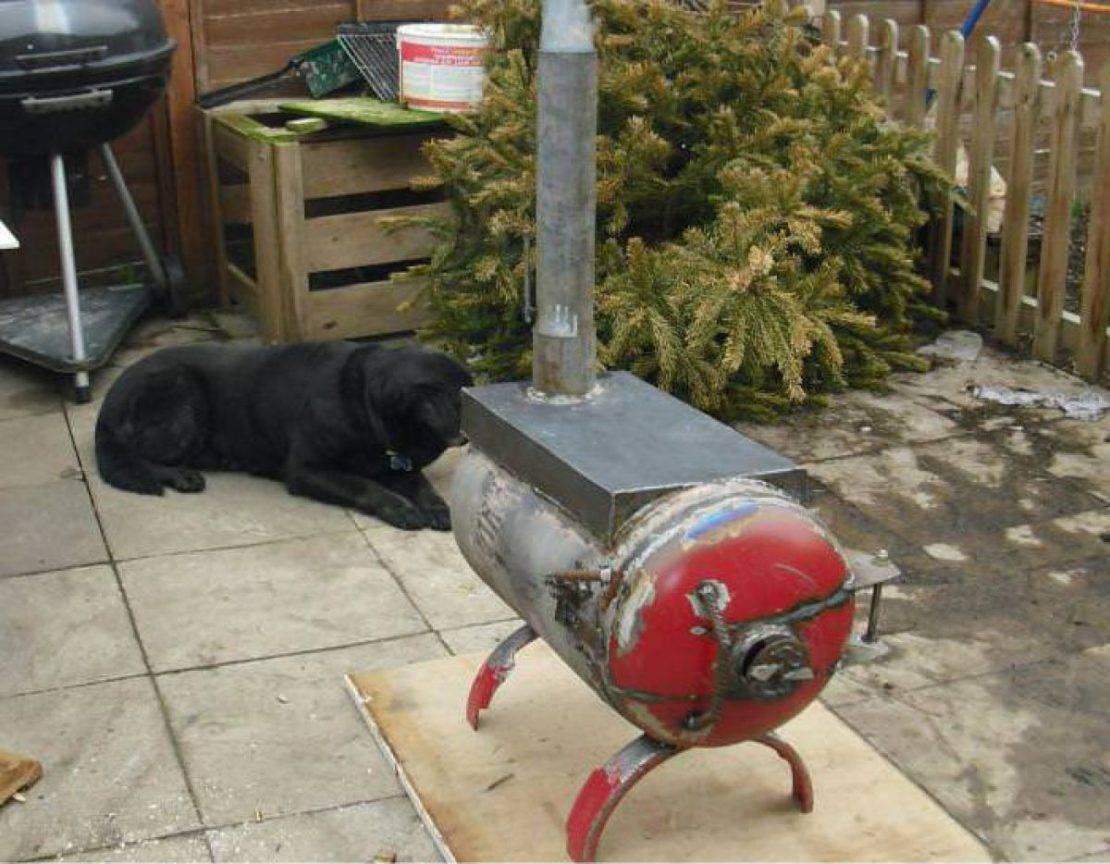
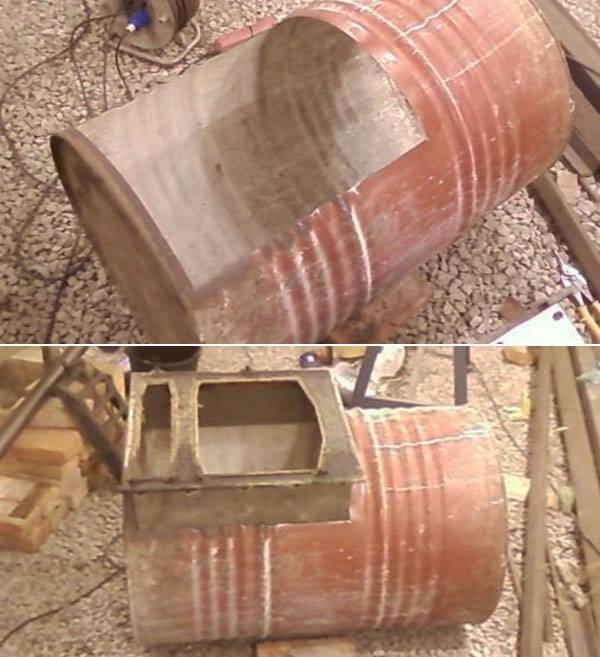
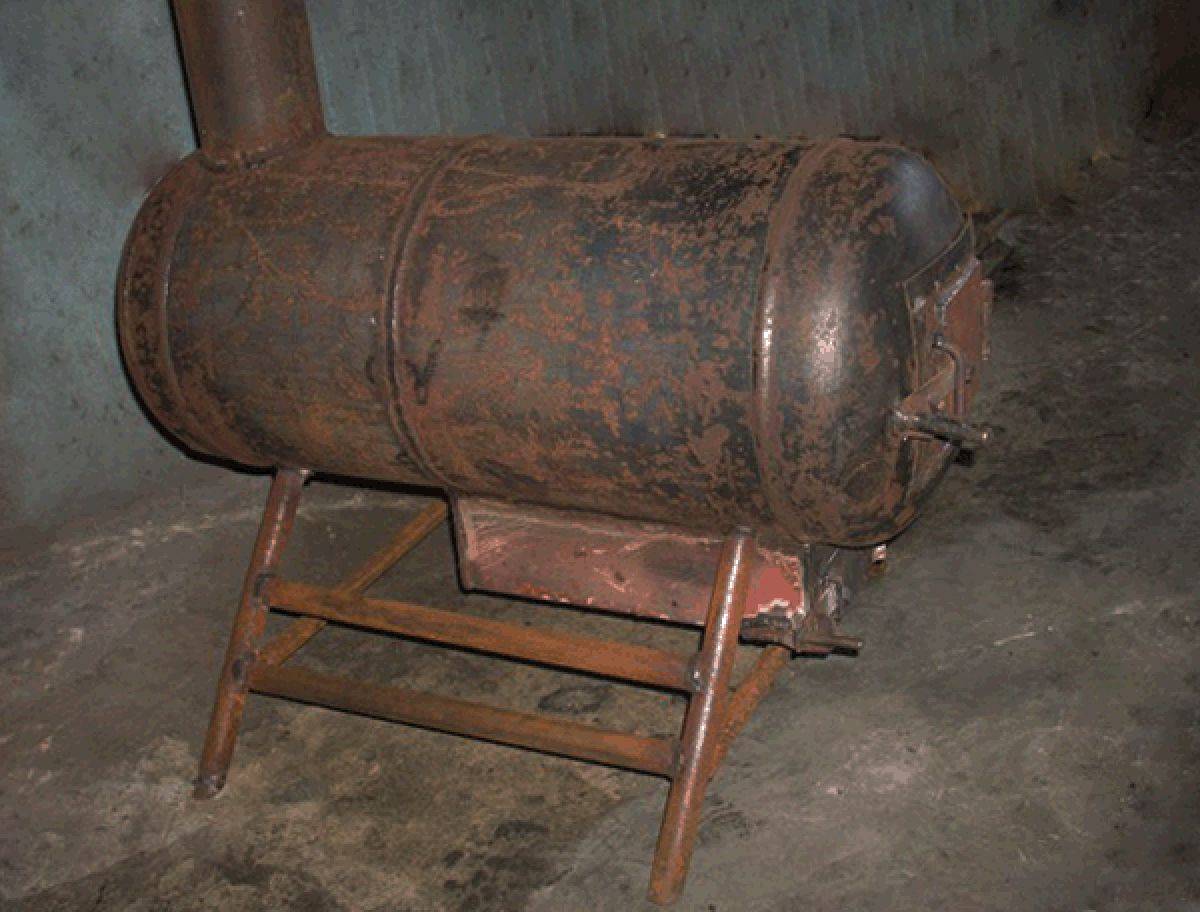
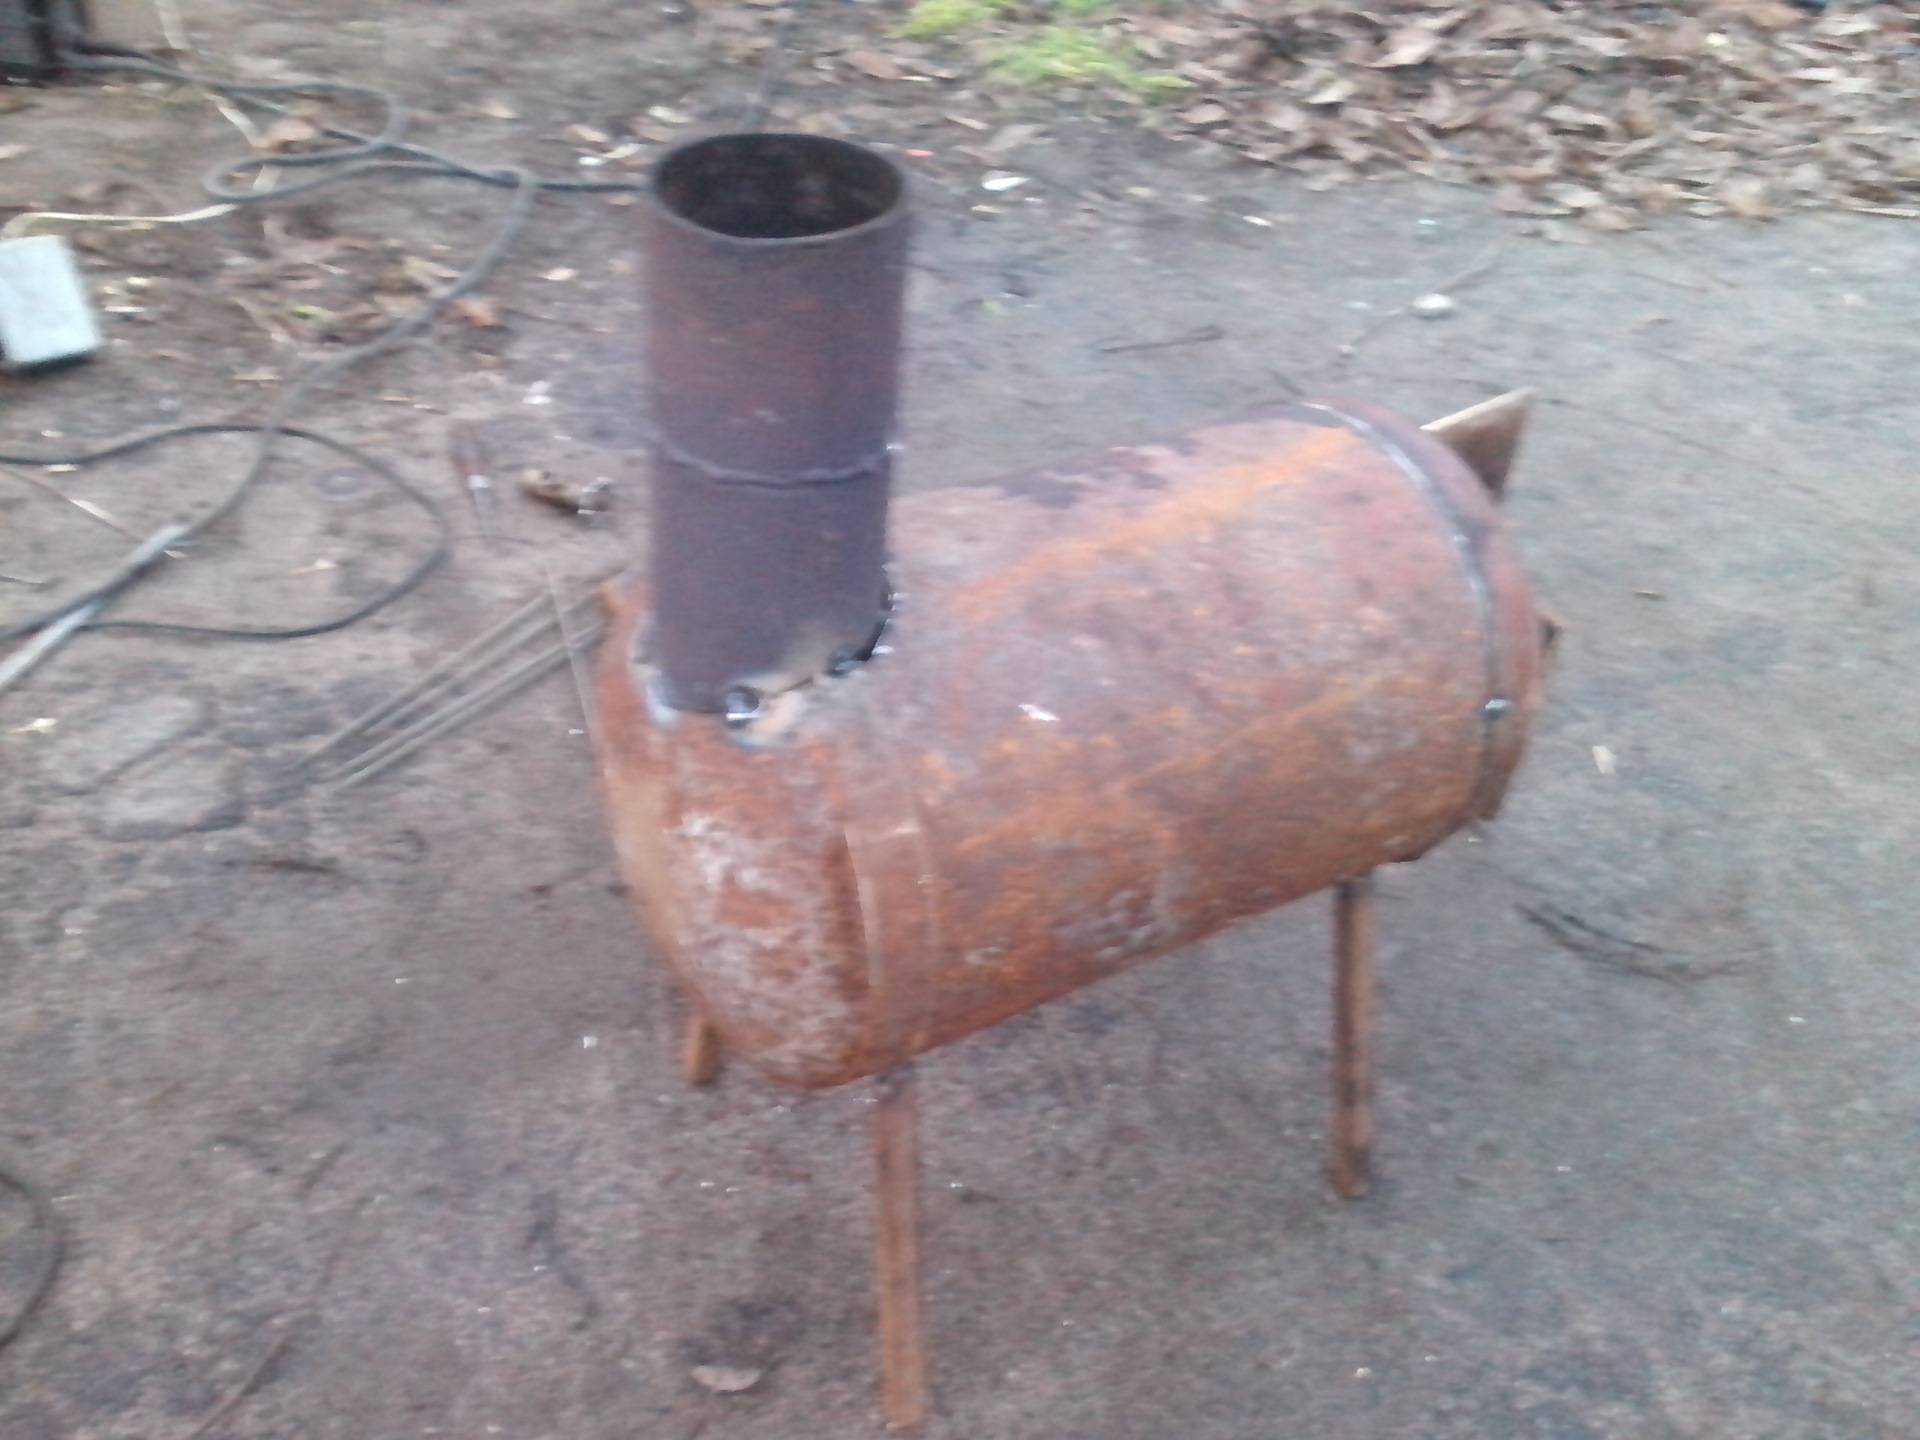
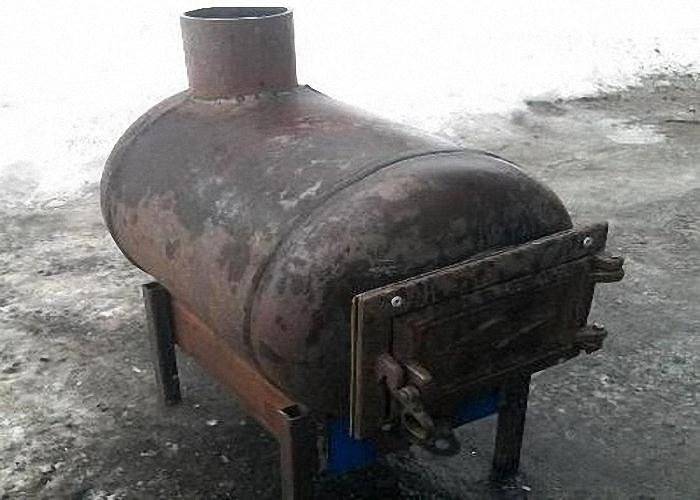
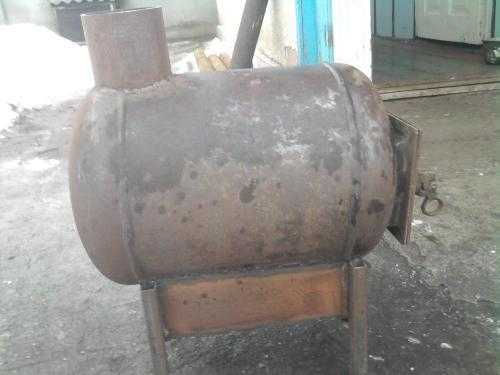
Horizontal potbelly stove from a barrel
The process of manufacturing a horizontal version of a potbelly stove from a barrel is carried out in almost the same way as from a cylinder.
- In the upper plane, a window is marked and cut out, on which a door made from a cut piece of metal will be installed. Connections of the door with hinges and hinges with the body are made with the help of rivets. Firebox window with installed door. The regular opening of the barrel will serve as a blower.
- The regular pressure relief hole in the barrel, 20 mm in diameter, is used as a blower. There is no separate door for the ash pan.
- It is recommended to immediately make a stand to accommodate the future stove. It is made from scraps of pipes or a corner, so that the shelves ensure the stability of the barrel laid on them, without backlash.
- The next step is the manufacture of a grate from a metal sheet 3-4 mm thick. First, the area is measured and, according to the data obtained, a panel of the required size is cut out, in which holes for air supply are drilled. The finished grate is laid on the bottom of the barrel in such a way that at the highest point, in the center, the distance between the grate and the inner surface of the barrel is about 70 mm. The grate is not fixed rigidly - it should be easily removed to clean the stove from accumulated ash.
- A special connecting node is made for the chimney pipe in the rear upper part. After marking the desired diameter with a grinder, diametrical slots are cut at an angle of 15 º from one another - a total of 12 cuts will be obtained. The resulting "teeth" are bent upward - the chimney pipe inserted then will be attached to them with rivets.
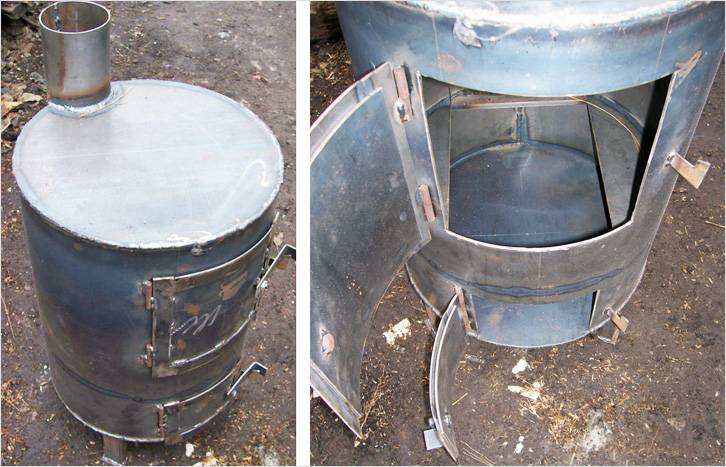
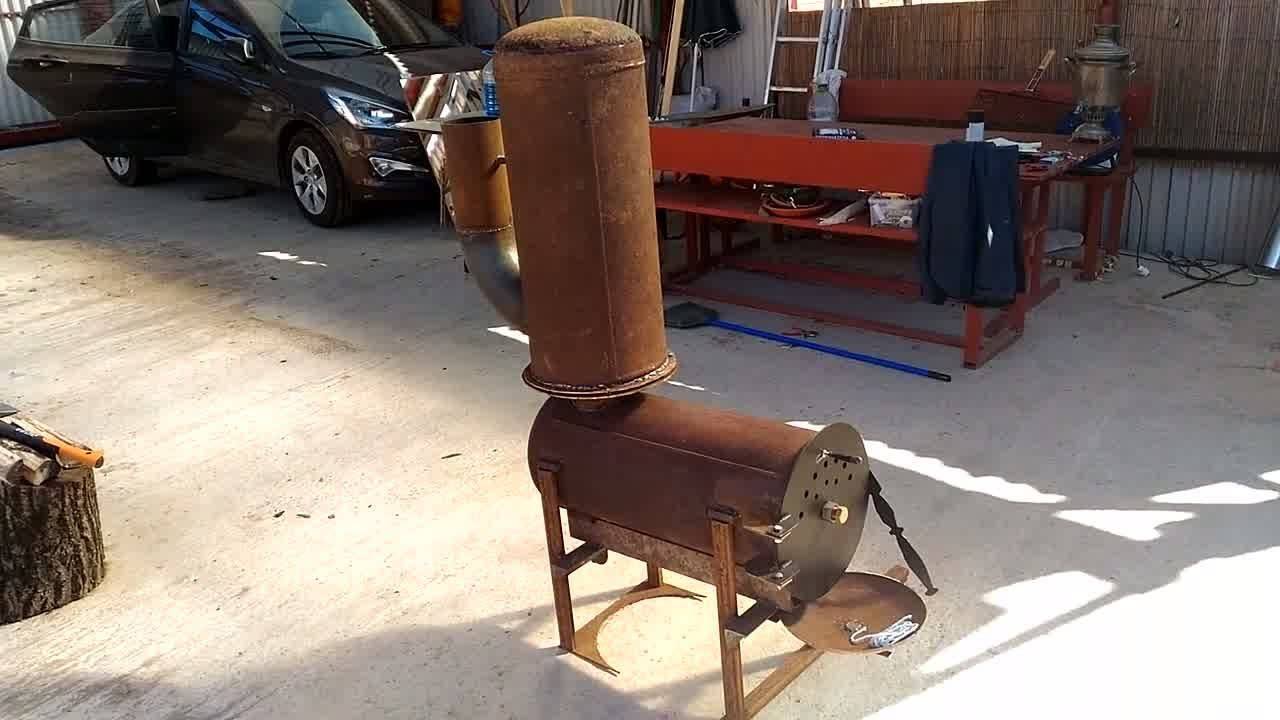
Vertical potbelly stove
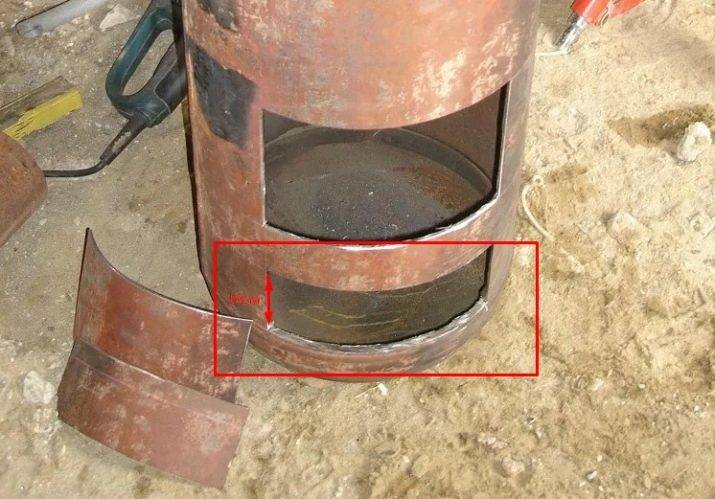
- The barrel is measured and marked on its surface with the location of the doors of the blower and the firebox, as well as the place of the cut. It should pass below the edge of the firebox by 30 ÷ 50 mm.
- Then the barrel is cut into two parts, and each of them is first worked separately.
- A round plate is cut out of a steel sheet, equal in diameter to the size of the barrel. It provides a hole for the passage of the chimney pipe.
- A hole is also cut in the top of the barrel so that it can be aligned with the hole on the round piece that will become the hob.
- The chimney pipe is welded into the hole in the barrel, and then from above, through the hole, a hob is threaded onto the pipe and placed, which is welded to the sides of the barrel. The air space created between them, which is the height of the rim, will help keep the hob hot for a longer time.
- Further, a round metal part with holes cut in it - a grate is also welded to the underside of the upper part. Another option is to weld two semicircular brackets under the finished cast-iron grate. The photo clearly shows how these elements look and are located.
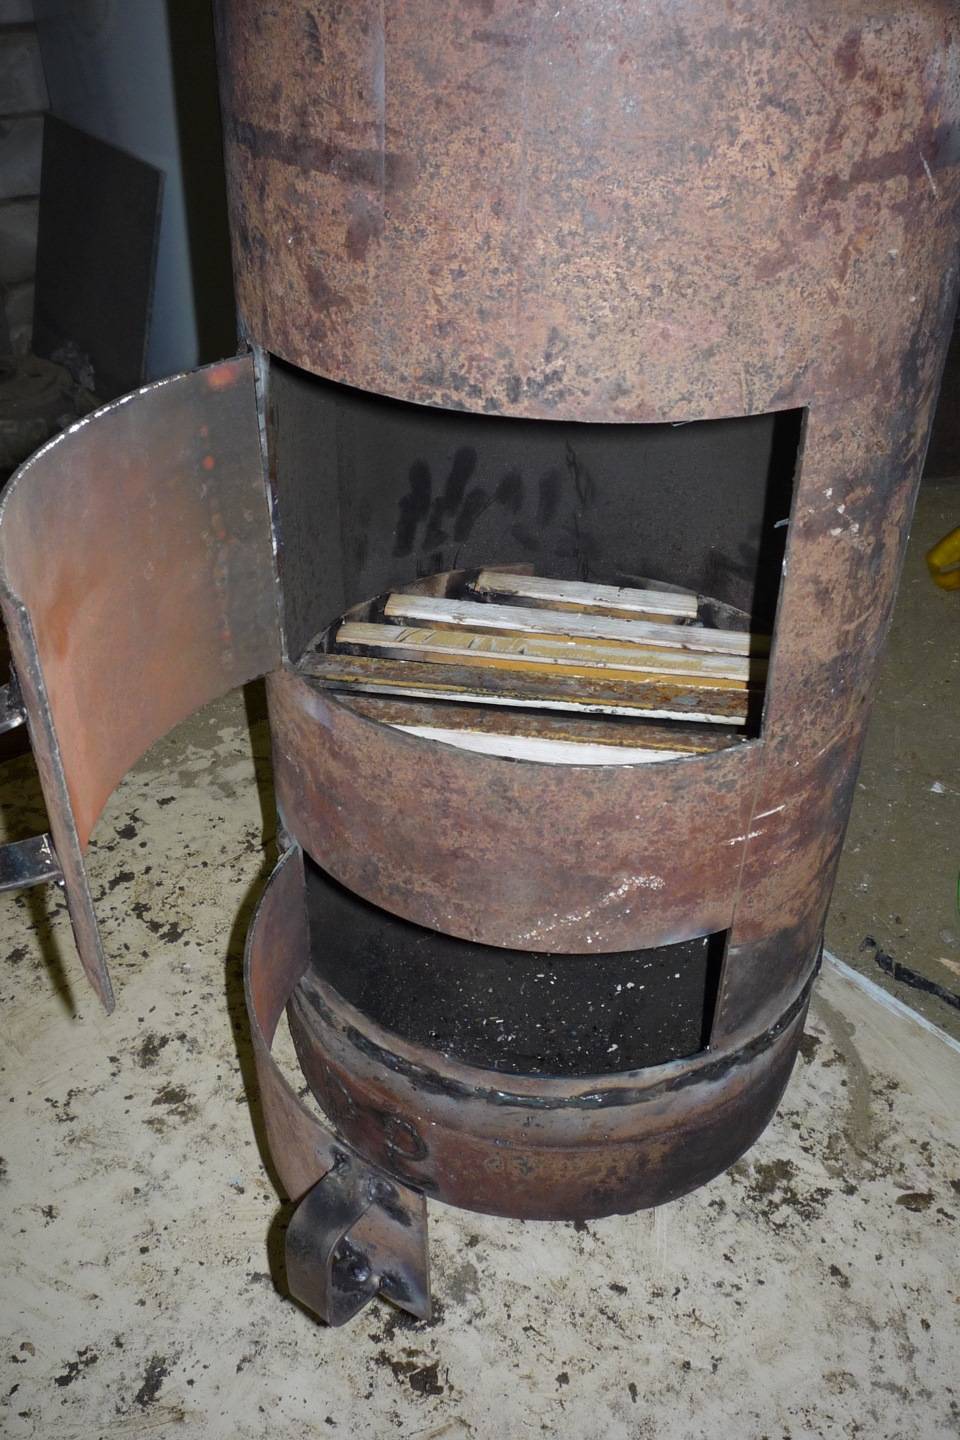
- When the bottom and top panel of this part of the stove are ready, you can cut a hole for the firebox door according to the markings made earlier.
- The cut-out part is scalded around with metal strips, hinges and a handle with a vertical latch are fixed to the door.
- Next, the hinges for the door and the hook for the valve are welded to the body.This process must be carried out very carefully, accurately calculating the distances for installation, since the door should open and close easily, and the valve should freely enter the holder arranged by the hook.
- In the lower part of the barrel, an opening is cut for the ash pan. The door is being prepared and hung - in the same way as in the case of the combustion chamber.
- After that, both parts are connected into a single structure by a welded seam.
Screen Design Guidelines
The brick screen in question, as already noted, saves the furnace from its main drawback, which is extremely rapid cooling. You turn off the stove, and it will continue to give heat. However, the device of such a screen must be carried out taking into account a number of important rules and requirements.
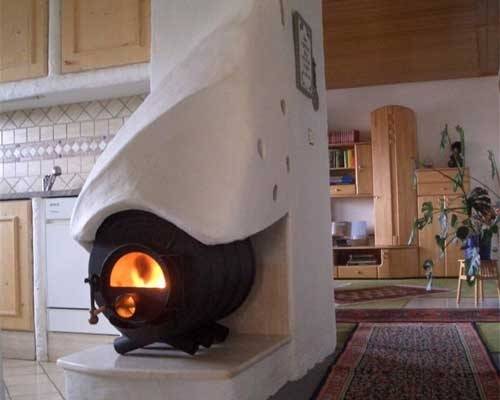
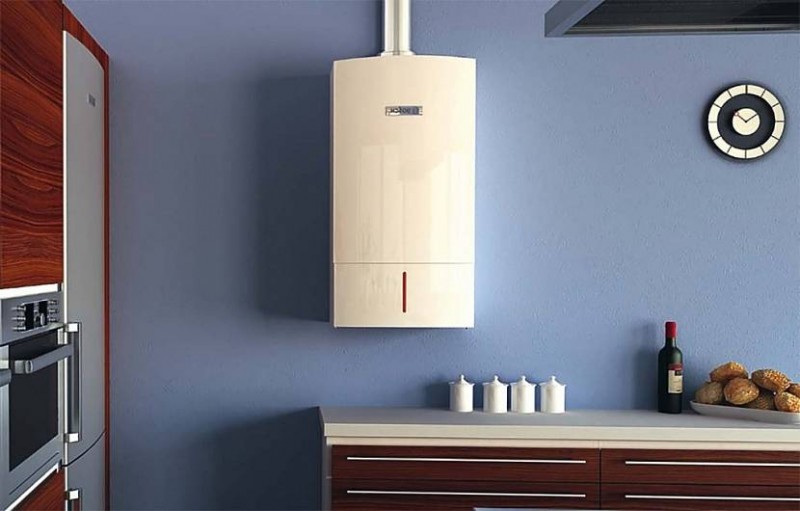
Modern potbelly stoves
Usually laying is carried out at a distance of about 15 cm from the body of the heating unit. Ventilation holes are created below and above the brick screen, thanks to which air can circulate inside the structure. As a result, efficient heating will be organized with the most rational fuel consumption. Warm air will be able to go into the heated room, and the cold air entering in its place will cool the body of the stove, protecting its walls from excessive heating and burning.
In some situations, masonry is performed without a gap between the stove body and the screen, or the brick is laid in a checkerboard pattern. This is a completely wrong approach, it is better not to consider it at all. In the absence of a gap, the heating efficiency will noticeably decrease. Excess heat will simply evaporate into the chimney.The disadvantage of "chessboard" masonry is that under such conditions, the air does not have the opportunity for normal circulation.
The total screen area is much smaller than in the case of solid masonry, which is why the stove will cool down very quickly. The total heat loss will be about 50%. The room, of course, will warm up quickly, but it will also cool down just as quickly. And is there any point in arranging such a screen at all in this case?
If you are very limited in money, you can not buy a new brick, but make a screen from broken and used products. This is not a fundamental point. But if the potbelly stove will be used as a permanent source of heat, it is better to allocate money and do everything in good faith.
Rules for installing a potbelly stove
In order for you to have no problems with the stove and all sorts of troubles, it should be installed, adhering to certain safety rules:
- The oven should only be installed on a fire-resistant surface. It is possible to make it yourself using tile tiles or using bricks. The walls located in the vicinity of the stove must also be protected from overheating. The best effect can be achieved when using specialized drywall, as well as any other non-combustible material;
- In no case should flammable materials be placed near the firebox;
- You should also equip an excellent ventilation system in the room in which the stove will be located. This is a very important factor, since the concentration of carbon monoxide in the room must be reduced to zero;
- In order to make a potbelly stove, you need to use only high-quality material.
Video: potbelly stove from do-it-yourself barrels
Making a potbelly stove is absolutely simple, as you have seen. For such a thing, you only need improvised materials, which are often found in the garage or in the country house of almost every person. A potbelly stove will delight the eye if all the details are thought out to the smallest detail and made very carefully.
Homemade stove from a metal 200 liter barrel: drawings, stove diagram, photo and video. A barrel stove can be used to heat garages, workrooms, greenhouses and other premises.
A standard metal 200 liter barrel has a height of 860 mm, a diameter of 590 mm and a weight of 20-26 kg.
The dimensions of the barrel are almost ideal for making a stove from it, the only caveat is the thin walls of the barrel 1 - 1.5 mm, which will quickly burn out from the high temperature. Alternatively, the firebox can be lined with refractory bricks from the inside.
To make an oven you will need:
- Two 200 liter barrels.
- Door for oven.
- Grids.
- Sheet metal, corners and rods.
- Chimney pipe.
- Refractory brick.
Tools:
- Bulgarian with a cutting wheel.
- Welding machine.
- Electric drill.
Stove from a 200 liter barrel: scheme.
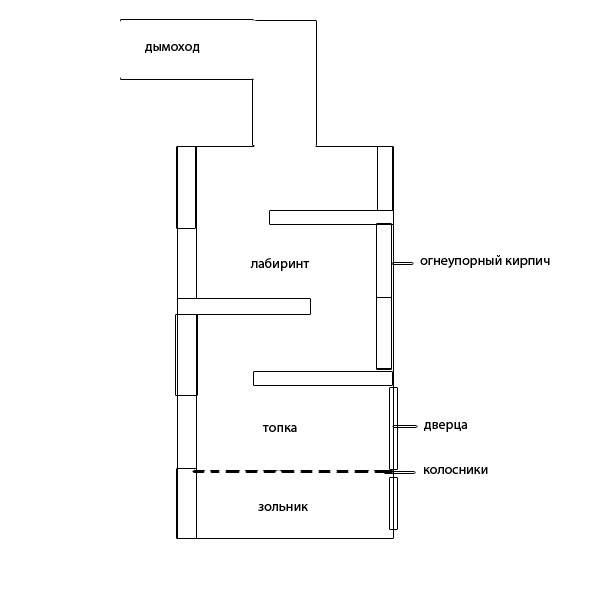
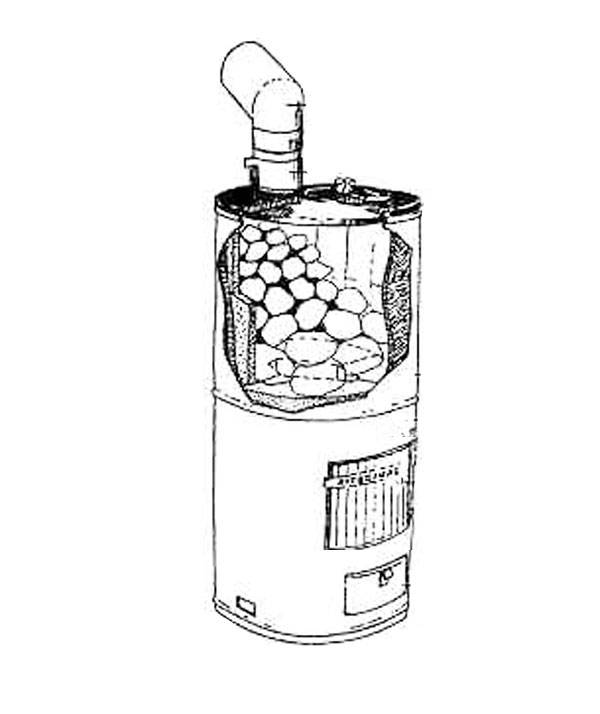
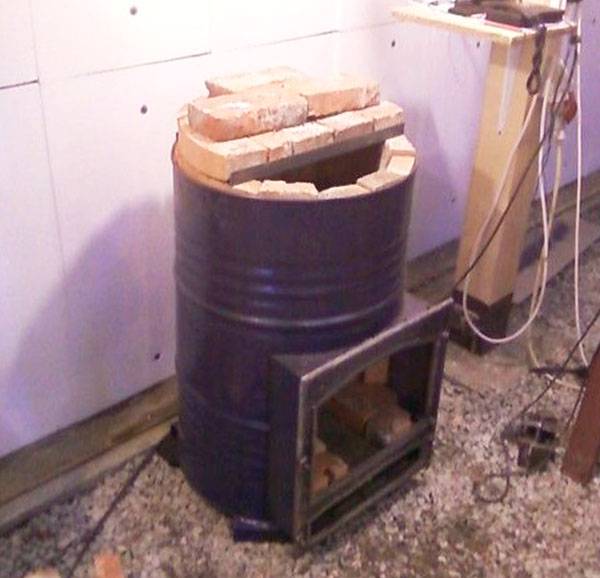
We cut off the top of the barrel with a grinder and cut out a side opening under the furnace door.
We weld the furnace door to the barrel with a welding machine. At a height of 20 cm from the bottom of the barrel, we install grates for ash.


Under the ash pan, you can make a separate door, slightly opening it, you can adjust the traction force in the oven.
So that the metal walls of the barrel do not burn out over time, you need to lay out the inner surface of the firebox with refractory bricks. To fit the bricks more tightly, we file them with a grinder.
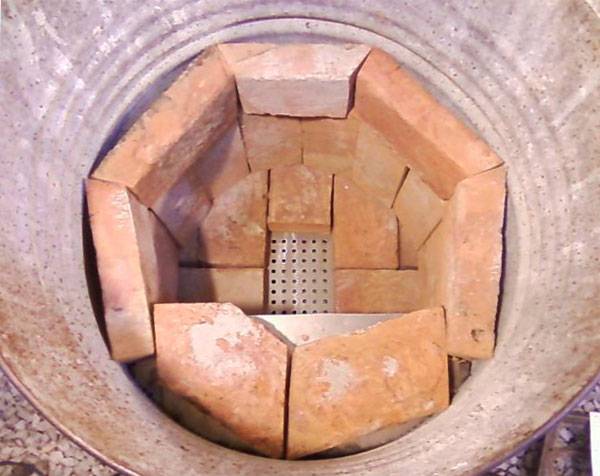
For laying the labyrinth of the chimney, it is necessary to weld from the corners of the crossbar under the bricks.
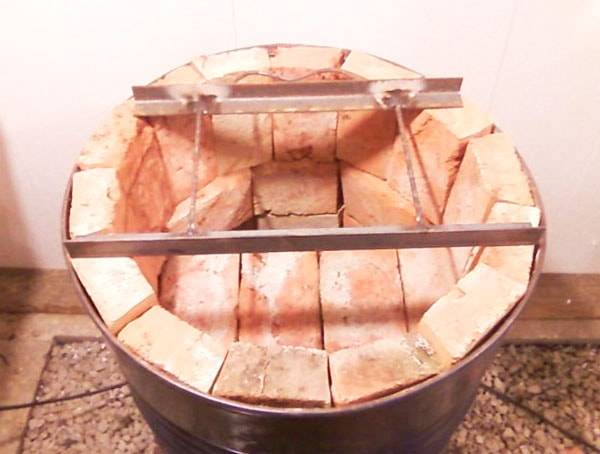
Bricks are laid out on the furnace mortar.The composition of the furnace solution is 1 part clay to 2 parts sand, the mixture is kneaded with a minimum amount of water to a very thick consistency.
The thickness of the joints for masonry should not exceed 5 mm.
Blower size 50 by 300 mm. Firebox 300 x 300 mm. It is necessary to take into account the difference in the heights of the barrels and the height of the base, which will be placed in the outer barrel;
3. A 100-liter barrel is welded on top with a steel sheet;
4. A hole for the chimney is cut in the steel sheet, the diameter of the existing pipe is taken into account;
5. A pedestal is laid out at the installation site of a brick potbelly stove;
6. In 200-lit. a barrel with a mixture of crushed stone and clay, using a brick, the base for a 100-liter barrel is laid out;
7. The base is carefully compacted;
8. A 100-liter barrel is installed on a finished base;
9. The openings of the furnace and the blower of the barrels are combined and brewed;
10. A door is cut out of a steel sheet;
11. A deadbolt is made from a steel sheet cut into a plate.
12. One end of the plate is bent in the form of the letter "O" for the handle.
13. Hinges from a metal sheet plate in the form of the letter “P” are welded onto the door and the bourgeois wall, with legs on the walls. There are 2 pieces on the door - a bolt will slide along them. On the wall of the barrel 1. It will hold the door when the bolt is inserted;
14. Door hinges are welded;
15. The furnace door is welded;
16. The pipe for the chimney is cut to the required length. The longer, the stronger the pull.
17. The chimney pipe is welded. Welding without gaps is necessary so that the smoke only escapes into the chimney.
18. The free space between the barrels is filled with a mixture of clay and gravel.
19.The folded edges of the 200 liter drum are welded to the edges of the 100 liter drum.


When cutting holes and parts, it must be taken into account that the metal expands when heated. Therefore, the gaps of the door and other parts must be left sufficient for normal operation.
Between the blower and the firebox, to facilitate the removal of ash, you can put a grate assembled from metal corners.
Methods and rules of calculation
The calculation rules have their own tolerances, you need to know them before calculating the pipe diameter. There are several calculation methods, they depend on who and for what conditions they will be executed:
- High-precision, they are used in the manufacture of boilers and are carried out by the design departments of equipment manufacturers.
- Approximate calculations performed by non-experts based on graphs, charts and tables.
- Automatic, obtained on the basis of online calculation.
Accurate calculations are understood as those in which many factors are taken into account:
flue gas temperature at the outlet of the boiler and from the pipe, the speed of movement of gases in the furnace and in sections of the smoke exhaust system, the loss of gas pressure along the movement in the gas-air path. Most of these parameters are obtained experimentally by manufacturers of boiler equipment and depend on the brand of the boiler, so this type of calculation is practically not available to users.
With regard to the approximate method, before calculating the diameter of the chimney, the characteristics of the volume of the combustion chamber are taken into account. To determine the geometric parameters of pipes, there are various tables and graphs. For example, with a firebox with dimensions of 500x400 mm, you will need a round pipe from 180 to 190 mm
For example, with a firebox with dimensions of 500x400 mm, a round pipe from 180 to 190 mm is required.
The third method is based on the use of special online calculators. They take into account almost all important parameters, so they give very accurate results. In order to use them, the operator will need to know a lot of starting data.
exact method
Accurate calculations are based on a rather laborious mathematical base. To do this, you will need to know the fundamental geometric characteristics of the pipe, the heat generator and the fuel used. For such a calculation, you can use the following method for determining the diameter of a round pipe for a wood stove.
Input calculation parameters:
- Indications of T gases at the outlet of the boiler t - 151 C.
- The average velocity of the flue gases is 2.0 m/s.
- The estimated length of the pipe, which is standardly used for stoves, is 5 m.
- The mass of burned firewood B= 10.0 kg/hour.
Based on these data, the volume of exhaust gases is first calculated:
V=[B*V*(1+t/272)]/3600 m3/s
Where V is the volume of air masses that are necessary for the completeness of fuel combustion - 10 m3 / kg.
V=10*10*1.55/3600=0.043 m3/s
d=√4*V/3.14*2=0.166 mm
Swedish method
Chimney calculations are often performed using this method, although it is more accurate when calculating the flue systems of fireplaces with open fireboxes.
According to this method, the size of the combustion chamber and its gas volume are used for calculation. For example, for a fireplace with a portal 8 masonry high and 3 masonry wide, which corresponds to the size F = 75.0 x 58.0 cm = 4350 cm2.The ratio F / f = 7.6% is calculated and it is determined from the graph that a rectangular chimney with this size cannot work, perhaps the use of a circular section design, but its length must be at least 17 meters, which is not really high. In this case, it is better to make a choice from the reverse, according to the minimum required diameter section. It is easy to find it by the height of the building, for example, for a 2-storey house, the height from the fireplace to the chimney cap is 11 m.
F/f ratio= 8.4%. f = Fх 0.085 = 370.0 cm2
D= √4 x 370 / 3.14 = 21.7 cm.
How to do it yourself?
Manufacturing options:
Rectangular oven
It is a metal box, you can independently weld the structure of steel sheets. For a rectangular potbelly stove, an old automobile tank, a box will fit perfectly.
Usually, this form is chosen when it is necessary to cook food on the stove.
On a capacious platform, you can immediately put 2 large pots or containers for heating water.
The manufacturing principle is simple: doors are built to cover the blower and the combustion chamber, a hole is made for the chimney, combustion products must leave the room in a timely manner, otherwise you can inhale carbon monoxide.
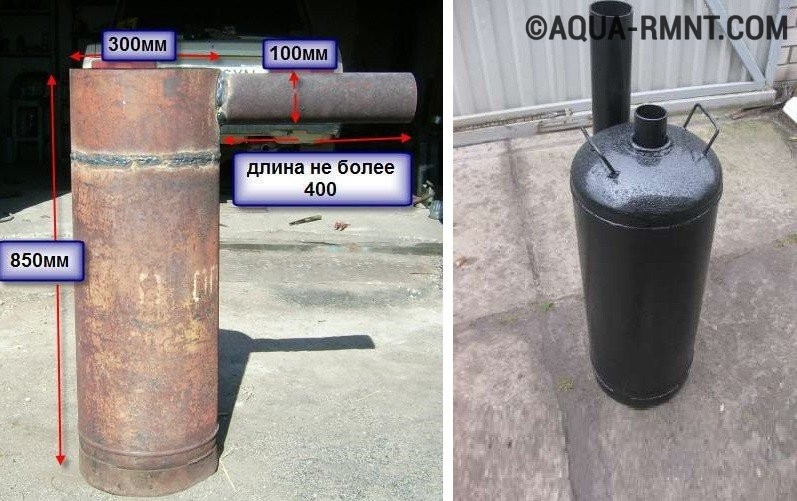
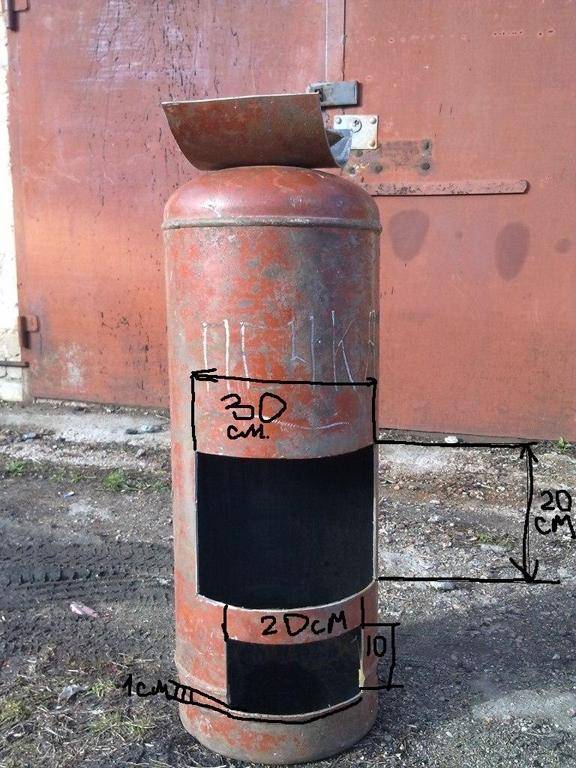
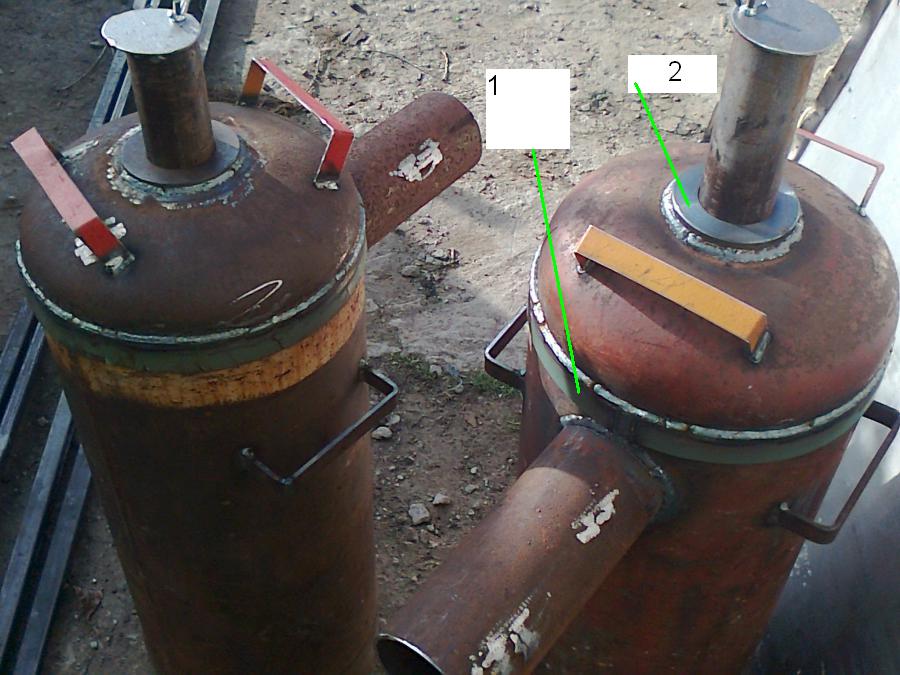
From a gas bottle
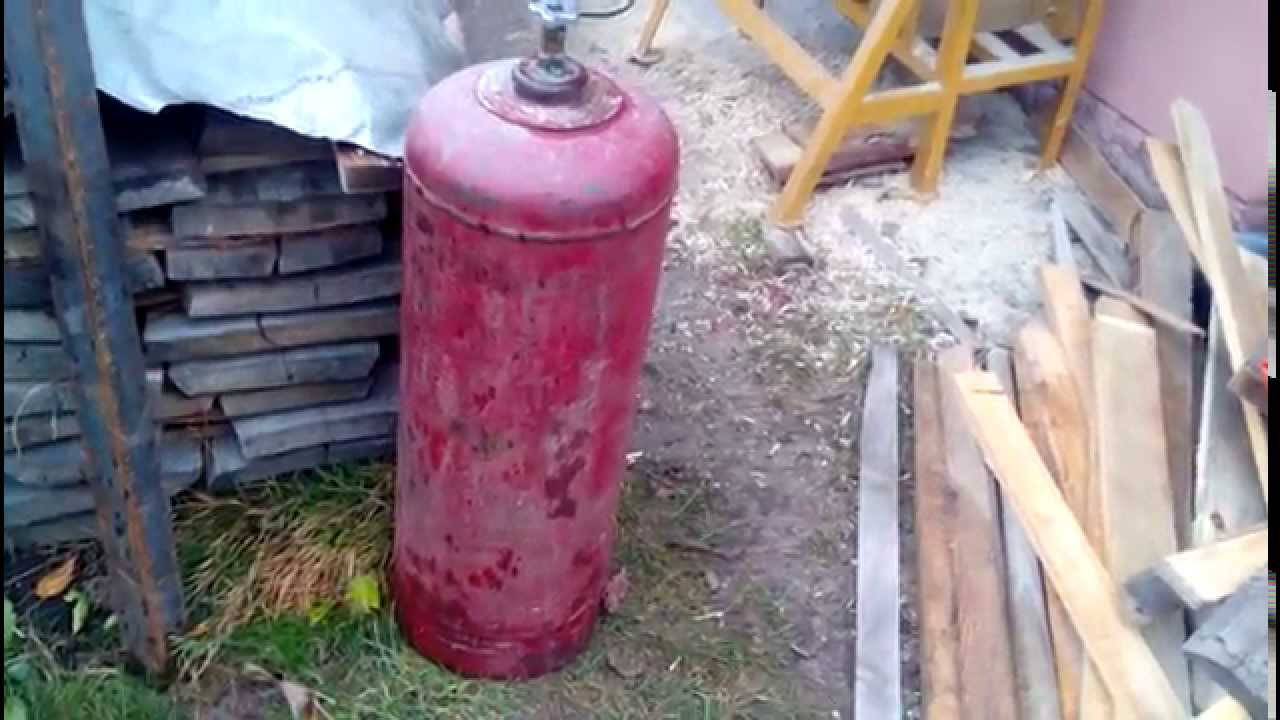
The most common type of potbelly stove. The cylinders have thick walls, the furnace is durable, mobile, fireproof.


First, a drawing is drawn, markings are made. The door for the combustion chamber will be located in the center of the cylinder. It blew in the same plane, only 10-12 cm lower.
Instruction:
- We take a grinder, cut out both doors, draw a closed line between them.
- We cut the balloon into 2 parts along the line.
- At the bottom we weld a grate - a blower.
- We install the grate, weld both parts again.
- For the valve, we make a hole in a radius of 10 cm.
- For the hood, we insert a hole into the pipe, by welding we weld objects.
- A simple stove from a cylinder is ready, you can use it, throw in fuel and check its operation.
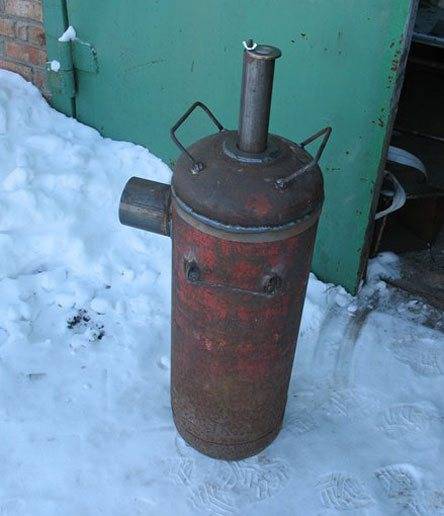
For cooking on the top of the stove, the design is slightly different:
- The top of the balloon is cut off.
- The rods are inserted and welded inside.
- A hole for the pipe is cut out on the top side. You can heat and cook food at the same time.
- A hole is welded, a valve is screwed in, a comfortable handle is adjusted.
- You can also make a stove from a pipe, a barrel. The barrel or pipe must be selected according to the diameter.
- At the bottom of the pipe barrel, cut 2 holes for the firebox and ash pan.
- Make doors.
- Frame the holes with metal strips.
- Under the furnace door at a distance of 10 - 12 cm inside the barrel, weld brackets at the corners, a grate will lie on them, weld it first from any fittings.
When making a furnace from a pipe, weld the bottom of it, as well as a part on top:
- Weld 4 legs at the bottom to the bottom.
- Cut a hole on the surface, weld a pipe to it, this will be a chimney.
- Weld the hinges to the previously cut holes, install the doors. Also, mark and attach a hook so that the doors lock tightly.
- For the aesthetics of the construction, process all welding seams, clean them 10. Paint the outside of the device with heat-resistant paint. Whatever a factory product, you can sell or successfully use it yourself.
Working furnace
The option is distinguished by a specific smell, which during the combustion of fuel will be emitted by oil mining, even in the presence of an exhaust hood.
Instruction:
- To make this model, select sheet material with a thickness of at least 4 mm, a chimney pipe, and individual small structural elements.
- Make accurate markings of all elements on the sheet, having previously drawn a drawing.
- Cut all the elements with a grinder, clean the edges of the parts. Drill round holes in the pipe.
- At the top of the tank, cut a hole for the pipe with an offset from the center to the left.
- Offset to the right on the circle, drill a hole for the connecting pipe.
- It turned out 2 circles, weld them to the pipe, the thickness of the upper tank will depend on its segment.
- Decorate the part of the stove from below in the same way, but now cut the hole right in the center of the indicated circle.
- Cut a second hole next to it, fix the sliding cover on it.
- Weld 4 legs to the bottom plane.
- Clean the seams after welding, paint the surface with high temperature resistant paint.
- Connect the chimney to the oven. The mining will be poured into the lower part of the tank, after the paper is ignited, the sliding cover closes, and the mining starts to burn. Oxygen will penetrate through the holes, mining will burn intensively.