
- Safety measures during work
- Main types of ovens
- We fill the foundation of the Russian stove
- Furnace device
- The main stages and important features of laying the furnace
- The procedure for laying a brick oven with your own hands
- Basic masonry techniques
- Possible problems and solutions
- The best stoves for a Russian wood-fired bath
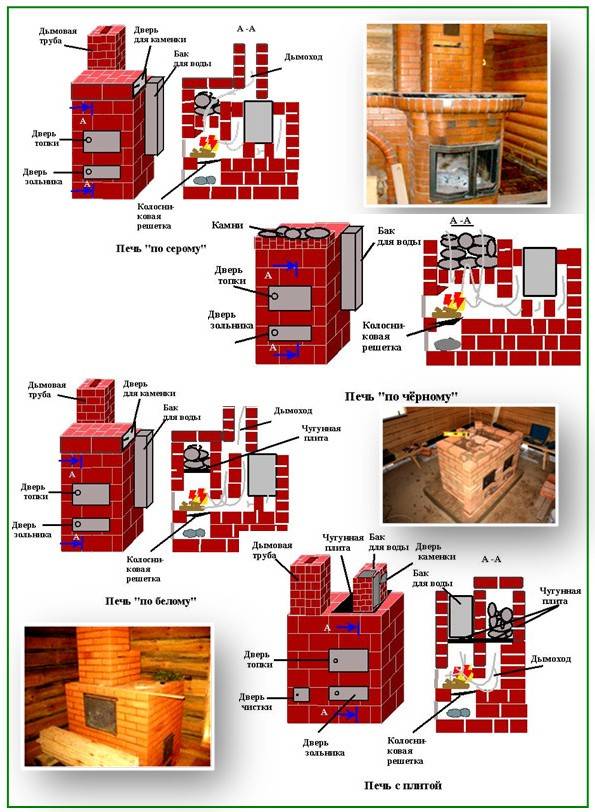
- Black oven
- "In gray"
- "White" oven
- How to build with your own hands
- Construction cost
- Recommendations for stove-makers for operation
- Stage 2. Choosing a suitable place
- Conclusions and useful video on the topic
Safety measures during work
The Russian stove has many advantages, but the following measures are important for safety:
- tightness check before each heating season;
- if cracks are found, they need to be repaired;
- the appearance of smoke at the beginning of the furnace indicates the absence of normal draft - if the valves were open, then the chimney channels need to be cleaned;
- check and clean the chimney at least once a year;
- organization of high-quality ventilation in the house.
The Russian oven in the house gives a lot of advantages. If desired, such a structure can be placed on the street. There are several design options, so you can choose a stove for any needs and size of the house.
Main types of ovens
Before proceeding with the self-laying of the furnace, familiarize yourself with the features of the existing varieties of such units.The ovens are:
- heating. Designed exclusively for heating. Such furnaces have an extremely simple design and are laid out in the shortest possible time and with the least effort compared to other types of structures;
- heating and cooking. The most popular and demanded option. At the same time they heat the house and allow cooking;
There are also improved varieties of heating and cooking stoves with a built-in stove or even a full-fledged oven.
masonry do-it-yourself dutch
Fireplace stoves belong to a separate category. This is a great option for a modern private home. Such designs perfectly cope with the tasks of space heating and have an attractive appearance. A properly laid out and finished fireplace stove will be a worthy addition to the interior of both a small country house and an expensive private villa.
These are the stones
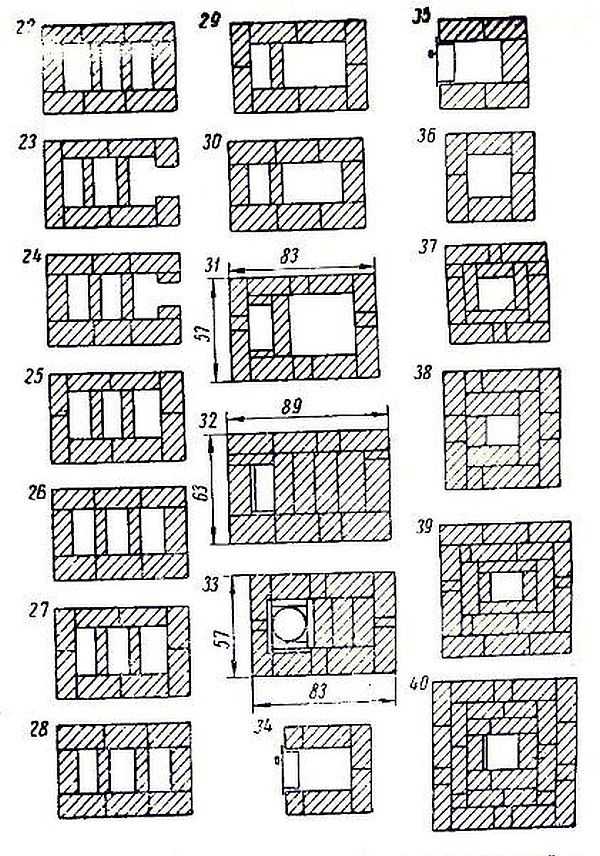
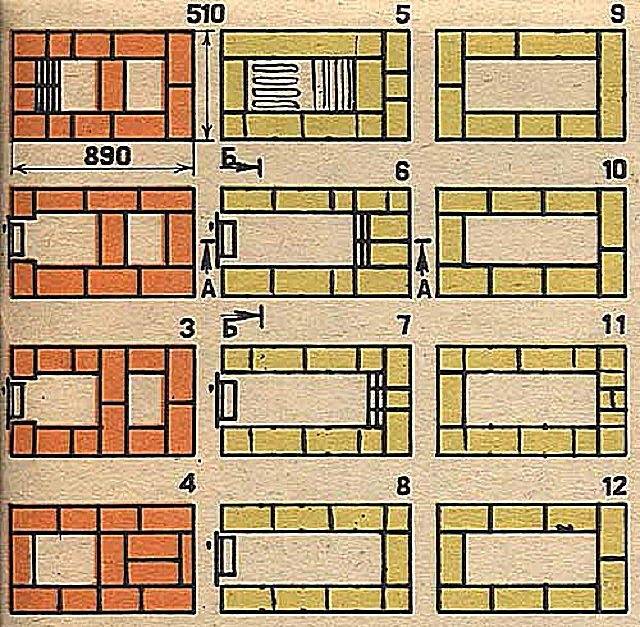
Schemes of modern furnaces distinguish them not only by purpose, but also by the features of the form. Most often, units of rectangular and square shape are installed in private houses. But if you wish, you can lay out a round oven. Select the specific option taking into account the characteristics of the room and your own preferences.
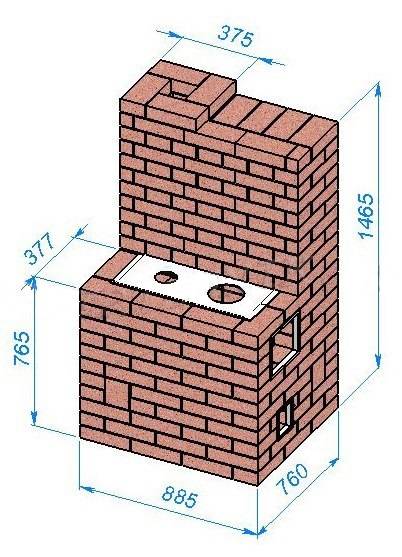
The figure shows a simple brick oven for heating and cooking.
The oven, of course, can be laid out with your own hands and numerous schemes will help you do this in the shortest possible time. However, when performing such work, remember that any furnace, regardless of its purpose, shape and other characteristics, must fully comply with current fire safety standards.
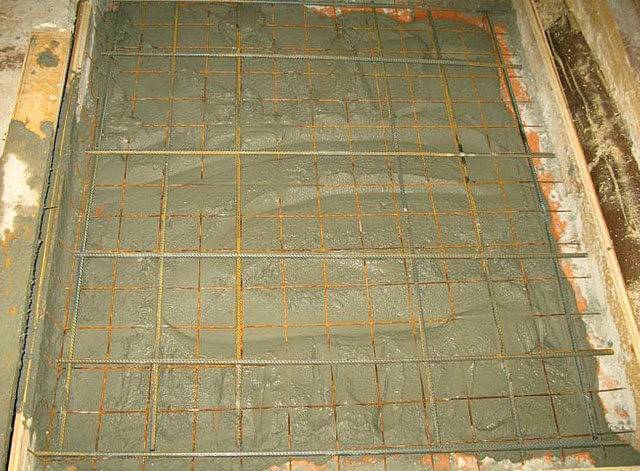
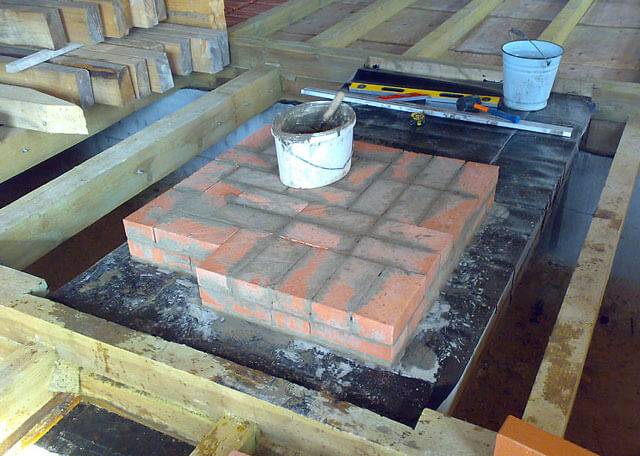
We fill the foundation of the Russian stove
Before you fold the Russian stove with a stove bench, you need to pour a foundation under it. It must be very durable and solid, because the weight of the Russian stove is quite large.
To pour the foundation for a Russian stove, they prepare a standard concrete mortar from cement, sand and gravel in a ratio of 1: 3: 4 with their own hands. The thickness of the fill must be at least the depth of freezing of the soil.
However, since in most cases a Russian stove with a stove is installed in the center of the house, the foundation is poured onto a sand and gravel cushion 15-20 cm thick to a depth of about 70 cm.
The procedure will be like this:
- We're digging a ditch.
- We pour a pillow of gravel with sand and ram it.
- We assemble the formwork, lower it to the bottom of the pit, and align its upper edges horizontally.
- Inside the formwork we place a reinforcing mesh of 8-10 mm rods.
- Pouring concrete solution.
When the pouring of the foundation is completed, care must be taken to compact the concrete and eliminate air bubbles from it. For these purposes, you can use a hydraulic press or a simple rebar, making them frequent punctures in the screed.


When pouring the foundation for a Russian stove with a stove bench in a country house, the concrete mortar should be slightly poured over the edges of the formwork. Then we take the rule and align the foundation horizontally.
When leveling is completed, a thin layer of dry cement should be poured over the wet mortar and rubbed lightly, performing ironing. It takes 28 days for the foundation to fully cure.
Before further laying the furnace itself, a layer of waterproofing is laid on the foundation, for example, 2 layers of roofing material.
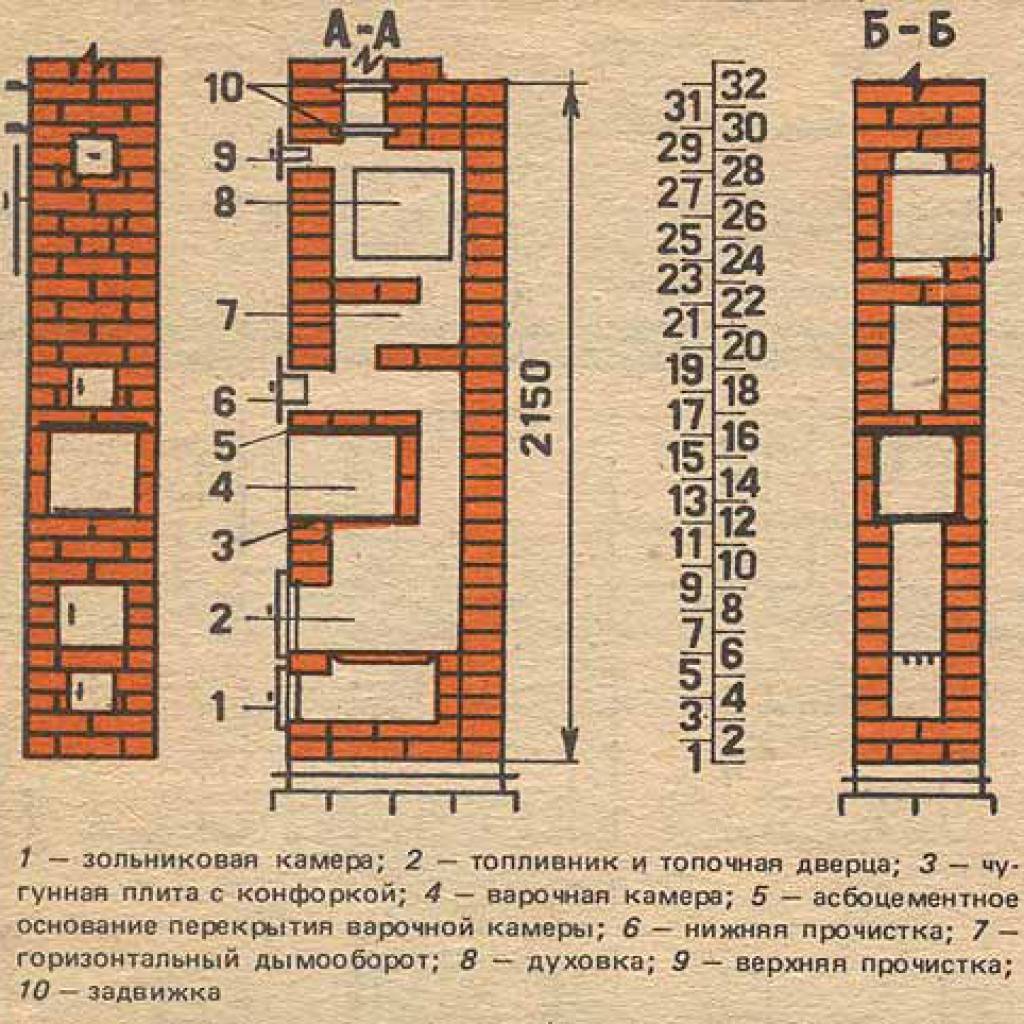
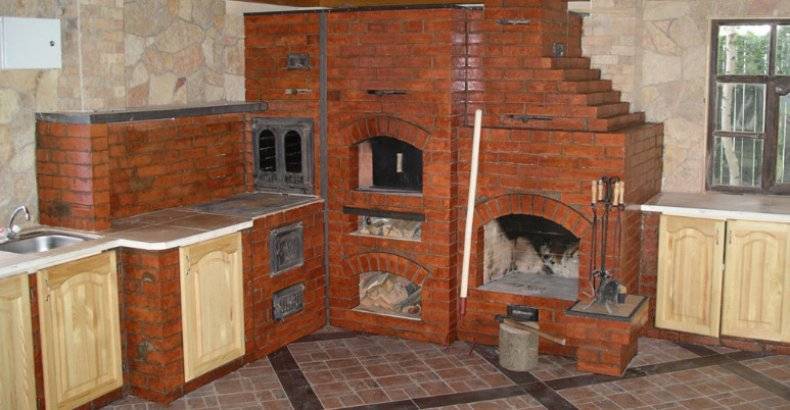
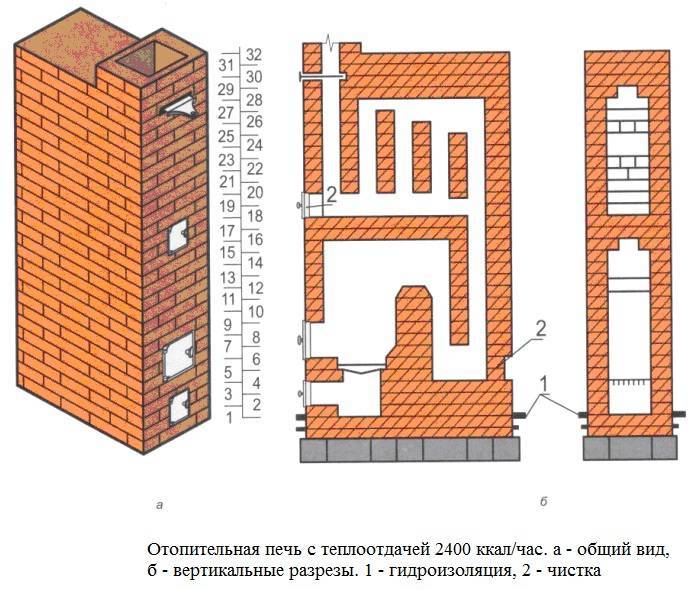
Furnace device
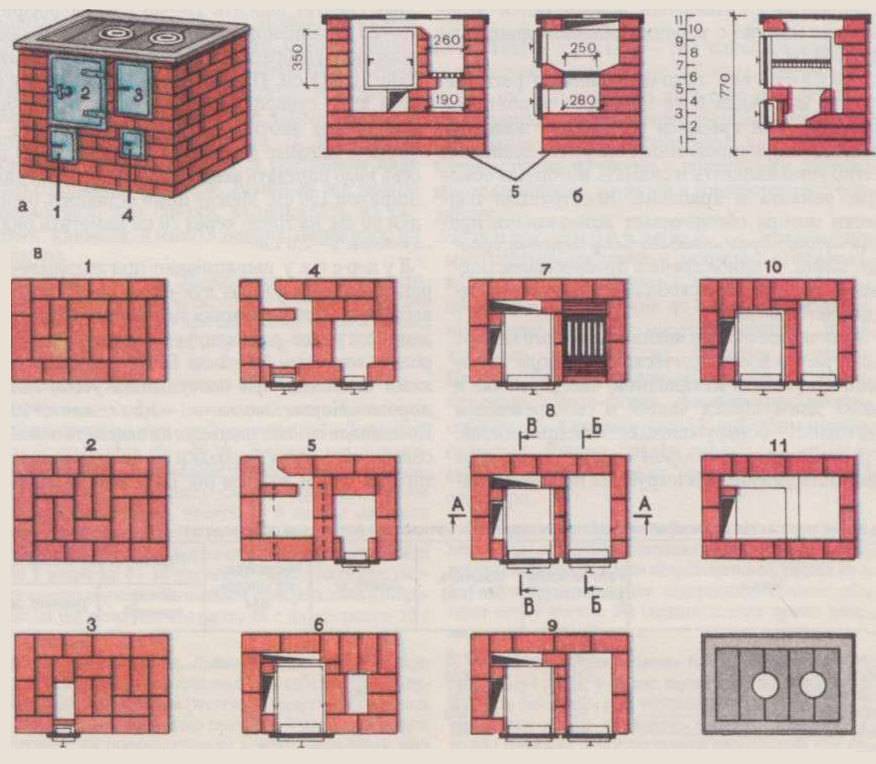
Small brick ovens are designed to heat houses with an area of \u200b\u200bno more than 50-60 square meters. m.Depending on what design of the furnace was taken as a sample, on what fuel it works, the heat transfer to the room will depend. The most common model of the stove is a brick stove (with a firebox and a cast-iron hob), located inside the house so that the front side is located in the kitchen, and the back wall of the stove complements the dividing wall between the rooms. Some ovens have an oven. Such a brick oven may well not have a hob or oven, but only serve to heat the premises. In furnaces, dampers in the chimney (views) are necessarily provided.
We recommend reading about how to install an outlet and a switch, how to remove paint from walls, whitewash from a ceiling, how to paste wallpaper, how to properly whitewash a ceiling, how to make a plasterboard partition with a doorway, and how to sheathe walls with plasterboard.
The stove can be used in different modes: summer and winter. In summer, a summer chimney damper is used (directing smoke directly into the chimney). In the warm season, the oven can be used for cooking, drying herbs and mushrooms, heating water, steaming grain or animal feed for poultry and livestock. In winter, use a winter damper in the chimney. It is slightly opened only during the kindling of the furnace, after the fire flares up hot, the damper is covered. A covered damper directs the smoke from the stove into a complex system of passages located in the rear wall.
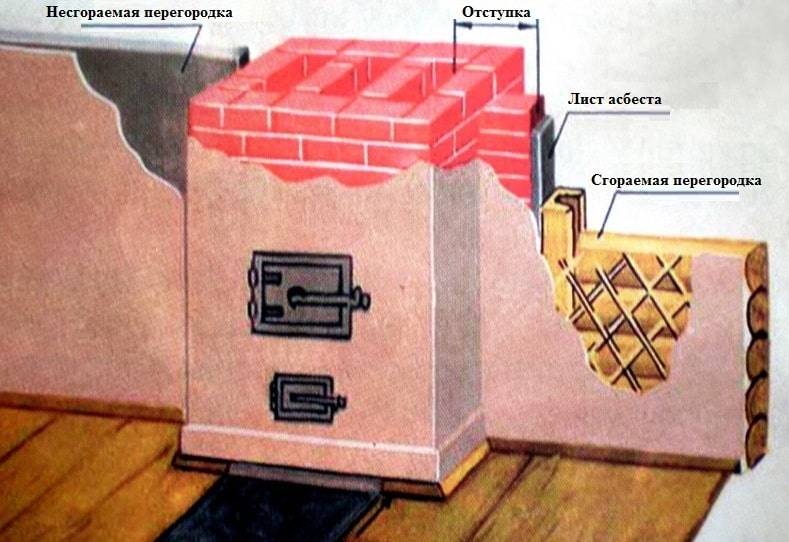
Important! The oven must always be placed on a concrete or brick foundation. This is necessary for fire safety and for support, since the structure is very heavy.
The main components of the stove:
The main components of the stove:
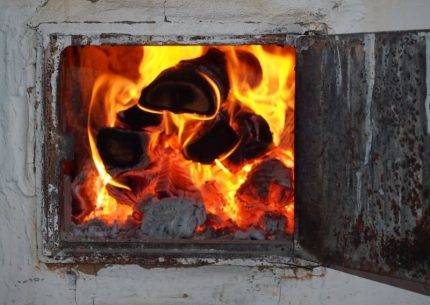
- The firebox is provided in any design and is one of the main components of the thermal unit. The firebox should be as large as possible to accommodate firewood or other fuel in order to ensure maximum performance of the structure. The size of the furnace in different designs may vary, since this parameter depends on the type of solid fuel. In wood-burning stoves, the height of the combustion chamber ranges from 40 to 100 cm. The furnace is completely laid out from heat-resistant and refractory bricks, its wall thickness must be at least a quarter of a brick, and a door made of cast iron or refractory glass is always present. The lower part of the combustion chamber is made in the form of a cast-iron grate, through which ash and fine coals fall into the ash chamber.
- An ash pan or an ash chamber is a smaller compartment than a firebox, and is also equipped with a door without fail. The ashpit is located directly under the grate-bottom of the furnace section. It is used to collect ash and to supply air flow (blowing from below) into the combustion chamber. Air blowing from below, together with the chimney, creates draft and is necessary to ignite the flame. The height of the ash chamber corresponds to the height of three bricks laid flat.
- The chimney is one of the main elements that is present in all modern stoves. Inside, the chimney resembles a closed labyrinth through which hot smoke moves. Thanks to this movement, the brick walls in which the passages are located are heated, and the air in the room is heated from the hot walls.
Did you know? In 1919, American Alice Parker invented the first central heating system.Her invention allowed homeowners to heat their homes more efficiently and subsequently led to the creation of the charcoal-fired air wall oven in 1935, equipped with an electric fan and air duct.
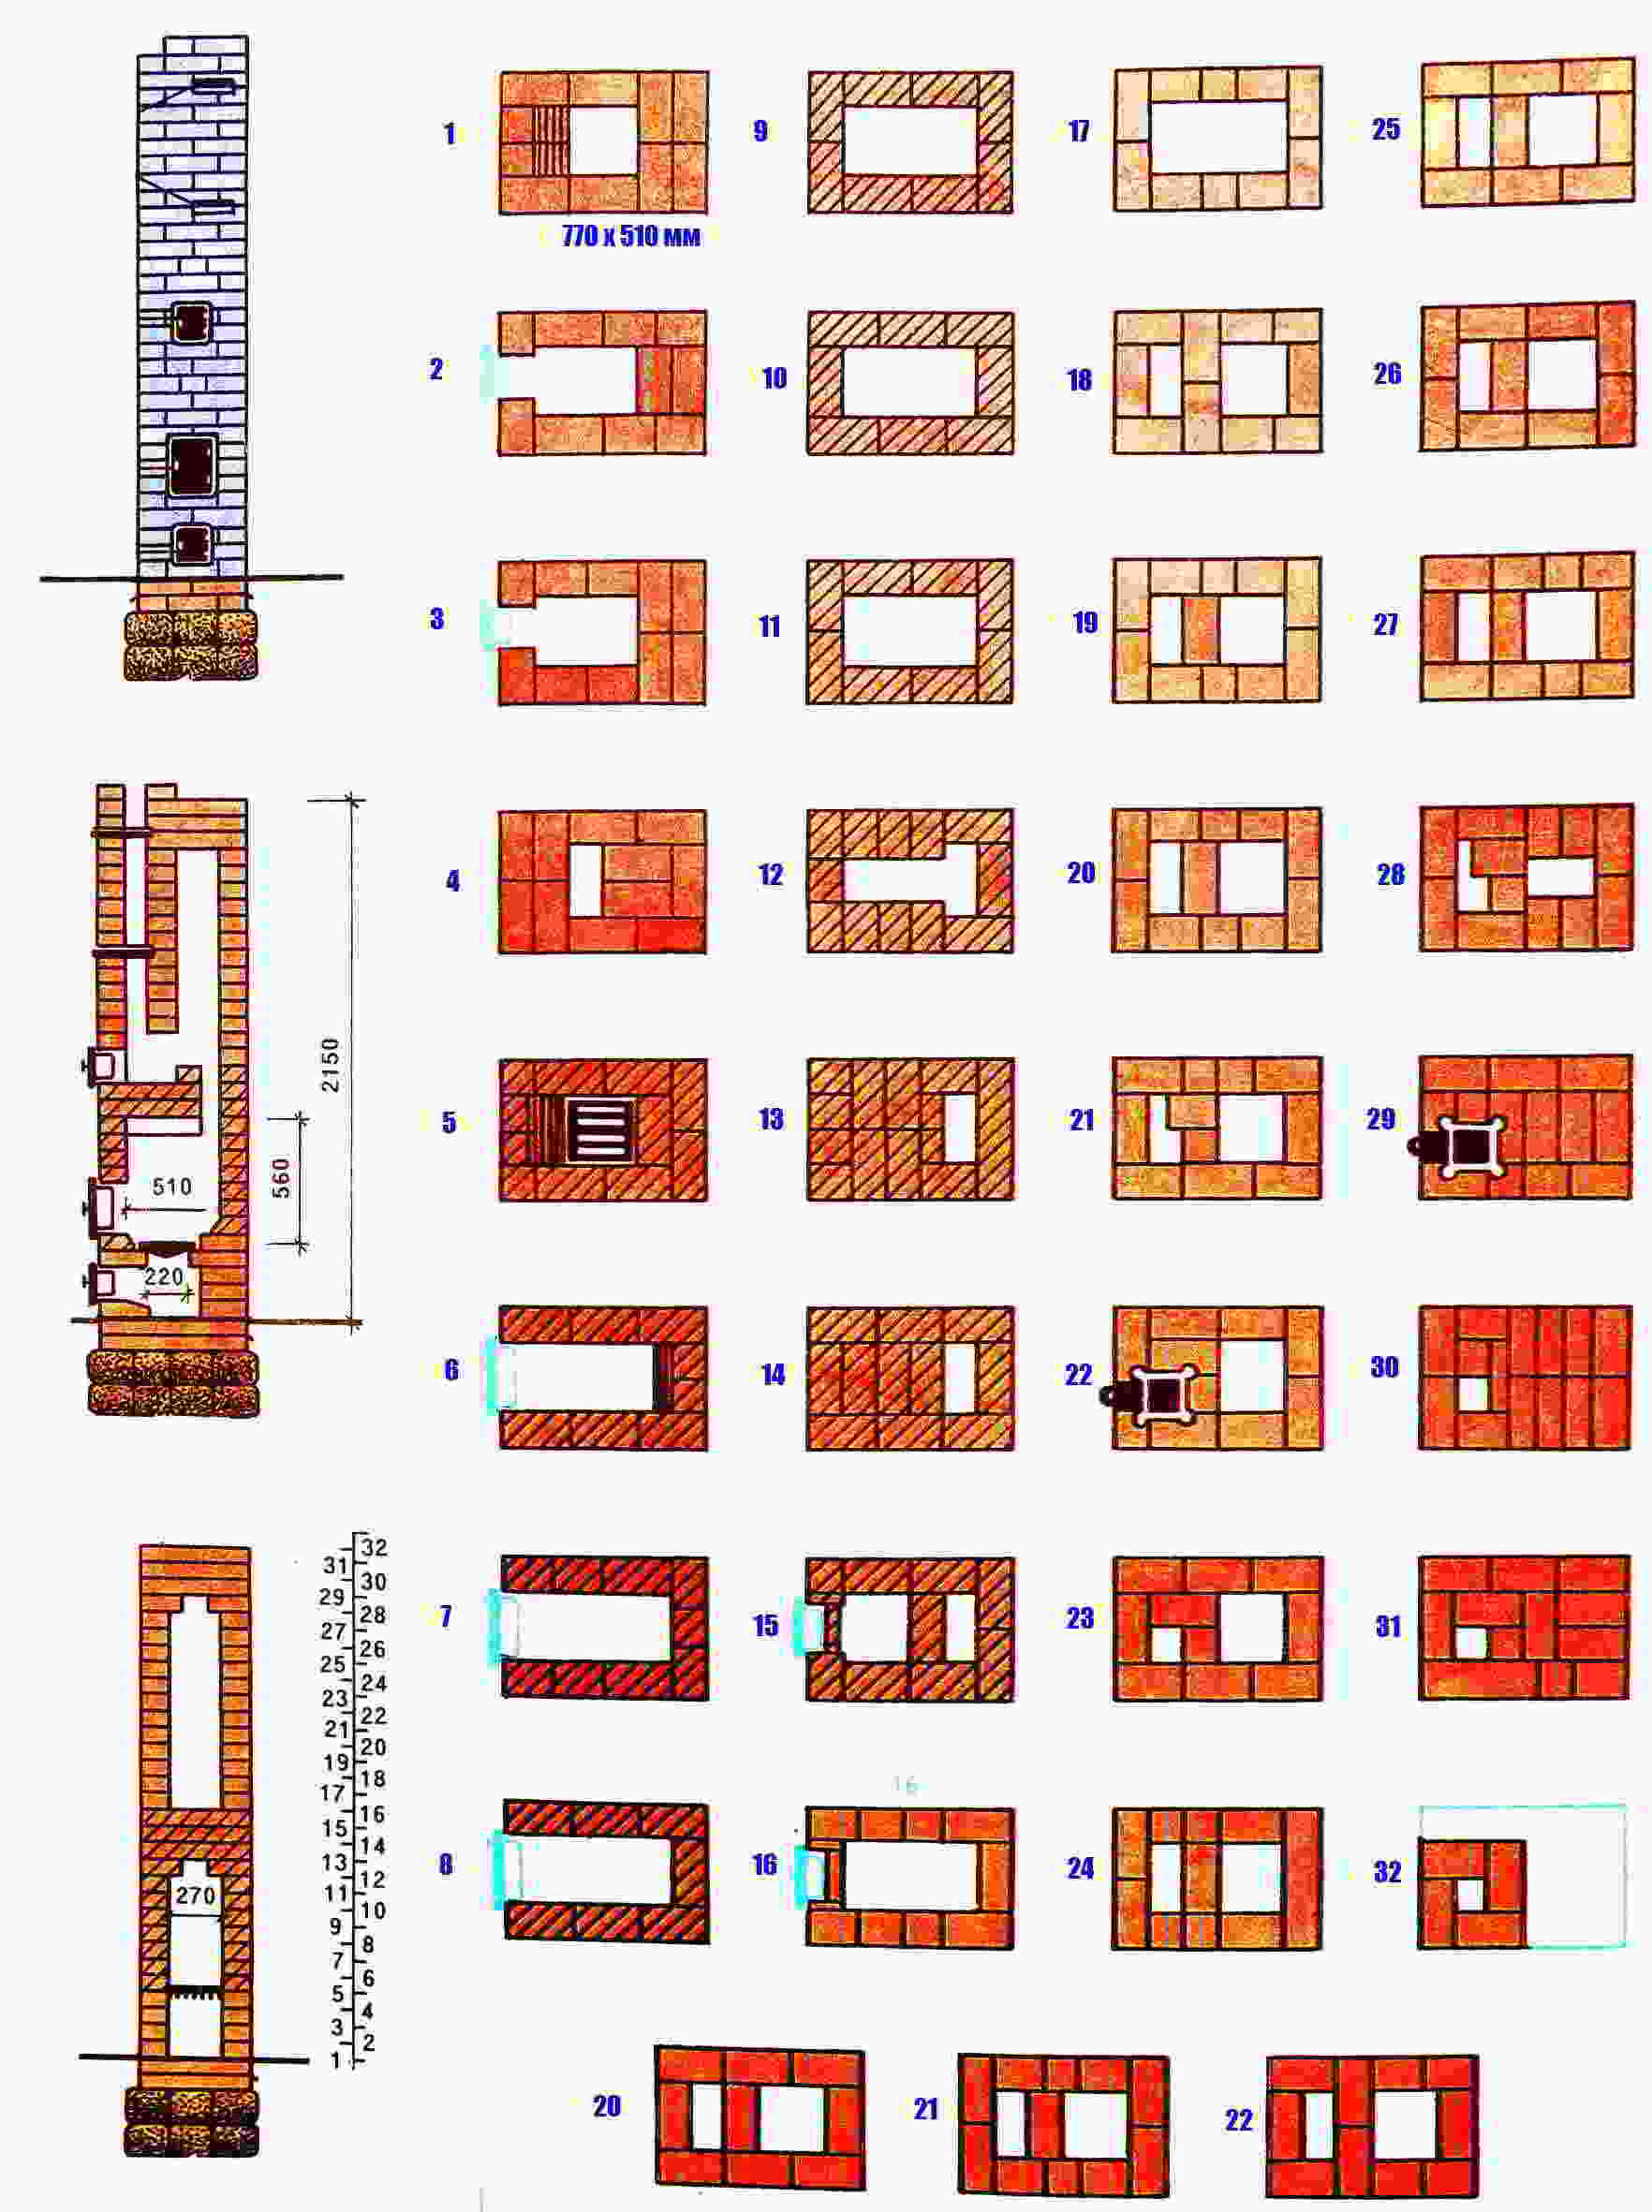
The main stages and important features of laying the furnace
From the moment the foundation is poured to the start of construction, 3-4 weeks should pass. During this time, the base will gain the necessary strength and be able to withstand the weight of a brick oven. The work in question requires maximum responsibility and concentration on the part of the performer. Any mistakes can lead to irreparable consequences, so tune in to work in advance and allocate enough time to complete it.
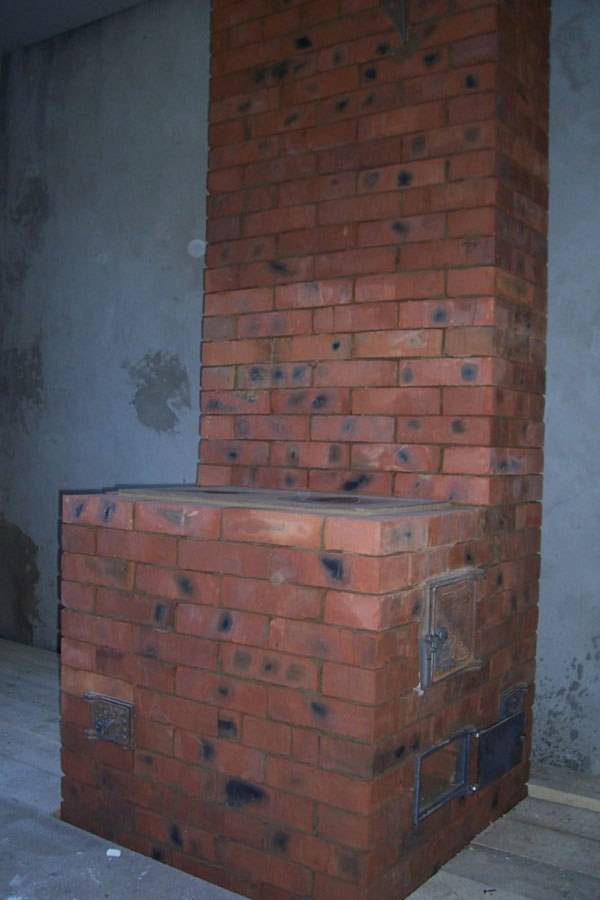
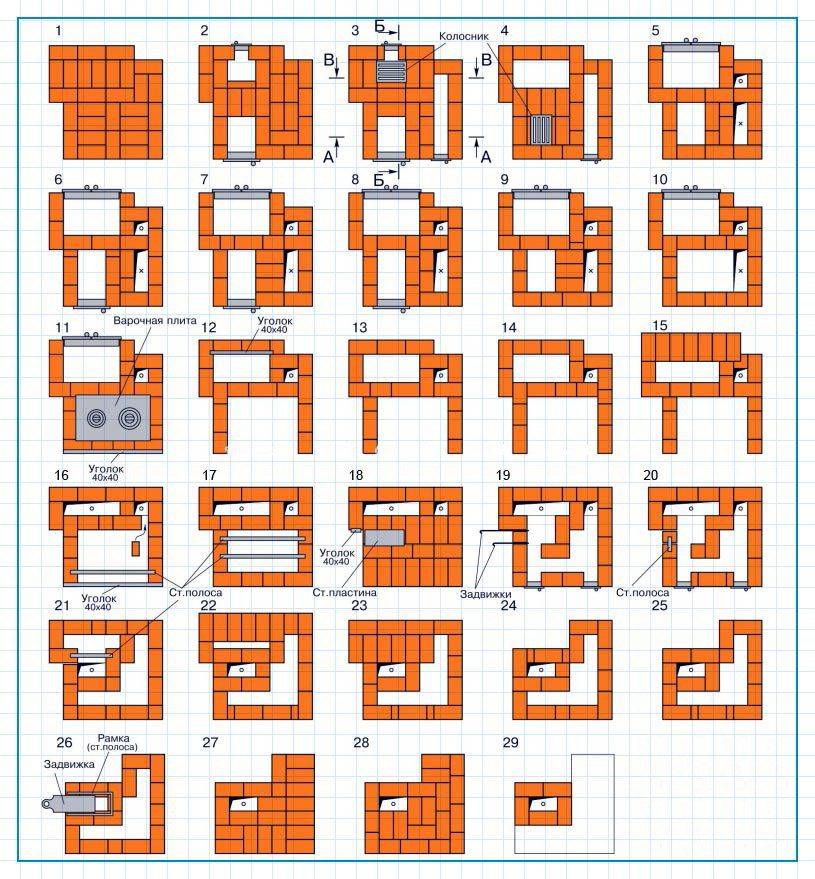
DIY brick oven
The laying of the furnace is carried out in several stages.
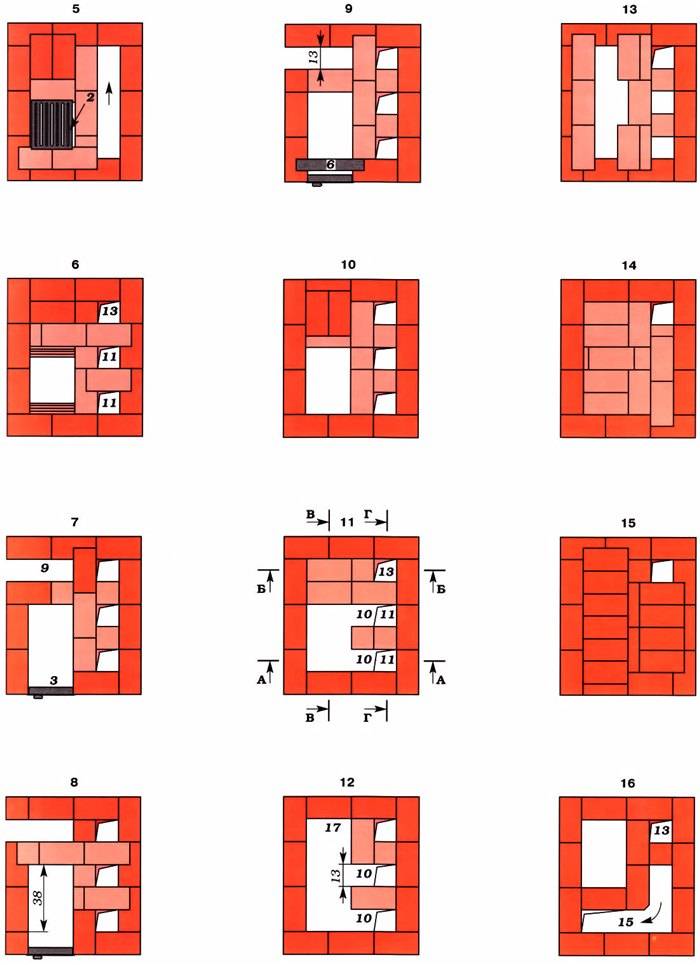
First stage. Lay out the ash pan and the lower part of the first cap from the brick. Perform masonry using the sand-clay mortar discussed earlier.
Second phase. Install the ash pan door into the masonry. Use galvanized wire to fix the door.

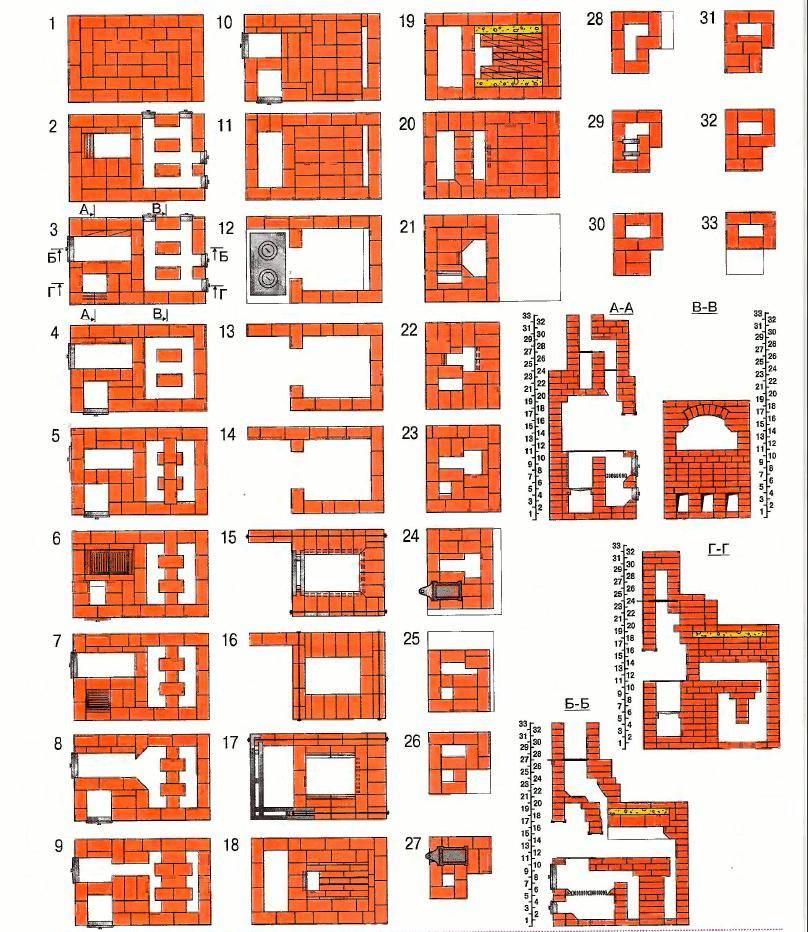


Install the ash pan door into the masonry
Third stage. Install a grate above the ash pan chamber.
Install a grate above the ash pan chamber
Fourth stage. Mount the firebox. Surround the inside of this compartment with refractory bricks. Bricks lay out "on edge". At this stage, you need to use a special masonry mortar. It is prepared in the same way as the standard one, but instead of simple clay, refractory clay is taken, i.e. fireclay. Secure the combustion chamber door with a steel plate and the wire you already know.
Fifth stage. Continue the standard laying until you reach the 12th row.Having reached this row, close the combustion chamber and evenly lay the tiles with burners. This plate must be made of cast iron. Check the evenness of the laying using the building level.
Sixth stage. Lay out the first cap. It is built in the left edge of the stove. At the same stage, a canal for the summer course is being equipped.
Seventh stage. Install the stove and lay out the walls of the cooking compartment. Keep the calculation of the lower cap mentioned earlier.
Eighth stage. Install a gate valve for the mentioned summer run channel. This valve is located in the inner corner of the brewing compartment.
Ninth stage. Lead the laying to the 20th row. Having reached this row, block cooking compartment and the first cap. Be sure to leave in the solid masonry the required number of openings for the summer run and the lifting channel, as well as the vents of the cooking compartment. Place bricks on steel corners - this way you will ensure higher strength and reliability of the stove.
Tenth stage. Close the portal of the brewing compartment with hinged fireplace doors. It is better that the doors have heat-resistant glass inserts. This solution will allow you to monitor the process of burning fuel and admire the flame.
Eleventh stage. Install cleaning doors for easy soot removal. For installation, choose a place to which it will be easiest for you to get to.
Twelfth stage. Lay out the walls of the cap almost to the top edge of the wall opening. At the top, block the stove with a couple of rows of bricks. Fill the gap between the top of the stove and the jumper with mineral wool. This will provide additional thermal insulation and slightly increase the heating efficiency.
Thirteenth stage. Lay a decorative band around the upper perimeter of the unit.
Fourteenth stage. Proceed to the device of the chimney pipe. It is better that the chimney was brick. This design will last much longer than the same metal or asbestos pipes.

Heating and cooking oven
Thus, laying the stove, although not a simple event, but it is quite possible to do it yourself. It is enough to simply understand the technology and follow the instructions in everything. Remember, the materials for work should be of the highest quality. And the schemes of furnaces tested over the years will allow you to independently build a unit that will heat your house for many years without any problems and complaints.


Successful work!
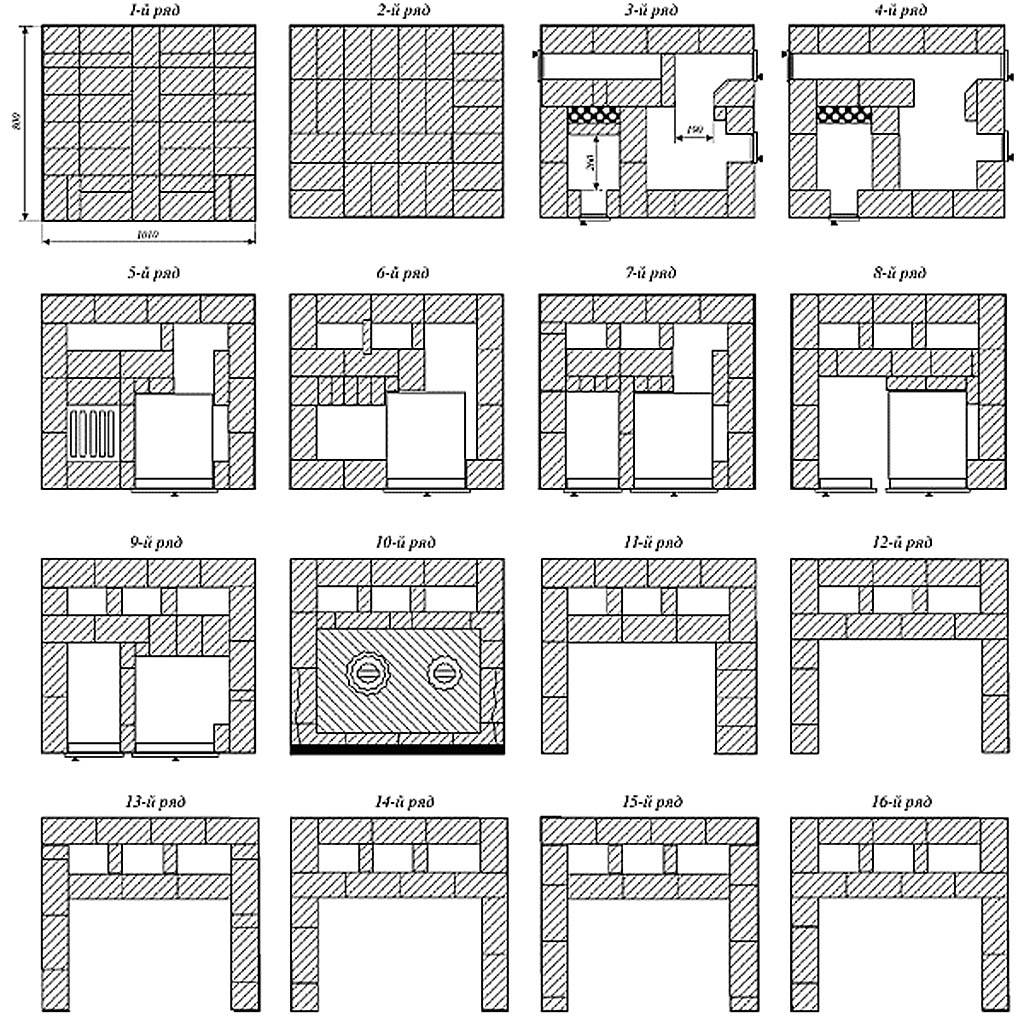
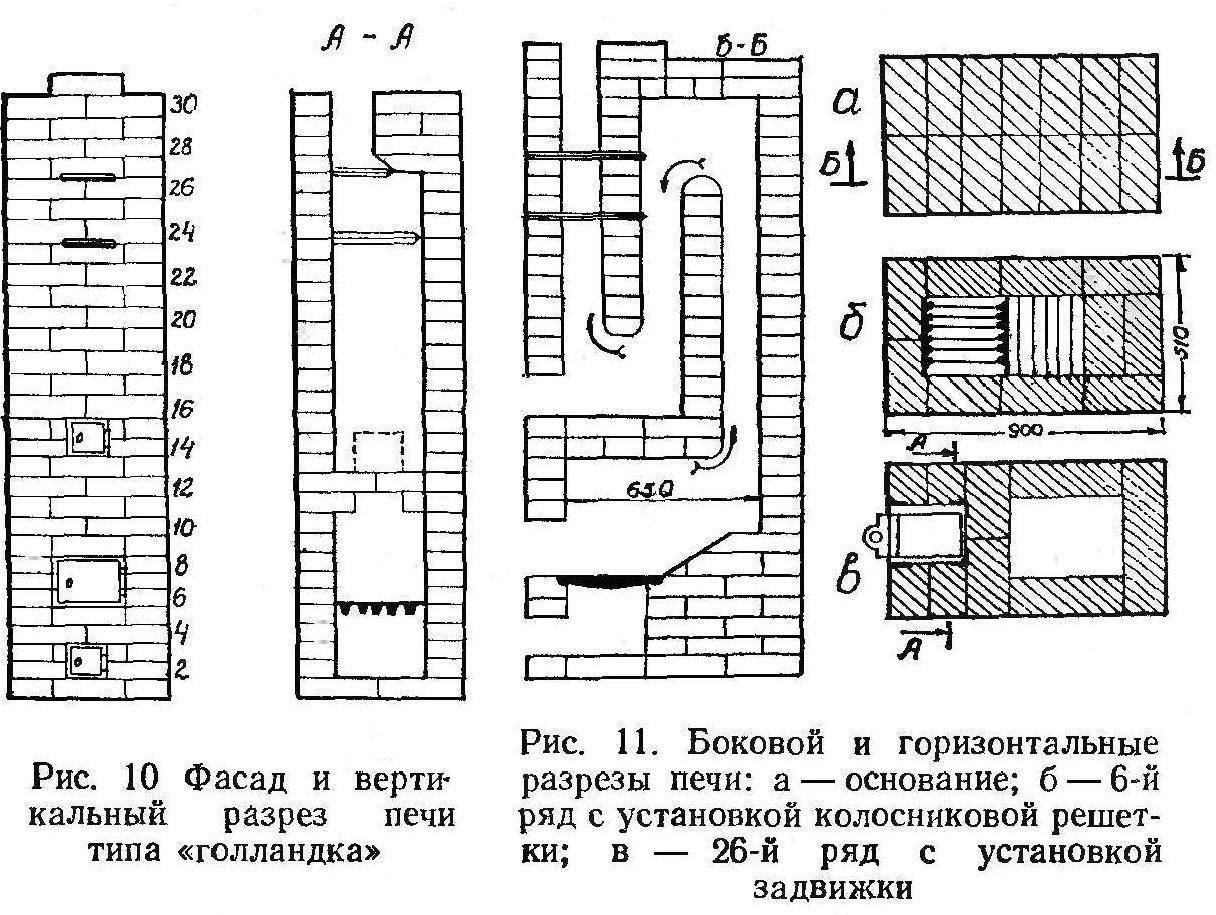
The procedure for laying a brick oven with your own hands
The next stage is the construction of the stove itself:
- In the first row, the solution is not applied. 12 pieces are laid out strictly horizontally on the sand. A blower is placed on a clay-sand mortar. The door is wrapped with asbestos cardboard, wrapped with a cord. Fastening is done with wire.
- Then lay the second row.
- In the third row, laid out of refractory bricks, strictly above the blower, a grate is placed.
- Bricks in the fourth row go on edge.
- In the chimney, a stand for the partition is provided. The back wall is laid out without the use of mortar. These bricks will then need to be removed. Then they put the furnace door, wrapping it with an asbestos cord. For fastening, a couple of bricks are temporarily used. Fasten with wire.
- The fifth row is laid out flat, like the fourth.
- Bricks of the sixth row go on edge.
- Bricks in the seventh row are laid flat again.For an inter-row bundle, you need to start with a brick, chipped off three-quarters in size. Having placed two bricks with an edge, they begin to build a back wall.
- The eighth row will close the firebox door. To direct the fire towards the center of the hob, the brick is placed at an angle. Tightness is ensured by means of a wetted asbestos cord.
- The ninth row is also laid using an asbestos cord. The peculiarity of this row is that it is slightly shifted back so that the door remains open.
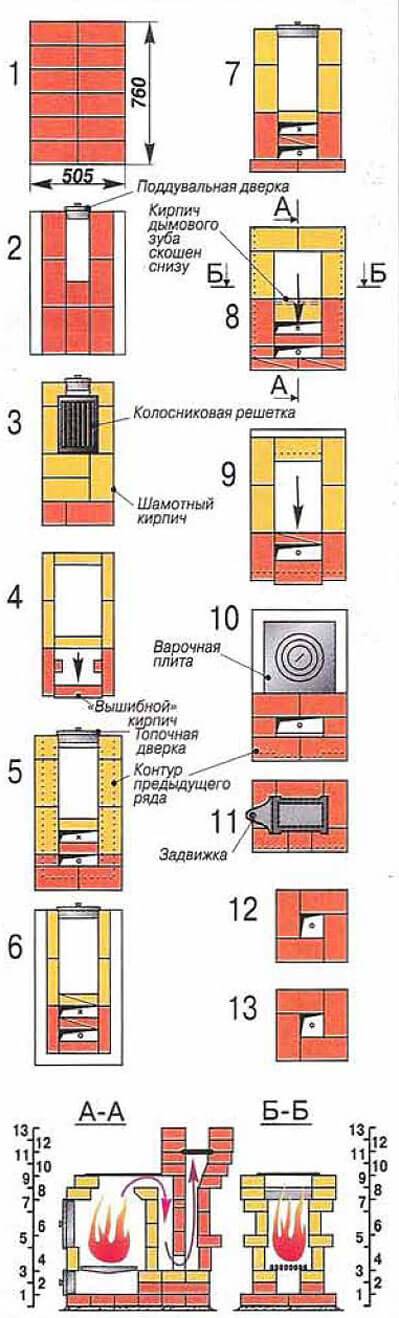
The beginning of the chimney is formed in the tenth row. There will be a place for attaching an iron pipe. In the eleventh row, a chimney valve is installed. At this stage, step-by-step instructions will come in handy - how to fold the stove with your own hands, which will help you not get confused in the details.
Basic masonry techniques
In the manufacture of heat-resistant and refractory materials for the furnace, as well as hardened bricks. It is not recommended to make the oven device yourself. It is necessary to contact specialists for high-quality and safe masonry.
Specialists carry out work in compliance with all safety standards and rules. For laying bricks, a cement mortar is used, which is diluted with sand in a ratio of 1 to 3.
For a binding material, many craftsmen use clay with sand.

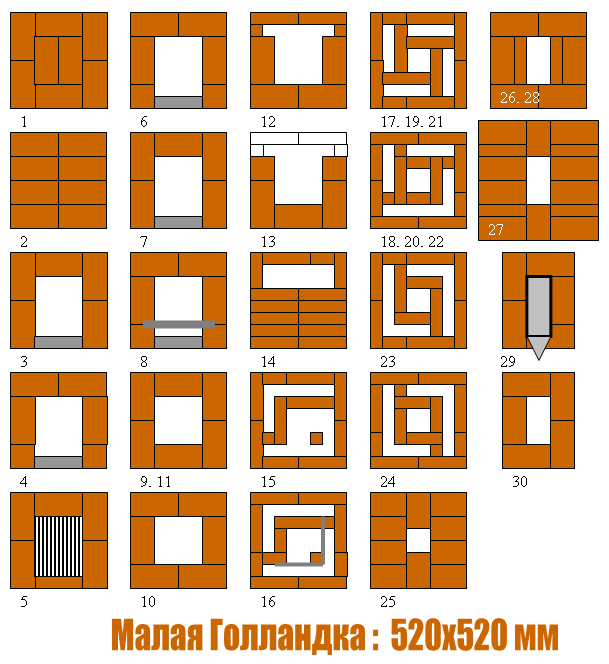
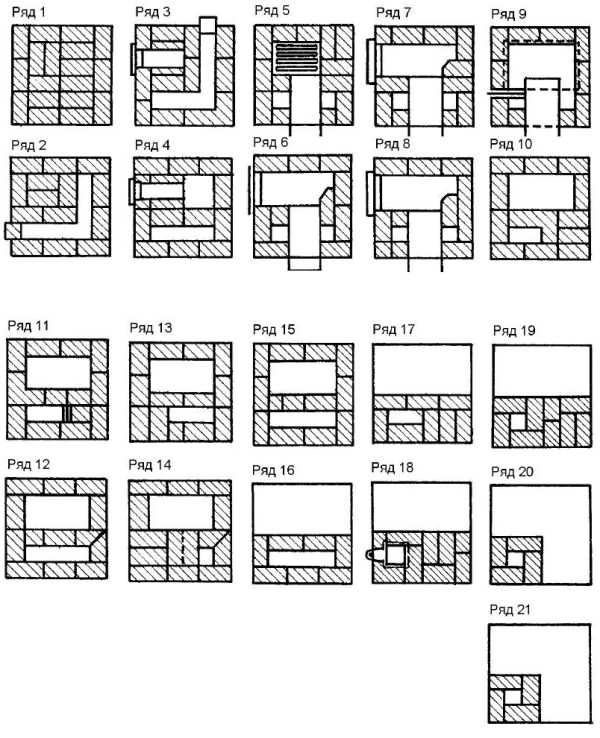
Each row of bricks is laid out in a certain way, forming a furnace of a given project.
Possible problems and solutions
Errors when laying bricks on mortar can happen even with an experienced master. Therefore, first perform a dry test laying. This will allow you to carefully study the sequence of laying out again, to make sure that there are enough prepared materials.
If, nevertheless, a mistake was made already when working with the mortar, remove all incorrectly laid bricks, clean them thoroughly and only then lay them again. Clay mortar cannot be reused.
Failure to tie the brick leads to cracks in the structure. Proper masonry - each brick rests on the two lower ones, the vertical seams in the rows do not match. A small error is permissible only when laying out the internal elements of the furnace.
Proper application of the mortar - a thin layer on the entire surface of the brick bed without empty spaces. The brick is placed in the chosen place, moves a little and presses tightly. The next brick is laid according to a similar principle, but the solution is applied to the bed and to the poke.
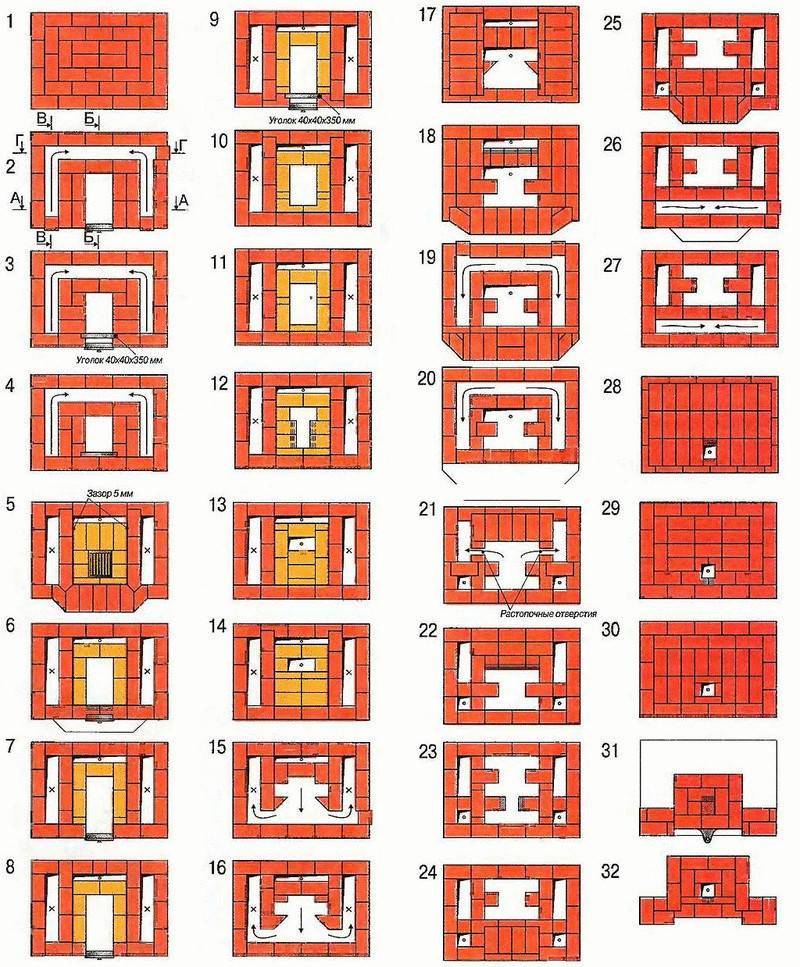
The best stoves for a Russian wood-fired bath
There are several methods known on how to build a stationary hearth for a bath out of bricks. They differ in the ways in which combustion products are removed from the furnace.
Black oven
The oldest design places minimum demands on the quality of materials. The stove does not have a chimney. The products of combustion go directly into the room, filling it with thick smoke and soot. From the bath, the smoke comes out through the top slot above the door. Despite all the shortcomings, the design has a plus: the highest heat transfer. In addition, the smoke disinfects the room and drives out insect parasites.
"In gray"
The gray oven appeared as a development of the black one. A hole is made in the roof above the hearth and a wooden pipe is led into it. According to the same principle, smoke comes out in mobile yurts of nomads.
Nowadays, the “gray” method is practically not used, except when there is not enough experience for high-quality masonry or you want to save on materials.
The principle is simple: first, they wait for the complete combustion of firewood, close the smoke hole and then use the bath for its intended purpose.
"White" oven
This is a standard design with the output of combustion products through a heat-resistant brick chimney. This oven differs from the previous options:
- good traction;
- lack of flue gas indoors;
- protection from flying sparks.
The best stoves for a Russian wood-fired bath are just that.
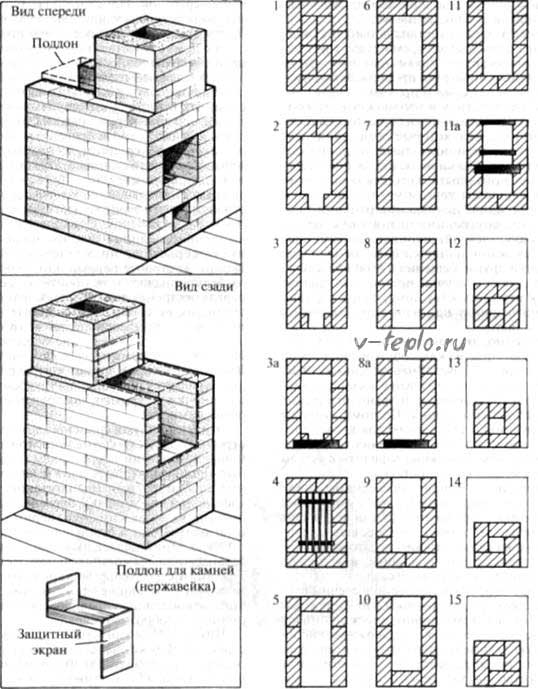


How to build with your own hands
To arrange a brick oven with a heater in the bath, choose a place in the steam room, taking into account the size. The most common options are 3.5x4 bricks (89x102 cm in plan) or 4x5 bricks (102x129 cm). Be sure to provide a fire-prevention indent from the wall of the furnace to the combustible structures of the bath at least 40 cm. The furnace door is usually released into the dressing room.
Construction cost
The need for bricks for a hearth with a heater:
- In a steam room up to 4 m2 - 650 pcs.
- A steam room with a dressing room with an area of 5 m2 - 850 pcs.
- Room up to 6 m2 - 1100 pcs.
With an average price per unit in the range of 22-25 rubles, the price of masonry material will be 16-28 thousand rubles. Fireclay bricks for the firebox (30 pcs.) - 2 thousand rubles. A set of furnace casting - 25 thousand rubles. Total purchase costs 43-55 thousand rubles.
Recommendations for stove-makers for operation
The efficiency of fuel combustion and the general condition of the stove depend on compliance with the rules of operation, which should be followed not from time to time, but regularly.
Brick, like mortar, refers to "living" materials that can deform over time due to temperature changes.Therefore, it will be necessary not only to clean, but also to cover up cracks so that condensation does not form and the heat capacity of the structure does not fall.
This happens very simply, here is an example: over time, a gap of only 2 mm wide formed around the valve. It turns out that in an hour it passes as much as 15 m³ of air heated to a temperature of 90-100 ° C, that is, about 10% of all heat coming from the furnace.
 Heat loss increases up to 40% if you just open the door, and by 20-25% if you supply air through the blower
Furnaces are repaired and cleaned once a year, before the heating season. But chimneys need to be cleaned much more often - about 2-3 times per season. Before starting the firebox, the ash is removed from the grate to provide free air access for efficient combustion.
Fuel is prepared in advance, as the logs must dry. To do this, they are stacked in woodpile under a canopy and left for at least a year. Raw firewood is not recommended, as evaporating moisture settles on the walls and mixes with soot.
It is better if the firewood is the same length and thickness no more than 10 cm
So they burn out equally quickly and evenly, which is important for heating bricks. Usually the burning process takes from 1.5 to 2 hours.
Usually the burning process takes from 1.5 to 2 hours.
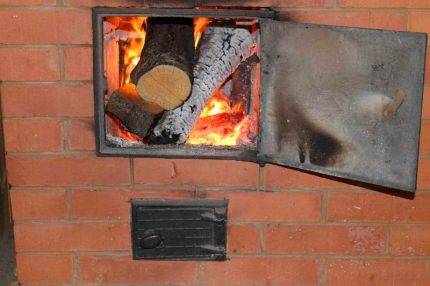
Firewood is placed in the combustion chamber in rows or a cage, with a small distance between the logs.
It is important that they burn out at the same time, as the heat will be greater.
It is not recommended to heat the stove for increased heating for a long time. So you can provoke the appearance of cracks, as a result of which you will need first a cosmetic, and then a major overhaul - laying again.
 For kindling, quickly flammable materials are usually used: wood chips, paper, shavings. Before kindling, open all dampers, a view, a door
As soon as the firewood ignites, the firebox is closed and the blower is opened. Thrust is regulated by the position of the valve or view.


A few more helpful tips:
- Bright red flames and black smoke indicate a lack of air - the flow must be increased.
- White flame and hum in the pipe - excess air, it is better to cover the blower a little.
- It is possible to move the logs only after they have thoroughly burned out and form wastelands that allow air to pass through.
- The firebrands are pushed into the center of hot coals so that they burn out faster.
- As soon as the coals cease to burn with a blue flame, they are distributed over the hearth, moving closer to the mouth.
- For insurance against carbon monoxide, the pipe is not closed for another 10 minutes to prevent carbon monoxide from entering the room.
If the stove is heated with coal, then it is recommended to melt it with firewood.
When finishing the outer walls, remember that a beautiful cladding can partially reduce the flow of heat into the room.
Stage 2. Choosing a suitable place
Immediately make a reservation that the outdoor stove should be located in the most convenient place. Ideally, its location should be determined at the initial stage of building a house. But if the house is already built, then the choice of location will depend on specific conditions.
In this case, you must adhere to a number of mandatory requirements:
- the structure should be placed near the recreation area, terrace or veranda (otherwise, you will have to build a canopy and put a few benches);
- there must be lighting;
- with regards to the dimensions, we cannot advise anything specific, since they depend only on your personal preferences and needs;
- between the gazebo and the stove (if the distance is large enough) you need to lay a path;
- the structure should be located on the leeward side so that smoke does not enter the house;
- it is better not to build it next to plants and bushes, because they can suffer from high temperatures;
- the space around the stove must be laid with stone or tile;
- and most importantly - there should not be any flammable materials nearby!

Conclusions and useful video on the topic
The order of construction of a structure with a stove bench and a firebox:
Overview of a furnace built using traditional technologies:
Overview of the Kuznetsov stove with a stove bench:
The presence of a stove bench near a Russian stove does not indicate the complexity of its design, so you can build a useful and even fashionable structure on your own. However, do not forget to carefully study the topic, delve into the nuances of masonry and enlist the support of a specialist - an experienced master stove-setter.
Do you want to talk about how they built a Russian stove in their country house or in the country? Do you know the technological subtleties that will be useful to site visitors? Please write comments in the block below, ask questions, publish photos on the topic of the article.


