- SMALL FURNACE with dimensions of 2x3 bricks 510x760mm
- Advantages of a brick oven
- Commissioning
- How to put the heater into operation
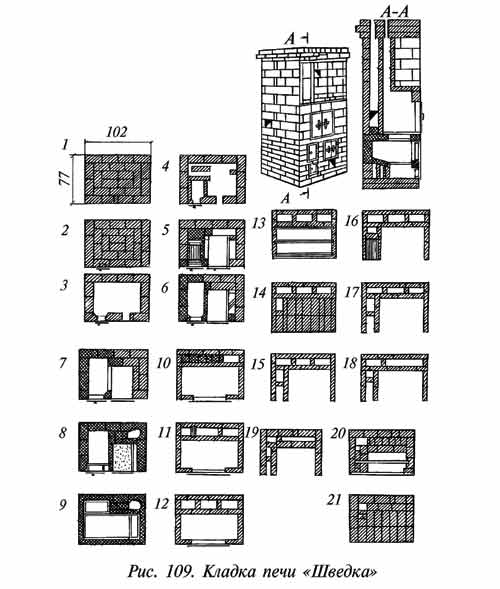
- Do-it-yourself stove laying - Swede ordering
- Work Instructions
- Furnace Features
- How is the Swedish oven different from other variations?
- The process of building a Swedish
- Swede oven orders
- What should be
- Requirements
- materials
- Masonry furnace ordering
- Water circuit equipment
- Video: do-it-yourself Swedish oven
- The principle of operation of the furnace
- General recommendations for the choice of building materials
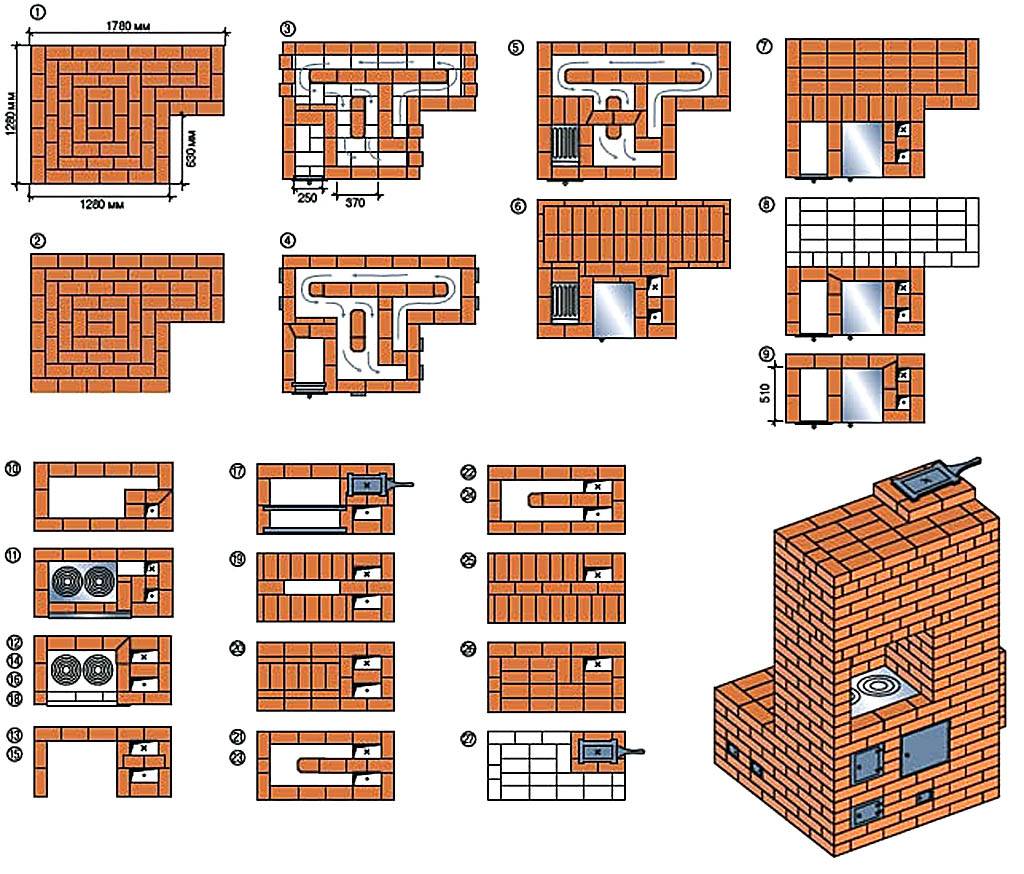
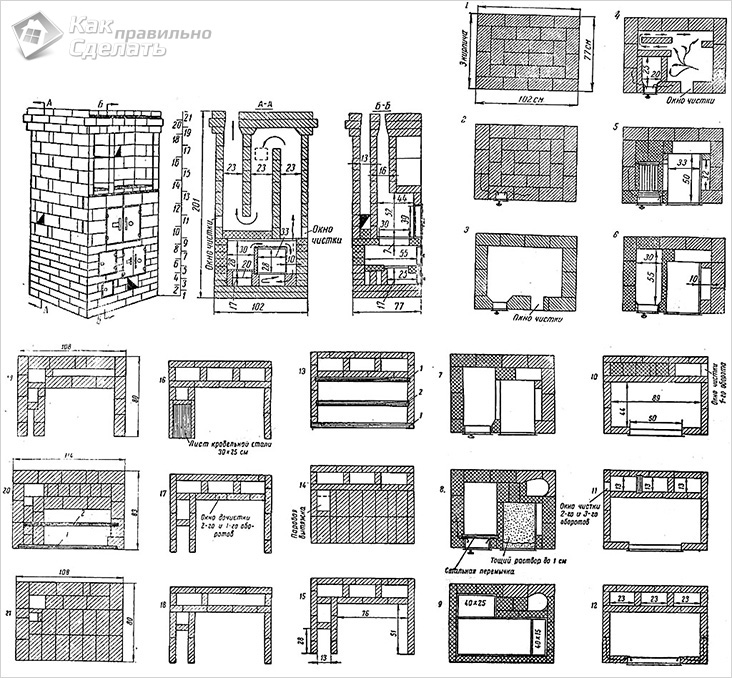
- The project of the heating and cooking stove-Swedish
- ordering
- Foundation arrangement
- Construction work practices
- guardianship
- Arches and vaults
- Material consumption
- Possible difficulties
- Finally. About order and principles
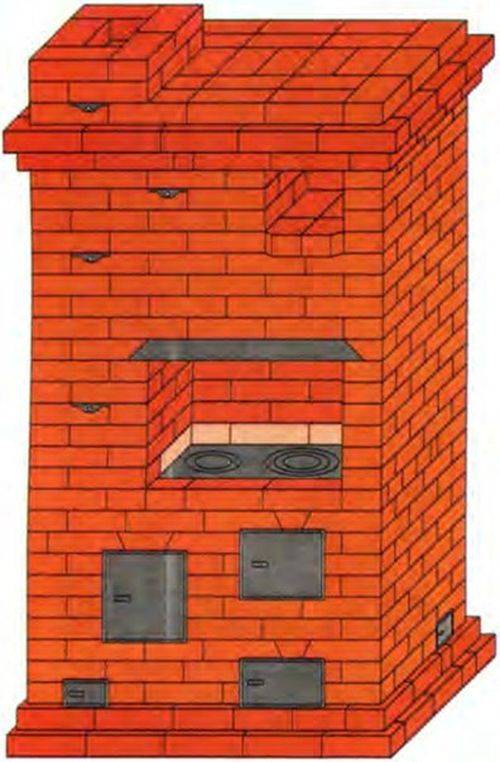
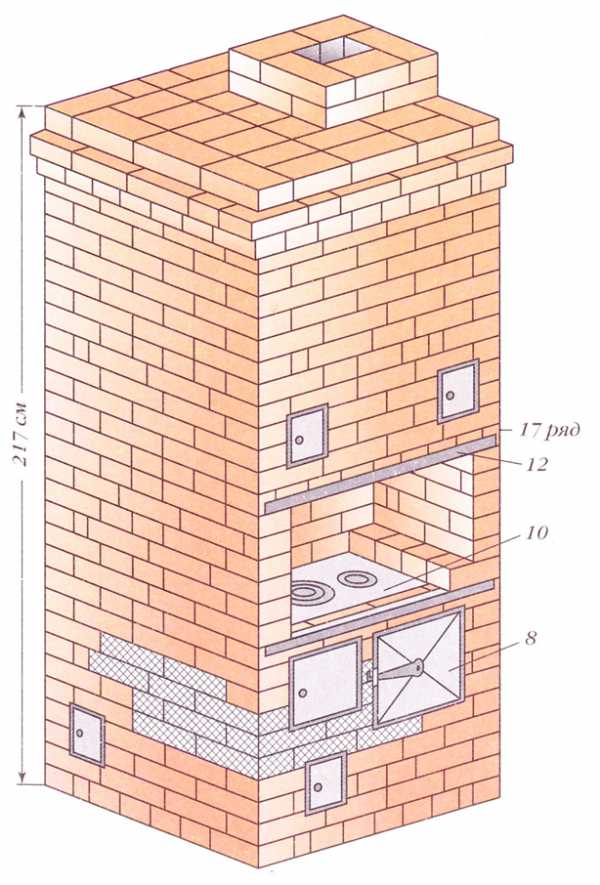
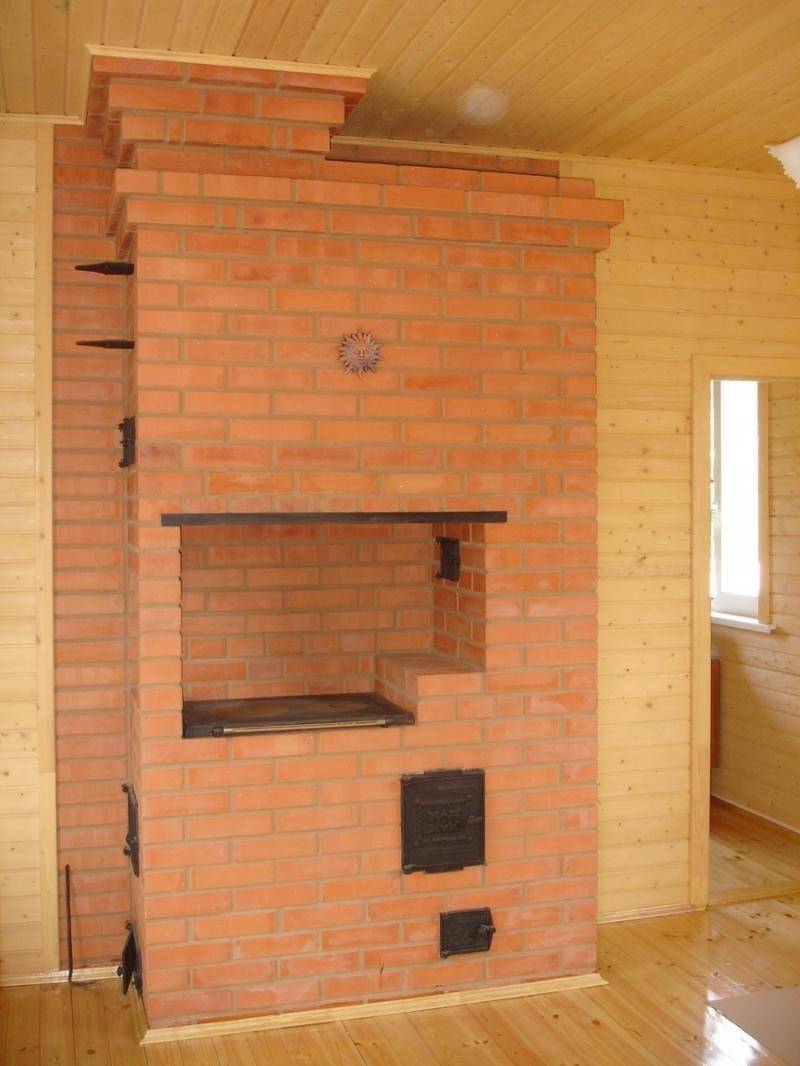
SMALL FURNACE with dimensions of 2x3 bricks 510x760mm
HOME IDEAS > FURNACE, FIREPLACE, GRILL PROJECTS
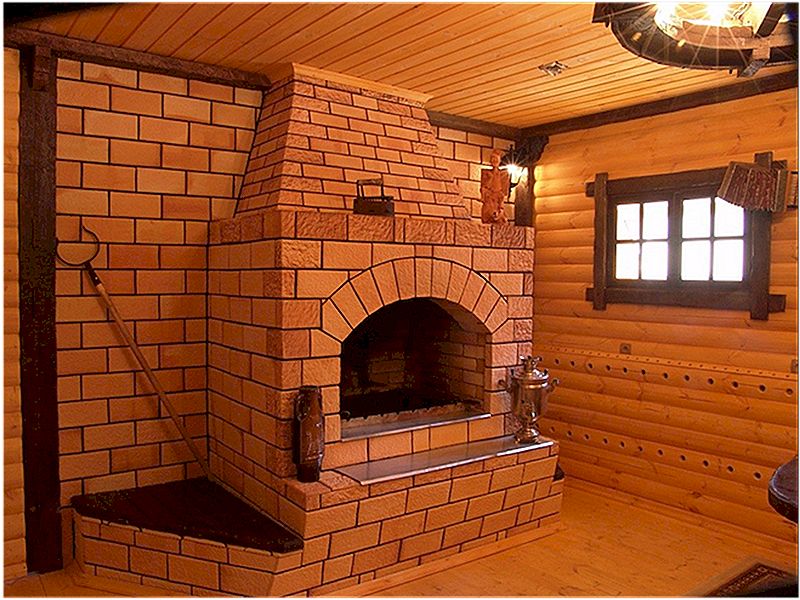
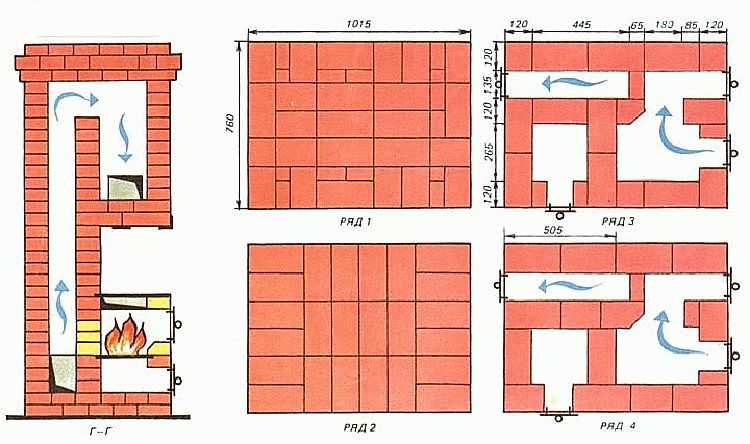
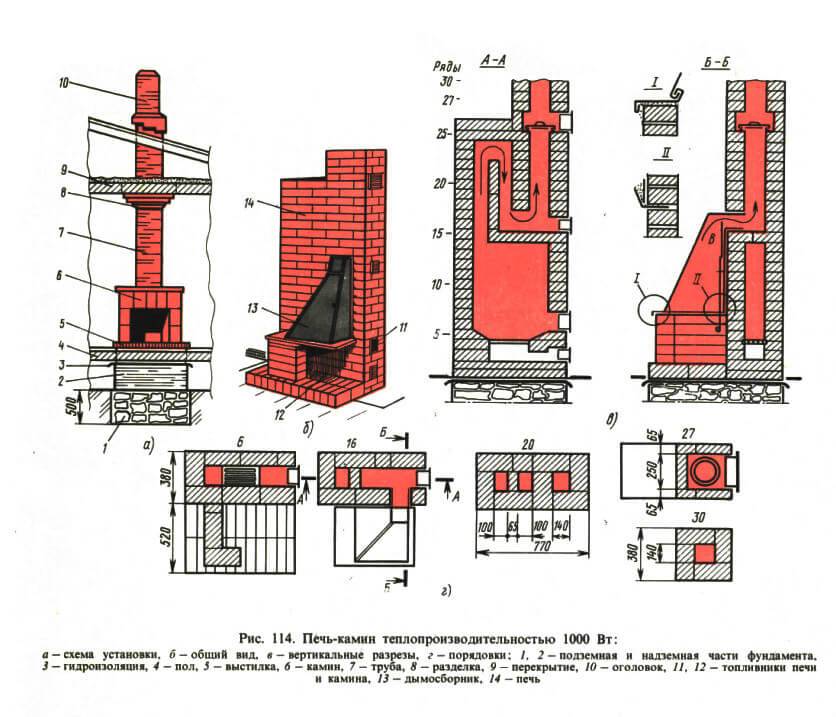
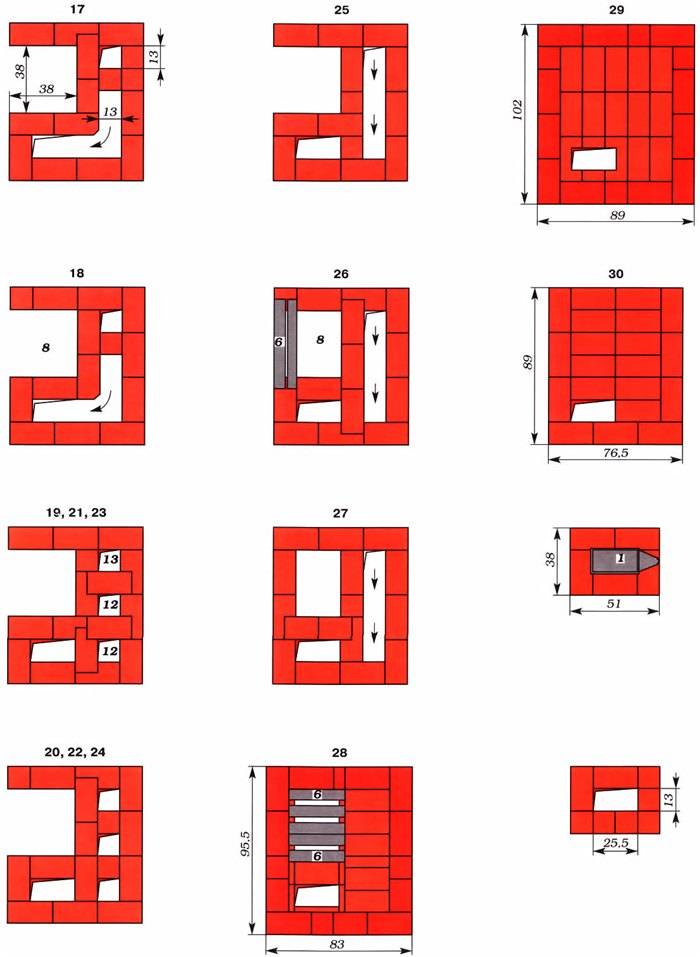
Project of a small-sized heating furnace 2x3, very simple in design. Its size is 2 by 3 bricks (510x760 mm) at the base. Despite the apparent simplicity of the design, it has pretty good technical characteristics. With its, in general, small size, the stove allows you to heat a room up to 25m2. The design of the furnace is very convenient for placing it in the wall between two rooms.At the same time, it can easily cope with the total area of these premises up to 35m2. The above characteristics are valid for a one-time furnace fire in the spring-autumn period, when the average daily air temperature is positive. With significant cold snaps, as well as in winter, it is necessary to produce two fireboxes per day. Another feature of the stove is that it can use any type of fuel, from ordinary firewood to coal and anthracite. If ordinary firewood is used as fuel, only ordinary brick can be used to build a stove. However, the quality of the brick from which the furnace firebox and the vault of the firebox will be laid out must be high. The oven is very simple in design. The furnace does not have a traditional system of heating channels. The role of the channels is performed by a thermal cap.
MENU
×
-
PROJECTS: FIREPLACES, STOVES, GRILLS, BBQ
-
Brick oven for a bath
-
A simple sauna stove
-
Kamenka stove with water boiler
-
Do-it-yourself barbecue in the gazebo
-
Barbecue complex for summer cottage part 1
-
Barbecue complex for summer cottage part 2
-
Barbecue complex for summer cottage part 3
-
We make a barbecue with a stove
-
How to calculate the heat loss of a room
-
How to calculate the heat output of a furnace
-
Chimney schemes
-
Mini fireplace for a country house
-
Corner fireplace "Annushka"
-
double bell oven
-
Double bell oven with oven
-
Heating and cooking oven 2.5 x 6 bricks
-
Heating and cooking oven 1020 x 770
-
Heating and cooking oven for 65 70 m2
-
Furnace with water heating boiler
-
Oven with drying chamber
-
Heating and cooking stove "Swede"
-
Oven "Swede" on 2 floors
-
Stove "Swede" with a stove bench
-
Furnace "Swede" with three firing modes
-
Stove "Swede" with a fireplace
-
Baby oven options 1 and 2
-
Baby oven option 3
-
Small-sized heating stove 2x3
-
Heating stove 1880x640 “Ya.G. Porfiriev"
-
-
Heating stove 51x89 cm “V. Bykov"
-
Heating stove 51 x 140 cm “B. Bykov"
-
heat capacity oven
-
Compact stove with fireplace
-
Small oven with fireplace
-
Stove with a fireplace "E. Doktorova"
-
Furnace fireplace for giving
-
Homemade long-burning stove


LIKE THE OVEN PROJECT?YOU CAN BUY ITS DRAWING IN WORD and PDF FORMAT FOR ONLY 75 RUBLES!OR ALL 35 PROJECTS OF STOVES, FIREPLACES, GRILLS AND BBQ, DRAWINGS + REGULAR LAYOUT FOR ONLY 490 RUBLES!
BUY A FULL SET - 490 RUBLES (click - buy, then place an order)
BUY THIS PROJECT FOR 75 RUBLES (click - buy, then place an order)
Do you have any questions? Ask them boldly, we will solve!
Advantages of a brick oven
Why does the brick oven remain competitive, more and more are being built, so many advantages?
It would seem that today there are many alternatives for heating, which are much more convenient to use, and according to manufacturers, have a greater efficiency (coefficient of performance). But why are bricks still in demand in some areas or buildings. One of the reasons is that the brick stove “breathes”.
This means that when the furnace is heated, moisture is released from the base of the structure. As it cools, the moisture reabsorbs. Due to this, it maintains a normal dew point in the room. It is this indicator that indicates that "a cozy atmosphere is maintained in the house."
The ability of a brick oven to "breathe" not only has a positive effect on human health, but also allows you to feel comfort even at a non-domestic level.During the heat engineering calculation of the house, the temperature indicators during the heating season are set within 18-20 Celsius. At the same time, air humidity should be optimal for health. The furnace for the house provides optimum humidity of air, at a temperature of warming up about 16 degrees Celsius. At this temperature, a person does not feel discomfort, clothes, bedding remain dry. At the same time, in panel houses, when using centralized water heating, even at a temperature of 18 degrees Celsius, excessive air humidity can be felt.
For water heating, the optimal temperature range will be 20-23 Celsius. And for electric heating with infrared emitters, the temperature should be even higher (since they dry the air a lot). It turns out that a brick oven with an efficiency of about 50% will be more profitable, in terms of economy, than modern systems, with indicators of 60-80%. Thus, the savings will be more significant, because the heat loss of the house depends on the difference in temperatures inside and outside the room.
Commissioning
In no case should you immediately start heating the Swedish oven. She will not forgive a raw brick!
Mandatory condition: 2 weeks of normal drying (no additional tricks, just let it stand). Then 2 weeks of "hot" drying.
You need the following:
- Or guess what, so that the end of construction work falls on a period of good, dry weather.
- Or two weeks to "heat" the room with electric heaters (if it's cold).
- Then the stove is heated with small portions of firewood so that it only warms up slightly. It would be nice to be continuous, but if it doesn’t work out, just regularly (within 2 weeks).
- During such ducts, crumpled paper (newsprint or wrapping) is applied through the cleaning doors. When the paper stops dampening, you can stop heating.
For the “hot” drying period, birch and pine firewood cannot be used (they produce a lot of heat and soot). It is better to use aspen poles or anthracite.
At the very end, you need to heat the stove for three days in the mornings and evenings, increasing the intensity of the heat (loading a little firewood at first, then adding it and bringing it to the maximum). The oven is now ready for daily use.
So. Swede is suitable for a small residential lady. If the room is heated irregularly or the house is multi-room, a Dutch woman is more suitable. For regular heating, we can say that the Swede is perfect!
How to put the heater into operation
Having built a stove, in no case should you rush to try its heating abilities at full strength. It must be handled carefully and carefully, because with intensive heating, the walls located closer to the hearth will dry out much faster than distant surfaces. The difference in thermal expansion of wet and dry materials is quite significant, so there is a risk of cracks appearing at the joint boundaries. To avoid trouble, all oven openings are opened and dried under natural conditions for two weeks.
To speed up the process of removing moisture or when drying a structure under adverse weather conditions, a fan heater or a powerful electric lamp can be placed in the crucible and firebox. In this case, the oven doors are closed, and the channels are left open.


The hearth is kindled only after the walls have completely dried.
The kiln is fired only after the pre-drying period has ended.To do this, during the first two days, no more than 3-4 kg of firewood are laid in the unit, adding 1 kg of fuel every day for a decade. The readiness of the furnace for full operation is judged by the absence of condensate on the internal surfaces of metal parts. The heater is tested several times at half power, after which the operation of the unit is checked at maximum mode. During the "break-in" be sure to inspect the surface of the walls for the appearance of cracks and their possible increase. The flaws that have appeared are closed only after the furnace has been heated several times at full strength.
Do-it-yourself stove laying - Swede ordering
Traditionally, a Swede oven with her own hands is assembled from ceramic red brick, and the material that was in use is categorically not suitable here. But the fireclay brick is suitable for the firebox.
In addition, even before starting work, you will have to prepare such basic elements of the furnace as:
- blew,
- oven,
- furnace design,
- grates and gate valves,
- cleaning doors,
- as well as steel strip.
Moreover, the amount of materials necessary for work for each specific case will be determined by the dimensions and the option of ordering the furnace.
 Swede stove masonry In any case, the foundation should be slightly larger than the dimensions of the future furnace. For it, concrete is used, which is poured in layers between broken bricks and rubble. After pouring the last layer, a waterproofing layer is necessarily laid. Only after that it is possible to start laying the ordering bricks, see the drawings and diagrams.
Work Instructions
Within the framework of this publication, we will not teach you the stove business - the masonry technology is set out in the corresponding instructions - how to build a fireplace for heating a house with wood. Here we offer general recommendations for the construction of the furnace - "Swedes":
- The rubble or reinforced concrete foundation of the structure is placed on a stable soil horizon. Remove the top soil layer and dig a pit of the required depth, the size is 10 cm wider than the dimensions of the stove. In subsiding soils, lay a pile-screw or pile-grillage foundation.
- A mortar mixture of fine sand (particles 1 ... 1.5 mm) with clay of medium fat content is used for laying the furnace. For beginners, it is better to buy ready-made mortar in bags.
- Soak the red brick for a day, and make the solution thick so that it does not spread upon contact with the building material.
- The fireclay brick is not soaked, but only rinsed from dust immediately before being placed in a row.
- Refractory stones are placed on a solution of chamotte + refractory clay in a ratio of 1: 1, the optimal solution is to purchase a ready-made mixture of the Superfireplace Refractory type. Ceramic masonry is not tied up with fireclay, a gap of 5-6 mm wide is made between them, laid with basalt cardboard.
- Foundations and pipes are built on the usual cement-sand mortar, clay is not suitable.
To build a stove, prepare the tools shown in the photo. The concrete base must harden within 28 days after pouring, then it is covered with roofing felt waterproofing (2 layers) and basalt cardboard.
Furnace Features
The Swede is characterized by a very high efficiency, especially for its modest size.The power of one standard furnace of this type is enough to heat a room up to 25-30 m2.
Do-it-yourself Swede oven ordering
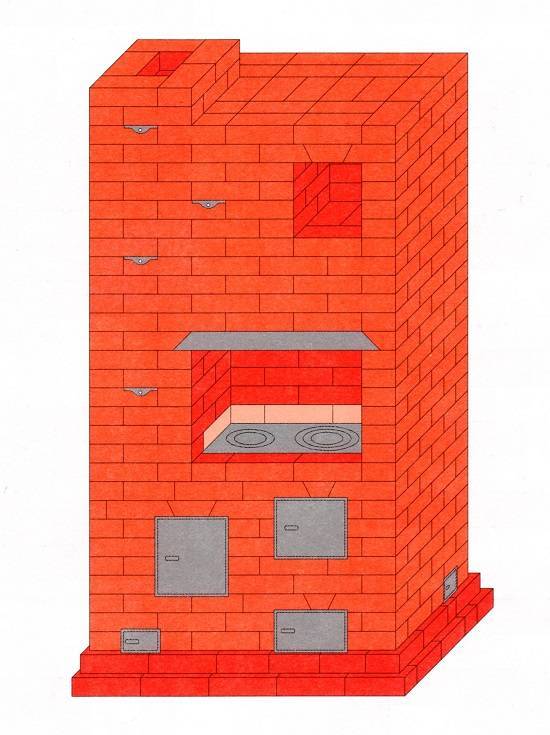
At its core, the Swede stove is an ordinary heating and cooking stove, additionally equipped with a three- or five-channel shield. If desired, the design of the Swede can be supplemented with a stove bench or a convenient dryer.
At its core, the Swede stove is an ordinary heating and cooking stove.
Among the main advantages of the Swede, it should be noted the simplicity of her self-laying - you just need to prepare the required materials, sort out the order and do everything according to the instructions.
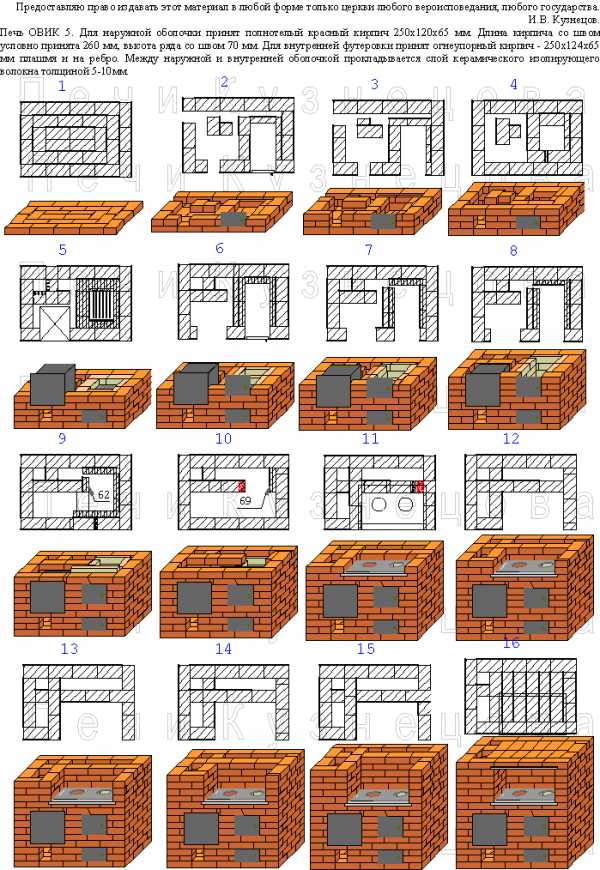
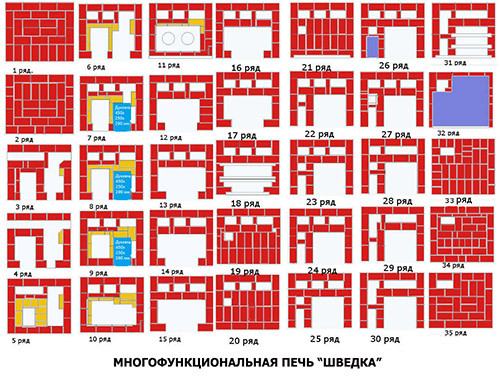
The ordering of the furnace should be understood as a drawing indicating the order of laying out each row of the structure.
A simplified version of the Swedish stove masonry
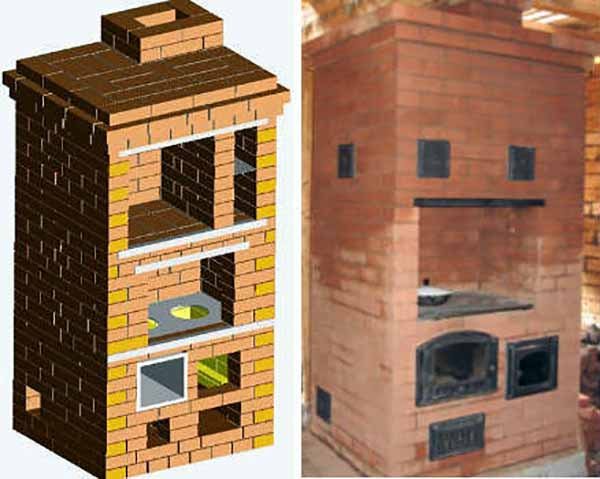
How is the Swedish oven different from other variations?
Compared to the common Russian stove, the brick Swede has a minimum size: without additional outbuildings, it occupies 1 m² of usable area, the height reaches 2 m. sunbed. With a smaller mass of a relatively common Russian counterpart, the Swede shows the same high heat transfer.
If you introduce additional valves, you can set up "winter" and "summer" heating modes. The unit heats up within 15 minutes, unlike other stoves, you can use coal, pallets, firewood, peat with equal success. Even in harsh climatic conditions, a two-time firebox is enough to maintain an optimal daily microclimate.
The heat exchanger, assembled from vertically or horizontally directed channels, does not require time-consuming maintenance. If you follow the elementary rules, you can avoid the formation of traffic jams from combustion products. But it must be remembered that high performance indicators will be achieved only if selected materials are used: for example, high-quality ceramic and fireclay bricks will be needed for masonry.
The only vulnerability of the model may be the firebox door. This part operates under conditions of maximum thermal loads, made of stamped sheet, it will quickly fail. Cast iron specimens are optimal, equipped with a "mustache" or mounts in the form of paws.
The process of building a Swedish
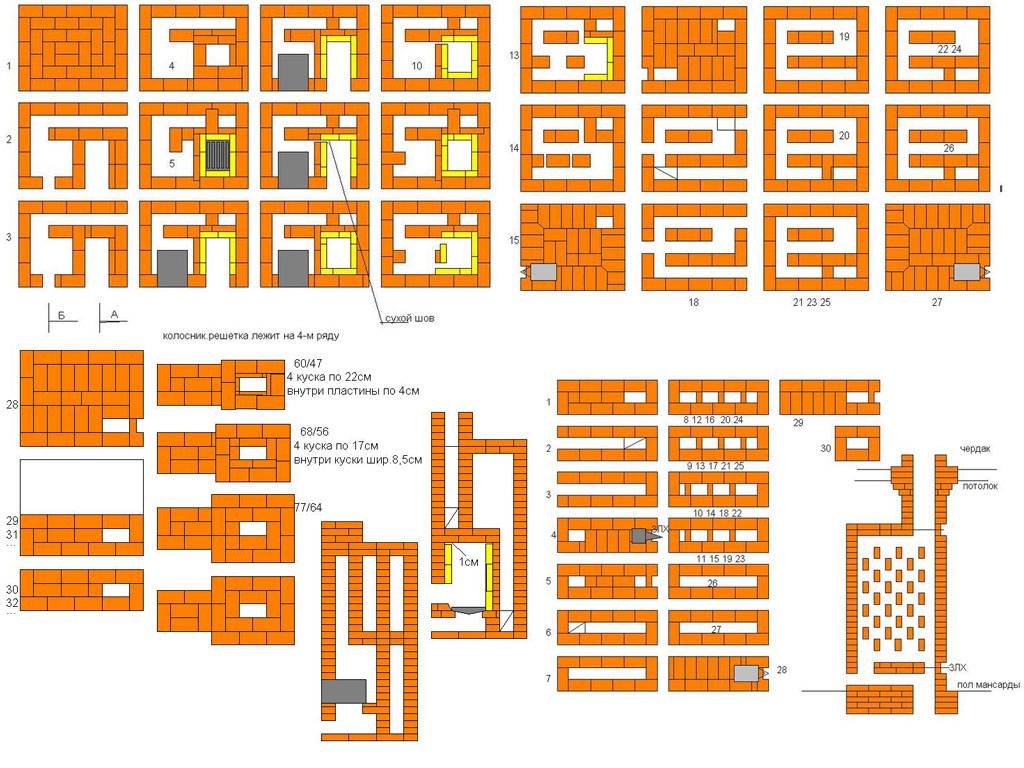
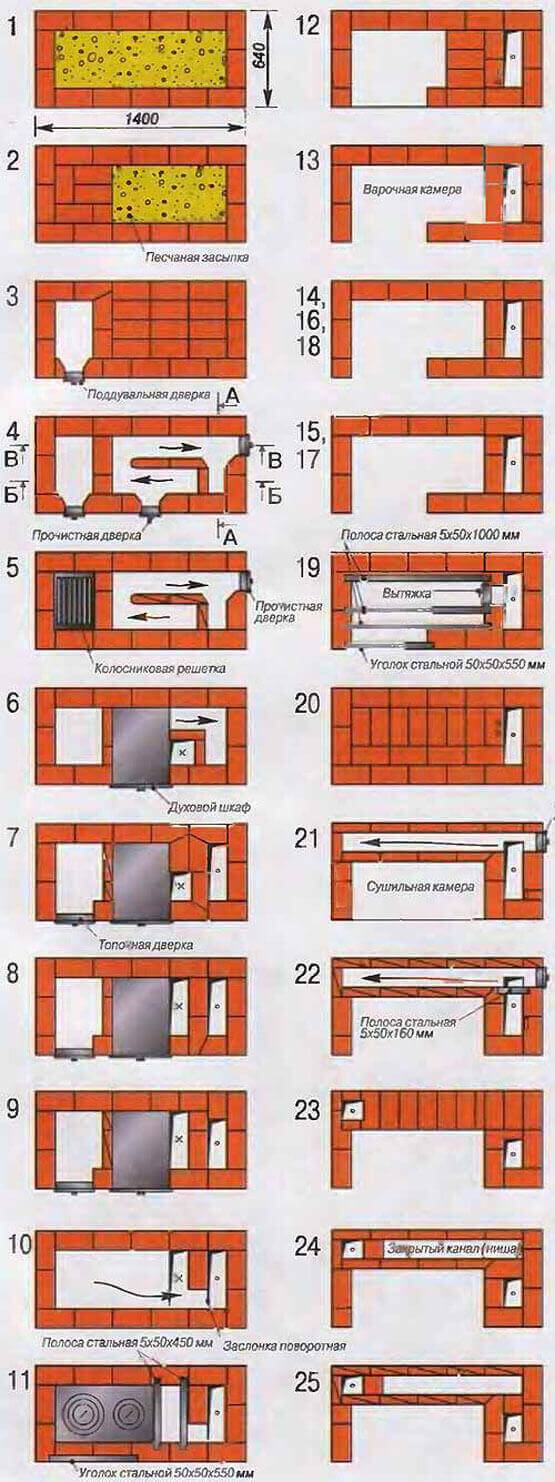
The process of building a Swede stove. For the construction of the furnace, calculations are taken: for the stove - 71 by 41 centimeters; for the firebox (height, width, depth) 30 by 35 and 45 centimeters; for the oven 30 by 35 and 50 centimeters. These dimensions may vary depending on the oven version. The metal walls for the oven must be at least 4 millimeters. From the edge of the grates to the oven, the distance should be about one brick. There should be a gap of a quarter of a brick from the back of the oven to the firebox. The oven is made of dense cast metal.


Swede oven orders
When the oven approaches the firebox, the walls are additionally protected by vermiculite. The door must be cast iron. It is attached to the masonry, which guarantees the reliability of fixation.
Before laying the brick oven, the floor is thermally insulated. Insulation can be made from basalt cardboard. The insulation is laid so that at the end a 1.5 cm layer is formed. The middle layer is made of foil sheet.The foot of the furnace (the first 2 rows) is laid out with widened centimeter seams, so a ledge is obtained. Brick before laying is moistened. The next two rows form an ash pan and three doors are mounted to clean the oven. Doors are mounted with a gap. An asbestos cord is inserted into the gaps.
With a two-layer furnace made of red and fireclay bricks, a distance of 6 millimeters is made between them. Internal furnace lining lined with fireclay bricks. The grates are inserted. And the oven is inserted into the same row. From the sixth to the ninth, a combustion chamber is formed. The door is inserted. The tenth row covers the oven.
Next, the slab is laid and smoke channels are made. When laying the slab, quarters are cut out in the bricks. From the twelfth to the sixteenth, the cooking chamber is laid out, channels for smoke exhaust. The next two are shifted with cut bricks. From the twenty-first to the twenty-eighth there is a chimney. In the twenty-seventh, a valve is inserted with a gasket of basalt cord in the gap. From the twenty-ninth row there is an extension for a cornice of 5 centimeters. The channels (except for the pipe) are closed.
The next row is made even wider by 5 centimeters. Then the size is reduced to the original. The pipe is laid out in 5 bricks. In front of the ceiling for 3 rows, a fluff pipe is made. The thickness of the pipe is one and a half bricks. An iron chimney cap is placed on top of the pipe. The pipe going outside the house is laid out with cement mortar.
What should be
It would seem that there is nothing easier than replacing the suitable surface of a brick oven with a metal insert with your own hands, getting a stove for cooking. In reality, everything is much more complicated.A stove is a complex device, and the thermophysical processes occurring in it depend on the correct arrangement of its elements.
Special requirements are placed on furnaces of this type. On the one hand, it must effectively accumulate heat in the thickness of the brickwork, on the other hand, it must take a significant part of the heat for heating the hob. In the summer, when heating the house is not required, the hob should warm up quickly with economical fuel consumption.
Requirements
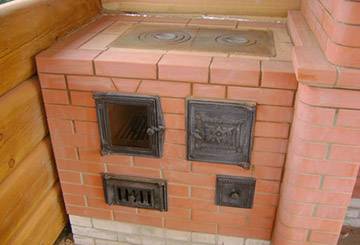
Theoretically, the hob can be made from any material that can heat up to high temperatures when the furnace is fired. In practice, cast-iron plates with holes closed with a removable lid are used.
This design allows you to get zones with different temperatures on the stove. The thermal conductivity of cast iron, unlike steel, is not very high, so food can be heated on the plate plane, as well as boiled or stewed “over low heat”. And by opening the lid, you can achieve direct heating of the dishes with an open flame, which allows you to quickly boil water or fry food in a pan.
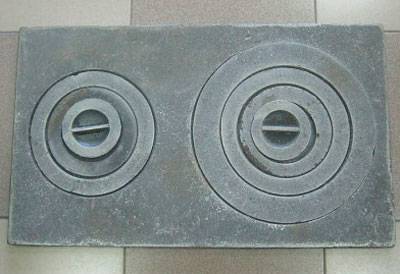 The most practical burners shown in the photo, consisting of concentric rings of different diameters - they can be matched to the size of the bottom of the dish. In addition, the gaps between the rings compensate for the thermal expansion of cast iron that occurs during overheating, and the plate can withstand repeated heating and cooling cycles without damage. Solid cast iron stoves are less reliable and require a more accurate firebox.
materials
Which brick is preferable for masonry oven equipped with a hob? In most cases, on the ordering schemes of furnaces for a house, cottage or bath, you can see two types of bricks: ordinary full-bodied ceramic and refractory fireclay - it is most often indicated in yellow. Do-it-yourself fireclay bricks lay out those parts that experience the greatest thermal loads during combustion: the firebox and the roof of the furnace, part of the smoke channel immediately after the combustion chamber.
The main difference between fireclay bricks is its increased heat capacity. It is able to accumulate and give off the received heat for a long time more efficiently than ceramic. For laying a heating stove, and especially sauna stoves, this is an indisputable plus.
But if the stove is used mainly as a cooking stove, then the increased heat capacity of fireclay is rather a disadvantage: it will absorb a significant part of the heat, and it will take more time to cook food. In summer, it will be impossible to cook on such a stove - the room will become hot and stuffy.
If the oven is mainly used for cooking, it is recommended to use the minimum amount of fireclay bricks!
Masonry furnace ordering
During laying, special attention will have to be paid to the strength and evenness of the surface. So, there should not be excess mortar or voids in the seams, and all channels from the inside should be perfectly smooth
Bandaged in this case in half a brick.
Swede couch Special attention when laying the Swede stove with their own hands is given to the section of the smoke channel. It must remain unchanged throughout the laying of the furnace.
Otherwise, even with minimal constriction, flue gases may escape into the room.
When the first row is ready, you can put the blower door.Further work will be carried out on the basis of the chosen order. To form the internal space of the main elements of the furnace, including the blower, the bricks used for them are somewhat hemmed. Already on the next row, the doors can be closed.
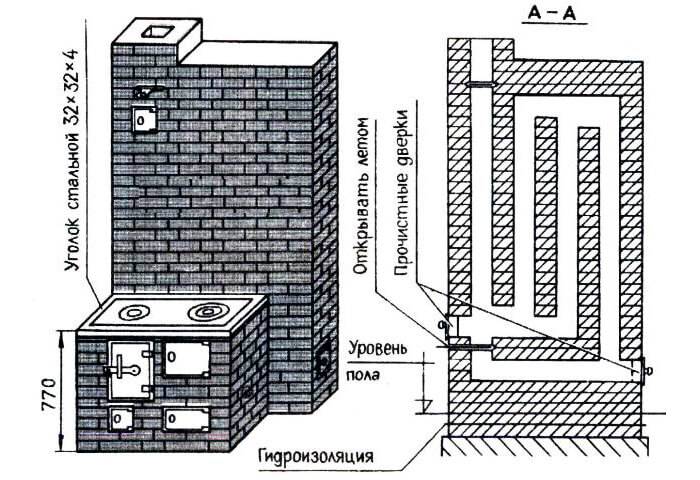
Water circuit equipment
The hot water coil should be placed at the back of the oven. The storage tank can be installed in two ways:
- In the drying niche: the maximum possible volume is 120 l. The tank is located low, so it is convenient to fill it manually - relevant for houses without running water. But the pressure at such a height will be weak.
- On the roof of the furnace: the tank is L-shaped to increase the contact area with the chimney. Unlike the first option, it is oriented horizontally and has a height of only 400–450 mm.

Swedish equipment furnaces with a water circuit
Thermal insulation is best made from foil basalt cardboard 10 mm thick, but basalt wool with a density of 30–50 kg / m3 can also be used. Outside, the tank with thermal insulation must be sheathed with moisture-resistant drywall.
In a vertically oriented tank (installation in a drying niche), a simpler solution can be applied - put a vertical tube on the valve, the second end of which is located at the very bottom. But this technique is less effective: hot water will remain only in the upper two-thirds of the tank.
Video: do-it-yourself Swedish oven
For a small house in which a Russian stove would look too cumbersome, a "Swede" is the most suitable option. It has a relatively simple device, is quite functional and at the same time is not as voracious as the "Dutch".But during long downtimes, the “Swede” actively absorbs moisture, which has to be disposed of by multiple accelerating furnaces.


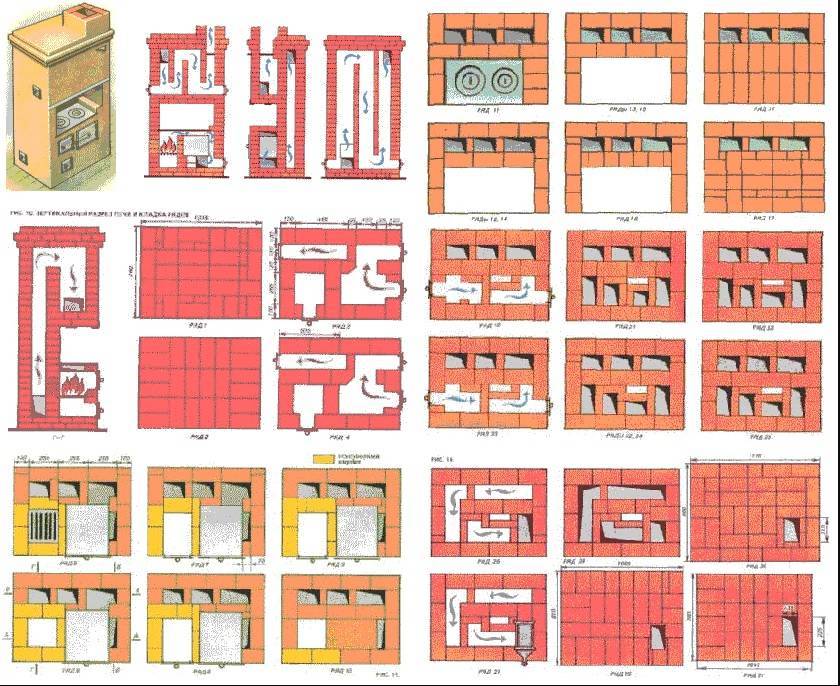
The principle of operation of the furnace
An important distinguishing feature of the “Swede” is the maximum heat. If we compare its device with channel variations - there the heat is removed through the pipe and heats the combined channels, and in the “Swede” - the stove for cooking and the oven heat up at the moment.
In a vertically built furnace, the channel holes are located behind the main device. Unlike other varieties, there is no overheating of the lower part in the furnace and the amount of soot is noticeably reduced.
The oven compartment in the Swedish oven serves as heating. In this part the main heat is concentrated. The heating wave spreads in just 2-3 minutes from the floor to the very top.
Schematic designation can be seen in the figure below:
General recommendations for the choice of building materials
It is worth taking on the construction of a Swede stove with your own hands only if you already have at least some initial masonry experience. This is a rather complicated design and should not be chosen as the first experiment.
If you have elementary bricklaying skills and have already dealt with the installation of furnaces, then our detailed step-by-step instructions will allow you to master this process. Follow the instructions exactly and build each row in accordance with the indicated scheme.
Do-it-yourself Swede oven
As mentioned above, the Swedish oven requires a very careful and accurate approach. Unlike a traditional Russian or Dutch oven, a used brick will not work for it. The efficiency and productivity of the Swede directly depends on the quality of the material. It is better to take fireclay or red brick.
You should also pay attention to the choice of solution. For the construction of a firebox, it is necessary to knead a solution of special chamotte clay, which can withstand high temperatures
Clay should be smooth, medium fat.
To check if the kneading is done correctly, take a thin layer of clay and apply it to a vertical surface. It should not drain and the consistency should resemble thick sour cream. In no case, lumps or unmixed solution should be present in the mixture.
Ordinary clay is suitable for facing the heating structure. If you make a chamber for igniting fuel from it, then it will crack, and the integrity of the furnace may be in jeopardy.
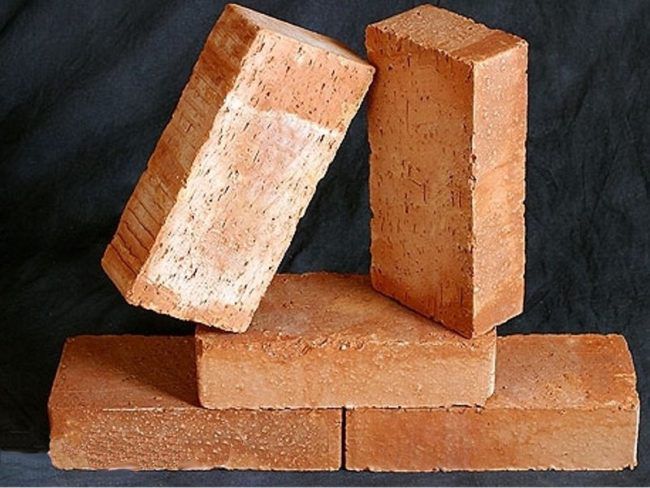
fireclay brick
Separately, it should be said about the foundation for the Swedish stove. Given its large weight, the base must be made powerful. It takes at least three weeks for the concrete monolith to harden. If you rush and start laying on a fresh, not completely frozen foundation, then the stove can deform under heavy weight.
One of the weak points of the Swede is the furnace door. If you take a budget door from a stamped sheet, then it will quickly loosen and fail. Therefore, it is necessary to take a cast door with a mustache, which during masonry will need to be securely walled up.
You can vary the size of the stove and oven within 5-10 cm, but the thickness of the oven is of great importance. If you cook the oven yourself, then use steel, which does not conduct heat well. If you take a thin roofing iron, then such an oven will cool down quickly.
The project of the heating and cooking stove-Swedish
Before starting work, a few tips from a stove-maker on laying Swedish stoves with your own hands:
Before starting work, print out the order on the printer and, in order not to get confused, laying out the next row, circle or cross it out on the plan.
When laying out the foundation, it is very important to check its horizontal level by level. However, with the level periodically you need to check all further rows.
Each brick is immersed in water for 15 seconds before being laid.
But you can't soak the bricks!
Starting a new row, put all its bricks in place without mortar, check the dimensions, adjust, and only then lay out the row.
The grinder cuts the bricks of the desired shape very evenly, but this causes a lot of dust, so it is better to prepare all the halves and quarters in advance in the open air.
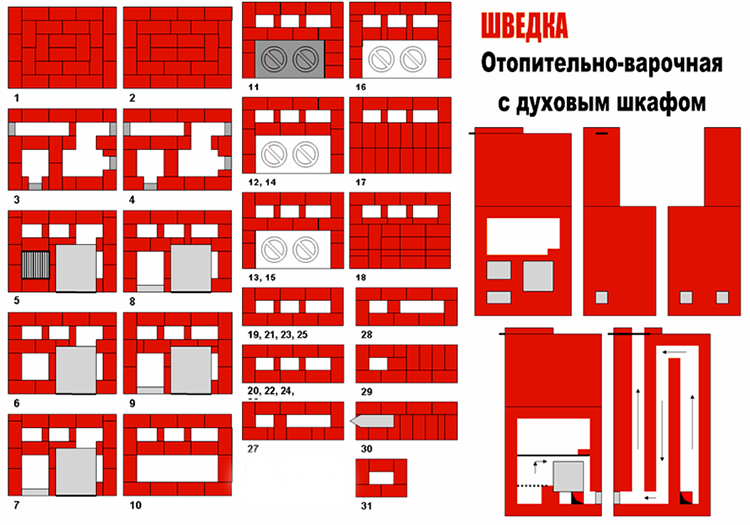
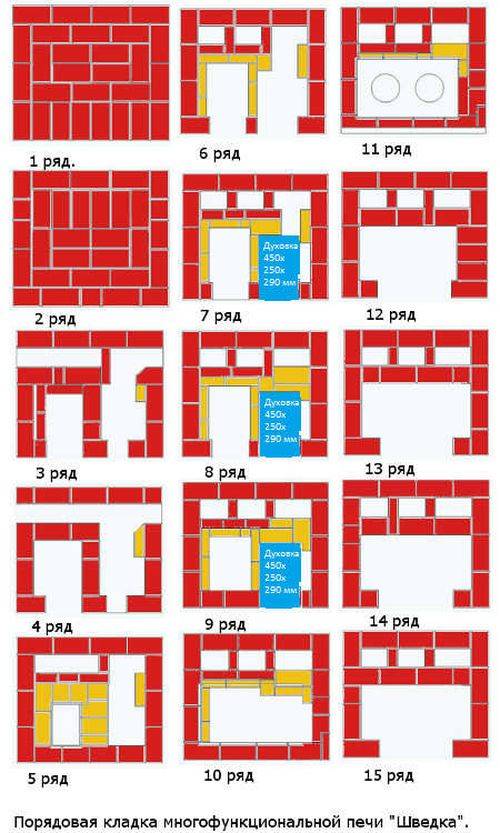
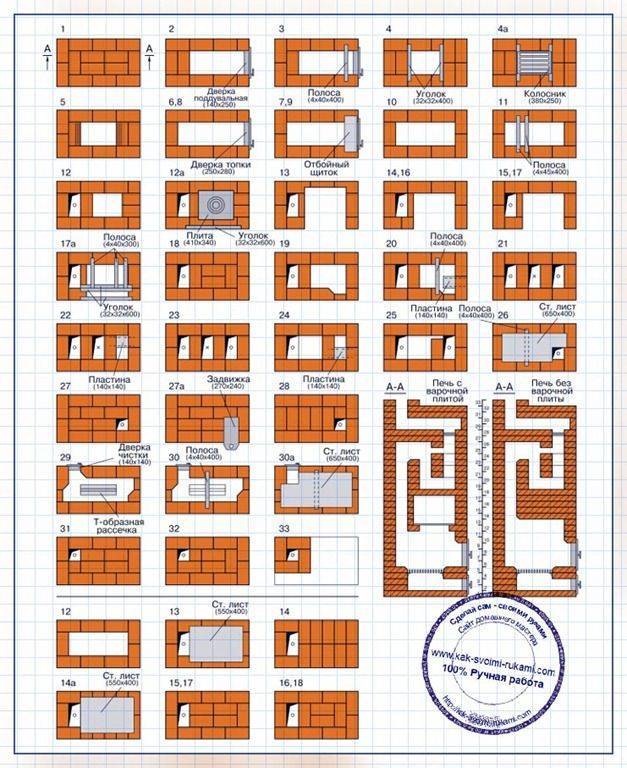
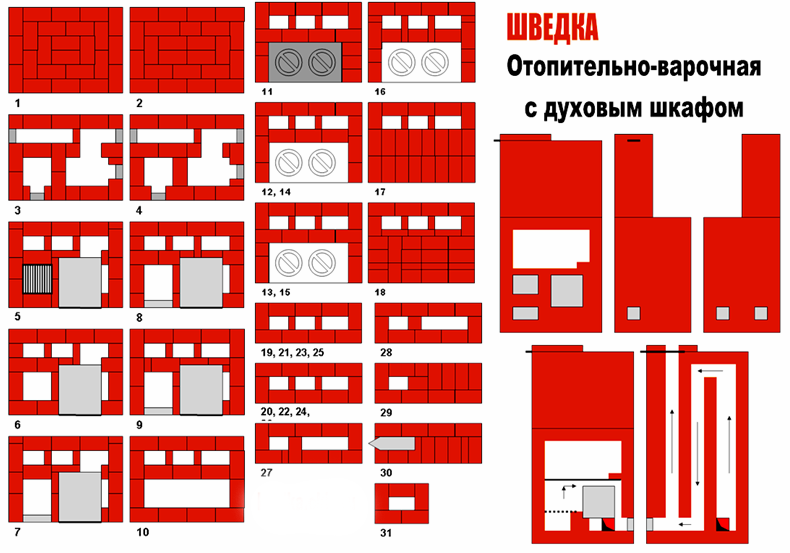
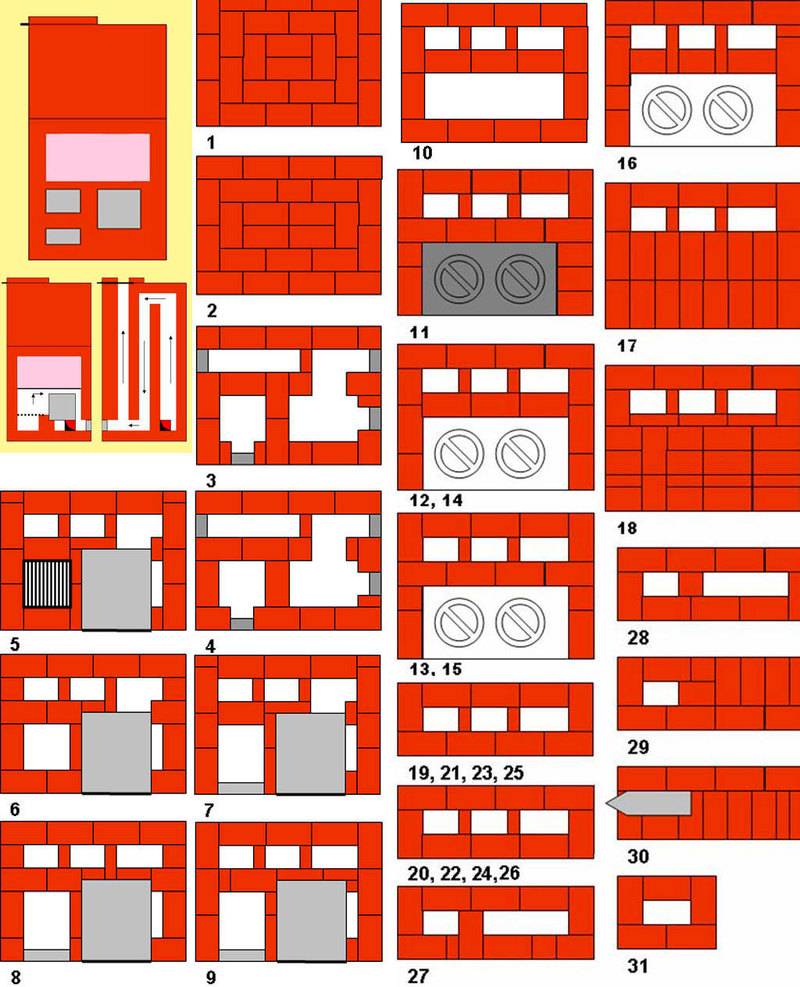
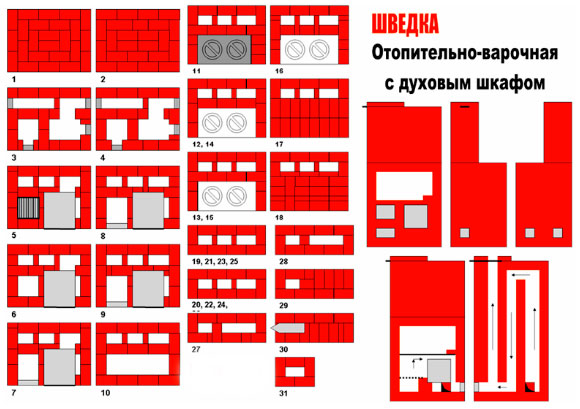
Ordering scheme for a Swede heating and cooking stove with an oven
ordering
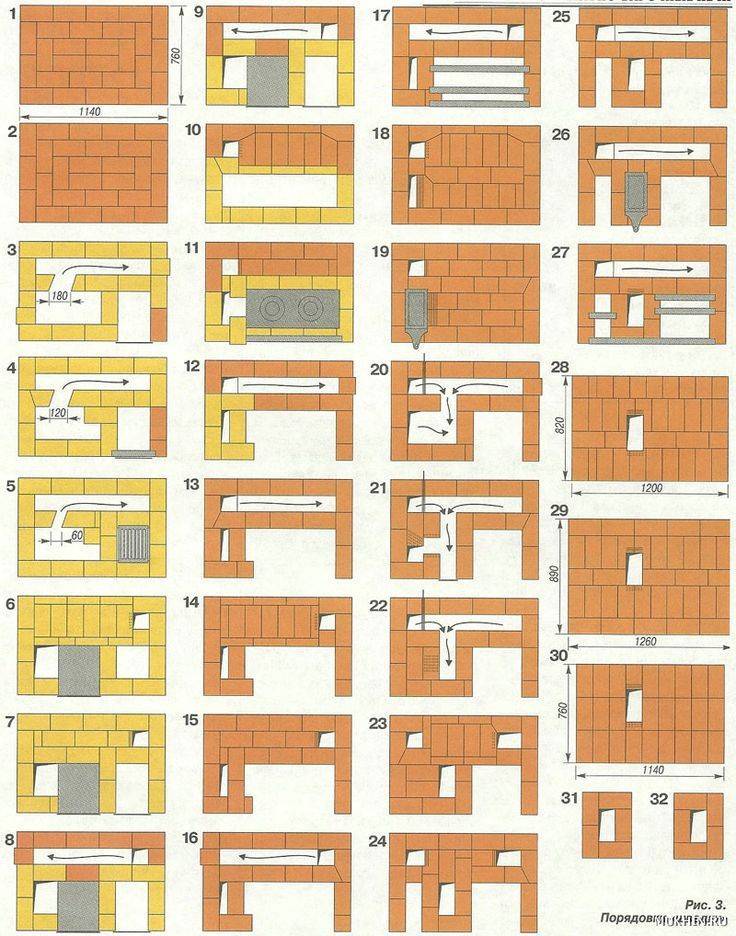
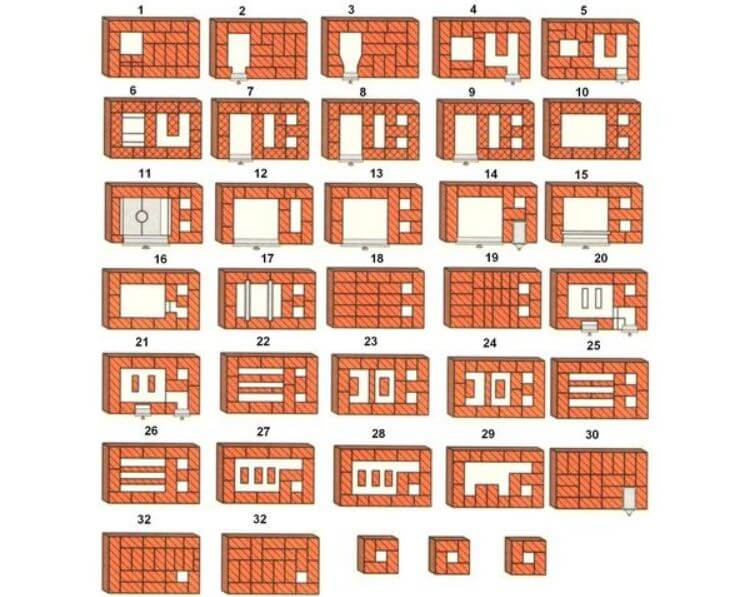
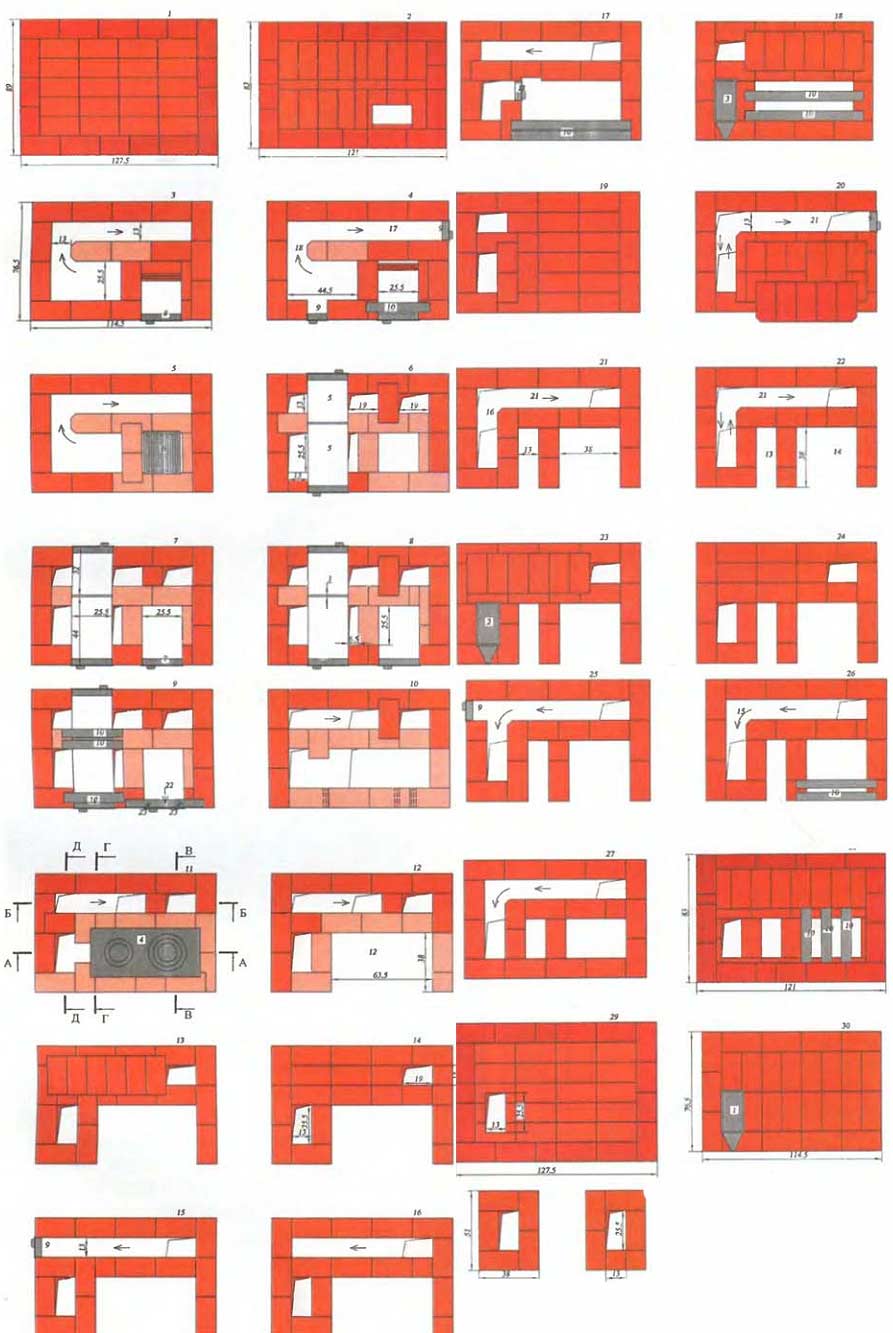
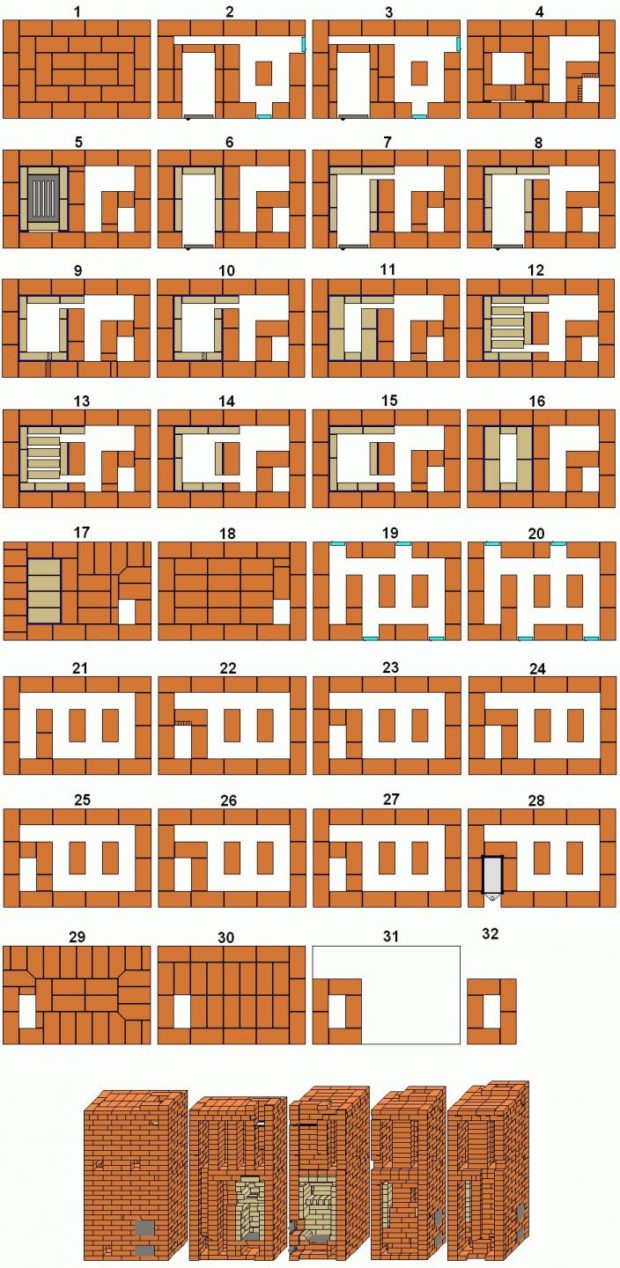
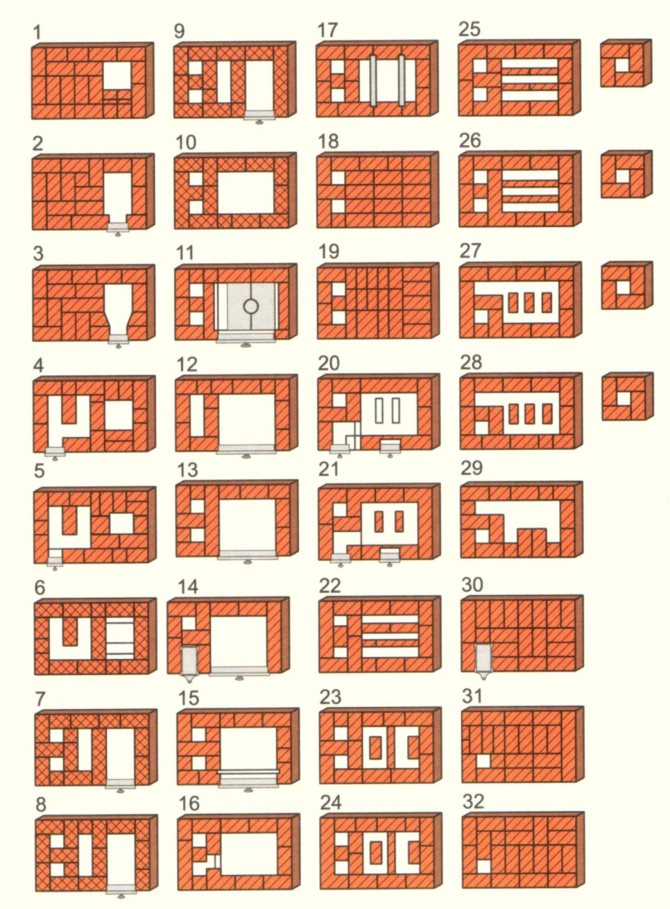
Consider the ordering of a Swedish brick oven with a do-it-yourself oven.
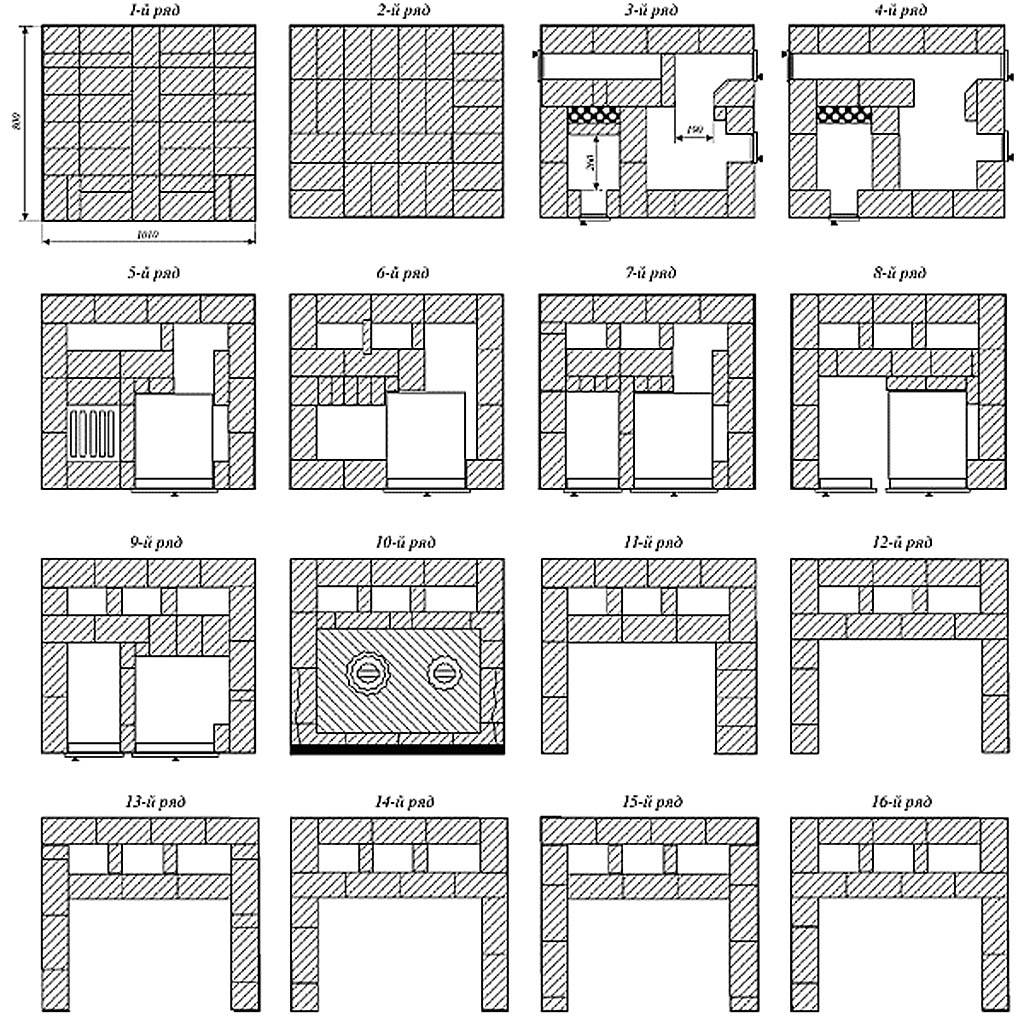
- 1 row. Solid (28 red bricks).
- 2 row. Duplicate (if in the previous row all the bricks were whole, then there are many halves and ¾).
- 3 row. They are marked with bricks: on the left is an ash chamber, on the right is the space under the oven (a quarter of a refractory brick is laid here) and in the background are vertical channels. Doors are installed: an ash pan (25 x 14 cm), three for cleaning (14 x 14). Several bricks are set on edge. Red brick - 19 pcs.
- 4 row. The vertical channels are still merged. The ash chamber is growing. Half of the refractory brick is laid in the space under the oven. 14.5 red bricks in a row.
- 5 row. The doors of all channels and chambers overlap. The ash chamber is laid out with refractory bricks (this will be the bottom of the firebox). An opening is left for the grate (a corner is cut along the perimeter of the hole, into which the grate is laid). 16 red + 8 fireclay bricks.
- 6 row.The firebox door is installed, the vertical channels are separated. Between the firebox and the oven there is a wall a quarter of a refractory brick. The oven is installed. 13 red + 3.5 refractory.
- 7 row. Duplicate.
- 8 row. Refractory blocks the entrance to the channel behind the oven. 13 red + 5 refractory.
- 9 row. Two bricks are laid above the firebox door, one of which is cut obliquely from below, and the other from above. 13.5 red + 5 refractory.
- 10 row. In the likeness of the previous row, the oven door overlaps. The wall between the firebox and the oven is not laid out. In the bricks, a corner is selected to install the slab. A corner (1m 20cm long) is installed on the front of the stove. 15 red, 4.5 fireproof.
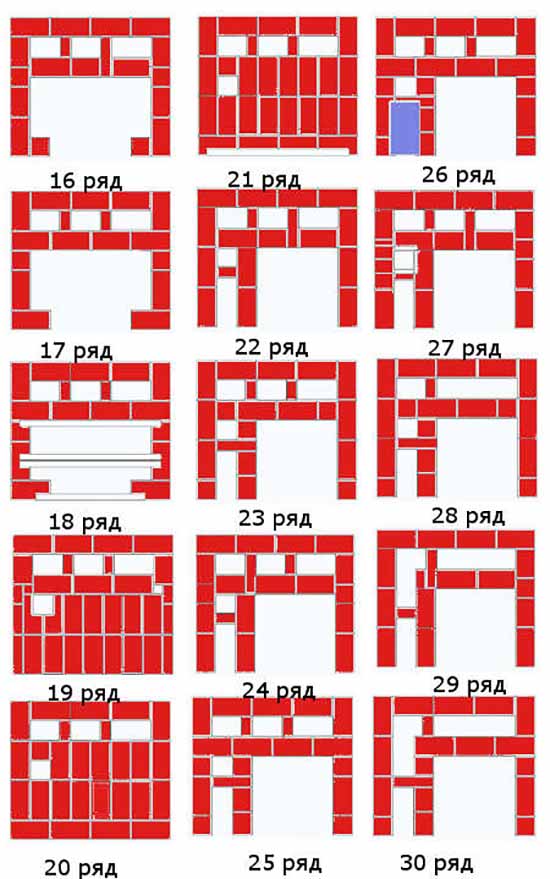
- 11 row. The cooking chamber is formed. 16.5 red.
- 12 - 15 row. Duplicate.
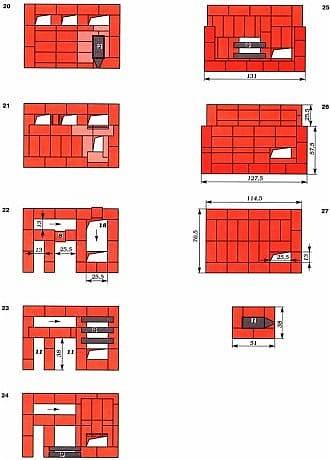
- 16 row. Preparing to cover the cooking chamber. 70 cm is placed in the front. corner, and above the camera - three corners of 90.5 cm. 14.5 red.
- 17 row. The cooking chamber is tightly closed, leaving only an exhaust hole in half a brick. 25.5 red.
- 18 row. Duplicate. Another corner is being installed. 25 red.
- 19 row. Building up: exhaust channel, drying chambers, vertical channels. 16 red.
- 20, 21 row. Duplicate.
- 22 row. The smaller drying chamber is covered with a 19 x 34 cm steel plate. 16 red.
- 23 row. A place for a valve is cut out above the vent. Latch 13 x 13 cm. 17 red.
- 24 row. Two vertical channels are combined behind the oven. 15.5 red.
- 25 row. The steam exhaust channel is combined with a vertical channel behind it. 15.5 red.
- 26 row. All cameras and channels are growing. In the frontal part, 90.5 cm is installed. corner.Two strips of 65 cm are laid above the drying chamber. An angle is cut out in a large steel sheet (80 x 90.5) according to the size of the angular vertical channel. A sheet is laid, covering the entire surface of the stove, including two channels behind the oven. On all sides, a half-brick distance is left uncovered.
- 27 row. Solid, covering the entire area, except for the vertical channel. From all sides, the brick now "hangs" over the previous rows by 2.5 cm. 32 red.
- 28 row. Another solid row, the bricks “hanging” even more from all sides (another 2.5 cm). 37 red.
- 29 row. Solid row, original oven size. 26.5 red. Furnace body completed.
- 30 row. The base of the pipe is formed. A corner is cut in the bricks according to the size of the smoke damper. Gate valve is installed. 5 red.
- 31 row and beyond. Pipe extension.
Foundation arrangement
The depth of the bookmark may be different. It is determined by the nature of soil freezing in winter and averages 80-100 cm. The width of the foundation should be 10-15 cm larger than the dimensions of the furnace itself.

A layer of sand 15-20 cm is laid in a dug trench at the bottom, which will level the surface, provide drainage functions and redistribute pressure on the ground. Large crushed stone, fragments of brick or natural stone are poured on top and cement mortar is poured for strength.


To do this, after leveling the concrete and its hardening, roofing material is laid out in 2-3 layers. You can also use roofing felt or synthetic materials with foil.
At the last stage, it is necessary to make a hole for the masonry, and then increase the coating at the point of contact with the base of the furnace. Skirting boards are installed here.Logs from a bar can be attached to the floorboards with self-tapping screws.
Construction work practices
guardianship
A wooden guard holds a stove weighing up to 1600 pounds (approximately 750 kg), i.e. small or medium without baking. It is performed in the form of a log house in two belts, with backfilling with rubble and a flooring of beams. The flooring is covered with felt, properly soaked in a liquid solution of greasy clay, and over it with roofing iron.
Arches and vaults
Arches and vaults are laid out from an ODD number of bricks along the formwork on wooden templates - circles. First, a life-size drawing of the arch is made in section, then castle bricks are hewn onto it onto a wedge. You don’t have to try to lay out a vault with a direct lock or a lockless do-it-yourselfer, this may not be every experienced bricklayer.
Next, the circles are prepared, taking into account the thickness of the formwork boards, and a vault without a lock is laid out on them. Then you need to thickly grease the grooves of the locks with a solution and put the locks into the groove. The next stage - the locks in turn and in several passes are gradually hammered into the groove to the place. You can’t get by with a mallet here, you have to wield a log. But it is impossible to beat that there is foolishness; you need to use the inertia of a heavy log, and not the force of a sharp blow.
The quality of the closure of the vault is controlled by squeezing the solution sausages out of the seams: it should be more or less uniform over the entire surface. Thick mortar flows slowly, so you need to take breaks between passes. The result is a prestressed structure; only such a vault will last for many decades.
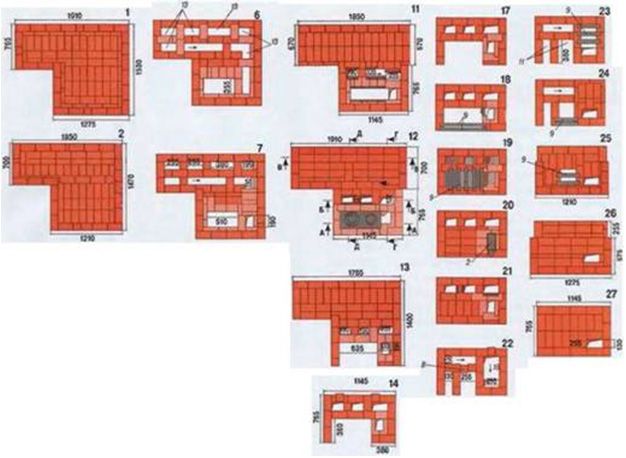
Material consumption
The classic Russian oven described above, depending on the size, requires approximately the following amount of materials:
- Small - 1500 bricks and 0.8 cubic meters. m solution.
- Average - 2100 bricks and 1.1 cubic meters. m solution.
- Large - 2500 bricks and 1.35 cubic meters. m solution.
Possible difficulties
With self-construction and lack of experience, it is easy to make some mistakes:
- Use of low-quality materials - cheap brick often has defects or cracks when heated to high temperatures.
- If the brick is not soaked before construction, it will draw moisture from the solution, which will lead to uneven drying and deterioration in the strength and tightness of the masonry.
- The seams between the bricks are filled unevenly and not tightly enough - in the future this leads to a violation of the seal.
To avoid these and other mistakes before starting work, it is better to seek the advice of an experienced specialist.
Finally. About order and principles
Despite the apparent complexity of the design, having a competent order and observing all the requirements for the construction, you can build a furnace with your own hands. Of course, the described furnace is somewhat different from the traditional one, but they have the same principle of operation.
In this article, the principles and technology for the construction of a combined structure were considered, which can be used both for heating and for cooking. It remains only to finish it, but this is a topic for another article.
Once the classic stoves from bricks for the house were its obligatory attribute and the only way of heating. Professional stove-makers were in demand and respected. To date, there are many new means for space heating, which operate on various energy sources, from solid fuel to electricity. However, good stove-setters remain in demand and the online request for “brick ovens for home drawings with orders” remains frequent.
Some build stoves for baths, for giving, or simply because of the remoteness of housing, which is why there is no alternative. Different types of ovens can perform a heating function, some models can cook traditional dishes. Some are large in size, others are compact and prefabricated. Some plan before building a house, while others need to fit into an existing room. Furnaces are ordered or made with their own hands in order to save money, others are erected to fill the decor. In any case, all such equipment should be built from high-quality and suitable materials, in accordance with the existing SNiP. On the Internet, you can find any drawings with orders, but you need to understand that it will not be so easy to build a stove for a house with your own hands.