- How to make a cast-iron stove from an old bath with your own hands?
- Manufacturing
- Tools and materials
- Training
- Firebox manufacturing
- How to make a stone
- Assembling a tank for heating water
- Assembly of the structure
- Preparatory work: choosing the installation site and laying the foundation
- Foundation for the oven
- Types of structures
- open
- Closed (lined with brick or stone)
- Combined
- The sequence of manufacturing a stove for a bath
- Potbelly stoves - proven and simple designs
- Potbelly stoves from a cylinder, barrel or pipe
- vertical
- Horizontal
- From two barrels
- Finishing
- Why build furnaces from a bath
- Materials and tools for work
- Calculation of basic parameters (with drawings and dimensions)
- Pipe
- Screen
- bedding
- Chimney
- Photo gallery: diagrams for a potbelly stove for a garage
How to make a cast-iron stove from an old bath with your own hands?
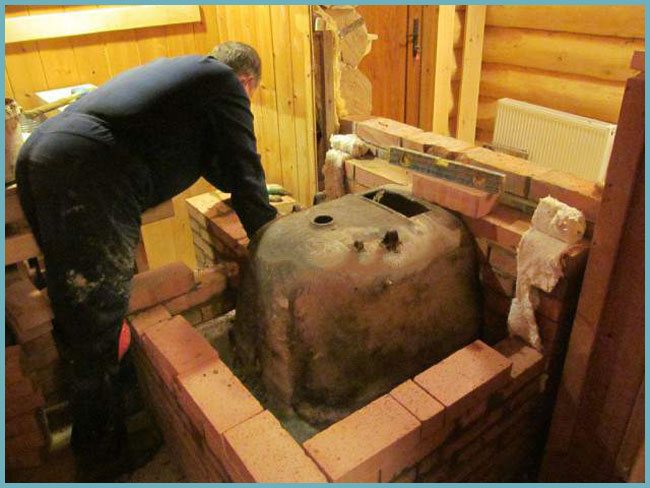
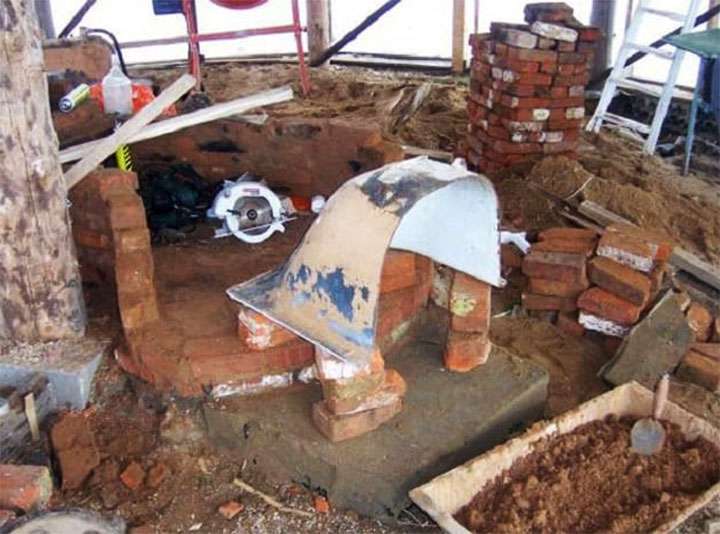
After completing the preparatory work, deliver the cut bath to the installation site, and you can proceed with the construction of the intended structure.
Perform manufacturing using this technology:
In the place where the stove made from a cast-iron bath will be installed with your own hands, equip the foundation.
Install the lower part of the bath on a dried foundation.If you want it to be higher, then raise it with supports and fix it to the concrete solution. While the base will harden and dry, start making other parts.
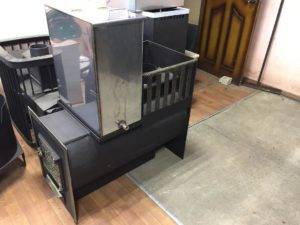
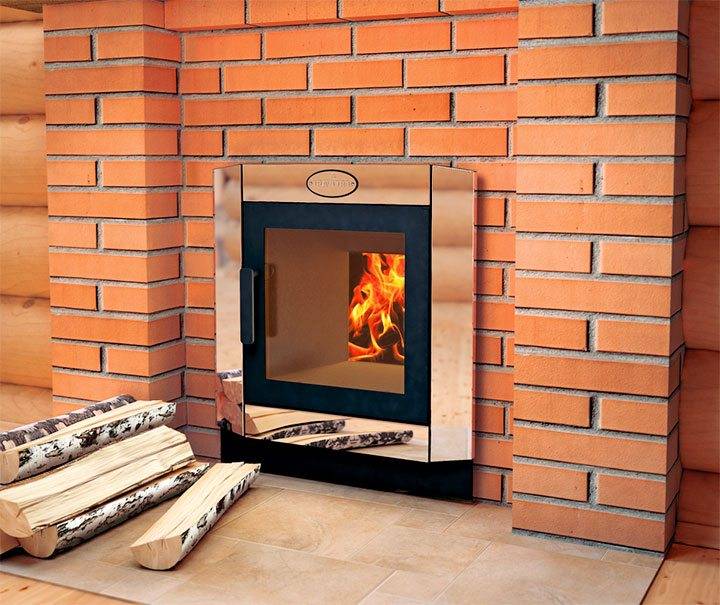
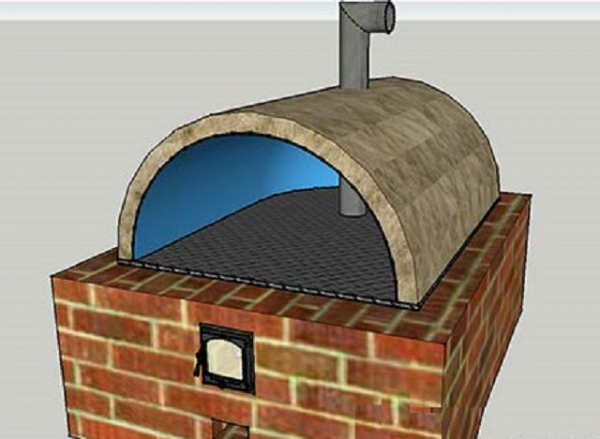
You can make the oven in two variations, and then everyone decides for himself what to stop at. In the first case, its facade is made entirely of metal walls, in the second case, the blower and the firebox are closed with a brick wall, where metal or cast-iron doors are built in.
On the walls of the lower semi-cylinder, fix the brackets for mounting the grate. It is needed to separate the blower and the firebox, so it is better to raise it slightly above the bottom of the bath by 15 cm. Fasten the metal corners to the marked walls of the product, lay the grate on them.
Cut out a sheet of metal to cover the bottom of the firebox.
Then, in cast iron, cut a hole for the chimney pipe along the intended contour of the circle, first small holes, then carefully combine them with a grinder, bring the resulting opening with a file to the required configuration.
Lubricate the furnace part with a fire-resistant sealant, cover it with a metal sheet with a chimney built into it. On top of the sheet, install the second part of the bath with a hole for the pipe. It is also treated with sealant before installation.
As a result, you will put the upper part on the pipe, increase the chimney to the desired height.
Twist both parts of the tub and the metal sheet located between them with 10 mm bolts. First, drill through holes in the sides of the bathtub in increments of 15-20 cm, then fasten all the elements through them into a single structure.
Divide the blower and combustion chamber with a grate.Lay the grate on the prepared corners on the walls.
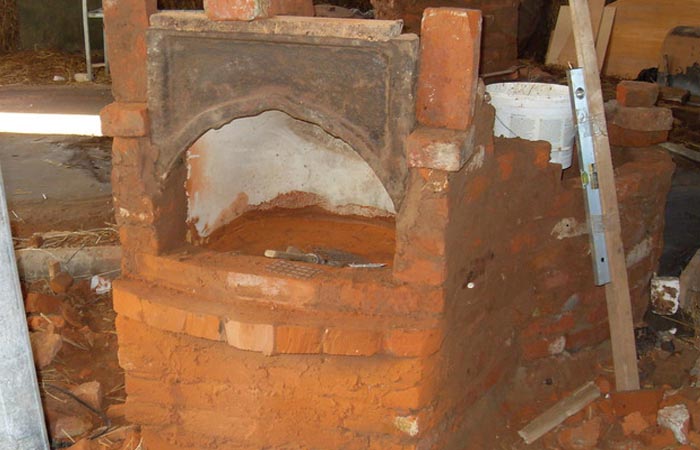
Proceed to masonry work. The walls will be located on three sides of the future structure, that is, behind and on the sides, or around the entire perimeter of the chambers. First of all, the laying lines are laid out along the foundation, and only then the walls are brought out.
If you decide to close the firebox from the front side and blow it with a brick wall, then install the blower door in the wall not lower than the level of the bathtub bottom, and the furnace door a little higher than the grate. Fold the walls to the level of the cooking chamber, expand them inward so that the brick fits snugly against the outside of the structure.
It is also treated with sealant before installation. As a result, you will put the upper part on the pipe, increase the chimney to the desired height.
Twist both parts of the tub and the metal sheet located between them with 10 mm bolts. First, drill through holes in the sides of the bathtub in increments of 15-20 cm, then fasten all the elements through them into a single structure.
Divide the blower and combustion chamber with a grate. Lay the grate on the prepared corners on the walls.
Proceed to masonry work. The walls will be located on three sides of the future structure, that is, behind and on the sides, or around the entire perimeter of the chambers. First of all, the laying lines are laid out along the foundation, and only then the walls are brought out.
If you decide to close the firebox from the front side and blow it with a brick wall, then install the blower door in the wall not lower than the level of the bathtub bottom, and the furnace door a little higher than the grate. Fold the walls to the level of the cooking chamber, expand them inward so that the brick fits snugly against the outside of the structure.
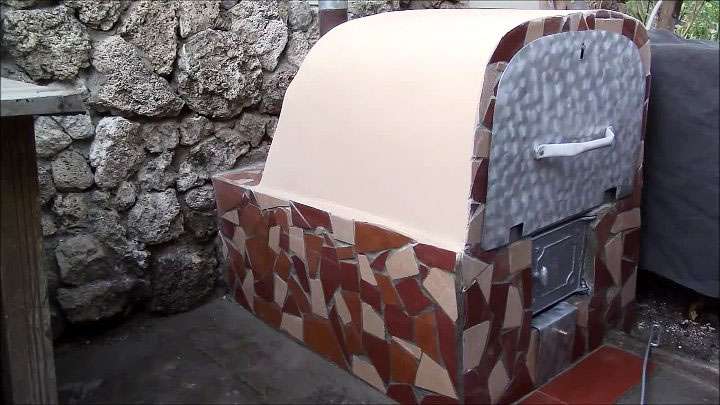
- As soon as the entire lower part is dressed in brickwork, proceed to the insulation of the cooking chamber. To create a fur coat, it is better to use a clay solution with low thermal conductivity. Prepare the mixture, add some sand to it, after it dries, add lime to it. Leave him to infuse.
- Cover the cooking compartment with a metal mesh, attach it to the brickwork on the sides and from the back. On top of it, apply a solution in two layers, so that the thickness of the insulating coat as a result is 5-7 cm.
- Now it's time to take care of the aesthetic appearance of the stove, because it should not only perform its main functions, but also decorate your site. You can overlay it with ceramic tiles in the form of a mosaic, only for this you will have to first break it into small pieces. Laying is carried out using a special heat-resistant compound.
Manufacturing
The manufacture of home-made equipment begins with drawing up a drawing of a furnace for a metal bath. On it it is necessary to indicate the components, the main dimensions. The manufacturing process consists of several main steps.
Tools and materials
 After drawing up the drawing, you can go to the hardware store for materials, tools:
- grinder with discs for metal;
- welding machine with electrodes;
- a set of measuring tools;
- sheets of metal;
- metal corners;
- doors for the combustion chamber, blower;
- fittings for the manufacture of a grate;
- chimney pipes.
Additionally, you will need a metal water tank, which must have a drain valve, a water supply hole with a plug.
Training
Before proceeding with the assembly of home-made furnace equipment, it is necessary to cut the metal sheets into their component parts in size. After that, it is desirable to perform steel tempering. This requires several steps:
- Fire up metal parts.
- Let the metal cool down on its own.
When the steel tempering is completed, you need to check the dimensions of the parts. They shouldn't change much.
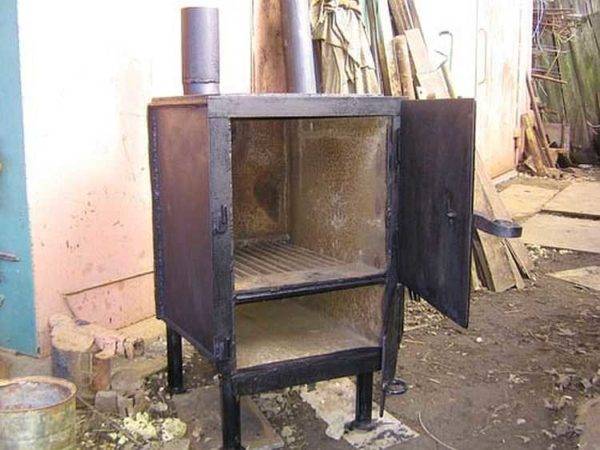
Firebox manufacturing
The firebox can be made from a large diameter metal pipe or made from individual sheets of metal. Both methods need to be considered.
Assembling the firebox from individual sheets of metal:
- Cut metal sheets to create the body.
- Separately weld the two parts of the box.
- Fasten the reinforcement between the parts.
- Weld the parts of the box together. In the front part, make two rectangular holes - one above the grate, the other below it.
- Make holes in the holes.
- Drill a round hole in the top of the box for the chimney.
Assembling a firebox from a large diameter pipe:
- Place the handset in a vertical position. Cut it into two pieces.
- Fix the reinforcement on the surface of the lower part to make a grate.
- Weld the two pieces of pipe together.
- Cut two holes above the grate, below it. Attach to door openings.
- Make a hole in the top of the homemade firebox for the chimney.
When the combustion chamber is ready, you can start assembling the heater.
 The frame of the furnace from the pipe
How to make a stone
There are two methods for making a stove. First build method:
- If home-made stove equipment is made from a large diameter pipe, you can place the heater inside it, above the combustion chamber. To do this, you need to cut an additional door above the firebox.
- Weld the fittings so that stones can be poured over the combustion chamber, which will be heated.
- A tank can be fixed on top of the entire structure. Stones are laid inside the stove, the door is closed, firewood is set on fire.
Second build method:
- If a water tank is not needed, you can place the heater on top of the stove, around the chimney.
- Fix the smoke exhaust pipe in the hole made. On the contour of the metal box, weld the walls for the heater on top.
 After that, you can pour special stones inside a homemade heater.
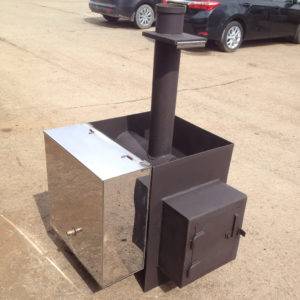
Assembling a tank for heating water
When assembling a homemade stove with a water tank, the container is placed above the general design of the stove. On top of the heater, you need to weld a metal plate 10 mm thick. Make a hole in it for the chimney. After that, weld the water tank from separate metal sheets. Make a hole for the drain cock on the side.
Assembly of the structure
After assembling a homemade stove, you need to properly install it in the bath. To do this, you need to consider some rules:
- Choose a location so that the stove is away from the walls.
- For the foundation, you need to make a masonry of refractory bricks.
- Adjacent surfaces should be covered with a layer of non-combustible material, a sheet of reflective steel.
- To improve heat transfer, you can overlay the furnace with a layer of red brick. In this case, you need to leave a distance between the metal brick surfaces.
- To protect visitors to the bath from burns, you can assemble a wooden fence. Wood must be impregnated with refractory impregnations in advance.
When installing a chimney, it must be taken into account that the pipe will get very hot.Therefore, it is necessary to make additional insulation in the places where the pipeline passes through the ceiling, roof.


Preparatory work: choosing the installation site and laying the foundation
Cut parts from steel sheets must be checked for burrs and sharp metal protrusions, as during welding they will interfere
You should also pay attention to the dimensions of the cut elements.
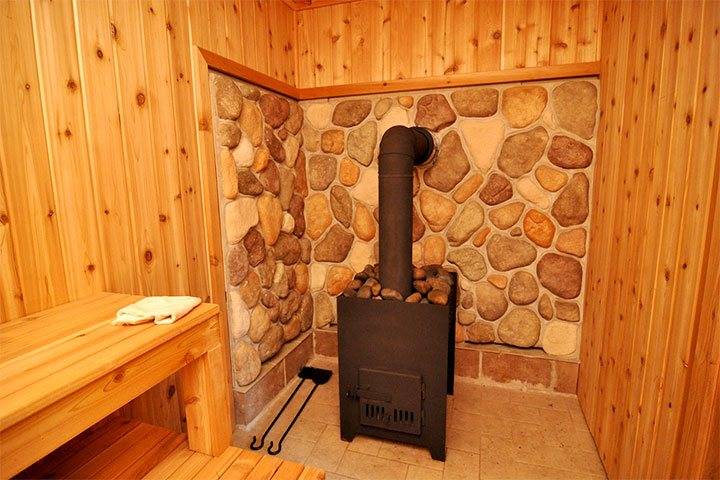
At choosing a place for installation ovens, it should be noted that these units are best installed in the corner of the room away from walk-through doors and windows. If such a stove is intended for a bath or a steam room, then it can be installed behind a small partition. This will additionally protect against accidental contact with the hot surfaces of the oven.
Bath option
It is best to build the foundation for the furnace along with the building under construction. However, if the heating structure is planned to be installed indoors, it is necessary to disassemble the floor to the very foundation. In this case, the logs can be sawn only after the foundation has been erected to their level.
Over time, the building shrinks, and otherwise the base of the furnace will crack, and the unit will warp.
To lay the foundation for a brick-lined oven, you must perform the following steps:
Make a marking of the future dimensions of the furnace. It is more convenient to take notes on the wall.
Dismantle the flooring. You need to get to the ground. At this stage, do not cut the wooden logs.
In accordance with the markings on the wall, dig a pit 50 cm deep and 75 cm wide. If there is a large amount of sand in the soil, then the walls of the pit may crumble. To avoid this, it is necessary to cover them with roofing felt or polyethylene.
The bottom of the pit is carefully compacted and leveled.
Pour gravel of medium fraction inside to make a layer 250 mm thick.
Lay waterproofing on top of it - roofing material.
Then fill up a layer of sand equal to 150 mm. It needs to be tamped down. It should be noted that wet sand compresses better.
From boards or OSB slabs, make formwork for liquid concrete. If it is made of boards, then concrete can pour out through the cracks or earth can fall inside. To prevent this, the inner surface of the formwork can be covered with polyethylene.
Now you need to make a metal frame that will strengthen the concrete base. This requires reinforcing bars with a thickness of 8 to 10 mm. Of these, it is required to make a three-dimensional structure consisting of two gratings connected at a distance of 200 mm parallel to each other. The width of the cells should be no more than 150x150 mm. The intersections of the reinforcing bars can be strengthened by welding, wire or plastic clamps.
Install the finished metal frame inside the formwork. It should be noted that this structure must be placed at a height of 50 mm above the waterproofing. To do this, you can, perpendicular to the base, drive in wooden stakes or pieces of reinforcement. Attach a metal frame to them. You can use halves of bricks for this, which will create the desired height for placement.
Pour concrete mix. For this, the brand M 300 or M 400 is suitable.
It should be noted that all elements of the reinforcing cage are hidden under a layer of concrete. In the process of pouring the foundation, air bubbles are formed, which must be removed by baying or using a deep vibrator.
Cover the poured mixture with polyethylene
This is necessary for uniform hardening of the foundation.If this is not done, moisture will evaporate from the top layer of concrete. This can cause the hardened base to crack and lose its strength. After 8-10 days, the foundation will harden.
Clear the hardened base from dust and debris.
Cover with waterproofing material. For this, roofing material or thick polyethylene is suitable.
From above, in a continuous layer, make masonry of refractory red brick. When the masonry level reaches the lag, they must be sawn so that the wooden ends lie on a concrete base.
Foundation for the oven
The type of foundation depends on the total weight of the furnace:
- a brick base is suitable for a light oven. Bricks are laid on edge and bound with mortar. Grade of cement for binder solution is not less than M300;
- for a heavy furnace weighing more than 700 kg, a self-leveling foundation with a depth of at least 50 cm is required. Formwork is made and poured with liquid concrete with or without filler. The filler will be a broken brick of fine fraction or gravel.
It is possible to build a stove only on a solid and heat-resistant base. The top of the base is arranged flush with the floor or below the level. floor by 15 cm. To protect the base from moisture, the bottom and walls of the formwork are covered with roofing material and all joints are coated with bitumen.
Types of structures
They differ in structure, principles of work. Let's analyze each type in more detail.
open
The stones are laid on top of the furnace structure, not covered by anything. Due to this, the steam room warms up faster, reaching a temperature of up to 100 degrees. But the humidity in the room is low, so the heat is dry.
The product consists of three parts:
- furnaces;
- compartments for stones;
- containers with water.
There should be few stones, otherwise the top layer will not warm up well and the steam room will not be warm enough.
To increase the level of humidity and the release of water vapor, hot stones are simply poured with water. One or two buckets will be enough - this will give up to 15% moisture.
To increase the level of fire safety and reduce the risk of burns, it is recommended to build refractory bricks around the walls of the furnace or make a partition of wood.
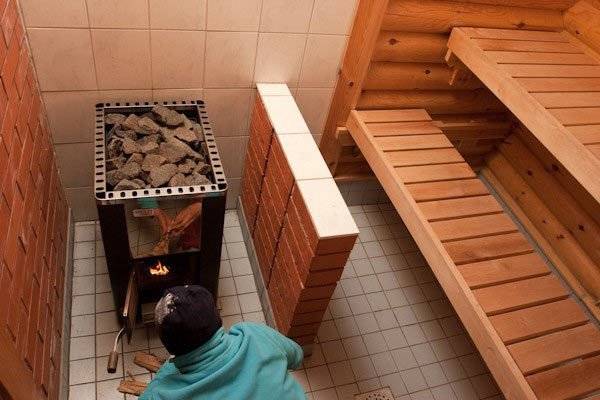
For sauna heating, it is important that as much of the stove area as possible is in contact with the air space. This contributes to faster heating of the air in the steam room.
Closed (lined with brick or stone)
If wood fuel is chosen for heating, then large supplies will have to be prepared in advance. Such a furnace takes a long time to gain the desired temperature, but, having reached the desired level, it gives good heat transfer and retains heat for a long time.


Closed structures are great for large baths, where there is not only a steam room, washing room, dressing room, but also a relaxation room.
One of the advantages is closed stones. Therefore, there is no risk of getting burned.
In factory economical models, the oven has a double casing with a gap for air exchange between the walls.
Combined
Most manufacturers the design consists of a high box with grates, double valves (acts as a firebox). A chimney pipe comes out of the neck of the box. Stones are also placed in the neck here.
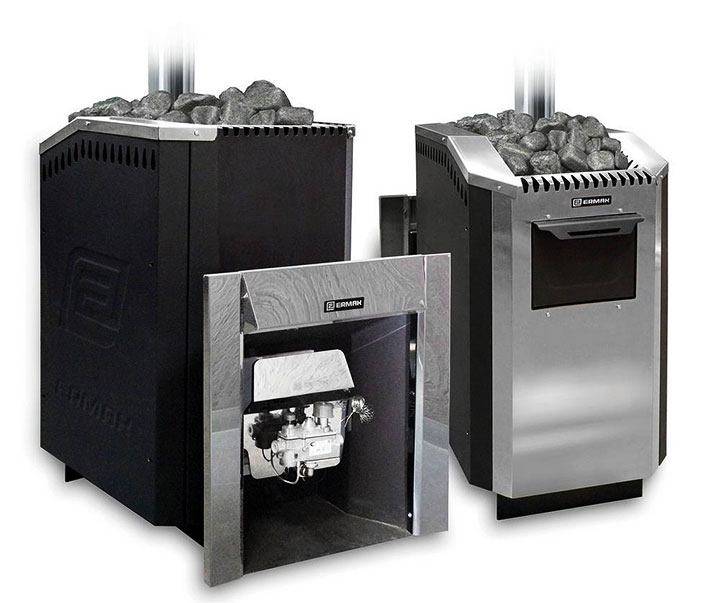
There are devices for sale with combined types of fuel:
- gas-wood;
- electric wood.
They do not need to be constantly monitored. Simply set to the required temperature.
By design, they are divided into 3 types:
- Monoblock. With heat exchanger, combustion chamber.Gas burner of non-removable type, covered with steel sheet.
- Paired. They have two separate combustion chambers for wood and gas.
- Reconfigurable. Universal device. Can be modified for every fuel.
The first two types do not need to be reconfigured, since you can switch from one type of fuel to another.
Gas is used main or liquefied in bottles.
The electric wood-burning design allows you to successfully heat the bath from electricity, with firewood (optional). Moreover, firewood is considered the main raw material. When they burn out and the temperature drops, the electric heater automatically starts to work. On the sides of the product are two heating elements. Such stoves operate from a 220 W network, with a three-phase voltage of 380 V.
The owners can choose which fuel they use to heat the sauna. But such designs are many times more expensive than simple wood-burning stoves.
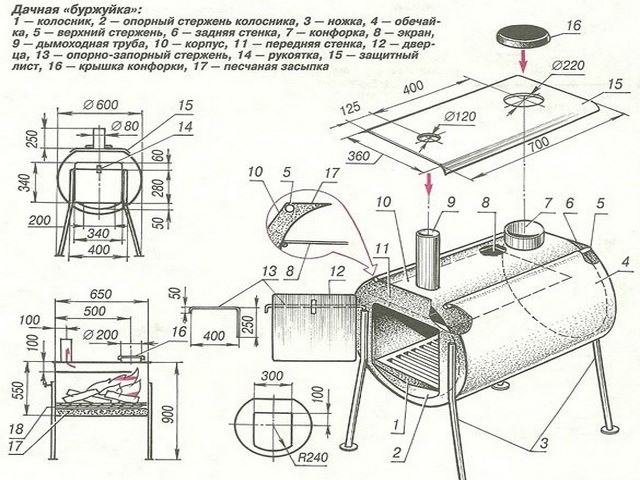
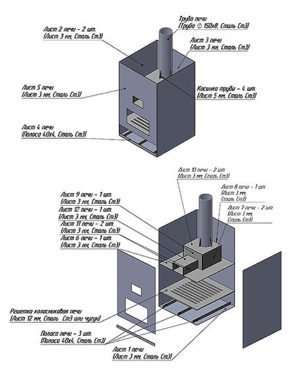
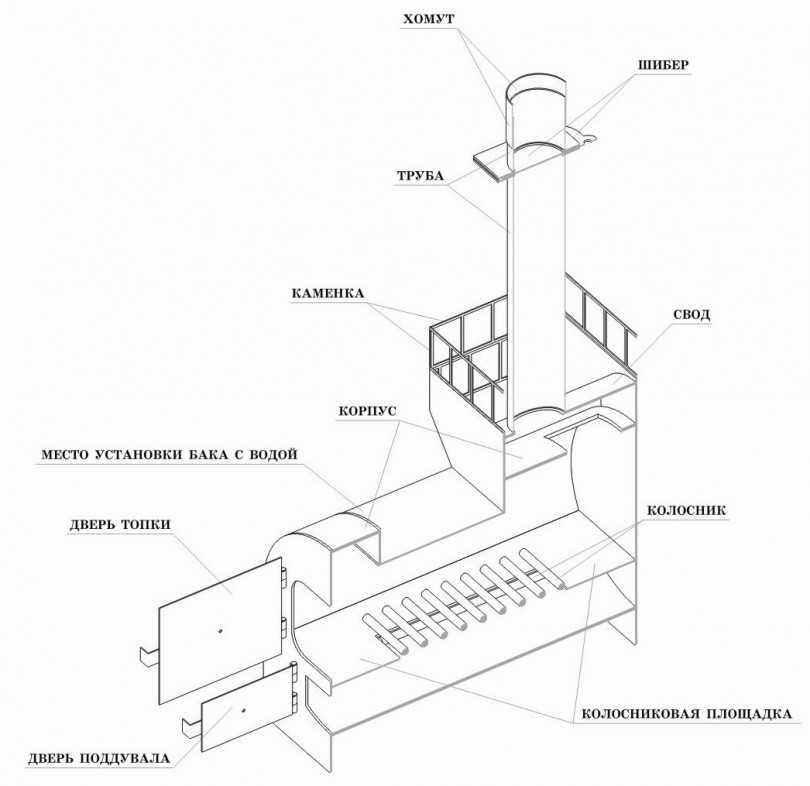
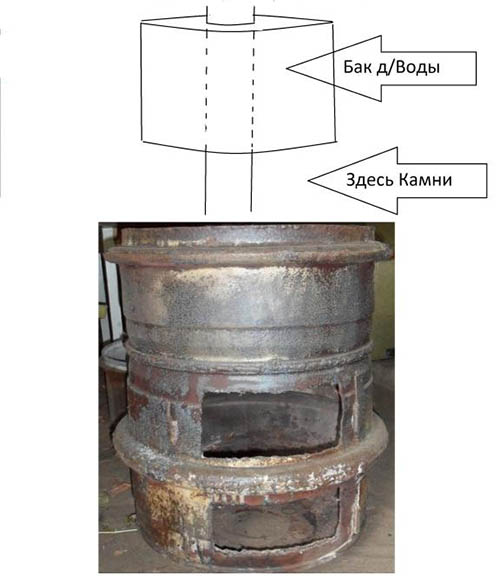
The sequence of manufacturing a stove for a bath
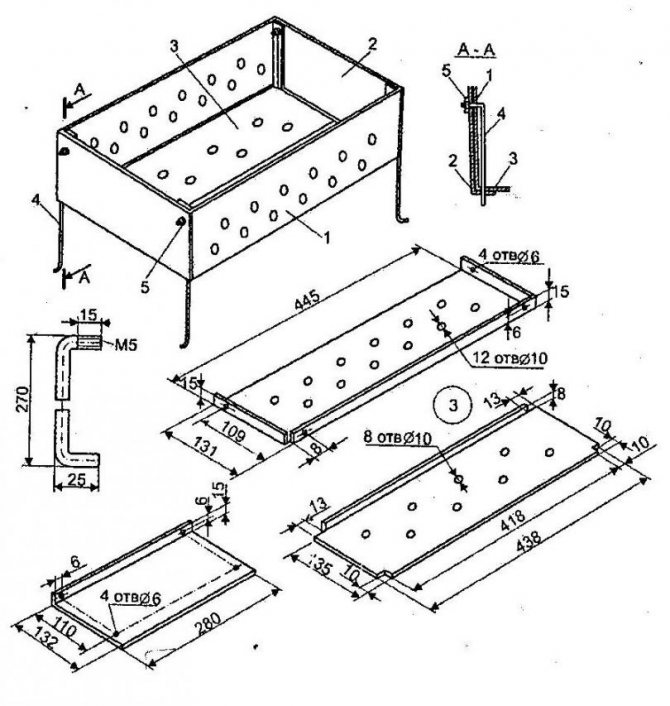
We mark the pipe according to the dimensions in the drawing. From a sheet of metal using gas welding or an angle grinder, we cut out 6 circles with a diameter of 500 mm.

From the cut round blanks, we select two that go inside the pipe with minimal gaps between the edges of the flat pancakes and the inner wall of the pipe. These two will go to the upper and lower bottom of the firebox.
We mark the position of the upper cover of the combustion chamber at a distance of 450 mm from the pipe cut, using chalk we make risks on the inner surface of the pipe blank. We mark the location of the door of the combustion chamber, the blower and the heater. Carefully cut out the windows with the help of a "grinder" - an angle grinder. Cut out rectangular fragments are used to make doors.To do this, we weld the hinges of the canopies using electric welding in the places where the doors are attached.
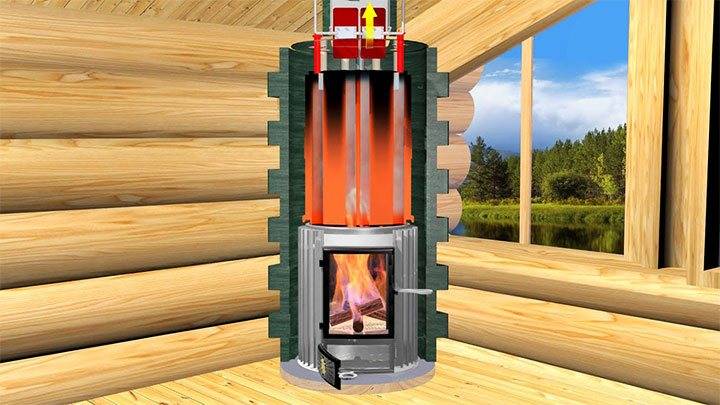
In a round blank of the upper wall of the combustion chamber, we cut out four round holes with a diameter of 60 mm and, using electric welding, weld the sections of the flame tubes used to heat the heater. On the free ends of the welded pipes, we install the blank of the upper wall of the heater and weld it. As a result, we get two flat pancakes connected by four pipes.

We install the body of the sauna stove in a vertical position and place the resulting assembly of four flame tubes and two round bottoms inside the pipe blank. Using electric welding, we weld the round upper wall of the combustion chamber into place, according to the drawing.
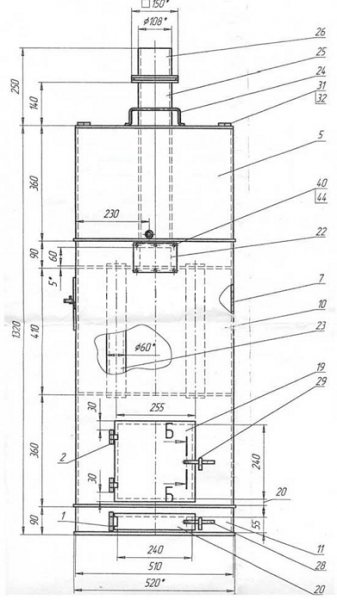
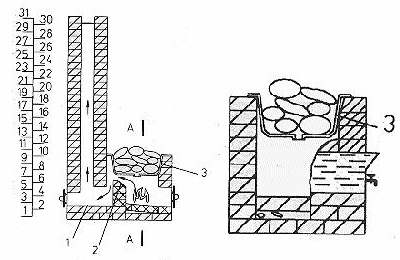
1, 2, 19, 20, 28.29 - doors and elements of the furnace, blower; 3 - valve; 7, 8, 9, 10 11, 12, 13 - sections of the furnace and heater - blower walls; 14, 16, 18 - bottom; 15 - grate; 17 - hole for replenishing water; 21, 24 - loading hatch heaters; 23 - heater heating pipes; 25, 26 - main gas outlet pipe; 27 - hot water tap;
Attention! Welding of the upper bottom of the furnace should be carried out in several passes with maximum quality. We turn over the body of the sauna stove, install it vertically, in the same way we weld the upper bottom of the intermediate chamber
Next, you need to install in the body and weld a round pancake of home-made grate, the bottom of the stove and the bottom of the water tank. For the manufacture of grate, you can choose from two ways:
We turn the body of the sauna stove over, install it vertically, and weld the upper bottom of the intermediate chamber in the same way.Next, you need to install in the body and weld a round pancake of home-made grate, the bottom of the stove and the bottom of the water tank. For the manufacture of grate, you can choose from two ways:


- You can use one of the blank pancakes, having previously drilled a grid of through holes with a diameter of 10 mm in the central part, spaced at a distance of 15-20 mm from each other. To do this, it is better to choose the most “weakened” blank in size - the one with the largest gaps between the inner surface of the body of the sauna stove and the outer diameter of the “pancake”.
- A more preferable option is to use ready-made cast-iron grates that are suitable in size. To install them in the “pancake”, a grinder cuts out a window according to the size of the grate, which is fastened with four bolts and a pair of strips of metal.
After installing the grate, the bottom of the stove is welded - its lower wall. In the body of the stove, a metal blank is installed with an indent from the edge by 10-15 mm.
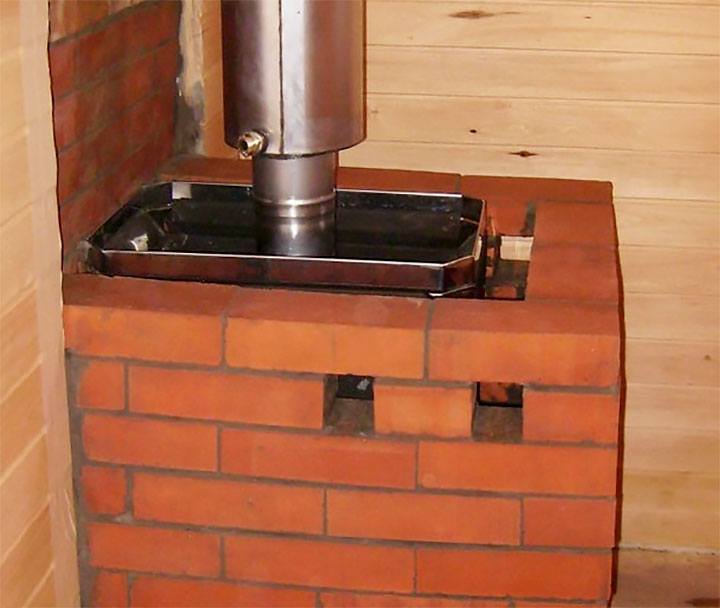
An equally important stage is the installation of the bottom of the water tank in the upper part of the sauna stove. The design of the metal sauna stove provides that a pipe for the removal of combustion products passes through the central part of the tank, and it is not located coaxially with the cylindrical body of the stove.
Important! It is necessary to weld the chimney to the lower base of the tank with additional control of the geometry of the relative position of the pipe and the bottom. The welding seam is welded at least twice, only after that the lower wall with the chimney is installed in the body of the sauna stove and welded along the contour
The welding seam is welded at least twice, only after that the lower wall with the chimney is installed in the body of the sauna stove and welded along the contour.
The top cover of the water tank is easily removable; for its fastening on the stove body, you can use a pair of conventional clamps or simply press down on top with a heavy object. A ring can be put on the chimney to seal the gap between the hole in the lid and the pipe.
At the final stage, the doors of the combustion chamber, blower and heater are hung. The window for cleaning the intermediate chamber between the heater and the water tank is best fixed with bolts using a gasket.
Potbelly stoves - proven and simple designs
Potbelly stoves - a hit of the 20s of the last century. Then these stoves competed with brick ones and stood everywhere, even in apartments. Later, with the advent of centralized heating, they lost their relevance, but are used in garages, summer cottages, for heating utility or outbuildings.
sheet metal
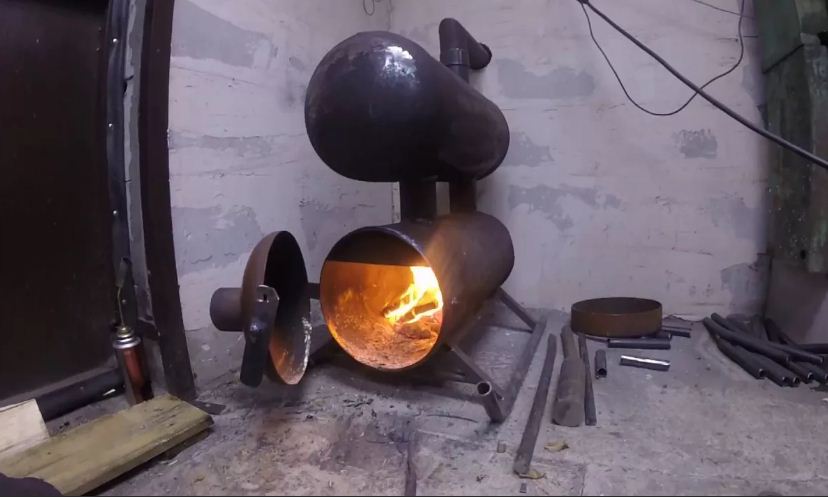
Potbelly stoves from a cylinder, barrel or pipe
The most suitable material for making a potbelly stove for a garage is propane tanks or a thick-walled pipe. Barrels are also suitable, but you need to look for a not very large volume and with a thick wall. In any case, the minimum wall thickness is 2-3 mm, the optimal one is 5 mm. Such a stove will serve for more than one year.
By design, they are vertical and horizontal. It is more convenient to heat a horizontal one with firewood - longer logs fit. It is easier to make it elongated upwards, but the firebox is small in size, you will have to cut firewood finely.
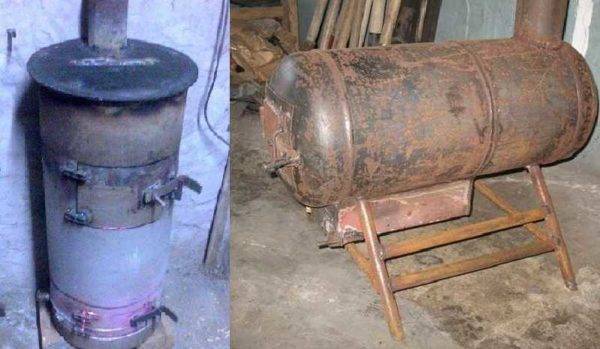
A potbelly stove for a garage can be made from a cylinder or a pipe with a thick wall
vertical
First, how to make a vertical garage oven from a cylinder or pipe. Divide the selected segment into two unequal parts. Below is a smaller one for collecting ashes, above is the main one for laying firewood.The following is the order of work:
- Cut out the doors. Small at the bottom, large at the top. We use the cut pieces as doors, so we don’t throw them away.
-
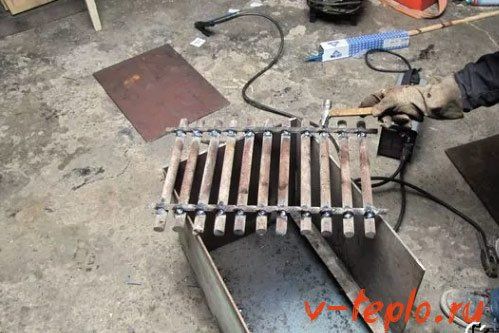
We weld the grates in the chosen place. Usually it is steel reinforcement 12-16 mm thick cut into pieces of the desired length. The fitting step is about 2 cm.
- We weld the bottom if it is not.
- We cut a hole in the lid for the chimney, weld a strip of metal about 7-10 cm high. It is better to make the outer diameter of the resulting pipe for standard chimneys. Then there will be no problems with the chimney device.
- The cover with the welded pipe is welded into place.
- By welding we fasten locks, hinges to the cut-out pieces-doors and put all this in place. As a rule, potbelly stoves are leaky, so seals can be omitted. But if desired, a strip of metal 1.5-2 cm wide can be welded around the perimeter of the doors. Its protruding part will close a small gap around the perimeter.
All in all, that's all. It remains to assemble the chimney and you can test a new stove for the garage.
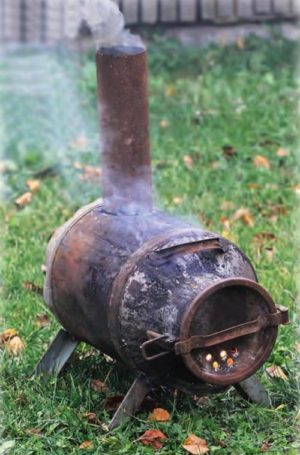
Horizontal
If the body is horizontal, the ash drawer is usually welded on from below. It can be welded to the required dimensions from sheet steel or a suitable sized piece of channel can be used. In the part of the body that will be directed downward, holes are made. It is better to cut something like a grate.
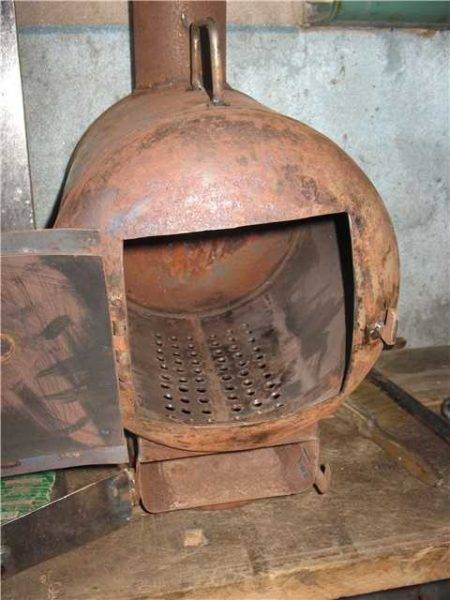
How to make a potbelly stove in the garage from a gas cylinder
Then in the upper part of the body we make a pipe for the chimney. To do this, you can weld a cut piece from a pipe of a suitable diameter. After a piece of pipe is installed and the seam checked, the metal inside the ring is cut out.
Next, you can make the legs.Corner segments are best suited, to which small pieces of metal are attached from below to stand stably.
The next step is to install the doors. On the blower, you can cut a piece of metal, attach loops and constipation. Here without any problems. The gaps along the edges do not interfere - air for combustion will flow through them.


There will be no difficulties even if you make a metal door - welding the hinges is not a problem. Only here, in order to be able to at least slightly regulate combustion, the door needs to be made a little larger - so that the perimeter of the opening is closed.
How to install furnace casting on a metal stove
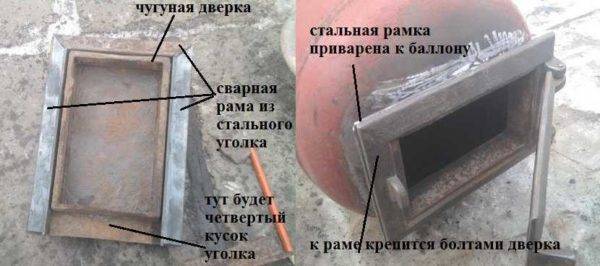
It is problematic to install furnace casting. Suddenly someone wants to have not a steel door, but a cast-iron one. Then it is necessary to weld a frame from a steel corner, attach a casting to it with bolts, and weld this entire structure to the body.
From two barrels
Everyone who used a potbelly stove knows that very hard radiation comes from its body. Often the walls are heated to a red glow. Then next to her is impossible. The problem is solved by an interesting design: two barrels of different diameters are inserted one into the other. The gaps between the walls are covered with pebbles, clay mixed with sand (calcined on fire, covered only when it has cooled down). The inner barrel acts as a firebox, and the outer one is only the body.
This stove will take longer to heat up. It will not immediately begin to give off heat, but it will be more comfortable in the garage and after the fuel burns out, it will warm the room for a couple more hours - giving off the heat accumulated in the tab.
Finishing
Furnace finishing plays a rather important role, but not a key one. Still, finishing is worth doing for several reasons, including:
- Longer heat retention period;
- Prevention of unintentional burns;
- Attractive product appearance.
Clay, sand mixture and much more can be actively used as a finishing material. Often, ceramic tiles are also used, which give the bath an unforgettable appearance and a memorable external texture.
If you plan to additionally paint the oven to give an attractive appearance, then you should use specialized heat-resistant paints for metal!
Why build furnaces from a bath
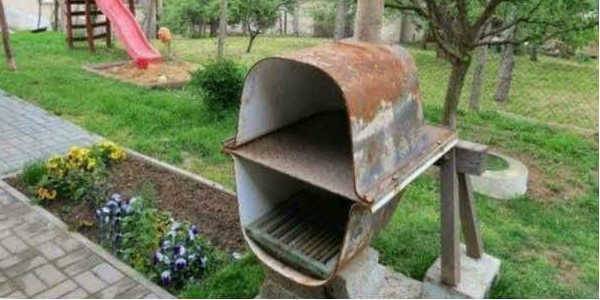
At first glance, the idea of a homemade cast iron heater looks rather unusual and strange. Why make a stove from a cast-iron bath with your own hands, if you can buy a factory-made steel boiler-stove. In fact, there is a rational grain in such an undertaking:
- Any metallurgist will confirm that thick-walled cast iron casting is ideal for arranging stoves, fireplaces, boilers of various designs and models;
- A good cast-iron boiler costs fabulous money, while building a stove from an old bathtub will take a maximum of a couple of thousand rubles and several days of work;
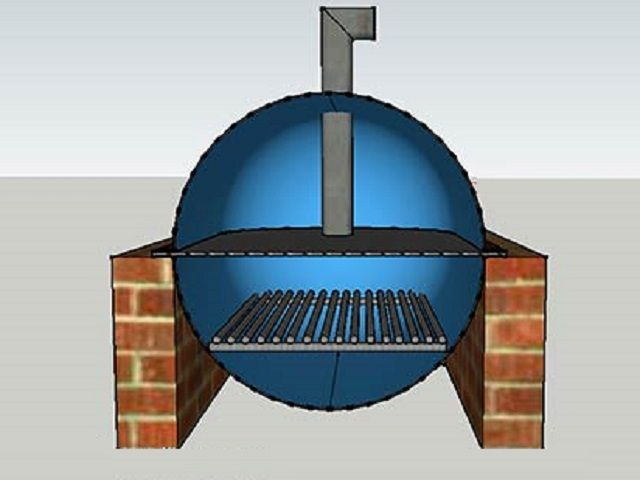
- The semicircular section and the shape of the bath body are ideal for organizing the combustion process, there are no stagnant zones or sharp corners leading to local overheating of the bowl walls.
It is clear that the body of the bowl should not have cracks, metal chips or through corrosion. Due to poor machinability, brittleness and low ductility, cast iron is quite difficult to process, cut and weld in the artisanal conditions of a garage or cottage. Therefore, in order to make a stove from a bath with your own hands, some practice will be required.At least, it will take a long time to select the mode in order to weld the cast-iron walls of the furnace by electric welding.
Materials and tools for work
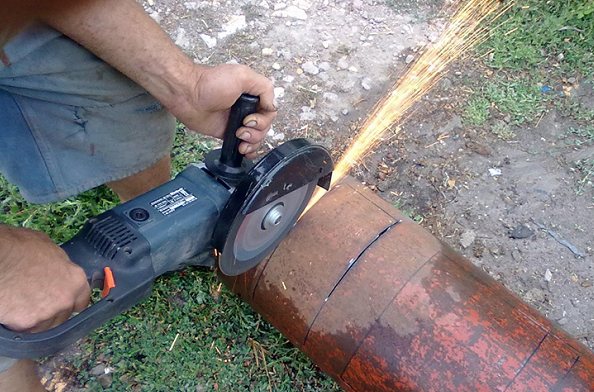
For the manufacture of such a furnace, you need to prepare the necessary tools and materials. Since sawing a cast-iron bath, especially Soviet-made, when metal was really not spared, is not so easy, and “disposable” Chinese appliances may not be able to cope with such a task. For this work, you need a reliable German or Russian tool.
Tools:
Small angle grinder - grinder.
"Bulgarian" must be reliable - a low-quality tool may not even be able to cope with such a task
- Circles for cutting metal, 1 mm thick and 125 mm in diameter, they will need 3 ÷ 4 pieces, depending on the thickness of the cast iron.
- Grinding wheels - for processing the cut sides of metal, files.
- Electric drill with metal drill Ø 9 or 11 m (depending on the selected bolts). It is necessary for drilling holes in the sides of the bath to connect its two parts with bolts.
- Trowel and spatula for bricklaying and finishing work.
- Construction gun for sealant.
- Plumb and building level.
- A hammer.
Prices for angle grinders
angle grinder
Materials:
- The cast iron bath.
- Sheet metal, at least 5 mm thick.
- Cooking two-burner cast-iron stove. Instead, an ordinary metal sheet can be laid.
- Brick for erecting walls that will close the lower part of the bath, which will be the combustion chamber, on three or even four sides.
- Grate grate placed in the furnace.
- Clay and sand for masonry mortar.
- Ready-to-use heat-resistant adhesive mixture for exterior walls with ceramic tiles.
- Heat-resistant sealant (material - heat-resistant silicone).
- Bolts with nuts and washers for fastening the structure.
- Metal mesh "netting" for reinforcing the clay solution laid on the top of the bath, which will act as a cooking chamber.
- Ceramic tiles (possibly broken) for decoration.
- A metal corner that may be required for the manufacture of brackets - for installing a grate that separates the firebox and blower.
- Chimney pipe with a diameter of about 110 ÷ 120 mm.
In order to ensure personal safety, work should be carried out in safety glasses, a respirator and construction gloves.
Prices for heat resistant sealant
heat resistant sealant
Calculation of basic parameters (with drawings and dimensions)
The high efficiency of a potbelly stove can only be obtained if all the main design parameters are correctly calculated.
Pipe
In this case, the diameter of this element is very important. The throughput of the chimney should be less than the performance of the furnace furnace, which is the main distinguishing feature of the potbelly stove. This will allow warm air not to immediately leave the stove, but to linger in it and heat the surrounding air.


It is very important to make an accurate calculation for her. The diameter should be 2.7 times the volume of the firebox. In this case, the diameter is determined in millimeters, and the volume of the furnace in liters
For example, the volume of the furnace part is 40 liters, which means that the diameter of the chimney should be about 106 mm
In this case, the diameter is determined in millimeters, and the volume of the furnace in liters. For example, the volume of the furnace part is 40 liters, which means that the diameter of the chimney should be about 106 mm.
If the stove provides for the installation of grates, then the height of the furnace is considered without taking into account the volume of this part, that is, from the top of the grate.
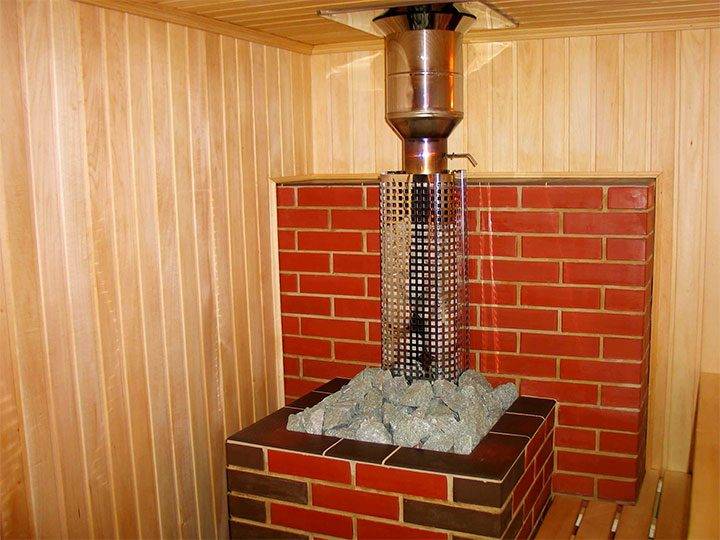
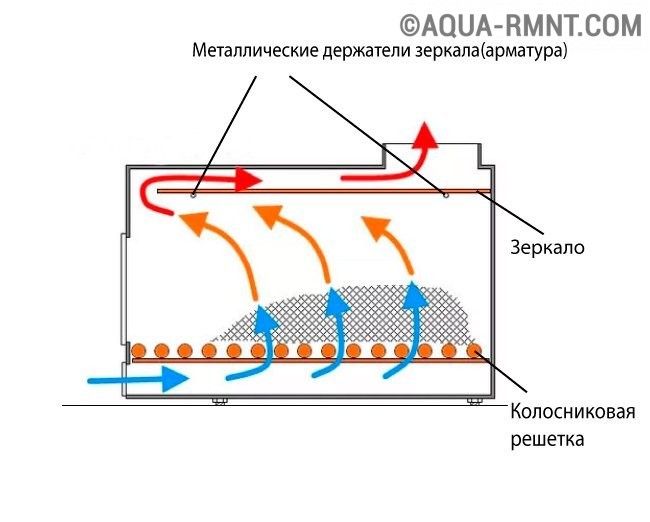
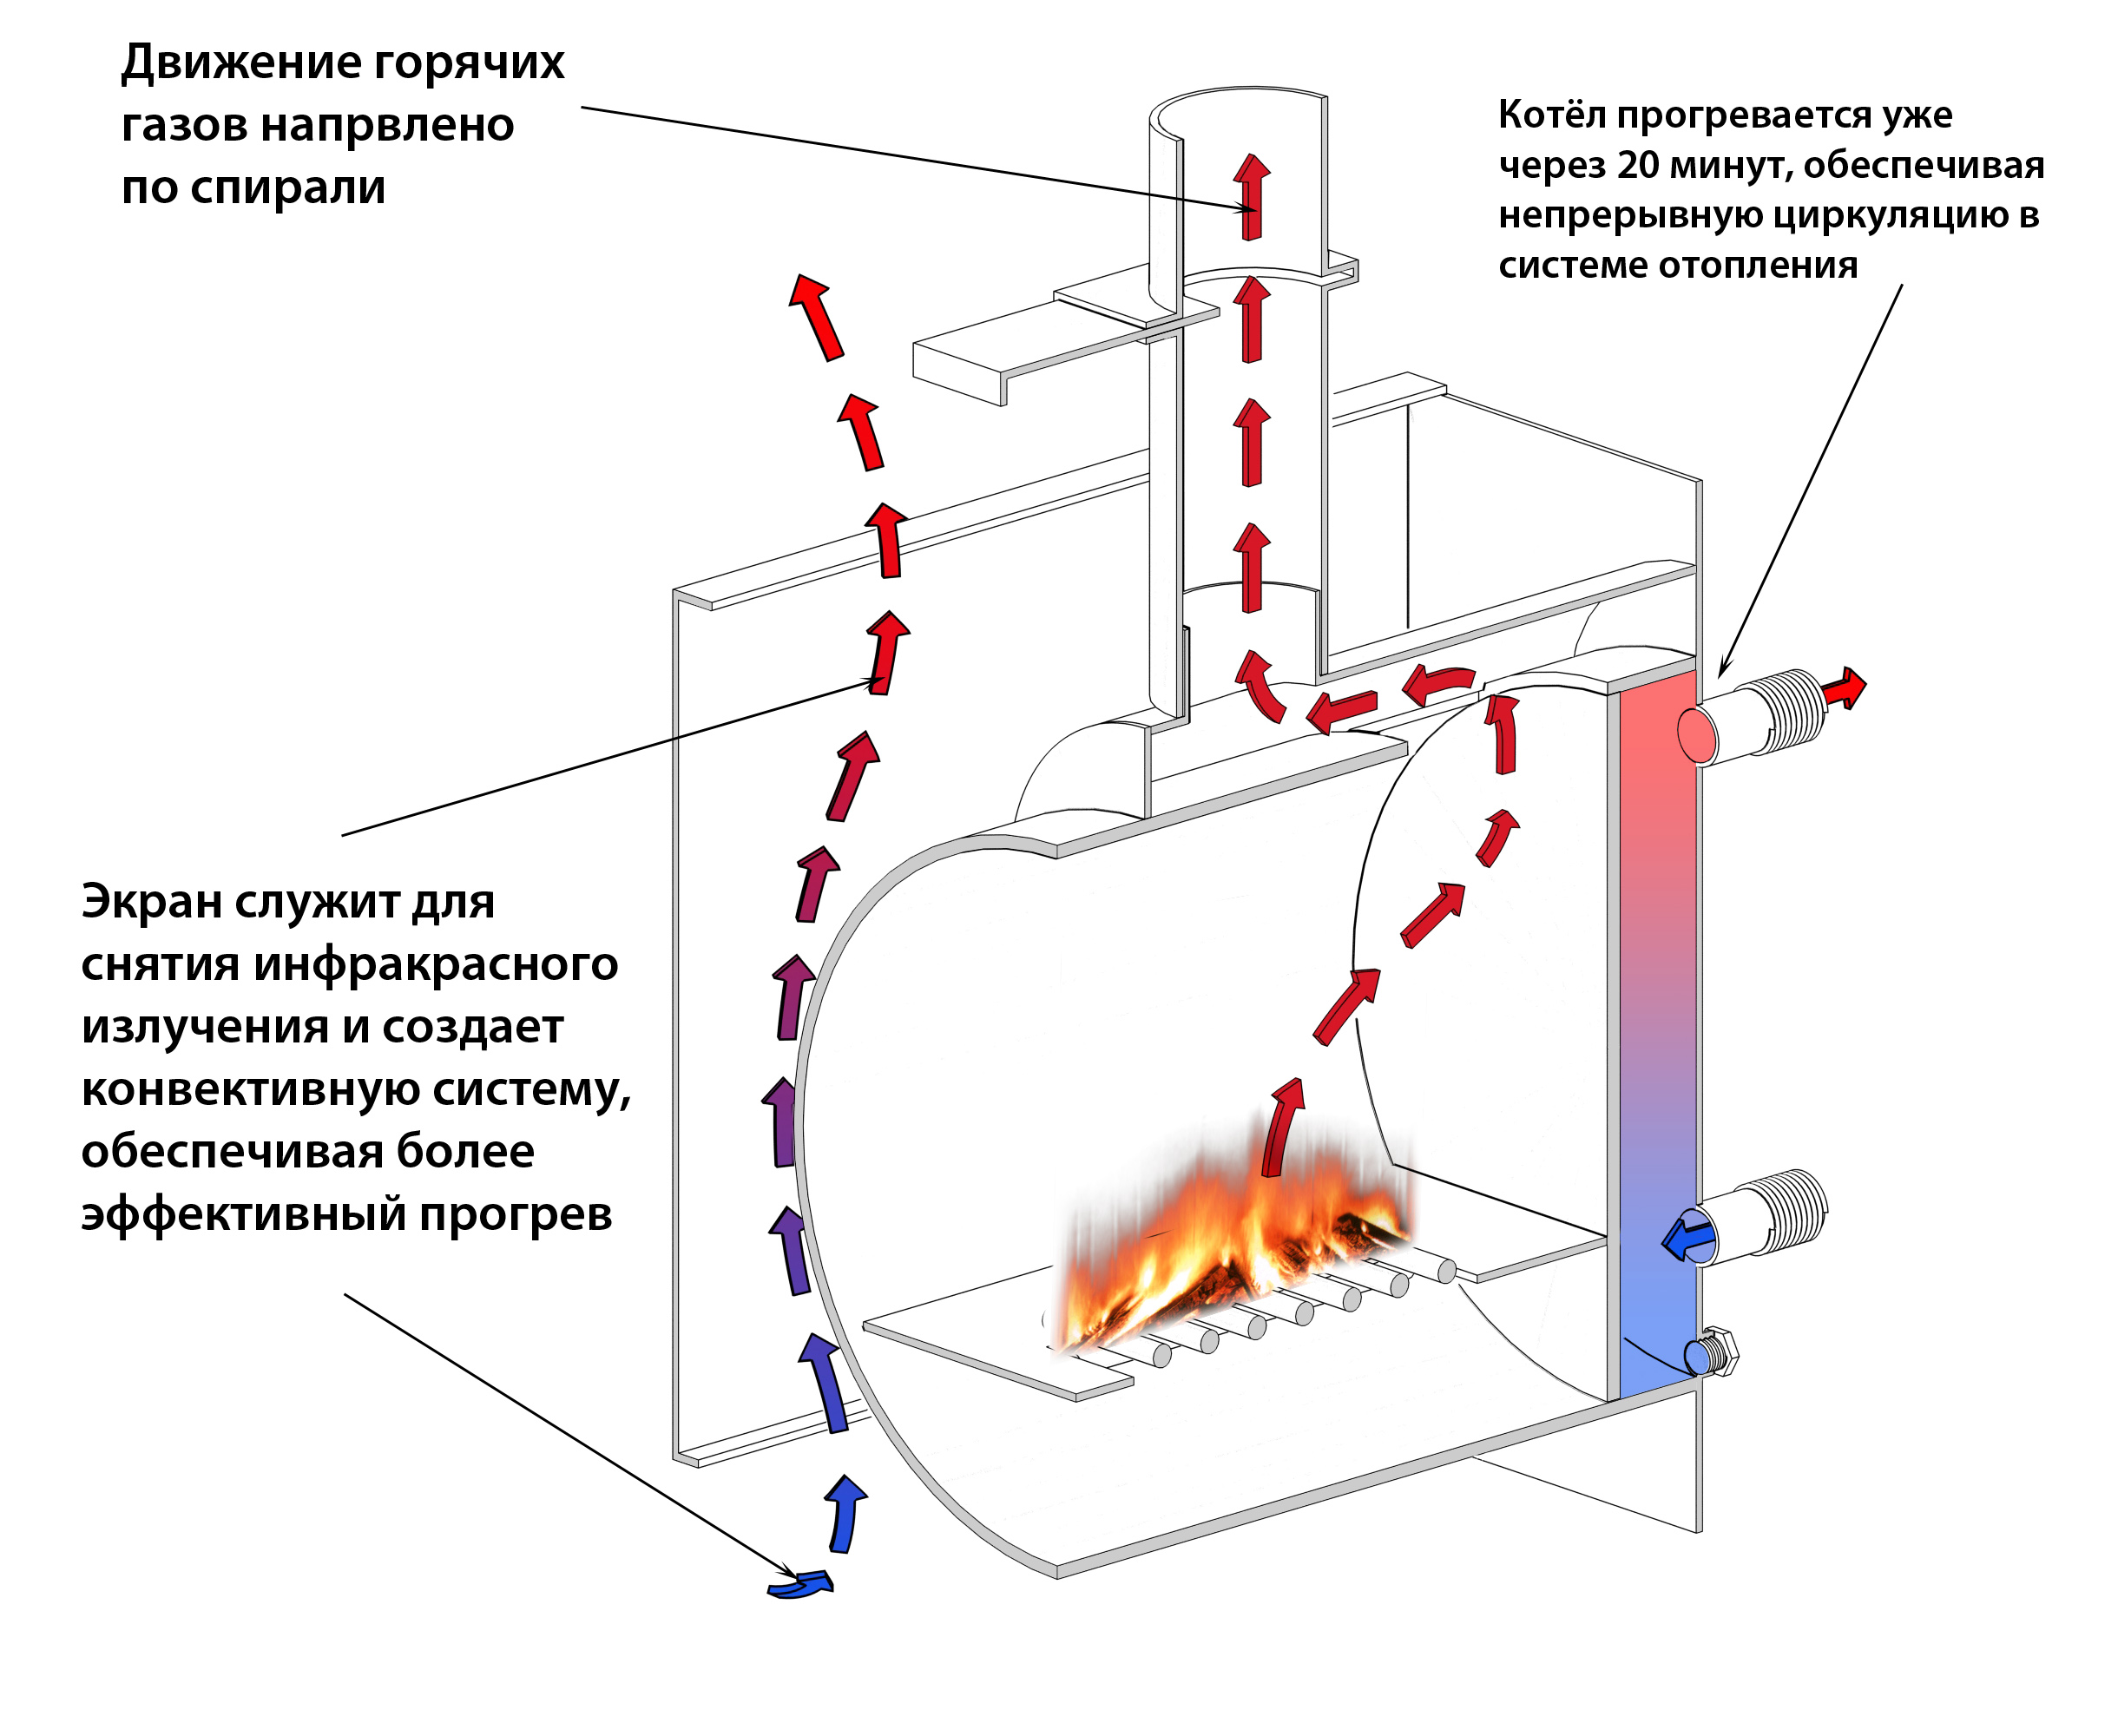
Screen
It is very important to make the hot gases not cool down, but completely burn out. In addition, the fuel must be burned by partial pyrolysis, which requires an extremely high temperature. A metal screen, which is located on three sides of the stove, will help to achieve a similar effect.
You need to put it at a distance of 50–70 mm from the walls of the stove, so that most of the heat will return to the stove. This movement of air will give the necessary heat, and protect against fire.
A metal screen, which is located on three sides of the stove, will help to achieve a similar effect. You need to put it at a distance of 50–70 mm from the walls of the stove, so that most of the heat will return to the stove. This movement of air will give the necessary heat, and protect against fire.
The screen of a potbelly stove made of red brick is able to accumulate heat
bedding
She must be. There are two reasons for this:
- part of the heat is radiated downward;
- the floor on which the stove stands is heated, which means there is a risk of fire.
The litter solves two of these problems at once. It can be used as a metal sheet with an extension of 350 mm (ideally 600 mm) beyond the contour of the furnace itself. There are also more modern materials that do an excellent job with this task, for example, a sheet of asbestos or kaolin cardboard, at least 6 mm thick.
Asbestos sheet can be used for bedding under a potbelly stove
Chimney
Despite all the calculations, gases sometimes go into the chimney not completely burned out. Therefore, it must be done in a special way. The chimney consists of:
- vertical part (1–1.2 m), which is recommended to be wrapped with heat-insulating material;
- burs (slightly inclined part or completely horizontal), 2.5–4.5 m long, which should be 1.2 m from the ceiling, which is not protected by heat-resistant materials, from the floor - by 2.2 m.
The chimney must be brought outside
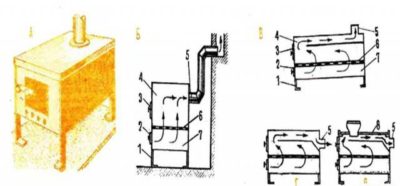
Photo gallery: diagrams for a potbelly stove for a garage
All exact measurements must be indicated on the diagram. The chimney must necessarily be brought out to the street. The potbelly stove can be round or square. The volume of the furnace depends on the presence of grates. The scheme of the potbelly stove depends on the material used


