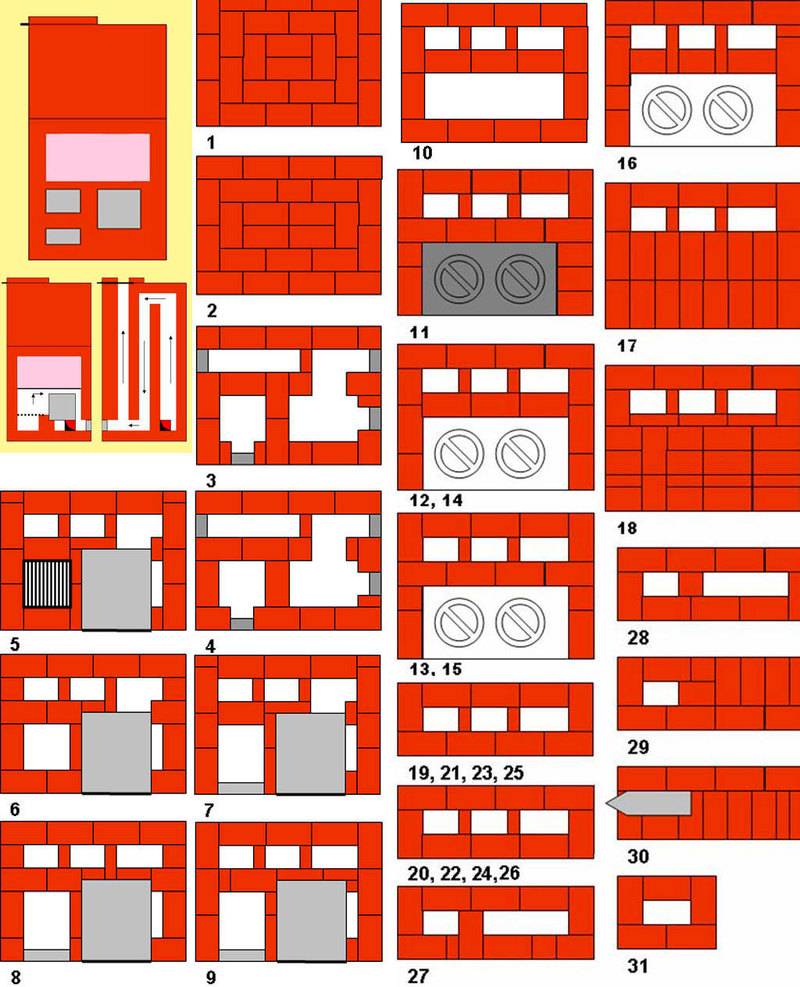
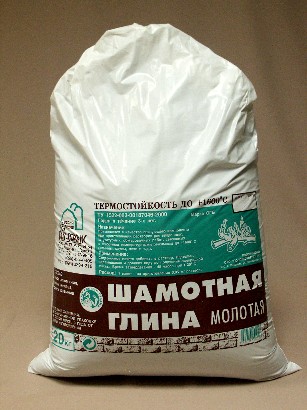
- masonry materials
- The basis of the furnace - the foundation
- The process of the Russian stove
- Power calculation
- Advantages and disadvantages of a brick oven in the house
- The use of brick ovens
- How to choose the location of the furnace?
- What mortar to use for masonry
- Traditional Russian ovens
- With a bed
- with stove
- With water box
- Schemes of brick mini-ovens
- small heating structure
- Small heating and cooking stove
- The best stoves for a Russian wood-fired bath
- Black oven
- "In gray"
- "White" oven
- How to build with your own hands
- Construction cost
- Unusual street hearth
- The main stages and important features of laying the furnace
- Let's start laying the oven
- Stove with hob
masonry materials
Before you start building a furnace with your own hands, you need to purchase materials in sufficient quantities that will be used in its construction. During the work it is necessary:
- red brick M150 in the amount of 1085 pieces;
- silicate brick for the construction of the furnace 150 pcs. Instead, you can use fireclay;
- sand - 80-100 buckets;
- clay -200 kg;
- corner 50 × 50 mm and 40x40 mm;
- steel wire 2 mm - 25 m;
- metal sheet 4 mm 1.5 × 1.5 m;
- roofing material -3 m;
- asbestos cord 5 mm - 10 m;
- wall insulation material.
The construction of the foundation also requires the preparation of appropriate materials:
- sand;
- cement;
- fittings;
- crushed stone;
- formwork boards.
In addition, for the construction of a full-fledged furnace with do-it-yourself stove, which can be used to heat the home and cook, you will need to purchase cast-iron parts:
- grate -1 pc.;
- hob with two burners - 1 pc.;
- gate valves - 3 pcs.;
- two doors for the combustion chamber and the blower, 1 each;
- doors for cleaning - 5 pcs.
After the materials are prepared and the builder has the necessary tools at his disposal, you can proceed to the active phase of work.
The basis of the furnace - the foundation
However, the first thing to do is to provide a minimum distance of 15 cm between the roof slab and the chimney pipe. And only after that you can start marking the place of the foundation, which should be larger than the rest of the structure.
Ideally, the furnace foundation is formed during the construction of a common house foundation. In order for the stove and the house itself to last as long as possible, their foundations should not be tied together. This requirement is due to the fact that the natural shrinkage of the foundations is different due to temperature differences and loads.
The most common technique for building a foundation for a furnace is that the foundation pit is poured with concrete, followed by the construction of bricks. Wooden formwork is pre-placed. The foundation should be wider than the future dimensions of the stove by about 15 centimeters (in each direction). The upper foundation level should be about 19 centimeters below the floor. The foundation must be perfectly level in order to correctly lay the first row of bricks. The foundation is not thoroughly satisfied only when building a fireplace.But then they calculate the load on the floor (on the upper floors)
Without fail, the foundation is waterproofed with roofing felt or roofing felt. If the size of the stove is larger than the width of the materials, they are laid “overlapping” with an allowance of 10 centimeters. In this case, the diagonals are controlled. If the quality of the diagonal directions is violated, then there will be big problems with the further laying of the stove.
The process of the Russian stove
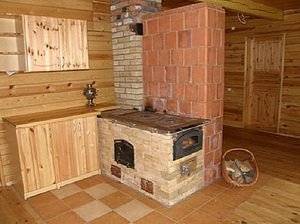
Despite serious competition and a solid history, the construction is still in demand among owners of suburban real estate. That's why, how does a Russian stove work from the inside, it will be possible to focus on the dimensions outside and accordingly plan a place for it and lay the foundation.
Before how to fold a russian oven, you need to understand its principle of operation - the design is a heating device of periodic action, that is, when burning firewood, it accumulates heat, then gives it away for almost a day. So the building can warm or languish for almost a day, which makes it possible to cook baked milk in it, steam porridges and soups without controlling the process.
Before you make a Russian stove, you should build a separate foundation base that is not connected to the tape, since the structure usually has a lot of weight
This is especially important when the house "dances" on heaving soil during freezing and thawing. In this case, the stove will move along its own amplitude along with its foundation, without destroying the finish and without affecting the walls and openings.

Russian stove in section during heating and languishing
Work principles:
- the whole structure stands on a brick guardianship or concrete;
- firewood for kindling is stored in the stove, where it dries very well and lights up instantly when ignited;
- the top of the stove is made with a hemispherical vault, like a trough;
- sand, clay, brick battle - any heat-intensive material is poured on it, and on top of it is laid out under the furnace - the front part of the furnace (cooking chamber), it is laid without clay mortar.
If you ignore the filling, then you can forget about real hearth bread and pies. By the way, they are baked on cabbage leaves.
Next comes the bail with an overtube and a hail in the form of a tapering nozzle. Ash pans are provided on the sides in the wall near the walls - recesses for smoldering coals (for the next kindling) and ash. Sometimes they are raked into an ocholok - a part of a cast-iron or stone slab (pole), protruding from the face (chela) of the furnace.
To reduce costs and cleanliness in the room, an ash pan and an eyeglass can be omitted. Previously, they were raked into the corner of the mouth, then the coals of birch, maple, elm, oak and aspen kept heat only for a day.

Cooking in a cast iron stove
Most likely, this is where the belief came from that the Russian stove is quite picky in the form of fuel. But this is not so - it works on any solid fuel, including:
- brushwood;
- dung;
- deadwood;
- sawdust
- straw;
- peat briquettes.
The zagnetok, thanks to this configuration, acts as an economizer, where the following happens: the smoke circulation heats up the air, which enters the furnace, without extracting oxygen from it and without preventing combustion - there should be no mixing of heat flows. In fact, the zagnetok is an energy recuperator (heat exchanger).
Before as build a Russian oven, you should check the dimensions in advance - this is important so that the structure does not smoke, does not cool down quickly and does not use a lot of firewood. For the same purpose, perfectly smooth hail vaults are made.
Moreover, they cannot be plastered, so the bricks on the inside are hewn and polished to a gloss - then there will be no turbulence in the overtube.

The smoke from the oven goes up the chimney
Power calculation
Each furnace, no matter what it is made of, has its own power. If you do the design yourself, then you need to know how to do it. But it’s worth mentioning right away that the house is first insulated, and then they just start calculations.
There is a very simple formula that helps solve the problem. 1 sq.m. a heated room requires 0.5 kW of power, if the conditions are normal, and 0.76 kW, if there are severe frosts outside. For example: the height of the furnace is 2.5 m, the dimensions are 1.5x1.5 m, and the surface area is 17.5 sq.m., then the average power indicator will be 8.5 kW. But with intensive use, this figure will rise to 13.3 kW. On average, this capacity is enough for heating 80-100 sq.m.
If we talk about the firebox, then it is better to buy it in the store, since the calculations here are very complicated.
Advantages and disadvantages of a brick oven in the house
So, let's try to understand why an old heating appliance is often more preferable than its modern high-tech counterparts. There are several reasons:
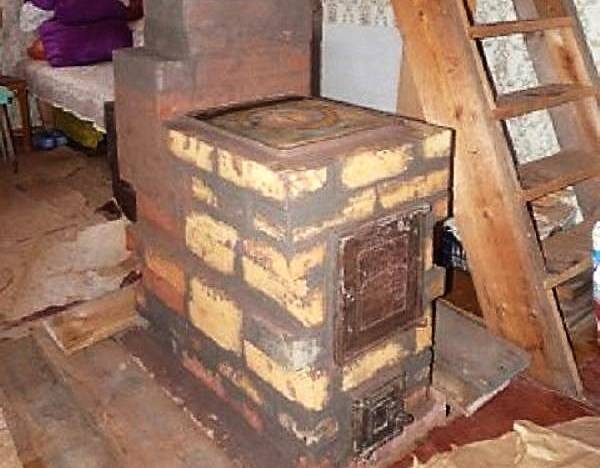
- The body of the stove is an excellent heat accumulator: Due to this property, a brick stove has to be fired much less often than a conventional steel and even cast iron one.Some varieties keep heat up to 24 hours, while firewood needs to be thrown into the firebox of a metal stove every 4-6 hours.
- The ability to accumulate heat makes a brick oven more economical and less harmful to the environment than its metal "substitutes". The fuel in it burns in the optimal mode - with the highest heat transfer and almost complete decomposition of organic molecules into water and carbon dioxide. The resulting excess heat is absorbed by the brickwork and then gradually transferred to the room.
- The outer surface of the oven does not heat up to a high temperature.
Due to this, the thermal radiation generated by this unit is softer than that of hot steel stoves. In addition, upon contact with hot metal, the dust contained in the air burns, releasing harmful volatile substances (this can be recognized by the characteristic unpleasant odor). Of course, they cannot be poisoned, but they certainly cause harm to health.
A brick oven (this does not apply to stone ones) emits steam when heated, and absorbs it again when it cools. This process is called kiln breathing. Thanks to him, the relative humidity of the heated air always remains at a comfortable level - within 40-60%. When using any other heating device that is not equipped with a humidifier, the relative humidity in the room decreases, that is, the air becomes dry.
A steel furnace has nowhere to put excess heat, so it has to either be heated often, putting small portions of fuel, or operated in smoldering mode.In the latter case, the operating time on one tab of fuel increases, but it burns out with incomplete heat transfer and with a large amount of carbon monoxide and other environmentally harmful substances - the so-called. heavy hydrocarbon radicals.
What can be opposed to all of the above? The cooled room with a brick oven warms up for a long time. Therefore, homeowners are still advised to acquire an additional steel convector that will heat the air in forced mode while the stove is heating.
It should also be noted that a brick oven is a rather massive structure that should be built along with the house. And ideally, this should be done by an experienced master, who still needs to be found.
The use of brick ovens
The scope of application of stoves is not limited to their main functions - heating and cooking. Here are some other tasks that such a unit can solve:
- Smoking meat and fish.
- Remelting of scrap metal (cupola furnace).
- Hardening and cementing of metal parts (muffle furnaces).
- Firing of ceramic products.
- Heating blanks in the blacksmith shop.
- Maintaining the required temperature and humidity conditions in the bath.
But in poultry houses, greenhouses, greenhouses and livestock farms, it is not recommended to build a brick oven: here she will have to breathe putrefactive fumes, which will lead to rapid deterioration.
How to choose the location of the furnace?
It is very important to decide on the choice of the place where the Russian stove will be installed. If its location is in a wooden room, be sure to make the distance between the walls of the stove and the house approximately 20 cm.
It is best to protect wooden walls for safety, using non-combustible material, such as asbestos boards.The gap made will allow for an audit of the walls of the furnace, which is done before the onset of the heating season.
If the stove is installed in the opening between two rooms, then it is lined with brickwork, at least 20 cm thick. An asbestos sheet gasket is made between the masonry and the wooden wall.
What mortar to use for masonry
The quality of the masonry mortar directly affects the reliability and durability of the finished furnace. Masonry will be carried out using a sand-clay mortar.
There is nothing difficult in preparing the solution. Take clay, fill it with water and soak it. Sift the mixture through a sieve and then stir into "clay milk". Finally, add some water to get a sufficiently viscous and plastic solution.
Remember, the reliability and strength of the furnace directly depends on the correct preparation of the masonry mortar. Do everything right - the stove will effectively heat your home for many years. Break the technology or decide to save a lot on materials - the thermal unit is unlikely to be able to fully reveal its potential and stand for at least a long time.
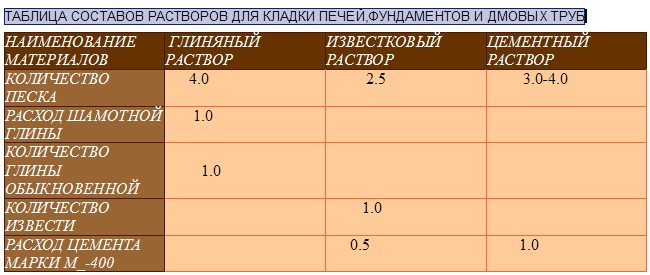
The mortar used for laying the stove
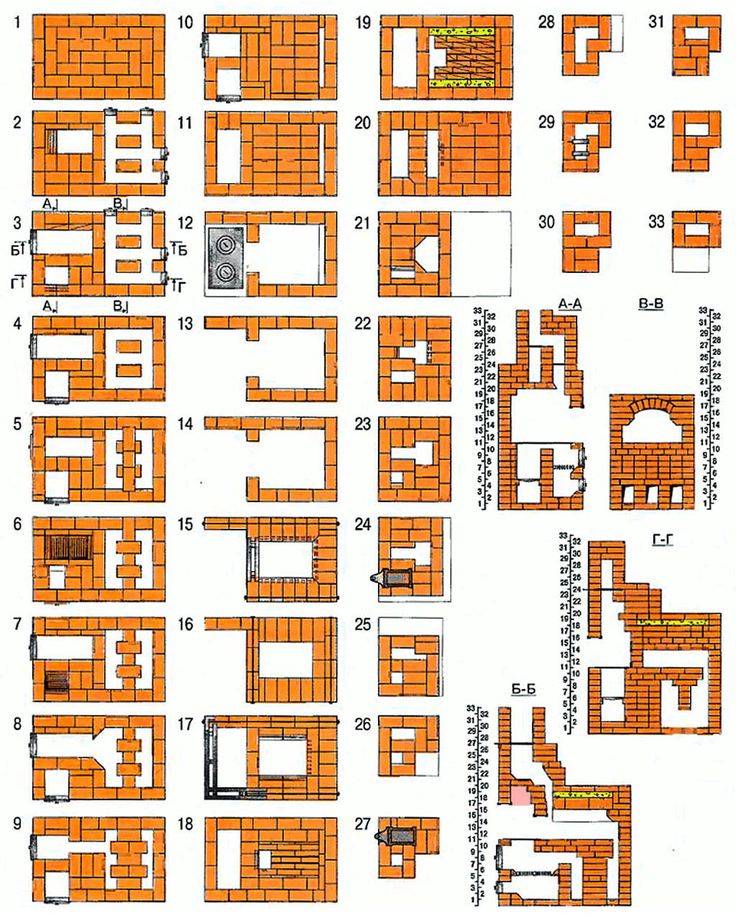
Traditional Russian ovens
Despite all the variety of devices of Russian stoves, there are several of their main types.
With a bed
In the Russian hut on stoves in the cold season, heated sleeping places were arranged. While the thermal insulation of the walls was not reliable, they tried to make such beds as high as possible, where warm air was collected under the ceiling. On the floor you had to climb a ladder. They accommodated from 2 to 6 people.
Traditional Russian oven with stove bench
Later, the design of the buildings improved.The beds were attached to the stoves on the side, passing inside the smoke channel for heating. The height from the floor did not exceed 0.5 m.


with stove
If a heated bench is not attached to the stove, a cast-iron stove is placed above the firebox. It acts as a cooking surface. Covered burners (usually two) are factory cast in the stove. If necessary, the lid can be removed and installed in the opening of the cauldron with food.
With water box
A heating box for water with a collapsible tap is built directly into the masonry. As an option, a metal riveted or welded case is mounted, where a box with water is inserted.
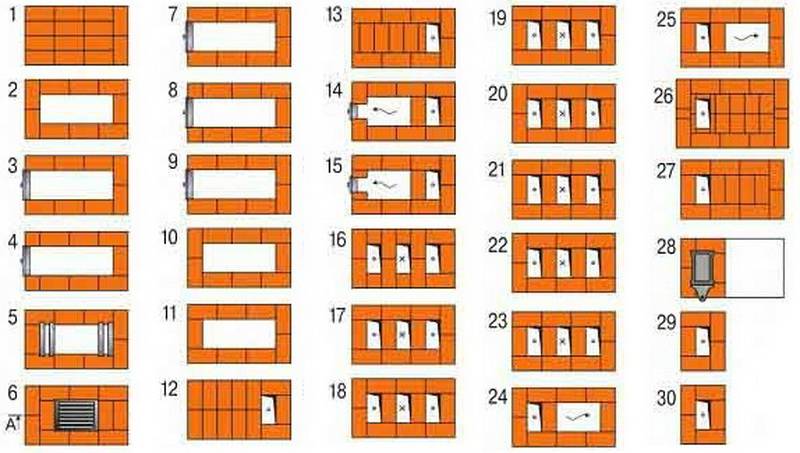
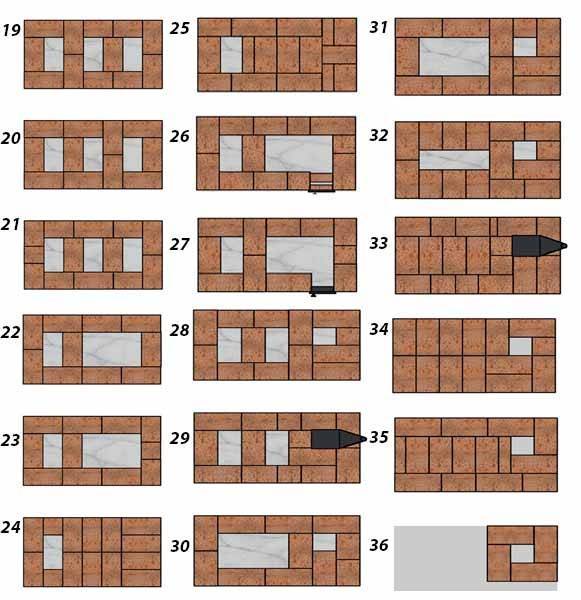
Schemes of brick mini-ovens
Small stoves occupy a small area, the dimensions of their bases range from 50 to 70 centimeters in width and up to 65-100 cm in length. The height of the heating structure is from 1.5 to 2.3 meters. A hob, oven, hot water tank are built into the oven. Stove makers have also developed appliances designed only for home heating.
small heating structure
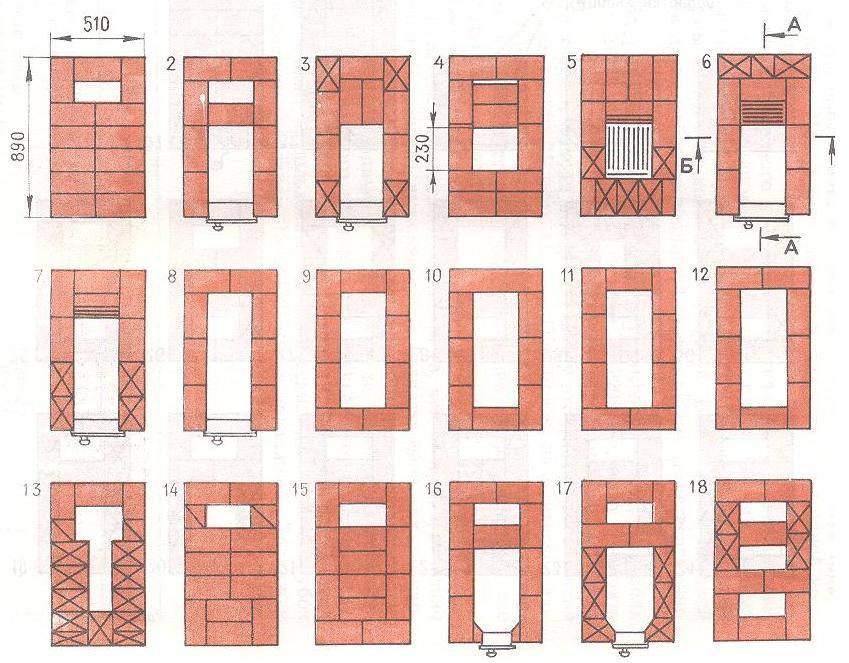
This is the simplest heating structure. Let's analyze the model of the following sizes:
- base width - 51 cm;
- base length (depth) - 89 cm;
- height - 238 cm.
A mini-stove is installed in the middle of the kitchen or against the wall. The optimal heating area is 20-35 meters. Interior partitions are erected around the stove, which allows you to heat both the kitchen and the adjacent room.
Inside the device are:
- combustion chamber;
- blew;
- smoke channels leading to the chimney.
The furnace door of the mini-stove (cast iron or glass) is selected depending on the aesthetic preferences of the owners of the house. The door made of heat-resistant glass, through which you can see how the firewood is burning, gives the structure a resemblance to a fireplace.Two smoke dampers are installed in the middle and upper parts of the furnace. There is one door for cleaning channels. To build this model of the device you will need:
- 260 pieces of ceramic bricks;
- 130 pieces of fireclay bricks;
- grate (40x23 cm);
- furnace (30x20 cm) and blower (20x14 cm) doors;
- 2 doors for cleaning holes (20x40 cm);
- metal pre-furnace sheet (50x70 cm);
- two sheets of roofing material 60x100 mm in size;
- sand and clay (or ready-made clay-sand mixture for masonry), clay-chamotte mixture.
Reference. Masonry mortar increases the volume of the device by the thickness of the joints.
The base and upper part of the mini-oven is laid out with ceramic bricks on a clay-sand mortar. The firebox is placed from fireclay bricks on a clay-fireclay mixture.
Three and a half bricks fit on the long side of the base, 2 standard bricks 25 cm long on the short side. The masonry consists of 35 rows in height.
Small heating and cooking stove
This is a model mini ovens for heating and cooking - a convenient and very compact structure. The optimal area of a heated room at sub-zero temperatures is 20-25 square meters.
The device has the following dimensions:
- base length (depth) - 64 cm;
- base width - 51 cm;
- height - 215 cm.
The structure is being built in the kitchen. The device includes:
- blew;
- combustion chamber;
- smoke channels leading to the chimney;
- cooking floor;
- niche for the oven.
The cast iron cooking floor has a hole that closes with a disk and a circle. On sale there are also continuous floorings. A metal oven or hot water tank with a tap is placed in a niche for the oven chamber.If a niche is left free, it serves to dry things. To build a stove you will need:
- 222 pieces of ceramic bricks;
- grate (40x25 cm);
- firebox door (20x20 cm);
- blower door (14x14 cm);
- cooking floor (35x38 cm);
- metal oven or hot water tank;
- iron pre-furnace sheet (50x70 cm);
- two doors for cleaning holes (20x14 cm);
- two valves;
- a piece of flat slate;
- steel corner;
- clay, sand or ready-made clay-sand mixture for masonry.
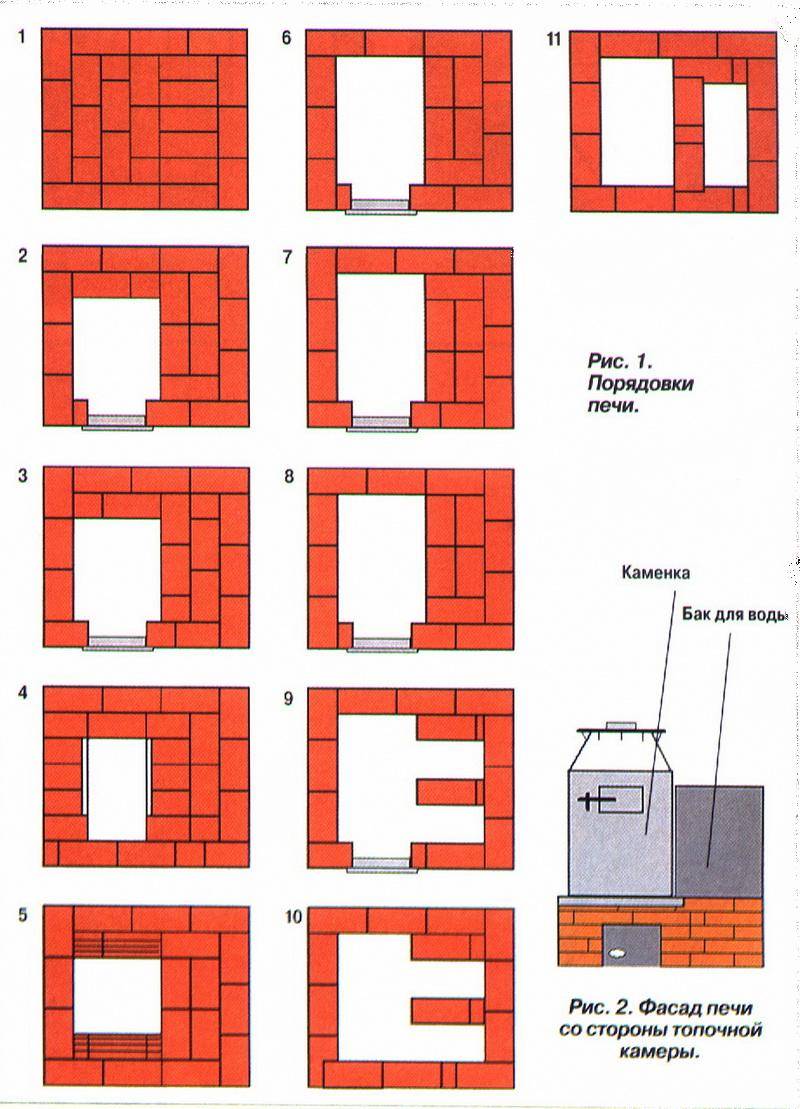
The best stoves for a Russian wood-fired bath
There are several methods known on how to build a stationary hearth for a bath out of bricks. They differ in the ways in which combustion products are removed from the furnace.
Black oven
The oldest design places minimum demands on the quality of materials. The stove does not have a chimney. The products of combustion go directly into the room, filling it with thick smoke and soot. From the bath, the smoke comes out through the top slot above the door. Despite all the shortcomings, the design has a plus: the highest heat transfer. In addition, the smoke disinfects the room and drives out insect parasites.
"In gray"
The gray oven appeared as a development of the black one. A hole is made in the roof above the hearth and a wooden pipe is led into it. According to the same principle, smoke comes out in mobile yurts of nomads.
Nowadays, the “gray” method is practically not used, except when there is not enough experience for high-quality masonry or you want to save on materials.
The principle is simple: first, they wait for the complete combustion of firewood, close the smoke hole and then use the bath for its intended purpose.
"White" oven
This is a standard design with the output of combustion products through a heat-resistant brick chimney.This oven differs from the previous options:
- good traction;
- lack of flue gas indoors;
- protection from flying sparks.
Best stoves for Russian bath on wood - just like that.
How to build with your own hands
To arrange a brick oven with a heater in the bath, choose a place in the steam room, taking into account the size. The most common options are 3.5x4 bricks (89x102 cm in plan) or 4x5 bricks (102x129 cm). Be sure to provide a fire-prevention indent from the wall of the furnace to the combustible structures of the bath at least 40 cm. The furnace door is usually released into the dressing room.


Construction cost
The need for bricks for a hearth with a heater:
- In a steam room up to 4 m2 - 650 pcs.
- A steam room with a dressing room with an area of 5 m2 - 850 pcs.
- Room up to 6 m2 - 1100 pcs.
With an average price per unit in the range of 22-25 rubles, the price of masonry material will be 16-28 thousand rubles. Fireclay bricks for the firebox (30 pcs.) - 2 thousand rubles. A set of furnace casting - 25 thousand rubles. Total purchase costs 43-55 thousand rubles.
Unusual street hearth
Scheme of a long-burning furnace.
Most summer residents try to create a cozy corner on their backyard where you can relax, enjoy nature, cook food on fire. In the evening, many people like to warm themselves by the hearth, bake potatoes, and brew fragrant tea. The kitchen stove in the garden house is not quite suitable for this purpose. A completely different thing is an outdoor stove. Any dish cooked in it seems much tastier than homemade.
The summer cottage in the recreation area should be built from environmentally friendly materials and have a neat appearance. For a small area, a compact design that you can create with your own hands is suitable.All these requirements are met by the original outdoor oven - tandoor. You can cook almost everything in it: bread, pastries, first and second courses. Especially delicious are pilaf, flatbread and baked vegetables.
The size and shape of the hearth, the location of the firebox, everyone chooses according to their own preferences. For work you will need:
- a huge cauldron (cauldron);
- vegetable oil;
- paper or newspaper sheets;
- clay;
- sand;
- sheep's wool or an armful of straw;
- bricks or stones for the foundation.
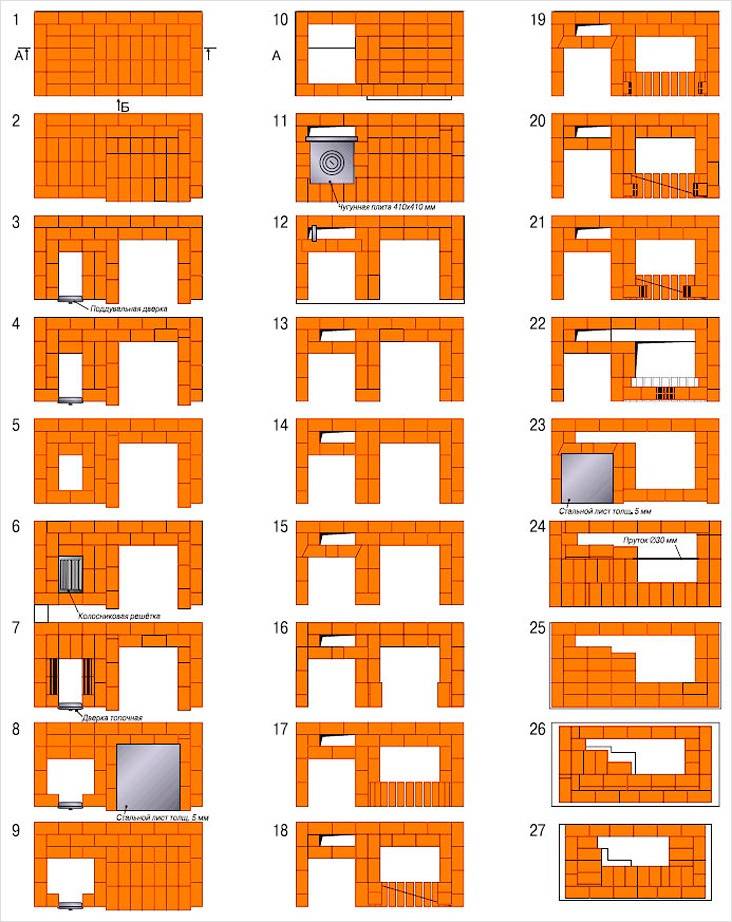
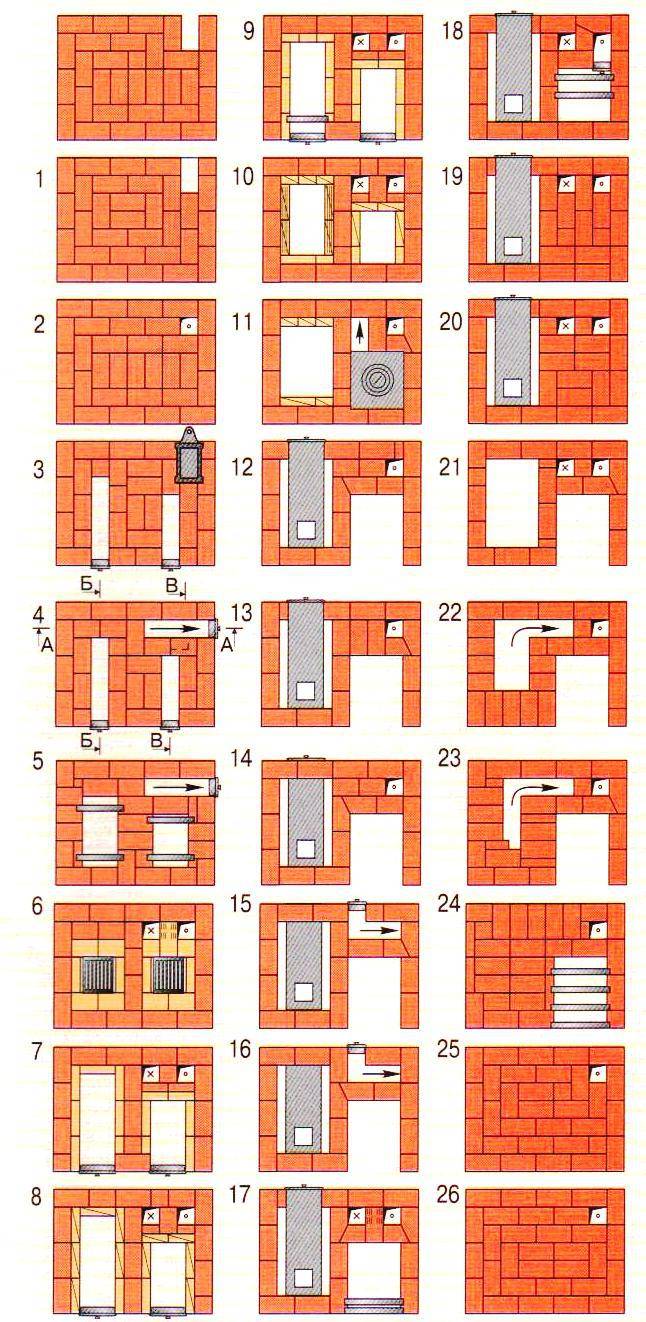
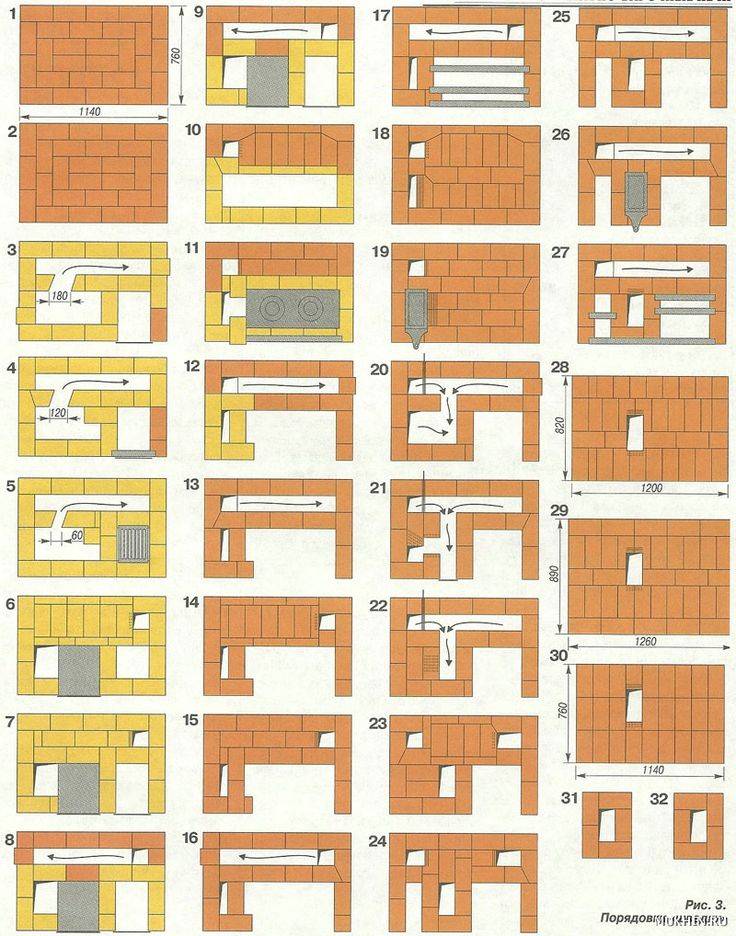
The main stages and important features of laying the furnace
From the moment the foundation is poured to the start of construction, 3-4 weeks should pass. During this time, the base will gain the necessary strength and be able to withstand the weight of a brick oven. The work in question requires maximum responsibility and concentration on the part of the performer. Any mistakes can lead to irreparable consequences, so tune in to work in advance and allocate enough time to complete it.

DIY brick oven
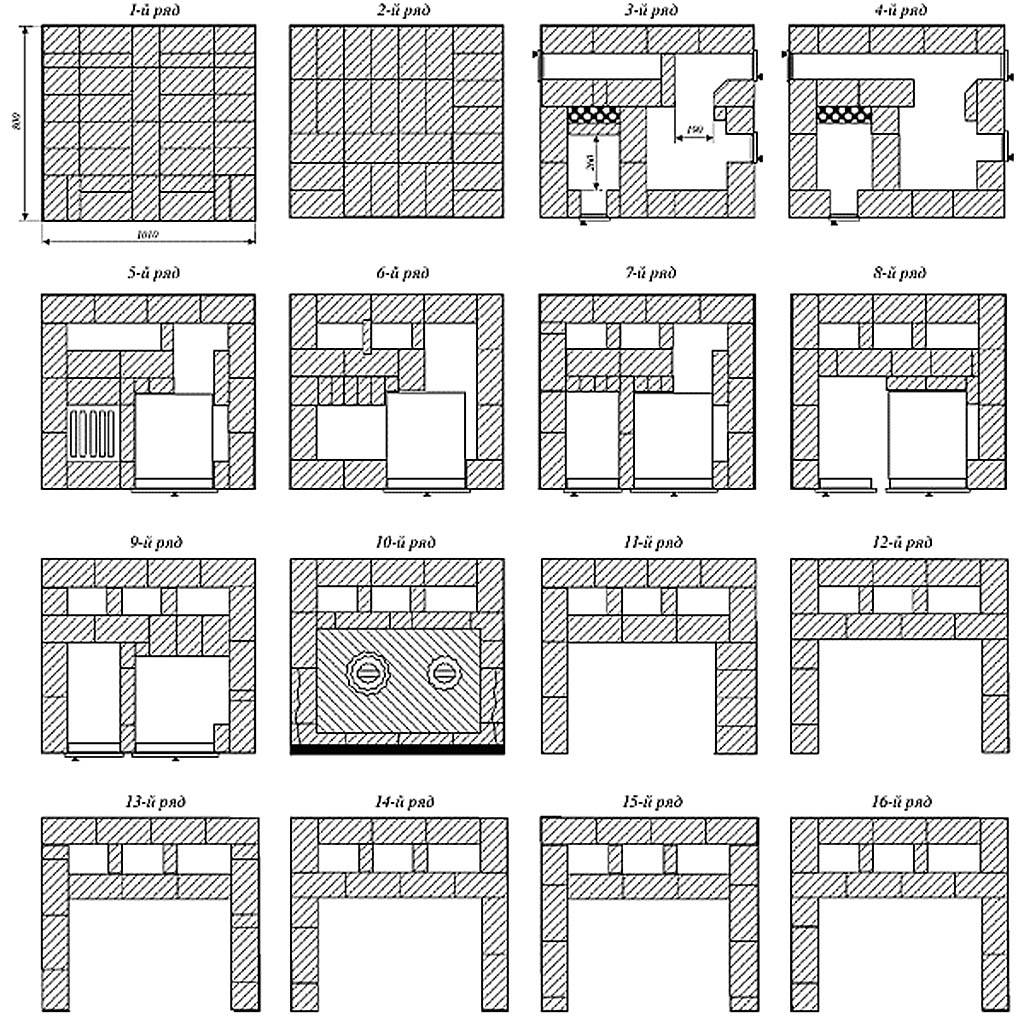
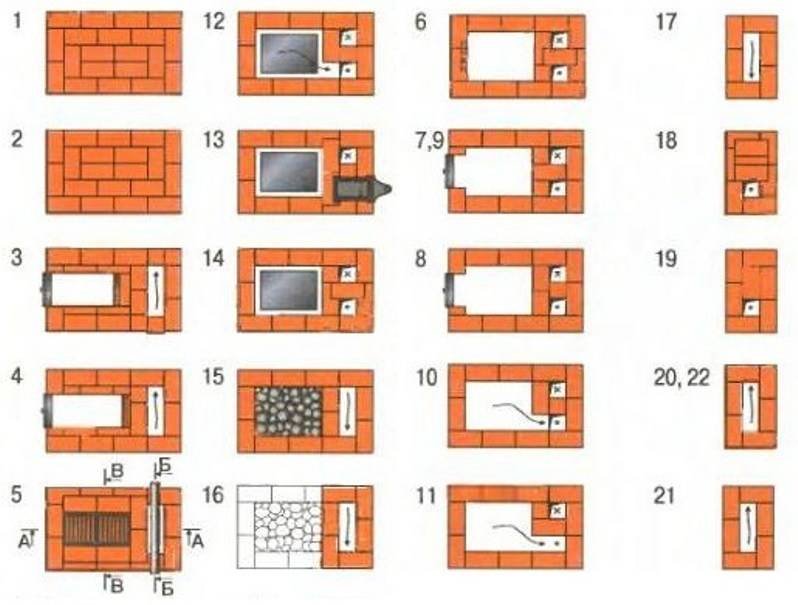
The laying of the furnace is carried out in several stages.
First stage. Lay out the ash pan and the lower part of the first cap from the brick. Carry out masonry using the previously discussed sand-clay solution.
Second phase. Install the ash pan door into the masonry. Use galvanized wire to fix the door.
Install the ash pan door into the masonry
Third stage. Install a grate above the ash pan chamber.
Install a grate above the ash pan chamber
Fourth stage. Mount the firebox. Surround the inside of this compartment with refractory bricks. Bricks lay out "on edge". At this stage, you need to use a special masonry mortar.It is prepared in the same way as the standard one, but instead of simple clay, refractory clay is taken, i.e. fireclay. Secure the combustion chamber door with a steel plate and the wire you already know.
Fifth stage. Continue the standard laying until you reach the 12th row. Having reached this row, close the combustion chamber and evenly lay the tiles with burners. This plate must be made of cast iron. Check the evenness of the laying using the building level.
Sixth stage. Lay out the first cap. It is built in the left edge of the stove. At the same stage, a canal for the summer course is being equipped.
Seventh stage. Install the stove and lay out the walls of the cooking compartment. Keep the calculation of the lower cap mentioned earlier.
Eighth stage. Install a gate valve for the mentioned summer run channel. This valve is located in the inner corner of the brewing compartment.
Ninth stage. Lead the laying to the 20th row. Having reached this row, close the cooking compartment and the first hood. Be sure to leave in the solid masonry the required number of openings for the summer run and the lifting channel, as well as the vents of the cooking compartment. Place bricks on steel corners - this way you will ensure higher strength and reliability of the stove.
Tenth stage. Close the portal of the brewing compartment with hinged fireplace doors. It is better that the doors have heat-resistant glass inserts. This solution will allow you to monitor the process of burning fuel and admire the flame.
Eleventh stage. Install cleaning doors for easy soot removal. For installation, choose a place to which it will be easiest for you to get to.
Twelfth stage.Lay out the walls of the cap almost to the top edge of the wall opening. At the top, block the stove with a couple of rows of bricks. Fill the gap between the top of the stove and the jumper with mineral wool. This will provide additional thermal insulation and slightly increase the heating efficiency.


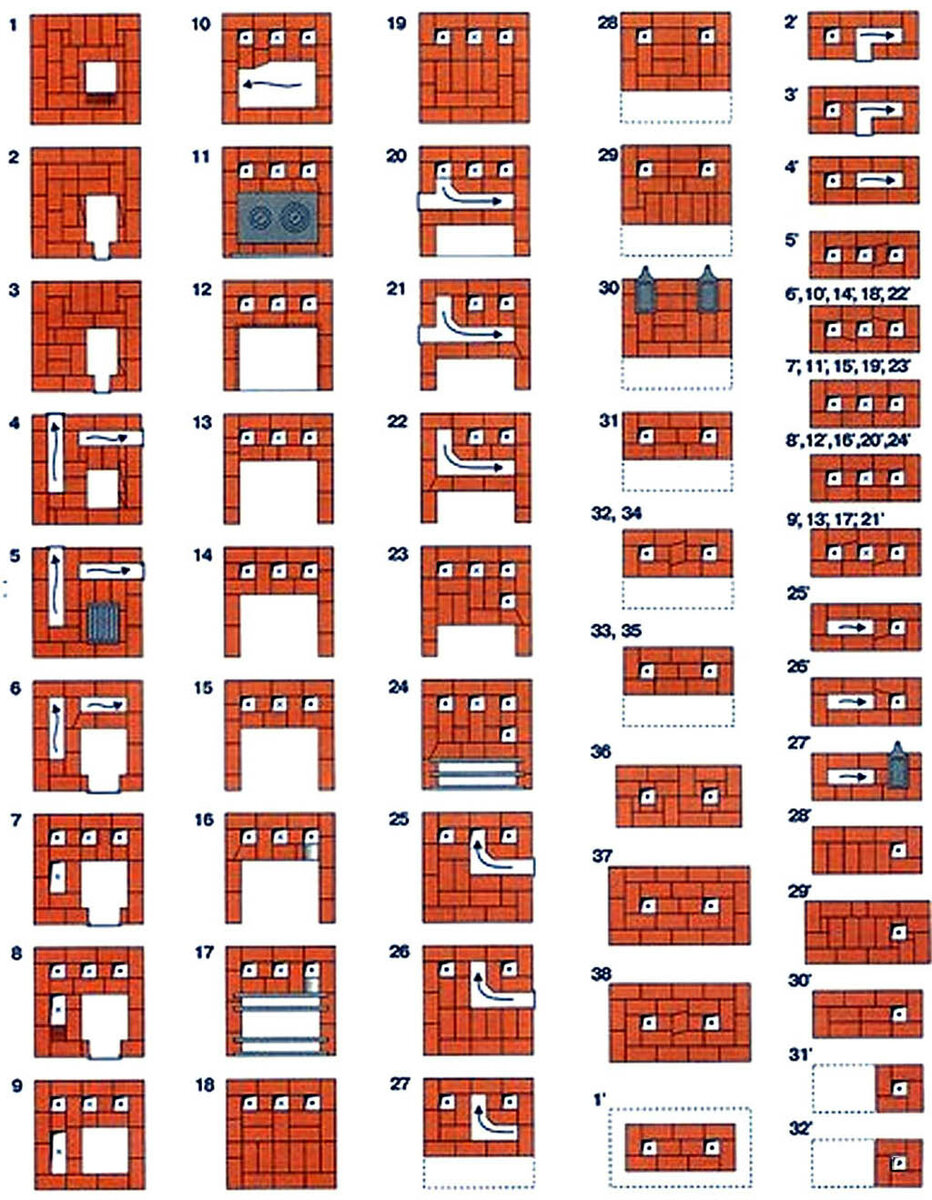


Thirteenth stage. Lay a decorative band around the upper perimeter of the unit.
Fourteenth stage. Proceed to the device of the chimney pipe. It is better that the chimney was brick. This design will last much longer than the same metal or asbestos pipes.
In the end, all you have to do is lay out the chimney to the end and, if desired, finish the exterior of the stove. The easiest option is plastering. Otherwise, be guided by your own preferences and available budget.
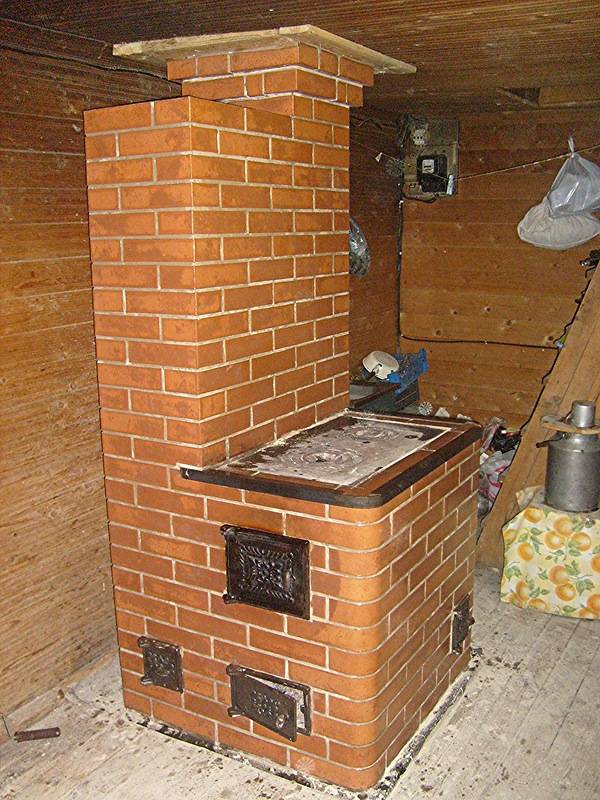
Thus, laying the stove, although not a simple event, but it is quite possible to do it yourself. It is enough to simply understand the technology and follow the instructions in everything. Remember, the materials for work should be of the highest quality. And the schemes of furnaces tested over the years will allow you to independently build a unit that will heat your house for many years without any problems and complaints.
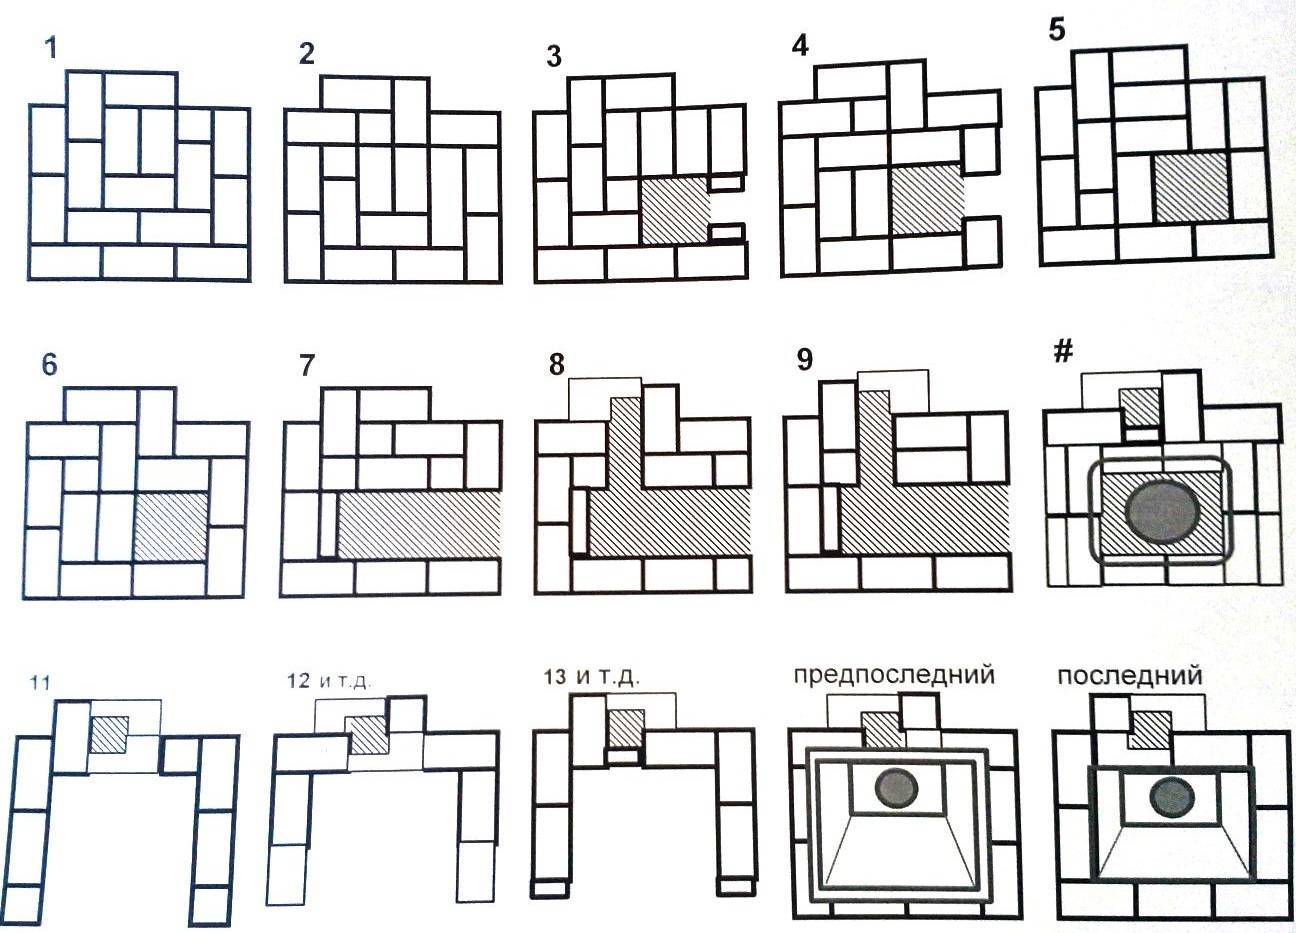
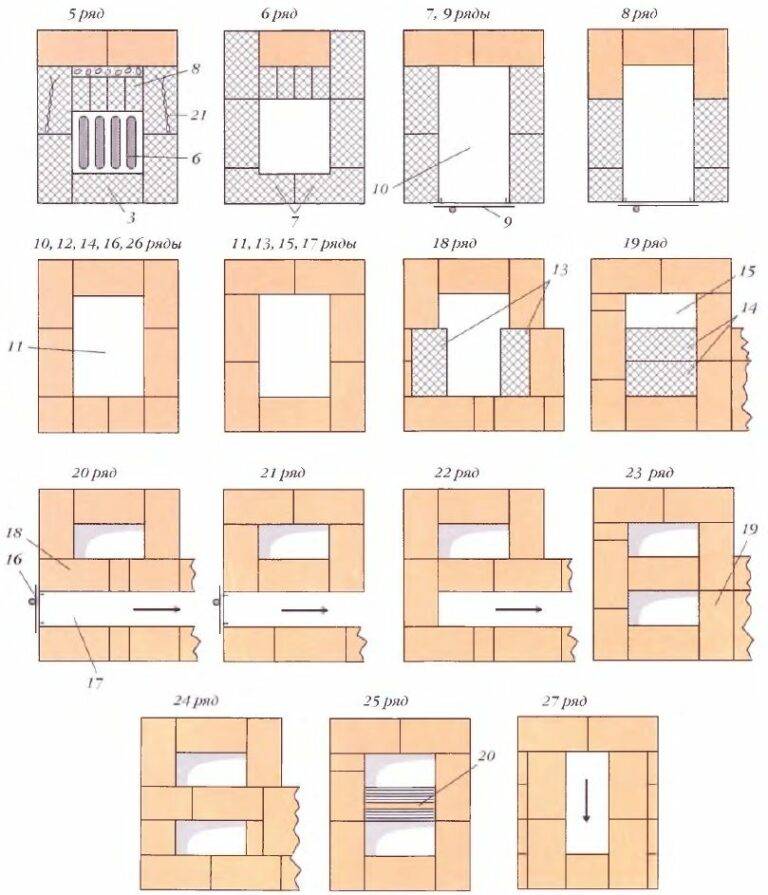
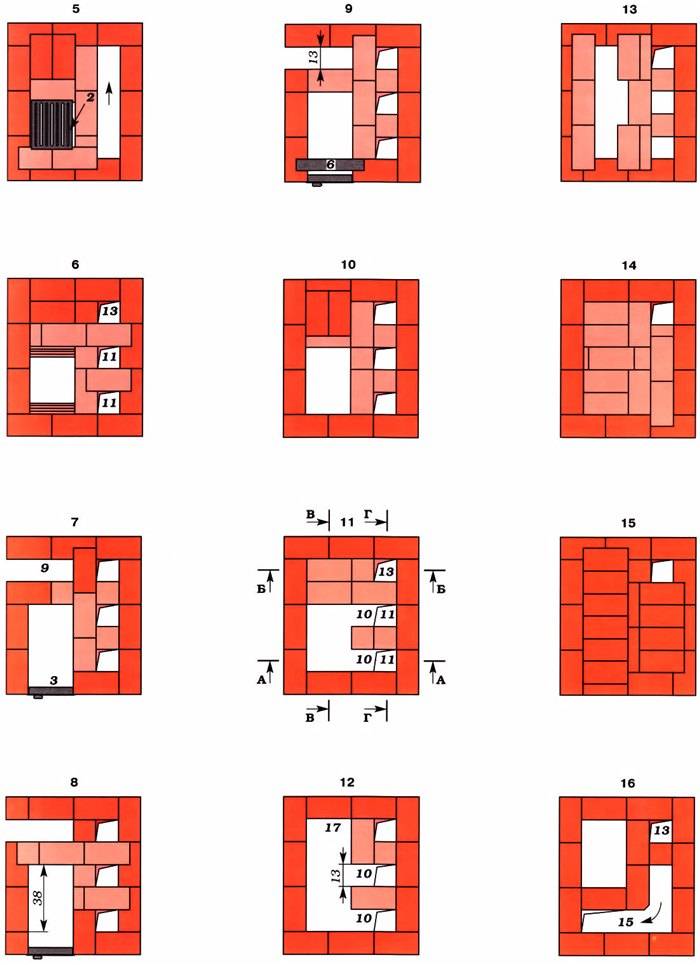
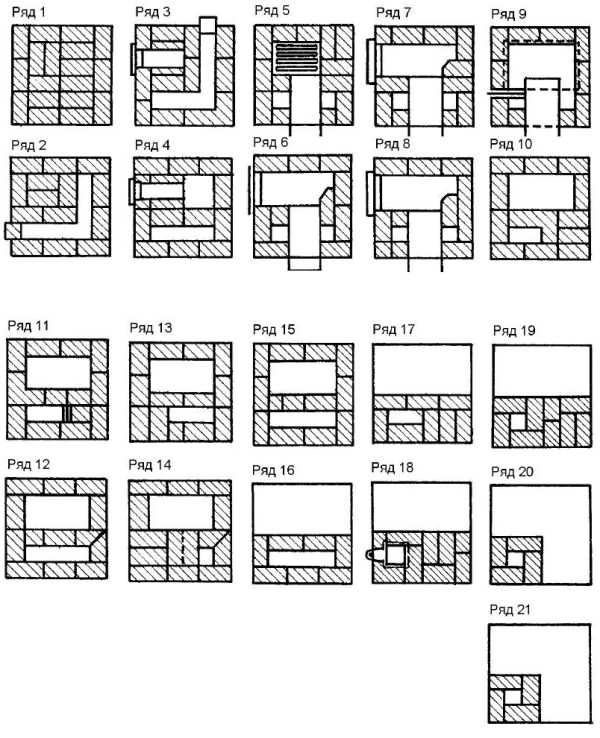
Let's start laying the oven

first row of bricks.
A big misconception for novice craftsmen is that they do not spare the solution for the oven. In fact, the thinner the mortar layer, the better the bricks will “grab”, the stronger, more durable and “hotter” the oven will be.
We hold the brick with one hand in weight. With light blows we make outlines of the future chip. We outline each edge in turn. Holding the brick to the canopy, we make a sharp and precise cutting into pieces, adhering to the intended lines. The first layer of the stove should be laid out filigree.First, the outer row of bricks is laid, then the middle is laid, the seams are carefully filled with mortar without voids.
The initial rows are laid only from a whole brick. The rule of “dressing” the seams must be observed: the vertical seams should not coincide. But after the first rows of masonry, you will definitely need to cut the brick.
The rule for laying chipped bricks - the chopped side is directed inside the masonry array
First of all, we pay attention to this moment when constructing the firebox and smoke channels. Otherwise, chips will become a place for soot to accumulate, which will clog the chimney.
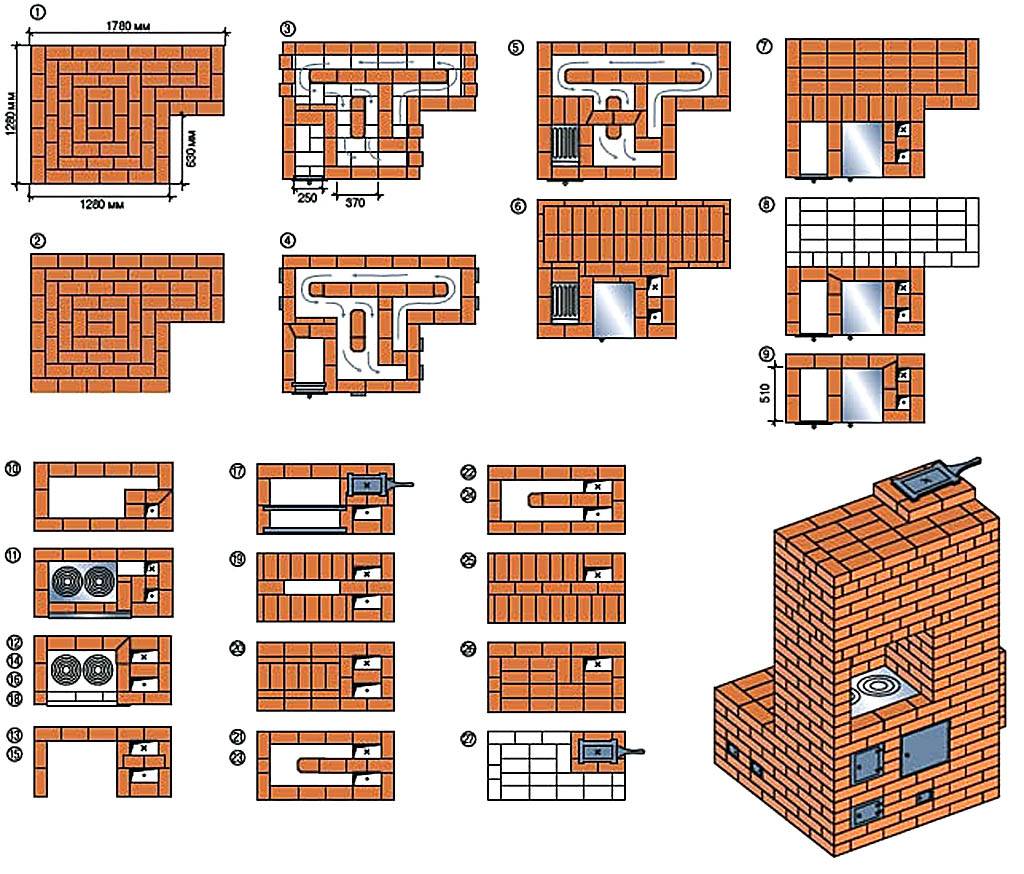
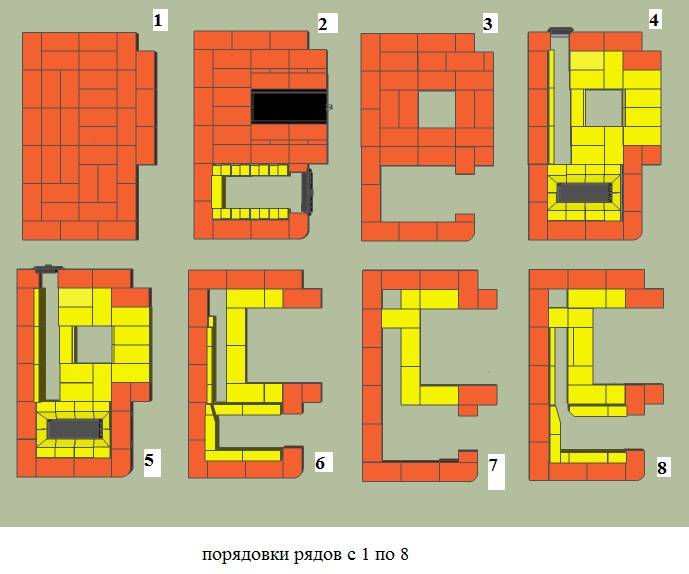
Stove with hob
In the simplest version, this design has small dimensions (width 2, and depth 3 bricks - 78x53 cm). However, even in such a limited area, it is possible to place a single-burner stove.
Work goes smoothly when everything you need is at hand.
Therefore, purchase the following materials and accessories in advance:
Solid red brick - 107 pcs;
Blower door - 1 pc;
Grate - 1 piece;
Single-burner cast-iron stove - 1 pc;
Furnace door - 1 pc;
Pipe valve - 1 pc.
Refractory bricks are not needed for a wood-burning stove. Buying it is a waste of money. But red should be chosen carefully, rejecting cracked and uneven.
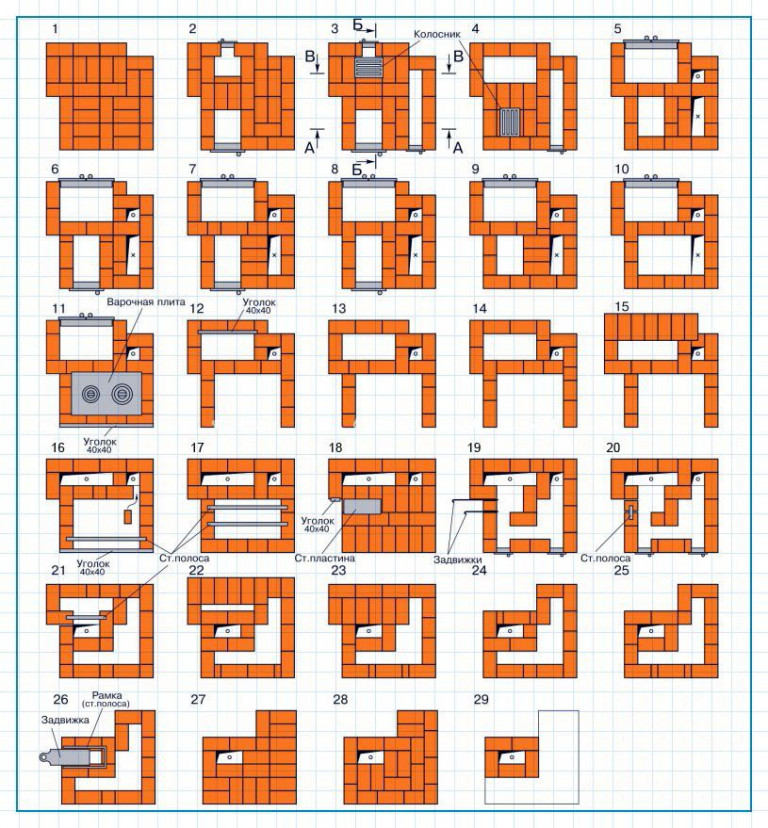
Solution preparation
The masonry mixture is made by mixing four parts of clay with one part of water and adding to them eight parts of sifted sand. The normal consistency is determined simply: the solution easily slides off the trowel, leaving no streaks on it. When laying, it should not flow out of the seams.
The volume of the solution is determined, focusing on the number of bricks.With an optimal seam thickness (3-5 mm), one bucket is enough for 50 pieces.
Having prepared the masonry mixture, you can start laying the foundation. Its width is made 10 cm more than the width of the furnace. The height of the foundation is chosen so that the bottom of the first row of bricks is at floor level.
Approximate prototype of the stove
If the underground is deep enough (50-60 cm), then it is not necessary to dig a hole under the foundation. It is enough to make a formwork on the ground with a size in terms of 76 x (51 + 10 cm). Two layers of roofing material are laid on its bottom to protect it from moisture. After laying the concrete, he is given a week to gain strength and then proceed to masonry.
The dimensions of the ovens with hob - 3 x 1.5 bricks (76x39 cm).
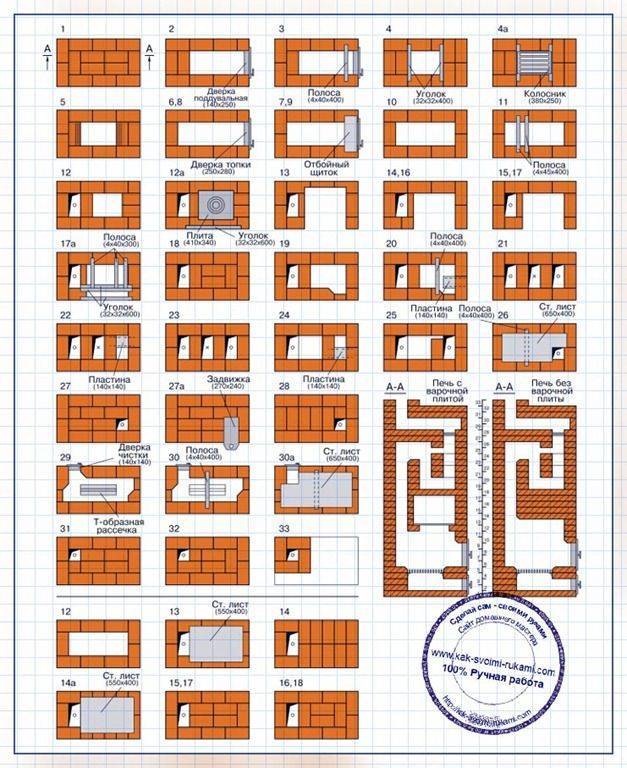
The first row is placed on a layer of clay mortar (4-5 mm). Having leveled the base, lay out the second one, leaving room for the blower door.


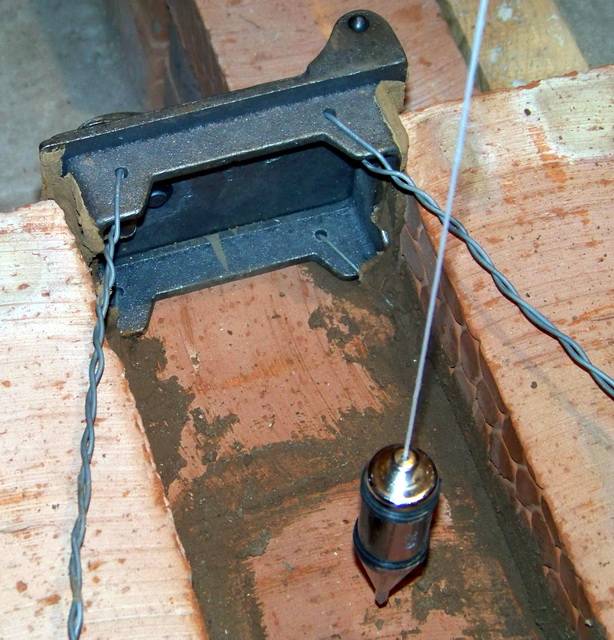
Before mounting the door, you need to screw a soft wire to it and lay its ends in the seams for better fixation.
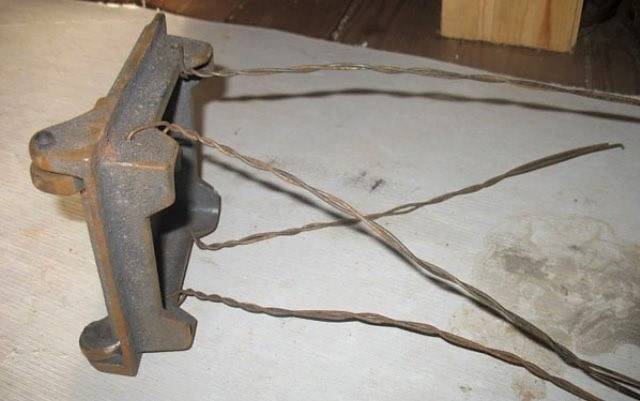
There are four holes in the frame of the cast-iron door for the wire that serves to fix it in the masonry.
To compensate for the thermal expansion of the metal, a gap is left between the door and the brick. Before installation, its frame is wrapped with a wet asbestos cord.
The laying of the third row is carried out, overlapping the seams of the second. At this level, a grate is installed in the firebox.
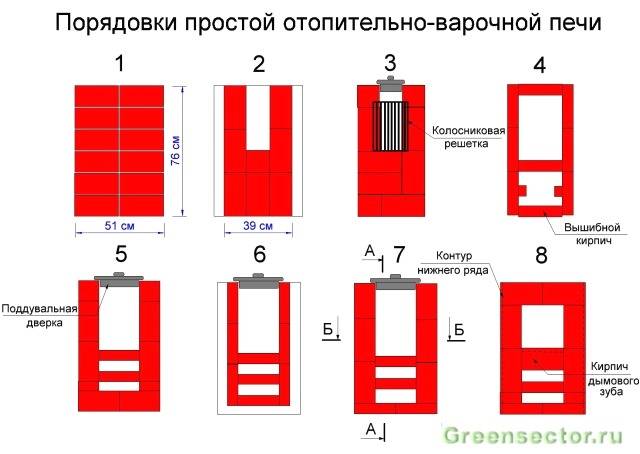
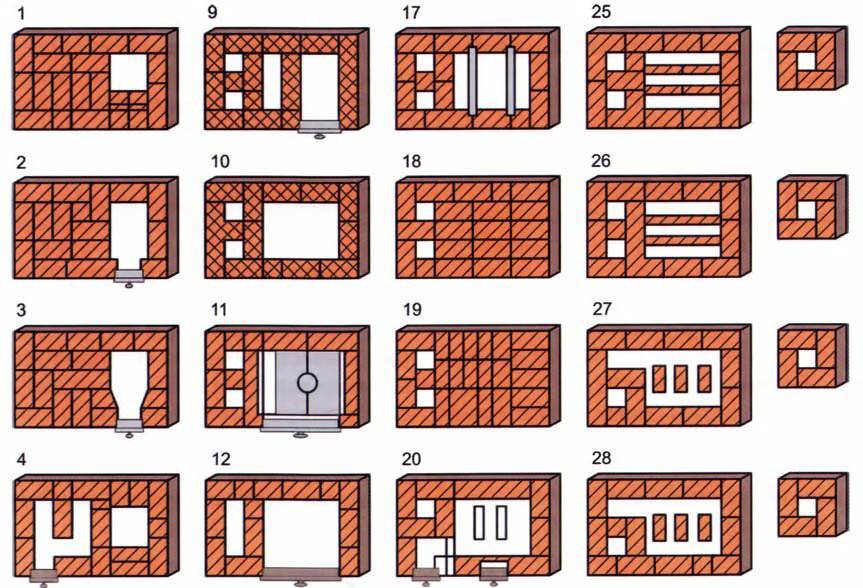
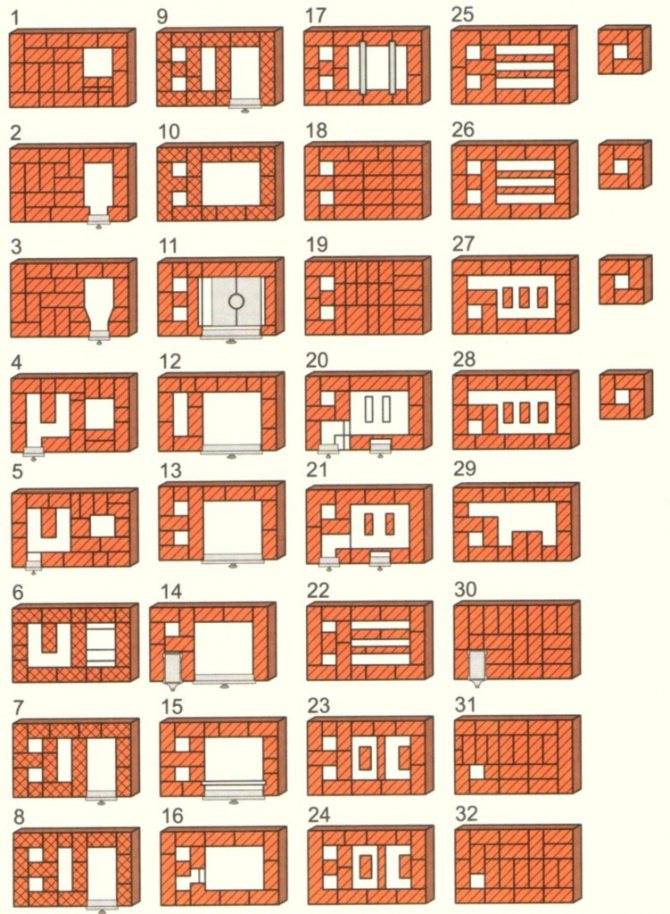
Ordering scheme from 1 to 8 row
The fourth row is placed on the edge, observing the dressing of the seams, and the walls of the combustion chamber are formed. Behind it there will be the first and only smoke circulation (see section A-A in diagram No. 2). To clean its bottom, a so-called knockout brick is placed in the back wall without mortar, periodically removed to remove ash.Inside the chimney, two supports are made from pieces of brick to support the internal partition.
The stones of the fifth row are placed flat, leaving room for the furnace door. In the back of the furnace, in order, we see the walls of two smoke channels. Their surface during operation must be thoroughly cleaned with a wet cloth from clay protruding from the seams.
This is an important condition for good traction.
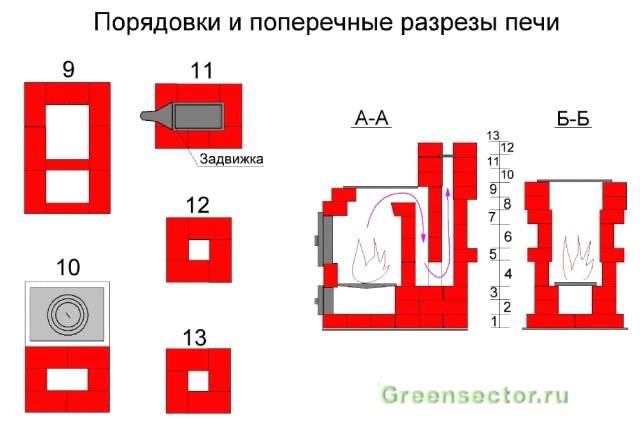
Ordering scheme from 9 to 11 row
Having raised it into the masonry up to the eighth row, they close the furnace door, laying a wire in the seams that fixes its frame. At the same level, a brick with a beveled end is placed in the back of the fuel chamber - a smoke tooth. It improves heat transfer by preventing the rapid exit of flue gases into the chimney.
Having finished the ninth row, an asbestos cord is laid on it in a clay solution. It is necessary for sealing the joints of the cast-iron plate and brick. On the tenth row, the firebox is covered with a hob.
At the eleventh, a smoke damper is installed in the pipe. It is also sealed along the contour with an asbestos cord dipped in clay.
12th and 13th row - the formation of the walls of the pipe. After their completion, a light sheet metal pipe is placed on the furnace, which is brought out to the roof.


