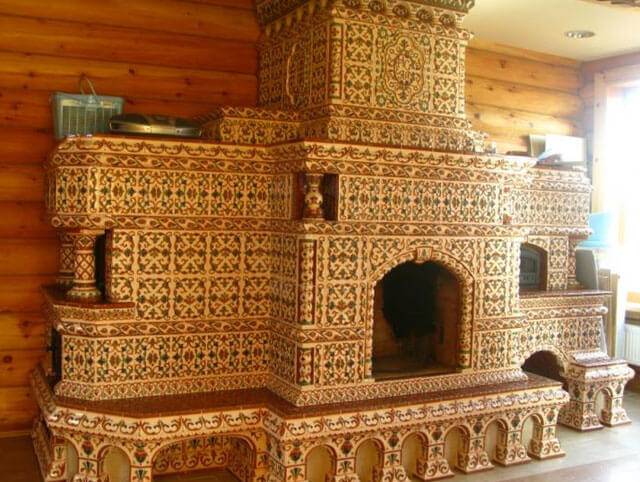
- Plaster, cladding and decor
- Tools and materials used in the construction of a Dutch oven with a stove
- Pros and cons of the Dutch oven
- Preparation for work, materials and tools
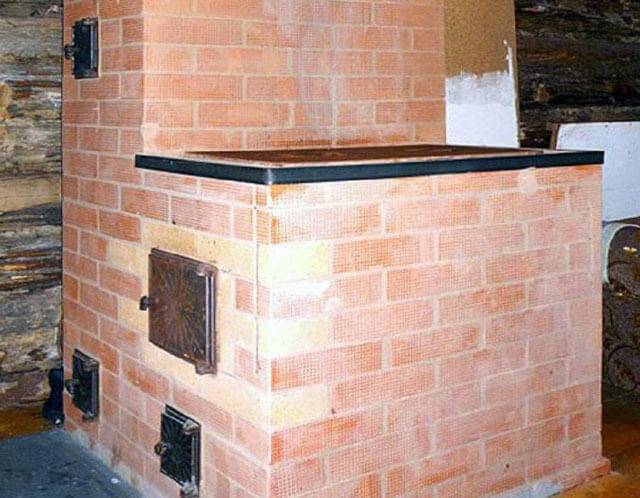
- Varieties of Dutch
- The device of the foundation under the Dutch
- Varieties and modifications
- Heating dutch stove
- With hot water boiler
- The principle of operation of the Dutch
- Do-it-yourself Dutch stove diagram
- Design features
- Stages of making a round dutch
- Foundation
- Production of a metal casing
- Laying and ordering
- The first test furnace furnace
- Do-it-yourself Dutch oven construction
- Training
- Execution of the foundation
- Substrate preparation and waterproofing
- More about tiles
Plaster, cladding and decor
To veneer, like a real Dutch woman, with tiles, not every master can do it. The device of tiles and the method of their installation makes this a difficult matter. However, if in the process the space of the boxes behind the tile is filled with fireclay sand, the thermal inertia will increase many times over. It should be noted that in this case, its weight will become much larger. I would recommend tiling for old surfaces.
Pre-plastering will help seal microcracks, and tiles will increase heat transfer.A reinforcing mesh must be laid in the plaster. And for tiles, use a special heat-resistant adhesive. After that, there is still no guarantee that the tile will not start to lag behind after accidental overheating. Therefore, most often they are plastered if the masonry is sloppy.
For plastering, you will need a slightly thinner composition used for masonry. To do this, you can add a tenth of the sand to it. A binder should be added to the plaster composition. It can be asbestos fiber, fiberglass, the people often used chaff formed during threshing of cereals. This greatly increases the integrity of the layer when dried. Plaster with warm, cracks and seams, cleaned of dust and thoroughly moistened with water.
Now it is easy to purchase a fine-mesh metal mesh. Fix it to the masonry surface with nails, hammering them into the seams at an angle and the plaster will not crack. The applied layers should be thin, about 3 mm. First there is a more liquid layer, then thicker. After setting, while the surface is still soft, rub it with a grater, smoothing out minor flaws.
After complete hardening, the surface is covered with lime milk. Corners can be decorated with tiles imitating artificial stone, glued with heat-resistant glue. If a new ceramic brick was used, the stove can be carefully “embroidered” and coated with heat-resistant varnish.
Tools and materials used in the construction of a Dutch oven with a stove
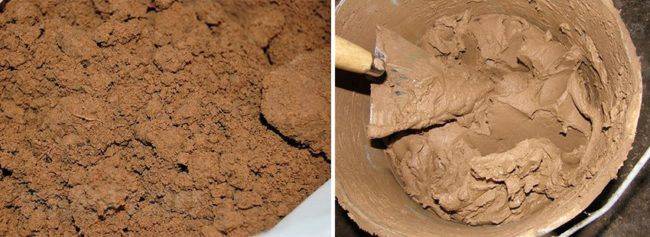
A prerequisite for a good oven is a high-quality masonry mortar, which is recommended to be kneaded from red clay and brick. The main composition for laying the Dutch is sand, red clay and water.
In this case, the ratio of proportions for each of the types of clay will be different. The smaller the amount of sand present in natural clay, the correspondingly less will be needed for the solution.
Clay
For oily clay, we take the proportion: 1 part clay and 2.5 sand.
For medium clay - 1 part to 1.5 sand.
For skinny, you need 1 to 1.
Materials for laying a Dutch oven with a stove:
- Chamotte refractory brick for the combustion chamber.
- Red ceramic brick.
- Mortar for laying the foundation (cement, sand, gravel and water).
- Mortar for laying bricks.
- Roofing material for foundation waterproofing.
- Boards for the construction of formwork.
- Grate.
- It blew.
- Metal door.
- damper.
- Metal rods and wire for reinforcement.
- Metal wire 0.8 mm for dressing.
- Asbestos cord.
- Cooking plate.
From the tools prepare:
- Trowel for laying bricks.
- Building level, protractor and plumb.
- Construction stapler.
- Roulette and marker.
- Rule.
- Bulgarian for turning bricks.
- Shovel and bayonet shovel.
- Solution bucket.
- Construction mixer or drill with a nozzle.
- Rubber mallet for laying bricks.
- Construction hammer for the construction of formwork.
Pros and cons of the Dutch oven
It is worth discussing in more detail the positive and negative qualities of the Dutch woman.
The advantages include the following points:
- Design variability. If you do not make the grossest technical errors, any shape of the furnace will in no way affect the strength and efficiency of the finished furnace.
- Decent functionality. Although initially the stove served only for heating, at present, a Dutch oven for a brick house can be equipped with a hob for cooking.
- Small dimensions of the furnace - no more than 0.5 × 0.5 m.
- Less material is required to build a kiln compared to a traditional kiln - less than 650 bricks. In order to build a Russian stove, you will need 1300 bricks, plus a small Russian stove will not heat the room as efficiently.
- Such a stove can be mounted even on the upper floors of country houses, without fear that the floors will not withstand the load. This is possible due to the small mass of the furnace, since a small amount of materials is used for its construction.
- The main advantage of the furnace of this design is that it is undemanding to the materials used for its construction. Its structure and small wall thickness allow the furnace to retain its shape even under the influence of thermal loads. For example, the main structure can be assembled even from hollow bricks, and the oven will not lose its functions. However, you can not use cheap materials for the firebox - it can only be built from refractory bricks.
- Regular use of a Dutch brick oven can significantly save on fuel, since it cools down slowly and heats up quickly enough.
- The Dutch stove has a very good heat dissipation, which allows it to heat a room of 60-70 m2 with high quality.
It is worth mentioning some of the disadvantages of furnaces of this design:
- The efficiency of a Dutch stove with a boiler is not very high, since a significant amount of heat is lost through a chimney made of a set of channels, which causes the stove to cool down quite quickly.
- It is undesirable to use fast-burning fuel, such as brushwood, straw or dry reeds, to kindle a Dutch oven, since it simply does not have time to warm up.Fuel that can smolder for a long time is best suited, then the stove will work as efficiently as possible.
- These furnaces are sensitive to the quality of the fuel used. So, if you burn low-quality materials that produce a large amount of ash, soot will begin to collect on the walls of the chimney. One day, she might start a fire.
- Since overheating of the furnace leads to the release of carbon monoxide, it is undesirable to reheat it.
If we consider how the Dutch oven is arranged, we can see that the gases heated in the firebox first enter the first lifting channel of the chimney. Having reached the cold top of the channel and giving off heat to the walls of the furnace, the gases enter the second passage, through which they enter the furnace. From it, the newly heated gases enter the third channel, simultaneously heating its walls. Similarly, heat passes through the fourth and fifth channels. At the very end, the gases through the sixth passage again reach the firebox and are discharged outside through the chimney.
Preparation for work, materials and tools
In order to start the main work, it is necessary to familiarize yourself with the materials in detail. So, what kind of working tool do you need to purchase? You will need a red full-bodied ceramic brick, which can be of medium quality. You can also use the old one, which is often denser and has a high thermal conductivity. But when using old brick, cladding is required. You need to decide which clay you are dealing with in order to adjust its properties.To get strong seams that will not crumble, the solution is made plastic, and clay must be used with medium fat content. There is a way to increase the strength of clay plaster by adding 100 - 150 g of ordinary salt to the composition. However, this works when the furnace is constantly running.
In idle time, salt gains moisture and the solution, swelling, crumbles. Still, it is much more important to determine its fat content. Skinny, will have to be elutriated, and excessively oily, mixed with an additional amount of sand, the proportion of which can reach up to 5 parts by volume. It is not difficult to determine the proportion of sand and clay for masonry mortar. Take about a liter of clay and divide it into 5 parts. Next, each part must be mixed with sand in the following proportions:
- do not add
- four to one
- two to one
- one to one
- one to two
Add water to each composition until it looks like dough and roll into balls, leave them to dry for 3 days. “Correct” balls should not crack and when falling from a height of a meter, they do not fall apart. The composition of the cake that has passed the test is the desired one for work.
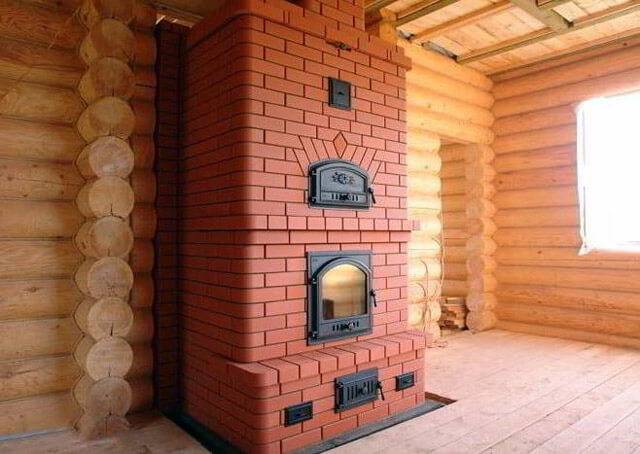
Varieties of Dutch
Some common types of Dutch ovens are shown in the figure. The first is the classic old one. Restored, these are the most valuable antiques, the cost of which can exceed the cost of the premises where they are located. A new classic design with a choice of decor is easy to fit into any interior due to the simplicity of its shape.

Some types of Dutch stoves
Next - a modern Dutch woman with a fireplace. We will return to these a little lower, and the next one is a small country Dutch column designed for seasonal irregular use.And the heating and cooking Dutch house with a stove closes the row. We will further analyze a similar one, but simpler, for a summer residence.


The principle of operation of the Dutch is simple, so she is susceptible to improvements and tolerant of design flaws. In Russian, the very word "Dutch" has become synonymous with any improved or tiled heating stove. Because of this, confusion arose, which we will try to understand.
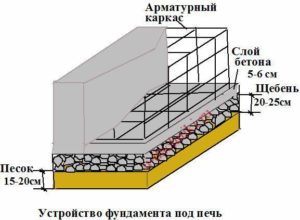
The device of the foundation under the Dutch
Despite the fact that the Dutch oven weighs a little, it needs a reliable and solid foundation. It can be made of bricks or concrete.
Each of these bases has its pros and cons:
- a concrete foundation is cheaper, but it is more laborious to make it;
- a brick foundation is more expensive than concrete, but it can be done faster and easier.
Concrete foundation pouring guide:
- tear off a pit with a depth of 50 cm, the size of the pit should be slightly larger than the future furnace;
- the bottom of the pit is covered with gravel 10 cm thick and gently rammed;
- formwork is installed;
- lay out a reinforcing cage of rods 1 cm thick;
- cement-sand mortar is mixed - 3-4 parts of sand are taken for one part of M400 cement;
- pour the solution into the formwork;
- they rub the surface of the foundation with cement - this technique is called ironing, with its help they increase the water resistance of concrete structures.
Important: if the foundation of the furnace is in contact with the foundation of the house, then a layer of sand must be made between them. The setting time of the solution will depend on temperature and weather conditions.
On average, the foundation hardens in two to three weeks.
The curing time of the solution will depend on the temperature and weather conditions.On average, the foundation hardens in two to three weeks.
After that, waterproofing is laid on it and the foundation is continued to the floor level, using brick, rubble stone or concrete pouring.
The upper part of the foundation is checked for horizontal level and covered with roofing material or poured with hot tar. On this basis for the Dutch oven is considered ready.
How to build a brick foundation:
- stoves weighing more than 700 kilograms need a foundation, lighter structures can be installed simply on the floor;
- the width of the foundation on all sides must exceed the width of the furnace itself by 5 cm;
- each stage of the construction of the foundation is controlled using a level;
- the brick foundation consists of an outer and inner row, the outer one is laid with dressing of the seams;
- without bringing the brick foundation one row to a clean floor, a layer of waterproofing is laid on the laid out penultimate row and only then the laying of the last row of bricks begins;
- it is forbidden to connect the foundation of the furnace with the foundation of the main building, since the furnace may collapse if the house sags.
Video:
Varieties and modifications
There are several common modifications of Dutch ovens:
- Heating (classic). Optimal for heating residential premises of a small area.
- Bell-type. They differ in the most compact sizes, the existing laying patterns allow the construction of miniature Dutch triangular sections for corner placement.
- Calorific. The operation is based on the principle of forced air circulation. Ideal for buildings with high ceilings.
- Heating with water heating boilers. They are used when it is impossible to place the furnace in the central part of the house.The installation of a Dutch woman with a built-in heating boiler is carried out in the kitchen or in the corridor, after which the heating circuit is bred.
Important! The operation of Dutch women with built-in boilers for heating large areas requires the use of coal as a fuel. In addition to using the Dutch woman as a purely heating structure, there are possibilities for additionally equipping the stove with a hob, fireplace or stove bench
To do this, at the preparatory stage, it is important to make the required amendments to the selected laying scheme. It is possible to use ready-made schemes available in the public domain
In addition to using the Dutch woman as a purely heating structure, there are possibilities for additionally equipping the stove with a hob, fireplace or stove bench
To do this, at the preparatory stage, it is important to make the required amendments to the selected laying scheme. It is possible to use ready-made schemes available in the public domain
Heating dutch stove
The principle of operation of the classic Dutch is to increase the time of circulation of smoke inside the case due to the installation of winding smoke channels. Before leaving the chimney, the smoke from the burnt fuel transfers its own thermal energy to the body. The stove acts as a heat accumulator: heat accumulates in the body and is systematically consumed to heat the premises.
Reference. Classic Dutch women do not require a constant firebox and quickly warm up after long periods of inactivity.
In addition to the general design features, the differences between Dutch women and other types of stoves vary depending on the laying pattern and the availability of additional equipment. The difference lies both in efficiency and in the feature set.
With hot water boiler
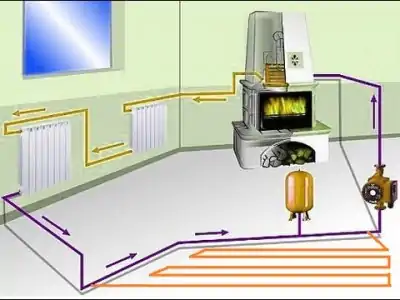
The principle of operation of Dutch women with a built-in water heating boiler is similar to the classic version.
The presence of a heating circuit increases the efficiency of the furnace by ensuring a uniform distribution of heat energy within the heated premises.
From a heat source that implements the principle of air heating, the stove turns into the central element of a liquid heating system.
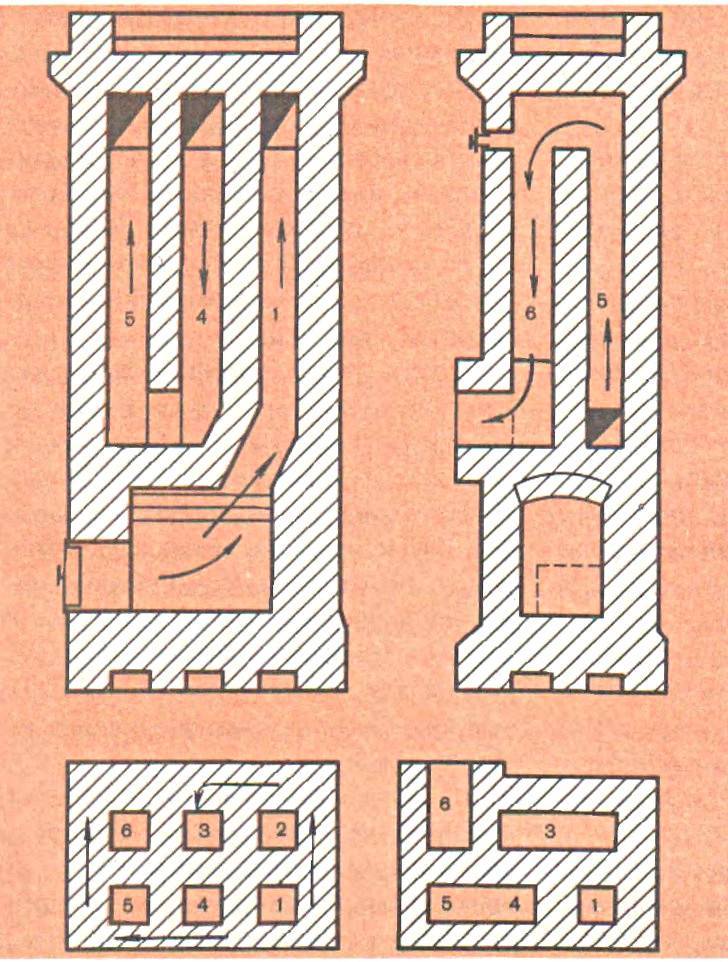
The principle of operation of the Dutch
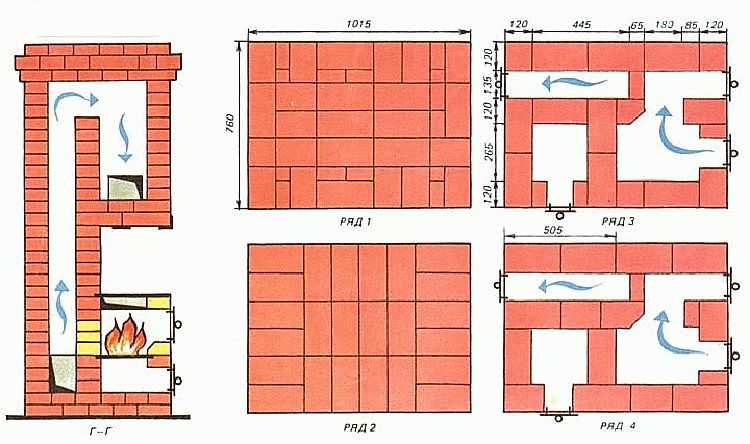
A distinctive feature of the Dutch stove is a six-channel chimney system through which heated gas circulates.
Leaving the combustion chamber, the smoke rises upward along the upward flow. During his journey, he manages to heat the walls of the furnace. Then it cools down and goes down to the firebox. When heated, it rises along the second channel, and so on. The sixth channel already brings the smoke out through the chimney.


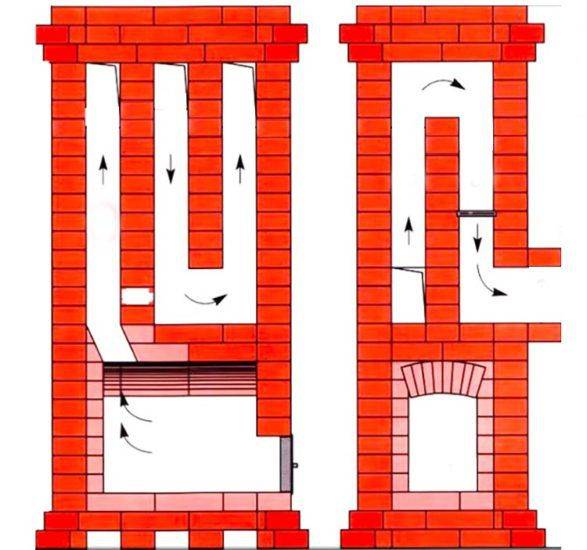
Dutch work system
The six-channel system allows the oven to warm up evenly, without sudden changes and retain heat for a long time.
If we talk about the design of the Dutch woman, then here the main elements are:
- large firebox;
- chimney;
- 6 smoke channels.
Whatever the dimensions of the Dutch stove, its firebox is always large and has a rectangular shape, while the design of the Dutch stove itself can be semicircular, triangular, etc.
Dutch oven elements
A large firebox significantly increases efficiency and allows you to further supplement the design with a water heating system.
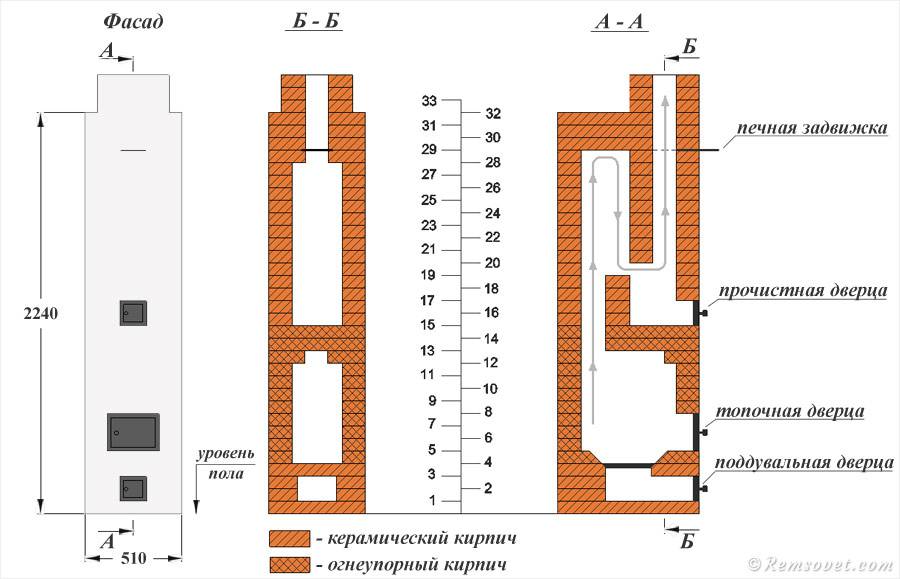
The chimney of the Dutch woman is connected to the chimney with a side part, and a metal pipe acts as their connecting link.
If the oven needs to cool down quickly, it is enough to open the damper.
Standard furnace layout
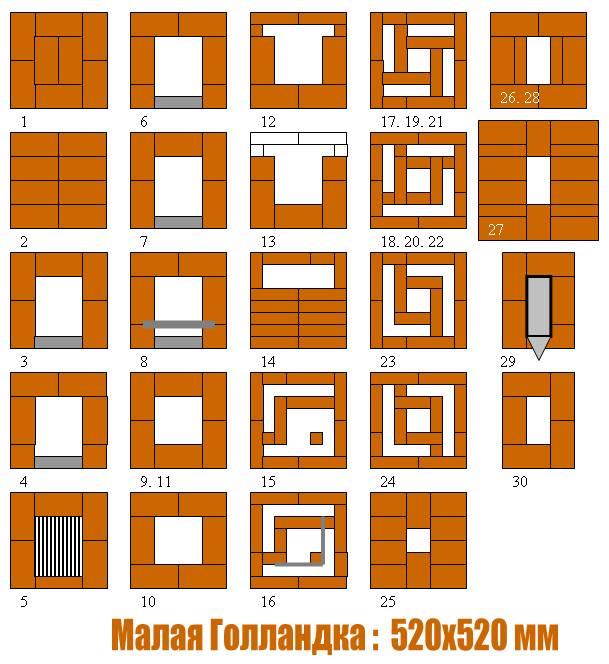
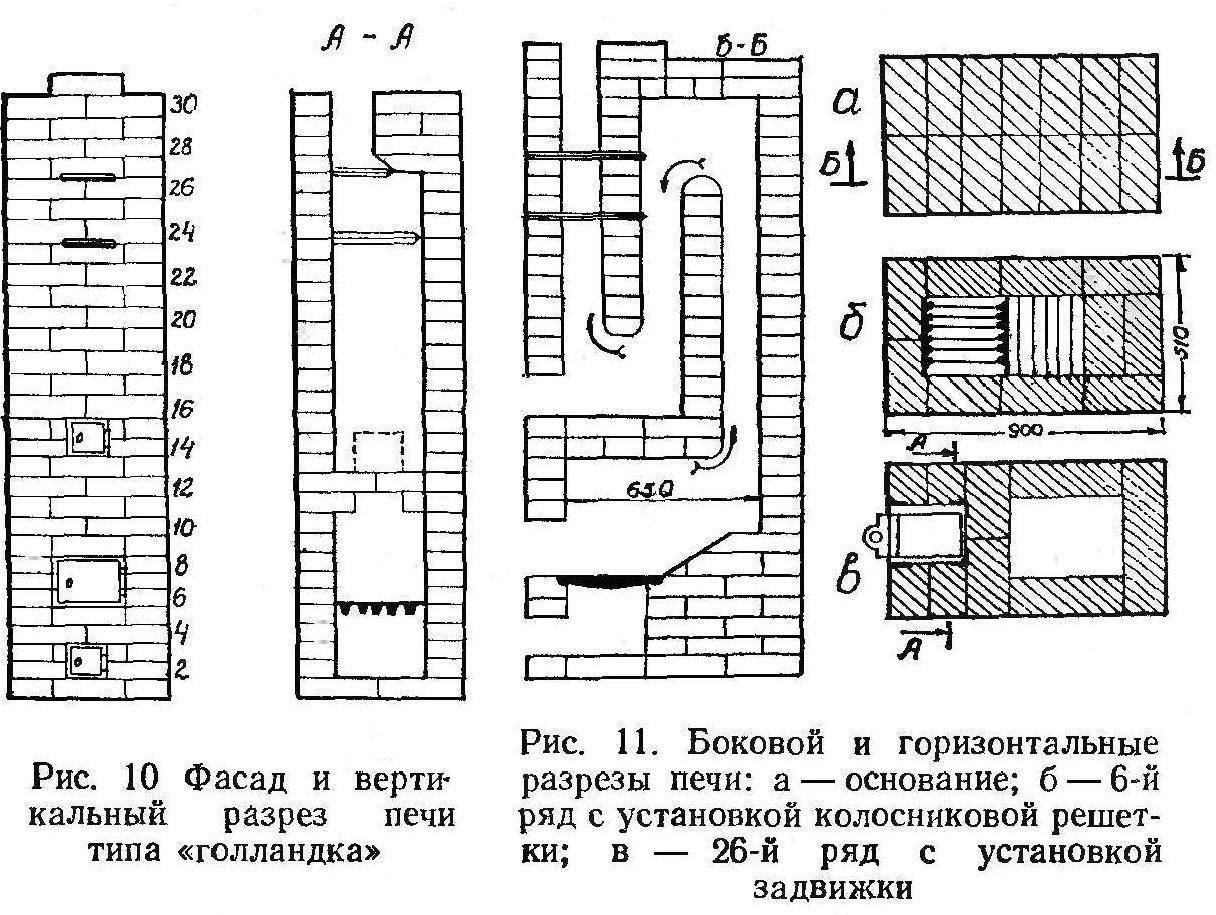
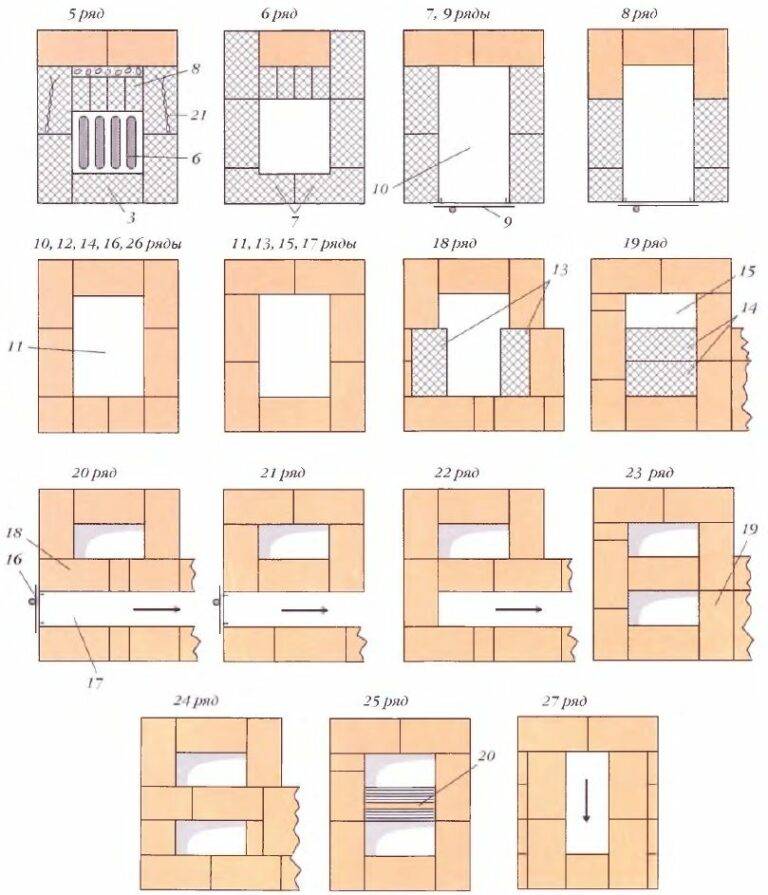
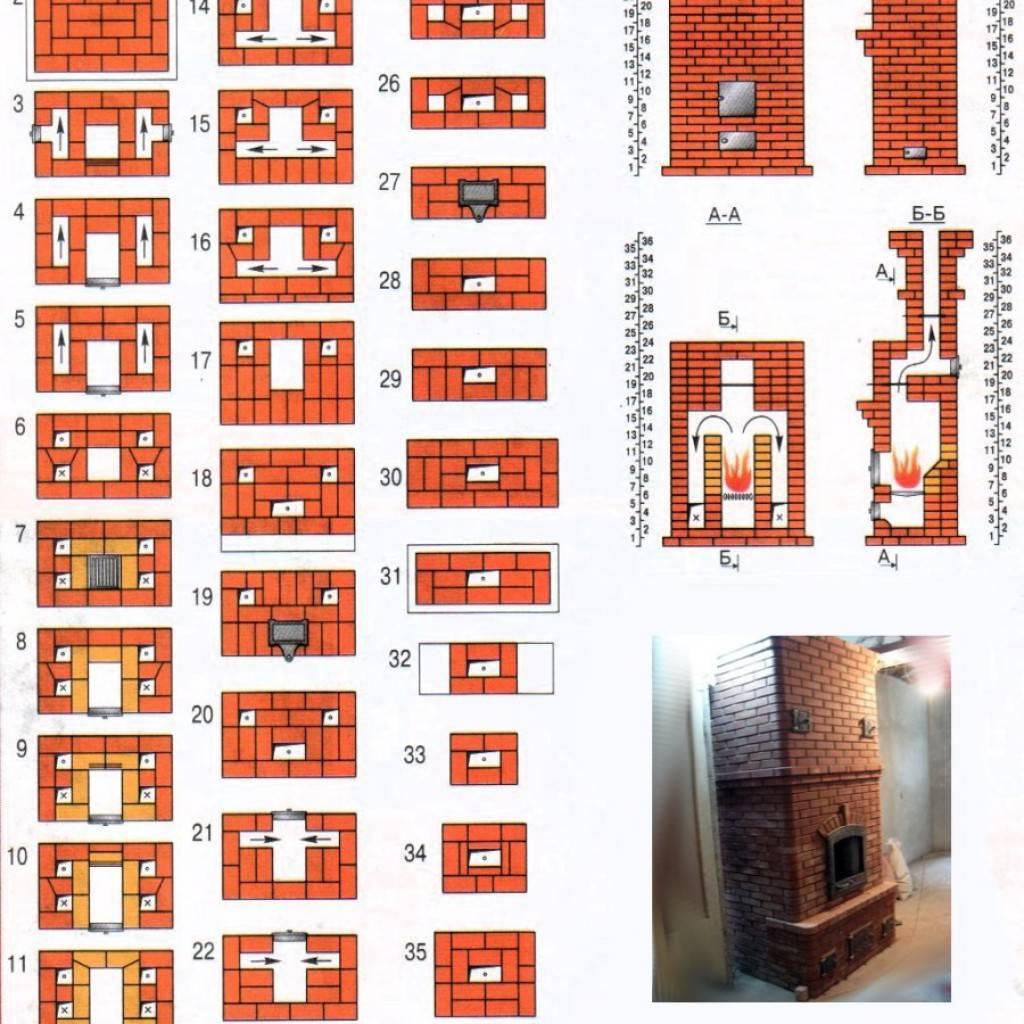
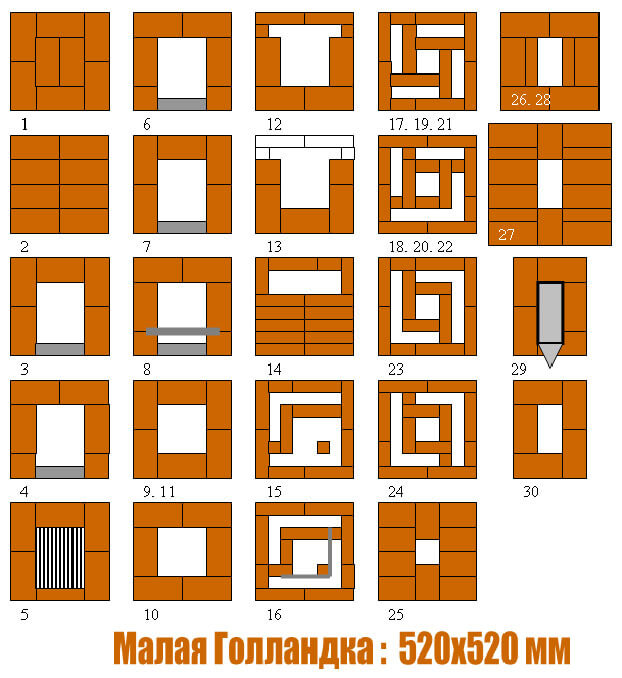
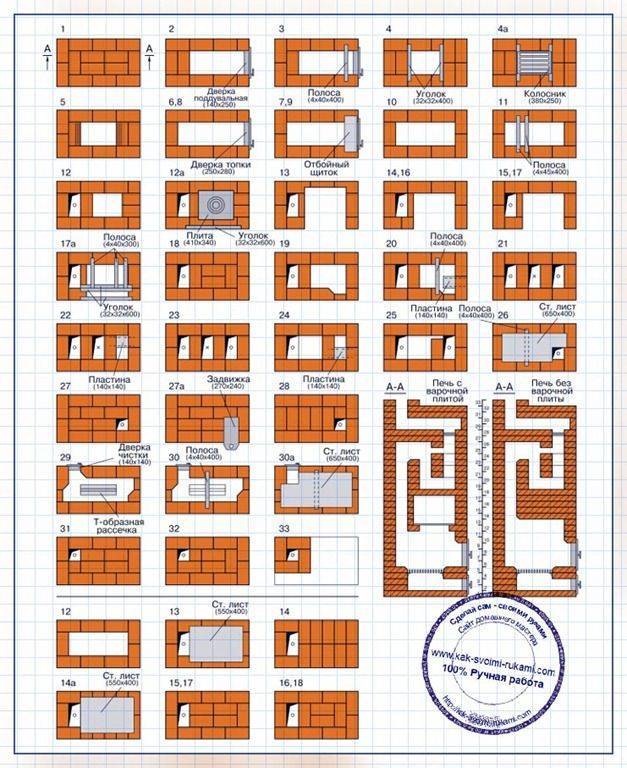
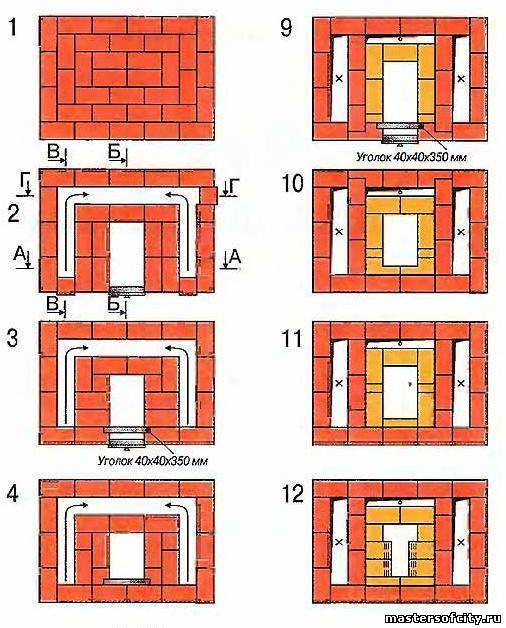
Do-it-yourself Dutch stove diagram
When they make Dutch brick heating stoves, they use:
- fire-resistant brick;
- steel wire;
- clay, sand;
- waterproofing material;
- grate;
- doors for the firebox and blower;
- plumb and level;
- squares and tape measure;
- sieve for sifting;
- a pick for processing bricks;
- drawings showing the ordering of the Dutch oven.
Do-it-yourself oven: ordering
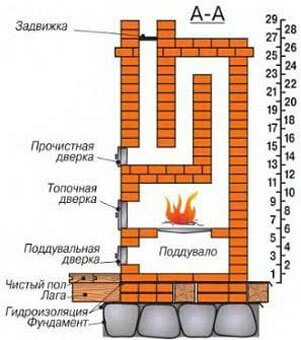
heating furnace ordering
How a Dutch oven with a stove works, the principle of operation and a construction guide How a Dutch oven works, differences from a traditional oven, how to fold it correctly

Design features
The Dutch woman does not have a grate. Unlike many other models of furnaces, it has several smoke channels. No blower. This feature does not allow the fuel to flare up intensively. Therefore, firewood burns slowly, evenly and gives off thermal energy to the room for a long time. That is, the design of the furnace is suitable in terms of its operational characteristics for long-burning furnaces. Oxygen for combustion enters through the firebox door.
The Dutch is elongated in shape. The firebox has a rectangular shape. In the classic version, the function of the Dutch is heating. The hob, oven and benches were added by the craftsmen later. Thus, over time, the standard look of the Dutch woman has changed.
The oven has very thin walls - half a brick. This feature allows the structure to warm up quickly. Combustion products, passing through a long chimney, give off heat to the walls and go outside. The design of the furnace can be changed, the main thing is to observe the basic proportions and maintain the principle of operation.
The principle of the Dutch woman's work is not to make the logs burn with a strong flame, they must smolder intensively. If the fire is strong, the flue gases will exit through the chimney channels to the street very quickly and will not have time to transfer thermal energy to the walls. Therefore, small logs, shavings, sawdust and other quickly burning types of fuel should not be loaded into the combustion chamber. With the correct firing of the furnace, it will warm up quickly and will give off heat to the room for a long time. The temperature of the outer surface of the wall is usually around 60 degrees.
How to drown the Dutch? First make sure that there is no ash in the fuel chamber and ash pan. Fuel should be placed on the grate. The fuel must be dry. Before setting fire to the logs, cover the blower. Poles are laid out horizontally, in even rows. Then the firebox door must be closed and the blower opened.
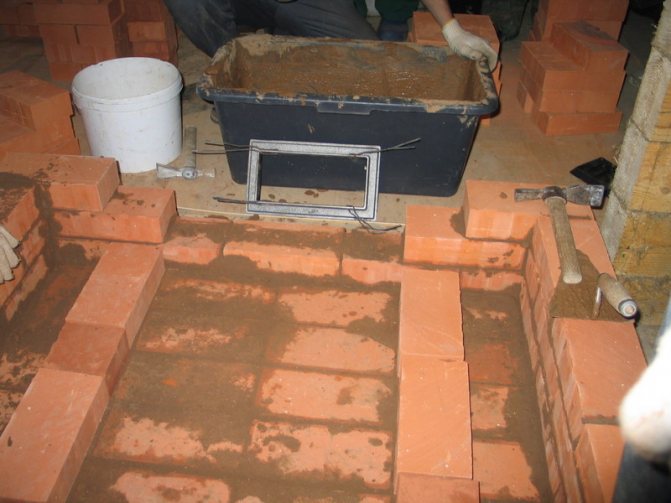
Stages of making a round dutch
Foundation
As in any other design, in order for the Dutch round stove to be stable and to function properly, first you need to make a foundation:
- To do this, you need to dig a recess into which the base for the furnace will be installed.
- First, take measurements and disassemble the flooring, having previously decided on the future location of the system.
- Dig a hole and fill it with a cement mortar of this consistency: 1 bucket of cement, 3 buckets of sand.
- On top of the resulting future base, you need to put a reinforcing screed so that the foundation better holds the Dutch structure.
- Let the mortar dry for 10-15 days before starting work on the construction of the furnace.
Production of a metal casing
Installing a metal casing on a Dutch stove was invented in the Russian Empire by the German designer Utenmark, often it is in his honor that such systems are called - "utenmarkovka".
Today, on the market for heating systems and products for them, there is a wide range of ready-made metal casings for Dutch stoves. They are sold in ready-made sizes, so if you decide to use the “downmarking” purchased in the store, you should compare it with the dimensions of the oven in advance. Ready-made prefabricated metal casings look like this:


Metal casing
If it was decided to make a metal casing with your own hands, then in the form of a material you can use an ordinary galvanized sheet or roofing iron:
It is better to prepare blanks for installation in advance, having previously made holes for the firebox, valves, blower and doors for cleaning
It is important to understand that the masonry is formed by the dimensions of the casing, so keep this in mind when making it.
Shell blanks
A sheet of iron is fastened into a rounded mold with rivets; in extreme cases, the structure can be welded if the thickness of the metal allows this.
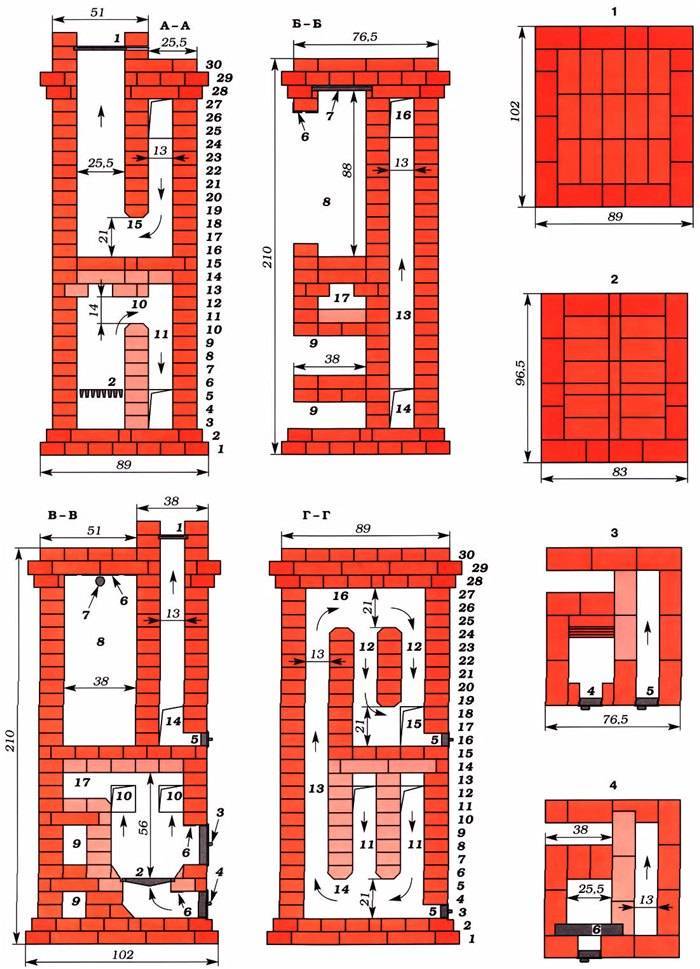
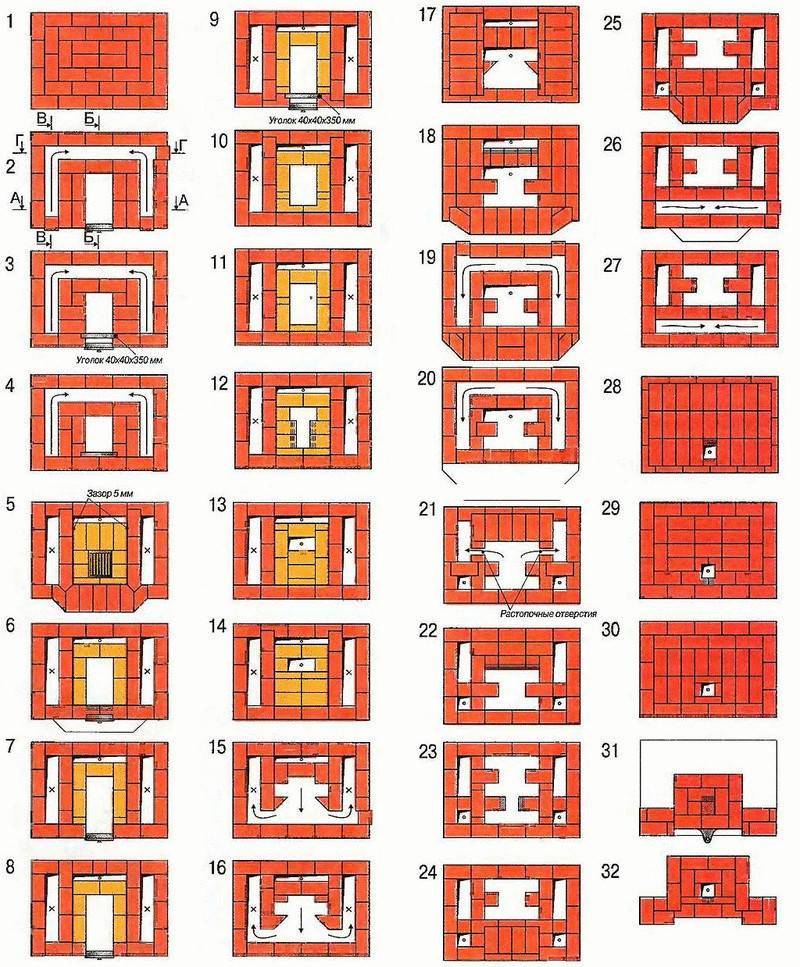
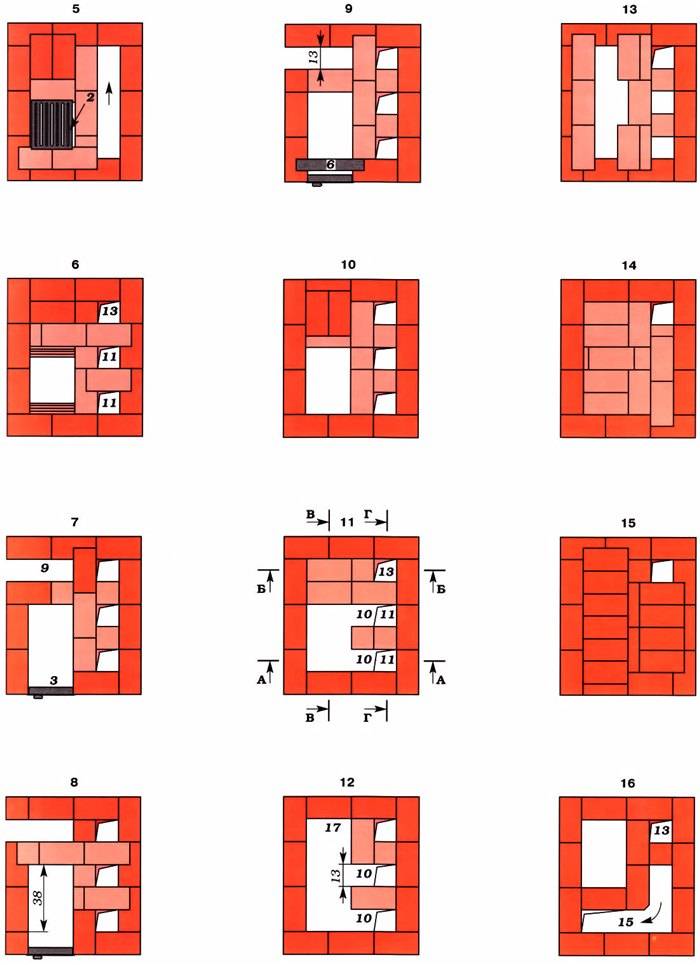
Laying and ordering
An important feature in the laying of the Dutch oven is the order of its rows, not every master is ready to take on the installation of such structures, so the decision to make a round Dutch oven with your own hands is risky.But if you are confident in your skills, then it is important to use a specially invented order of this design.
Appearance
In the context of a round Dutch oven in a casing, it looks like this:
Scheme of a round Dutch woman in a section
Features of bricklaying
The installation of the casing is carried out simultaneously with the laying of the Dutch. A section of the system before overlapping the firebox is placed in the brick floor - that is, the first three rows. Then, using a plumb line and a level, a casing is installed - its first, lower ring. The distance between the wall of the case and the masonry is filled with ready-made semi-liquid clay mortar.
Now the furnace is being formed, while it is important to observe the order and dressing so that the structure has good stability and high efficiency. When the firebox is formed, you can start laying the subsequent parts of the Dutch system

First rows
Despite the apparent simplicity of the design, the main thing here is the ordering of the system, without it the bricklayer will not be able to install the entire system correctly. The first twelve rows begin like this, the diagram shows the dimensions and the entire Dutch order:
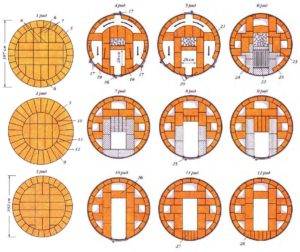
1-12 rows
From 13 to 29, the row and the pipe diagram are shown in the following design order:
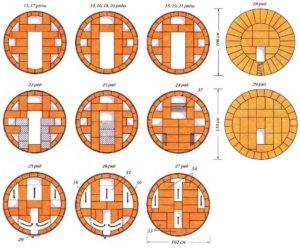
13-29 rows
30-32 rows
Please note that if one row is incorrectly folded, not to mention more errors, then smoke will pour into the house and the system will not be able to function correctly.
The first test furnace furnace
It is important to make the first furnace in accordance with certain rules:
- It is necessary to make a test heating of the heating system after the complete drying of the entire structure, including masonry and facing mortar.Premature testing of the furnace may result in cracking of the structure, which will degrade its performance and lead to malfunctions.
- The first furnace is made using 1/5 of the fuel. First you need to lay a chip, shavings, and then you can put more logs. In this case, all valves and dampers must be open.
Expert opinion
Pavel Kruglov
Baker with 25 years of experience
If you have a thermometer installed, then make sure that the temperature in the system does not reach 600 degrees Celsius - you need to carefully carry out the test firebox, constantly inspecting the entire structure for damage to the system.
Do-it-yourself Dutch oven construction
The construction of the stove is carried out in the following sequence:
- preparatory work (arrangement of the foundation and preparation of materials for masonry);
- oven masonry;
- chimney masonry;
- structure cladding.
Now let's take a closer look at each item individually.
Training
At the preparatory stage, the foundation is being built and the walls are protected from heat. Since the oven is heavy, formwork will be required.


When cooking, it is important to observe the proportion of ingredients
Execution of the foundation
Work at this stage is carried out according to the following step-by-step instructions:
- mark the floor, taking into account the location of window and door openings;
- with the help of a grinder, cut and dismantle the boards at the marked place;
- build a foundation, and pour the solution;
- lay roofing material.
After that, a short break is made for a period until the solution completely hardens.
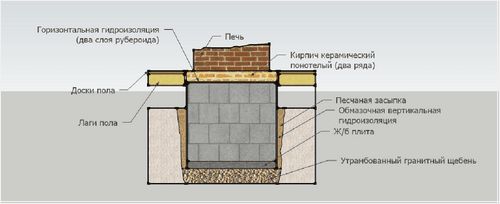
Substrate preparation and waterproofing
The height of the foundation is made such that it is possible to lay two rows of bricks.He lays down side by side. In this case, do not forget about the dressing. Waterproofing is laid on top, which consists of several layers. It is securely attached to the base.
Since most of the heat goes down, the waterproofing must be approached very carefully. Experts additionally recommend laying a layer of thermal insulation. Together with roofing material, you can use basalt cardboard.
Before starting laying, you need to pull plumb lines from a strong thread. Thanks to such plumb lines, rows can be prevented from shifting during masonry. Otherwise, you need to periodically check the evenness of the structure. Any deviations will cause the stove to work inefficiently.
Several continuous rows of bricks are laid at the base
More about tiles
Glazed painted pottery with burnt-in pattern (majolica) has been known since prehistoric times. Already in Sumer and pre-dynastic Egypt, highly artistic works of art were made from it.

Ancient Greek, Arabic and Turkish tiles
The ancient Greeks were the first to make standard-sized majolica facing tiles (in the figure on the left). In Byzantium, this art was further developed, and from the Greeks it was adopted by the Arabs, who called the tiles rumi as-zulaysh (rumi means Greek) in the east of the Arab world, and in the west, in the Maghreb - az-zillij.
Tiled finishes in the harem
The Arabs also contacted the Chinese, and learned from them about the excellent qualities of white clay - kaolin. By the 8th century the Arabic tile acquired its final form (in the middle in the figure), and by the XIV-XV centuries. Turkish tiles were widely used, on the right in fig. Their drawing was softer, but still - the Koran strictly forbade images of people and animals as idols.Both there and there, cold tones dominated, mostly blue. The sons of the desert baked by the Sun valued coolness above all else.
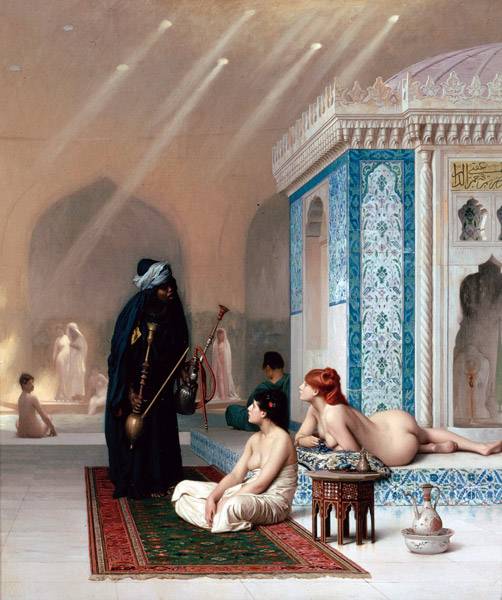
It seems surprising that Europeans during the Crusades learned almost nothing about tiles; in the "Book" of Marco Polo they are not mentioned. In fact, the Arabs used tiles, as an especially refined and elegant decoration, primarily for decorating the harems of the highest nobility (see the figure), where not only the damned Ferengi, but also their own access was strictly forbidden under pain of a painful shameful execution. Individual tiles certainly fell into the hands of the "Franks", but it was useless to talk about technology with rude, ignorant crusaders.
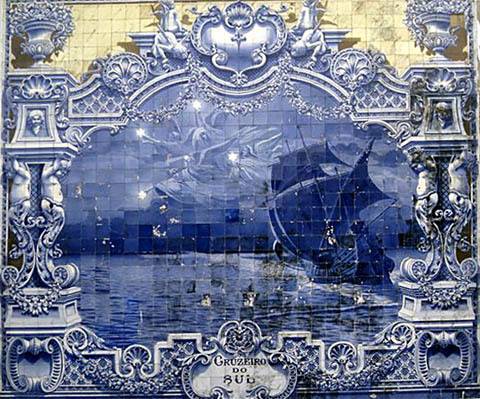
Portuguese azulejo tile panel
Thoroughly Europeans got acquainted with tiles on the Iberian Peninsula during the reconquest of Mauritanian Spain. The local Muslim lords of the Baghdad caliphs considered their overlords no more than Benjamin Franklin and George Washington - King George and did not keep az-zillij behind seven castles; on the contrary, they briskly traded in tiles, and the az-zillij masters willingly hired conscientious Christian apprentices.
The Portuguese were the first to adopt and improve the tile technique and began to create their own azuleijos - large art panels from tiled fragments, see fig. above. Courtiers of the Spanish monarchs of Dutch origin in the 15th-16th centuries. became more interested in piece tiles and brought them home. The neat Dutch az-zillij, which they called kahel in the German (more precisely, Upper Dutch) way, really liked it, and very soon their own production was established in the Netherlands, see next. rice. The technique remained practically the same, only the plots were taken on their own.
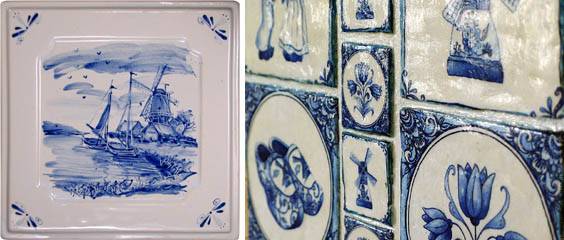
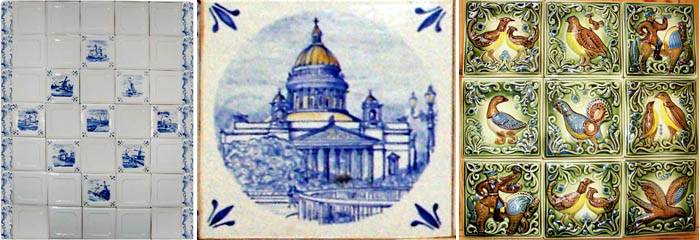
Dutch tiles
Kahel, which was quickly renamed here as tiles, was brought to Russia, as already mentioned, by Peter I, but mass production of world-class products was established only under Catherine II in Gzhel, using the Arab-Dutch technique, on the left of the trail. rice. In the 19th century they tried to make tiles of this type in St. Petersburg (in the middle in the figure), but by that time a national school of tiles of world cultural significance had already been formed (on the right in the figure), and in terms of artistic level, St. Petersburg tiles were inferior to Gzhel ones, and the enterprise was not successful. Now the old Pereburg tile is a welcome exhibit for a connoisseur collector.
Russian tiles


