- Terms of Use and Safety
- Making a wood stove
- Main advantages
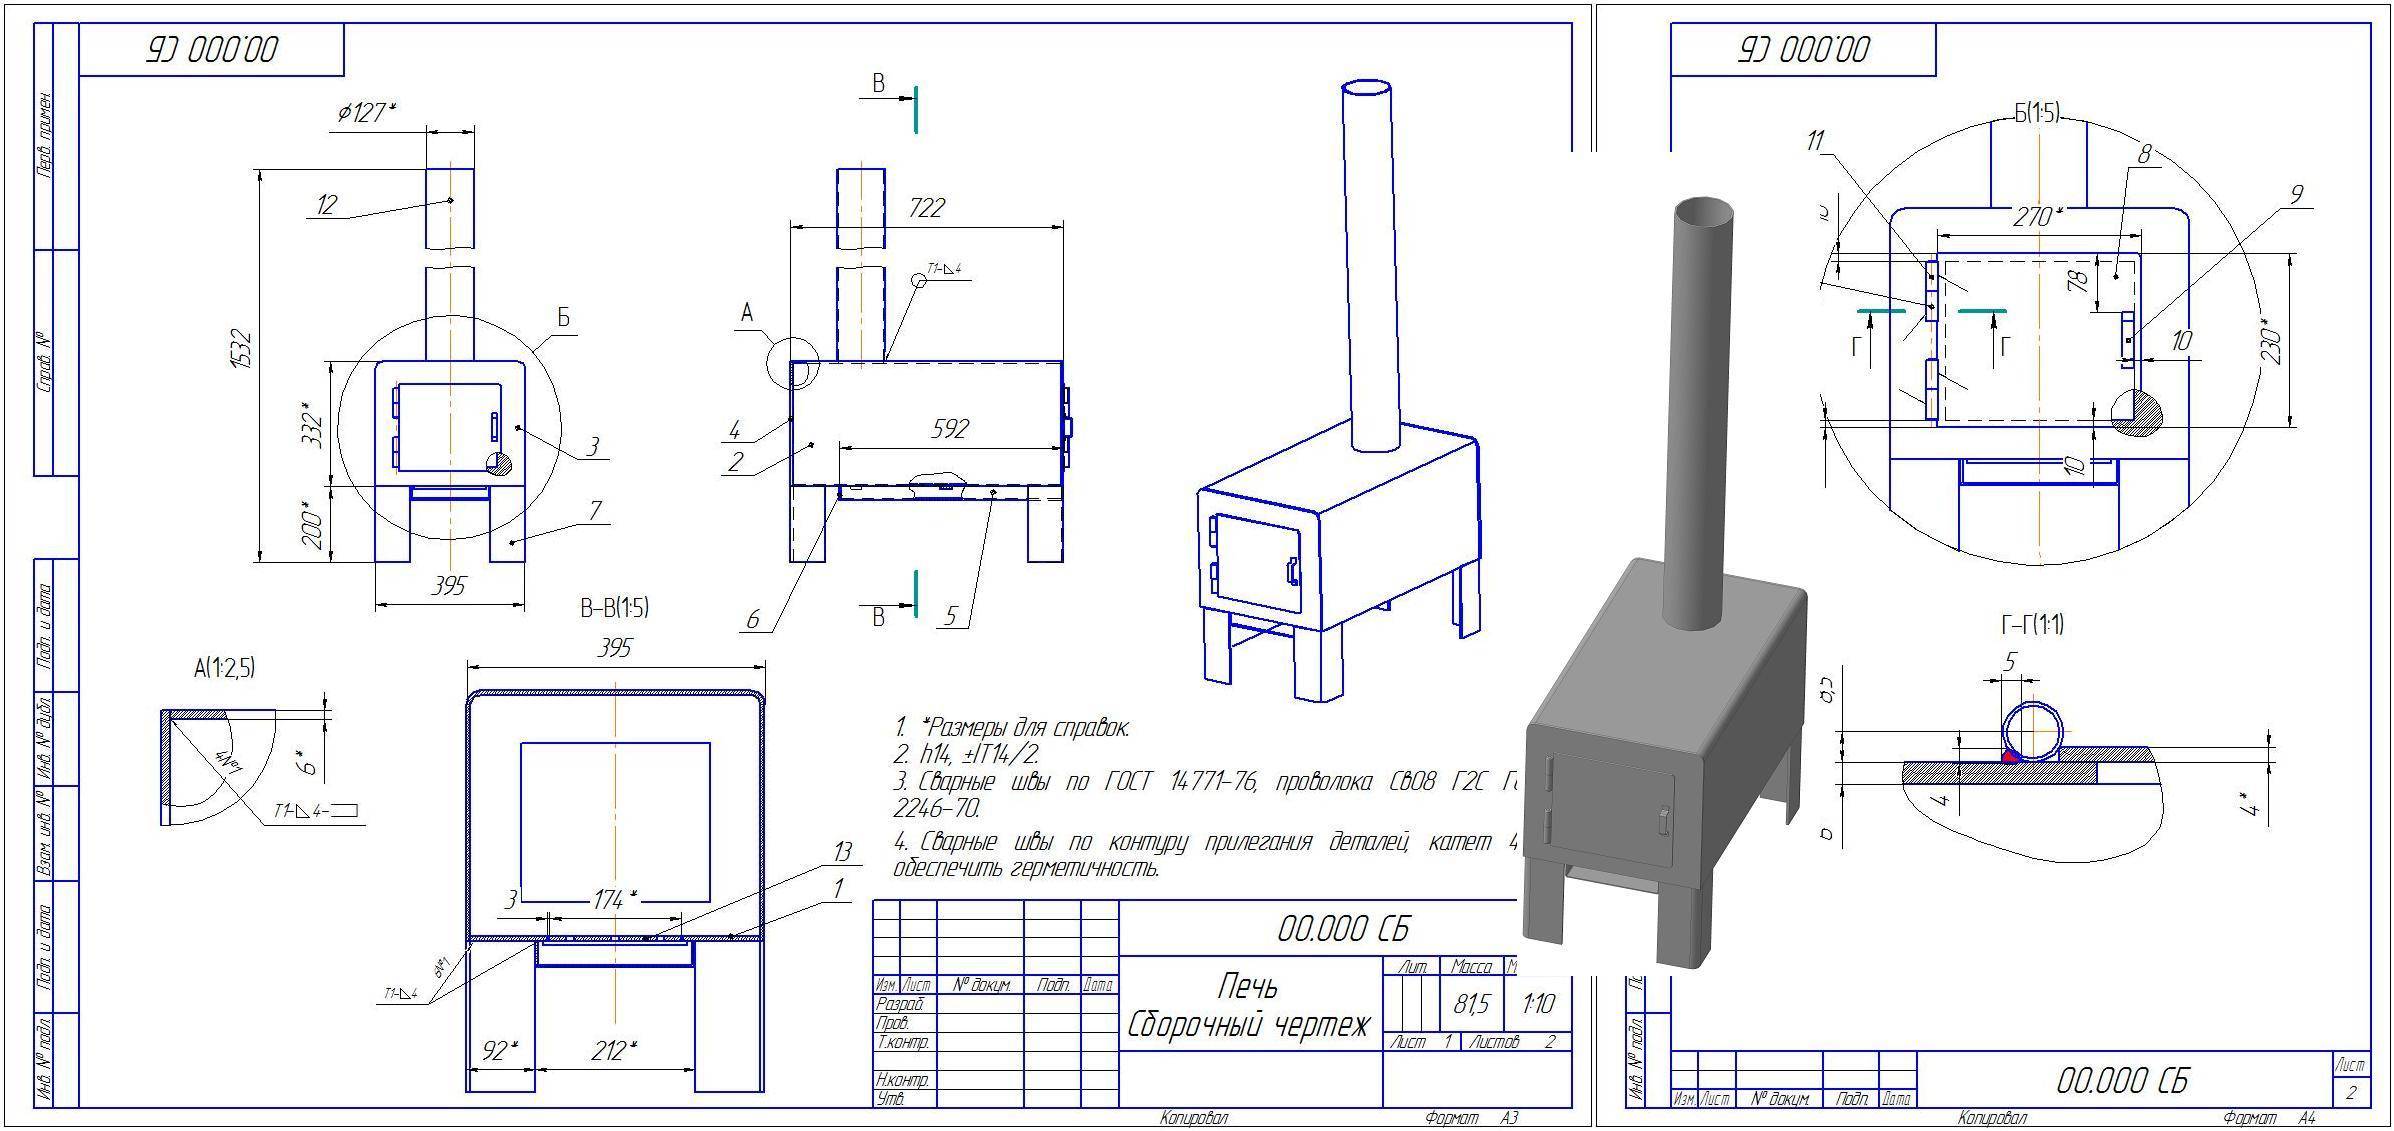
- The design of the "potbelly stove"
- What will be required in the work
- Construction assembly
- Operation features
- Potbelly stoves - proven and simple designs
- Potbelly stoves from a cylinder, barrel or pipe
- vertical
- Horizontal
- From two barrels
- How to build a stove
- Foundation laying
- Scheme of a coal stove for a house
- For a bath
- No. 4. Electric garage heating
- Design and principle of operation
- Garage Tips
- Design examples
- Video: operation of the buleryan furnace in the garage
- About long burning stoves
Terms of Use and Safety
Before you place a stove in the garage and use it, you will have to figure out the basic rules for its operation:
- It is better to use solid wood as fuel, as such material burns longer and gives better heat. Hardwoods include beech, ash and birch.
- It is necessary to kindle the stove with a resin torch or paper. Such material improves fuel ignition and traction.
- If the potbelly stove has not been used for a long time, kindling is carried out only with the valve ajar.
- Do not start a fire with flammable liquids, as this may start a fire.
Making a wood stove
Making a wood stove
This is a simple option that is ideal for heating a garage space. The most popular among motorists is a design called "potbelly stove".
Main advantages
Do-it-yourself potbelly stove
Among the many positive qualities that such a furnace possesses, it is worth noting:
- no need to build a foundation;
- ease of use;
- the possibility of using both for heating and for cooking;
- profitability;
- autonomy from communications;
- low cost;
- small dimensions;
- high efficiency.
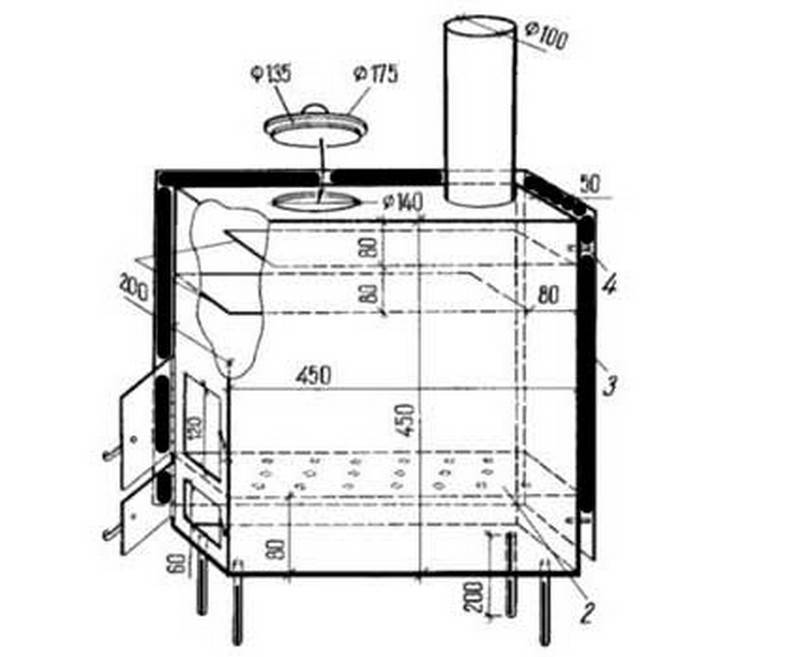
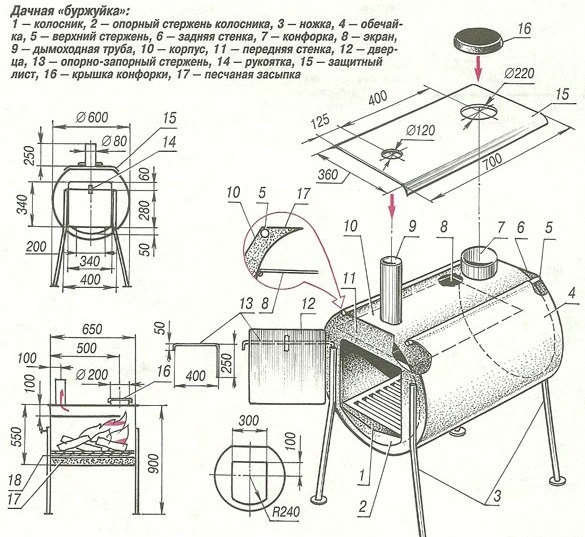
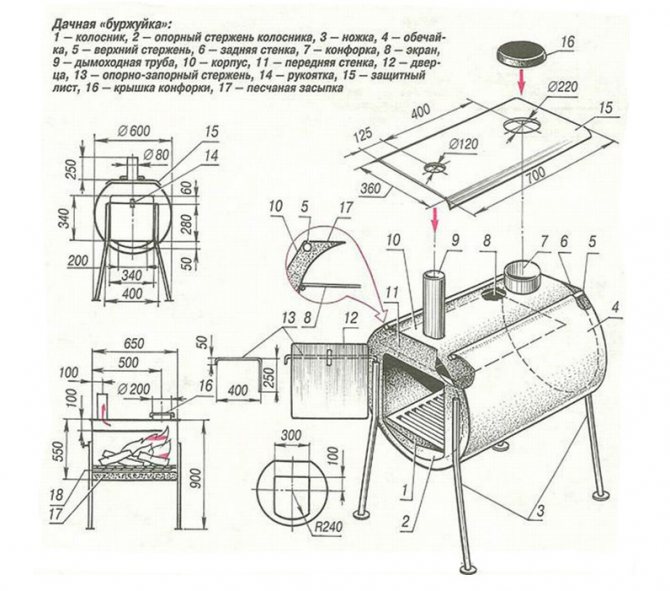
The design of the "potbelly stove"
The design of the "potbelly stove"
The design of the "potbelly stove"
There are no clear requirements regarding the design, everyone can make a "potbelly stove" taking into account their own needs and preferences. But in any case, the stove should consist of four main elements.
- The combustion chamber is a container in which fuel will burn.
- Lattice located next to the base. It provides traction and is used for stacking firewood.
- The ash pan is installed below the grate. It is necessary to remove soot accumulations.
- Chimney.
If desired, the "potbelly stove" can be somewhat improved to reduce the consumption of firewood. For this purpose, the exhaust pipe is not installed next to the rear wall, but on top of the door. In this case, the walls of the furnace will first heat up, and only then the gases will enter the pipe. Consequently, the heat transfer time will increase.
Making a potbelly stove
Making a potbelly stove
Making a potbelly stove
What will be required in the work
For the manufacture of a wood stove, the following materials are required:
- channel;
- iron container for 200 l;
- pipes.
To determine the volume of consumables, read the drawings of the garage oven, carefully study all the connecting nodes.
Construction assembly
Construction assembly
Approximate scheme of the furnace
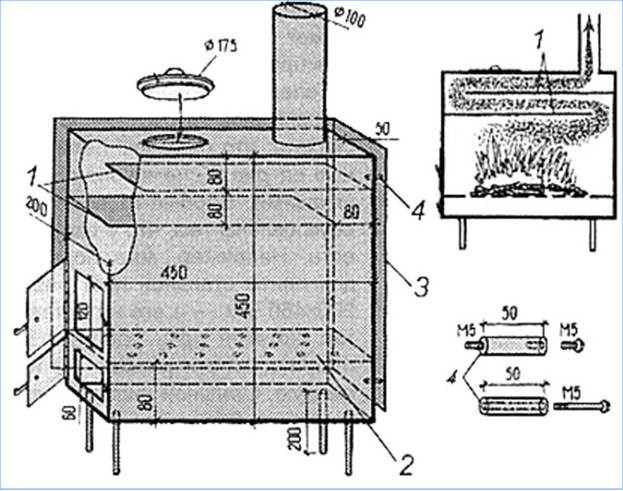
Step 1. First, the upper part of the container is cut off. To do this, you can use the grinder.


200 liter barrel
Step 2. The formed edges are equal. The edges of the barrel are wrapped with a hammer inside. The edges of the lid are folded in the same way, but this time outward.
Step 3. A hole ø10-15 cm for the pipe is cut in the center of the lid. To do this, you can use a hammer and chisel.
Step 4. A channel is welded to the cover. At the same time, the hole for the cork can be either welded or left for visual control of the combustion process.
pressure circle
Installing the pressing wheel in the furnace
Step 5. A hole ø10 cm is made under the chimney in the upper part of the body, a pipe is welded.
Step 6. A pipe of the appropriate diameter is inserted into the hole on the lid so that it rises slightly above the surface. With the help of this pipe, air will be supplied to the structure.
Furnace elements
garage oven
The oven-"potbelly stove" is ready.
Chimney installation
Chimney installation
Chimney installation
Chimney installation
Chimney installation
Operation features
After assembling the oven, it is necessary to test it for correct functioning. To do this, you need to perform the following sequence of actions.


Loading firewood
Step 1. First, the combustion chamber is filled with firewood by a third.
Step 2. The air supply pipe is installed and closed with a lid. As the fuel burns, the cover lowers a little.
Step 3. Firewood is inserted, slightly moistened with gasoline, a lit match is thrown.
Oven in operation
Potbelly stoves - proven and simple designs
Potbelly stoves - a hit of the 20s of the last century.Then these stoves competed with brick ones and stood everywhere, even in apartments. Later, with the advent of centralized heating, they lost their relevance, but are used in garages, summer cottages, for heating utility or outbuildings.
sheet metal
Potbelly stoves from a cylinder, barrel or pipe
The most suitable material for making a potbelly stove for a garage is propane tanks or a thick-walled pipe. Barrels are also suitable, but you need to look for a not very large volume and with a thick wall. In any case, the minimum wall thickness is 2-3 mm, the optimal one is 5 mm. Such a stove will serve for more than one year.
By design, they are vertical and horizontal. It is more convenient to heat a horizontal one with firewood - longer logs fit. It is easier to make it elongated upwards, but the firebox is small in size, you will have to cut firewood finely.
A potbelly stove for a garage can be made from a cylinder or a pipe with a thick wall
vertical
First, how to make a vertical garage oven from a cylinder or pipe. Divide the selected segment into two unequal parts. Below is a smaller one for collecting ashes, above is the main one for laying firewood. The following is the order of work:
- Cut out the doors. Small at the bottom, large at the top. We use the cut pieces as doors, so we don’t throw them away.
- We weld the grates in the chosen place. Usually it is steel reinforcement 12-16 mm thick cut into pieces of the desired length. The fitting step is about 2 cm.
How to make grates - We weld the bottom if it is not.
- We cut a hole in the lid for the chimney, weld a strip of metal about 7-10 cm high.The outer diameter of the resulting pipe is best made for standard chimneys. Then there will be no problems with the chimney device.
- The cover with the welded pipe is welded into place.
- By welding we fasten locks, hinges to the cut-out pieces-doors and put all this in place. As a rule, potbelly stoves are leaky, so seals can be omitted. But if desired, a strip of metal 1.5-2 cm wide can be welded around the perimeter of the doors. Its protruding part will close a small gap around the perimeter.
All in all, that's all. It remains to assemble the chimney and you can test a new stove for the garage.
Horizontal
If the body is horizontal, the ash drawer is usually welded on from below. It can be welded to the required dimensions from sheet steel or a suitable sized piece of channel can be used. In the part of the body that will be directed downward, holes are made. It is better to cut something like a grate.
How to make a potbelly stove in the garage from a gas cylinder
Then in the upper part of the body we make a pipe for the chimney. To do this, you can weld a cut piece from a pipe of a suitable diameter. After a piece of pipe is installed and the seam checked, the metal inside the ring is cut out.
Next, you can make the legs. Corner segments are best suited, to which small pieces of metal are attached from below to stand stably.
The next step is to install the doors. On the blower, you can cut a piece of metal, attach loops and constipation. Here without any problems. The gaps along the edges do not interfere - air for combustion will flow through them.
There will be no difficulties even if you make a metal door - welding the hinges is not a problem.Only here, in order to be able to at least slightly regulate combustion, the door needs to be made a little larger - so that the perimeter of the opening is closed.
How to install furnace casting on a metal stove
It is problematic to install furnace casting. Suddenly someone wants to have not a steel door, but a cast-iron one. Then it is necessary to weld a frame from a steel corner, attach a casting to it with bolts, and weld this entire structure to the body.
From two barrels
Everyone who used a potbelly stove knows that very hard radiation comes from its body. Often the walls are heated to a red glow. Then next to her is impossible. The problem is solved by an interesting design: two barrels of different diameters are inserted one into the other. The gaps between the walls are covered with pebbles, clay mixed with sand (calcined on fire, covered only when it has cooled down). The inner barrel acts as a firebox, and the outer one is only the body.


This stove will take longer to heat up. It will not immediately begin to give off heat, but it will be more comfortable in the garage and after the fuel burns out, it will warm the room for a couple more hours - giving off the heat accumulated in the tab.
How to build a stove
First you need to understand what requirements are put forward for a heating furnace for coal:
the heater must warm up evenly and quickly, intensively giving off heat to the indoor air;
the outer walls of the brickwork facing the rooms can warm up to a maximum of 90 ° C;
fuel combustion must be efficient;
the stove should be located in the house in such a way that its walls warm up several rooms;
when erecting the furnace body and chimney, it is important to follow all fire safety rules;
during the construction it is not allowed to use combustible materials;
masonry should be even, without cracking;
the heater should be finished in accordance with the interior of the home.
When the requirements are known and worked out in relation to your home, you should choose an appropriately sized stove design and lay a solid foundation for it.
Foundation laying
A coal stove is a massive and rather heavy structure, and therefore the foundation for it must be made reliable. Its dimensions in the plan are taken 5 cm more in each direction from the dimensions of the future structure.
An important condition: the foundation of a brick heating or cooking device should not be joined to the base of the building itself, but should be at least 10 cm away from it. Foundation laying work is carried out in the following sequence: Foundation works are carried out in the following sequence:
Foundation works are carried out in the following sequence:
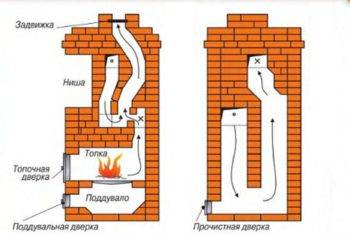
Scheme of a coal stove for a house
The design of a coal-fired brick oven is almost the same as a conventional wood-burning stove.
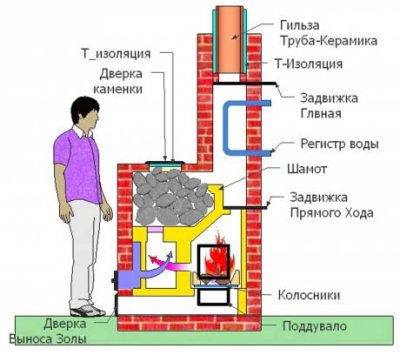
It consists of, arranged in a certain sequence: a foundation, an ash pan, a combustion chamber, a vault, a chimney.
The main difference between a coal stove is a reinforced firebox and an increased volume of an ash pan (when burning coal, more ash is obtained than when wood is burned).
Also, a larger grate must be installed (ideally, it replaces the bottom of the firebox).
Coal in the combustion chamber of the furnace burns out from below, so the walls of the compartment are made inclined - this design helps the upper layers of coal to fall as they burn out.The dimensions of a standard device are 110x900 cm, the height without a chimney is about a meter.
For a bath
The device for a bath is characterized by the presence of a heater - a container for stones. Together with it, the height of the furnace will be 1.6 m, length 1.1 m, width 90 cm. The heater is made open and is located in the upper part of the furnace. Because of this, the chimney is not located above the combustion chamber, but on the side.
More compact metal stoves are often installed in the bath. The dimensions of a standard metal furnace on a coal are 50x80 cm and a height of 80 cm. It is recommended that the wall thickness be at least 8-10 mm.
No. 4. Electric garage heating
Electric heating is the easiest to organize, but you have to pay dearly for such convenience.
Advantages:
- simplicity and high speed of arrangement. It is enough to buy a heater and plug it into an outlet;
- a large selection of heating devices;
- lack of combustion products, so a chimney is not needed;
- high level of security;
- high heating rate;
- ease of temperature adjustment.
There are also disadvantages:
- long-term heating with electricity will cost a pretty penny;
- not suitable for regions with power outages;
- rapid cooling of the room after turning off the heating;
- low durability of the equipment.
Most often, the following electric heaters are used to heat the garage:
- heat guns are a more powerful analogue of a household fan heater. Cold air passes through the heating element, heats up and is blown into the room with the help of a fan. You can put the heat gun anywhere, it is mobile and allows you to adjust the degree of heating. There are very powerful models that need to be connected to a 380 V network.The gun is capable of raising dust into the air, this is especially noticeable in small garages, so the room will have to be kept clean;
- the fan heater is inferior in terms of power to the heat gun, it is the cheapest, it dries the air. For them, as well as for guns, a fairly high noise level is characteristic. Ceramic fan heaters are more durable, economical and comfortable in terms of operation than spiral counterparts;
- a convector is a heating element in a housing with holes. The room is warmed up due to the heat transfer of the body and the exit of warm air through the holes. Many models are equipped with wheels for easier movement. The convector heats up the room more slowly than a heat gun, but after turning off the case cools down for a long time. Another disadvantage is the higher price;
- an oil heater is more complicated than a convector. Here, the heating element first heats the oil, then the oil heats the body, and the body already heats the air. The room heats up for a long time, so this is not the best option for a garage;
- Infrared heaters heat surfaces and objects, which then heat the air. The person becomes warm immediately. By the same principle, the sun warms the planet. Such devices consume a minimum of electricity, but during operation they heat up significantly - be careful if the garage is small. It is better not to direct the beams at the car;
- Inverter split systems are a fairly economical way to generate heat, but the equipment itself is very expensive. The system can operate at temperatures not lower than -20C.
Electric heaters are suitable for temporary garage heating: they planned to do some work, turned on the heater, did everything and turned it off. It won’t hit your wallet, and you won’t have to bother with kindling and a chimney.If the garage is a workshop where you spend time regularly, then this heating method is not for you.
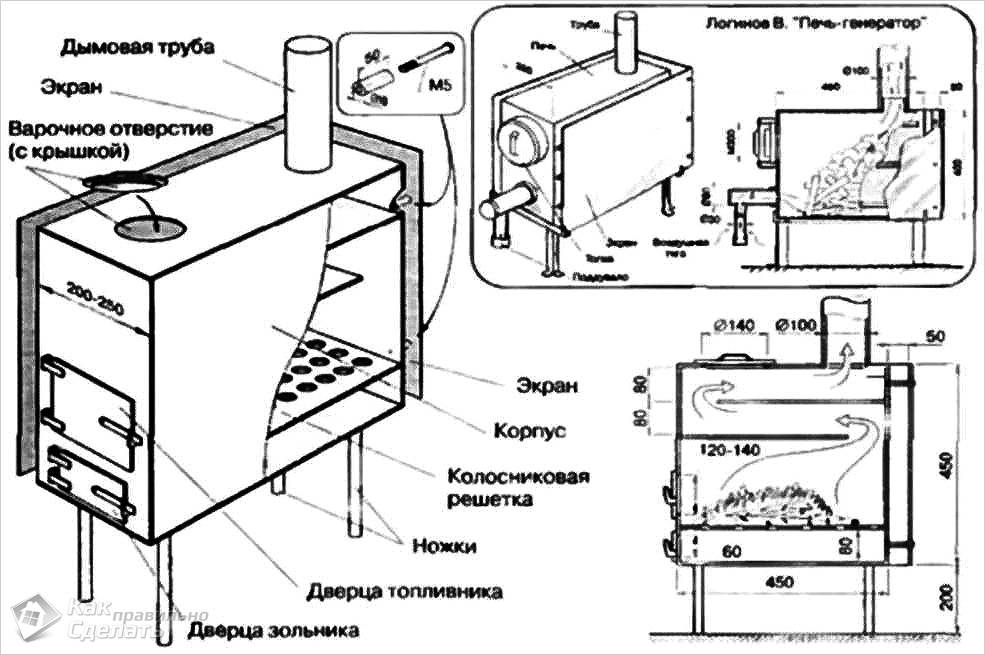


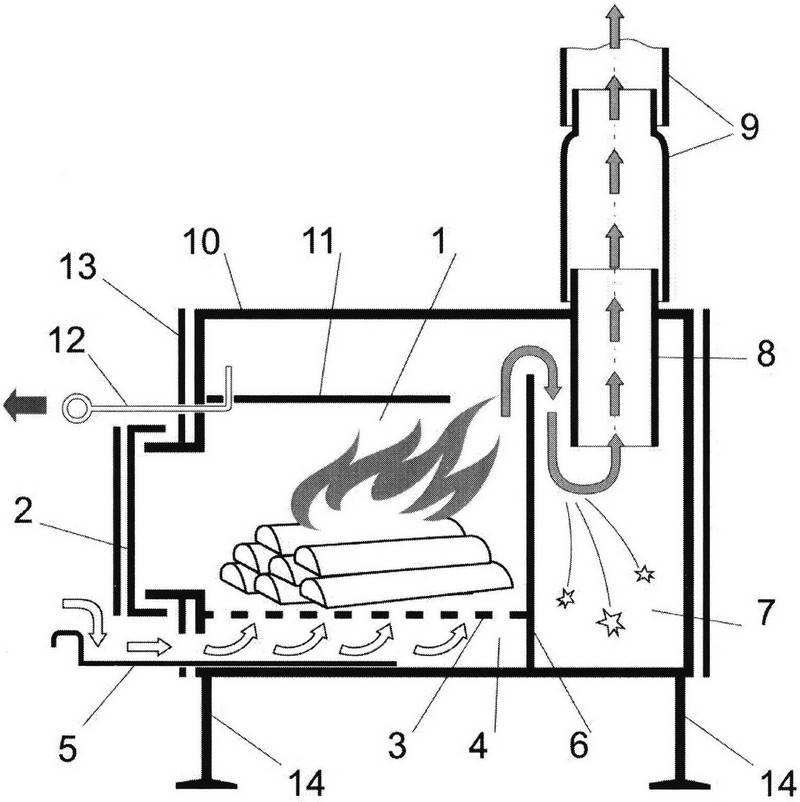
Design and principle of operation
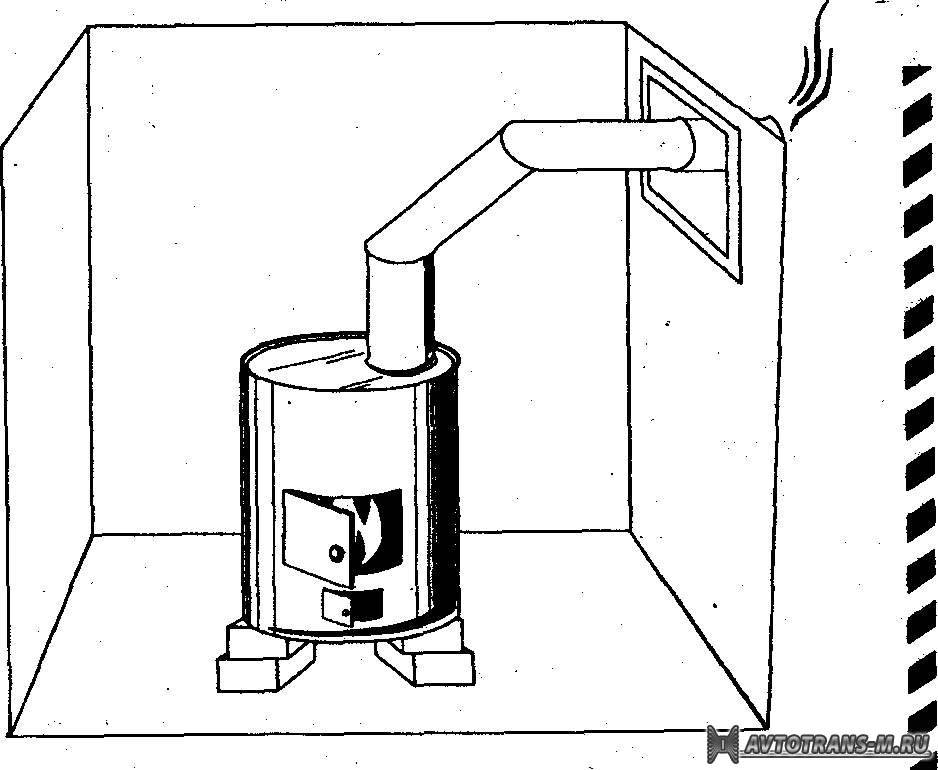
For a garage that does not have electricity or gas, a potbelly stove is the best solution. Under it also does not need to build a foundation.
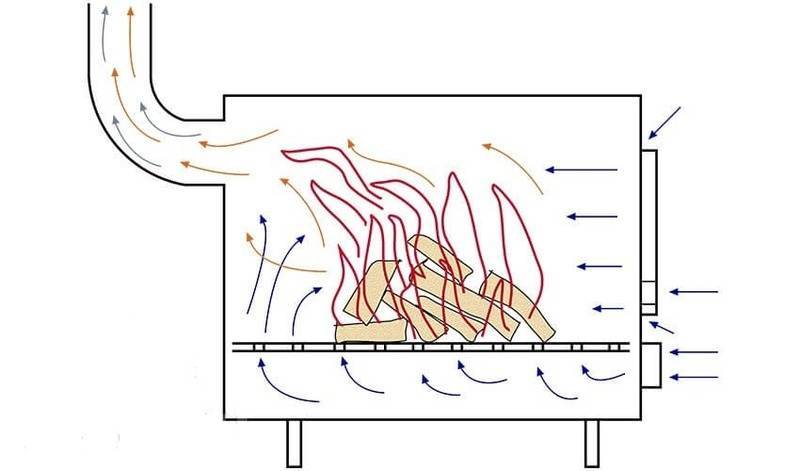
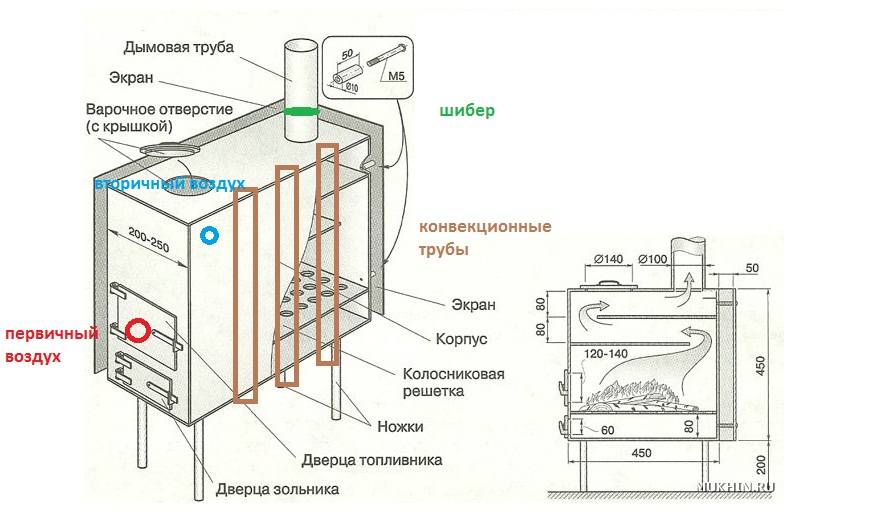
Most often, the potbelly stove has a cylindrical shape. The main elements of the standard design of such a furnace are a metal case and a chimney. The oven itself can be divided into two compartments. The upper one is the combustion chamber (furnace), where fuel is laid. A branch pipe is also installed there for the removal of combustion products into the chimney.
The grate separates the lower compartment - the ash pan. correct supply of oxygen to ensures proper combustion of firewood. It is recommended to install loading doors in both compartments. The amount of air entering the furnace, and hence the intensity of fuel combustion, depends on them.
It is important that the chimney be welded close to the hole, be solid and thick-walled.
Garage Tips
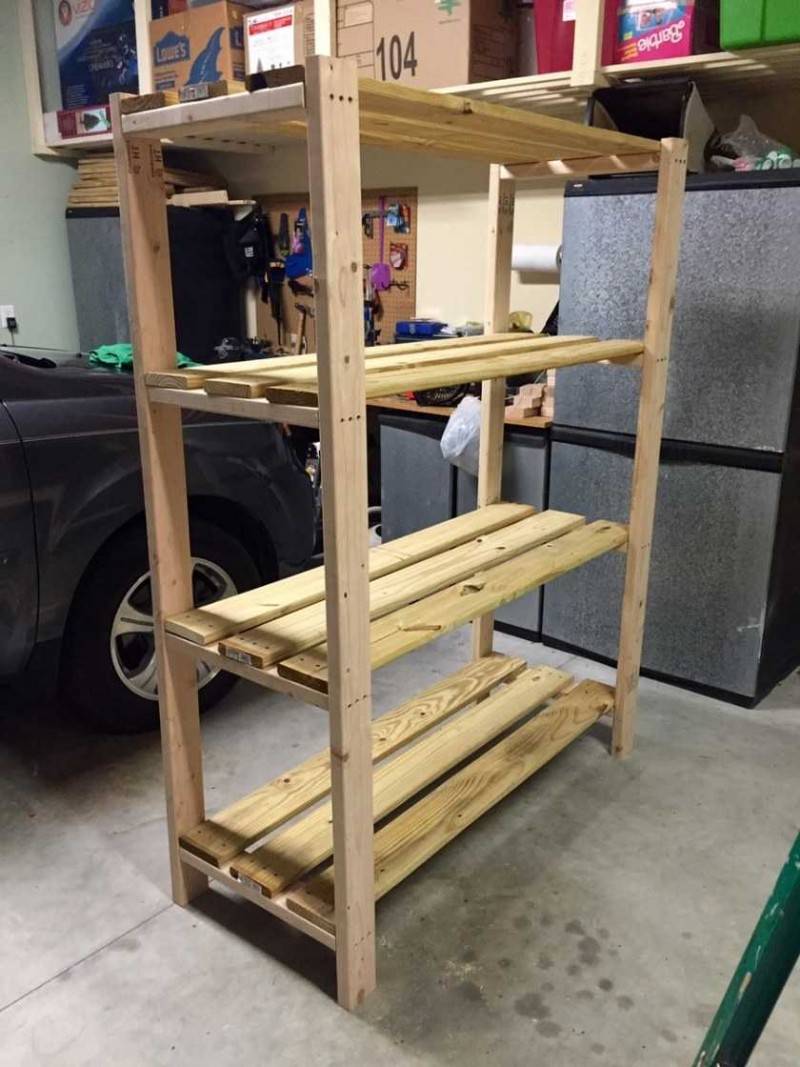
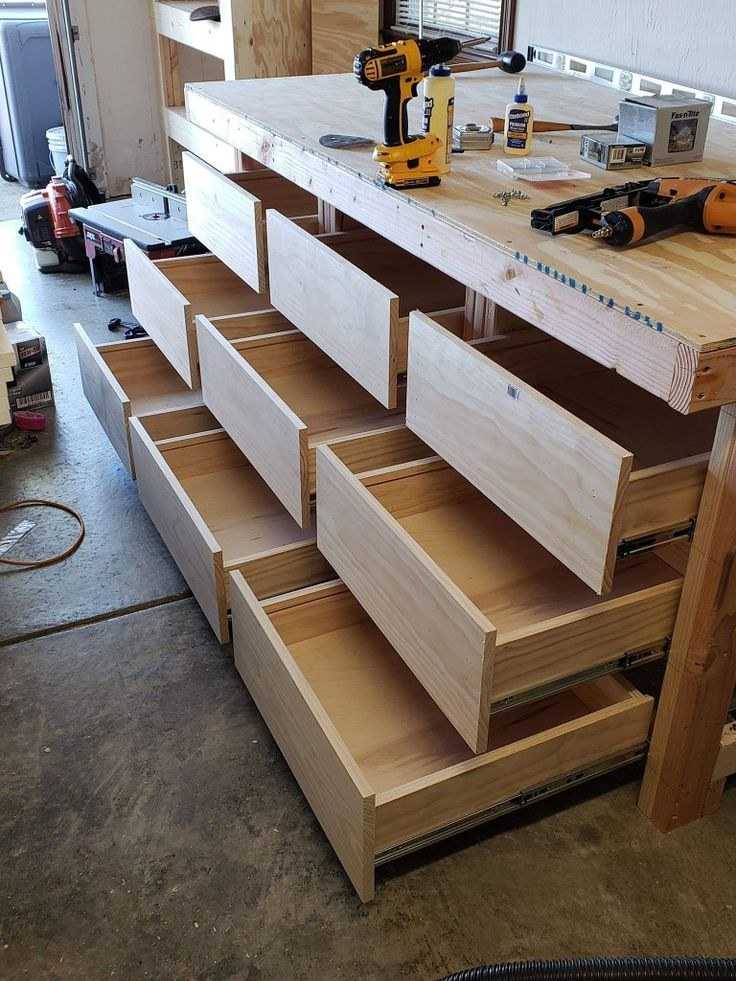
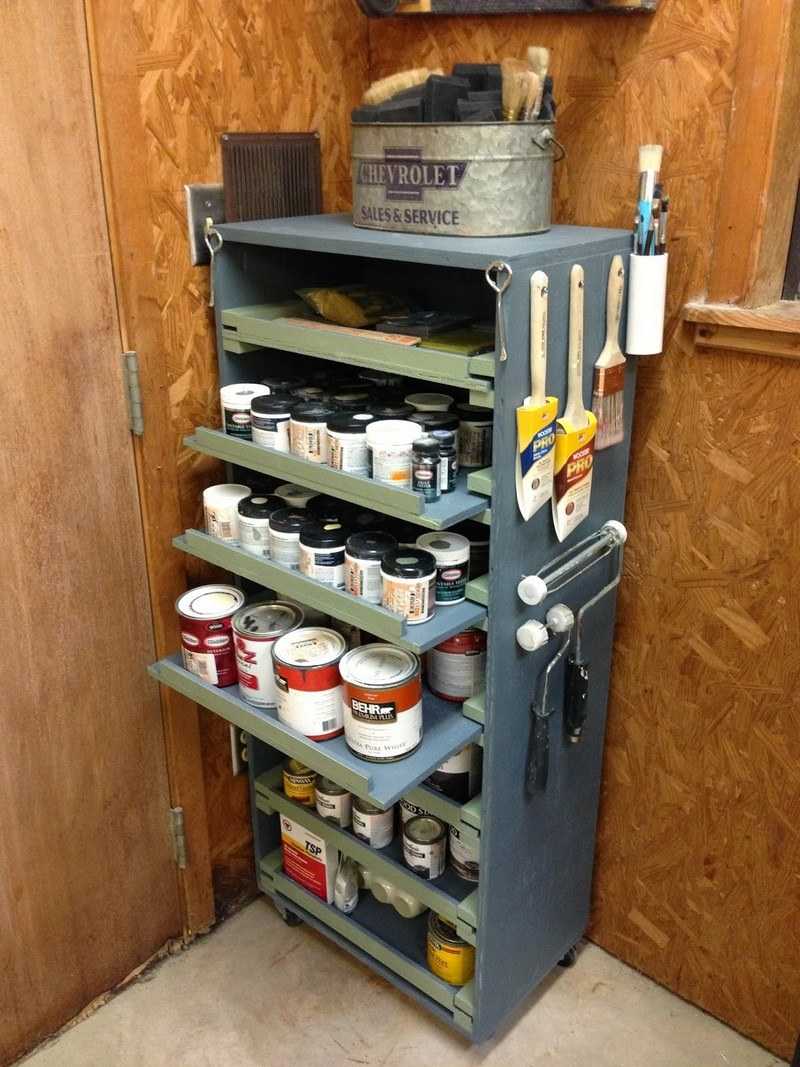
Useful garage hacks will help you use the available space ergonomically. There are several competent ways to arrange and design a garage space:

The garage, as a rule, has a rectangular shape, and the car does not occupy all the free space. Therefore, you can equip the work area with workbenches, shelves and tools. Separate zones should be allocated for spare parts, tools and appliances.

If the garage has a separate room (panel room, utility room), its door can be converted into a kind of rack for storing light small accessories.


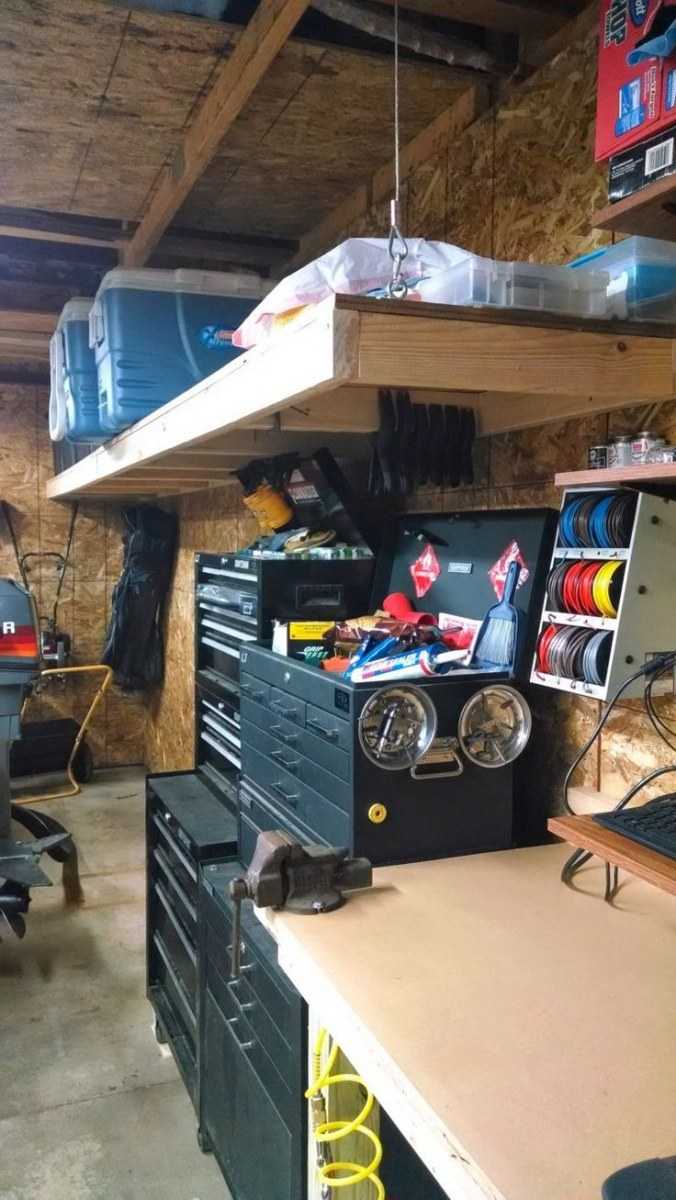
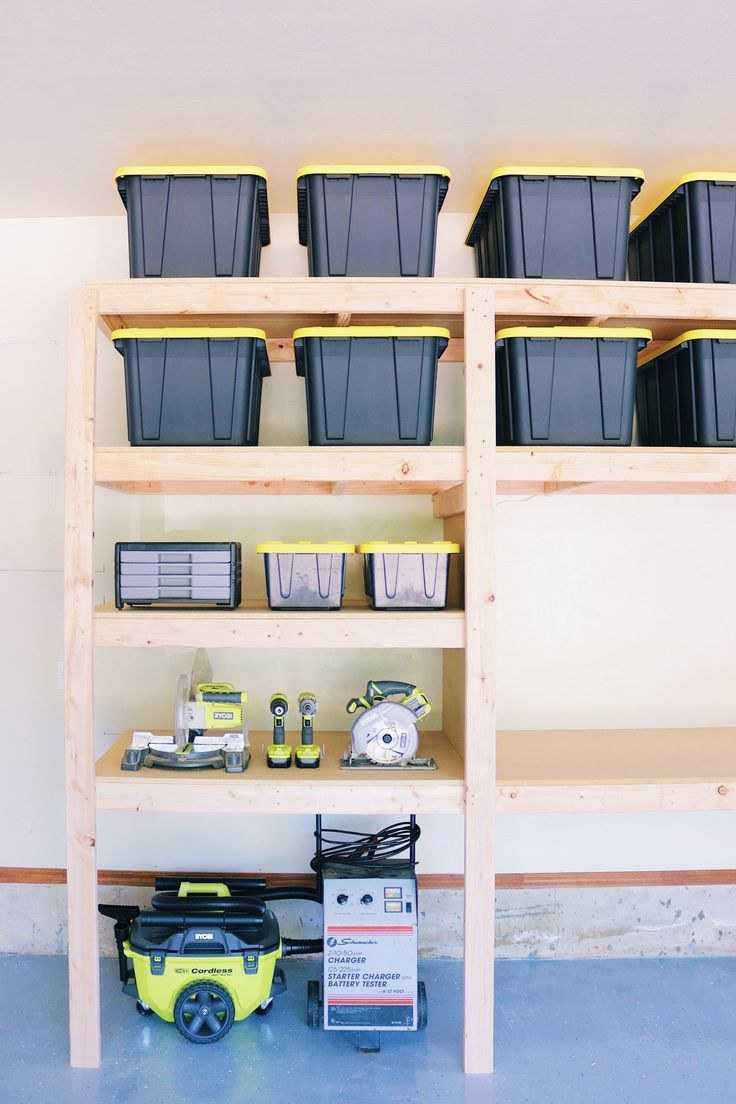

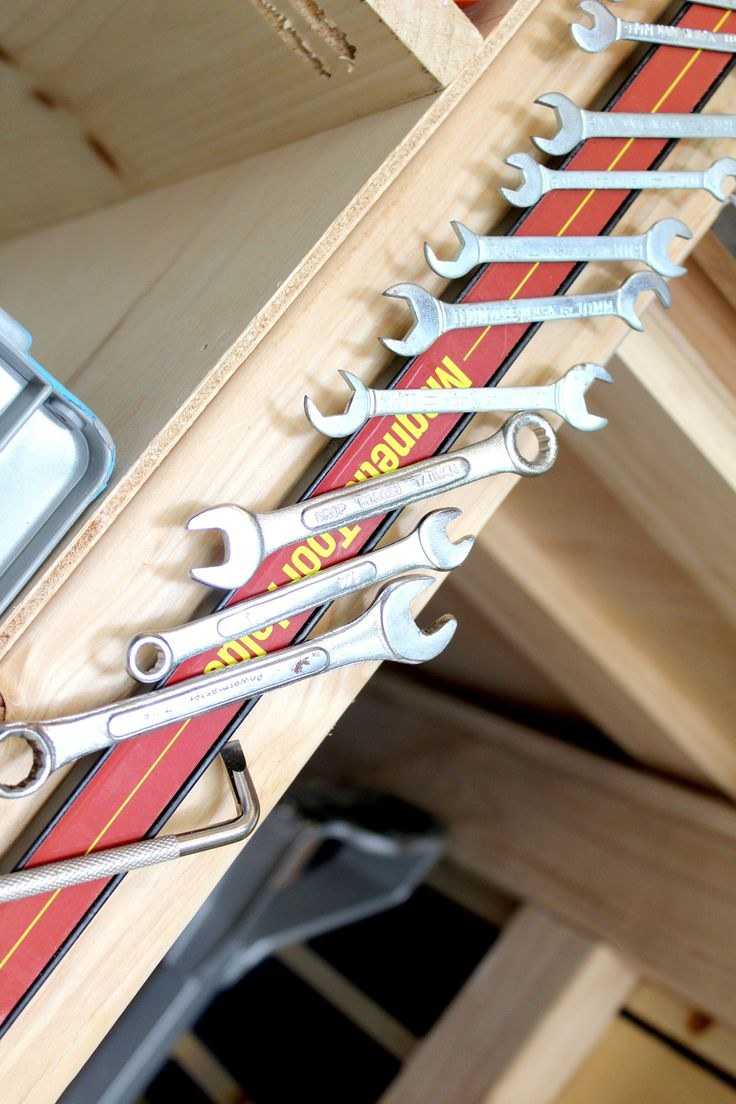


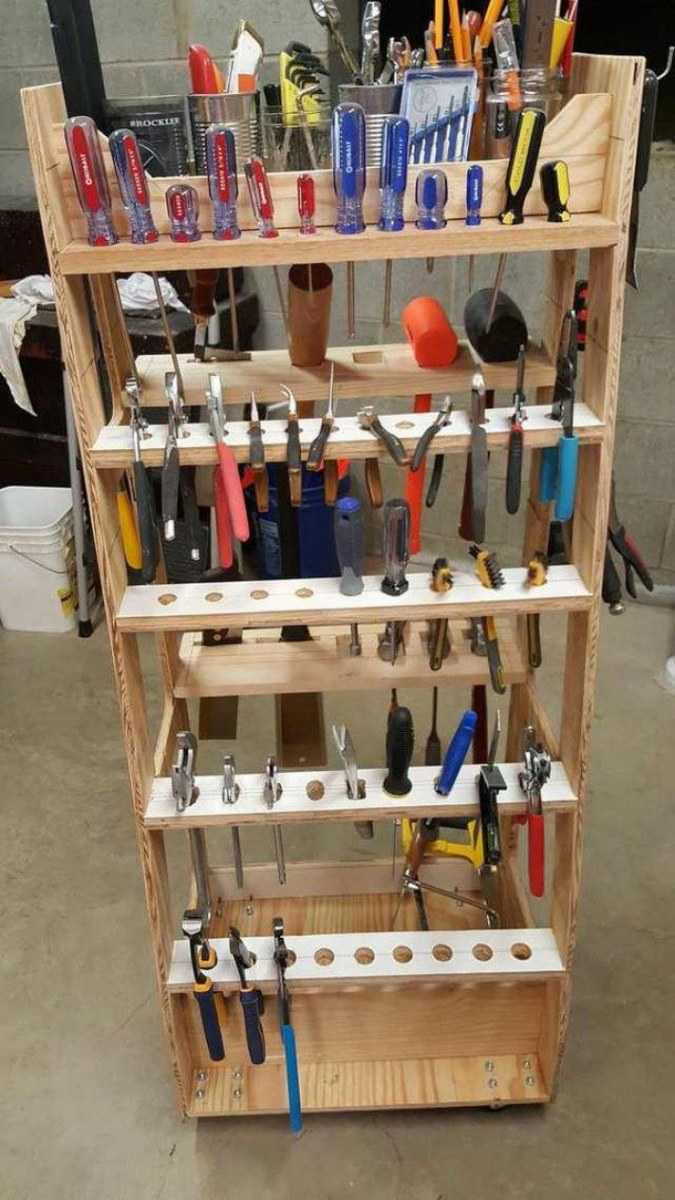
In a compact room, metal bars can be made on the walls, which are used for compact storage of tools. The hooked rack can also be used to store garden tools and work clothes.

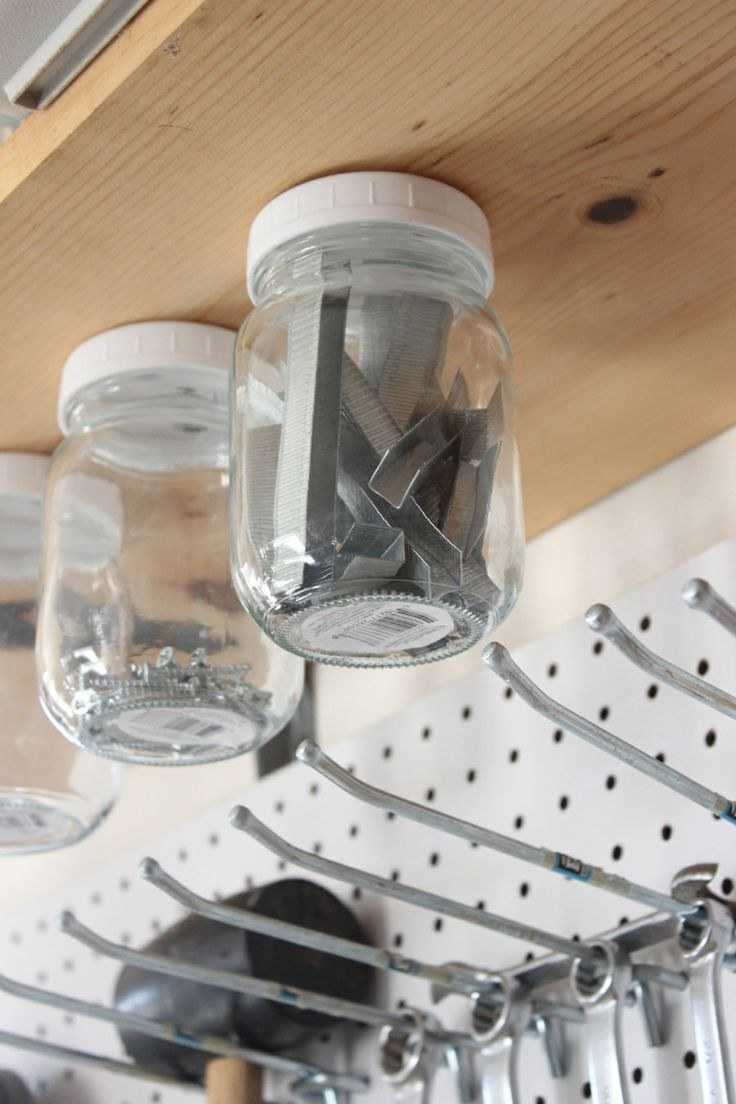
Hooks for storing garage accessories can be installed on almost any surface. You can use ready-made factory hooks, or make your own.

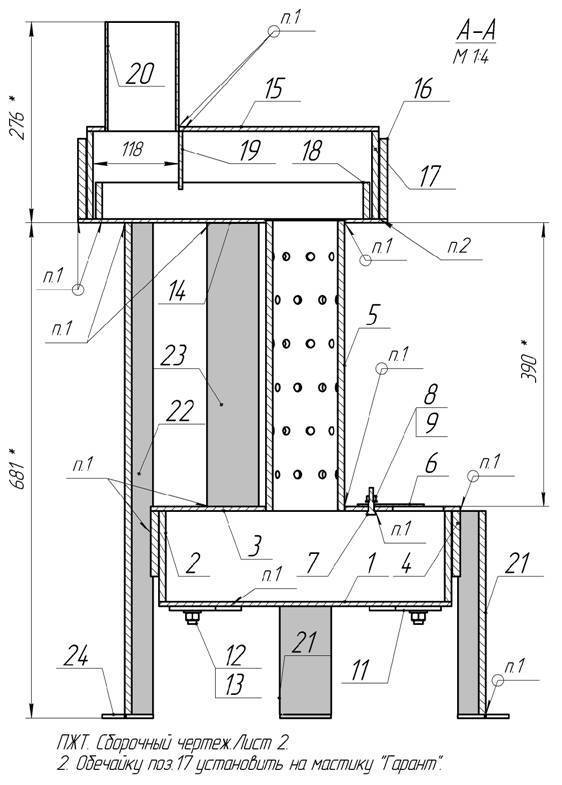
Design examples
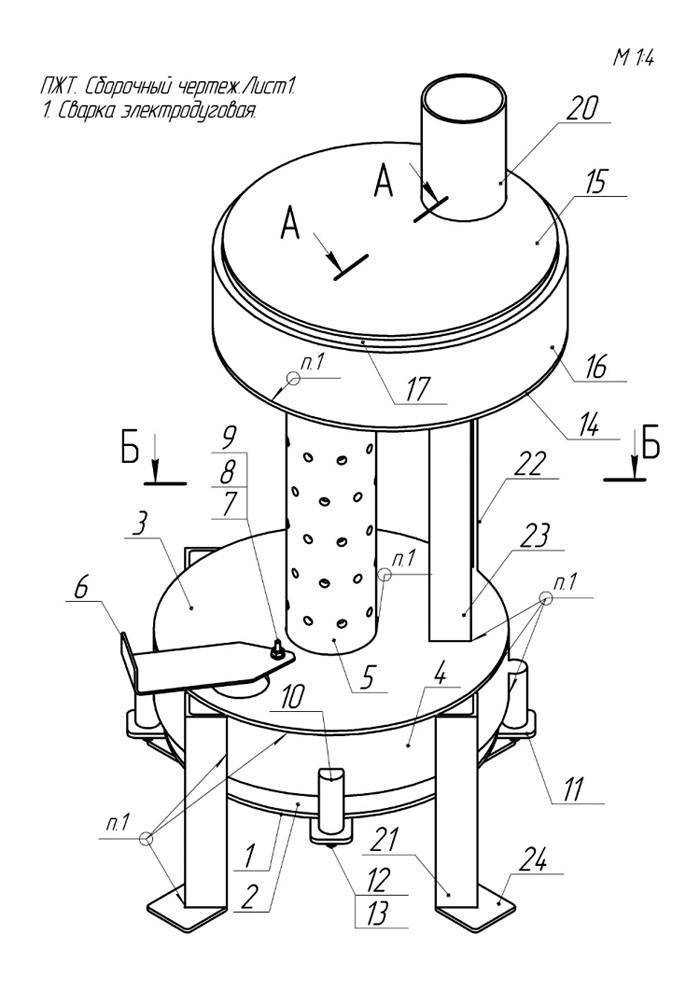
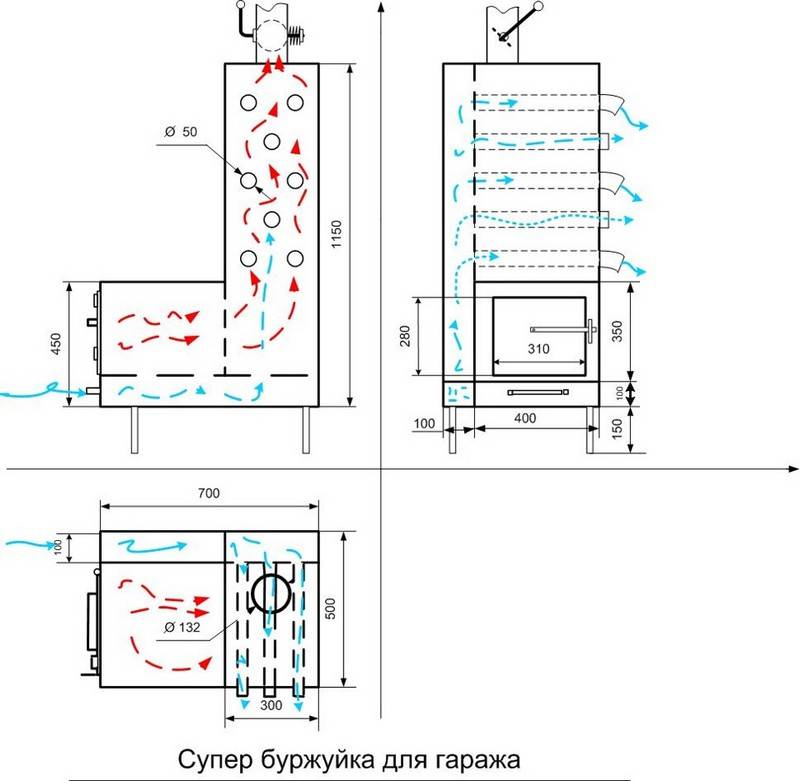
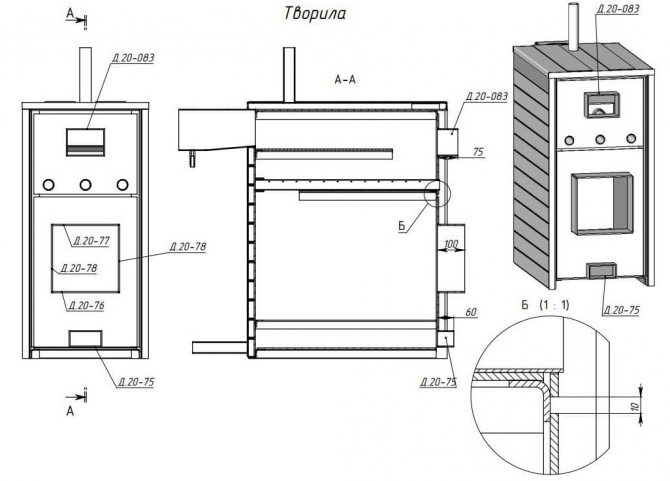
As an example of the above here in pic. - drawings of the Buleryan furnace for thermal power up to 6-13 kW. The total number of pipes in the batteries can be reduced to 6-7, then the length of the furnace will be reduced accordingly. It is also quite possible to do without a viewing insert made of heat-resistant glass in the door, the stove is ignited absolutely reliably.

Drawings of the furnace buleryan
But turned parts, pipe bending according to a template and shaped blanks made of 4 mm steel are a must. That is, only a fairly experienced craftsman who has the opportunity to use at least the smallest machine park should undertake the manufacture of a buller himself.
Video: operation of the buleryan furnace in the garage

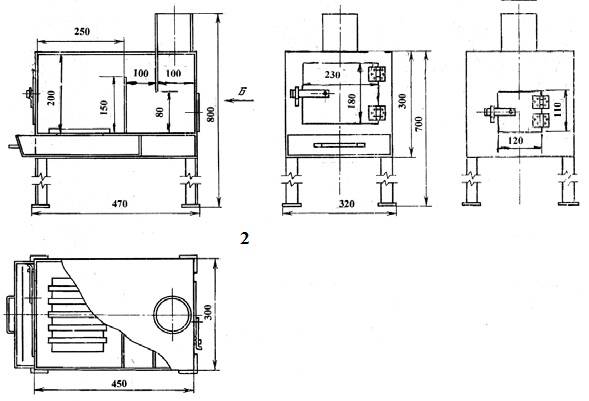
Drawings of a stove-stove for a garage
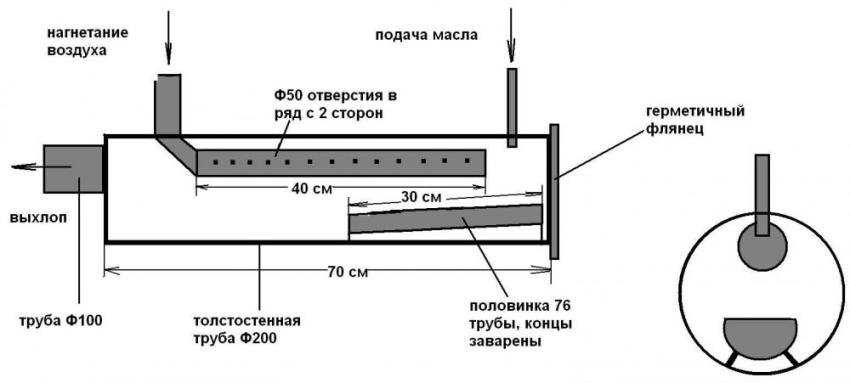
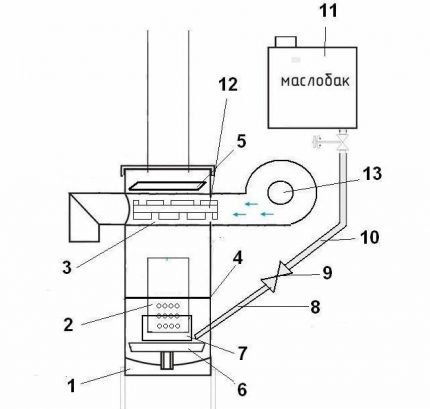
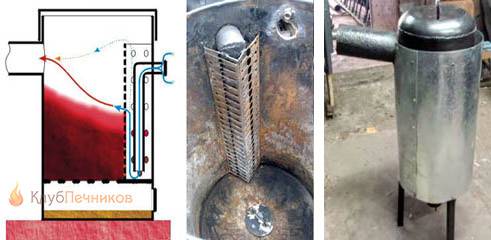
This potbelly stove can be used as an afterburner for a mining furnace, see above, by extending the legs to 400-450 mm. In this case, it is better to place the flange for the gasifier nozzle on the side wall under the grate and provide it with a blind threaded cover that is screwed on when burning wood / coal. A round window must be cut in the screen for the gasifier; it will not noticeably affect the efficiency of the furnace. Then it is necessary to put asbestos gaskets on the doors of the firebox and blower from the inside in order to exclude parasitic air inflow.


Part 1 (the body and partitions of the afterburner) are made of steel 2.5-4 mm.Grate 2 - made of steel 4-8 mm thick. Screen 3 - made of tin or thin galvanized. Variants of spacers for screen 4 are shown in the inset.
About long burning stoves
A constantly heated garage with stove heating is, generally speaking, a risky business. But in some areas, car owners simply have no other choice. In this case, a long-burning stove will help out. In addition to the fact that home-made, from improvised materials, "long" stoves provide uniform heat transfer for 12-24 hours, they also work on sawdust, shavings, wood chips, small brushwood, straw, dry leaves, cardboard and paper waste. The general disadvantages of long-burning stoves are as follows:
- Fuel is required only room-dry, i.e. in the garage it will be necessary to allocate a place for a woodcutter, which also increases the fire hazard.
- Abundant condensate settles in the chimney (water molecules are formed during the pyrolysis of wood or volatile components of coal), so a chimney elbow with its collector and drain valve is required, which also takes up space for the stove.
- It is impossible to extinguish a kindled furnace, the fuel must completely burn itself out.
- The use of homemade long-burning stoves is not permitted by fire regulations, which will automatically void your garage and car insurance.
- If the car is rented or leased (lease with a buyout), then the lessor gets the right to take it away at any time without returning a penny from the payments already received.
Long-burning furnaces are mainly carried out according to 2 schemes: with closed and open combustion zones. The efficiency of both those and others in an amateur version reaches 70%. Furnaces with a closed combustion zone develop a large specific thermal power, but are somewhat more complicated in design.
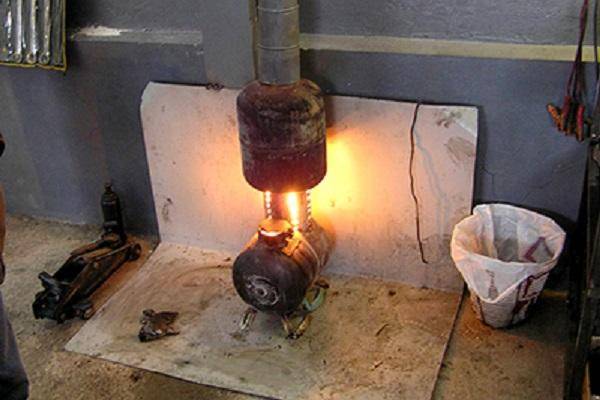
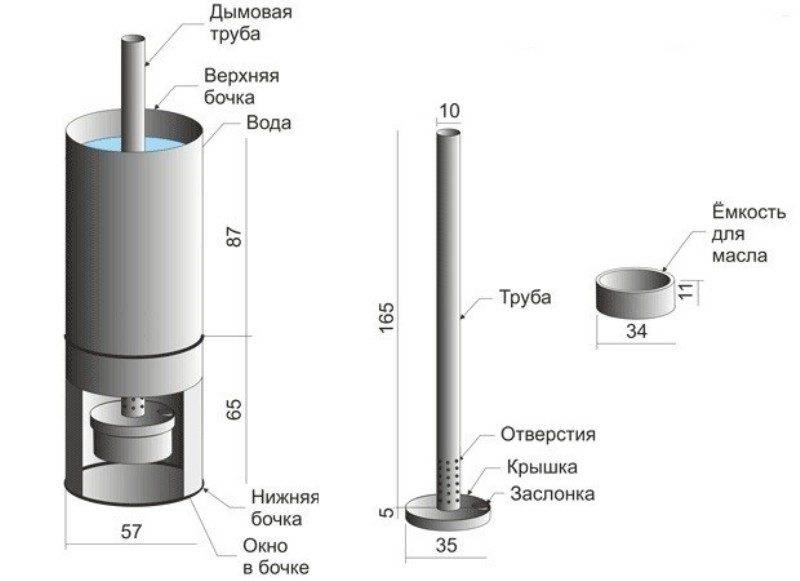
An example of the first is the well-known bubafonya, see fig. below. She is very popular, because. it can be made from a barrel, a gas cylinder, a pipe cut, etc. Bubafonya without a screen gives a convective flow, just enough to create a warm hat. However, bubafoni as a garage stove has a serious drawback: when blowing into the chimney, reverse combustion is possible, in which a flame beats out of the duct, which is useless in the garage.
Bubafonya long burning stove in the garage
Of the furnaces with an open combustion zone, Slobozhanka is quite popular, see fig. below. It is extremely simple in design and, if the lid is not removed during the firebox, is completely safe. "Slobozhanka" is produced in small batches by some small private enterprises. But it will not work out of a cylinder or a pipe: the diameter of the furnace should be in the range of 500-700 mm. With equal dimensions to the bubafonya, the power of the Slobozhanka is approximately half as much. A screen is needed to create a warm hat.
Oven Slobozhanka with a screen


