- The foundation for the sauna stove
- Preparatory work
- How to calculate and install the foundation
- Solution preparation rules
- cutting blanks
- The choice of the design of the sauna stove
- Furnace wall masonry
- Installation of a metal furnace with a remote firebox in a log house
- Tips
- Stones for the heater
- Video: correct laying of stones in a sauna stove
- Chimney for sauna stove
- Masonry schemes
- Stove-heater
- from brick
- metal
- Other structural elements
- Installation of a chimney (chimney) in a Russian bath
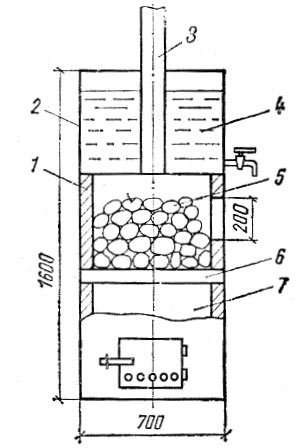
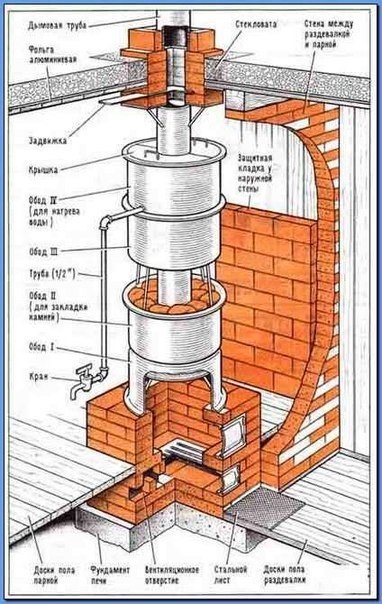
- Installing a hot water barrel (liquid heat exchanger)
- Manufacturing instructions with orders
- Masonry stove-heater open type
- Ordering a closed stove-heater for a bath
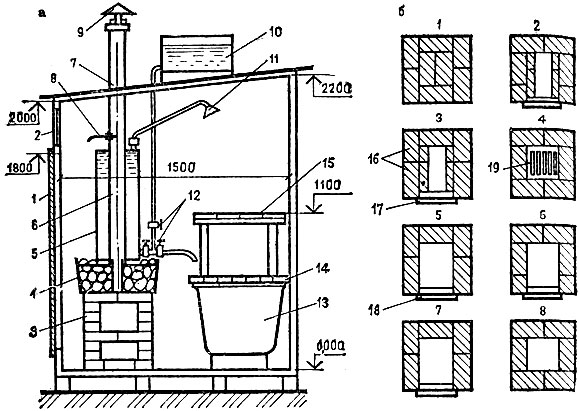
The foundation for the sauna stove
Furnaces weighing up to 750 kg do not require a foundation.
Its role will be played by a sheet of asbestos, covered with a sheet of soft roofing iron and laid on a clay mortar. The dimensions of such a base are selected more than the dimensions of the future furnace by 25 cms on each side.
For the heaviest furnaces, a foundation is needed.
Recommendation! The weight of a cubic meter of brickwork is 1350 kg. Use this information to determine the weight of the oven.
It is unacceptable to bandage (connect) the foundations of the bath and the furnace, since the pressure of the massive brick oven on one point of the base of the bath will lead to uneven settlement and create an additional risk of destruction of both structures.
If the bath is installed on a slab foundation, then a separate stove base is not needed. When choosing the depth of laying the furnace foundation, you should focus on the depth of the foundation of the bath.
Preparatory work
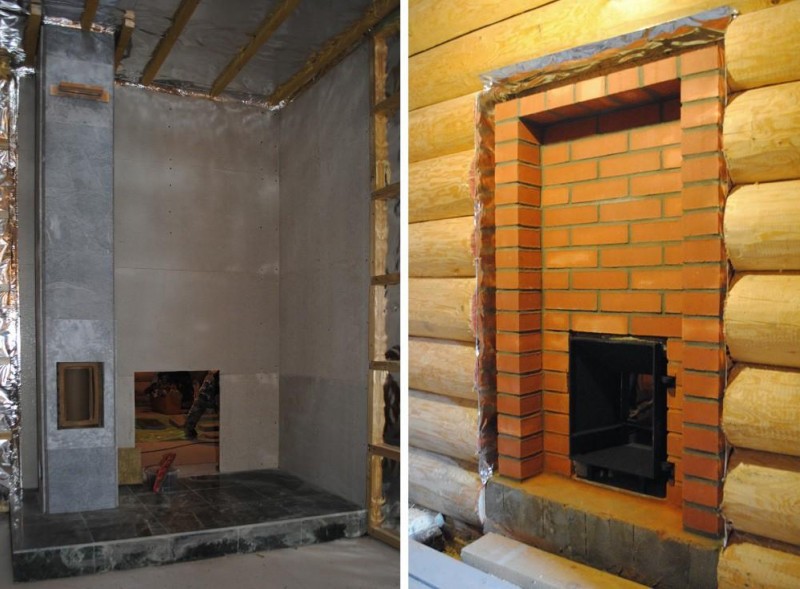
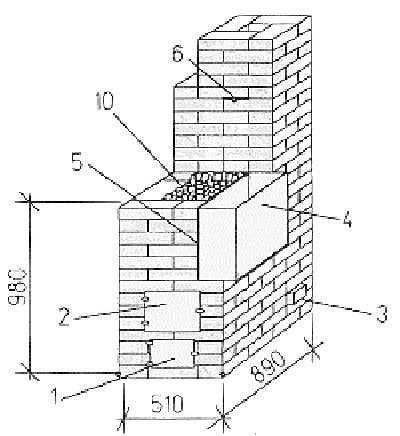
Work begins with the preparation of the construction site. If the stove is installed in the wall between the steam room and the dressing room, then part of the wall is cut out. When placed in a corner, the walls are protected with mineral thermal insulation, after which they are lined with red brick. When choosing a place, it is imperative to foresee how the chimney will be installed - it is possible that floor beams or rafters will prevent its installation.
How to calculate and install the foundation
You should be aware that even a small metal stove-heater is an impressive structure, not to mention brick structures weighing hundreds of kilograms. Therefore, the first thing to do is to build a solid, reliable foundation.
To build a foundation:
- At the installation site of the structure, a pit is dug with a depth of 0.5–0.6 m and dimensions that are 20–25 cm larger than the dimensions of the furnace.
- The bottom of the pit is covered with sand (layer 10-15 cm), after which it is poured with water and carefully compacted.
- After that, a pillow of crushed stone or granite screenings up to 20 cm thick is laid.
- To equip a reinforced concrete slab around the perimeter of the pit, a plank formwork is constructed, inside which an armored belt is mounted at a height of 7–10 cm from the bottom.
- Concrete for the foundation is prepared by mixing 1 part of M-400 cement with 4 parts of crushed stone and 3 parts of sand.When using cement M-500, the proportion of sand can be increased to 4 parts. There should be enough water so that the concrete laid in a slide does not spread and at the same time retains plasticity. Immediately after preparation, the solution is poured into the formwork, necessarily compacted by vibration. The surface of the foundation is leveled with a rule, after which it is covered with a plastic film and left until the solution has completely set.
If it is planned to install a metal furnace with subsequent lining with red brick or stone, then the dimensions of the foundation must necessarily take into account the dimensions of the final structure.
Solution preparation rules
For laying a brick heater, you can use both factory mixtures and a simple clay-sand mortar. For its preparation, river sand and oily clay are best suited - it is more plastic, and in the process of drying it forms a strong seam. To determine the amount of both components, an experiment is carried out. To do this, small parts of clay and sand are mixed in different proportions, after which balls with a diameter of about 5 cm are rolled out of the solution. Lumps of clay dried for several minutes are squeezed between two wooden planks, observing the beginning of their surface cracking. The optimal composition is one in which the ball began to collapse only after it was compressed by 2/3 of its original size. If this happens earlier, then the amount of clay in the solution must be increased.
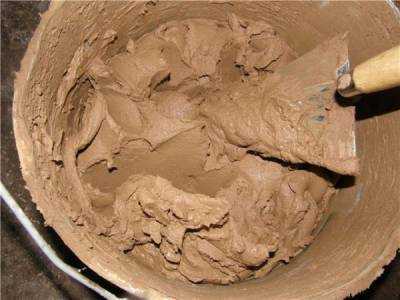
Not only ease of use, but also the strength of the entire structure depends on the quality of the clay solution.
To obtain a high-quality solution, the clay is cleaned of impurities and thoroughly kneaded. After that, it is soaked in cold water for a day.
Another way to determine the quality of the masonry mixture is to lower a wooden spatula into a bucket of mortar. The mixture should not drain immediately after removing the tool from the container - this indicates an increased sand content. If there is a lot of clay, then the composition will spread unevenly over the surface of the blade, with the formation of lumps. The optimal composition forms a layer 1.5–2 mm thick.
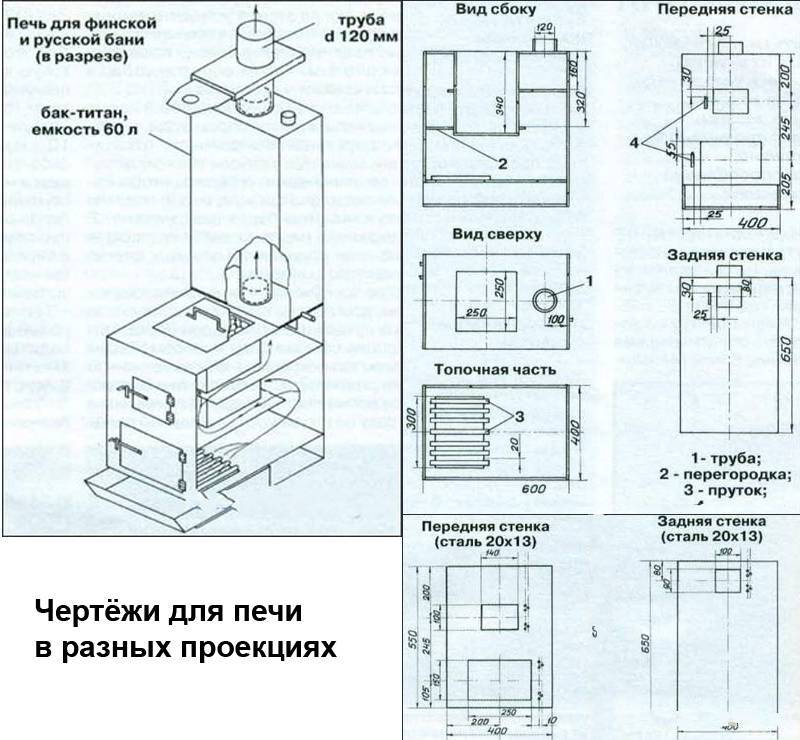
cutting blanks
For the construction of a metal furnace, a steel sheet with a thickness of at least 4 mm is used. To cut it with a grinder, it will take a lot of time and effort, in addition, you will have to spend more than one abrasive disc. If possible, it is better to cut the metal in advance using a gas cutter or plasma cutter. Even if you or your friends do not have such equipment, do not despair. Now at any nearby enterprise or car service there is everything you need, including a specialist who can help you.

For cutting blanks, it is best to use a special tool
The choice of the design of the sauna stove
Ideally, a heat source made of metal should meet the following requirements:
- Quickly warm up and raise the temperature in the steam room. With this, iron stoves do an excellent job.
- Keep warm as long as possible. Since the steel heats up and cools quickly, you will need a heater that stores heat, or an increase in the burning time of the firebox. The third option is to overlay the sauna stove with bricks after installation.
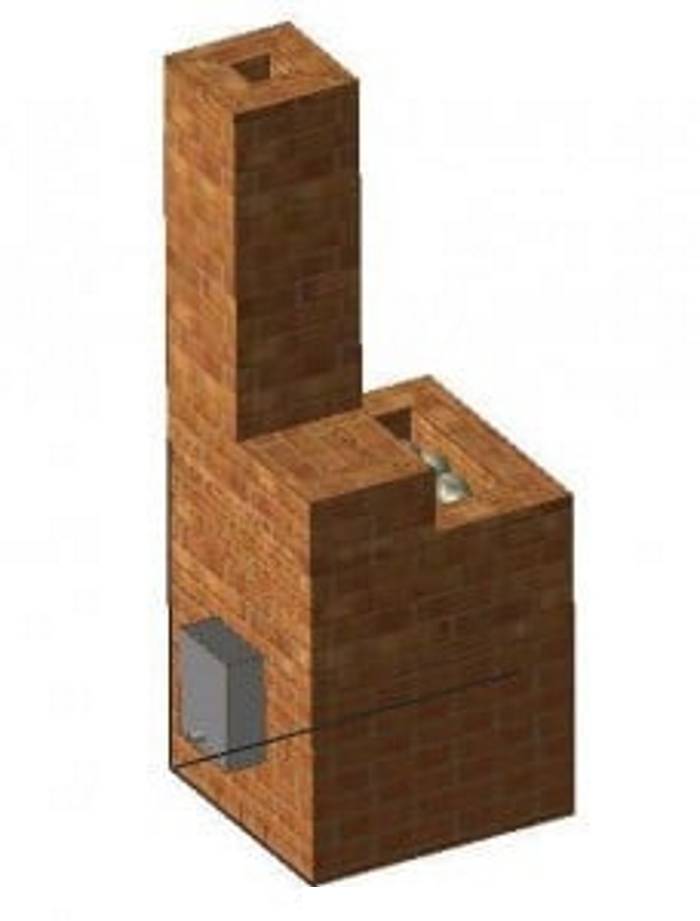
- Occupy a minimum of usable space in the steam room. If the volume of this room is too small, then it is better to choose a vertical design with a loading door placed in the dressing room.
- The heater must be safe for people washing in the bath. To protect yourself from burns, you can install a convection casing made of sheet iron on the case or, again, build a brick wall around the case.
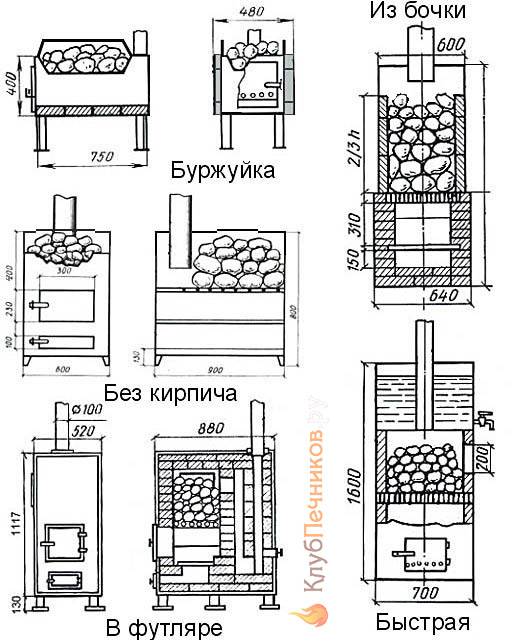
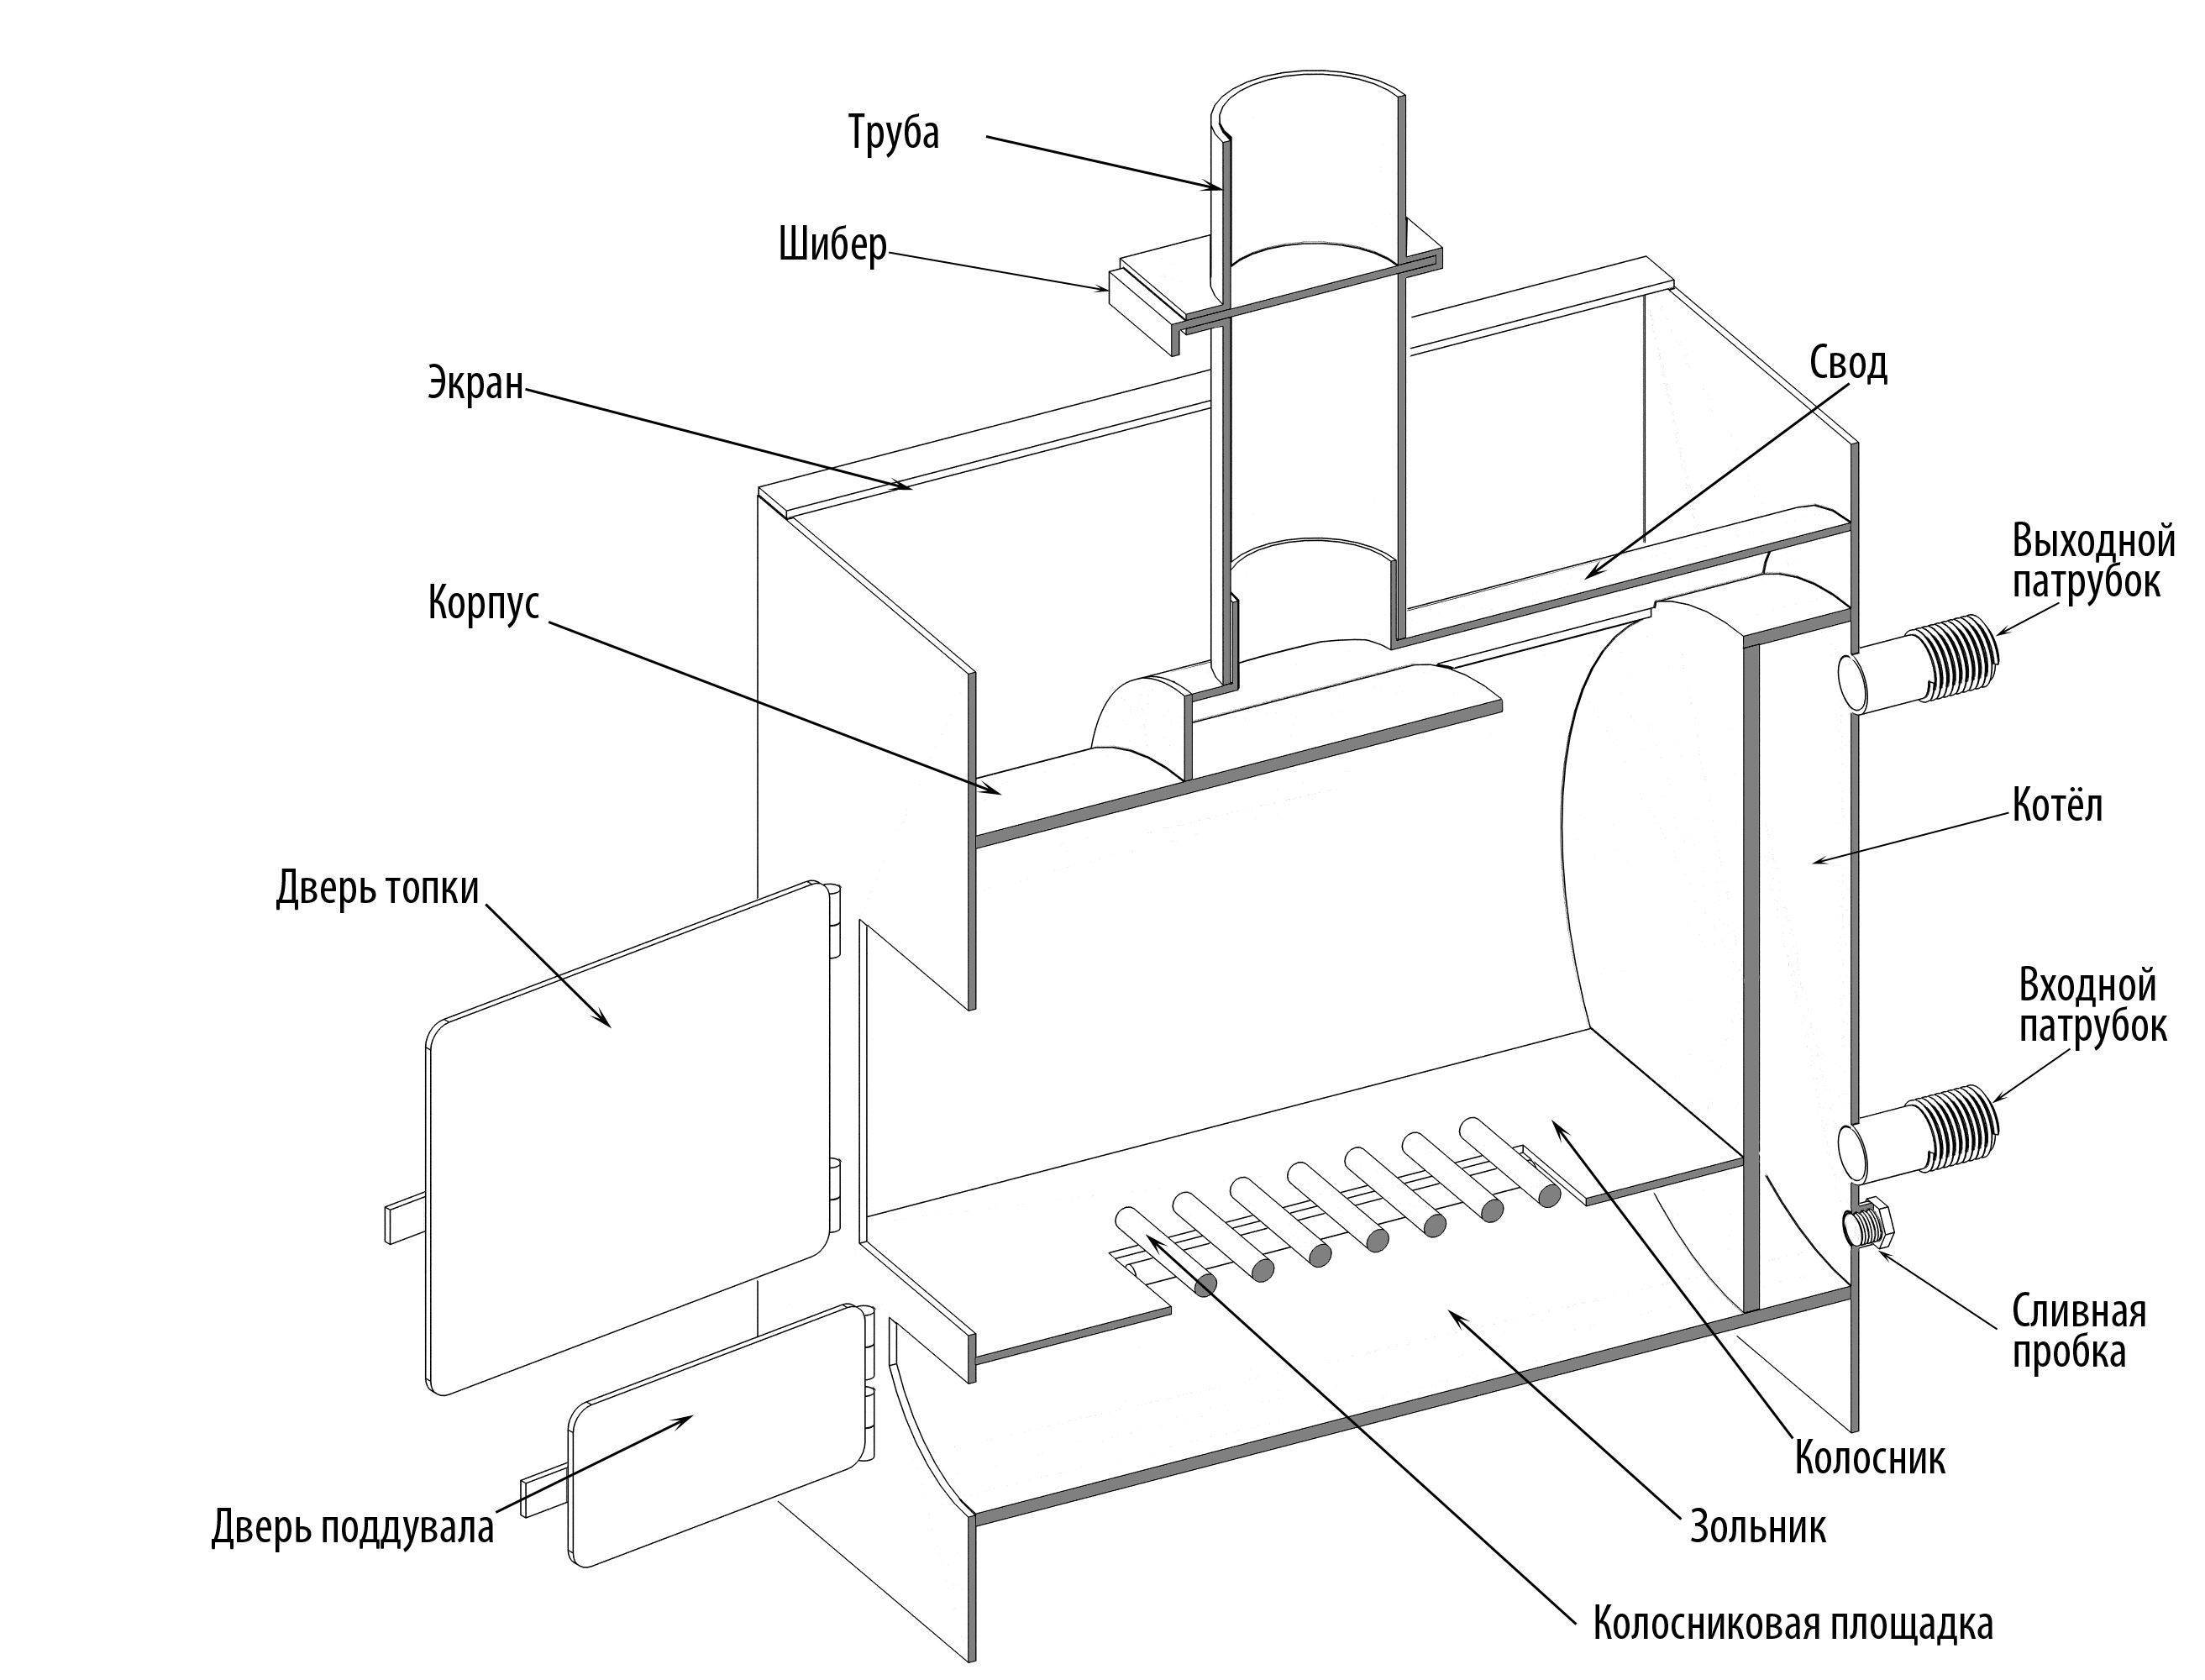
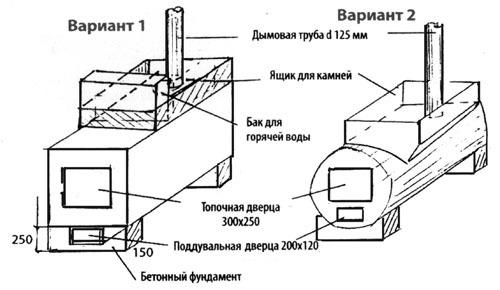
Do-it-yourself iron stoves for a bath are of the following designs:
- with a body oriented in space vertically or horizontally;
- melted directly from the steam room or from the next room (a remote firebox door is made);
- with and without a water tank;
- with outdoor or indoor heater.

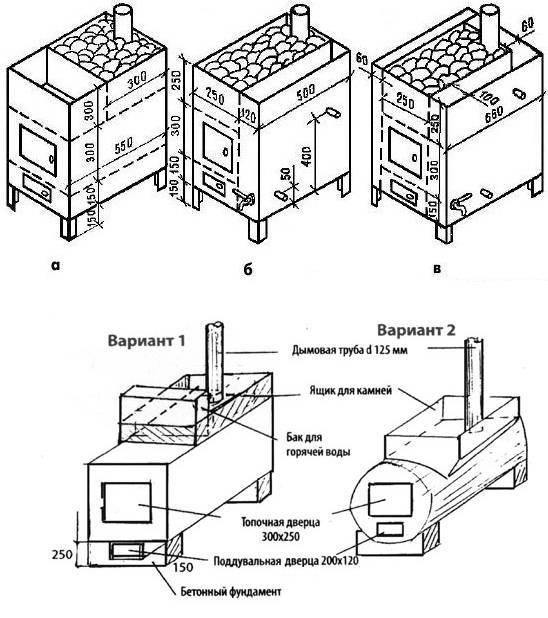
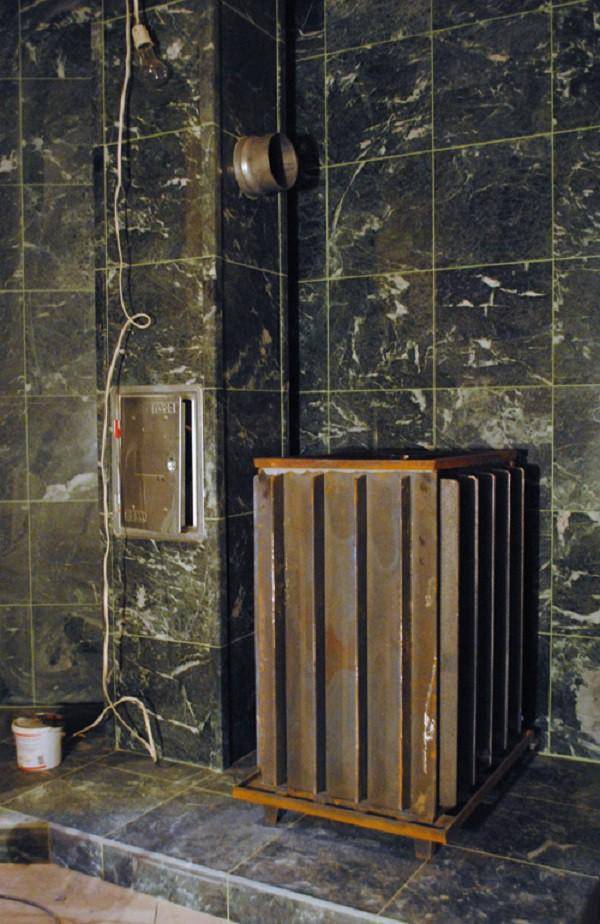
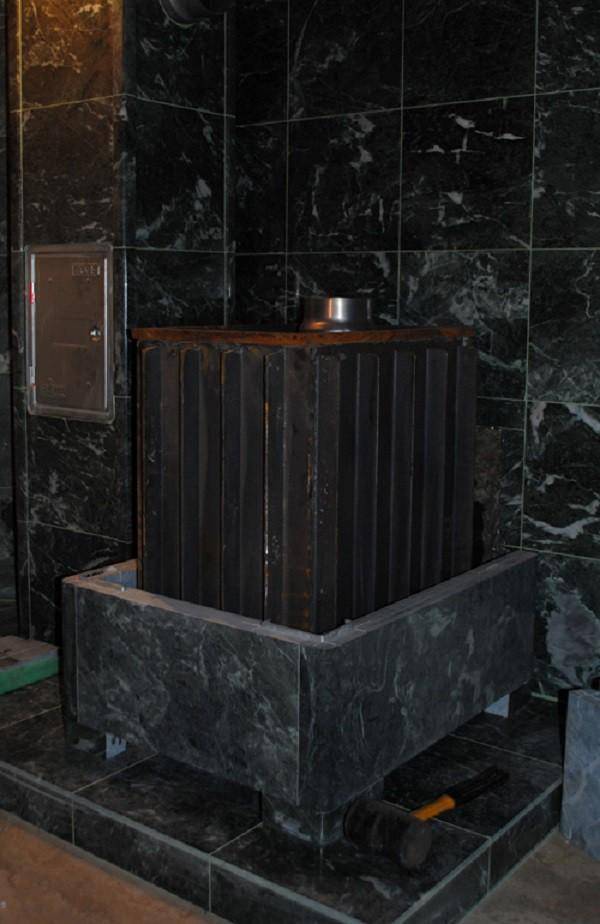
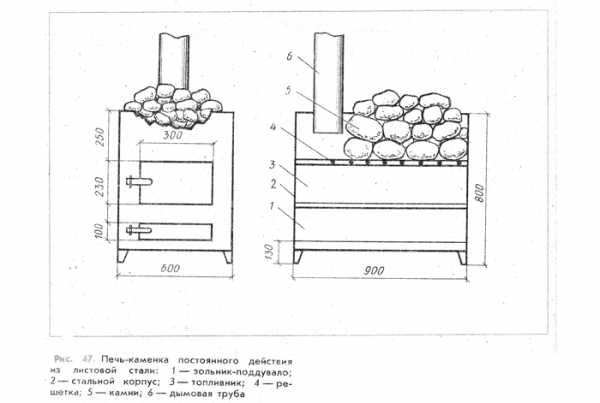
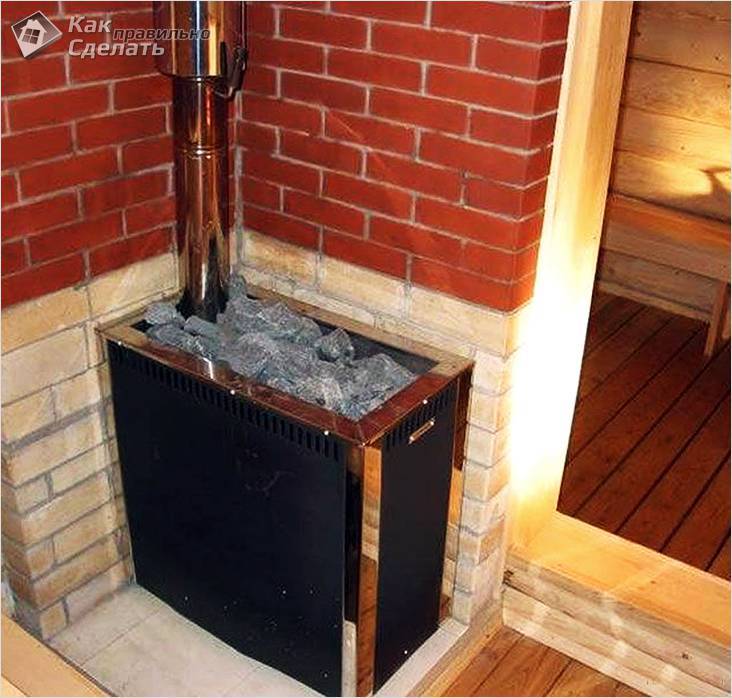
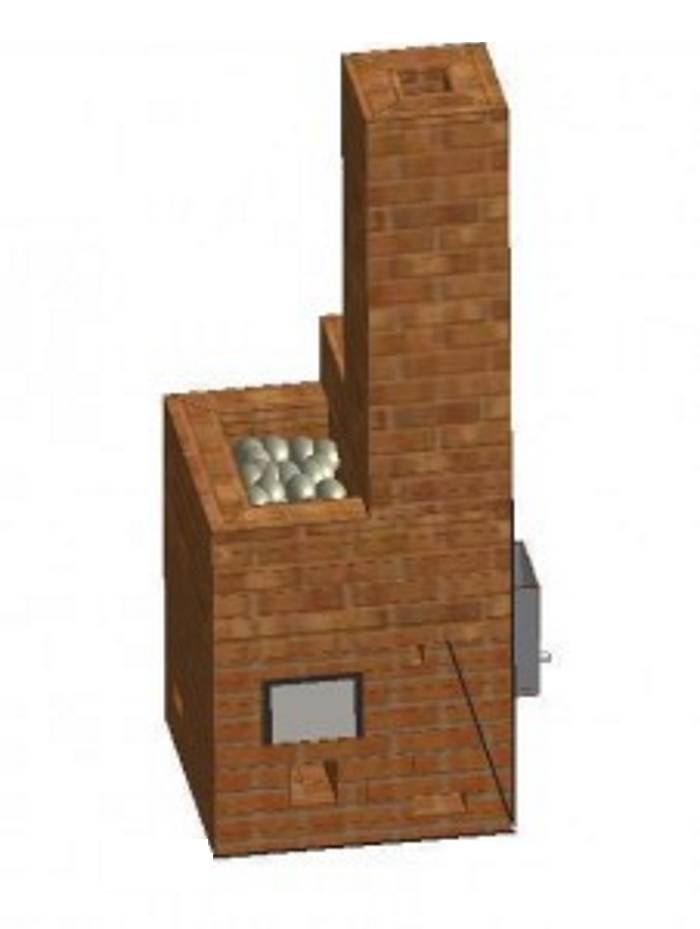
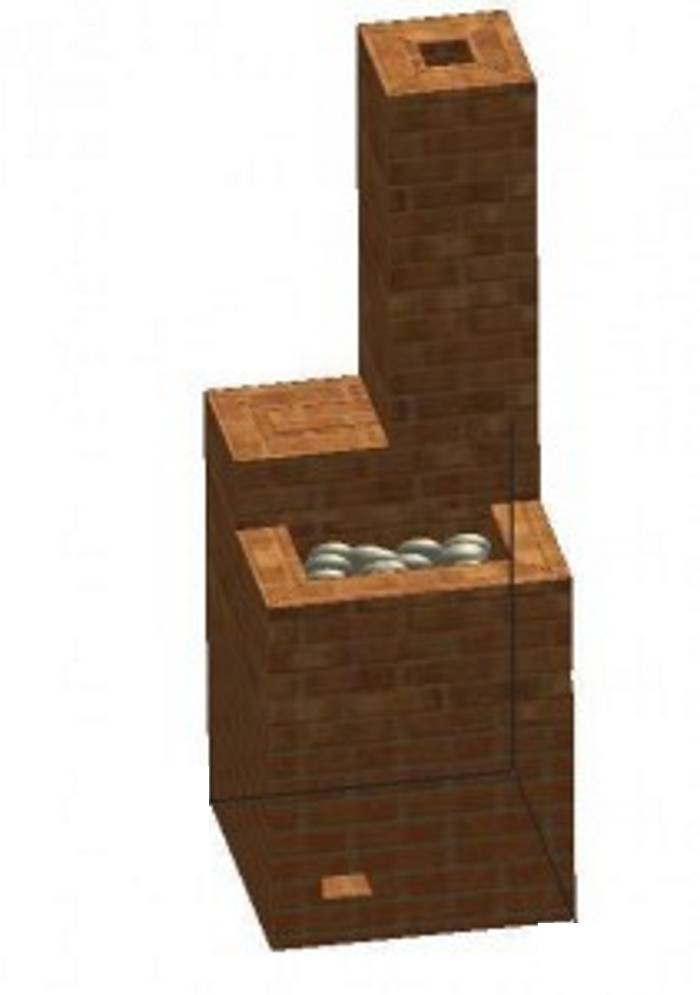
Vertical heater
The vertical body of the stove shown in the photo gives 1 advantage - saving space in the bath. There are more disadvantages: a short burning time (due to the fact that the flame covers the entire laying of firewood) and not too high heat transfer. According to these important parameters, a horizontal bath heater outperforms a vertical one, but at the same time it occupies a large area.


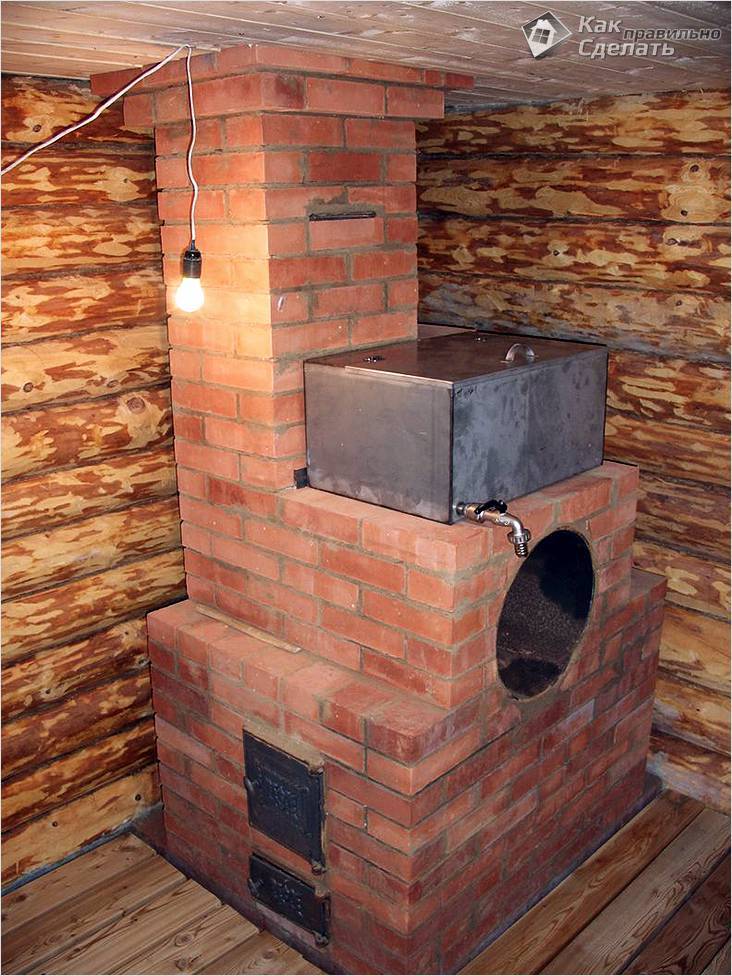
Horizontal stove with heater and tank
If there is no electric water heater in the bath, it costs nothing to put a tank for heating water intended for washing on the stove or chimney. It can be welded from ordinary metal, and preferably from stainless steel. There is also a more convenient way to heat water: a tank located in the washing room is connected pipes with steel samovar-type heat exchanger installed on the chimney.
Steel chimney heat exchanger
The open heater, inherited from the Finnish sauna, heats up to a maximum of 400 ° C, but it can be poured with water in order to "succumb to the park."Kamenka, closed inside the body of the stove, accumulate more heat, warming up to 700-800 ° C, but at the same time they are polluted by passing flue gases and therefore require periodic cleaning.
Furnace wall masonry
Brick must be dampened before laying. Then apply the required amount of solution.
The brick is firmly in place. The mortar displaced by the brick is removed.
It is not necessary to plaster the internal surfaces with clay, excess mortar is unacceptable here. After drying, it exfoliates and clogs the chimney channel.
Furnace casting is installed directly during masonry and fixed with wire. In order for the doors to fit snugly against the masonry, they are wrapped around the perimeter with asbestos cord.
The cord will seal the points of contact and will not allow the cast-iron door expanding when heated to destroy the masonry.
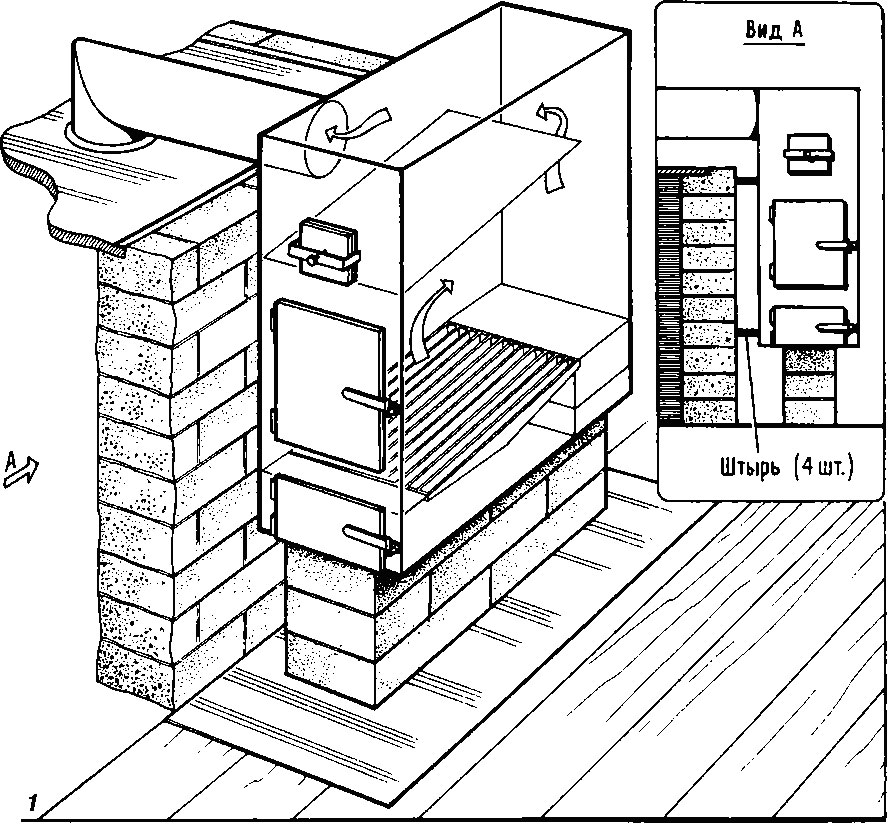
Installation of a metal furnace with a remote firebox in a log house
Let's consider the option of mounting a fire-resistant anti-shrink wall made of minerite LV. A special fastening method will allow installation in a log house before it shrinks, and the floating design of the fasteners will prevent the rigid wall from deforming.
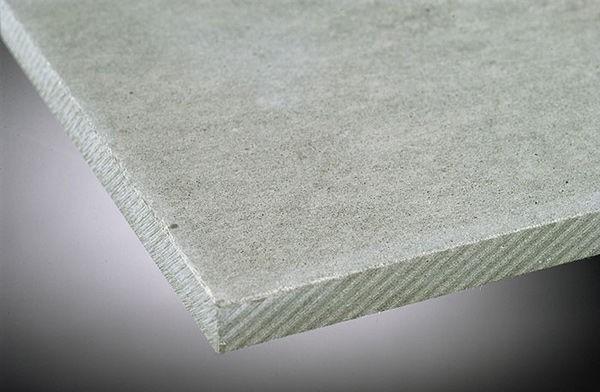
Minerite LV
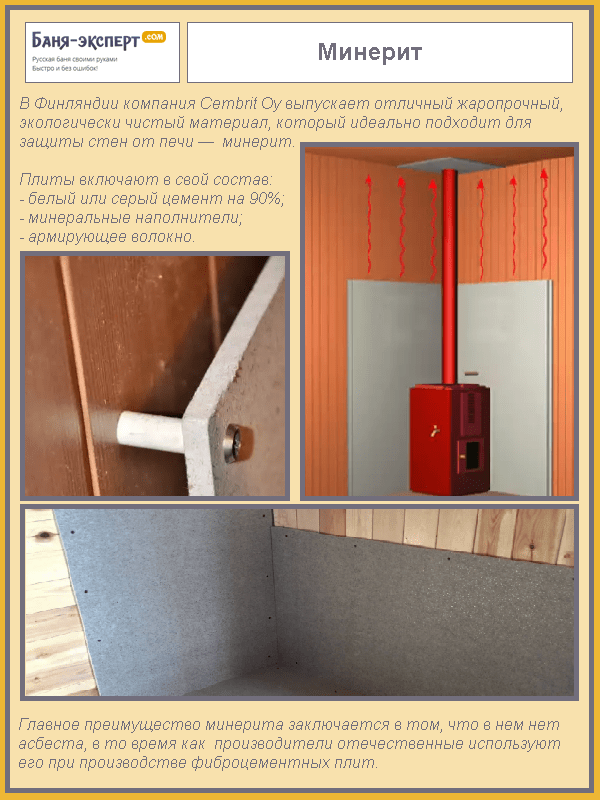
Minerite
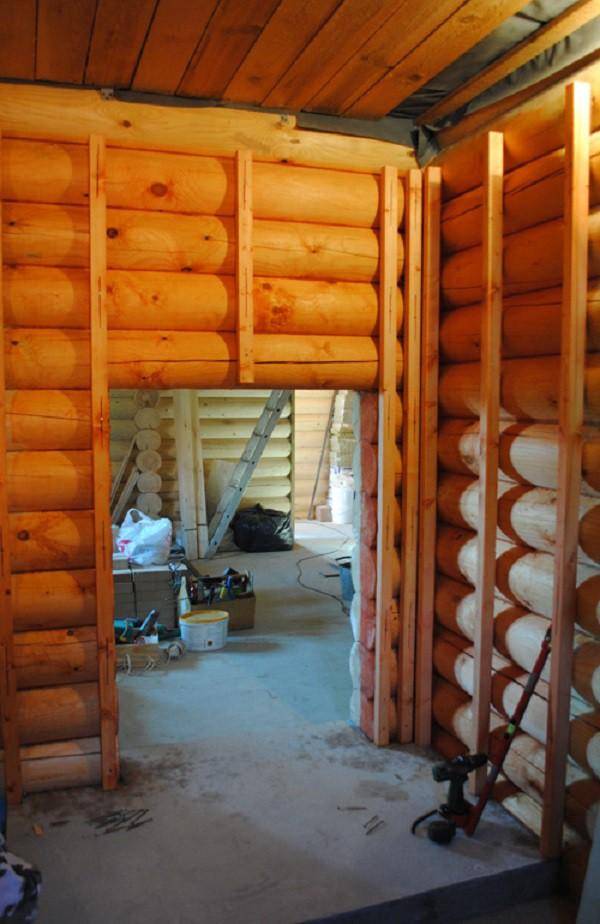
Step 1. We prepare an opening in the wall. We cut it with a chainsaw according to the markup.
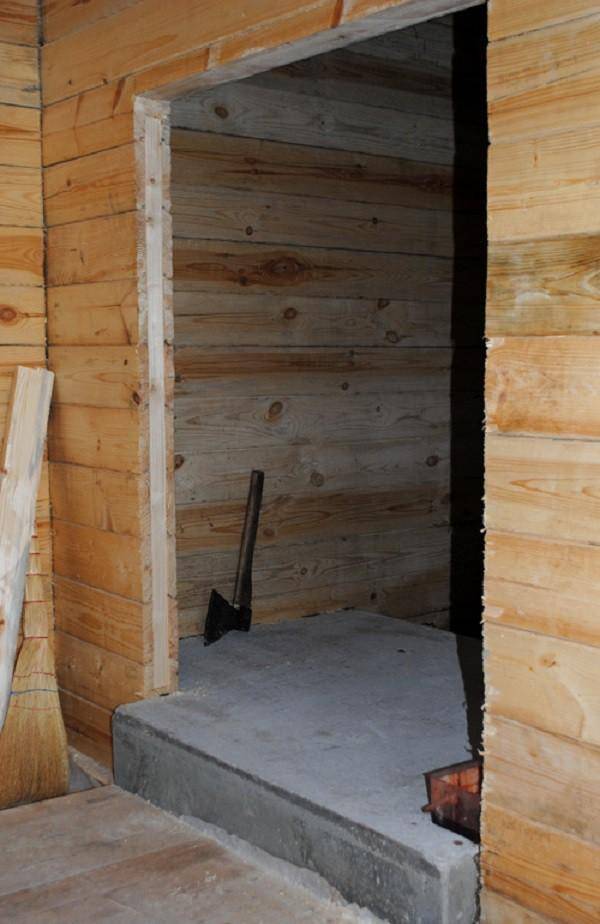
hole in the wall
Step 2. We sheathe the inner surface of the opening with mineralite. Saw the minerite sheet into three segments. We cut two vertical pieces from the calculation opening height minus 10 cm. We cut out the horizontal part with a length equal to the width of the opening minus 2 cm. The width of the minerite segment should be equal to the thickness timber or timberfrom which the wall of the bath was built.
Step 3. We nail the foil on the inside around the perimeter, and then the minerite. First, fix the vertical segments with nails, then the horizontal.
Step 4. It is necessary to make an opening in the mineralite sheets, which will protect the wall from oven heat. Through this opening will pass the remote firebox of the furnace. We take measurements of the remote firebox, then make a markup with a pencil and cut the sheet so that 3 cm remains between the remote channel and the sheet on each side.


Installation of foil and minerite. The opening can be finished both before and after the installation of the main refractory plates.
You can do otherwise - first we fix the sheet on the wall, and then we cut the opening for the remote firebox.
Mounting the minerite on the wall
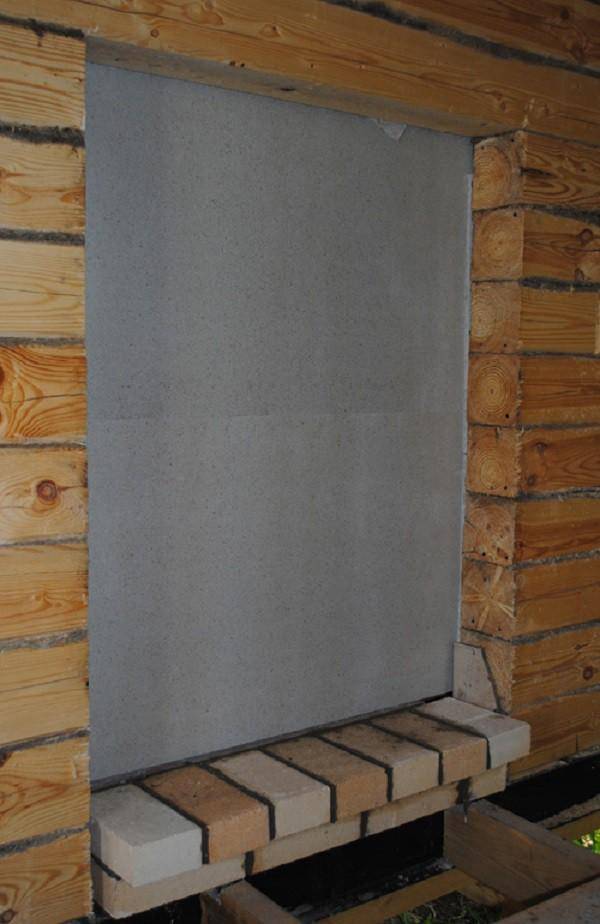
The sheet is fixed, you can cut the opening
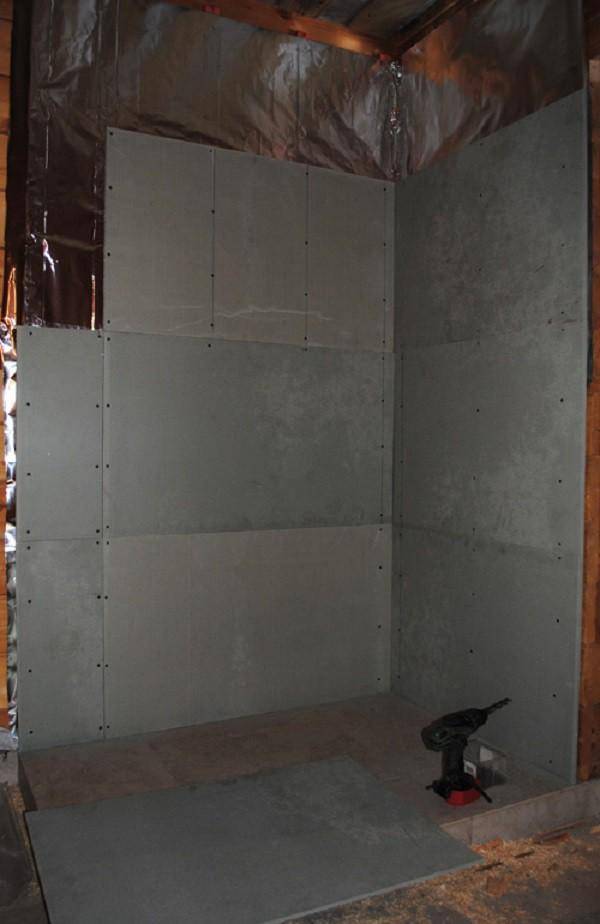
Step 5. We drill oval holes in the sheet for self-tapping screws. When shrinkage occurs, the screws will move down inside these holes, while the sheet will remain motionless. We fix the foil insulation on the wall (with a stapler), and then with self-tapping screws with a washer a sheet of minerite (we mount the sheet from the side of the steam room).
Step 6. We fix the second layer of mineralite with an air gap of 3 cm. To do this, you need to purchase a mounting kit with ceramic or steel bushings.

Mounting kit
You need to drill holes again oval, but at the same time we make sure that the fasteners of the first and second sheets do not fall into one point.

The photo shows the installation diagram of a protective screen made of minerite. Double layer lining. If the stove has a remote firebox, make an opening according to the instructions
When joining two sheets at 90 degrees, we cut the ends at 45 degrees for a more aesthetic appearance.
After mounting the sheets, install the oven on the base. We adjust the legs, make sure that the remote channel is located exactly in the center of the opening cut in the mineralite.We take foil-coated basalt wool and tightly lay it between the walls of the remote channel and the minerite. In this case, the foil should “look” towards the steel walls of the channel.
Tips
Masters use different methods of installing stoves and protecting walls. So, for example, in a log bath, it will be more convenient to install a minerite on a wooden crate. Antisepticize the 50x50 mm bars, drill holes for self-tapping screws and fix the racks of the crate exactly vertically. Minerite will be fixed to this crate with self-tapping screws.
crate
If you plan to close the wall from the inside (from the steam room side) with mineralite for further finishing, for example, with a serpentine, and finish the portal with bricks from the outside, then it is worth doing the work in the following sequence:
- from the side of the steam room, fix a sheet of minerite;
- cut a hole for the remote channel;
- fix the horizontal guides from the drywall profile. Fasten the planks with self-tapping screws at the top of the opening, along the bottom and exactly above the opening for the fuel channel;
- install the vertical racks of the crate from the profile, fix with self-tapping screws through the shelves;
- take basalt wool and lay it between the racks of the crate;
- sew the opening with minerite (from the side of the dressing room);
- install the oven in its place;
- now, from the side of the dressing room, lay the opening with a brick (do not forget to lay the insulation in the cracks), and from the side of the steam room, carry out decorative stone trim.

Sheathing and insulation

View from the steam room and dressing room
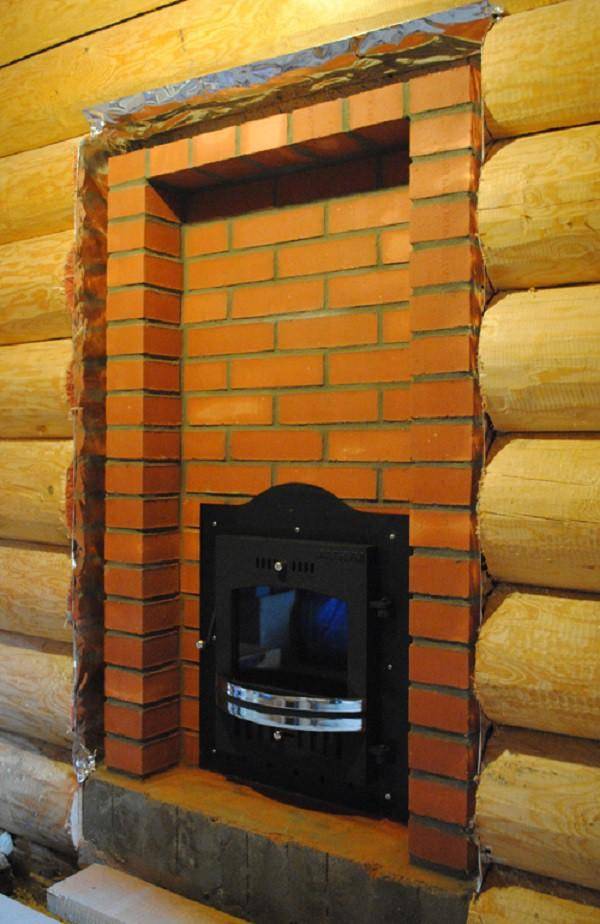
Fixed oven portal
Walls and chimney after finishing with a serpentine
Furnace finishing process
The work on installing the furnace does not end there. Be sure to install water tank and a heat exchanger, if provided for in the design, mount the chimney in accordance with the fire safety rules, prepare and lay the stones in the net.


Stones for the heater
As mentioned above, stones with a high heat capacity and at the same time low thermal conductivity are suitable for the heater.
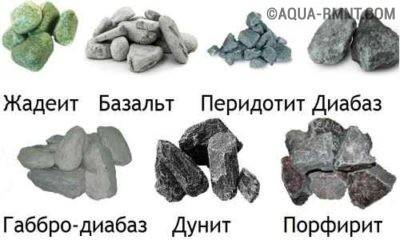
Types of stones used for stoves
The use of rocks of a metamorphic type - slate, marble, dolomite or limestone - is contraindicated: they are characterized not only by an incorrect ratio of heat capacity to thermal conductivity, but also by the presence of organic impurities, which, when heated, are released in the form of gases harmful to health. Rocks of volcanic origin with a high density are best suited for heaters: soapstone, gabbro, diabase and, of course, basalt. They are characterized by the following features:
- big weight;
- dark color;
- the fracture is smooth or fine-grained.
It is important to choose the right shape of the stones. To reduce the share of convection heating to 1/3, their surface area per unit volume must be minimal
This requirement is satisfied by the shape of a ball with as smooth a surface as possible. Accordingly, the stones should be looked for as rounded as possible. The largest can have a diameter of 100 to 150 mm (about the size of a fist or a little more), the smallest - from 20 mm.
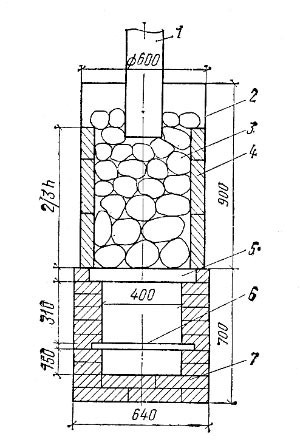
The method of laying stones depends on the type of heater. If it is flowing, as in the furnaces described above, then the size of the fraction in the layers should decrease in the direction from the bottom up, that is, the largest stones are at the bottom, the smallest are at the top.
When laying a deaf heater, the opposite principle is used: here it is important to ensure the fastest possible transfer of heat from the heated stove to the stones, so the smallest of them (they lie in a denser layer) are laid down
Video: correct laying of stones in a sauna stove
The sauna stove differs to a large extent from conventional heating and cooking stoves.
And although it is used less often, the construction process should be approached with much more attention.
Chimney for sauna stove
There are different classifications:
- Depending on the material: brick and metal. By installation method: internal and external.
exit point chimney from roofs must be insulated with heat-resistant materials and the chimney must be protected from moisture with a visor.
Tip! A good choice is a sandwich chimney. It is easy to install and protected from condensation.
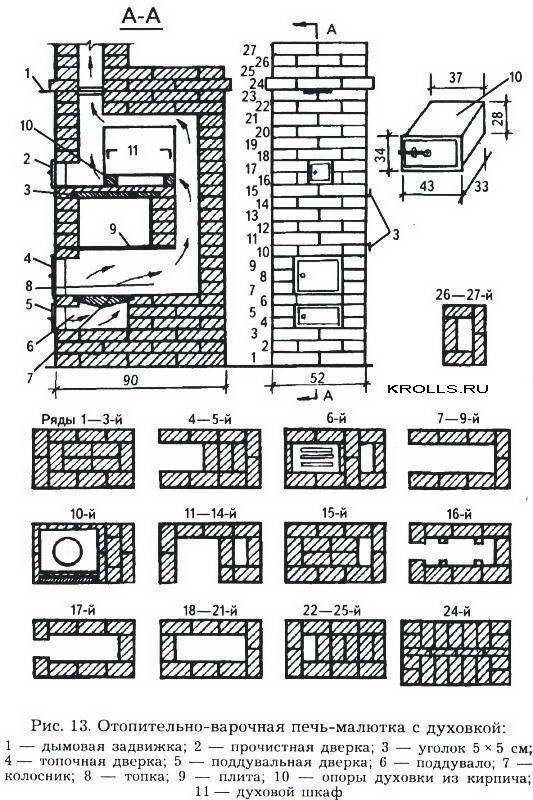
Finding the right furnace project in finished form is almost impossible. Ordering is expensive. To save money, you can select the appropriate project and correct its order.
A detailed ordering scheme is an exact description of the place of each brick in the masonry. It is recommended to show the corrected project to specialists.
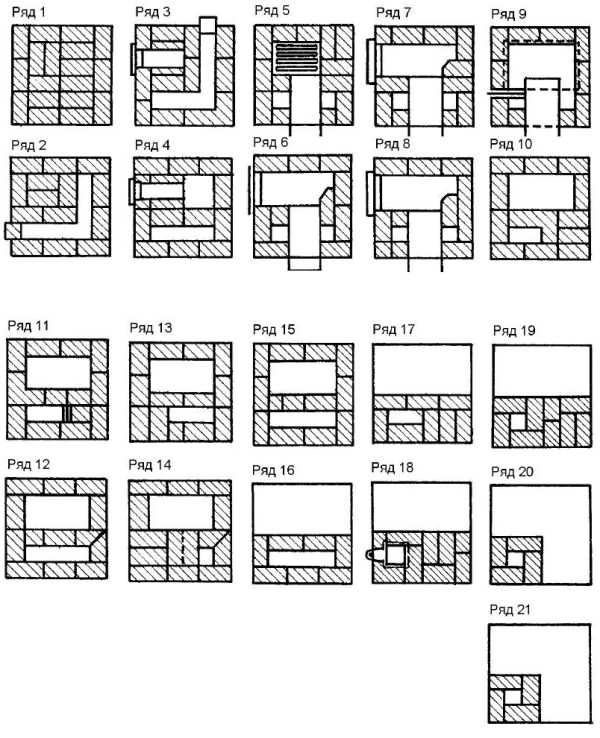
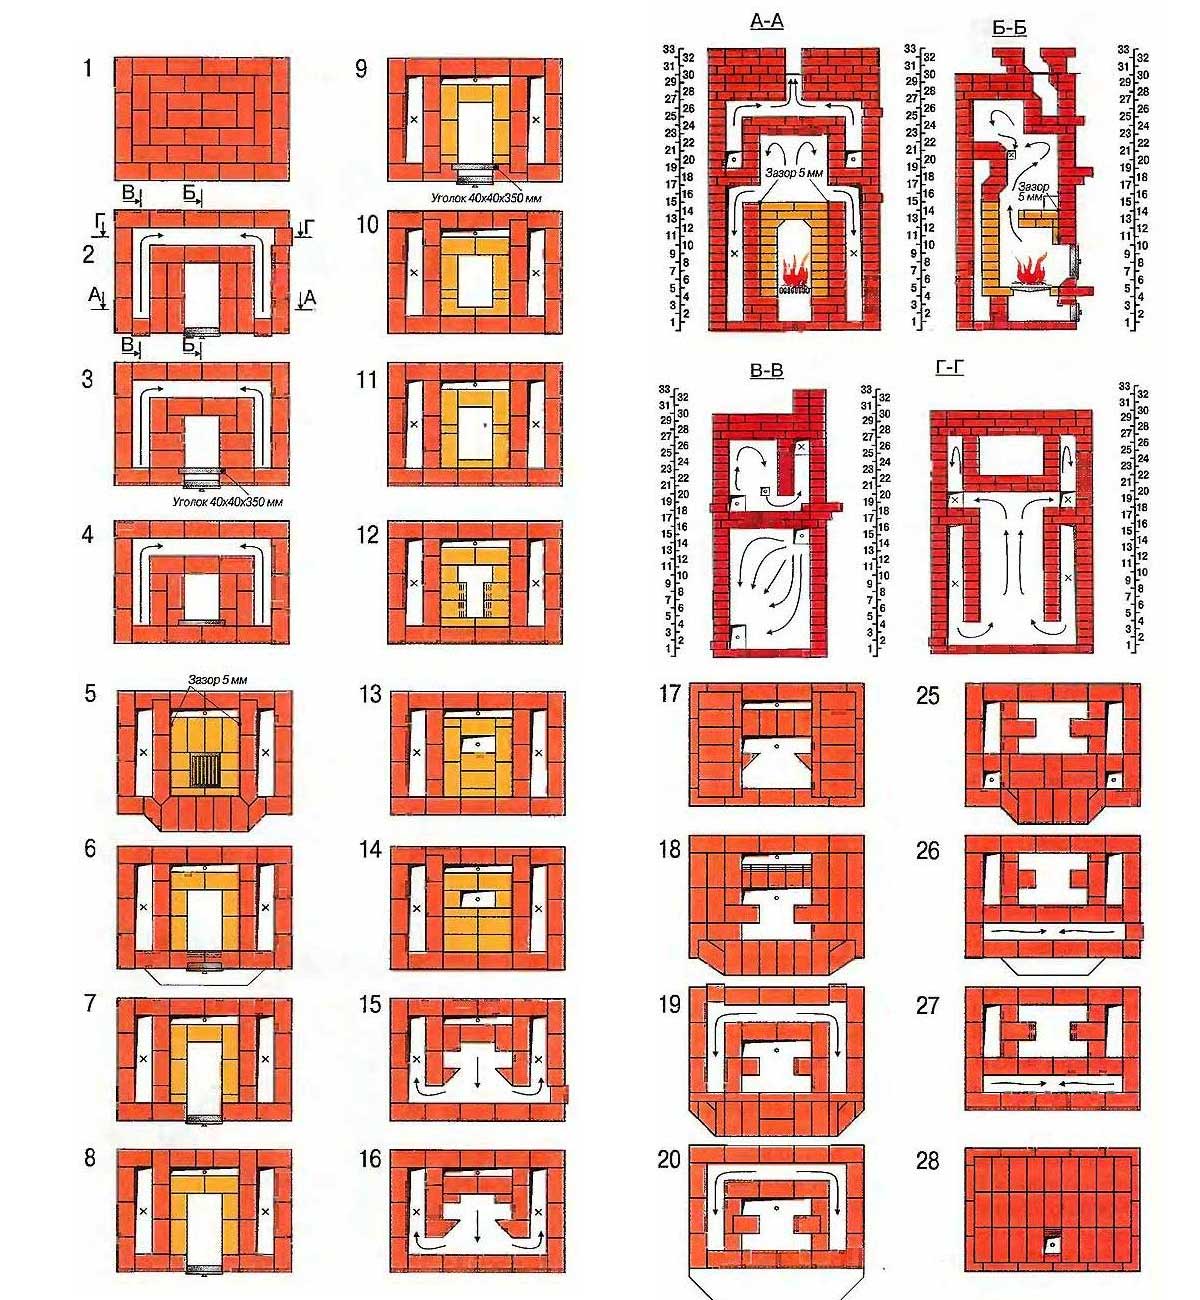
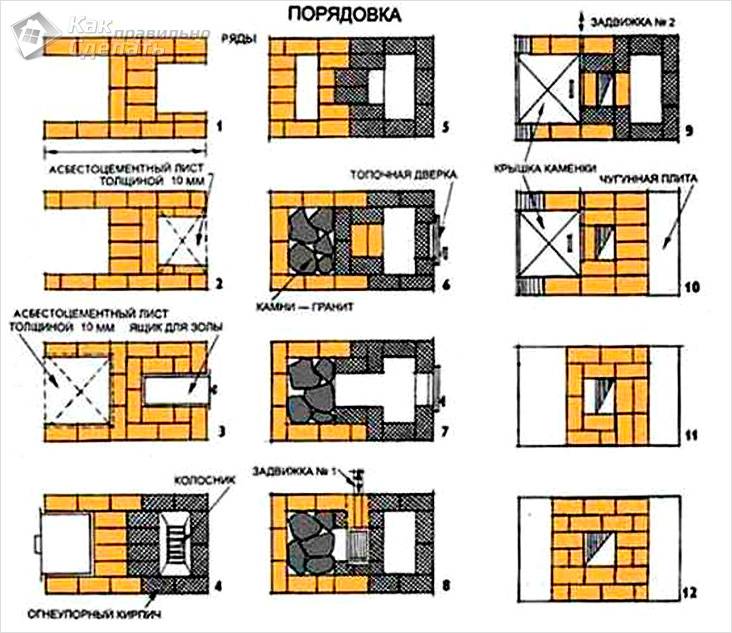
Masonry schemes
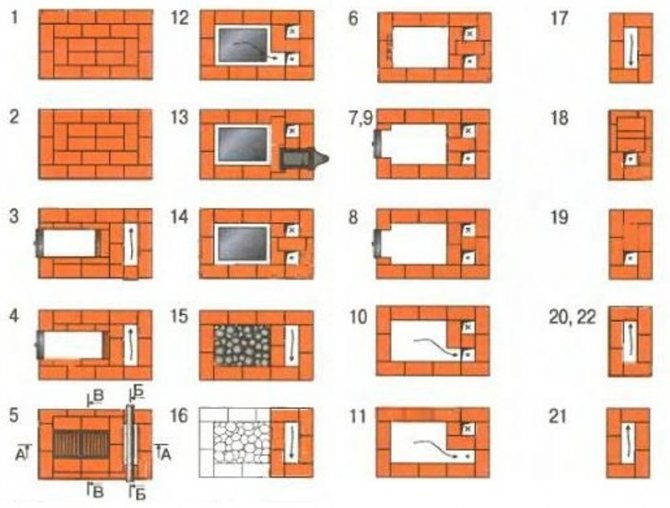
If it has not happened before to build a heater, then it is recommended not to take it personally for drawing up a drawing, but to find a ready-made order and use it. Currently, various masonry schemes are used, the most complex of which are chosen by professionals, and the simple ones by amateurs. In both cases, the result is satisfactory, and the oven works efficiently. In addition to traditional masonry methods, they also distinguish the order of bell-shaped sauna stoves Kuznetsov. This design takes up much less space.
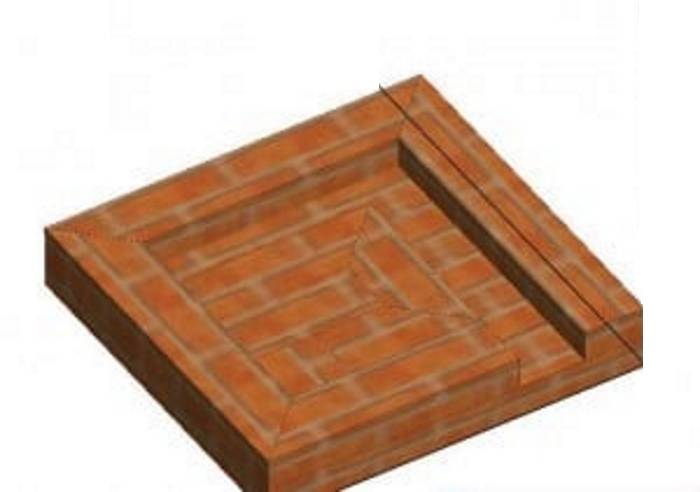
Ordering always begins with the foundation of the furnace, the so-called zero row. At this level, the installation is continuous, but a half-window is usually left on the side in order to create additional traction and clean the chimney shaft. At the next level, ligation is carried out - this means that the row is shifted by 30-50% to make the structure stable. If you need halves or quarters of a brick, it is recommended to use a grinder with a diamond disc. It must be remembered that such elements cannot be located in chimneys, the shafts of which are always assembled from solid bricks, but only inside the structure.
At the third level, a damper usually appears, and the installation of the ash pan door begins. The fourth row indicates the appearance of a soot sampling door. At the sixth stage, as a rule, the shaft is divided into two parts using a jumper, one of which will become the slab shaft. On the twelfth row, one of the mines will be laid, and one main one will remain. Usually, at the twenty-fifth and twenty-sixth stage, the masonry of the main structure ends, and then the chimney is laid.


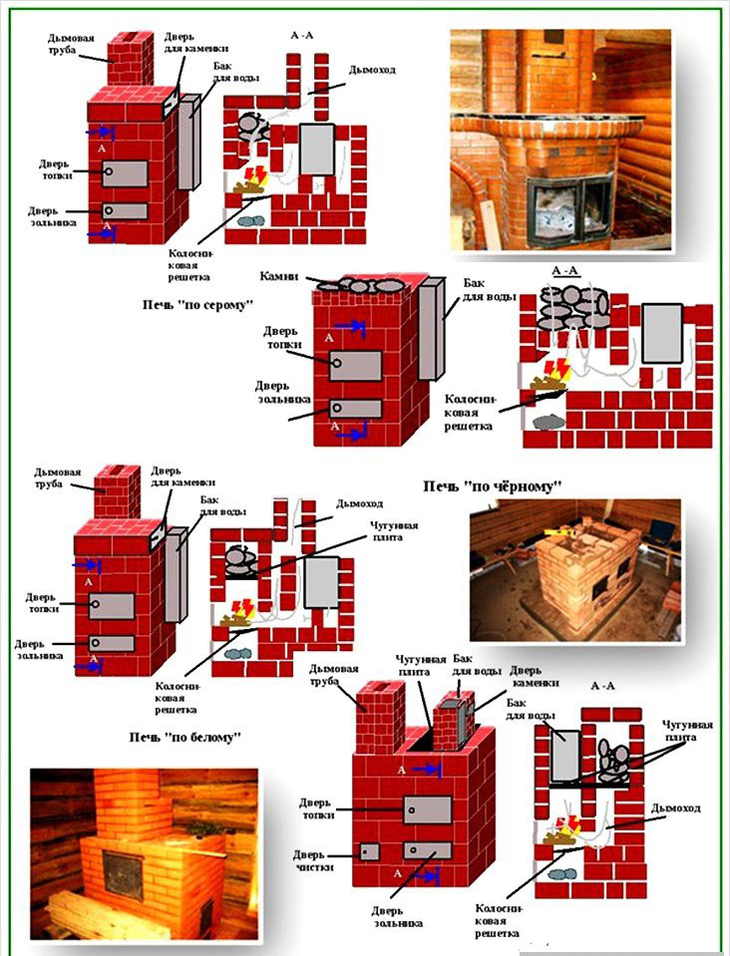
Stove-heater
The most important element of the bath is the stove. Nowadays, stoves are usually used for these purposes. They are brick and metal. It is difficult to say from what material the stove-heater is better. Here, rather, everything depends on some circumstances, namely the area of the bath, the number of people staying in this room per day, etc. In view of this, we will consider the features of a metal and brick heater separately.
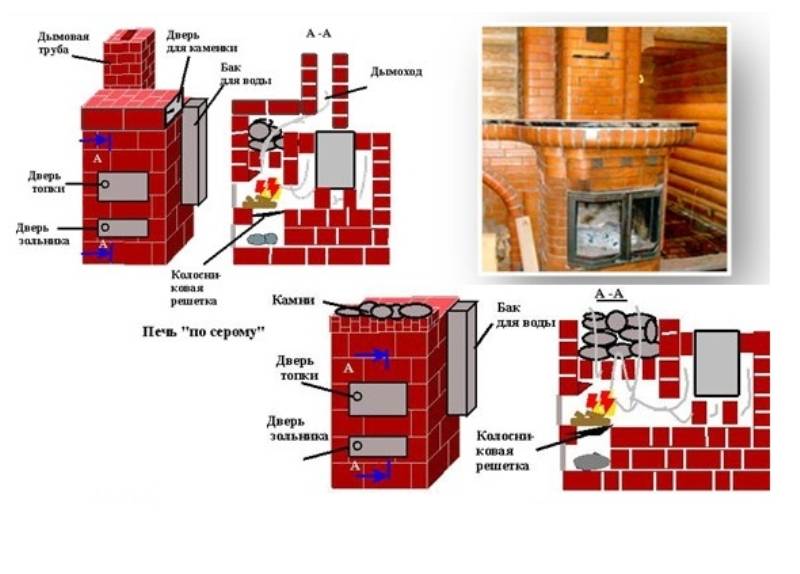
Kamenka also happen closed and open. An open heater heats up quickly, but also cools down quickly. It works great for small companies.The stones in such a furnace are stacked over the firebox in a pile. Their temperature can rise up to 250º.
The closed heater transfers heat at the same level. It has a steam door. During the combustion process, the door is closed, so that the smoke from the fire does not enter the room. The door can only be opened in front of the entrance to the steam room. Thanks to this, the temperature in the steam room warms up to 60º.
from brick
The peculiarity of the brick stove-heater is that it has thick walls built of heat-resistant bricks. The furnace of this type is quite large, has a closed heater and large volume stones. Only solid fuels can be burned in it. As a rule, it is firewood or peat.
Among the advantages of the furnace, it is worth noting the following:
- Possibility to heat baths over 30 m2.
- The design is fireproof.
- Keeps heat in the bath for a long time.
- Even on the second day, the heat in the bathhouse remains around 20º, which allows you to use the room, for example, for washing clothes.
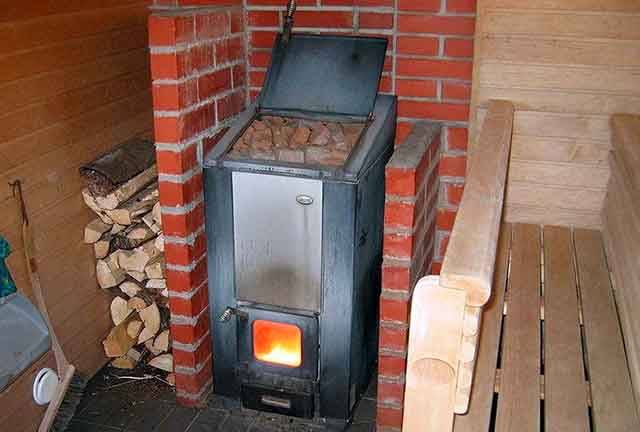
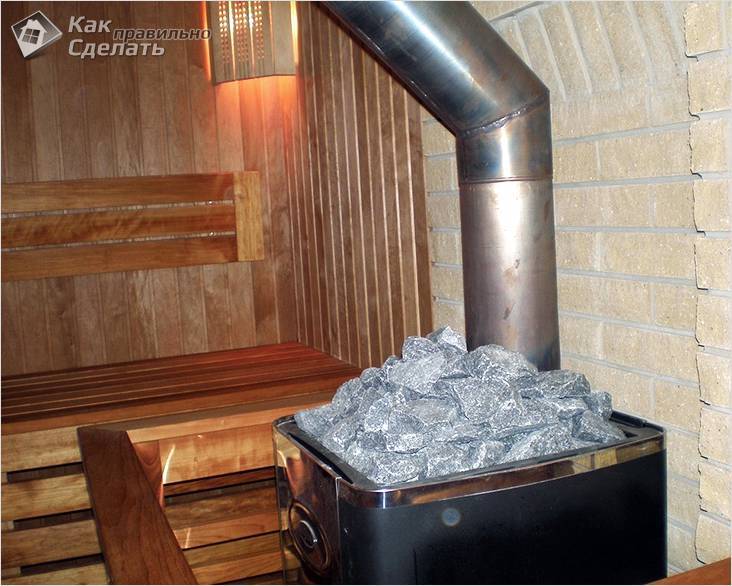
metal
Metal heaters heat the bath for only 1.5–2 hours. They are quite compact, so they are ideal for small spaces. Kamenki are usually open type. The stones are heated by the combustion chamber. In a metal furnace, you can burn different types of fuel, depending on the model.
The main advantages of the furnace:
- Rapid heating of the bath.
- The design is small-sized, has a small weight, and this reduces the cost of its installation.
- The possibility of taking bath procedures during the heating process.
On this, a general description of the process of installing a brick oven for a bath can be considered complete.For a more complete understanding of the process, you can familiarize yourself with the relevant videos on the subject.
Other structural elements
Reinstalling the oven is not enough. It will function only if there is good traction, which will be provided by a properly built chimney. In addition, in a real bath there should be not only dry steam, but also a sufficient amount of hot water. To do this, the furnace is equipped with a tank for heating it.
Installation of a chimney (chimney) in a Russian bath
Its design depends entirely on which furnace it is intended for. So, a massive brick unit needs a pipe with an increased flow area, while even thrust in a small heater will provide chimney with a diameter of 100 mm. When calculating the chimney, experts recommend starting from the size of the blower opening, taking its cross section equal to 1/2 of the window area for air supply.
The thickness of the walls of the chimney, as well as the cross section of the internal channel, should not be less than half a brick. During the construction process, two types of mortar are used - clay for building up an array of pipes indoors and cement or lime for working outside. Thanks to the latter, masonry joints will not collapse under the influence of moisture.
Even to chimney installation for sauna stove and more loyal requirements are imposed than for heating appliances in residential buildings, it must rise above the roof level by at least 0.5 m.
The furnace can be equipped with metal or asbestos pipe
At the same time, it is important to make its lower part heat-resistant, for which a thick-walled steel or cast-iron piece is installed at a distance of at least 1 m
Installing a hot water barrel (liquid heat exchanger)
The sauna stove can be equipped with a water heater. open or closed tank. If the building is connected to the water supply, it is better to install a sealed container, be sure to equip it with a safety valve configured to operate when the pressure in the system is exceeded by 3–4 atm. Otherwise, you will have to fill the water heater manually, through the opening in its upper part.
Heating of water in a tank is carried out in two ways. The first is that the container is installed at the back of the firebox or above it. The second involves the installation of a water heater on the chimney. Passing through the internal channel, the heated gases give off their heat, quickly heating water up to high temperature.
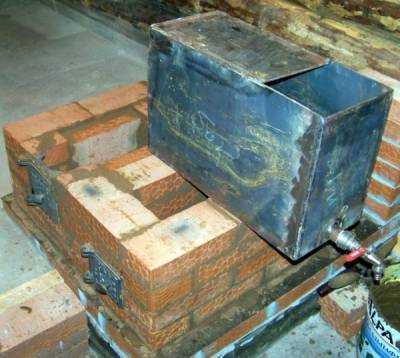
The water tank will provide you with hot water
For the manufacture of a boiler, a steel sheet with a thickness of at least 3 mm is used, welding its joints with a continuous seam. The pipe that is installed inside must be thick-bodied, otherwise it will quickly corrode due to high humidity and temperature.


If the building has running water (for example, if your frame bath has a bathroom), then the tank can be replaced with a liquid heat exchanger. Its contour is welded from steel pipes with a diameter of up to 1 inch, installing the structure at the rear of the furnace. To prevent water from boiling over, the heat exchanger is equipped with a bypass valve, from the outlet of which a pipeline is laid to the heater.
Manufacturing instructions with orders
Craft brick oven for a bath with a closed or open heater is easy. You need to choose the material and learn the whole process of work.
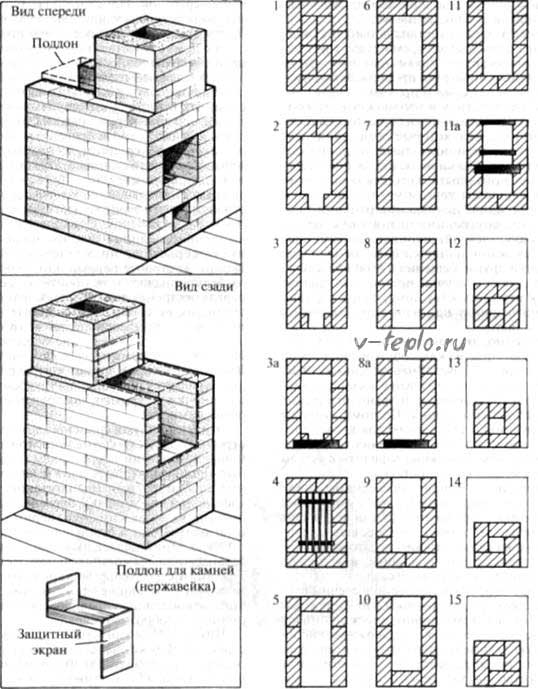
Masonry stove-heater open type
When the concrete base is completely ready, you can proceed to further work.Below are the main construction works on laying a stove for a sauna stove with your own hands made of bricks and a diagram of actions.
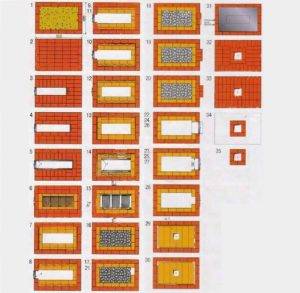
Do-it-yourself ordering of a brick oven for a bath with an open heater can be seen in the photo below:
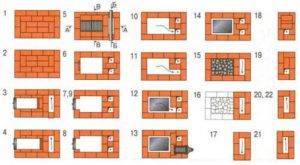
Photo-instruction for laying an open stove-heater for a bath:

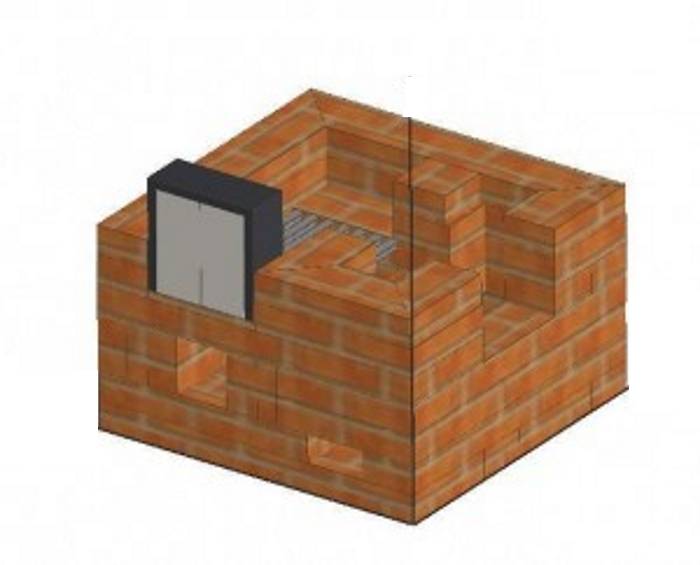
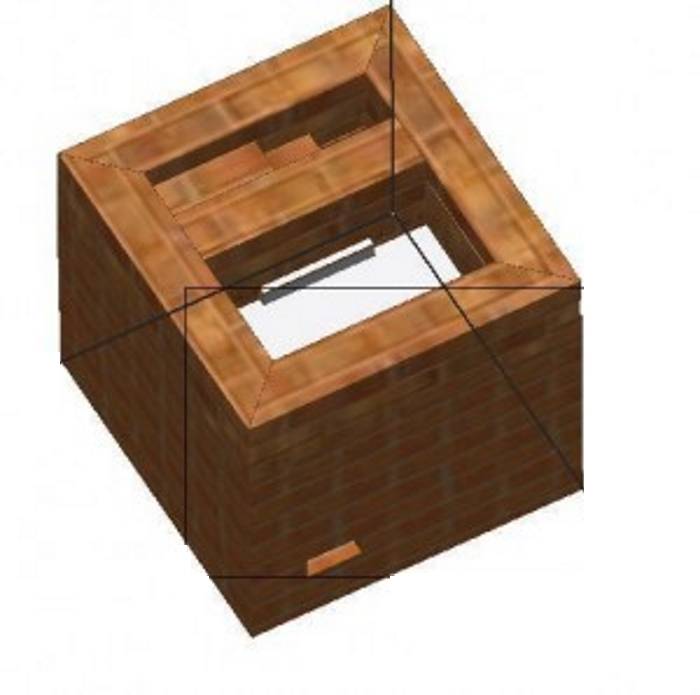
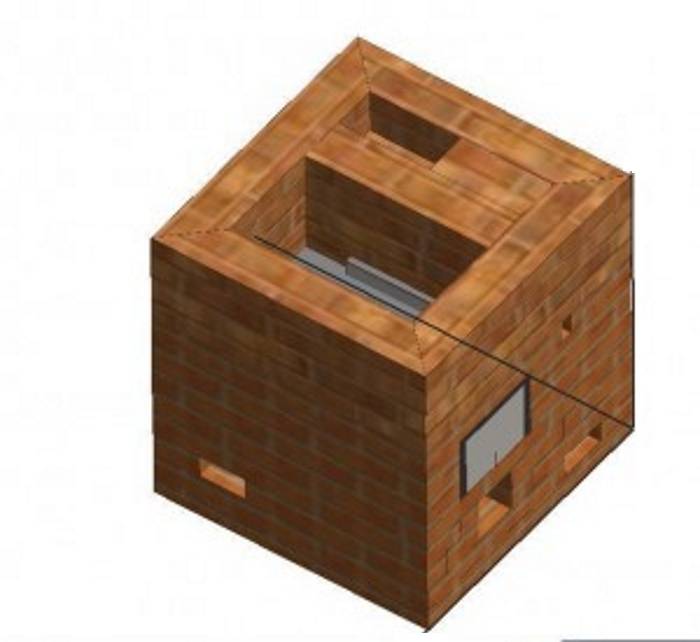
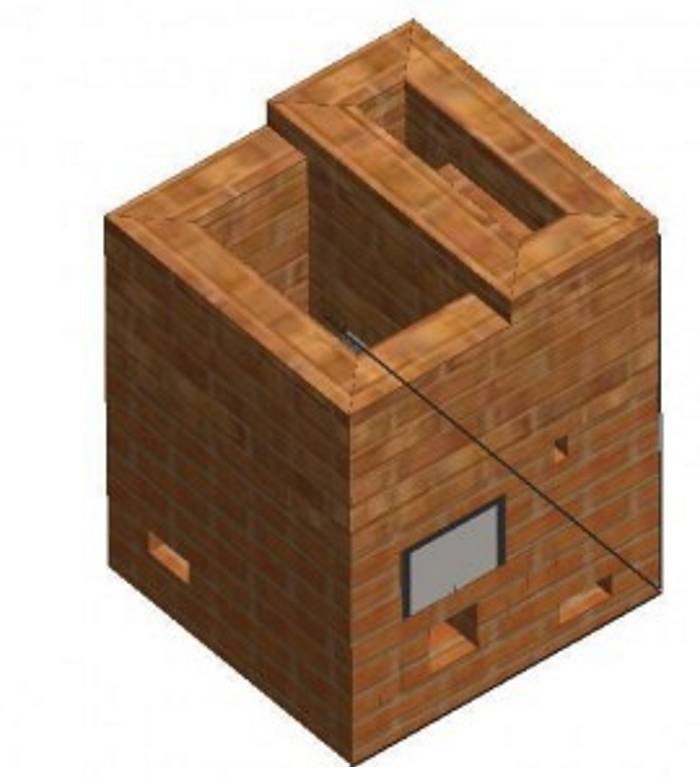
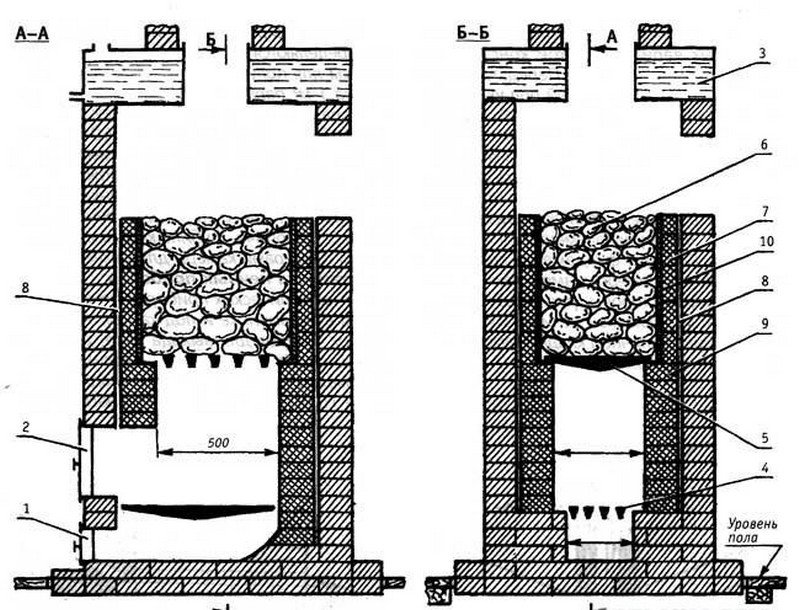
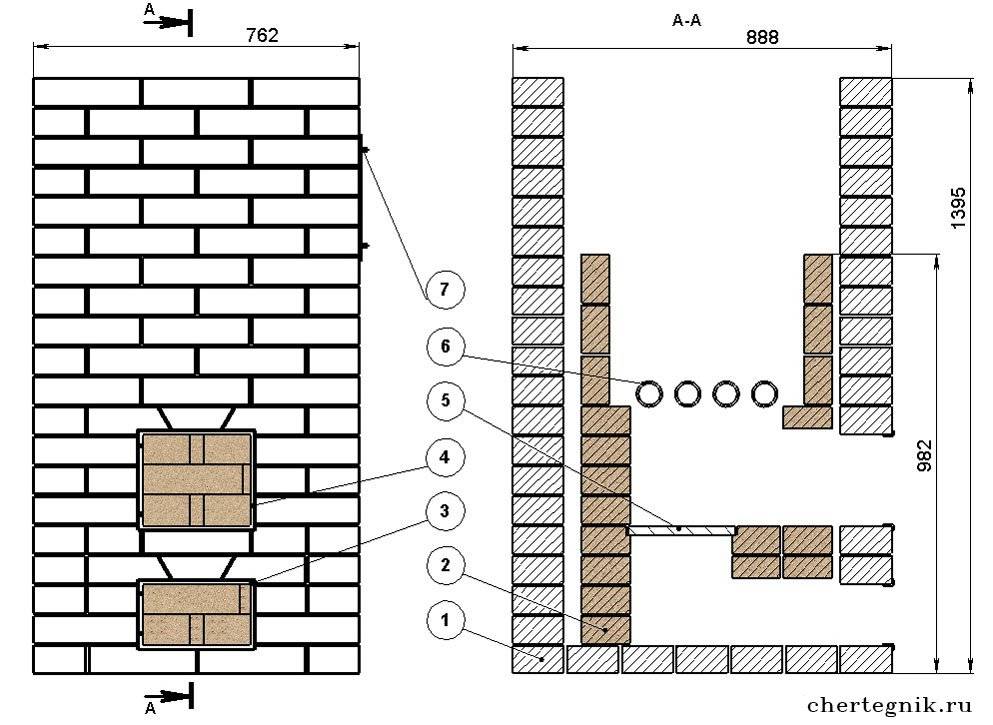
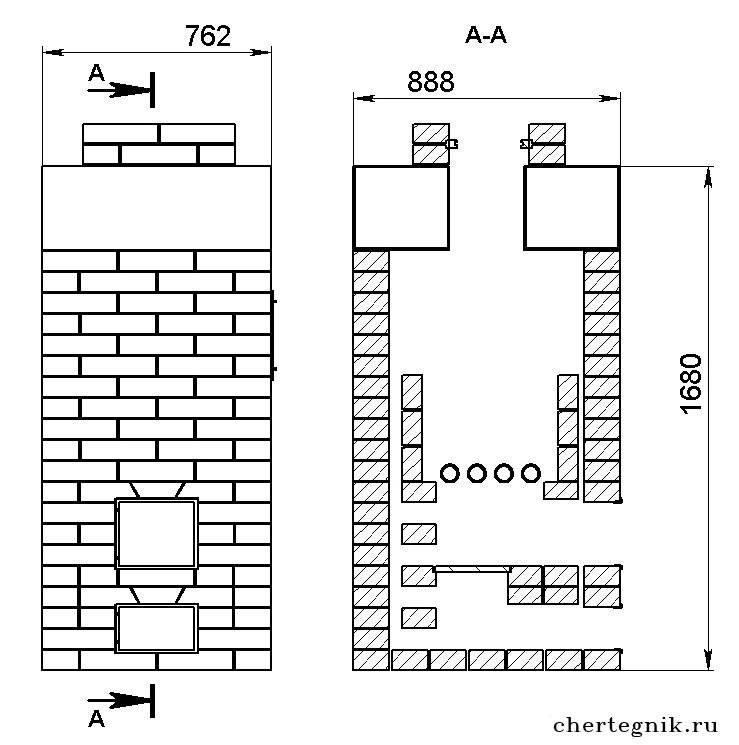
Ordering a closed stove-heater for a bath
Description of the masonry of a closed stove-heater for a bath:
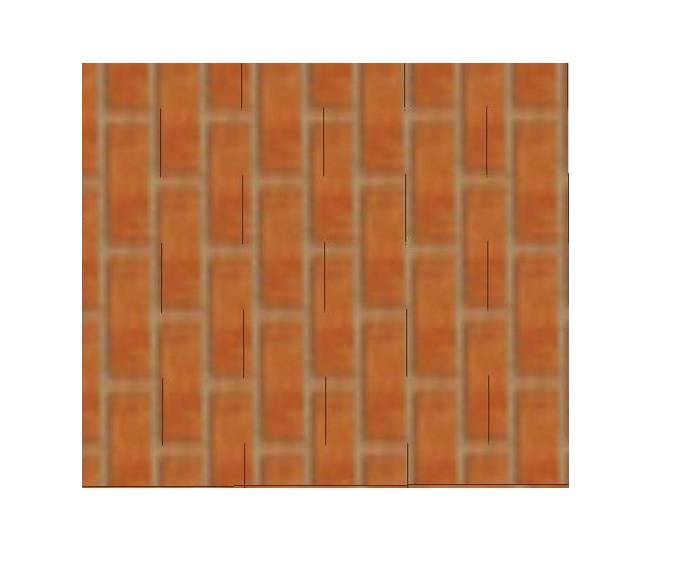
- The first row should be perfectly even. Further on its bricks with the help of a plumb line, the vertical of the walls is checked.
- An ash pan is being made. It is needed for the waste that remains in the process of burning fuel.
- At the level of the third row, the blower is fastened with a steel strip. Usually it regulates the combustion process: if you open the valve, the flame begins to burn more intensely.
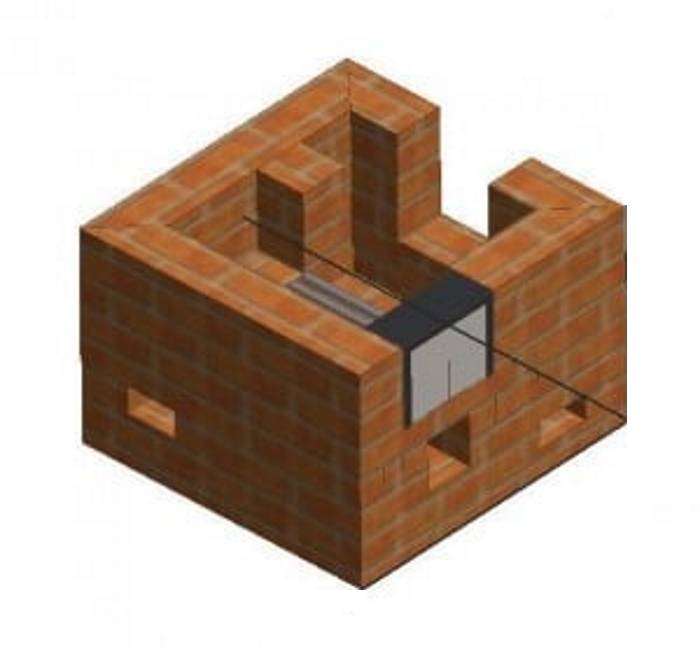
- Steel corners for the grate are laid on top of the fifth row.
- After that, they start laying the firebox.
- In the sixth row, the firebox is laid out with fireclay bricks. The height of the firebox is usually 25 cm, and the width is slightly larger - 30. A grate is laid on top.
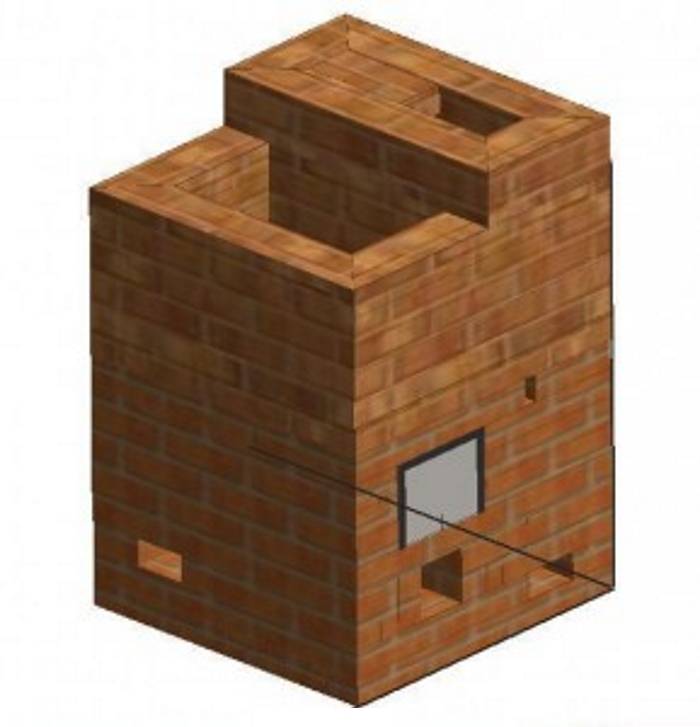
- Further, the area of the furnace gradually expands. The outer masonry with refractory bricks narrows.
- It is necessary to create holes for the secondary air supply. To do this, side bricks are cut with teeth.
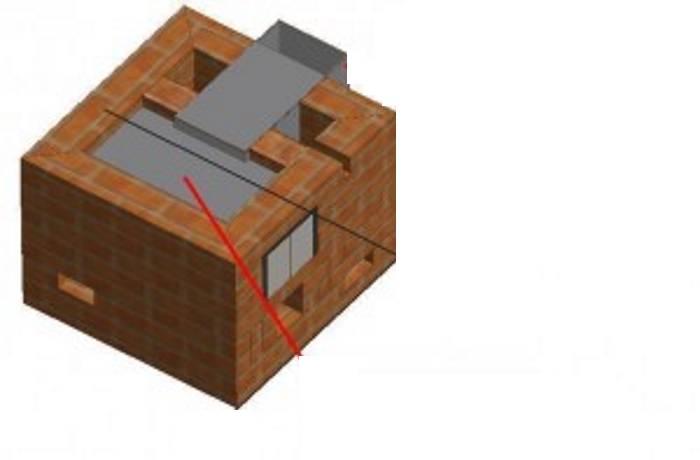
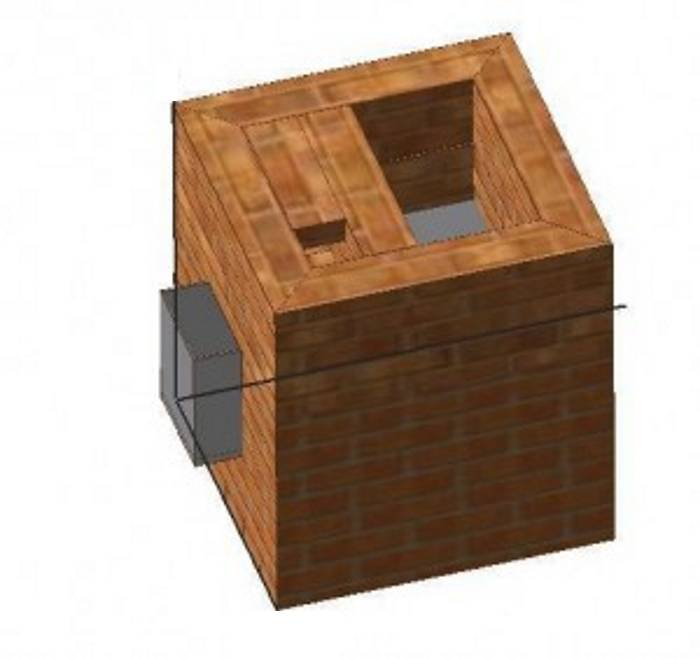
- The laying of the outer brick continues.
- The firebox doors are closed.
- A chimney baffle is installed.
- The water tank is installed.
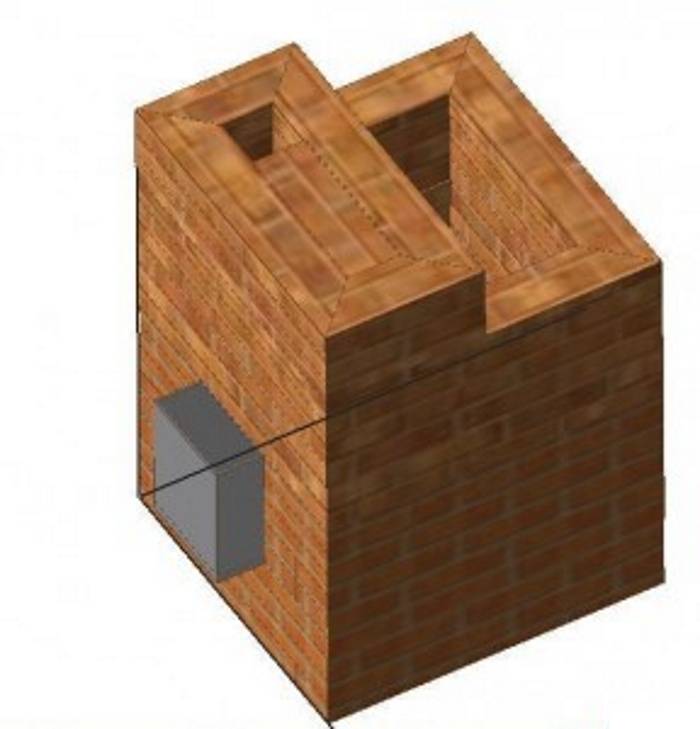
- At the level of the fifteenth row, the firebox is covered from above with a slab of durable material on which stones will be laid.
- The compartment where the stones will be laid is being laid, it should be quite large.
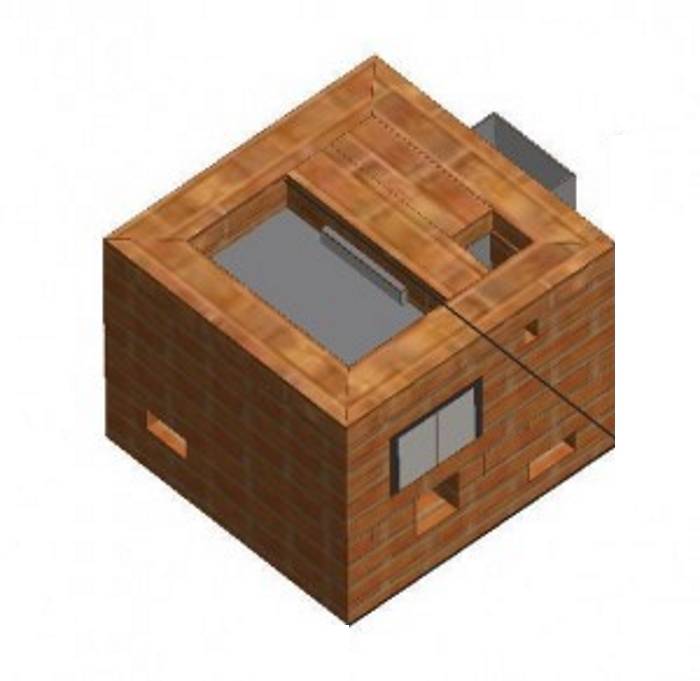
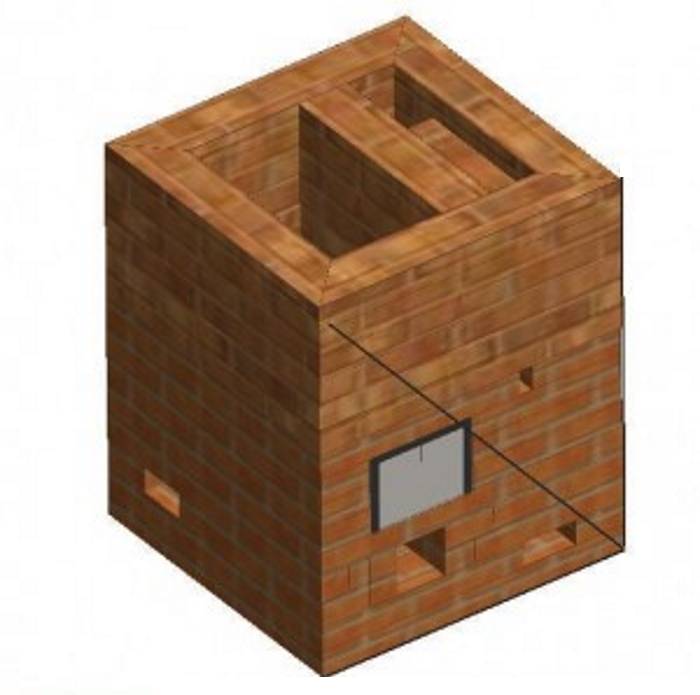
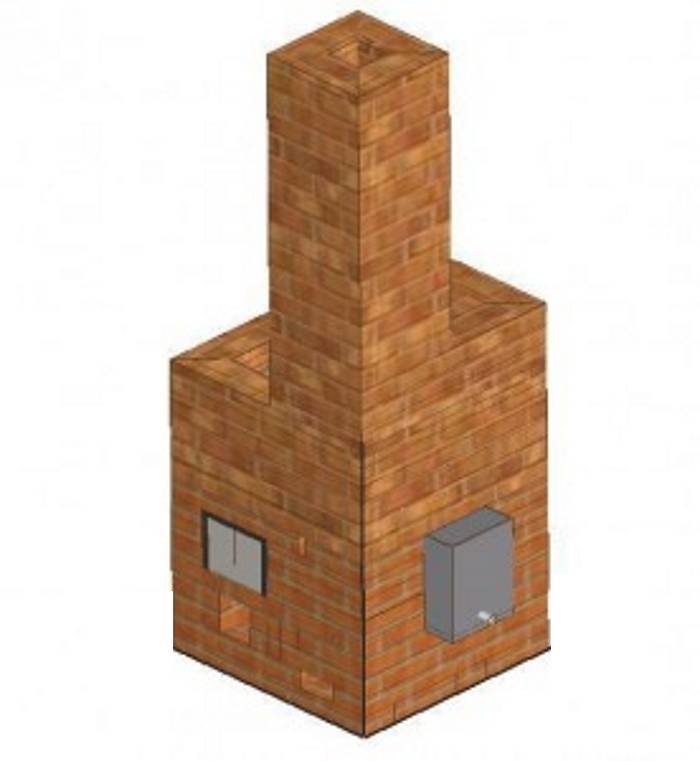
- The chimney is laid out of fireclay bricks and gradually narrows to the top. The damper is installed.The chimney can be installed through the roof or wall. To do this, in places where it passes, you need to put a layer of thermal insulation. The chimney during operation can become dusty with sediments from fuel. To prevent this, you can make a tin protection in the form of a cap.
After installation, dry the device well. All doors must be opened and in this state, leave the product to be ventilated for several days, and preferably for a week.
You can not immediately use the thermal device to the fullest. All moisture must be removed. To do this, heat the oven with small logs for several minutes for several days. If no wet drops remain on the damper, the device is ready for operation.


